
GFVS1000 - Grill GEORGE FOREMAN - Free user manual and instructions
Find the device manual for free GFVS1000 GEORGE FOREMAN in PDF.


| Product Type | Electric Indoor Grill |
| Brand | George Foreman |
| Model | GFVS1000 |
| Dimensions (L x W x H) | 15 x 12 x 6 inches |
| Weight | 7 lbs |
| Power | 120V, 60Hz, 1300W |
| Plate Material | Non-stick coated die-cast aluminum |
| Cooking Surface Area | 100 sq in |
| Temperature Control | Adjustable thermostat with dial |
| Indicator Lights | Power and preheat ready |
| Drip Tray | Removable, dishwasher safe |
| Cleaning Method | Wipe non-stick plates with damp cloth; drip tray dishwasher safe |
| Floating Hinge | Yes, adjusts to food thickness |
| Fat Drainage | Dual sloped cooking plates |
| Safety Features | Cool-touch handles, non-slip feet |
| Warranty | 1 year limited |
| Certifications | ETL Listed |
Frequently Asked Questions - GFVS1000 GEORGE FOREMAN
User questions about GFVS1000 GEORGE FOREMAN
0 question about this device. Answer the ones you know or ask your own.
Ask a new question about this device
Download the instructions for your Grill in PDF format for free! Find your manual GFVS1000 - GEORGE FOREMAN and take your electronic device back in hand. On this page are published all the documents necessary for the use of your device. GFVS1000 by GEORGE FOREMAN.
USER MANUAL GFVS1000 GEORGE FOREMAN
natural_image
Exterior view of a black and white electric shaver with a clear glass lid (no text or symbols visible on the device body)
GEORGE FOREMAN® VEGGIE SPIRALIZER
Instructions & Warranty
Spectrum Brands Australia Pty Ltd
Locked Bag 3004 Braeside
Victoria 3195 Australia
Customer Service in Australia
TollFree: 1800 623 118
Email: info@spectrumbrands.com.au
Website: www.spectrumbrands.com.au
Spectrum Brands New Zealand Ltd
PO Box 9817 Newmarket
Auckland 1149 New Zealand
Customer Service in New Zealand
TollFree: 0800 736 776
Email: service@spectrumbrands.co.nz
Website: www.spectrumbrands.co.nz
Spectrum Brands Australia Pty Ltd and Spectrum Brands New Zealand Ltd Warranty Against Defects

In this warranty:
Australian Consumer Law means the Australian consumer law set out in Schedule 2 to the Competition and Consumer Act 2010;
CGA means the New Zealand Consumer Guarantees Act 1993;
Goods means the product or equipment which was accompanied by this warranty and purchased in Australia or New Zealand, as the case may be;
Manufacturer, We or us means:
- for Goods purchased in Australia, Spectrum Brands Australia Pty Ltd ABN, 78 007 070 573; or
- for Goods purchased in New Zealand, Spectrum Brands New Zealand Ltd, as the case may be, contact details as set out at the end of this warranty;
Supplier means the authorised distributor or retailer of the Goods that sold you the Goods in Australia or in New Zealand; and
You means you, the original end-user purchaser of the Goods.
- Our goods come with guarantees that cannot be excluded under the Australian Consumer Law, or the CGA. You are entitled to a replacement or refund for a major failure and compensation for any other reasonably foreseeable loss or damage. You are also entitled to have the goods repaired or replaced if the goods fail to be of acceptable quality and the failure does not amount to a major failure.
- The benefits provided by this Warranty are in addition to all other rights and remedies in respect of the Goods which the consumer has under either the Australian Consumer Law or the CGA. The original purchaser of the Goods is provided with the following Warranty subject to the Warranty Conditions:
- We warrant the Goods for all parts defective in workmanship or materials from the date of purchase (Warranty Period), for the period of 1 year from the date of purchase (Warranty Period).
If the Goods prove defective within the Warranty Period by reason of improper workmanship or material, we may, at our own discretion, repair or replace the Goods without charge.
Warranty Conditions
- The Goods must be used in accordance with the manufacturer's instructions. This Warranty does not apply should the defect in or failure of the Goods be attributable to misuse, abuse, accident or non-observance of manufacturer's instructions on the part of the user. As far as the law permits, the manufacturer does not accept liability for any direct or consequential loss, damage or other expense caused by or arising out of any failure to use the Goods in accordance with the manufacturer's instructions.
- Exhaustible components (such as batteries, filters and brushes) of the Goods are included under this Warranty only where there is a defect in workmanship or materials used.
- The warranty granted under clause 3 is limited to repair or replacement only.
- Any parts of the Goods replaced during repairs or any product replaced remain the property of the manufacturer. In the event of the Goods being replaced during the Warranty Period, the warranty on the replacement Goods will expire on the same date as for the Warranty Period on the original Goods which are replaced.
- In order to claim under the warranty granted under clause 3 you must:
(a) Retain this warranty with your receipt/proof of purchase; and
(b) Return the Goods to us at the relevant address or to the Supplier by prepaid freight within the Warranty Period accompanied with (i) the legible and unmodified original proof of purchase, which clearly indicates the name and address of the Supplier, the date and place of purchase, the product name or other product serial number and (ii) this warranty.
- This warranty is immediately void if:
(a) Any serial number or appliance plate is removed or defaced;
(b) The Goods have been serviced or otherwise repaired by a person not authorised to do so by us or where non approved replaced parts are used.
-
The Goods are designed for domestic use only. The Goods must be connected to the electrical voltage requirements as specified in the ratings label located on the Goods.
-
This warranty does not cover the cost of claiming under the warranty or transport of the Goods to and from the Supplier or us.
-
This warranty is only valid and enforceable in Australia against Spectrum Brands Australia Pty Ltd and in New Zealand against Spectrum Brands New Zealand Ltd.
Contact us or the Supplier for further details.
Register your product online
If you live in Australia please visit: www.spectrumbrands.com.au/warranty If you live in New Zealand Please visit: www.spectrumbrands.co.nz/warranty Registration of your warranty is not compulsory, it gives us a record of your purchase AND entitles you to receive these benefits: Product information; Hints and tips; Recipes and news; Information on special price offers and promotions.
Any questions? Please contact Customer Service for advice.
IMPORTANT SAFEGUARDS
Read all instructions before, and follow whilst using this appliance.
When using this appliance, basic safety precautions should always be followed, including the following:
- Care must be taken when handling sharp cutting blades during emptying and cleaning.
- Don't run the appliance for more than 3 minutes. After 3 minutes, switch off for at least 2 minutes.
-
Keep hands and utensils out of the feed chute while spiralizing to reduce the risk of severe injury to persons or damage to the spiralizer.
-
Never feed food by hand. Always use food pusher.
-
Blades are sharp. Handle carefully.
-
Do not attempt to defeat the cover interlock mechanism.
-
Do not use in the bathroom or near any source of water.
-
Do not use outdoors.
-
This product is not intended for use by persons (including children) with reduced physical, sensory or mental capabilities, or lack of experience and knowledge, unless they have been given supervision or instruction concerning use of the product by a person responsible for their safety.
-
This appliance is not a toy. Children must be supervised to ensure they do not play with this appliance.
-
Cleaning or user maintenance shall not be carried out by children without the supervision of a person responsible for their safety.
-
Always switch off and disconnect this appliance from the wall power outlet when not in use and before cleaning.
-
To disconnect, turn off the wall power outlet, then grasp and remove the plug. Never pull by the cord.
-
Do not operate the appliance with a damaged cord or plug or after the appliance has malfunctioned, or has been dropped or damaged in any manner. Contact customer service for replacement, examination, repair or adjustment.
-
There are no user serviceable parts. If the power cord is damaged, it must be replaced by the manufacturer or similarly qualified person in order to avoid a hazard.
-
Keep the appliance and the power cord away from the edge of tables or countertops and out of reach of children and persons with reduced physical, sensory and mental capacities.
-
Do not move the appliance whilst in use.
-
Do not use the appliance for other than its intended purpose.
-
Misuse of this appliance may result in potential injury.
-
This appliance is not intended to be operated by means of an external timer or separate remote control system.
-
For added safety, electrical appliances should be connected to a power outlet that is protected by a residual current device (RCD / 'Safety Switch') having a rated residual operating current not exceeding 30mA. Your switchboard may already incorporate an RCD. If unsure, call an electrician for verification and fitting if necessary.
-
This appliance is intended to be used in household and similar applications such as:
-
Staff kitchen areas in shops, offices and other working environments;
- Farm houses;
- By clients in hotels, motels, and other residential type environments;
- Bed & breakfast type environments.
SAVE THESE INSTRUCTIONS
Congratulations on the purchase of your George Foreman Veggie Spiralizer. Each unit is manufactured to ensure safety and reliability. Before using the appliance for the first time, please read the instruction book carefully and keep it for future reference. Pass it on if you pass on the appliance.
When using electrical appliances, basic safety precautions should always be followed.
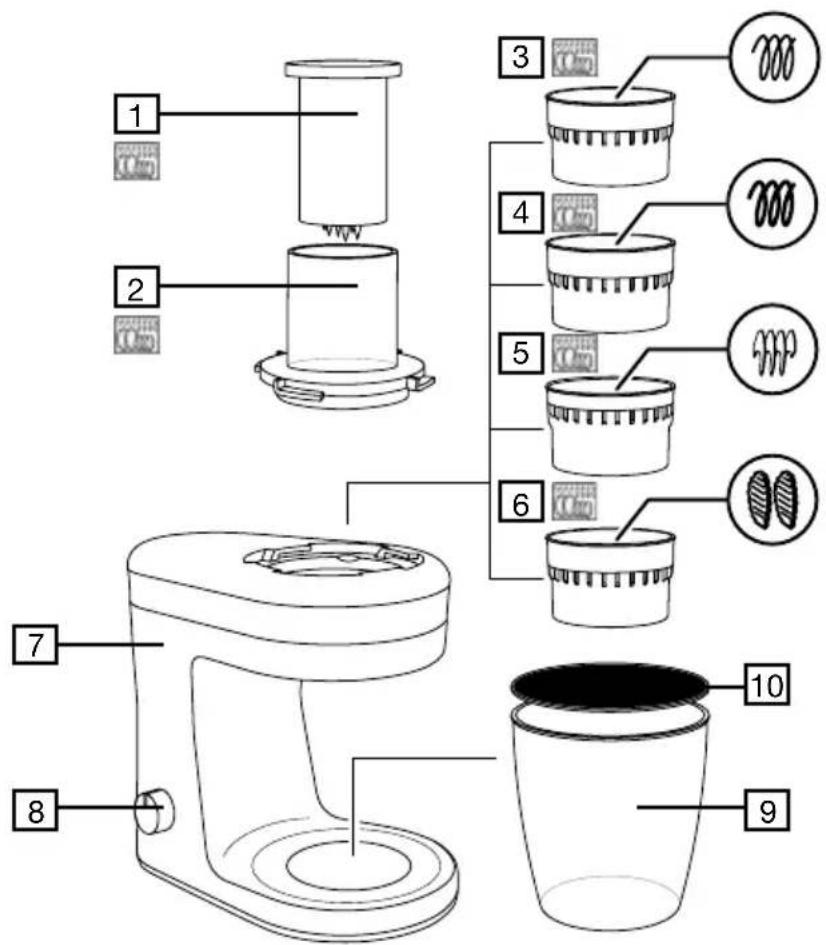
- Food pusher
- Feed chute
- Thin noodle shape blade
- Thick noodle shape blade
- Thick slice shape blade
-
Wavy cut shape blade
-
Motor unit
- On/Off Dial
- Container
- Container lid
Dishwasher safe
BEFORE FIRST USE
- Remove all packing material, any stickers, and the plastic band around the power plug.
- Remove and save instruction booklet.
- Wash all removable parts as instructed in CARE AND MAINTENANCE section of this manual.
CAUTION: Handle blades very carefully. They are sharp.
- Select a dry, level countertop where the appliance is to be used, allowing air space on all sides to provide proper ventilation for the motor.
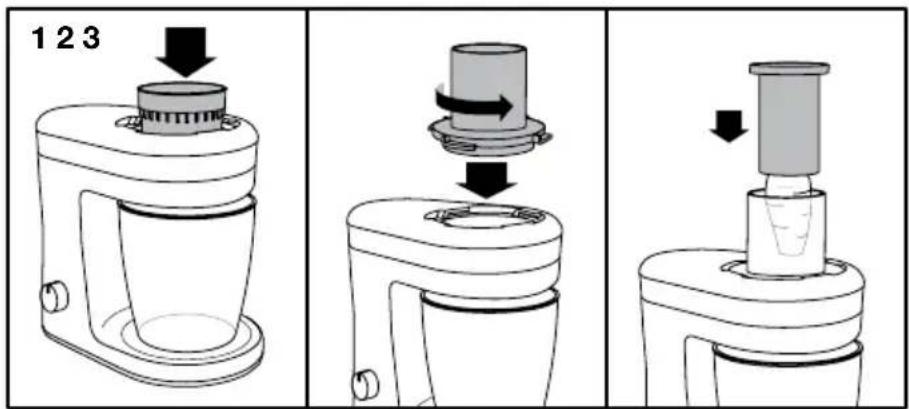
ASSEMBLY
- Sit the appliance on a dry, stable, level surface.
- Route the cable so it doesn't overhang, and can't be tripped over or caught.
-
Don't plug it in until you have finished assembling it.
-
Put the container underneath the opening on the motor unit.
- Put the chosen blade into the opening on the motor unit (Fig. 1).
- Put the feeder chute into the opening then turn it counter clockwise until it locks (Fig 2).
- Determine which blade you will be using. Each blade is marked with a symbol (shown below) to help you easily understand which blade is which.
| THIN NOODLE | THICK NOODLE | THICK SLICE | WAVY CUT |
 |  |  |  |
| Perfect for: spaghetti noodles | Perfect for: fettuccine and linguine noodles | Perfect for: potato slices, salad toppings | Perfect for: wavy veggie chips, salad toppings |
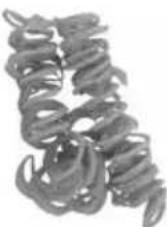 |  |  |  |
- Always make sure your spiralizer is set to O (OFF) and unplugged before assembly. Make sure the motor base is on a flat, level surface.
- Holding the outer lip of the blade top, place the selected blade into the opening on top of the motor base. (A)

natural_image
Close-up of a hand pressing down on a black cylindrical object (no text or symbols visible)- Lock the feed chute to the base by turning counterclockwise. (B)

natural_image
Close-up of a hand pressing a glass container with a curved arrow indicating rotation (no text or symbols)- Cut a thin slice from one end of your produce. (C)
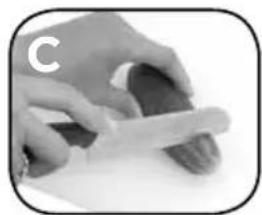
natural_image
Close-up of hands holding a small object with a white plastic clip, no visible text or symbols-
Place the container under the feed chute.
-
Put the plug into the power socket.
-
Impale the prepared food centrally onto the teeth on the end of the pusher. (D)

natural_image
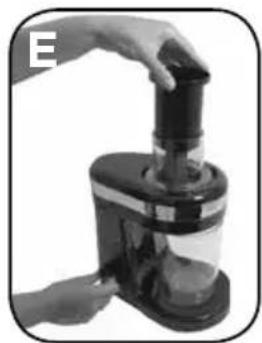
Close-up of hands holding a cylindrical object with a separate handle, no visible text or symbols- Set the switch to the I position. (E)
natural_image
Hand holding a black brush in a kitchen brush (no visible text or symbols)- Place the pusher/food into the feed chute and apply downward pressure.
Note: If food at the end of the food pusher begins to rotate, it will not be processed. Stop the machine and reconnect the food to the food pusher.
-
The food will be processed and collect in the container.
-
When finished, turn spiralizer OFF (O). Allow the blade to stop revolving and unplug appliance before removing feed chute. Twist the feed chute clockwise to unlock.
CAUTION: Always unplug appliance when not in use.
- Carefully remove blade by grasping the outer lip of the blade top.
Note: Most fruits and vegetables only take 20 seconds to 1 minute (at most) to spiralize. Turn off the spiralizer between ingredients.
Keep constant downward pressure on the food with the pusher during processing.
The Spiralizer is designed to take a variety of fruits and vegetables and turn them into unique shapes and sizes for use in meal preparation. Below are some suggestions to get you started.
| Food | Blade Type | Comments | |||
 |  |  |  | ||
| Apple | √ | √ | √ | √ | Trim to fit feed chute. Leave core/seeds in. |
| Beetroot | √ | √ | √ | √ | Trim to fit feed chute. Remove leaves. |
| Butternut Pumpkin | √ | √ | √ | √ | Peel and trim to fit feed chute. |
| Broccoli | √ | √ | × | × | Stalks only. Trim to fit feed chute |
| Carrot | √ | √ | √ | √ | Trim to fit feed chute. Cut off the top and bottom. |
| Cabbage | × | × | √ | √ | Red and white, not Savoy. Trim to fit feed chute. |
| Celeriac | √ | √ | √ | √ | Peel and trim to fit feed chute. |
| Cucumber | √ | √ | √ | √ | Process whole. |
| Melon | √ | √ | √ | √ | Slightly underripe, firm melons process best. Trim to fit feed chute. |
| Onion | √ | √ | √ | √ | Trim to fit feed chute. |
| Parsnip | √ | √ | √ | √ | Trim to fit feed chute. |
| Pear | √ | √ | √ | √ | Trim to fit feed chute. |
| Potato | √ | √ | √ | √ | Peel and trim to fit feed chute. |
| Sweet potato | √ | √ | √ | √ | Peel and trim to fit feed chute. |
| Turnip/Swede | √ | √ | √ | √ | Peel and trim to fit feed tube. |
| Zucchini | √ | √ | √ | √ | Cut off the top and bottom. |
Note: We do not recommend spiralizing dough, or fruits and vegetables that are frozen, hollow, very soft, or that have pits.
√ = suitable, X = unsuitable
HINTS AND TIPS
- Cut a small piece off the larger end of your produce to create a flat, even surface to attach the food pusher to.
- Trim long/thick ingredients so that they will fit the feed chute without jamming.
- Fresh, firm fruits and vegetables produce the best results.
- Cover and refrigerate any processed ingredients you are not immediately using.
- Some ingredients will discolour quickly so it's best to process these ingredients last.
- Processed apples, pears, etc. can be mixed with a little lemon juice to help prevent browning.
- To cut spirals to a shorter length, lift the pusher up slightly away from the blade and then push it back in to stop and restart the spiralizing action.
- Always remove seeds, core and pits before spiralizing.
- When spiralizing produce with high water content, like cucumbers, squeeze water out of noodles with a tea towel.
- Peeling is not necessary on all fruits and vegetables, only for those with tough exteriors.
CARE AND MAINTENANCE
Switch off (O) and unplug before cleaning.
WARNING: Blades are very sharp. Handle with extreme care.
- Wash the removable parts in warm soapy water, rinse, and dry.
- You may wash the blades, container, feed chute and pusher in a dishwasher (top rack only). The harsh environment inside the dishwasher will affect the surface finishes. The damage should be cosmetic only, and should not affect the operation of the appliance.
- Wipe the outside surfaces of the appliance with a clean damp cloth.
STORING
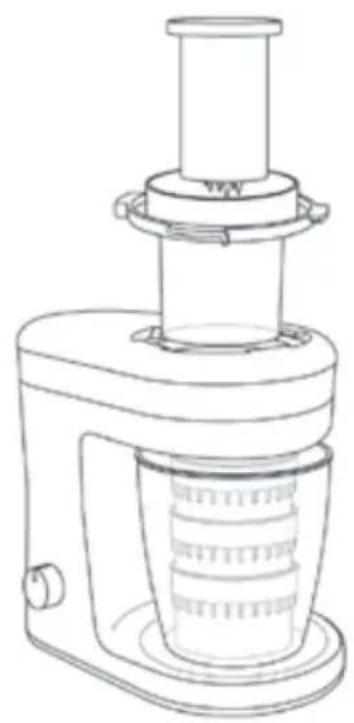
Arrange your spiralizer as follows so that it takes up the minimum of storage space.
- Stack three blades inside the container and one into the unit. Then put the container under the opening of the motor unit.
- Turn the feed chute upside down and insert it into the motor unit opening
- Put the pusher into the feed chute.
natural_image
Line drawing of a blender with a cylindrical top and side base (no text or symbols)TROUBLESHOOTING
| PROBLEM SOLUTION | |
| Spiralizer doesn’t turn on | Make sure the feed chute is properly aligned and locked in place.Check to make sure the spiralizer is plugged in.If you have a circuit breaker box, be sure the circuit is closed.Unplug the spiralizer and plug it back into the outlet. |
| Spiralizer not working properly/blade stops | The blade is most likely clogged. Turn spiralizer off, remove blade and clean, replace blade in base and continue spiralizing.Make sure the ingredients are suitable for spiralizing. |
| Feed Chute won’t lock in place | Make sure the blade is installed correctly.Make sure there is no food or other object blocking the interlock system. |
NOTES:
NOTES:
GEORGE FOREMAN®
HEALTHY COOKING

RECIPES
GEORGE FOREMAN® VEGGIE SPIRALIZER
WWW.GEORGEFOREMAN.COM.AU
WWW.GEORGEFOREMAN.CO.NZ
GEORGE FOREMAN and logo are trade marks of Spectrum Brands, Inc., or one of its subsidiaries.
©2016 Spectrum Brands, Inc.
WWW.GEORGEFOREMAN.COM.AU
WWW.GEORGEFOREMAN.CO.NZ
GEORGE FOREMAN and logo are trademarks of Spectrum Brands, Inc., or one of its subsidiaries.
©2016 Spectrum Brands, Inc.
Manufactured in China to Spectrum Brands specifications.
Recipes are to be used in conjunction with the GFVS1000 George Foreman Veggie Spiralizer.
All rights reserved. No part of this publication may be reproduced, stored in a retrieval system or transmitted in any form or by any means, electronic, mechanical, photocopying, recording or otherwise, without prior permission of the copyright owner.
SPIRALIZER RECIPES
SIMPLE CUCUMBER AND HERB SALAD
(Serves approx. 5-6)
Ingredients:
2 cucumbers
15g mixed chopped herbs (parsley, chives, mint, dill, etc.)
12 lemon, juice and zest
Salt and cracked black pepper to taste
Method:
- Spiralize the cucumber with the thick slice shape.
- Cut the cucumber ribbons into 4-5 cm pieces.
- Combine with the remaining ingredients and serve.
MELON RIBBONS WITH STRAWBERRIES AND MINT
Ingredients:
1 honeydew melon
8 ripe strawberries
12 blueberries
1 bunch fresh mint
Method:
- Spiralize half the melon using the thick slice shape. Juice the other half.
- Add the melon juice to a pan with six sprigs of mint. Bring to the boil then leave to cool and infuse.
- Remove the stalks from the strawberries then wash them and cut them into quarters.
- Wash the blueberries. Arrange the fruits in layers on a plate.
- Add a few mint leaves then pour over some of the juice before serving.
SPIRALIZER RECIPES
EGG FRIED ZUCCHINI NOODLES WITH CHICKEN
(Serves approx. 4)
Ingredients:
2 large zucchini
5g fresh ginger, finely grated
200g boneless chicken thigh, cut into 1-2 cm pieces
4 spring onions, sliced
12 bunch fresh coriander, chopped
12 red chilli, finely diced
3 medium free range eggs
30ml vegetable oil
20ml sesame oil
20ml dark soy sauce
Salt and pepper to taste
Method:
- Spiralize the zucchini with the thin noodle shape blade. Cut the strands into 4-5 cm pieces.
- Heat the oil then fry the chicken for 4-5 minutes stirring occasionally until golden brown all over.
- Add the chilli, ginger and salt and pepper and fry for a further 1-2 minutes.
- Remove the cooked chicken from the pan and drain on kitchen paper. Return the pan to the heat.
- Whisk the eggs together then add them to the pan. Keep stirring with a fork to break them up as they cook.
- When the eggs are cooked add the zucchini noodles, season and fry for 3-4 minutes.
- Add the spring onions, sesame oil and the cooked chicken and fry for a further 2-3 minutes. Stir in the soy sauce and coriander and serve.
SPIRALIZER RECIPES
SWEET POTATO LINGUINI WITH RED CAPSICUM SAUCE
(Serves approx. 4)
Ingredients:
2 sweet potatoes
3 red capsicum cut into approx. 1 cm dice
2 red onions, finely diced
3 garlic cloves, finely chopped
3g paprika
30ml olive oil
100ml white wine
200ml cream
12 bunch fresh flat leaf parsley, chopped
Salt and pepper to taste
Method:
-
Spiralize the sweet potatoes with the thick noodle shape blade. Cut the strands into 4-5 cm pieces.
-
Cook the sweet potato in boiling salted water for 2 minutes. Drain then place in iced water for a few seconds before removing and drying on kitchen paper.
-
Heat the olive oil until hot then fry the onion and garlic for 1-2 minutes.
-
Add the capsicum and paprika and fry for a further 3-4 minutes until they are soft.
-
Add the wine and simmer until the wine has reduced by 34 before adding the cream.
-
Bring to the boil then stir in the sweet potato, season and add the chopped parsley. Serve with grated parmesan.
SPIRALIZER RECIPES
BUTTERNUT PUMPKIN NOODLES WITH CHICKEN AND SAGE
(Serves approx. 4)
Ingredients:
1 butternut pumpkin
30ml olive oil
1 red onion, finely diced
2 garlic cloves, finely chopped
1 bunch of fresh sage
400g boneless chicken, cut into 1-2 cm pieces
50g butter
100g stilton cheese
Salt and pepper to taste
Method:
- Spiralize the butternut pumpkin with the thin noodle shape blade.
- Heat the oil in a pan then add the chicken and fry for 5-6 minutes.
- Stir to ensure the chicken is evenly browned.
- Add the onion and garlic and cook for a further 3-4 minutes.
- Add the butter and half of the chopped sage. When the butter is starting to foam add the butternut pumpkin, season and fry for 5-6 minutes.
- Serve sprinkled with the rest of the sage and the crumbled stilton.
SPIRALIZER RECIPES
BEETROOT, GOAT'S CHEESE, WALNUT AND APPLE SALAD
(Serves approx. 5-6)
Ingredients:
5 beetroots
120g walnuts, roasted and lightly crushed
2 gala apples, peeled, cored
250g soft goat's cheese
20ml olive oil
12 lemon, juice and zest
Salt and pepper to taste
Method:
- Spiralize the beetroot with the thin noodle shape blade then cut the strands into approx. 3-4 cm pieces.
- Spiralize the apple with the thick slice shape blade then cut the ribbons into approx. 1-2cm pieces.
- Mix with the remaining ingredients being careful not to break the goat's cheese up too much.
SPIRALIZER RECIPES
ZUCCHINI SPAGHETTI WITH AVOCADO, PINE NUTS, MOZZARELLA AND BASIL
(Serves approx. 4)
Ingredients:
1 large zucchini
2 avocados
12 onion
20ml olive oil
8 cherry tomatoes, halved
3 rashers streaky bacon, cooked until crispy
40g pine nuts, toasted
2 bunches basil
12 lemon, juice
Buffalo mozzarella
Method:
-
Spiralize the zucchini with the thick noodle shape blade.
-
Spiralize the onion with the thick slice shape blade.
-
Peel the avocados and put them into a food processor.
-
Add the basil leaves, lemon and season lightly. Process until smooth. Heat the olive oil in a pan then add the onion and fry for 2-3 minutes without browning.
-
Add the seasoned zucchini spaghetti then fry for 3-4 minutes without browning. Add the pine nuts and tomatoes and cook for another 2-3 minutes. To serve, sprinkle the zucchini with the crispy bacon, add a spoonful of the avocado mix and garnish with torn pieces of mozzarella.
SPIRALIZER RECIPES
CHICKEN, ZUCCHINI AND BUTTERNUT PUMPKIN LASAGNE
(Serves approx. 6-8)
Ingredients:
6 chicken breasts, sliced thinly
2 large zucchini
1 butternut pumpkin
3 tsp paprika
Lasagne sheets
300g grated cheese
Salt and pepper to taste
For the béchamel sauce:
120g plain flour, sieved
120g butter
1L milk
200ml double cream
1 tsp English mustard
12 whole nutmeg, ground
Method:
- Spiralize the zucchini and sweet potatoes with the thick slice shape blade. Cut the ribbons into 5-6 cm pieces.
- To make the béchamel heat the milk in a pan, and in a separate pan, carefully heat the butter without browning it. Stir the flour into the butter stirring continuously for 2-3 minutes on a medium heat. The flour should be a golden colour.
- Next, use a ladle to add a little of the heated milk to the butter/flour mixture stirring continuously until the milk has been combined.
- Continue until all of the milk has been added. Stir in the cream, mustard and nutmeg then check the seasoning and remove the pan from the heat.
- Build up your lasagne is layers. Place a layer of lasagne sheets in the bottom of an oven proof tray.
- Put over that a layer of chicken, butternut pumpkin, zucchini and béchamel sauce and sprinkle with paprika.
- Then, add a layer of lasagne sheets followed by the chicken mixture and continue in this way until the chicken, butternut pumpkin and zucchini have been used up.
- The top layer should consist of the remains of the béchamel sauce sprinkled with the cheese. Cook in an oven on 175^ C for 30-35 minutes until the chicken is thoroughly cooked.
SPIRALIZER RECIPES
SWEET POTATO SPAGHETTI WITH CHORIZO, RED CAPSICUM AND BASIL
(Serves approx. 4)
Ingredients:
2 sweet potatoes
100g chorizo, diced
30ml olive oil
10 red capsicums, seeds removed
1 onion, peeled and sliced
12 red chilli, finely diced
Juice of 12 a lemon
1 bunch fresh basil
Salt and pepper to taste
Method:
- Spiralize the sweet potatoes with the thin noodle shape blade. Cut the strands into 6-7cm pieces.
- Cut two of the capsicums into 1cm dice and set aside. Roughly chop five of the red capsicums and juice the remaining three.
- Heat the oil in a pan then add the onions and chilli. Fry until soft (without browning).
- Next, add the roughly chopped capsicums and again fry until soft (without browning).
- Add the juiced capsicums and simmer for approx. 20 minutes until the liquid has cooked into the capsicums, season to taste, add the lemon juice and blend until smooth.
- In a separate pan, fry the chorizo until lightly browned then add the diced capsicums and fry for 4 – 5 minutes, stirring frequently.
- Then, add the sweet potato and fry for 5-6 minutes stirring frequently. Add enough of the red capsicum sauce to coat the sweet potato spaghetti and cook for a further 3-4 minutes.
- Serve sprinkled with torn basil leaves.
SPIRALIZER RECIPES
BEETROOT AND CARROT SALAD
(Serves approx. 6)
Ingredients:
3 medium beetroots, spiralized with wavy blade
3 medium carrots, spiralized with wavy blade
1/4 cup dried mango, chopped
1/4 cup dried cherries, chopped
1/4 cup shelled pistachios
2 Tbsp. cherry jam
2 Tbsp. red wine vinegar
1 Tbsp. olive oil
Method:
- In a small bowl, mix together the preserves, vinegar and oil.
2 In a medium bowl, toss together the remaining ingredients. - Pour the dressing over the top and toss to combine.
- Serve cold as a colorful side salad with your next dinner.
- GEORGE FOREMAN® VEGGIE SPIRALIZER
- Spectrum Brands Australia Pty Ltd
- Customer Service in Australia
- Spectrum Brands New Zealand Ltd
- Customer Service in New Zealand
- Spectrum Brands Australia Pty Ltd and Spectrum Brands New Zealand Ltd Warranty Against Defects
- Manufacturer, We or us means:
- Warranty Conditions
- Register your product online
- IMPORTANT SAFEGUARDS
- SAVE THESE INSTRUCTIONS
- BEFORE FIRST USE
- CAUTION: Handle blades very carefully. They are sharp.
- ASSEMBLY
- HINTS AND TIPS
- CARE AND MAINTENANCE
- WARNING: Blades are very sharp. Handle with extreme care.
- STORING
- TROUBLESHOOTING
- NOTES:
- GEORGE FOREMAN®
- RECIPES
- WWW.GEORGEFOREMAN.COM.AU
- WWW.GEORGEFOREMAN.CO.NZ
- SPIRALIZER RECIPES
- SIMPLE CUCUMBER AND HERB SALAD
- Ingredients:
- Method:
- MELON RIBBONS WITH STRAWBERRIES AND MINT
- EGG FRIED ZUCCHINI NOODLES WITH CHICKEN
- SWEET POTATO LINGUINI WITH RED CAPSICUM SAUCE
- BUTTERNUT PUMPKIN NOODLES WITH CHICKEN AND SAGE
- BEETROOT, GOAT'S CHEESE, WALNUT AND APPLE SALAD
- ZUCCHINI SPAGHETTI WITH AVOCADO, PINE NUTS, MOZZARELLA AND BASIL
- CHICKEN, ZUCCHINI AND BUTTERNUT PUMPKIN LASAGNE
- For the béchamel sauce:
- SWEET POTATO SPAGHETTI WITH CHORIZO, RED CAPSICUM AND BASIL
- BEETROOT AND CARROT SALAD
Brand : GEORGE FOREMAN
Model : GFVS1000
Category : Grill