
CAO888X - Oven Artusi - Free user manual and instructions
Find the device manual for free CAO888X Artusi in PDF.


| Product Type | Built-in Electric Oven |
| Brand | Artusi |
| Model | CAO888X |
| Dimensions (HxWxD) | 595 x 595 x 568 mm |
| Weight | 35 kg (approx.) |
| Power Supply | 220-240 V, 50/60 Hz |
| Power Consumption | 2.5 kW (max) |
| Energy Efficiency Class | A+ (typical) |
| Oven Capacity | 70 liters |
| Cooking Modes | Conventional, Fan-assisted, Grill, Defrost |
| Temperature Range | 50°C - 250°C |
| Interior Material | Enamel |
| Door Type | Cool touch, double glazed |
| Control Type | Electronic touch + rotary knobs |
| Display | LED digital timer |
| Interior Light | Yes |
| Child Lock | Yes |
| Safety Features | Automatic shut-off, residual heat indicator |
| Cleaning | Easy-clean enamel interior, removable door glass |
| Spare Parts Availability | Heating elements, thermostat, door seal, control board |
| Installation Type | Built-in |
Frequently Asked Questions - CAO888X Artusi
User questions about CAO888X Artusi
0 question about this device. Answer the ones you know or ask your own.
Ask a new question about this device
Download the instructions for your Oven in PDF format for free! Find your manual CAO888X - Artusi and take your electronic device back in hand. On this page are published all the documents necessary for the use of your device. CAO888X by Artusi.
USER MANUAL CAO888X Artusi

ARTUSI
THE ART OF LIVING
Congratulations, you are now the proud owner of an ARTUSI cooking appliance. Thank you for purchasing ARTUSI and welcome to the ARTUSI Family.
This instruction manual has been specially created to inform you of the full range of features your ARTUSI appliance has to offer and serves as an introduction to getting the very best out of your ARTUSI appliance.
We present detailed information on each of the features your ARTUSI appliance consists of. Once you have read this section you will be able to choose the most appropriate settings for your appliance when cooking different types of food.
We ask you to read the instructions in this booklet very carefully as this will allow you to get the best results from using your appliance. KEEP THE DOCUMENTATION OF THIS PRODUCT FOR FUTURE REFERENCE.
Dear Artusi Customer, please read this user manual carefully before using the product and, keep it permanently at your disposal.
Note: This user manual is prepared for more than one model. Some of the features specified in this Manual may not be available on your appliance. All our appliances are only for domestic use, not for commercial use. Products marked with (*) are optional.
"THIS APPLIANCE SHALL BE INSTALLED IN ACCORDANCE WITH THE REGULATIONS FORCE AND ONLY USED IN A WELL VENTILATED SPACE. READ THE INSTRUCTIONS BEFORE INSTALLING OR USING THIS APPLIANCE"
"Conforms with the WEEE Regulations."
TO REGISTER YOUR PRODUCT WITH ARTUSI, PLEASE FILL OUT THE WARRANTY CARD AT THE END OF THIS BOOKLET AND POST IT TO: REPLY PAID 83617
LEICHHARDT NSW 2040

ARTUSI
THE ART OF LIVING
SAFETY INSTRUCTIONS
IMPORTANT SAFEGUARDS & RECOMMENDATIONS
- Do not carry any cleaning or maintenance without first disconnecting the appliance from the electrical supply.
- During and after use of the double oven, certain parts will become very hot. Do not touch hot parts.
● After use always ensure that the control knobs are in the "0" OFF position. - Keep children away form the double oven during use.
● Household appliances are not intended to be played with by children. - Children, or persons with a disability which limits their ability to use the appliance, should have a responsible person to instruct them in its use. The instructor should be satisfied that they can use the appliance without danger to themselves or their surroundings.
WARNING
When correctly installed, you product meets all safety requirements laid down for this type of product category. However special care should be taken around the rear or the underneath of the appliance as there areas are not designed or intended to be touched and may contain sharp or rough edges, that may cause injury.
WARNING
Ensure that the appliance is switched off before replacing the lamp to avoid the possibility of electric shock. - If the supply cord is damaged, it must be replaced by the manufacturer, its service agent or similarly qualified persons in order to avoid a hazard.
● Fire Risk! Do not store inflammable materials inside the ovens.
● Always use oven gloves when removing the shelves and food trays from the oven whilst hot. - Do not line the oven walls with aluminium foil. Do not place baking trays or the drip tray on the base of the oven chamber.
- Clean the ovens regularly and do not allow fat or oils to build up in the oven base or trays. Remove spillages as soon as they occur.
● Always stand back from the oven when opening the oven door to allow steam and hot air to escape before removing the food. - Do not hang towels, dishcloths or other items on the cooker or its handle - as this could be a fire hazard.
- Make sure that electrical cords connecting other appliances in the proximity cannot become entrapped in the oven doors.
- Before disposing of an unwanted appliance, it is recommended that it is made inoperative and that all potentially hazardous parts are made harmless.
- Important: This appliance has been designed for domestic use only. The appliance is NOT suitable for use within a semi-commercial, commercial or communal environment.
- Safe food handling; leave food in the oven for as short a time as possible before and after cooking. This is to avoid contamination by organisms which may cause food poisoning. Take particular care during warmer weather.
HOW TO SAVE ENERGY

Using energy in a way not responsible only saves money but also helps the environment.
So let's save energy! And this is how you can do it.
● Make use of residual heat from the oven. If the cooking time is greater than 40 minutes, switch off the oven 10 minutes before the end time. Important when using the timer, set appropriately shorter cooking times according to the dish being prepared.
● Make sure the oven door is properly closed.
Heat can leak through spillages on the door seals. Clean up any spillages immediately.
- Do not install the oven in the direct vicinity of refrigerators/freezers. Otherwise energy consumption increases unnecessarily.
UNPACKING

During transportation, protective packaging was used to protect the appliance against any damage.
After unpacking, please dispose of all elements of packaging in a way that will not cause damage to the environment. All materials used for packaging the appliance are environmentally friendly; they are 100% recyclable and are marked with the appropriate symbol.
Caution!
During unpacking, the packaging materials (polythene bags, polystyrene pieces, etc.) should be kept out of reach of children.
DISPOSAL OF THE APPLIANCE

Old appliances should not simply be disposed of with normal household waste, but should be delivered to a collection and recycling centre for electric and electronic equipment.
A symbol shown on the product, the instruction manual or the packaging shows that it is suitable for recycling.
Materials used inside the appliance are recyclable and are labelled with information concerning this. By recycling materials or other parts from used devices you are making a significant contribution to the protection of our environment.
Information on appropriate disposal centres for used devices can be provided by your local authority.
DESCRIPTION OF THE APPLIANCE
BEFORE USING FOR THE FIRST TIME
- Read the instructions carefully before installing and using the appliance.
• After unpacking the appliance, check that it is not damaged. In case of doubt, do not use the appliance and contact your supplier or a qualified engineer. - Remove all the packing materials (i.e. plastic bags, polystyrene foam, etc.) and do not leave it around within easy reach of children, as these may cause serious injuries. The packing materials are recyclable.
- Do not attempt to modify the technical characteristics of the appliance, as it may become dangerous to use.
- The appliance should be installed and all the electrical connections made by a qualified engineer in compliance with local regulations in force and following the manufacturer's instructions.
IMPORTANT PRECAUTIONS AND RECOMMENDATIONS FOR USE OF ELECTRICAL APPLIANCES
Use of any electrical appliance implies the necessity to follow a series of fundamental rules. In particular:
- Never touch the appliance with wet hands or feet;
- Do not operate the appliance barefooted;
- Do not allow children or disabled people to use the appliance without your supervision.
The manufacturer cannot be held responsible for any damages caused by improper, incorrect or unreasonable use of the appliance.
USING THE DOUBLE OVEN FOR THE FIRST TIME
You are advised to carry out the following operations:
- Assemble the interior of the oven as described under the heading "Cleaning and maintenance".
- Switch the empty oven ON at maximum temperature for about two hours to eliminate traces of grease and smell from the components
- Let the oven cool down, switch off the electrical supply, then clean the inside of the oven with a cloth soaked in water and neutral detergent and dry thoroughly.
DESCRIPTION OF THE APPLIANCE

INSTALLATION
IMPORTANT
- The appliance should be installed by a QUALIFIED INSTALLATION TECHNICIAN.
The appliance must be installed in compliance with regulations in force.
You need the following housing area to fit your oven correctly.
The double oven is designed to fit into a cabinet of 600 mm width.
The double oven can be built in the kitchen units, but you must ensure that it is properly ventilated.
In the diagram the appliance is ventilated by means of the space in the top of the kitchen cabinet.
Lift the appliance into position onto the shelf, taking care NOT to lift it by the door handles. If you open the oven doors, you will see some screw holes.
The oven should then be secured to the housing by fitting screws into these holes. Remember the housing should not be free standing but be secured to the wall and/or adjacent fitting.
Adjust the hinges of furniture door adjacent to the double oven to allow a 5-7 mm gap between the furniture door and the oven frame.
| Dimensions (mm) | Oven Housing | |
| Height | 888 | 877 |
| Width | 595 | 565 |
| Depth | 545 | 555 min. |
WARNING
• We would point out that the adhesive which bonds the plastic laminate to the furniture must withstand temperatures not less than 150^ C to avoid delamination.
- The appliance must be housed in heat resisting units.
- The walls of the units must be capable of resisting temperatures of 75^ above room temperature.
WARNING
When correctly installed, your product meets all safety requirements laid down for this type of product category.
However special care should be taken around the rear or the underneath of the appliance as these areas are not designed or intended to be touched and may contain sharp or rough edges, that may cause injury.

INSTALLATION

Fig. 1.2
IMPORTANT:
To avoid damage to the lower trim please note the following instructions. The lower trim is designed to allow for good air circulation and the correct opening of the oven door. To ensure the trim is not damaged due to the appliance being placed on the floor, the appliance should be suitably supported as in above illustrations. After installation the appliance door should be slowly opened to ensure no damage has occurred. No responsibility for lower trim damage will be accepted if these instructions have not been followed.
INSTALLATION
▷ Electric connection
oven
Warning!
All electrical work must be carried out by a suitably qualified and authorized electrician. No alterations or willful changes in the electricity supply should be carried out.
● Before attempting the connection, check whether the voltage indicated on the rating plate corresponds to the actual mains voltage.
● Mains lead should be minimun 1.5m long.
- Earthing wire should be installed in such manner to be the last one pulled out in case the safety relief device of the mains lead should fail.
Mains lead behind the oven must be placed in such manner to avoid touching the back panel of the oven because of the heat it develops during operation.
● The cable of correct size rating please follow the below diagram.
CONNECTION DIAGRAMCaution! Voltage of heating elements 220-240V Caution! In the event of any connection the safety Wire must be connected to the 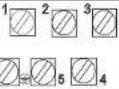 E terminal. E terminal. | Recommended type of connection lead | ||
| 1 | For 220-240V earthed one-phase connection, bridges connect 1-2-3 terminals and 4-5 terminals, safety wire to 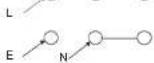 . . | H05VV-F 3G2.5 | |
| L=R, N=null terminal, PE=safety wire terminal | |||
Recommended type of connection lead
H05VV-F
3G2.5
The connection cable must be secured in a strain-relief clamp. For the connection leads, the grounding wire must be longer than the other wires.
Caution!
Remember to connect the safety circuit to the connection box terminal marked with ⏻. The electricity supply for the oven must have an all-pole disconnection switch which enables the power to be cut off in case of emergency. The distance between the working contacts of the safety switch must be at least 3 mm.
Before connecting the cooker to the power supply it is important to read the information on the manual.
OPERATION

CAO888B
CAO888W
CAO888X/1

flowchart
graph TD
    A["Circle Node 1"] --> B["Arrow to Top"]
    C["Circle Node 2"] --> D["Arrow to Bottom"]
    E["Circle Node 3"] --> F["Arrow to Right"]
    G["Rectangle: |0,1,2,3| = 1"] --> H["Arrow to Left"]
CAO888X
OPERATION
Top Natrual Convection
GENERAL FEATURES
This oven features 2 different thermostatic control functions to satisfy all cooking requirements, provided by 3 heating elements:
• Upper element, 850W
• Lower element, 1150W
• Grill element, 1100W
NOTE:
When using for the first time, you are advised to operate the oven at maximum temperature(thermostat knob on the maximum position) for approximately
one hour in the mode and for another
15 minutes in the mode in order to eliminate any traces of grease from the electrical elements.
WARNING:
The door is hot, use the handle. During use the appliance becomes hot. Care should be taken to avoid touching heating elements inside the oven.

OPERATING PRINCIPLES
Heating and cooking in the natural convection oven are obtained:
a. by natural convection The heat is produced by the upper and lower heating elements.
b. by radiation
The heat is radiated by the infrared grill elements.
Attention: The oven door becomes very hot during operation. Keep children away.
OPERATION

THERMOSTAT KNOB(fig.2.1)
To turn on the heating elements of the oven, set function selector knob to the required position and the thermostat knob to the desired temperature.
To set the temperature, turn the thermostat control knob indicator mark to the required temperature.
The elements will turn on or off automatically which is determined by the thermostat.
The operation of the heating elements is signalled by a light placed on the control panel.
FUNCTION SELECTOR KNOB
(fig.2.2)
Rotate the knob clockwise to set the oven to one of the following functions:

Oven light
By turning the function selector knob to this setting, the oven light will illuminate in the oven cavity.
The oven light will operate on all selected functions.

Classic convection
Convection
(Top element+Bottom element)
The upper and lower heating elements are switched on.
The heat is diffused by natural convection and the temperature must be regulated between 50°C and the maximum position with the thermostat knob.
It is necessary to preheat the oven before introducing the foods to be cooked.
Recommended for:
For foods which require the same cooking temperature both internally and externally, i.e. roasts, spare ribs, meringue, etc.
OPERATION OPERATION

Grill
Grill
(Grill and the top element)
When the "combined grill" is active it enables grilling with the grill and with the top element switched on at the same time.
This function allows a higher temperature at the top of the cooking area, which causes more intense browning of the dish and permits larger portions to be grilled.
Warning!
When using function Grill it is required that the oven door is closed.

Base heat
(Bottom heater)
At this oven function knob position, the oven activates the bottom element.
OVEN COOKING
Before introducing the food, preheat the oven to the desired temperature. For a correct preheating operation, it is advisable to remove the tray from the oven and introduce it together with the food, when the oven has reached the desired temperature. Check the cooking time and turn off the oven 5 minutes before the theoretical time to recuperate the stored heat.
USE OF THE GRILL
Leave to warm up for approximately 5 minutes with the food closed. Place the food inside positioning the rack as near as possible to the grill. Insert the drip pan under the rack to collect the cooking juices. Always grill with the oven door closed. Grill with the oven door closed and for no longer than 30 minutes at any one time. Attention: the oven door becomes very hot during operation. Keep children away.
Bottom Main Multifunction Oven
GENERAL FEATURES
The heating and cooking in electrical hot air ovens take place by forced convection.
The element which make this process take place is:
-Circular element 2000W
NOTE:
Upon first use, it is advisable to operate the oven at the maximum temperature (thermostat knob on the maximum position) for 60 minutes in the position to eliminate possible traces of grease on the heating element.
WARNING:
The door is hot, use the handle.
During use the appliance becomes hot. Care should be taken to avoid touching heating elements inside the oven.

OPERATING PRINCIPLES
Heating and cooking in the fan oven are obtained in the following ways:
a. by ventilation
The food is defrosted by using the fan only function without heat.
b. by forced convection
A fan sucks in the air contained in the oven, which circulates it through the circular heating element and then forced back into the oven by the fan. Before the hot air is sucked back again by the fan to repeat the described cycle, it envelops the food in the oven, provoking a complete and rapid cooking. It is possible to cook several dishes simultaneously.
Attention: the oven door becomes very hot during operation. Keep children away.
OPERATION

THERMOSTAT KNOB (fig. 3.2)
To turn on the heating elements of the oven, set function selector knob to the required position and the thermostat knob to the desired temperature. To set the temperature, turn the thermostat control knob indicator mark to the required temperature.
The elements will turn on or off automatically which is determined by the thermostat.
The operation of the heating elements is signalled by a light placed on the control panel.
FUNCTION SELECTOR KNOB
( )fig.3.1
Rotate the knob clockwise to set the oven to one of the following function:

Defrost (fan only)
Defrost
At this function, the fan only works. You can cool the dish or the oven chamber or defrost food.

Fan forced
Fan Forced
The circular element and the fan are on. The heat is diffused by forced convection and the temperature must be regulated between 50^ and the maximum position with the thermostat knob. It is not necessary to preheat the oven.
Recommended for:
For foods that must be well done on the outside and tender or rare on the inside, i.e. lasagna, lamb, roast beef, whole fish, etc.

Fan assisted
(Fan+bottom heat+Top Heat)
At this knob position the oven executes the cook function. Conventional oven with a fan.
OPERATION

Static Grill
Grill
(Grill and the top element)

Classic convection
Convection
(Bottom Heat+Top Heat)
When the "combined grill" is active it enables grilling with the grill and with the top element switched on at the same time.
This function allows a higher temperature at the top of the cooking area, which causes more intense browning of the dish and permits larger portions to be grilled.
The upper and lower heating elements are switched on.
The heat is diffused by natural convection and the temperature must be regulated between 50°C and the maximum position with the thermostat knob. It is necessary to preheat the oven before introducing the foods to be cooked.
Warning!
When using function Grill it is required that the oven door is closed.
Recommended for:
For foods which require the same cooking temperature both internally and externally, i.e. roasts, spare ribs, meringue, etc.

Base heat
(Bottom heater)
At this oven function knob position, the oven activates the bottom element.

Half Fan Grill
Half Fan Grill
When the knob is turned to this position, the oven activates the grill and fan function. In practice, this function allows the grilling process to be speeded up and an improvement in the taste of the dish, you should only use the gill with the oven door shut.
OPERATION
COOKING ADVICE
COOKING WITH FORCED AIR
Fan cooking is more economical and quicker than cooking in a conventional oven. The moving hot air surrounds the food and penetrates it more quickly than in a conventional oven.
The oven can be filled with different dishes all requiring the same cooking temperature. Subtract 10 minutes per hour for every dish requiring a cooking time of more than 1 hour and reduce the heat by 10 - 20^ ; the hotter the oven, the more the temperature can be reduced.
Generally, there is no need to pre-heat the oven, but it is advisable to pre-heat for about 5 minutes to ensure the best results; use the indicator light as a guide, it goes out when the set temperature is reached.
Fan cooking is ideal for gelatine based dishes and softening ice cream - a microwave oven is much too strong for these dishes. Cooking yeast based dishes is also speeded up this way. If the oven door has been opened, the oven quickly regains its temperature once the door is closed.
STERILIZATION
Sterilization of foods to be conserved, in full and hermetically sealed jars, is done in the following way:
a. Set the switch to position
b. Set the thermostat knob to position 175^ C and preheat the oven.
c. Fill the dripping pan with hot water.
d. Set the jars onto the dripping pan making sure they do not touch each other and the door and set the thermostat knob to position 125°C.
When sterilization has begun, that is, when the contents of the jars start to bubble, turn off the oven and let cool.
REGENERATION
Set the switch to position and the thermostat knob to position 150^ C. Bread becomes fragrant again if wet with a few drops of water and put into the oven for about 10 minutes.
ROASTING
To obtain classical roasting, it is necessary to remember:
- that it is advisable to maintain a temperature between 180 and 200^ .
that the cooking time depends on the quantity and the type of foods.
COOKING DIFFERENT DISHES AT THE SAME TIME
With the function selector in position, ^① , the ventilated oven allows you to cook different types of food at the same time. Fish, cakes and meat can be cooked together without the smells and flavours mixing.
The only precautions required are the following:
- The cooking temperatures must be as close as possible with a maximum difference of 20^ - 25^ C between the different foods.
- Different dishes must be placed in the oven at different times according to the cooking time required for each one. This type of cooking obviously provides a considerable saving on time and energy.
OPERATION

Prior first use
- Remove packaging, clean the interior of the oven.
● Take out and wash the oven fittings with warm water and a little washing-up liquid. - Switch on the ventilation in the room or open a window.
- Heat the oven (to a temperature of 250°C, for approx. 30min.) remove any stains and wash carefully.
Caution!
When heating the oven for the first time, it is normal phenomenon to give off smoke and peculiar smell. This will disappear about 30 min later.

Electronic programmer (Only for Bottom main oven)

A-Display field
B-Seconds Icon
C- Buttons
D - Timer
E -Current time
F - Cooking time
G - End of cooking time
M - Function
- To decrease the numbers on the digital display
⊕ - To increase the numbers on the digital display
OPERATION
Setting the time
- At power on, displays and @ flashes.

- The current time can be set with button 1 and 3, 5 seconds after the time has been set, the new data will be saved.
Timer
The timer can be activated at any time and any function. The timer can be set from 1 minute to 23 hours and 59 minutes.
To set the timer you should:
- Press button 2, flashing △. Enter the timer setting.

- Set the timer using buttons 1 and 3

- 5 seconds after the time is set, or directly press button 2, the signal function △ is on. Your setting is saved.

- When the set time is up the alarm signal will be activated and the signal function △ starts flashing again.

- Press any button, the signal function and alarm signal will go off. Or the alarm signal will be turned off automatically after 2 minutes.
OPERATION
Caution!
Apart from the timer alarm, any other alarms can be turned off by pressing any button, if the alarm signal is not turned off manually, it will be turned off automatically after 2 minutes.
Semi-automatic operation
If the oven is to be switched off at a given time, or after defined period, you should:
-
Set the oven function knob and the temperature regulator knob to the setting at which you want the oven to operate.
-
Press the function button, the oven will begin to work and the function signal flashing.
-
Press button 1 or 3 to adjust the cooking time, within a range from 1 minute to 10 hours.
-
Or press button "M" twice. then the display will show flashing→1. Set the end time by buttons 1 and 3.
-
The set time is memorised after 5 seconds.
-
When the set time is up, the oven is switched off automatically, the alarm is activated.
-
Press any button, the alarm signal and the icon go off, will Or the alarm signal will be turned off automatically minutes?
Caution!
- The cooking time and end of cooking time range: Cooking time range: 0<t≤10hours End of cooking time range: current time< end of cooking time ≤ current time + 10 hours End of cooking time = current time + cooking time
- When using the semi-automatic operation, set either the cooking time or the end of cooking time.
- If you set the cooking time to 0 or set the end of cooking time to the current time, the auto function will be off.
● After the auto function switches off, the cooking time to 0, end of cooking time and current time remains the same.
For example:
The current time is 2:00, and you want the oven to work for 3 hours, end of cooking time is set to be 5:00 (2:00+3:00 = 5:00).

There are two methods to achieve this setting:
First method:
- Set the cooking time using buttons 1 and 3.
OPERATION

- End of cooking time automatically changes to 5:00.
Second method:
- Set the end of cooking time using buttons 1 and 3.

- Cooking time automatically changes to 3:00. 5 seconds after setting, the auto function is on. 3 hours later, the current time shows "5.00" The alarm signal is activated.
Automatic operation
If the oven is to be switched on for a specified period of time and switched off at a fixed hour then you should set the cooking time and the end of cooking time:
-
Set the oven function knob and the temperature regulator knob to the setting at which you want the oven to operate.
-
Press, buttonBe oven will begin to work and the function signal I→I flashing.
-
Press button 1 or 3 to adjust the cook time, within a range from 1 minute to 10 hours.
-
Press button 2. then the display will show flashing → | . Set the cooking time using buttons 1 and 3 .
-
The set time is introduced to the memory after 5 seconds, the and always on.
-
When the set time passed, the oven is switched off automatically, the alarm is activated, and the will go off.
-
Press any button, the alarm signal and the →1 icon go off, will Orthe alarm turned signal will be off automatically after 2 minutes.
OPERATION
Caution!
● Work time = end of cooking time-cooking time
For example:
If the current time is 2:00; cooking time set to be 3 hours; end of cooking time set to be 10:00, the work time will be 7:00 (7:00=10:00-3:00).

- Set the cooking time to be 3.00" with buttons 1 and 3.

- Set the end of cooking time, time to be "10.00" with buttons 1 and 3.

- 5 seconds after setting, the auto function is on.

- When it up to 7:00, the oven will begin to work.

- When it up to 10:00, the alarm signal is activated. The oven is switched off automatically.

Caution!
● End of cooking time > current time + cooking time <= 10 hours
- At least more than one minute cooking time, cooking time and end of cooking time must be set.
- If the cooking time set to be 0 or the end of cooking time set to be the current time, the auto function will be off.
● After the auto function switches off, the cooking time returns to 0, end of cooking time and current time remain the same.
OPERATION
Electronic programmer (Only for CAO888X)

A- Display field
B- Functions
- Automatic operation indication
Cooking indication
- Running indication
- Timer
C - Buttons
A - Timer
- Cooking time
- End of cooking time
- Manual position and cancellation
of the set cooking programme
- To decrease the numbers on the digital display
A - To increase the numbers on the digital display
OPERATION
Caution!
Before any setting, press button 4 to start the oven.
Setting the time
After connection to the mains or 1. reconnection after a power cut, the display shows flash"0:00"
and

- Press button 4, the signal function 📋 is on.

- The signal function ●been flashing, set the current time using buttons 5 and 6.
5 seconds after the time has been set, the new data will be saved. The signal function ● is on.

Timer
The timer can be activated at any time and any function. The timer can be set for from 1 minute to up to 23 hours and 59 minutes.
To set the timer you should:
- Press button 1, the display will show
“0.00” and flashing △.

- Set the timer using buttons 5 and 6.

- 5 seconds after the time is set, the signal function is on. The new data will be save and the display will show the current time.

- Press button 1, the remanent time will be shown on the display. (In the last minute, the display will show the seconds)

If you want to reset the timer, repeat step 2 and set time to 0:00.
- When the set time is up the alarm signal will be activated and the signal function ⚠ starts flashing again.

OPERATION
- Press any button, the signal function
- and alarm signal will go off. if the alarm signal is not turned off manually, it will be turned off automatically after 7 minutes.
Caution!
Beside timer alarm, any other alarms can be turned off by pressing buton1,2,3 or 4. If the alarm signal is not turned off manually, it will be turned off automatically after 7 minutes.
Semi-automatic operation
If the oven is to be switched off at a given time, or after defined period, you should:
- Set the oven function knob and the temperature regulator knob to the setting at which you want the oven to operate.
- Press button 4, the oven will begin to work and the function signal is on
- Press button 2 or 3, then the display will show flashing
- Set the required time using buttons 5 and 6, within a range from 1 minute to 10 hours.
- The set time is introduced to the memory after 5 seconds, then the display will show the current time. At the same time, the function signal is on.
- When the set time has passed, the oven is switched off automatically, the alarm is activated, the signal function

is off, and the signal function

starts flashing again.
- Press button1.2.3, the alarm signal will go off, if press button 4, the alarm signal and 16 signal will all go off. Or if the alarm signal is not turned off manually, it will be turned off automatically after 7 minutes.
Caution!
- The cooking time and switch-off time range: Cooking time range: 0<t≤10 hours Switch-off time range: current time<switch-off time≤current time+10 hours
Switch-off time=current time+cooking time - When using the semi-automatic operation, set either the cooking time or the switch-off time.
- If you set the cooking time to 0 or set the switch-off time to the current time, the auto function will be off.
For example:
The current time is 2:00, the maximum switch-off time is set to be 12:00 (2:00+10:00=12:00).

There are two methods to achieve this setting:
First method:
- Press button 2, then the display will show flashing
OPERATION

- Set the cooking time using buttons 5 and 6.

Second method:
- Press button 3, then display will show flashing

- Set the switch-off time using buttons 5 and 6.

5 seconds after the setting, the auto function is on.
10 hours later, the current time shows "12.00". The alarm signal is activated, the signal function is off, and the signal function starts flashing.
Automatic operation
If the oven is to be switched on for a specified period of time and switched off at a fixed hour then you should set the cooking time and the stop time:
- Set the oven function knob and the temperature regulator knob to the setting at which you want the oven to operate.
- Press button 4, the oven will begin to work and the function signal 📋 is on.
- Press button 2, the display will show flashing. Set the cooking time using buttons 5 and 6, within a range from 1 minute to 10 hours.
- Press button 3, set the switch-off time using buttons 5 and 6.
- The set time is introduced to the memory after 5 seconds, then the function signal is on. When the start time is reached, the oven will begin to work and the display will show the current time. At the same time, the function signal is on.
- When the set time has passed, the oven is switched off automatically, the alarm signal is activated, the signal function is off, and the signal function starts flashing again.
- Press button 1.2.3, the alarm signal will go off, if press button 4, the alarm signal and 110 signal will all go off. Or if the alarm signal is not turned off manually, it will be turned off automatically after 7 minutes.
OPERATION
Caution!
● Work time = switch-off time - cooking time
For example:
If the current time is 2:00; cooking time set to be 3 hours; switch-off time set to be 10:00, the work time will be 7:00 (7:00=10:00-3:00).

- Press button 4, the oven begin to work, and the signal function is on.

- Press button 2, then the display will show flashing

- Set the cooking time to be "3.00" with buttons 5 or 6.

- Press button 3.

- Set the switch-off time to be "10.00" with buttons 5 or 6. the signal function 📄 goes out.

- 5 seconds after setting, the auto function is on.

- When it up to 7:00, the oven will begin to work and the signal function 📄 is on.

OPERATION
- When it up to 10:00, the alarm signal is activated, the signal function is off, and the signal starts flashing.

- If the cooking time set to be 0 or the switch-off time set to the current time, the auto function will be off.
Cancel settings cancel automatic function
Press button 2 and 3 simultaneously or button 4, the auto function will be cancelled, and the function signal '0' will go out. Then the display will show the current time.
Cancel timer settings
Press button 1 to select timer settings, and then press button 5 set time to 0:00, 5 seconds later, timer is cancelled.
OPERATION
Top Oven guide levels
Baking pans and accessories(oven grid, baking tray, etc) may be inserted into the oven in 5 guiding levels. Appropriate levels are indicated in the tables that follow. Always count levels from the bottom upwards!

natural_image
Technical line drawing of a rectangular electronic device with labeled ports and a central knob (no text or symbols beyond basic labels)Bottom main Oven guide levels
Baking pans and accessories (oven grid, baking tray, etc) may be inserted into the oven in 5 guiding levels. Appropriate levels are indicated in the tables that follow. Always count levels from the bottom upwards!

CLEANING AND MAINTENANCE
By ensuring proper cleaning and maintenance your oven you can have a significant influence on the continuing fault-free operation of your appliance.
Before you start cleaning, the oven must be switched off and you should ensure that all knobs are set to the "0" position. Do not start cleaning until the oven has completely cooled.

Oven
● The oven should be cleaned after each use.
● Cool the oven completely before cleaning.
● Never clean the appliance with pressurized hot steam cleaner.
● The oven chamber should only be washed with warm water and a small amount of washing-up liquid.
- Steam cleaning
-pour 250m l of water(1 cup) into a bowl placed in the oven on the first level from the bottom.
-Close the oven door.
- Set the function knob to the 100°C and the function knob to the bottom heater position.
-Heat the oven chamber for approximately 30 minutes.
-Open the oven door, wipe the chamber inside with a cloth or sponge and wash using warm water with washing-up liquid.
● After cleaning the oven chamber wipe it dry.
Caution!
Do not use cleaning products containing abrasive materials for the cleaning and maintenance of the glass front panel.

Replacement of the oven light Bulb
Before any maintenance is started involving electrical parts, the appliance must be disconnected from the power supply.
If the oven has been in use, let the oven cavity and the heating elements cool down before attempting any maintenance.
Changing the bulb
● Unscrew the protective cover. We recommend that you wash and dry the glass cover at this point.
- Carefully remove the old bulb and insert the new bulb suitable for high temperatures (300°C) having the following specifications: 220-240V, 50-60Hz, 25W, G9 fitting.
● Refit the protective cover.

IMPORTANT
Never use screwdrivers or other utensils to remove the light cover. This could damage the enamel of the oven or the lampholder. Remove only by hand.
IMPORTANT
Never replace the bulb with bare hands as contamination from your fingers can cause premature failure. Always use a clean cloth or gloves.
Please note:
The bulb replacement is not covered by your guarantee
CLEANING AND MAINTENANCE

Door removal
In order to obtain easier access to the oven chamber for cleaning, it is possible to remove the door.
To do this, tilt the safety catch part of the hinge upwards. Close the door lightly, lift and pull it out towards you. In order to fit the door back on to the cooker, do the reverse. When fitting, ensure that the notch of the hinge is correctly placed on the protrusion of the hinge holder. After the door is fitted to the oven, the safety catch should be carefully lowered down again. If the safety catch is not set it may cause damage to the hinge when closing the door.

natural_image
Diagram of a hand pressing down on a device panel, with no visible text or symbolsTilting the hinge safety catches

natural_image
Technical line drawing of a door with arrows indicating direction (no text or symbols)Door removal

Removal of the internal glass panel
Unscrew and unfasten the plastic latch that is in the corner at the top of the door. Next take out the glass from the second blocking mechanism and remove. After cleaning, insert and block the glass panel, and screw in the blocking mechanism.

natural_image
Isometric line drawing of a rectangular electronic component with mounting holes and a small inset showing a separate component (no text or symbols)Removal of the internal glass panel

Install door

natural_image
Technical line drawing of a mechanical assembly with no visible text or symbolsCLEANING AND MAINTENANCE

Models With Wire Racks
- Assemble the wire racks to the oven walls using the 2 screws (fig.4.1-4.2)
- Slide in ,on the guides, the shelf and the tray(fig.4.3-4.4).
The shelf must be fitted so that the safety catch, which stops it sliding out, faces the inside of the oven.
● To dismantle, operate in reverse order.
Top oven Bottom main oven


natural_image
Diagram of a refrigerator interior with a magnified inset showing the window and door (no text or symbols)
natural_image
Technical line drawing of a kitchen appliance with two circular insets showing internal components (no text or symbols)OPERATION IN CASE OF EMERGENCY
In the event of an emergency, you should:
● Switch off all working units of the oven
- Call the service centre
- Some minor faults can be fixed by referring to the instructions given in the table below. Before calling the customer support centre or the service centre check the following points that are presented in the table.
| PROBLEM | REASON | ACTION |
| 1. The appliance does not work. | Break in power supply. | Check the household fuse box; if there is a blown fuse replace it with a new one |
| Choose wrong function. | Check if function knob, temperature knob are set to the correct position. | |
| 2. The programmer display is flashing "0.00". | The appliance was disconnected from the mains or there was a temporary power cut. | Set the current time(see Use of the programmer) |
| 3. The oven lighting does not work. | The bulb is loose or damaged. | Tighten up or replace the blown bulb (see Cleaning and Maintenance) |
BAKING IN THE OVEN
Baking pastry
Most appropriate position for baking is the hot air.
Warning!
- The baking parameters given in Tables are approximate and can be corrected based on your own experience and cooking preferences;
- In case you may not find any particular type of cake in the tables, use the information available for the next most similar type of cake.
Baking with upper and lower elements
- Use only a single guide level.
- This baking position is especially suitable for baking dry pastry, bread and teacakes. Use dark baking pans. Light pans reflect heat and pastry is not adequately browned.
● Always place baking pans on the grid rack. Remove the grid only if baking in the flat biscuit tray, supplied with the appliance.
● Preheating shortens the baking time. Do not put the cake in the oven until proper temperature is obtained.
Baking tips
Is cake baked?
Pierce the cake with a wooden skewer at the thickest part, if the dough does not stick to it, the cake is bake. You may switch off the oven and use the remaining heat.
Cake has fallen
Check the recipe. Use less liquid next time. Follow the mixing times, especially when using electric kitchen mixers.
Cake is too light on the bottom
Use dark baking pan next time, or place the pan one level lower, or switch on the lower heater a while before the completion.
Cheese cake is undercooked
Next time reduce the baking temperature and extend the baking time.
Warnings regarding the baking tables
- The tables indicate the temperature range. Always select lower temperature first. You may always increase the temperature in case pastry needs more baking.
● Baking times are indicative only.
● The asterix indicates that the oven requires preheating.
BAKING IN THE OVEN
Pastry Baking Table
| Type of pastry | Guide level from down upwards | Temp(°C) — Convection | Guide level from down upwards | Temp(°C) * Fan-Canada | Guide level from down upwards | Temp(°C) ✉ Fan-Canada | Baking time (in min.) |
| Sponge cake/ marble cake | 2 | 170-180 | 2 | 160-170 | 2 | 150-170 | 60-80 |
| Victoria sponge | 2 | 160-180 | 2 | 150-170 | 65-80 | ||
| Base for a layer cake | 2-3 | 170-180 | 2-3 | 150-170 | 20-30 | ||
| Sponge layer cake | 2 | 170-180 | 30-40 | ||||
| Fruit cake(crispy base) | 3 | 160-170 | 2-3 | 160-180 | 60-70 | ||
| Cheesecake(shortcrust) | 3 | 160-170 | 2 | 140-150 | 60-90 | ||
| Teacake | 2 | 160-180 | 2 | 150-170 | 40-60 | ||
| Bread(e.g. wholegrain bread) | 2 | 210-220 | 3 | 180-210 | 2 | 150-170 | 50-60 |
| Fruit cake(crispy base) | 3 | 170-180 | 3 | 160-170 | 2 | 160-200 | 35-60 |
| Fruit cake(with yeast) | 2 | 160-170 | 30-50 | ||||
| Crumble cake | 3 | 160-170 | 150-170 | 30-40 | |||
| Sponge roll | 2 | 180-200 | 10-15 | ||||
| Pizza(thin base) | 3 | 220-240 | 3 | 200-220 | 10-15 | ||
| Pizza(thick base) | 2 | 180-210 | 3 | 210-230 | 30-50 | ||
| Puff pastry | 3 | 180-190 | 3 | 160-170 | 2 | 170-190 | 18-25 |
| Moringues | 3 | 90-110 | 80-90 | ||||
| Choux buns | 2 | 170-190 | 35-45 |
BAKING IN THE OVEN

Roasting
Tip regarding roasting pans
- For best results, use light enamel pans, temperature resistant glass pans, clay dishes or cast iron dishes.
- As stainless steel dishes reflect the heat, they are not recommended.
- If you cover your roast or wrap it in foil, it will preserve its juices and the oven will remain clean.
- The roast will be cooked quicker if it is left uncovered. Large roasts can be placed directly on the grid with the oven tray below for catching the juices and melted fat.
Attention when roasting!
Roasting tables indicate suggested temperatures, guide level and roasting times. Roasting time largely depends upon the type of meat, its size and quality. So you may expect some variations
- Roasting of large chunks of meat may produce excessive steaming and condensation on the oven door. This is quite normal, and does not affect the operation of the oven. However, after the completion of roasting wipe the oven door and the glass thoroughly.
- Add as much liquid as necessary to prevent burning of juice, dripping from meat. Roast must be checked regularly and liquid added if necessary.
- At approximately the middle of the indicated time turn the roast round, especially if you use the deep roast dish.
- When roasting on the grill grid, place the grid in the deep roasting pan and insert both into the sliding guide. The bottom pan will intercept dripping fat.
- Never leave roast to cool in the oven, as it might produce condensation and corrosion of the oven.
BAKING IN THE OVEN
Roasting table
| Type of meat | Guide level (from bottom up) | Temp (°C) Convection | Guide level (from bottom up) | Temp (°C)※For Pouchard | Guide level (from bottom up) | Temp (°C)※For Pouchard | Roasting time (in min.) |
| per 1 cm | |||||||
| Roast beef or fillorare | 2 | 3 | 250 | 12-15 | |||
| oven warmed upjuicy("medium") | 3 | 250 | 15-25 | ||||
| oven warmed up"well done" | 3 | 210-230 | 25-30 | ||||
| oven warmed upRoast joint | 2 | 160-180 | 2 | 200-220 | 120-140 | ||
| Pork | |||||||
| Roast joint | 2 | 160-180 | 2 | 2 | 200-210 | 90-140 | |
| Ham | 2 | 160-180 | 2 | 200-210 | 60-90 | ||
| Fillet | 3 | 210-230 | 25-30 | ||||
| VEAL | 2 | 160-170 | 2 | 2 | 200-210 | 90-120 | |
| LAMB | 2 | 160-180 | 2 | 200-220 | 100-120 | ||
| VENISON | 2 | 175-180 | 2 | 2 | 200-220 | 100-120 | |
| POULTRY | |||||||
| Chicken | 2 | 170-180 | 2 | 220-250 | 50-80 | ||
| Goose(approx.2kg) | 2 | 160-180 | 2 | 2 | 190-200 | 150-180 | |
| FISH | 2 | 175-180 | 2 | 2 | 210-220 | 50-80 |
BAKING IN THE OVEN

Grilling
- Take extra precautions when grilling. Intensive heat from infrared element makes the oven and the accessories extremely hot. Use protective gloves and barbecue accessories!
- Perforated roast may produce spurting of hot grease(sausages). Use long grill tongs to prevent skin burns and protect your eyes.
- Supervise the grill at all time. Excessive heat may quickly burn your food and provoke fire!
- Do not let the children in the vicinity of the grill.
Grill heater is especially suitable for the preparation of low-fat sausages, meat and fish fillets and steaks, and for browning and crisping the roast skin.
Tips for grilling
- Grilling should be carried out with the oven door closed.
- Grilling tables indicate the recommended temperature, guide levels and grilling times, which may vary according to the weight and quality of meat
- Grill element should be pre-heated for 3 minutes.
- Oil the grill grid before placing food on it, to avoid food sticking to the grid.
- Place the meat upon the grid, then place the grid upon the grease interception pan. Insert both trays into the oven guides.
- Turn the meat round after half of the grilling time has expired. Thinner slices will require only one turn, for larger chunks you might need to repeat the procedure. Always use barbecue tongs to avoid losing excessive juice from meat.
● Dark beef meat is grilled quicker than lighter pork or veal. - Clean the grill, the oven and the accessories each time after use.
BAKING IN THE OVEN
Grill table
| Type of meat for grill | Weight (in grams) | Guide level( from bottom up) | Temp(°C) | Grill time (in min.) |
| Grill | ||||
| Meat and sausages | ||||
| 2 beefsteaks, rare | 400 | 5 | 240 | 14-16 |
| 2 beefsteaks, medium | 400 | 5 | 240 | 16-20 |
| 2 beefsteaks, well done | 400 | 5 | 240 | 20-23 |
| 2 pork scrag fillets | 350 | 5 | 240 | 19-23 |
| 2 pork chops | 400 | 5 | 240 | 20-23 |
| 2 veal staeks | 700 | 5 | 240 | 19-22 |
| 4 lamb cutlets | 700 | 5 | 240 | 15-18 |
| 4 grill sausages | 400 | 5 | 240 | 9-14 |
| 2 slices of meat cheese | 400 | 5 | 240 | 9-13 |
| 1 chicken, halved | 1400 | 3 | 240-250 | 28-33(1.side)23-28(1.side.) |
| Fish | ||||
| Salmon fillets | 400 | 4 | 240 | 19-22 |
| Fish in aluminium foil | 500 | 4 | 230 | 10-13 |
| Toast | ||||
| 4 slices of white bread | 200 | 5 | 240 | 1,5-3 |
| 2 slices of whole meal | 200 | 5 | 240 | 2-3 |
| Toast sandwich | 600 | 5 | 240 | 4-7 |
| Meat/pourtry | ||||
| Chicken | 1000 | 3 | 180-200 | 60-70 |
| Pork roast | 1500 | 3 | 160-180 | 90-120 |
| Pork scrag | 1500 | 3 | 160-180 | 100-180 |
| Pork knuckle | 1000 | 3 | 160-180 | 120-160 |
| Roast beef/beef fillet | 1500 | 3 | 190-200 | 40-80 |
TECHNICAL INFORMATION
| Model | CAO888X, CAO888BCAO888W, CAO888X/1 |
| Top oven | |
| Top element | 850W |
| Grill element | 1100W |
| Bottom element | 1150W |
| Top oven power | 2000W |
| Bottom mains oven | |
| Top element | 850W |
| Grill element | 1100W |
| Bottom element | 1150W |
| Circular element | 2000W |
| Fan | ● |
| Bottom mains oven power | 2000W |
| Voltage rating | 220-240V50-60HZ |

ARTUSI
THE ART OF LIVING
Worldwide Appliances Pty Limited
A.B.N. 45868077422
Office:
48-50 Moore Street, Leichhardt N.S.W 2040
Post:
Locked Bag 3000, Annandale, N.S.W 2038
P: 1300 694 583
WARRANTY REGISTRATION
Your ongoing satisfaction with your artusi product is important to us. We ask that you complete the enclosed Warranty Registration Card and return it to us so that we have a record of the artusi product purchased by you.
PRIVACY
Worldwide Appliances respects your privacy and is committed to handling your personal information in accordance with the National Privacy Principles and the Privacy Act 1988 (Cth). A copy of the Worldwide Appliances Privacy Policy is available at www.artusi.com.au. Worldwide Appliances will not disclose any personal information set out in the Warranty Registration Card (“Personal Information”) without your consent unless required by:
-
law;
-
any Worldwide Appliances related company;
-
any service provider which provide services to artusi or assist artusi in providing services (including repair and warranty services) to customers. Our purpose in collecting the Personal Information is
to keep a record of the artusi product purchased by you, in order to provide a better warranty service to you in the unlikely event that there is a problem with your artusi product. Worldwide Appliances may contact you at any one or more of the address, email address or telephone numbers set out in the Warranty Registration
Card. Please contact artusi on 1300 694 583 should you not wish to be contacted by Worldwide Appliances.
WARRANTY
1. Warranty
Worldwide Appliances warrants that each artusi product will remain, for a period of either 12 months or 24 months of warranty. All Warranties are valid from the original date of purchase, And warranty claims must be accompanied by the proof of purchase.
24 months warranty products:
All Built-in Appliances – Limited to Ovens, Gas, Induction and Electric Cooktops, and All Rangehoods
Freestanding Cookers - Gas and Electric Models (900mm Width)
Dishwashers - Freestanding, Fully Integrated, Semi Integrated and built-in
12 months warranty products:
Freestanding Cookers - Gas and Electric Models in 50cm, 54cm and 60cm Widths
Portable Appliances* – Benchtop Models and Portable Gas Models
- What is not Covered by the Warranty.
The Warranty does not apply if an artusi product is defective by a factor other than a defect arising in the manufacture of the artusi product, including but not limited to:
(a) damage through misuse (including failure to maintain, service or use with proper care), neglect, accident or ordinary wear and tear (including deterioration of parts and accessories and glass breakage);
(b) use for purpose for which the artusi product was not sold or designed;
(c) use or installation which is not in accordance with any specified instructions for use or installation;
(d) use or operation after a defect has occurred or been discovered;
(e) damage through freight, transportation or
handling in transit (other than when Worldwide Appliances is responsible);
(f) damage through exposure to chemicals, dusts, residues, excessive voltage, heat, atmospheric conditions or other forces or environmental factors outside the control or Worldwide Appliances;
(g) repair, modification or tampering by the purchaser or any person other than Worldwide Appliances, an employee of Worldwide Appliances or an authorised artusi service contractor ^* ;
(h) use of parts, components or accessories which have not been supplied or specifically approved by artusi.
(i) damage to surface coatings caused by cleaning or maintenance using products not recommended in the artusi product handbook provided to the purchaser upon purchase of the artusi product;
(j) damage to the base of an electric oven due to items having been placed on the base of the oven cavity or covering the base, such as aluminium foil (this impedes the transfer of heat from the element to the oven cavity and can result in irreparable damage); or
(k) damages, dents or other cosmetic imperfections not affecting the performance of the artusi in respect of an artusi product purchased as a "factory second" or from display The Warranty does not extend to light globes used in artusi products.
- Domestic Use
Each artusi product is made for domestic use. This Warranty may not extend to artusi products used for commercial purposes.
- Time for Claim under the Warranty
You must make any claim under this Warranty within twenty eight (28) days after the occurrence of an event which gives rise to a claim pursuant to the Warranty, by booking a service call on the telephone number below.
Continued over...
5. Proof of Purchase
Customers must retain proof of purchase in order to be eligible to make a warranty claim in respect of an artusi product.
6. Claiming under the Warranty
Customers will bear the cost of claiming under this Warranty unless Worldwide Appliances determines the expenses are reasonable, in which case the customer must claim those expenses by providing written evidence of each expense to Worldwide Appliances at the address on the Warranty Registration Card.
7. Statutory Rights
(a) These terms and conditions do not affect your statutory rights.
(b) The limitations on the Warranty set out in this document do not exclude or limit the application of the consumer guarantees set out in the Act or any other equivalent or corresponding legislation in the relevant jurisdiction where to do so would: (i) contravene the law of the relevant jurisdiction; or (ii) cause any part of the Warranty to be void.
(c) Worldwide Appliances excludes indirect or consequential loss of any kind (including, without limitation, loss of use of the artusi product) and (other than expressly provided for in these terms and conditions) subject to all terms,
conditions and warranties implied by custom, the general law, the Act or other statute. (d) The liability of Worldwide Appliances to you for a breach of any express or non-excludable implied term, condition or warranty is limited at the option of Worldwide Appliances to: (i) replacing or repairing the defective part of the artusi product;
(ii) paying the cost of replacing or repairing the defective part of the artusi product;
(iii) replacing the artusi product; or (iv) paying the cost of replacing the artusi product.
(e) Our goods come with guarantees that cannot be excluded under the Australian Consumer Law. You are entitled to a replacement or refund for a major failure and for compensation for any other reasonably foreseeable loss or damage. You are also entitled to have the goods repaired or replaced if the goods fail to be of acceptable quality and the failure does not amount to a
major failure.
8. Defects
Any part of an artusi product deemed to be defective and replaced by Worldwide Appliances is the property of Worldwide Appliances. Worldwide Appliances reserves the right to inspect and test artusi products in order to determine the extent of any defect and the validity of a claim under the Warranty.
*To locate your closest artusi authorised service agent please contact us on 1300 652 100 or visit www.artusi.com.au
ALL SERVICE CALLS MUST BE BOOKED THROUGH AN AUTHORISED DEALER OR WARRANTY DEPARTMENT ON 1300 652 100 OR stokesaps.com.au/artusi-service 01032014

ARTUSI THE ART OF LIVING
Warranty Card tear off
| WARRANTY REGISTRATION CARD Please complete and send to ARTUSI at: REPLY PAID 8361701052013 LEICHHARDT NSW 2040 | ||
| Last Name: First Name: | ||
| Address: | ||
| State: Postcode: Email: | ||
| Home Phone: Mobile: | ||
| Purchase Date: / / (Please attach proof of purchase to validate warranty) | ||
| MODEL NUMBER | SERIAL NUMBER(if you cannot locate the serial number please call ARTUSI on 1300 694 583) | |
| 1 | ||
| 2 | ||
| 3 | ||
| 4 | ||
01032014

ARTUSI
THE ART OF COOKING
DISCLAIMER
Worldwide Appliances PTY LTD, trading as ARTUSI, is continually seeking ways to improve the design specifications, aesthetics and production techniques of its products. As a result alterations to our products and designs take place continually. Whilst every effort is made to produce information and literature that is up to date, this brochure should not be regarded as an infallible guide to the current specifications, nor does it constitute an offer for the sale of any particular product. Product dimensions indicated in our literature is indicative only. Actual product only should be used to define dimension cutouts. Distributors, and retailers are not agents of ARTUSI and are not authorised to bind ARTUSI by any express or implied undertaking or representation.
ARTUS OFFICES ARE OPEN DAILY FROM 9AM-5PM AND SATURDAYS 10AM-4PM
NSW & ACT (HEAD OFFICE)
48-50 MOORE STREET
LEICHARDT
FO28594099
VIC TAS & SA
121 TOOBNK ROAD
CAMBERWEI
F 0598092163
OLD
1/42 CAVENDISH ROAD
CORPARO
FO/33970820
WA&NT
UNIT 10/55 HOWE STREET
OSBORNE PARK
FOS 92019188
NZ
PO BOX 11160
SOCKP.UN CHRISTCHURCH
FOJ 344 9906
P:1300649583
ARTUSI.COM.AU
- SAFETY INSTRUCTIONS
- HOW TO SAVE ENERGY
- UNPACKING
- Caution!
- DISPOSAL OF THE APPLIANCE
- DESCRIPTION OF THE APPLIANCE
- BEFORE USING FOR THE FIRST TIME
- IMPORTANT PRECAUTIONS AND RECOMMENDATIONS FOR USE OF ELECTRICAL APPLIANCES
- USING THE DOUBLE OVEN FOR THE FIRST TIME
- INSTALLATION
- IMPORTANT
- WARNING
- IMPORTANT:
- ▷ Electric connection
- oven
- Warning!
- OPERATION
- Top Natrual Convection
- GENERAL FEATURES
- NOTE:
- WARNING:
- OPERATING PRINCIPLES
- THERMOSTAT KNOB(fig.2.1)
- FUNCTION SELECTOR KNOB
- OPERATION OPERATION
- OVEN COOKING
- USE OF THE GRILL
- Bottom Main Multifunction Oven
- THERMOSTAT KNOB (fig. 3.2)
- Defrost (fan only)
- Fan forced
- Fan assisted
- (Fan+bottom heat+Top Heat)
- Static Grill
- Classic convection
- Base heat
- Half Fan Grill
- COOKING ADVICE
- COOKING WITH FORCED AIR
- STERILIZATION
- REGENERATION
- ROASTING
- COOKING DIFFERENT DISHES AT THE SAME TIME
- Prior first use
- Setting the time
- Timer
- Semi-automatic operation
- For example:
- Automatic operation
- Cancel settings cancel automatic function
- Cancel timer settings
- Top Oven guide levels
- Bottom main Oven guide levels
- CLEANING AND MAINTENANCE
- - Steam cleaning
- Replacement of the oven light Bulb
- Changing the bulb
- Please note:
- Door removal
- Removal of the internal glass panel
- Models With Wire Racks
- OPERATION IN CASE OF EMERGENCY
- BAKING IN THE OVEN
- Baking pastry
- Baking with upper and lower elements
- Baking tips
- Is cake baked?
- Cake has fallen
- Cake is too light on the bottom
- Cheese cake is undercooked
- Warnings regarding the baking tables
- Attention when roasting!
- Grilling
- Tips for grilling
- TECHNICAL INFORMATION
- ARTUSI
- THE ART OF LIVING
- PRIVACY
- WARRANTY
- Warranty
- Proof of Purchase
- Claiming under the Warranty
- Statutory Rights
- Defects
- THE ART OF COOKING
- DISCLAIMER
Brand : Artusi
Model : CAO888X
Category : Oven