AFGG54EG - Oven Artusi - Free user manual and instructions
Find the device manual for free AFGG54EG Artusi in PDF.

User questions about AFGG54EG Artusi
0 question about this device. Answer the ones you know or ask your own.
Ask a new question about this device
Download the instructions for your Oven in PDF format for free! Find your manual AFGG54EG - Artusi and take your electronic device back in hand. On this page are published all the documents necessary for the use of your device. AFGG54EG by Artusi.
USER MANUAL AFGG54EG Artusi
text_image
APPLIANCES FOR LIVINGAPPLIANCES
FOR LIVING

ARTUSI
THE ART OF LIVING
AFGG54EG
OPERATION MANUAL
Congratulations, you are now the proud owner of an ARTUSI cooking appliance. Thank you for purchasing ARTUSI and welcome to the ARTUSI Family.
This instruction manual has been specially created to inform you of the full range of features your ARTUSI appliance has to offer and serves as an introduction to getting the very best out of your ARTUSI appliance.
We present detailed information on each of the features your ARTUSI appliance consists of. Once you have read this section you will be able to choose the most appropriate settings for your appliance when cooking different types of food.
We ask you to read the instructions in this booklet very carefully as this will allow you to get the best results from using your appliance. KEEP THE DOCUMENTATION OF THIS PRODUCT FOR FUTURE REFERENCE.
Dear Artusi Customer, please read this user manual carefully before using the product and, keep it permanently at your disposal.
Note: This user manual is prepared for more than one model. Some of the features specified in this Manual may not be available on your appliance. All our appliances are only for domestic use, not for commercial use. Products marked with (*) are optional.
"THIS APPLIANCE SHALL BE INSTALLED IN ACCORDANCE WITH THE REGULA TIONS FORCE AND ONLY USED IN A WELL VENTILATED SPACE. READ THE INSTRUCTIONS BEFORE INSTALLING OR USING THIS APPLIANCE"
"Conforms with the WEEE Regulations."
TO REGISTER YOUR PRODUCT WITH ARTUSI, PLEASE FILL OUT THE WARRANTY CARD AT THE END OF THIS BOOKLET AND POST IT TO: REPLY PAID 83617
LEICHHARDT NSW 2040

ARTUSI
THE ART OF LIVING
SAFETY INSTRUCTIONS
- To avoid any possible hazard, the appliance must be installed by qualified/authorised personnel only. Installation should be carried out in accordance with the legal regulations and technical requirements of the local gas supplier. Important instructions in this regard may be found in the section "Installation".
● The appliance becomes hot during operation. Take care not to touch the hot parts inside the oven. - Please pay attention to children in the vicinity of the appliance. In particular, hot surface burners, the oven chamber, grates, the door pane, and pans containing hot liquids standing on the hob may cause burns to children.
● Mind that electrical connection leads from other home appliances (e.g. of a food mixer) do not touch hot parts of the cooker. - Do not place flammable material into the utility drawer
- Do not leave the cooker unattended when frying. Oils and fats may catch fire due to overheating.
● At the point of boiling, mind to avoid spills on the burner. - If the cooker is damaged, it may be used again only after the fault has been fixed by an authorised person.
- Do not open the tap on the gas connection or cylinder valve before checking that all burner knobs are closed.
- Do not allow the burners to be soiled or liquids to spill on the burners. If soiled, clean and dry burners immediately after they have cooled down.
- Do not put pans directly onto burners.
● Never use the burners or the oven for heating of the room. Never place empty dishes upon the cooking zones. - Do not place pans with a weight greater than 10kg onto the grate over one burner, or pans with a total weight of over 40 kg on the whole grate.
- Do not open the cooker knobs before already having a lighted match or a gas lighter in your hand.
- Do not put out a burner flame by blowing
- Do not make your own alterations to the cooker in order to adapt it to a different type of gas, move the cooker to another place or make changes to the power supply. These operations may only be carried out by an authorised electrician or gas fitter.
- Do not use harsh cleaning agents or sharp metal objects to clean the door as they can scratch the surface, which could then result in the glass cracking.
- In the event of any incident caused by a technical fault, disconnect the power (applying the above rule) and report the fault to the service centre to be repaired.
- Do not attach any antenna cords (e.g. radio) to the gas supply.
SAFETY INSTRUCTIONS
- IN CASE OF ANY SUSPICION OF GAS LEAKAGE YOU MUST NOT: Light matches, smoke cigarettes, swith electrical switches(eg.door bell or light switch) on and off, or use other electric or mechanical devices that create electrical or percussive sparks. In such a case, immediately close the cylinder valve or tap cutting off gas supply, air the room, and then call a person authorized to repair the source of the leakage.
- In a case of gas escaping form leaky piping and catching frie, close gas supply immediately using a cutting-off valve.
- In a case of gas escaping from a leaky cylinder and catching fire: throw a wet blanket over the cylinder to cool it down and turn off the cylinder valve. Do not use the damaged cylinder.
- When the cooker is not to be used for several days, close the main valve on the gas piping.
● The cooker should not be cleaned using steam equipment.
● Do not subject the knobs and burners to sharp forces.
● Alterations and repairs carried out by an unqualified person are not allowed.
● Do not put pans weighing over 15kg on the opened door of the oven. - During the operation of gas burners the room may be filled with extra heat and humidity, so it is necessary to assure adequate ventilation. Occasional opening of the window or door should provide enough exchange of air. During the prolonged use of the appliance, or during a very intense use, more ventilation will be required, and it will probably be necessary to engage the extractor hood.
- Do not use the cooker in the event of a technical fault. Any faults must be fixed by an appropriately qualified and authorized person.
- The rules and provisions contained in this instruction manual should be strictly observed. Do not allow anybody who is not familiar with the contents of this instruction manual to operate the cooker.
● Never put aluminum foil on the bottom of the oven, and do not place any crockery upon the bottom of the oven. - Must not be installed in a marine craft, caravan or mobile home, unless each burner is fitted with a flame safeguard.
● DO NOT USE OR STORE FLAMMABLE MATERIALS IN THE APPLIANCE STORAGE DRAWER OR NEAR THIS APPLIANCE
● DO NOT SPRAY AEROSOLS IN THE VICINITY OF THIS APPLIANCE WHILE IT IS IN OPERATION.
● WHERE THIS APPLIANCE IS INSTALLED IN MARINE CRAFT OR IN CARAVANS, IT SHALL NOT BE USED AS A SPACE HEATER
● DO NOT MODIFY THIS APPLIANCE
● DO NOT PLACE ARTICLES ON OR AGAINST THIS APPLIANCE
● Not suitable for use with aftermarket lids or covers.
HOW TO SAVE ENERGY

Using energy in a responsible way not only saves money but also helps the environment. So let's save energy and this is how you can do it:
- Use proper pans for cooking. A saucepan should never be smaller than a burner crown.
- Ensure burners, the grate the hob are clean. Soils can prevent heat transfer-and repeatedly burnt-on spillages can often only be removed by products which cause damage to the environment. In particular, ensure that flame opening in the rings under caps, and opening of burner nozzles are clean.
- Do not uncover the pan too often(a watched pot never boils!).
Do not open the cover door unnecessarily often. - Only use the oven when cooking larger dishes. Meat of up to 1 kg can be prepared more economically in a pan on the cooker burner.
- Make use of residual heat from the oven. If the cooking time is greater than 40 minutes it is recommended to switch off the oven 10 minutes before the end time.
- Make sure the oven door is properly closed. Heat can leak through spillages on the door seals. Clean up any spillages immediately.
- Do not install the cooker in the direct vicinity of refrigerators/freezers. Otherwise energy consumption increases unnecessarily.
UNPACKING

During transportation, protective packaging was used to protect the appliance against any damage.
After unpacking, please dispose of all elements of packaging in a way that will not cause damage to the environment. All materials used for packaging the appliance are environmentally friendly; they are 100% recyclable and are marked with the appropriate symbol.
Caution!
During unpacking, the packaging materials (polythene bags, polystyrene pieces, etc.) should be kept out of reach of children.
DISPOSAL OF THE APPLIANCE

Old appliances should not simply be disposed of with normal household waste, but should be delivered to a collection and recycling centre for electric and electronic equipment.
A symbol shown on the product, the instruction manual or the packaging shows that it is suitable for recycling.
Materials used inside the appliance are recyclable and are labeled with information concerning this. By recycling materials or other parts from used devices you are making a significant contribution to the protection of our environment.
Information on appropriate disposal centers for used devices can be provided by your local authority.
DESCRIPTION OF THE APPLIANCE

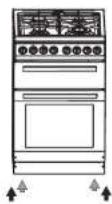
text_image
splashback Medium burner Medium burner Control panel Auxiliary burner Wok burner Grate Oven door handle Oven door handle Temperature control knob Main oven control knob Top oven/grill control knob Mechanical timer control knob Top burners control knob Burner safely valve optional Soon indicator Main oven indicator light Top oven indicator lightINSTALLATION
This appliance must be installed by an authorised person in accordance with this instruction manual, AS/NZS 5601.1-Gas installations (installation and pipe sizing), local gas fitting regulations, local electrical regulations, Building Code of Australia and any other government authority.
text_image
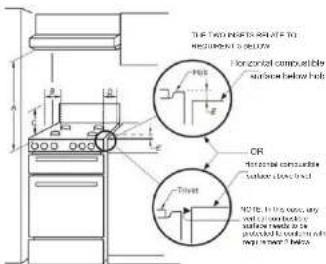
FOR THE POINTS OF THE RECORDED CONSTRUCTION Horizontal combustible surface below hole CR Horizontal combustible surface above hole TOPS. In this section, any surface is necessary to be proposed to be used for the surface above hole.Overhead clearances-(Measurement A) Range hoods and exhaust fans shall be installed in accordance with the manufacturer's
relevant instructions. However, in no case shall the clearance between the highest part of the hob of the gas cooking appliance and a range hood be less than 600 mm or, for an overhead exhaust fan, 750mm
Side clearances-(Measurements B, &C) Where B measured from the periphery of the nearest burner to any vertical combustible surface, or vertical combustible surface. covered with toughened glass or sheet metal, is less than 200mm, the surface shall be protected to a height C of not less than 150 mm above the hob for the full dimension (width or depth) of the cooking surface area. Where the gas cooking appliance is fitted with a splashback, protection of the rear wall is not required.
Additional requirements for freestanding and elevated gas cooking appliances-(Measurements D &E).Where D, the distance from the periphery of the nearest burner to a horizontal combustible surface is less than 200mm, then E shall be 10 mm or more, or horizontal surface shall be above the trivet.the
- If the appliance is used for extended periods, it may be necessary to open a window in order to boost ventilation.
● The kitchen where the appliance is to be installed must be dry and well ventilated.
The room should be equipped with a ventilation system that pipes away exhaust fumes created during combustion. This system should consist of a ventilation grid or hood. Hoods should be installed according to the manufacturer's instructions. The cooker should be placed so as to ensure free access to all control elements.
● The cooker should stand on a hard, even floor (do not put it on a base).
● Before you start using the cooker, it should be leveled, which is particularly important for fat distribution in a frying pan. To this purpose, adjustable feet can be found upon removing the utility drawer. The adjustment range is +/-5mm.
INSTALLATION
● Install the cooktop Remove the crown caps and burner crowns from the oven, and arrange them on the cooktop as per the earlier diagram entitled. Description of the appliance! These components will fit together neatly when correctly installed.

Caution!
The crown cap and burner cap must be tightly installed to ensure that the gas flame burns as intended, if the flame fails to ignite, it may be because these components have been incorrectly installed.
● To fit the rear panel/splashback, slide the lugs on the bottom of the panel into the matching slots on rear of stove and fix with screws provided.

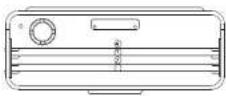
natural_image
Line drawing of a double boiler with front panel and side doors, no text or symbols presentCaution!
The splashback is fixed to the rear wall of cooker. kindly please REMOVE before installation. Pic: A
Unscrew the splashback from the rear wall of the cooker, Pic: A and fit to the rear of the cooktop section of the cooker, Pic: B
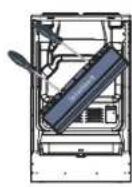
Pic: A

Pic: B
Gas connection Caution!
The cooker should only be connected to a gas supply of the particular type that the appliance is manufactured to function with. Information about the type of gas that the cooker has been adapted to by the factory is shown on the rear panel.
This appliance is suitable for connection with rigid pipe or flexible hose. The isolating manual shut-off valve connection point must be accessible when the appliance is installed.
Natural Gas: the supplied regulator must be fitted to the appliance inlet connection. Gas pressure must be adjusted to 1.0 kPa when approximately 50% of the burners are on high flame, the appliance test point is located on the regulator.
LPG: the supplied test point adaptor must be fitted to the appliance inlet connection. Gas pressure must be adjusted to 2.75 kPa, the appliance test point is located on the test point adaptor.
Suitable for connection with a flexible hose assembly. The flexible hose assembly must be certified to AS/NZS 1869 class B or D, be of appropriate internal diameter for the total gas consumption, be kept as short as possible (not exceeding 1200mm), must not be in contact with the floor or any hot or sharp surfaces. The hose assembly must not be subject to strain, abrasion, kinking or deformation.
INSTALLATION
Gas leakage and operation of the appliance must be tested by the installer before leaving. Check all burner flames are blue in colour, stable and completely ignite at both high low flame settings with no appreciable yellow tipping, carbon deposition, lifting, floating, lighting back or objectionable odour. Test burners individually and in combination.
For minor adjustment and fault finding refer to page 25 if this appliance cannot be adjusted to perform correctly. Refer to the warranty card for service & parts contact information. Where the data plate is obscured by cabinetry when the cooker is in the installed position, place the supplied duplicate data plate to a suitable adjacent surface or within the instruction manual for future reference.
Caution!
On completion of the cooker installation, the tightness of all connections should be checked, e.g. applying water with soap. Do not use fire to check tightness.
Fix the cooker to the back wallwith 2 chains
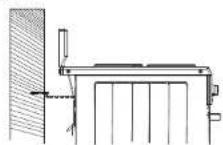
Anti tilt chains are located at the rear of the appliance and must be secured to the wall behind the appliance to prevent accidental tipping/tilting. The chain length must be as short as practicable to avoid appliance tilting forward and also diagonal to avoid appliance moving sideways.
Flexible hose connection
In case the appliance is connected by means of a flexible hose, the position A of the hose is not permissible. In case the connection hose is made of metal, position A is permissible.

Beginning of operation
Start using the appliance in accordance with the instructions for use.
Lit up all burners and check the stability of the flame with high and low setting. Adjust air intake if necessary. After that, take time and explain the operation and control of the appliance to the user and read with him the instructions for use.
Liquefied gas connection
10 Gasket
11 Connection R 1/2
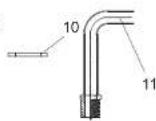
Gas connection
- Accessibility: Make sure that it is possible to run gas lines to the gas connection point of the appliance. The gas connection point must be accessible without having to remove the oven. If a flexible hose is used, the connection point must also be accessible without having to remove the oven.
- Natural gas connection: Using the supplied gas regulator, remove the dust seals on the inlet and outlet ports and position the "OUT" port of the regulator towards the gas inlet pipe of the oven. Using a suitable thread sealant, screw the regulator on and ensure that it is orientated with easy access to the test point. Connect the appropriate Natural Gas supply to the "IN" port of the gas regulator.
INSTALLATION
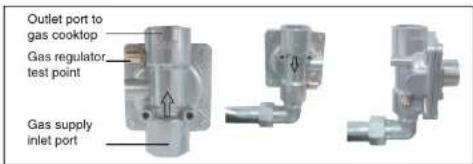
text_image
Outlet port to gas cooktop Gas regulator test point Gas supply inlet port- ULPG connection: Using the supplied gas regulator, remove the dust seals on the inlet and outlet ports and position the outlet port of the regulator towards the gas inlet pipe of the oven. Using a suitable thread sealant, screw the regulator on and ensure that it is orientated with easy access to the test point. Connect the appropriate ULPG supply to the inlet port of the gas regulator.
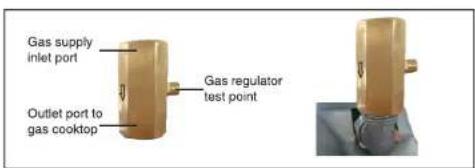
text_image
Gas supply inlet port Outlet port to gas cooktop Gas regulator test pointAdapting the cooker to another type of gas
This operation may only be carried out by an appropriately authorised fitter.
The cooker is supplied with natural gas (NG 1.0kpa). If the cooker is to be supplied with differs from the gas provided for the cooker by the manufacturer, burner nozzles must be exchanged and the flame needs to be adjusted.
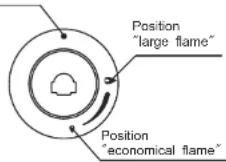
In order to adapt the cooker to burn a different type of gas, you should:
● Exchange nozzles (see tables below),
- Adjust the "economical" flame.
- If you need to replace the natural gas (NG 1.0kpa), please contact the service center.
According to NG install instruction:
Use M7 sleeve to replace LPG nozzle to be NG nozzle Adjust NG pressure, ignite to check burner minimum flame status, adjusting damping hole till flame is stable.
INSTALLATION

Caution!
The cookers provided by the manufacturer have burners which are factory-adapted to use the gas specified on their data plates and guarantee cards.
Burner
| Uplight | Burner | Gas type | Inclor Size(mm) | TPS (kPa) | NGC (kPa) |
| 540mm | Auxiliary | Natural gas | 0.97 | 1.0 | 3.6 |
| Semi-rapid | 1.10 | 6.3 | |||
| Wet | 1.65 | 12.6 | |||
| Cven | 1.28 | 10.8 | |||
| Auxiliary | Universal LPG | 0.52 | 2.76 | 3.6 | |
| Semi-rapid | 0.68 | 6.3 | |||
| Wet | 0.95 | 12.6 | |||
| Cven | 0.89 | 10.8 |
| Burner flame | Re-arming from liquid gas to natural gas | Re-arming from natural gas to liquid gas |
| Full | 1. Exchange a burner nozzle for the appropriate type according to the nozzle table | 1. Exchange a burner nozzle for the appropriate type according to the nozzle table. |
| Economical | 2. Unscrew an adjusting bolt slightly and adjust the flame size. | 2. Screw in an adjusting bolt slightly to the end and check the flame size. |
In order to perform adjusting operations, take off the knobs. Adjusting elements of the oven burner are accessible after drawing out the oven chamber floor.
Surface burners applied do not require adjustment of primary air. A correct flame has distinct internal cones of blue and green colour. A short, humming flame or long, yellow and smoking one, without clearly outlined cones, shows improper quality of gas in the household piping or a damaged or soiled burner. In order to check a flame, heat a burner for around 10 minutes with a full flame, and next turn the valve knob to the economical flame position. The flame should not go out or jump onto the nozzles.

Exchange of a burner nozzle: unscrew the nozzle with special socket spanner No 7 and replace with a new one according to a type of gas (seetables)
Knobs should be adjusted with the burner switched on and set to the economical flame position, using an adjustment screwdriver of the 2.5mm size.
OPERATION

Fig.C
Adjust the air flow of the oven burner

Caution!
● Adapting the appliance to a different type of gas than that indicated by the manufacturer of the cooker on the data plate, or purchasing a cooker for
a different type of gas than supplied to the house, is exclusively the responsibility of the user and the fitter.
● After adjustment is completed, place a label indicating the type of gas to which the cooker is now adapted.

electrical connections
Electric connection may be carried out by qualified service personnel only!
Wrong connection may permanently damage parts of the appliance and render your warranty void! Mains voltage of the user(240V) must be verified with the measuring device! Three separating switches should be placed in accordance with the mains connection.
● Mains lead behind the cooker must be placed in such manner to avoid touching the back panel of the cooker because of the heat it develops during operation.
- The mains lead extension may be made by qualified personnel only. - Repairs of electrical parts may be carried out only by qualified electrician. In case of malfunction call the service center.
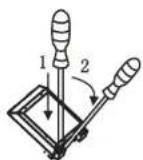
Connection
● Using the screwdriver open the connector cover at the rear of the appliance. Release two locks located at either side of the connector bottom.
● Mains lead must be led through the relief safety device, protecting the mains leadcable from disconnection.
● Tighten the relief device securely and close the connector cover.
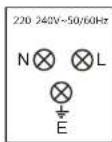
Colour code
L=exterior live wires, usually coloured black. The colour is usually white. Beware of the correct N-connection!

E=earthing wire.
The colour is green .
OPERATION
Before first use
Remove packaging elements,
Gently (slowly) remove labels from the oven door, trying not to break the glue tape. If any visible trace is left on the glass, warm up the oven chamber (see below), spray the warmed-up glass with a glass cleaner, and wipe off with a soft cloth.
Empty the drawer, clean off factory preservatives from the oven chamber,
Take out and wash the oven fittings with warm water and a little washing-up liquid,
Switch on the ventilation in the room or open a window,
Heat the oven (to atemper ature of 250°C, for approximately 30 min.), remove any stains and wash carefully.
When handling the cooker, follow the safety instructions carefully.
The oven chamber should only be washed with water and a small amount of washing-up liquid.
How to use surface burners
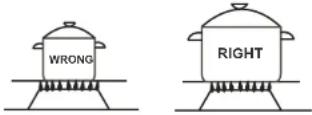
Choice of cookware
Mind that the diameter of a pan base is always larger than the burner flame crown, and that the pan itself is covered. The recommended pan diameter is around 2.5 to 3 times larger than the burner diameter, that is, for:
● An auxiliary burner - a pan with a diameter of 90 to 150 mm,
● A medium burner - a pan with a diameter of 160 to 220 mm,
● A large burner - a pan with a diameter of 200 to 240 mm, and the pan height should not be greater than its diameter.
Gas burner control knobs
Position
burner"switched off"
Ignition without an ignitor
● Light a match.
- Press in the knob to the end and turn it left to the "large flame" position ⬆,
- Ignite gas with a match.,
- Set required flame size (e.g. "economical")
- Switch off the burner after finishing cooking, turning the knob right (to the off position●).
Knob ignition
- Press in the knob to the end and turn it left to the "large flame" position,
- Hold until gas is lit,
OPERATION
● After the flame is lighted release the pressure on the knob and set a required flame size.
Caution!
In cooker models equipped with a surface burner safety valve, hold the knob pressed down to the end when igniting for 10 seconds at the "large flame" position to activate the safety device.
If the ignition device is out of order, either due to power failure or humid ignition device, use a match or a lighter to ignite the gas.
- Keep the button pressed for approximately 10 second after ignition to stabilize the flame.
- If you failed to ignite the burner after 15 seconds. Shut the burner off and wait for at least one minute before the next attempt.
Selection of the appropriate flame
A correctly adjusted burner has a light blue flame with a clearly visible internal cone. Selection of flame size depends on the position of the burner knob which has been set:
Large flame
- Small flame ("economical flame")
● Burner switched off (gas supply is cut off)
Depending on requirements, flame size can be set in a continuous manner.

WRONG

RIGHT

Caution:
- Button positions between ● in △ are not recommended. In these positions the flame is not stabilized and may be extinguished.
- If the flame goes out repeat the procedure.
- If the burner flame goes out (for whatever reason), shut the burner off and wait for at least one minute before next attempt.
● Before igniting the burners cover them with appropriate cookware.
Operation of the burner protection valve
Some models are equipped with an automatic system that cuts off gas supply to a burner when the flame has disappeared.
This system protects the cooker against gas leakage when the flame on a burner goes out e.g. in case of spillage. The user's intervention is needed to re-ignite the burner.

Oven
Oven functions and operation
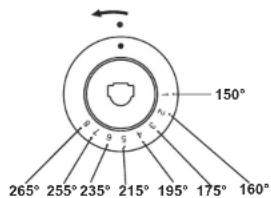
text_image
150° 265° 255° 235° 215° 195° 175° 160°OPERATION
Oven is equipped with gas valve with temperature regulator and anti-outflow protection. To ignite the oven, as in the description below, keep down the pressed knob during about 3 s, this is the time necessary to warm the sensor and to make the protection function. If the flame goes out, repeat ignition operations after a lapse of 3 sec. if the flame does not start burning within 10 sec., repeat the ignition operation after lapse of about 1 min, i.e. after the oven ventilation.
Caution!
Open or close the oven door slowly when using the oven. Before leaving the working oven, check that the flame is stable.
Operating the grill/top oven
Caution!
Do not touch the heating elements or other parts that may become hot when the grill/top oven is in use, children must be kept away.
A switch operated by the door changes the heating element configuration between grill and oven operation .when the door is open the top inner element is activated for intense downward heat .when the door is closed, the top outer elements is activated to provide even oven heating.

Using as a grill
When the door is full open, it remains titled slightly, so that any spillage will be directly away from you.
1.Opened the door.
-
Turn the grill on by turning the control knob to maximum temperture position and allow to preheat for around 5 minutes.
-
The indicator light will glow to show that the grill has been switched on.
-
Then choose the desired setting.
- Do not line the grill pan with aluminium foil.
- Plates and dishes placed on the floor of the grill compartment will be heated when the main oven in use.
- Do not switch on the grill when using the compartment for storage.
Using as an oven
-
Turn on the oven by rotating the top oven control knob clockwise.
-
Select the temperature in the oven by selecting the temperature (in degrees Celsius) printed on the knob.
-
The amber temperature indicator light on the control panel will glow until the pre-set temperature is reached.
-
Once the temperature has been reached, the amber light will go off and cycle on and off. to maintain the pre-set temperature.
Take care when opening the door. let steam and hot air escape before removing the food.
OPERATION

Mechanical timer (Only for main oven)
When using the oven, you must set food cooking time.
- Turn mechanical timer to the time
position you want.

- Turn function knob to the function
position you want.

- Turn temperature knob to the temperature position you want.

-
After above operation, oven knob runs normally.
-
When oven works till pre-set time, timer will have sound which means the cooking is finished.
If you don't want the oven work controlled by the mechanical timer, you can turn the mechanical timer to the position.

Caution!
When selecting any oven function, the oven will only be switched on after the temperature has been set by the temperature selection knob.

Static Grill (Double Grill)
When the "combined grill" is active it enables grilling with the grill and with the top heater switched on at the same time.
This function allows a higher temperature at the top of the cooking area, which causes more intense browning of the dish and permits larger portions to be grilled.

Separate oven lighting
By setting the knob to this position the lighting inside the oven is switched on, e.g. use when washing the oven chamber
Caution!
At this oven function knob position. The oven is not being warmed up.
OPERATION
Top oven temperature chart
This chart is for guidance only. follow food manufactures recommendations whenever available.
There is a temperature conversion chart in the oven section.
| Food | Cooking temperature °C | Time |
| Beef 170-180 | 30 mins per 450g+30 mins | |
| Lamb | 180-190 | 30 mins per 450g+30 mins |
| Pork | 170-190 | 30 mins per 450g+30 mins |
| Poultry | 170-190 | 25-30 mins per 450g+25 mins |
| Fruit cake | 140-160 | Time dependent on size |
| Small cakes 160-180 | 20-25mins | |
| Victoria sandwich | 160-180 | 20-25mins |
Top Oven guide levels
Baking pans and accessories(oven grid, baking tray, etc) may be inserted into the oven in 4 guiding levels. Appropriate levels are indicated in the tables that follow. Always count levels from the bottom upwards!
Bottom main Oven guide levels
Baking pans and accessories (oven grid, baking tray, etc) may be inserted into the oven in 5 guiding levels. Appropriate levels are indicated in the tables that follow. Always count levels from the bottom upwards!
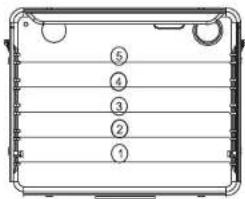
text_image
⑤ ④ ③ ② ①BAKING IN THE OVEN

Baking
- We recommend using the baking trays which were provided with your cooker which should be put on the drying rack;

- Before the cake is taken out of the oven, check if it is ready using a wooden stick (if the cake is ready the stick should come out dry and clean after being inserted into the cake);
● After switching off the oven it is advisable to leave the cake inside f or about 5 min.; - The baking parameters given in tables are approximate and can be corrected based on your own experience and cooking preferences;
- If information given in recipe books is significantly different from the values included in this instruction manual, please apply the instructions from the manual.
| CAKE TYPE TEMPERATURE(°C)WARMED UP | TEMPERATURE(°C) | BAKING TIMEIN MINUTES | LEVEL FROMTHE BOTTOM | |
| Fruit cake 170 | 160 60-70 2 | |||
| Victoria sponge 170 | 150-160 20-40 2-3 | |||
| Sponge layer cake 170 | 150-160 20-30 2-3 | |||
| Buns 180 | 170 30-50 3 | |||
| Teacake 180 | 180 40-50 3 | |||
| Cake (crispy base) | 200 180 40-60 3 | |||
| Puff pastry | 230-250 200-220 15-20 3 | |||
CLEANING AND MAINTENANCE

Roasting meat
Cooking meat weighing over 1 kg in the oven, but smaller pieces should be cooked on the gas burners.
Use heatproof ovenware for roasting, with handles that are also resistant to high temperatures;
When roasting on the drying rack or the grate we recommend that you place a baking tray with a small amount of water on the lowest level of the oven;
It is advisable to turn the meat over at least once during the roasting time and during roasting you should also baste the meat with its juices or with hot salty water - do not pour cold water over the meat.
| TYPE OF MEAT LEVEL FROM THE BOTTOM | TEMPERATURE(°C) | TIME* IN MINUTES | |
| BEEF | Per 1 cm | ||
| Roast beef or fillet rare | 3 | 250 | 12-15 |
| Oven warmed up juicy ("medium") | 3 | 250 | 15-25 |
| Oven warmed up "well done" | 3 | 210-230 | 25-30 |
| Oven warmed up roast joint | 2 | 200-220 | 120-140 |
| PORK | |||
| Roast joint | 2 | 200-210 | 90-140 |
| Ham | 2 | 200-210 | 60-90 |
| Fillet | 3 | 210-230 | 25-30 |
| VEAL 2 200-210 | 90-120 | ||
| LAMB 2 200-220 | 100-120 | ||
| VENISON 2 200-220 | 100-120 | ||
| POULTRY | |||
| Chicken | 2 | 220-250 | 50-80 |
| Goose (approx. 2 kg) | 2 | 190-200 | 150-180 |
| FISH 2 210-220 | 40-55 | ||
● The figures presented in the table refer to a portion of 1kg, if the portion is larger than that an additional 30-40 minutes should be added for each additional kilogram.
CLEANING AND MAINTENANCE
By ensuring proper cleaning and maintenance of your cooker you can have a significant influence on the continuing fault-free operation of your appliance.
Before you start cleaning, the cooker must be switched off and you should ensure that all knobs are set to the "●" position. Do not start cleaning until the cooker has completely cooled.
Front side of the casting
For cleaning of frontal part of the cooker use the usual cleaning agents and follow the manufacturer's instructions.
Never use any aggressive cleaning agents or dish cleaning accessories which might cause scratches.
Enamel coated and plastic surface
Clean the knobs and handles with soft cloth and liquid cleaners, intended for use of smooth enamel surfaces.

Cooktop
Gas grid, cooking area and burner components should be cleaned with warm water and mild detergent for manual washing of dishes.
Thermal element and ignition device should be cleaned with soft brush. To ensure perfect operation, these elements must always be thoroughly clean.
Clean the crown and the crown cap. Always keep the gas outless nozzles on the burner crown free of dirt.
Upon completion of cleaning wipe all components dry and replace them carefully to their respective slots. Oblique position of components may cause troubled ignition of burners.


Caution!
Crown caps are coated with black enamel. Discoloration of caps, due to high temperatures, is inevitable, but is has no adversary effect on normal operation of burners.

Oven
● The oven should be cleaned after every use. When cleaning the oven the lighting should be switched on to enable you to see the surfaces better
● The oven chamber should only be washed with warm water and a small amount of washing-up liquid.
● After cleaning the oven chamber wipe it dry.

Caution!
Do not use cleaning products containing abrasive materials for the cleaning and maintenance of the glass front panel.
CLEANING AND MAINTENANCE
Replacement of the oven light bulb
Before any maintenance is started involving electrical parts, the appliance must be disconnected from the power supply. If the oven has been in use, let the oven cavity and the heating elements cool down before attempting any maintenance.
Changing the bulb
● Unscrew the protective cover. We recommend that you wash and dry the glass cover at this point.
- Carefully remove the old bulb and insert the new bulb suitable for high temperatures (300°C) having the following specifications: 220-240V, 50Hz, 25W, G9 fitting.
● Refit the protective cover.

IMPORTANT
Never use screwdrivers or other utensils to remove the light cover. This could damage the enamel of the oven or the lampholder. Remove only by hand.
IMPORTANT
Never replace the bulb with bare hands as contamination from your fingers can cause premature failure. Always use a clean cloth or gloves.
Please note:
The bulb replacement is not covered by your guarantee
Door removal
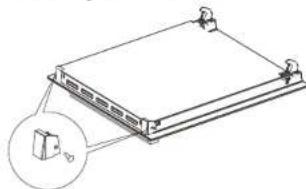
In order to obtain easier access to the oven chamber for cleaning, it is possible to remove the door, to do this, tilt the safety catch part of the hinge upwards, close the door lightly, lift and pull it out towards you, in order to fit the door back on to the cooker, do the inverse. When fitting, ensure that the notch of the hinge is correctly placed on the protrusion of the hinge holder. After the door is fitted to the oven, the safety catch should be carefully lowered down again, if the safety catch is not set it may cause damage to the hinge when closing the door.

natural_image
Diagram of a mechanical device with a magnified inset showing a hand interacting with a component (no text or symbols present)Door removal

natural_image
Technical line drawing of a door frame with directional arrows indicating movement (no text or symbols)Door removal
CLEANING AND MAINTENANCE
Removal of the internal glass panel
Unscrew and unfasten the plastic latch that is in the corner at the top of the door. Next take out the glass from the second blocking mechanism and remove. After cleaning, sert and block the glass panel, and screw in the blocking mechanism.
natural_image
Technical line drawing of a rectangular electronic component with mounting holes and a magnified inset showing a small component (no text or symbols)Removal of the internal glass panel
▷ Regular inspections
Besides keeping the cooker clean, you should:
- Carry out periodic inspections of the control elements and cooking units of the cooker. After the guarantee has expired you should have a technical inspection of the cooker carried out at a service centre at least once every two years.
● Fix any operational faults.
● Carry out periodical maintenance of the cooking units of the cooker.
Caution!
All repairs and regulatory activities should be carried out by the appropriate service centre or by an appropriately authorized fitter.
Turn off at the mains before cleaning.
Before switching on again ensure that all controls are in the off position. Make sure that the oven grill and hobs are sufficiently cool before you start cleaning.
Never mix different cleaning products as different active ingredients may react with unforeseen results.
Ecterior
Use a damp cloth to clean the outside. Never use any sharp instruments, abrasive household cleaner, or detergents for cleaning. For hard stains use suitable washing liquid.
Control panel
Wipe over the control panel with a damp cloth and polish with a dry cloth. Do not use oven cleaners or aerosols, scouring pads or abrasive powder for cleaning the plastic knobs or end caps as damage will occur. Do not attempt to remove any of the control knobs from the panel as this may cause damage and is a safety hazard.
Grill interior
Wipe the grill elements with a damp cloth (ensuring they are sufficiently cool first) to remove any fat spasches. This will prevent fumes from any fat being burned off when the cooker is next used.
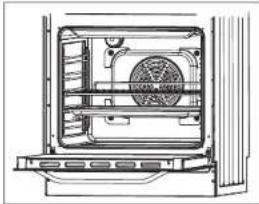
natural_image
Technical line drawing of an open refrigerator with visible fan and door (no text or symbols)Oven interior
Remove the rod shelves for washing in the sink. Use a fine steel wool soap pad for removing stubborn stains from the rod shelves and floor of the oven. Take care during cleaning not to damage, bend or dislodge from the surrounding clips the thermostat sensor which is located at the top right hand side of the oven.
OPERATION IN CASE OF EMERGENCY
In the event of an emergency, you should:
Switch off all working units of the cooker
Disconnect the mains plug
Call the service centre
Some minor faults can be fixed by referring to the instructions given in the table below.
Before calling the customer support centre or the service centre check the following points that are presented in the table.
| REASON ACTION | ||
| Burner flame is not steady. Wrong setting of gas. Expert should set the gas escape | ||
| Bumer flame suddenly changes | ncorrect assembly of burner components. | Assemble the burner components correctly! |
| The flame goes off after ignition. | Early release of control button. Control button is not pushed in firmly. | Keep the button pressed longer. Before releasing the button, give it one final solid push. |
| The color of the cooking zone | Normal situation, caused by the high temperature. | Clean the grid with metal cleaning agents. |
| Electric operations are generally | Fuse is burned. Check the fuse in the fuse box, and replace if required. | |
| Electric ignition of burners does | Food residues or detergent block the contact between the ignition device and the burner. | Open and clean carefully the opening between the ignition device and the burner. |
| Bumer crown caps look ugly. Usual staining. Clean the crown cap with metal cleaning agents. | ||
| Dew forms at oven door glass | Normal situation, caused by the temperature difference. | No remedy; it does not impede normal operation. |
| Roasting temperature too high | Reduce roasting temperature...if you detect | |
| Thermostat failure. Experts should replace the thermostat. | ||
| Oven is excessively stained | Roasting temperature is too high.Grid rack and grease tray are incorrectly placed. | Reduce the roasting temperature, Place the grid above the grease tray and insert them both in the guide. |
| Liquid or pastry dough is lifted to | The appliance is not leveled. | Level the appliance into horizontal position by setting the adjustable legs. |
| Baking results are disappointing. | Wrong oven setting. | Select correct oven setting according to the instructions from the baking tables. |
| Flat cake is too light from below. | Baking pan was placed in top of roasting pan. | Place the baking tray upon the grid rack. |
| Temperature is too low.Baking time too long. | Set higher oven temperature duce baking time. | |
| Pastry is slippery, smeary and mellow. Meat is rare in the | Baking temperature is too high.Roasting time is too short.Excessive quantity of liquid in dough. | Reduce the temperature - baking time may not be reduce d by setting higher temperature (roasted from the outside. raw from the inside) select longer baking time, let the dough rise longer.Add less liquid to the dough. |
smoke during
TECHNICAL INFORMATION
| Type | AFGG54EG |
| Dimensions:height/width/depth(mm)Gas inlet: right rear 150mm from top | 900/540/600 |
Injector Table
| Upright | Burner | Gas type | Injector Size(mm) | TPP (kPa) | NGC (MJ/h) |
| 540mm | Auxiliary | Natural gas | 0.87 | 1.0 | 3.6 |
| Semi-rapid | 1.10 | 6.3 | |||
| Wok | 1.65 | 12.6 | |||
| Oven | 1.39 | 10.8 | |||
| Auxiliary | Universal LPG | 0.53 | 2.75 | 3.6 | |
| Semi-rapid | 0.68 | 6.3 | |||
| Wok | 0.95 | 12.6 | |||
| Oven | 0.89 | 10.8 |
Total Gas Consumption
540mm
Natural gas 28.8MJ/h - Universal LPG 28.3MJ/h

ARTUSI
THE ART OF LIVING
Worldwide Appliances Pty Limited
A.B.N. 45868077422
Office:
48-50 Moore Street, Leichhardt N.S.W 2040 Post:
Locked Bag 3000, Annandale, N.S.W 2038
P: 1300 694 583
WARRANTY REGISTRATION
Your ongoing satisfaction with your artusi product is important to us. We ask that you complete the enclosed Warranty Registration Card and return it to us so that we have a record of the artusi product purchased by you.
PRIVACY
Worldwide Appliances respects your privacy and is committed to handling your personal information in accordance with the National Privacy Principles and the Privacy Act 1988 (Cth). A copy of the Worldwide Appliances Privacy Policy is available at www.artusi.com.au. Worldwide Appliances will not disclose any personal information set out in the Warranty Registration Card (“Personal Information”) without your consent unless required by:
-
law;
-
any Worldwide Appliances related company;
- any service provider which provide services to artusi or assist artusi in providing services (including repair and warranty services) to customers. Our purpose in collecting the Personal Information is
to keep a record of the artusi product purchased by you, in order to provide a better warranty service to you in the unlikely event that there is a problem with your artusi product. Worldwide Appliances may contact you at any one or more of the address, email address or telephone numbers set out in the Warranty Registration
Card. Please contact artusi on 1300 694 583 should you not wish to be contacted by Worldwide Appliances.
WARRANTY
1. Warranty
Worldwide Appliances warrants that each artusi product will remain, for a period of either 12 months or 24 months of warranty. All Warranties are valid from the original date of purchase, And warranty claims must be accompanied by the proof of purchase.
24 months warranty products:
All Built-in Appliances – Limited to Ovens, Gas, Induction and Electric Cooktops, and All Rangehoods
Freestanding Cookers - Gas and Electric Models (900mm Width)
Dishwashers - Freestanding, Fully Integrated, Semi Integrated and built-in
12 months warranty products:
Freestanding Cookers - Gas and Electric Models in 50cm, 54cm and 60cm Widths
Portable Appliances* – Benchtop Models and Portable Gas Models
- What is not Covered by the Warranty.
The Warranty does not apply if an artusi product is defective by a factor other than a defect arising in the manufacture of the artusi product, including but not limited to:
(a) damage through misuse (including failure to maintain, service or use with proper care), neglect, accident or ordinary wear and tear (including deterioration of parts and accessories and glass breakage);
(b) use for purpose for which the artusi product was not sold or designed;
(c) use or installation which is not in accordance with any specified instructions for use or installation;
(d) use or operation after a defect has occurred or been discovered;
(e) damage through freight, transportation or
handling in transit (other than when Worldwide Appliances is responsible);
(f) damage through exposure to chemicals, dusts, residues, excessive voltage, heat, atmospheric conditions or other forces or environmental factors outside the control or Worldwide Appliances;
(g) repair, modification or tampering by the purchaser or any person other than Worldwide Appliances, an employee of Worldwide Appliances or an authorised artusi service contractor ^* ;
(h) use of parts, components or accessories which have not been supplied or specifically approved by artusi.
(i) damage to surface coatings caused by cleaning or maintenance using products not recommended in the artusi product handbook provided to the purchaser upon purchase of the artusi product;
(j) damage to the base of an electric oven due to items having been placed on the base of the oven cavity or covering the base, such as aluminium foil (this impedes the transfer of heat from the element to the oven cavity and can result in irreparable damage); or
(k) damages, dents or other cosmetic imperfections not affecting the performance of the artusi in respect of an artusi product purchased as a “factory second” or from display The Warranty does not extend to light globes used in artusi products.
- Domestic Use
Each artusi product is made for domestic use. This Warranty may not extend to artusi products used for commercial purposes.
- Time for Claim under the Warranty
You must make any claim under this Warranty within twenty eight (28) days after the occurrence of an event which gives rise to a claim pursuant to the Warranty, by booking a service call on the telephone number below.
Continued over...
5. Proof of Purchase
Customers must retain proof of purchase in order to be eligible to make a warranty claim in respect of an artusi product.
6. Claiming under the Warranty
Customers will bear the cost of claiming under this Warranty unless Worldwide Appliances determines the expenses are reasonable, in which case the customer must claim those expenses by providing written evidence of each expense to Worldwide Appliances at the address on the Warranty Registration Card.
7. Statutory Rights
(a) These terms and conditions do not affect your statutory rights.
(b) The limitations on the Warranty set out in this document do not exclude or limit the application of the consumer guarantees set out in the Act or any other equivalent or corresponding legislation in the relevant jurisdiction where to do so would:
(i) contravene the law of the relevant jurisdiction; or
(ii) cause any part of the Warranty to be void.
(c) Worldwide Appliances excludes indirect or consequential loss of any kind (including, without limitation, loss of use of the artusi product) and (other than expressly provided for in these terms and conditions) subject to all terms,
conditions and warranties implied by custom, the general law, the Act or other statute.
(d) The liability of Worldwide Appliances to you for a breach of any express or non-excludable implied term, condition or warranty is limited at the option of Worldwide Appliances to:
(i) replacing or repairing the defective part of the artusi product;
(ii) paying the cost of replacing or repairing the defective part of the artusi product;
(iii) replacing the artusi product; or
(iv) paying the cost of replacing the artusi product.
(e) Our goods come with guarantees that cannot be excluded under the Australian Consumer
Law. You are entitled to a replacement or refund for a major failure and for compensation for any other reasonably foreseeable loss or damage. You are also entitled to have the goods repaired or replaced if the goods fail to be of acceptable quality and the failure does not amount to a
major failure.
8. Defects
Any part of an artusi product deemed to be defective and replaced by Worldwide Appliances is the property of Worldwide Appliances. Worldwide Appliances reserves the right to inspect and test artusi products in order to determine the extent of any defect and the validity of a claim under the Warranty.
*To locate your closest artusi authorised service agent please contact us on 1300 652 100 or visit www.artusi.com.au
ALL SERVICE CALLS MUST BE BOOKED THROUGH AN AUTHORISED DEALER OR WARRANTY DEPARTMENT ON 1300 652 100 OR stokesaps.com.au/artusi-
service
01032014

ARTUSI
THE ART OF LIVING
Warranty Card tear off
WARRANTY REGISTRATION CARD
01052013
Please complete and send to ARTUSI at: REPLY PAID 83617 LEICHHARDT NSW 2040
| Last Name: First Name: | ||
| Address: | ||
| State: Postcode: Email: | ||
| Home Phone: Mobile: | ||
| Purchase Date: / / (Please attach proof of purchase to validate warranty) | ||
| MODEL NUMBER | SERIAL NUMBER(if you cannot locate the serial number please call ARTUSI on 1300 694 583) | |
| 1 | ||
| 2 | ||
| 3 | ||
| 4 | ||
01032014

ARTUSI
THE ART OF COOKING
DISCLAIMER
Worldwide Appliances PTY LTD, trading as ARTUSI, is continually seeking ways to improve the design specifications, aesthetics and production techniques of its products. As a result alterations to our products and designs take place continually. Whilst every effort is made to produce information and literature that is up to date, this brochure should not be regarded as an infallible guide to the current specifications, nor does it constitute an offer for the sale of any particular product. Product dimensions indicated in our literature is indicative only. Actual product only should be used to define dimension cutouts. Distributors, and retailers are not agents of ARTUSI and are not authorised to bind ARTUSI by any express or implied undertaking or representation.
ARTUS OFFICES ARE OPEN DAILY FROM 9AM-5PM AND SATURDAYS 10AM-4PM
NSW & ACT (HEAD OFFICE)
46 50 MOORE STREET
LEICHARDT
FO285694699
VIC TAS & SA
121 TOORAK ROAD
CAMBERWELL
F0398092155
OLD
1/42 CAVENDISI ROAD
COOPAROC
F0733970850
WA&NT
UNIT 10/55 HOWE STREET
OSBORNE PARK
F099201988
NZ
PO BOX 11160
SOCKBURN CHRISTCHURCH
F033445906
P:1300649583
ARTUSI.COM.AU