
CAO600X - Oven Artusi - Free user manual and instructions
Find the device manual for free CAO600X Artusi in PDF.


| Product Type | Built-in Electric Oven |
| Brand | Artusi |
| Model | CAO600X |
| Overall Dimensions (H x W x D) | 595 x 595 x 550 mm (approx.) |
| Cutout Dimensions (H x W x D) | 585 x 560 x 550 mm (approx.) |
| Power Supply | 220-240V, 50Hz |
| Total Power | 2000 W |
| Upper Heater Power | 850 W |
| Grill Heater Power | 1100 W |
| Lower Heater Power | 1150 W |
| Circular Heater Power | 2000 W |
| Oven Functions | Top and bottom heat, fan forced, grill, fan grill, defrost, oven light |
| Timer Type | Mechanical timer (up to 120 min) |
| Temperature Range | 50°C - 250°C (approx.) |
| Number of Shelf Levels | 5 |
| Door Removal | Yes, for cleaning |
| Oven Light Bulb | 25W, G9 fitting, 300°C resistant |
| Cleaning Method | Manual cleaning; steam cleaning function (250 ml water, 100°C, 30 min) |
| Safety Features | Child safety lock not mentioned; residual heat warning; automatic shut-off with timer |
| Warranty | 24 months for built-in ovens (domestic use) |
Frequently Asked Questions - CAO600X Artusi
User questions about CAO600X Artusi
0 question about this device. Answer the ones you know or ask your own.
Ask a new question about this device
Download the instructions for your Oven in PDF format for free! Find your manual CAO600X - Artusi and take your electronic device back in hand. On this page are published all the documents necessary for the use of your device. CAO600X by Artusi.
USER MANUAL CAO600X Artusi

ARTUSI
THE ART OF LIVING
AO6O1, AO6O1X/1, CAO6X, CAO6OO
OPERATION MANUAL
Congratulations, you are now the proud owner of an ARTUSI cooking appliance. Thank you for purchasing ARTUSI and welcome to the ARTUSI Family.
This instruction manual has been specially created to inform you of the full range of features your ARTUSI appliance has to offer and serves as an introduction to getting the very best out of your ARTUSI appliance.
We present detailed information on each of the features your ARTUSI appliance consists of. Once you have read this section you will be able to choose the most appropriate settings for your appliance when cooking different types of food.
We ask you to read the instructions in this booklet very carefully as this will allow you to get the best results from using your appliance. KEEP THE DOCUMENTATION OF THIS PRODUCT FOR FUTURE REFERENCE.
Dear Artusi Customer, please read this user manual carefully before using the product and, keep it permanently at your disposal.
Note: This user manual is prepared for more than one model. Some of the features specified in this Manual may not be available on your appliance. All our appliances are only for domestic use, not for commercial use. Products marked with (*) are optional.
"THIS APPLIANCE SHALL BE INSTALLED IN ACCORDANCE WITH THE REGULATIONS FORCE AND ONLY USED IN A WELL VENTILATED SPACE. READ THE INSTRUCTIONS BEFORE INSTALLING OR USING THIS APPLIANCE"
"Conforms with the WEEE Regulations."
TO REGISTER YOUR PRODUCT WITH ARTUSI, PLEASE FILL OUT THE WARRANTY CARD AT THE END OF THIS BOOKLET AND POST IT TO: REPLY PAID 83617
LEICHHARDT NSW 2040

ARTUSI
THE ART OF LIVING
SAFETY INSTRUCTIONS
● The appliance becomes very hot during operation. Take care not to touch the heating elements inside the oven.
● WARNING: Accessible parts may become hot during use. To avoid burns young children should be kept away.
● Mains lead of adjacent appliances may be damaged by hobs or stuct between the oven doors, and produce short circuit, therefore keep them at safe distance from the appliance.
● Never put pans weighing over 15kg on the opeded door of the oven.
- Do not use the oven in the event of a technical fault, once a technical fault caused, disconnect the power and report the fault to the service center to be repaired.
● Never clean the oven with the high-pressure steam cleaning device, as it may provoke short circuit.
- Do not use harsh abrasive cleaners or sharp metal scrapers to clean the door glass as they can scatch the surface, which could then result in the glass shattering.
● The rules and provisions contained in this instruction manual should be strictly observed. Do not allow anybody who is not familiar with the contents of this instruction manual to operate the oven.
● During use the appliance becomes hot, care should be taken to avoid touching heating elements inside the oven.
- If the supply cord is damaged, it must be replaced by the manufacturer, its service agent or similarly qualified persons in order to avoid a hazard.
● The appliance is not entened for use by persons (including children) with reduced physical, sensory or mental capabilities, or lack of experience and knowledge, unless they have been given supervision or instruction concerning use of the appliance by a person responsible for their safety.
● Children should be supervised to ensure that they do not play with the appliance.
● WARNING: Ensure that the appliance is switched off before replacing the lamp to avoid the possibility of electric shock.
● WARNING: Accessible parts may become hot during use. To avoid burns young children should be kept away.
● WARNING: The appliance and its accessible parts become hot during use.
● Care should be taken to avoid touching heating elements.
● Children less than 8 years of age shall be kept away unless continuously supervised.
- This appliance can be used by children aged from 8 years and above and persons with reduced physical, sensory or mental capabilities or lack of experience and knowledge if they have been given supervision or instruction concerning use of the appliance in a safe way and understand the hazards involved. Cleaning and user maintenance shall not be made by children without supervision.
● WARNING: Accessible parts may become hot during use.
● Young children should be kept away
● During use the appliance becomes hot. Care should be taken to avoid touching heating elements inside the oven
HOW TO SAVE ENERGY

Using energy in a responsible way not only saves money but also helps the environment.
So let's save energy! And this is how you can do it:
● Make use of residual heat from the oven. If the cooking time is greater than 40 minutes, switch off the oven 10 minutes before the end time. Important when using the timer, set appropriately shorter cooking times according to the dish being prepared.
● Make sure the oven door is properly closed. Heat can leak through spillages on the door seals. Clean up any spillages immediately.
- Do not install the oven in the direct vicinity of refrigerators/freezers. Otherwise energy consumption increases unnecessarily.
UNPACKING

During transportation, protective packaging was used to protect the appliance against any damage.
After unpacking, please dispose of all elements of packaging in a way that will not cause damage to the environment. All materials used for packaging the appliance are environmentally friendly; they are 100% recyclable and are marked with the appropriate symbol.
Caution!
During unpacking, the packaging materials (polythene bags, polystyrene pieces, etc.) should be kept out of reach of children.
DISPOSAL OF THE APPLIANCE
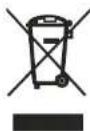
Old appliances should not simply be disposed of with normal household waste, but should be delivered to a collection and recycling centre for electric and electronic equipment.
A symbol shown on the product, the instruction manual or the packaging shows that it is suitable for recycling.
Materials used inside the appliance are recyclable and are labeled with information concerning this. By recycling materials or other parts from used devices you are making a significant contribution to the protection of our environment.
Information on appropriate disposal centers for used devices can be provided by your local authority.
DESCRIPTION OF THE APPLIANCE
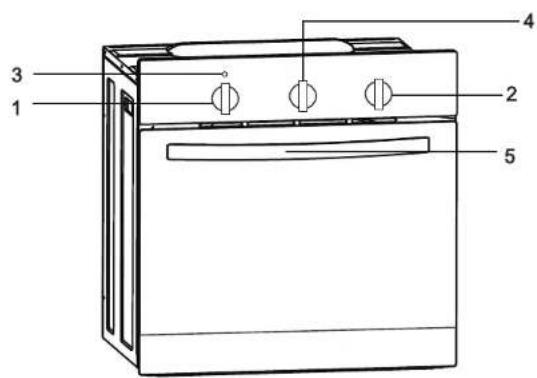
1 Temperature control knob
2 Oven function selection knob
3 Oven temperature indicator
4 Mechanical timer
5 Oven door handle
6 Electronic programmer
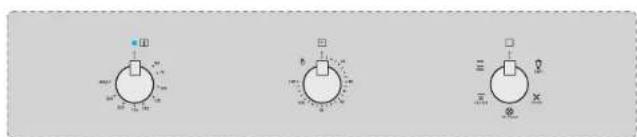
CAO6X
DESCRIPTION OF THE APPLIANCE
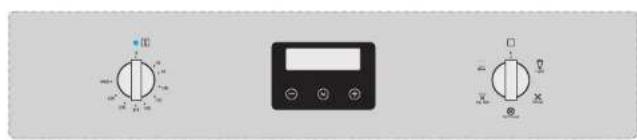
AO601X
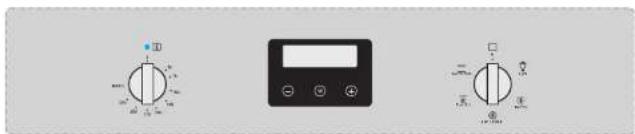
AO601X/1
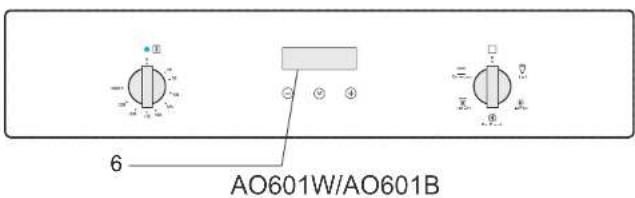
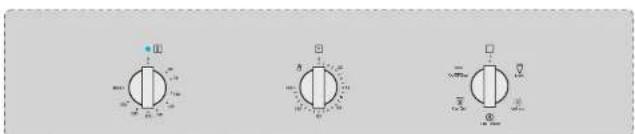
CAO600X/CAO600B/CAO600W
INSTALLATION
Installing the oven
● The kitchen should be dry and have effective ventilation according to the existing technical provisions.
- Main lead behind the oven must be placed in such manner to avoid touching the back panel of the oven because of the heat it develops during operation.
- Remove any packaging materials (foils, artificial foam, nails, etc.) from the reach of children, because they represent potential danger. Children may swallow small parts, or suffocate with foils.
This is a built-in oven, which means that its back wall and one side wall can be placed next to a high piece of furniture or a wall. Coating or veneer used on fitted furniture must be applied with a heat resistant adhesive (100°C). This prevents surface deformation or detachment of the coating. If you are unsure of your furniture's heat resistance, you should leave approximately 2cm of free space around the oven. The wall behind the oven should be resistant to high temperatures. During operation, its back side can warm up to around 50°C above the ambient temperature
● Make an opening with the dimensions given in the diagram for the oven to be fitted.
● The appliance must be earthed.
- Insert the oven completely into the opening without allowing the four screws in the places shown in the diagram to fall out.
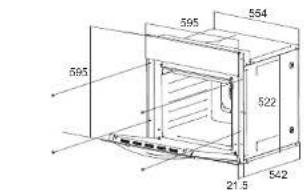
CAO6X, AO601X
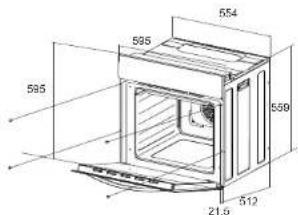
AO601X/1, AO601W, AO601B CAO600X, CAO600W, CAO600B
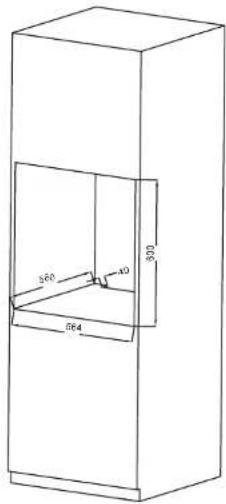
INSTALLATION
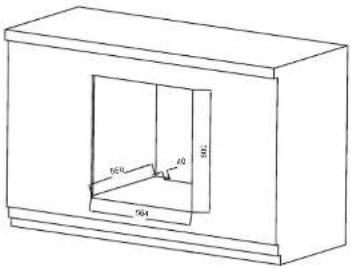
Electrical connection
Warning!
All electrical work must be carried out by a suitably qualified and authorized electrician. No alterations or willful changes in the electricity supply should be carried out.
● Before attempting the connection, check whether the voltage indicated on the rating plate corresponds to the actual mains voltage.
● Mains lead should be minimum1.5m long.
● Earthing wire should be installed in such manner to be the last one pulled out in case the safety relief device of the mains lead should fail.
● Mains lead behind the oven must be placed in such manner to avoid touching the back panel of the oven because of the heat it develops during operation.
- The cable of correct size rating must be used cable type H05VV-F 3× 1.5m m ^2 . the grounding wire shall be longer than the other wires.
● The means for disconnection from the supply mains having a contact separation in all poles that provide full disconnection under over voltage fixed wiring in accordance with the
Connection (by authorised electrician)
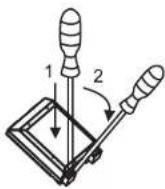
- Using the screwdriver open the connector cover at the rear of the appliance. Release two locks located at either side of the connector bottom.
● Mains lead must be led through the relief safety device, protecting the
● Tighten the relief device securely and close the connector cover.
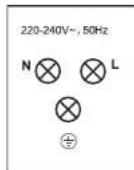
Colour code
L = exterior live wires, usually ycoloured black, brown.
N=neutral
The colour is usually blue.
Beware of the correct N-connection!

E = earthing wire, the colour is yellow.
OPERATION
Prior first use
- Remove packaging, clean the interior of the oven.
● Take out and wash the oven fittings with warm water and a little washing-up liquid. - Switch on the ventilation in the room or open a window.
● Heat the oven (to a temperature of 250^ C, for approx. 30 min.), remove any stains and wash carefully.
Caution!
When heat the oven for the first time, it is normal phenomenon to give off smoke and peculiar smell. This will disappear about 30 min later.
Electronic programmer
(Only for AO601X, AO601X/1, AO601W, AO601B)
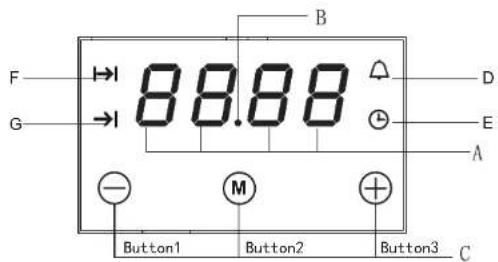
A - Display field
B - Seconds Icon
C-Buttons
D - Timer
E - Current time
F - Cooking time
G - End of cooking time
M - Function
- To decrease the numbers on the digital display
⊕ - To increase the numbers on the digital display
OPERATION
Setting the time
- At power on, "displayed and ⏻ flashes.
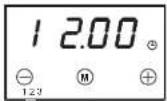
- The current time can be set with button 1 and 3, 5 seconds after the time has been set, the new data will be saved.
Timer
The timer can be activated at any time and any function. The timer can be set from 1 minute to 23 hours and 59 minutes.
To set the timer you should:
- Press button 2, flashing △. Enter the timer setting.
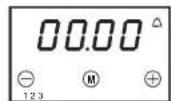
- Set the timer using buttons 1 and 3.
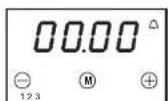
- 5 seconds after the time is set, or directly press the button 2, the signal function is on. your setting is saved.
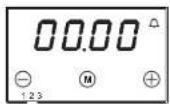
- When the set time is up the alarm signal will be activated and the signal function starts flashing again.
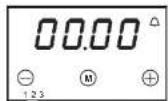
- Press any button, the signal function and alarm signal will go off. Or the alarm signal will be turned off automatically after 2 minutes.
OPERATION
Caution!
Besides timer alarm, any other alarms can be turned off by pressing any button, If the alarm signal is not turned off manually, it will be turned off automatically after 2 minutes.
Semi-automatic operation
If the oven is to be switched off at a given time, or after defined period, you should:
- Set the oven function knob and the temperature regulator knob to the setting at which you want the oven to operate.
- Press the function button, the oven will begin to work and the function signal flashing.
- Press button 1 or 3 to adjust the cooking time, within a range from 1 minute to 10 hours.
- Or press button "MODE" twice, then the display will show flashing →|. Set the end time by buttons 1 and 3.
- The set time is introduced to the memory after 5 seconds.
- When the set time passed, the oven is switched off automatically, the alarm is activated.
- Press any button, the alarm signal and the |→| icon go off, will Or the alarm turned signal will be off automatically after 2 minutes.
Caution!
- The cooking time and end of cooking time range: Cooking time range: 0 < t ≤ 10 hours End of cooking time range: current time < end of cooking time ≤ current time + 10 hours End of cooking time = current time + cooking time
- When using the semi-automatic operation, set either the cooking time or the end of cooking time.
- If you set the cooking time to 0 or set the end of cooking time to the current time, the auto function will be off.
● After the auto function be off, the cooking time to 0, end of cooking time and current time remains the same.
For example:
The current time is 2:00, want to oven work of 3 hours, end of cooking time is set to be 5:00 (2:00+3:00 = 5:00).
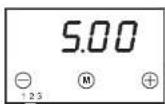
There are two methods to achieve this setting:
First method:
- Set the cooking time using buttons 1 and 3.
OPERATION
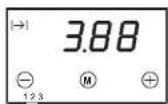
- End of cooking time automatically change to 5:00.
Second method:
- Set the end of cooking time using buttons 1 and 3.
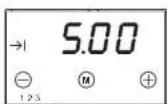
- Cooking time automatically change to 3:00. 5 seconds after the setting, the auto function is on. 3 hours later, the current time shows "5.00" The alarm signal is activated.
Automatic operation
If the oven is to be switched on for a specified period of time and switched off at a fixed hour then you should set the cooking time and the end of cooking time:
- Set the oven function knob and the temperature regulator knob to the setting at which you want the oven to operate.
- Press, button2e oven will begin to work and the function signal flashing.
- Press button 1 or 3 to adjust the cook time, within a range from 1 minute to 10 hours.
- And press button 2. then the display will show flashing → | Set the cooking time using buttons 1 and 3.
- The set time is introduced to the memory after 5 seconds, the | and | always on.
- When the set time passed, the oven is switched off automatically, the alarm is activated, and the || will go off.
- Press any button, the alarm signal and the →| icon go off, will Orthe alarm turned signal will be off automatically after 2 minutes.
OPERATION
Caution!
● Work time = end of cooking time-cooking time
For example:
If the current time is 2:00; cooking time set to be 3 hours; end of cooking time set to be 10:00, the work time will be 7:00 (7:00=10:00-3:00).
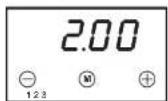
- Set the cooking time to be 3.00" with buttons 1 and 3.
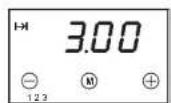
- Set the end of cooking time. time to be "10.00" with buttons 1 and 3.
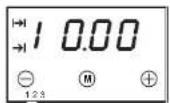
- 5 seconds after setting, the auto function is on.
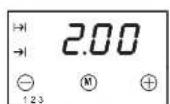
- When it up to 7:00, the oven will begin to work.
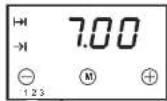
- When it up to 10:00, the alarm signal is activated. The oven is switched off automatically.
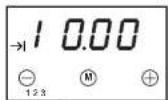
● End of cooking time > current time + cooking time <= 10 hours
- At least more than one minute cooking time, cooking time and end of cooking time must be set.
- If the cooking time set to be 0 or the end of cooking time set to be the current time, the auto function will be off.
● After the auto function be off, the cooking time to 0, end of cooking time and current time remains the same.
OPERATION

Mechanical timer
(Only for CAO6X, CAO600X, CAO600B, CAO600W)
When using the oven, you must set food cooking time.
- Turn mechanical timer to the time
position you want.

- Turn function knob to the function
position you want.

- Turn temperature knob to the
temperature position you want.

-
After above operation, oven knob runs normally.
-
When oven works till pre-set time, timer will have sound which means the cooking is finished.
If you don't want the oven work controlled by the mechanical timer you can turn the mechanical timer to
the position

Caution!
Don't turn mechanical timer in a clockwise way front 120 to " ☐".

Oven
Oven is controlled by the function knob and the temperature control knob.
Caution!
When selecting any heating function (switching a heater on etc.) the oven will be switched on only after the temperature has been set by the temperature control knob.
Possible settings of the oven function knob

Separate oven lighting
By setting the knob to this position the lighting inside the oven is switched on

Bottom and top element on
Setting the knob to this position allows the oven to be heated conventionally.

Fan(Defrost)
Defrost
At this function, the fan only works. You can cool the dish or the oven chamber or defrost food.

Fan grill
Air movement inside the oven softens the intense heat of the grill, optimal for the cooking of thick cuts of meat, for example.

Fan forced
Fan Forced
A heating element around the fan enables the most uniform heating possible. This mode minimises preheating time, and is also the best for cooking several different types of food at once.
OPERATION
Caution!
When the functions with fan have been selected but the temperature knob is set to zero only the fan will be on.
With this function you can cool the dish or the oven chamber.
Oven guide levels
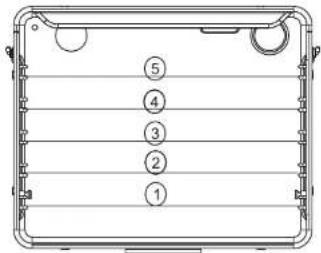
Baking pans and accessories (oven grid, baking tray, etc) may be inserted into the oven in 5 guiding levels. Appropriate levels are indicated in the tables that follow. Always count levels from the bottom upwards!
CLEANING AND MAINTENANCE
By ensuring proper cleaning and maintenance of your oven you can have a significant influence on the continuing fault-free operation of your appliance.
Before you start cleaning, the oven must be switched off and you should ensure that all knobs are set to the "0" position. Do not start cleaning until the oven has completely cooled.
Caution!
Do not use cleaning products containing abrasive materials for the cleaning and maintenance of the glass front panel.
▷ Oven cleaning
● The oven should be cleaned after every time use.
● Cool the oven completely before cleaning.
● Never clean the appliance with pressurized hot steam cleaned.
● The oven chamber should only be washed with warm water and a small amount of washing up liquid.
Steam cleaning
-pour 250m | of water (1 glass) into a bowl placed in the oven on the first level from the bottom.
Close the oven door.
- Set the temperature knob to 100°C, and the function knob to the bottom heater position.
- Heat the oven chamber for approximately 30 minutes. - Open the oven door, wipe the chamber inside with a cloth or sponge and wash using warm water with washing-up liquid.
● After cleaning the oven chamber wipe it dry.
CLEANING AND MAINTENANCE

Replacement of the oven light Bulb
Before any maintenance is started involving electrical parts, the appliance must be disconnected from the power supply. If the oven has been in use, let the oven cavity and the heating elements cool down before attempting any maintenance.
Changing the bulb
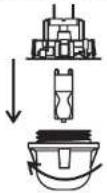
● Unscrew the protective cover. We recommend that you wash and dry the glass cover at this point.
- Carefully remove the old bulb and insert the new bulb suitable for high temperatures (300°C) having the following specifications: 220-240V, 50Hz, 25W, G9 fitting.
● Refit the protective cover.
IMPORTANT
Never use screwdrivers or other utensils to remove the light cover. This could damage the enamel of the oven or the lampholder. Remove only by hand.
IMPORTANT
Never replace the bulb with bare hands as contamination from your fingers can cause premature failure. Always use a clean cloth or gloves.
Please note:
The bulb replacement is not covered by your guarantee

Door removal
In order to obtain easier access to the oven chamber for cleaning, it is possible to remove the door.
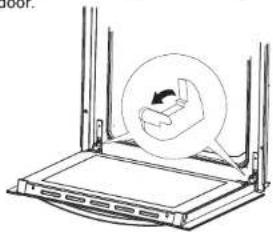
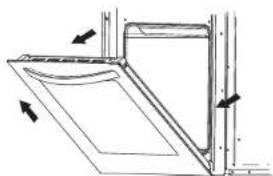
To do this, tilt the safety catch part of the hinge upwards. Close the door lightly, lift and pull it out towards you. In order to fit the door back on to the cooker, do the inverse. When fitting, ensure that the notch of the hinge is correctly placed on the protrusion of the hinge holder. After the door is fitted to the oven, the safety catch should be carefully lowered down again. If the safety catch is not set it may cause damage to the hinge when closing the door.
natural_image
Diagram of a device with a magnified inset showing a hand interacting with a screen (no text or symbols)Tilting the hinge safety catches
natural_image
Technical line drawing of a door frame with arrows indicating direction (no text or symbols)Door removal
CLEANING AND MAINTENANCE

Removal of the internal glass panel
Unscrew and unfasten the plastic latch that is in the corner at the top of the door. Next take out the glass from the second blocking mechanism and remove. After cleaning, insert and block the glass panel, and screw in the blocking mechanism.
(Only for CAO6X, AO601X)
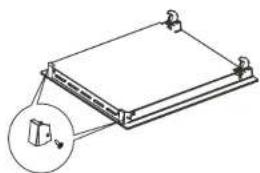
natural_image
Technical line drawing of a mechanical assembly with a magnified inset showing a component (no text or symbols)Removal of the internal glass panel
(Only for AO601W, AO601B, AO601X/1 CAO600W, CAO600B, CAO600X)
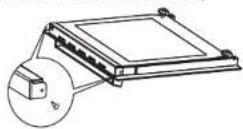
Removal of the internal glass panel
OPERATION IN CASE OF EMERGENCY
In the event of an emergency, you should:
● Switch off all working units of the oven
- Call the service centre
- Some minor faults can be fixed by referring to the instructions given in the table below. Before calling the customer support centre or the service centre check the following points that are presented in the table.
| PROBLEM | REASON | ACTION |
| 1. The appliance does not work. | Break in power supply. | Check the household fuse box; if there is a blown fuse replace it with a new one |
| 2. The programmer display is flashing “12.00”. | The appliance was disconnected from the mains or there was a temporary power cut. | Set the current time (see Use of the programmer) |
| 3. The oven light does not work. | The bulb is loose or damaged. | Tighten up or replace the blown bulb (see Cleaning and Maintenance) |
BAKING IN THE OVEN
Baking pastry
Most appropriate position for baking is the application of both upper and lower heater, or the hot air.
Warning!
- The baking parameters given in Tables are approximate and can be corrected based on your own experience and cooking preferences;
- In case you may not find any particular type of cake in the tables, use the information available for the next most similar type of cake.
Baking with upper and lower heaters
• Use only a single guide level.
- This baking position is especially suitable for baking dry pastry, bread and teacakes. Use dark baking pans. Light pans reflect heat and pastry is not adequately browned.
• Always place baking pans on the grid rack. Remove the grid only of baking in the flat biscuit tray, supplied with the appliance
- Preheating shortens the baking time. Do not put the cake in the oven until proper temperature is obtained.
Baking tips
Is pastry baked?
Pierce the cake with a wooden peg at the thickest part, if the dough does not stick to it, the cake is baked. You may switch off the oven and use the remaining heat.
Pastry has fallen
Check the recipe Use less fluid next time Follow the mixing times, especially when using powered kitchen mixers.
Pastry is too light below
Use dark baking pan next time, or place the pan one level lower, or switch on the lower heater a while before the completion.
Cheese cake is undercooked
Next time reduce the baking temperature and extend the baking time.
Warnings regarding the baking tables
- The tables indicate the temperature range. Always select lower temperature first. You may always increase the temperature in case pastry needs more baking.
● Baking times are indicative only. They may vary in dependence of individual characteristics.
● The asterix indicates that the oven requires preheating.
BAKING IN THE OVEN
Baking Table
| Type of pastry | Guide level from down upwards) | Temp(°C) Fan Forced | Baking time (in min.) |
| Sponge cake/marble cake | 2 | 150-170 | 60-80 |
| Victoria sponge | 2 | 150-170 | 65-80 |
| Base for a layer cake | 2-3 | 150-170 | 20-30 |
| Sponge layer cake | 30-40 | ||
| Fruit cake(crispy base) | 2-3 | 160-180 | 60-70 |
| Cheesecake(shortcrust) | 2 | 140-150 | 60-90 |
| Teacake | 2 | 150-170 | 40-60 |
| Bread(e.g. wholegrain bread) | 2 | 150-170 | 50-60 |
| Fruit cake(crispy base) | 2 | 160-200 | 35-60 |
| Fruit cake(with yeast) | 2 | 160-170 | 30-50 |
| Crumble cake | 150-170 | 30-40 | |
| Sponge roll | 10-15 | ||
| Pizza(thin base) | 10-15 | ||
| Pizza(thick base) | 30-50 | ||
| Puff pastry | 2 | 170-190 | 18-25 |
| Meringues | 80-90 | ||
| Choux buns | 2 | 170-190 | 35-45 |
BAKING IN THE OVEN
Roasting
Best results are obtained with the engagement of both upper and lower. Best heating mode for each type of roasting pan is indicated by bold print in the Roasting Tables.
Tips regarding roasting pans
- Use light enamel pans, temperature resistant glass pans, clay dishes or wrought iron dishes.
- Stainless steel dishes are not recommendable because they excessively reflect heat.
- Cover your roast or wrap it in foil. It will preserve its juice and the oven will remain cleaner.
- If you leave the pan uncovered the roast will be cooked sooner. Roast large chunks of meat directly on the grid, with intercepting pan underneath.
Attention when roasting!
Roasting tables indicate suggested temperatures, guide level and roasting times. Roasting time largely depends upon the type of meat, its size and quality. So you may expect some variations
- Roasting of large chunks of meat may produce excessive steaming and dew formation at the oven door. This is quite normal, and does not affect the operation of the oven. However, after the completion of roasting wipe the oven door and the glass thoroughly.
- Roasting of red meat, poultry and fish is rational if the roast exceeds one kilogram in size.
- Add as much liquid as necessary to prevent burning of juice, dripping from neat. Roast must be surveyed at all times. And liquid added if necessary.
- At approximately the middle of the indicated time turn the roast round, especially if you use the deep roast dish.
- When roasting on the grill grid, place the grid in the deep roasting pan and insert both into the sliding guide. The bottom pan will intercept dripping fat.
● Never leave roast to cool in the oven, as it might produce dew and corrosion of the oven.
BAKING IN THE OVEN
Roasting table
| Type of meat | Guide level (from bottom up) | temp (°C)Fan Forced | Roasting time (in min.) |
| Beef | per 1 cm | ||
| Roast beef or fille rare | 3 | 250 | 12 -15 |
| oven warmed up juicy("medium") | 3 | 250 | 15 -25 |
| oven warmed up "well done" | 3 | 210-230 | 25-30 |
| oven warmed up Roast joint | 2 | 200-220 | 120-140 |
| Pork | |||
| Roast joint | 2 | 200-210 | 90-140 |
| Ham | 2 | 200-210 | 60 -90 |
| Fillet | 3 | 210-230 | 25 -30 |
| VEAL | 2 | 200-210 | 90 -120 |
| LAMB | 2 | 200-220 | 100-120 |
| VENISON | 2 | 200-220 | 100-120 |
| POULTRY | |||
| Chicken | 2 | 220-250 | 50 -80 |
| Goose(approx.2kg) | 2 | 190-200 | 150-180 |
| FISH | 2 | 210-220 | 50 -80 |
| Model | AO601BAO601WAO601XAO601X/1 CAO600XÇAO600BCA0600WCAP6X |
| Voltage ratly | 220-240V 50Hz |
| Total power | 2000W |
| Upper heater | 850W |
| Gill heater | 1100W |
| Lower heater | 1150W |
| Circular heater | 2000W |
| fan | ● |

ARTUSI
THE ART OF LIVING
Worldwide Appliances Pty Limited
A.B.N. 45868077422
Office:
48-50 Moore Street, Leichhardt N.S.W 2040
Post:
Locked Bag 3000, Annandale, N.S.W 2038
P: 1300 694 583
WARRANTY REGISTRATION
Your ongoing satisfaction with your artusi product is important to us. We ask that you complete the enclosed Warranty Registration Card and return it to us so that we have a record of the artusi product purchased by you.
PRIVACY
Worldwide Appliances respects your privacy and is committed to handling your personal information in accordance with the National Privacy Principles and the Privacy Act 1988 (Cth). A copy of the Worldwide Appliances Privacy Policy is available at www.artusi.com.au. Worldwide Appliances will not disclose any personal information set out in the Warranty Registration Card (“Personal Information”) without your consent unless required by:
-
law;
-
any Worldwide Appliances related company;
-
any service provider which provide services to artusi or assist artusi in providing services (including repair and warranty services) to customers. Our purpose in collecting the Personal Information is
to keep a record of the artusi product purchased by you, in order to provide a better warranty service to you in the unlikely event that there is a problem with your artusi product. Worldwide Appliances may contact you at any one or more of the address, email address or telephone numbers set out in the Warranty Registration
Card. Please contact artusi on 1300 694 583 should you not wish to be contacted by Worldwide Appliances.
WARRANTY
1. Warranty
Worldwide Appliances warrants that each artusi product will remain, for a period of either 12 months or 24 months of warranty. All Warranties are valid from the original date of purchase, And warranty claims must be accompanied by the proof of purchase.
24 months warranty products:
All Built-in Appliances – Limited to Ovens, Gas, Induction and Electric Cooktops, and All Rangehoods
Freestanding Cookers - Gas and Electric Models (900mm Width)
Dishwashers - Freestanding, Fully Integrated, Semi Integrated and built-in
12 months warranty products:
Freestanding Cookers - Gas and Electric Models in 50cm, 54cm and 60cm Widths
Portable Appliances* – Benchtop Models and Portable Gas Models
- What is not Covered by the Warranty.
The Warranty does not apply if an artusi product is defective by a factor other than a defect arising in the manufacture of the artusi product, including but not limited to:
(a) damage through misuse (including failure to maintain, service or use with proper care), neglect, accident or ordinary wear and tear (including deterioration of parts and accessories and glass breakage);
(b) use for purpose for which the artusi product was not sold or designed;
(c) use or installation which is not in accordance with any specified instructions for use or installation;
(d) use or operation after a defect has occurred or been discovered;
(e) damage through freight, transportation or
handling in transit (other than when Worldwide Appliances is responsible);
(f) damage through exposure to chemicals, dusts, residues, excessive voltage, heat, atmospheric conditions or other forces or environmental factors outside the control or Worldwide Appliances;
(g) repair, modification or tampering by the purchaser or any person other than Worldwide Appliances, an employee of Worldwide Appliances or an authorised artusi service contractor ^* ;
(h) use of parts, components or accessories which have not been supplied or specifically approved by artusi.
(i) damage to surface coatings caused by cleaning or maintenance using products not recommended in the artusi product handbook provided to the purchaser upon purchase of the artusi product;
(j) damage to the base of an electric oven due to items having been placed on the base of the oven cavity or covering the base, such as aluminium foil (this impedes the transfer of heat from the element to the oven cavity and can result in irreparable damage); or
(k) damages, dents or other cosmetic imperfections not affecting the performance of the artusi in respect of an artusi product purchased as a "factory second" or from display The Warranty does not extend to light globes used in artusi products.
- Domestic Use
Each artusi product is made for domestic use. This Warranty may not extend to artusi products used for commercial purposes.
- Time for Claim under the Warranty
You must make any claim under this Warranty within twenty eight (28) days after the occurrence of an event which gives rise to a claim pursuant to the Warranty, by booking a service call on the telephone number below.
Continued over...
5. Proof of Purchase
Customers must retain proof of purchase in order to be eligible to make a warranty claim in respect of an artusi product.
6. Claiming under the Warranty
Customers will bear the cost of claiming under this Warranty unless Worldwide Appliances determines the expenses are reasonable, in which case the customer must claim those expenses by providing written evidence of each expense to Worldwide Appliances at the address on the Warranty Registration Card.
7. Statutory Rights
(a) These terms and conditions do not affect your statutory rights.
(b) The limitations on the Warranty set out in this document do not exclude or limit the application of the consumer guarantees set out in the Act or any other equivalent or corresponding legislation in the relevant jurisdiction where to do so would: (i) contravene the law of the relevant jurisdiction; or (ii) cause any part of the Warranty to be void.
(c) Worldwide Appliances excludes indirect or consequential loss of any kind (including, without limitation, loss of use of the artusi product) and (other than expressly provided for in these terms and conditions) subject to all terms,
conditions and warranties implied by custom, the general law, the Act or other statute. (d) The liability of Worldwide Appliances to you for a breach of any express or non-excludable implied term, condition or warranty is limited at the option of Worldwide Appliances to: (i) replacing or repairing the defective part of the artusi product;
(ii) paying the cost of replacing or repairing the defective part of the artusi product;
(iii) replacing the artusi product; or (iv) paying the cost of replacing the artusi product.
(e) Our goods come with guarantees that cannot be excluded under the Australian Consumer Law. You are entitled to a replacement or refund for a major failure and for compensation for any other reasonably foreseeable loss or damage. You are also entitled to have the goods repaired or replaced if the goods fail to be of acceptable quality and the failure does not amount to a
major failure.
8. Defects
Any part of an artusi product deemed to be defective and replaced by Worldwide Appliances is the property of Worldwide Appliances. Worldwide Appliances reserves the right to inspect and test artusi products in order to determine the extent of any defect and the validity of a claim under the Warranty.
*To locate your closest artusi authorised service agent please contact us on 1300 652 100 or visit www.artusi.com.au
ALL SERVICE CALLS MUST BE BOOKED THROUGH AN AUTHORISED DEALER OR WARRANTY DEPARTMENT ON 1300 652 100 OR stokesaps.com.au/artusi-service 01032014

ARTUSI THE ART OF LIVING
Warranty Card tear off
| WARRANTY REGISTRATION CARD Please complete and send to ARTUSI at: REPLY PAID 8361701052013 LEICHHARDT NSW 2040 | ||
| Last Name: First Name: | ||
| Address: | ||
| State: Postcode: Email: | ||
| Home Phone: Mobile: | ||
| Purchase Date: / / (Please attach proof of purchase to validate warranty) | ||
| MODEL NUMBER | SERIAL NUMBER(if you cannot locate the serial number please call ARTUSI on 1300 694 583) | |
| 1 | ||
| 2 | ||
| 3 | ||
| 4 | ||
01032014

ARTUSI
THE ART OF COOKING
DISCLAIMER
Worldwide Appliances PTY LTD, trading as ARTUSI, is continually seeking ways to improve the design specifications, aesthetics and production techniques of its products. As a result alterations to our products and designs take place continually. Whilst every effort is made to produce information and literature that is up to date, this brochure should not be regarded as an infallible guide to the current specifications, nor does it constitute an offer for the sale of any particular product. Product dimensions indicated in our literature is indicative only. Actual product only should be used to define dimension cutouts. Distributors, and retailers are not agents of ARTUSI and are not authorised to bind ARTUSI by any express or implied undertaking or representation.
ARTUSIOFFICES ARE OPEN DAILY FROM 9AM-5PM AND SATUPDAYS 10AM-4PM
NSW & ACT (HEAD OFFICE)
48-50 MOORE STREET
LEICHARDT
FO285094099
VIC TAS & SA
121 TOORANK ROAD
CAMBERWEI
F 0598092155
OLD
1/42 CAVENDISH ROAD
CORPARO
FO/55970850
WA&NT
UNIT 10/55 HOWE STREET
OSBORNE PARK
FOSV201988
NZ
PO BOX 11160
SOCKP.UN CHRISTCHURCH
FOJ 3445906
P: 1300 649 583
ARTUSI.COM.AU
- SAFETY INSTRUCTIONS
- HOW TO SAVE ENERGY
- UNPACKING
- Caution!
- DISPOSAL OF THE APPLIANCE
- INSTALLATION
- Installing the oven
- Electrical connection
- Warning!
- Connection (by authorised electrician)
- Colour code
- OPERATION
- Prior first use
- Electronic programmer
- Setting the time
- Timer
- Semi-automatic operation
- For example:
- Automatic operation
- Mechanical timer
- Oven
- Possible settings of the oven function knob
- Separate oven lighting
- Bottom and top element on
- Fan(Defrost)
- Fan grill
- Fan forced
- Oven guide levels
- CLEANING AND MAINTENANCE
- ▷ Oven cleaning
- Steam cleaning
- Replacement of the oven light Bulb
- Changing the bulb
- IMPORTANT
- Please note:
- Door removal
- Removal of the internal glass panel
- OPERATION IN CASE OF EMERGENCY
- BAKING IN THE OVEN
- Baking pastry
- Baking with upper and lower heaters
- Baking tips
- Pastry has fallen
- Pastry is too light below
- Cheese cake is undercooked
- Warnings regarding the baking tables
- Roasting
- Tips regarding roasting pans
- Attention when roasting!
- ARTUSI
- THE ART OF LIVING
- PRIVACY
- WARRANTY
- Warranty
- Proof of Purchase
- Claiming under the Warranty
- Statutory Rights
- Defects
- THE ART OF COOKING
- DISCLAIMER
Brand : Artusi
Model : CAO600X
Category : Oven