
CAFI95X - Oven Artusi - Free user manual and instructions
Find the device manual for free CAFI95X Artusi in PDF.


| Product Type | Freestanding Electric Cooker with Induction Hob and Multifunction Oven |
| Brand | Artusi |
| Model | CAFI95X |
| Overall Dimensions (H x W x D) | 895 x 595 x 770 mm |
| Oven Capacity | Approx. 70 L |
| Number of Oven Functions | 8 (Conventional, Fan Forced, Grill, Double Grill, Double Grill with Fan, Convection, Defrost, Bottom Heat) |
| Oven Temperature Range | 50°C – 250°C |
| Hob Type | Induction hob with 5 cooking zones (including flexible zone) |
| Hob Power (Total) | 7.4 kW |
| Oven Power | 2.94 kW |
| Total Connected Load | 10.34 kW |
| Voltage / Frequency | 220-240 V~ 50/60 Hz or 380-415 V 3N~ 50/60 Hz |
| Oven Light | 25 W, G9 bulb, replaceable |
| Oven Cleaning | Catalytic self-cleaning rear and side walls |
| Oven Accessories | Wire shelf, enamelled baking tray, rotary spit |
| Control Type | Touch controls for hob; electronic buttons and rotary dial for oven |
| Safety Features | Child lock, auto shut-off, over-temperature protection, residual heat indicator |
| Installation Requirements | Stability bracket must be fitted; minimum clearance to adjacent units: 90°C heat resistant |
| Energy Class | Not specified (likely A) |
| Warranty | 24 months for built-in models (domestic use) |
Frequently Asked Questions - CAFI95X Artusi
User questions about CAFI95X Artusi
0 question about this device. Answer the ones you know or ask your own.
Ask a new question about this device
Download the instructions for your Oven in PDF format for free! Find your manual CAFI95X - Artusi and take your electronic device back in hand. On this page are published all the documents necessary for the use of your device. CAFI95X by Artusi.
USER MANUAL CAFI95X Artusi
APPLIANCES
FOR LIVING
Congratulations, you are now the proud owner of an ARTUSI cooking appliance. Thank you for purchasing ARTUSI and welcome to the ARTUSI Family.
This instruction manual has been specially created to inform you of the full range of features your ARTUSI appliance has to offer and serves as an introduction to getting the very best out of your ARTUSI appliance.
We present detailed information on each of the features your ARTUSI appliance consists of. Once you have read this section you will be able to choose the most appropriate settings for your appliance when cooking different types of food.
We ask you to read the instructions in this booklet very carefully as this will allow you to get the best results from using your appliance. KEEP THE DOCUMENTATION OF THIS PRODUCT FOR FUTURE REFERENCE.
TO REGISTER YOUR PRODUCT WITH ARTUSI, PLEASE FILL OUT THE WARRANTY CARD AT THE END OF THIS BOOKLET AND POST IT TO: REPLY PAID 83617
LEICHHARDT NSW 2040
Dear Artusi Customer, please read this user manual carefully before using the product and, keep it permanently at your disposal.
Note: This user manual is prepared for more than one model. Some of the features specified in this Manual may not be available on your appliance.
All our appliances are only for domestic use, not for commercial use. Products marked with (*) are optional.
"THIS APPLIANCE SHALL BE INSTALLED IN ACCORDANCE WITH THE REGULA TIONS FORCE AND ONLY USED IN A WELL VENTILATED SPACE. READ THE INSTRUCTIONS BEFORE INSTALLING OR USING THIS APPLIANCE"
"Conforms with the WEEE Regulations."
ACKNOWLEDGMENT
Thank you for purchasing our product. We hope you enjoy using the many features and benefits it provides. Before using this product please study this entire Instruction Manual carefully. Keep this manual in a safe place for future reference. Ensure that other people using the product are familiar with these instructions as well.
WARNING
When the oven is first switched on, it may give off an unpleasant smell. This is due to the bonding agent used for the insulating panels within the oven. This is completely normal, if it does occur, you merely have wait for the smell to clear before putting food into the oven.
! The appliance and its accessible parts become hot during use.
! Care should be taken to avoid touching heating elements.
! Children less than 8 years of age shall be keptaway unless continuously supervised.
This appliance can be used by children aged from 8 years and above and persons with reduced physical, sensory or mental capabilities or lack of experience and knowledge if they have been given supervision or instruction concerning use of the appliance in a safe way and understand the hazards involved. Children shall not play with the appliance. Cleaning and user maintenance shall not be made by children without supervision.
! Do not use harsh abrasive cleaners or sharp metal scrapers to clean the oven door glass since they can scratch the surface, which may result in shattering of the glass.
! The hob surface is of glass-ceramic: if the surface is cracked, switch off the appliance to avoid the possibility of electric shock.
! For the models equipped with a facility to use a temperature
sensing probe: Only use the temperature probe recommended for this oven.
! During use, the appliance becomes very hot.
! Care should be taken to avoid touching heating elements inside the oven.
! Do not allow children to go near the oven when it is operating, especially when the grill is on.
! Ensure that the appliance is switched off before replacing the oven lamp to avoid the possibility of electric shock.
! The means for disconnection must be incorporated in the fixed wiring in accordance with the wiring specifications.
! Children should be supervised to ensure that they do not play with the appliance.
This appliance is not intended for use by persons (including children) with reduced physical, sensory or mental capabilities, or lack of experience and knowledge, unless they have been given supervision or instruction concerning use of the appliance by person responsible for their safety.
! Accessible parts may become hot during use. Young children should be kept away.
! Never use steam cleaners to clean your cooking range
! For models with induction hobs : metallic objects such as knives, forks, spoons and lids should not be placed on the hob surface since they can get hot.
! For models with induction hobs : After use, switch off the hob element by its control and do not rely on the pan detector.
! For the models with a lid: any spillage should be removed from the lid before opening. The hob surface should be allowed to cool before closing the lid.
WARNING - AVVERTENZA - ADVERTENCIA - AVERTISSEMENT - WARNUNG - BEMÆRK - WAARSCHUWING VAROITUSMERKINTÄ - ADVARSEL - UWAGA - ADVERTÊNCIA - AVETIZARE - POZOR - OPOZORILO
| IT | Questo apparecchio non deve essere utilizzato da persone (compresi i bambini) con capacità fisiche, mentali o sensoriali ridotte, o mancanza di esperienza e conoscenza, a meno che non siano sorvegliati o istruiti riguardo l'utilizzo dell'apparecchio da parte di una persona responsabile della loro sicurezza.E' necessario sorvegliare i bambini affinchè non giochi con l'apparecchio. |
| FR | Cet appareil ne doit pas être utilisé par des personnes (y compris les petits enfants) avec capacités physiques, mentales ou sensorielles réduites, ou absence d'expérience ou connaissance, à moins qu'ils ne soient surveillés ou instruits sur l'utilisation de l'appareil par une personne responsable de leur sécurité.Il est nécessaire de sourveiller les petits enfants pour s'assurer qu'ils ne jouent pas avec l'appareil. |
| EN | The appliance must not be used by people (including children) with limited physical, sensory or mental abilities, or without experience or expertise, unless they have received instructions for using it from those responsible for their safety.Young children should be supervised to ensure they not play with the appliance. |
| DE | Das Gerät darf von Personen (einschließlich Kindern), deren physische, sensorische oder geistige Fähigkeiten und deren Mangel an Erfahrung und Kenntnissen einen sicheren Gebrauch des Gerätes ausschließen nur unter Aufsicht oder nach ausreichender Einweisung durch eine verantwortungsbewußte Person benutzt werden, die sicherstellt, dass sie sich der Gefahren des Gebrauchs bewusst sind.Achten Sie darauf, dass Kinder nicht mit dem Gerät spielen können. |
| DK | Apparatet er ikke beregnet til at blive brugt af børn eller personer med fysiske, sensoriske eller mentale handicap eller med manglende erfaring og viden, medmindre disse personer er under opsyn eller er oplært i brugen af apparatet af en person, der er ansvarlig for deres sikkerhed.Lad ikke børn lege med apparatet. |
| ES | El aparato no ha sido diseñado para que lo utilicen personas (incluidos niños) con reducidas capacidades físicas, sensoriales o mentales, o personas sin experiencia ni conocimientos adecuados, a menos que quienes estén encargados de su seguridad las hayan instruido sobre cómo usar el aparato y las vigilen en todo momento.Evite que los niños jueguen con el aparato. |
| FI | Laitetta ei ole tarkoitettu sellaisten henkilöiden käyttöön (lapset mukaan lukien), joiden fyysinen, aistien tai mielen terveys on heikentynyt tai joilla ei ole laitteen käyttämistä varten tarpeellista kokemusta tai tietoa, ellei heidän turvallisuudestaan vastaava henkilö ole valmentanut heitä laitteen käyttöä varten tai valvo sitä.Valvo, että pikkulapset eivät pääse leikkimään laitteella. |
| GR | Η συσκευή autή δεν προορίζεται για χρήση από άτομα (συμπεριλαμβανομένων των παιδιών) με μειωμένες συματικές, αισθητήριες ή πνευματικές ικανότητες ή έλλειψη εμπειρίας και γνώσης, εκτός και εάν εξαρχής επιβλέπονται ή έχουν λάβει οδηγίες σχετικά με τη χρήση της συσκευής από άτομο υπεύθυνο για την ασφάλειά τους.Τα μικρά παιδιά πρέπει να επιβλέπονται για να εξασφαλιστεί ότι δεν παιζουν με τη συσκευή. |
| NL | Het apparaat mag niet worden gebruikt door personen (inclusief kinderen) met lichamelijke, sensorische of geestelijke beperkingen of personen zonder ervaring of kennis, tenzij zij over het gebruik van het apparaat zijn voorgelicht door personen die verantwoordelijk zijn voor hun veiligheid.Jonge kinderen moeten onder toezicht worden gehouden om ervoor te zorgen dat ze niet spelen met het apparaat. |
| NO | Dette apparatet er ikke beregnet for å bli betjent av personer (gjelder også barn) med redusert fysiske, åndelige eller mentale evner eller som ikke har erfaring i eller kunnskaper om bruken, dersom de ikke har fått grunnleggende veiledning eller opplæring angående bruken av en person som er ansvarlig for deres sikkerhet.Pass på at barn ikke leker med apparatet. |
| PL | Niniejsze urządzenie nie jest przeznaczone do użytku przez osoby (w tym dzieci) o ograniczonych zdolnościach ruchowych, postrzegania lub umysłowych, a także osoby nie posiadające odpowiedniej wiedzy i doświadczenia, chyba że osoba odpowiedzialna za ich bezpieczeństwo udziella odpowiedniego instruktażu z zakresu obsługi urządzenia i nadzorowała pierwsze czynności obsługi.Kontrolować, czy dzieci nie bawią się urządzeniem. |
| PT | A utilização do aparelho não é permitida a pessoas (incluindo crianças) com capacidades físicas, sensoriais ou mentais reduzidas, ou com falta de experiência ou conhecimentos, a menos que tenham recebido instruções relativas ao uso do aparelho por parte de pessoas responsáveis pela sua segurança.Esteja atento às crianças pequenas e certifique-se de que não brincam com o aparelho. |
| SE | Apparaten får ej användas av personer (inklusive barn) med reducera fysisk, känslomässig eller mental kapacitet, eller av personer utan lämplig kompetens eller erfarenhet, såvida de inte fått instruktioner om apparatens användande från den eller de personer som ansvarar för deras säkerhet.Se till att barn inte leker med apparaten. |
| RO | Acest aparat nu trebuie utilizat de persoane (inclusiv copii) cu capacitāpi fizice, senzoriale sau mentale reduse, sau lipsite de experiența și cunoștințe, decât dacă au primit instrucțiuni cu privire la utilizarea aparatului de la o persoană responsabilă de siguranpa acestora.Copiii nu trebuie să se joace cu aparatul. |
| RU | Не разрешается использование данного прибора лицами (включая детей) со сниженными физическими, сенсорными или умственными возможностями, а также лицами, не имеющими соответствующего опыта и знаний, без надзора или предварительного обучения пользованию оборудованием со стороны лица, отвечающего за их безопасность.Не допускайте никаких игр детей с прибором. |
| UK | Люди (у тому числі dіти) з обмеженими фізичними, сенсорними та психічними можливостями або які не мають відповідного досвіду чи знань не повинні користуватися цим приладом, хіба що вони отrimають інструкції щодо користуванням ним від тих, хто відповідає за їхню безпеку.Необхідно наглядати за малими дітьми, щоб вони не гралися з цим приладом. |
| IS | Ekki er ætʃlast til að fólk með skerta lìkamlega eða andlega getu eða skynjun (að börnum meðtöldum) noti pennan búnað. Pað á lìka við um fólk sem ekki býr yfir nauðsynlegri reynslu eða pekkingu, nema pað njóti umsjónar eða aðstoðar einhvers sem ber ábyrgð á öryggi pess, á meðan tækið er í notkun.Börn þurfa að vera undir eftirliti svo tryggt sé að þau leiki sér ekki með tækið. |
| SI | Naprave ne smejo uporabljati ljudje (tudi otrocí) z zmanjšanimi fizičnimi sposobnostmi, psihi čnimi ali zaznavnimi sposobnostmi ali brez potrebnih izkušenj ali znanja, razenče jih pri uporabi naprave ne nadzira in vodi oseba, odgovorna za njihovo varnost. Pazite, da se otroci ne bi igralí z napravo. |
| HR | Ovaj ure đaj ne smiju koristiti osobe (uključujući djecu) slabijih fizičkih, mentalnih ili osjetilnih mogućnosti, niti osobe koje ne posjeduju odgovarajuće iskustvo i znanje, osim ako ih druga osoba odgovorna za sigurnost ne nagleda ili ne navodi pri korištenju. Djeca se moraju nagdledati kako se ne bi igrala s uređajem. |
| HU | Ezt a készüléket nem használhatják korlátozott fizikai, mentális, illetve érzékelési képességekkel rendelkező (beleértve a gyerekeket), vagy a szükséges tapasztalattal, illetve szaktudással nem rendelkező személyek, kivéve, ha a biztonságukért felelő személy a készülék használatával kapcsolatban felügyel!, vagy képziðket. A gyermekekre felügyelni kell, nehogy játszanak a készülékkel. |
| CS | Toto za řízení nesmí obsluhovat lidé (ani děti) s nedostatečnou fyzickou, psychickou nebo senzorickou způsobilostí nebo osoby bez potřebných zkušeností a znalostí, pokud nejsou pod dohledem nebo pokud nejsou řádně poučeni o používání tohoto zařízení osobou zodpovědnou za jejich bezpečnost. Děti musí být vždy pod dohledem, aby si se zařízením nemohli hrát. |
| SK | Toto zariadenie nemôžu používať ľudia (vrátane detí) s obmedzenými fyzickými, psychickými alebo zmyslovými schopnosťami, prípadne bez potrebných skúseností a znalostí, pokial na ne nedohliada alebo ich nepoučí o používaní zariadenia osoba, ktorá je zodpovedná za ich bezpečnosť. Na deti musíte dohlíadať, aby sa zaistilo, že sa zo zariadením nebudú hrať. |
| TR | Bu aparat fiziksel, duyumsal ve zihinsel kapasiteleri yetersiz kişiler tarafından (çocuklar dahil) veya bu kişiler, onların güvenliğinden sorumlu bir kişi tarafından aparatın kullanımı esnasında denetlenmedikleri ve kullanımı hakkında bilgilendirilmemiş olduklarında veya deneyim ve bilgi eksikliginde kullanılmamalıdır. Çocukların aparat lle oynamadıklarını kontrol altında tutmak gerekir. |
| BG | Този уред не трябва да бъде използван от лица (включително деца) с понижени физически, умствени или сетивни въzmможности, както и от лица без необходимия опит и познания, освен в случаите, когато същите са направлявани или инструktирани относно употребата и работата с уреда от лице, отговорно за безопасността. Не трябва да се разрешава на деца да играят с уреда. |
| AR | heďا الجهاز غير مصمم للاستخدام بواسطة الأشخاص (بما في ذلك الأطقال) ذوي الامicanيات时间内ية أو الحسیsea أوleggالیة المحدودة، أو الأشخاص محدودی الخ借りة أو الدرایة، إلا بعد تزويدهم بالتدريب Oregonاشرا فالازم قيما يتعلق باستخدام الجهاز بواسطة اشخص مسنول عن سلامتهم.يجب الإشراف على الأطقال لضمان عدم نعبه بالجهاز. |
Installation instructions
Safety precautions ....7
Before installing ....7
Applicance ....7
Installation ....10
Fitting the adjustable feet ....10
Fitting the splash guard ....11
Positioning and levelling ....11
Instruction assembly crossbar reinforced legs 12
Electrical connection ....14
Stability brackets ....16
Safety precautions
This manual is valid for several models.
Variations in details for each cooker are possible.
The safe operation of this appliance can only be guaranteed if it has been professionally assembled and installed in accordance with these instructions.
The individual who assembled and installed the appliance is liable for damage or faults resulting from incorrect assembly or installation.
All installation and adjustment work, must be undertaken by an authorized expert and carried out in accordance with the currently applicable rules and regulations of the local electricity supply company.
Shut off the supply of electricity before carrying out any work.
Electrical appliances must always be earthed.
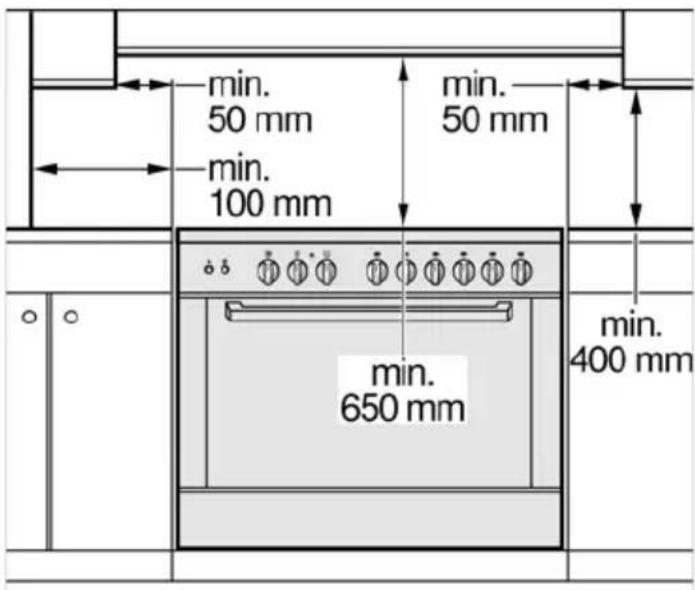
If an extractor hood is to be fitted, it must be fitted according to the associated assembly instructions. Ensure that the hood is fitted at least 650 mm clear of the hob.
Before installing
Appliance
Unpacking
Check the condition of the appliance after unpacking it. Do not connect the appliance if it has been damaged in transport.
Dispose of packaging in an environmentally-friendly manner.
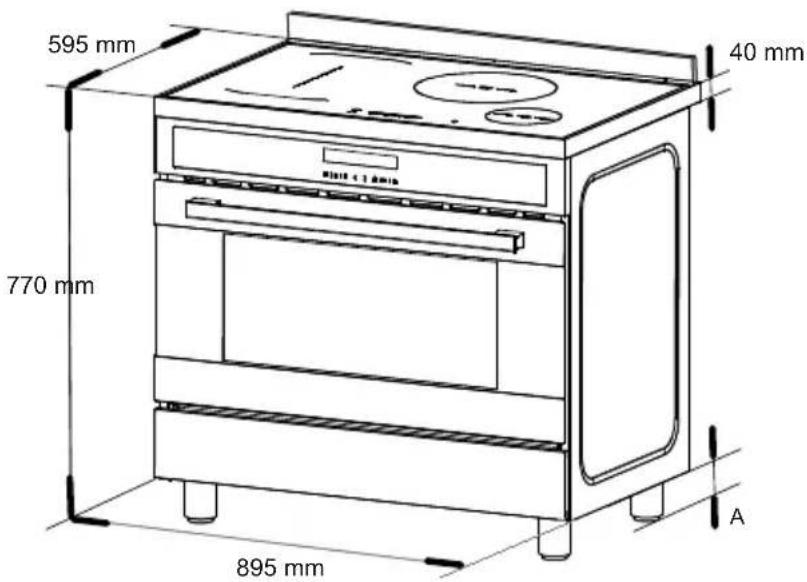
Appliance dimensions Note the specified dimensions.
A=89-149 mm
All product outward appearance, the color take the material object as, the picture only supply the reference.
Adjacent units
Adjacent units must be made of non-combustible material. The fronts of adjacent units must be resistant to temperatures up to at least 90 °C. If the appliance is fitted close to other units, the minimum distances specified in the picture must be maintained.
This appliance is always supplied with a set of adjustable feet and, depending on the model, with a splash guard. The appliance may also be used without the splash guard.
Fitting the adjustable feet
Beforehand:
! Remove all parts that are not permanently fixed.
! Remove the accessories from the oven.
natural_image
Diagram showing a square frame with an arrow indicating direction, and a bottle with directional arrows below (no text or symbols)Proceed as follows:
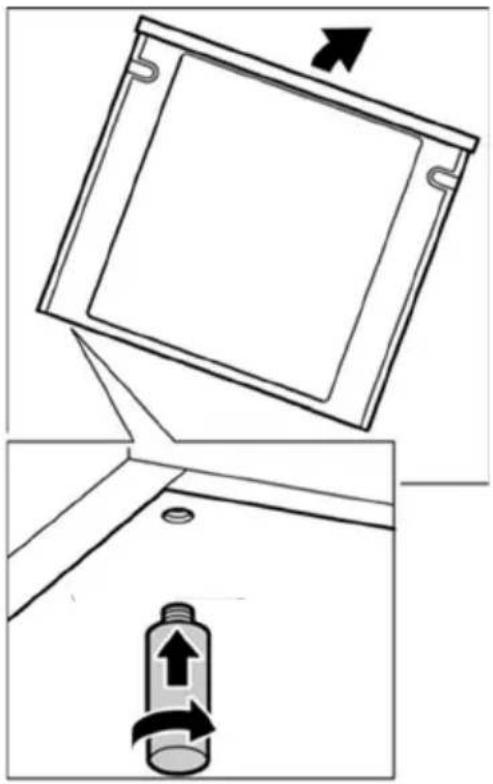
! Tilt the appliance by raising one side slightly from the floor.
! With the plates in position, screw the adjustable feet into the mounting holes on the underneath of the appliance.
! Repeat the process on the other side.
You can make the final adjustments to the feet in order to level the appliance once the electricity supply has been connected.
If it is necessary to pull the appliance, screw the adjustable feet in fully. Make the final settings only when the other installation tasks have been completed.
Fitting the splash guard
natural_image
Technical line drawing of a mechanical assembly with circular components and a bracket (no text or symbols)Depending on the model.
Proceed as follows:
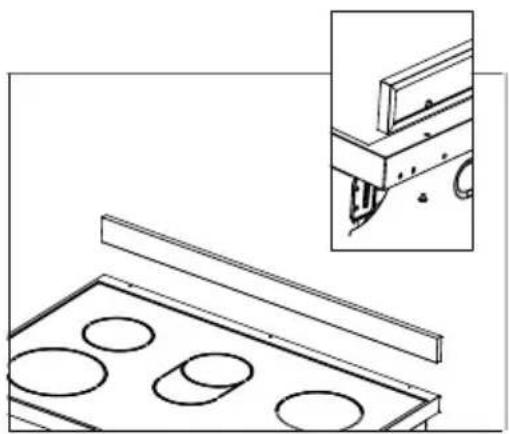
- Remove the packaging and the protective film from the splash guard.
- Screw the splash guard onto the rear of the appliance using the 2 bolts.
- Not permitted use with lids or covers aftermarket.
WARNING: This appliance is not suitable to be installed on a base
Positioning and levelling
Positioning the appliance
When installing the appliance, make sure that there is enough space in the final installation location to pull the appliance forwards for cleaning and maintenance work.
The ground underneath must be hard and stable. The wall immediately behind the appliance must be made from non-flammable material, e.g. tiles.
If you need to pull the appliance in order to position it, make sure that the adjustable feet are screwed in fully.
natural_image
Simple diagram of a mechanical component with a curved arrow indicating rotation or force direction (no text or symbols)Levelling the appliance
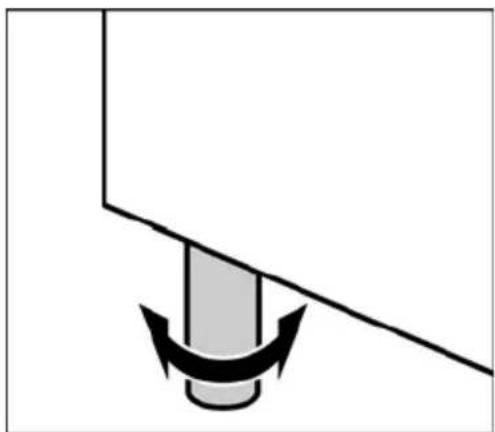
Level the appliance once all other work has been completed.
To do this, turn the adjustable feet.
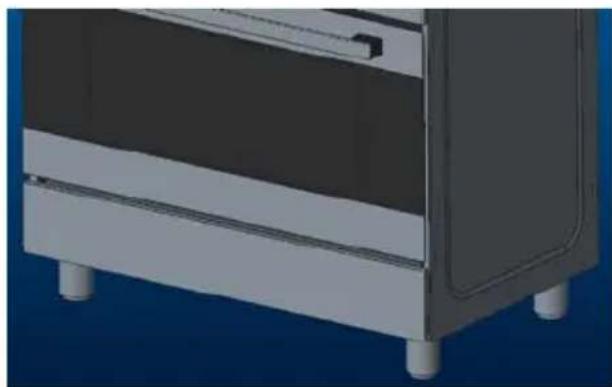
Instruction assembly crossbar reinforced legs
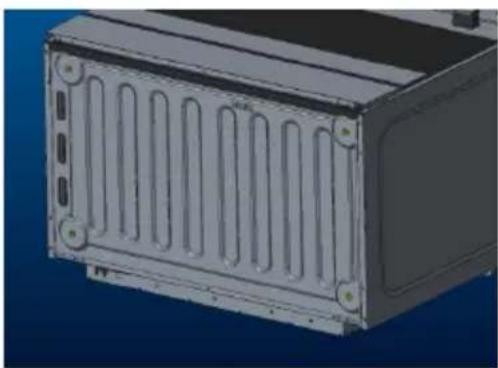
- Recline the cooker on the back as (This must be done by two operators)
- Remove two screws from the front frame.
natural_image
3D rendering of a rectangular electronic device with vertical slots and mounting holes (no text or symbols visible)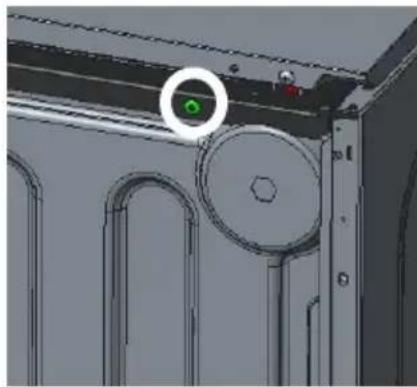
natural_image
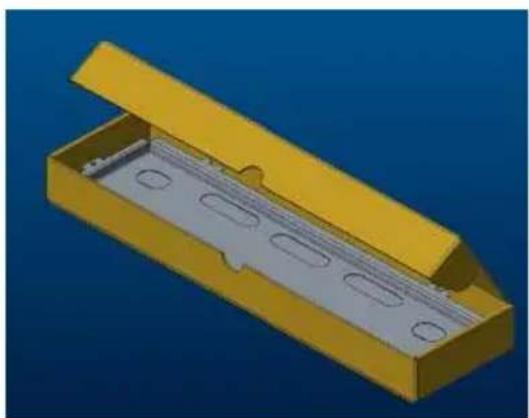
3D CAD model of a mechanical assembly with a green circular annotation highlighting a specific component (no text or symbols present)- Take the two reinforcement bars from the box positioned inside the cavity of the oven.
- Place the two reinforcement bars as the image (The two reinforcement bars are ambidextrous)
- Fix the two reinforcement bars with the screws provided (4 screws each reinforcement bars)
natural_image
3D rendering of a yellow plastic enclosure with internal slots and mounting holes (no text or symbols)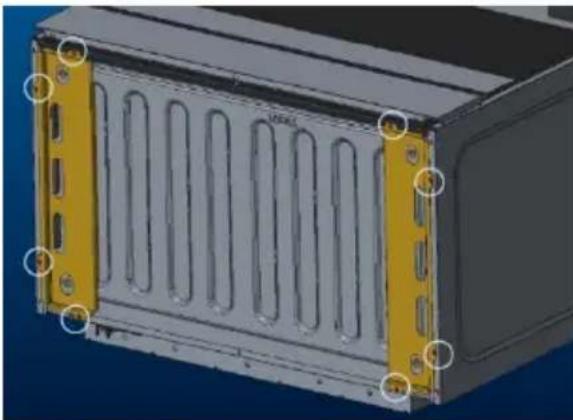
natural_image
3D model of a server rack unit with yellow connectors and ventilation slots (no text or symbols visible)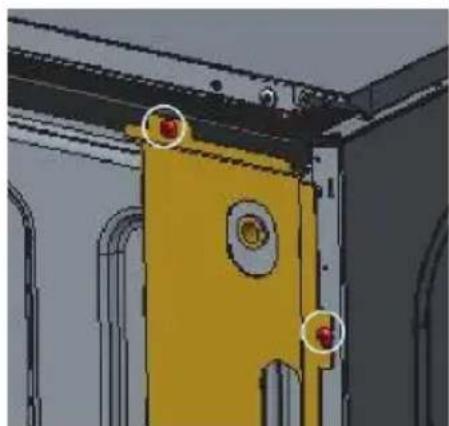
natural_image
Exterior view of a yellow industrial door with two red circular markers on the door (no text or symbols visible)- Screw the legs into their seats threaded
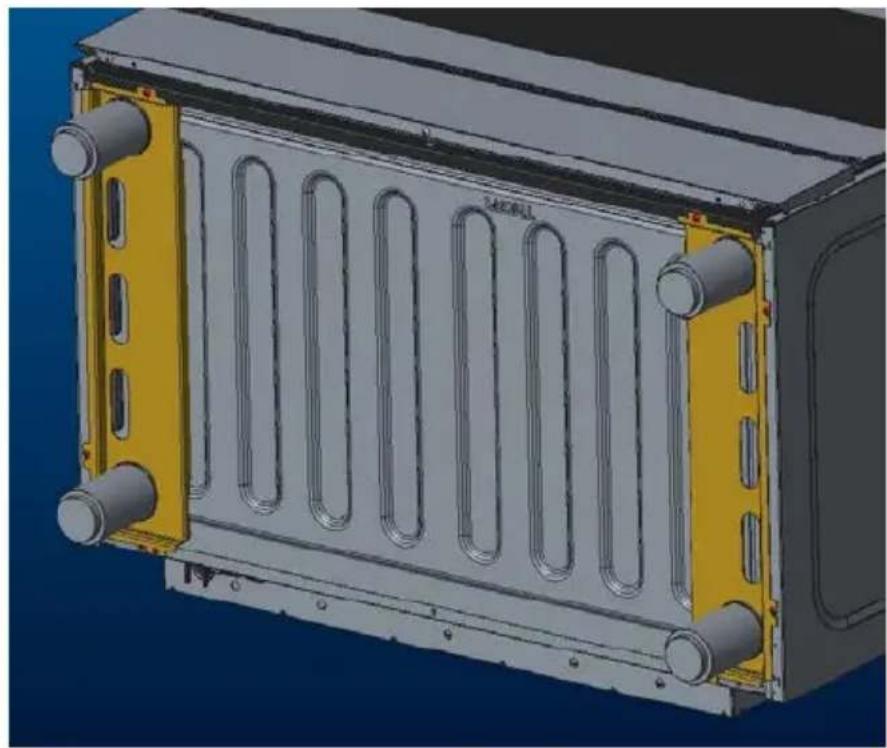
natural_image
3D rendering of a rectangular industrial or thermal device with vertical metallic components and yellow safety tabs (no text or symbols visible)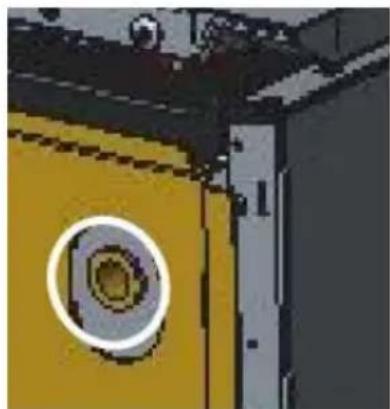
natural_image
Close-up of a yellow mechanical component with a circular inset showing a textured center (no visible text or symbols)- Place the cooker as the image and adjust the legs through the appropriate adjustments (This must be done by two operators)
natural_image
3D rendering of a mechanical component with four legs and a side panel, shown against a blue background (no text or symbols)Electrical connection
! This appliance must be earthed by law. Before connecting the appliance to the electrical supply, check that the earth system in your house is working correctly.
! Check that unit voltage and power, marked on the rating plate applied on the appliance, are correct for the supply. It is necessary that the feeding network is protected by a powerful switch able to disconnect completely the network with a contacts separation of at least 3 mm. Be sure that the earth wire green/yellow is not interrupted by the switch.
WARNING: THIS APPLIANCE MUST BE EARTHED
! In order to avoid hazard, any electrical work performed on this equipment or its associated wiring should only be done by persons authorised by the manufacture or similar qualified persons.
Replacement or mounting of the power cord
The mains cable is replaced via the rear backboard.
The mains cable must be of the following type:
| 380-415V 3N~ | 220-240V | ||
| H05RR-F | H05RR-F | ||
| H05VV-F | 5×2.5mm2 | H05VV-F | 3×4mm2 |
| H05RN-F | H05RN-F | ||
| H07RN-F | H07RN-F |
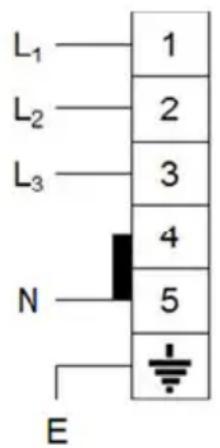
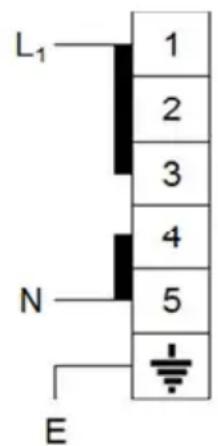
Leave the mains cable slightly overlong so that you can pull out the appliance for cleaning purposes.
Proceed as follows:
! Remove the rear backboard.
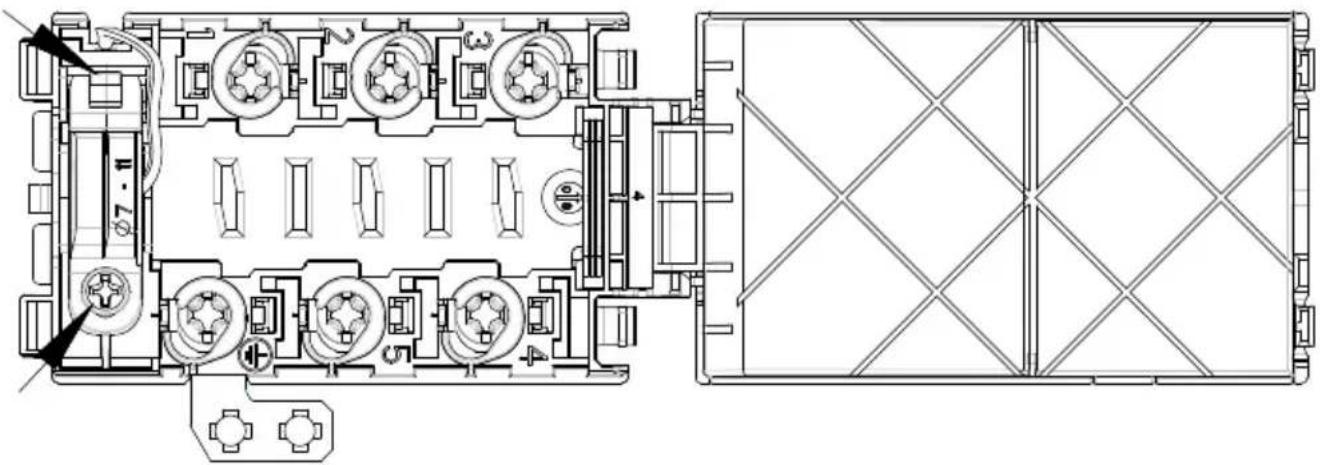
! Undo the screw on the terminal block that fixesthe cable in place.
! Loosen the screw contacts and replace the cable with a new one of the same length. The cable must comply with the stipulated specifications.
! Connect the yellow-green wire to the 12 terminal. This wire must be at least 10 mm longer than the other wires.
! Connect the blue neutral wire to terminal N.
! Connect the brown power wire toterminal L.
natural_image
Technical schematic of a mechanical or electrical assembly with internal components and a grid-patterned structure (no text or symbols)Stability bracket
natural_image
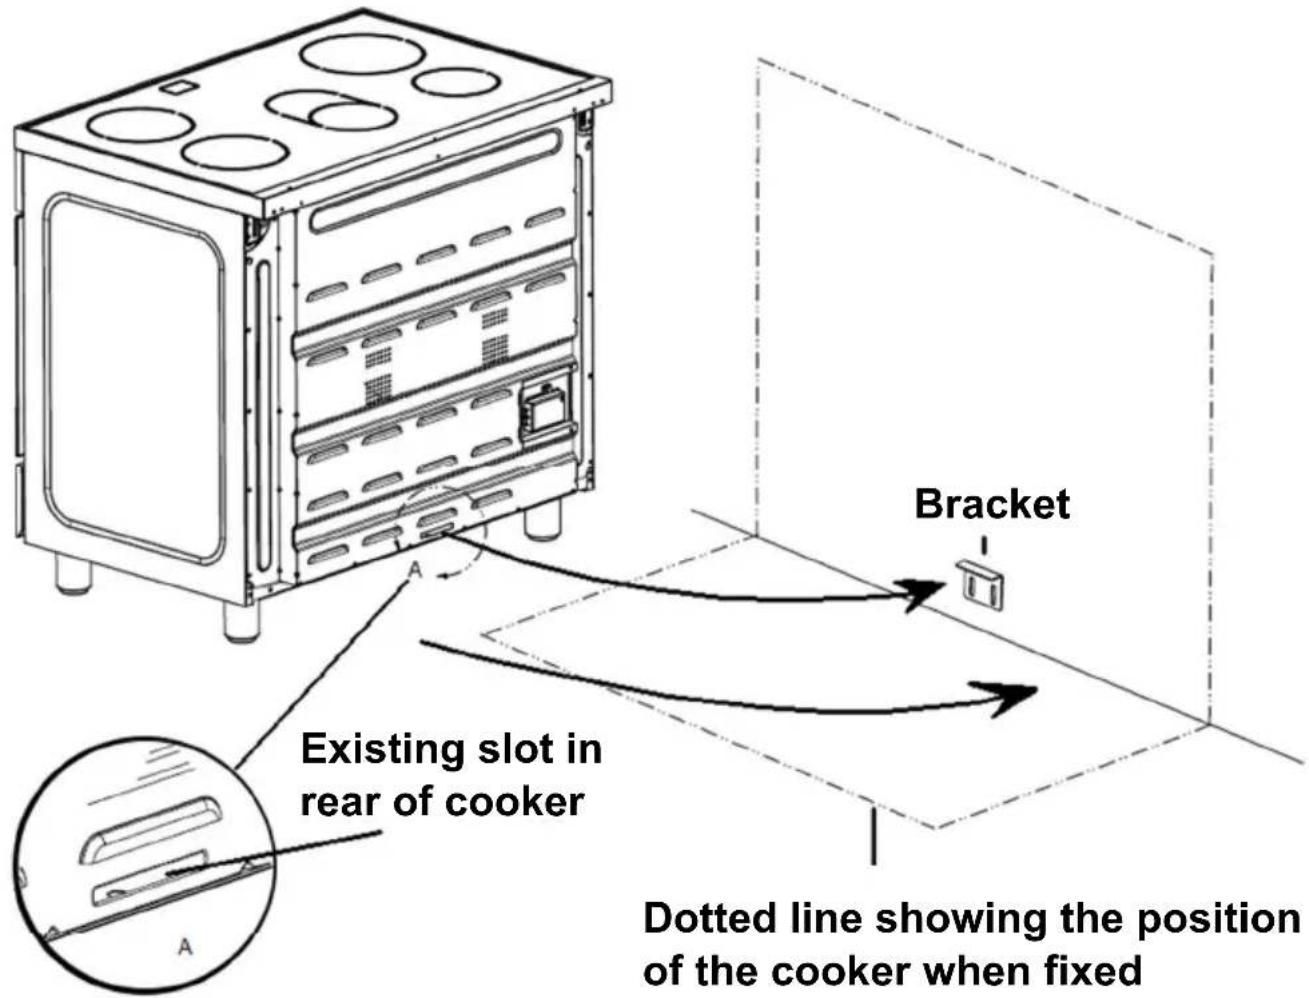
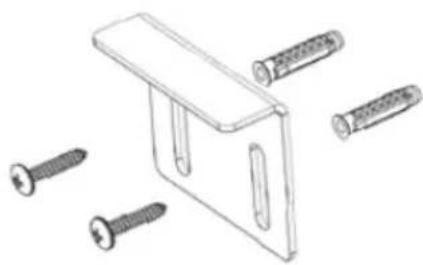
Technical line drawing of a bracket with four screws (no text or symbols)Dotted line showing the position of the cooker when fixed
Wall fixing
Instructions for use
Important information.... 18
Safety precautions 19
Property damage 21
Your new appliance 22
The hob.... 23
The oven 40
The storage compartment.... 45
Before using for the first time 46
Baking out the oven 46
Using the rotary spit 48
Cleaning and care 51
Catalytic cooking compartment panels 51
Telescopic rails 52
Using the correct cleaning agent 53
Cleaning the interior glass of the oven 54
Removing and fitting the appliance door 56
Removing and inserting the hook-in racks 58
Faults and the after-sales service 59
Replacing the oven light bulb 60
Aftersales service 61
Tips and tricks 62
Tips for saving energy 62
Tips on using the ceramic hob 62
Tips on using the oven 62
Tips for using your appliance 63
Boiling and frying 63
Baking tips 64
Tips on using the rotary spit 64
Important information
Read the instructions for use carefully.
This will enable you to operate your appliance safely and correctly.
This manual is valid for several models.
Variations in details for each cooker are possible.
Please keep the instruction manual, installation instructions and the various accessories in a safe place. Please pass on these manuals and accessories to the new owner if you sell the appliance.
Transport damage
Check the appliance for damage after unpacking it. Do not connect the appliance if it has been damaged in transport.
Environmentally-friendly disposal
Dispose of packaging in an environmentally-friendly manner.
This appliance is labelled in accordance with European Directive 2012/19/EU on Waste Electrical and Electronic Equipment WEEE.
Connections Have a licensed professional carry out the electric connection.
Assembly instructions are supplied with the appliance.
Any damage caused by the appliance being incorrectly connected is not covered under the guarantee. We assume no liability for damage and faults caused by connection and setting errors.
Safety precautions
This appliance is intended for domestic use only. This appliance must only be used for food preparation.
Adults and children must not operate the appliance without supervision if:
! they do not have the physical or mental ability; ! or they lack the knowledge and experience required to operate the appliance safely and correctly.
Never let children play with the appliance.
Never drag, push or move the device once unpacked. The appliance should be lifted and placed in the position desired in order to prevent accidental damage to the floor.
Open the cover plate when the oven is working. Do not use harsh abrasive cleaners or sharp metal scrapers to clean the oven door glass since they can scratch the surface, which may result in shattering of the glass.
Do not use steam cleaners to clean the appliance.
Hot surfaces Risk of burns.
Never touch the hob plates, the surfaces of the cooking compartment, the heating elements or the oven steam outlets when they are hot.
Children must be kept at a safe distance from the appliance at all times.
Open the appliance door carefully. Hot steam may escape.
If the hob plates are in operation for a prolonged period, the areas between them can become hot.
Risk of fire.
Never leave flammable objects on the hob or in the storage compartment, or keep them in the cooking compartment.
Risk of short-circuit.
Never trap the mains cable of electrical appliances in the appliance door when it is hot or pull the cable over the hob plates when they are hot. The cable insulation may melt.
Overheated oil and fat
Risk of fire.
Overheated oil or fat can ignite very quickly. Never leave fat or oil to heat unattended. Should the oil ignite, do not try to put it out by pouring water on it. Cover the pan immediately with a lid or plate. Switch off the hob plate. Allow the cookware to cool down on the hob plate.
High-proof alcohol
Be careful with food that is prepared using drinks with a high alcohol content (e.g. cognac, rum). Alcohol evaporates at high temperatures. In unfavourable circumstances, the alcoholic vapours could catch fire in the appliance.
Risk of burns.
Only use small quantities of drinks with a high alcohol content and open the appliance door carefully.
Repairs
Risk of electrocution.
Incorrect repairs are dangerous.
Repairs may only be carried out by one of our experienced after-sales engineers.
Risk of electrocution.
Never replace a damaged power cable yourself. Power cables may only be replaced by one of our experienced after-sales engineers.
Switch off the circuit breaker in the fuse box if the appliance is faulty.
Lateral stress
Possibility of tilting

In order to prevent tipping of the appliance. This stabilising means must be installed. Refer to the installation
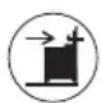
Anti-tip restraint
This appliance is labeled in accordance with European Directive 2011-05(IEC)
Property damage
Damage to the hob Only use the hob plates if cookware is placed on them.
Do not heat empty pots or pans.
This will damage the pan base.
Do not allow saucepans to boil dry, in particular enamel and aluminium saucepans.
The pan base must be clean, dry and flat.
With electric hotplates, it is possible that not enough heat is drawn off and the pans become red hot.
Please follow the manufacturer's instructions when using special cookware. Aluminium foil and plastic containers can melt and stick on hot burners.
Do not use a roasting dish which has to be heated using two burners. This will cause heat to accumulate. This could damage the appliance.
Please note that appliances with a hob cover may only be used with the hob cover open.
Damage to the oven
Never cook meals on the floor of the cooking compartment. Do not leave the baking tray on the cooking compartment floor.
Do not cover it with aluminium foil.
Do not place oven or cookware on the oven floor.
This will cause heat accumulation.
The baking and roasting times will no longer be correct and the enamel will be damaged.
Never pour water directly into a hot oven.
This will damage the enamel. When making very moist fruit flans, do not put too much on the baking tray. Fruit juice dripping from the baking tray leaves stains that cannot be removed.
Do not stand or sit on the open oven door.
Damage to the fronts of adjacent units
Only leave the oven to cool down with the door closed. The fronts of adjacent units may eventually become damaged even if you only leave the oven door open slightly.
If the oven door seal is very dirty, the appliance door will no longer close properly during operation.
The fronts of adjacent units will become damaged over time. Keep the seal clean.
Your new appliance
Get to know your appliance. You will find information about the control panel and hob, as well as the oven, types of heating and accessories.
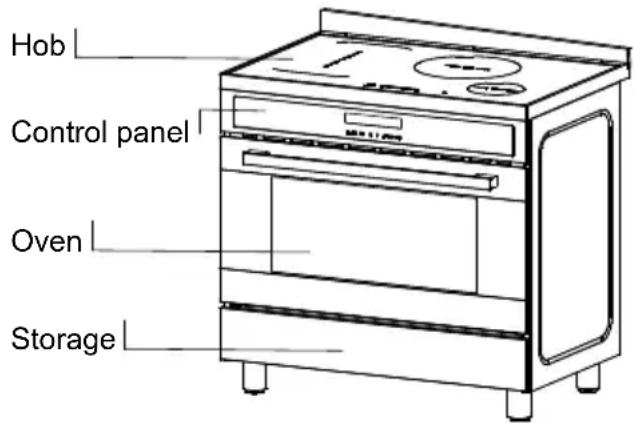
The hob (according to the models)
Inductionhob
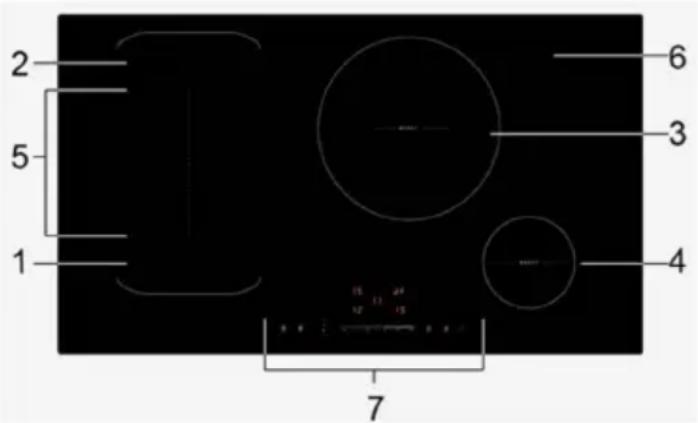
- m a x. 1800/3000 W
- max. 1800/3000 W zone
- max. 3000/4000 W zone
- max. 1400/2000 W zone
- Flexible zone 3000/4000 W
- Glass plate
- Control panel
z o
Table for domestic electric hob in according to the Delegated Regulation (UE) n° 66/2014 Energy Consumption calculated according to standard EN 60350-2: 2013
| Identification Model | See rating plate | ||
| Type hob Cooktop | |||
| Number of zones or areas of cooking | 5 | ||
| Type of heating system | Induction plate | ||
| Cooking circular zones | 3 =4 = | 28,015,0 | cmcm |
| Cooking not circular zones | 1 LW2 LW5 LW | 20,023,020,023,040,023,0 | cmcmcmcmcmcm |
| Energy consumption per area | EC electric cooking | 1 = 210,42 = 210,43 = 199,74 = 189,85 = 211,7 | Wh/kgWh/kgWh/kgWh/kgWh/kg |
| Energy consumption of the hob EC | electric hob | 204,4 | Wh/kg |
HOB TOTAL 7.4kW
OVEN TOT AL 2 .94kW
Maximum Power 10.34kW
Voltage
220-240V\~50Hz-60Hz
380-415V 3N\~50Hz-60Hz
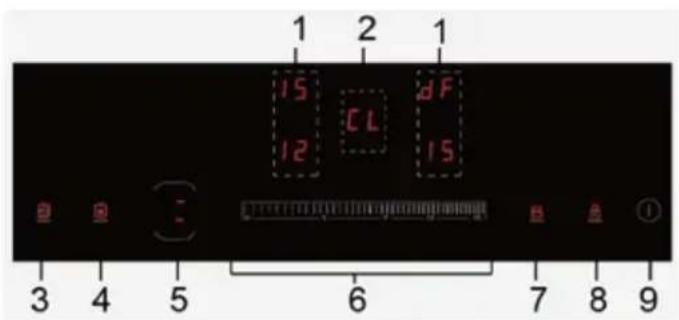
- Heating zone selection controls
- Timer control
- Boiling cue control
- Special function
- Flexible zone control
- Power / Timer slider touch control
- Boost control
- Keylock control
- ON/OFF control
Instruction for use of the induction hob
A Word on Induction Cooking
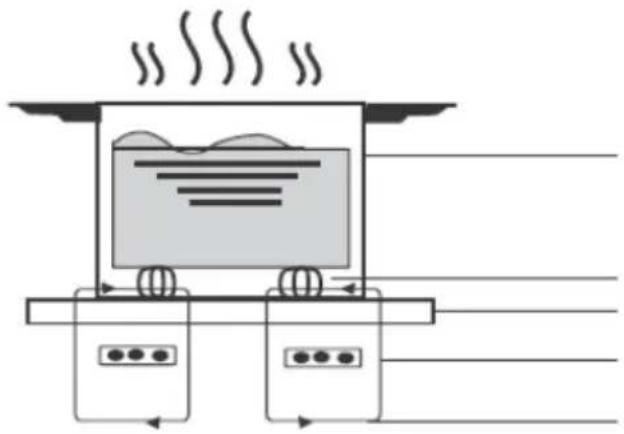
Induction cooking is a safe, advanced, efficient, and economical cooking technology. It works by electromagnetic vibrations generating heat directly in the pan, rather than indirectly through heating the glass surface. The glass becomes hot only because the pan eventually warms it up.
natural_image
Diagram of a steam locomotive with wheels and exhaust lines, no text or symbols presentiron pot
magnetic circuit ceramic glass plate induction coil induced currents
Before using your New Induction Hob
- Read this guide, taking special note of the 'Safety Warnings' section.
- Remove any protective film that may still be on your Induction hob.
Using the Touch Controls
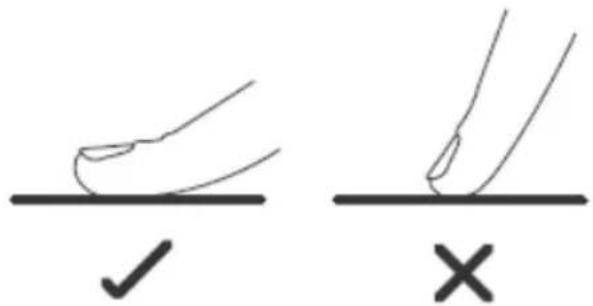
- The controls respond to touch, so you don't need to apply any pressure.
• Use the ball of your finger, not its tip. - You will hear a beep each time a touch is registered.
- Make sure the controls are always clean, dry, and that there is no object (e.g. an utensil or a cloth) covering them. Even a thin film of water may make the controls difficult to operate.
Choosing the right Cookware

- Only use cookware with a base suitable for induction cooking. Look for the induction symbol on the packaging or on the bottom of the pan.
natural_image
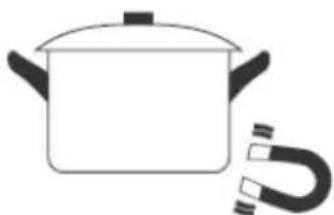
Simple line drawing of a cooking pot with a U-shaped tube attached to its side (no text or symbols)- You can check whether your cookware is suitable by carrying out a magnet test. Move a magnet towards the base of the pan. If it is attracted, the pan is suitable for induction.
-
If you do not have a magnet:
-
Put some water in the pan you want to check.
- Follow the steps under "To start cooking".
- If U does not flash in the display and the water is heating, the pan is suitable.
- Cookware made from the following materials is not suitable: pure stainless steel, aluminium or copper without a magnetic base, glass, wood, porcelain, ceramic, and earthenware.
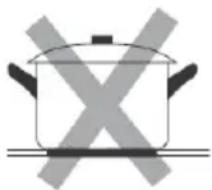
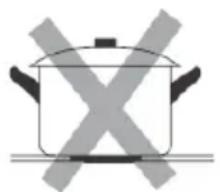
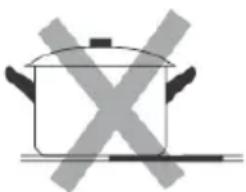
Do not use cookware with jagged edges or a curved base.
natural_image
Simple line drawing of a cooking pot with crossed-out X marks (no text or symbols)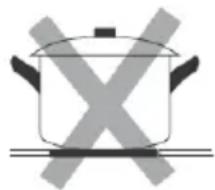
natural_image
Simple line drawing of a cooking pot with crossed X marks (no text or symbols)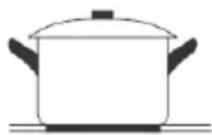
Make sure that the base of your pan is smooth, sits flat against the glass, and is the same size as the cooking zone. Use pans whose diameter is as large as the graphic of the zone selected. Using a pot a slightly wider energy will be used at its maximum efficiency. If you use smaller pot efficiency could be less than expected. Pot less than 140 mm could be undetected by the hob. Always centre your pan on the cooking zone.
natural_image
Simple line drawing of a cooking pot with crossed-out X mark (no text or symbols)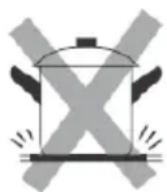
natural_image
Simple line drawing of a cooking pot with crossed-out X marks (no text or symbols)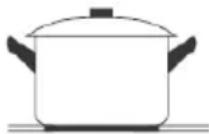
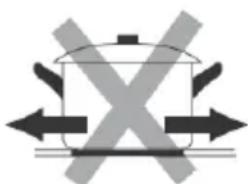
Always lift pans off the Induction hob – do not slide, or they may scratch the glass.
natural_image
Simple line drawing of a cooking pot with crossed arrows indicating pressure or heat (no text or symbols)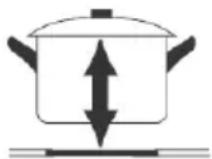
Pan Dimension
The cooking zones are, up to a limit, automatically adapted to the diameter of the pan. However the bottom of this pan must have a minimum of diameter according to the corresponding cooking zone. To obtain the best efficiency of your hob, please place the pan in the centre of the cooking zone.
| Cooking zone | The base diameter of induction cookware | |
| Minimum (mm) | Maximum (mm) | |
| 1,2, 140 | 220 | |
| 3 0 300 | 22 | |
| 4 120 160 | ||
| Flexible zone | 220 220x400 | |
Using your Induction Hob To start cooking
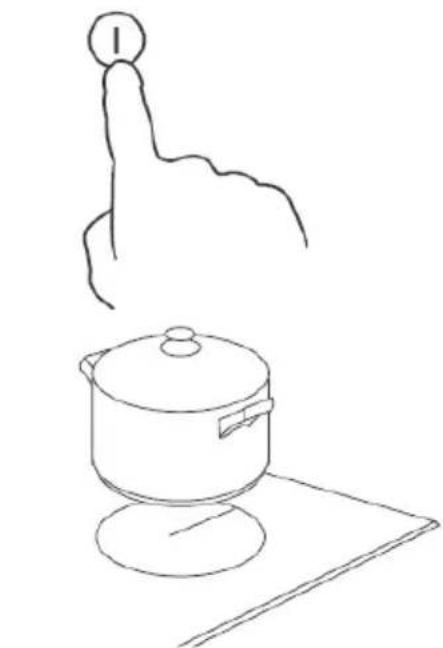
- Touch the ON/OFF control.
After power on, the ① buzzer beeps once, timer control show “CL”, heating zone selection controls show “00”, indicating that the induction hob has entered the state of standby mode.
- Place a suitable pan on the cooking zone that you wish to use.
- Make sure the bottom of the pan and the surface of the cooking zone are clean and dry.
-
Touching the heating zone selection control, and a indicator where you touched will flash.
-
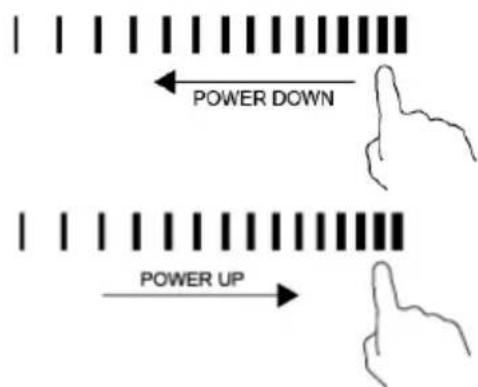
Adjust heat setting by touching the slider control.
- If you don't choose a heat setting within 1 minute, the Induction hob will automatically switch off. You will need to start again at step 1.
- You can modify the heat setting at any time during cooking.
natural_image
Line drawing of a hand pointing at a cooking pot on a surface (no text or symbols)
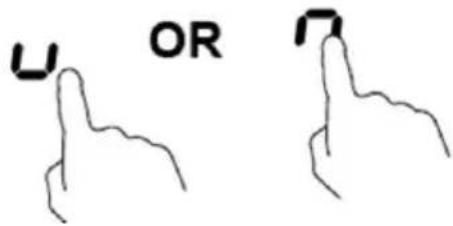
If the display flashes ≥slant U ≤slant alternately with the heat setting this means that:
- you have not placed a pan on the correct cooking zone or,
- the pan you're using is not suitable for induction cooking or,
- the pan is too small or not properly centred on the cooking zone.
No heating takes place unless there is a suitable pan on the cooking zone.
The display will automatically turn off after 1 minute if no suitable pan is placed on it.
When you have finished cooking
- Touching the heating zone selection control that you wish to switch off.
- Turn the cooking zone off by touching the slider to the left. Make sure the display shows "0".
- Turn the whole cooktop off by touching the ON/OFF control.
- Beware of hot surfaces
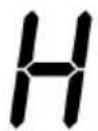
H will show which cooking zone is hot to touch. It will disappear when the surface has cooled down to a safe temperature. It can also be used as an energy saving function if you want to heat further pans, use the hotplate that is still hot.
Using the Boost function
Active the boost function
- Touching the heating zone selection control
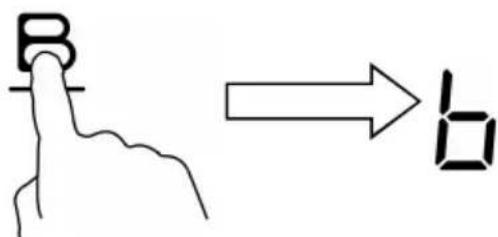
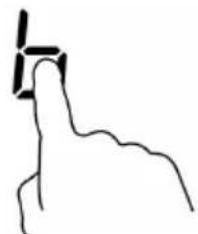
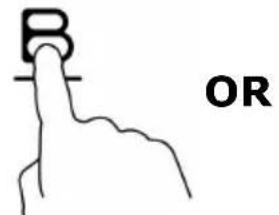
- Touching the boost control B, the zone indicator shows "b" and the power reach Max.
Cancel the Boost function
- Touching the heating zone selection control that you wish to cancel the boost function.
natural_image
Simple line drawing of a hand holding a small object (no text or symbols)- a: Touching the boost control "B", then the cooking zone will revert to its original setting. b: Touching the slider control, then the cooking zone will revert to the level you select.
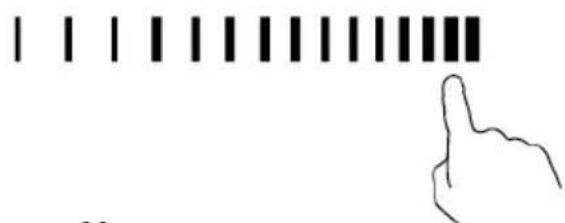
• The function can work in all cooking zones.
- The cooking zone returns to its original setting after 5 minutes.
- As the boost function of 1st cooking zone is activated, the 2nd cooking zone is limited under level 2 automatically. vice versa
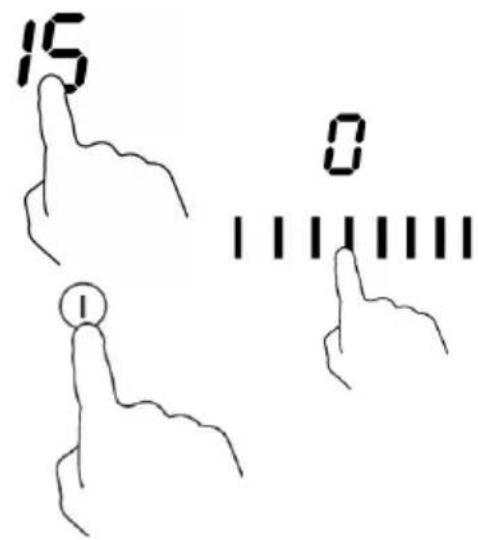
- If the original heat setting equals 0, it will return to 15 after 5 minutes.
FLEXIBLE AREA
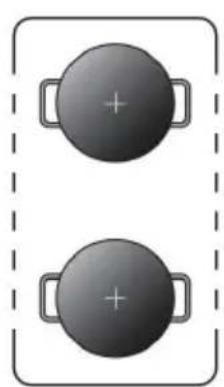
- This area can be used as a single zone or as two different zones, accordingly to the cooking needs anytime.
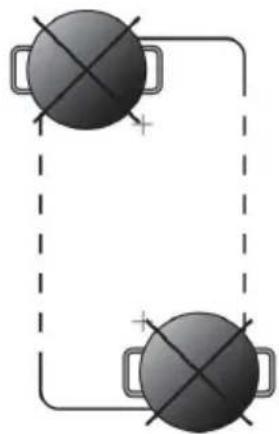
- Flexible area is made of two independent inductors that can be controlled separately. When working as a single zone, a cookware is moved from one zone to the other one within the flexible area keeping the same power level of the zone where the cookware originally was placed, and the part that is not covered by cookware is automatically switched off.
- Important: Make sure to place the cookwares centered on the single cooking zone. In case of big pot, oval, rectangular and elongated pans make sure to place the pans centered on the cooking zone covering both logos. Examples of good pot placement and bad pot placement.
natural_image
Two identical circular objects with plus signs placed vertically, enclosed in a dashed border (no text or symbols)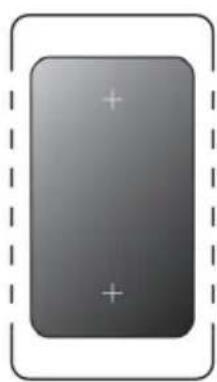
natural_image
Gray rectangular button with plus signs, enclosed in a dashed border (no text or symbols)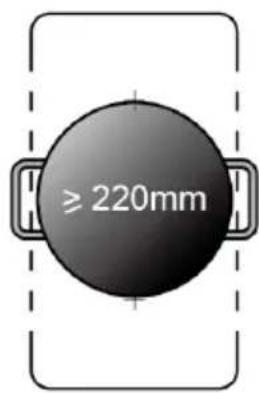
natural_image
Simple diagram of two black circular objects with cross marks connected by a dashed line, no text or symbols present.As big zone
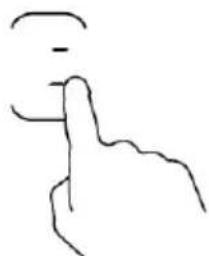
- To activate the flexible area as a single big zone, simply press the dedicated keys.
- The power setting works as any other normal area.
- If the pot is moved from the front to the rear part (or
natural_image
Simple line drawing of a hand gesture (no text or symbols)viceversa), the flexible area detects automatically the new position, keeping the same power.
- To add a further pot, press again the dedicated keys, in order to detect the cookware.
As two independent zones
To use the flexible area as two different zones with different power settings, press the dedicated keys.
Special function
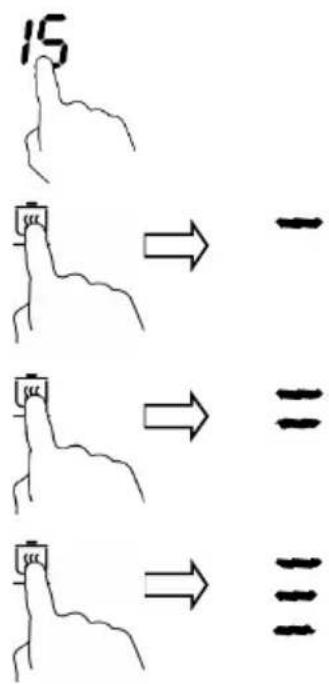
The product have 3 levels of Special Function.
Activate the Special Function
- Touching the heating zone selection control.
- Touching the Special Function control 📄, the zone indicator show “→”, this means choosing the heating level for keep warm.
- Touching the Special Function control again ☐, the zone indicator show “=”, this means choosing the heating level for melting.
- Touching the Special Function control 📄 for the third time, the zone indicator show “ ≡”, this means choosing the heating level for Frying.
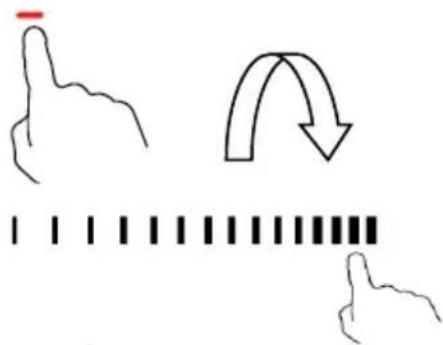
Cancel the Special Function
- Touching the heating zone selection control that you wish to cancel the Special Function.
- Touching the slider control, then the cooking zone will revert to the level you select.
Note:
- This function may be used on all cooking zones at the same time.
- Be sure to use a lid, as this could affect the final result.
- Better not use cast iron cookware.
Locking the Controls
- You can lock the controls to prevent unintended use (for example children accidentally turning the cooking zones on).
- When the controls are locked, all the controls except the ON/OFF control are disabled.
To lock the controls
Touch the key lock 🔒 control. The timer indicator will show "Lo".
To unlock the controls
- Make sure the Induction hob is turned on.
- Touch and hold the key lock control 🔒 for a while.
- You can now start using your Induction hob.

When the hob is in the lock mode, all the controls are disable except the ON/OFF, you can always turn the induction hob off with the ON/OFF control in an emergency, but you shall unlock the hob first in the next operation.
Over-Temperature Protection
A temperature sensor equipped can monitor the temperature inside the Induction hob. When an excessive temperature is monitored, the Induction hob will stop operation automatically.
Detection of Small Articles
When an unsuitable size or non-magnetic pan (e.g. aluminium), or some other small item (e.g. knife, fork, key) has been left on the hob, the hob automatically go on to standby in 1 minute. The fan will keep cooling down the induction hob for a further 1 minute.
Auto Shutdown Protection
Auto shut down is a safety protection function for your induction hob. It shut down automatically if ever you forget to turn off your cooking. The default working times for various power levels are shown in the below table:
| Power level | Keep warm | 1~5 | 6~10 | 11~14 | 15 | |
| Default working timer (hour) | 2 8 4 | 2 1 |
When the pot is removed, the induction hob can stop heating immediately and the hob automatically switch off after 2 minutes.

People with a heart pace maker should consult with their doctor before using this unit.
Using the Timer
You can use the timer in two different ways:
- You can use it as a minute minder. In this case, the timer will not turn any cooking zone off when the set time is up.
- You can set it to turn cooking zones off after the set time is up.
- You can set the timer for up to 99 minutes.
Using the Timer as a Minute Minder
If you are not selecting any cooking zone
-
Make sure the cooktop is turned on.
Note: you can use the minute minder even if you're not selecting any cooking zone. -
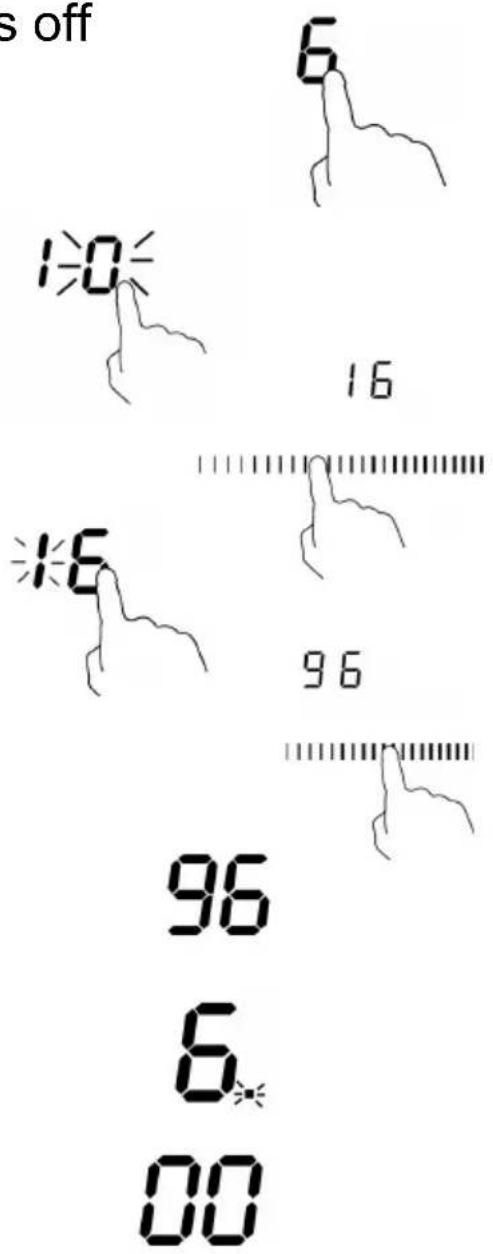
Touch timer control, the "10" will show in the timer display timer display where touched and the "0" flashes.
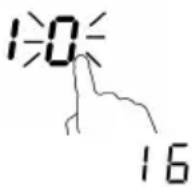
-
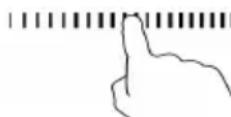
Set the time by touching the slider control. (e.g. 6)
-
Touch timer control again, the "1" will flash.
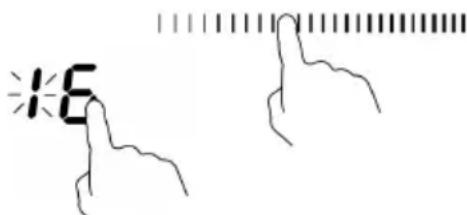
- Bettime by touching the slider control (e.g.9), now the timer you set is 96 minutes.
96
- Buzzer will beep for 30 seconds and the timer indicator shows "00" when the setting time finished.
00
Setting the timer to turn cooking zones off If the timer is set on one zone:
- Touching the heating zone selection control that you want to set the timer for.
- Touch timer control, the "10" will show in the timer display and the "0" flashes.
- Set the time by touching the slider control. (e.g. 6)
- Touch timer control again, the "1" will flash.
- Set the time by touching the slider control (e.g.9), now the timer you set is 96 minutes.
- When the time is set, it will begin to count down immediately. The display will show the remaining time and the timer indicator flash for 5 seconds.
NOTE: The red dot next to power level indicator will illuminate indicating that zone is selected.
- When cooking timer expires, the corresponding cooking zone will be switch off automatically.

Other cooking zone will keep operating if they are turned on previously.
If the timer is set on more than one zone:
- When you set the time for several cooking zones simultaneously, decimal dots of the relevant cooking zones are on. The minute display shows the min. timer. The dot of the corresponding zone flashes.
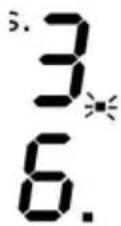
15
(set to 15 minutes)
(set to 45 minutes)
- Once the countdown timer expires, the corresponding zone will switch off.
Then it will show the new min. timer and the dot of corresponding zone will flash.
30
6
- Touch the heating zone selection control, the corresponding timer will be shown in the timer indicator.
Using the boiling cue control
You can use the function to boil water and it will remind you of the boiling water.
Active the boiling cue function
- Touching the heating zone selection control.
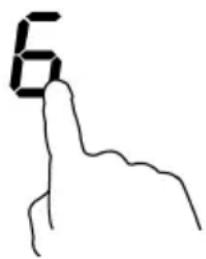
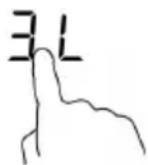
- Touching the boiling cue control the zone indicator show "2L".
Touching the boiling cue control again, the zone indicator show "3L".
Touching the boiling cue control for the third time, the zone indicator show "5L".
Touching the boiling cue control for the fourth time, the zone indicator show "0".
Cancel the boiling cue function
- Touching the heating zone selection control.
- a: Touching the slider control, then the cooking zone will revert to the level you select.
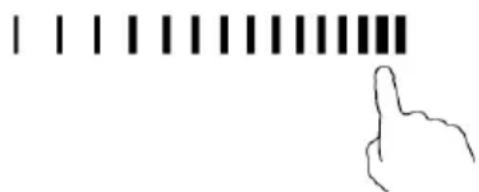
b: Touching the function control B, then the cooking zone will revert to you select.
- It is important that the water temperature is neither too hot nor too cold when cooking begins, as this could affect the final result.
- Once the water has boiled, a series of beeps is heard and the zone indicator flashes.
Then give a short press on the boiling cue control

Power 9 is displayed by default.
- The function can only work in 3rd cooking zone.
- Use pans whose diameter is as large as the graphic of the zone selected.
- Do not use cast iron cookware.
- Do not use a lid.
- As the boost function of 3rd cooking zone is activated, the 4th cooking zone is limited.
Cooking Guidelines

Take care when frying as the oil and fat heat up very quickly, particularly if you're using PowerBoost. At extremely high temperatures oil and fat will ignite spontaneously and this presents a serious fire risk.
Cooking Tips
- When food comes to the boil, reduce the temperature setting.
- Using a lid will reduce cooking times and save energy by retaining the heat.
- Minimise the amount of liquid or fat to reduce cooking times.
- Start cooking on a high setting and reduce the setting when the food has heated through.
Simmering, cooking rice
- Simmering occurs below boiling point, at around 85^ , when bubbles are just rising occasionally to the surface of the cooking liquid. It is the key to delicious soups and tender stews because the flavors develop without overcooking the food.
You should also cook egg-based and flour thickened sauces below boiling point.
- Some tasks, including cooking rice by the absorption method, may require a setting higher than the lowest setting to ensure the food is cooked properly in the time recommended.
Searing steak
To cook juicy flavoursome steaks:
- Stand the meat at room temperature for about 20 minutes before cooking.
- Heat up a heavy-based frying pan.
- Brush both sides of the steak with oil. Drizzle a small amount of oil into the hot pan and then lower the meat onto the hot pan.
- Turn the steak only once during cooking. The exact cooking time will depend on the thickness of the steak and how cooked you want it. Times may vary from
about 2 – 8 minutes per side. Press the steak to gauge how cooked it is – the firmer it feels the more ‘well done’ it will be.
- Leave the steak to rest on a warm plate for a few minutes to allow it to relax and become tender before serving.
For stir-frying
- Choose an induction compatible flat-based wok or a large frying pan.
- Have all the ingredients and equipment ready. Stir-frying should be quick. If cooking large quantities, cook the food in several smaller batches.
- Preheat the pan briefly and add two tablespoons of oil.
- Cook any meat first, put it aside and keep warm.
- Stir-fry the vegetables. When they are hot but still crisp, turn the cooking zone to a lower setting, return the meat to the pan and add your sauce.
- Stir the ingredients gently to make sure they are heated through.
- Serve immediately.
Heat Settings
The settings below are guidelines only. The exact setting will depend on several factors, including your cookware and the amount you are cooking. Experiment with the induction hob to find the settings that best suit you.
| Heat setting | Suitability |
| 1 - 2 | ·delicate warming for small amounts of food·melting chocolate, butter, and foods that burn quickly·gentle simmering·slow warming |
| 3 - 5 | ·reheating·rapid simmering·cooking rice |
| 6 - 11 | ·pancakes |
| 12 - 14 | ·sautéing·cooking pasta |
| 15/P | ·stir-frying·searing·bringing soup to the boil·boiling water |
Care and Cleaning
The settings below are guidelines only. The exact setting will depend on several factors, including your cookware and the amount you are cooking.
Experiment with the cooktop to find the settings that best suit you.
| What? How? Important! | ||
| Everyday soiling on glass (fingerprints, marks, stains left by food or non-sugary spillovers on the glass) | 1. Switch the power to the cooktop off.2. Apply a cooktop cleaner while the glass is still warm (but not hot!)3. Rinse and wipe dry with a clean cloth or paper towel.4. Switch the power to the cooktop back on. | When the power to the cooktop is switched off, there will be no 'hot surface' indication but the cooking zone may still be hot! Take extreme care.Heavy-duty scourers, some nylon scourers and harsh/abrasive cleaning agents may scratch the glass. Always read the label to check if your cleaner or scourer is suitable.Never leave cleaning residue on the cooktop: the glass may become stained. |
| Boilovers, melts, and hot sugary spills on the glass | Remove these immediately with a fish slice, palette knife or razor blade scraper suitable for Induction glass cooktops, but beware of hot cooking zone surfaces:1. Switch the power to the cooktop off at the wall.2. Hold the blade or utensil at a 30° angle and scrape the soiling or spill to a cool area of the cooktop.3. Clean the soiling or spill up with a dish cloth or paper towel.4. Follow steps 2 to 4 for 'Everyday soiling on glass' above. | Remove stains left by melts and sugary food or spillovers as soon as possible. If left to cool on the glass, they may be difficult to remove or even permanently damage the glass surface.Cut hazard: when the safety cover is retracted, the blade in a scraper is razor-sharp. Use with extreme care and always store safely and out of reach of children. |
| Spillovers on the touch controls | 1. Switch the power to the cooktop off.2. Soak up the spill3. Wipe the touch control area with a clean damp sponge or cloth.4. Wipe the area completely dry with a paper towel.5. Switch the power to the cooktop back on. | The cooktop may beep and turn itself off, and the touch controls may not function while there is liquid on them. Make sure you wipe the touch control area dry before turning the cooktop back on. |
Hints and Tips
| Problem | Possible causes | What to do |
| The induction hob cannot be turned on. | No power. Make sure the induction hob is connected to the power supply and that it is switched on.Check whether there is a power outage in your home or area. If you've checked everything and the problem persists, call a qualified technician. | |
| The touch controls are unresponsive. | The controls are locked. Unlock the controls. See section 'Using your induction cooktop' for instructions. | |
| The touch controls are difficult to operate. | There may be a slight film of water over the controls or you may be using the tip of your finger when touching the controls. | Make sure the touch control area is dry and use the ball of your finger when touching the controls. |
| The glass is being scratched. | Rough-edged cookware.Unsuitable, abrasive scourer or cleaning products being used. | Use cookware with flat and smooth bases. See 'Choosing the right cookware'.See 'Care and cleaning'. |
| Some pans make crackling or clicking noises. | This may be caused by the construction of your cookware (layers of different metals vibrating differently). | This is normal for cookware and does not indicate a fault. |
| The induction hob makes a low humming noise when used on a high heat setting. | This is caused by the technology of induction cooking. | This is normal, but the noise should quieten down or disappear completely when you decrease the heat setting. |
| Fan noise coming from the induction hob. | A cooling fan built into your induction hob has come on to prevent the electronics from overheating. It may continue to run even after you've turned the induction hob off. | This is normal and needs no action.Do not switch the power to the induction hob off at the wall while the fan is running. |
| Pans do not become hot and appears in the display. | The induction hob cannot detect the pan because it is not suitable for induction cooking.The induction hob cannot detect the pan because it is too small for the cooking zone or not properly centred on it. | Use cookware suitable for induction cooking. See section 'Choosing the right cookware'.Centre the pan and make sure that its base matches the size of the cooking zone. |
| The induction hob or a cooking zone has turned itself off unexpectedly, a tone sounds and an error code is displayed (typically alternating with one or two digits in the cooking timer display). | Technical fault. Please note down | the error letters and numbers, switch the power to the induction hob off at the wall, and contact a qualified technician. |
Failure Display and Inspection
If an abnormality comes up, the induction hob will enter the protective state automatically and display corresponding protective codes:
| Problem Possible causes What to do | ||
| F1-F6 Temperature sensor failure Please contact the supplier. | ||
| F9-FA | Temperature sensor of the IGBT failure. | Please contact the supplier. |
| FC | The connection between the display board and the main board is fail | Please contact the supplier. |
| E1/E2 Abnormal supply voltage Please inspect | whether power supply is normal.Power on after the power supply is normal. | |
| E3/E4 | Temperature sensor of the ceramic glass plate is high | Please restart after the induction hob cools down. |
| E5 Temperature sensor of the IGBT is high. | Please restart after the induction hob cools down. | |
If there are anyone zone of the flexible area to be protected, the flexible area selection control will not be able to use
The above are the judgment and inspection of common failures.
Please do not disassemble the unit by yourself to avoid any dangers and damages to the induction hob.
The oven (according to the models)
Always keep small children away from the oven while it is in use.
Before cooking for the first time switch the oven on and allow it to heat up while empty.
At this point you may notice a slightly odour, this is perfectly normal and occurs as the protective covering which surrounds the insulating panels is gently removed.
This covering is designed for transit purposes only and its removal will not affect the performance of your oven.
Prior to use simply wipe the oven interior with a damp cloth, it is then ready for cooking.
Electronic control


| Symbol | Function description |
 | Oven Lamp: Which enables the user to observe the progress of cooking without opening the door. Oven lamp will light for all cooking functions. |
| [kWW6] | Defrost: The circulation of air at room temperature enables quicker thawing of frozen food, (without the use of any heat). It's a gentle but quick way to speed up the defrosting time and thawing of ready-made dishes and cream filled produce etc. |
 | Bottom heater: A concealed element in the bottom of the oven provides a more concentrative heat to the base of food without browning. This is ideal for slow cooking dishes such as casseroles, stews, pastries and pizzas where a crispy base is desired. The temperature can be set within the range of 60-120°C. The default temperature is 60°C. |
 | Conventional cooking: The top and bottom work together to provide convectional cooking. The temperature can be set within the range of 50-250°C. The default temperature is 220°C. This is optional function that can be work with rotisserie motor |
 | Convention with fan: Combination of the fan and both heating element provides more even heat penetration, saving up to 30-40% of energy. Dishes are lightly browned on the outside and still moist on the inside. Note: This function is suitable for grilling or roasting big pieces of meat at a higher temperature. The temperature can be set within the range of 50-250°C. The default temperature is 220°C. |
 | Radiant grilling: The inner grill element switches on and off to maintain temperature. The temperature can be set within the range of 180-240°C. The default temperature is 210°C. This is optional function that can be work with rotisserie motor. |
 | Double grilling: The inside radiant element and top element are working. The temperature can be set within the range of 180-240°C. The default temperature is 210°C. This is optional function that can be work with rotisserie motor. |
 | Double grilling with fan: The inside radiant element and top element are working with fan The temperature can be set within the range of 180-240°C. The default temperature is 210°C |
 | Convection: An element around the convection fan provides an additional source of heat for convection style cooking. In convection mode the fan automatically comes on to improve air circulation within the oven and creates an even heat for cooking. The temperature can be set within the range of 50-240°C. The default temperature is 180°C. |
Oven Accessories
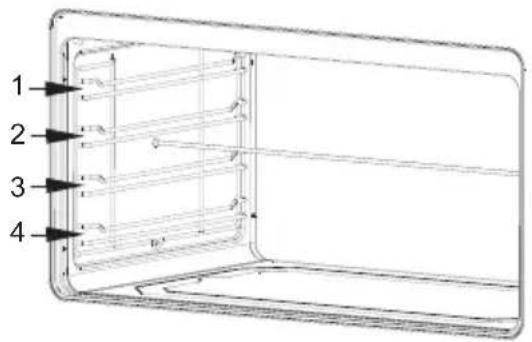
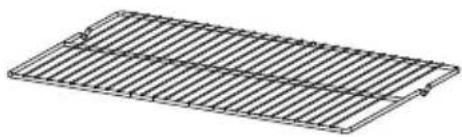
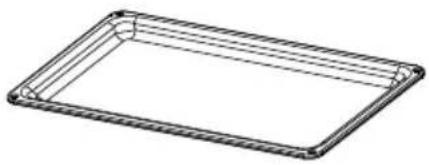
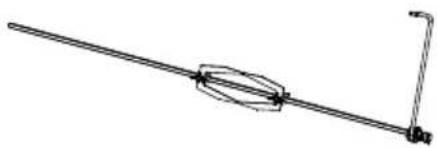
The accessories can be inserted in the oven in 4 different shelf positions.
You can pull the accessories two-thirds of the way out without them tipping.
This allows meals to be removed easily.
You can buy accessories from the after-sales service or from specialist retailers.
Accessory Description
natural_image
Isometric view of a rectangular metal grate or rack structure with no text or symbolsBaking and roasting shelf
For ovenware, cake tins, roasts, grilling and frozen meals.
natural_image
Simple line drawing of a rectangular tray or container with no text or symbolsEnamelled baking tray
For moist cakes, pastries, frozen meals and large roasts. Can also be inserted underneath the wire rack or rotary spit and used as a drip tray to collect fat.
natural_image
Simple line drawing of a mechanical lever or rod with a central bracket and pivot point (no text or symbols)Rotary spit
For roasts and large pieces of poultry. Use only in combination with the enameled baking tray.
Using the electronic oven control
OPERATION INSTRUCTIONS
1. Clock Setting
After connecting the unit to the power, the symbols "0:00" will be visible on the display.
1> Press " Ⓛ ", the hour figures will flash.
2> Press "<>" to adjust the hour figures, (time should be within 0--23).
3> Press "L", the minutes will flash.
4> Press "<>" to adjust the minutes setting, (time should be within 0--59).
5> Press " ℓ " to finish the clock settings. ":" will flash, and the time will be illuminated.
Note: The clock is 24 hours. After power on, if not set, the clock will show "0:00".
2. Function Setting
1> Press "F" to choose the cooking function you require. The related indicator will illuminate.
2> Press "<>" to adjust the cooking time and adjust the temperature before press "F" to switch.
3> Press "▶" to confirm the start of cooking.
4> If step 2 is ignored, press " ⬆" to confirm the start of cooking and the default time is 9 hours.
The default temperature will display on the LCD.
NOTES:
1>The step quantities for the adjustment time of the coding switch are as follow:
0--0:30min: step 1 minute 0:30--9:00hour :step 5 minutes
2>The step quantities for the adjustment of temperature is 5^ , and "W" " " can not adjust the temperature.
3>Press "<>" to adjust the cooking time when cooking begins. Then press " ⬆ " to confirm.
If " ⭕ " is not pressed within 5 seconds, the oven will revert back to the previous time to continue cooking.
4>Press" ", the" " will show, then press" <> to adjust the temperature when cooking begins.
Then press" ☐ " to start cooking. If " ☐ " is not pressed in 5 seconds, the oven will revert back to the previous temperature to continue cooking.
3. Lamp Setting
1> Press "F" to select the relevant function, then the corresponding icon will be on.
2> Press " ⬆ " button to start, "0:00" and lamp icon" ⓦ " will light up, " : " will flash.
4. Inquiring function
In the following states, you can use inquiring function, after 3 seconds return to the current state.
1> During working state, if the clock was set, press " Ⓛ " button to see the current time; if the reminder function was set, press " ✕ " button to see the time of reminder.
2> In reminding state, if the clock was set, press " ( ) " button to see the current time.
3> In clock display state, if the reservation function was set, press " ☒ " button to see the time of reservation.
5. Child lock function
To Lock : press " 🔒 " and " 🔒 " simultaneously for 3 seconds, there will be a long "beeping" sound and the " 🔒 " will be illuminated.
Lock quitting : press " 🔒 " and " 📊 " simultaneously for 3 seconds, there will be a long "beeping" sound indicating the child-lock is released.
Note: During working mode, if you want to stop cooking, press stop button quickly. Do not need to long pressing on stop button, it is invalid.
6. Reminder Function
The oven has 9 hours reminder, this function will help to remind you to start cooking in a certain time from 1 minute to 9 hours. Only when oven in standby mode, the reminder can be set. Follow below to set the reminder:
1> Press reminder setting button " ☒ " and the display shows " 🔊 " and "AL".
2> Press "<>" to set the time of reminder.
3> Press "播放" to confirm setting. ":" will flash and the indicator for reminder "播放" will light. The time will count down.
Note: The oven buzzer will sound for 10 times after the time back to the zero hour . " 🔊 "symbol disappears on the screen to remind you to start cooking. You can cancel the reminder during setting by pressing the stop button. After the reminder has been set, you can cancel it by pressing stop button twice.
7. Start/Pause/Cancel Function
1> If the cooking time has been set, press " ⬆ " to start cooking. If the cooking is paused, press " ⬆ " to resume cooking.
2> During cooking process, press " ☐ " once to pause the cooking. Press " ☐ " twice to cancel the cooking.
8. Reservation Function
Only when the clock has been set, delay function can be used. In standby mode,
1, Pres " " 2, time display shows " " and "End".
2, Pre"s>s>" to set the hour of the cooking ending time of reservation.
3, Press " "button again.
4, Press>" " to set the minute of the cooking ending time of reservation.
5, Press " " to choose the cooking function you require.
6, After set the cooking time and temperature, press " " to start.
Note:
Subtract the cooking time from the cooking ending time, you will get the time that oven starts to cook.
9. Energy-Saving Function
1> In waiting state and reminding state, press " ☑" for three seconds, the LCD display will go off and set to energy-saving mode.
2> If no operation in 10 minutes under waiting state, the LCD display will go off and go into energy-saving mode.
3> Under the energy-saving mode, press any key can quit the energy-saving mode.
10. Note
1> The oven lamp will be on for all functions.
2> Once the cooking programme has been set and the" "button is not pressed within 5 minutes, the current time will be displayed or turn back to waiting state. The setting program will be invalid.
3> The buzzer will sound once when effectively pressed, if not effectively pressed there will be no response.
4> The buzzer will sound five times to remind you when cooking has finished.
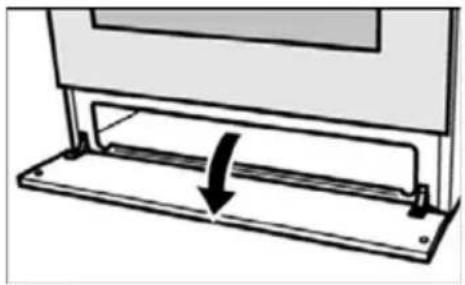
The storage compartment
natural_image
Diagram of a device with a downward arrow indicating a component or movement (no text or symbols present)Open the storage compartment by folding down the fascia panel.
This compartment can be used to store hob or oven accessories.
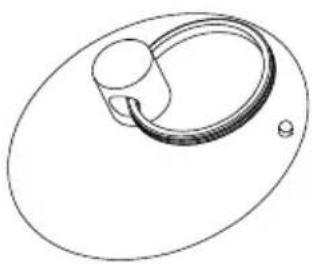
natural_image
Simple line drawing of a mechanical component with a circular end and ring (no text or symbols)There is a plastic sucker in some models can help you open the drawer.
Risk of fire.
Never leave combustible items in the storage compartment.
Before using for the first time
Please read the following instructions before using your appliance for the first time.
Remove the appliance packaging and dispose of this appropriately.
Baking out the oven
Cooking compartment initial cleaning
Remove the accessories from the cooking compartment.
Completely remove any leftover packaging, e.g. small pieces of polystyrene, from the cooking compartment.
Some parts are covered with a protective film. Remove this film.
- Clean the outside of the appliance with a soft, damp cloth.
- If the hook-in racks have already been fitted, unhook and remove them. For information on removing the racks, see the section "Removing and refitting hook-in racks.#
- Clean the cooking compartment with warm soapy water.
Heating up the oven (according to the model)
To remove the new cooker smell, heat up the oven when it is empty and closed.
- Put the switch in position □ conventional cooking. Set the thermostat to 200 °C.
-
After 25 minutes, switch the oven off by turning the control knob clockwise to position 0.
-
Put the switch in position fan assisted multi-level oven. Set the thermostat to 200 °C.
- After 25 minutes, switch the oven off by turning the control knob clockwise to position 0.
Heating up the grill
- Put the switch in position
grill

- After 25 minutes, switch the oven off by turning the control knob clockwise to position 0.
Rinsing cooking compartment after initial cleaning
Clean the cooking compartment with hot soapy water. Refit the hook-in racks.
Using the rotary spit
The rotary spit can be used to cook joints such as rolled joints and poultry with excellent results. The meat is roasted thoroughly and evenly.
The rotary spit function only when the switch is in position grill.
Preparing joints
Place the joint as centrally as possible on the rotary spit and secure it at both ends with the retaining clips.
You can also truss the joint with string. With poultry, bind the ends of the wings underneath the back and the thighs against the body. This will prevent them from becoming too dark. Pierce the skin on the underside of the wings to allow the fat to escape.
Inserting the rotary spit
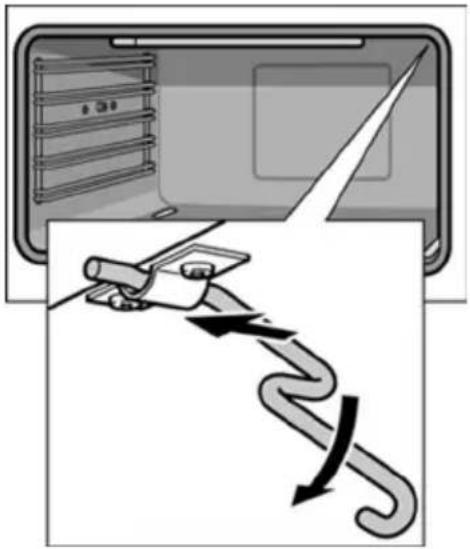
natural_image
Diagram showing a hand holding a pen with a curved arrow indicating motion or force, next to an open device (no text or symbols present)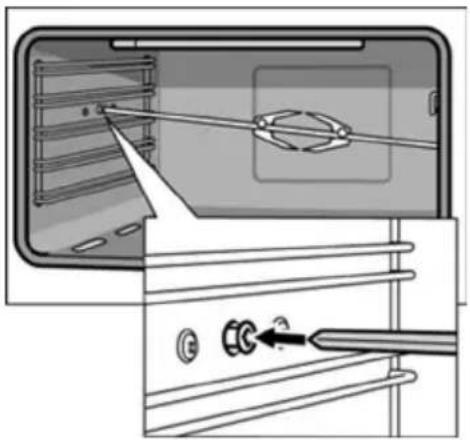
natural_image
Diagram showing a device with a tool inserted into a panel, no text or symbols present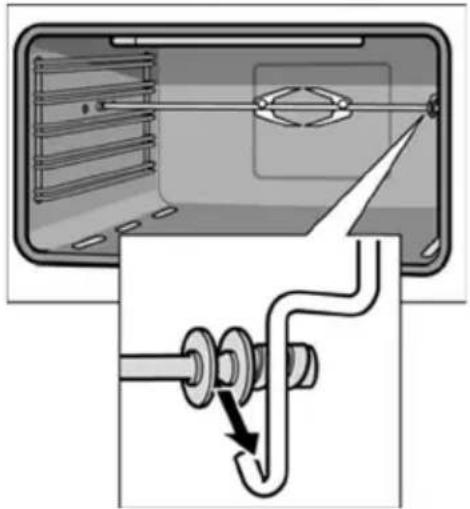
natural_image
Diagram showing a mechanical assembly with a pipe and housing, no text or symbols presentInsert the rotary spit as follows:
- Hook the spit holder into the bracket on the ceiling of the cooking compartment. If you require to preheat the oven, hook in the holder before preheating.
Risk of burns
Never touch the hot surfaces of the cooking compartment or the heating elements.
Children must be kept at a safe distance from the appliance at all times.
Open the appliance door carefully. Hot steam may escape.
-
If the oven has been preheated, only attach the rotary spit if you are using an oven cloth or wearing (thermal) oven gloves. To attach the spit, slide one end into the recessed adapter in the left-hand side panel of the cooking compartment.
-
Hook the other end into the holder.
-
Pour a little bit of water into the baking tray and slide this into shelf position 1 to collect the run-off fat.
Removing the rotary spit

Risk of burns.
Never touch the hot surfaces of the cooking compartment or the heating elements. Children must be kept at a safe distance from the appliance at all times. Open the appliance door carefully. Hot steam may escape.

Risk of burns.
Never touch the rotary spit or other accessories directly when they are hot. Always wear oven gloves or heat-resistant gloves when handling hot accessories.
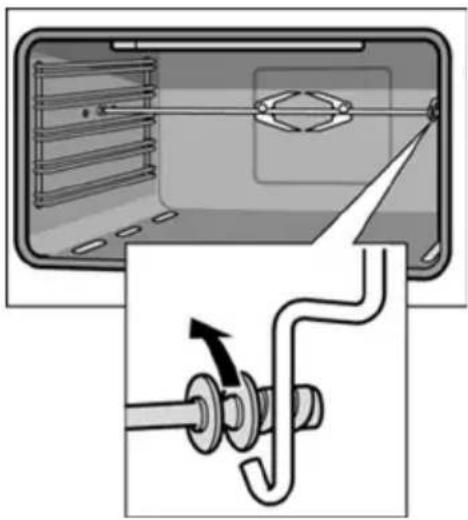
natural_image
Diagram showing a mechanical assembly with a pipe and rotating components, no text or symbols present.Remove the rotary spit as follows:
- Carefully open the appliance door. Carefully remove the rotary spit from the holder.
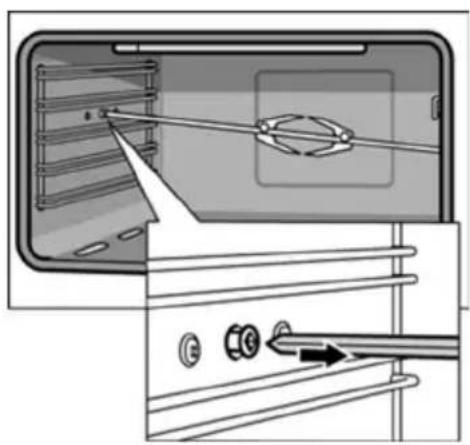
natural_image
Diagram of a device interior showing a screen with a lens and a cable inserted into a panel, with no visible text or symbols.- Carefully withdraw the rotary spit from the recessed adapter in the side panel and remove it from the oven.
- Take out the baking tray.
Cleaning and care

Never use high-pressure cleaners or steam jets. Risk of short circuit.
Never use caustic or abrasive cleaning agents. These could damage the surface. If such an agent gets on the front of the appliance, wipe it off immediately with water.
Do not clean any surfaces of the appliance while they are hot.
Switching on the oven lighting
To make it easier to clean the oven, you can switch on the oven lighting. To switch on the lighting, press the function button for oven lighting until it locks into place.
Catalytic cooking compartment panels
The catalytic cooking compartment panels are coated with self-cleaning enamel.
The surfaces clean themselves while the oven is in operation. Larger splashes will only be removed after the oven has been used several times.
Self-cleaning surfaces
The rear and side walls are protected with catalytic paneling.
Never clean these surfaces with oven cleaner.
Slight discolouration of the enamel does not affect automatic self-cleaning.
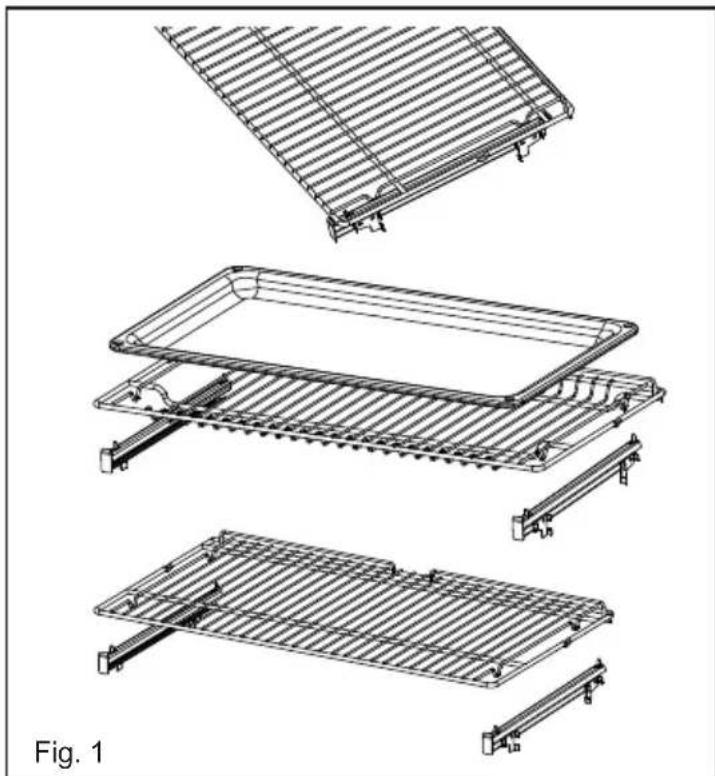
OPTIONAL: ONLY FOR THE MODELS EQUIPPED WITH TELESCOPIC RAILS
The oven is equipped with telescopic rails to position the pan and wire grid (Fig. 1).
You can change the position, depending on your personal taste and needs of different foods (Fig. 2).
natural_image
Technical line drawings of a grid-like mechanical assembly, showing structural components and mounting brackets (no text or symbols)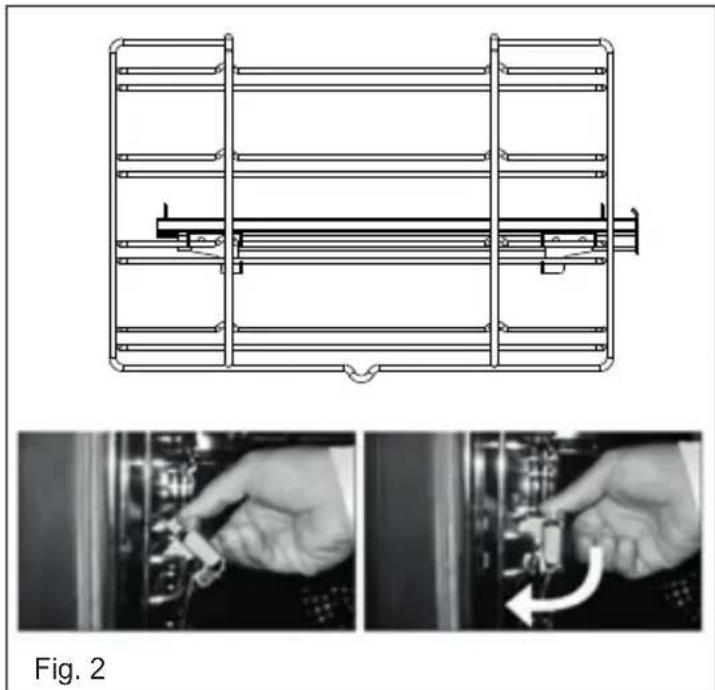
natural_image
Technical line drawing of a mechanical assembly with two views showing hand tool positioning (no text or symbols)Using the correct cleaning agent
Do not use cleaning agents that contain abrasive substances or acids, or cleaning aids such as steel wool or stainless steel sponges. These could damage the surfaces.
| Appliance parts Cleaning agent and cleaning aid | |
| Appliance door glass panel | ! Use glass cleaner.Risk of injury.The lower edge of the door may have sharp edges.Clean the door and glass panels with care.!Do not use a glass scraper. |
| Control panel and knobs | !Wipe with a damp, soft cloth. |
| Seal (on the cooking compartment) | !Use warm soapy water. |
| Hook-in racks | !Use warm soapy water. |
| Cooking compartment Enameled surfaces | !Use warm soapy water; Dry off with a soft cloth. |
| Appliance exterior Stainless steel surfaces | !Use warm soapy water; Dry off with a soft cloth.!Always remove flecks of limescale, grease, starch and albumin (e.g. egg white) immediately.!Special stainless steel cleaners are available from the after-sales service or specialist shops. |
| Glass cover (in front of the oven lighting) | !Use warm soapy water. |
| Pan support | !Use warm soapy water.!Do not clean the pan supports in the dishwasher. |
| Appliance parts Cleaning agent and cleaning aid | |
| Accessory | !Soak in hot soapy water. Clean with a brush or sponge. |
Cleaning the interior glass of the oven
The interior glass of the oven door can be removed: with the door in the semi-open position, use both hands to remove the glass. After cleaning, refit the glass by proceeding in reverse order.
Note
In some models, the glass is screen printed. In this case, when refitting the glass make sure the screen printed part is legible when theoven door is opened.
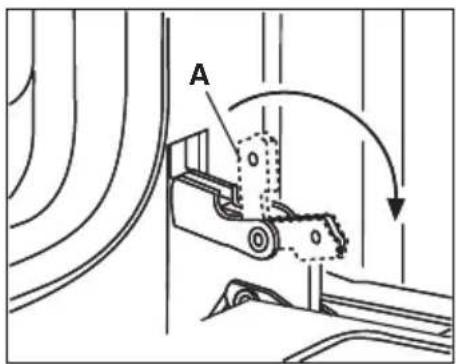
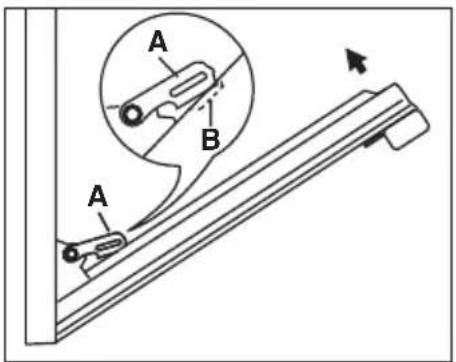
The inner glass of the oven
The inner glass of the oven door can be removed:
- Open the oven door completely.
- Flip the hinge hooks "A" outwards.
- Shut the oven door slowly until it reaches hooks "A", making sure these are locked into slots "B" of the oven door.
- With the door in a semi-open position, remove the screws D and E by screwdriver, and the profile F.
- Use both hands to remove the glass.
- After cleaning, refit the glass by proceeding in reverse order.
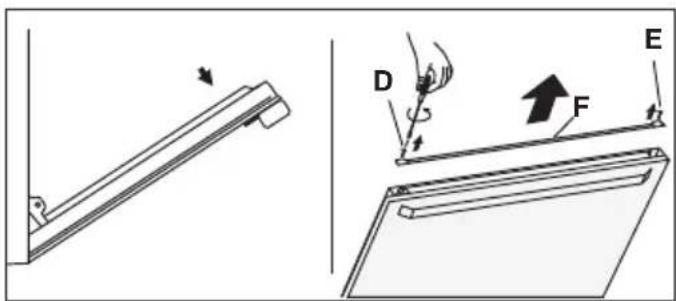
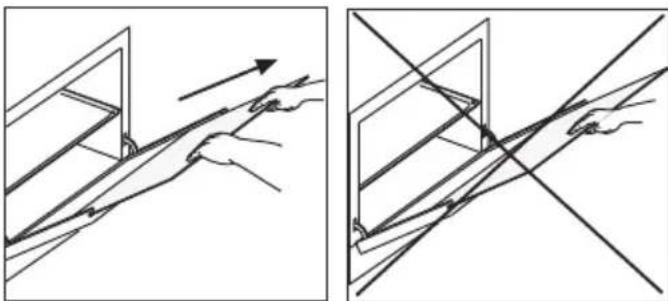
natural_image
Two technical diagrams showing hand positioning and alignment of a mechanical component, with no visible text or symbols.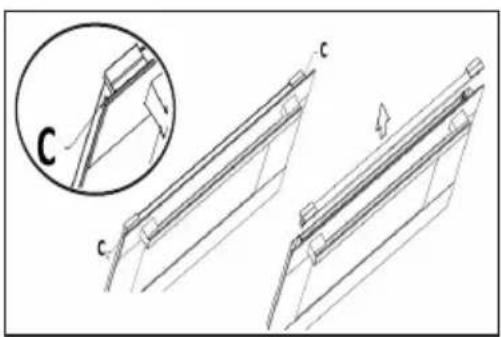
The inner glass of the oven with fixing snap (only for the models where is provided)
The inner glass of the oven door can be removed:
- Open the oven door completely.
- Flip the hinge hooks "A" outwards.
- Shut the oven door slowly until it reaches hooks "A", making sure that hinges are locked into slots "B" of the oven door.
- With the door in a semi-open position, press the two buttons C on the upper profile, and extract the profile.
- Use both hands to remove the glass.
- After cleaning, refit the glass by proceeding in reverse order.
Removing and fitting the appliance door
You can remove the appliance door for easier cleaning.
natural_image
Two-panel diagram showing mechanical components with labeled sections A and B, no text or symbols present.Removing the appliance door
natural_image
Diagram of a mechanical device with a rotating lever and directional arrow (no text or symbols)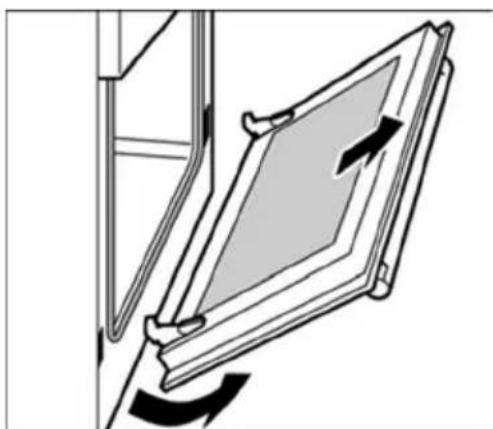
natural_image
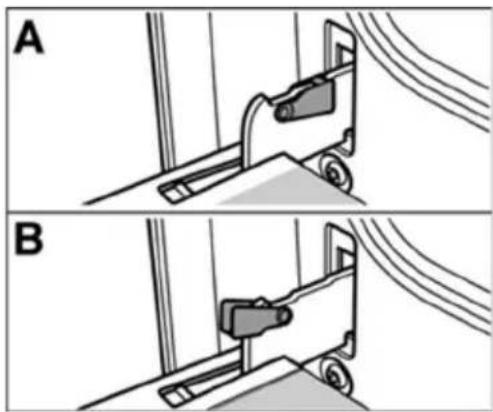
Diagram of a door frame with an open panel and directional arrows indicating movement (no text or symbols)The hinges of the appliance door are each secured by a locking lever.
When the locking lever is folded in (A), the appliance door is secured. It cannot be unhinged.
If the locking lever is open (B), only the hinge is secured, and you can remove the appliance door.
Risk of injury.
Do not reach inside the hinge.
Proceed as follows:
- Open the appliance door.
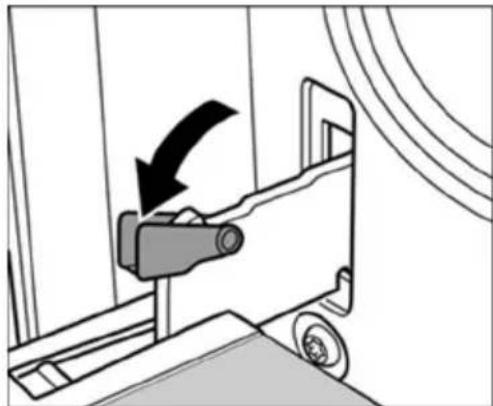
-
Lift up the locking levers on both sides.
-
Close the appliance door until you feel resistance at an angle of around 15^ (in relation to the closed appliance door).
- Grip the door on either side with both hands.
- Close the appliance door a little further.
- Lift the door upwards and at an angle to remove it.
Do not disassemble the door.
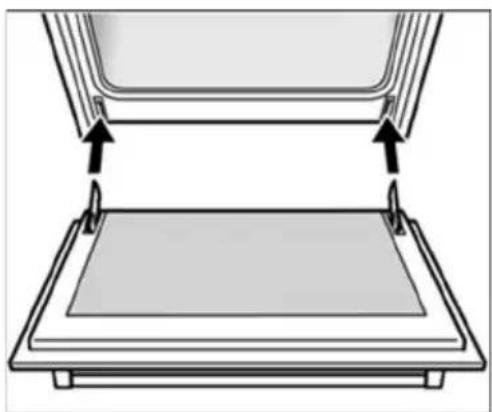
Fitting the appliance door Proceed as follows:
natural_image
Diagram of a mechanical assembly with two arrows indicating force or movement (no text or symbols present)- Hold the appliance door at an angle.
- Insert both hinges, left and right, into the supports.
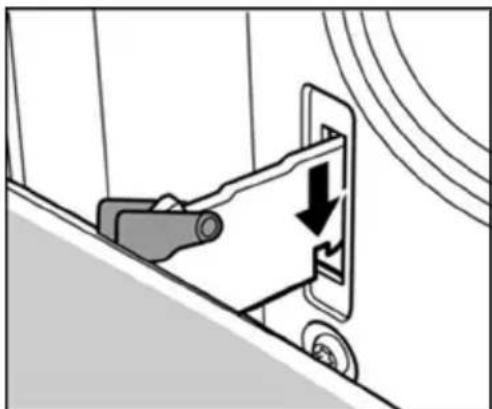
natural_image
Diagram of a mechanical device with a downward arrow indicating motion or force (no text or symbols present)- Position the door so that the hinge grooves engage on both sides.
- Open the appliance door.
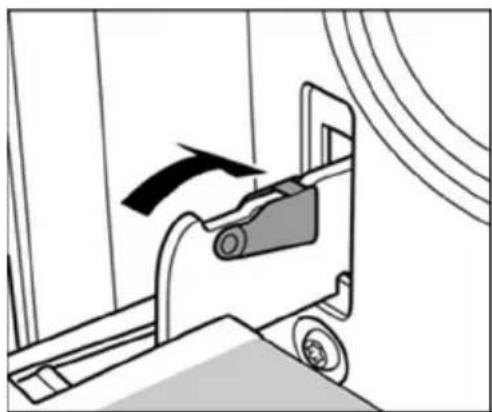
natural_image
Diagram of a mechanical device with an arrow indicating motion or force direction (no text or symbols present)- Fold in the locking levers on both sides.
- Close the appliance door.
Removing and inserting the hook-in racks
You can remove the hook-in racks in order to clean them separately.
The hook-in racks are all fixed to the walls of the cooking compartment at four points.
Removing the hook-in racks
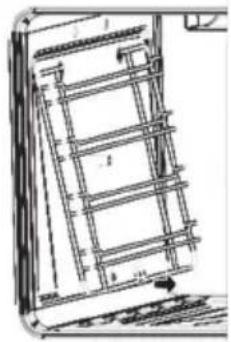
natural_image
Technical line drawing of a door frame with structural ribs and mounting holes (no text or symbols)To remove the hook-in racks, proceed as follows:
- Undo the screw on the bottom the hooking rack. The lower hooks of the hook-in rack are released
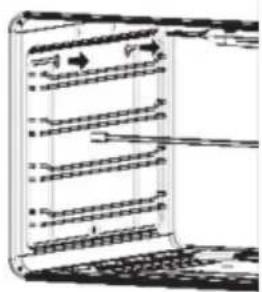
natural_image
Diagram of a server rack with multiple drive bays and indicator lights (no text or labels)- Take hold of the top of the hook-in rack and screw on the screw on the bottom the hook-in rack again.
Inserting the hook-in rack To reinsert the hook-in racks, proceed as follows:
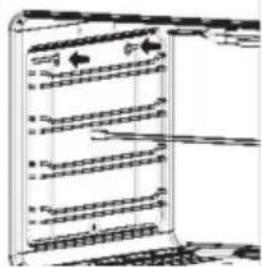
- Insert the upper hooks into the drill holes in the side panel.
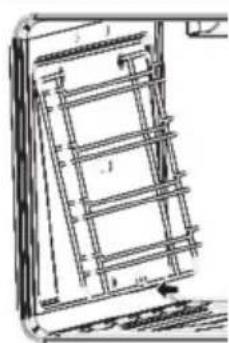
natural_image
Technical line drawing of a structural frame or panel assembly (no text or symbols)- Pull the hook-in rack slightly downwards and insert the lower hooks into the drill holes.
Faults and the after-sales service
Malfunctions often have simple explanations.
Please read the following notes before calling the aftersales service.
| Fault Possible cause Remedial action | ||
| The door panel steams up when the oven is hot. | Normal occurrence; caused by the difference in temperature. | Not possible; this has no effect on oven performance. |
| The appliance does not work. | Defective circuit breaker | Look in the fuse box and check that the circuit breaker for the appliance is in working order. |
| Power cut Check whether the kitchen light works, for example. | ||
| All dishes that are prepared in the oven become burnt very quickly. | Thermostat faulty Call the after-sales service. | |
| The oven lighting has failed. | Oven light is faulty Replace the oven light.(see section "Replacing oven light") | |
Repairs may only be carried out by fully trained after-sales service engineers.
If your appliance is not repaired professionally, you may be exposing yourself to substantial risks.
Replacing the oven light bulb
WARNING: Ensure that the appliance is switched off before replacing the lamp to avoid the possibility of electric shock
If the oven light bulb fails, it must be replaced. Replacement heat-resistant bulbs can be obtained from the after-sales service or from specialist retailers. Please specify the SN number of your appliance. Do not use any other type of bulb.
Proceed as follows:
- Switch off the relevant circuit breaker.
- Open the appliance door.
- Lay a tea towel in the cooking compartment if it is cold to prevent damage.
- Unscrew the glass cover from the bulb inside the cooking compartment by turning it anti-clockwise.
- Replace the bulb with one of the same type.
Voltage: 230 V
Power: 25 W
Thread: G9
Temperature resistance: 300^
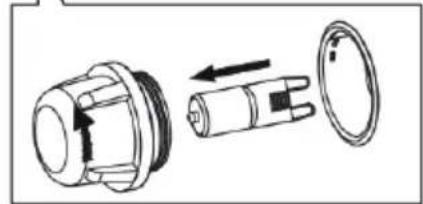
natural_image
Diagram of a mechanical component with internal parts and directional arrows indicating movement (no text or symbols)- Screw on the glass cover again.
- Remove the tea towel and switch the circuit breaker back on.
Turn the oven switch or your control panel in
position

in order to check whether the
oven lighting is working properly.
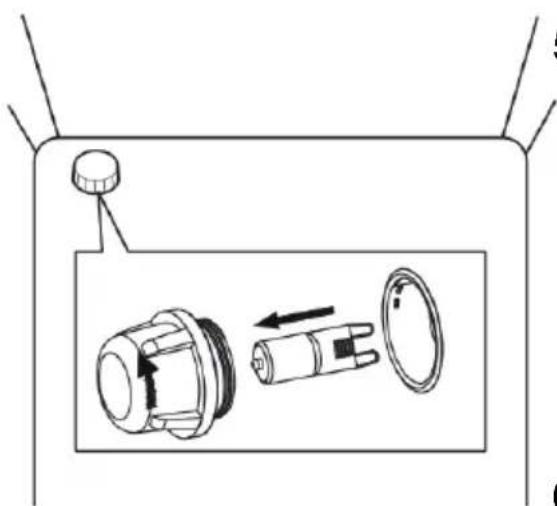
natural_image
Diagram of a mechanical component with internal parts and directional arrows, no text or symbols presentAftersales service
Our after-sales service is there for you if your appliance needs to be repaired. You will find the address and telephone number of your nearest after-sales service centre in the phone book. The after-sales service centres listed will also be happy to give you the details of an after-sales service point near you.
SN number
Please quote the SN number of the appliance when contacting the after-sales service. These numbers can be found on the rear backboard.
So you do not have to spend time looking for it if there is a fault, you can enter the data for your appliance here now.
SN no.
After-sales service
Tips and tricks
The following are tips and tricks to help you when cooking food in your appliance.
Tips for saving energy
Here are a few tips for saving energy when using the hob and oven.
Tips on using the hob Suitable cookware diameter
Make sure that the diameter of the cookware is suitable for the diameter of whichever hotplate you are using. You can find an overview of suitable diameters in the section entitled "Your new appliance - the hob#.
Cookware with lids Use cookware with a flat bottom.
If possible, use cookware with lids to save gas.
Less water
To reduce the cooking time for e.g. vegetables and potatoes, use less water.
Tips on using the oven
Several cakes
It is best to bake several cakes one after the other. The oven is still warm. This reduces the baking time for the second cake. You can also place two cake tins next to each other.
Using residual heat Where longer cooking times are used, you can switch the oven off 10 minutes before the end of the cooking time and use the residual heat to finish cooking.
Closing the appliance door Always keep the appliance door closed when it is in operation. If you need to open the appliance door, close it again as soon as possible. Otherwise, the temperature will drop and the oven will need to heat itself up again.
Tips for using your appliance
The following tips relate to ovenware and cooking and explain what to do if something goes wrong.
General tips Since a lower temperature allows more even browning.
Clean the appliance and accessories after each use, once they have cooled down.
Always place baking tins or ovenware in the centre of the wire rack.
Always place cookware in the middle of the hotplate on the hob.
Boiling and frying Cookware
For dishes which require a lot of liquid, use deep-sided pots so that they do not boil over.
The pan base must be clean, dry and flat.
Baking tips
| How to confirm whether your sponge cake is cooked through. | Approximately 10 minutes before the end of the baking time stated in the recipe, pierce the highest point of the cake with a wooden skewer. If no cake mixture sticks to the wood, the cake is ready. |
| The cake collapses. | Next time, use less liquid or bake at a slightly lower temperature. Note the stirring times indicated in the recipe. |
| The cake has risen high in the middle and less around the edges. | Do not grease the edges of the baking tin. After baking, carefully loosen the cake using a knife. |
| The cake is too dark on the top. | Place the cake lower in the oven and bake at a lower temperature for slightly longer. |
| The cake is too dry. | Make tiny holes in the finished cake using a cocktail stick. Then pour fruit juice or an alcoholic drink over the cake. Next time, bake at a slightly higher temperature for less time. |
| The bread or cake looks good but it is streaked with water inside. | Next time, use less liquid and bake at a lower temperature for slightly longer. For cakes with a moist topping: Pre-bake the base first. Sprinkle the base with almonds and breadcrumbs and then pour the topping on. Take care to follow recipes and baking times. |
| The pastries are not evenly browned. | Set the temperature slightly lower. Excess greaseproof paper can affect the air circulation. Always cut the greaseproof paper down to the size of the baking tray. |
Tips on using the rotary spit
Place the joint as centrally as possible on the rotary spit and secure it at both ends with the retaining clips.
You can also truss the joint with string. With poultry, bind the ends of the wings underneath the back and the thighs against the body. This will prevent them from becoming too dark. Pierce the skin on the underside of the wings to allow the fat to escape.
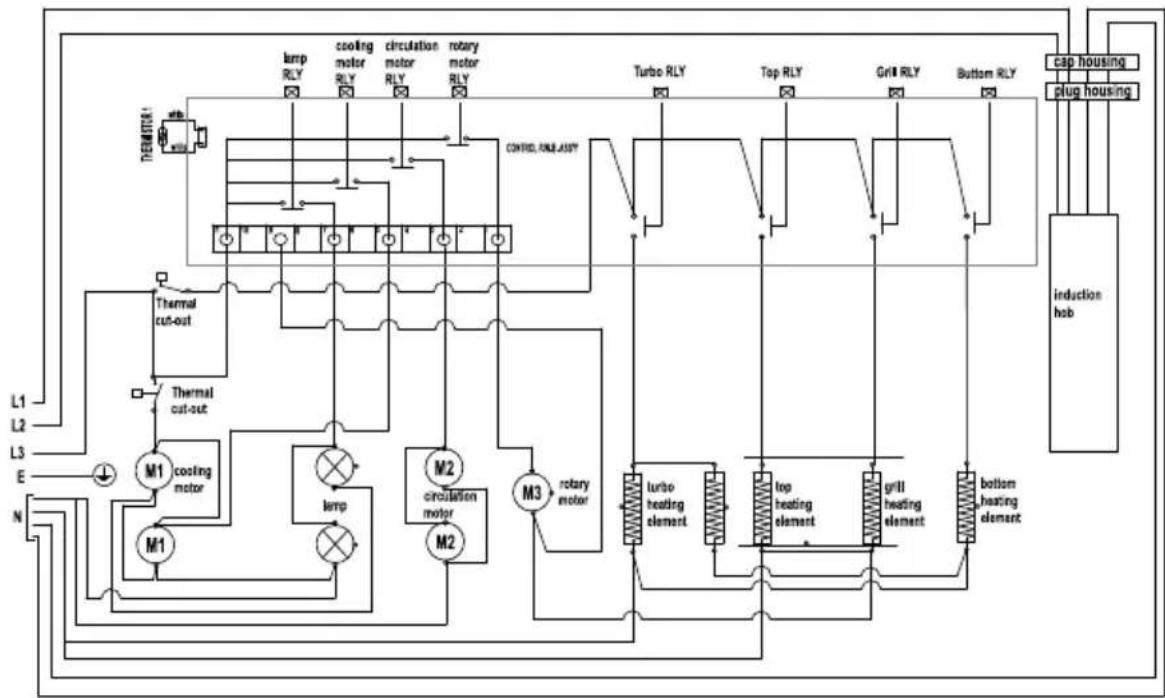
flowchart
graph TD
    A["LE1"] --> B["LE2"]
    C["L3"] --> D["E"]
    E["N"] --> F["M1"]
    F --> G["coating motor"]
    G --> H["M1"]
    H --> I["lump"]
    I --> J["lump RLY"]
    J --> K["cooling motor RLY"]
    K --> L["circulation motor RLY"]
    L --> M["rotary motor RLY"]
    M --> N["Turbo RLY"]
    N --> O["Tap RLY"]
    O --> P["Grill RLY"]
    P --> Q["Button RLY"]
    Q --> R["cap housing"]
    S["INDUCTION Hobb"] --> T["plug housing"]
    U["CONTROL RUN ASSY"] --> V["M2"]
    V --> W["m2 circulation motor"]
    W --> X["m2"]
    X --> Y["m3"]
    Y --> Z["m3 rotary motor"]
    Z --> AA["turbo heating element"]
    AA --> AB["top heating element"]
    AB --> AC["grill heating element"]
    AC --> AD["bottom heating element"]
ARTUSI THE ART OF LIVING
Worldwide Appliances Pty Limited
A.B.N. 45868077422
Office:
48-50 Moore Street, Leichhardt N.S.W 2040 Post:
Locked Bag 3000, Annandale, N.S.W 2038
P: 1300 694 583
WARRANTY REGISTRATION
Your ongoing satisfaction with your artusi product is important to us. We ask that you complete the enclosed Warranty Registration Card and return it to us so that we have a record of the artusi product purchased by you.
PRIVACY
Worldwide Appliances respects your privacy and is committed to handling your personal information in accordance with the National Privacy Principles and the Privacy Act 1988 (Cth). A copy of the Worldwide Appliances Privacy Policy is available at www.artusi.com.au. Worldwide Appliances will not disclose any personal information set out in the Warranty Registration Card (“Personal Information”) without your consent unless required by:
- law;
- any Worldwide Appliances related company;
- any service provider which provide services to artusi or assist artusi in providing services (including repair and warranty services) to customers. Our purpose in collecting the Personal Information is
to keep a record of the artusi product purchased by you, in order to provide a better warranty service to you in the unlikely event that there is a problem with your artusi product. Worldwide Appliances may contact you at any one or more of the address, email address or telephone numbers set out in the Warranty Registration Card. Please contact artusi on 1300 694 583 should you not wish to be contacted by Worldwide Appliances.
WARRANTY
1. Warranty
Worldwide Appliances warrants that each artusi product will remain, for a period of either 12 months or 24 months of warranty. All Warranties are valid from the original date of purchase, And warranty claims must be accompanied by the proof of purchase.
24 months warranty products:
All Built-in Appliances – Limited to Ovens, Gas, Induction and Electric Cooktops, and All Rangehoods
Freestanding Cookers - Gas and Electric Models (900mm Width)
Dishwashers - Freestanding, Fully Integrated, Semi Integrated and built-in
12 months warranty products: Freestanding Cookers - Gas and Electric Models in 50cm, 54cm and 60cm Widths Portable Appliances* – Benchtop Models and Portable Gas Models
2. What is not Covered by the Warranty.
The Warranty does not apply if an artusi product is defective by a factor other than a defect arising in the manufacture of the artusi product, including but not limited to:
(a) damage through misuse (including failure to maintain, service or use with proper care), neglect, accident or ordinary wear and tear (including deterioration of parts and accessories and glass breakage);
(b) use for purpose for which the artusi product was not sold or designed;
(c) use or installation which is not in accordance with any specified instructions for use or installation;
(d) use or operation after a defect has occurred or been discovered;
(e) damage through freight, transportation or handling in transit (other than when Worldwide Appliances is responsible);
(f) damage through exposure to chemicals, dusts, residues, excessive voltage, heat, atmospheric conditions or other forces or environmental factors outside the control or Worldwide Appliances;
(g) repair, modification or tampering by the purchaser or any person other than Worldwide Appliances, an employee of Worldwide Appliances or an authorised artusi service contractor ^* ;
(h) use of parts, components or accessories which have not been supplied or specifically approved by artusi.
(i) damage to surface coatings caused by cleaning or maintenance using products not recommended in the artusi product handbook provided to the purchaser upon purchase of the artusi product;
(j) damage to the base of an electric oven due to items having been placed on the base of the oven cavity or covering the base, such as aluminium foil (this impedes the transfer of heat from the element to the oven cavity and can result in irreparable damage); or
(k) damages, dents or other cosmetic imperfections not affecting the performance of the artusi in respect of an artusi product purchased as a “factory second” or from display
The Warranty does not extend to light globes used in artusi products.
3. Domestic Use
Each artusi product is made for domestic use. This Warranty may not extend to artusi products used for commercial purposes.
4. Time for Claim under the Warranty
You must make any claim under this Warranty within twenty eight (28) days after the occurrence of an event which gives rise to a claim pursuant to the Warranty, by booking a service call on the telephone number below.
5. Proof of Purchase
Customers must retain proof of purchase in order to be eligible to make a warranty claim in respect of an artusi product.
6. Claiming under the Warranty
Customers will bear the cost of claiming under this Warranty unless Worldwide Appliances determines the expenses are reasonable, in which case the customer must claim those expenses by providing written evidence of each expense to Worldwide Appliances at the address on the Warranty Registration Card.
7. Statutory Rights
(a) These terms and conditions do not affect your statutory rights.
(b) The limitations on the Warranty set out in this document do not exclude or limit the application of the consumer guarantees set out in the Act or any other equivalent or corresponding legislation in the relevant jurisdiction where to do so would:
(i) contravene the law of the relevant jurisdiction; or
(ii) cause any part of the Warranty to be void.
(c) Worldwide Appliances excludes indirect or consequential loss of any kind (including, without limitation, loss of use of the artusi product) and (other than expressly provided for in these terms and conditions) subject to all terms,
conditions and warranties implied by custom, the general law, the Act or other statute.
(d) The liability of Worldwide Appliances to you
Warranty Card tear off
for a breach of any express or non-excludable implied term, condition or warranty is limited at the option of Worldwide Appliances to:
(i) replacing or repairing the defective part of the artusi product;
(ii) paying the cost of replacing or repairing the defective part of the artusi product;
(iii) replacing the artusi product; or
(iv) paying the cost of replacing the artusi product.
(e) Our goods come with guarantees that cannot be excluded under the Australian Consumer Law. You are entitled to a replacement or refund for a major failure and for compensation for any other reasonably foreseeable loss or damage. You are also entitled to have the goods repaired or replaced if the goods fail to be of acceptable quality and the failure does not amount to a major failure.
8. Defects
Any part of an artusi product deemed to be defective and replaced by Worldwide Appliances is the property of Worldwide Appliances.
Worldwide Appliances reserves the right to inspect and test artusi products in order to determine the extent of any defect and the validity of a claim under the Warranty.
*To locate your closest artusi authorised service agent please contact us on 1300 652 100 or visit www.artusi.com.au
ALL SERVICE CALLS MUST BE BOOKED
THROUGH AN AUTHORISED DEALER OR
WARRANTY DEPARTMENT ON 1300 652 100
OR stokesaps.com.au/artusi-service
0 1 0 3 2

ARTUSI
THE ART OF LIVING
WARRANTY REGISTRATION CARD 01052013
Please complete and send to ARTUSI at:
REPLY PAID 83617
LEICHHARDT NSW 2040
| Last Name: First Name: | ||
| Address: | ||
| State: Postcode: Email: | ||
| Home Phone: Mobile: | ||
| Purchase Date: / / (Please attach proof of purchase to validate warranty) | ||
| MODEL NUMBER | SERIAL NUMBER(if you cannot locate the serial number please call ARTUSI on 1300 694 583) |
| 1 | |
| 2 | |
| 3 | |
| 4 |

ARTUSI
THE ART OF COOKING
DISCLAIMER
Worldwide Appliances PTY LTD, trading as ARTUSI, is continually seeking ways to improve the design specifications, aesthetics and production techniques of its products. As a result alterations to our products and designs take place continually. Whilst every effort is made to produce information and literature that is up to date, this brochure should not be regarded as an infallible guide to the current specifications, nor does it constitute an offer for the sale of any particular product. Product dimensions indicated in our literature is indicative only. Actual product only should be used to define dimension cutouts. Distributors, and retailers are not agents of ARTUSI and are not authorised to bind ARTUSI by any express or implied undertaking or representation.
ARTUSI OFFICES ARE OPEN DAILY FROM 9AM-5PM AND SATURDAYS 10AM-4PM
NSW & ACT (HEAD OFFICE)
48 50 MOORE STREET
LEICHHARDT
FO285694699
VIC. TAS & SA
1211 TOORAK ROAD
CAMBERWELL
F0398092155
QLD
1/42 CAVENDISH ROAD
COORPAROO
F0733970850
WA&NT
UNIT 10/55 HOWE STREET
OSBORNE PARK
F 08 9201 9188
NZ
PO BOX 11.160
SOCKBURN CHRISTCHURCH
F033445906
- APPLIANCES
- FOR LIVING
- ACKNOWLEDGMENT
- WARNING
- Installation instructions
- Safety precautions
- Before installing
- Appliance
- Unpacking
- Adjacent units
- Fitting the adjustable feet
- Fitting the splash guard
- Positioning and levelling
- Levelling the appliance
- Instruction assembly crossbar reinforced legs
- Electrical connection
- Replacement or mounting of the power cord
- Stability bracket
- Instructions for use
- Important information.... 18
- Safety precautions 19
- Property damage 21
- Your new appliance 22
- Before using for the first time 46
- Cleaning and care 51
- Faults and the after-sales service 59
- Tips and tricks 62
- Important information
- Transport damage
- Environmentally-friendly disposal
- Hot surfaces Risk of burns.
- Risk of fire.
- Risk of short-circuit.
- Overheated oil and fat
- High-proof alcohol
- Risk of burns.
- Repairs
- Risk of electrocution.
- Lateral stress
- Possibility of tilting
- Anti-tip restraint
- Property damage
- Damage to the oven
- Damage to the fronts of adjacent units
- Your new appliance
- The hob (according to the models)
- Instruction for use of the induction hob
- A Word on Induction Cooking
- Before using your New Induction Hob
- Using the Touch Controls
- Choosing the right Cookware
- Pan Dimension
- Using your Induction Hob To start cooking
- When you have finished cooking
- Using the Boost function
- Active the boost function
- Cancel the Boost function
- FLEXIBLE AREA
- As big zone
- As two independent zones
- Special function
- Activate the Special Function
- Cancel the Special Function
- Note:
- Locking the Controls
- To lock the controls
- To unlock the controls
- Over-Temperature Protection
- Detection of Small Articles
- Auto Shutdown Protection
- Using the Timer
- Using the Timer as a Minute Minder
- If you are not selecting any cooking zone
- Setting the timer to turn cooking zones off If the timer is set on one zone:
- If the timer is set on more than one zone:
- 15
- 30
- 6
- Using the boiling cue control
- Active the boiling cue function
- Cancel the boiling cue function
- Cooking Guidelines
- Cooking Tips
- Simmering, cooking rice
- Searing steak
- For stir-frying
- Heat Settings
- Care and Cleaning
- Failure Display and Inspection
- The oven (according to the models)
- Electronic control
- Oven Accessories
- Accessory Description
- Baking and roasting shelf
- Enamelled baking tray
- Rotary spit
- Using the electronic oven control
- OPERATION INSTRUCTIONS
- Clock Setting
- Function Setting
- NOTES:
- Lamp Setting
- Inquiring function
- Child lock function
- Reminder Function
- Start/Pause/Cancel Function
- Reservation Function
- Energy-Saving Function
- Note
- The storage compartment
- Before using for the first time
- Baking out the oven
- Cooking compartment initial cleaning
- Heating up the oven (according to the model)
- Heating up the grill
- Using the rotary spit
- Preparing joints
- Inserting the rotary spit
- Risk of burns
- Removing the rotary spit
- Cleaning and care
- Switching on the oven lighting
- Catalytic cooking compartment panels
- Self-cleaning surfaces
- OPTIONAL: ONLY FOR THE MODELS EQUIPPED WITH TELESCOPIC RAILS
- Using the correct cleaning agent
- Cleaning the interior glass of the oven
- Note
- The inner glass of the oven
- The inner glass of the oven with fixing snap (only for the models where is provided)
- Removing and fitting the appliance door
- Risk of injury.
- Fitting the appliance door Proceed as follows:
- Removing and inserting the hook-in racks
- Removing the hook-in racks
- Faults and the after-sales service
- Replacing the oven light bulb
- Aftersales service
- SN number
- Tips and tricks
- Tips for saving energy
- Tips on using the hob Suitable cookware diameter
- Less water
- Tips on using the oven
- Several cakes
- Tips for using your appliance
- Boiling and frying Cookware
- Tips on using the rotary spit
- ARTUSI THE ART OF LIVING
- PRIVACY
- WARRANTY
- Warranty
- What is not Covered by the Warranty.
- Domestic Use
- Time for Claim under the Warranty
- Proof of Purchase
- Claiming under the Warranty
- Statutory Rights
- Warranty Card tear off
- Defects
- ARTUSI
- THE ART OF LIVING
- THE ART OF COOKING
- DISCLAIMER
Brand : Artusi
Model : CAFI95X
Category : Oven