
JS900CS - Portable starter STANLEY - Free user manual and instructions
Find the device manual for free JS900CS STANLEY in PDF.


| Product Type | Portable Jump Starter with Compressor |
| Brand | Stanley |
| Model | JS900CS |
| Boost Current | 450A instantaneous |
| Battery Type | Maintenance-free, sealed lead acid, 12V DC, 17Ah |
| AC Input | 120V AC, 60Hz, 12W |
| DC Accessory Outlet | 12V DC, 5A |
| USB Charging Port | 5V DC, 500mA |
| Compressor Maximum Pressure | 120 PSI |
| Area Light | 2 long-life white LEDs |
| Folding Handle | Yes |
| Reverse Polarity Indicator | Yes (alarm and light) |
| Battery Status LEDs | 3 indicators (green, yellow, red) |
| Jump-Starter Power Switch | On/Off |
| USB Power Button | Yes |
| LED Light Power Button | Yes |
| Compressor Power Switch | Yes |
| Air Hose and Nozzle Storage | Built-in compartment |
| Built-in 120V AC Charger | Under protective cover |
| Warranty | One-year limited |
Frequently Asked Questions - JS900CS STANLEY
User questions about JS900CS STANLEY
0 question about this device. Answer the ones you know or ask your own.
Ask a new question about this device
Download the instructions for your Portable starter in PDF format for free! Find your manual JS900CS - STANLEY and take your electronic device back in hand. On this page are published all the documents necessary for the use of your device. JS900CS by STANLEY.
USER MANUAL JS900CS STANLEY
natural_image
Exterior view of a black and white electrolytic cell device (no visible text or symbols)English page 3
Español pagina 11
SAVE THIS INSTRUCTION MANUAL FOR FUTURE REFERENCE.
CONSERVE ESTE MANUAL PARA FUTURAS CONSULTAS.
© 2014 Baccus Global LLC
Boca Raton, FL 33432
(877) 571-2391


Intertek
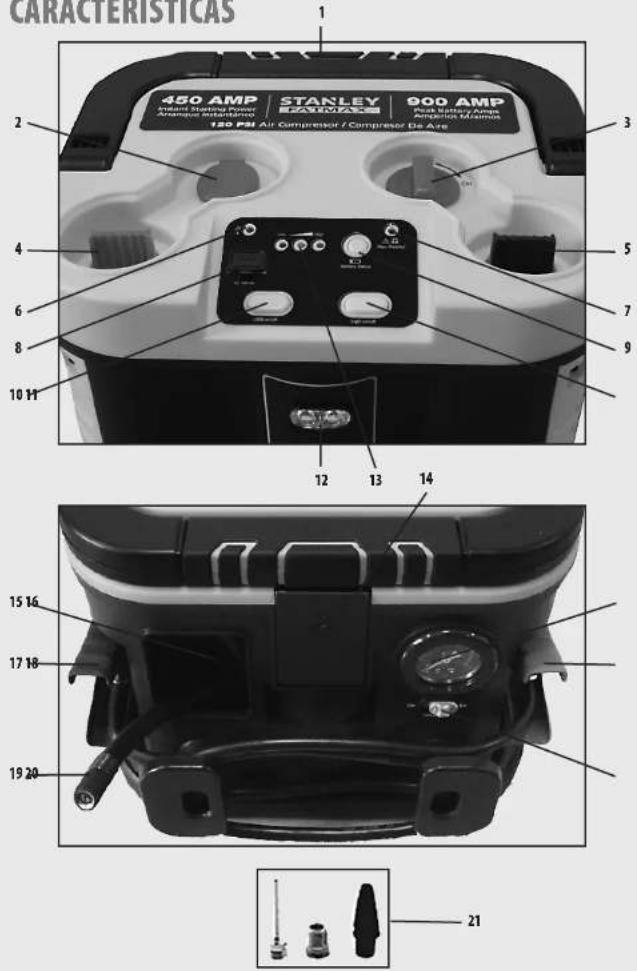
FEATURES
CARACTERÍSTICAS
2
JS900CS_ManualENSP_022514.indo 2-3 2/25/2014 10:46:56 AM

FEATURES
-
Folding Handle
-
12 Volt DC Accessory Outlet (under protective cover)
-
Jump-Starter Power Switch
-
Tab for Positive (+) Red Clamp
-
Tab for Negative (—) Black Clamp
-
USB power indicator
-
Reverse Polarity Indicator
-
USB Charging Port (under protective cover)
-
Battery Power Level Button
-
USA Power Button
-
LED Light Power Button
-
2-LFD Area Light
-
2 LED HIPS Light
-
Battery Status LED
-
Battery Status LED Indicators 14. Built in 120Volt ACChomer
-
Built-in 120 volt AC charger under protective cover,
-
Air Hose, Nozzle and Adapter Storage Compartment
-
Air Pressure Gauge
-
Negative (−) Black Clamp
-
Positive (+) Red Clamp
-
Air Hose and SureFit™ Nozzle Connector
-
Compressor Power Switch
-
Nozzle adapters
CARACTERÍSTICAS
This device complies with part 15 of the FCC rules. Operation is subject to the following two conditions: (1) this device may not cause harmful interference, and (2) this device must accept any interference received, including interference that may cause undesired operation.
This equipment has been tested and found to comply with the limits for a Class B digital device, pursuant to part 15 of the FCC Rules. These limits are designed to provide reasonable protection against harmful interference in a residential installation. This equipment generates, uses and can radiate radio frequency energy and, if not installed and used in accordance with the instructions, may cause harmful interference to radio communications. However, there is no guarantee that interference will not occur in a particular installation. If equipment does cause harmful interference to radio or television reception, which can be determined by turning the equipment off and on, the user is encouraged to try to correct the interference by one or more of the following measures:
- Reorient or relocate the receiving antenna.
- Increase the separation between equipment and receiver.
- Connect the equipment into an outlet on a circuit different from that to which the receiver is connected.
- Consult the dealer or an experienced radio/TV technician for help.
Changes or modifications not approved by the party responsible for compliance could void user's authority to operate the equipment.
DANGER: Indicates an imminently hazardous situation which, if not avoided, will result in death or serious injury.
WARNING: Indicates a potentially hazardous situation which, if not avoided, could result in death or serious injury.
■CAUTION: Indicates a potentially hazardous situation which, if not avoided, may result in minor or moderate injury.
CAUTION: Used without the safety alert symbol indicates potentially hazardous situation which, if not avoided, may result in property damage.
RISK OF UNSAFE OPERATION. When using tools or equipment, basic safety precautions should always be followed to reduce the risk of personal injury. Improper operation, maintenance or modification of Tools or equipment could result in serious injury and property damage. There are certain applications for which tools and equipment are designed. Manufacturer strongly recommends that this product NOT be modified and/or used for any application other than for which it was designed. Read and understand all warnings and operating instructions before using any tool or equipment.
IMPORTANT SAFETY INSTRUCTIONS
READ ALL INSTRUCTIONS
WARNING: Read all instructions before operating jump-starter. Failure to follow all instructions listed below may result in electric shock, fire and/or serious injury.
GENERAL SAFETY WARNINGS AND INSTRUCTIONS
WARNING: This product or its power cord contains lead, a chemical known to the State of California to cause cancer and birth defect or other reproductive harm. Wash hands after handling.
• This unit was designed for household use only.
WARNING – TO REDUCE THE RISK OF FIRE, ELECTRIC SHOCK, BURST HAZARD, OR INJURY TO PERSONS OR PROPERTY:
- Avoid dangerous environments. Don't use appliances in damp or wet locations. Don't use appliances in the rain.
- Keep children away. All visitors should be kept at a distance from work area.
- Dress properly. Do not wear loose clothing or jewelry. They can be caught in moving parts. Rubber gloves and substantial, non-skid footwear are recommended when working outdoors. Wear protective hair covering to contain long hair.
- Use safety glasses and other safety equipment. Use safety goggles or safety glasses with side shields, complying with applicable safety standards. Safety glasses or the like are available at extra cost at your local dealer.
- Store indoors. When not in use, this equipment should be stored indoors in a dry, and high or locked-up place – out of reach of children.
- Don't abuse cord. Never carry appliance by cord or yank it to disconnect from receptacle. Keep cord from heat, oil, and sharp edges.
- Disconnect appliances. Disconnect the appliance from the power supply when not in use, before servicing, and when changing accessories.
- Ground Fault Circuit Interrupter (GFCI) protection should be provided on the circuits or outlets to be used. Receptacles are available having built in GFCI protection and may be used for this measure of safety.
- Use of accessories and attachments. The use of any accessory or attachment not recommended for use with this appliance could be hazardous. Refer to the accessory section of this manual for further details.
- Stay alert. Use common sense. Do not operate appliance when you are tired or impaired.
- Check for damaged parts. Any part that is damaged should be replaced by the manufacturer before further use. Contact the manufacturer at (877) 571-2391 for more information.
- Do not operate this appliance near flammable liquids or in gaseous or explosive atmospheres. Motors in these tools normally spark, and the sparks might ignite fumes.
- Never submerge this unit in water or any other liquid; do not expose it to rain, snow or use when wet.
- To reduce risk of electric shock, disconnect the unit from any power source before attempting maintenance or cleaning. Turning off controls without disconnecting will not reduce this risk.
- This equipment employs parts (switches, relays, etc.) that produce arcs or sparks. Therefore, if used in a garage or enclosed area, the unit MUST be placed not less than 18 inches above the floor.
- Do not use this unit to operate appliances that need more than 5 amps to operate from the 12 volt DC accessory outlet.
- Do not insert foreign objects into either the USB outlet or the 12 volt DC accessory outlet.
SPECIFIC SAFETY INSTRUCTIONS FOR CHARGING THIS UNIT
- IMPORTANT: This unit is delivered in a partially charged state. Fully charge unit with a household extension cord (not supplied) for a full 40 hours before using for the first time. You cannot overcharge the unit using the AC charging method.
• To recharge this unit, use only the built-in AC Charger.
4

- All ON/OFF switches should be in the OFF position when the unit is charging or not in use. Make sure all switches are in the OFF position before connection to a power source or load.
WARNING: SHOCK HAZARD
- Do not operate charger with damaged cord or plug.
- Do not operate charger if it has received a sharp blow, been dropped, or otherwise damaged in any way.
- Do not disassemble charger; return it to the manufacturer when service or repair is required. Incorrect reassembly may result in a risk of electric shock or fire.
- Outdoor use extension cords. When appliance is used outdoors, use only extension cords intended for use outdoors and so marked. - Extension cords. Make sure your extension cord is in good condition. When using an extension cord, be sure to use one heavy enough to carry the current your product will draw. An undersized cord will cause a drop in line voltage resulting in loss of power and overheating. The following table shows the correct size to use depending on cord length and nameplate ampere rating. If in doubt, use the next heavier gage. The smaller the gage number, the heavier the cord.
| MINIMUM GAGE FOR CORD SETS | |||||
| Volts | Total Length of Cord in Feet | ||||
| 120V | 0-25(7.6-15.2m) | 26-50(15.2-30.4m) | 51-100(30.4-45.7m) | 101-150 | |
| 240V | 0-50(0-15.2m) | 51-100(15.2-30.4m) | 101-200(30.4-60.9m) | 201-300(60.9-91.4m) | |
| Ampere Rating | Extension Cord Length | ||||
| More Than | Not more Than | 0'-25' | 26'-50' | 51'-100' | 101'-150' |
| American Wire Gage (AWG) | |||||
| 0 - | 6 | 18 | 16 | 16 | 14 |
| 6 - | 10 | 18 | 16 | 14 | 12 |
| 10 - | 12 | 16 | 16 | 14 | 12 |
| 12 - | 16 | 14 | 12 | Not Recommended | |
When an extension cord is used, make sure that:
- a) the pins of extension cord are the same number, size and shape as those in the charger,
- b) the extension cord is properly wired and in good electrical condition,
• c) the wire size is large enough for the AC rating of the charger.
■ CAUTION: TO REDUCE THE RISK OF INJURY OR PROPERTY DAMAGE: Pull cord by plug rather than cord when disconnecting the extension cord from the unit or the outlet.
SPECIFIC SAFETY INSTRUCTIONS FOR COMPRESSORS
■ CAUTION: TO REDUCE THE RISK OF INJURY OR PROPERTY DAMAGE: Never leave the compressor unattended while in use.
WARNING: BURST HAZARD:
• Carefully follow instructions on articles to be inflated.
- Never exceed the recommended pressure listed in instructions on articles to be inflated. If no pressure is given, contact article manufacturer before inflating.
• Monitor the pressure at all times on the pressure gage.
■ CAUTION: TO REDUCE THE RISK OF PROPERTY DAMAGE:
Do not operate compressor continuously for longer than approximately 10 minutes, depending on ambient temperatures, as it may overheat. In such event, compressor may automatically shut down. Turn off the Compressor Power Switch immediately and restart after a cooling down period of approximately 30 minutes.
SPECIFIC SAFETY INSTRUCTIONS FOR JUMP STARTERS
WARNING: BURST HAZARD
Do not use the unit for charging dry-cell batteries that are commonly used with home appliances. These batteries may burst and cause injury to persons and damage property. Use the unit for charging/boosting a lead-acid battery only. It is not intended to supply power to a low-voltage electrical system other than in a starter-motor application.
- Use of an attachment not supplied, recommended or sold by manufacturer specifically for use with this unit may result in a risk of electrical shock and injury to persons.
WARNING: RISK OF EXPLOSIVE GASES
- Working in the vicinity of a lead acid battery is dangerous. Batteries generate explosive gases during normal battery operation. For this reason, it is of the utmost importance that each time before using the jump-starter you read this manual and follow instructions exactly.
5
• To reduce the risk of battery explosion, follow these instructions and those published by the battery manufacturer and manufacturer of any equipment you intend to use in the vicinity of the battery. Review cautionary markings on these products and on the engine.
■ CAUTION: TO REDUCE THE RISK OF INJURY OR PROPERTY DAMAGE:
• NEVER ATTEMPT TO JUMP-START OR CHARGE A FROZEN BATTERY.
- Vehicles that have on-board computerized systems may be damaged if vehicle battery is jump-started. Before jump-starting, read the vehicle's owner's manual to confirm that external-starting assistance is suitable.
- When working with lead acid batteries, always make sure immediate assistance is available in case of accident or emergency.
• Always have protective eyewear when using this product: contact with battery acid may cause blindness and/or severe burns. Be aware of first aid procedures in case of accidental contact with battery acid.
- Have plenty of fresh water and soap nearby in case battery acid contacts skin.
- Never smoke or allow a spark or flame in vicinity of vehicle battery, engine or power station
- Stay clear of fan blades, belts, pulleys, and other parts that can cause injury to persons.
- Remove personal metal items such as rings, bracelets, necklaces and watches when working with a lead acid battery. A lead acid battery can produce a short circuit current high enough to weld a ring, or similar metal object, to skin, causing a severe burn.
- Do not wear vinyl clothing when jump-starting a vehicle when jump-starting a vehicle. Friction can cause dangerous static-electrical sparks.
- Jump-start procedures should only be performed in a safe, dry, well-ventilated area.
- Always store battery clamps when not in use. Never touch battery clamps together. This can cause dangerous sparks, power arcing and/or explosion.
- When using this unit close to the vehicle's battery and engine, stand the unit on a flat, stable surface, and be sure to keep all clamps, cords, clothing and body parts away from moving vehicle parts.
- Never allow red and black clamps to touch each other or another common metal conductor — this could cause damage to the unit and/or create a sparking/explosion hazard.
a) For negative-grounded systems, connect the positive (red) clamp to the positive ungrounded battery post and the negative (black) clamp to the vehicle chassis or engine block away from the battery. Do not connect the clamp to the carburetor, fuel lines or sheet-metal body parts. Connect to a heavy gage metal part of the frame or engine block. b) For positive-grounded systems, connect the negative (black) clamp to the negative ungrounded battery post and the positive (red) clamp to the vehicle chassis or engine block away from the battery. Do not connect the clamp to the carburetor, fuel lines or sheet-metal body parts. Connect to a heavy gage metal part of the frame or engine block.
- If the connections to the battery's positive and negative terminals are incorrect, the reverse polarity indicator will light and the unit will sound a continuous alarm until the clamps are disconnected. Disconnect clamps and reconnect to battery with correct polarity.
• Always disconnect the negative (black) jumper cable first, followed by the positive (red) jumper cable, except for positive grounded systems.
- Do not expose battery to fire or intense heat since it may explode. Before disposing of the battery, protect exposed terminals with heavy-duty electrical tape to prevent shorting (shorting can result in injury or fire).
- Place this unit as far away from the battery as cables permit.
- Never allow battery acid to come in contact with this unit.
- Do not operate this unit in a closed area or restrict ventilation in any way.
- This system is designed to be used only on vehicles with a 12 volt DC battery system. Do not connect to a 6 volt or 24 volt battery system.
- This system is not designed to be used as a replacement for a vehicular battery. Do not attempt to operate a vehicle that does not have a battery installed.
- Excessive engine cranking can damage a vehicle's starter motor. If the engine fails to start after the recommended number of attempts, discontinue jump-start procedures and look for other problems that may need to be corrected.
- Do not use this jump starter on a watercraft. It is not qualified for marine applications.
- Although this unit contains a non-spillable battery, it is recommended that unit be kept upright during storage, use and recharging. To avoid possible damage that may shorten the unit's working life, protect it from direct sunlight, direct heat and/or moisture.
FIRST AID
- Skin: If battery acid contacts skin or clothing, wash immediately with soap and water for at least 10 minutes. If redness, pain, or irritation occurs, seek immediate medical attention.
- Eyes: If battery acid comes in contact with eyes, flush eyes immediately, for a minimum of 15 minutes and seek immediate medical attention.
SAVE THESE INSTRUCTIONS
6

INTRODUCTION
Congratulations on purchasing your new Stanley FatMax™ 450 Amp Jump Starter with Compressor. Read this Instruction Manual and follow the instructions carefully before using this unit.
CHARGING/RECHARGING
Lead-acid batteries require routine maintenance to ensure a full charge and long battery life. All batteries lose energy from self-discharge over time and more rapidly at higher temperatures. Therefore, batteries need periodic charging to replace energy lost through self-discharge. When the unit is not in frequent use, manufacturer recommends the battery be recharged at least every 30 days.
Notes: This unit is delivered in a partially charged state – you must fully charge it upon purchase and before using it for the first time. Initial AC charge should be for 40 hours.
Rechanging battery after each use will prolong battery life; frequent heavy discharges between recharges and/or overcharging will reduce battery life. The battery can be recharged using the Built-In 120 Volt AC Charger.
Make sure all other unit functions are turned off during recharging, as this can slow the recharging process.
IMPORTANT: If you know the unit is discharged, but the battery status LEDs illuminate as if the unit is fully charged when connected to a charging power source, this may be due to the internal battery having high impedance. The manufacturer suggests leaving the unit charging for a period of 24-48 hours using the AC charging method before use.
■ CAUTION: RISK OF PROPERTY DAMAGE: Failure to keep the battery charged will cause permanent damage and result in poor jump starting performance.
Charging/Recharging Using the 120 Volt AC Charger and a Standard Household Extension Cord (not included) 1. Lift the AC adapter cover located on the back of the unit and connect an extension cord to the unit. Plug the other end of the cord into a standard 120-volt AC wall outlet.
-
Charge until the green Battery Status LED Indicator lights solid or flashes.
-
Disconnect the extension cord.
Note: The unit cannot be overcharged using this method.
JUMP-STARTER
This Jump-Starter is equipped with an On/Off Power Switch. Once the connections are properly made, turn the switch on to jump-start the vehicle.
-
Turn off vehicle ignition and all accessories (radio, A/C, lights, connected cell phone chargers, etc.). Place vehicle in "park" and set the emergency brake.
-
Make sure the Jump-Starter Power Switch is turned to off.
-
Remove jumper clamps from clamp tabs. Connect the red clamp first, then the black clamp.
-
Procedure for jump-starting a NEGATIVE GROUNDED SYSTEM (negative battery terminal is connected to chassis) (MOST COMMON)
4a. Connect positive (+) red clamp to vehicle battery's positive terminal.
4b. Connect negative (−) black clamp to chassis or a solid, non-moving, metal vehicle component or body part. Never clamp directly to negative battery terminal or moving part. Refer to the automobile owner's manual.
5. Procedure for jump-starting POSITIVE GROUND SYSTEMS
Note: In the rare event that the vehicle to be started has a Positive Grounded System (positive battery terminal is connected to chassis), replace steps 4a and 4b above with steps 5a and 5b, then proceed to step 6.
5a. Connect negative (−) black clamp to vehicle battery's negative terminal.
5b. Connect positive (+) red clamp to vehicle chassis or a solid, non-moving, metal vehicle component or body part. Never clamp directly to Positive battery terminal or moving part. Refer to the automobile owner's manual.
-
When clamps are connected properly, turn the Jump-Starter Power Switch to ON.
-
Turn ON the ignition and crank the engine in 5-6 second bursts until engine starts.
-
Turn the Jump-Starter Power Switch back to the OFF position.
-
Disconnect the negative (−) engine or chassis clamp first, then disconnect the positive (+) battery clamp.
WARNING: TO REDUCE THE RISK OF INJURY OR PROPERTY DAMAGE:
- FOLLOW ALL SAFETY INSTRUCTIONS FOUND IN THE "SPECIFIC SAFETY INSTRUCTIONS FOR JUMP STARTERS" SECTION OF THIS INSTRUCTION MANUAL.
- This power system is to be used ONLY on vehicles with 12 volt DC battery systems.
- Never touch red and black clamps together — this can cause dangerous sparks, power arcing, and/or explosion.
- After use, turn the Jump-Starter Power Switch off.
■ CAUTION: TO REDUCE THE RISK OF PROPERTY DAMAGE:
- Vehicles that have on-board computerized systems may be damaged if vehicle battery is jump-started. Before jump-starting this type of vehicle, read the vehicle manual to confirm that external-starting assistance is advised.
7


- Excessive engine cranking can damage the vehicle's starter motor. If the engine fails to start after the recommended number of attempts, discontinue jump-start procedure and look for other problems that need to be corrected.
- If the connections to the battery's positive and negative terminals are incorrect, the Reverse Polarity Indicator will light and the unit will sound a continuous alarm until the clamps are disconnected. Disconnect clamps and reconnect to battery with correct polarity.
• If vehicle fails to start, turn off the ignition, turn off the Jump-Starter Power Switch, disconnect the jump-start system's leads and contact a qualified technician to investigate why the engine did not start.
• Recharge this unit fully after each use.
12 VOLT DC PORTABLE POWER SUPPLY
The 12 volt DC accessory outlet is located under a protective cover on the top of the unit. This portable power source is for use with all 12 volt DC accessories equipped with a male accessory outlet plug that are rated up to 5 amps.
- Lift up the cover of the unit's 12 volt DC outlet.
- Insert the 12 volt DC plug from the appliance into the 12 volt accessory outlet on the unit. DO NOT EXCEED A 5 AMP LOAD.
- Switch on the appliance and operate as usual.
- Periodically check the unit's battery status by pressing the battery power level button. (When all three battery status indicators light, it indicates a full battery. When only one red battery status indicator lights, it indicates that the unit needs to be recharged.)
USB CHARGING PORT
The USB charging port is located under a protective cover on the left side of the main control panel.
- Push the USB Power Button to turn the USB Charging Port on and the USB power indicator will light.
- Lift up the cover of the USB Charging Port.
- Plug the USB-powered device into the USB Charging Port and operate normally.
- Periodically check the unit's battery status by pressing the battery power level button. (When all three battery status indicators light, it indicates a full battery. When only one red battery status indicator lights, it indicates that the unit needs to be recharged.)
Notes: This unit's USB Power Port does not support data communication. It only provides 5 volts/500mA DC power to an external USB-powered device.
Make sure the USB Power Button is in the off position when the unit is being recharged or stored.
Some household USB-powered electronics will not operate with this unit.
LED AREA LIGHT
The area light is controlled by the LED Light Power Button on main control panel. Make sure the area light is turned off when the unit is being recharged or stored.
Periodically check the unit's battery status by pressing the battery power level button. (When all three battery status indicators light, it indicates a full battery. When only one red battery status indicator lights, it indicates that the unit needs to be recharged.)
PORTABLE COMPRESSOR
The built-in 12 volt DC compressor is the ultimate compressor for all vehicle tires, trailer tires and recreational inflatables. The compressor hose with tire fliting is stored in a retaining channel on the back of the unit. The On/Off Switch is located on the rear of the unit under the air pressure gauge. The compressor can operate long enough to fill up to 3 average sized tires before the battery must be recharged.
The compressor may be used by removing the air hose from the storage compartment and if required, fitting an appropriate nozzle to the air hose. Return hose to the storage compartment after use.
Inflating Tires or Products With Valve Stems
- Screw the SureFit™ nozzle connector into the valve stem. Do not overtighten.
- Turn on the Compressor Power Switch.
- Check pressure with the pressure gauge
- When desired pressure is reached, turn off the Compressor Power Switch.
- Unscrew and remove the SureFit™ nozzle connector from the valve stem.
- Allow the unit to cool before storing away.
- Store the compressor hose and nozzle in the storage compartment.
Inflating Other Inflatables Without Valve Stems
Inflation of other items requires use of one of the nozzle adapters.
- Select the appropriate nozzle adapter (i.e., needle).
- Screw the adapter into the SureFit™ nozzle connector. Do not overtighten.
- Insert the adapter into item to be inflated.
- Turn on the Compressor Power Switch — inflate to desired pressure or fullness.
IMPORTANT NOTE: Small items such as volleyballs, footballs, etc. inflate very rapidly. Do not over-inflate. - When desired pressure is reached, turn off the Compressor Power Switch.
8
- Disconnect the adapter from the inflated item.
- Unscrew and remove the adapter from the SureFit™ nozzle connector.
- Allow the unit to cool before storing away.
- Store the compressor hose, nozzle and adapter in the storage compartment.
WARNING: TO REDUCE THE RISK OF INJURY OR PROPERTY DAMAGE: FOLLOW ALL SAFETY INSTRUCTIONS FOUND IN THE "SPECIFIC SAFETY INSTRUCTIONS FOR COMPRESSORS" SECTION OF THIS INSTRUCTION MANUAL.
CARE AND MAINTENANCE
All batteries lose energy from self-discharge over time and more rapidly at higher temperatures. When the unit is not in use, we recommend that the battery is charged at least every 30 days.
Never submerge the unit in water. If the unit gets dirty, gently clean the outer surfaces of the unit with a soft cloth moistened with a mild solution of water and detergent.
There are no user-replaceable parts. Periodically inspect the condition of adapters, connectors and wires. Contact manufacturer to replace any components that have become worn or broken.
Battery replacement/disposal
BATTERY REPLACEMENT
The battery should last the service life of the unit. Service life is dependent on a number of factors including but not limited to the number of recharge cycles, and proper care and maintenance of the battery by the end user. Contact manufacturer for any information you may need.
SAFE BATTERY DISPOSAL
Contains a maintenance-free, sealed, non-spillable, lead acid battery, which must be disposed of properly. Recycling is required. Failure to comply with local, state and federal regulations can result in fines or imprisonment. Contact your local waste management authority to dispose of this product.

WARNINGS:
- Do not dispose of the battery in fire as this may result in an explosion.
- Before disposing of the battery, protect exposed terminals with heavy-duty electrical tape to prevent shorting (shorting can result in injury or fire).
- Do not expose battery to fire or intense heat as it may explode.
TROUBLESHOOTING
Unit will not charge
• Make sure all of the unit's functions are turned off.
- Make sure a suitable gage extension cord is properly connected to both the unit and a functioning AC outlet.
Unit Fails to Jump-Start
- Make sure unit's power switch is in the on position.
- Check that jump-starter has a full charge. Recharge unit if necessary.
- Make sure a proper polarity cable connection has been established.
12 volt DC portable power supply will not power appliance
• Make sure the appliance does not draw more than 5 amps
- Check that jump-starter has a full charge. Recharge unit if necessary.
USB Power Port will not power appliance - Make sure the USB Power Button is in the on position.
- Check that Jump-Starter has a full charge. Recharge unit if necessary.
LED Area Light does not come on
• Make sure the LED Area Light Power button is in the on position
- Check that Jump-Starter has a full charge. Recharge unit if necessary.
Portable Compressor will not inflate
- Make sure the Compressor Power Switch is in the on position.
- Check that Jump-Starter has a full charge. Recharge unit if necessary.
- Make sure the connector nozzle is securely screwed on to the valve stem when attempting to inflate tires; or nozzle adapter is securely inserted into SureFit ^™ nozzle connector on all other inflatables.
ACCESSORIES
Recommended accessories for use with your tool may be available from the manufacturer. If you need assistance regarding accessories, please contact the manufacturer at (877) 571-2391.
WARNING: The use of any accessory not recommended for use with this appliance could be hazardous.
9
#
©
SERVICE INFORMATION
Whether you need technical advice, repair, or genuine factory replacement parts, contact the manufacturer at (877) 571-2391.
ONE-YEAR LIMITED WARRANTY
The manufacturer warrants this product against defects in materials and workmanship for a period of ONE (1) YEAR from the date of retail purchase by the original end-user purchaser ("Warranty Period").
If there is a defect and a valid claim is received within the Warranty Period, the defective product can be replaced or repaired in the following ways: (1) Return the product to the manufacturer for repair or replacement at manufacturer's option. Proof of purchase may be required by manufacturer. (2) Return the product to the retailer where product was purchased for an exchange (provided that the store is a participating retailer). Returns to retailer should be made within the time period of the retailer's return policy for exchanges only (usually 30 to 90 days after the sale). Proof of purchase may be required. Please check with the retailer for their specific return policy regarding returns that are beyond the time set for exchanges.
This warranty does not apply to accessories, bulbs, fuses and batteries; defects resulting from normal wear and tear, accidents; damages sustained during shipping; alterations; unauthorized use or repair; neglect, misuse, abuse; and failure to follow instructions for care and maintenance for the product.
This warranty gives you, the original retail purchaser, specific legal rights and you may have other rights which vary from state to state or province to province. This product is not intended for commercial use.
Please complete the Product Registration Card and return within 30 days from purchase of the product to: Baccus Global LLC, 595 S. Federal Highway, Suite 210, Boca Raton, FL 33432. Baccus Global LLC, toll-free number: 1-877-571-2391.
SPECIFICATIONS
AC input: 120Vac, 60Hz, 12W
Boost Ampere: 12Vdc, 450A
instantaneous
Battery Type: Maintenance-free, sealed lead acid, 12 volt DC, 17Ah
Area Light: 2 long-life white LEDs
USB Port: 5Vdc, 500mA
DC Accessory Outlet: 12Vdc, 5A
Compressor Maximum Pressure: 120 PSI

Imported by
Baccus Global LLC
595 S. Federal Highway, Suite 210
Boca Raton, FL 33432
(877) 571-2391
RD022514
10

- FEATURES
- CARACTERÍSTICAS
- IMPORTANT SAFETY INSTRUCTIONS
- READ ALL INSTRUCTIONS
- ■ CAUTION: TO REDUCE THE RISK OF INJURY OR PROPERTY DAMAGE:
- FIRST AID
- SAVE THESE INSTRUCTIONS
- INTRODUCTION
- CHARGING/RECHARGING
- JUMP-STARTER
- Procedure for jump-starting POSITIVE GROUND SYSTEMS
- WARNING: TO REDUCE THE RISK OF INJURY OR PROPERTY DAMAGE:
- ■ CAUTION: TO REDUCE THE RISK OF PROPERTY DAMAGE:
- VOLT DC PORTABLE POWER SUPPLY
- USB CHARGING PORT
- LED AREA LIGHT
- PORTABLE COMPRESSOR
- Inflating Tires or Products With Valve Stems
- WARNING: TO REDUCE THE RISK OF INJURY OR PROPERTY DAMAGE: FOLLOW ALL SAFETY INSTRUCTIONS FOUND IN THE "SPECIFIC SAFETY INSTRUCTIONS FOR COMPRESSORS" SECTION OF THIS INSTRUCTION MANUAL.
- CARE AND MAINTENANCE
- Battery replacement/disposal
- BATTERY REPLACEMENT
- SAFE BATTERY DISPOSAL
- WARNINGS:
- TROUBLESHOOTING
- Unit will not charge
- Unit Fails to Jump-Start
- volt DC portable power supply will not power appliance
- LED Area Light does not come on
- Portable Compressor will not inflate
- ACCESSORIES
- SERVICE INFORMATION
- ONE-YEAR LIMITED WARRANTY
- SPECIFICATIONS
Brand : STANLEY
Model : JS900CS
Category : Portable starter