
ACPE - Oven ARC - Free user manual and instructions
Find the device manual for free ACPE ARC in PDF.


| Product Type | Built-in Oven |
| Brand | ARC |
| Model | ACPE |
| Category | Oven |
| Power Supply | 220-240V ~ 50Hz, Max 2.0 kW |
| Product Dimensions (HxWxD) | 595 x 595 x 575 mm |
| Aperture Dimensions (HxWxD) | 590-595 x 560 x 560 mm (min) |
| Usable Capacity | 56 litres |
| Weight | Approx. 32 kg |
| Oven Functions | Natural convection (top and bottom heaters), Fan forced, Grill, Grill with fan, Ultra-fan, Fast heat-up |
| Timer | Minute minder up to 120 minutes |
| Control Type | Knobs (function selector, temperature, timer) |
| Interior Light | Yes, replaceable (E14, 25W, 300°C bulb) |
| Door | Removable, internal glass panel removable for cleaning |
| Cleaning | Steam cleaning option; do not use abrasive cleaners |
| Safety Features | Safety switch required, grounded outlet, child safety warnings |
| Installation | Built-in, requires proper ventilation and heat-resistant surroundings |
| Energy Saving Tips | Use residual heat, avoid opening door unnecessarily |
| Included Accessories | Baking tray, grill rack (optional) |
Frequently Asked Questions - ACPE ARC
User questions about ACPE ARC
0 question about this device. Answer the ones you know or ask your own.
Ask a new question about this device
Download the instructions for your Oven in PDF format for free! Find your manual ACPE - ARC and take your electronic device back in hand. On this page are published all the documents necessary for the use of your device. ACPE by ARC.
USER MANUAL ACPE ARC
natural_image
Line drawing of an open oven with three circular gauges and a scroll, labeled 'ARC' at the bottom (no text or symbols on the oven itself)AOF6S
INSTRUCTION MANUAL
DEAR CUSTOMER,
The cooker is exceptionally easy to use and extremely efficient. After reading the instruction manual, operating the oven will be easy.
Before being packaged and leaving the manufacturer, the oven was thoroughly checked with regard to safety and functionality.
Before using the appliance, please read the instruction manual carefully.
By following these instructions carefully you will be able to avoid any problems in using the appliance.
It is important to keep the instruction manual and store it in a safe place so that it can be consulted at any time.
It is necessary to follow the instructions in the manual carefully in order to avoid possible accidents.
Caution!
Do not use the oven until you have read this instruction manual.
The oven is intended for household use only.
The manufacturer reserves the right to introduce changes which do not affect the operation of the appliance.
- WARNING: The appliance and its accessible parts become hot during use. Care should be taken to avoid touching heating elements. Children less than 8 years of age shall be kept away unless continuously supervised.
- This appliance can be used by children aged from 8 years and above and persons with reduced physical, sensory or mental capabilities or lack of experience and knowledge if they have been given supervision or instruction concerning use of the appliance in a safe way and understand the hazards involved. Children shall not play with the appliance. Cleaning and user maintenance shall not be made by children without supervision.
- During use the appliance becomes hot. Care should be taken to avoid touching heating elements inside the oven.
- WARNING: Accessible parts may become hot during use. Young children should be kept away.
- Do not use harsh abrasive cleaners or sharp metal scrapers to clean the oven door glass since they can scratch the surface, which may result in shattering of the glass.
TABLE OF CONTENTS
Safety instructions 3 ....
Description of the appliance....7
Installation....9
Operation....11
Cleaning and maintenance....18
Baking in the oven-practical hints....19
Technical data....24
SAFETY INSTRUCTIONS
NOTE;
Ensure there is a grounded socket nearby (behind the unit)
A dedicated power circuit is recommended for the unit but not required. Additional electrical appliances on the same circuit may exceed the current (amperage) rating for that circuit. If after the installation of your unit, the circuit breaker trips or the fuse fails on a repeated basis, then a dedicated circuit will likely be required.
!The appliance must be installed only by a qualified person in compliance with the instructions provided. Incorrect installation may cause harm to persons, animals or may damage property.
The manufacturer declines all responsibility for improper
installation which may harm persons and animals and damage property.
Important: The power supply to the appliance must be cut off before any adjustments or maintenance work is done on it.
WARNING:
When using this product, basic precautions should always be taken, including the following:
Your built-in oven is a classified electrical appliance. As with any electrical appliance and particularly with electric heaters, basic precautions must be followed in order to reduce the risk of fire, burns, electrical shocks and/or other serious injuries or death.
! The appliance becomes hot during operation. Take care not to touch the hot parts inside the oven.
! This appliance is not intended for use by persons (including children) with reduced physical, sensory or mental capabilities, or lack of experience and knowledge, unless they have been given supervision or instruction concerning use of the appliance by a person responsible for their safety. Children should be supervised to ensure that they do not play with the appliance.
While in operation direct contact with the cooker may cause burns!
! Ensure that small items of household equipment, including connection leads, do not touch the hot oven or the hob as the insulation material of this equipment is usually not resistant to high temperatures.
! Do not leave the cooker unattended when frying. Oils and fats may catch fire due to overheating or boiling over.
Do not put pans weighing over 15 Kg on the opened door of the oven and pans over 25 kg on the hob.
! Do not use harsh cleaning agents or sharp metal objects to clean the door as they can scratch the surface, which could then result in the glass cracking.
! Do not use the cooker in the event of a technical fault. Any faults must be fixed by an appropriately qualified and authorised person.
! In the event of any incident caused by a technical fault, disconnect the power and report the fault to the service centre to be repaired.
! The rules and provisions contained in this instruction manual should be strictly observed. Do not allow anybody who is not familiar with the contents of this instruction manual to operate the cooker.
! The cooker should not be cleaned using steam cleaning equipment.
SAFETY INSTRUCTIONS
! The panels adjacent to the oven must be made of heat-resistant material.
! !Cabinets with a veneer exterior must be assembled with glues which can withstand temperature of up to 100°C.
! Keep combustible materials, such as: curtans, drapes, furniture, pillows, clothing, linens, bedding, paper, etc., at least 3 feet (0.9 meters) from the front sides and rear of the heater. Do not use this unit in areas where gasoline, paint or other flammable liquids or their associated vapors may be present.
! To reduce the risk of fire, do not place or install this unit in areas where the ventilation or circulation ducts may become blocked.
! The unit's power cord must be connected to a properly grounded and protected, 220-240V electrical outlet. Always use ground fault protection where required by the electrical code. To redece the risk of fire, avoid running the power cord under rugs, carpets, etc. Keep the power cord away from high traffic areas where it may pose a tripping hazard.
! Avoid the use of an extension cord, which may overheat and cause a fire.
! When transporting or storing the unit, keep it in a dry location, free from dust, excessive vibration or other factors, which may damage the unit.
! Do not operate any oven with a damaged cord or plug or after the heater malfunctions, has been dropped or damaged in any manner. Return oven to authorized service facility for examination, electrical or mechanical adjustment, or repaired.
! If the supply cord is damaged, it must be replaced by a special cord or assembly available from the manufacturer or its service agent.
! Use this oven only as described in this manual. Any other use not recommended by the manufacturer may cause fire, electric shock, or injury to persons.
! This appliance is not intended for use by persons (including children) with reduced physical, sensory or mental capabilities, or lack of experience and knowledge, unless they have been given supervision or instruction concerning use of the appliance by a person responsible for their safety. Children should be supervised to ensure that they do not play with the appliance.
! Never add cold water to food on a hot universal tray or baking tray or directly onto food in a hot oven. The steam created could cause serious burns or scalding and the sudden change in temperature can damage the enamel.
! Do not lift the oven by the handle.
! Care should be taken to avoid touching heating elements inside the oven.
! Do not use harsh abrasive cleaners or sharp metal scrapers to clean the oven door glass since they can scratch the surface, which may result in shattering of the glass.
! This appliance is not intended for use by persons (including children) with reduced physical, sensory or mental capabilities, or lack of experience and knowledge, unless they have been given supervision or instruction concerning use of the appliance by a person responsible for their safety.
! Children should be supervised to ensure that they do not play with the appliance.
! The appliance is for indoor use only.
! Unplug the appliance from the outlet when not in use and before cleaning.
! Warning - Ensure that the appliance is switched off before replacing the lamp to avoid the possibility of electric shock.
! After installed, must possible to unplug the appliance.

natural_image
Simple line drawing of a tree with cloud-like canopy and horizontal lines below (no text or symbols)Using energy in a responsible way not only saves money but also helps the environment. So let's save energy! And this is how you can do it:
! Do not open the oven door unnecessarily often.
! Switch off the oven in good time and make use of residual heat.
For long cooking times, switch off oven
5 to 10 minutes before finishing cooking,
This saves up to 20% on energy.
Only use the oven when cooking larger dishes.
Meat of up to 1 kg can be prepared more economically in a pan on the cooker hob.
! Make use of residual heat from the oven.
If the cooking time is greater than 40 minutes switch off the oven 10 minutes before the end time.
Important! When using the timer, set appropriately shorter cooking times according to the dish being prepared.
! Make sure the oven door is properly closed.
Heat can leak through spillages on the door seals. Clean up any spillages immediately.
! Do not install the cooker in the direct vicinity of refrigerators/freezers.
Otherwise energy consumption increases unnecessarily.

UNPACKING

natural_image
Simple line drawing of a recycling symbol (three chasing arrows), no text or labels present.During transportation, protective packaging was used to protect the appliance against any damage. After unpacking, please dispose of all elements of packaging in a way that will not cause damage to the environment.
All materials used for packaging the appliance are environmentally friendly; they are 100% recyclable and are marked with the appropriate symbol.
Caution! During unpacking, the packaging materials (polythene bags, polystyrene pieces, etc.) should be kept out of reach of children.

DISPOSAL OF THE APPLIANCE
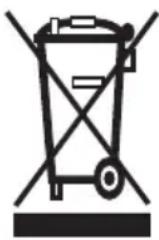
Old appliances should not simply be disposed of with normal household waste, but should be delivered to a collection and recycling centre for electric and electronic equipment. A symbol shown on the product, the instruction manual or the packaging shows that it is suitable for recycling.
Materials used inside the appliance are recyclable and are labelled with information concerning this. By recycling materials or other parts from used devices you are making a significant contribution to the protection of our environment.
Information on appropriate disposal centres for used devices can be provided by your local authority.
DESCRIPTION OF THE APPLIANCE

1 Oven function selection knob
2 Temperature control knob
3 Indicator lamp
4 Handle
5 Timer
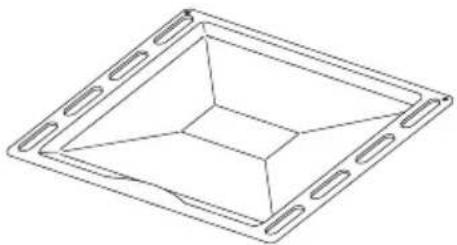
SPECIFICATIONS OF THE APPLIANCE
natural_image
Line drawing of a square frame with internal geometric lines and mounting holes (no text or symbols)Baking tray

natural_image
Line drawing of a rectangular metal grate with vertical slats (no text or symbols)2G rill rack
*optional
INSTALLATION
!The kitchen area should be dry and aired and equipped with efficient ventilation. When installing the oven, easy access to all control elements should be ensured.
!This is a built-in oven, and its back wall and one side wall can be placed next to a high piece of furniture or a wall. Coating or veneer used on fitted furniture must be applied with a heat-resistant adhesive (100°C). This prevents surface deformation or detachment of the coating.
! Make an opening with the dimensions given in the diagram for the oven to be fitted.
!Make sure the mains plug is disconnected and then connect the oven to the mains supply.
!Insert the oven completely into the opening without allowing the four screws in the places shown in the diagram to fall out.

Product Dimensions Aperture Dimensions
Height: 595 mm 590 mm - 595 mm
Width: 595 mm 560 mm
Depth: 575 mm 560 mm (min)


natural_image
Pure architectural floor plan lines without any text, numbers, or symbolsINSTALLATION
Electrical connection
Warning!
All electrical work should be carried out by a suitably qualified and authorised electrician. No alterations or wilful changes in the electricity supply should be carried out.
Fitting guidelines
The oven is manufactured to work with three-phase alternating current (220V-240V/50Hz). The connection diagram is also found on the cover of the connection box. Remem-ber that the connection wire should match the connection type and the power rating of the oven.
The connection cable must be secured in a strain-relief clamp.
Warning!
Remember to connect the safety circuit to the connection box terminal marked with .The electricity supply for the oven must have a safety switch which enables the power to be cut off in case of emergency. The distance between the working contacts of the safety switch must be at least 3 mm.
Before connecting the oven to the power supply it is important to read the information on the data plate and the connection diagram.

natural_image
Line drawing of a rectangular electronic device with a recessed top and side panel (no text or symbols)
| CONNECTION DIAGRAMCaution!Voltage of heating elements 220V~240VCaution! In the event of any connection the safetywire must be connected to the 12 PE terminal |  | ||||
| For 220V-240V earthed one-phaseconnection ,L (Brown wire)connectto 3 and N(blue wire) to 5,safety wire (Yellow-green)to 12 | 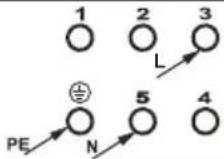 | ||||
OPERATION
Before first use
!Remove packaging, clean the interior of the oven
!Take out and wash the oven fittings with warm water and a little washing-up liquid.
!Switch on the ventilation in the room or open a window.
! Heat the oven (to a temperature of 250^ C, for approx, 30 min.), remove any stains and wash carefully
Important!
The inside of the oven should only be washed with warm water and a small amount of washing-up liquid.
OPERATION
Note
This manual is a generic manual that covers other models sold in different countries, some of the references throughout the manual may not relate to your oven.
Oven functions and operation.
Natural convection oven
(conventional)
The oven can be heated up using the bottom and top heaters. The oven is controlled by one knob handling, serving as a work type switch integrated with a temperature regulator.
On and off
In order to switch on the oven you need to:
!Set required working conditions of the oven, its temperature and a mode of heating.
!Set the knob to the required position, turning it right.
Using the minute minder
The minute minder can be used independently of an oven cooking function for a time period of up to 120 minutes.
To set the timer, turn the knob fully clockwise until it stops and then turn it back anticlockwise to the required time.
The time period that has been set will expire when the control knob reaches zero, a brief audible signal will sound.
Selecting manual operation mode
Before you can select a cooking function or set a temperature, you must set the appliance into manual operation mode.
Turn the manual operation control knob anti-clockwise, so that it points at the manual operation symbol.

OPERATION
Oven with automatic air circulation (including fan)
The oven can be warmed up using the fan forced, fan grilling or the grill only functions of the oven is controlled by the oven function knob-to set a required function you should turn the knob to the selected position.

as well as the temperature regulator knob – to set a required function you should turn the knob to the selected position.

The oven can be switched off by setting both of these knobs to the position “●”/“○”.
Caution!
When selecting any heating function (switching a heater on etc.) the over will only be switched on after the temperature has been set by the temperature regulator knob.
Possible settings of the oven function knob

Separate oven lighting
By setting the knob to this position the lighting inside the oven is switched on, e.g. use when washing the oven chamber.
Caution!
At this oven function knob position, when setting the temperature regulator to a position other than zero, the red light may go on, although the oven is not being warmed up.

Grill with fan On
Excellent combination for cooking spitroasted chicken, game and a variety of roasts.

Central element with fan On
This cooking mode allows homogenous distribution of the heat inside the oven, making it possible to cook several items of food at the same time.

Grill heater on
Setting the knob to this position allows dishes to be grilled on the grate.
Switching on the oven is indicated by two signal lights, yellow and red, turning on. The yellow light tutned on means the oven is working. If the red light goes out, it means the oven has reached the set temperature. If a recipe recommends placing dishes in a warmed-up oven, this should be not done before the red light goes out for the first time. When baking, the red light will temporarily come on and go out (to maintain the temperature inside the oven). The yellow signal light may also turn on at the knob position of "oven chamber lighting".
Fast oven heat-up
In ovens with automatic air circulation, equipped with a fan and an ultra-fan heater, the fast heat-up function may be used-the oven will reach a temperature of 150^ C within approximately 4 minutes.
Mode of operation:
!set the oven function to the position of ultra-fan and bottom heater,
!set the temperature regulator knob to the position of 150^ C,
!the oven warms up to the temperature of 150^ C (or lower if set); the oven reaching the temperature is signalled by the red light of the temperature regulator going off,
!now put the tray with dough into the oven,
!set the oven function knob to the selected heating mode,(see the chapter Baking in the oven-practical hints).
Important!
When the fast oven heat-up function has been selected, the chamber should not contain a baking tray with dough or other elements that do not constitute the oven fittings.
The fast heat-up function is not recommended for use with the programmer set.
Use of the grill
The grilling process operates through infrared rays emitted onto the dish by the incandescent grill heater.
In order to switch on the grill you need to:
!set the oven knob to the position marked with
!heat the oven for approximately 5 minutes (with the oven door shut).
!insert a tray with a dish onto the appropriate cooking level, and if you are grilling on the grate insert a tray for dripping on the level immediately below (under the grate).
!the oven door shut.
For grilling and combined grill the temperature must be set to 250^ C, but for the grill function with fan it must be set to a maximum of 200^ C.
Caution!
The grill should be used with the oven door shut.
When the grill is in use, accessible parts can become hot.
It is recommended to keep children away from the oven.
CLEANING AND MAINTENANCE
Replacement of the oven light bulb
In order to avoid the possibility of an electric shock ensure that the appliance is switched off before replacing the bulb.
!Set all control knobs to the position"●"/"0" and disconnect the mains plug,
!unscrew and wash the lamp cover and then wipe it dry.
!unscrew the light bulb from the socket, replace the bulb with a new one-a high temperature bulb (300°C)with the following parameters:
-voltage230 V
-power 25 W
-thread E14.

natural_image
Diagram showing three mechanical components with upward and downward arrows indicating motion (no text or symbols)Oven light bulb
!Screw the bulb in, making sure it is properly inserted into the ceramic socket.
!Screw in the lamp cover.
*optional
CLEANING AND MAINTENANCE
By ensuring proper cleaning and maintenance of your cooker you can have a significant influence on the continuing fault-free operation of your appliance.
Before you start cleaning, the cooker must be switched off and you should ensure that all knobs are set to the “●”/“0” position. Do not start cleaning until the cooker has completely cooled.
Oven
!The oven should be cleaned after every use. When cleaning the oven the lighting should be switched on to enable you to see the surfaces better.
!The oven chamber should only be washed With warm water and small amount of washing-up liquid.
!After cleaning the oven chamber wipe it dry.
Caution!
Do not use cleaning products containing abrasive materials for the cleaning and maintenance of the glass front panel.
!steam cleaning \* :
-pour 250ml of water(1 glass)into a bowl placed in the oven on the first level from the bottom, -close the oven door, -set the temperature knob to 50°C, and the function knob to the bottom heater position, -heat the oven chamber for approximately 30 minutes, -open the oven door, wipe the chamber inside with a cloth or sponge and wash using warm water with washing-up liquid. Caution! Possible moisture or water residues under the cooker can result from steam cleaning.
!After cleaning the oven chamber wipe it dry.
*optional
OPERATION IN CASE OF EMERGENCY
In the event of an emergency, you should:
!switch off all working units of the cooker
!disconnect the mains plug
!call the service centre
!Some minor faults can be fixed by referring to the instructions given in the table below. Before calling the customer support centre or the service centre check the following points that are presented in the table.
| PROBLEM | REASON ACTION | |
| The appliance does not work. | break in power supply | check the household fuse box, if there is a blown fuse replace it with a new one |
| The oven lighting does not work | the bulb is loose or dama-ged | tighten up or replace the blown bulb (see chapter Cleaning and Maintenance) |
CLEANING AND MAINTENANCE
Door removal
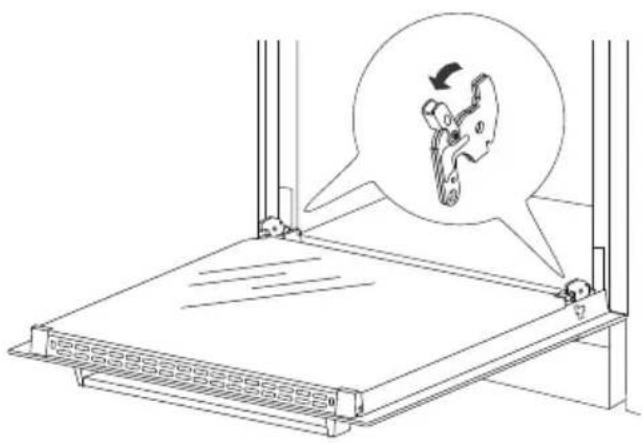
In order to obtain easier access to the oven chamber for cleaning, it is possible to remove the door. To do this, tilt the safety catch part of the hinge upwards. Close the door lightly, lift and pull it out towards you. In order to fit the door back on to the cooker, do the inverse. When fitting, ensure that the notch of the hinge is correctly placed on the protrusion of the hinge holder. After the door is fitted to the oven, the safety catch should be carefully lowered down again. If the safety catch is not set it may cause damage to the hinge when closing the door.
natural_image
Line drawing of a mechanical device with a magnified inset showing a mechanical component (no text or symbols)Door removal
Removal of the internal glass panel
Unscrew and unfasten the plastic latch that is in the corner at the top of the door .Next take out the glass from the second blocking mechanism and remove. After cleaning, insert and block the glass panel, and screw in the blocking mechanism.

natural_image
Technical line drawing of a rectangular electronic device with a grid and mounting bracket, showing internal structure and a magnified inset (no text or symbols)Removal of the internal glass panel
BAKING IN THE OVEN-PRACTICAL HINTS
TABLE 1: Cakes
Oven functions: cake (bottom and top heaters + fan)
| BAKING TYPE | TEMPERATURE [°C] | BAKING TIME [min] |
| Baking in cake tins | ||
| Meringues | 80 | 60-70 |
| Victoria sponge | 150 | 65-70 |
| Teacake | 150 | 60-70 |
| Layer cake | 150 | 25-35 |
| Baking on the trays provided with the cooker | ||
| Yeast cake | 150 | 40-45 |
| Crumble cake | 150 | 30-45 |
| Fruit cake | 150 | 40-55 |
| Sponge cake | 150 | 30-40 |
Caution!
When using the cake function of the oven it is necessary to initially heat up the oven chamber, Using the third level from the bottom is recommended for baking.
Roasting meat
! cook meat weighing over 1 kg in the oven, but smaller pieces should be cooked on the gas burners.
! use heatproof ovenware for roasting with handles that are also resistant to high temperatures;
! when roasting on the drying rack or the grate we recommend that you place a baking tray with a small amount of water on the lowest level of the oven;
! It is advisable to turn the meat over at least once during the roasting time and during roasting you should also baste the meat with its juices or with hot salty water-do not pour cold water over the meat.
BAKING IN THE OVEN-PRACTICAL HINTS
TABLE 2:Cakes
Oven functions: bottom + top heaters
ultra-fan
| CAKE TYPE | BOTTOM+TOP HEATERS | ULTRA-FAN | BAKINGTIME[min] | ||
| LEVEL | TEMPE-RATURE[°C] | LEVEL | TEMPE-RATURE[°C] | ||
| Baking in cake tins | |||||
| Sponge cake/marble cake | 2 | 170-180 | 2 | 150-170 | 60-80 |
| Victoria sponge | 2 | 160-180 | 2 | 150-170 | 68-80 |
| Base for a layer cake | 2-3 | 170-180 | 2-3 | 160-170 | 20-30 |
| Sponge layer cake | 2 | 170-180 | 30-40 | ||
| Fruit cake (crispy base) | 2-3 | 160-180 | 60-70 | ||
| Cheesecake(shortcrust base) | 2 | 140-150 | 60-90 | ||
| Teacake | 2 | 160-180 | 2 | 150-170 | 40-60 |
| Bread(e.g. wholegrain bread) | 2 | 210-220 | 2 | 180-200 | 50-60 |
| Baking on the trays prays provided with the cooker | |||||
| Fruit cake(crispy base) | 3 | 170-180 | 2 | 160-170 | 35-60 |
| Fruit cake (with yeast) | 2 | 160-170 | 30-50 | ||
| Crumble cake | 3 | 160-170 | 2 | 150-170 | 30-40 |
| Sponge roll | 2 | 180-200 | 10-15 | ||
| Pizza (thin base) | 3 | 200-240 | 10-15 | ||
| Pizza (thick base) | 2 | 190-210 | 30-50 | ||
| Baking smaller items | |||||
| Buns | 3 | 160-170 | 2 | 150-160 | 10-30 |
| Puff pastry | 3 | 180-190 | 2 | 170-190 | 18-25 |
| Meringues | 3 | 90-110 | 80-90 | ||
| Choux buns | 2 | 170-190 | 35-45 | ||
BAKING IN THE OVEN-PRACTICAL HINTS
TABLE 3: Grill
Oven functions: grill heater
| TYPE OF DISH | LEVEL FROM THE BOTTOM | TEMPERATURE [°C] | GRILLING TIME [MINUTES] | |
| SIDE 1 | SIDE 2 | |||
| Pork chop | 4 | 250 | 8-10 | 6-8 |
| Pork schnitzel | 3 | 250 | 10-12 | 6-8 |
| Shish kebab | 4 | 250 | 7-8 | 6-7 |
| Sausages | 4 | 250 | 8-10 | 8-10 |
| Roastbeef,(steal approx. 1kg) | 3 | 250 | 12-15 | 10-12 |
| Veal cutlet | 4 | 250 | 8-10 | 6-8 |
| Veal steak | 4 | 250 | 6-8 | 5-6 |
| Mutton chop | 4 | 250 | 8-10 | 6-8 |
| Lamb chop | 4 | 250 | 10-12 | 8-10 |
| Chicken half (per 500 g) | 3 | 250 | 25-30 | 20-25 |
| Fish fillet | 4 | 250 | 6-7 | 5-6 |
| Trout (per approx. 200-250g) | 3 | 250 | 5-8 | 5-7 |
| Bread (toast) | 4 | 250 | 2-3 | 2-3 |
* optional
BAKING IN THE OVEN-PRACTICAL HINTS
TABLE 4: Roasting meat
Oven functions: bottom and top heaters
Ultra-fan
| TYPE OF MEAT | LEVELFROM THE BOTTOM | TEMPERATURE[°C] | TIME *IN MINUTES | ||
| ULTRA-FAN ULTRAPAN | BOTTOM+TOP HEATERS | ||||
| BEEF | Per 1 cm | ||||
| Roast beef or fillet rare | 3 | 250 | 12-15 | ||
| oven warmed up Juicy("medium") | 3 | 250 | 15-25 | ||
| oven warmed up "well done" | 3 | 210-230 | 25-30 | ||
| oven warmed up Roast joint | 2 | 2 | 160-180 | 200-220 | 120-140 |
| PORK | |||||
| Roast joint | 2 | 2 | 160-180 | 200-210 | 90-140 |
| Ham | 2 | 2 | 160-180 | 200-210 | 60-90 |
| Fillet | 3 | 210-230 | 25-30 | ||
| VEAL | 2 | 2 | 160-170 | 200-210 | 90-120 |
| LAMB | 2 | 2 | 160-180 | 200-220 | 100-120 |
| VENISON | 2 | 2 | 175-180 | 200-220 | 100-120 |
| POULTRY | |||||
| Chicken | 2 | 2 | 170-180 | 220-250 | 50-80 |
| Goose(approx.2 kg) | 2 | 2 | 160-180 | 190-200 | 150-180 |
| FISH | 2 | 2 | 175-180 | 210-220 | 40-55 |
* the figures presented in the table refer to a portion of 1 kg, if the portion is larger than that an additional 30-40 minutes should be added for each additional kilogram.
Caution!
In the middle of the roasting time the meat must be turned over.
It is advisable to roast meat in heatproof ovenware.
BAKING IN THE OVEN-PRACTICAL HINTS
TABLE 5: Fan with grill
| Oven functions: | combined grill + fan |
| grill + fan |
| TYPE OF MEAT | WEIGHT [kg] | LEVEL FROM THE BOTTOM | TEMPERATURE [°C] | BAKING [MINUTES] |
| Roast pork | 1.0 | 2 | 170-190 | 80-100 |
| 1.5 | 2 | 170-190 | 100-120 | |
| 2.0 | 2 | 170-190 | 120-140 | |
| Leg of lamb | 2.0 | 2 | 170-190 | 90-110 |
| Roast beef | 1.0 | 2 | 180-200 | 30-40 |
| Chicken | 1.0 | 2 | 180-200 | 50-60 |
| Duck | 2.0 | 1-2 | 170-190 | 85-90 |
| Goose | 3.0 | 2 | 140-160 | 110-130 |
| Turkey | 2.0 | 2 | 180-200 | 110-130 |
| 3.0 | 1-2 | 160-180 | 150-180 |
During baking you should turn the meat over periodically as well as basting it with its juices or with hot salty water.
Caution!
The figures given in the Tables are approximate and can be adapted based on your own experience and cooking preferences.
TECHINCAL DATA
| Voltage rating | 220V~240V 50Hz |
| Power rating | Max. 2.0kw |
| Cooker dimensions H/W/D | 59.5/59.5/57.5 |
| Usable capacity of the oven * | 56 litres |
| Weight | Approx. 32kg |


- AOF6S
- DEAR CUSTOMER,
- Caution!
- TABLE OF CONTENTS
- SAFETY INSTRUCTIONS
- NOTE;
- WARNING:
- UNPACKING
- DISPOSAL OF THE APPLIANCE
- SPECIFICATIONS OF THE APPLIANCE
- INSTALLATION
- Electrical connection
- Warning!
- Fitting guidelines
- OPERATION
- Before first use
- Important!
- Note
- Oven functions and operation.
- Natural convection oven
- (conventional)
- On and off
- Using the minute minder
- Selecting manual operation mode
- Oven with automatic air circulation (including fan)
- Possible settings of the oven function knob
- Separate oven lighting
- Grill with fan On
- Central element with fan On
- Grill heater on
- Fast oven heat-up
- Mode of operation:
- Use of the grill
- CLEANING AND MAINTENANCE
- Replacement of the oven light bulb
- Oven
- !steam cleaning \* :
- OPERATION IN CASE OF EMERGENCY
- Door removal
- Removal of the internal glass panel
- BAKING IN THE OVEN-PRACTICAL HINTS
- Roasting meat
- TECHINCAL DATA
Brand : ARC
Model : ACPE
Category : Oven