
AR90S - Oven ARC - Free user manual and instructions
Find the device manual for free AR90S ARC in PDF.


| Product Type | Built-in Electric Oven |
| Brand | ARC |
| Model | AR90S |
| Energy Class | A |
| Capacity | 70 Liters |
| Dimensions (H x W x D) | 595 x 595 x 575 mm |
| Weight | 35 kg |
| Power Supply | 220-240 V, 50 Hz |
| Power Consumption | 2.8 kWh (conventional) / 2.2 kWh (fan) |
| Temperature Range | 50 - 250 °C |
| Heating Functions | 8 functions including Grill, Fan, Pizza, Defrost |
| Control Type | Electronic touch + knob |
| Display | LED digital |
| Cleaning | Easy-clean enamel interior |
| Safety Features | Child lock, cool door, auto shut-off |
| Spare Parts Availability | Available via ARC authorized service |
| Warranty | 2 years |
| Installation | Built-in; requires professional installation |
Frequently Asked Questions - AR90S ARC
User questions about AR90S ARC
0 question about this device. Answer the ones you know or ask your own.
Ask a new question about this device
Download the instructions for your Oven in PDF format for free! Find your manual AR90S - ARC and take your electronic device back in hand. On this page are published all the documents necessary for the use of your device. AR90S by ARC.
USER MANUAL AR90S ARC
natural_image
Black-and-white photo of a baked tart with chocolate chips and a cup of milk in the background (no text or symbols visible)Dear Customer,
Congratulations on purchasing your new product from Home Appliances.
To register your Parts and Labour Warranty, some conditions apply, please refer to your warranty card for more details and contact our Customer Care team on:
1800 444 357
Our Customer Care Centre is there to ensure you get the most out of your appliance. Should you want to learn more about your product and how to use it to its best potential or tips on cleaning, please feel free to call us on the above number.
It is important that you read through the following instruction manual thoroughly to become familiar with the installation and operation of this appliance and ensure optimum performance.
We also carry a complete range of spare parts for all Home Appliance products. For all your spare parts enquiries please contact our team at Pronto Parts on
1300 306 973
Again, thank you for choosing an appliance brought to you by Home Appliances and we look forward to being of service to you.
Kind regards,
The Management
Home Appliances
NOTE: This User Instruction Manual contains important information, including safety & installation points, which will enable you to get the most out of your appliance. Please keep it in a safe place so that it is easily available for future reference; for you or any person not familiar with the operation of the appliance.
Safety Warnings
- The appliance is not intended for use by persons (including children) with reduced physical, sensory or mental capabilities, or lack of experience and knowledge, unless they have been given supervised or instruction concerning use of the appliance by a responsible person for their safely.
- Young children should be supervised to ensure that they do not play with the appliance.
- During use the appliance becomes hot. Care should be taken to avoid touching heating elements inside the oven.
- WARNING: Ensure the appliance is switched off before replacing the lamp to avoid the possibility of electric shock.
- WARNING - Accessible parts will become hot when in use. To avoid burns and scalds, young children should be kept away.
- Do not use a steam cleaner to clean this appliance
- Do not use harsh abrasive cleaners or sharp metal scrapers to clean the oven glass door since they can scratch the surface, which may result in shattering of the glass
- If the electrical supply is restricted, means of all-pole disconnection must be accessible and incorporated in the fixed wiring in accordance with the wiring rules.
If instructions for grilling mention to keep the door open:
- WARNING: Accessible parts may become hot when the grill is in use. Children should be kept away.
NOTE 1: When it is not practical for the rating label information of a fixed appliance be visible after the appliance has been installed, the relevant rating information shall be included in the Instruction Manual.
NOTE 2: If the oven is not supplied with a supply flexible cord, the instruction manual must state the size and type of cord intended to be connected to the oven
NOTE 3: Instruction Manual must include details indicating the correct installation of the shelves and baking tray
We recommend that you read the instructions in this owner's manual carefully before use for the best performance and to extend the life of your appliance, as it will provide you with all the instructions you require to A ensure its safe installation, use and maintenance. Always keep this owner's manual close to hand since you may need to refer to it in the future. Thank you.
Safety Is A Good Habit To Get Into
Hower, in general, it does not take into account:
- Children playing with the appliance;
The use of the appliance by very young children
The use of the appliance by young children without supervision
- User maintenance by children, including the cleaning of the appliance
To maintain the efficiency and safety of this appliance, we recommend that you do the following:
· only call the Service Centers authorized by the manufacturer
· always use original spare part s
- in case of damage to the power cord, a special purpose cord or component bought from the manufacturer or maintenance department shall be used for replacement
. An omni polar circuit breaker with a minimum contact opening of 3mm must be incorporated between the appliance and the mains. The omni polar circuit breaker should be sized according to the load and should comply with current regulations (the earth wire should not be interrupted by the circuit breaker).
When handling the appliance, we recommend you always use the purpose provided handles recessed into the sides of the oven to prevent harming people or damaging the appliance itself.
- This appliance is designed for non-professional, house-hold use and its functions must not be changed
The electrical system of this appliance can only be used safely when it is correctly connected to an efficient earthing system in compliance with current safety standards.
WARNING: The appliance and its accessible parts become hot during use. Care should be taken to avoid touching heating elements. Children less than 8 years of age shall be kept away unless continuously supervised. WARNING: Accessible parts may become hot during use. Young children should be kept away.
WARNING: Ensure that the appliance is switched off before replacing the lamp to avoid the possibility of electric shock.

Caution .hot surface
- When the appliance is in use, the heating elements and some parts of the oven door become extremely hot. Make sure you don't touch them and keep children well away.
- Heat will be generated during its working. Caution must be observed to avoid touch of the heating element.
The following items are potentially dangerous, and therefore appropriate measures must be taken to prevent children and the disabled from coming into contact with them:
- Controls and the appliance in general:
- Packaging (bags, polysylene, nails, etc.):
- The appliance itself, immediately after use of the oven or grill due to the heat generated:
- The appliance itself, when no longer in use (potentially dangerous parts must be made safe).
Avoid the following:
- Touching the appliance with wet parts of the body:
- Using the appliance when barefoot
- Pulling on the supply cable to unplug it from the electrical outlet:
- Impower or dangerous operations:
- Obstructing the ventilation or heat dissipation slots:
- Allowing power supply cables of small appliances to come into contact with the hot parts of the appliance;
- Exposing the appliance to atmospheric agents such as rain, or sunlight;
- Using the oven for storage purposes:
- Using flammable liquids near the appliance:
- Using adapters, multiple sockets and /or extension leads:
- Attempting to install or repair the appliance without the assistance of qualified personnel.
Qualified personnel must be contacted in the following cases:
- Installation (following the manufacturer's instructions):
- When in doubt about operating the appliance
- When in doubt about operating the appliance, - Replacing the electrical socket when it is not compatible with the appliance plus
- The temperature probe is a part of thermostat, if damaged; they shall be replaced overall by authorized
service person.
Service Centers authorized by the manufacturer must be contacted in the following cases:
- If in doubt about the soundness of the appliance after removing it from its packaging;
- If the power supply cable has been damaged or needs to be replaced:
- If the appliance breaks down or functions poorly; ask for original spare parts.
It is a good idea to do the following:
- Steam cleaner cannot be used to clean the oven:
- Do not use harsh abrasive cleaners or sharp metal scrapers to clean the oven door glass since the can scratch the surface, which may result in shattering of the glass.
- Only use the appliance to cook food and nothing else:
- Check the soundness of the appliance after it has been unpacked:
- Disconnect the appliance from the electrical mains if it is not functioning properly and before cleaning or performing maintenance.
- When left unused, unplug the appliance form the electricity mains:
- Use oven gloves to place cookware in the oven or when removing it;
- Always grip the oven door handle in the center as the extremities of the same may be hot due to any hot air leaks:
- Make sure the knobs are in the "☐" position when the appliance is not in use.
- Cut the power supply cable after disconnecting it from the mains when you decide not to use the appliance any longer.
- The manufacturer may not be held responsible for any damage due to :Incorrect installation, improper, incorrect and irrational use.
Close-up view
5-FUNCTION MODEL 6-FUNCTION MODEL 8-FUNCTION MODEL 10-FUNCTION MODEL 5-FUNCTION MODEL

6-FUNCTION MODEL 8-FUNCTION MODEL 10-FUNCTION MODEL
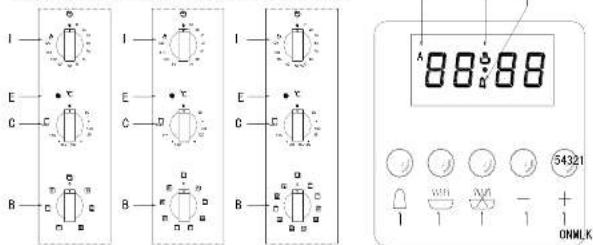

A. Control Panel
B. Cooking mode selection knob
C. Cooking temperature selection knob
D. Electronic programmer-Allows you to programme the desired cooking times by selecting the cooking duration and the end cooking time. It can also be used as a timer (only available on certain models)
E. Oven indication light (only available on certain models)
-When lit, it indicates the oven is heating up to the set temperature or the heat plate is heating according to the heating model set.
F. Dripping Pan or Baking Sheet
G. Oven Rack
H. Guides for sliding the racks or dripping in and out
- End Cooking Time Knob
K Timer
- Cooking Duration time with automatic operation
M. End of cooking time
N. Carrying backward button
O. Carrying forward button
-
Automatic program
-
Duration and manual mode
-
Minute control
How to use your oven
This multifunction oven combines the advantages of traditional convection oven with those of the more modern fan assisted models in a single appliance.
It is an extremely versatile appliance that allows you to choose easily and safely between different cooking modes. The various features offered by the oven are selected by means of selector knob "B" and thermostat "C" situated on the control panel.
Notice: The first time you use your appliance, we recommend that you set the thermostat to the highest setting and leave the oven on for about half an hour with nothing in it, with the oven door shut. Then, open the oven door and let the room air in. The odor that is often detected during this initial use is due to the evaporation of substances used to protect the oven during storage and until it is installed.
Notice: Place the dripping pan provided on the bottom shelf of the oven to prevent any sauce and/or grease from dripping onto the bottom of the oven only when grilling food or when using the roisserie (only available on certain models). For all other types of cooking, never use the bottom shelf and never place anything on the bottom of the oven during operation as this could damage the enamel finishing. Place your cookware (dishes, aluminum foil, etc., On the grid provided with the appliance inserted especially along the oven guides.
Notice: to use the oven in manual mode (not using the end cooking time programmer); the ^iii symbol must be aligned with the reference mark on the control panel.
Convection mode □ 2540-2988W
Position the thermostat knob "C" between 60°C and Max on this setting. The top and bottom heating elements come on. This is the classic, traditional type of oven which has been perfected for efficient heat distribution and reduced energy consumption. The convection oven is still unequalled when it comes to cooking dishes such as cabbage with ribs, Spanish style cod, Ancona style stockfish, tender veal strips with rice, etc. Excellent results are
achieved when preparing veal or beef-based dishes as well (braised meats, stew, goulash, wild game, ham etc.) which need to be cooked slowly and basting or the addition of liquid. It is the best system for baking cakes as well as fruit and cooking using covered casserole dishes for oven baking. When cooking in convection mode, only use one dripping pan or cooking rack at a time for even heat distribution. Use the different rack heights available to balance the amount of heat between the top and the bottom of the oven. Select from among the various rack heights based on whether the dish needs more or less heat from the top.
"Fast cooking" Mode 2561-3005W
Position the thermostat knob "C": Between 60°C and Max. The top and bottom heating elements, as well as the fan, will come on, guaranteeing constant heat distributed uniformly throughout the oven.
This mode is especially recommended for cooking pre-packed food quickly (as pre-heating is not necessary), for instance, frozen or pre-cooked food) as well as for a few "home-made" dishes.
The best results for cooking using the "Fast cooking" mode are obtained if you use one cooking only (the second from the bottom), please see the table entitled "Practical Cooking Advice".
Multi-Cooking Mode 2733-3278W
Position the thermostat knob "C": Between 60°C and Max. The top, circle and bottom heating elements, as well as the fan, will come on alternately. Since the heat remains constant and uniform throughout the oven, the air cooks and browns food uniformly over its entire surface. This model also allows you cook various simultaneously as long as their respective cooking temperatures are the same. A maximum of 2 racks can be used at the same time. Please follow the instructions in the "Cooking on More Than One Rack" section.
This cooking mode is particularly recommended for dishes requiring a gratin finish or for those requiring considerably prolonged cooking times, for instance: lasagna, pasta backs, roast chicken and potatoes, etc. Moreover the excellent heat distribution makes it possible to use lower temperatures when cooking roasts. This results in less loss of juices, meat which is more tender and less weight loss for the roast. The Multi-cooking mode is especially suited for cooking fish, which can be prepared with limited amounts of condiments, thus maintaining their flavor and appearance. Excellent results can be obtained when cooking vegetable-based side dishes like courgettes, aubergines, peppers, etc.
Desserts: this mode is also perfect for baking leavened cakes.
This mode can also be used to thaw quickly white or red meat and bread by setting the temperature to 80°C. To thaw more delicate foods, set the thermostat to 60°C or use only the cold air circulation feature by setting the thermostat to 0°C.
Pizza Mode | 3168-3660W
Position of thermostat knob "C": Between 60°C and 250°C. The bottom and circle heating elements, as well as the fan, will come on. This combination rapidly heats the oven due to the large amounts of power used by the appliance, which results in considerable heat coming prevalently from the bottom.
The pizza mode is ideal for foods requiring high temperatures to cook, like pizzas and large roasts. Only use one oven tray or rack at a time. However, if more than one is used, these must be switched halfway through the cooking process.
Delicate cooking 1367-1570W
Position of thermostat knob "C": Between 60°C and 250°C. The bottom heating element and the fan come on. Ideal for pastries, cakes and non-dry sweets in baking tins or moulds. Excellent results are also obtained in cooking requiring above all heat from the bottom.
You are advised to put the pan on a lower level.
"Top" oven 1330-1523W
Position of thermostat knob "C". Between 60°C and Max. The top heating elements comes on. This mode can be used to brown food at the end of the cooking duration.
Grill 2928-3375W
Position of thermostat knob 'C': Max. The top central heating elements comes on .The extremely high and direct temperature of the grill makes it possible to brown the surface of meats and roasts while locking the juices in to keep them tender. The grill is also highly recommended for dishes that require a high temperature on the surface: beef steaks, veal, rib steak, filets, hamburgers etc.
Some grilling examples are included in the "Practical Cooking Advice" paragraph.
Fan Assisted Grill 2953-3400W
Position of thermostat knob "C": Between 60°C and 200°C. The top central heating elements and the fan come on. This combination of features increases the effectiveness of the heating elements unidirectional thermal radiation through forced circulation of the air throughout the oven. This helps prevent food from burning on the surface, allowing the heat to penetrate right into the food. Excellent results are achieved with kebabs made with meats and vegetables, sausages, ribs lamb chops, chicken in a spicy sauce, quail, pork chops, etc. Cooking in "fan assisted grill mode" with the oven door shut.
This mode is also ideal for cooking fish steaks, like swordfish, stuffed cuttlefish etc.
Baking Mode | 1950-2276W
Position of thermostat knob "C": Between 60°C and 250°C. The rears heating element and the fan come on, guaranteeing delicate heat distribution uniformly throughout the oven.
This mode is ideal for baking and cooking delicate foods-especially cakes that need to rise, and for the preparation of certain tartlets on 3 shelves at the same time. Here are a few examples: cream puffs, sweet and savory biscuits, savoury puffs, Swiss rolls and small portions of vegetables au gratin, etc. ....
"Defrosting" Mode 70-87W
Position of thermostat knob "C": Any
The fan located on the bottom of the oven makes the air circulate at room temperature around the food. This is recommended for the defrosting of all types of food, but in particular for delicate types of food which do not require heat, such as for example: ice cream cakes, cream or custard desserts, fruit cakes. By using the fan, the defrosting time is approximately halved. In the case of meat, fish and bread, it is possible to accelerate the process using the "Baking" mode and setting the temperature to 80°C-100°C.
The turnspit (only available on certain models)
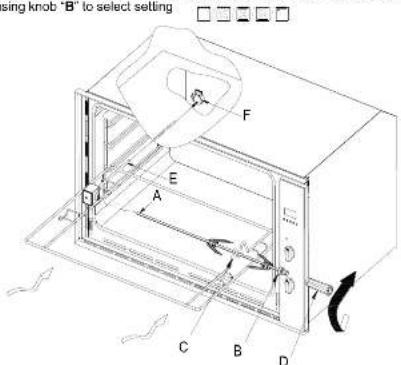
To start the turnspit, proceed as follows
- Insert the rotisserie rod“A” into the drive unit and groove “B” into bend“C”.
- Turn the plastiv handle "D" anti clockwise and slide the rack into the oven runners ensuring that the rod "E" slots into the hole "F";
- The rotisserie rack must always be filled in the middle of the oven (second position from bottom);
· start the turnspit using knob "B" to select setting
End Cooking Time Knob (I) (only available on certain models)
This model is equipped with a timer to control when the oven shuts off during cooking. Position of timer knob
'I': Between 10 minutes and 120 minutes.
At the end of the programmed length of time, the timer will sound and automatically turn off the oven.
5-keys timer procedure baking mode (only available on certain models)
Settings
After pressing a function button, the required time can be set via the +/- keys. For quicker regulation, keep the required key pressed. By pressing the function key and then releasing it, the preselected function appears on the display and remains for 5 seconds during the time the setting can be performed (with one hand). Five seconds after releasing the function key or finishing the setting, the display returns to the clock. Any program set will start immediately. Program selection is accompanied by the surrounding of a buzzer.
Setting the time(clock)
Select the clock function by simultaneously pressing the Duration(2) and End of Cooking (3) time keys and adjust the clock by means of the +/- (4+5) keys. All the Programs set will be cancelled and relay will switch off.
Manual operation
Simultaneously press the Duration (2) and End of cooking (3) time keys (the auto symbol will be cancelled): the saucepan symbol will light up. Any program set will be cancelled.
Semi automatic operation and cooking duration
Press the Cooking duration (2) key and set the duration by means of the +/- (4+5) keys. The saucepan symbol will appear.
The relay output will be activated.
If clock=end of the cooking time, the relay and saucepan symbol will be off. The buzzer will sound and symbol A will blink.
Semi automatic operation and end of cooking time
Press the end of cooking time key (3) and set the required time by means of the +I - (4 + 5) keys. The symbol A and the symbol of the saucepan will light up. The relay output will be activated.
If clock=end of the cooking time, the relay and saucepan symbol will switch off. The buzzer will sound and the symbol A will blink.
Completely automatic operation
Press the duration key (2) and set the required time by means of the +/- keys(4+5). The symbol A will appear. The relay will come on the saucepan symbol will appear. Select the End of cooking time function (3)- the minimum setting time will appear. Set the required time by means of the +/- keys (4+5).
The relay and the saucepan symbol. The saucepan symbol will re-appear when the clock time=the calculated switch on time. After setting the automatic program the symbol A will blink. The buzzer will sound and the saucepan symbol and relay will switch off.
Minute control
Press the Minute control key (1) and set the required time by means of the +/- keys (4+5). While the set time runs, the bell symbol will appear.
When the set time elapses, the buzzer will sound.
Buzzer
The buzzer remains active for 7 minutes after the minute control cycle or the cooking program has finished press any function key to stop the buzzer.
Program start-up and check
A set program is run when the required time has also been set. The remaining timers can be checked at any time by selecting the relevant function.
Setting error
The setting is not correct if the clock time is between the beginning of the cooking time and the end of the cooking time.
The error is indicated via sounding of a buzzer and blinking of the Auto symbol.
An incorrect setting can be corrected by re-setting either the beginning or end of cooking time.
Cancelling a program
A program can be cancelled by selecting the manual function. A set program is automatically cancelled when it reaches the end of its cycle.
The oven light
Set knob "B" to the ☐ symbol to turn it on .It lights the oven and stays on when any of the electrical heating elements in the oven come on.
Cooling ventilation
In order to cool down the exterior of the appliance, this model is equipped with a cooling fan, which comes on automatically when the oven is hot.
When the fan is on, a normal flow of air can be heard exiting between the oven door and the control panel.
Note: When cooking is done, the fan stays on until the oven cools down sufficiently.
How to Keep Your Oven in Shape
Before cleaning your oven, or performing maintenance, disconnect it from the power supply. To extend the life of your oven, it must be cleaned frequently, keeping in mind that:
To extend the line of your oven, it must be cleaned frequently, keeping in mind that. - the enameled or stainless steel parts should be washed with lukewarm water without using any abrasive powders or corrosive substances which could ruin them; Stainless steel could get stained. If these stains are difficult to remove, use special products available on the market. After cleaning, it is advisable to rinse thoroughly and dry.
- the inside of the oven should preferably be cleaned immediately after use, when it is still warm, with hot water and soap; The soap should be rinsed away and the interior dried thoroughly. Avoid using abrasive detergents (for example cleaning powders, etc) and abrasive sponges for dishes or acids (such as lime scale - remover, etc...) as these could damage the enamel. If the grease spots and dirt are particularly tough to remove, use a special product for oven cleaning, following the instructions provided on the packet. Never use a steam cleaner for cleaning inside of oven.
· if you use your oven for an extended period of time ,condensation may form .Dry it using a soft cloth.
there is a rubber seal surrounding the oven opening which guarantees its perfect functioning. Check the condition of this seal on a regular basis. If necessary, clean it and avoid using abrasive products or objects to do so. Should it become damaged, please contacts you're nearest After-sales Service Center. We recommend you avoid using the oven until it has been repaired.
never line the oven bottom with aluminum foil, as the consequent accumulation of heat could compromise the cooking and even damage the enamel.
clean the glass door using non-abrasive products or sponges and dry it with a soft cloth.
How to Remove The Oven door
For a more thorough clean, you can remove the oven door. Proceed as follows:
· Lift up and turn the small levers situated on the two hinges ;
· Grip the door on the two external sides .shut it slowly but not
Completely
: Pull the door towards you, pulling it out of its seat
Reassemble the door by following the above procedures backwards.

Replacing the Oven Lamp
WARNING: Ensure that the appliance is switched off before replacing the lamp to avoid the possibility of electric shock
- Disconnect the oven from the power supply by means of the omni polar switch used to connect the appliance to the electrical mains; or unplug the appliance if the plug is accessible;
- Remove the glass cover of the lamp-holder;
- Remove the lamp and replace with a lamp resistant to high temperatures (300 °C) with the following characteristics:
Voltage: 220-240V
Wattage: 25W
Type: F. 14
type. L 14

Replace the glass cover and reconnect the oven to the mains power supply
Practical Cooking Advice
The oven offers a wide range of alternatives which allow you to cook any type of food in the best possible way. With time you will learn to make the best use of this versatile cooking appliance and the following directions are only a guideline which may be varied according to your own personal experience.
Preheating
If the oven must be preheated (this is generally the case when cooking leavened foods ),the "Multi-Cooking" mode and the "Fast cooking"mode can be used to reach the desired temperature as quickly as possible in order to save on energy.
Once the food has been placed in the oven, the most appropriate cooking mode can then be selected.
Cooking on More Than One Rack
If you have to cook food using several racks, use either the 'baking' mode or the 'Multi-Cooking' mode, as these are the only modes that allow you to do so.
When cooking delicate food on more than one rack, use the "baking" mode, which allows you to cook on 2 racks at the same time (the 2nd and 3rd from the bottom). Some examples are included in the "Practical Cooking Advice" table.
When cooking other food on several racks, use the "Multi-Cooking" mode keeping the following suggestions in mind:
- The oven is fitted with 4 racks. During fan assisted cooking, use the two central racks; the lowest and highest racks receive the hot air directly and therefore delicate foodstuffs could be burnt on these racks.
As a general rule, use the 2nd and 3rd rack from the bottom, placing the foodstuffs that require greater heat on the 2nd rack from the bottom. For example, when cooking meat roasts together with other food, place the roast on the 2nd rack from the bottom and the more delicate food on the 3rd rack from the bottom.
- When cooking foodstuffs that require differing times and temperatures, set a temperature that is somewhere between the two temperatures required, place the more delicate food on the 4th rack from the bottom and take the food requiring less time out of the oven first.
- Use the dripping pan on the lower rack and the grid on the upper;
Using the "Fast Cooking" Mode
Functional, fast and practical for those of you who use pre-packed products (such as for example: frozen or pre-cooked food) along with other food items. You will find useful suggestions in the*Practical Cooking Advice*table.
Using the Grill
This multi-function oven offers you 2 different grilling modes.
Use the "grill" mode , placing the food under the center of the grill (situated on the 3rd or 4th rack form the bottom) because only the central part of the top heating element is turned on .
Use the bottom rack (1st from the bottom), placing the dripping pan provided to collect any sauce and /or grease and prevent the same from dripping onto the oven bottom. When using this mode, we recommend you set the thermostat to the highest setting. However, this does not mean you cannot use lower temperatures, simply by adjusting the thermostat knob to the desired temperature.
Setting — “fan assisted grill”, is extremely useful for grilling foods rapidly, as the distribution of heat makes it possible not only to brown the surface, but also to cook the bottom part.
Moreover, it can also be used for browning foods at the end of the cooking process, such as adding that gratin finish to pasta bakes, for example.
When using this mode, place the grid on the 2nd or 3rd oven rack from the bottom (see cooking table) then, to prevent fat and grease from dripping onto the bottom of the oven and thus smoke from forming, place a dripping-pan on the 1st rack from the bottom.
When using this mode, we advise you to set the thermostat to 200°C, as it is the most efficient way to use the grill, which is based on the use of infrared rays. However, this does not mean you cannot use lower temperatures, simply by adjusting the thermostat knob to the desired temperature.
Therefore the best results when using the grill modes are obtained by placing the grid on the lower racks (see cooking table) then, to prevent fat and grease from dripping onto the bottom of the oven and smoke from forming, place a dripping-pan on the 1st oven rack from the bottom.
Baking Cakes
When baking cakes ,always place them in a preheated oven .Make sure you wait until the oven has been preheated thoroughly (the end light "E 'will turn off ).Do not open the oven door during baking to prevent the cake from dropping .In general:
Pastry is too dry
Increase the temperature by 10°C and reduce the cooking time.
Pastry dropped
Use less liquid or lower the temperature by 10°C.
Pastry is too dark on top
Place it on a lower rack, lower the temperature, and increase the cooking time.
Cooked well on the inside but sticky on the outside
Use less liquid, lower the temperature, and increase the cooking time.
The Pastry sticks to the pan
Grease the pan well and sprinkle it with a dusting of flour or use greaseproof paper.
I used more than one level (in the function "ventilated oven") and they are not all at the same cooking
point
Use a lower temperature setting. It is not necessary to remove the food from all the racks at the same time.
Cooking Pizza
For best results when cooking pizza use the "Pizza Mode"
: Preheat the oven for at least 10 minutes
- Use a light aluminum pizza pan, placing it on the grid supplied with the oven. If the dripping pan is used, this will
end the cooking time, making it difficult to get a crispy crust:
- Do not open the oven door frequently while the pizza is cooking
- If the pizza has a lot of toppings (three of four), we recommend you add the mozzarella cheese on top halfway through the cooking process.
- When cooking pizza on two racks, use the 2nd and 4th with a temperature of 220^ , and place the pizzas in the
When cooking piezal on two hands pass the 2nd and 1st time a temperature of 2.5°C and plate the piezal in the oven after having preheated it for at least 10 minutes .
Cooking Fish and Meat
When cooking white meat, fowl and fish, use temperature setting from 180°C to 200°C
For red meat that should be well done on the outside while tender and juicy in the inside, it is a good idea to start with a high temperature setting (200°C-220°C) for a short time, then turn the oven down afterwards.
In general, the larger the roast, the lower the temperature setting. Place the meat on the center of the grid and place the dripping pan beneath it to catch the fat.
Make sure that the grid is inserted so that it is in the center of the oven. If you would like to increase the amount of heat from below, use the low rack heights. For savory roasts (especially duck and wild game), dress the meat with lard or bacon on the top.
| Selector knob setting | Food to be cooked | Weight (In kg) | Cooking rack position from bottom | Preheating time (Minutes) | Thermostat knob setting | Cooking time (Minutes) |
| 1 Convection | Duck | 1 | 3 | 15 | 200 | 65-75 |
| Roast veal or beef | 1 | 3 | 15 | 200 | 70-75 | |
| Pork roast | 1 | 3 | 15 | 200 | 70-80 | |
| Biscuits (short pastry) | - | 3 | 15 | 180 | 15-20 | |
| Tarts | 1 | 3 | 15 | 180 | 30-35 | |
| 2Multi-Cooking | Pizza (on 2 racks) | 1 | 2-3 | 15 | 220 | 15-20 |
| Lasagna | 1 | 3 | 10 | 200 | 30-35 | |
| Lamb | 1 | 2 | 10 | 180 | 50-80 | |
| Roast chicken +potatoes | 1 | 2-3 | 10 | 180 | 60-75 | |
| Mackerel | 1 | 2 | 10 | 180 | 30-35 | |
| Plum-cake | 1 | 2 | 10 | 170 | 40-50 | |
| Cream puffs (on 2 racks) | 0.5 | 2-3 | 10 | 190 | 20-25 | |
| Biscuits (on 2 racks) | 0.5 | 2-3 | 10 | 180 | 10-15 | |
| Sponge cake (on 1 cake) | 0.5 | 2 | 10 | 170 | 15-20 | |
| Sponge cake (on 2 cakes) | 1.0 | 2-3 | 10 | 170 | 20-25 | |
| Savory pies | 1.5 | 3 | 15 | 200 | 25-30 | |
| 3 Top Oven | Browning food to perfect Cooking | - | 3 | 15 | 220 | - |
| 4 Defrosting | All frozen food | |||||
| 5 Grill | Soles and cuttlefish | 1 | 3 | 5 | Max | 8-10 |
| Squid and prawn kebabs | 1 | 3 | 5 | Max | 6-8 | |
| Cod fillet | 1 | 3 | 5 | Max | 10 | |
| Grilled vegetables | 1 | 3 | 5 | Max | 10-15 | |
| Veal steel | 1 | 3 | 5 | Max | 15-20 | |
| Cutlets | 1 | 3 | 5 | Max | 15-20 | |
| Hamburgers | 1 | 3 | 5 | Max | 7-10 | |
| Mackerels | 1 | 3 | 5 | Max | 15-20 | |
| Toasted sandwiches | - | 3 | 5 | Max | 2-3 | |
| With rotisseric (where prevent) | ||||||
| Veal on the spit | ||||||
| Chicken on the spit | 1.0 | - | 5 | Max | 80-90 | |
| Lamb on the spit | 1.5 | - | 5 | Max | 70-80 | |
| 1.0 | - | 5 | Max | 70-80 | ||
| 6 Fan Assisted Grill | Grilled chicken | 1.5 | 3 | 5 | 200 | 55-60 |
| Cuttlefish | 1.5 | 3 | 5 | 200 | 30-35 | |
| With rotisseric (where prevent) | ||||||
| Veal on the spit | ||||||
| Chicken on the spit | 1.5 | - | 5 | 200 | 70-80 | |
| Chicken (on the spd)+potatoes | 2.0 | - | 5 | 200 | 70-80 | |
| (rossled) | 1.5 | - | 5 | 200 | 70-75 | |
| Lamb on the spit | - | 2 | 5 | 200 | 70-75 | |
| 1.5 | - | 5 | 200 | 70-80 | ||
| 7 Baking | Tarls | 0.5 | 3 | 15 | 180 | 20-30 |
| Fruit cakes | 1 | 2/3 | 15 | 180 | 40-45 | |
| Fruitcake | 0.7 | 3 | 15 | 180 | 40-50 | |
| Sponge cake | 0.5 | 3 | 15 | 160 | 25-30 | |
| Stuffed pancakes) on 2 racks) | 1.2 | 2-3 | 15 | 200 | 30-35 | |
| Small cakes (On 2 rakes) | 0.6 | 2-3 | 15 | 190 | 20-25 | |
| Cheese puffs (On2 cakes) | 0.4 | 2-3 | 15 | 210 | 15-20 | |
| Cream puffs (on 3 cakes) | 0.7 | 1-4 | 15 | 180 | 20-25 | |
| Biscuits (On 3 racks) | 0.7 | 1-4 | 15 | 180 | 20-25 | |
| Meringues (On 3 racks) | 0.5 | 1-4 | 15 | 90 | 180 | |
| 8 Fast cooking | Frozen food | |||||
| Pizza | 0.3 | 2 | - | 250 | 12 | |
| Courgettle and prawn pie | 0.4 | 2 | - | 200 | 20 | |
| Country style spinach pie | 0.5 | 2 | - | 220 | 30-35 | |
| Turnovers | 0.3 | 2 | - | 200 | 25 | |
| Lasagne | 0.5 | 2 | - | 200 | 35 | |
| Golden Rolls | 0.4 | 2 | - | 180 | 25-30 | |
| Chicken morseis | 0.4 | 2 | - | 220 | 15-20 | |
| Pre-cooked food | ||||||
| Golden chicken wings | 0.4 | 2 | - | 200 | 20-25 | |
| Fresh Food | ||||||
| Biscuits(short pastry) | 0.3 | 2 | - | 200 | 15-18 | |
| Fruitcake | 0.6 | 2 | - | 180 | 45 | |
| Cheese puffs | 0.2 | 2 | - | 210 | 10-12 | |
| 9 Pizza | Pizza | 0.5 | 3 | 15 | 220 | 15-20 |
| Roast veal or beef | 1 | 2 | 10 | 220 | 25-30 | |
| Chicken | 1 | 2/3 | 10 | 180 | 60-70 |
NB: cooking times are approximate and may vary according to personal taste. When cooking using the grill or fan assisted grill the dripping pan must always be placed on the 1st oven rack from the bottom.
Installation
Only a qualified person in compliance with the instructions provided must install the appliance. Appliance are fully assembled as in normal operation without any parts removed. The manufacturer declines all responsibility for improper installation, which may harm persons and animals and damage property.
Important: - The power supply to the appliance must be cut off before any adjustments or maintenance work is done on it;
- Air duct is supposed to use in Ventilation.
Installation of Built-in Ovens
In order to ensure that the built-in appliance functions properly, the cabinet containing it must be appropriate. The figure below gives the dimensions of the cut-out for installation under the counter. In order to ensure adequate ventilation, the back panel of the cabinet unit must be removed.
The oven must have a 40mm clearance between the oven and the rear timber panel.

The panels of the adjacent cabinets must be made of heat-resistant material. In particular, cabinets with a veneer exterior must be assembled with glues which can withstand temperatures of up to 100°C. In compliance with current safety standards, contact with the electrical parts of the oven must not be possible once it has been installed. The oven must be secured by 4 screws to the cabinet.
Electrical Connection
Those ovens equipped with a three-pole power supply cable are designed to operate with an alternating current. The wire for earthling the appliance is yellow-green in color.
Connecting the supply cable to the mains
Install a standardized plug corresponding to the load indicated on the data plate. When connecting the cable directly to the mains, install an omni polar circuit breaker with a minimum contact opening of 3 mm between the appliance and the mains. The omni polar circuit breaker should be sized according to the load and should comply with current regulations (the earth wire should not be interrupted by the circuit breaker).
The supply cable should be positioned so that it does not reach a temperature of more than 50°C with respect to the room temperature, anywhere along its length, or protected by insulation sleeping having an appropriate rating.
Before making the connection, check that:
The electrical safety of this appliance can only be guaranteed if the cooker is correctly and efficiently earthed, in compliance with regulations on electrical safety. Always ensure that the earthling is efficient; if you have any doubts call in a qualified technician to check the system, The manufacturer declines all responsibility for damage resulting from a system which has not been earthed.
- Before plugging the appliance into the mains ,check that the specifications indicated on the date plate (on the appliance and /or packaging )correspond to those of the electrical mains system of your home .
- Check that the electrical capacity of the system and sockets will support the maximum power of the appliance, as indicated on the data plate. If you have any doubts, call in a qualified technician.
If the socket and appliance plug are not compatible, have the socket replaced with a suitable model by a qualified technician. The latter, in particular, will also have to ensure that the cross section of the socket cables are suitable for the power absorbed by the appliance. The use of adapters, multiple sockets and/or extensions, is not recommended. If their use cannot be avoided, remember to use only single or multiple adapters and extensions which comply with current safety regulations. In these cases, never exceed the maximum current capacity indicated on the single adapter or extension and the maximum power indicated on the multiple adapter. The plug and socket must be easily accessible.
Technical Specifications
Inner dimensions of the oven:
Width 65.7cm
Depth 43.5cm
Height 35.1cm
Inner Volume of the oven 105 liters
Voltage and Frequency of Power Supply:
220-240V\~50/60Hz or 50H


Meaning of crossed -out wheeled dustbin:
Do not dispose of electrical appliances as unsorted municipal waste, use separate collection facilities.
Contact you local government for information regarding the collection systems available.
If electrical appliances are disposed of in landfills or dumps, hazardous substances can leak into the groundwater and get into the food chain, damaging your health and well-being.
When replacing old appliances with new ones, the retailer is legally obligated to take back your old appliance for disposals at least free of charge.
ARC


- 444 357
- 306 973
- The Management
- Safety Warnings
- Safety Is A Good Habit To Get Into
- Caution .hot surface
- How to use your oven
- "Fast cooking" Mode 2561-3005W
- Multi-Cooking Mode 2733-3278W
- Pizza Mode | 3168-3660W
- Delicate cooking 1367-1570W
- "Top" oven 1330-1523W
- Grill 2928-3375W
- Fan Assisted Grill 2953-3400W
- Baking Mode | 1950-2276W
- "Defrosting" Mode 70-87W
- The turnspit (only available on certain models)
- End Cooking Time Knob (I) (only available on certain models)
- Settings
- Setting the time(clock)
- Manual operation
- Semi automatic operation and cooking duration
- Semi automatic operation and end of cooking time
- Completely automatic operation
- Minute control
- Buzzer
- Program start-up and check
- Setting error
- Cancelling a program
- The oven light
- Cooling ventilation
- Note: When cooking is done, the fan stays on until the oven cools down sufficiently.
- How to Keep Your Oven in Shape
- How to Remove The Oven door
- Replacing the Oven Lamp
- Practical Cooking Advice
- Preheating
- Using the Grill
- Baking Cakes
- Pastry dropped
- Cooking Fish and Meat
- Connecting the supply cable to the mains
- Before making the connection, check that:
- Technical Specifications
- Inner dimensions of the oven:
- ARC
Brand : ARC
Model : AR90S
Category : Oven