
NV70H7796MS - Kitchen Appliances SAMSUNG - Free user manual and instructions
Find the device manual for free NV70H7796MS SAMSUNG in PDF.


| Product Type | Built-in Microwave Oven |
| Model Name | NV70H7796MS |
| Brand | Samsung |
| Capacity | 70 Liters |
| Dimensions (Width x Height x Depth) | 595 mm x 455 mm x 570 mm |
| Net Weight | Approx. 33 kg |
| Power Supply | 230 V, 50 Hz |
| Input Power | 3700 W (max) |
| Microwave Power | 1000 W |
| Grill Power | 1800 W |
| Convection Power | 2500 W |
| Functions | Microwave, Grill, Convection, Combination, Auto Cook, Defrost, Keep Warm |
| Display | LED Digital Display with Touch Control |
| Interior Material | Stainless Steel with Ceramic Enamel |
| Door Type | Drop-down Door |
| Safety Features | Child Lock, Automatic Shut-off, Overheat Protection, Door Interlock |
| Cleaning | Easy-clean Ceramic Enamel Interior, Steam Cleaning Function |
| Accessories | Glass Turntable, Wire Rack, Baking Tray, Crisp Plate |
| Spare Parts Availability | Yes, via Samsung Service Centers |
| Repairability Index | 8.5/10 (Estimated) |
Frequently Asked Questions - NV70H7796MS SAMSUNG
User questions about NV70H7796MS SAMSUNG
0 question about this device. Answer the ones you know or ask your own.
Ask a new question about this device
Download the instructions for your Kitchen Appliances in PDF format for free! Find your manual NV70H7796MS - SAMSUNG and take your electronic device back in hand. On this page are published all the documents necessary for the use of your device. NV70H7796MS by SAMSUNG.
USER MANUAL NV70H7796MS SAMSUNG
100% Recycled Paper
- Rotate the side chute by approximately 45°.
Removing the oven door
- Remove the 2 screws on the left and right sides of the oven door.
- Press the central part of the top of the side rails.
- Pull out and remove the side rails from the two holes at the bottom.
Cleaning the top wall (depending on the model)
Troubleshooting
Built-in Oven user manual

100% Recycled Paper
This manual is made with 100% recycled paper.
imagine the possibilities
Thank you for purchasing this Samsung product.
contents
USING THIS MANUAL

04 Using this manual
SAFETY INSTRUCTIONS

07 Bulb exchange 09 Door removal 09 Door glass removal 09 Auto energy saving function
INSTALLATION

10 Installation
OVEN CONTROLS

11 Oven controls
ACCESSORIES

11 Accessories
INITIAL CLEANING

13 Initial cleaning
USING THE OVEN

13 Use of cavity 14 Set cooking function 14 Set temperature 14 Using the twin mode 14 Useful twin mode 14 Useful auto speed preheating
English - 2
TIME SETTING

15 Set time 15 Set cook timer 15 Set end timer 16 Set delay start 16 Set kitchen timer
OTHER SETTINGS

16 Tone signal 16 Oven light 16 Child lock 16 Switch off
COOKING FUNCTION

17 Cooking function
AUTOMATIC COOKING

19 Single oven auto cook programmes 21 Upper oven auto cook programmes 21 Lower oven auto cook programmes 22 Twin oven auto cook programmes
COOKING GUIDE

23 Large grill 23 Eco grill 24 Conventional 25 Bottom + Convection 25 Convection 26 Top + Convection 26 Eco convection 27 Twin mode 28 Test dishes
CLEANING AND CARES
29 Self cleaning 30 Steam cleaning (depending on model) 30 Catalytic enamel surface (depending on model) 30 Hand cleaning 31 Water collector cleaning 31 Detaching the side runners (depending on model) 31 Cleaning the ceiling (depending on model) 32 Troubleshooting 32 Information codes
English - 3
using this manual
Thank you for choosing SAMSUNG Built-In Oven.
This user manual contains important safety information and instructions intended to assist you in the operation and maintenance of your appliance.
Please take the time to read this Owner's Manual before using your oven and keep this book for future reference.
The following symbols are used in the text of this Owner's Manual:

WARNING or CAUTION Important Note


Safety instructions
Installation of this oven must be performed only by a licensed electrician. The installer is responsible for connecting the appliance to the mains power supply in observance of the relevant safety recommendations.
WARNING
This appliance is not intended for use by persons (including children) with reduced physical, sensory or mental capabilities, or lack of experience and knowledge, unless they have been given supervision or instruction concerning use of the appliance by a person responsible for their safety.
Children should be supervised to ensure that they do not play with the appliance.
If the supply cord is defective, it must be replaced by a special cord or assembly available from the manufacturer or an authorized service agent. (Fixed wiring type model only)
If the supply cord is damaged, it must be replaced by the manufacturer, its service agent, or similarly qualified persons in order to avoid a hazard. (Power cord type model only)
The appliance should allow easy disconnection from the supply after installation. Disconnection may be achieved by having the plug accessible or by incorporating a switch in the fixed wiring in accordance with the wiring rules.
| During use the appliance becomes hot. Care should be taken to avoid touching heating elements inside the oven. | |
| ⚠ WARNING: Accessible parts may become hot during use. Young children should be kept away. | |
| If this appliance has steam or self cleaning function, excess spillage and all utensils must be removed before using the cleaning or self cleaning options. | |
| If this appliance has self cleaning function, during self cleaning the surfaces may get hotter than usual and children should be kept away. (cleaning function model only) | |
| Only use the temperature probe recommended for this oven.(temperature sensing probe model only) | |
| A steam cleaner is not to be used. | |
| ⚠ WARNING: Ensure that the appliance is switched off before replacing the lamp to avoid the possibility of electric shock. | |
| Do not use harsh abrasive cleaners or sharp metal scrapers to clean the oven door glass since they can scratch the surface, which may result in the glass shattering. | |
| ⚠ WARNING: The appliance and its accessible parts become hot during use.Care should be taken to avoid touching heating elements.Children less than 8 years of age shall be kept away unless continuously supervised. | |
| This appliance can be used by children aged from 8 years and above and persons with reduced physical, sensory or mental capabilities or lack of experience and knowledge if they have been given supervision or instruction concerning use of the appliance in a safe way and understand the hazards involved. Children shall not play with the appliance. Cleaning and user maintenance shall not be made by children without supervision. | |
| The temperature of external surfaces may be high when the appliance is operating. | |
| The door or the outer surface may get hot when the appliance is operating. | |
| Keep the appliance and its cord out of reach of children less than 8 years. | |
| Appliances are not intended to be operated by means of an external timer or separate remote-control system. | |
| Please put the bent up frame side to the back, in order to support the rest position when cooking big loads. (Depending on model) | 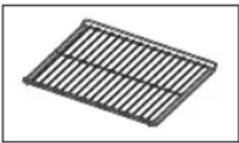 |
CAUTION
| If the oven has been damaged in transport, do not connect it. |
| This appliance must be connected to the mains power supply only by a specially licensed electrician. |
| In the event of a fault or damage to the appliance, do not attempt to operate it. |
| Repairs should be performed by a licensed technician only. Improper repair may result in considerable danger to you and others. If your oven needs repair, contact a SAMSUNG Service Centre or your dealer. |
| Electrical leads and cables should not be allowed to touch the oven. |
| The oven should be connected to the mains power supply by means of an approved circuit breaker or fuse. Never use multiple plug adapters or extension leads. |
| The power supply of the appliance should be turned off when it is being repaired or cleaned. |
| Take care when connecting electrical appliances to sockets near the oven. |
| If this appliance has steam cooking function, do not operate this appliance when the water supply cartridge is damaged. (Steam function model only) |
| When the cartridge is cracked or broken, do not use it and contact your nearest service center. (Steam function model only) |
| This oven has been designed only for the cooking of household foods. |
| During use, the oven interior surfaces become hot enough to cause burns. Do not touch heating elements or interior surfaces of the oven until they have had time to cool. |
| Never store flammable materials in the oven. |
| The oven surfaces become hot when the appliance is operated at a high temperature for an extended period of time. |
| When cooking, take care when opening the oven door as hot air and steam can escape rapidly. |
| When cooking dishes that contain alcohol, the alcohol may evaporate due to the high temperatures and the vapour can catch fire if it comes into contact with a hot part of the oven. |
| For your safety, do not use high-pressure water cleaners or steam jet cleaners. |
| Children should be kept at a safe distance when the oven is in use. |
| Frozen foods such as pizzas should be cooked on the Big grid. If the baking tray is used, it may become deformed due to the great variation in temperatures. |
| Do not pour water into the oven bottom when it is hot. This could cause damage to the enamel surface. |
| The oven door must be closed during cooking. |
| Do not line the oven bottom with aluminium foil and do not place any baking trays or tins on it. The aluminium foil blocks the heat, which may result in damage to the enamel surfaces and cause poor cooking results. |
| Fruit juices will leave stains, which can become indelible on the enamel surfaces of the oven. When cooking very moist cakes, use the deep pan. |
| Do not rest bakeware on the open oven door. |
| Young children should be supervised to ensure that they do not play with the appliance. |
| Keep children away from the door when opening or closing it as they may bump themselves on the door or catch their fingers in the door. |
| Do not step, lean, sit or place heavy items on the door. |
| Do not open the door with unnecessarily strong force. |
| WARNING: Do not disconnect the appliance from the main power supply even after the cooking process is completed. |
| WARNING: Do not leave the door open while oven is cooking. |
BULB EXCHANGE
Danger of electric shock! Before replacing any of the oven bulbs, take the following steps:
- Switch oven Off.
- Disconnect the oven from the mains.
- Protect the oven light bulb and the glass cap by laying a cloth on the bottom of the oven compartment.
- Bulbs can be purchased from the SAMSUNG Service Centre.
Rear oven light
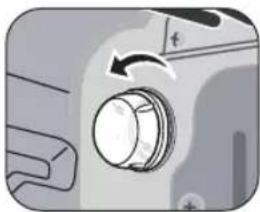
- Remove cap by turning anticlockwise and remove the metal ring, the sheet ring and clean the glass cap. If necessary, replace the bulb with a 25 watt, 300 °C heat-resistant oven light bulb.
- Clean the glass cap, the metal ring and the sheet ring if necessary.
- Fit the metal and the sheet ring to the glass cap.
- Place glass cap where you have removed it in step 1 and turn it clockwise to keep it in place.
Oven side light (Depending on model)
- To remove the glass cover, hold the lower end with one hand, insert a flat sharp implement such as a table knife between the glass and the frame.
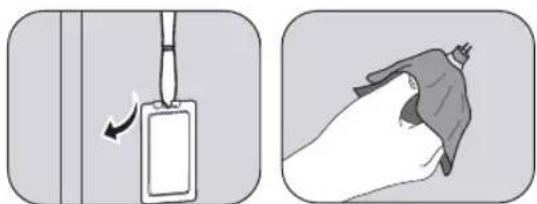
- Pop out the cover.
- If necessary, replace the halogen bulb with a 25-40 watt, 300 °C heat resistant halogen oven light bulb.
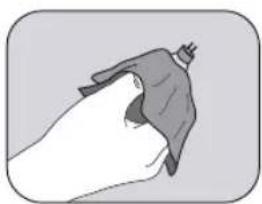
Tip: Always use a dry cloth when handling a halogen bulb to prevent sweat from fingers being deposited on the bulb surface. It increases the life of the bulb when you exchange the bulb.
- Reattach the glass cover.
DOOR REMOVAL
For normal use, the oven door must not be removed but if removal is necessary, for example, for cleaning purposes, follow these instructions.

CAUTION: The oven door is heavy.
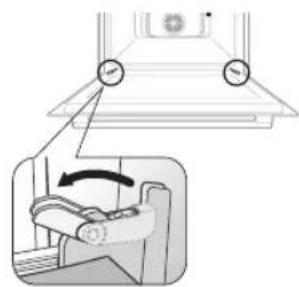
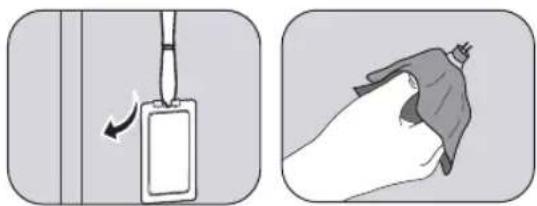
- Open the door and flip open the clips at both hinges completely.
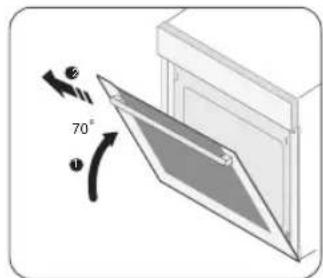
- Close the door by approximately 70°. With both hands, grasp the sides of the oven door at its middle and lift and pull upwards until the hinges can be taken out.
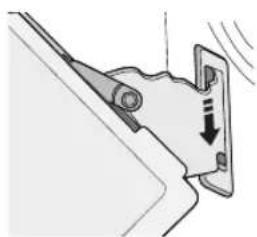
- After cleaning, to attach the door repeat steps 1 and 2 in reverse order. The clip on the hinge should be closed on both side.
DOOR GLASS REMOVAL
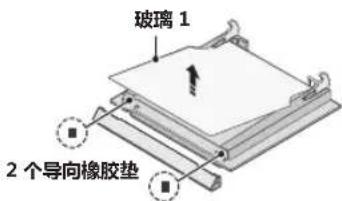
Glass Door Removal is equipped with four sheets of glass placed against each other. These sheets can be removed for cleaning.
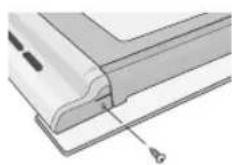
- Remove 2 screws on the left and right sides of the door.
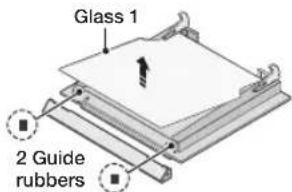
- Detach the covering and remove glass 1, 2, 3 and 2 guide rubbers from the door.
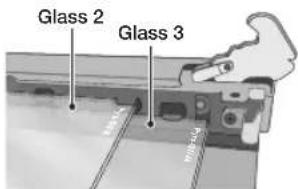
- After cleaning the door glasses, reassemble and repeat steps 1 and 2 in reverse order. Check the correct position of glass 2 and 3 with the above picture.

ATTACHING: The door glass differs from 2 EA to 4 EA depending on the model. When assembling the inner glass 1, put the printing facing downward.
AUTO ENERGY SAVING FUNCTION
- If you do not select any function when the appliance is in the middle of setting or operating with a temporary stop condition, the function is cancelled and the clock will be displayed after 10 minutes.
- Light: During the cooking process, you can switch off the oven lamp by pressing the 'Oven light' button. For energy saving, the oven lighting is switched off a few minutes after the cooking program has started.
Installation

Safety instructions for the installation
This oven may be installed only by an approved electrician. The installer is responsible for connecting the appliance to the main supply, while observing the relevant safety regulations.
- Ensure protection from live parts when installing the oven.
Power connection
If the appliance is not connected to the mains with a plug, a multi-pole isolator switch (with at least 3 mm contact spacing) must be provided in order to satisfy safety regulations. The power cable (H05 RR-F or H05 VV-F, min., 2.5 mm²) must be of sufficient length to be connected to the oven, even if the oven stands on the floor in front of its built-in cabinet. Open the rear connection cover of the oven with a screwdriver and loosen the screws of the cable clamp before you connect the power lines to the relevant connection terminals. The oven is earthed via the (½) terminal. The yellow and green cable (earth connection) must be connected first and be longer than the others. If the oven is connected to the mains with a plug, this plug must remain accessible after the oven is installed. Samsung will take no responsibility for accidents that originate from a m
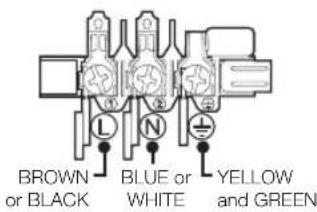

WARNING: Do not allow the connecting cable to become trapped during installation, and prevent it coming into contact with hot parts of the oven.
Installation in the cabinet
With built-in furniture, plastic surfaces and adhesive for the oven should be resistant to 90 °C inside the furniture and to 75 °C for adjacent furniture. Samsung will take no responsibility for damage to plastic surfaces or adhesive from the heat.
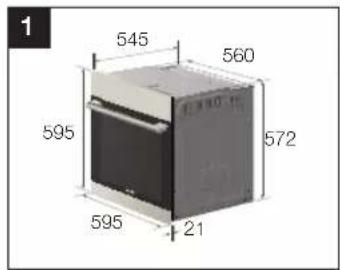
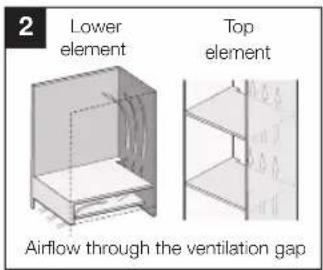
There should be a ventilation gap in the base of the kitchen cabinet where the oven is to be placed. For ventilation, a gap of about 50 mm should be left between the lower shelf and the supporting wall. If the oven is to be installed below a hob, the hob's installation instructions should be followed.
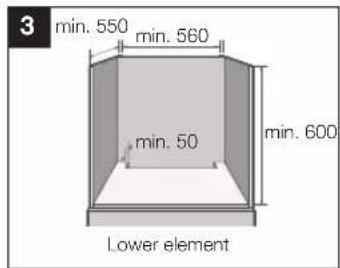
Push the appliance completely into the cabinet and fix the oven firmly on both sides using 2 screws. Make sure that a gap of at least 5 mm should be left between the appliance and the adjacent cabinet.
After installation, remove the vinyl protective film, tape, paper and accessories from the door and inside of oven. Before uninstalling the oven from the furniture, disconnect the oven from the power supply and release the 2 screws on the both sides of the oven.

WARNING: The built-in furniture must have a minimum ventilation gap for Air-flow as shown in picture. Do not cover this hole with strips of wood, for this is used to provide ventilation.

The front exterior of the oven such as handle is different model by model. But the size of the oven in the picture is same.
Oven controls
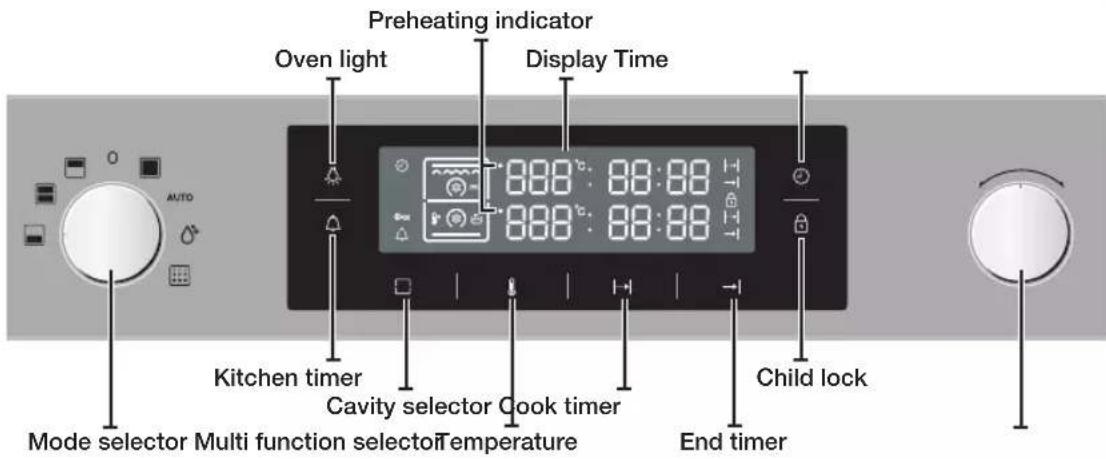

Front design
The front panel is available in various material and color options including stainless steel, white, black and glass. For purposes of quality improvement, the appearance may be subject to change.
Accessories
Your new Samsung oven comes with several accessories that should become very helpful during the preparation of different meals. The following accessories supplied depend on the model.

CAUTION: Be sure to attach the accessory correctly to the shelf level inside of the oven. Trays need to have at least 2 cm space towards the bottom of the oven, otherwise the enamel surface could be damaged.

WARNING: Be very careful removing meals and/or accessories out of the oven. Hot meals, accessories and surfaces can burn you!

The accessories can become deformed when they become hot. When they have cooled down, the deformation disappears with no effect on the function.
Divider
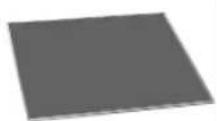
The divider needs to be applied if you want to use the upper and lower ovens separately, on their own or together for different cooking temperatures. It separates the upper and lower compartment and must only be used on shelf level 3.
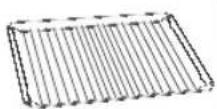
Wire shelf
The wire shelf should be used for grilling and roasting meals. You could use it with casseroles and other baking pots. Please put the bent up frame side to the back, in order to support the items when cooking big loads.
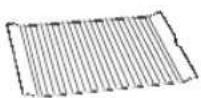
Wire tray insert (Depending on model)
The wire tray insert should be used for grilling and roasting meals. It can be used in combination with the tray to prevent liquids from dropping onto the bottom of the oven.
English - 11
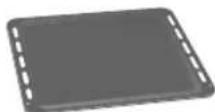
Baking tray (Depending on model)
The baking tray (Depth : 20 mm) can be used for the preparation of cakes, cookies and other pastries. Please put the slanted side to the front.
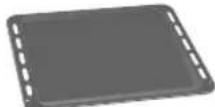
Universal tray (Depending on model)
The universal tray (Depth : 30 mm) can be used for the preparation of cakes, cookies and other pastries. And it is also good for roasting. It can be used in combination with the wire tray insert to prevent liquids from dropping onto the bottom of the oven. Please put the slanted side to the front.
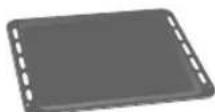
Extra deep tray (Depending on model)
The extra deep tray (Depth : 50 mm) is also good for roasting. It can be used in combination with the wire tray insert to prevent liquids from dropping onto the bottom of the oven. Please put the slanted side to the front.
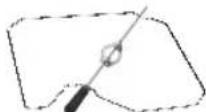
Rotisserie spit (Depending on model)
The rotisserie spit can be used for grilling foods such as chicken. The rotisserie spit can only be used in single mode on shelf level 3, because its spit has to be attached to an adapter on the back plane. Remove black plastic handle while cooking.
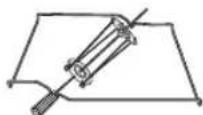
Rotisserie spit and Shashlik (Depending on model)
To use it :
- Place the tray (no trivet) at shelf level 1 to collect the cooking juices or on the bottom of the oven if the piece of meat to be roasted is too big.
- Slide one of the forks onto the spit; put the piece of meat to be roasted onto the spit;
- Parboiled potatoes and vegetables can be placed around the edge of the tray to roast at the same time.
- Place the cradle on the middle shelf and position with the "v" shape at the front. • To help insert the spit, the handle can be screwed onto the blunt end.
- Rest the spit onto the cradle with the pointed end towards the back and gently push until the tip of the spit enters the turning mechanism at the back of the oven. The blunt end of the spit must rest on the "v" shape. (The spit has two lugs which should be nearest to the oven door to stop the spit going forward, the lugs also act as a grip for the handle.)
- Unscrew the handle before cooking. After cooking screw the handle back on to help remove the spit from the cradle.
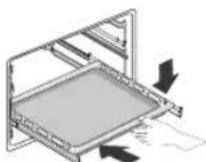
Telescopic rails (Depending on model)
- To insert the wire shelf or tray, first slide out the telescopic rails for one particular level.
- Place the wire shelf or tray on the rails and push them back completely into the oven. Close the oven door only after you have pushed the telescopic rails into the oven.
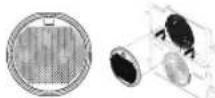
Grease filter (Depending on model)
The grease filter installed on the back oven interior wall protects the fan, round heater, and the oven from impurity, particularly spattering fat. When cooking meat, we recommend using the fat filter. When baking pastry, always remove the filter! If the filter is installed when baking pastry or cakes, the results can be quite poor.
Manual
Access the guide for the Samsung NV70H7796MS here, completely free. This manual falls under the other kitchen appliance category and has been rated by 1 users with an average score of 8.4. The manual is presently available in the following languages: English. If you have any specific questions about the Samsung NV70H7796MS or need further assistance with your product, feel free to ask.
Ask your question here

Need help?
Do you have a particular question about the Samsung NV70H7796MS not answered by the manual?
Type your question here
Ask a question
√ Receive updates on solutions √ Get answers to your question
Question and answer
Number of questions: 0
SET COOKING FUNCTION
The cooking function can be set after cavity selection. This oven offers various cooking options, refer to the cooking function part in the manual.
- Press the key, cooking function figure will blink.
- Turn the multi function selector to set desired cooking function.
- Press the key again.

During cooking, you can change the cooking function in the same order as above.
SET TEMPERATURE
The temperature can be set after setting the cooking function. Each cooking function has different temperature range, refer the cooking function part in the manual.
- Press the 🔊key, temperature figure will blink.
- Turn the multi function selector to set the desired temperature.
- Press the 🔊 key again.

During cooking, you can change the temperature in the same order as above.
USING THE TWIN MODE
For twin mode, the upper mode and lower mode are required to set function and temperature separately.
Select the Twin mode
- Select the Twin mode by turning the mode selector.
Upper Mode setting
- Press the key and turn the multi function selector to select the desired upper cooking function.
- Press the key and turn the multi function selector to select the desired temperature.
Lower Mode setting
- Press the key and turn the multi function selector to select the desired lower cooking function.
- Press the key and turn the multi function selector to select the desired temperature.

To change the cooking function or temperature with the twin mode, you should choose the cavity (upper or lower) first. If you press the key once, you can choose the upper cavity and change the setting. If you press the key twice, you can choose the lower cavity and change the setting.
USEFUL TWIN MODE
When you cook with twin mode, one cavity might finish cooking first. In this case, you can choose one cooking compartment to use half compartment.
When you turn the mode selector from Twin mode to Upper mode or Lower mode, the selected mode keeps the existing setting.
USEFUL AUTO SPEED PREHEATING
Your oven offers cooking functions, which include a fast preheating stage. This stage will be indicated beside the temperature setting in the display. During this preheating stage various heating elements are applied to speed up heating of the oven. Even though you change temperature to higher, the oven automatically changes target temperature and auto speed preheating will be applied. Even if you increase the temperature, the oven will automatically change the temperature and auto speed preheating will be applied.
TIME SETTING
The twin cooking mode allows to use different cook timer or end timer settings for each half cavity. To apply or modify cook timer or end timer, press the key once for Upper cavity and twice for Lower cavity.
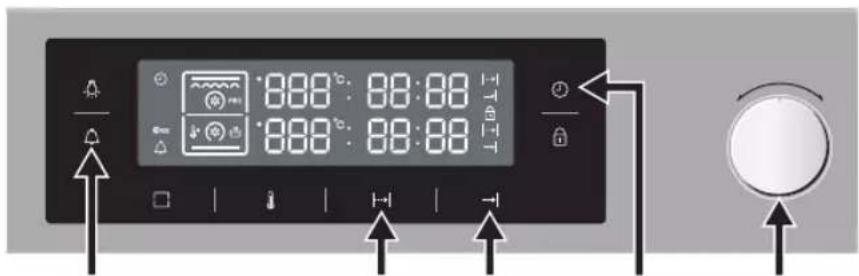
Multi function selector, Cook timer, End timer, Tim
SET TIME
For the first time use of the oven or after power failure, time setting is required.
- Press the power key, hours figure will blink.
- Turn the Multi function selector to set hours.
- Press the ⏻ key, the minutes figure will blink.
- Turn the Multi function selector to set the minutes.
- Press the ⏻ key again to set the current time.

The desired time can be reset in the same order as above.
During the cooking process, press the ⏻ key to see the current time.
SET COOK TIMER
After you set the cooking function, you can select the cooking time. When the cooking time is over, the heating elements automatically turn off.
- Press the | key, the cook timer figure will blink.
- Turn the multi function selector to apply the desired time for the cook timer.
- Press the | key again.

The cook timer can be reset in the same order as above. When the set time is over, the display shows blinking "0:00" with a signal. You can set a new cook timer or turn off the oven.
To cancel the cook timer, press the | key and set the cook timer to zero.
SET END TIMER
After you set the cooking function, you can set when the cooking time ends. When the cooking time is over, the heating elements automatically turn off.
- Press the — key, the end timer figure will blink.
- Turn the Multi function selector to apply the time for end timer.
- Press — key again.

The end timer can be reset in the same order as above and when the set time is over, the display shows blinking "0:00" with a signal.
To cancel the end timer, press—key and set the end timer to current time.
SET DELAY START
If the end timer is entered after the cook timer has already been set, the cook timer and the end timer are calculated and if necessary the oven sets a delay start point.

WARNING: Do not leave the food for too long time in the oven as food may spoil.
- Press | key, cook timer figure will blink.
- Turn the multi function selector to apply the time for cook timer.
- Press — key, end timer figure will blink.
- Turn the multi function selector to apply the time for end timer.
- The delay start point is automatically calculated and the oven is waiting until delay start point.

Delay start will not be set in twin mode.
The cook timer, end timer and delay start can be set after cooking function setting.
SET KITCHEN TIMER
The kitchen timer can be set independently of the oven function and used with cook timer or end timer at the same time. The kitchen timer has its own signal so you can recognize it from the others.
- Press key, kitchen timer figure will blink.
- Turn the multi function selector to apply the desired time for kitchen timer.
- Press key again.

To cancel the kitchen timer, press the hold key for two seconds.
The kitchen timer can be reset in the same order as above and when the set time is over, the display shows blinking "0:00" with a signal.
Other settings
Tone signal
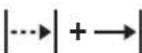
To activate or deactivate the tone signal, press and hold the | and key for 3 seconds.
Oven light

Press key to turn on and off. For energy saving, the oven light is switched off within a few minutes after the start of cooking.

Some models have 2 oven lights on the upper and lower side in the oven.
Child lock

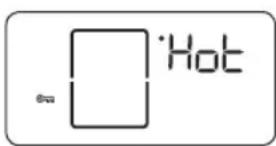
To activate or deactivate the child lock function, press and hold key for 3 seconds. Display will show the when the child lock function is activated. You can use the child lock function during cooking also. In this case all keys and multi function selector will not operate but you can switch off by turning the mode selector to off.
Switch off
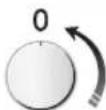
When the oven has been switched off, every heating element stops operating. The cooling fan will continue to run for a while after the oven has been switched off for safety.
Cooking function
This oven offers various functions below.
| Symbol | Function Use | Single Upper Lower Twin | ||||
| Temperature Range (°C) | ||||||
 | Conventional | Heat is emitted from the top and bottom heating system. This function can be used for standard baking and roasting of almost any dish.Suggested temperature : 200 °C | OXX | |||
| 40-250 | -- | |||||
 | Convection | The heat generated by the convection is evenly distributed in the oven by fans. This function can be used for frozen dishes and baking.Suggested temperature : 170 °C | OO | UpperLower | ||
| 40-250 | 40-250 40-250 | 170-250 | ||||
 | Top + Convectoin | The heat generated by the top heating system and the convection is evenly distributed in the oven by fans. This function can be used for roasting dishes that require a crispy topping eg. meat or lasagne.Suggested temperature : 190 °C | OXX | Upper | ||
| 40-250 | 40-250 - 170 | -250 | ||||
 | Bottom + Convectoin | The heat generated by the bottom heating system and the convection is evenly distributed in the oven by fans. This function can be used for pizzas, bread and cakes.Suggested temperature : 190 °C | OXX | Lower | ||
| 40-250 | -40-250 170 | -250 | ||||
 | Eco grill | Heat is emitted from the small area grill. This function can be used for smaller dishes that need less heat, like fish and filled baguettes.Suggested temperature : 240 °C | OXX | Upper | ||
| 40-270 | 40-250 - 200 | -250 | ||||
 | Large grill | Heat is emitted from the large area grill. This function can be used for browning the tops of food eg. meat, lasagne, gratin dishesSuggested temperature : 240 °C | OXX | Upper | ||
| 40-270 | 40-250 - 200 | -250 | ||||
 | Fan grill | The heat generated by the two top heating elements is distributed by the fan. This mode can be used for grilling meat and fish.Suggested temperature : 240 °C | OXX | Upper | ||
| 40-270 | 40-250 - 200 | -250 | ||||
 | Intensive cook | This mode activates all heating elements such as top, bottom and convection fan alternately.The heat is distributed evenly in the oven. This mode is suitable for big quantities of food, which need heat , such as large gratins and pies.Suggested temperature : 170 °C | OXXX | |||
| 40-250 | -- | |||||
 | ProRoasting | This mode includes an automatic pre-heat cycle up to 220 °C. The top heater and the convection fan is operating during the process of searing the meat. After this stage the food is cooked gently by the low temperature selected.The top and bottom heaters are operating on this cycle. This mode is suitable for meat roasts, poultry and fish.Suggested temperature : 100 °C | OXXX | |||
| 40-150 | -- | |||||
| Symbol | Function Use | Single Upper Lower Twin | |||
| Temperature Range (°C) | |||||
 | Keep warm | This mode activates bottom the heating element. This mode is suitable for keeping food warm.Suggested temperature : 80 °C | XXOX | ||
| -- 40-100 - | |||||
 | Plate warming | This mode activates bottom heating element and convection fan. This mode is suitable for warming Ceramic bowls, plates and cups.Suggested temperature : 60 °C | XXOX | ||
| -- 40-80 - | |||||
 | Eco convection | This mode uses the optimized heating system so that you save the energy during cooking your dishes.Suggested temperature : 170 °CECO Convection mode of heating used to determine the energy efficiency class in accordance with EN50304. | OXXX | ||
| 40-250 -- | |||||
Automatic cooking
With the automatic cooking function, you can select desired auto programmes for cooking, roasting, and baking.
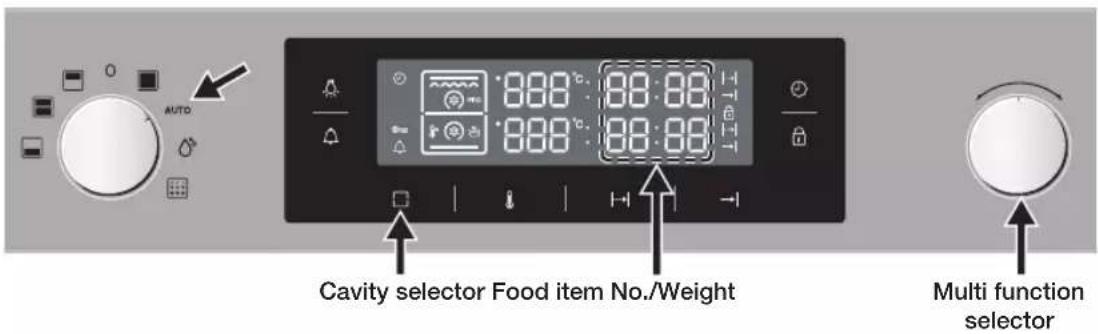
- Turn the Mode selector to Auto cook mode.
- Press the key to select the desired cavity.
- Turn the Multi function selector to choose the desired Food item No. and wait for 4-5 seconds.
- Turn the Multi function selector to enter the desired weight and wait for 4-5 seconds.
- After 4-5 seconds, Auto cook programmes will start automatically.

When you use the twin oven auto cook, after selecting the Food item No, select the desired weight for upper and lower cavity each.
SINGLE OVEN AUTO COOK PROGRAMMES
The following table presents 25 Auto Programmes for Cooking, Roasting, and Baking.
Those can be used in the single cavity of your oven. Always remove the divider.
It contains its quantities, weight ranges and appropriate recommendations.
Cooking modes and times have been pre-programmed for your convenience.
You can refer to these guidelines for cooking. Always insert food in a cold oven.
| No | Food item Weight | kg Accessory | Shelf level | Recommendation |
| A-01 | Frozen Pizza 0.3-0.60.7-1.0 | Wire shelf 2 Put frozen pizza in the middle of the Wire shelf. | ||
| A-02 | Frozen Oven Chips | 0.3-0.5 (thin)0.6-0.8 (thick) | Baking(universal) tray | 2 Distribute frozen oven chips evenly on the baking tray. First setting is for thin French fries, the second setting is for thick oven chips. |
| A-03 | Frozen Croquettes | 0.3-0.50.6-0.8 | Baking(universal) tray | 2 Put frozen potato croquettes on the tray. |
| A-04 | Homemade Lasagne | 0.3-0.50.8-1.0 | Wire shelf 3 | |
| A-05 | Beef Steaks 0.3-0.60.6-0.8 | Universal(deep) tray with Wire tray insert | 4 Put marinated beef steaks side by side on the Wire tray insert. Turn over, as soon as the oven beeps. The first setting is for thin beef steaks, the second setting is for thick beef steaks. | |
| A-06 | Roast Beef 0.6-0.80.9-1.1 | Universal(deep) tray with Wire tray insert | 2 Put marinated roast beef on Wire tray insert. Turn over, as soon as the oven beeps. | |
| A-07 | Roast Pork 0.6-0.80.9-1.1 | Universal(deep) tray with Wire tray insert | 2 Put marinated roast pork on Wire tray insert with the rind side down. Turn over as soon as the oven beeps. | |
| A-08 | Lamb Chops 0.3-0.40.5-0.6 | Universal(deep) tray with Wire tray insert | 4 | Marinate lamb chops. Put lamp chops on Wire tray insert. Turn over, as soon as the oven beeps. The first setting is for thin chops, the second setting is for thick chops. |
| A-09 | Chicken pieces | 0.5-0.71.0-1.2 | Universal(deep) tray with Wire tray insert | 4 Brush chicken pieces with oil and spices. Put chicken pieces side by side on the Wire tray insert. |
| A-10 | Whole Chicken | 1.0-1.11.2-1.3 | Universal(deep) tray with Wire tray insert | 2 Brush whole chicken with oil and spices. Put chicken on the Wire tray insert with the breast side down. Turn over, as soon as the oven beeps. |
| A-11 | Duck breast 0.3-0.50.6-0.8 | Universal(deep) tray with Wire tray insert | 4 Prepare duck breast, put on the Wire tray insert with the fat-side up. First setting is for one duck breast, the second setting is for 2 thick duck breasts. | |
| A-12 | Roll of Turkey | 0.6-0.80.9-1.1 | Universal(deep) tray with Wire tray insert | 2 Put roll of turkey on the Wire tray insert. Turn over, as soon as the oven beeps. |
| A-13 | Steamed Fish | 0.5-0.70.8-1.0 | Wire shelf 2 Rinse and clean fishes, such as whole trout, perch or sea bass. Put head to tail in an oval ovenproof glass dish. Add 2-3 tablespoon lemon juice. Cover with lid. |
| No | Food item Weight | ht/kg Accessory | Shelf level | Recommendation | |
| A-14 | Roast Fish 0.5 | 0.70.8-1.0 | Universal (deep) tray with Wire tray insert | 4 Put | fishes head to tail on the Wire tray insert. First setting is for 2 fishes, the second setting is for 4 fishes. The programme is suitable for whole fishes, like trout, pikeperch or gilthead. |
| A-15 | Salmon Steaks | 0.3-0.40.7-0.8 | Universal (deep) tray with Wire tray insert | 4 Put | salmon steaks on the Wire tray insert. Turn over, as soon as the oven beeps. |
| A-16 | Oven Potatoes | 0.4-0.50.8-1.0 | Baking (universal) tray | 2 Rinse | se potatoes, cut potatoes into halves. Brush with olive oil, herbs and spices. Distribute on the tray evenly. The first setting is for small potatoes (each 100 g), the second setting is for large oven potatoes (each 200 g). |
| A-17 | Roast Vegetables | 0.4-0.50.8-1.0 | Universal (deep) tray | 4 Put | vegetables, such as sliced courgette, pieces of pepper, sliced aubergine, mushrooms and cherry tomatoes into Universal tray. Brush with a mixture of olive oil, herbs and spices. |
| A-18 | Vegetable Gratin | 0.4-0.60.8-1.0 | Wire shelf 2 | Prepare | vegetable gratin using an ovenproof round dish. Put dish in the centre of oven. |
| A-19 | Marble Cake 0 | 5-0.60.7-0.80.9-1.0 | Wire shelf 2 | Put mixture | into a suitable sized buttered baking dish or tin. |
| A-20 | Fruit Flan Base | 0.3-0.4 (large)0.2-0.3 (tartlets) | Wire shelf 2 | Put mixture | into buttered baking dish or flan ring. First setting is for one fruit flan base, the second setting is for 5-6 small tartlets. |
| A-21 | Sponge Cake | 0.4-0.5 (midsize)0.2-0.3 (small) | Wire shelf 2 | Put mixture | into a round metal baking tin. First setting is for ∅ 26 cm and the second setting is for small ∅ 18 cm baking tin. |
| A-22 | Muffins 0.5-0.6 | 0.7-0.8 | Wire shelf 2 | Put mixture | into metal baking dish for 12 muffins. First setting is for small muffins, the second setting is for large muffins. |
| A-23 | Bread 0.7-0.8 (white)0.8-0.9 (wholemeal) | Wire shelf 2 | Prepare dough according to manufacturers instructions and put into a metal rectangular baking dish (length 25 cm). The first setting is for white bread (0.7-0.8 kg) and the second setting (0.8-0.9 kg) is for wholemeal bread. | ||
| A-24 | Homemade Pizza | 1.0-1.21.3-1.5 | Baking (universal) tray | 2 Put | pizza on the tray. The weight ranges include topping such as sauce, vegetables, ham and cheese. Setting 1 (1.0-1.2 kg) is for thin pizzas and setting 2 (1.3-1.5 kg) is for pizza with much topping. |
| A-25 | Yeast Dough Fermentation | 0.3-0.50.6-0.8 | Wire shelf 2 | The first set | setting is recommended for rising pizza yeast dough. The second setting is suitable for bread dough. Put into a large round heat-resistant dish and cover with cling film. |
UPPER OVEN AUTO COOK PROGRAMMES
The following table presents 5 Auto Programmes for Cooking, Roasting and Baking. It contains its quantities, weight ranges and appropriate recommendations. Insert the divider to use it.
Cooking modes and times have been pre-programmed for your convenience.
You can refer to these guidelines for cooking. Always insert food in a cold oven.
| No | Food item Weight | kg Accessory | Shelf level | Recommendation | |
| A-01 | Frozen Bread Rolls | 0.2-0.30.4-0.5 | Wire shelf 4 | Distribute | frozen bread rolls evenly on Wire shelf. |
| A-02 | Frozen Pizza Snacks | 0.1-0.20.3-0.4 | Wire shelf 5 | Put frozen | pizza in the centre of Wire shelf. |
| A-03 | 0.2-0.30.4-0.5 | Wire shelf 5 | Distribute | pizza snacks side by side on the Wire shelf. | |
| A-04 | Frozen Fish fingers | 0.2-0.30.4-0.5 | Baking (universal) tray | 5 | distribute fish fingers evenly on baking tray.0.2-0.3 kg weight range is suggested for 10 pcs, 0.4-0.5 kg for 15 pcs. Turn over after beep sounds. |
| A-05 | Frozen Oven Chips | 0.4-0.50.6-0.7 | Baking (universal) tray | 5 | distribute frozen oven chips on baking tray.The first setting is recommended for thin French fries, the second setting is recommended for thick oven chips. Use baking paper.Turn over after beep sounds. |
LOWER OVEN AUTO COOK PROGRAMMES
The following table presents 5 Auto Programmes for Cooking, Roasting and Baking. It contains its quantities, weight ranges and appropriate recommendations. Insert the divider to use it.
Cooking modes and times have been pre-programmed for your convenience.
You can refer to these guidelines for cooking.
Insert food in a cold oven, unless it is recommended to preheat the oven.
| No | Food item Weight/kg Accessory | Shelf level | Recommendation | ||
| A-01 | Frozen Salmon in puff pastry | 0.2-0.3 0.5-0.6 | Baking (universal) tray | 1 Use | baking paper. Put 2 pcs (0.2-0.3 kg) side by side or 4 pcs (0.5-0.6 kg) puff pastries in two rows on the baking tray. |
| A-02 | Homemade Quiche | 0.5-0.6 (small) 0.9-1.0 (large) | Wire shelf 1 | We recommend to preheat the lower oven to 210 °C with Bottom + convection mode until beep sounds. Use black metal baking tin. After preheating put in the centre of Wire shelf. For first setting use ∅ 18 cm tin, for second setting use ∅ 26 cm tin. | |
| A-03 | Homemade Pizza | 0.2-0.6 0.8-1.2 | Baking (universal) tray | 1 Use | baking paper. Put 0.2-0.6 kg on a round pizza tray, put 0.8-1.2 kg on the square baking tray. |
| A-04 | Muffins 0.5-0.6 | 0.7-0.8 | Wire shelf 1 | Put dough into black metal baking dish for 12 muffins. | |
| A-05 | Puff Pastry in Fruit | 0.2-0.3 0.4-0.5 | Baking (universal) tray | 1 | Put 4 puff pastries in two rows on the baking tray using baking paper. Use first setting for 4 small puff pastries (0.2-0.3 kg) and second setting for 4 large puff pastries (0.4-0.5 kg). |
TWIN OVEN AUTO COOK PROGRAMMES
Before using the twin auto cook function, insert the divider into the oven.
The following table presents 5 Twin Auto Cook Programmes for Cooking, Roasting and Baking.
Using those programmes you will be able to cook your main dish & side dish or main dish & dessert simultaneously. This table contains quantities, weight ranges and appropriate recommendations.
Cooking modes and times have been pre-programmed for your convenience. Please refer to those guide lines for cooking. Always insert food in cold oven.
| No cavity Food item | Weight/kg | Accessory | Shelf level | Recommendation | ||
| A-01 | upper Chicken Pieces 0.3-0.5 | 0.8-1.0 | Universal (deep) tray with Wire tray insert | 4 Brush | chicken pieces with oil and spices. Put pieces with the skin side up on the Wire tray insert. | |
| lower Potato Gratin 0.4-0.6 | 0.8-1.0 | Wire shelf 1 Use ovenproof baking dish. | ||||
| A-02 | upper Roast Vegetables | 0.4-0.50.7-0.8 | Universal (deep) tray | 4 Distribute sliced vegetables, such as courgettes, pepper, onions, mushrooms, fennel, egg plants and tomatoes on the Universal tray. Brush with olive oil and spices. | ||
| lower Pizza Bread 0.1-0.2 | 0.3-0.4 | Baking (universal) tray | 1 Put pizza bread on baking paper on tray. | |||
| A-03 | upper Roast Fish 0.3-0.5 | 0.6-0.8 | Universal (deep) tray with Wire tray insert | 4 Rinse and prepare whole fishes, such as trout, bream, pike-perch or gilthead, add lemon juice, herbs and spices. Brush skin with olive oil and spices. Put on Wire tray insert. | ||
| lower Potato wedges 0.3-0.4 | 0.5-0.6 | Baking (universal) tray | 1 Rinse and clean potatoes. Cut them into wedges or cut small potatoes into halves. Brush with olive oil and spices. | |||
| A-04 | upper Roast Duck Breast | 0.3-0.5(1-2 thin)0.6-0.8(2 thick) | Universal (deep) tray with Wire tray insert | 4 Put marinated duck breasts with the fat side up on the Wire tray insert.The first setting is for normal sized duck breasts (0.3 kg), the second setting is for 2 duck breasts (each 0.4 kg). | ||
| lower Baked Apples 0.4-0.5 | 0.9-1.0 | Wire shelf 1 Rinse and core apples and fill with marzipan or raisins. Put into a round ovenproof dish. | ||||
| A-05 | upper Muffins 0.5-0.6 | 0.7-0.8 | Wire shelf 4 Put dough into black metal baking dish for 12 muffins. | |||
| lower Homemade Pizza | 0.2-0.60.8-1.2 | Baking (universal) tray | 1 Put 0.2-0.6 kg on a round metal pizza baking dish, put 0.8-1.2 kg on the baking tray. Use baking paper. | |||

LARGE GRILL
We recommend to pre-heat the oven using Large Grill mode.
| Food item | Shelf level | Accessory | Temperature (°C) | Time (min.) |
| Sausages (thick) 5-10 pcs | 4 | Wire tray insert + Universal (deep) tray | 220 | 1st side : 5-8 2nd side : 5-8 |
| Sausages (thin) 8-12 pcs | 4 | Wire tray insert + Universal (deep) tray | 220 | 1st side : 4-6 2st side : 4-6 |
| Toasts 5-10 pcs | 5 Wire shelf 240 | 1st side : 1-2 2st side : 1-2 | ||
| Cheese Toasts 4-6 pcs | 4 | Wire tray insert + Baking (universal) tray | 200 4-8 | |
| Frozen Pancakes with filling ‘Russian Style’ (200-500 g) | 3 | Baking (universal) tray | 200 20-30 | |
| Beef Steaks (400-800 g) | 4 | Wire tray insert + Universal (deep) tray | 240 | 1st side : 8-10 2st side : 5-7 |

ECO GRILL
We recommend to pre-heat the oven using Eco grill mode. Put food in the centre of accessory.
| Food item | Shelf level | Accessory | Temperature (°C) | Time (min.) |
| Frozen Oven Camembert(2 – 4 each 75 g)PUT IN COLD OVEN (before preheat) | 3 Wire shelf 200 10-12 | |||
| Frozen Baguettes with topping(Tomato-Mozzarella or Ham & Cheese) | 3 | Wire tray insert +Baking (universal) tray | 200 15-20 | |
| Frozen Fish fingers (300-700 g)PUT IN COLD OVEN, (before preheat)DROP OIL | 3 | Wire tray insert +Baking (universal) tray | 200 15-25 | |
| Frozen Fish burger (300- 600 g)PUT IN COLD OVEN, DROP OIL | 3 | Baking (universal) tray | 180-200 20-35 | |
| Frozen Pizza (300-500 g)PUT IN COLD OVEN (before preheat) | 3 | Wire tray insert +Baking (universal) tray | 180-200 23-30 | |
We recommend to pre-heat the oven in conventional mode.
| Food item | Shelf level | Accessory | Temperature (°C) | Time (min.) |
| Whole chicken (800-1300 g)BRUSH WITH OIL & SPICESPlace with the breast side down and turn over at half time. | 2 | Wire tray insert + Universal (deep) tray | 200-220 50-70 | |
| Pork joint with crackling (1500-2000 g)Place with the rind side down and turn over at half time. | 2 | Wire tray insert + Universal (deep) tray | 190-200 120-150 | |
| Frozen Lasagne (500-1000 g) 3 Wire shelf 180-200 40-50 | ||||
| Whole Fish (e.g. Dorade)(300-1000 g)3-4 cut on each side DROP OIL | 3 | Wire tray insert + Universal (deep) tray | 240 15-20 | |
| Fish filets (500-1000 g)3-4 cut on each side DROP OIL | 3 | Baking (universal) tray | 200 13-20 | |
| Frozen cutlets (350-1000 g)minced meat & with ham, cheese or mushroom filing DROP OIL | 3 | Baking (universal) tray | 200 25-35 | |
| Frozen cutlets from minced, carrot, beetroot or potato(350-1000 g)DROP OIL | 3 | Baking (universal) tray | 200 20-30 | |
| Pork on bone cutlets (500-1000 g)DROP OIL, ADD SALT & PEPPER | 3 | Wire tray insert + Universal (deep) tray | 200 40-50 | |
| Baked potato (cut in half)(500-1000 g) | 3 | Baking (universal) tray | 180-200 30-45 | |
| Frozen Meat roll with mushrooms filing(500-1000 g)DROP OIL | 3 | Baking (universal) tray | 180-200 40-50 | |
| Sponge Cake (250-500 g) 2 Wire shelf 160-180 20-30 | ||||
| Marble Cake (500-1000 g) 2 Wire shelf 170-190 40-50 | ||||
| Yeast Cake on Tray with fruit & crumbles topping (1000-1500 g) | 2 | Baking (universal) tray | 160-180 25-35 | |
| Muffins (500-800 g) 2 Wire shelf 190-200 25-30 | ||||
We recommend to pre-heat the oven in Bottom + Convection mode.
| Food item | Shelf level | Accessory | Temperature (°C) | Time (min.) |
| Yeast dough pie with apple frozen (350-700 g) 3 Wire shelf 180-200 15-20 | ||||
| Puff pastry small pies with filling frozen (300-600 g)BRUSH EGG YOLK, PUT IN COLD OVEN (before preheat) | 3 | Baking (universal) tray | 180-200 20-25 | |
| Meat balls in sauce (250-500 g)use ovenproof dish | 3 Wire shelf 180-200 25-35 | |||
| Puff pastry fans (500-1000 g)BRUSH EGG YOLK | 3 | Baking (universal) tray | 180 15-23 | |
| Cannelloni in sauce (250-500 g)use ovenproof dish | 3 Wire shelf 180 22-30 | |||
| Yeast dough pies with filling (600-1000 g)BRUSH EGG YOLK | 3 | Baking (universal) tray | 180-200 20-80 | |
| Homemade Pizza (500-1000 g) | 2 | Baking (universal) tray | 200-220 15-25 | |
| Homemade Bread (700-900 g) 2 Wire shelf 170-180 45-55 | ||||

CONVECTION
We recommend to pre-heat the oven in convection mode.
| Food item | Shelf level | Accessory | Temperature (°C) | Time (min.) |
| Lamb rack (350-700 g), BRUSH WITH OIL & SPICES | 3 | Wire tray insert + Universal (deep) tray | 190-200 40-50 | |
| Baked Bananas (3-5 pcs), cut with knife on top, add10-15 g chocolate, 5-10 g nuts into cuts, drop sugar water, wrap in aluminium foil. | 3 Wire shelf 220-240 15-25 | |||
| Baked apples 5-8 pcs each 150-200 g Take out the hearts, add raisins and jam. Use ovenproof dish. | 3 Wire shelf 200-220 15-25 | |||
| Cutlets from minced meat (300-600 g) DROP OIL | 3 | Baking (universal) tray | 190-200 18-25 | |
| Minced Meat roll with filling ‘Russian style’ (500 g-1000 g) BRUSH WITH OIL | 3 | Baking (universal) tray | 180-200 50-65 | |
| Frozen Croquettes (500-1000 g) | 2 | Baking (universal) tray | 180-200 25-35 | |
| Frozen Oven Chips (300-700 g) | 2 | Baking (universal) tray | 180-200 20-30 | |
| Frozen Pizza (300-1000 g) 2 Wire shelf 200-220 | 15-25 | |||
| Apple & Almond Cake (500-1000 g) 2 Wire shelf | 170-190 | 35-45 | ||
| Fresh Croissant (200-400 g) (ready-dough) | 3 Wire shelf 180-200 15-25 | |||
We recommend to pre-heat the oven with Top + Convection mode.
| Food item | Shelf level | Accessory | Temperature (°C) | Time (min.) |
| Pork on bone (1000 g)BRUSH WITH OIL & SPICES | 3 | Wire tray insert + Universal (deep) tray | 180-200 50-65 | |
| Pork shoulder in foil (1000-1500 g)MARINATE | 2 Baking (universal) tray 180-230 80-120 | |||
| Whole chicken (800-1300 g)BRUSH WITH OIL & SPICESPlace with the breast side down and turn over at half time. | 2 | Wire tray insert + Universal (deep) tray | 190-220 45-65 | |
| Meat or fish steaks (400-800 g)DROP OIL, ADD SALT & PEPPER | 3 | Wire tray insert + Universal (deep) tray | 180-200 15-35 | |
| Chicken Pieces (500-1000 g)BRUSH WITH OIL & SPICES | 4 | Wire tray insert + Universal (deep) tray | 200-220 25-35 | |
| Roast Fish (500 g-1000 g)use ovenproof dishBRUSH WITH OIL | 2 Wire shelf 180-200 30-40 | |||
| Roast Beef (800-1200 g)BRUSH WITH OIL & SPICES | 2 | Wire tray insert + Universal (deep) tray Add 1 cup water | 200-220 45-60 | |
| Duck Breast (300-500 g) | 4 | Wire tray insert + Universal (deep) tray Add 1 cup water | 180-200 25-35 | |

ECO CONVECTION
This mode uses the optimized heating system so that you save energy during cooking your dishes. We recommend pre-heating the oven in Eco convection mode.

Energy saving tip
- During cooking, the oven door should be closed except for turning food over. Please do not open the door frequently during cooking to keep the temperature in the cavity, and it will save energy and time.
- If cooking time is more than 30 minutes, you can switch off the oven 5-10 minutes before the end of the cooking time for energy saving. The residual heat will complete the cooking process.
- After completing one cooking, if you succeed to another cooking before the oven cools off, you can reduce energy and time for re-heating the oven.
| Food item | Shelf level | Accessory | Temperature (°C) | Time (min.) |
| Sponge cake (250-500 g) 2 Wire shelf 1 | 50-160 30-40 | |||
| Muffin (500-800 g) 2 Wire shelf 180-200 | 15-25 | |||
| Roast beef (800-1200 g) | 2 | Wire tray insert + Extra deep tray Add 1 cup water | 200-220 40-55 | |
| Roast pork (800-1200 g) | 2 | Wire tray insert + Extra deep tray Add 1 cup water | 150-170 70-100 | |
| Frozen oven chips (300-700 g) | 2 | Baking (universal) tray | 180-200 | 20-30 |
| Frozen pizza (300-500 g) 2 Wire shelf 200-220 8-15 | ||||
| Mini pie (200-400 g) 2 Baking (universal) tray 180-200 8-15 | ||||
TWIN MODE

Using twin mode you can cook two different food items in your oven. When cooking in the upper and lower cavity you can use different temperatures, cooking modes, and cooking times. For example, you can grill steaks and bake gratin simultaneously. Using the divider, you can cook gratin in the lower and steaks in the upper part of the oven. Always insert the divider into shelf level 3 before you start cooking.

Notice: Put food in a cold oven.
Suggestion 1: Cooking at different temperatures
| Cavity Food item | Shelf level | Cooking mode | Temperature (°C) | Accessory | Time (min.) | |
| UPPER | Frozen Pizza (300-400 g) 4 | Convection | 200-220 Wire shelf | 15-25 | ||
| LOWER | Marble Cake (500-700 g) 1 | Convection | 160-180 Baking (universal) | tray | 50-60 | |
Suggestion 2: Cooking at different cooking modes
| Cavity | Food item | Shelf level | Cooking mode | Temperature (°C) | Accessory | Time (min.) |
| UPPER | Chicken Pieces (400-600 g) | 4 | Top Heat + Convection | 200-220 Universal pan + Wire tray insert | 25-35 | |
| LOWER | Potato Gratin (500-1000 g) | 1 | Convection | 160-180 | Wire shelf | 30-40 |
TEST DISHES
According to standard EN 60350
1. Baking
The recommendations for baking refer to a preheated oven.
Always put trays with the slanted side to the door front.
| Type of food | Dish & Notes | Shelf level | Cooking mode | Temp. (°C) | Cooking time (min.) |
| Shortbread Baking | (universal) tray 3 Conventional | 50-170 25-35 | |||
| 2 Convection 150-170 | 20-30 | ||||
| Baking tray + Universal tray 1 + 4 | Convection | 150-170 20-30 | |||
| Baking (universal) tray + Extra deep tray | 2 + 5 Convection 150-170 | 20-30 | |||
| Small Cakes Baking tray 3 Conventional 160-180 | 25-35 | ||||
| 2 Convection 150-170 | 25-35 | ||||
| Baking tray + Universal tray 1 + 4 | Convection | 150-170 25-35 | |||
| Baking (universal) tray + Extra deep tray | 2 + 5 Convection 150-170 | 25-35 | |||
| Fatless Sponge Cake | Springform cake tin (Dark coated, ø 26 cm) on Wire shelf | 2 Conventional 160-180 | 20-30 | ||
| 2 Convection 150-170 | 35-45 | ||||
| Springform cake tin (Dark coated, ø 26 cm) on baking tray + Wire shelf | 1 + 4 Convection 150-170 | 35-45 | |||
| Apple Yeast Tray Cake | Baking (universal) tray 3 Conventional 150-170 | 65-75 | |||
| 2 Convection 150-170 | 70-80 | ||||
| Baking tray + Universal tray 1 + 4 Convection 150-170 75-85 | |||||
| Baking (universal) tray + Extra deep tray | 2 + 5 Convection 150-170 | 75-85 | |||
| Apple Pie Wire shelf + 2 Springform cake tins * (Dark coated, ø 20 cm) | 1 Placed diagonally | Conventional 170-190 | 70-90 | ||
| Baking (universal) tray + Wire shelf + 2 Springform cake tins ** (Dark coated, ø 20 cm) | 1 + 3 Convection 170-190 | 80-100 | |||
* Two cakes are arranged on the grid at the back left and at the front right. ** Two cakes are arranged in the center on top of each other.
2. Grilling
Preheat the empty oven for 5 minutes using Large Grill function.
| Type of food D | Dish & Notes | Shelf level | Cooking mode | Temp. (°C) | Cooking time (min.) |
| White Bread Toasts | Wire shelf 5 Large Grill 270 °C | 1 | st 1-2 2nd 1-1 1/2 | ||
| Beef Burgers * (12 ea) | Wire tray insert + Universal tray (to catch drippings) | 4 Large | Grill 270 °C | 1 | st 14-16 2nd 5-7 |
* Beef Burgers: Preheat the empty oven for 15 minutes using Large Grill function.
Cleaning and Care
SELF CLEANING
This mode is for cleaning the oven automatically.
This mode burns off residues like grease inside the oven with temperatures over 400 °C. It is recommended to use self cleaning every 2 to 3 months for cleaning, but it can be used more often.

Please clean the inner glass of the door regularly after you use the oven, otherwise self cleaning functions cannot be effective for accumulated dirt on the glass.
During self cleaning, the oven door is locked automatically for your safety.
| Door locking ( ♂) | When the oven temperature heats up to 300 °C, the door will be locked automatically for safety. |
| Unlocking | When the oven temperature is falls below 200 °C, the door will be unlocked automatically. |
Before starting the self cleaning
- All accessory parts including the wire, tray and side runners (depends on model) should be taken out of the oven.
The high temperature over 400 °C will damage the accessories.
- Remove any large pieces of dirt by hand inside the oven.
Because thick food residue, grease and meat juices are flammable, a fire may happen in the oven during self cleaning.
Self cleaning settings
- Turn the mode selector to
- Turn the multi function selector to choose the self-cleaning level among the 3 levels below. When you choose a self-cleaning level, self-cleaning automatically starts after a few seconds, and it is not possible to change the self-cleaning level once it has started.
| Level Duration | ||
| P 1 Low | approx. 120 minutes | |
| P 2 Med | um approx. 150 minutes | |
| P 3 High | approx. 180 minutes | |
- When the display starts to blink with a signal, the self-cleaning is complete. Set the mode selector to Off to end the self-cleaning.
- After the oven has cooled down, clean the oven interior with a damp cloth and remove the remaining ash inside the oven.

It is possible to stop the function during self-cleaning by turning the mode selector to Off. If the temperature inside the oven is too high, you cannot open the door until it is automatically unlocked for safety.

Warning
- During the self-cleaning process, the oven surface becomes hotter than in normal cooking mode.
- Children should be supervised to ensure that they do not touch the oven surface during the self-cleaning process.
STEAM CLEANING (DEPENDING ON MODEL)
If the oven is dirty, it must be cleaned, and you can use the steam cleaning option. It helps you clean the inside of the oven more easily.
- Remove all accessories from the oven before using the steam cleaning function.
- Pour 400 ml (3/4 pint) of water onto the bottom of the oven and close the oven door.
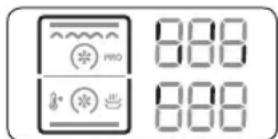
- Turn the mode selector to ⬆. When you choose the steam cleaning function, steam cleaning automatically starts after a few seconds.
- When the display starts to blink with a signal, the steam cleaning is complete. Set the mode selector to Off to end the steam cleaning.
- Clean the oven interior with a soft clean cloth and remove the remaining water on the bottom of the oven with a sponge.

Steam cleaning notes
- Take care when opening the door before the end of the steam cleaning procedure; the water on the bottom is hot.
- Never leave the residual water in the oven for a longer time, for example, over night. • If the oven is heavily soiled, the procedure may be repeated after the oven has cooled.
- If the oven is heavily soiled with grease, for example, after roasting or grilling, it is recommend that you rub detergent into the stubborn soil before activating the oven cleaning function.
- Leave the oven door ajar after cleaning to allow the interior enamel surface to dry thoroughly.
CATALYTIC ENAMEL SURFACE (DEPENDING ON MODEL)
The removable cover casing is coated with a dark gray catalytic enamel this can become coated with oil and fat distributed by circulating air during convection heating. These deposits will burn off at oven temperatures of 200°C and above.
- Remove all accessories from the oven.
- After cleaning all interior oven surfaces, set the oven to convection 250 °C.
HAND CLEANING

CAUTION: Make sure the oven and accessories are cool before cleaning.
Do not use abrasive cleaning agents, hard brushes, scouring pads or cloths, steel wool, knives, or other abrasive materials.
Oven Interior
- For cleaning the interior of the oven, use a clean cloth and a mild cleaning agent or warm soapy water.
- Do not hand-clean the door seal. To avoid damaging the enameled oven surfaces, only use customary oven cleaners. To remove stubborn soil, use a special oven cleaner.
Oven Exterior
For cleaning the exterior of the oven, such as the oven door, handle, and display, use a clean cloth and a mild cleaning detergent or warm soapy water, and dry with kitchen roll or a dry towel.
Grease and dirt can remain around the handle or keys because of hot air coming from the oven, so please clean the handle and keys after you use the oven.
Accessories
Wash the accessories after every use and dry them with a tea towel. If necessary, soak them in warm soapy water for about 30 minutes for easier cleaning.
WATER COLLECTOR CLEANING
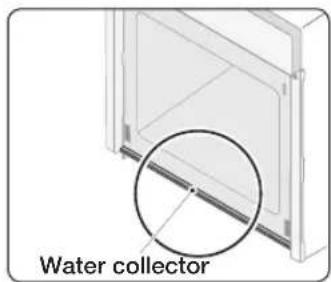
The water collector collects any excess moisture when the oven is operating. Food residue can collect on the water collector. Clean the water collector regularly to protect against any damage to your kitchen units after cooking.

WARNING: If you encounter water leakage from the water collector after cooking, please contact us at the service center.
DETACHING THE SIDE RUNNERS (DEPENDING ON MODEL)
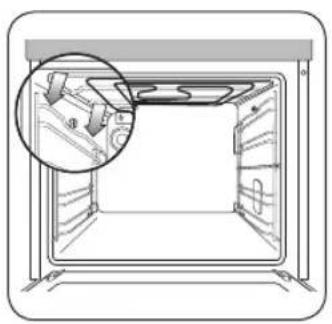
- Press the central part of the side runner top portion.
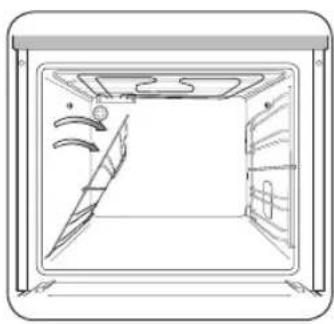
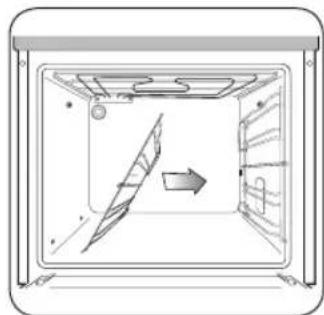
- Rotate the side runner by approximately 45°.
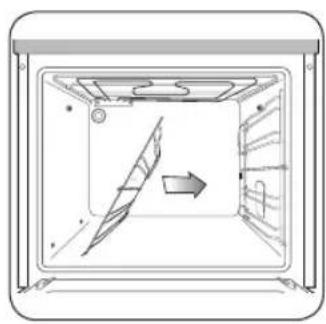
- Pull and remove the side runner from the bottom two holes.
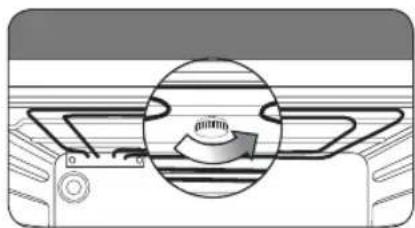
CLEANING THE CEILING (DEPENDING ON MODEL)
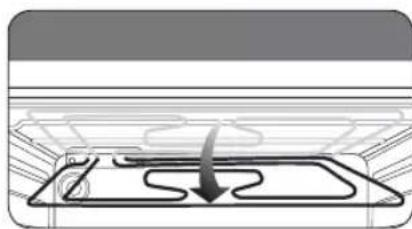
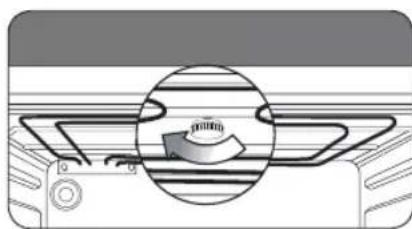
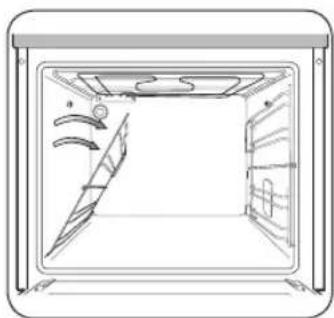
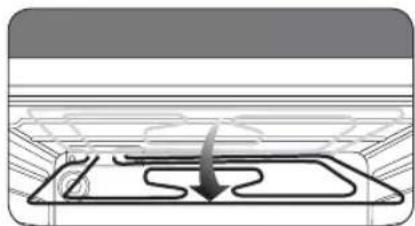
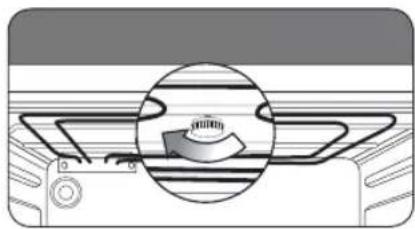
- You can lower the grill heater to help when cleaning the ceiling of the oven. Remove the circular nut by turning it anti-clockwise while holding the grill heater.
- The front of the grill heater moves down and the grill heater cannot be removed from the oven. Do not force the grill heater down, or it may become deformed.
- When cleaning has been done, lift the grill heater back to its original level and turn the circular nut clockwise.
TROUBLESHOOTING
| PROBLEM SOLUTION | |
| What should I do if the oven doesn’t heat up? | The oven may not be switched on. Switch the oven on.Check to see if the required settings have been applied.A household fuse may have blown or a circuit breaker may have tripped. Replace the fuses or reset the circuit. If this happens repeatedly, call a qualified electrician. |
| What should I do if, even though the oven function and temperature have been set, the oven does not heat up? | Do not leave the oven door open while oven is cooking.If you don’t leave the oven door open, there may be problems with the internal electrical connections. Call your local service centre. |
| What should I do if the oven light doesn’t illuminate? | The oven light may have failed. Replace the oven light.If the oven light doesn’t work after changing the oven light, call your local service centre. |
| What should I do if the cooling fan is running after the oven has been switched off? | After use, the cooling fan runs to protect your oven from the heat until the oven has cooled down. Call your local service centre if the cooling fan continues to run after the oven has cooled down. |
| What should I do if the all keys are not pressed? | Check if the child lock function is active or not. If the child lock function is not activated, call your local service centre. |
INFORMATION CODES
All information codes are not from the fault of the oven. Please refer to the solution below first. If the information codes still occur, please call your local SAMSUNG Customer Care Centre.
| CODE PROBLEM SOLUTION | ||
 | Safety ShutoffOven has continued operating at set temperature for prolonged time.Under 105 °C 16 hoursFrom 105 °C to 240 °C 8 hoursFrom 245 °C to Max 4 hours | Turn oven off and remove food.Allow oven to cool before using again.As it is not the error of oven, please use the oven again after turning oven off and cool down. |
 | Key ErrorIt occurs when the key is pressed and held for a period of time. | Clean the keys and check if there is water on the surface around key. Turn off the oven and try setting again. If it occurs again, call your local SAMSUNG Customer Care Centre. |
 | Divider use is incorrect. Insert divider for upper, twin and lower mode. Remove divider for single mode.If it occurs again even though you use the divider with right way, call your local SAMSUNG Customer Care Centre. | |
 | Safety ErrorAn oven error may cause low performance and problems in safety. | Stop using the oven immediately and turn oven off.Call your local SAMSUNG. |
1) ** refers to all numbers.
memo
memo
memo
QUESTIONS OR COMMENTS
| COUNTRY CALL OR VISIT US ONLINE AT | ||
| AUSTRALIA 1300 | 362 603 | www.samsung.com/au/support |
| NEW ZEALAND | 0800 SAMSUNG (0800 726 786) | www.samsung.com/nz/support |
| CHINA 400-810-5858 | www.samsung.com/cn/support | |
| HONG KONG (852) | 3698 4698 | www.samsung.com/hk/support (Chinese) www.samsung.com/hk_en/support (English) |
| INDIA 1800 | 3000 8282 - Toll Free1800 266 8282 - Toll Free | www.samsung.com/in/support |
| BANGLADESH 09612300300 – non toll free | ||
| INDONESIA | 0800112888021-56997777 | www.samsung.com/id/support |
| JAPAN 0120-327-527 | www.samsung.com/jp/support | |
| MALAYSIA | 1800-88-9999 | www.samsung.com/my/support |
| PHILIPPINES | 1-800-10-7267864 [PLDT]1-800-8-7267864 [Globe landline and Mobile]02-4222111 [Other landline] | www.samsung.com/ph/support |
| SINGAPORE | 1800-SAMSUNG(726-7864) | www.samsung.com/sg/support |
| THAILAND | 0-2689-32321800-29-3232 | www.samsung.com/th/support |
| TAIWAN | 0800-32-9999 | www.samsung.com/tw/support |
| VIETNAM | 1800 588 889 | www.samsung.com/vn/support |
DG68-00543A-00
- REMOVING THE OVEN DOOR
- CLEANING THE TOP WALL (DEPENDING ON THE MODEL)
- BUILT-IN OVEN USER MANUAL
- CONTENTS
- USING THIS MANUAL
- SAFETY INSTRUCTIONS
- INSTALLATION
- OVEN CONTROLS
- ACCESSORIES
- INITIAL CLEANING
- USING THE OVEN
- ENGLISH
- TIME SETTING
- OTHER SETTINGS
- COOKING FUNCTION
- AUTOMATIC COOKING
- COOKING GUIDE
- CLEANING AND CARES
- WARNING
- CAUTION
- BULB EXCHANGE
- DANGER OF ELECTRIC SHOCK! BEFORE REPLACING ANY OF THE OVEN BULBS, TAKE THE FOLLOWING STEPS
- REAR OVEN LIGHT
- OVEN SIDE LIGHT (DEPENDING ON MODEL)
- DOOR REMOVAL
- DOOR GLASS REMOVAL
- AUTO ENERGY SAVING FUNCTION
- SAFETY INSTRUCTIONS FOR THE INSTALLATION
- POWER CONNECTION
- INSTALLATION IN THE CABINET
- FRONT DESIGN
- DIVIDER
- WIRE SHELF
- WIRE TRAY INSERT (DEPENDING ON MODEL)
- BAKING TRAY (DEPENDING ON MODEL)
- UNIVERSAL TRAY (DEPENDING ON MODEL)
- EXTRA DEEP TRAY (DEPENDING ON MODEL)
- ROTISSERIE SPIT (DEPENDING ON MODEL)
- ROTISSERIE SPIT AND SHASHLIK (DEPENDING ON MODEL)
- TELESCOPIC RAILS (DEPENDING ON MODEL)
- GREASE FILTER (DEPENDING ON MODEL)
- MANUAL
- NEED HELP
- QUESTION AND ANSWER
- SET COOKING FUNCTION
- SET TEMPERATURE
- USING THE TWIN MODE
- SELECT THE TWIN MODE
- UPPER MODE SETTING
- LOWER MODE SETTING
- USEFUL TWIN MODE
- USEFUL AUTO SPEED PREHEATING
- SET TIME
- SET COOK TIMER
- SET END TIMER
- SET DELAY START
- SET KITCHEN TIMER
- TONE SIGNAL
- OVEN LIGHT
- CHILD LOCK
- SWITCH OFF
- SINGLE OVEN AUTO COOK PROGRAMMES
- UPPER OVEN AUTO COOK PROGRAMMES
- LOWER OVEN AUTO COOK PROGRAMMES
- TWIN OVEN AUTO COOK PROGRAMMES
- LARGE GRILL
- ECO GRILL
- CONVECTION
- ECO CONVECTION
- ENERGY SAVING TIP
- TWIN MODE
- TEST DISHES
- BAKING
- GRILLING
- CLEANING AND CARE
- SELF CLEANING
- BEFORE STARTING THE SELF CLEANING
- SELF CLEANING SETTINGS
- STEAM CLEANING (DEPENDING ON MODEL)
- STEAM CLEANING NOTES
- CATALYTIC ENAMEL SURFACE (DEPENDING ON MODEL)
- HAND CLEANING
- OVEN INTERIOR
- OVEN EXTERIOR
- WATER COLLECTOR CLEANING
- DETACHING THE SIDE RUNNERS (DEPENDING ON MODEL)
- CLEANING THE CEILING (DEPENDING ON MODEL)
- TROUBLESHOOTING
- INFORMATION CODES
Brand : SAMSUNG
Model : NV70H7796MS
Category : Kitchen Appliances