
Tapo L920-10 - Lighting TP-LINK - Free user manual and instructions
Find the device manual for free Tapo L920-10 TP-LINK in PDF.


| Product Type | Smart Light Strip |
| Brand | TP-Link |
| Model | Tapo L920-10 |
| Total Length | 10 meters (2 x 5m strips) |
| Number of Color Zones | 50 |
| Colors | Over 16 million |
| Connectivity | Wi-Fi 2.4 GHz, no hub required |
| Voice Assistants | Amazon Alexa, Google Assistant, Apple Siri |
| Power Adapter Input | 100-240V AC, 50/60Hz |
| Power Adapter Output | 12V DC, 1.5A |
| Adapter Model | T120150-2B1 / S042-1A120330VU |
| Control Methods | Tapo app, physical button, voice |
| Cuttable | Yes, cut at marked lines (cannot be reattached) |
| Mounting | 3M adhesive backing |
| Protective Coating | PU coating for external protection |
| Water Resistance | Indoor use only, suitable for dry and damp locations |
| Operating Temperature | -20°C to 40°C (-4°F to 104°F) |
| Operating Humidity | 10% to 90% RH, non-condensing |
| Certifications | FCC, CE, UKCA, IC |
| Safety | For indoor use only, not for emergency lighting, keep away from water and fire |
Frequently Asked Questions - Tapo L920-10 TP-LINK
User questions about Tapo L920-10 TP-LINK
0 question about this device. Answer the ones you know or ask your own.
Ask a new question about this device
Download the instructions for your Lighting in PDF format for free! Find your manual Tapo L920-10 - TP-LINK and take your electronic device back in hand. On this page are published all the documents necessary for the use of your device. Tapo L920-10 by TP-LINK.
USER MANUAL Tapo L920-10 TP-LINK
natural_image
Colorful spiral film strips with square markers, no text or symbols present© 2022 TP-1 HK 1910013210 REVI.0.1
Contents
About This Guide ....1
Introduction 2
Appearance 3
Set Up Your Light Strip4
Install Your Light Strip6
Basic Device Control 8
Configure Your Light Strip....9
Smart Actions 18
Third-Party Services 21
Reset Your Light Strip 23
Authentication 24
About This Guide
This guide provides a brief introduction to the Tapo Smart Light Strip and the Tapo app, as well as regulatory information.
Features available in Tapo may vary by model and software version. Tapo availability may also vary by region. All images, steps, and descriptions in this guide are only examples and may not reflect your actual Tapo experience.
Conventions
In this guide, the following convention is used:
| Convention | Description |
| Blue | Key information appears in blue, including management page text such as menus, items, buttons and so on. |
| Underline | Hyperlinks are in blue and underlined. You can click to redirect to a website. |
| ■ Note Ignoring this type of note might result in a malfunction or damage to the device. | |
More Info
- Specifications can be found on the product page at https://www.tapo.com.
• Our Technical Support and troubleshooting information can be found at https://www.tapo.com/support/.
• A Technical Community is provided for you to discuss our products at https://community.tp-link.com. - Setup Video can be found at https://www.tp-link.com/support/setup-video/.
Introduction
The Tapo Smart Wi-Fi Light Strip is part of the Tapo smart home family of products, including plugs, switches, cameras and more. Over 16 million vibrant colors and 50 separate color zones are available for you to pick from and create your own scenes. Cut it to whatever length you want and attach it to any surface with the 3M adhesive. You can light up walkways, TV setups, bookshelves, bedrooms and so much more.
Whether you use your preferred Tapo app or Smart Voice Assistant, you can control the light strip easily. With Tapo, your home is never more than a few taps away.
• Multiple Color & Effects - Control 50 separate color zones and bring vibrant joy to your life.
- External Protection - Easy maintenance and extended lifespan thanks to PU coating.
- No Hub Required - Connect to your home's secure Wi-Fi network. No need for a hub or extra equipment.
- Flexible Installation* - Cut it to whatever length you want and attach it to any surface with the 3M adhesive.
*Once cut, it cannot be reattached. Prevent accidental shocks by removing its power and then cutting along the strip's indicator lines.
- Preset for Convenience - Save and preset your favorite lightings for multiple scenarios.
- Schedule & Timer - Create schedules and count plans to turn on/off with the brightness/color you set.
- Away Mode - Simulate someone being at home to frighten away unwanted visitors.
- Connect It Your Way - Use it with your smart assistant, a hub, or connect directly to the Tapo App. Control the Light Strip however you want.
• Voice Control - Use simple voice commands to control your light strip with Alexa or Google Assistant.
- Sync-to-Sound - Bounce to the beat of your favorite tunes. Coordinate the vibrant colors to your songs and fill your life with energy.
Appearance
The Tapo Smart Light Strip includes a power adapter, a control button, a controller, and the Light Strip.

flowchart
graph LR
    A["Input"] --> B["Capacitor"]
    B --> C["Output"]
    style A fill:#f9f,stroke:#333
    style C fill:#bbf,stroke:#333
Power Adapter Control Button Light StripController
Control Button Explanation
| Control Button Description | |
| Turn On/Off Press once to | turn on/off the light strip. |
| Switch Preset Lighting Effects | Press twice to switch preset lighting effects. |
| Soft Reset(Only reset Wi-Fi info) | Press and hold for 5s but no more than 10s, and release. The light strip will blink orange and green. |
| Factory Reset(Reset to factory settings) | Press and hold for at least 10s until the light strip turns solid white, then blinks orange and green. |
LED Light Status
| LED Status Description | |
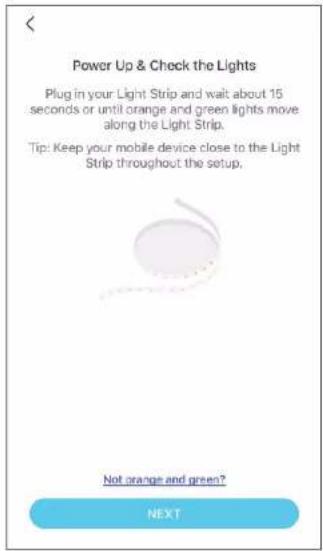
| Blinks orange and green Ready for setup | |
| Blinks green and white Connecting to Wi-Fi | |
| Blinks among several colors, then remains solid white | Connected to Wi-Fi and TP-Link server |
Set Up Your Light Strip
Follow the steps below to get started with your new light strip.
Step 1. Download Tapo App
Get the Tapo app from the App Store or Google Play, or by scanning the QR code below.
Step 2. Log In
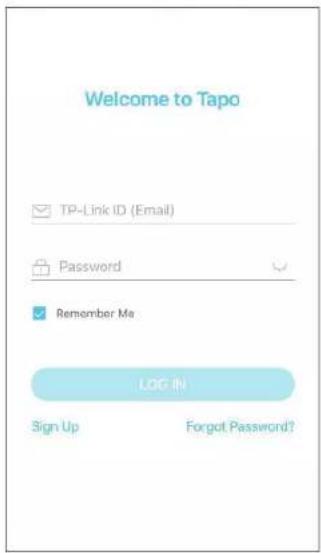
Open the app, and log in with your TP-Link ID. If you don't have an account, create one first.
Step 3. Add Your Light Strip
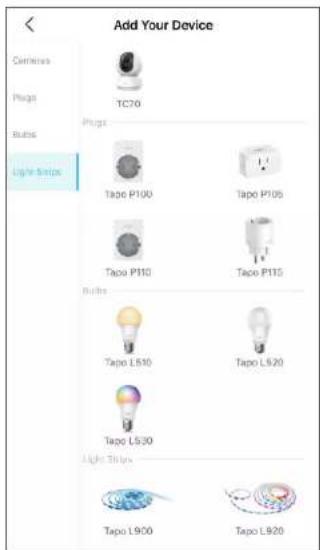
Tap the Ⓐ button in the app, tap Light Strips, and select your model.
Step 4. Connect All Parts
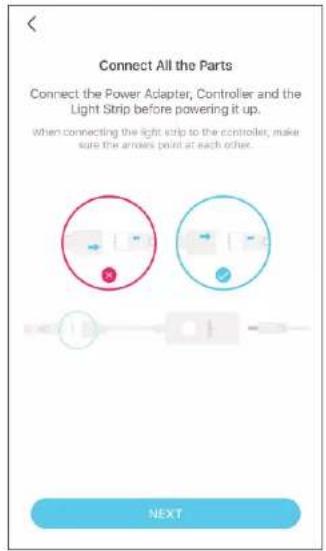
Connect the Power Adapter, Controller, and the Light Strip before powering it up.
Note: Make sure the arrows on the light strip and the controller point at each other. Otherwise, it will not be powered on.
Step 5. Power Up Light Strip
Plug in the power adapter and check the lights.
Note: Do not roll up when using. Spread out the light strip before connecting the power supply.
Step 6. Join Your Home Wi-Fi
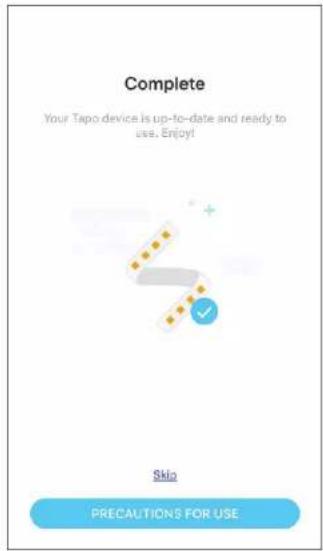
Follow app instructions to add your light strip to your home network.
Install Your Light Strip
After you have set up the light strip via the Tapo app, you can cut it to length-fit and attach it to any surface with the 3M adhesive. To avoid damaging your light strip, please note the following Installation Tips before installing the light strip.
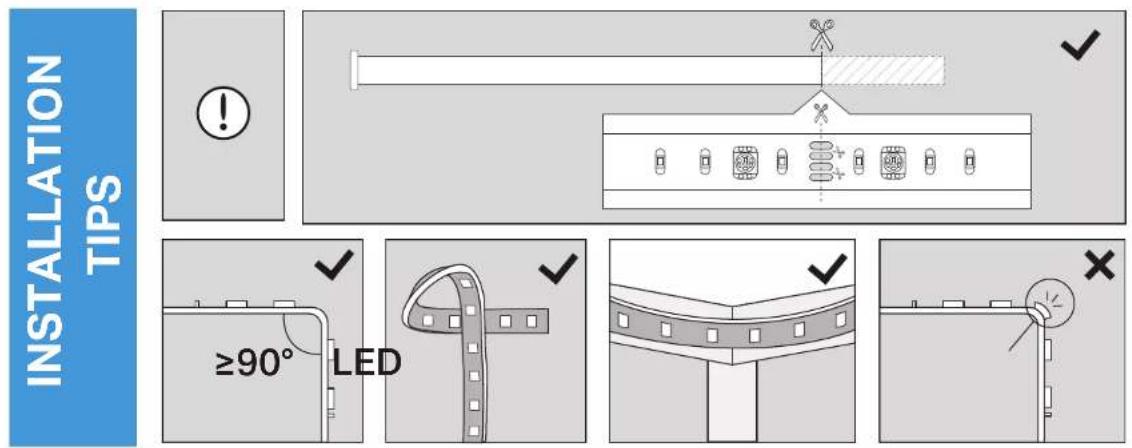
Cut Only On Specific Areas of Light Strip
You can custom tailor the length of your light strip with scissors. Unplug the Light Strip and cut only on these specific areas or your light strip will no longer function.
Avoid Bending on LED Beads
The bend should be avoided just in the position of the LED components, so as not to damage the product and affect the life of the product.
Avoid Sharp Turns
Carefully roll the light strip into a clover or use a gentle hill when making 90° turns like those need behind a TV. Sharp bends can damage your light strip.
Avoid Sharp Corners
Use gentle weeps when bending light strip around corners and avoid creases as they may cause damage.
Step 1. Choose Location
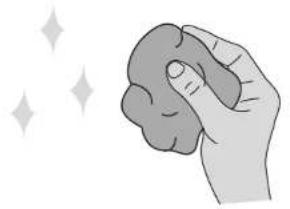
Choose a location that avoids static and eases away from splashing water. Find a clean, dry and smooth surface, then wipe off the dust.
natural_image
Illustration of a hand holding a crumpled object with sparkles in the background (no text or symbols)Step 3. Stick Light Strip
Stick the light strip and press it down for 10-15 seconds. Secure the controller with the adhesive pads. Do not move it to other place after it is attached.
natural_image
Illustration of hands using a tool to adjust or install a component on a ruler (no text or symbols visible)INSTALL LIGHT STRIP
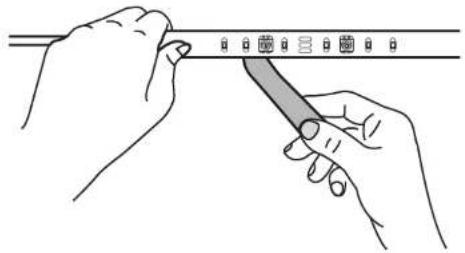
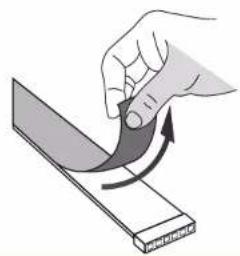
Step 2. Remove Adhesive Tape
Unplug the light strip first. Slowly peel away the 3M adhesive backing and take it out bit by bit.
Note: Do not peel off the tape under the adhesive backing.
natural_image
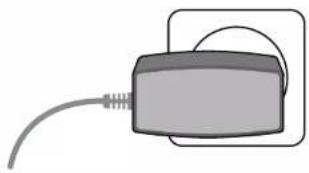
Illustration of a hand using a curved tool to lift a rectangular block (no text or symbols)Step 4. Power Up Light Strip
Plug in the power adapter to power on your light strip.
natural_image
Simple line drawing of a rectangular device with a curved cable and looped ends (no text or symbols)Basic Device Control
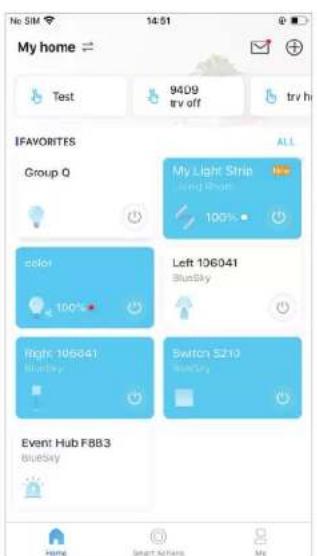
After successfully setting up your light strip, you will see the home page of the Tapo app. Here you can view the status of all devices that you've added and manage them. You can tap on the device to control and manage.
Home Page
You can turn on or off the light strip anytime anywhere and tap the card to enter the status page.
Device Status Page
You can adjust brightness and colors, start sync-to-sound, set lighting effects, create schedules, enable away mode, or set a timer to automatically control your device, view its runtime & energy usage, and more.
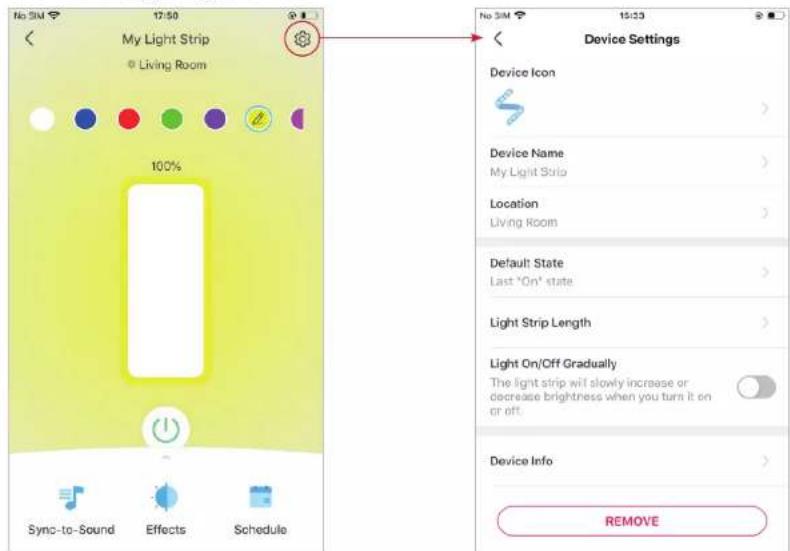
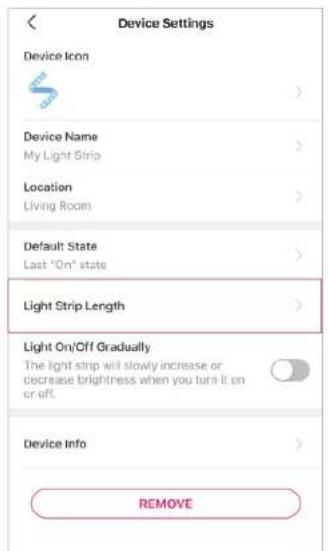
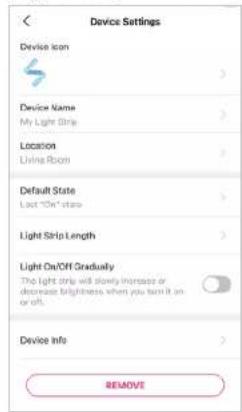
Device Settings Page
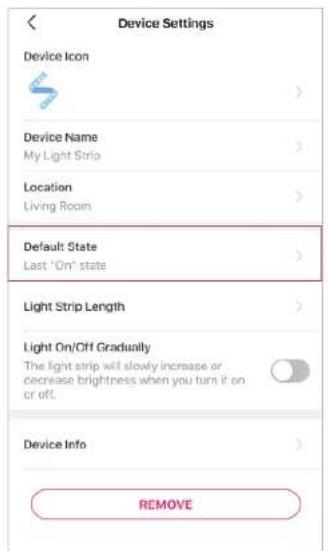
You can edit the basic information, set default state, change the illuminated length, enable gentle on/off, update firmware, and more.
Configure Your Light Strip
You can configure your light strip by adjusting lighting settings and setting Presets, Schedule, Timer, Away Mode and more.
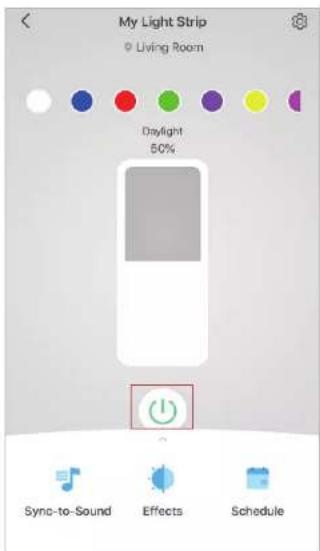
Power On/Off At One Tap
Quickly power on or off your light strip with a tap.
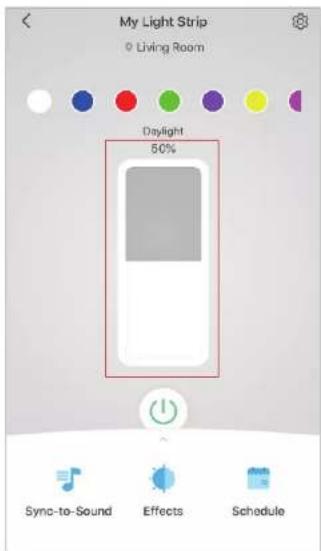
Adjust Brightness
Slide to dim your light strip with a range from 1% to 100%.
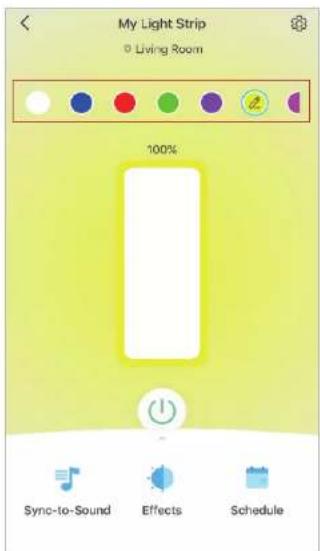
Change Color & Lighting Effect
Tap to apply the color or lighting effect.
Presets
Tap on a preset to quickly apply your favorite colors or lighting effects.
To edit Presets, tap on a preset and the edit icon will appear, then tap the edit icon.
Presets Settings
Color Light: Change the color and brightness for the preset.
Effects: Select or create a new lighting effect for the preset.
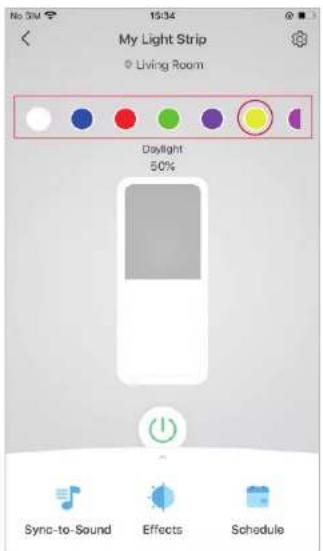
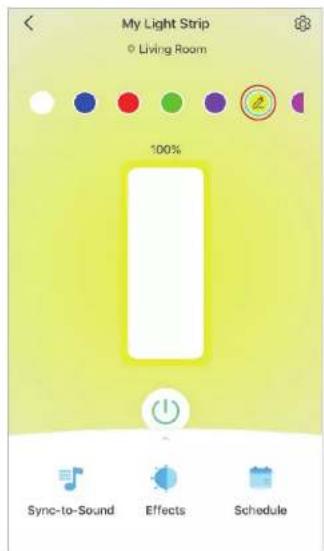
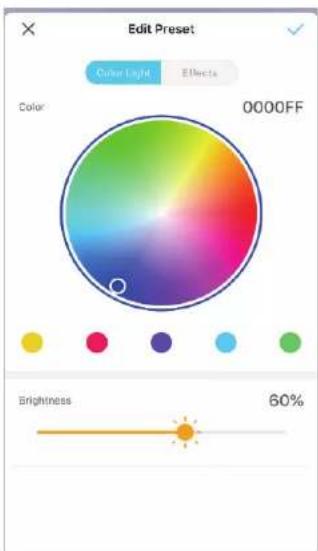
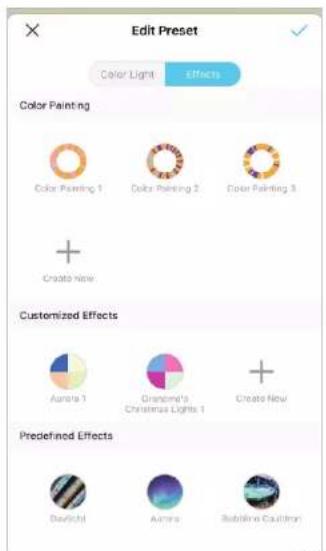
Sync to Sound
Tap to start sync-to-sound to Sync-to-Sound
coordinate your favorite music with your Tapolights.
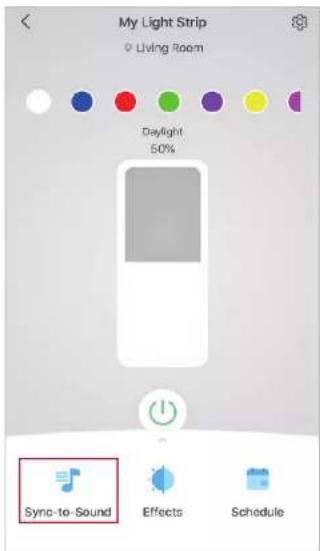
Keep sync-to-sound page in the foreground to ensure audio reception.
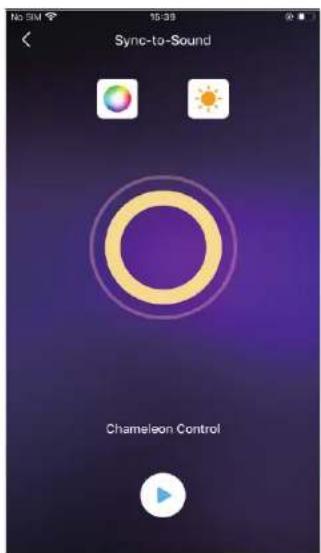
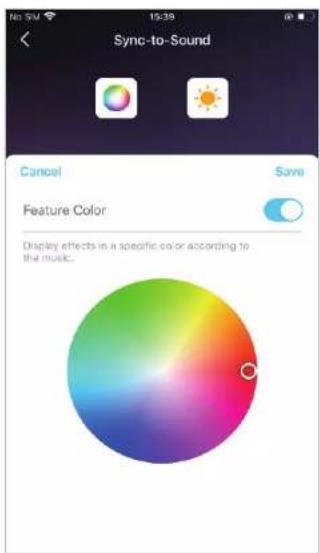
Adjust the displayed color and brightness according to the music.
Set Lighting Effects
Tap to create wonderful lighting effects to meet your needs.
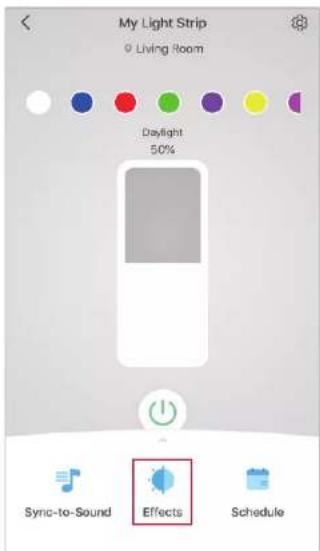
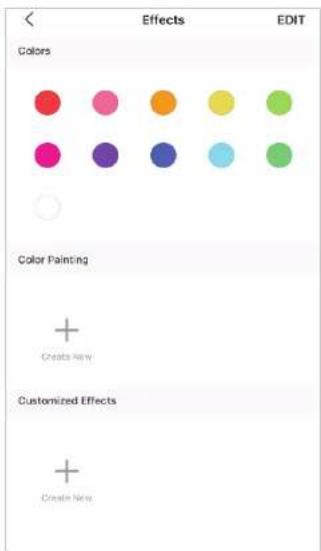
Option 1: Choose a Solid Color
Multiple colors are provided and you can select a color you prefer.
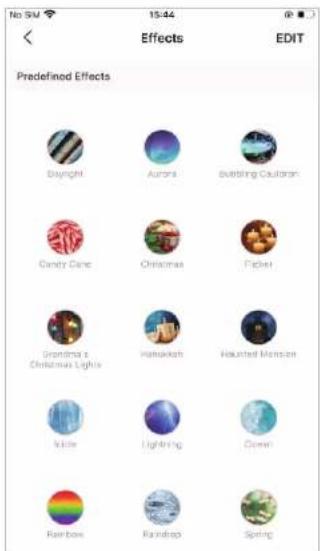
Option 2: Choose a Predefined Effect
There are all kinds of predefined effects to fit different scenarios. Select the one you prefer.
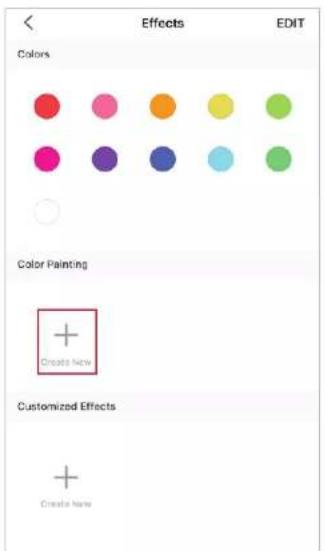
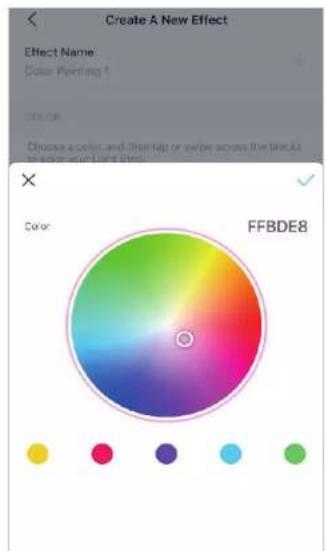
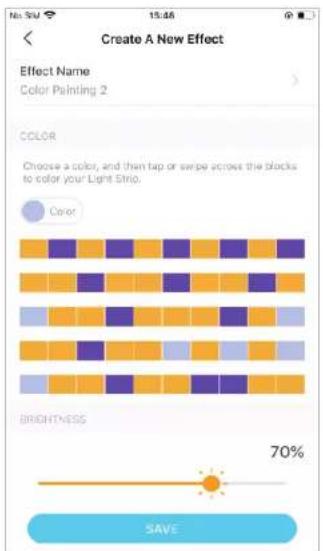
Option 3: Create a Color Painting
-
Tap to create a new color painting.
-
Choose a color you prefer. 3. Tap or swipe across the blocks to color your
light strip and set the brightness as needed. Tap SAVE to save the color painting.
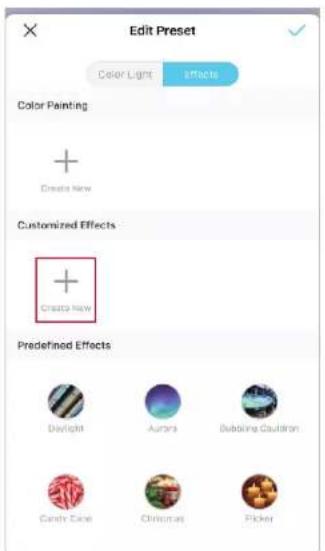
Option 4: Create a Lighting Effect
-
Tap to create a new effect.
-
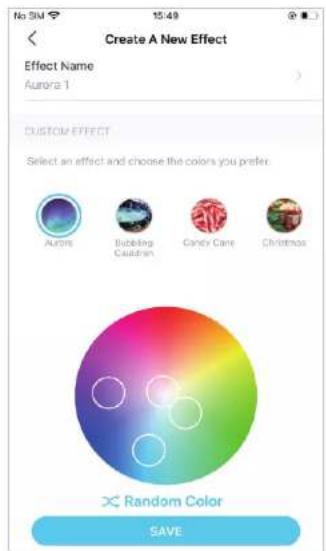
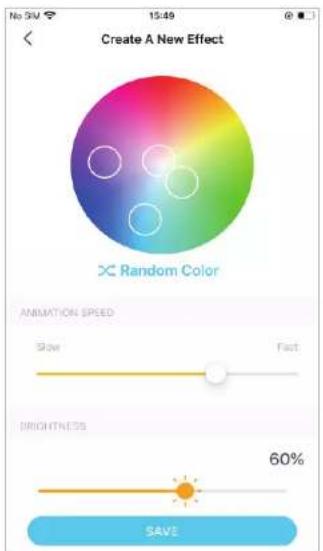
Edit the name as needed, then select an effect and choose colors you prefer. If you have no idea, tap Random Color and Tapo will help select colors for you.
-
Adjust how fast you want the color to switch and set the brightness as needed. Tap SAVE to save the custom effect.
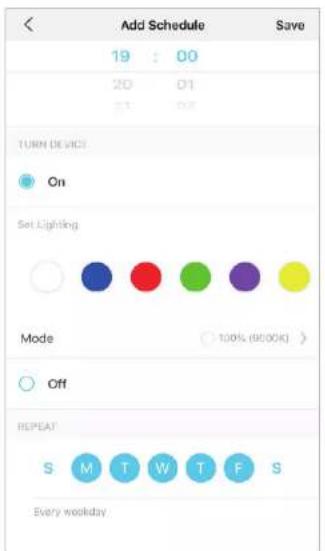
Set Schedule
Tap to add a schedule for your light strip Schedule to automatically turn on/off and adjust the lighting settings to simplify your daily routine.
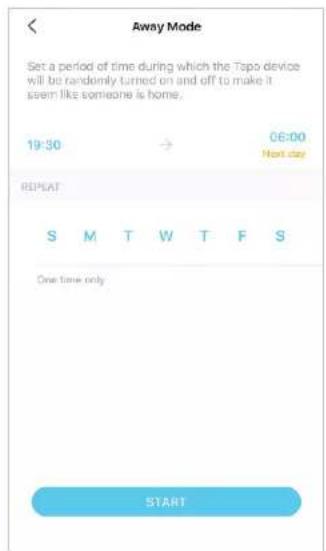
Set Away Mode
Tap to preset the Away Mode, set the start and end time, then your light strip will be randomly turned on/off during this period.
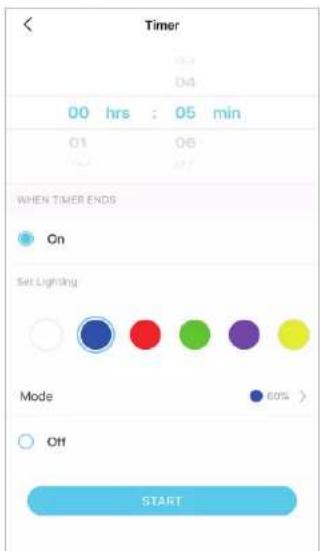
Set Timer
Tap to set the timer and lighting settings, then your light strip will automatically turn on with the specific settings after the timer ends.
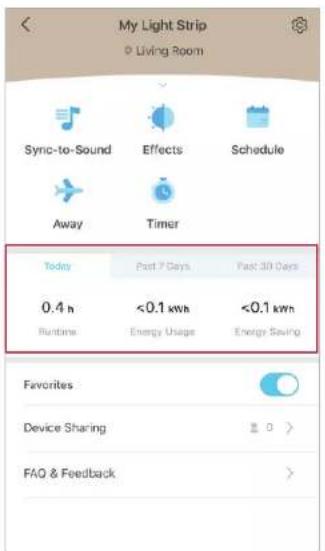
Check Runtime & Energy Usage
Slide up to check your light strip's Runtime and Energy Usage today, past 7 days or past 30 days.
Share Your Light Strip
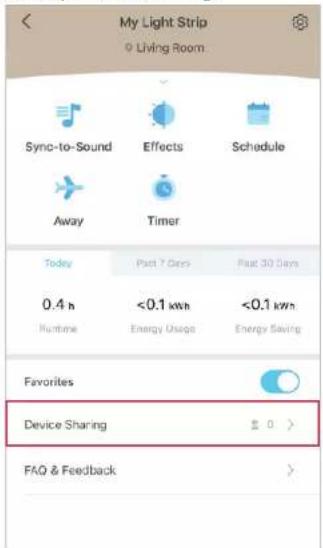
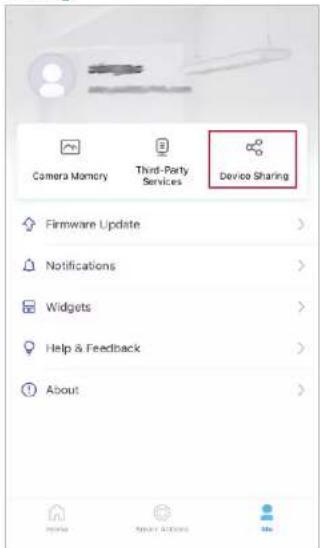
You can invite your family members to manage your Tapo devices together by entering the TP-Link ID (email) you want to share the devices with.
Method 1: Go to Device Status page, slide up and tap Device Sharing.
Method 2: Go to Me page and tap Device Sharing.
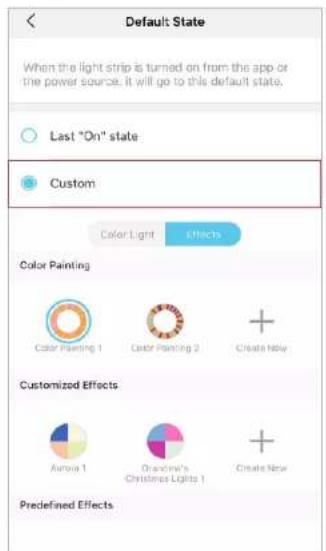
Device Default State
Set the state (color/brightness/effect) of your light strip, and then each time you turn on the light strip, your light strip will go to this set state.
Option 1: Last "On" State
When you turn off the light strip, the light strip will remember the state (color/brightness/effect) before it was turned off. Therefore, if you select Last "On" state, the light strip will go to the remembered state each time it's turned on.
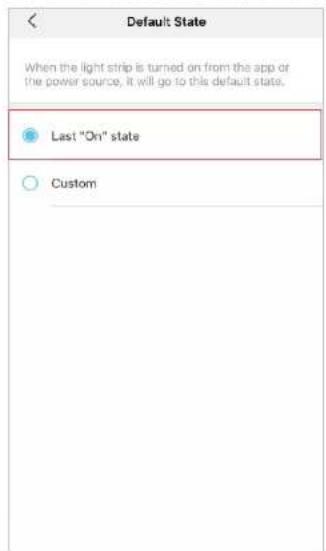
Option 2: Custom
Set a preferred state (color/brightness/effects), and then you light strip will go to your preferred state each time it's turned on.
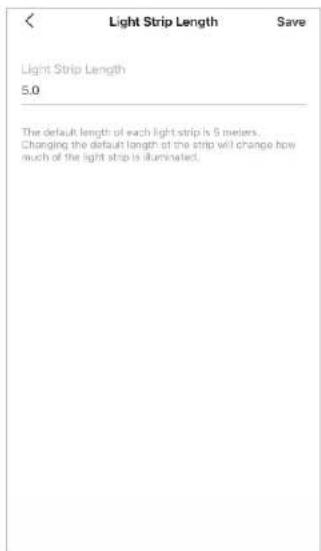
Light Strip Length
Changing the default length of your light strip will change how much of the strip illuminates. It takes effect after you switch the lighting effect.
Note: For Tapo L920-10, illuminated lengths of two strips synchronize according to the length set. If you prepare to cut the strips, it is recommended to cut them into equal lengths to ensure the lighting effect.
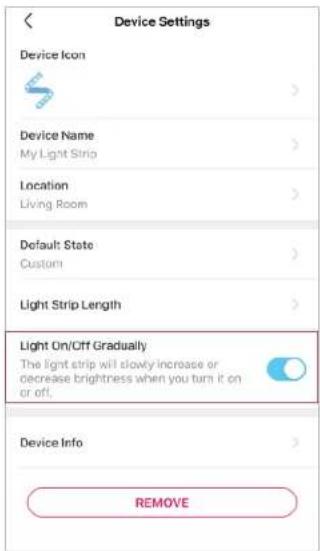
Light On/Off Gradually
Enable Light On/Off Gradually and your light strip will slowly increase or decrease brightness when you turn it on or off.
Smart Actions
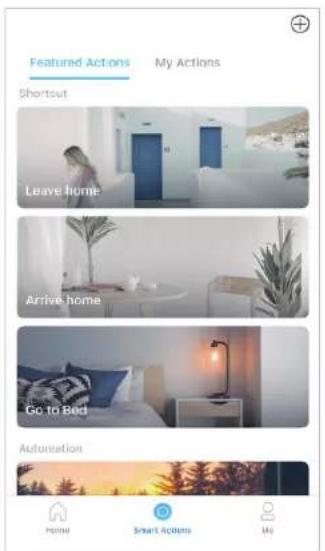
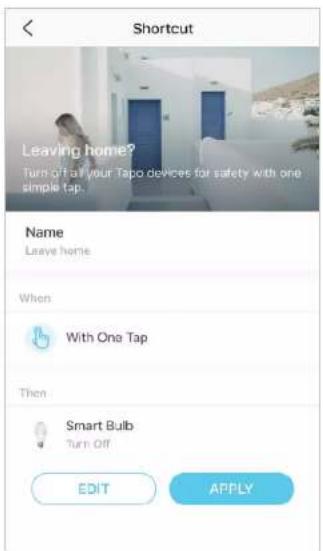
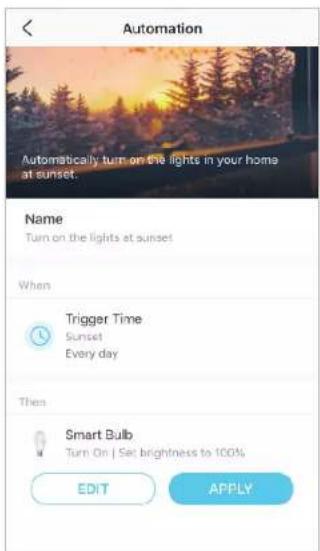
Smart Actions automate repetitive tasks, allowing you to blaze through tedium with utmost ease. Set everything up once and never have to worry about it again. With Smart Actions, giving your home that level of intelligence is a snap. Shortcut lets you perform an action with a simple tap. Automation allows you to automate tasks to be performed at a set time. e.g. The light will light on at sunset.
Option 1: Edit based on the featured actions
-
Go to the Smart Actions page and you will see the Featured Actions (Shortcut or Automation).
-
Tap on a featured action. Tap EDIT to change the settings as needed and tap APPLY to save changes.
Option 2: Create your own actions
-
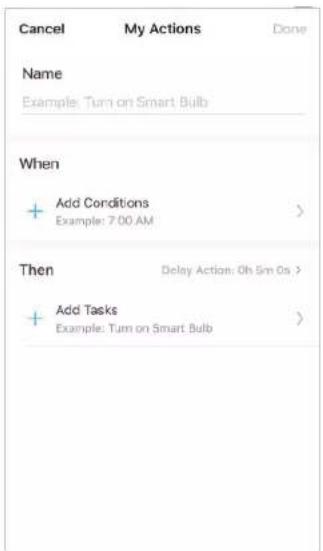
Go to My Actions page. Tap + on the top right to add a simple and smart action.
-
Name the new action. Tap + to add conditions (When) like the trigger time, and tap + to add tasks (Then) like turning on your light strip with specific effects.
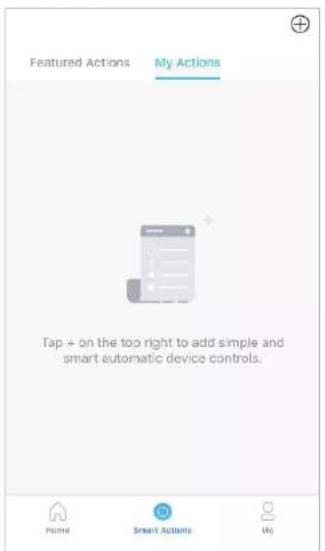
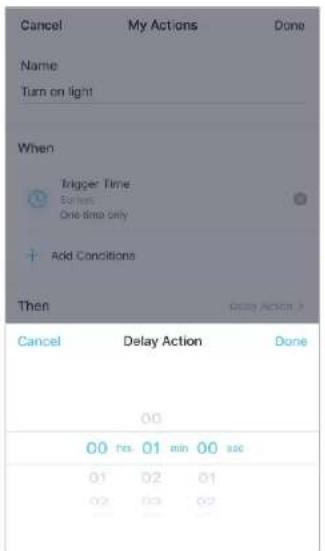
- When the action created, you can also delay the action for a specific time. Tap Done to save all the settings.
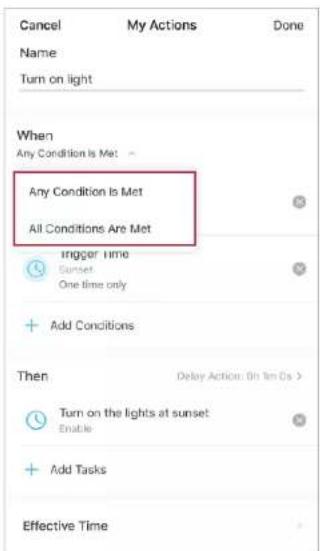
If there are more than 2 conditions added, you can decide when to perform the action. Tap When Any Condition is Met, and select "Any Condition is Met" or "All Conditions Are Met".
Third-Party Services
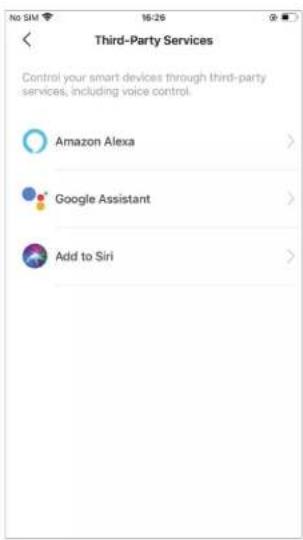
Control your smart devices through third-party services, including voice control. Free up your hands with simple voice commands to control your devices via Amazon Alexa or Google Assistant.
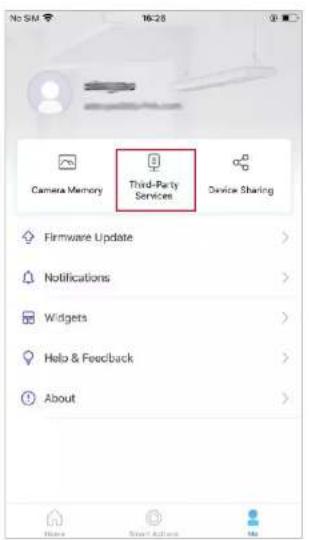
Go to Me page and tap Third-Party Services.
Select Amazon Alexa or Google Assistant. Follow the app instructions to control your device via voice.
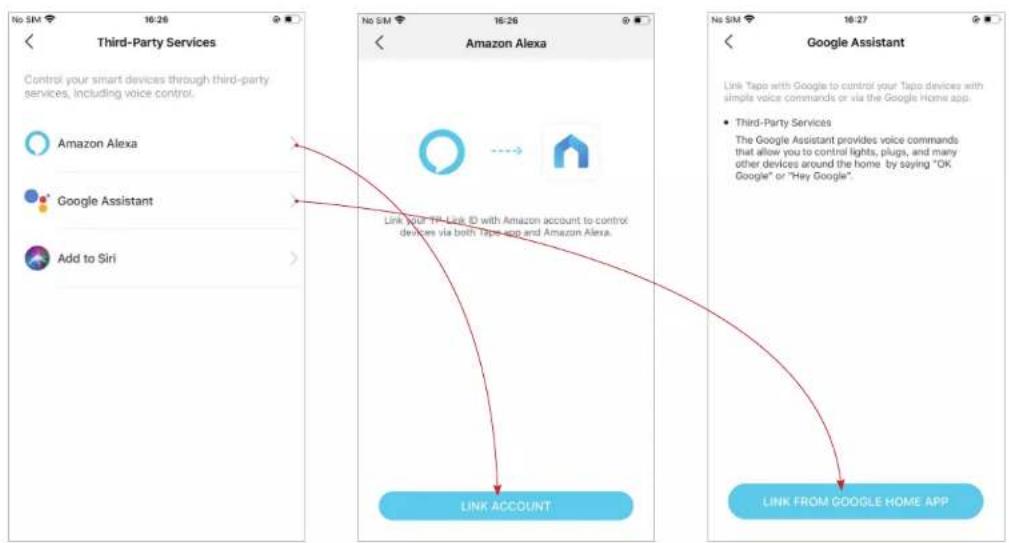
flowchart
graph TD
    A["Control your smart devices through third-party services, including voice control."] --> B["Amazon Alexa"]
    C["Google Assistant"] --> D["Add to Siri"]
    E["Link Account"] --> F["Link from Google Home App"]
    G["Link You'll Like ID with Amazon account to control devices via both Tape app and Amazon Alexa."] --> H["Google Assistant"]
    I["Link Tapio with Google to control your Tapio devices with simple voice commands or via the Google Home app. • Third-Party Services"] --> J["The Google Assistant provides voice commands that allow you to control lights, plugs, and many other devices around the home by saying "OK Google" or "Hey Google""].
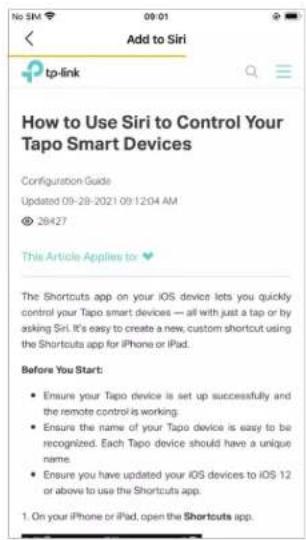
Select Add to Siri. Follow the app instructions to create a new, custom shortcut using the Shortcuts app for iPhone or iPad.
Reset Your Light Strip
There are two types of reset available: a soft reset which resets the Wi-Fi settings only, and a factory reset that erases all of your custom settings and restore them to factory defaults.
Soft Reset (without losing the configuration settings except Wi-Fi)
Press and hold the button on your controller for more than 5 seconds but no more than 10 seconds and release. The light strip animating orange and green after that indicates a successful soft reset. Then you can reconfigure your light strip in Tapo app.
Factory Reset (back to factory default settings)
Method 1
Press and hold the button on the controller for at least 10 seconds until the light strip turns solid white then blinks orange and green. Then you can reconfigure your light strip in Tapo app.
Method 2
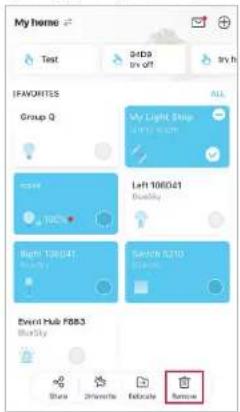
On the home page in Tapo app, long press the card and tap Remove.
OR Go to Device Settings page and tap REMOVE at the bottom.
Authentication
FCC Compliance Information Statement

Product Name: Tapo Smart Light Strip, Multicolor
Model Number: Tapo L920-5 / Tapo L920-10
| Component Name Model FCC ID | ||
| Tapo Smart Light Strip, Multicolor Tapo L920-5 | / Tapo L920-10 2AXJ4KL420 | |
| I.T.E. Power T120150-2B1 / S042-1A120330V | U N/A |
Responsible party:
TP-Link USA Corporation
Address: 10 Mauchly, Irvine, CA 92618
Website: https://www.tp-link.com/us/
Tel: +1 626 333 0234
This equipment has been tested and found to comply with the limits for a Class B digital device, pursuant to part 15 of the FCC Rules. These limits are designed to provide reasonable protection against harmful interference in a residential installation. This equipment generates, uses and can radiate radio frequency energy and, if not installed and used in accordance with the instructions, may cause harmful interference to radio communications. However, there is no guarantee that interference will not occur in a particular installation. If this equipment does cause harmful interference to radio or television reception, which can be determined by turning the equipment off and on, the user is encouraged to try to correct the interference by one or more of the following measures:
- Reorient or relocate the receiving antenna.
- Increase the separation between the equipment and receiver.
- Connect the equipment into an outlet on a circuit different from that to which the receiver is connected.
- Consult the dealer or an experienced radio/ TV technician for help.
This device complies with part 15 of the FCC Rules. Operation is subject to the following two conditions:
-
This device may not cause harmful interference.
-
This device must accept any interference received, including interference that may cause undesired operation.
Any changes or modifications not expressly approved by the party responsible for compliance could void the user's authority to operate the equipment.
Note: The manufacturer is not responsible for any radio or TV interference caused by unauthorized modifications to this equipment. Such modifications could void the user's authority to operate the equipment.
FCC RF Radiation Exposure Statement
This equipment complies with FCC RF radiation exposure limits set forth for an uncontrolled environment. This device and its antenna must not be co-located or operating in conjunction with any other antenna or transmitter.
"To comply with FCC RF exposure compliance requirements, this grant is applicable to only Mobile Configurations. The antennas used for this transmitter must be installed to provide a separation distance of at least 20 cm from all persons and must not be co-located or operating in conjunction with any other antenna or transmitter."
We, TP-Link USA Corporation, has determined that the equipment shown as above has been shown to comply with the applicable technical standards, FCC part 15. There is no unauthorized change is made in the equipment and the equipment is properly maintained and operated.
Issue Date: 2022-02-07
FCC Compliance Information Statement

Product Name: I.T.E. Power
Model Number: T120150-2B1 / S042-1A120330VU
Responsible party:
TP-Link USA Corporation
Address: 10 Mauchly, Irvine, CA 92618
Website: https://www.tp-link.com/us/
Tel: +1 626 333 0234
This equipment has been tested and found to comply with the limits for a Class B digital device, pursuant to part 15 of the FCC Rules. These limits are designed to provide reasonable protection against harmful interference in a residential installation. This equipment generates, uses and can radiate radio frequency energy and, if not installed and used in accordance with the instructions, may cause harmful interference to radio communications. However, there is no guarantee that interference will not occur in a particular installation. If this equipment does cause harmful interference to radio or television reception, which can be determined by turning the equipment off and on, the user is encouraged to try to correct the interference by one or more of the following measures:
- Reorient or relocate the receiving antenna.
- Increase the separation between the equipment and receiver.
- Connect the equipment into an outlet on a circuit different from that to which the receiver is connected.
- Consult the dealer or an experienced radio/ TV technician for help.
This device complies with part 15 of the FCC Rules. Operation is subject to the following two conditions:
- This device may not cause harmful interference.
- This device must accept any interference received, including interference that may cause undesired operation.
Any changes or modifications not expressly approved by the party responsible for compliance could void the user's authority to operate the equipment.
Note: The manufacturer is not responsible for any radio or TV interference caused by unauthorized modifications to this equipment. Such modifications could void the user's authority to operate the equipment.
We, TP-Link USA Corporation, has determined that the equipment shown as above has been shown to comply with the applicable technical standards, FCC part 15. There is no unauthorized change is made in the equipment and the equipment is properly maintained and operated.
Issue Date: 2022-02-07
CE Mark Warning

This is a class B product. In a domestic environment, this product may cause radio interference, in which case the user may be required to take adequate measures.
OPERATING FREQUENCY(the maximum transmitted power)
2400 MHz -2483.5 MHz(20dBm)
EU declaration of conformity
TP-Link hereby declares that the device is in compliance with the essential requirements and other relevant provisions of directives 2014/53/EU, 2009/125/EC, 2011/65/EU, and (EU)2015/863.
The original EU declaration of conformity may be found at https://www.tapo.com/support/ce/
RF Exposure Information
This device meets the EU requirements (2014/53/EU Article 3.1a) on the limitation of exposure of the general public to electromagnetic fields by way of health protection.
The device complies with RF specifications when the device used at 20 cm from your body.
Restricted to indoor use.

UKCA declaration of conformity
TP-Link hereby declares that the device is in compliance with the essential requirements and other relevant provisions of the Radio Equipment Regulations 2017.
The original UK declaration of conformity may be found at https://www.tapo.com/support/ukca/
Canadian Compliance Statement
This device contains licence-exempt transmitter(s)/receiver(s) that comply with Innovation, Science and Economic Development Canada's licence-exempt RSS(s). Operation is subject to the following two conditions:
Radiation Exposure Statement:
This equipment complies with IC radiation exposure limits set forth for an uncontrolled environment. This equipment should be installed and operated with minimum distance 20cm between the radiator & your body.
Industry Canada Statement
CAN ICES-3 (B)/NMB-3(B)
CAN ICES-005(B)/NMB-005(B)
Korea Warning Statements
Note 1: “Exceeding 0.1 wt %” and “exceeding 0.01 wt %” indicate that the percentage content of the restricted substance exceeds the reference percentage value of presence condition.
Note 2: “○” indicates that the percentage content of the restricted substance does not exceed the percentage of reference value of presence.
Note 3: The “—” indicates that the restricted substance corresponds to the exemption.

CAUTION: To reduce the risk of fire, electric shock, or injury to persons:
- For indoor use only.
- Do not place in reach of children.
• NOT FOR EMERGENCY LIGHTING. - Light strips only connect to adjacent units.
- Suitable for surface and cabinet mounting.
- Operating Temperature: -20^ 40^(-4^ 104^)
- Operating Humidity: 10%\~90%RH, Non-condensing
- Use only insulated staples or plastic ties to secure cords.
- Not intended for recessed installation in ceilings, or soffit.
- Do not use the device where wireless devices are not allowed.
- Keep the device away from water, fire, wet or hot environments.
- Adapter shall be installed near the equipment and shall be easily accessible.
- The maximum distance to the receptacle is determined by the length of adapter cord.
- Only use the control provided with or specified by these instructions to control this device.
- Switch off the power supply to the device and allow sufficient time for it to cool before handling it.
- Suitable for dry and damp locations, keep the device away from water, fire, wet or hot environments.
- Route and secure cords so that they will not be pinched or damaged when the cabinet is pushed to the wall.
- Do not use damaged charger to charge the device. Do not use any other charger than those recommended.
- Avoid placing controller box in areas surrounded by mental or near other devices designed to receive or transmit radio signals.
- Position the portable cabinet light with respect to the cabinet so the lamp replacement markings are able to be read during replacing;
- Please disconnect this strip from AC outlet before cleaning. Do not use liquid or detergent to clean the product. Only use a dry cloth. Drop or fall could cause injury.
- Use only power supplies which are provided by manufacture and in the original packing of this product, if you have any questions, please don't hesitate to contact us.
- The National Electrical Code (NEC) does not permit cords to be concealed where damage to insulation may go unnoticed. To prevent fire danger, do not run cord behind walls, ceilings, soffits, or cabinets where it may be inaccessible for examination. Cords should be visually examined periodically and immediately replaced when any damage is noted.
Please read and follow the above safety information when operating the device. We cannot guarantee that no accidents or damage will occur due to improper use of the device. Please use this product with care and operate at your own risk.
Explanation of the symbols on the product label
| SymbolExplanation | |
| Indoor use only | |
| AC voltage | |
| Direct current | |
SymbolExplanation
 | RECYCLINGThis product bears the selective sorting symbol for Waste electrical and electronic equipment (WEEE). This means that this product must be handled pursuant to European directive 2012/19/EU in order to be recycled or dismantled to minimize its impact on the environment.User has the choice to give his product to a competent recycling organization or to the retailer when he buys a new electrical or electronic equipment. |
- Contents
- About This Guide
- Conventions
- More Info
- Introduction
- Appearance
- Set Up Your Light Strip
- Step 1. Download Tapo App
- Step 2. Log In
- Step 3. Add Your Light Strip
- Step 4. Connect All Parts
- Step 5. Power Up Light Strip
- Step 6. Join Your Home Wi-Fi
- Install Your Light Strip
- Cut Only On Specific Areas of Light Strip
- Avoid Bending on LED Beads
- Avoid Sharp Turns
- Avoid Sharp Corners
- Step 1. Choose Location
- Step 3. Stick Light Strip
- Step 2. Remove Adhesive Tape
- Step 4. Power Up Light Strip
- Basic Device Control
- Home Page
- Device Status Page
- Device Settings Page
- Configure Your Light Strip
- Power On/Off At One Tap
- Adjust Brightness
- Change Color & Lighting Effect
- Presets
- Presets Settings
- Sync to Sound
- Set Lighting Effects
- Option 1: Choose a Solid Color
- Option 2: Choose a Predefined Effect
- Option 3: Create a Color Painting
- Option 4: Create a Lighting Effect
- Set Schedule
- Set Away Mode
- Set Timer
- Check Runtime & Energy Usage
- Share Your Light Strip
- Device Default State
- Option 1: Last "On" State
- Option 2: Custom
- Light Strip Length
- Light On/Off Gradually
- Smart Actions
- Option 1: Edit based on the featured actions
- Option 2: Create your own actions
- Third-Party Services
- Reset Your Light Strip
- Soft Reset (without losing the configuration settings except Wi-Fi)
- Factory Reset (back to factory default settings)
- Authentication
- FCC RF Radiation Exposure Statement
- CE Mark Warning
- OPERATING FREQUENCY(the maximum transmitted power)
- EU declaration of conformity
- RF Exposure Information
- UKCA declaration of conformity
- Canadian Compliance Statement
- Radiation Exposure Statement:
- Industry Canada Statement
Brand : TP-LINK
Model : Tapo L920-10
Category : Lighting