656 ETC/E-RCT - Oven IFB - Free user manual and instructions
Find the device manual for free 656 ETC/E-RCT IFB in PDF.


| Product Type | Built-in Electric Oven |
| Model | 656 ETC/E-RTC |
| Brand | IFB |
| Color | Black + Inox |
| Fuel Type | Electrical |
| Energy Class | A |
| Oven Volume | 58 Liters |
| Total Power | 3350 W |
| Grill Power | 3200 W |
| Turbo Fan Power | 50 W |
| Cooling Fan Power | 35 W |
| Oven Lamp Power | 15 W |
| Rotisserie Motor Power | 4.5 W |
| Voltage | 230 V |
| Frequency | 50-60 Hz |
| Dimensions (W x D x H) | 594 mm x 540 mm x 595 mm |
| Thermostat Range | 0 – 285 °C |
| Security Thermostat | 160 °C |
| Cooking Functions | 11 Functions including Grill, Turbo, Defrost, Pizza, etc. |
| Timer Type | Touch Full Control with 6 Digital Buttons + 2 Thermostat Buttons |
| Energy Consumption (Conventional) | 0.84 kWh |
| Energy Consumption (Forced Air) | 0.79 kWh |
| Safety Features | Child Lock, Automatic Shut-off, Residual Heat Indication |
| Cleaning | Removable Door for Easy Cleaning, Enamel Interior |
| Warranty | Standard manufacturer warranty (details in manual) |
Frequently Asked Questions - 656 ETC/E-RCT IFB
User questions about 656 ETC/E-RCT IFB
0 question about this device. Answer the ones you know or ask your own.
Ask a new question about this device
Download the instructions for your Oven in PDF format for free! Find your manual 656 ETC/E-RCT - IFB and take your electronic device back in hand. On this page are published all the documents necessary for the use of your device. 656 ETC/E-RCT by IFB.
USER MANUAL 656 ETC/E-RCT IFB
India's Finest Brand
Trusted by millions

www.ifbappliances.com
The User Manuel
Built in Oven
656 MTC/E-RTC
656 ETC/E-RTC
656 FTC/E-RTC
Before use the appliances ensure that any protective packaging or coating have been removed
CALL ONLY IFB AUTHORISED PERSON TO SERVICE YOUR BUILT IN OVEN & USE ONLY GENUINE SPARES IF IN ANY CASE IT'S REQUIRE
Trusted by millions
Dear customer,
We welcome you as the proud owner to the IFB Club.
You have just purchased one of the products from the wide range of products available. We Thank and Congratulate you in your choice and having trust in IFB. We are convinced that, as time goes by, you will agree your trust was Motivated.
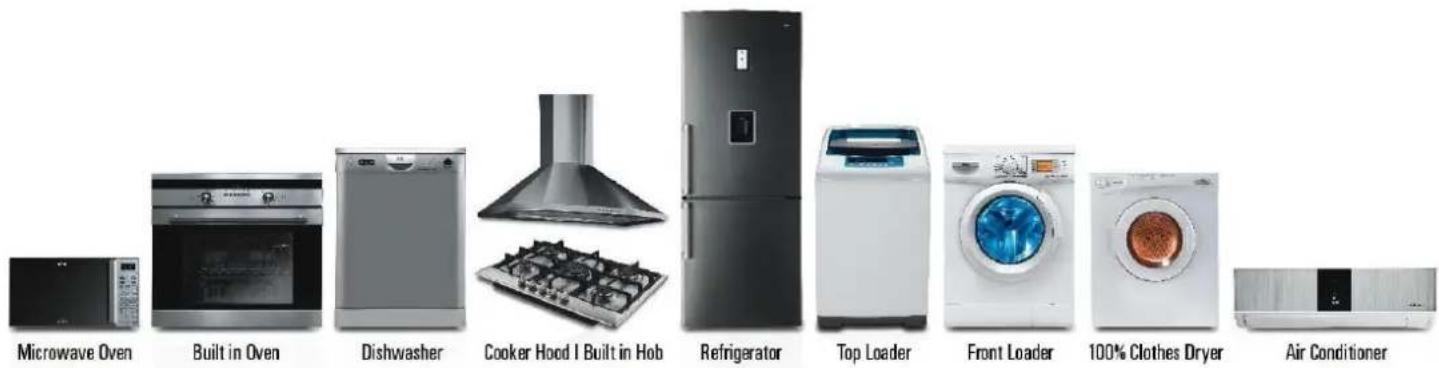
The rigour quality standard we have set for our complete range of the products from Hobs, Chimneys, Built in Ovens, Built in Microwave. Built in dishwasher, Washing Machines, Cloth Dryers Free standing Dish washers, Free standing Microwaves Ovens, Air conditioner & Refrigerator for Domestic use & Industrial Dishwashers & Launderette for commercial use at Hotels, Restaurants, Canteens & even for Housing complex's has helped touch & caring the people lives,
IFB is also into manufacturing & supplying critical Fine Blanking Auto Components and leading Car Making (maker) Companies around the world.
IFB is a trusted brand, known for its User Friendly & Convenient Products, designed to combine Technology and Simplicity beside Great Looks & an Unbeatable Performance.
With IFB Oven you would enjoy making delicious food every day for your family without any hassle. Besides the oven, you can also use the IFB chimney, which helps to quickly absorb the smoke and vapors generated by typical Indian cooking.
Dear Customer
Congratulations on purchasing your IFB Built-In Electric Oven.
This product has been made to the most exacting standards and will provide you with years of service if used properly. Please read this user guide carefully, it contains all the information you require to use this product safely.
TABLE of CONTENTS
SECTION 1
Technical Features & Sections of Oven
SECTION 2
Important Safety Notices
SECTION 3
Installation of Built-In Oven
SECTION 4
Introduction of Control Panel
SECTION 5
Usage of Oven
SECTION 6
Grill Function of Oven
SECTION 7
Adjustment of Timer
SECTION 8
Maintenance & Cleaning
SECTION 9
Information on Transportation
SECTION 10
Troubleshooting
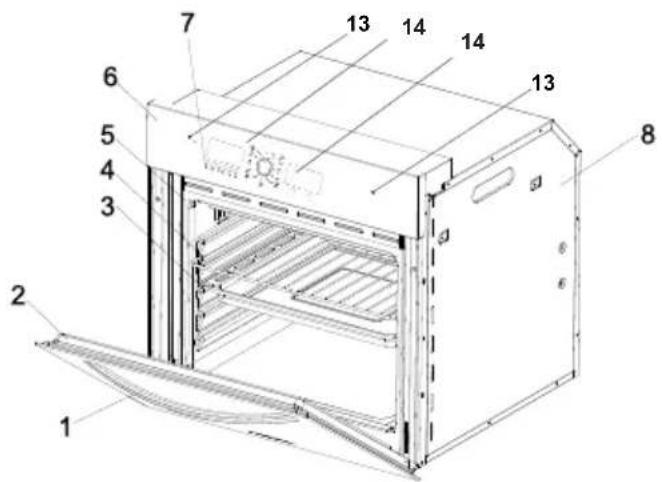
(for 656 ETC/E-RTC)
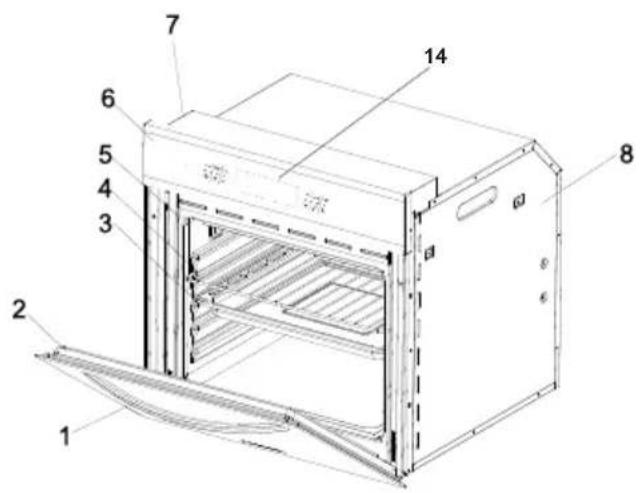
(for 656 FTC/E-RTC)
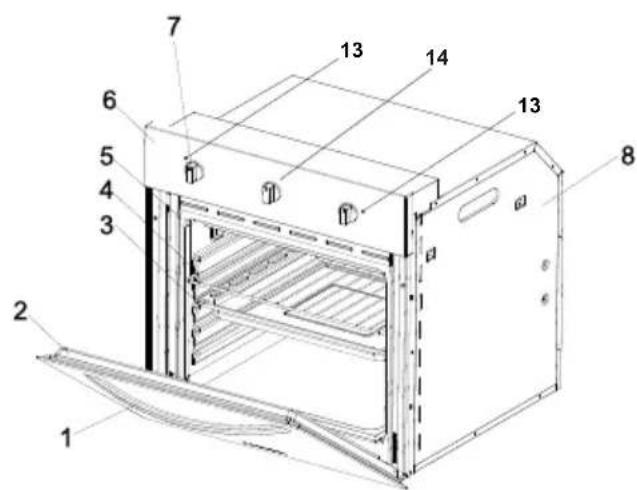
(for 656 MTC/E-RTC)
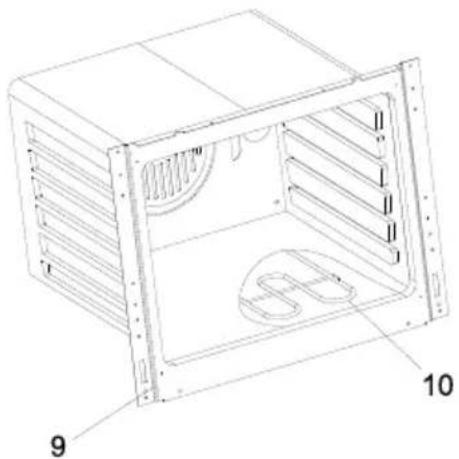
SECTIONS of OVEN
- Oven Handle
- Oven Glassdoor
- Tray
- Grid
- Oven Gasket
- Control Panel
- Control Knob
- Foreign Body
- Inner Body
- Lower Resistance
- Upper Resistance
- Indicator Light
- Signal Lamp
- Timer
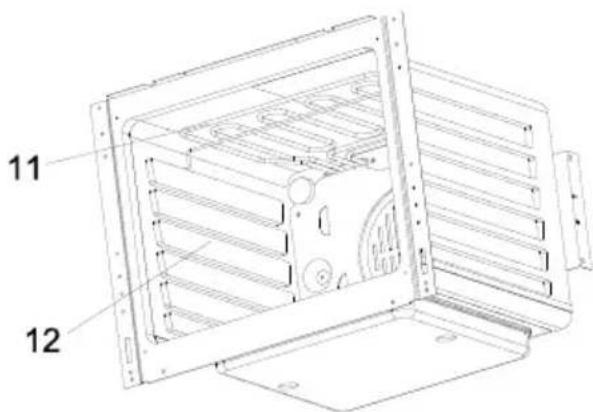
natural_image
Technical line drawing of a rectangular industrial enclosure with ventilation ducts and labeled parts (no text or symbols beyond labels)TECHNICAL SPECIFICATION
| MODEL | 656 MTC/E- RTC 656 FTC/E- RT C 656 ETC/E- RTC | |||
| COLOUR | BLACK+INOX BLACK+INOX BLACK+INOX | |||
| FUEL TYPE | ELECTRICAL ELECTRICAL ELECTRICAL | |||
| TIMER MECHANICAL TIMER TOUCH FULL CONTROL 6 BUT. DIJ. + 2 BUT. THER. | ||||
| OVEN INNER CAVITY 1 1 1 | ||||
| COOKING FUNCTION 7 FUNCTION 13 FUNCTION 11 FUNCTION | ||||
| OVEN VOLUME | 58 LITER | 58 LITER | 58 LITER | |
| OVEN POWER | 3350 WATT | 3350 WATT | 3350 WATT | |
| GRILL POWER | 3200 WATT | 3200 WATT | 3200 WATT | |
| TURBO REZISTANCE | 2000 WATT | 2000 WATT | 2000 WATT | |
| TURBO FAN | 50 WATT | 50 WATT | 50 WATT | |
| POWER OF LIGHT | 15 WATT | 15 WATT | 15 WATT | |
| COOLING FAN | 35 WATT | 35 WATT | 35 WATT | |
| ROT/SSER/E GRILL MOTOR | 4,5 WATT | 4,5 WATT | 4,5 WATT | |
| TOTAL POWER | 3350 WATT | 3350 WATT | 3350 WATT | |
| THERMOSTAT | OVEN 0-285 C | 0-285 C | 0-285 C | |
| SECURITY | 160 C | 160 C | 160 C | |
| VOLTAGE | 230 V | 230 V | 230 V | |
| FREQUENCY | 50-60 HZ | 50-60 HZ | 50-60 HZ | |
| ENERGY CLASS | A | A | A | |
| ENERGY CONSUMPTION (CONVERSIONAL-KWH) | 0,84 Kwh | 0,84 Kwh | 0,84 Kwh | |
| ENERGY CONSUMPTION - FORCED AIR- KWH | 0,79 Kwh | 0,79 Kwh | 0,79 Kwh | |
| DIMENSIONS | WIDTH (MM) 594 | 594 | 594 | |
| DEPTH (MM) | 540 | 540 | 540 | |
| HEIGHT (MM) | 595 | 595 | 595 | |
SECTION 2 IMPORTANT SAFETY NOTICES
This Built-in electrical oven is manufactured for use in the preparation of normal home meals. Please do not use for other purposes.
Installation:
- This appliance must be installed by qualified personnel, according to the manufacturer's instructions and the relevant Safety Standards.
- This appliance is heavy. Take care when moving it.
- Remove all packaging, protective films and oils from the appliance before using for the first time.
- Ensure that the electrical supply complies with the type stated on the rating plate.
- Do not attempt to modify the appliance in any way.
- The voltage of your oven is 230 Volt – 50-60 Hz.
- This appliance has been constructed and distributed in compliance with the regulations of AS/NZS 3350-1 and AS/NZS 3350-2-6.
Warning: This appliance must be earthed.
Do not use a steam cleaning device with this appliance.
WARNING : ensure the appliance is switched off before replacing the lamp to avoid the possibility of electric shock.
When you have finished cooking check that all controls are in the OFF position.
- Please check your electrical installation is earthed. This appliance must be installed by a qualified engineer.
- This appliance must be fitted with a min 16 A Fuse.
- Please ensure that plug of your oven is not accidentally pulled or stretched beyond the extend of the power cord, if this appliance is installed without proper earthling, defective & under rating power supply the manufacturer doesn't accept any responsibility for any damage caused to any person, product, property, third party & animal what so ever its & etc. It advisable installations of the product must be done by company authorized person. Connection of this appliances must be via 3 x 2.5 mm ^2 .
- Connection diagram can be found on the rear of the appliance
-
Please reset the timer when in the event of a power failure. The oven will not operate until the timer is properly set.
-
The oven door must always close properly. Keep the door seal areas clean.
- Pressing on open cover of oven with heavy matters can cause damage on cover hinges. So please do not sit or load heavy matters on open cover of oven.
- Do not use aluminium foil to cover the grill pan, or put items wrapped in foil under the grill as this creates a fire hazard. The high reflectivity can also damage the elements.
- Do not use the oven with the door inner glass panel removed.
- Do not use the drop down door as a step to reach above cabinets
- After using oven please wipe vapour drops with a cloth that can be formed on oven cover by high temperature.
- Do not block the oven vent in anyway, as this creates a fire hazard.
- When opening the appliance door, take care to avoid skin contact with any steam that may escape from the oven.
- Perishable food, plastic items and aerosols may be affected by heat and should not be stored above or around the appliance.
Service:
- Cables routed too near to oven may become damaged and short, if they come into contact with hot parts of oven. The cables of other appliances must be routed a safe distance from oven. If power cord is damaged then contact your authorised repairer.
- This appliance should only be repaired or serviced by an authorised Service Engineer and only genuine approved spare parts should be used.
SECTION 3 INSTALLATION of BUILT-IN OVEN
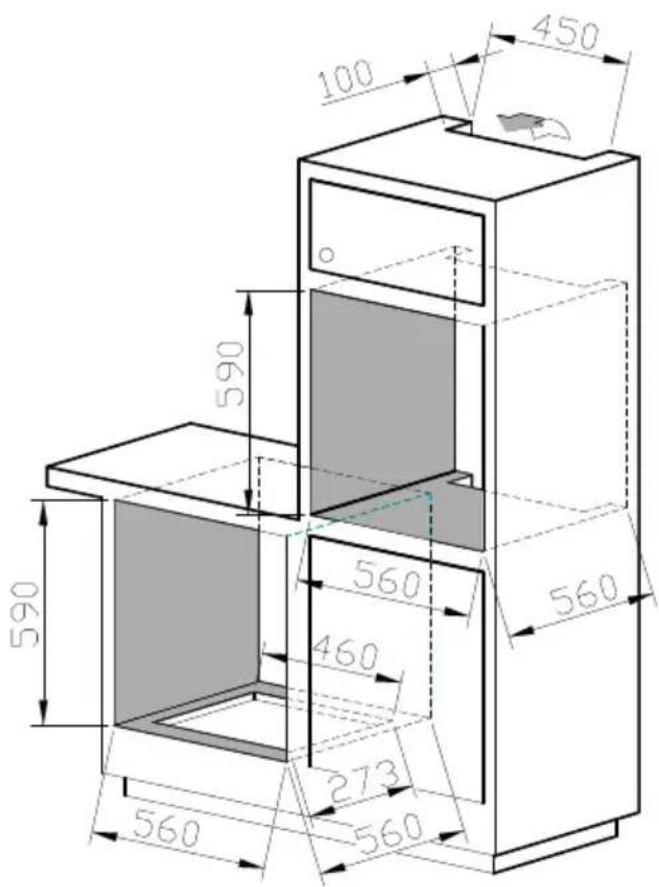
Figure.4 Cabinet Dimensions
natural_image
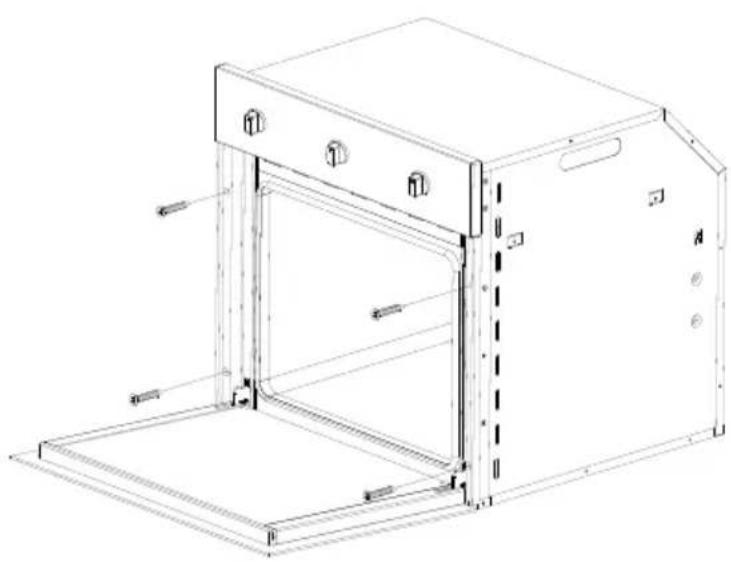
Technical line drawing of a cabinet or enclosure with mounting brackets and internal components (no text or symbols)Figure.3 Oven Dimensions
Installation instructions :
Installation must be completed by an authorised technician
- Dimensions and materials of cabinet must be suitable and capable of withstanding heat radiation from oven.
- Correct Installation - Cabinet should not come into contact with any of the ovens electrical parts.
Isolation materials or parts that used for isolation must affix strongly to prevent taking out by any tool. - It is not recommend you to install your appliance near refrigerator or freezer.
- If a hob is installed with your oven, all electrical cables of cooker and oven must be seperat.
- Install your appliance in a position that allows access to power cable.
- Do not place power cable to close or in contact with hot surfaces. Do not attach the cable to the oven door.
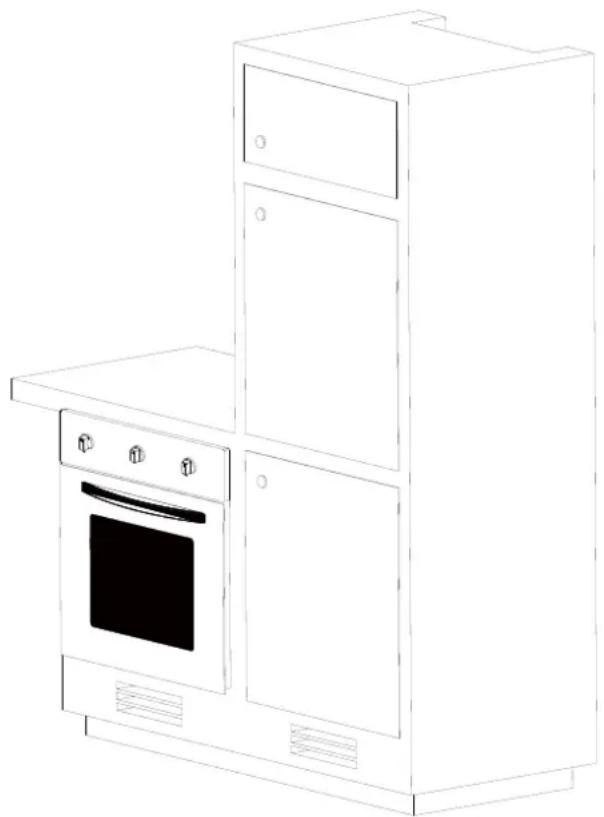
Dimensions of Built-in oven and cabinet are at Figure.3 & 4
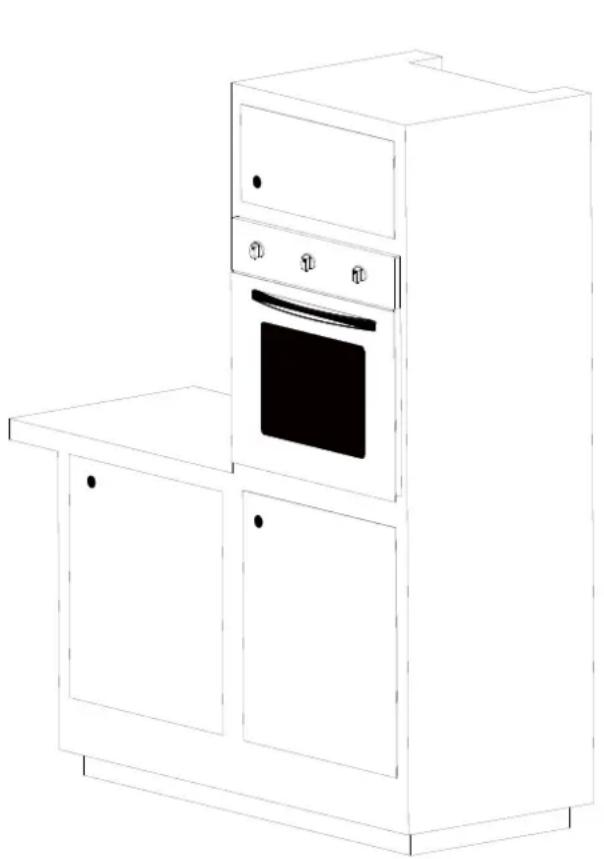
Installed Built-in Oven pictures are at Figure.5 & 6
natural_image
Line drawing of a kitchen appliance with oven, cabinet, and door (no text or symbols)FigFigure.5
natural_image
Line drawing of a kitchen oven setup with cabinet, oven, and oven (no text or symbols)Figure.6
Front panels and control knobs for Built-In Oven models are at Figure 7. The Knobs control power and setting of each heating element. Turn Knobs clockwise to activate oven and set at required cooking temperature. Turn Knob anti-clockwise to decrease cooking temperature and to deactivate oven.
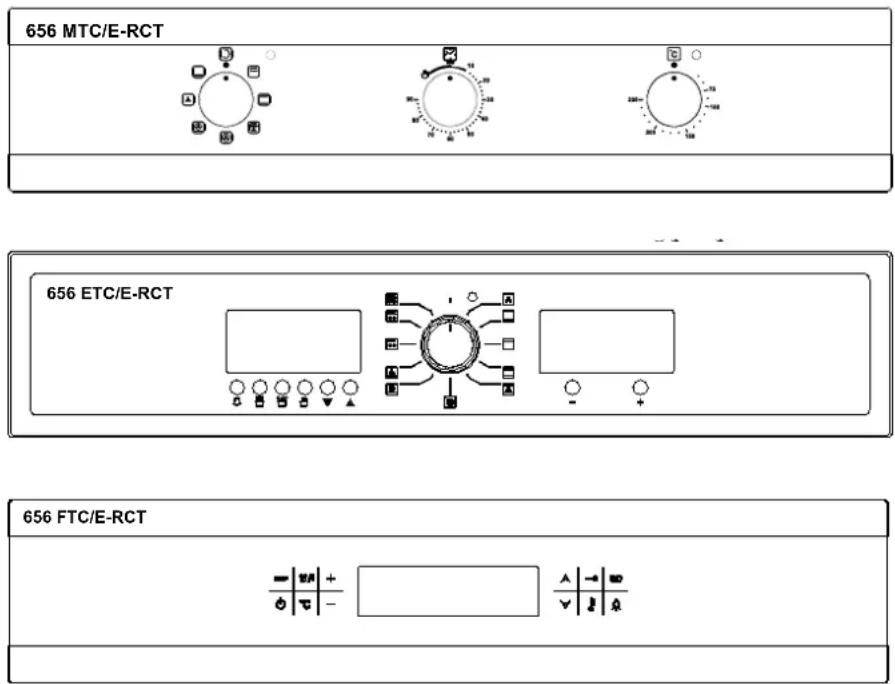
Figure. 7
SECTION 5 USING THE OVEN
Thermostatic Control of Oven
The indicator lamp will switch on together with the thermostat. When the heat inside the oven reaches the set value, the thermostat cuts the circuit and the lamp will go off. When the heat falls below set value, the thermostat will switch on again and indicator lamp will be lit.
Usage of Oven
For initial operation of your oven, a smell arising from insulation materials and heating elements will be generated. To help avoid it, operate your oven at 250 C for 45 minutes without putting any trays in oven.
Suggested Settings
- Meals that may be cooked
- Oven Control Position
- Thermostat position
- Recommended cooking times are given in cooking table.
- Turn the “oven heating control” switch clockwise to adjust cooking time for the meal you desire to cook, refer to cooking table.
- Before cooking, pre-heat the oven for 10 minutes. The door of the oven should be open. Put the dish in the oven after pre-heating.
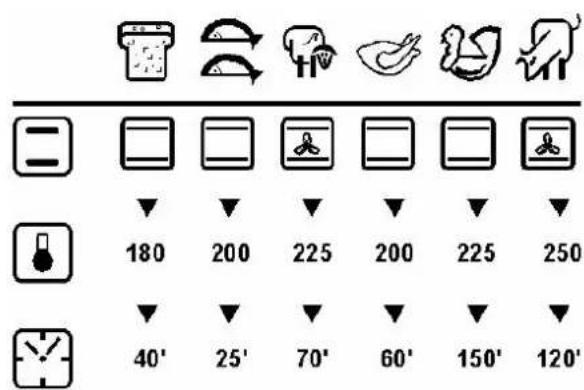
THIS IS GENERAL OVEN FUNCTION TABLE, FUNCTION MAY VARY FROM MODEL TO MODEL
| LEVELFUNCTIONDESCRIPTION | ||
| OClose | Oven is not working | |
 | Oven LampDouble Grill | Outer Heating Element and Grill Heating Element works together. Recommends to use for big and powerfull grill. |
 | Oven LampGrill Heating Element | Oven Lamp and Grill heater works. Recommend to use for frying. Thermostat must be at maximum position. |
 | Oven LampTop&Bottom Heating Elements | Hot air comes from up and down heats the tray from both side. Top and bottom sides of meals cooked equally. |
 | Oven LampGrill Heating ElementTurbo Fan | Oven Lamp, Grill heater and Turbo Fan work together. Recommend to use for frying. Thermostat must be at maximum position. |
 | Oven LampDouble GrillTurbo Fan | Oven Lamp, Double Grill and Turbo Fan work together. Recommend to use for frying. Thermostat must be at maximum position. |
 | Oven LampTurbo Heating ElementTurbo Fan | Oven Lamp, Turbo Fan and Turbo Heating Element work. Recommend to use fast cooking. |
 | Oven LampTurbo Heating ElementTurbo Fan, Bottom Heating Element | Oven Lamp, turbo heating element, turbo fan and bottom heating element work together. Recommended to use for pizza. |
 | Oven LampTurbo Fan | Only Oven Lamp and Turbo Fan work. Recommend to use for defrosting. |
 | BottomHeating Element | Bottom heating element, Recommended to use cake and bread. |
 | TopHeating Element | Top Heating Element for keeping cooked food warm or gently reheating. |
 | Oven LampTop&Bottom Heating ElementsTurbo Fan | Hot air comes from up and down heats the tray from both side. Top and bottom sides of meals cooked equally with Turbo Fan. |
 | Oven LampTop&Bottom Heating Elements | Hot air comes from up and down. Elements keep the heat at 80C level. Recommended to use for fermentation of yogurt and bread. |
WARNING
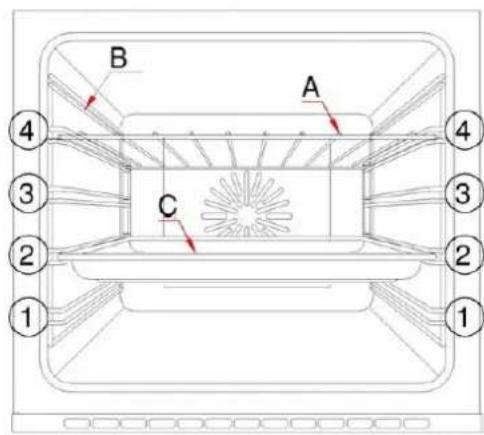
To ensure the oven shelves operate safely, correct placement of the shelves between the side rails (figure 1, 2, 3, 4) is imperative. This will ensure that during careful removal of the shelf or tray, hot food items should not slide out.
COOKING TABLE
| MEALS | SELF POSITIONS | TERMOSTAT POSITION | COOKING TIME (Min.) | ||
 |  |  |  | ||
| Upper + Lower Heater | Upper + Lower Heater + Fan | Upper + Lower Heater | Upper + Lower Heater + Fan | ||
| Pandispania ( 8 persons ) | 2-3 | 3 | 170-180 | 25-35 | 20-25 |
| Cake ( In mould , 8 persons ) | 2-3 | 3 | 180 | 40 | 20-25 |
| Cookie ( 12 persons ) | 2-3 | 3 | 170-190 | 25-35 | 20-25 |
| Pastry with cheese filling | 2-3 | 3 | 180-190 | 25-35 | 20-25 |
| Bun / A Savory Bun | 2-3 | 3 | 160-180 | 25-35 | 20-25 |
| Leavened pie ( 18 persons ) | 2-3 | 3 | 200-220 | 35-45 | 25-35 |
| Biscuit ( 10 persons ) | 2-3 | 3 | 170-180 | 20-30 | 18-22 |
| Cake ( 20 persons ) | 2-3 | 3 | 150-160 | 25-35 | 20-25 |
| Spaghetti ( 8 persons ) | 2-3 | 3 | 170-180 | 40-50 | 30-40 |
| Pizza ( 8 persons ) | 2-3 | 3 | 200-220 | 30-35 | 25-30 |
| Lamb meat ( Wrapped arm - 8 persons ) | 2-3 | 3 | 225 | 70-90 | 70 |
| Fried chicken ( Whole - 1 piece ) | 2-3 | 3 | 200 | 60 | 50-60 |
| Fish | 2-3 | 3 | 200 | 25 | 15-20 |
NOTE: The values given in cooking table are the values obtained in our laboratories. You can obtain various results to satisfying your tastes depending on your cooking and use habits. Cooking times depend on quantity of ingredients. Using cake forms gives better results for making cakes.
SECTION 6 Grill Function of Oven - Closed Door Grilling
Turn the oven control knob to position

- We advise you to use trivet shelf placed into grill tray when you are grilling. This will help avoid spills and help keep your oven clean
- If you decide use grill wire on shelf rather than placing in tray, position a tray below to collect oils. For easy cleaning, put some water in tray.
- Preheat grill with door closed position for 5-10 minutes before use.
• Always pre-heat grill before use and grill with door closed.
ATTENTION:
It is recommended that you always grill with the Panel Protection Sheet in place. Our company is not responsible for damage made by not using this sheet.
| GRILL | ||
| Shelf | Time (min.) | |
| Lamb Meat | 4 15 | |
| Lamb Chops | 4 | 15 |
| Calf Chops | 4 15-25 | |
| Sheep Chops | 4 15-25 | |
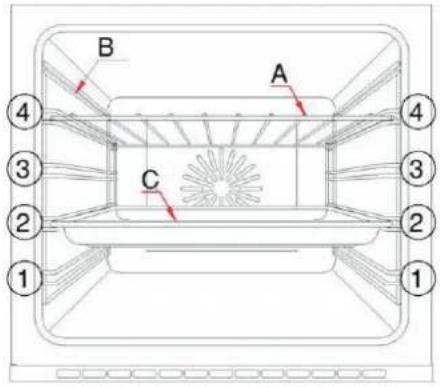
Figure 8
natural_image
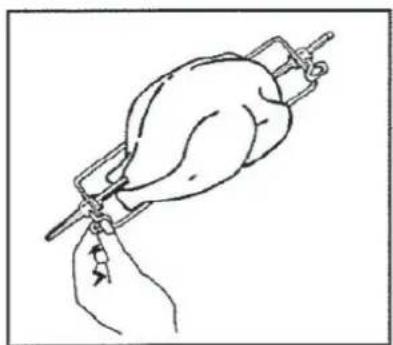
Line drawing of a hand holding a stringed object with a loop handle (no text or symbols)ROTISSERIE GRILL
1- INSERT THE CHICKEN TO THE ROTISSERIE GRILL STICK. THEN PLACE THE STICK TO THE BUSH ON THE REAR COVER OF THE INNER CAVITY.
2- PLACE THE TRAY TO THE LOWEST SHELF AT THE INNER CAVITY.
3- ADJUST THE TIMER
4- ADJUST THE SWITCH TO THE ↔ POSITION
5- ADJUST THE TEMPERATURE TO THE MAXIMUM POSITION.
GENERAL OVERVIEW
A) (for 656 ETC/E-RTC)
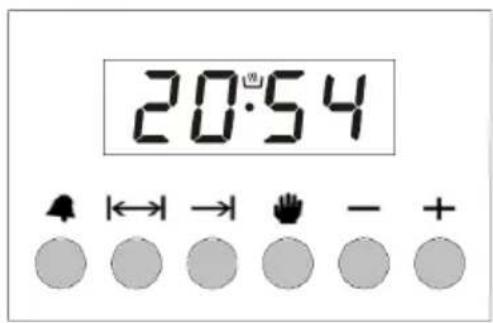
Electronic timer, which enables your oven to get the food ready to serve at the desired time. The only thing to be done is to program the cooking time and ready time. It can also be used as an alarm clock, where you just give in the amount of time after which it should remind you by a buzzer tone.
TIME OF DAY ADJUSTMENT
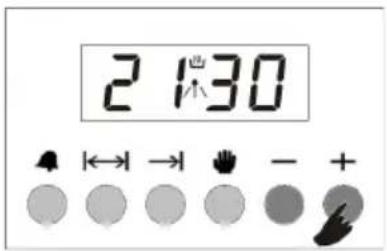
This adjustment can only made when no cooking program is in progress. Press the button or and buttons together. Within 5 seconds, using and adjust the clock. Long presses of those buttons will result in fast changes.

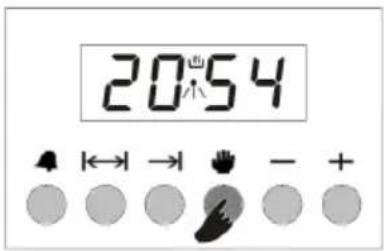
or
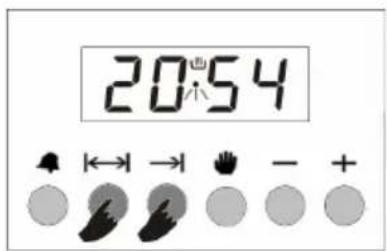
1) Press the ⏚ button.
1) Press the || and | buttons together.
2) Adjust the time using the + or - buttons.
ADJUSTING THE BUZZER ALARM
With this feature, you can program after how much elapsed time you should be warned by a buzzer sound.
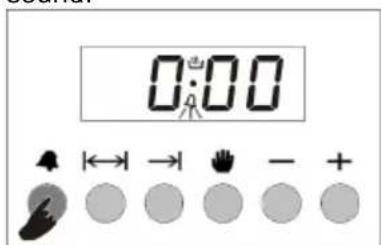
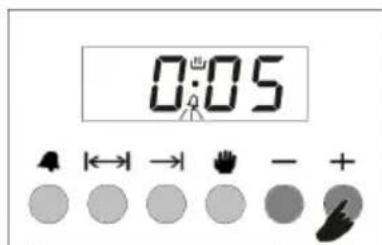
1) Switch into buzzer alarm 2) mode. time to be counted down
2) Give in the period of 3) wn will return to clock mode
3) After a few seconds, screen
Note: Once programmed, the remaining time can be seen by pressing the button once
1) Buzzer will sound after the programmed amount of time elapses.
2) Press the button to cancel.
AUTOMATIC COOKING PROGRAM
If you want to start cooking immediately, you just have to give in the cooking time.
Example: We placed our food into the oven and want it to be cooked for 2 hours and 15 minutes
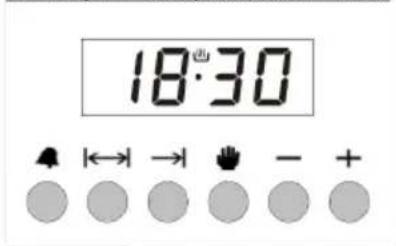
1) Current time is 18:30.
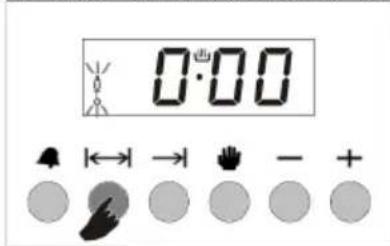
2) Switch into cooking time mode.
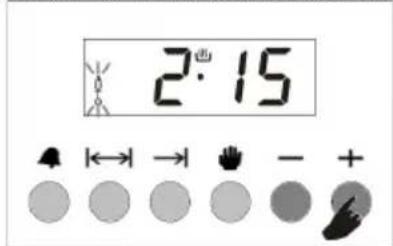
3) Adjust the cooking time using the + or - buttons.
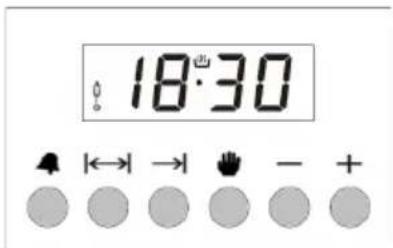
4) After a few seconds, the screen will indicate that cooking has started and show the current time
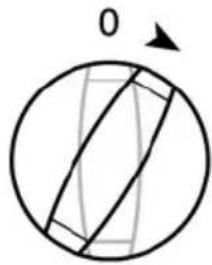
Now, you have programmed your oven to cook the food for 2 hours and 15 minutes. Please do not forget to bring the function and/or temperature knobs of your oven to appropriate position.
natural_image
Simple geometric diagram showing a circle with internal lines and a diagonal line, no text or symbols present.Note: You may cancel the automatic cooking mode any time by pressing the ➕ button or and →l buttons together.
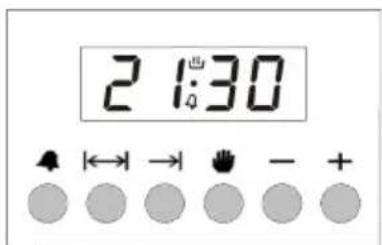
In the above example, cooking immediately started after giving in the cooking period. By pressing the button, you can see the ready time, ie. the time when the food will be ready to serve, and if you want, you can also change it. In the example below, the ready time will be changed to 21:30.
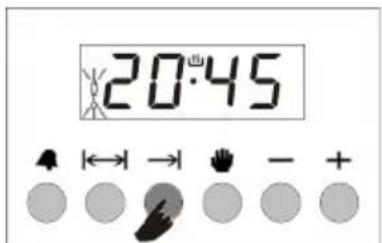
1) Displayed is the ready time 18:30+2:15=20:45.
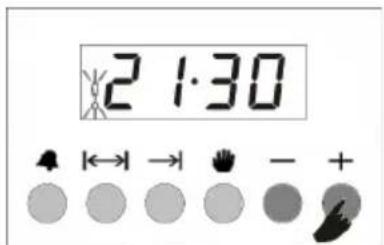
2) Set it to the desired time by using the + or - buttons.
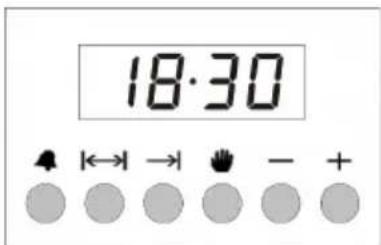
3) In a few seconds, screen switches to clock mode.
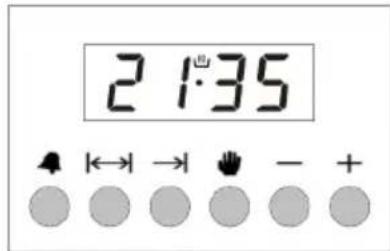
We now have programmed our oven to get the food ready at 21:30. Since the cooking time was preprogrammed as 2 hours 15 minutes, your oven will start cooking at 19:15, so that the food is ready at 21:30.
Screen just when cooking starts
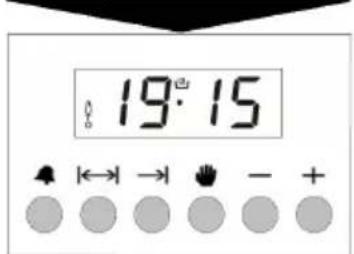
Screen just when cooking ends
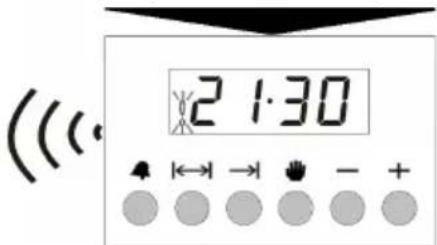
When automatic cooking is completed, a buzzer alarm is heared and will sound, if not stopped, for 7 minutes.
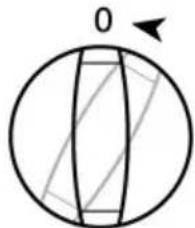
1) Switch your oven OFF
natural_image
Simple geometric diagram showing a circle with internal lines and a labeled arrow (no text or symbols)2) Reset the timer.
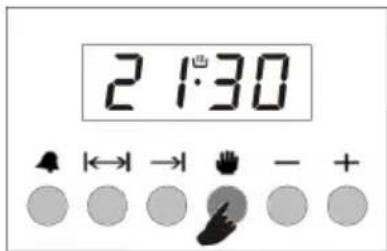
or
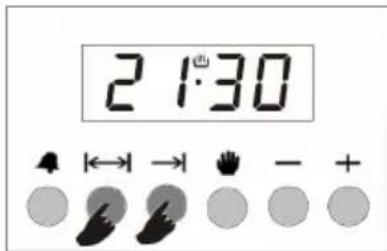
Note: Your oven will be inoperative until you reset the timer.
In the example shown, cooking time has been programmed first, the ready time was calculated automatically and was edited by us. It is also possible first to program the ready time, in that case the cooking time will be calculated automatically and should be edited thereafter.
BUZZER VOLUME ADJUSTMENT
You may adjust the buzzer tone of the timer in the following way:
1) Pressing and holding the ‘-’ button, you can hear the current buzzer tone. Releasing and pressing again will switch to the next tone (3 different tones available)
2) The buzzer tone will be set to the last adjusted tone.
Note: As factory setting, the buzzer volume is set to the high tone. In case of a long power loss, the set buzzer tone will be this one.
B) Adjustment of Mechanical Timer : ( for 656 MTC/ E-RTC )
Mechanical cut off timer will switch off the oven after the set time, beside that it will give the Buzzer also. Example: If time is set for 50 miunte after the 50 minute oven will also switch off automatically, it will give the buzzer also.
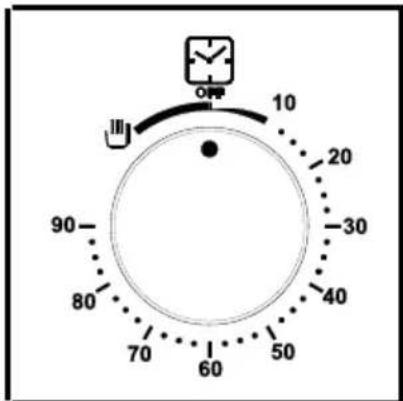
It's a cut off timer.
C) Touch Full Control Oven Timer : ( for 656 FTC/ E-RTC )
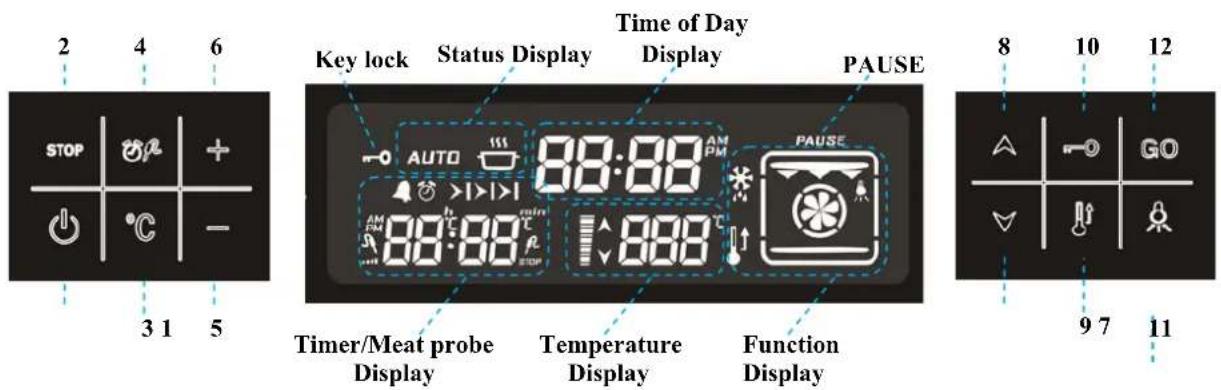
Display :
Time of day – shows the time of day;
Combination Display-indicates the selected cooking function
Temperature Display – indicates the adjusted oven temperature
Timer / Meat probe Display – shows timer or food temperature status
Status symbol- shows the oven status
Pause – indicates that the cooking with the parameters on screen, is paused by user
Key lock indicator
Touch keys :
- ON/OFF- switches the device ON or OFF
- STOP – Stops any program;
- ℃ - Temperature adjustment;
- Timer Menu/Meat probe functions;
-
- Minus;
-
-
- Plus;
-
- ▼ - Function adjustment-down;
-
- Function adjustment-up;
1. General Overview:
Resistance and fan combinations in the menu can be selected using touch keys in the user interface. Cooking time, end time (if meat probe is used end temperature), cooking temperature are adjustable. Additionally keep warm, heat up, real time display, stopwatch, and key lock functions are available.
SWITCHING THE CONTROL ON or OFF:
key activates or deactivates the control (independently from child lock). When the control is OFF, the screen is completely blank. Pressing ⏻ key for 1 second, activates the control. The current time of day appears on the display.
Note: In case of any occurred power interrupt, the current time of day will not be correct any more. A flashing 0:00 will appear on the time of day display. It is impossible to use any features of the control without setting the time of day. The correct time can be adjusted using the — and +keys.
Pressing 🔒 for 1 second as control is ON, sets the control in the OFF state.
ADJUSTING TIME OF DAY:
Touch and hold both — and +buttons until time of day digits start flashing. Using — or +keys, set the correct time. Wait for 7 seconds, flashing will stop, adjustment is completed.
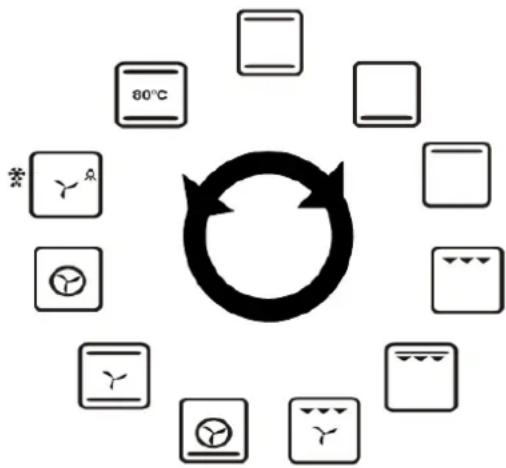
SELECTING A COOKING FUNCTION :
Using either of ▲ or ▼keys, you may scroll through the function menu.
flowchart
graph TD
    A["80°C"] --> B((Process))
    C["12 Air Condition Icon"] --> B
    D["Air Condition Icon"] --> B
    E["Air Condition Icon"] --> B
    F["Air Condition Icon"] --> B
    G["Air Condition Icon"] --> B
    H["Air Condition Icon"] --> B
    I["Air Condition Icon"] --> B
    J["Air Condition Icon"] --> B
    K["Air Condition Icon"] --> B
    L["Air Condition Icon"] --> B
    M["Air Condition Icon"] --> B
    N["Air Condition Icon"] --> B
    O["Air Condition Icon"] --> B
    P["Air Condition Icon"] --> B
    Q["Air Condition Icon"] --> B
    R["Air Condition Icon"] --> B
    S["Air Condition Icon"] --> B
    T["Air Condition Icon"] --> B
    U["Air Condition Icon"] --> B
    V["Air Condition Icon"] --> B
    W["Air Condition Icon"] --> B
    X["Air Condition Icon"] --> B
    Y["Air Condition Icon"] --> B
    Z["Air Condition Icon"] --> B
The current function will flash on the Function Display for 7 seconds and the default cooking temperature assigned to this function will appear on the temperature display (Note: For some functions, a temperature control is not possible and the temperature display is blank).
The 📋 is steady on the status display, whereas 📄 is flashing, indicating that you are ready to cook but not started yet.
CHANGING THE ASSIGNED DEFAULT OVEN TEMPERATURE:
The Temperature Setting on the Temperature Display might be changed by touching the Ⓞ button- the Temperature Display starts flashing- and setting the desired value using ➕ or ➕n 5 degree intervals.
(!)Note: If you want to replace the default temperature setting for this function with this adjusted temperature permanently, touch ℃ for approximately 5 seconds, until a buzzer tone is heard. The factory set default temperature for this function is now permanently changed.
MANUAL COOKING:
Once a function is selected, touching the GO key, initiates cooking with a temperature setting on the temperature display (if any). PAUSE disappears, and the time passed in cooking starts to be displayed on the timer/meat probe display. Cooking will continue until it is ended by the user manually (see: to pause, edit or end cooking) or the maximum allowed cooking time, depending on the selected cooking temperature, has passed, as listed below:
050-120 C 10h
121-200 C 6h
201-250 C 3h
In half and full automatic cooking, as described later, cooking is ended automatically depending on the parameters entered by the user before initiating cooking (by touching GO)
TO PAUSE, EDIT or END COOKING:
Touching STOP during cooking, interrupts the cooking progress and PAUSE starts flashing, whereas other portions of the display remain the same. All oven heating elements and turbo fan are disabled temporarily. Cooking is paused.
To end cooking, touch STOP once again, all cooking related indications on the display disappear. The temperature display will indicate the residual heat, if any (see: Residual Heat Indication).
Note: After cooking has ended, touching GB rings the previous function and temperature settings on the screen, by a second GD touch, cooking may be initiated again.
To edit the cooking parameters (Fuction, Temperature, etc), use the appropriate buttons as described in this document. Touching GO will restart cooking with the edited parameters.
AUTOMATIC COOKING:
Automatic cooking means, that cooking will end automatically according to the parameters you tell the control after selecting the cooking function and temperature but before touching GO
Half Automatic Cooking:
This method is used when NO meat probe is used and you want to start cooking immediately, entering the desired cooking duration.
1) Select the desired function and adjust (if needed) the temperature as described before in this document.
2) Touch 📄 key. Will flash on the timer screen.
3) Adjust the required cooking duration using □ and +keys. appears on the status display. ( If duration is brought to 0:00, two warning beeps occur)
4) Touch key, disappears, cooking starts. The cooking end time is displayed on the timer display, together with symbol ▶1.
Full Automatic Cooking:
This method is used when NO meat probe is used and you want the food to be ready at a certain time in future. Therefore, this method is also called 'Delayed Cooking'
1) Go through steps 1 to 3 of half automatic cooking (setting the cooking duration)
2) Touch 📄 key again, 🎨 ashes on the timer screen together with the current cooking end time.
3) Adjust the desired end time using — and + keys. On the status display may disappear whereas AUTO is still there, indicating that a delayed cooking is programmed and cooking will not start immediately.
4) Touch GO key, disappears, cooking starts. The cooking end time is displayed on the timer display, together with symbol ▶1.
Cooking with Meat Probe:
Meat probe is a sensor, connected to plug inside the oven and inserted into the meat to be cooked. Using the meat probe, cooking is automatically ended when the meat reaches the desired temperature.
1) Select the desired function and adjust (if needed) the temperature as described before in this document.
2) Touch ☐ key. The default value of the meat probe temperature will flash on the right two digits of the timer/meat probe display. AUTO will appear on the screen.
3) Adjust the desired meat temperature at cooking end in the range 20-99 C using □nd □vs.
4) Touch GO, disappears, cooking starts. The actual meat temperature is displayed on the left, the adjusted end temperature on the right portion of the timer/meat probe display.
During Cooking:
The 5 bars on the temperature display give an indication about the actual oven temperature. Each bar is assigned to 1/5 th of the adjusted value. The up-arrow near the bars flashes, when the heating elements are currently active.
AUTOMATIC END OF COOKING:
After cooking ends automatically, the temperature display will indicate the residual heat, if any (see: Residual Heat Indication), AUTO will be flashing and buzzer will sound for 7 minutes. Touching STOP will cancel the latter.
Residual Heat Indication:
After cooking has ended manually or automatically, if the internal oven temperature is above 60 °C, 'down arrow' on the right side of heat bars flashes every 2 second and also "hot" is displayed on the temperature display. Each one of the 5 heat bars symbolize now 60 °C. This indication goes on until the oven temperature falls below 60 °C.
SPECIAL FEATURES:
Lamp ON/OFF: The lamp inside the oven will be ON, whenever a function is being or is adjusted. It will get OFF, after cooking and residual heat indication ends.
However, it can be switched ON or OFF touching 🔥, except using the defrost function.
Heat Up Rapidly: Sometimes it is desired to bring the oven temperature rapidly to the adjusted value. Touching 🎨 will energize the circular resistance and/or turbo fan temporarily to achieve a rapid heat up. 🎨 symbol will be visible on the screen, after reaching the adjusted oven temperature, it will vanish and a buzzer tone is heard. Note: Rapid heat up is not allowed for some functions (grill) or when the actual temperature is less than 50C away from the adjusted one or the adjusted temperature is below 100 C.
Child Lock:
Child lock can be activated or deactivated via touching the ☐ key for 1 second, until the symbol appears on the screen. When child lock is activated, no key except ⏻, is accepted.
Minute Minder Alarm:
Touch and release ⚡️ key until appears in a flashing manner. Give in the time in minutes, using the ➔ or +keys. Flashing will stop after 7 seconds, a buzzer alarm lasting 7 minutes will be produced after the adjusted time has elapsed. This alarm can be stopped touching any of ➔ or keys.
Alarm Clock:
Touch and release 🔍 key until 🔍 appears in a flashing manner. Give in the alarm time, using the ☑ or keys. Flashing will stop after 7 seconds, a buzzer alarm will be produced when the adjusted time has come. This alarm can be stopped touching any of ☐ or keys.
ERROR INDICATIONS:
When situations which prevent normal operation occur, the device enters error mode. Device is in the standby status but an error code is displayed on Time of Day Display. Even if the error recovers, this code will remain on the display until STOP key is touched. A total number of 8 error codes exist:
Err1: Communication error
Err2: PT1000 open circuit
Err3: PT1000 short circuit
Err4: Temperature exceed in user interface
Err5: Temperature exceed in the power module.
Err6: Temperature sensor failure in the user interface.
Err7: Temperature sensor failure in the power module.
Err8: Main power error. There is no warm up detected although heating elements seem to be activated.
Programmable Options
Buzzer Tone: There are three buzzer tones to select. Touch the ▶ key 5 seconds long, time of day display will show the currently valid one as "tn 1" (high) or "tn 2 (medium)" or "tn 3 (low)". The valid tone can be hanged by a ▶ key touch within 7 seconds after the last one. Default tone is "tn".
Key Sound: There are three key sound options to select. Touch the ✝ key key 5 seconds long, time of day display will show the currently valid key tone as "bt" (beep tone) or "c" (click tone) or "nt" (no tone). The valid key sound can be changed by a ✝ key touch within 7 seconds after the last one. Default key sound is "bt".
Time of Day Mode 24h/12h: Default mode is 24 hours. If 12h am/pm node is desired, touch both ▶ and +keys 5 seconds long. Mode changes and a beep one occurs. Do the same for vice versa.
Auto Power Save (APS): APS is an option not set as factory setting. If set, the control will be switched OFF automatically, whenever there is nothing other than the time of day to be displayed. Touching 5 seconds long in idle mode (no looking related operation present) activates this option, Time of day digits will show PS ON for a few seconds accompanied with a beep tone. Cancelling this option is lone in the same way, PS OF will be shown on the screen.
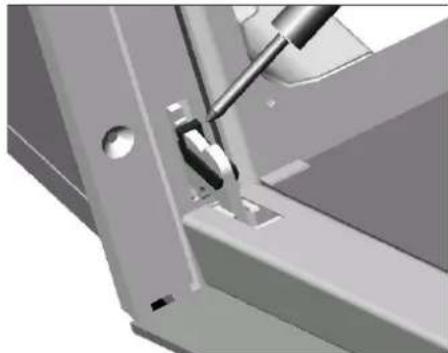
Removal oven door for easy cleaning
Before cleaning the oven door, we advise you to follow below steps to separate oven door from the oven body:
- Open the door completely. Dismount the locking part on the hinge by lifting with screwdriver.
- Push the locking part in the direction of the glass door to the hinge body.
- Open the glass door to the back slightly and insert the locking part to it's place on hinge. Make sure that this is done on both for left and right hinges.
- Lift the door slightly and pull the door with your two hands to separate from the oven.
natural_image
Close-up of a mechanical assembly with a tool inserted into a bracket (no visible text or symbols)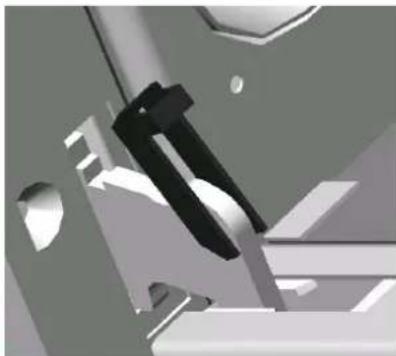
natural_image
Close-up of mechanical components with no visible text or symbolsInserting the oven door
After cleaning, for inserting oven door to oven body it is recommended to apply below steps:
- Hold the door in open position and insert the hinge to hinge counter part.
- Open the glass door to the back slightly for getting the locking part and then push ahead and lock with screwdriver.
- Open and close the door to make sure that it has been fitted correctly.
Oven Gasket
Please check this gasket at regular periods. If it requires cleaning, clean it without using abrasive materials.
If gasket is damaged, immediately contact with closest authorised servicel. Do not use oven till gasket repaired or replaced.
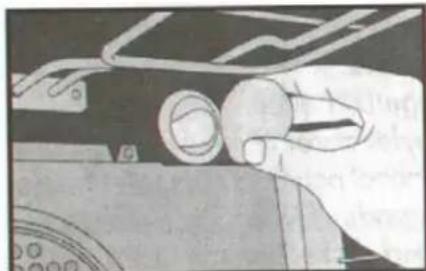
Changing Oven Lamp
- Pull the plug out of socket.
- Turn the lamp fixing glass counter-clockwise direction to separate it.
- To separate lamp from body turn it to counter-clockwise direction.
- Fix new lamp that you gain from authorised service in place of old lamp.
- Ensure the appliance is switched off before replacing the lamp to avoid the possibility of electric shock.
natural_image
Close-up of a hand holding a circular component with a handle, next to a mechanical device (no visible text or symbols)CHANGING OVEN LAMP
SECTION 8 MAINTENANCE & CLEANING
Cleaning your Oven
- Before you start cleaning, switch off power-supply at the socket. If the oven is hot, wait it to cool off.
- Do not use the abrasive cleaning agents on enamel, ceramic or painted surfaces. Use only creams or liquid cleaning agents that do not contain abrasive agents.
- Any liquid spilling on the cooker may cause damage to enamel surfaces when they burn. Promptly clean spilt liquids.
- Do not use corrosive cleaning agents when cleaning control panel.
- Never drip water on and touch the glass when the oven is hot.
- Remove covers of the oven. Wash and rinse with soapy water.
Cleaning the Interior of Your Oven
- Switch off power supply before starting to clean oven.
Remove trays and grill. Wipe the interior parts with soap soaked cloth. Clean it with dampened cloth again and wipe dry. - Do not use dry or powder cleaning agents. Clean the glass surfaces with specialised glass cleaning agents.
- Do not use hard brushes, steel wood or sharp instruments such as a knife when cleaning the interior part of the oven.
SECTION 9 INFORMATION ABOUT TRANSPORTATION
In case of transport hold your oven vertically and do not put anything on it.
Transportation;
Please Keep your ovens original box.
Carry your oven with original box. Obey carrying signs on box.
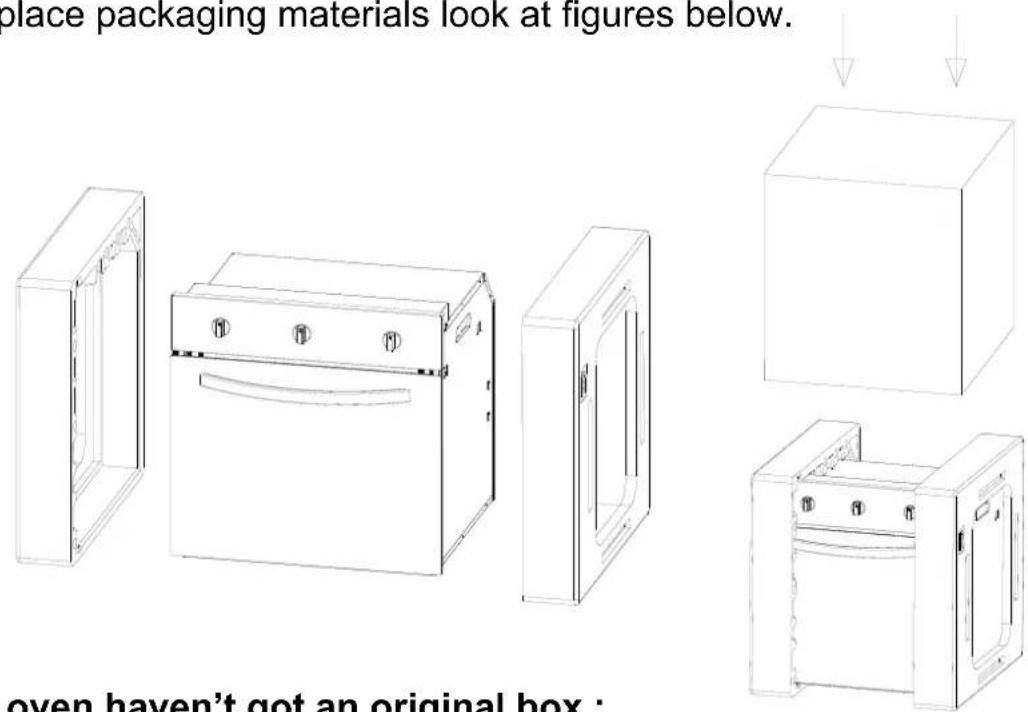
To keep your oven door from damage that may occur during transportation by wire grate and trays, stick 1-1,5 cm thin cardboard or paper on oven front door inner glass with sticky tape at level of trays. Stick oven door to side walls with sticky tape.
To place packaging materials look at figures below.
If your oven haven't got an original box ;
Take precautions to avoid possibility of oven outer walls, glass, painted, enamelled or stainless steel surfaces.
SECTION 10 TROUBLESHOOTING
Please do the following controls before calling authorised service.

If oven not heats;
Plug of your product may not be in an earthed socket; your fuse may blow; timer may not adjusted in models that have timer.
If oven is not working ;
Please check that oven button is adjusted to a function in multifunction models.
Please check that heater button adjusted.

Please check fuse of oven plug's socket or main fuse to be sure of its blow or not.

If inner oven lamp is not;
Check is electricity on; is lamp working; if it is not, read User's Manual to change it.

Upper and Lower heaters do not cook equally;
Check raw positions, thermostat positions and cooking time from list in your Users Manual.

If there is still any problem in your product, please call closest authorised service.
656 MTC/E-RTC
Low Voltage Directive is 2006/95/EC; Electromagnetic Compatibility Directive is 5004/108/EC RoHS Directive is 2011/65/EU
656 FTC/E-RTC
Low Voltage Directive is 2006/95/EC; Electromagnetic Compatibility Directive is 5004/108/EC RoHS Directive is 2011/65/EU
656 ETC/E-RTC
RoHS Directive is 2011/65/EU
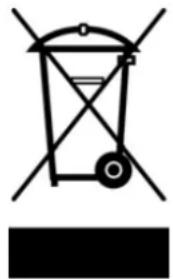
This appliance/fitting is marked according to the European directive 2002/96/EC on Waste Electrical and Electronic Equipment (WEEE). By ensuring this product is disposed of correctly, you will help prevent potential negative consequences for the environment and human health, which could otherwise be caused by inappropriate waste handling of this product.
The symbol on the product, or on the documents accompanying the product, the Crossed Out Wheelie Bin symbol, indicates that this appliance/fitting may not be treated as household waste. Instead it shall be handed over to the applicable collection point for the recycling of electrical and electronic equipment. Disposal must be carried out in accordance with local environmental regulations for waste disposal. For more detailed information about treatment, recovery and recycling of this product, please contact your local authority, your household waste disposal service or the retailer where you purchased the product.
natural_image
Pure electrical circuit lines without any symbolsIFB decline any responsibility whatsoever its due to misprinting or printing error.
- India's Finest Brand
- The User Manuel
- Built in Oven
- Trusted by millions
- Dear customer,
- Dear Customer
- TABLE of CONTENTS
- SECTION 1
- SECTION 2
- SECTION 3
- SECTION 4
- SECTION 5
- SECTION 6
- SECTION 7
- SECTION 8
- SECTION 9
- SECTION 10
- SECTIONS of OVEN
- SECTION 2 IMPORTANT SAFETY NOTICES
- Installation:
- Warning: This appliance must be earthed.
- When you have finished cooking check that all controls are in the OFF position.
- Service:
- Installation instructions :
- SECTION 5 USING THE OVEN
- Thermostatic Control of Oven
- Usage of Oven
- Suggested Settings
- THIS IS GENERAL OVEN FUNCTION TABLE, FUNCTION MAY VARY FROM MODEL TO MODEL
- WARNING
- SECTION 6 Grill Function of Oven - Closed Door Grilling
- ATTENTION:
- ROTISSERIE GRILL
- GENERAL OVERVIEW
- TIME OF DAY ADJUSTMENT
- ADJUSTING THE BUZZER ALARM
- AUTOMATIC COOKING PROGRAM
- BUZZER VOLUME ADJUSTMENT
- B) Adjustment of Mechanical Timer : ( for 656 MTC/ E-RTC )
- Display :
- Touch keys :
- General Overview:
- SWITCHING THE CONTROL ON or OFF:
- ADJUSTING TIME OF DAY:
- SELECTING A COOKING FUNCTION :
- CHANGING THE ASSIGNED DEFAULT OVEN TEMPERATURE:
- MANUAL COOKING:
- TO PAUSE, EDIT or END COOKING:
- AUTOMATIC COOKING:
- Half Automatic Cooking:
- Full Automatic Cooking:
- Cooking with Meat Probe:
- During Cooking:
- AUTOMATIC END OF COOKING:
- Residual Heat Indication:
- SPECIAL FEATURES:
- Child Lock:
- Minute Minder Alarm:
- Alarm Clock:
- ERROR INDICATIONS:
- Programmable Options
- Removal oven door for easy cleaning
- Inserting the oven door
- Oven Gasket
- Changing Oven Lamp
- SECTION 8 MAINTENANCE & CLEANING
- Cleaning your Oven
- Cleaning the Interior of Your Oven
- SECTION 9 INFORMATION ABOUT TRANSPORTATION
- Transportation;
- If your oven haven't got an original box ;
- SECTION 10 TROUBLESHOOTING
- Please do the following controls before calling authorised service.
- MTC/E-RTC
- FTC/E-RTC
- ETC/E-RTC
Brand : IFB
Model : 656 ETC/E-RCT
Category : Oven