28QOLCD1 - Oven IFB - Free user manual and instructions
Find the device manual for free 28QOLCD1 IFB in PDF.


| Product Type | Quartz Counter-top Oven |
| Brand | IFB |
| Model | 28QOLCD1 |
| Capacity | 28 Litres |
| Power Consumption | 1400 W |
| Voltage | 230 V, 50 Hz |
| Temperature Range | 65°C to 230°C |
| Timer | Up to 240 minutes (4 hours) |
| Functions | 11: Toast, Bagel, Bake, Roast, Broil, Pizza, Cookies, Reheat, Keep Warm, Defrost, Dehydrate |
| Turbo Convection | Yes |
| Display | LCD |
| Rack Positions | 2 (Upper and Lower) |
| Accessories Included | Wire rack, Baking pan, Pizza pan, Dehydrate rack, Removable crumb tray |
| Interior Light | Yes, replaceable (18W G9 bulb) |
| Power Cord Length | 1 meter |
| Net Weight | 8.79 kg |
| Dimensions (W x D x H) | 475 x 398 x 296 mm |
| Warranty | 24 months |
| Cleaning | Removable crumb tray; accessories dishwasher safe |
| Safety Features | Auto shut-off, cool-touch door |
Frequently Asked Questions - 28QOLCD1 IFB
User questions about 28QOLCD1 IFB
0 question about this device. Answer the ones you know or ask your own.
Ask a new question about this device
Download the instructions for your Oven in PDF format for free! Find your manual 28QOLCD1 - IFB and take your electronic device back in hand. On this page are published all the documents necessary for the use of your device. 28QOLCD1 by IFB.
USER MANUAL 28QOLCD1 IFB
natural_image
Black 280QOLCO1 microwave oven with open oven, surrounded by dried fruit and red chili peppers (no text or symbols on main subject)10 IN ONE
28QOLCD1 QUARTZ OVEN

natural_image
Close-up of a white popcorn with visible seeds and cavity (no text or symbols)CONTENT
INTRODUCTION
SETTING UP YOUR QUARTZ OVEN 01

IMPORTANT SAFETY INSTRUCTIONS
02

CHAPTER 1
FUNCTIONS
04
USING YOUR OVEN
05

CHAPTER 2
COOKING FUNCTIONS
06

CHAPTER 3
CLEANING AND MAINTENANCE
11

CHANGING THE LIGHT BULB 11

CHAPTER 4
ERROR CODE & POSSIBLE CAUSES 12

TROUBLESHOOTING GUIDE 12

CHAPTER 5
TECHNICAL SPECIFICATIONS 13

SERVICE RECORD 13

WARRANTY 16
The A to Z of your Quartz oven
SETTING UP YOUR QUARTZ OVEN

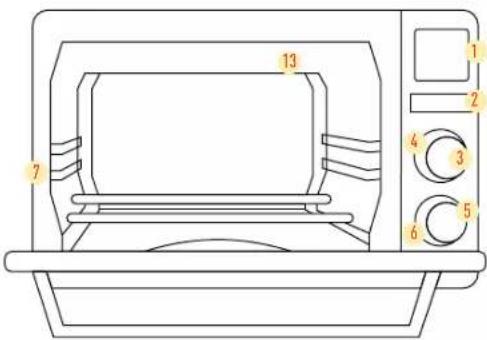
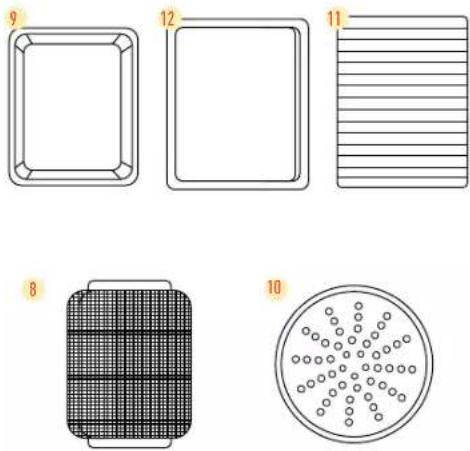
NAMES OF OVEN PARTS AND ACCESSORIES
1 LCD Display
2 Light, (Start/Cancel), OFF Buttons
3 Function Selector Dial
4 Turbo Convection Selector Button
5 Time/Temperature Control Dial
6 Time/Temperature Selector Button
7 Two Rack Positions
8 Dehydrate Rack
9 Baking Pan
10 Pizza Pan
11 Removable Wire Rack
12 Removable Crumb Tray
13 Interior Light
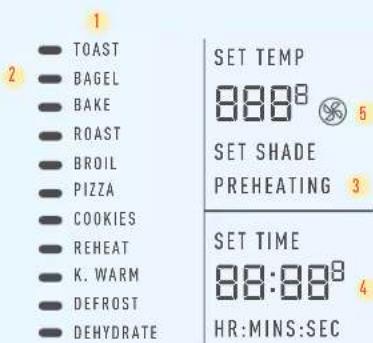
LCD DISPLAY
1 Function Options
2 Function Indicator
3 Shade Setting or Temperature Setting
4 Timer
5 Turbo Convection Icon
- Remove the oven and all materials from the oven cavity. Keep the packaging material. It may come in handy when shifting residence.
- Wipe the appliance clean using a damp cloth. Make sure to only use mild, soapy water. Abrasive cleaners, scrubbing brushes and chemical cleaners will damage the Quartz oven's coating. Dry the unit thoroughly before using.
The A to Z of your Quartz oven
- Remove the appliance's accessories from their packaging and clean them by immersing in warm, soapy water and wiping dry with a soft cloth. They can also be washed in the top rack of a dishwasher.
- Select a location for the Quartz Oven. It should be on a dry, stable, even surface and in the vicinity of a power outlet.
- Plug the Quartz Oven into the power outlet.
Note:
Do not immerse the appliance or its cord in water
IMPORTANT SAFETY INSTRUCTIONS

To reduce the risk of fire, electric shock, injury to persons when using your appliance, follow these basic precautions:
- Read all instructions, product labels and warnings before using the Quartz Oven.
- Do not install and use a damaged machine. Before connecting the machine, ensure that the connection data on the data plate (voltage and frequency) match the main electricity supply. If in any doubt, consult IFB Care.
- This appliance generates heat during use. Do not touch its surface when in it is in use as it may be hot. Always protect your hands with non-slip oven mitts or similar heat resistant gloves.
- To protect against electric shock, ensure the appliance, its power cord and plug do not come in contact with water or any other liquid.
- This appliance can be used by children aged 8 years and above and persons with reduced physical, sensory or mental capabilities or lack of experience and knowledge if they have been given supervision or instruction concerning use of the appliance in a safe way and understand the hazards involved. Children shall
not play with the appliance. Cleaning and user maintenance shall not be done by children unless they are older than 8 years of age and supervised. Children less than 8 years of age shall be kept away unless continuously supervised.
- Keep the appliance and its cord out of reach of children younger than 8 years.
- If the cord is faulty, it must be replaced only an IFB approved service technician to protect the user from danger.
- Unplug the appliance from the power outlet when not in use and before cleaning.
- Do not pull the cord to disconnect the plug. Hold the plug itself. Do not insert or remove the plug with damp hands.
- Avoid using accessories not recommended by IFB as these may cause injury.
- This appliance is not designed for outdoor or commercial use. Do not let the cord hang over the edge of the table or counter, or come into contact with hot surfaces.
- Do not place the appliance on or near wet surfaces, or heat sources such as a hot gas stove, electric burner, heated oven etc.
- Be extremely careful when moving the appliance or removing the pan when it contains hot oil or any other hot liquid. Always protect your hands with non-slip oven mitts or heat resistant gloves.
- Do not use this appliance for any purpose other than its intended use. Misuse may lead to injuries. This appliance is intended for domestic counter-top use only.
- Always ensure there is 6 inches space between the appliance and the wall on all sides.
• Always place the appliance on a dry, stable, level surface. - Oversized food items or metal utensils must not be placed in the appliance as they may cause fire or electric shock.
- Do not cover the appliance as it may lead to fire.
- Do not place the appliance near flammable materials, including curtains, towels, clothes etc.
- Do not clean this appliance using metal scouring pads. Pieces of the pads could break off and make contact with the electrical components, causing electric shock.
- Extreme caution should be exercised when using containers not designated as oven safe.
- Never place paper, cardboard, plastic, or any material that may melt or ignite, in the appliance.
Do not cover the crumb tray or any part of the oven with metal foil. This will cause overheating of the oven.
• Empty the crumb tray after each use.
The A to Z of your Quartz oven
- The glass door is made of tempered glass. Always inspect it for chips, cracks or other damage. Do not operate the appliance if the glass door s damaged.
- Do not use this appliance in conjunction with a programmer, timer, wireless plug adapter or outlet that allows remote control. Do not connect it to a circuit that is regularly switched ON and OFF.
CAUTION
natural_image
Illustration of a hand holding a pink warning triangle with an exclamation mark (no text or symbols present)- The electrical safety of this appliance can only be guaranteed when continuity is complete between the machine and an effective earthing system, which complies with local and national regulations. It is most important that a qualified electrician regularly tests this basic safety requirement.
The manufacturer cannot be held responsible for the consequences of an inadequate earthing system. - For safety reasons do not operate this appliance on an extension cable. Extension leads do not guarantee the required safety of the appliance. The appliance must be earthed. Its cord is equipped with an earthed wire and plug.
- The machine is built in accordance with current safety requirements.
- Unauthorised repairs could result in unforeseen dangers for the user, for which the manufacturer cannot accept responsibility. Only authorised IFB Care Service Personnel should undertake repairs.
- The machine is completely isolated from the electricity supply only when it is switched OFF at the wall socket and the plug is taken out. or it is switched OFF from the main source, or the main fuse is taken out or MCB switched OFF.
- Only genuine IFB original spare parts should replace faulty components. Only when these parts are fitted can the safety standards of the machine be guaranteed.
- If the connection cable is faulty, it must be replaced only by an IFB approved service technician to protect the user from danger.
- It is recommended that a separate circuit be used exclusively for the appliance. Overloading the voltage of the circuit may lead to fire.
The wires of the power cord are colour coded accordingly
GREEN and YELLOW = EARTH
BLACK = NEUTRAL
RED = LIVE
Note:
Some counter-tops and surfaces may not be designed to withstand the prolonged heat generated by the appliance. Do not operate the appliance on a finished wooden table. We recommend placing a hopad or trivet under the appliance to prevent possible damage to the surface. During initial use of this appliance, slight smoke and/or odour may be detected. This is normal with heating appliances and will not recur after a few uses.
FUNCTIONS


RACK POSITION

PREHEAT

RANGE - TEMPERATURE

TIME
TOAST
| Upper | No Shade 1-7 1:35 - 7:30 | ||
BAGEL
| Upper | No Shade 1-7 1:35 - 7:30 |
BAKE
| Lower | Yes 65-230°C Up to 1 hour | ||
ROAST
| Lower | Yes 65-230°C Up to 2 hour | ||
BROIL
| Upper | Yes 175-230°C Up to 2 hour | ||
PIZZA
| Upper | Yes 65-230°C Up to 1 hour | ||
COOKIES
| Upper | Yes 65-230°C Up to 1 hour | ||
REHEAT
| Upper/Lower | No 65-230°C Up to 1 hour |
KEEP WARM
| Upper/Lower | No 65°C/78°C /93°C Up to 1 hour | ||
DEFROST
| Upper/Lower | Yes 65°C/78°C /93°C Up to 1 hour | ||
DEHYDRATE
| Upper | Yes 65-93°C Up to 4 hour | ||
USING YOUR OVEN

- Once the IFB Quartz Heat Counter-top Oven has been plugged in, the LCD screen will illuminate and the START button LED will flash.
• The Function Options will be displayed on the LCD screen with the Function Indicator on the default TOAST function.
• Turn the Function Selector Dial to select one of the following 11 options: Toast, Bagel, Bake, Roast, Broil, Pizza, Cookies, Reheat, Keep Warm, Defrost and Dehydrate. The Function Indicator will scroll as the Function Selector Dial is turned.
There are default temperature settings available for functions other than Toast and Bagel, whose temperature and time settings may be adjusted based on your requirements.
Press the Time button for 3 secs to change the temperature • unit from Celsius to Fahrenheit
Once the desired function has been selected, use the Time/Temperature Control Dial to select the desired cooking temperature or shade (for TOAST and BAGEL functions).
Turn clockwise to increase and counter-clockwise to decrease. Press the Time/Temperature button to confirm decrease. Press the Time/Temperature button to confirm the setting.
- Press the START button to begin preheating. PREHEATING will be displayed on the LCD screen. Ensure the door is closed for preheating. The oven does not preheat for the BAGEL and TOAST functions. For these, food items maybe placed inside the oven immediately after pressing the START button.
- Once the oven is preheated, it will beep and PREHEATING will disappear from the LCD screen.
- You may set the timer before the oven begins preheating, during preheating, or once preheating is complete. Press the Time/Temperature button to change the Time/Temperature Selector Dial to time selection. Turn the dial clockwise to increase cooking time and counter-clockwise to decrease cooking time. The maximum time setting is 4 hours. Maximum time settings differ as per the function selected.
Note:
TOAST and BAGEL functions automatically set the time based on the shade setting.
- Once preheating is complete and the timer is set, put the food into the oven, using the Wire Rack, Baking Pan, Pizza Pan or Dehydrator Rack. When using the Baking Pan or Pizza Pan, always place it on top of the Wire Rack.
Note:
TOAST and BAGEL functions automatically set the time based on the shade setting.
- Once the food is in the oven, close the door and press the START button again. The Timer will begin counting down.
- Press the TURBO CONVECT button for better air circulation and crispier food, if needed.
- Once the allotted time has expired, the oven will beep and stop heating. The display will remain lit for some time and then go off. You may press Cancel/OFF to turn OFF the display before it times out.
- Use oven mitts to carefully remove the food from the oven.
- The back light of the LCD display will turn OFF after 90 secs of inactivity. Press any button to wake up the appliance.
- Press the Cancel/OFF button to turn OFF the oven.
COOKING FUNCTIONS

TOAST

Grill tray
For best results, place the wire rack in the upper rack position. This function is ideal for sliced toast, English muffins and frozen waffles.
Note:
For darker toast, use a higher shade setting (Shade 6 or 7). Please monitor while using a higher shade setting to prevent the toast from burning.
1 Insert the wire rack into the upper rack position.
2 Place the food in the centre of the wire rack for more even toasting.
3 Close the oven door.
4 Turn the Function Selector Dial to select the TOAST function. Once the function has been selected, use the Time/temperature Control Dial to select the desired shade (Shade 3, 4 or 5). Turn the Time/temperature Control Dial clockwise to increase shade selection and counter-clockwise to decrease.
5 Press the START button to begin toasting.
6 When the toasting cycle is complete, an audible alert will sound.
7 Open the oven door fully and remove the food carefully using oven mitts.
Warning:
Cooked food can be very hot. Handle with care. Do not leave the oven unattended.

BAGEL

Grill tray

For optimal results, place the wire rack in the upper rack position.
1 Insert the wire rack in the upper rack position.
2 Place the food in the centre of the wire rack for more even cooking.
3 Close the oven door.
4 Turn the Function Selector Dial to select the BAGEL function. Once the function has been selected, use the Time/temperature Control Dial to select the desired darkness. Turn the Time/temperature Control Dial clockwise to increase shade selection and counter clockwise to decrease.
5 Press the START button to begin the bagel cycle.
6 When the bagel cycle is complete, an audible alert will sound.
7 Open the oven door fully and remove the food carefully using oven mitts.
Warning:
Cooked food can be very hot. Handle with care. Do not leave the oven unattended.

BAKE

Grill tray

Baking tray

For optimal results, place the wire rack in the lower rack position.
1 Insert the wire rack into the lower rack position. Note that certain baked items require upper rack placement.
2 Ensure the oven door is closed for preheating.
3 Turn the Function Selector Dial to select the BAKE function. Once the function has been selected, use the Time/Temperature Control Dial to select the desired cooking temperature and time. Turn the Time/Temperature Control Dial clockwise to increase temperature and time and counter-clockwise to decrease. Press the Time/Temperature button to confirm the temperature and time settings.
4 Press the TURBO CONVECT button for better air circulation and crispier food if needed. The turbo convection fan icon will appear on the LCD screen. To cancel the convection setting, press the TURBO CONVECT button again.
5 Press the START button to begin preheating. PREHEATING will appear on the LCD screen.
6 Once preheating is complete, an audible alert will sound. The START button will flash.
Carefully place the food in the centre of the wire rack for more even cooking.
8 Close the oven door.
9 Press the START button to begin the Baking cycle
Note:
The timer wont begin until until the START button is pressed
When the baking cycle is complete, an audible alert will sound.
11 Open the oven door fully and remove the food carefully using oven mitts.
Warning:
Cooked food can be very hot. Handle with care. Do not leave the oven unattended.

ROAST

Grill tray

Baking tray
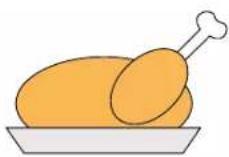
For optimal results, place the wire rack in the lower rack position.
1 Insert the wire rack into the lower rack position. Note that certain baked items require upper rack placement.
2 Ensure the oven door is closed for preheating.
3 Turn the Function Selector Dial to select the ROAST function. Once the function has been selected, use the
Time/Temperature Control Dial to select the desired cooking temperature and time. Turn the Time/temperature Control Dial clockwise to increase temperature and time and counter-clockwise to decrease. Press the Time/Temperature button to confirm the temperature and time settings.
4 Press the TURBO CONVECT button for better air circulation and crispier food if needed. The turbo convection fan icon will appear on the LCD screen. To cancel the convection setting, press the TURBO CONVECT button again.
5 Press the START button to begin preheating. PREHEATING will appear on the LCD screen.
6 Once preheating is complete, an audible alert will sound. The START button will flash.
7 Carefully place the food in the centre of the wire rack for more even cooking.
- Close the oven door.
Press the START button to begin the Roasting cycle.
Note:
The timer wont begin until until the START button is pressed
10 When the roasting cycle is complete, an audible alert will sound.
11 Open the oven door fully and remove the food carefully using oven mitts.
Warning:
Cooked food can be very hot. Handle with care. Do not leave the oven unattended.

BROIL

Grill tray

Baking tray

For optimal results, place the wire rack in the lower rack position.
1 Insert the wire rack into the lower rack position. Note that certain baked items require upper rack placement.
2 Ensure the oven door is closed for preheating.
3 Turn the Function Selector Dial to select the BROIL function. Once the function has been selected, use the
Time/Temperature Control Dial to select the desired cooking temperature and time. Turn the Time/temperature Control Dial clockwise to increase temperature and time and counter-clockwise to decrease. Press the Time/Temperature button to confirm the temperature and time settings.
4 Press the TURBO CONVECT button for better air circulation and crispier food if needed. The turbo convection fan icon will appear on the LCD screen. To cancel the convection setting, press the TURBO CONVECT button again.
5 Press the START button to begin preheating. PREHEATING willappear on the LCD screen.
6 Once preheating is complete, an audible alert will sound. The START button will flash.
7 Carefully place the food in the centre of the wire rack for more even roasting.
8 Close the oven door.
9 Press the START button to begin the Broiling cycle.
Note:
The timer wont begin until until the START button is pressed
11 When the broiling cycle is complete, an audible alert will sound.
11 Open the oven door fully and remove the food carefully using oven mitts.
Warning:
Cooked food can be very hot. Handle with care. Do not leave the oven unattended.

PIZZA
Pizza tray
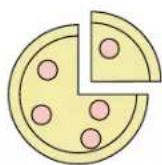
For optimal results, place the wire rack in the lower rack position.
1 Insert the wire rack in the lower rack position.
Ensure the oven door is closed for preheating.
2 Turn the Function Selector Dial to select the PIZZA function.
Once the function has been selected, use the
Time/Temperature Control Dial to select the desired cooking temperature and time. Turn the Time/Temperature Control Dial clockwise to increase temperature and time and counter-clockwise to decrease. Press the Time Temperature button to confirm the temperature and time settings.
4 Press the TURBO CONVECT button for better air circulation and crispier food if needed. The turbo convection fan icon will appear on the LCD screen. To cancel the convection setting, press the TURBO CONVECT button again.
5 Press the START button to begin preheating. PREHEATING will appear on the LCD screen.
Once preheating is complete, an audible alert will sound. The START button will flash.
7 Carefully put the pizza on the pizza pan and place it in the centre of the wire rack for more even cooking.
Close the oven door.
9 Press the START button to begin the Pizza cycle.
Note:
The timer wont begin until until the START button is pressed
10 When the pizza cycle is complete, an audible alert will sound.
11 Open the oven door fully and remove the food carefully using oven mitts.
Warning:
Cooked food can be very hot. Handle with care. Do not leave the oven unattended.

COOKIES

Grill tray

Baking tray
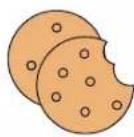
For optimal results, place the wire rack in the upper rack position.
1 Insert the wire rack into the upper rack position.
2 Ensure the oven door is closed for preheating.
3 Turn the Function Selector Dial to select the COOKIES function. Once the function has been selected, use the Time/Temperature Control Dial to select the desired cooking temperature and time. Turn the Time/Temperature Control Dial clockwise to increase temperature and time and counter-clockwise to decrease. Press the Time/Temperature button to confirm the temperature and time settings.
4 Press the TURBO CONVECT button for better air circulation and crispier food if needed. The turbo convection fan icon will appear on the LCD screen. To cancel the convection setting, press the TURBO CONVECT button again.
5 Press the START button to begin preheating. PREHEATING will appear on the LCD screen.
Once preheating is complete, an audible alert will sound. The START button will flash.
Place the cookies on the baking pan. Then, carefully place the baking pan on the wire rack.
Close the oven door.
Press the START button to begin the Cooking cycle.
Note:
The timer wont begin until until the START button is pressed
When the cooking cycle is complete, an audible alert will sound.
11 Open the oven door fully and remove the cookies carefully using oven mitts.
Warning:
Cooked food can be very hot. Handle with care. Do not leave the oven unattended.

REHEAT

Grill tray

Baking tray
For optimal results, place the wire rack in the desired rack position.
1 Insert the wire rack in the desired rack position.
2 Place the food on the oven-safe accessory. Carefully place the accessory in the centre of the wire rack for more even heating and close the oven door.
Turn the Function Selector Dial to select the REHEAT function. Once the function has been selected, use the Time/Temperature Control Dial to select the desired cooking temperature and time. Turn the Time/Temperature Control Dial clockwise to increase temperature and time and counter-clockwise to decrease. Press the Time/Temperature button to confirm the temperature and time settings.
4 Press the TURBO CONVECT button for better air circulation and crispier food if needed. The turbo convection fan icon will appear on the LCD screen. To cancel the convection setting, press the TURBO CONVECT button again.
5 Press the START button to begin the Re-heat cycle.
Note:
The timer wont begin until until the START button is pressed
6 When the reheat cycle is complete, an audible alert will sound.
7 Open the oven door fully and remove the food carefully using oven mitts.
Warning:
Cooked food can be very hot. Handle with care. Do not leave the oven unattended.

KEEP WARM

Grill tray

Baking tray
For optimal results, place the wire rack in the desired rack position.
1 Insert the wire rack in the desired rack position.
2 Close the oven door.
3 Place the food on the oven-safe accessory. Carefully place the accessory in the centre of the wire rack for more even heating and close the oven door.
Turn the Function Selector Dial to select the KEEP WARM function. Once the function has been selected, use the Time/Temperature Control Dial to select the desired cooking temperature and time. Turn the Time/Temperature Control Dial clockwise to increase temperature and time and counter-clockwise to decrease.
5 Press the TURBO CONVECT button for better air circulation and crispier food if needed. The turbo convection fan icon will appear on the LCD screen. To cancel the convection setting, press the TURBO CONVECT button again.
6 Press the START button to begin the Warming cycle.
Note:
The timer wont begin until until the START button is pressed
7 When the warming cycle is complete, an audible alert will sound.
8 Open the oven door fully and remove the food carefully using oven mitts.
Warning:
Cooked food can be very hot. Handle with care. Do not leave the oven unattended.

DEFROST

Grill tray

Baking tray
For optimal results, place the wire rack in the upper rack position.
1 Insert the wire rack into the upper rack position.
2 Ensure the oven door is closed for preheating.
3 Turn the Function Selector Dial to select the DEFROST function. Once the function has been selected, use the Time/Temperature Control Dial to select the desired cooking temperature and time. Turn the Time/Temperature Control Dial clockwise to increase temperature and time and counter-clockwise to decrease.
4 Press the TURBO CONVECT button for better air circulation and crispier food if needed. The turbo convection fan icon will appear on the LCD screen. To cancel the convection setting, press the TURBO CONVECT button again.
5 Press the START button to begin preheating. PREHEATING will appear on the LCD screen.
6 Once preheating is complete, an audible alert will sound. The START button will flash.
7 Carefully place the food in the centre of the wire rack for more even roasting.
8 Close the oven door.
9 Press the START button to begin the Defrost cycle.
Note:
The timer wont begin until until the START button is pressed
10 When the defrost cycle is complete, an audible alert will sound.
11 Open the oven door fully and remove the food carefully using oven mitts.
Warning:
Cooked food can be very hot. Handle with care. Do not leave the oven unattended.

DEHYDRATE
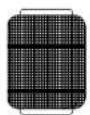
Dehydrated rack

For optimal results, place the DEHYDRATE RACK in the upper rack position.
1 Place the food evenly on the DEHYDRATE RACK in a single layer and leave spaces between the pieces.
2 Insert the DEHYDRATE RACK directly into the upper rack position.
3 Ensure the oven door is closed for preheating.
Turn the Function Selector Dial to select the DEHYDRATE function. Once the function has been selected, use the Time/Temperature Control Dial to select the desired cooking temperature and time. Turn the Time/Temperature Control Dial clockwise to increase temperature and time and counter-clockwise to decrease.
4 Press the TURBO CONVECT button for better air circulation and crispier food if needed. The turbo convection fan icon will appear on the LCD screen. To cancel TURBO CONVECT option, press the TURBO CONVECT button again.
5 Press the START button to begin preheating. PREHEATING will appear on the LCD screen.
6 Once preheating is complete, an audible alert will sound.
7 The START button will flash.
8 Close the oven door.
9 Press the START button to begin the Dehydrate cycle.
Note:
The timer wont begin until until the START button is pressed
When the De-hydrate cycle is complete, an audible alert will sound.
11 Open the oven door fully and remove the food carefully using oven mitts.
Warning:
Cooked food can be very hot. Handle with care. Do not leave the oven unattended.

CLEANING AND MAINTENANCE

- Clean the appliance and its accessories after each use.
- Before cleaning your oven, press the CANCEUOFF button to turn OFF the oven. Unplug the cord and allow it to cool before cleaning.
- To clean the exterior of the oven, wipe it with a damp cloth using mild, soapy water. Abrasive cleaners, scrubbing brushes and chemical cleaners will damage the coating on this unit.
Note:
Do not immerse the appliance in water.
- To clean the Wire Rack, Baking Pan, Dehydrate Rack, or Pizza Pan, remove them from the oven and immerse them in warm, soapy water. Wipe dry with a soft cloth or sponge.
These accessories may also be washed in the top rack of a dishwasher. - Remove the Removable Crumb Tray and shake off any crumbs. Wash with soapy water and dry thoroughly. Cleaning the Crumb Tray often will avoid any accumulations.
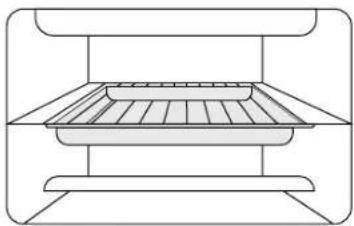
- Attach the baking tray below the grill rack within the groves provided while broiling, grilling, roasting, de-hydrating, toasting or cooking any food items which can drip food moistures or juices. These drippings can fall over quartz heating tubes and can stain them. Consistent saturation of food dripping on quartz tube can diminish their cooking performance.
natural_image
Line drawing of a three-tier appliance or storage unit with no text or symbolsCHANGING THE LIGHT BULB

The A to Z of your Quartz oven
- Remove all accessories from the oven.
- Remove the cover of the interior light bulb by turning it counterclockwise and remove the bulb.
- Insert a new 18WI 20VG9 bulb as per instructions on the light bulb's package. Replace the interior light bulb cover, turning clockwise to tighten.
Note:
This should be done when the oven has been OFF for a while and is no longer hot.
TROUBLESHOOTING GUIDE

× PROBLEM
√ SOLUTION
× Oven does not turn ON
- Plug the oven into the electrical outlet.
- Check that the power plug is securely inserted into the outlet.
- Insert the power plug into a different outlet.
- Press the START button.
× Smoke or odour
- During initial use of this appliance, slight smoke and/or odour may be detected. This is normal with heating appliances and will not recur after a few uses.
× Oven light does not turn ON
- Press the LIGHT button.
- Change light bulb.
✗ Heating elements do not stay ON
- Make sure that the correct function has been selected. The heating elements will cycle ON and OFF to maintain proper heat.
× Overcooked/undercooked food
√ • Adjust the time and temperature settings.
Chapter 4
- Because this oven is smaller than a regular oven, it will heat up faster and generally cook in short span of time.
• The rack may be adjusted to accommodate different foods.
× Burnt smell
- Refer to 'Cleaning & Maintenance'. Food build-up inside the oven, on heating elements and in the crumb tray can sometimes cause a burnt smell.
× LCD display turns OFF
- Press any button to wake up the appliance. The LCD screen turns off after 90 secs of inactivity.
ERROR CODE & POSSIBLE CAUSES

ERROR CODE
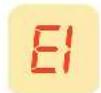
Possible Causes:
The temperature does not rise more than 5^ C after 3 min of power ON.
ERROR CODE
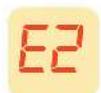
Possible Causes:
The terminal of the temperature sensor is loose or the temperature sensor is damaged.
ERROR CODE
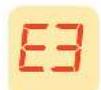
Possible Causes:
The sensor temperature is higher than 260°C
| Model | 28QOLCD1 | |
| Voltage | 230 V, 50 Hz | |
| Wattage | 1400W | |
| Capacity | 28 Litre | |
| Timer | Up to 240 mins | |
| Temperature | 230 °C | |
| Power Cord Length | 1 meter | |
| Net Weight | 8.79 Kg | |
| Dimensions (WxDxH) mm | 475 X 398 X 296 | |
| COMPLAINT COMMENTS, ATTENDED BY DATE | ||
WARRANTY
CUSTOMER COPY
Model :
Serial no :
Dealer's name : ____
Date of purchase :
Customer's name : ____
Address :
Phone :
Email :
WARRANTY CARD
IFB Industries Limited, (the Company) warrants to the original domestic purchase of this Quartz Oven (appliance) that is free from defects in workmanship and materials. During 24 months from the date of purchase, all parts of the Quartz Oven; shall be replaced or repaired free of charge, upon intimation to the Company. This warranty is subject to limitations.
LIMITATIONS OF WARRANTY
1 This warranty is not valid in case of the following events:
a If the warranty card is not fully and properly filled in and signed at the time of purchase/installation by the Company's authorised dealer/service engineer.
b If the completed warranty card is not presented to the authorised personnel at the time of service/repair
c If the appliance in not used in accordance with manufacturer's instructions given in the User Manual.
d If the appliance has been serviced, repaired, opened or tampered by any unauthorised personnel.
c If defects arise or are caused by accidents, alteration, misuse, neglect, abuse, substitution of original components with spurious/non-genuine components, attack by household pests/ rodents, fire, flood, earthquake, lightning and/or any other acts of God/natural calamities.
If damages occur by improper electrical circuit outside the appliance or by any defective electrical supply thereof.
g If the machine serial number on the appliance is defaced, missing or altered.
h If the appliance is taken out of India
2 This warranty does not cover any type of painting, plating including rusting etc or defects thereof.
3 This warranty does not cover normal wear and tear of parts.
4 Liability for consequential damages is neither accepted nor implied.
5 Parts replaced or repaired under this warranty are warranted throughout the remaining of the original warranty period.
6 The Company is not liable for any delay in servicing due to reasons beyond the control of the Company or any of its authorised service centres.
7 This warranty is not applicable if the appliance is used commercially at places such as hotels, hospitals, hostels etc.
For any service under this warranty beyond city/ town/municipal limits from the Company/authorised service centre, a fixed charge of Rs 250 will be collected from the customer in addition to the actual to and fro charges by the shortest route. Alternatively, the customer can bring the appliance to the nearest service centre for carrying out the necessary repairs, at the customer's own cost.
During the warranty period, whenever the appliance is shifted from the original city of purchase to another city/town where service is provided by the Company's authorised service agent, a warranty transfer charge of Rs 300/- will be collected from the customer by the Company's authorised service agent. The above charges also include the reinstallation of the appliance. However, in case of transfer to a city where the Company provides direct service, a nominal charge of only Rs 250/- will be collected from the customer towards reinstallation. The Company, however, shall not undertake the responsibility of shifting/transferring the appliance from the location where the appliance was originally installed.
10 This Warranty is issued subject to the jurisdiction of Kolkata courts and/or other judicial/quasi judicial forums having jurisdiction over the registered office of the Company,
Note:
For all types of repairs/maintenance under Warranty, the appliance shall be brought to the Company's nearest service centre/authorised service centre.


natural_image
Close-up of a dried red, textured object with no visible text or symbols
natural_image
Close-up of dried red and yellow dates on a white background, no text or symbols visibleOVER 6 MILLION SATISFIED CUSTOMERS
natural_image
Product lineup of various kitchen appliances including oven, dishwasher, refrigerator, oven, washing machine, and air conditioner (no text or symbols on products)Shop 24x7 @ www.ifbappliances.com | Email: customerservice@ifglobal.com | Call: 1860 2085678 or 1860 4255678

www.facebook.com/IFBappliances

twitter.com/IFBAppliances

www.instagram.com/ifbappliances
Read these instructions carefully before using your Oven. Keep this user manual for future reference.
- IN ONE
- CONTENT
- INTRODUCTION
- CHAPTER 1
- CHAPTER 2
- CHAPTER 3
- CHAPTER 4
- CHAPTER 5
- SETTING UP YOUR QUARTZ OVEN
- NAMES OF OVEN PARTS AND ACCESSORIES
- LCD DISPLAY
- The A to Z of your Quartz oven
- Note:
- IMPORTANT SAFETY INSTRUCTIONS
- CAUTION
- FUNCTIONS
- TOAST
- BAGEL
- BAKE
- ROAST
- BROIL
- PIZZA
- COOKIES
- REHEAT
- KEEP WARM
- DEFROST
- DEHYDRATE
- USING YOUR OVEN
- COOKING FUNCTIONS
- Warning:
- CLEANING AND MAINTENANCE
- CHANGING THE LIGHT BULB
- TROUBLESHOOTING GUIDE
- × Oven does not turn ON
- × Smoke or odour
- × Oven light does not turn ON
- ✗ Heating elements do not stay ON
- × Overcooked/undercooked food
- × Burnt smell
- × LCD display turns OFF
- ERROR CODE & POSSIBLE CAUSES
- ERROR CODE
- Possible Causes:
- WARRANTY
- CUSTOMER COPY
- WARRANTY CARD
- LIMITATIONS OF WARRANTY
Brand : IFB
Model : 28QOLCD1
Category : Oven