
PCM Native Random Hall - Audio Mixer LEXICON - Free user manual and instructions
Find the device manual for free PCM Native Random Hall LEXICON in PDF.


| Product Type | Audio Plugin (Reverb Effect) |
| Brand | Lexicon |
| Model | PCM Native Random Hall |
| Plugin Formats | VST 2.4, Audio Units (AU), AAX Native (64-bit) |
| Operating Systems | macOS 10.9 or later, Windows 7 or later (64-bit only) |
| Supported Sample Rates | 44.1 kHz to 192 kHz |
| Bit Depth | 64-bit native processing |
| Reverb Algorithms | Hall, Room, Chamber, Plate, Random Hall (proprietary) |
| Factory Presets | Over 200 |
| Adjustable Parameters | Decay, Pre-delay, Diffusion, Damping, Reverb Level, EQ, Modulation, etc. |
| Copy Protection | iLok account (optional, machine-based activation also available) |
| Installation | Download installer from Lexicon website; serial number required |
| Support | Online knowledge base, email support, user forums |
Frequently Asked Questions - PCM Native Random Hall LEXICON
User questions about PCM Native Random Hall LEXICON
0 question about this device. Answer the ones you know or ask your own.
Ask a new question about this device
Download the instructions for your Audio Mixer in PDF format for free! Find your manual PCM Native Random Hall - LEXICON and take your electronic device back in hand. On this page are published all the documents necessary for the use of your device. PCM Native Random Hall by LEXICON.
USER MANUAL PCM Native Random Hall LEXICON
The Lexicon® Legacy continues...
...with the PCM Native Random Hall
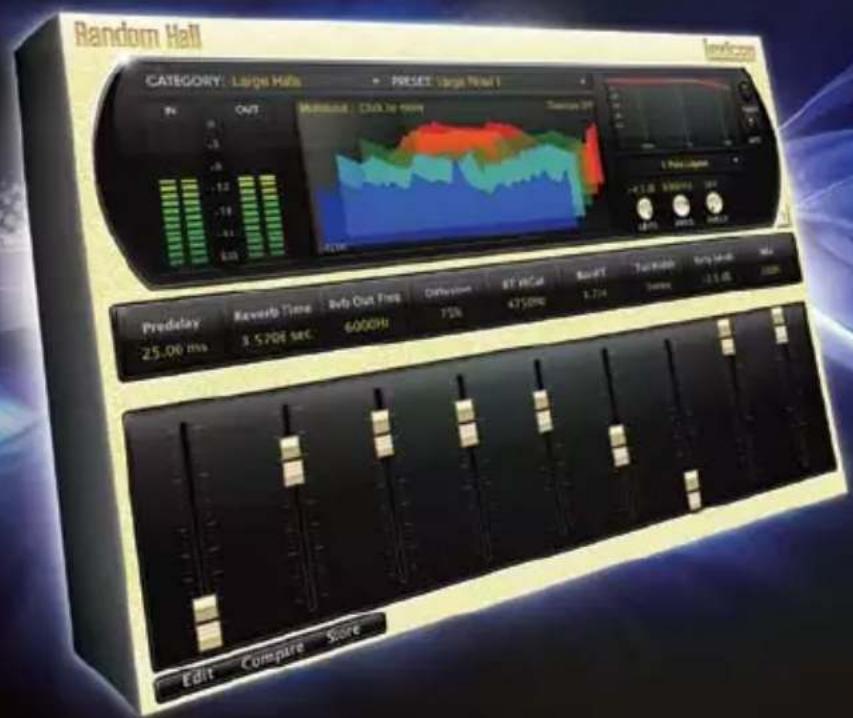
For over 40 years Lexicon® has been recognized as the gold standard of digital reverb and effects processing and has continuously introduced leading edge technology for the audio industry. Lexicon again rocked the audio industry with the introduction of the PCM Native Reverb and PCM Native Effects Plug-In Bundles, the ultimate bundles for creating professional, inspirational mixes within popular DAWs like Pro Tools®, Logic®, and any other VST®, Audio Unit™, or RTAS® compatible platform.
With all the flexibility you would expect from native plug-ins, these powerhouse plug-ins offer legendary Lexicon processing with the most versatile and finely crafted studio presets. Designed to bring the highest level of sonic quality and functionality to all your audio applications, the PCM Native Series Plug-Ins will take center stage in your DAW.
Congratulations and thank you
for purchasing the PCM Native Random Hall plug-in. With decades of legacy products to pull from, the PCM Native plug-ins include the finest collection of factory presets available. Designed to bring the highest level of sonic quality and functionality to all of your audio applications, the PCM Native plug-ins will take center stage in your DAW.
Quick Start
- Open your DAW and choose the Lexicon plug-in from your list of plug-ins
- In the plug-in's window, select a category
- Select a preset
- Adjust parameters (optional)
- Save the preset (optional)
It can be as simple or as in-depth as you'd like. The included presets work well for most situations, but you can easily adjust any parameter and save any preset. See the "Factory Presets" section for more information on editing, loading and saving presets.
Included Items
• PCM Native Random Hall software CD
- iLok license code
- This manual
Table of Contents
Installation....1
Install the Plug-in....1
iLok License....1
First Look—The User Interface......2
Overview 2
Level Meters....3
Preset Category......3
Realtime Display....3
Preset Selector 3
EQ Window 3
Help Button....3
Fader Area....3
Control Buttons 3
The Realtime Display....4
Off 5
Multiband 5
Frequency....5
Impulse....5
The EQ Window....6
Graphic Display 7
Early/Late Selectors....7
EQ Type Selector......7
Level Control....7
EQ Parameters 7
The Fader Area....8
Parameter Name 8
Parameter Value 8
Modifier Button 8
Fader 8
The Control Buttons....9
Edit....9
Compare 9
Store 9
Edit Navigation and Full Edit Mode......10
The Soft Row 11
Customizing the Soft Row 11
Input & Mix....12
Reverb 13
Reflections....14
Master Time Control 14
Absolute/Tempo Switch 14
Gain Polarity Switch....14
Presets....15
Loading a Preset....15
Storing and Managing Presets 16
Portable Presets.... 17
Where are presets stored? 18
Getting the most out of your computer..19
Reverb Tail Behavior....19
The Algorithm....22
Random Hall....23
The Parameters ...... 24
Mix and Input 24
Mix....24
Predelay.... 24
Diffusion 25
Shape and Spread....25
Reverb Control 26
Size 26
Reverb Time 26
BassRT 26
Bass XOV (Bass Crossover)......26
RT Hi Cut....27
RTHC Damping 27
Infinite 27
Spin and Wander....27
Tap Slope 28
Tail Width 29
Reflections....30
Rfl Time Master 30
Rfl Delay 30
Rfl Gain....30
Early & Late (Reverb) Shaping 31
Level 31
Frequency....31
Bandwidth 31
Shelf 31
Type....31
Lexicon Plug-Ins & Upgrades......32
Available Lexicon Plug-Ins......32
Upgrading 32
Installation
Install the Plug-in
Insert the CD into your CD-ROM drive. The Installer should start automatically.
If the Installer doesn't start automatically, you can start it manually by opening the appropriate file on the CD:
Mac®: Use the ".dmg" installation file
Windows®: Use the "32-bit.exe" or "64-bit.exe" installation file
Once the Installer is open, follow the on-screen instructions to install the software.
iLok License
You must download the license to your 2nd Generation iLok USB smart key before running any program that might use this plug-in. If a valid iLok license is not present, the initial plug-in validation scan will fail and you may not be able to run the plug-in without digging into your system. For more information go to www.iLok.com.

Important! Your PCM Native Plug-in will not work without an authorized 2nd Generation iLok USB smart key inserted in your computer's USB port!

First Look—The User Interface
Overview
When the plug-in is instantiated, you will see a window that looks something like this:

Level Meters
Shows the input and output levels.
Preset Category
Presets for the algorithm are grouped into categories to make them easier to find. Clicking in this area will show the list of categories. Selecting a category will load the presets for that category in the Preset Selector.
Realtime Display
Three unique visualizations help you to see inside the reverb. This is explained in greater depth in the "Realtime Display" section of this manual.
Preset Selector
Displays the list of presets within the selected category. Selecting a preset from the list will cause the preset to be loaded into the plug-in.
EQ Window
Allows you to see the type of EQ filters that are applied to the early and late reverb signals. This is explained in greater depth in the "EQ Window" section of this manual.
Help Button
Click on the Help button to enable tooltip help. Then hover your mouse cursor over the button or parameter you want to know about. An explanation will appear onscreen.
Fader Area
Parameter values are shown and controlled in this area. This is explained in more depth in the "Fader Area" section of this manual.
Control Buttons
These let you access all of a preset's parameters, manage presets, and compare changes you've made to the original settings. This is explained in more detail in the "Control Buttons" section of this manual.
The Realtime Display
The realtime display window allows you to visualize the reverberation in three ways. While your ears will always be the primary tool in choosing and adjusting presets, the displays provide a direct way to see what's going on. Click anywhere in the realtime display window to change the view.

Off
This mode shows only the algorithm name. It is the default view for the plug-in and requires the least amount of CPU cycles.
Multiband
This display shows the reverb in five frequency bands, with the lowest frequency in the rear. The image moves from right to left as it ages.
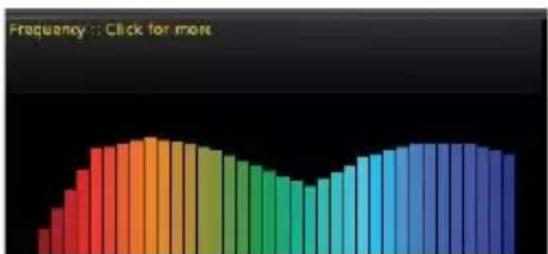
Frequency
This display shows the reverb as a more traditional RTA image, with lower frequencies on the left.
Impulse
This display shows the signal as a single impulse response, The image moves to the left as it ages.


bar
| Category | Frequency | |---|---| | Category 1 | 10 | | Category 2 | 15 | | Category 3 | 20 | | Category 4 | 25 | | Category 5 | 28 | | Category 6 | 27 | | Category 7 | 26 | | Category 8 | 24 | | Category 9 | 22 | | Category 10 | 20 | | Category 11 | 18 | | Category 12 | 16 | | Category 13 | 15 | | Category 14 | 14 | | Category 15 | 13 | | Category 16 | 12 | | Category 17 | 11 | | Category 18 | 10 | | Category 19 | 9 | | Category 20 | 8 | | Category 21 | 7 | | Category 22 | 6 | | Category 23 | 5 | | Category 24 | 4 | | Category 25 | 3 | | Category 26 | 2 | | Category 27 | 1 | | Category 28 | 0 | | Category 29 | 0 | | Category 30 | 0 | | Category 31 | 0 | | Category 32 | 0 | | Category 33 | 0 | | Category 34 | 0 | | Category 35 | 0 | | Category 36 | 0 | | Category 37 | 0 | | Category 38 | 0 | | Category 39 | 0 | | Category 40 | 0 | | Category 41 | 0 | | Category 42 | 0 | | Category 43 | 0 | | Category 44 | 0 | | Category 45 | 0 | | Category 46 | 0 | | Category 47 | 0 | | Category 48 | 0 | | Category 49 | 0 | | Category 50 | 0 | | Category 51 | 0 | | Category 52 | 0 | | Category 53 | 0 | | Category 54 | 0 | | Category 55 | 0 | | Category 56 | 0 | | Category 57 | 0 | | Category 58 | 0 | | Category 59 | 0 | | Category 60 | 0 | | Category 61 | 0 | | Category 62 | 0 | | Category 63 | 0 | | Category 64 | 0 | | Category 65 | 0 | | Category 66 | 0 | | Category 67 | 0 | | Category 68 | 0 | | Category 69 | 0 | | Category 70 | 0 | | Category 71 | 0 | | Category 72 | 0 | | Category 73 | 0 | | Category 74 | 0 | | Category 75 | 0 | | Category 76 | 0 | | Category 77 | 0 | | Category 78 | 0 | | Category 79 | 0 | | Category 80 | 0 | | Category 81 | 0 | | Category 82 | 0 | | Category 83 | 0 | | Category 84 | 0 | | Category 85 | 0 | | Category 86 | 0 | | Category 87 | 0 | | Category 88 | 0 | | Category 89 | 0 | | Category 90 | 0 | | Category 91 | 0 | | Category 92 | 0 | | Category 93 | 0 | | Category 94 | 0 | | Category 95 | 0 | | Category 96 | 0 | | Category 97 | 0 | | Category 98 | 0 | | Category 99 | 0 | | Total (Frequency) = Click for more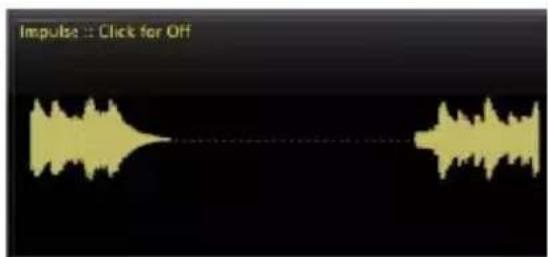
The EQ Window
This window provides control of the output equalization:

Graphic Display
Shows the EQ in a graphic form. The active section (Early or Late) is in the forefront.
Early/Late Selectors
These buttons select which EQ section is currently being edited. 'Early' includes reflections, direct echo outputs and room patterns. 'Late' includes the reverb tail.
EQ Type Selector
Allows any of six types of EQ to be applied to the active section. Those types are:
• Single-pole lowpass (6db / Octave)
• Single-pole highpass (6db / Octave)
• Double-pole lowpass (12db / Octave)
• Double-pole highpass (12db / Octave)
- Bandpass
- Notch
Level Control
Overall output level of the active section. These may be edited by holding the mouse down and moving up and down over the knob. Alternatively, the value field may be directly edited.
EQ Parameters
Frequency, shelf and bandwidth parameters of the active section. To edit these, click and hold on the knob, then move the mouse up or down. Alternatively, the value field may be directly edited. The bandwidth knob is only available when the filter type is Bandpass or Notch.
The Fader Area
The fader area may be populated by up to nine faders. This illustration shows what may be found for each fader.
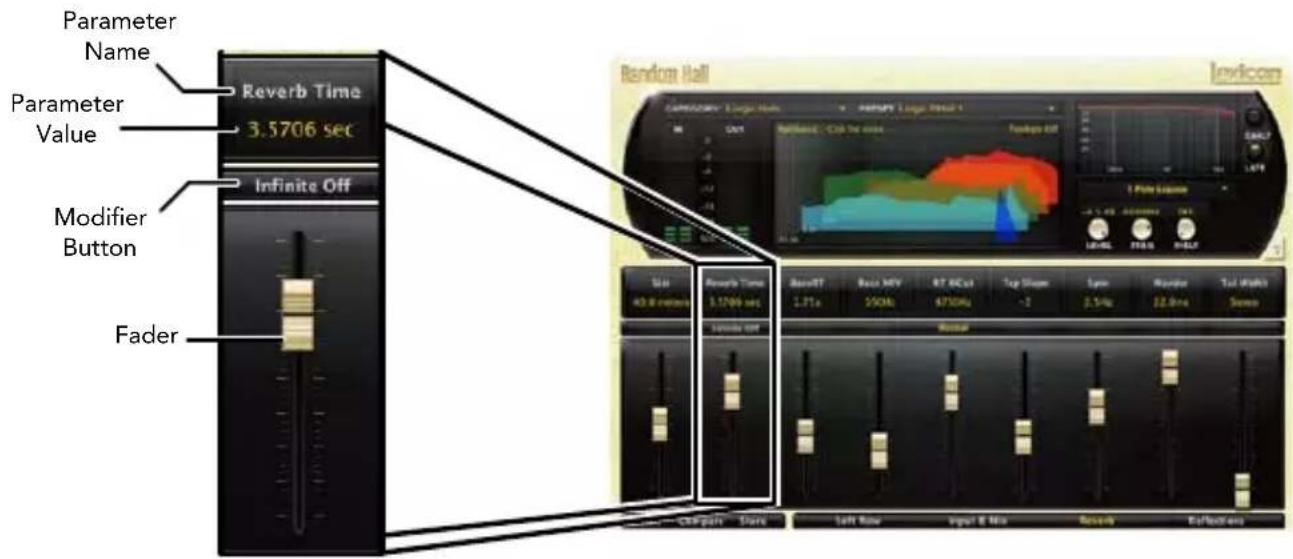
Parameter Name
Shows the parameter being adjusted.
Parameter Value
Shows the current value of the parameter. This field may be directly edited.
Modifier Button
This button only appears for certain types of parameters. It controls aspects of the parameter. In this illustration, it serves as a button to send the reverb into infinite reverberation.
Fader
Changes the value of the parameter. May be dragged, control-dragged (for higher resolution) or may be controlled by the mouse wheel.
The Control Buttons
These buttons let you access all of a preset's parameters, manage presets, and compare changes you've made to the original settings.

Edit
The Edit button makes the Navigation buttons visible. These buttons allow all of the algorithm's parameters to be edited. See page 10 for more detailed information.
Compare
The Compare button temporarily restores the plug-in to the selected preset. It gives you a chance to see what was changed. While in compare mode, the plug-in is not editable. Click Compare again to restore your edits.
Store
The Store button allows you to create and manage your own presets. See page 16 for more information.
Edit Navigation and Full Edit Mode
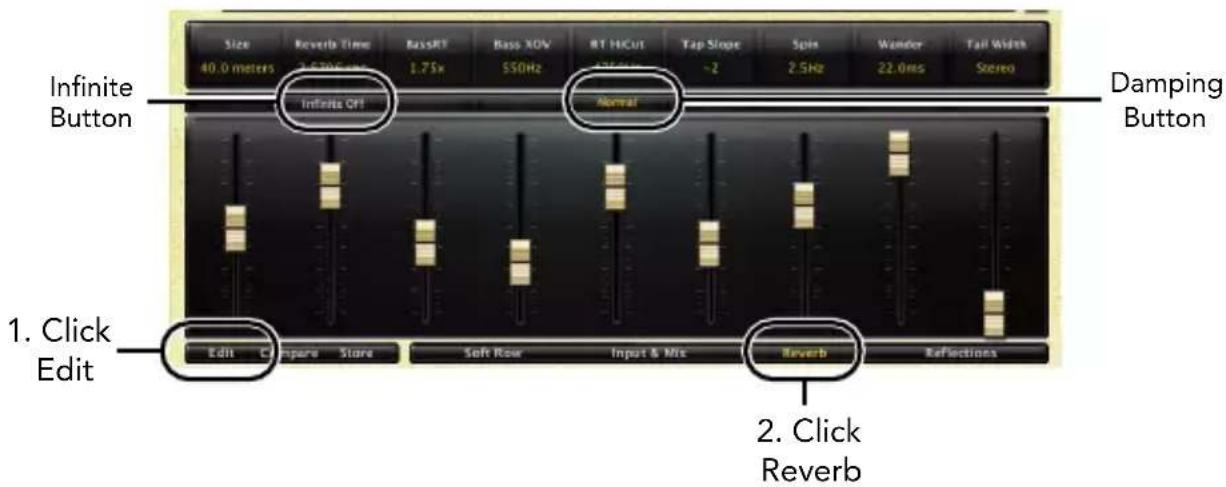
When the Edit button is clicked, an additional row of buttons appear along the lower right portion of the plug-in. Clicking one of the buttons will bring up an edit page holding parameters related to the button name. Those parameters may be edited until the desired sound is achieved.

The Soft Row
When the plug-in is first instantiated, a number of parameters appear. This page of parameters is called the "Soft Row". These parameters were chosen as being the most useful parameters for a particular preset. In most cases, we've tried to make a consistent set of choices, but many presets call for different parameters. For most people, the soft row is all that's needed.
Customizing the Soft Row
The soft row assignments are part of the preset. You can change the soft row assignments and store the preset as a User Preset. To do this, press the Edit button to go into edit mode then press the button for Soft Row. The plug-in will look something like this:

In the modifier button area, just above the fader, you will see the name of the parameter that is assigned to that position in the soft row. Clicking on any of these parameter buttons reveals a list of all the algorithm's parameters. Select a parameter (or "no selection") from the list, and that parameter is then assigned to the soft row. The assigned parameter is still available on its original edit page, but now it appears in the soft row as well.
You can assign any parameter, whether it's on an edit page or in the EQ window. You can even assign the same parameter more than once. When you're done, store it as a User Preset and you'll always be able to recall the preset with your customized soft row.
Input & Mix
Clicking the Input & Mix button reveals a straightforward group of parameters, all of which are described in the "Parameters" section starting on page 24. The Predelay parameter includes an Absolute/Tempo button. In Absolute Mode, a delay is shown in milliseconds. In Tempo Mode, a rhythmic value is shown and the delay time responds to changes in the tempo using this plugin. If tempo slows down, delays get longer.

Reverb
The Reverb button opens a selection of parameters. Each parameter is described in the "Parameters" section starting on page 24. This edit page also includes an Infinite button (which lets the reverb echoes continue endlessly) and a Damping button (which controls the high frequency damping of the signal during the reverb tail). It may be considered analogous to air absorption.
Reflections
Reflections are simple delay voices leading from one of the input channels to one of the output channels. Their delay time may be modified, as well as the output level and polarity. These voices pass through the input diffusors.

Master Time Control
Scales all reflection voices by a percentage value. Once individual voices are set, this is a handy method for quickly changing the effect of the reverb.
Absolute/Tempo Switch
Nearly all delays (including predelays) have this switch. In Absolute Mode, a delay is shown in milliseconds. In Tempo Mode, a rhythmic value is shown and the delay time responds to changes in the tempo using this plug-in. If tempo slows down, delays get longer.
Gain Polarity Switch
Changes the gain's polarity from normal to inverted.
Presets
The PCM Native plug-ins come with a large complement of Factory Presets. These presets are grouped in categories that make it easier for you to find the sound you need. Most presets also come with several variants that may save you a lot of editing time. For example, most of the reverb presets have dark, light, bandpass and notch variants. These variants share the same basic characteristics, but are EQ'ed differently.
Loading a Preset
The preset category is chosen from the drop-down menu in the upper-left portion of the edit window. When you select a category, the preset menu is updated to show availability of the new presets within the selected category. An initial preset will be loaded from the category. It will be the first preset in the list unless you have previously visited the category. In that case, it will be the last preset you loaded from that category.

Storing and Managing Presets
When you load a Lexicon® plug-in, the overall appearance may be something like this:

You will notice that the Lexicon plug-in (with the gold border) is embedded within a larger window provided by the DAW. Appearance will differ from host to host (this example is from Logic®). Oftentimes, the DAW itself provides the ability to save presets. The presets saved by the DAW can only be used with the DAW that saved them. If you work with multiple DAWs, this would be a problem. However, Lexicon® solves this problem with the use of Portable Presets.
Portable Presets
When you store presets with the Lexicon Store button (shown below), your presets are available to all DAWs on your machine. With only a little effort, you can also share them with other machines, even when going between Mac and PC.
If you've made some edits you'd like to save as a User Preset, press the Store button on the upper portion of the plug-in editor. You'll see a screen that looks like this:
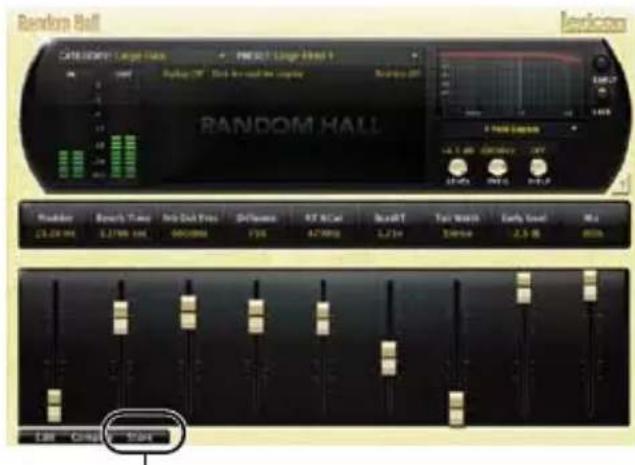
- Click Store

- Click to edit name
- Click Store to save
The upper field contains the list of User Presets that have already been created for this algorithm. Presets appear in alphabetical order. Click the name field to edit the name of the preset. Once done, click the Store button.
The lower field contains the name of the preset that was loaded before you began editing. You can easily click in this field and change the name to anything you like. Once you have the appropriate name, click the Store button and the preset will be saved. If you decide not to save the preset, pressing the Cancel button will return you to the editor without saving the preset.
If you select one of the existing presets in the library, you can replace or delete that preset.

- Click to replace, or Click to delete
Where are presets stored?
On the Mac, User Presets are stored in:
"Home"/Library/Application Support/Lexicon/Native/User Presets/"AlgorithmName"
("Home" is the name of the account you're logged in under. "AlgorithmName" is the name of the plug-in.)
On Windows Vista/Seven, User Presets are stored in:
Users/"Username"/AppData/Roaming/Lexicon PCM Native/UserPresets/"AlgorithmName"
("Username" is the name of the account you're logged in under. "AlgorithmName" is the name of the plug-in.)
On Windows XP, User Presets are stored in:
Documents and Settings/"Username"/Application Data/Lexicon PCM Native/User Presets/"AlgorithmName"
("Username" is the name of the account you're logged in under. "AlgorithmName" is the name of the plug-in.)
Note: The AppData and Application Data folders are Windows system folders and are hidden by default. Windows must be configured to "show hidden files and folders" to view these folders.
Getting the most out of your computer
The PCM Native plug-ins are written to be efficient, and most computers will run more copies than you may need. But if you find yourself needing to squeeze a little bit more out of your CPU, you can take the following simple steps:
- Turn off the active realtime display. The active display window can represent your effect in real time in several ways. However, this display consumes some of your computer's processing power. If you click until you reach the static display, your computer will have more CPU power available.
- Close the plug-in editor. Unless you're actively controlling your mix in realtime, you don't need the editor after you've made the appropriate settings. All those knobs, faders and displays require processing power. You can always reopen the editor if you need to edit.
Reverb Tail Behavior
Each host treats plug-ins a little bit differently. You'll notice this especially when you stop, loop or relocate. You may notice that the tail stops immediately on one platform and continues to ring on another. You may also notice that the behavior changes when the plug-in is inserted on an audio track, an instrument track or an aux track.
The lexicon®
Heritage
Lexicon ^® occupies a unique position as a leading innovator in both professional and consumer audio industries. Since the release of the first digital delay, Lexicon has stood at the forefront of digital audio with a reputation as a manufacturer of exceptional audio and home theater products and an inventor of new technologies. Years of research, development, and learning allow us to continue expanding the boundaries of the listening experience.
Our professional products are prominent in the creation of worldwide music, television, and film productions. These products have won numerous awards, including an Emmy® and numerous TEC awards, including a TEC Hall of Fame award for the Lexicon Delta T-101, the world's first digital delay. Lexicon processors have been embraced as the standard in professional signal processing since the introduction of the 480L Digital Effects Processor, which has retained tremendous popularity for the past 22 years. It has since been replaced as the standard in professional signal processing by the 960L Multi-Channel Digital Effects System and the PCM96 Series Reverb/Effects Processors, which have themselves garnered an impressive following of producers, artists, and engineers.
Growing demand for proprietary Lexicon technologies has led to its appearance in numerous applications, with dramatic results. Our processing is relied upon to enhance the sound of prestigious live halls and venues.
Knowingly or unknowingly, you experience Lexicon products and technologies on a daily basis. Chances are that Lexicon processing was involved in the television program you watch at home, the film you see at the cinema, or the song you listen to on the radio. From the initial tracks to your listening room or automobile, Lexicon is part of the process that brings these recordings to life. Our commitment to the audio professional and content delivery ensures an unbroken chain between the artist and the audience. Now hear this...
The Algorithm

natural_image
Interior view of a large, empty theater with red and purple seating, arched ceilings, and no visible text or signage.Random Hall
The highly acclaimed Lexicon ^® Hall, Concert Hall, and Random Hall reverb algorithms have regularly been used by live sound and recording engineers because of their exceptional ability to reproduce the musical ambience of large, wide, panoramically wonderful spaces.
Random Hall is similar to Hall, with gradual build-up, well suited to complex sounds like orchestral music. Its reverberators change over time in controlled random ways to avoid the buildup of tinny, grainy, metallic, or other colorations. The modulation can be noticeable and is often a desirable effect. This is one of the classic Lexicon® sounds.
The early reflections are user adjustable in amplitude and delay. Some skill is needed to set useful reflection patterns. The pattern can be expanded or contracted in time using the “Delay Master” control, and the overall level of the pattern can be set with the “Early Level” control.
A hall is the principal venue for classical ensembles, but has proven to be useful for all types of music. A hall is comparatively large, with wall-to-wall distances that are typically several tens of meters. Smaller halls may be used for smaller ensembles. The characteristic sound of a hall includes very low initial reflection density, with little reflection energy before 60-100 milliseconds. Density buildup is more gradual, because of the larger distances between reflecting surfaces. Reverberation time is somewhat longer as well. Finally, in most halls lower frequencies reverberate longer than higher frequencies.
One of its charms is a bit of irregularity in the decay. In some cases (very small rooms with precisely-pitched instruments), this modulation may not be the best choice. But in general, this is a time-tested reverberator.
The Parameters
The PCM Native plug-ins contain presets covering a wide range of needs, but you can refine and customize any preset by adjusting its parameters. Parameters are the building blocks within each preset that determine how it sounds and behaves.
Each PCM Native plug-in contains a set of parameters, and a variety of those parameters are combined to create a preset.
Below are all the algorithm parameters you can edit in the PCM Native Random Hall Plug-in. Note that sometimes parameter names are abbreviated when they appear onscreen, and they may have prefixes indicating what channel they control (for example, the left channel reflection gain may appear as "L Rfl Gain").
Mix and Input
Mix
Mix is the proportion of wet (processed) signal to dry (unprocessed) signal. This must be used with care. If the plug-in is used as an insert on a single track, then it is probably appropriate to use the mix control directly in the plug-in. However, reverbs are often used on Aux tracks and may be sourced over internal busses in the DAW. In this case, it may be better to control the level on the Aux track rather than wet/dry mix. Not all DAWs feature delay compensation, so it's important not to have a dry signal in more than one path (cancellation being a possible outcome).
The mix parameter is "sticky". Like other parameters, it is saved and restored by the DAW. But after the plug-in is loaded, the mix value will stay where you put it, even if you load another preset in the same plug-in. This makes it easier to preview presets and choose the one you want, since the mix won't spring back to 100% every time you load another preset.
Predelay
This is used to add a small amount of delay to a signal before it enters the reverberator. This creates a little separation between the wet and dry signals, in turn creating greater clarity in the mix. This delay can also be toggled into Tempo Mode, causing the delay to follow the DAW's session tempo.
Diffusion
Input diffusion is the first part of processing for any signal entering a reverb or delay. It can be described as a smearing or softening of the signal and is typically used to lessen the impact of strong transients.
Shape and Spread
The Shape parameter is closely tied to the Spread parameter. Shape controls how energy is injected into the reverberator. A low value means that sound enters the reverb at the beginning of the spread window. A high value means that most sound moves into the reverb at the end of the spread window. A value somewhere in the middle means that sound enters the reverb evenly across the spread window.
Tip: Shape will not have this effect if spread is at its minimum value. But even then, it can make a difference. In this case, it affects reverb timbre and density. Higher values of shape may be both darker and denser, although the effect is subtle.
Spread is a window of time during which a signal is injected into the reverb. Shape controls just how the signal is injected during this window. Together, the two parameters create an envelope for the early portion of the reverb, as shown in this illustration.
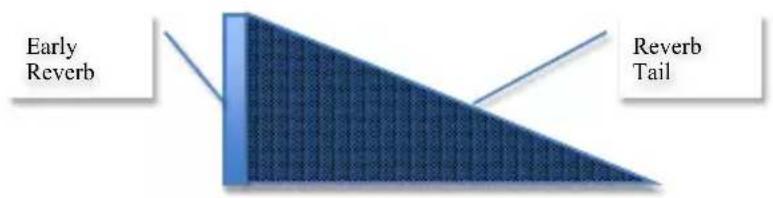
Shape = 32, Spread = 20%

natural_image
Blue triangular shape with grid pattern, no text or symbols presentShape = Anything, Spread = 0%

natural_image
Blue triangular shape with a textured fill, no text or symbols presentShape = 64, Spread = 75%
Reverb Control
Size
Size corresponds roughly to the length of the longest wall of a rectangular room. In a more general sense, it corresponds to the overall dimension of some mythical space. This space has a geometry that causes sound to bounce around. When the room size is small, the "walls" of this space are closer together and the resultant reflection density increases. When the room size is large, that density decreases. The most natural reverbs use room sizes that vary from about 24 meters to 45 meters or so, but there are many useful reverbs that are outside of this range. There is a relationship between this parameter and the Reverb Time parameter. Please see the Reverb Time parameter for clarification.
Reverb Time
Reverb Time is the mid frequency reverb time (in the frequency above Bass XOV and below RT Hicut). As such, it is one of the primary controls affecting the length of the reverb tail. It may be considered to model the reflectivity of the walls in the reverberant space. The parameter most closely associated with Reverb Time is Size. A large room size with a small Reverb Time can easily have the same decay time as a small room with a large Reverb Time. Even though the two solutions may result in the same reverb time, they will sound quite different from one another. The value that is actually displayed is an approximate reverb time based on both of those values. The actual time is also highly-dependent on other parameters as well as the audio material.
BassRT
This parameter controls bass reverb time. It is closely associated with the Bass Crossover and Reverb Time parameters. BassRT is a multiple of Reverb Time that applies to signal below the frequency described by Bass Crossover. If BassRT is less than 1.0, then the low frequency part of the reverb tail will be shorter than the midrange part. If BassRT is greater than 1.0, then the low frequency part of the tail is longer.
Bass XOV (Bass Crossover)
The Bass XOV parameter is closely tied to the BassRT parameter. It represents the frequency below which BassRT has an effect. One is tied to BassRT, the other is found in the Pattern settings menu and affects the BassBoost.
RT Hi Cut
This parameter, also known as Hicut or RTHC is a low-pass filter in the recirculating part of the reverb. It represents a frequency above which the tail dies away more quickly. In some ways, it represents the opposite end of the scale from BassRT, and may be considered an analog of air absorption. It is also closely tied to the RTHC Damping parameter.
RTHC Damping
The damping parameter is closely tied to the RTHC parameter. It controls the strength of the hi frequency absorption and has three values: Light, Normal, and Heavy. The Normal value gives filter response identical to previous Lexicon ^® reverbs. The other values should be self-descriptive.
Infinite
This parameter captures the reverb tail as an infinite loop. This may be useful in music, where a note or chord can be extended. It is also useful in post-production for creating ambience backgrounds.
Spin and Wander
These two parameters control randomization effects within the reverb. Randomization is used to control the spectral purity of the reverb. It can also, at some settings, create a more noticeable modulation effect. Artificial reverbs sometimes create audible artifacts with some types of signals. For example, a voiceover in a very small room might sound a little metallic. Randomization works to minimize these effects and remove the sense of ringiness.
Spin controls the rate of randomization. In most cases, values between 1–2 Hz are appropriate. Typically, these values should be smaller for plates and chambers or for very small rooms. But it's always best to listen with the material you're using.
Wander controls the amount by which various delay values may be modulated, or the maximum size of randomizer steps, and is expressed in a time value (typically milliseconds).
Tap Slope
This is an unusual parameter which affects the relative gain of impulses coming from the reverb. While this parameter does not (as it might appear) make the reverb sound 'bumpy', it may affect timbre or the overall sense of spaciousness.
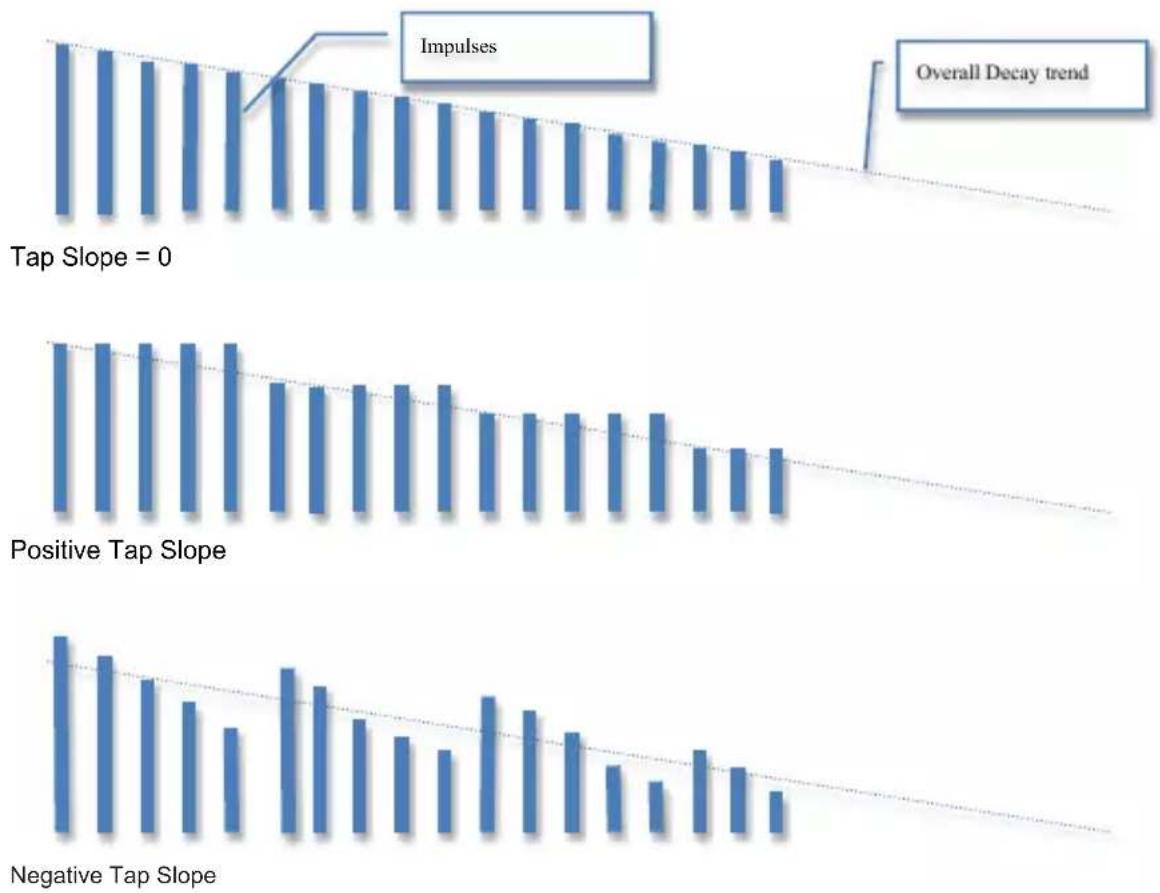
Tap Slope can also be used to create inverse and gated effects. In this case, Reverb Time should be at 0. Spread should be fairly high. Shape should be fairly high. Size should be fairly high. Tap Slope should be in the range of (5 to 10). Play with spread, shape and size to vary the effect.
Tail Width
The reverb tail (all components of the reverb except for early reflections, etc.) is passed through a simple 2x2 matrix. This provides an encoding of the tail that dramatically changes its spatial characteristics. The tail can be changed to feel narrower (even down to mono) or wider than normal stereo. There are values for the parameter to encode the tail in such a way that it decodes into surround channels.
The parameter operates in the range of 0 to 360 degrees, with an incremental change of 1 degree. The matrix uses Sine/Cosine rules so that power distribution remains constant. This may be acceptable, even highly desirable, but the mix engineer must fully understand the process and its implications. It is possible to compromise the mono compatibility of a mix by using this parameter carelessly.
This is a powerful tool for audio whose release format is two-channel. It is not useful in any other format. Formats include compact disc and radio/television broadcast. Some of these effects are clear and noticeable without any sort of decoder. Many are even more dramatic when a decoder is in place, such as in a home theater. It is strongly recommended that you monitor in all possible formats (stereo, mono, matrix surround) when using this parameter.
Reflections
Reflections are copies of the input which pass through the diffusors and then are passed directly to the output. Short reflections may be used to enhance the early part of the signal, enhancing the sense of a stagehouse or of slapbacks. Long reflections become more of an effect, with the discreet audio acting as if a separate delay unit has been inserted into the signal.
Rfl Time Master
This parameter is used to scale all reflection times at once.
Rfl Delay
Controls the delay time of a reflection. This can be toggled to Tempo Mode, in which case its delay time will be related to tempo. Note that this parameter can have different routing configurations, indicated in its name. For example, if its name appears as "L Rfl Delay" or "L-L Rfl Delay," the signal comes in from the left and goes out the left. If the name appears as "L-R Rfl Delay," the signal comes in from the left and goes out the right.
Rfl Gain
Controls the gain of a reflection. The polarity of the gain coefficient can be optionally inverted. Note that this parameter can have different routing configurations, indicated in its name. For example, if its name appears as "L Rfl Gain" or "L-L Rfl Gain," the signal comes in from the left and goes out the left. If the name appears as "L-R Rfl Gain," the signal comes in from the left and goes out the right.
Early & Late (Reverb) Shaping
Level
This parameter acts as a master level control for signals going to the output channels. Both early signals and late (reverb tail) signals can be controlled individually. Early signals include echoes and reflections.
Early level may be adjusted for any of a few reasons. Increasing the early level (depending on settings for reflections and echoes) might increase the sense that the microphone is closer to the source audio. By the same token, decreasing the reverb level may accomplish the same thing. Lowering the early level might be called for if the source audio has been recorded in a natural space with strong reflection characteristics. If the user is sweetening a track by adding just a little bit of reverb to a pre-existing natural reverb, then lowering the early level might be recommended.
Frequency
This parameter lets you set the cutoff frequency of the multimode filter. The audible effect of this is determined by the Type parameter. Both early signals and late (reverb tail) signals can be controlled individually.
Bandwidth
This parameter lets you set the bandwidth of a multimode filter. Bandwidth is specified in octaves or fractions thereof. This parameter is available only when it has an effect (bandpass and notch modes). In all other cases, it is hidden. Both early signals and late (reverb tail) signals can be controlled individually.
Shelf
This parameter effects all filter types. The shelf specifies the audio level below which the filter has no effect. For example, let's imagine we're using a one-pole lowpass with shelf set at -12 dB. The lowpass filter affects only the strongest 12 dB of the signal. Below the shelf, the signal is unfiltered. This is easy to understand by viewing the EQ window.
Type
This parameter selects what type of filter is used for shaping the tone of the effect. The selectable options include: 1 Pole Lopass, 1 Pole Hipass, 2 Pole Lopass, 2 Pole Hipass, bandpass, and Notch. Both early signals and late (reverb tail) signals can be controlled individually.
Lexicon Plug-Ins & Upgrades
Available Lexicon Plug-Ins
Please visit www.lexiconpro.com for the latest information on available Lexicon plug-ins.
Upgrading
Please visit www.lexiconpro.com for the latest information on upgrading to the PCM Native Reverb Bundle or PCM Total Bundle.
lexicon®
by HARMAN
www.lexiconpro.com
Harman
8760 South Sandy Parkway, Sandy, Utah 84070, U.S.A.
Phone: 801.568.7660 | Fax: 801.568.7662
Questions or comments? Visit us at www.lexiconpro.com
©2012 Harman. All rights reserved.
Lexicon is a registered trademark of Harman.
All other trademarks are property of their respective owners.
All features and specifications are subject to change.
PCM Random Hall Manual v0.1




- The Lexicon® Legacy continues...
- ...with the PCM Native Random Hall
- Congratulations and thank you
- Quick Start
- Included Items
- Table of Contents
- Installation....1
- First Look—The User Interface......2
- Presets....15
- Getting the most out of your computer..19
- Reverb Tail Behavior....19
- The Algorithm....22
- The Parameters ...... 24
- Installation
- Install the Plug-in
- iLok License
- First Look—The User Interface
- Overview
- Level Meters
- Preset Category
- Realtime Display
- Preset Selector
- EQ Window
- Help Button
- Fader Area
- Control Buttons
- The Realtime Display
- Off
- Multiband
- Frequency
- Impulse
- The EQ Window
- Graphic Display
- Early/Late Selectors
- EQ Type Selector
- Level Control
- EQ Parameters
- The Fader Area
- Parameter Name
- Parameter Value
- Modifier Button
- Fader
- The Control Buttons
- Edit
- Compare
- Store
- Edit Navigation and Full Edit Mode
- The Soft Row
- Customizing the Soft Row
- Input & Mix
- Reverb
- Reflections
- Master Time Control
- Absolute/Tempo Switch
- Gain Polarity Switch
- Presets
- Loading a Preset
- Storing and Managing Presets
- Portable Presets
- Where are presets stored?
- Getting the most out of your computer
- Reverb Tail Behavior
- The lexicon®
- Heritage
- The Algorithm
- Random Hall
- The Parameters
- Mix and Input
- Mix
- Predelay
- Diffusion
- Shape and Spread
- Reverb Control
- Size
- Reverb Time
- BassRT
- Bass XOV (Bass Crossover)
- RT Hi Cut
- RTHC Damping
- Infinite
- Spin and Wander
- Tap Slope
- Tail Width
- Rfl Time Master
- Rfl Delay
- Rfl Gain
- Early & Late (Reverb) Shaping
- Level
- Bandwidth
- Shelf
- Type
- Lexicon Plug-Ins & Upgrades
- Available Lexicon Plug-Ins
- Upgrading
- lexicon®
Brand : LEXICON
Model : PCM Native Random Hall
Category : Audio Mixer