
DFF563 - Refrigerator Defy - Free user manual and instructions
Find the device manual for free DFF563 Defy in PDF.


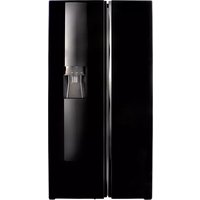
| Product Type | Freestanding Refrigerator |
| Brand | Defy |
| Model | DFF563 |
| Total Capacity | Approximately 300 liters |
| Energy Efficiency Class | A+ |
| Dimensions (H x W x D) | 1700 mm x 600 mm x 650 mm |
| Weight | Approximately 60 kg |
| Power Supply | 220-240 V, 50 Hz |
| Annual Energy Consumption | Approximately 250 kWh |
| Climate Class | N, ST |
| Refrigerant | R600a (isobutane) |
| Temperature Control | Thermostat with adjustable dial |
| Interior Light | Yes, LED |
| Number of Shelves | 3 adjustable glass shelves |
| Vegetable Crisper | Yes, one crisper drawer |
| Door Bins | 4 door bins |
| Egg Tray | Yes |
| Ice Cube Tray | Yes |
| Defrost Feature | Manual defrost for freezer compartment |
| Reversible Door | Yes, door can be reversed |
| Adjustable Feet | Yes, front leveling feet |
Frequently Asked Questions - DFF563 Defy
User questions about DFF563 Defy
0 question about this device. Answer the ones you know or ask your own.
Ask a new question about this device
Download the instructions for your Refrigerator in PDF format for free! Find your manual DFF563 - Defy and take your electronic device back in hand. On this page are published all the documents necessary for the use of your device. DFF563 by Defy.
USER MANUAL DFF563 Defy
natural_image
Abstract geometric pattern with four white circles on a gray background (no text or symbols)
natural_image
Simple line drawing of a kitchen range hood (no text or symbols)
natural_image
Simple line drawing of a kitchen oven with no text or symbols
natural_image
Blank white image with no visible content or text
natural_image
Simple line drawing of a washing machine with no text or symbols
natural_image
Simple line drawing of a kitchen appliance with a top panel and front panel (no text or symbols)
Customer Care Line
(after sales service)
086 100 3339
Part number: 3810190100 AK

Refrigeration
Instruction manual
Read this manual before initial installation and operation of the refrigerator!
Dear Customer,
Your new Defy refrigerator was manufactured in a state of the art facility and has passed the strictest quality control procedures.
Please read this manual carefully before using your product for the first time and then store it within easy reach for future reference.
We trust you will enjoy years of trouble free use.
The user manual:
- This manual will provide you with information on how to safely operate and care for your refrigerator in order that you gain the maximum benefit from it.
- Pay particular attention to any safety instructions.
- Please read all additional documents supplied with your product.
- Please note that this manual may be used for several similar but different models. Please check for relevance regarding your particular model.
Explanation of symbols used in this manual

Important safety information. Warning for hazardous situations with regard to life and property.

Caution; Warning for supply voltage.

Caution; Warning for fire hazard.
Useful information. Important information or useful hints about usage.

| Unpacking: Remove all packaging.Ensure that packing material is disposed of in a responsible manner and that any plastic bags are cut up to prevent children playing with them and accidentally suffocating. | |
| If the refrigerator is damaged in any way do not use it. Report the damage to your dealer who will take the necessary corrective action. |
1 Important safety information 4
Warnings 4
For models with water fountain 4
Child safety 6
HCA warning 6
2 Your Refrigerator 7
3 Installation 8
Installation location 8
Attaching the plastic wedges 8
Adjusting the feet 9
Power connection 9
Water connection 9
Connecting water hose to the product 10
Connecting to water mains 10
Water filter 12
Fixing external filter to the wall 12
Internal filter 13
Water line 13
Carboy line 13
4 Preparation 14
Things to be done for energy saving 14
First use 15
5 Using the product 15
Indicator panel 15
Activating the water filter replacement alert 21
Using the water dispenser 24
Cleaning the water tank 25
Dispensing Ice / water 26
Drip tray 26
Zero degree compartment 27
Vegetable bin 27
Blue light 27
lonizer 27
Minibar 27
Odour filter 27
Icematic and ice storage container 27
Ice-maker 27
Freezing fresh food 28
Recommendations for storing frozen foods 28
Deep freezer details 28
Placing food 28
Door open alert 29
Interior light 29
6 Maintenance and cleaning 29
Preventing malodour 29
Protecting plastic surfaces 29
7 Troubleshooting 30
8 Branches 33
9 Warranty 34
1 Important safety information
Please review and observe the following information. Failure to do so may result in injuries or material damage and will render any warranty and reliability commitments void.
Warnings
- The refrigerator must only be used for its intended purpose, i.e. storing of edible foodstuff.
- The refrigerator is intended to be used in household and similar applications such as staff kitchen areas in shops, offices and other working environments; farm houses and by clients in hotels, motels and other residential type environments; bed and breakfast type environments; catering and similar non-retail applications.
- This appliance is not intended for use by persons (including children) with reduced physical, sensory or mental capabilities, or lack of experience and knowledge, unless they have been given supervision or instruction concerning use of the appliance by a person responsible for their safety.
• Children should be supervised to ensure that they do not play with the appliance.
- In the event of a malfunction, disconnect the refrigerator from the power supply.
- Vapour and vaporized cleaning materials must never be used in the cleaning the refrigerator. The vapour may come into contact with the electrical parts and cause a short circuit or electric shock.
- Do not allow children to hang on the refrigerator doors as the unit could topple forward risking personal injury. Never use the parts on your refrigerator, such as the door, as a means of support or step.
- Keep ventilation openings, in the appliance enclosure or in the built-in structure, clear of obstruction.
- Do not use electrical appliances inside the food storage compartments of the appliance, unless they are of the type recommended by the manufacturer.
- Unplug the refrigerator when cleaning, during routine maintenance or if it will not be used for an extended period.
• To unplug the refrigerator, remove the plug by pulling on the plug and not the cable! - Never connect your refrigerator to electricity saving systems as they may damage the refrigerator.
For models with water fountain
• Water supply pressure must be minimum 1 bar and maximum 8 bars.
- Use drinking water only.
- If the supply cord is damaged, it must be replaced by the manufacturer, its service agent or similarly qualified persons in order to avoid a hazard.
- Exposing the refrigerator to rain, snow, sun and wind is an electrical safety risk.
- Do not store medicine or academic research samples which require strict temperature control in the refrigerator.
- Do not store or use flammable gas, benzene, petrol or volatile substances in or near the refrigerator.
- Do not store explosive substances such as aerosol cans with a flammable propellant in the refrigerator.
- Do not overload your refrigerator with large amounts of food. If overloaded, the food may fall down and injure you and damage the refrigerator when opening the door. Never place objects on top of the refrigerator, they may fall and injure you when you open or close the refrigerator door.
- The refrigerator may move if the adjustable legs are not properly levelled on the floor. Levelling the adjustable legs on the floor helps prevent the refrigerator from moving.
- If there is a blue light fitted on the refrigerator, do not look at the blue light through optics.
- When carrying the refrigerator, do not hold on the door handle as the handle may break.
- When placing your refrigerator next to another refrigerator or freezer, the distance between the devices must be at least 8 cm. Failure to do so may cause adjacent walls to humidify.
- Do not put bottled or canned liquid beverages in the freezer compartment: they may burst.
- Do not touch frozen food with your hands; it may stick to your hands.
- Never pour or spray water into or on the refrigerator and do not store liquids, pot plants or open containers on top of the refrigerator as these may spill causing electrical shorting.
- Avoid any damage to the power cable when transporting the refrigerator.
- Bending the cable may cause a fire.
- Never place heavy objects on the power cable.
- Do not touch the plug with wet hands.
- Contact a Defy service centre for all questions and problems relating to the refrigerator.
- The lamp(s) used in this appliance is not suitable for household room illumination.
- If the product has LED type lighting, contact the Defy service centre for replacing or in case of any problem.
- Do not plug in the refrigerator if the wall socket is loose.
- On delivery, check to make sure that the refrigerator is not damaged and that all the parts and accessories are in perfect condition.
- Ensure that the plug remains readily accessible. Do not use multiple adapter plugs or an extension cable.
- Ensure that there is sufficient spacing between the refrigerator and surrounding walls.
Child safety
- If the door has a lock, keep the key out of reach from children.
- If you are discarding an old refrigerator with a lock or latch fitted to the door, disable the lock/latch, and ensure that the refrigerator is left in a safe condition to prevent children from being trapped inside and suffocating.
• Children must be supervised to prevent them from tampering with the refrigerator.
HCA Warning
Refrigerator cooling systems containing R600a: This refrigerator contains non CFC/HFC natural substances in the cooling system (Called R600a) and in the insulation (Called cyclopentane). These are potentially flammable if exposed to fire. Take care not to damage
the cooling circuit / pipes of the refrigerator in transportation and in use. In case of damage do not expose the refrigerator to fire or potential ignition sources and immediately ventilate the room where the refrigerator is situated. Ignore this warning if your refrigerators cooling system contains R134a.
 | Do not drill, cut or modify the refrigerator. Injuries may result if the refrigerant circuit is damaged. WARNING: Do not damage the refrigerant circuit. |
 | Do not operate a damaged refrigerator. Contact the nearest Defy service center. |
 | The electrical safety of the refrigerator is only guaranteed if the earth system of your home is compliant to national standards. |
 | Repairs must be carried out by authorised persons only. Repairs carried out by incompetent persons create a user risk. |
 | Never plug the refrigerator into the wall socket during installation. Death or serious injury may result. |
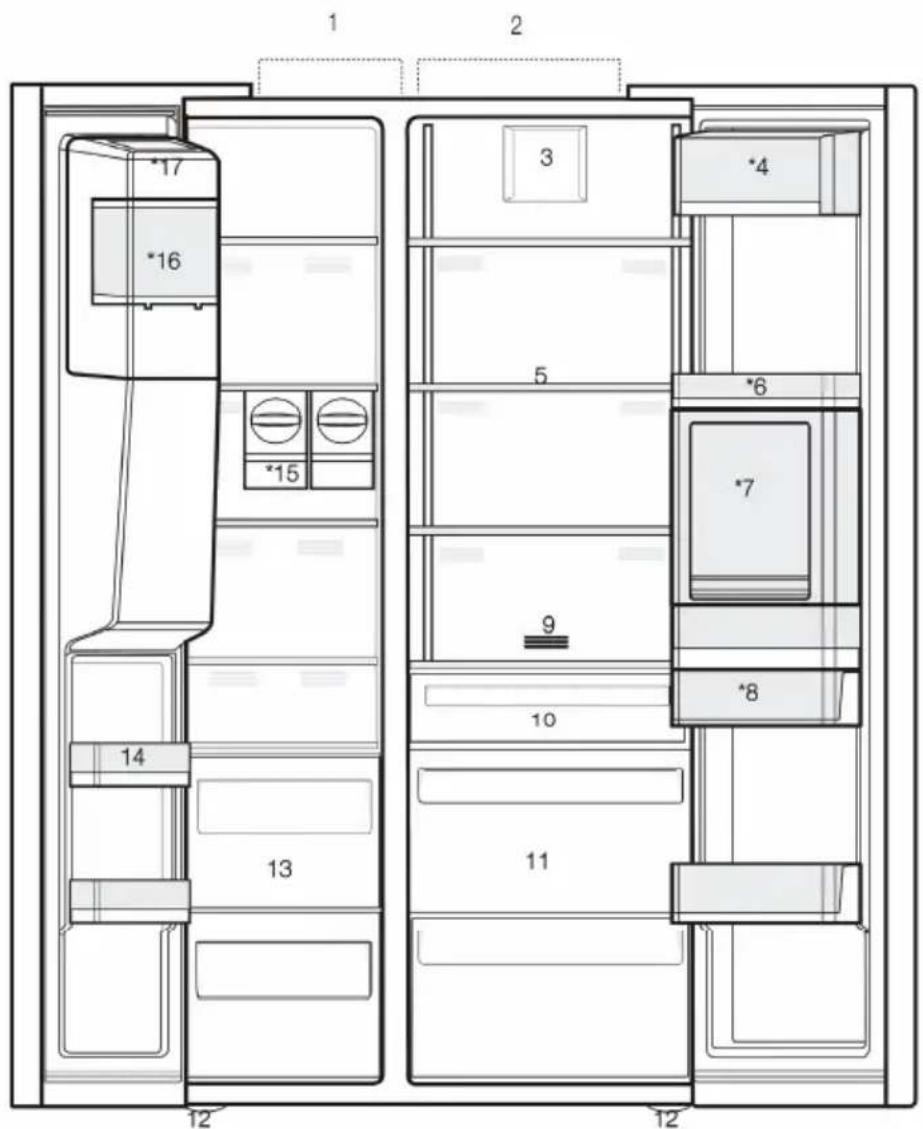
1- Freezer compartment
2- Cooler compartment
3- Fan
4- Butter-cheese compartment
5- Glass shelves
6- Cooler compartment door shelves
7- Minibar accessory
8- Water tank
9- Odour filter
10- Zero degree compartment
11- Vegetable bins
12- Adjustable feet
13- Frozen food storing compartments
14- Freezer compartment door shelves
15- Icematics
16- Ice storage box
17- Ice-maker decorative lid
*Optional

*Optional: Figures in this user guide are schematic and may not be exactly match your product. If your product does not comprise the relevant parts, the information pertains to other models.
3 Installation
Installation location
Contact the Authorized Service for the product's installation. To ready the product for installation, see the information in the user guide and make sure the electric and water utilities are as required. If not, call an electrician and plumber to arrange the utilities as necessary.
 | WARNING: The manufacturer assumes no responsibility for any damage caused by the work carried out by unauthorized persons. |
 | WARNING: The product's power cable must be unplugged during installation. Failure to do so may result in death or serious injuries! |
 | WARNING: If the door span is too narrow for the product to pass through, remove the door and turn the product sideways; if this does not work, contact the authorized service. |
- Place the product on a flat surface to avoid vibration.
- Place the product at least 30 cm away from heaters, stoves and similar sources of heat and at least 5 cm away from electric ovens.
- Do not expose the product to direct sunlight or keep in damp environments.
- The product requires adequate air circulation to function efficiently. If the product will be placed in an alcove, remember to leave at least 5 cm distance between the product and the ceiling and the walls.
- Do not install the product in environments with temperatures below -5°C.
Attaching the plastic wedges
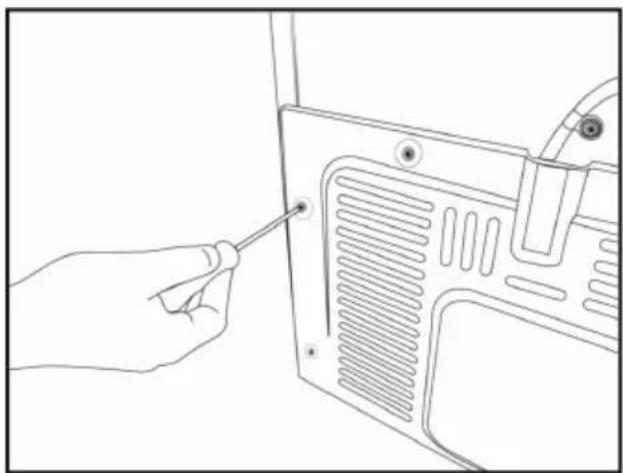
Use the plastic wedges provided with the product to provide sufficient space for air circulation between the product and the wall.
- To attach the wedges, remove the screws on the product and use the screws provided with the wedges.
natural_image
Line drawing of a hand inserting a screwdriver into a device panel (no text or symbols)- Attach the 2 plastic wedges on the ventilation cover shown as in the figure.

natural_image
Line drawing of a hand using a screwdriver to adjust or install a device component (no text or symbols visible)Installation
Adjusting the feet
- If the product is not in a balanced position, adjust the front adjustable feet by rotating right or left.

natural_image
Simple line drawing of a two-decker cabinet with two doors and two base legs (no text or symbols)
natural_image
Mechanical assembly diagram showing a hand operating a tool with an arrow indicating rotation (no text or symbols present)Power connection

WARNING: Do not use extension or multi sockets in the power connection.
WARNING: Damaged power cable must be replaced by authorized service.

When placing two coolers in an adjacent position, leave at least 4 cm distance between the two units.
- Our firm will not assume responsibility for any damages due to usage without earthing and power connection in compliance with national regulations.
- The power cable plug must be easily accessible after installation.
- Connect the refrigerator to an earthed socket with 220-240V/50 Hz voltage. The plug must comprise a 10-16A fuse.
- Do not use a multi-group plug with or without an extension cable between the wall socket and the refrigerator.
Water connection (Optional)

WARNING: Unplug the product and the water pump (if available) during connection.
- The product's water mains, filter and carboy connections must be done by authorized service. The product can be connected to a carboy or directly to the water mains, depending on the model. To establish the connection, the water hose must first be connected to the product.
- Check to see the following parts are supplied with your product model:

- Connector (1 piece): Used to attach the water hose to the rear of the product.
- Hose clip (3 pieces): Used to fix the water hose on the wall.
- Water hose (1 piece, 5 meters, diameter 1/4 inches): Used for the water connection.
- Faucet adapter (1 piece): Comprises of a porous filter, used for connection to the cold water mains.
- Water filter (1 piece *Optional): Used to connect the mains water to the product. Water filter is not required if a carboy connection is available.
Installation
Connecting water hose to the product
To connect the water hose to the product, follow the instructions below.
- Remove the connector on the hose nozzle adaptor at the back of the product and run the hose through the connector.

natural_image
Two-step diagram showing hands installing a camera module into a device (left) and adjusting a cable or pin (right), both without any text or symbols.- Push the water hose down tightly and connect to the hose nozzle adaptor.
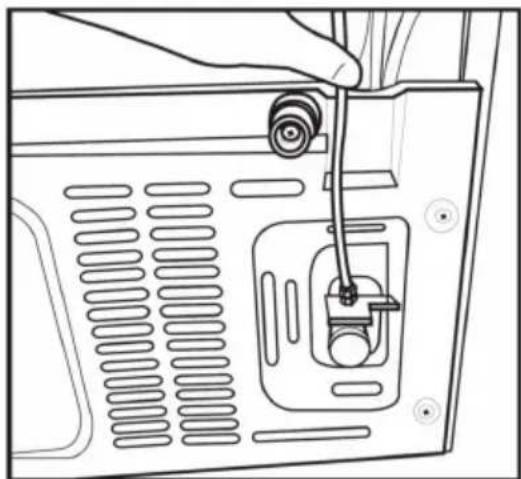
natural_image
Line drawing of a hand inserting a cable into a device panel with ventilation slots (no text or symbols)- Tighten the connector manually to fix on the hose nozzle adaptor. You may also tighten the connector using a pipe wrench or pliers.

natural_image
Line drawing of a hand adjusting a mechanical component with no visible text or symbols- Connect the other end of the hose to the water mains or to the water pump. See page 11 to use a carboy.
Connecting to water mains (Optional)
To use the product by connecting to the cold water mains, a standard 1/2" valve connector must be installed to the cold water mains in your home. If the connector is not available or if you are unsure, consult a qualified plumber.
- Detach the connector (1) from the faucet adaptor (2).

natural_image
Three technical line drawings of mechanical components labeled 1, 2, and 3 (no text or symbols beyond labels)- Connect the faucet adaptor to the water mains valve.

natural_image
Line drawing of a mechanical pipe fitting with no text or symbols- Attach the connector around the water hose.

natural_image
Line drawing of a hand holding a pen tip, no text or symbols presentInstallation
- Attach the connector into the faucet adaptor and tighten by hand / tool.

natural_image
Line drawing of a mechanical component with no visible text or symbols- To avoid damaging, shifting or accidentally disconnecting the hose, use the clips provided to fix the water hose appropriately.

natural_image
Line drawing of hands holding a cable with a hose attached (no text or symbols)
WARNING: After turning the tap on, ensure there is no water leak on either end of the water hose. In case of leakage, turn the valve off and tighten all connections using a pipe wrench or pliers.
For products using water carboy (Optional)
To use a carboy for the product's water connection, the water pump recommended by the authorized service must be used.
- Connect one end of the water hose provided with the pump to the product and follow the instructions.

natural_image
Line drawing of a hand inserting a component into a device panel (no text or symbols)- Connect the other end of the water hose to the water pump by pushing the hose into the pump's hose inlet.

natural_image
Line drawing of a hand holding a cable connected to an electronic device (no text or symbols)- Place and fasten the pump hose inside the carboy.

natural_image
Line drawing of a laboratory apparatus with a gas cylinder connected to a stopper and tubing (no text or symbols)- Once the connection is established, plug in and start the water pump.
 | Please wait 2-3 minutes after starting the pump to achieve the desired efficiency. |
 | Please read the pump's user guide for water connection. |
 | When using a carboy, a water filter is not required. |
Installation
Water filter
(Optional)
The product may have an internal or external filter, depending on the model. To attach the water filter, follow the instructions below.
Fixing external filter on the wall (Optional)

WARNING: Do not fix the filter on to the product
Check to see the following parts are supplied with your product model:
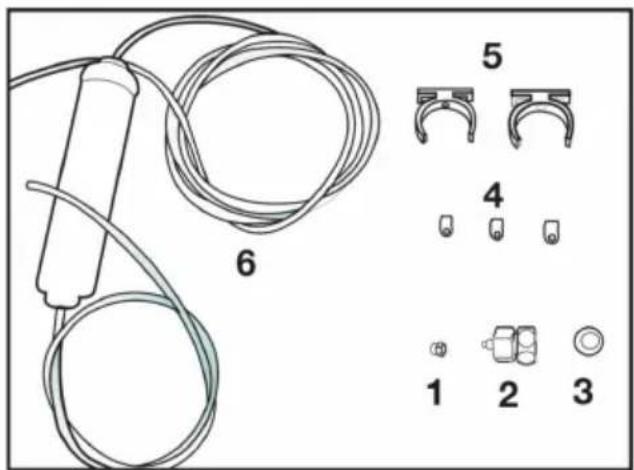
-
Connector (1 piece): Used to attach the water hose to the rear of the product.
-
Faucet adapter (1 piece): Used for connection to the cold water mains.
-
Porous filter (1 piece)
-
Hose clip (3 pieces): Used to fix the water hose on the wall.
-
Filter connecting apparatus (2 pieces): Used to fix the filter on the wall.
-
Water filter (1 piece): Used to connect the product to the water mains. A water filter is not necessary when using carboy connection.
-
Connect the faucet adaptor to the water mains valve.
-
Determine the location to fix the external filter. Fix the filter's connecting apparatus (5) on the wall.
-
Attach the filter in the upright position on the filter connecting apparatus, as indicated on the label. (6)

natural_image
Line drawing of a hand holding a mechanical component with a tool, against a plain background (no text or symbols)- Attach the water hose extending from the top of the filter to the product's water connection adaptor, (see page 10).
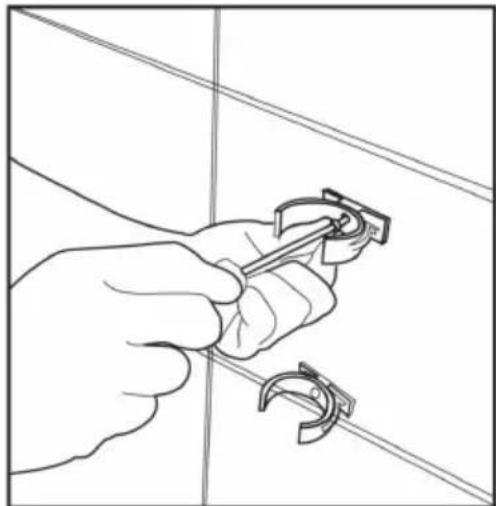
natural_image
Line drawing of a hand holding a tool with a hook, against a grid background (no text or symbols)After the connection is established, it should look like the figure below.

natural_image
Line drawing of a hand holding a cylindrical object with an upward arrow, no text or symbols present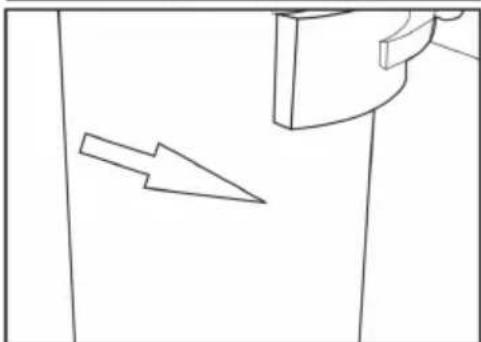
natural_image
Simple line drawing of a door with an arrow pointing to the side panel (no text or symbols)Installation
Internal filter
The internal filter provided with the product is not installed upon delivery; please follow the instructions below to install the filter.

natural_image
Line drawing of a computer monitor rear panel with a hand inserting a cable to the right side (no text or symbols)Water line

natural_image
Line drawing of a simple electrical circuit connection with a plug and fuse, next to a door (no text or symbols)Carboy line

natural_image
Line drawing of a water pump connected to a door via tubing (no text or symbols)
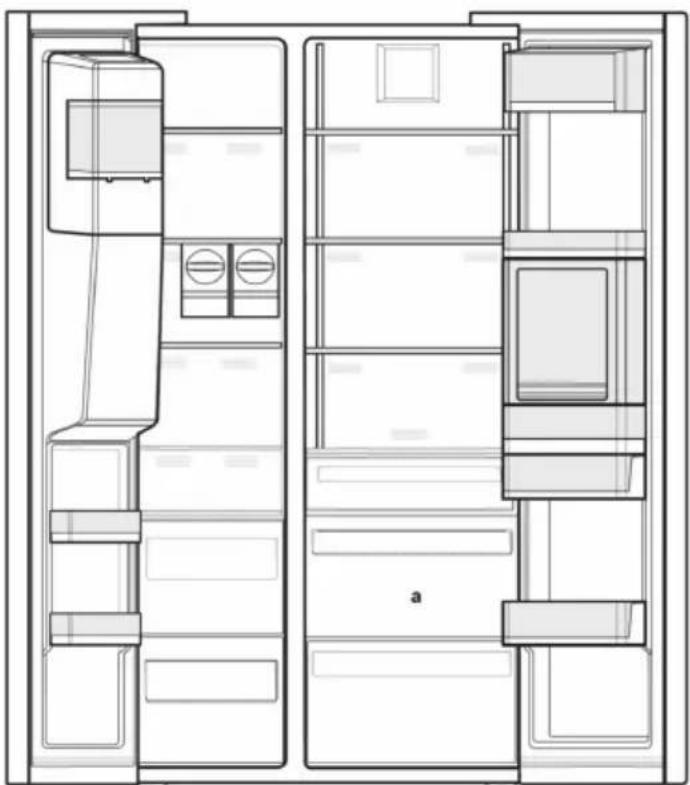
Do not use the first 10 glasses of water after connecting the filter.
- The "Ice Off" indicator must be active while installing the filter. Switch the ON-OFF indicator using the "Ice" button on the screen.

- Remove the vegetable bin (a) to access the water filter.
natural_image
Top-down architectural sketch of a refrigerator interior showing front, back, and side views (no text or symbols)Installation
- Remove the water filter by-pass cover by pulling.
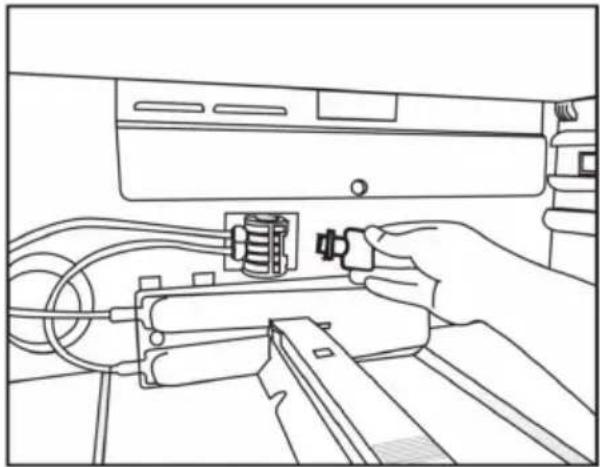
natural_image
Line drawing of a hand holding a connector with cable and switch (no text or symbols)- Place the water filter cover into the mechanism and push to lock in place.
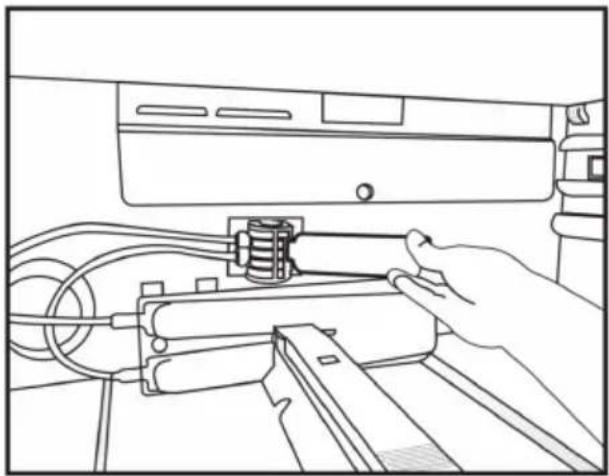
natural_image
Line drawing of a hand operating a mechanical device with hoses and a spring (no text or symbols)- Push the "Ice" button on the screen again to cancel the "Ice Off" mode.
 | The water filter will clear certain foreign particles in the water. It will not clear microorganisms in the water. |
| See page 21 for activating the filter replacement period. | |
| A few drops of water may flow out after removing the cover; this is normal. |
4 Preparation
Things to be done for energy saving

Connecting the product to electronic energy-saving systems is harmful, as it may damage the product.
- Do not keep the refrigerator doors open for long periods.
- Do not place hot food or beverages into the refrigerator.
- Do not overfill the refrigerator; blocking the internal air flow will reduce the cooling capacity.
- The energy consumption value specified for the refrigerator was measured with the freezer compartment's upper shelf removed, other shelves and the lowest drawers in place and under maximum load. The top glass shelf can be used, depending on the shape and size of food to be frozen.
- Depending on the product's features; defrosting frozen foods in the cooler compartment will ensure energy saving and preserve food quality.
- Make sure the foods are not in contact with the cooler compartment temperature sensor indicated below.

natural_image
Simple line drawing of a ceiling fixture with a bulb and internal components (no text or symbols)
Ensure the fridge contents do not touch the back wall of the refrigerator to prevent them from freezing.
First Use
Before using your refrigerator, make sure the necessary preparations are made in line with the instructions in "Safety and environment instructions" and "Installation" sections.
- Keep the product running with no food inside for 6 hours and do not open the door, unless absolutely necessary.
 | A sound will be heard when the compressor is engaged. It is normal to hear sound even when the compressor is inactive, due to the compressed liquids and gasses in the cooling system. |
 | It is normal for the front edges of the refrigerator to be warm. These areas are designed to warm up in order to prevent condensation. |
5 Using the product
Indicator panel
Indicator panels may vary depending on the model of your product.
Audial and visual functions of the indicator panel will assist in using the refrigerator.

- Cooler compartment indicator
- Error status indicator
- Temperature indicator
- Vacation function button
- Temperature adjustment button
- Compartment selection button
- Cooler compartment indicator
- Economy mode indicator
- Vacation function indicator
*optional

* Optional: Figures represented in this instruction manual are schematic and may not correspond exactly with your refrigerator. If the parts are not included in the refrigerator you have purchased, they may be model specific and therefore only valid for some models.
1. Cooler compartment indicator
The cooler compartment light will turn on when adjusting the cooler compartment temperature.
2. Error status indicator
This sensor will activate if the refrigerator is not cooling adequately or in case of sensor fault. When this indicator is active, the freezer compartment temperature indicator will display "E" and the cooler compartment temperature indicator will display "1, 2, 3..." etc. numbers. The numbers on the indicator serve to inform the service personnel about the fault.
3. Temperature indicator
Indicates the temperature of the freezer and cooler compartments.
4. Vacation function button
To activate this function, press and hold the Vacation button for 3 seconds. When the Vacation function is active, the cooler compartment temperature indicator displays the inscription "-" and no cooling process will be active in the cooling compartment. This function is not suitable to keep food in the cooler compartment. Other compartments will remain cooled with the respective temperature set for each compartment.
Push the Vacation button ( ^3 ) again to cancel this function.
5. Temperature adjustment button
Respective compartment's temperature varies in -24^ ..... -18^ and 8^ ... 1^ ranges.
6. Compartment selection button
Use the refrigerator compartment selection button to toggle between the cooler and freezer compartments.
7. Cooler compartment indicator
The freezer compartment light will turn on when adjusting the cooler compartment temperature.
8. Economy mode indicator
Indicates the refrigerator is running on energy-saving mode. This indicator will be active when the temperature in the freezer compartment is set to -18^ .
9. Vacation function indicator
Indicates the vacation function is active.
Indicator panel
Indicator panels may vary depending on the model of your product. Audial and visual functions of the indicator panel help assist in using the refrigerator.
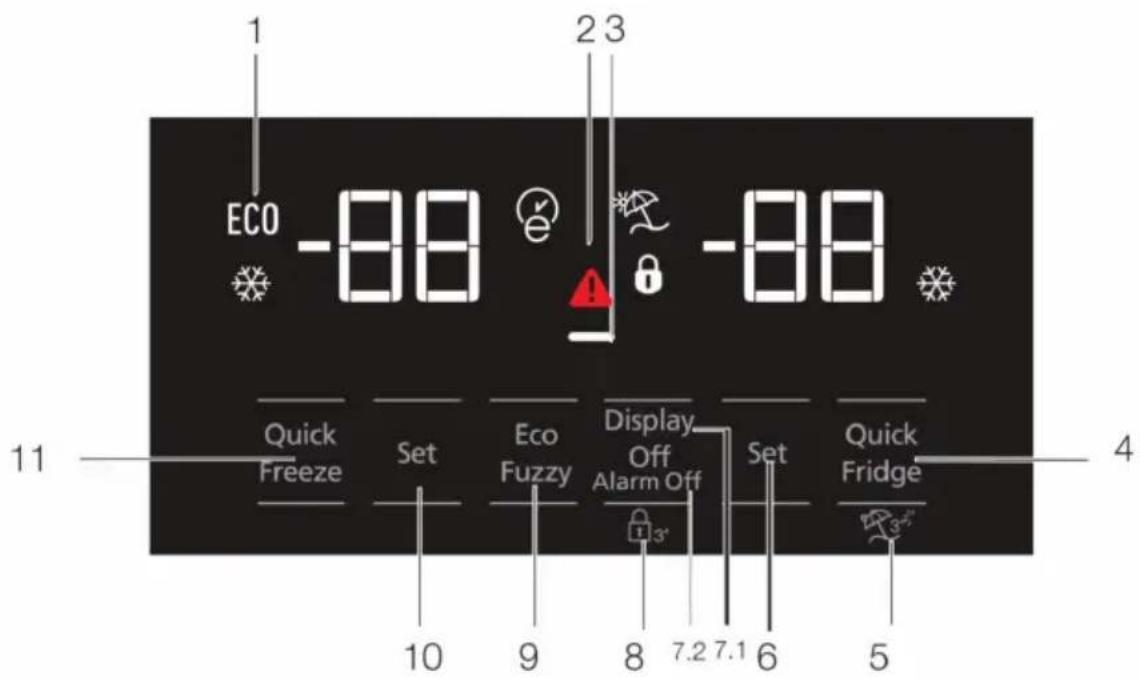
- Economic use
2- High temperature / fault alert - Energy saving function (display off)
4- Rapid cooling
5- Vacation function
6- Cooler compartment temperature setting - Energy saving (display off) /Alarm off warning
8- Keypad lock
9- Eco-fuzzy
10- Freezer compartment temperature setting
11- Rapid freezing

* Optional: Figures represented in this instruction manual are schematic and may not correspond exactly with your refrigerator. If the parts are not included in the refrigerator you have purchased, they may be model specific and therefore only valid for some models.
1. Economic use
This sign will light up when the freezer compartment is set to -18^' , the most economical setting. (ECO) Economic use indicator will turn off when rapid cooling or rapid freezing function is selected.
2. Power failure/High temperature / error warning indicator
This indicator (⚠️) will light up in case of temperature faults or fault alerts. If you see this indicator is lit up, please see the troubleshooting section in this guide. This indicator illuminates during power failure, high temperature failures and error warnings. During sustained power failures, the highest temperature that the freezer compartment reaches will flash on the digital display. After checking the food located in the freezer compartment press the alarm off button to clear the warning.
Please refer to the troubleshooting section on your manual if you observe that this indicator is illuminated.
3. Energy saving function (display off)
If the product doors are kept closed for a long time the energy saving function is automatically activated and the energy saving symbol is illuminated. When energy saving function is activated, all symbols on the display other than the energy saving symbol will turn off. When the Energy Saving function is activated, if any button is pressed or the door is opened, the energy saving function will be cancelled and the symbols on display will return to normal.
The energy saving function is activated from the factory and cannot be cancelled.
4. Rapid cooling
When the rapid cooling function is turned on, the rapid cool indicator will light up (✗) and the cooler compartment temperature indicator will display the value 1. Push the Rapid cool button again to cancel this function. The Rapid cool indicator will turn off and return to normal setting. The rapid cooling function will be automatically cancelled after 1 hour, unless cancelled by the user. To cool a large amount of fresh food, press the rapid cool button before
placing the food in the cooler compartment.
5. Vacation function
To activate the Vacation function, press the quick fridge button for 3 seconds; this will activate the vacation mode indicator (☐). When the Vacation function is active, the cooler compartment temperature indicator displays the inscription "-" and no cooling process will be active in the cooling compartment. This function is not suitable to keep food in the cooler compartment. Other compartments will remain cooled with the respective temperature set for each compartment. Push the vacation function button again to cancel this function.
6. Cooler compartment temperature setting
After pressing the button number (5), the cooler compartment temperature can be set to 8,7,6,5,4,3,2 and 1 respectively. (☐)
7.1 Energy saving (display off)
Pressing this button (—) will light up the energy-saving sign (—) and the Energy-saving function will activate. Activating the energy-saving function will turn off all other signs on the display. When the energy-saving function is active, pressing any button or opening the door will deactivate the energy-saving function and the display signals will return to normal. Pressing this button (—) again will turn off the energy-saving sign and deactivate the energy-saving function.
7.2 Alarm off warning
In case of power failure/high temperature alarm. After checking the food located in the freezer compartment press the alarm off button to clear the warning.
8. Keypad lock
Press the display off button, simultaneously for 3 seconds. The keypad lock sign will light up and the keypad lock will be activated; the buttons will be inactive when the Keypad lock is activated. Press the Display off button again simultaneously for 3 seconds. The keypad lock sign will turn off and the keypad lock mode will be disengaged. Press the Display off button to prevent changing the refrigerator's temperature settings.
9. Eco-fuzzy
To activate the eco-fuzzy function, press and hold the eco-fuzzy button for 1 second.
When this function is active, the freezer will switch to the economic mode after at least 6 hours and the economic use indicator will light up. To deactivate the (⑧) eco-fuzzy function, press and hold the eco-fuzzy function button for 3 seconds.
The indicator will light up after 6 hours when the eco-fuzzy function is active.
10. Freezer compartment temperature setting
The temperature in the freezer compartment is adjustable. Pressing the button will enable the freezer compartment temperature to be set at -18,-19, -20, -21, -22, -23 and -24.
11. Rapid freezing
For rapid freezing, press the button; this will activate the rapid freezing indicator (✗). When the rapid freezing function is turned on, the rapid freeze indicator will light up and the freezer compartment temperature indicator will display the value -27. Press the Rapid freeze button (✗) again to cancel this function. The Rapid freeze indicator will turn off and return to normal setting. The rapid freezing function will be automatically cancelled after 24 hours, unless cancelled by the user. To freeze a large amount of fresh food, press the rapid freeze button before placing the food in the freezer compartment.
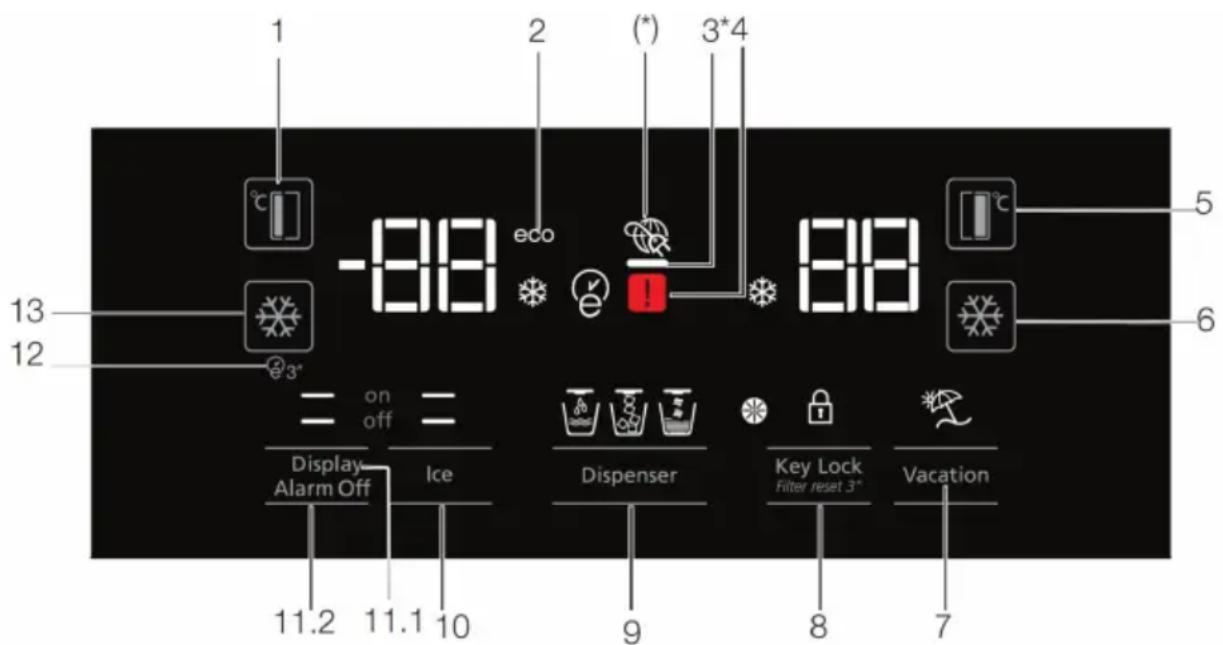
- Freezer compartment temperature setting
- Economy mode
- Energy saving function (display off)
- Power failure/High temperature / error warning indicator
- Cooler compartment temperature setting
- Rapid cooling
- Vacation function
- Keypad lock / filter replacing alert cancellation
- Water, fragmented ice, ice cubes selection
- Ice making on/off
- Alarm off warning
- Autoeco
- Rapid freezing

* Optional: Figures represented in this instruction manual are schematic and may not correspond exactly with your refrigerator. If the parts are not included in the refrigerator you have purchased, they may be model specific and therefore only valid for some models.
1. Freezer compartment temperature setting
Pressing the button ( ^1 ) number (1) will enable the freezer compartment temperature to be set at -18,-19,-20,-21,-22,-23,-24,-18...
2. Economy mode
Indicates the refrigerator is running on energy-saving mode. This indicator will be active when the freezer compartment temperature is set at -18 or the energy-saving cooling is engaged in the eco-extra function. (ECO)
3. Energy saving function (display off)
If the product doors are kept closed for a long time the energy saving function is automatically activated and the energy saving symbol is illuminated. When the energy saving function is activated, all symbols on the display other than the energy saving symbol will turn off. When the energy Saving function is activated, if any button is pressed or the door is opened, the energy saving function will be cancelled and the symbols on the display will return to normal. Energy saving function is activated from the factory and cannot be cancelled.
4. Power failure/High temperature / error warning indicator
This indicator (⚠️) will light up in case of temperature faults or fault alerts. If you see this indicator is lit up, please see the troubleshooting section in this guide.
This indicator illuminates during a power failure, high temperature failures and error warnings. During sustained power failures, the highest temperature that the freezer compartment reaches will flash on the digital display. After checking the food located in the freezer compartment press the alarm off button to clear the warning.
Please refer to the troubleshooting section in your manual if you observe that this indicator is illuminated.
5. Cooler compartment temperature setting
After pressing the button ( ) number (4), the cooler compartment temperature can be set to 8,7,6,5,4,3,2.. respectively.
6. Rapid cooling
For rapid cooling, press the button number (5); this will activate the rapid cooling indicator (✗).
Press this button again to deactivate this function.
Use this function when placing fresh foods into the cooler compartment or to rapidly cool food items. When this function is activated, the refrigerator will be engaged for 1 hour.
7. Vacation function
When the Vacation function ( ^1 ) is active, the cooler compartment temperature indicator displays the inscription "- -" and no cooling process will be active in the cooling compartment. This function is not suitable to keep food in the cooler compartment. Other compartments will remain cooled with the respective temperature set for each compartment.
Press the vacation function button again to cancel this function. (工).
8. Keypad lock / Keypad lock / filter replacing alert cancellation
Press keypad lock button ⏻ to activate the keypad lock. You may also use this function to prevent changing the refrigerator's temperature settings. The refrigerator's filter must be replaced every 6 months. If you follow the instructions on page 12, the refrigerator will automatically calculate the remaining period and the filter replacing alert indicator ⏱ will light up when the filter expires.
Press and hold the button (*) for 3 seconds to turn off the filter alert light.
9. Water, fragmented ice, ice cubes selection
Navigate the water 🎨, ice cube 🔊 and fragmented ice 🔊 selections using the button. The active indicator will remain lit.
10. Ice making on/off
Press the button (7) to cancel(off —) or activate (on —) ice-making.
11.1 Display on/off
Press the button (— off) to cancel (XX) or activate (— on) display on/off.
11.2 Alarm off warning
In case of power failure/high temperature alarm, after checking the food located in the freezer compartment press the alarm off button to clear the warning.
12. Autoeco
Press the auto eco button (e3"), number, for 3 seconds to activate this function. If the door remains closed for a long time when this function is activated, the cooler section will switch to economic mode. Press the button again to deactivate this function. The indicator will light up after 6 hours when the auto eco function is active. (e)
13. Rapid freezing
Press the button (✗) for rapid freezing. Press the button again to deactivate the function.
Activating the water filter replacement alert
(For products connected to water mains and comprising filter)
The water filter replacement alert is adjusted as described below.
- Press the A (Keypad lock) button while the refrigerator is operational.

-
Then press the following buttons respectively.
-
Vacation button.
- Cooler temperature adjustment button.
- Rapid cool adjustment button.
- Freezer temperature adjustment button.
If the buttons are not pressed in the respective order, the button I indicator will turn off, a short audible alert will be heard and the Filter Replacement Alert indicator will light up.
The filter service life automatic calculation function is inactive by default. This function must be activated for products comprising a filter. Your refrigerator will automatically indicate the filter replacement period after 6 months. Repeating this process when the filter service life automatic calculation is active will cancel this function.


*Optional: The figures in this user guide are intended as drafts and may not perfectly match your product. If your product does not comprise the relevant parts, the information pertains to other models.
1- Power failure/High temperature / error warning
2- Freezer compartment temperature setting
3- Quick freeze
4- Key lock
5- Vacation function
6- Quick Fridge
7- Fridge compartment temperature setting
8- Eco fuzzy
9- Alarm off warning
• High temperature alarm :RED (1 Hz flash)
- Within 1 min. after the door is opened (when the door: open alarm is enabled) RED light becomes on.
- When the door is opened: WHITE
- Eco Mode : GREEN
- Quick Freeze : BLUE
- Quick Fridge : BLUE
• Vacation : YELLOW
- Display Off : GREEN
- After the door is closed, if one of the WHITE / Eco Mode, Quick Freeze, Quick Fridge, Vacation modes are active, the colour of these modes are displayed for 1 min. (The colour of the mode is more dominant than that of the display status).
1. Power failure/High temperature / error warning
This indicator illuminates during power failure, high temperature failures and error warnings. During long-term power failures, the highest temperature value that the freezer compartment reaches will blink on the digital display. After checking the food located in the freezer compartment, press the alarm off button to clear the warning. Please refer to "solutions recommended for troubleshooting" section in your manual if you observe that this indicator is illuminated.
2. Freezer compartment temperature setting
Temperature setting is made for freezer compartment. When this button is pressed, you can set the temperature of the freezer compartment to -18, -19, -20, -21, -22, -23 and -24.
3. Quick freeze
Press this button for quick freeze operation, the quick freeze indicator ( ✉ ) will be activated.
Quick freeze indicator is lit when quick freeze function is on and fridge compartment temperature indicator displays -27. To cancel this function press the quick freeze button ( ) again. Quick freeze indicator will turn off and refrigerator will reset to its normal settings. Quick freeze function is cancelled automatically in 24 hour if you do not cancel it. If you want to freeze large amounts of fresh food, press the quick freeze button before putting the food into the freezer compartment.
4. Key lock
Press and hold the alarm off button for 3 seconds. The key lock symbol will be on and key lock will be activated; When the Key Lock is on, the buttons are disabled. Press and hold the alarm off button for 3 seconds again. The key lock symbol will be off and the key lock mode will be disabled.
5. Vacation function
In order to activate the vacation function, press and hold the fuzzy button for 3 seconds; the vacation mode indicator ( ) will be activated. When the vacation function is activated, "-" is displayed on the fridge compartment temperature indicator and no active cooling operation will be performed on the fridge compartment. It is not suitable to keep the food in the fridge compartment in this function. Other compartments will continue to be cooled according to their set temperatures.
To cancel this function, press the Vacation function button again.
Using the water dispenser (for certain models)
 | The first few glasses of water taken from the dispenser will normally be warm. |
 | If the water dispenser is not used for a long time, dispose of the first few glasses of water to get clean water. |
Please wait for approximately 12 hours for cold water after first installation.
Use the display* to select the water option (*Using the display to select the water option depends on the model), press the trigger for water flow. Remove the glass shortly after pressing the trigger.

natural_image
Simple line drawing of a rectangular container with a side slot and label '0.05' at the bottom (no other text or symbols)Filling the water dispenser's tank
The water tank filling reservoir is located inside the door rack. Open the reservoir cover and fill up with pure and clean drinking water. Close the cover.

natural_image
Line drawing of a wooden shelf with two compartments and a side shelf (no text or symbols)
natural_image
Line drawing of a multi-level office space with a toilet and storage unit, showing directional arrows indicating movement (no text or symbols)Water tray
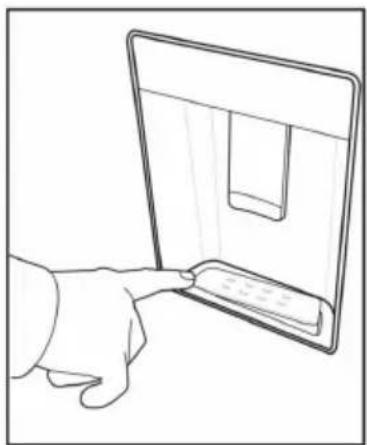
Any water that drips whilst using the water dispenser accumulates in the spillage tray. Remove the plastic strainer by pressing on the side as shown in the figure. With a clean and dry cloth, remove the water that has accumulated.
natural_image
Line drawing of a hand pressing a button on a computer monitor (no text or symbols) | Do not fill the water tank with fruit juice, fizzy beverages, alcoholic beverages or any other liquids incompatible for use in the water dispenser. Using such liquids will cause malfunction and irreparable damage to the water dispenser. Using the dispenser in this way is not covered by the warranty. Certain chemicals and additives in the beverages / liquids may cause material damage to the water tank. |
 | The water tank and water dispenser components cannot be washed with dishwashers. |
Using the product
Cleaning the water tank
- Remove the water filling reservoir inside the door rack.

natural_image
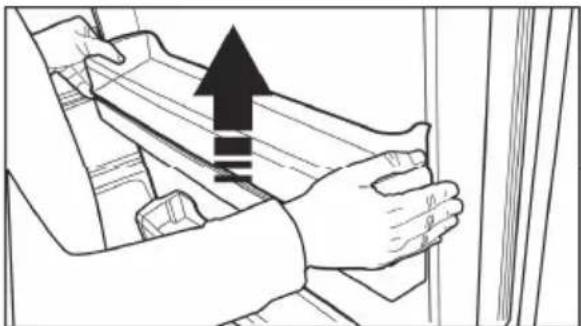
Line drawing of a hand opening a drawer with an upward arrow and three vertical lines (no text or symbols)- Remove the water dispenser shelf by holding from both sides.
natural_image
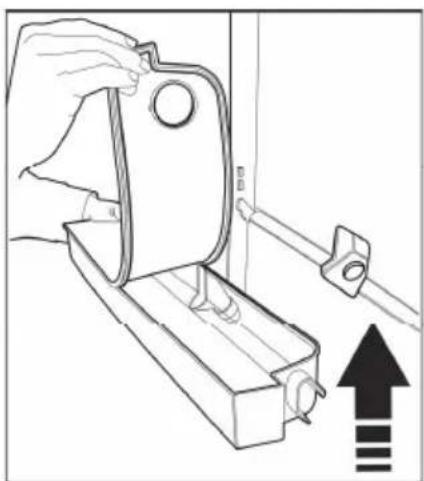
Line drawing of hands adjusting a door handle with an upward arrow indicating motion (no text or symbols)- Grab the water dispenser reservoir on both sides & remove it at an angle of 45^ .

- Clean the reservoir by removing its lid.
natural_image
Line drawing of a hand using a tool to adjust a mechanical component, with an upward arrow and plus symbols (no text or labels)Make sure that the parts and seals removed (if any) as illustrated in the exploded diagram below, during cleaning are properly refitted to prevent any water leakage.
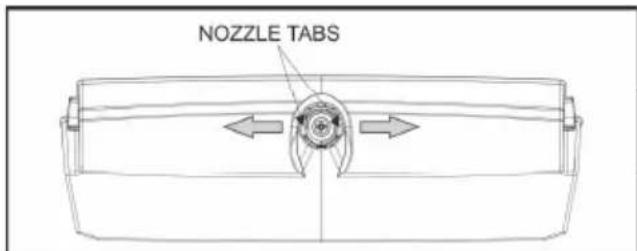

When fastening the nozzle, please ensure that the nozzle tabs are horizontally aligned with the dispenser housing.
Dispensing ice / water (Optional)
To take water (💡) / ice cube (💡) / fragmented ice (💡), use the display to select the respective option. Take water/ice by pushing the trigger on the water dispenser forward. When switching between ice cube (💡) / fragmented ice (💡) options, the previous ice type may be discharged a few more times.

- Wait approximately 12 hours before taking ice from the ice / water dispenser for the first time. The dispenser may not discharge ice if there is insufficient ice in the ice box.
- The 30 pieces of ice cubes (3-4 Litres) taken after first operating should not be used.
- In case of power blackout or temporary malfunction, the ice may partly melt and refreeze. This will cause the ice pieces to merge with each other. In case of extended power blackouts or malfunction, the ice may melt and leak out. If you experience this problem, remove the ice in the ice box and clean the box.

WARNING: The product's water system should be connected to a cold water line only. Do not connect to a hot water line.
- The product may not discharge water during first operation. This is caused by the air in the system. The air in the system must be discharged. To do this, push the water dispenser trigger for 1-2 minutes until the dispenser discharges water. The initial water flow may be irregular. The water will flow normally once the air in the system is discharged.
- The water may be cloudy during first use of the filter; do not consume the first 10 glasses of water.
- Please wait approximately 12 hours for cold water after first installation.
- The product's water system is designed for clean water only. Do not use any other beverages.
- It is recommended to disconnect the water supply if the product will not be used for long periods during vacation etc.
- If the water dispenser is not used for a long time, the first 1-2 glasses of water received may be warm.
Drip tray
(optional)
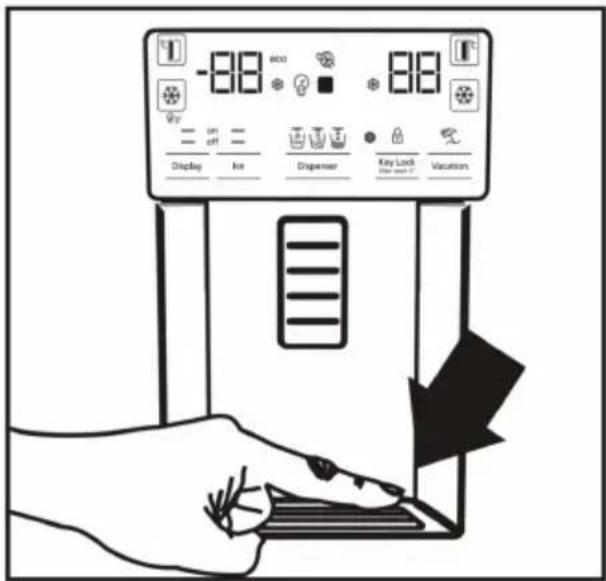
The water dripping from the water dispenser accumulates on the drip tray; no water drainage is available. Pull the drip tray out or push on the edges to remove the tray. You may then discharge the water inside the drip tray.
Using the product
Zero degree compartment (Optional)
- Use this compartment to keep delicatessen at lower temperatures or meat products for immediate consumption. Do not place fruits and vegetables in this compartment. You can expand the product's internal volume by removing any of the zero degree compartments. To remove the compartment, simply pull forth, lift up and pull out.
Vegetable bin
- The refrigerator's vegetable bin is designed to keep vegetables fresh by preserving humidity. For this purpose, the overall cold air circulation is intensified in the vegetable bin. Keep fruits and vegetables in this compartment. Keep the green-leaved vegetables and fruits separately to prolong their life.
Blue light (Optional)
- The product's vegetable bins comprise blue light. The vegetables in the bin will continue to photosynthesize under the blue light's wavelength effect and remain live and fresh.
Ionizer (Optional)
- The ionizer system in the cooler compartment's air duct serves to ionize the air. The negative ion emissions will eliminate bacteria and other odour causing molecules in the air.
Minibar (Optional)
- The refrigerator's minibar door shelf can be accessed without opening the door. This will allow you to easily take frequently consumed food and beverages from the refrigerator. To open the minibar cover, push with your hand and pull towards yourself.

WARNING: Do not sit, hang or place heavy objects on the minibar cover. This may damage the product or cause you to be injured.
To close this compartment, simply push forward from the upper section of the cover.
Odour filter (optional)
The odour filter in the cooler compartment's air duct will prevent undesirable odour formation.
Icematic and ice storage container (Optional)
- Fill the icematic with water and put in place. The ice will be ready after approximately two hours. Do not remove the icematic to take ice. - Turn the buttons on the ice chambers right hand side by 90^ ; the ice will fall to the ice storage box below. You may then remove the ice storage box and serve the ice.

The ice storage box is intended for storing ice only. Do not fill with water. Doing so will cause it to break.

natural_image
Illustration of a hand using a rotary knob to move inside a device (no text or symbols visible)Ice-maker (Optional)
- The ice maker is located on the upper section of the freezer cover.
- Hold the handles on the sides of the ice stock reservoir and move up to remove.
- Remove the ice-maker decorative lid by moving up.

natural_image
Three-panel diagram showing a device with a screen, a close-up of its screen, and a hand holding a device (no text or symbols present)Freezing fresh food
- To preserve food quality, the food items placed in the freezer compartment must be frozen as quickly as possible, use the rapid freezing for this.
- Freezing food items when fresh will extend the storage time in the freezer compartment.
- Pack the food items in air-tight packs and seal tightly.
- Make sure the food items are packed before putting in the freezer. Use freezer holders, tinfoil and damp-proof paper, plastic bag or similar packaging materials instead of traditional packaging paper.
- Mark each food pack by writing the date on the package before freezing. This will allow you to determine the freshness of each pack every time the freezer is opened. Keep the earlier food items in the front to ensure they are used first.
- Frozen food items must be used immediately after defrosting and must not be frozen again.
- Do not freeze large quantities of food all at once.
Recommendations for storing frozen foods
The compartment must be set to at least - 18°C.
-
Place the food items in the freezer as quickly as possible to avoid defrosting.
-
Before freezing, check the "Expiry Date" on the package to make sure it has not expired.
-
Make sure the food's packaging is not damaged.
Deep freezer details
As per the IEC 62552 standards, the freezer must have the capacity to freeze 4,5 kg of food items at -18°C or lower temperatures in 24 hours for each 100 litres of freezer compartment volume. Food items can only be preserved for extended periods at or below temperatures of -18°C. You can keep the foods fresh for months (in deep freezer at or below temperatures of 18°C).
Food items to be frozen must not come into contact with the already frozen food inside the freezer to avoid partial defrosting of the already frozen food.
Boil the vegetables and filter the water to extend the frozen storage time. Place the food in air tight packages after filtering and place in the freezer. Bananas, tomatoes, lettuce, celery, boiled eggs, potatoes and similar food items should not be frozen.
Freezing these food items will simply reduce the nutritional value and food quality, as well as possible spoiling which is harmful to health.
| Freezer Compartment Setting | Cooler Compartment Setting | Descriptions |
| -18°C 4°C This is the default, recommended | setting. | |
| -20,-22 or -24°C 4°C Recommended for ambient | temperatures exceeding 30°C. | |
| Rapid Freeze 4°C Use this to freeze food items in a short time, the product will reset to previous settings when the process is completed. | ||
| -18°C or colder 2°C Use these settings if you believe the cooler compartment is not cold enough due to ambient temperature or frequently opening the door. | ||
Placing food
| Freezer compartment shelves | Various frozen goods including meat, fish, ice cream, vegetables etc. |
| Cooler compartment shelves | Food items inside pots, capped plate and capped cases, eggs (in capped case) |
| Cooler compartment door shelves | Small and packed food or beverages |
| Vegetable bin Fruits | and vegetables |
| Fresh food compartment | Delicatessen (breakfast food, meat products to be consumed at short notice) |
Door open alert (Optional)
An audible alert will be heard if the product's door remains open for 1 minute. The audible alert will stop when the door is closed or any button on the display (if available) is pressed.
Interior light
Interior light uses a LED type lamp. Contact the nearest Defy call centre for any problems with this lamp.

IMPORTANT: Check the trouble shooting list on the following page before contacting a Defy service centre. Doing so will save you time and money. This list includes frequent complaints that are not related to faulty workmanship or materials. Certain features mentioned herein may not apply to your product.
Cleaning the product regularly will prolong its service life.
WARNING: Disconnect the power before cleaning the refrigerator.
- Do not use sharp and abrasive tools, soap, house cleaning materials, detergents, gas, gasoline, varnish and similar substances for cleaning.
- Melt a teaspoonful of carbonate in the water. Moisten a piece of cloth in the water and wring out. Wipe the device with this cloth and dry off thoroughly.
- Take care to keep water away from the lamp's cover and other electrical parts.
- Clean the door using a wet cloth. Remove all items inside before detaching the door and chassis shelves. Lift the door shelves up to detach. Clean and dry the shelves, then attach back in place by sliding in from above.
- Do not use chloric water or cleaning products on the exterior surface and chrome-coated parts of the product. Chlorine will cause rust on such metallic surfaces.
Preventing malodour
The product is manufactured free of any odorous materials. However, keeping the food in inappropriate sections and improper cleaning of internal surfaces may lead to malodour.
To avoid this, clean the inside with carbonated water every 15 days.
- Keep the foods in sealed holders.
Microorganisms may spread out of unsealed food items and cause malodour. - Do not keep expired and spoilt foods in the refrigerator.
Protecting plastic surfaces
Oil spilled on plastic surfaces may damage the surface and must be cleaned immediately with warm water.
7 Troubleshooting
The refrigerator is not working.
• The power plug is not fully settled. >>> Plug it in to settle completely into the socket.
- The fuse connected to the socket powering the product or the main fuse is blown. >>> Check the fuses.
Condensation on the side wall of the cooler compartment (MULTI ZONE, COOL, CONTROL and FLEXI ZONE).
- The environment is too cold. >>> Do not install the product in environments with temperatures below -5°C.
- The door is opened too frequently >>> Take care not to open the product's door too frequently.
• The environment is too humid. >>> Do not install the product in humid environments. - Foods containing liquids are kept in unsealed holders. >>> Keep the foods containing liquids in sealed holders.
- The product's door is left open. >>> Do not keep the product's door open for long periods.
- The thermostat is set to too low a temperature. >>> Set the thermostat to an appropriate temperature.
Compressor is not working
- In case of sudden power failure or pulling the power plug off and putting back on, the gas pressure in the product's cooling system is not balanced, which triggers the compressor thermic safeguard. The product will restart after approximately 6 minutes. If the product does not restart after this period, contact service.
- Defrosting is active. >>> This is normal for a fully automatic defrosting product. The defrosting is carried out periodically.
• The product is not plugged in. >>> Make sure the power cord is plugged in.
• The temperature setting is incorrect. >>> Select the appropriate temperature setting. - There is a power outage. >>> The product will continue to operate normally once the power is restored.
The refrigerator's operating noise is increasing while in use.
- The product's operating performance may vary depending on the ambient temperature variations. This is normal and not a malfunction.
The refrigerator runs too often or for too long.
- The new product may be larger than the previous one. Larger products will run for longer periods.
- The room temperature may be high. >>> The product will normally run for long periods in a higher room temperature.
- The product may have been recently plugged in or a new food item is placed inside. >>>The product will take longer to reach the set temperature when recently plugged in or a new food item is placed inside. This is normal.
- Large quantities of hot food may have been recently placed into the product. >>> Do not place hot food into the product.
- The doors were opened frequently or kept open for long periods. >>> The warm air moving inside will cause the product to run longer. Do not open the doors too frequently.
• The freezer or cooler door may be ajar. >>> Check that the doors are fully closed. - The product may be set to too low a temperature. >>> Set the temperature to a higher degree and wait for the product to reach the adjusted temperature.
- The cooler or freezer door gasket may be dirty, worn out, broken or not properly settled. >>> Clean or replace the gasket. A damaged / torn door gasket will cause the product to run for longer periods in order to maintain the current temperature.
The freezer temperature is very low, but the cooler temperature is adequate.
- The freezer compartment temperature is set to a very low degree. >>> Set the freezer compartment temperature to a higher degree and check again.
The cooler temperature is very low, but the freezer temperature is adequate.
- The cooler compartment temperature is set to a very low degree. >>> Set the cooler compartment temperature to a higher degree and check again.
The food items kept in cooler compartment drawers are frozen.
- The cooler compartment temperature is set to a very low degree. >>> Set the freezer compartment temperature to a higher degree and check again.
The temperature in the cooler or the freezer is too high.
- The cooler compartment temperature is set to a very high degree. >>> The cooler compartment temperature setting influences the freezer compartment temperature. Change the cooler or freezer compartment's temperature and wait until the relevant compartments reach the adjusted temperature level.
- The doors were opened frequently or kept open for long periods. >>> Do not open the doors too frequently.
- The door may be ajar. >>> Fully close the door.
- The product may have been recently plugged in or a new food item is placed inside. >>> This is normal. The product will take longer to reach the set temperature when recently plugged in or a new food item is placed inside.
- Large quantities of hot food may have been recently placed into the product. >>> Do not place hot foods into the product.
Shaking or noise.
- The ground is not level or durable. >>> If the product is shaking when moved slowly, adjust the feet to balance the product. Also make sure the ground is sufficiently durable to bear the product.
- Any items placed on the product may cause noise. >>> Remove any items placed on the product.
The product is making noise of liquid flowing, spraying etc.
- The product's operating principles involve liquid and gas flow. >>> This is normal and not a malfunction.
There is sound of wind blowing coming from the product.
- The product uses a fan for the cooling process. This is normal and not a malfunction.
There is condensation on the product's internal walls.
- Hot or humid weather will increase icing and condensation. This is normal and not a malfunction.
- The doors were opened frequently or kept open for long periods. >>> Do not open the doors too frequently; if open, close the door.
- The door may be ajar. >>> Fully close the door.
There is condensation on the product's exterior or between the doors.
- The ambient weather may be humid, this is quite normal in humid weather. >>> The condensation will dissipate when the humidity is reduced.
The interior smells bad.
- The product is not cleaned regularly. >>> Clean the interior regularly using a sponge, warm water and carbonated water.
- Certain holders and packaging materials may cause odour. >>> Use holders and packaging materials free of odour.
- Foods were placed in unsealed holders. >>> Keep food in sealed holders. Microorganisms may spread out of unsealed food items and cause malodour.
- Remove any expired or spoilt foods from the product.
The door is not closing.
• Food packages may be blocking the door. >>> Relocate any items blocking the doors.
- The product is not standing in the full upright position on the ground. >>> Adjust the feet to balance the product.
- The ground is not level or durable. >>> Make sure the ground is level and sufficiently durable to bear the product.
The vegetable bin is jammed.
- Food items may be in contact with the upper section of the drawer. >>> Reorganize the food items in the drawer.

Warning: If you cannot eliminate the problem although you follow the instructions in this section, contact the nearest Defy service centre. Never try to repair a non-functional refrigerator yourself.

Warning: Never dispose of the Refrigerator in a fire.

Do not dispose of your Refrigerator along with regular household waste.
Contact your local authority for disposal information and facilities available.
Please register your product at
www.defy.co.za
DEFY APPLIANCES (PTY) LTD
P.O.BOX 12004
JACOBS
DURBAN
4026
SOUTH AFRICA
Record in the space below the listed information for future reference.
SERIAL NUMBER......
DATE OF PURCHASE......
PURCHASED FROM......
8
Branches
If you have followed the instructions and still have a problem, contact the customer care line on 086 100 3339. They will be able to advise you on any aspect of the product or send a qualified technician to repair it.
South African Branches:
BLOEMFONTEIN
Unit Number 5
Monument Business Park
50 Monument Road
Oranjesig, Bloemfontein
Bloemfontein.Service@defy.co.za
CAPE TOWN
5A Marconi Rd. Montague Gardens, 7441
CapeTown.Service@defy.co.za
DURBAN
135 Teakwood Road, Jacobs,
Durban, 4052
Durban.Service@defy.co.za
EAST LONDON
Robbie de Lange Road, Wilsonia,
East London, 5201
EastLondon.Service@defy.co.za
GAUTENG, MIDRAND
127 15th Road, Cnr Pharmaceutical &15th Rd, Midrand, Gauteng
Gauteng.Service@defy.co.za
POLOKWANE
87 Nelson Mandela Drive, Superbia 0699
Polokwane.Service@defy.co.za
PORT ELIZABETH
112 Patterson Road, North End, Port Elizabeth 6001
PortElizabeth.Service@defy.co.za
Sub-Saharan Africa Branches:
ZAMBIA: SOUTHGATE INVESTMENTS LTD
Plot 1606, Sheki Sheki Road
P.O. Box 33681
Lusaka, 10101, Zambia
Tel: +260 0211 242332/3
Fax: +260 0211 242933
sgiservicecentre@microlink.zm
NAMIBIA: ATLANTIC DISTRIBUTORS (PTY) LTD
10 Tienie Louw Street, Northern Industrial Area
P.O. Box 21158, Windhoek, Namibia
Tel: (061) 216162
Fax: (061) 216134
atlantic@mweb.com.na
ZIMBABWE: TRADECOMAFRICA
Trade Com Africa, 183 Loreley Crescent
Msasa, Harare, Zimbabwe
Tel: +263 4 486165/6
Cell: +263 772 469010
Cell: +263 772 469011
BOTSWANA: RAY MORGAN AGENCIES
RMA Service Centre, Plot 48, East Gate
Gaborone International Commerce Park
Kgale View, Gaborone
Botswana
Tel: +267 390 3996 / 390 3912
Fax: +267 318 7376
Cell: +267 7134 6539
service@rma.co.bw; raja@rma.co.bw
SWAZILAND: LYNDS DISTRIBUTORS
P.O Box 716, Mbabane, Swaziland, H100
Tel: (00268) 2515 4310/8
Fax: (00268) 2518 4318
MOZAMBIQUE: COOL WORLD. LDA
This certificate is issued by DEFY APPLIANCES (PTY) LIMITED manufacturers of Defy and Ocean products, hereinafter the Company, to the original purchaser only, of the appliance described on the certificate and shall constitute the only warranty given in respect of this appliance.
The Company warrants to the original purchaser that for a period of *THREE YEARS from date of purchase, plus an additional *TWO years on registration, the appliance is free from defect under normal domestic use, both in workmanship and material, subject to the following conditions.
- Repair or replacement of any part of this appliance, found by the Company to be defective, shall be at the election of the Company. The Company reserves the right to effect such service through any of its Service Divisions or Authorised Service Dealers. The cost of such service shall be borne by the Company in full, provided that the appliance is located no further than 50km from a Company Service Centre or an Authorised Service Dealer. Where the appliance is located beyond the 50km radius, the purchaser shall be liable for the standard travelling charges, as determined by the Company.
- Vitreous enamelware, fuses and lamps are specifically excluded from these warranties. It is an express condition of these warranties that the purchaser takes due care and attention in the use and maintenance of the appliance. Abuse, misuse in conflict with operating instructions, connection to incorrect voltages and subjection to commercial use shall release the Company from its obligations.
- This warranty shall become void and cease to operate if the appliance is dismantled by, or any repairs to the appliance are effected by any persons not duly authorised by the Company, or if substitute parts not approved by the Company are used in the appliance, or if the serial number of the appliance is removed.
- The Company shall not be responsible for damages resulting from fire, flood, civil disturbances or any Act of God. The Company shall not, in terms of these warranties be responsible nor held liable for any consequential loss or damage of any kind caused by or due to the failure or malfunction of the appliance. The Company shall not be responsible for damages caused by insect and/or animal infestation.
- The Company shall not be responsible for transportation or other costs other than those incurred within the provisions of Point 1 of this Certificate.
- For warranties in the Republic of South Africa and Sub-Saharan Africa, please contact the customer care line. Please refer to the previous page for respective South African branches and Sub-Saharan Africa branches.
- Where service is requested under warranty and no fault or defect can be found by the Company, all costs incurred will be for the purchaser's account.
- This Certificate as well as your invoice will serve as proof of purchase. For the purpose of warranty, it will be essential to produce this Certificate and invoice. Failure to do so, will render the purchaser liable for service costs.
KEEP THIS CERTIFICATE AND SALES INVOICE AS PROOF OF PURCHASE FOR WARRANTY PURPOSES.
*THREE YEARS full coverage, additional *TWO YEARS (with registration) will cover only parts, labour cost to be charged accordingly. Please register your product at www.defy.co.za in order to activate the additional two year warranty.


- Read this manual before initial installation and operation of the refrigerator!
- The user manual:
- Explanation of symbols used in this manual
- Important safety information 4
- Your Refrigerator 7
- Installation 8
- Preparation 14
- Using the product 15
- Maintenance and cleaning 29
- Troubleshooting 30
- Important safety information
- Warnings
- For models with water fountain
- Child safety
- HCA Warning
- Installation
- Installation location
- Attaching the plastic wedges
- Installation
- Adjusting the feet
- Power connection
- Water connection (Optional)
- Connecting water hose to the product
- To connect the water hose to the product, follow the instructions below.
- Connecting to water mains (Optional)
- For products using water carboy (Optional)
- Water filter
- (Optional)
- Fixing external filter on the wall (Optional)
- Internal filter
- Preparation
- Things to be done for energy saving
- First Use
- Using the product
- Indicator panel
- Cooler compartment indicator
- Error status indicator
- Temperature indicator
- Vacation function button
- Temperature adjustment button
- Compartment selection button
- Cooler compartment indicator
- Economy mode indicator
- Vacation function indicator
- Economic use
- Power failure/High temperature / error warning indicator
- Energy saving function (display off)
- Rapid cooling
- Vacation function
- Cooler compartment temperature setting
- Energy saving (display off)
- Alarm off warning
- Keypad lock
- Eco-fuzzy
- Freezer compartment temperature setting
- Rapid freezing
- Freezer compartment temperature setting
- Economy mode
- Power failure/High temperature / error warning indicator
- Cooler compartment temperature setting
- Rapid cooling
- Vacation function
- Keypad lock / Keypad lock / filter replacing alert cancellation
- Water, fragmented ice, ice cubes selection
- Ice making on/off
- Display on/off
- Alarm off warning
- Autoeco
- Rapid freezing
- Activating the water filter replacement alert
- (For products connected to water mains and comprising filter)
- Power failure/High temperature / error warning
- Freezer compartment temperature setting
- Quick freeze
- Key lock
- Using the water dispenser (for certain models)
- Filling the water dispenser's tank
- Water tray
- Using the product
- Cleaning the water tank
- Dispensing ice / water (Optional)
- Drip tray
- Zero degree compartment (Optional)
- Vegetable bin
- Blue light (Optional)
- Ionizer (Optional)
- Minibar (Optional)
- Odour filter (optional)
- Icematic and ice storage container (Optional)
- Ice-maker (Optional)
- Freezing fresh food
- Recommendations for storing frozen foods
- Deep freezer details
- Door open alert (Optional)
- Interior light
- Preventing malodour
- Protecting plastic surfaces
- Troubleshooting
- The refrigerator is not working.
- Condensation on the side wall of the cooler compartment (MULTI ZONE, COOL, CONTROL and FLEXI ZONE).
- Compressor is not working
- The refrigerator's operating noise is increasing while in use.
- The refrigerator runs too often or for too long.
- The freezer temperature is very low, but the cooler temperature is adequate.
- The cooler temperature is very low, but the freezer temperature is adequate.
- The food items kept in cooler compartment drawers are frozen.
- The temperature in the cooler or the freezer is too high.
- Shaking or noise.
- The product is making noise of liquid flowing, spraying etc.
- There is sound of wind blowing coming from the product.
- There is condensation on the product's internal walls.
- There is condensation on the product's exterior or between the doors.
- The interior smells bad.
- The door is not closing.
- The vegetable bin is jammed.
- 8
- Branches
- South African Branches:
- BLOEMFONTEIN
- CAPE TOWN
- DURBAN
- EAST LONDON
- GAUTENG, MIDRAND
- POLOKWANE
- PORT ELIZABETH
- Sub-Saharan Africa Branches:
- ZAMBIA: SOUTHGATE INVESTMENTS LTD
- NAMIBIA: ATLANTIC DISTRIBUTORS (PTY) LTD
- ZIMBABWE: TRADECOMAFRICA
- BOTSWANA: RAY MORGAN AGENCIES
- SWAZILAND: LYNDS DISTRIBUTORS
- MOZAMBIQUE: COOL WORLD. LDA
- KEEP THIS CERTIFICATE AND SALES INVOICE AS PROOF OF PURCHASE FOR WARRANTY PURPOSES.
Brand : Defy
Model : DFF563
Category : Refrigerator