
FP-9 - Food processor CUISINART - Free user manual and instructions
Find the device manual for free FP-9 CUISINART in PDF.


| Product Type | 9-Cup Continuous Feed Food Processor |
| Brand | Cuisinart |
| Model | FP-9CF Series |
| Work Bowl Capacity | 9 cups (2.1 L) |
| Power | 720 W (typical for Cuisinart food processors) |
| Voltage / Frequency | 120 V ~ 60 Hz |
| Dimensions (H × W × D) | Approx. 10.5 × 8.0 × 7.5 in (26.7 × 20.3 × 19.0 cm) |
| Weight | Approx. 11.5 lb (5.2 kg) |
| Cord Length | Approx. 36 in (0.9 m) |
| Materials | Housing: ABS plastic; Work bowl: Tritan copolyester; Blade and discs: Stainless steel |
| Functions | Chopping, mixing, dough kneading, slicing, shredding, continuous feed |
| Controls | High, Low, Pulse/Off buttons |
| Safety Features | Interlock system prevents operation unless bowl and cover are locked; fast-stop circuit; polarized plug |
| Included Accessories | 9-cup work bowl, work bowl cover with small/medium pushers, universal chopping/mixing/dough blade, medium reversible slicing/shredding disc, fine reversible slicing/shredding disc, stem adapter, storage hub, continuous feed attachment with stem and slinger disc, instruction/recipe booklet |
| Dishwasher Safe Parts | All parts except housing base (top rack only) |
| Cleaning | Base: wipe with damp cloth; accessories: dishwasher safe or hand wash; do not immerse base |
| Storage | Store accessories in storage hub inside work bowl; keep blade and discs out of reach of children |
| Warranty | Limited 3-year warranty for U.S. consumers |
| Customer Service | 1-800-726-0190 (U.S.) |
| Maximum Capacities | Chopped fruit/vegetable: 5 cups; Sliced/shredded: 8 cups; Dough: 2.5 cups flour; Meat: 1 lb; Liquid: 5 cups |
Frequently Asked Questions - FP-9 CUISINART
User questions about FP-9 CUISINART
0 question about this device. Answer the ones you know or ask your own.
Ask a new question about this device
Download the instructions for your Food processor in PDF format for free! Find your manual FP-9 - CUISINART and take your electronic device back in hand. On this page are published all the documents necessary for the use of your device. FP-9 by CUISINART.
USER MANUAL FP-9 CUISINART
natural_image
Cuisine kitchen appliance with clear glass lid and control panel, labeled 'Cuisinart' (no visible text beyond branding)Cuisinart® 9-Cup Continuous Feed Food Processor
FP-9CF Series
IMPORTANT UNPACKING INSTRUCTIONS
This package contains a Cuisinart® 9-Cup Continuous Feed Food Processor and the accessories for it:
9-cup work bowl, work bowl cover with small and medium pushers, universal chopping/mixing/dough blade, medium reversible slicing/shredding disc, fine reversible slicing/shredding disc, removable stem adapter, storage hub, base, continuous feed attachment with stem and slinger disc, and instruction/recipe booklet.
CAUTION:
THE CUTTING TOOLS HAVE VERY SHARP EDGES.
To avoid injury when unpacking the parts, please follow these instructions.
- Place the box on a low table or on the floor next to the kitchen counter where you intend to keep the food processor. Be sure the box is right side up.
- Open top flaps—there will be a rectangular block of packing material that holds the processor parts, each fitted into a cavity.
- Remove the instruction/recipe book.
- Lift out the packing material.
- Remove the base, work bowl, work bowl lid, and continuous feed attachment, and place them on the counter or table. Read the instruction booklet thoroughly before using the machine.
- Save the shipping carton and packing material. You will find these very useful if you need to repack the processor for moving or other shipment.
We recommend that you visit our website, https://cuisinart.registria.com, for a fast, efficient way to complete your product registration.
IMPORTANT SAFEGUARDS
Always follow these safety precautions when using this appliance.
Getting Ready
- Read all instructions.
- Blade and discs are sharp. Handle them carefully.
- Always turn off and unplug appliance from outlet when not in use, before putting on or taking off parts, before removing food, and
before cleaning. To unplug, grasp plug and pull from electrical outlet. Never pull cord.
- Do not use outdoors.
- Do not let cord hang over edge of table or counter, or touch hot surfaces.
- Do not operate any appliance that has a damaged cord or plug, or after it has been dropped or damaged in any way. Contact Cuisinart Consumer Service Center at 1-800-762-0190 for information on examination, repair, or adjustment.
Operation
- Keep hands as well as spatulas and other utensils away from moving blade or discs while processing food to prevent the possibility of severe personal injury or damage to food processor. A plastic scraper may be used, but only when the food processor motor is stopped.
- Avoid coming into contact with moving parts. Never push food down by hand when slicing or shredding. Always use pusher.
- Make sure motor has completely stopped before removing cover. (If machine does not stop within 4 seconds after you remove the bowl cover assembly, call 1-800-762-0190 for assistance. Do not use the machine.)
- Never store any blade or disc on stem adapter. To reduce the risk of injury, no blade or disc should be placed on the shaft except when the bowl is properly locked in place and the processor is in use. Store blade and discs as you would sharp knives, out of reach of children.
- Be sure cover and feed tube are securely locked in place before operating food processor.
- Never feed food by hand. Always use the pusher.
- Never try to override or tamper with cover interlock mechanism.
Cleaning
To protect against risk of electrical shock, do not put base in water or other liquids.
General
- This appliance should not be used by or near children or individuals with certain disabilities.
- Do not operate this or any other motor-driven appliance while under the influence of alcohol or other substances that affect your reaction time or perception.
- This food processor is for household use. Use it only for food preparation as described in the accompanying instruction and recipe book. Do not use this appliance for anything but its intended use.
-
When using an approved Cuisinart Food Processor accessory, read all instructions included with that accessory.
-
The use of attachments not recommended or sold by Cuisinart may cause fire, electrical shock, personal injury, or damage to your food processor.
- To avoid possible malfunction of work bowl switch, never store processor with cover assembly in locked position.
- Do not operate your appliance in an appliance garage or under a wall cabinet. When storing in an appliance garage, always unplug the unit from the electrical outlet. Not doing so could create a risk of fire, especially if the appliance touches the walls of the garage or the door touches the unit as it closes.
NOTE: This appliance has a polarized plug (one blade is wider than the other). As a safety feature, this plug will fit in a polarized outlet only one way. If the plug does not fit fully in the outlet, reverse the plug. If it still does not fit, contact a qualified electrician. Do not attempt to defeat this safety feature.
NOTE: This appliance is not intended for use by children or by persons with reduced physical, sensory, or mental capabilities, or lack of experience and knowledge. Close supervision is necessary when any appliance is used near children. Children should be supervised to ensure that they do not play with the appliance.
Do not fill the bowl above the marked maximum fill line (or rated capacity) to avoid risk of injury due to damage to the cover or bowl.
SAVE THESE INSTRUCTIONS.
The lightning flash with arrowhead symbol within an equilateral triangle is intended to alert the user to the presence of dangerous uninsulated voltage within the product's enclosure that may be of sufficient magnitude to constitute a risk of fire or electric shock to persons.

The exclamation point within an equilateral triangle is intended to alert the user to the presence of important operating and
maintenance (servicing) instructions in the literature accompanying the appliance.
CONTENTS
Important Unpacking Instructions....2
Important Safeguards.... 2
Parts 4
Assembly Instructions.... 5
Machine Controls 5
Machine Functions....5
Cleaning, Storage, and Maintenance....6
For Your Safety....7
Technical Data....7
Troubleshooting....7
User Guide 10
Warranty Information.... 11
Recipes....12

WARNING
RISK OF FIRE OR ELECTRIC SHOCK DO NOT OPEN

WARNING: TO REDUCE THE RISK OF FIRE OR ELECTRIC SHOCK, DO NOT REMOVE COVER (OR BACK)
NO USER-SERVICEABLE PARTS INSIDE
REPAIR SHOULD BE DONE BY AUTHORIZED SERVICE PERSONNEL ONLY
PARTS
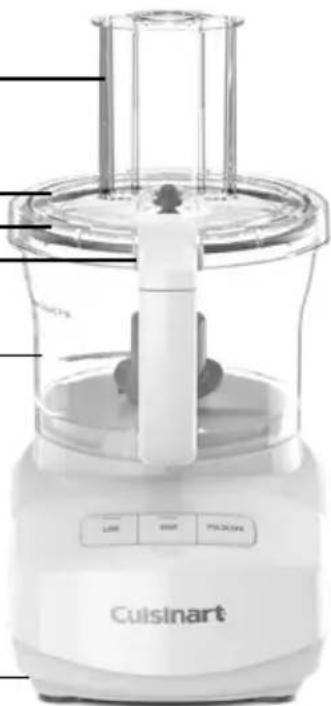
The machine includes:
- Housing base – With convenient button controls.
- 9-cup removable work bowl
- Work bowl cover with feed tube
To remove the work bowl cover, push in the release buttons (a) on each side of the handle interlock. The seal (b) can be removed for cleaning by hand or dishwasher.
- Small and medium pushers – Slide inside the feed tube.
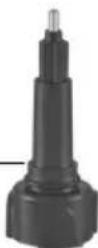
- Stem adapter
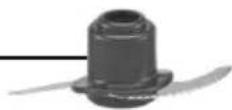
- Universal blade for chopping, mixing, and dough
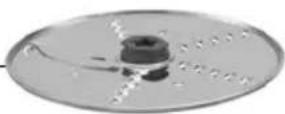
- Fine reversible slicing/shredding disc
- Medium reversible slicing/shredding disc
- Storage hub – Stores stem adapter, blade, and discs inside the work bowl (for storage use only).
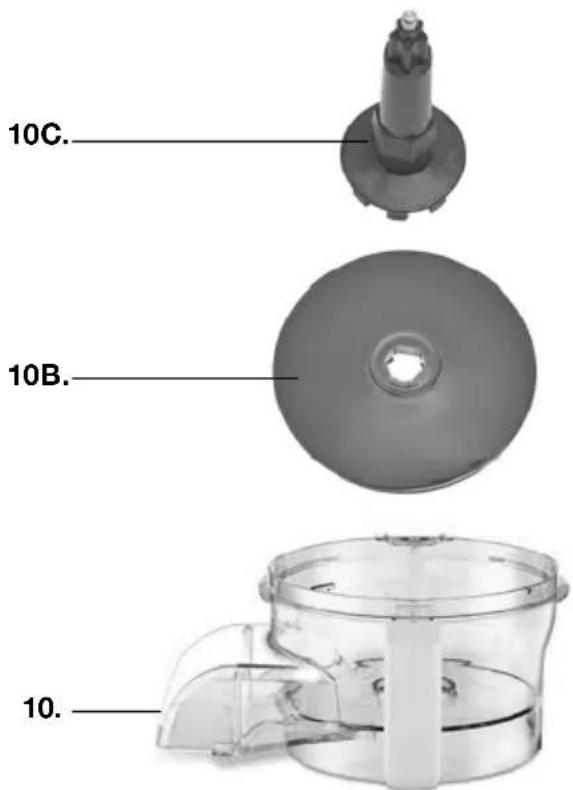
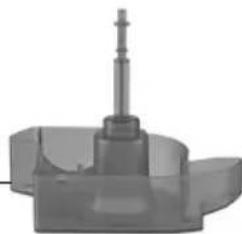
- Continuous feed attachment
10A. Work bowl – For slicing and shredding unlimited amounts of ingredients or separating sliced and/or shredded ingredients.
10B. Slinger disc – Directs sliced or shredded ingredients through continuous feed attachment.
10C. Stem adapter – Works with the food processor's reversible slicing/shredding discs.
8.

7.
6.
5.
natural_image
3D rendered mechanical component with cylindrical shaft and flanged base (no visible text or symbols)9.
4.
3.
3b.
3a.
2.
1.
natural_image
Front view of a Cuisinart kitchen blender with control panel and menu (no visible text or symbols on the device itself)ASSEMBLY INSTRUCTIONS
Before First Use
Before using your Cuisinart® 9-Cup Continuous Feed Food Processor for the first time, wash the work bowl, work bowl cover, pushers, blade, discs, and continuous feed attachment (see cleaning instructions on page 6).
- Place the food processor base on a dry, level countertop with the controls facing you. Do not plug the unit in until it is fully assembled.
- With the bowl on the base, use the handle to turn the work bowl clockwise to lock it onto the housing base.
UNIVERSAL BLADE FOR CHOPPING, MIXING, AND DOUGH
-
Place the work bowl on top of base, with the work bowl handle just to the right of center. Turn the work bowl clockwise to lock it onto the housing base until the handle is centered.
-
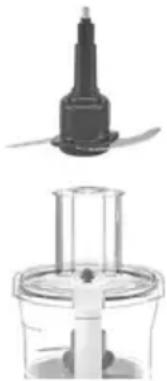
Carefully place the blade onto the stem adapter. Holding top of stem adapter, lift and place over the work bowl accessory adapter. Blade should rest on the bottom of the work bowl. (see Fig. 1).
natural_image
Two views of a kitchen appliance: top shows a black cylindrical component with a fan-like structure, bottom shows a clear lid with a small pot (no text or symbols visible)Fig. 1
-
Plug in the housing base.
-
Add desired ingredients to work bowl.
-
Place the work bowl cover, with feed tube at the back of the work bowl, on the work bowl by latching the back on first and then pushing down on the front to lock into place.
-
Align pusher with the feed tube opening on the work bowl cover and slide down to the bottom.
-
You are now ready to operate the machine.
REVERSIBLE SLICING AND SHREDDING DISCS
-
Place the work bowl on top of the base, with the work bowl handle just to the right of center. Turn the work bowl clockwise to lock it onto the housing base.
-
Insert stem adapter without universal blade.
-
Choose desired disc.
-
Carefully place disc over stem adapter, with the side being used facing up.
-
Place the work bowl cover, with feed tube at the back of the work bowl, on the work bowl by latching the back on first and then pushing down on the front to lock into place.
- Align pusher with the feed tube opening on the work bowl cover and slide down to the bottom.
- Plug in the housing base.
- The machine is now ready for use.
CONTINUOUS FEED ATTACHMENT
- Substitute the 9-cup work bowl for the continuous feed attachment. Place the continuous feed work bowl on top of food processor base, with the work bowl handle just to the right of center. Turn the work bowl clockwise to lock it onto the housing base.
- Insert the continuous feed attachment stem adapter into the continuous feed work bowl.
- Hold slinger disc with rib facing up. Slide slinger disc over the stem adapter until it is firmly in place.
- Carefully place slicing/shredding disc over the stem adapter with the side being used facing up.
- Place the work bowl cover, with feed tube at the back of the work bowl, on the work bowl by latching the back on first and then pushing down on the front to lock into place.
- Place a receptacle for processed food on counter under chute. You can use bowls or saucepans. Those with high (under 6 inches, or 15cm) straight sides work best.
- Put food in feed tube. Remember to cut one end of food flat if you are slicing and to insert in feed tube flat side down. Insert pusher and using light pressure, guide the pusher with one hand, while using either High, Low, or Pulse mode. Slinger disc will direct food through chute into receptacle. Total amount of food you can slice or shred is limited only by size of receptacle under chute. You can replace full receptacle with an empty one and continue slicing or shredding.
MACHINE CONTROLS
High and Low Control Buttons
The High and Low controls are buttons that allow the machine to run until Pulse/Off is selected. The High and Low speed control buttons direct the machine to run at either High or Low speed. Stop the machine by pressing Pulse/Off. High speed is used for most chopping, slicing, and shredding tasks. Use Low speed for doughs, mixing batters, and creating emulsions.
-
Properly assemble and engage the machine.
-
Add ingredients to the work bowl, either through the feed tube or directly into the bowl.
- Press the High or Low button and the motor will start.
- Press the Pulse/Off button when finished.
Pulse/Off Button
The Pulse control directs the machine to run only while it is being pressed. This capability provides more accurate control of the duration and frequency of processing. Unless otherwise specified, a pulse should be about 1 second.
With the machine properly assembled and engaged, and ingredients in the work bowl, press the Pulse button repeatedly as needed.
MACHINE FUNCTIONS
Using the Universal Blade for Chopping, Mixing, and Dough
Chopping
- For raw ingredients: Peel, core, and/or remove seeds and pits. Food should be cut into even 12 - to 1-inch pieces. Foods cut into same size pieces produce the most even results.
- Pulse food in 1-second increments to chop. For the finest chop, either hold the Pulse button down or press High or Low to run the machine continuously. Watch ingredients closely to achieve desired consistency, and scrape the work bowl as necessary. Low speed is recommended for making doughs and batters. High speed is recommended for most other chopping, processing, and slicing/shredding tasks.
Puréeing
- To purée fresh fruits or cooked fruits/vegetables: Ingredients should be cut into 1-inch pieces; a smooth purée is best achieved when all pieces are equal in size. Pulse to initially chop and then process on High until food is puréed; scrape the work bowl as necessary. NOTE: Do not use this method to purée cooked white potatoes.
- To purée solids for a soup or sauce: Strain the solids from the liquid, and process the solids alone. Add cooking liquid and process as needed.
Dough
- First, process the dry ingredients (flour, salt, etc). Start processing on Low. With the machine running, add the liquid ingredients through the small feed tube as quickly as the dry ingredients will absorb them. Should liquid be added too quickly, wait until ingredients in work bowl have been incorporated before adding more liquid. Add remaining liquid slowly with machine still running. If dough appears too sticky, add additional flour,
about 1 tablespoon at a time, until a cohesive dough ball forms. Conversely, do the same should the dough be too dry, adding additional liquid 1 tablespoon at a time until a cohesive dough ball forms.
Never use more than 2 cups of flour when preparing a yeasted dough in this food processor.
Using the Reversible Slicing and Shredding Discs
- The slicing side of the discs makes whole slices. It slices fruits and vegetables, cooked meat, and semi-frozen raw meat. The shredding side of the discs shreds most firm and hard cheeses. It also shreds vegetables like potatoes, carrots, and zucchini.
- Always pack food in the feed tube evenly for slicing and shredding. The food will dictate the amount of pressure: Use light pressure for soft foods, medium pressure for medium foods, and firm pressure for harder foods. Always process with even pressure.
- For round fruits or vegetables: Remove a thick slice on the bottom of the food so that it sits upright in the feed tube. If food does not fit in the feed tube, cut in half or quarters to fit. Process with even pressure.
- For small ingredients like mushrooms, radishes, or strawberries: Trim the ends so the food sits upright in the feed tube.
- When slicing or shredding soft cheese, be sure that the cheese is well chilled.
- For hard cheeses, like Parmesan, room temperature cheese yields best results.
- To shred leafy vegetables like lettuce or spinach: Roll leaves together and stand them up in feed tube. Process with even pressure.
NOTE: Do not use universal blade when slicing or shredding.
NOTE: Always use the pusher when slicing or shredding. Never put your hands in the feed tube while unit is running.
CLEANING, STORAGE, AND MAINTENANCE
- Keep your Cuisinart ^® 9-Cup Continuous Feed Food Processor ready to use on the kitchen counter. When not in use, leave it unplugged. Store accessories in the provided storage hub inside the work bowl.
- Keep the blade and discs out of the reach of children.
- All parts except the housing base are dishwasher safe but on the top rack only. Due to intense water heat, washing the work bowl, cover, and accessories on the bottom rack may cause
damage over time. Insert the cover with the feed tube facing up to ensure proper cleaning. Insert the work bowl and pushers upside down for drainage. Remember to unload the dishwasher carefully when removing sharp blade and discs.
- To simplify cleaning, rinse the work bowl, cover, pushers, stem adapter, blade, or discs immediately after use so food won't dry on them. Be sure to position the pushers and work bowl upside down for drainage. If food lodges in the pusher, remove it by running water through it, or use a bottle brush.
- If you wash the blade and discs by hand, do it carefully. When handling, use the plastic hubs. Avoid leaving them in soapy water where they may disappear from sight. If necessary, use a brush.
- Work bowl should not be placed in a microwave oven.
- The housing base may be wiped clean with a soapy, nonabrasive cloth or sponge. Be sure to dry it thoroughly.
- If the feet leave spots on the counter, spray them with a spot remover and wipe with a damp sponge. If any trace of the spot remains, repeat the procedure and wipe the area with a damp sponge and nonabrasive cleaning powder.
IMPORTANT: Always use the provided storage hub. Never store any blade or disc on the stem adapter. No blade or disc should be placed on the shaft except when the processor is about to be used.
MAINTENANCE: Any other servicing should be performed by an authorized service representative.
FOR YOUR SAFETY
Like all powerful electrical appliances, a food processor should be handled with care. Follow these guidelines to protect yourself and your family from misuse that could cause injury.
- Handle and store metal blade and discs carefully utilizing the provided storage hub. Their cutting edges are very sharp.
- Never install the stem adapter with blade or discs until the work bowl is locked in place.
- Always be sure that the blade or disc is down on the stem adapter as far as it will go.
- Always insert the stem adapter with metal blade in the work bowl before putting ingredients in bowl.
- When slicing or shredding food, always use the pusher. Never put your fingers or spatula into feed tube.
- Always wait for the blade or disc to stop spinning before you remove the pusher assembly or cover from the work bowl.
• Always unplug the unit before removing food,
cleaning, or putting on or taking off parts.
- Always remove work bowl from base of machine before you remove the universal blade or slicing/shredding disc.
- Be careful to prevent the universal blade or slicing/shredding disc from falling out of the work bowl when emptying the bowl. Remove the stem adapter with blade before tilting the work bowl.
TECHNICAL DATA
The motor in your food processor operates on a standard line operating current. The appropriate voltage and frequency for your machine are shown on a label on the bottom of the base.
An automatic temperature-controlled circuit breaker in the motor ensures complete protection against motor burnout. If the processor runs for an exceptionally long time when chopping, mixing, or kneading a thick or heavy mixture in successive batches, the motor may overheat. If this happens, the processor will stop. Turn it off, unplug the unit, and wait for the motor to cool before proceeding. It will usually cool within 10 minutes. In extreme cases, it could take an hour.
Safety switches prevent the machine from operating when the work bowl or the cover is not locked into position. The motor stops within seconds when the motor is turned off; and when the pusher assembly is removed, a fast-stop circuit also enables the motor to stop within seconds.
Cuisinart offers a limited three-year warranty on the entire machine.
TROUBLESHOOTING
Food Processing
-
Problem: The food is unevenly processed Solution:
-
The ingredients should be cut evenly into 12 - to 1-inch pieces before processing.
-
Process in batches to avoid overloading.
-
Problem: Slices are uneven or slanted.
Solution:
- Place food cut side down into the feed tube.
-
Apply even pressure on the pusher.
-
Problem: Food falls over in feed tube.
Solution:
- Food should not be tightly packed inside the feed tube. For best results feed tube should be loosely packed.
- Problem: Some food remains on top of the disc.
Solution:
- It is normal for small pieces to remain; cut remaining bits by hand and add to processed ingredients.
- Problem: Universal chopping/mixing/dough blade cannot be removed from the stem adapter.
Solution:
- Place the blade/stem adapter assembly in a bowl filled with warm tap water. This should help loosen trapped food particles between the blade and stem adapter. To see if food has loosened, remove assembly from water by lifting from the stem. Holding the stem, place the blade assembly on countertop and press down on stem. This should free the blade from the stem. If blade still cannot be removed, return to warm water and repeat above steps.
Dough Kneading
- Problem: Motor slows down.
Solution:
- Amount of dough may exceed maximum capacity of your food processor. Remove half and process in two batches.
-
Dough may be too wet (see number 8). If motor speeds up, continue processing. If not, add more flour, 1 tablespoon at a time, until the motor speeds up. Process until dough cleans the sides of the work bowl.
-
Problem: Blade doesn't incorporate ingredients.
Solution:
- Always start the food processor before adding liquid. Add liquid in a slow, steady stream through the small feed tube, allowing the dry ingredients to absorb the liquid as fast as they can. If too much liquid is added, wait until ingredients in the work bowl are incorporated, then add remaining liquid slowly with the machine running. Pour liquid onto dough as it passes under feed tube opening; do not pour liquid directly onto bottom of the work bowl.
- Problem: Blade rises in work bowl.
Solution:
- Excessively sticky dough can cause blade to rise. Carefully reinsert blade and immediately add 2 tablespoons of flour through the feed tube while the machine is running.
- Problem: Dough doesn't clean inside of the work bowl.
Solution:
- Amount of dough may exceed maximum capacity of your food processor. Remove half and process in two batches.
- Dough may be too dry (see number 7).
-
Dough may be too wet (see number 8).
-
Problem: Nub of dough forms on top of blade and does not become uniformly kneaded.
Solution:
- Stop machine, carefully remove dough, divide it into 3 pieces, and redistribute them evenly in the work bowl.
- Problem: Dough feels tough after kneading.
Solution:
- Divide dough into 2 or 3 pieces and redistribute evenly in bowl. Process 10 seconds or until uniformly soft and pliable.
- Problem: Dough is too dry.
Solution:
- While machine is running, add water 1 tablespoon at a time until dough cleans the inside of the bowl.
- Problem: Dough is too wet.
Solution:
- While machine is running, add flour 1 tablespoon at a time until dough cleans the inside of the bowl.
Continuous Feed
- Problem: Food is sticking to the walls of the continuous feed work bowl.
Solution: Make sure the continuous feed work bowl is clean and completely dry before using.
- Problem: Food is clogging the continuous feed chute.
Solution: We suggest using the medium slicing/shredding disc. To clear food from the chute, remove the lid from the continuous feed work bowl and then remove the slicing/shredding disc. Use a small spatula to clear food and dry bowl well.
Note: Foods with a higher water content can be more prone to sticking to the inside walls of the chute.
When slicing or shredding, begin processing ingredients in order from the least water content to the most. As the bowl gets wet, some ingredients might adhere to the side of the work bowl. Some examples of lower water content vegetables: cabbage and Brussels sprouts Medium water content: radish, carrots, celery Higher water content: cucumbers
For best results, be sure to trim all items so that they loosely fit in the feed tube. It should take minimal to no effort for items to feed through the tube.
Technical
- Problem: The motor does not start.
Solution:
- There is a safety interlock to prevent the motor from starting if it is not properly assembled. Make sure the work bowl and work bowl cover are securely locked into position.
-
If the motor still will not start, check the power cord and outlet.
-
Problem: The food processor shuts off during operation.
Solution:
- The cover may have become unlocked; check to make sure it is securely in position.
RECOMMENDED MAXIMUM WORK BOWL CAPACITY
| FOOD CAPACITY | |
| Sliced or shredded fruit, vegetable, or cheese 8 cups | |
| Chopped fruit or vegetable 5 cups | |
| Puréed fruit or vegetable | 31⁄2 cups cooked; 21⁄4 cups puréed |
| Chopped Cheese 2 1⁄2 cups | |
| Chopped or puréed meat, fish, or seafood (raw) 1 pound | |
| Thin liquid (e.g., dressings, soups, etc.) | 5 cups |
| Cake batter 8-inch cheesecake batter; 1 box (15.25-ounce) cake mix | |
| Cookie dough | 2 dozen (based on average chocolate chip cookie recipe) |
| White bread/pizza dough 21⁄2 cups (all-purpose or bread flour) | |
| Nuts for nut butter | 21⁄2 cups |
USER GUIDE
You can slice, shred and chop a multitude of vegetables and fruits in the Cuisinart® 9-Cup Continuous Feed Food Processor. What you may not know is that the food processor is the perfect tool for a number of other tasks, such as softening butter, making breadcrumbs, making baby food, etc. Here is a guide that will help you in preparing just about anything!
| FOOD TOOL SPEED DIRECTIONS | |||
| Soft Cheeses (ricotta, cream cheese, cottage cheese, etc.) | Universal Chopping/Mixing/Dough Blade | Low or High | Bring cheese to room temperature. When applicable, cut into 1-inch pieces. Process until smooth, stopping to scrape down the sides of the bowl as needed. Perfect for making cheesecakes, dips, pasta fillings, and more. |
| Firm Cheeses (Cheddar, Swiss, Edam, Gouda, etc.) | Slicing or Shredding Disc | Low or High | Cheese should be well chilled before slicing/shredding. Cut to fit feed tube. Use light to medium pressure when slicing/shredding. |
| Hard Cheeses (Parmesan, Romano, etc.) | Universal Chopping/Mixing/Dough Blade Slicing or Shredding Disc | Chopping: High Slicing/ Shredding: Low | If using the universal blade, cut into 12 -inch pieces. Pulse to break up and then process until finely grated. This will produce a nicely grated cheese. If slicing or shredding, cut to fit feed tube. Use light to medium pressure when slicing/ shredding. |
| Baby Food Universal | Chopping/Mixing/Dough Blade | Pulse and Low or High | As for all fruit and vegetable purées, cut ingredients into 12 - to 1-inch pieces. Steam ingredients until completely soft. Pulse to chop, then process until completely smooth (add steaming liquid through the feed tube when processing if necessary). To ensure there are no lumps, press mixture through a fine mesh strainer. Keeps frozen in ice cube trays for individual 1-ounce portions. |
| Butter Universal | Chopping/Mixing/Dough Blade Slicing or Shredding Disc | High | For creaming: Bring butter to room temperature. Cut into 1-inch pieces. Process, scraping bowl as necessary. For compound (flavored) butters, process flavoring ingredients, such as herbs, zest, vegetables, etc., before adding butter. For shredding/slicing: Freeze briefly. Use light to medium pressure to shred or slice. Shredded butter is great for preparing certain pastry doughs. Sliced butter is great for serving alongside corn on the cob or freshly made rolls. |
| Crumbs (Bread, Cookie, Cracker, Chip) | Universal Chopping/Mixing/Dough Blade | Pulse and High | Break into pieces. Pulse to break up, and then process until desired consistency. This will make perfect bread/cracker/chip crumbs for coating meats and fish. Processed cookies make delicious pie and cake crusts! |
| Fresh Herbs Universal | Chopping/Mixing/Dough Blade | Pulse Wash and dry herbs well. Pulse to roughly chop. Continue pulsing until desired consistency is achieved. | |
| Ground Meat Universal | Chopping/Mixing/Dough Blade | Pulse and High | Cut meat into 12 -inch pieces. Pulse to chop — about 14 long pulses or until desired consistency is achieved. If a purée is desired, continue to process. Never chop/purée more than 112 pounds at one time. |
| Ice Cream Universal | Chopping/Mixing/Dough Blade | High Put frozen fruit cut into 1-inch pieces into the work bowl, with liquid (juice or milk), any desired sweeteners (such as sugar, honey, or simple syrup), and other flavors. Process until smooth. | |
| Milkshakes/ Smoothies | Universal Chopping/Mixing/Dough Blade | Low For milk shakes, first add ice cream. While unit is running, add milk through the feed tube until desired consistency is achieved. For smoothies, add fruit first, then add the liquid through the feed tube while unit is running. | |
| Nuts Universal | Chopping/Mixing/Dough Blade | Pulse and High | Pulse to chop to desired consistency. To make a nut butter, pulse to break up, and then process until smooth, stopping to scrape down as needed |
| Superfine Sugar Universal | Chopping/Mixing/Dough Blade | High Process granulated sugar for about 1 minute until finely ground. Excellent for using in meringues and other baked goods. | |
| Whipped Cream | Universal Chopping/Mixing/Dough Blade | Low Process well-chilled cream until cream begins to thicken. Add sugar as desired; process continuously until cream reaches desired consistency. This cream is dense and perfect as a whipped topping for cake or ice cream. | |
WARRANTY
Limited Three-Year Warranty
This warranty is available only to U.S. consumers who purchase products directly from Cuisinart or an authorized Cuisinart® reseller. You are a consumer if you own a Cuisinart® 9-Cup Continuous Feed Food Processor that was purchased at retail for personal, family, or household use. Except as otherwise required under applicable law, this warranty is not available to retailers or other commercial purchasers or owners or consumers who purchase from unauthorized Cuisinart resellers. We warrant that your Cuisinart® 9-Cup Continuous Feed Food Processor will be free of defects in materials and workmanship under normal home use for 3 years from the date of original purchase.
We recommend that you visit our website, https://cuisinart.registria.com, for a fast, efficient way to complete your product registration. However, product registration does not eliminate the need for the consumer to maintain the original proof of purchase in order to obtain the warranty benefits. In the event that you do not have proof of purchase date, the purchase date for purposes of this warranty will be the date of manufacture.
CALIFORNIA RESIDENTS ONLY
California law provides that for In-Warranty Service, California residents have the option of returning a nonconforming product (A) to the store where it was purchased or (B) to another retail store that sells Cuisinart products of the same type. The retail store shall then, according to its preference, either repair the product, refer the consumer to an independent repair facility, replace the product, or refund the purchase price less the amount directly attributable to the consumer's prior usage of the product. If neither of the above two options results in the appropriate relief to the consumer, the consumer may then take the product to an independent repair facility, if service or repair can be economically accomplished. Cuisinart and not the consumer will be responsible for the reasonable cost of such service, repair, replacement, or refund for nonconforming products under warranty. California residents may also, according to their preference, return nonconforming products directly to Cuisinart for repair or, if necessary, replacement by calling our Consumer Service Center toll-free at 1-800-726-0190. Cuisinart will be responsible for the cost of the repair, replacement, and shipping and handling for such nonconforming products under warranty.
HASSLE-FREE REPLACEMENT WARRANTY
Your ultimate satisfaction in Cuisinart products is our goal, so if your Cuisinart® 9-Cup Continuous Feed Food Processor should fail within the generous warranty period, we will repair it or, if necessary, replace it at no cost to you. To obtain a return shipping label, please fill out the product inquiry form at https://www.cuisinart.com/customer-care/product-assistance/product-inquiry/. Or call our Consumer Service Center toll-free at 1-800-726-0190 to speak with a representative.
Your Cuisinart® 9-Cup Continuous Feed Food Processor has been manufactured to the strictest specifications and has been designed for use only in 120-volt outlets and only with authorized accessories and replacement parts. This warranty expressly excludes any defects or damages caused by attempted use of this unit with a converter, as well as use with accessories, replacement parts, or repair service other than those authorized by Cuisinart. This warranty does not cover any damage caused by accident, misuse, shipment, or other than ordinary household use. This warranty excludes all incidental or consequential damages. Some states do not allow the exclusion or limitation of these damages, so these exclusions may not apply to you. You may also have other rights, which vary from state to state.
Important: If the nonconforming product is to be serviced by someone other than Cuisinart's Authorized Service Center, please remind the servicer to call our Consumer Service Center at 1-800-726-0190 to ensure that the problem is properly diagnosed, the product is serviced with the correct parts, and the product is still under warranty.
Cuisinart
Cuisinart® 9-Cup Continuous Feed Food Processor
Recipe Booklet
natural_image
Top-down view of a meal set with various dishes and utensils on a marble surface (no text or symbols visible)Breakfast/Brunch
Chocolate Chip Scones....15
Zucchini Spice Bread 16
Spinach, Mushroom, and Gruyère Quiche 17
Hash Browns ....18
Tropical Smoothie Bowl 19
Dips/Spreads
Crispy Shallot Butter....19
Maple-Bacon Butter 20
Vegetable Cream Cheese....21
Honey Nut Butter 21
Winter Squash Hummus 22
Salsa Fresca....22
Caramelized Onion Dip 23
Guasacaca 24
Dressings/Sauces
Simple Tomato or Pizza Sauce 24
Pistachio-Arugula Pesto 25
Sun-Dried Tomato and Almond Pesto 26
Aioli....27
Greek Vinaigrette 27
Classic Caesar Dressing....28
Vegan Caesar Dressing....28
Vietnamese Peanut Sauce 29
Ginger-Sesame Dumpling Sauce 29
Soup/Salads/Sides
Gazpacho 30
Loaded Sweet Potato Soup.... 31
Greek Salad....32
Spicy Slaw 32
Sliced Brussels Sprouts Caesar Salad....33
Delicata Squash Gratin.... 34
Quick-Pickled Veggies 35
Potato-Zucchini-Carrot Cakes 36
Tahini and Miso Cucumber Salad.... 37
Cauliflower Fried Rice 38
Main Course
Pizza with Pistachio-Arugula Pesto, Prosciutto, and Burrata 39
Margherita Pizza....40
Vegetable Stir-Fry 41
Shrimp Summer Rolls 42
Vegetable Dumplings....43
Mushroom Bolognese 44
Chicken Pot Pie 45
Cilantro-Lime Chicken 46
Pasta Primavera 47
Falafel with Middle Eastern Salad 48
Lamb Meatballs....49
Smash Veggie Burgers 50
Breads/Dough
Plain or Seasoned Breadcrumbs....51
Pizza Dough 52
Gluten-Free Pizza Dough....52
Cauliflower Crust for Pizza....53
Buttermilk Drop Biscuits 56
Desserts
Cranberry Apple Pie 57
Classic Carrot Cake with Cream Cheese Frosting....58
Banana-Chip "Ice Cream" with Peanut Butter Swirl 59
Pistachio Shortbread....60
Raspberry Swirl Cheesecake....61
Chocolate Hazelnut Spread 62
Chocolate Chip Scones
Using mini chocolate chips ensures a little sweet treat in each bite. We love serving these warm with Chocolate Hazelnut Spread (page 62).
Yield: 8 scones
INGREDIENTS
1 12 cups cake flour
1 cup unbleached all-purpose flour, plus more for shaping
2 tablespoons granulated sugar
1½ teaspoons baking powder
14 teaspoon baking soda
1 teaspoon kosher salt
1 cup buttermilk
1 large egg
6 tablespoons unsalted butter, cold and cut into 12 -inch cubes
14 cup mini chocolate chips
Egg wash (1 large egg plus 1 teaspoon water, whisked well)
Turbinado sugar, for sprinkling
INSTRUCTIONS
- Insert the universal blade into the work bowl of the Cuisinart® 9-Cup Continuous Feed Food Processor. Put the flours, sugar, baking powder, baking soda, and salt into the work bowl, and process on Low to combine, about 20 seconds.
- Put the buttermilk and egg in a liquid measuring cup and whisk to fully combine. Reserve.
- Add the butter to the dry ingredients and pulse until the mixture is shaggy. While still pulsing, slowly add the liquid ingredients, until just combined; do not overmix.
- Transfer the mixture to a clean countertop or large cutting board, and dust lightly with flour. Add the mini chips and then gently fold the dough over a few times to combine. Form the dough into a 10-inch cylinder. Using a sharp knife, cut into 8 even rounds. Place on a parchment-lined baking sheet. Cover lightly and transfer to the refrigerator to chill for a minimum of 1 hour, or up to overnight.
- Once chilled, preheat the oven to 400^ F with a rack in the middle position. Brush each scone with some of the egg wash and sprinkle with turbinado sugar.
- Bake for 25 to 30 minutes, or until golden-brown. Remove from the oven and allow to cool slightly on the baking sheet. Serve warm or at room temperature.
Nutritional information per scone:
Calories 264 (35% from fat) • carb. 40g • pro. 5g • fat 9g • sat. fat 6g • chol. 47g • sod. 440g • calc. 99 mg • fiber 1g
Zucchini Spice Bread
This moist quick bread is perfect for breakfast or for an afternoon snack.
Yield: one 2-pound loaf (16 servings)
INGREDIENTS
| Nonstick cooking spray | 12 cup walnuts, lightly toasted |
| 214 cups unbleached all-purpose flour | 1 large zucchini (8 to 10 ounces) |
| 112 teaspoons ground cinnamon | 12 cup vegetable oil |
| 34 teaspoon ground allspice | 1 cup granulated sugar |
| 14 teaspoon ground nutmeg | 2 large eggs |
| 1 teaspoon kosher salt | 12 cup dried cherries or cranberries |
| 112 teaspoons baking powder |
INSTRUCTIONS
- Preheat the oven to 325^ F. Coat a 9x5x3-inch loaf pan with cooking spray.
- Insert the universal blade into the work bowl of the Cuisinart® 9-Cup Continuous Feed Food Processor. Add the flour, spices, salt, and baking powder and process on Low for 10 to 15 seconds to sift. Transfer to a large bowl; reserve. Add the walnuts to the work bowl and pulse to chop, 2 to 3 pulses. Leaving the nuts in the work bowl, remove the universal blade and insert the medium shredding disc. Trim the zucchini to fit the feed tube in a standing position, and shred on High. Transfer the walnuts and zucchini to the bowl with the dry ingredients. Stir to combine.
- Reinsert the universal blade and add the vegetable oil, sugar, and eggs. Process on Low for 5 to 10 seconds until combined. Add to the bowl with the dry ingredients, along with the dried fruit, and stir until just combined.
- Pour the batter into the prepared pan, and bake in the middle of the oven for 1 hour and 15 minutes, or until a toothpick or cake tester comes out clean.
- Cool on a wire rack for 5 minutes, and then turn the loaf onto a wire rack to cool completely.
Nutritional information per serving:
Calories 194 (37% from fat) • carb. 28g • pro. 3g • fat 8g • sat. fat 1g • chol. 23mg • sod. 183mg • calc. 14mg • fiber 1g
Spinach, Mushroom, and Gruyére Quiche
Quiche is surprisingly simple to prepare, and made even simpler with the assistance of the food processor. Be sure the crust is nicely par-baked before pouring in the filling to ensure a flaky base.
Yield: 12 servings
INGREDIENTS
| Unbleached all-purpose flour, as needed | 14 teaspoon kosher salt, dividedPinch freshly ground black pepper |
| 1 recipe Flaky Pie Crust (page 54) | 14 teaspoon fresh thyme leaves |
| 1 large egg white, lightly beaten | 1 cup baby spinach |
| 1 garlic clove, peeled | 1 ounce Gruyère |
| 4 ounces baby bella (cremini) or white mushrooms, scrubbed and trimmed | 12 cup whole milk 12 cup heavy cream |
| 112 teaspoons olive oil | 4 large eggs |
INSTRUCTIONS
- On a lightly floured surface, roll out the pastry into an 11-inch circle about 18 inch thick. Reverse the dough onto the rolling pin and unroll it evenly over a 9-inch tart pan. Press the dough lightly into the pan, lifting the edges and working it gently down into the bottom edge of the pan. Trim off excess dough by rolling the pin over the top of the pan. With your thumbs, push the dough 18 inch above the edge of the mold to make an even, rounded rim of dough around the inside circumference of the pan. Chill in refrigerator for about 30 minutes.
- Preheat the oven to 400^ F with the rack in the middle position. Using the tines of a fork, prick the dough evenly all over, but make sure not to go entirely through the dough. Line the shell with parchment and weigh it down with pie weights, dried beans, or rice. Put the tart shell in the oven and bake until the dough under the parchment is no longer wet, about 20 minutes. Remove the weights and parchment, and bake for another 2 minutes, until the shell is lightly brown. Brush immediately with the egg white. Reserve. Reduce the oven temperature to 325^ F.
- While the tart shell is baking, prepare the filling. Insert the universal blade in the work bowl of the Cuisinart® 9-Cup Continuous Feed Food Processor. With the machine running on High, drop the garlic through the feed tube to finely chop. Keeping the garlic in the work bowl, remove and set aside the universal blade, and insert the medium slicing disc. Fill the feed tube with the mushrooms and slice on High.
- Put the oil into a medium skillet (about 10 inches) set over medium-low heat. Once the oil is hot, add the garlic with a pinch of the salt and the pepper. Sauté until the garlic is softened and fragrant, but has not browned. Add the mushrooms, the remaining salt, and the thyme. Sauté until the mushrooms are starting to brown and have softened. Add the spinach and cook, stirring, until wilted. Remove and reserve.
- Remove the slicing disc and replace with the fine shredding disc. Shred the Gruyère on High. Remove and reserve.
-
Remove the shredding disc and replace with the universal blade. Process the milk, cream, and eggs on Low until combined, about 20 seconds. Reserve the custard in bowl.
-
Spread the mushroom-spinach mixture in the tart shell, top with the custard, and sprinkle with the cheese. (Depending on your tart pan, the custard may not all fit. Do not overfill.)
- Carefully place the quiche in the preheated oven. Bake until just set, 20 to 22 minutes.
- Transfer to a wire rack to cool for about 5 minutes before slicing and serving.
Nutritional information per serving:
Calories 181 (71% from fat) • carb. 9g • pro. 4g • fat 14g • sat. fat 8g • chol. 99mg • sod. 181mg • calc. 50mg • fiber 0g
Hash Browns
The food processor shreds potatoes in seconds for this crowd-pleasing diner side.
Yield: 4 hash brown patties
INGREDIENTS
1 pound russet potatoes, peeled and cut lengthwise into eight planks (to fit the feed tube)
1 scallion, cut into 2-inch pieces
1¼ teaspoons kosher salt Pinch freshly ground black pepper ¼ cup vegetable oil
INSTRUCTIONS
- Assemble the Cuisinart® Food Processor fitted with the continuous feed attachment. Place the medium shredding disc over the stem adapter.
- Place a large mixing bowl on the counter under the chute to catch the shredded potatoes.
- Shred the potatoes on High. Transfer the shredded potatoes to a clean tea towel. Squeeze the towel to remove excess liquid from the potatoes and then return to the mixing bowl. Reserve.
- Replace the shredding disc with the fine slicing disc. Place the bowl with potatoes under the chute. Add the scallion to the small feed tube and process on High. Add the salt and pepper and mix together to evenly distribute ingredients.
- Divide the potato mixture evenly into 4 portions. Use your hands to form the mixture into patties.
- Put the oil in a large, heavy skillet and place over medium heat. Once the oil is shimmering and a small piece of potato sizzles immediately upon contact, carefully place each patty in the pan. Cook for about 3 minutes, undisturbed, and then carefully flip and cook for 3 more minutes. Adjust the heat as necessary so that the patties are constantly sizzling.
- Once finished, transfer the patties to a paper towel-lined plate to drain, and then serve.
Nutritional information per hash brown:
Calories 200 (61% from fat) • carb. 15g • pro. 2g • fat 14g • sat. fat 1g • chol. 0mg • sod. 731mg • calc. 13mg • fiber 3g
Tropical Smoothie Bowl
Packed with vitamins and antioxidants, this tropical bowl is a great way to start the day.
Yield: 2 servings
INGREDIENTS
1 ripe banana
2 3.5-ounce packets frozen açai purée, broken or cut into 1-inch pieces
12 cup frozen mango pieces
12 cup frozen pineapple pieces
1 cup fresh berries
12 cup granola, mixed nuts and seeds, and or desired toppings
INSTRUCTIONS
- Insert the universal blade in the work bowl of the Cuisinart® 9-Cup Continuous Feed Food Processor. Add the banana, açai, mango, and pineapple in the work bowl.
- Pulse 5 to 6 times to break up the fruit, and then process on High for about 2 minutes until smooth and creamy.
- Divide between 2 bowls and top evenly with 12 cup each berries and 14 cup each granola, mixed nuts and seeds, and other desired toppings.
- Serve immediately.
Nutritional information per serving:
Calories 334 (27% from fat) • carb. 61g • pro. 5g • fat 11g • sat. fat 3g • chol. 0mg • sod. 71mg • calc. 32mg • fiber 12g
Crispy Shallot Butter
The first step of this recipe is to prepare the crispy shallots. You'll have more shallots than you need for the butter, so use the remainder for other uses, such as sprinkling over salads, grain bowls, or soup.
Yield: about 12 cup
INGREDIENTS
Crispy Shallots
2 medium shallots, peeled and trimmed
13 to 12 cup vegetable oil
Heavy pinch kosher salt
Compound Butter
8 tablespoons (1 stick) good-quality unsalted butter, cut into 4 pieces, room temperature
1 teaspoon fresh thyme leaves
14 to 34 teaspoon kosher salt, to taste
Pinch freshly ground black pepper
INSTRUCTIONS
- Prepare the crispy shallots. Insert the fine slicing disc in the work bowl of the Cuisinart® 9-Cup Continuous Feed Food Processor. Slice the shallots on High. Transfer the shallots to a microwave-safe bowl. Add the oil, making sure that the oil fully covers the shallots. Start with 13 cup but use no more than 12 cup. Put into a microwave and set the time for 5
minutes and power level to High. Continue to microwave on High, in 30-second increments, until golden, about 2 to 3 times. Keep the cycles short to prevent burning the shallots; cooking in 30-second bursts allow you to keep an eye on the color. Once golden, carefully transfer to a fine-mesh strainer to drain, and then transfer to a paper towel-lined plate. Blot well with additional paper towels, and then season with the salt. Reserve 3 tablespoons of the shallots for the butter, and store the remainder in an airtight container at room temperature.
- Remove the slicing disc and replace with the universal blade. Add the butter. Process on High until completely softened, then add 3 tablespoons of the crispy shallots, the thyme, and 14 teaspoon of the salt. Pulse, using long pulses, stopping to scrape down the bowl as needed, until ingredients are well incorporated but not overprocessed. Taste and add more salt if desired. Transfer to a piece of parchment paper. Shape into a log, wrap well in the parchment, then cover tightly with plastic wrap. Chill until firm.
Nutritional information per serving (1 tablespoon):
Calories 108 (97% from fat) • carb. 1g • pro. 0g • fat 12g • sat. fat 8g • chol. 30mg • sod. 143mg • calc. 2mg • fiber 0g
Maple-Bacon Butter
Packed with the best flavors of breakfast, this butter is great for sweet foods such as waffles, for savory items such as biscuits, or even stirred into a soup.
Yield: 12 cup
8 tablespoons (1 stick) good-quality unsalted butter, room temperature
2 slices bacon, diced and cooked (about 2 tablespoons bacon crumbles)
2 teaspoons pure maple syrup
INSTRUCTIONS
-
Insert the universal blade in the work bowl of the Cuisinart® 9-Cup Continuous Feed Food Processor. Put the butter in the work bowl. Pulse to soften, and then add the remaining ingredients. Pulse to combine, stopping to scrape down the bowl as necessary, then process on High for 5 seconds to fully combine.
-
Transfer to a piece of parchment paper. Form into a log, wrap well in the parchment, then cover tightly with plastic wrap. Chill until firm.
Nutritional information per serving (1 tablespoon):
Calories 71 (38% from fat) • carb. 2g • pro. 2g • fat 3g • sat. fat 0g • chol. 0mg • sod. 159mg • calc. 35mg • fiber 0g
Vegetable Cream Cheese
Vibrant with color and texture, this spread isn't just for schmearing on your morning bagel – serve with crackers, in sandwiches, or even as a topping for a baked potato.
Yield: 1½ cups
INGREDIENTS
12 medium carrot, cut into 12 -inch pieces
12 small red bell pepper, cut into 12 -inch pieces
1 scallion, chopped into 12 -inch pieces
1 tablespoon fresh Italian parsley leaves, stems discarded
8 ounces plain cream cheese
(1 standard package), room temperature and cut into 8 pieces
12 to 1 teaspoon fresh lemon juice
12 teaspoon kosher salt
INSTRUCTIONS
- Insert the universal blade in the work bowl of the Cuisinart® 9-Cup Continuous Feed Food Processor. Add the carrot, red pepper, scallion, and parsley, and pulse 5 to 6 times to chop. Add the cream cheese, lemon juice to taste, and salt, and pulse 10 to 12 times, until the ingredients are fully incorporated and the cream cheese is smooth. Scrape down the sides of the bowl every few pulses as needed. Store in an airtight container in the refrigerator.
Nutritional information per serving (1 tablespoon):
Calories 35 (85% from fat) • carb. 1g • pro. 1g • fat 3g • sat. fat 2g • chol. 10mg • sod. 79mg • calc. 1mg • fiber 0g
Honey Nut Butter
The perfect addition to your smoothie, bagel, or oatmeal.
Yield: 1 cup
INGREDIENTS
1 cup raw almonds
12 teaspoon kosher salt; more as needed
2 tablespoons vegetable oil
4 teaspoons clover honey; more as needed
INSTRUCTIONS
- Preheat oven to 350^ F. Spread the almonds on a baking sheet, and toast for 8 to 10 minutes until golden-brown and fragrant. Transfer the pan to a wire rack to cool completely.
- Once cooled, put the almonds and salt in the work bowl of the Cuisinart® 9-Cup Continuous Feed Food Processor fitted with the universal blade. Pulse 5 to 6 times to break up almonds. While processing on High, slowly stream in the oil and honey. Process until the mixture is smooth.
- Taste and adjust salt or sweetness as desired. Store in an airtight container in the refrigerator for up to two weeks.
Nutritional information per serving (2 tablespoons):
Calories 72 (72% from fat) • carb. 3g • pro. 2g • fat 6g • sat. fat 0g • chol. 0mg • sod. 73mg • calc. 24mg • fiber 1g
Winter Squash Hummus
Yield: 2 ^1/4 cups
INGREDIENTS
1½ pounds winter squash, such as butter-nut or delicata
14 cup extra-virgin olive oil, plus more for drizzling
12 teaspoon kosher salt
2 garlic cloves, peeled and smashed
12 cup cooked chickpeas, rinsed and drained
1 tablespoon tahini
1½ tablespoons fresh lemon juice
Pinch crushed red pepper flakes
Pinch freshly ground black pepper
Toasted pumpkin seeds for garnish (optional)
Pita bread, for serving
INSTRUCTIONS
- Preheat the oven to 350^ F with a rack in the middle position. Cut the squash in half and remove the seeds. Rub the flesh with 2 tablespoons of the olive oil and 2 generous pinches of the salt.
- Place the squash cut side down in a roasting pan, with 1 garlic clove under the cavity of each squash half. Roast until the squash is very soft, about 20 minutes for delicata or 45 minutes for butternut.
Scoop out the flesh from the squash. Put the squash and garlic in the work bowl of the Cuisinart® 9-Cup Continuous Feed Food Processor fitted with the universal blade. Add the chickpeas, tahini, remaining olive oil, lemon juice, remaining salt, black pepper, and pepper flakes. Process on High until smooth, about 2 minutes. Add up to 12 cup water while processing on High for a thinner hummus, if desired.
-
Taste and adjust seasoning as desired.
-
Transfer the hummus to a serving bowl or platter. Garnish with the pumpkin seeds, and serve the pita on the side. Store leftover hummus in an airtight container in the refrigerator for up to 1 week.
Nutritional information per serving ( 14 cup):
Calories 102 (54% from fat) • carb. 11g • pro. 2g • fat 7g • sat. fat 1g • chol. 0mg • sod. 119mg • calc. 44 mg • fiber 2g
Salsa Fresca
This vibrant salsa comes together in seconds using the food processor.
Yield: about 1½ cups
INGREDIENTS
1 small garlic clove, peeled
1 small jalapeño pepper, seeded, cut into 1-inch pieces
1 pint grape tomatoes
1 scallion, trimmed, cut in 1-inch pieces
14 cup fresh cilantro leaves
1 teaspoon fresh lime juice
1 / 2 to 3 / 4 teaspoon kosher salt
INSTRUCTIONS
- Insert the metal universal blade in the Cuisinart® 9-Cup Continuous Feed Food Processor. With the machine running on High, drop the garlic and jalapeño through the feed tube to finely chop. Scrape the work bowl.
- Add the tomatoes, scallion, cilantro, lime juice, and 12 teaspoon of the salt. Pulse 7 to 8 times to roughly chop.
- Strain any excess liquid before serving. Taste and add more salt as needed.
Nutritional information per tablespoon:
Calories 8 (9% from fat) • carb. 2g • pro. 0g • fat 0g • sat. fat 0g • chol. 0mg • sod. 170mg • calc. 4mg • fiber 0g
Caramelized Onion Dip
Allowing to sit overnight intensifies the fresh flavors of this dip, a perfect partner for potato chips, crispy veggies, or even french fries.
Yield: 3 cups
INGREDIENTS
1 pound onions (2 to 3 small to medium), peeled and sliced in half lengthwise
2 tablespoons unsalted butter
2 cups sour cream
2 tablespoons mayonnaise
1 teaspoon Worcestershire sauce
1 teaspoon onion powder
14 teaspoon garlic powder
12 teaspoon kosher salt; more to taste
14 teaspoon freshly ground black pepper; more to taste
14 cup fresh parsley leaves
INSTRUCTIONS
- Insert the medium slicing disc in the Cuisinart® 9-Cup Continuous Feed Food Processor. Slice the onions on High.
- Heat the butter and oil in a large Cuisinart® pan (12-inch skillet or 5½-quart sauté pan) over medium heat. Add the sliced onions and cook for 10 minutes, stirring occasionally. Reduce the heat to medium-low and cook for an additional 20 to 25 minutes, until browned and caramelized. Set aside to cool completely.
- Insert the universal blade in the clean work bowl of the food processor. Add the sour cream, mayonnaise, Worcestershire sauce, onion powder, garlic powder, salt, and pepper and process on High until smooth. Add the caramelized onions and parsley, and pulse until roughly chopped. Taste and adjust seasonings as necessary.
Nutritional information per serving (2 tablespoons):
Calories 65 (74% from fat) • carb. 3g • pro. 1g • fat 5g • sat. fat 3g • chol. 17mg • sod. 88mg • calc. 32mg • fiber 0g
Guasacaca
A zesty version of guacamole originating from Venezuela.
Yield: 2 cups
INGREDIENTS
3 tomatillos (7 to 8 ounces), quartered
1 small onion (2 to 3 ounces), cut into 2-inch pieces
1 small jalapeño, halved and seeded
2 garlic cloves, peeled
1 tablespoon olive oil
1½ teaspoons kosher salt, divided
12 cup fresh cilantro leaves
14 cup fresh parsley leaves
1 ripe avocado, halved and pitted
2 tablespoons fresh lime juice
2 tablespoons white vinegar
12 cup water
INSTRUCTIONS
- Preheat the oven to 400^ F.
- Toss the tomatillos, onion, jalapeño, and garlic with the oil and 12 teaspoon of the salt. Arrange evenly on a baking sheet and roast until the vegetables have softened and browned, about 30 minutes. Transfer the pan to a wire rack to cool to room temperature.
- Once cool, insert the universal blade in the work bowl of the Cuisinart® 9-Cup Continuous Feed Food Processor. Add the roasted vegetables, cilantro, and parsley. Pulse until the mixture is almost smooth.
- Scrape the sides of the bowl. Add the avocado, lime juice, vinegar, and remaining salt, and pulse 10 to 12 times, until the mixture is mostly smooth.
- With the machine running on High, pour the water through the feed tube.
- Adjust seasoning according to preference. Serve immediately.
Nutritional information per serving (based on 2 tablespoons):
Calories 52 (80% from fat) • carb. 2g • pro. 0g • fat 5g • sat. fat 3g • chol. 0mg • sod. 202mg • calc. 6mg • fiber 1g
Simple Tomato or Pizza Sauce
This sauce is quick and easy, and can be cooked down to a tasty pizza sauce in no time.
Yield: 2½ cups Tomato Sauce or 2 cups Pizza Sauce
INGREDIENTS
1 tablespoon olive oil
4 garlic cloves, peeled
^3/_4 teaspoon dried basil
12 teaspoon dried oregano
2 tablespoons dry white wine (optional)
1 28-ounce can whole plum tomatoes, with juices
12 teaspoon kosher salt
14 teaspoon freshly ground black pepper
1 to 2 tablespoons granulated sugar
14 teaspoon red pepper flakes (optional, for a spicier sauce)
INSTRUCTIONS
- Put the olive oil in a large saucepan set over medium-low heat.
- While the oil is heating, insert the universal blade into the work bowl of the Cuisinart® 9-Cup Continuous Feed Food Processor. With the machine running on High, drop the garlic through the feed tube, and process until finely chopped.
- When the oil is hot, add the garlic, basil, and oregano to the pan. Sauté until the garlic is fragrant, about 1 minute. Add the wine, if using, and increase the heat to medium; cook until the wine is completely evaporated, 3 to 4 minutes.
- While the wine is cooking, put the tomatoes into the work bowl and pulse 6 to 8 times to chop. Add the tomatoes, salt, and pepper to the pan.
- Bring sauce to a boil and then reduce the heat to low. Stir in 1 tablespoon of the sugar, adding more to taste. Partially cover the pan, and simmer for about 30 minutes, until slightly reduced. To make pizza sauce, simmer for an additional 30 minutes.
- After either sauce is ready, stir in the pepper flakes, if using. Taste and adjust seasoning as desired.
Tomato Sauce
Nutritional information per serving ( 14 cup):
Calories 38 (33% from fat) • carb. 5g • pro. 0g • fat 1g • sat. fat 0g • chol. 0mg • sod. 286mg • calc. 17mg • fiber 1g
Pizza Sauce
Nutritional information per serving (2 tablespoons):
Calories 24 (33% from fat) • carb. 3g • pro. 0g • fat 1g • sat. fat 0g • chol. 0mg • sod. 179mg • calc. 11mg • fiber 0g
Pistachio-Arugula Pesto
Ready in under 5 minutes, this versatile pesto is delicious baked on a pizza, spread on a sandwich, or tossed with pasta.
Yield: 2 cups
INGREDIENTS
1 ounce Parmesan cheese, cut into 12 -inch cubes
14 cup lightly salted pistachios
2 garlic cloves, peeled
2 cups baby arugula, packed
1 tablespoon fresh lemon juice
1 teaspoon fresh lemon zest
12 teaspoon kosher salt
14 teaspoon freshly ground black pepper
14 cup olive oil; more as needed
INSTRUCTIONS
-
Insert the universal blade in the work bowl of the Cuisinart® 9-Cup Continuous Feed Food Processor. Add the cheese, pistachios, and garlic, and process on High until roughly chopped, about 10 seconds. Add the arugula, lemon juice, lemon zest, salt, and pepper; chop using 10 to 15 pulses. With the machine running on High, add the olive oil in a slow, steady stream through the feed tube, processing to combine and form an emulsion, about 1 minute. Scrape down the sides of the work bowl. If a thinner consistency is desired, process with additional oil or water.
-
To store the pesto, transfer to a glass jar or airtight container; tap to remove air bubbles and even out the surface. Cover the surface directly with plastic wrap and refrigerate. The pesto will keep for 5 days in the refrigerator, or it may be frozen for up to 2 months.
Nutritional information per serving (1 tablespoon):
Calories 25 (84% from fat) • carb. 0g • pro. 1g • fat 2g • sat. fat 0g • chol. 1mg • sod. 56mg • calc. 14mg • fiber 0g
Sun-Dried Tomato and Almond Pesto
Let the food processor do the work for you with this incredibly easy, flavorful sauce.
Yield: 2 cups
INGREDIENTS
^3/_4 cup almonds
1 ounce Parmesan cheese, cut into 12 -inch cubes
1 garlic clove, peeled
14 cup sun-dried tomatoes, not packed in oil preferred
14 cup fresh parsley, packed
1 tablespoon fresh oregano
1 tablespoon red wine vinegar
2 teaspoons fresh thyme
1 teaspoon kosher salt
14 teaspoon freshly ground black pepper
1 cup olive oil
INSTRUCTIONS
- Preheat the oven to 350^ F. Spread the almonds on a baking sheet, and toast until fragrant and lightly golden-brown, 8 to 10 minutes. Transfer the pan to a wire rack to cool completely.
- Insert the universal blade into the work bowl of the Cuisinart® 9-Cup Continuous Feed Food Processor. Add the almonds, cheese, and garlic, and process on High until roughly chopped, about 10 seconds. Add the tomatoes, parsley, oregano, vinegar, thyme, salt, and pepper; pulse 10 to 15 times to chop. With the machine running on High, add the olive oil in a slow, steady stream through the feed tube, processing until combined and emulsified, about 1 minute. Scrape down the sides of the work bowl. For a thinner consistency, process with additional oil or water.
- To store the pesto, transfer to a glass jar or airtight container; tap to remove air bubbles and even out the surface. The pesto will keep for 5 days in the refrigerator or may be frozen for up to 2 months.
Nutritional information per serving (1 tablespoon):
Calories 84 (90% from fat) • carb. 1g • pro. 1g • fat 9g • sat. fat 1g • chol. 1mg • sod. 97mg • calc. 21mg • fiber 0g
Aioli
This garlicky mayo makes a great dipping sauce or sandwich spread.
Yield: 1 cup
INGREDIENTS
2 garlic cloves, peeled
4 large egg yolks
1 tablespoon fresh lemon juice
1 scant teaspoon Dijon mustard
1 cup olive oil
^3/_4 cup vegetable or grapeseed oil
INSTRUCTIONS
- Insert the fine shredding disc into the work bowl of the Cuisinart® 9-Cup Continuous Feed Food Processor. Shred the garlic on High.
- Replace the shredding disc with the universal blade. Scrape any garlic that has accumulated on the disc into the bowl as well as the sides of the bowl. Add the egg yolks, lemon juice, and mustard.
- With the machine running on Low, add the oils through the feed tube slowly, beginning drop by drop, until all the oil is incorporated and the mixture is completely emulsified. Store in an airtight container in the refrigerator for up to 4 days (note that the garlic will become more pronounced the longer it is stored).
Nutritional information per serving (based on 1 tablespoon):
Calories 225 (98% from fat) • carb. 0g • pro. 1g • fat 26g • sat. fat 3g • chol. 46mg • sod. 10mg • calc. 6mg • fiber 0g
Greek Vinaigrette
While this dressing is perfect for our simple Greek Salad on page 32, it's great on just about any green salad, and even works as a marinade for chicken or fish.
Yield: 23 cup
INGREDIENTS
1 garlic clove, peeled
2 tablespoons red wine vinegar
2 tablespoons fresh lemon juice
12 teaspoon Dijon mustard
1 teaspoon kosher salt
12 teaspoon freshly ground black pepper
12 tablespoon fresh oregano
12 cup extra-virgin olive oil
INSTRUCTIONS
- Insert the universal blade in the work bowl of the Cuisinart® 9-Cup Continuous Feed Food Processor. While running on High, drop the garlic through the feed tube and process until finely chopped. Add the vinegar, lemon juice, Dijon, salt, and pepper and process on High to combine.
- With machine running on Low, pour the olive oil through the drizzle hole in the pusher until the dressing is homogenous, 1½ to 2 minutes. Add the oregano and pulse a few times to combine.
Nutritional information per serving (1 tablespoon):
Calories 98 (97% from fat) • carb. 1g • pro. 0g • fat 11g • sat. fat 1g • chol. 0mg • sod. 235mg • calc. 5mg • fiber 0g
Classic Caesar Dressing
There are many versions of this recipe, but ours is close to the classic. If you would prefer not to use raw egg yolks, use an egg substitute.
Yield: 1 cup
INGREDIENTS
2 garlic cloves, peeled
6 anchovy fillets
2 large egg yolks
2 teaspoons Dijon mustard
4 teaspoons fresh lemon juice
4 teaspoons red wine vinegar
2 teaspoons Worcestershire sauce
12 teaspoon freshly ground black pepper
23 cup extra-virgin olive oil
INSTRUCTIONS
- Insert the universal blade in the work bowl of the Cuisinart® 9-Cup Continuous Feed Food Processor. With the machine running on High, drop the garlic down the feed tube and process until finely chopped. Add the anchovies, egg yolks, mustard, lemon juice, vinegar, Worcestershire, and pepper to the work bowl. Process on High until well blended.
- With the machine running on Low, slowly pour the olive oil through the drizzle hole in the pusher until the dressing is emulsified, about 30 seconds.
Nutritional information per serving (1 tablespoon
Calories 91 (95% from fat) • carb. 1g • pro. 1g • fat 10g • sat. fat 2g • chol. 24mg • sod. 60mg • calc. 4mg • fiber 0g
Vegan Caesar Dressing
A healthier, vegan-friendly alternative to traditional Caesar dressing, this recipe omits the egg yolks and anchovies and achieves creaminess from soaked cashews and umami flavor from soy sauce.
Yield: about 34 cup
INGREDIENTS
12 cup raw cashews, soaked overnight in cold water
14 cup water, plus more as needed
1 tablespoon fresh lemon juice
1½ teaspoons Dijon mustard
2 teaspoons reduced-sodium soy sauce
1 garlic clove, peeled
2 teaspoons capers
12 teaspoon freshly ground black pepper
Pinch kosher salt, plus more to taste
2 tablespoons extra-virgin olive oil
INSTRUCTIONS
- Insert the universal blade in the work bowl of the Cuisinart® 9-Cup Continuous Feed Food Processor.
- Drain and rinse the cashews. Put all ingredients except the olive oil in the work bowl and
process on High. While the unit is running on Low, gradually add the oil through the drizzle hole in the food pusher. Once the oil is fully incorporated, process for an additional minute, or until very smooth.
- If the dressing is too thick, add water, 1 tablespoon at a time, and continue to process on High.
- Taste and add salt, if desired.
Nutritional information per serving (2 tablespoons):
Calories 64 (62% from fat) • carb. 5g • pro. 2g • fat 5g • sat. fat 1g • chol. 0mg • sod. 1780mg • calc. 48mg • fiber 2g
Vietnamese Peanut Sauce
This creamy, flavorful sauce is commonly served with summer rolls but can also be used in a variety of other dishes. Try it on noodles or as a salad dressing.
Yield: 1 cup
INGREDIENTS
^3/_4 cup raw peanuts
14 cup hoisin sauce
2 teaspoons unseasoned rice vinegar
2 teaspoons sambal oelek (Indonesian chili paste)
14 cup cold water
INSTRUCTIONS
- Preheat the oven to 350^ F. Spread the peanuts on a baking sheet, and toast until fragrant and lightly golden-brown, 5 to 8 minutes. Let cool completely.
- Insert the universal blade in the work bowl of the Cuisinart® 9-Cup Continuous Feed Food Processor. Add the peanuts and process on High until roughly chopped, about 8 seconds. Reserve 1 tablespoon of the chopped peanuts.
- Continue to process the peanuts on High until a smooth paste forms, about 3 minutes. Add the hoisin sauce, rice vinegar, and sambal oelek. Process on High for an additional 10 seconds until fully incorporated. While continuing to process on High, stream in the water until a smooth sauce forms.
- Serve with the reserved peanuts sprinkled on top.
Nutritional information per serving (1 tablespoon):
Calories 48 (61% from fat) • carb. 3g • pro. 2g • fat 4g • sat. fat 0g • chol. 0mg • sod. 90mg • calc. 8mg • fiber 1g
Ginger-Sesame Dumpling Sauce
Salty, sweet, and sour, this balanced sauce is great paired with any type of dumpling!
Yield: makes about 1 cup
INGREDIENTS
1 garlic clove, peeled
1 12 -inch piece fresh ginger, peeled
1 scallion
12 cup low sodium soy sauce or tamari
1½ tablespoons unseasoned rice vinegar
2 teaspoons granulated sugar
2 teaspoons toasted sesame oil
INSTRUCTIONS
- Insert the universal blade into the work bowl of the Cuisinart® 9-Cup Continuous Feed Food Processor. With the unit running on High, add the garlic and ginger through the feed tube and process to finely chop, 10 to 15 seconds. Add the scallion, and process on High until finely chopped.
- Add the soy sauce, vinegar, sugar, and sesame oil. Pulse about 8 times, until the sugar is dissolved. Serve with your dumpling of choice.
Nutritional information per serving (1 tablespoon):
Calories 12 (42% from fat) • carb. 1g • pro. 0g • fat 1g • sat. fat 0g • chol. 0mg • sod. 265mg • calc. 3mg • fiber 0g
Gazpacho
This bright, vibrant soup is perfect all summer long.
Yield: 3½ cups
INGREDIENTS
1 garlic clove, peeled
1 jalapeño, seeded and cut into 1-inch pieces
2 medium vine-ripe tomatoes, cored and cut into 1-inch pieces
12 medium to large cucumber (about 3 ounces), cut into 1-inch pieces
2 scallions, trimmed and cut into 1-inch pieces
14 yellow bell pepper, cut into 1-inch pieces
14 red bell pepper, cut into 1-inch pieces
14 cup fresh Italian parsley, stems discarded
1 teaspoon kosher salt
14 teaspoon freshly ground black pepper
1 teaspoon red wine vinegar
1 teaspoon fresh lime juice
3 dashes hot sauce
1½ cups low-sodium vegetable juice
INSTRUCTIONS
- Insert the universal blade into the work bowl of the Cuisinart® 9-Cup Continuous Feed Food Processor. With the machine running on High, drop the garlic and jalapeño down the feed tube to chop. Stop to scrape down the sides of the work bowl, and add the tomatoes, cucumber, scallions, bell peppers, and parsley. Pulse 5 to 6 times to roughly chop.
- Add the salt, pepper, and vinegar, and vegetable juice, and pulse another 6 to 7 times to incorporate. Taste and adjust seasoning as desired. Serve.
Nutritional information per serving ( 12 cup):
Calories 24 (5% from fat) • carb. 5g • pro. 1g • fat 0g • sat. fat 0g • chol. 0mg • sod. 362mg • calc. 18mg • fiber 1g
Loaded Sweet Potato Soup
Time to get warm and cozy — the perfect rainy-day soup!
Yield: 5 cups
INGREDIENTS
3 ounces white Cheddar cheese
2 tablespoons unsalted butter
1 garlic clove, peeled
1 12 -inch piece fresh ginger, peeled
12 leek, trimmed and cut into 2-inch pieces
12 teaspoon kosher salt, divided Pinch freshly ground black pepper
1 medium sweet potato (about 8 ounces), peeled and cut to fit the feed tube (reserve in cold water if not using immediately)
1½ cups low-sodium chicken or vegetable broth
14 teaspoon ground cinnamon Pinch cayenne
14 to 12 cup heavy cream
14 cup sour cream or plain Greek yogurt
14 cup chopped cooked bacon
3 tablespoons sliced scallion
INSTRUCTIONS
- Insert the fine shredding disc in the Cuisinart® 9-Cup Continuous Feed Food Processor. Shred the Cheddar on High, transfer to a small bowl, and reserve.
- Put the butter in a medium pot set over low heat.
- While the butter is melting, prepare the vegetables. Insert the universal blade in the work bowl. With the unit running on High, add the garlic and ginger through the feed tube and process to finely chop, 10 to 15 seconds. Add the leek and pulse 8 to 10 times until finely chopped. Add the vegetables to the pot with a pinch each of the salt and pepper. Sauté on low until softened but not browning, about 8 minutes.
- While the vegetables are cooking, prepare the potato. Remove the universal blade and insert the medium slicing disc. Slice the potato on High. Add to the softened vegetables in the pot and stir to fullycoat. Add the broth, cinnamon, and cayenne, and raise the heat to bring the mixture to a boil. Once boiling, reduce heat to maintain a simmer. Cook until the potato slices are tender, about 15 minutes.
- Reinsert the universal blade into the work bowl and, using a slotted spoon, transfer the soup solids to the work bowl and transfer the broth to a measuring cup to make it easier to add to the food processor while puréeing. Process on Low while slowly adding the hot broth through the feed tube. Add 14 cup of the heavy cream and process until smooth, about 2 minutes. If a thinner soup is desired, add the remaining 14 cup of heavy cream.
- Serve immediately garnished with the Cheddar, sour cream or yogurt, bacon, and scallion divided evenly among each portion.
Nutritional information per serving (1 cup):
Calories 284 (68% from fat) • carb. 17g • pro. 4g • fat 21g • sat. fat 14g • chol. 70mg • sod. 726mg • calc. 68mg • fiber 2g
Greek Salad
Reminiscent of the pizza shop staple, the salad consists of all sliced ingredients, but can be served over chopped or sliced romaine lettuce, if desired.
Yield: 5 cups
INGREDIENTS
12 head romaine lettuce, cut to fit the feed tube
14 red onion, trimmed, halved, and cut to fit the feed tube
1 bell pepper, seeded and cut into four planks
1 cucumber, halved and trimmed to fit the feed tube
1 cup cherry tomatoes
12 cup pitted kalamata olives
4 ounces feta, well drained and blotted dry with paper towels
Greek vinaigrette (page 27), for serving
INSTRUCTIONS
- Assemble the Cuisinart® 9-Cup Continuous Feed Food Processor fitted with the continuous feed attachment. Place the medium slicing disc over the stem adapter.
- Place a medium serving bowl on the counter under the chute to catch the salad ingredients.
- Slice the vegetables in the order listed and then the olives on High, and finally the feta on Low.
- Gently toss, if desired, and serve immediately with the dressing.
Nutritional information per serving (1 cup, without dressing):
Calories 204 (33% from fat) • carb. 31g • pro. 6g • fat 8g • sat. fat 3g • chol. 20mg • sod. 453mg • calc. 172mg • fiber 4g
Spicy Slaw
This slaw works as a zesty companion for taco night, but we also love it as a side for any barbecue!
Yield: 2 cups
INGREDIENTS
3 ounces (about 14 small head) red cabbage, cut to fit the feed tube
3 ounces (about 14 small head) green cabbage, cut to fit the feed tube
2 ounces radish
12 small jalapeño, seeded
14 cup cilantro, roughly chopped
1 tablespoon fresh lime juice
2 teaspoons vegetable oil
14 teaspoon kosher salt, plus more to taste
14 teaspoon freshly ground black pepper, plus more to taste
INSTRUCTIONS
- Assemble the Cuisinart® 9-Cup Continuous Feed Food Processor fitted with the continuous feed attachment. Place the fine slicing disc over the stem adapter.
- Place a medium serving bowl on the counter under the chute to catch the slaw ingredients.
- Slice the cabbage on High. Reverse the disc to Shred and shred the radish and jalapeño also on High.
- Toss with chopped cilantro, lime juice, oil, salt and pepper.
- Taste and adjust seasoning according to preference.
Nutritional information per serving (1/4 cup):
Calories 18 (56% from fat) • carb. 2g • pro. 0g • fat 1g • sat. fat 0g • chol. 0mg • sod. 78mg • calc. 11mg • fiber 1g
Sliced Brussels Sprouts Caesar Salad
The different textures in this salad—crunchy Brussels sprouts and croutons, soft cheese, and creamy dressing—will have you reaching for seconds and thirds.
Yield: 6 cups
INGREDIENTS
Croutons
1 tablespoon extra-virgin olive oil
1 garlic clove, smashed
14 teaspoon kosher salt
4 ounces crusty bread (such as Italian or French), cut into 12 -inch cubes ( 412 cups cubed)
Salad
1 pound Brussels sprouts, loose leaves removed and stems trimmed (if desired, reserve some of the outer leaves to pan-fry to serve on top of the salad—this adds some extra texture and color to the salad)
2 ounces Parmesan
1 cup Caesar Dressing (page 28)
INSTRUCTIONS
- Heat the oven to 350^ F with a rack in the middle position. Line a large baking sheet with aluminum foil. Prepare the croutons. Combine the oil, garlic, and salt in a medium mixing bowl. Add the bread cubes and toss to fully coat, being sure to smash the garlic while tossing the bread. Transfer to the prepared pan and bake until golden-brown, 10 to 12 minutes, tossing halfway through. Transfer to a wire rack to cool. Discard the garlic.
- Assemble the Cuisinart® 9-Cup Continuous Feed Food Processor fitted with the continuous feed attachment. Place the fine slicing disc over the stem adapter.
- Place a medium serving bowl on the counter under the chute to catch the Brussels sprouts.
- Slice the Brussels sprouts on High. Reverse the disc to fine shred and then shred the Parmesan on High.
- If preparing the pan-fried leaves, put the oil in a medium skillet over medium-high heat. Once the oil is hot, add the leaves with a pinch of salt and pepper. Pan-fry until the edges of the leaves are browned and crispy, but the centers are bright green.
- Add the croutons to the bowl with the Brussels sprouts and Parmesan. Drizzle about 12 cup of the dressing over top and then gently toss together. Top with the pan-fried leaves, if using, and serve immediately with additional dressing on the side.
Nutritional information per serving ( 12 cup):
Calories 133 (63% from fat) • carb. 9g • pro. 4g • fat 1g • sat. fat 2g • chol. 19mg • sod. 242mg • calc. 77mg • fiber 2g
Delicata Squash Gratin
Delicata squash is the easiest winter squash to prepare thanks to the thin and edible skin. Because of that there is no need to peel it prior to cooking and it in turn gives a great color definition when cooked and served.
Yield: 8 to 10 servings
INGREDIENTS
2 tablespoons unsalted butter; plus more for the pan
1 garlic clove, peeled
1 medium to large onion, halved
1 teaspoon kosher salt, divided
14 teaspoon freshly ground black pepper, divided
12 teaspoon fresh thyme leaves
Pinch nutmeg
1½ pounds delicata squash (about 3), trimmed, halved lengthwise, seeded, cut to fit the feed tube, if necessary
2 ounces Gruyére
12 cup heavy cream
1 cup plain breadcrumbs
1 tablespoon olive oil
INSTRUCTIONS
- Preheat the oven to 350^ F. Butter a 9-inch square or round baking pan.
- While the oven is preheating, prepare the gratin. Insert the universal blade in the work bowl of the Cuisinart® 9-Cup Continuous Feed Food Processor. With the unit running on High, drop the garlic through the feed tube and process until finely chopped. Add the onion to the work bowl with the garlic and pulse 4 to 5 times, until finely chopped.
- Put the butter in a medium sauté pan over medium heat. Add the onion, garlic, a pinch each of the salt and pepper, thyme, and nutmeg, and cook until softened and just starting to caramelize, 8 to 10 minutes.
- While the garlic and onion are cooking, prepare the squash. Remove the universal blade and replace with the medium slicing disc. Slice the squash on High.
- Add the squash and remaining salt and pepper to the pan with the garlic and onion, and cook, stirring occasionally, for about 5 minutes, until the squash softens slightly. Transfer the vegetable mixture to the prepared baking pan, and shape into an even layer.
- Remove the slicing disc and replace with the fine shredding disc. Shred the Gruyère on High.
- In a small bowl, toss the breadcrumbs with the olive oil.
- Pour the cream over the vegetable mixture. Top with the cheese, and then the breadcrumbs.
- Bake for 30 minutes, or until bubbly and tender.
Nutritional information per serving (based on 10 servings):
Calories 174 (52% from fat) • carb. 17g • pro. 4g • fat 10g • sat. fat 6g • chol. 28mg • sod. 329mg • calc. 113mg • fiber 2g
Quick-Pickled Veggies
Use these to top salads, sandwiches, or just to munch on as a snack. Since they are not canned pickles that are shelf stable, be aware that these must be stored in the refrigerator for up to 2 weeks.
Yield: 2 quarts
INGREDIENTS
4 ounces ( 12 bulb) fennel, core removed
2 ounces radishes, trimmed
8 ounces ( 12 medium) seedless cucumber, English or Persian, unpeeled
4 ounces ( 12 medium) red bell pepper, trimmed and cored
4 ounces ( 12 medium) yellow bell pepper, trimmed and cored
2 ounces (1 stalk) celery, cut into 2-inch pieces
4 ounces ( 14 small head) cauliflower, broken into small florets
3 cups water
1 cup distilled white vinegar
2 garlic cloves, peeled
2 tablespoons granulated sugar
2 teaspoons kosher salt
12 teaspoon peppercorns
12 teaspoon dill seed
INSTRUCTIONS
- Assemble the Cuisinart® 9-Cup Continuous Feed Food Processor fitted with the continuous feed attachment. Place the medium slicing disc over the stem adapter.
- Place a medium serving bowl on the counter under the chute to catch the pickle ingredients.
- Slice, in order, the fennel, radishes, cucumber, peppers, and celery on High.
- Toss the cauliflower with the sliced vegetables.
- Prepare brine: In a small saucepan, combine the water, vinegar, garlic, sugar, salt, peppercorns, and dill seed. Bring to a boil.
- Divide the vegetables between two 1-quart containers with airtight lids. Once brine has come to a boil, pour it over the vegetables to cover. Put the lids on the containers, and then refrigerate for 24 to 48 hours before serving.
Nutritional information per serving (based on 14 cup):
Calories 8 (8% from fat) • carb. 2g • pro. 0g • fat 0g • sat. fat 0g • chol. 0mg • sod. 81mg • calc. 8mg • fiber 1g
Potato-Zucchini-Carrot Cakes
A twist on the traditional potato latke.
Yield: 10 to 12 2½-inch cakes
INGREDIENTS
1 small zucchini, trimmed and cut to fit the feed tube
1 small to medium carrot, trimmed, peeled, and cut to fit the feed tube
1 small onion, trimmed and cut to fit the feed tube
1 medium russet potato, peeled and cut to fit the feed tube
2 tablespoons unbleached all-purpose flour or matzo meal
1 tablespoon fresh Italian parsley, roughly chopped
^3/_4 teaspoon kosher salt
14 teaspoon freshly ground black pepper
1 large egg, lightly beaten
2 tablespoons vegetable oil, plus more as needed
Applesauce and sour cream for serving
INSTRUCTIONS
- Assemble the Cuisinart® 9-Cup Continuous Feed Food Processor fitted with the continuous feed attachment. Place the medium shredding disc over the stem adapter.
- Place a medium mixing bowl on the counter under the chute to catch the shredded vegetables. Feed the vegetables to shred horizontally in the feed tube in the following order, zucchini, carrot, onion, and then potato, on High. Wrap the vegetables in a clean kitchen towel, and wring over a bowl or the sink to squeeze out excess liquid. Wipe bowl dry before adding vegetables back to the bowl.
- Add the flour, parsley salt, and pepper, and gently mix to fully combine. Gradually add enough of the egg to form a mixture that just holds together (you may not need all of the egg). You do not want the mixture to be too wet or the final cakes will be dense.
- Put the oil in large nonstick skillet over medium-high heat. Using a heaping tablespoon per cake, drop the batter into the pan. Use the back of the spoon to flatten out the cakes into 2½-inch rounds. Cook the cakes in batches, no more than 4 at a time, about 1½ to 2 minutes per side or until crisp and browned. Repeat, adding oil as needed until all cakes are cooked. Keep finished cakes warm on rack set over a baking sheet in a 200°F oven.
- Serve warm with applesauce and sour cream.
Nutritional information per cake (based on 12):
Calories 48 (48% from fat) • carb. 5g • pro. 1g • fat 3g • sat. fat 0g • chol. 12mg • sod. 105mg • calc. 9mg • fiber 1g
Tahini and Miso Cucumber Salad
Crisp and refreshing, this cucumber salad is the perfect side, especially when paired with a spicy entrée.
Yield: 2 cups
INGREDIENTS
| 5 Persian cucumbers | 2 teaspoons unseasoned rice vinegar |
| 1 teaspoon kosher salt | 1 teaspoon granulated sugar |
| 1 garlic clove, peeled | 1 teaspoon toasted sesame oil |
| 1 1⁄2-inch piece fresh ginger, peeled | 2 tablespoons cold water |
| 2 tablespoons tahini | 1 tablespoon sliced scallions |
| 1 tablespoon white miso | 1 teaspoon toasted sesame seeds |
| 1 tablespoon low-sodium soy sauce or tamari | Chili crisp (optional for serving) |
INSTRUCTIONS
- Insert the medium slicing disc in the Cuisinart® 9-Cup Continuous Feed Food Processor. Slice the cucumbers on High, and then transfer to a medium bowl. Toss with the salt, cover, and refrigerate for at least 30 minutes.
- Insert the universal blade in the work bowl of the food processor. With the unit running on High, add the garlic and ginger through the feed tube and process to finely chop, 10 to 15 seconds. Add the tahini, miso, soy sauce, vinegar, sugar, and sesame oil. Process on High for an additional 10 seconds until fully incorporated. While continuing to process on High, stream in the water until a smooth sauce forms. Reserve sauce.
- Using a strainer, drain the cucumbers, pressing down slightly to squeeze out excess water. Toss the cucumbers in the tahini-miso sauce. Transfer to a serving bowl. Top with the scallions, sesame seeds, and chili crisp, if using.
Nutritional information per serving ( 12 cup):
Calories 108 (43% from fat) • carb. 13g • pro. 4g • fat 6g • sat. fat 1g • chol. 0mg • sod. 893mg • calc. 74mg • fiber 2g
Cauliflower Fried Rice
This fun and tasty side dish is also low in carbs.
Yield: 6 cups
INGREDIENTS
1 small jalapeño, seeded and cut into 1-inch pieces
1 1-inch piece fresh ginger, peeled
1 small onion, cut into 1-inch pieces
1 medium head cauliflower (about 1 pound), cut into about 6 cups of florets
1 small red pepper, cut into 1-inch-wide planks
2 tablespoons vegetable oil, divided
12 teaspoon kosher salt
14 teaspoon ground turmeric
Cilantro leaves and roasted peanuts, for garnish
INSTRUCTIONS
- Insert the universal blade in the work bowl of the Cuisinart® 9-Cup Continuous Feed Food Processor. With the machine running on High, drop the garlic, jalapeño, and ginger down the feed tube to finely chop, scraping bowl if necessary. Remove and reserve.
- Add the onion to the work bowl and pulse 8 to 10 times. Reserve with the garlic mixture.
- Add half of the cauliflower florets to the work bowl. Using 10 to 12 long pulses, chop until the cauliflower is cut into rice-size pieces. Remove and reserve on a paper towel-lined baking sheet. Repeat with the remaining cauliflower. Cover with paper towels and press to remove any excess moisture. (An optional step is to further dry cauliflower in a 200^ F oven for 15 minutes.)
- Replace the universal blade with the medium slicing disc. Line the red pepper planks vertically in the feed tube. Slice on High and reserve with the garlic mixture.
- Put 1 tablespoon of the oil in a large skillet or sauté pan, and place over medium heat. Once the oil is hot and shimmers across the pan, add the garlic-vegetable mixture. Cook, stirring frequently, until soft and fragrant, about 5 minutes. Once fragrant, stir in the salt and turmeric.
- Add the remaining oil. Once hot, add the cauliflower. Stir together. Cover and cook until the cauliflower is tender, 5 to 10 minutes.
- Remove the cover and continue cooking. Occasionally stir to scrape up any brown bits on the bottom of the pan; this adds to the crunch of the dish.
- Taste and adjust seasoning according to preference. Garnish with the cilantro and peanuts, and serve immediately.
Nutritional information per 12 cup serving:
Calories 68 (60% from fat) • Carb. 6g • Pro. 2g • Fat 5g • Sat. fat 1g • Chol. 0mg • Sod. 221mg • Calc. 22mg • Fiber 2g
Pizza with Pistachio-Arugula Pesto, Prosciutto, and Burrata
Slightly upscale but incredibly simple. Bring the pizzeria home with this flavorful pie.
Yield: one 12-inch pizza
INGREDIENTS
12 recipe Pizza Dough (page 52)
^1/_3 cup Pistachio-Arugula Pesto (page 25)
Unbleached all-purpose flour, as needed
Cornmeal, for sprinkling
1 teaspoon olive oil, for brushing
1 cup arugula
1 4-ounce piece burrata
- Prepare the Pizza Dough in the Cuisinart® 9-Cup Continuous Feed Food Processor. While the dough is rising, prepare the Pistachio-Arugula Pesto in the Cuisinart® 9-Cup Continuous Feed Food Processor.
- Position a rack in the oven about 8 inches from the top. If using a baking stone, place it on the rack. Preheat oven to 500^ F for 30 minutes or longer.
- On a lightly floured work surface, gently press the dough down with your fingertips to flatten slightly, and then stretch into a 14-inch round. Place on a baker's peel generously sprinkled with cornmeal, on a perforated pizza pan, on a pizza screen, or on a rimless baking sheet sprinkled with cornmeal. Brush the edges of the pizza dough with the olive oil. Spread the pesto on top of the dough, leaving about a 14 -inch edge. Carefully slide the pizza onto the stone, if using (position the peel over the back edge of the stone, and use a rocking motion to shake and slide the pizza off the peel onto the stone), or place the pan into the hot oven.
- Bake the pizza for 8 to 10 minutes, or until the edges of the dough are golden-brown, puffed, and crisp. Remove from the oven. Top with the arugula. Tear the burrata and prosciutto, and spread on top of the arugula. Garnish with the honey and flaky sea salt, then slice and serve.
Nutritional information per 12 cup serving:
Calories 68 (60% from fat) • Carb. 6g • Pro. 2g • Fat 5g • Sat. fat 1g • Chol. 0mg • Sod. 221mg • Calc. 22mg • Fiber 2g
Margherita Pizza
This pizza is perfect in summer, when fresh tomatoes and basil are abundant.
Yield: one 12-inch pizza (8 servings)
INGREDIENTS
1 recipe Pizza Dough (page 52)
1 ounce Parmigiano-Reggiano, cut into 12 -inch cubes
2 to 3 plum tomatoes (ripe, but firm)
Unbleached all-purpose flour, as needed
4 to 6 ounces fresh mozzarella, well chilled Cornmeal, for sprinkling
8 to 10 medium to large fresh basil leaves, thinly sliced
2 tablespoons extra-virgin olive oil Pinch kosher salt
INSTRUCTIONS
- Prepare the pizza dough and allow to rise. Preheat oven to 500^ F with a rack in the middle of the oven. If using a baking stone, place it on the rack and allow to heat for an additional 30 minutes after the oven has preheated.
- While the oven is heating, insert the universal blade in the work bowl of the Cuisinart® 9-Cup Continuous Feed Food Processor. With the unit running on High, drop the Parmigiano cubes through the feed tube and process until finely grated. Transfer to a small bowl and reserve.
- Remove the universal blade and insert the medium slicing disc. Slice the tomatoes on High.
- On a lightly floured work surface, stretch the dough into a 12- to 14-inch round. Place on a baker's peel or the underside of a baking sheet that has been sprinkled with cornmeal (or you can stretch the dough onto a greased pizza mesh/screen, or alternatively, bake on a parchment-lined baking sheet). Brush the dough with the olive oil and then sprinkle with both of the cheeses. Arrange the sliced tomatoes over the cheese.
- Carefully slide the pizza into the oven (whether onto the stone, or onto a baking sheet or directly onto the rack if using a pizza screen). Bake the pizza for 10 to 15 minutes, or until the cheese is bubbly and the dough is nicely browned at the edges.
- Remove the pizza, and sprinkle with the fresh basil and pinch of salt before slicing and serving.
Nutritional information per serving:
Calories 184 (40% from fat) • carb. 20g • pro. 7g • fat 8g • sat. fat 3g • chol. 14mg • sod. 390mg • calc. 96mg • fiber 1g
Vegetable Stir-Fry
A quick and simple stir-fry. To make it a bit heartier, add cooked chicken, beef, or cubed tofu.
Yield: 5 cups
INGREDIENTS
1 garlic clove, peeled
1 12 -inch piece fresh ginger, peeled
2 small zucchini
1 medium carrot, peeled
8 ounces cremini mushrooms
1 small eggplant
6 mini sweet peppers, multicolor
1 tablespoon vegetable oil
12 cup edamame, shelled
2 tablespoons soy sauce
2 teaspoons seasoned rice vinegar
1 tablespoon cornstarch
2 teaspoons toasted sesame oil
1 tablespoon toasted sesame seeds
White rice, for serving
INSTRUCTIONS
- Assemble the Cuisinart® 9-Cup Continuous Feed Food Processor fitted with the continuous feed attachment. Place the fine shredding disc over the stem adapter.
- Place a medium mixing bowl on the counter under the chute to catch ingredients.
- Shred the ginger on High. Reverse the disc to slice and slice the garlic. Both ginger and garlic can be dropped through the small feed tube with the machine running on High to process
- Replace the fine slicing disc with the medium slicing disc and grab a new mixing bowl to catch the remaining ingredients.
- Slice, in order, the zucchini, carrot, mushrooms, eggplant, and peppers on High.
- Put the oil into a large skillet over medium heat. Once the oil is hot, add the garlic and ginger. Sauté until softened and very fragrant, about 2 minutes. Increase the heat to medium-high. Add half of the sliced vegetables. Sauté for 3 to 5 minutes, and then add the remaining sliced vegetables. Sauté until softened, about 5 more minutes. Add the edamame and cook for a few more minutes.
- While the vegetables are cooking, stir together the soy sauce, vinegar, and cornstarch. Add the soy sauce mixture to the pan. Stir and cook until slightly thickened and the sauce coats the vegetables.
- Stir in the sesame oil and sesame seeds. Taste and adjust seasonings as desired. Serve immediately with white rice.
Nutritional information per 12 cup serving:
Calories 67 (44% from fat) • carb. 8g • pro. 3g • fat 4g • sat. fat 0g • chol. 0mg • sod. 213mg • calc. 19mg • fiber 3g
Shrimp Summer Rolls
Crisp, herbaceous, and so delicious! We recommend enjoying these summer rolls with our tasty Vietnamese Peanut Sauce (page 29).
Yield: 12 rolls
INGREDIENTS
1 5-ounce package vermicelli rice noodles
1 / 4 head purple cabbage, cut to fit the feed tube
12 head romaine lettuce
1 English cucumber, trimmed
1 mango, peeled and pitted
1 large carrot, washed and peeled
12 large round rice paper wrappers
18 cooked medium shrimp, peeled, deveined, and split in half lengthwise
Fresh cilantro leaves
Fresh mint leaves
INSTRUCTIONS
- In a medium pot, cook the vermicelli until chewy and tender. Drain and rinse with cold water. Reserve until ready to use.
- Assemble the Cuisinart® 9-Cup Continuous Feed Food Processor fitted with the continuous feed attachment. Place the medium slicing disc over the stem adapter.
- Place a medium mixing bowl on the counter under the chute to catch ingredients.
- Slice, in order, the cabbage, romaine, cucumber, and mango on High. For ease of assembling rolls, transfer the vegetables to separate bowls after they're sliced.
- Trim the carrot to fit into the feed tube horizontally. Slice on High. Gather the carrot slices together and stack back into the feed tube still horizontally, but turning 90° so that batons are created when sliced again. Transfer to a bowl and reserve.
- Assemble the summer rolls. In a shallow baking pan, dip a rice wrapper in warm water to cover for 10 seconds. Lay the soaked rice paper on a prep board and let sit for additional 20 seconds until soft and pliable.
- Arrange 3 pieces of shrimp and a small selection of vegetables, noodles, and several cilantro and mint leaves together in the bottom third of the rice paper. Fold up the bottom edge to cover, then fold in the sides. Roll tightly. Repeat with the remaining ingredients.
- Cut the rolls into sections and serve with your favorite dipping sauce.
Nutritional information per serving (1 roll):
Calories 86 (5% from fat) • carb. 17g • pro. 4g • fat 0g • sat. fat 0g • chol. 30mg • sod. 158mg • calc. 34mg • fiber 2g
Vegetable Dumplings
Perfectly complemented by our Sesame-Ginger Dumpling Sauce (page 29).
Yield: 40 dumplings
INGREDIENTS
8 ounces cremini mushrooms
10 ounces napa cabbage (about 14 small head)
1 large carrot, washed and peeled
2 cloves garlic, peeled
1 12 -inch piece fresh ginger, peeled
14 cup canola oil, divided
1 tablespoon low-sodium soy sauce or tamari
2 tablespoons hoisin sauce
2 teaspoons toasted sesame oil
2 tablespoons cornstarch, divided
40 round wonton wrappers
INSTRUCTIONS
-
Insert the universal blade into the work bowl of the Cuisinart® 9-Cup Continuous Feed Food Processor. With the unit running on High, add the garlic and ginger through the feed tube and process to finely chop, 10 to 15 seconds. Add the mushrooms and pulse about 10 times, until roughly chopped. Transfer the garlic, ginger, and mushrooms to a medium bowl and reserve.
-
Insert the medium slicing disc. Slice the cabbage on High. Remove the slicing disc and insert the fine shredding disc. Shred the carrot on High.
-
Heat 2 teaspoons of the canola oil in a large sauté pan over medium heat. Add the garlic, ginger, and mushrooms, and cook until the mushrooms stop releasing water. Add the cabbage and carrot and cook until softened, about 3 minutes. While the vegetables are cooking, in a small bowl stir together the soy sauce, hoisin, sesame oil, and 1 tablespoon of the cornstarch. Stir the soy sauce mixture into the vegetables. Cook until slightly thickened with the sauce nicely coating the vegetables. Transfer the vegetable mixture to a bowl and let cool completely.
-
Set up a workstation with a small bowl of water and a pastry brush, a large tray or cutting board dusted with the remaining cornstarch, the wonton wrappers, and the dumpling filling. On a clean surface, line up 3 to 6 wonton wrappers. Place about 12 tablespoon of filling in the middle of each wrapper. Brush the edges of the wrappers with a small amount of water and fold in half, making a half moon. Pleat the edges to seal, using more water if needed. Transfer the prepared dumplings to the cornstarch-dusted tray. Repeat with the remaining wonton wrappers and filling. Cover the prepared dumplings with plastic wrap to prevent them from drying out.
-
To cook the dumplings, heat 1 tablespoon of the canola oil in a large sauté pan over medium heat. Working in batches, add a single layer of dumplings to the sauté pan, dusting off cornstarch from the bottom, and cook until golden-brown on the bottom. Carefully add 12 cup water to the pan, cover, and cook for 3 more minutes.
-
Transfer the dumplings to a serving platter, and cover with foil to keep warm. Repeat with the remaining dumplings, adding 1 tablespoon of oil with each batch.
Nutritional information per serving (1 dumpling):
Calories 43 (37% from fat) • carb. 6g • pro. 1g • fat 2g • sat. fat 0g • chol. 1mg • sod. 74mg • calc. 7mg • fiber 0g
Mushroom Bolognese
A vegan option for a hearty pasta sauce.
Yield: 4 cups
INGREDIENTS
4 garlic cloves, peeled
3 shallots (about 3 ounces), cut into 1-inch pieces
1 medium carrot (about 2½ ounces), cut into 1-inch pieces
1 medium celery stalk (about 2 ounces), cut into 1-inch pieces
1 tablespoon olive oil
14 teaspoon kosher salt
14 teaspoon freshly ground black pepper
8 ounces cremini mushrooms, wiped
1 28-ounce can whole peeled tomatoes
14 cup white wine
1 tablespoon tomato paste
5 large basil leaves
INSTRUCTIONS
- Insert the universal blade into the work bowl of the Cuisinart® 9-Cup Continuous Feed Food Processor. With the machine running on High, drop the garlic down the feed tube to finely chop. Scrape the bowl and add the shallots, carrot, and celery to the work bowl. Pulse about 10 times to evenly chop.
- Put the olive oil into a 6-quart pot or stovetop casserole, and place over medium to medium-low heat. Once the oil is hot and shimmers across the pot, add the chopped vegetables, salt, and pepper. Lower the heat to low, and cook until vegetables are soft and fragrant, 5 to 8 minutes.
- While vegetables are cooking, add half of the mushrooms to the work bowl. Pulse 8 to 10 times to roughly chop. Reserve in a small mixing bowl. Repeat with the remaining mushrooms. Use your fingers to break up any large mushroom chunks. Varying sizes give the final sauce nice texture.
- Add the mushrooms to the pot and stir over low heat until the mushrooms have cooked down and their moisture starts to coat the bottom of the pot. While the mushrooms are cooking, add the tomatoes to the work bowl. Pulse to roughly chop.
- When the mushrooms are cooked down, add the wine, scraping up any browned bits from the bottom of the pot. Once the wine is just about fully evaporated, stir in the tomato paste and then the chopped tomatoes and soy sauce.
- Bring to a boil, and then reduce to a simmer. Simmer for about 45 minutes. Taste and adjust seasoning according to preference. Before serving, tear the basil leaves into pieces and stir into the warm sauce.
Nutritional information per serving (based on 12 cup serving):
Calories 65 (24% from fat) • carb. 9g • pro. 2g • fat 2g • sat. fat 0g • chol. 0mg • sod. 388mg • calc. 36mg • fiber 2g
Chicken Pot Pie
This hearty meal comes together quicker than you may think.
Yield: 8 servings
INGREDIENTS
Filling
4 tablespoons ( 12 stick) unsalted butter
2 celery stalks, cut into 2-inch lengths
2 medium carrots, peeled and cut into 2-inch lengths
1 medium to large onion, finely chopped
1½ teaspoons kosher salt, divided
^3/_4 teaspoon freshly ground black pepper, divided
1 teaspoon fresh thyme
12 cup dry white wine
14 cup unbleached all-purpose flour
3 cups low-sodium chicken broth; more as needed
1 medium sweet potato (8 to 10 ounces), peeled and cubed
2 medium Yukon Gold potatoes (about 1 pound), peeled and cubed
4 cups chopped cooked chicken (from one 4- to 5-pound rotisserie chicken or other cooked chicken)
14 cup fresh parsley leaves, finely chopped (this can be done ahead of time in the food processor using the universal blade)
1 cup pearl onions, halved if large, thawed if frozen
^3/_4 cup frozen peas, thawed
1 recipe unbaked Buttermilk Drop Biscuits (page 56)
INSTRUCTIONS
- Preheat the oven to 375^ F with the rack in the middle position.
- Put the butter in a medium-size stockpot over medium-low heat.
- While butter is melting, prepare the vegetables. Insert the medium slicing disc in the work bowl of the Cuisinart® 9-Cup Continuous Feed Food Processor. Put the carrot and celery together in the feed tube and slice on High. Reserve.
- Remove the slicing disc and insert the universal blade. Add the onion and pulse 5 to 6 times to chop.
- Once the butter is hot, add the celery, carrot, onion, a pinch each of the salt and pepper, and the thyme. Sauté until softened, 5 to 6 minutes. Add the wine and reduce by about half, another 3 minutes.
- Stir in the flour and cook 2 to 3 minutes to absorb the liquid. Gradually stir in the chicken broth, about 14 cup at a time, until all the broth has been added. Increase the heat and bring the mixture to a high simmer. Once the mixture is simmering, add the potatoes, chicken, pearl onions, and remaining salt and pepper. Simmer for about 10 minutes, adding more broth if the potatoes are not fully submerged. Stir in the peas and parsley, and then remove from heat.
- While filling is cooking prepare the biscuit dough.
-
Pour the filling into a 13x9-inch baking pan. Use a small scoop or spoon to dollop the biscuit dough over the filling.
-
Put the pan into the oven and bake until the biscuits are golden-brown and the chicken mixture is bubbling, about 35 to 40 minutes.
- Remove from the oven. Cool slightly before serving.
Nutritional information per serving (based on 8 servings):
Calories 514 (31% from fat) • carb. 46g • pro. 38g • fat 18g • sat. fat 10g • chol. 125mg • sod. 721mg • calc. 112mg • fiber 4g
Cilantro-Lime Chicken
This Latin-flavored chicken is a truly multifunctional dish and is great in tacos, salads, and rice bowls. The possibilities are endless!
Yield: 6 to 8 servings
INGREDIENTS
1 garlic clove, peeled
1 jalapeño, seeded and cut into 1-inch pieces
1 scallion, cut into 1-inch pieces
1 cup fresh cilantro leaves
2 teaspoons grated lime zest
1 teaspoon plus pinch kosher salt, divided
^1/_8 teaspoon chile powder
12 cup olive oil
3 pounds boneless, skinless chicken thighs, trimmed of visible fat
INSTRUCTIONS
- Insert the universal blade in the work bowl of the Cuisinart® 9-Cup Continuous Feed Food Processor. With the machine running on High, drop the garlic, jalapeño, and scallion through the feed tube to finely chop.
- Scrape the sides of the bowl and add the cilantro, lime zest, 1 teaspoon salt, and chile powder. Pulse to roughly chop. Scrape the sides and then turn on High. With the machine running, pour the olive oil through the feed tube and continue to process until mixture is homogenous.
- Put the chicken in a nonreactive mixing bowl and add the marinade, tossing so that the chicken is evenly coated. Refrigerate for at least 1 hour and up to overnight.
- When ready to cook, preheat a grill (indoor or outdoor). Sprinkle the chicken lightly with small pinch of salt and cook the chicken, flipping once, until the internal temperature reads 170^ F, 10 to 15 minutes per side. Alternatively, the chicken can be cooked in an airfryer or oven at 400^ F until fully cooked.
- Slice and serve as desired.
Nutritional information per serving (based on 8 servings):
Calories 325 (58% from fat) • carb. 1g • pro. 34g • fat 21g • sat. fat 34g • chol. 141mg • sod. 417mg • calc. 23mg • fiber 0g
Pasta Primavera
Fresh garden vegetables shine in this easy-to-make light, bright pasta dish for a spring or summer meal. We recommend linguine, but any pasta works here.
Yield: 8 to 10 servings
INGREDIENTS
2 ounces Parmigiano-Reggiano
2 garlic cloves, peeled
1 small shallot, trimmed
2 medium bell peppers (yellow, red, or orange), halved with core removed and cut to fit the feed tube
2 small carrots, peeled and cut to fit the feed tube horizontally
1 small zucchini, cut to fit the feed tube horizontally
1 small yellow squash, cut to fit the feed tube horizontally
1 pound pasta
1 teaspoon kosher salt, divided; more as needed
1 tablespoon olive oil
12 teaspoon freshly ground black pepper, divided
12 cup frozen peas, thawed Zest and juice of 1 small lemon
14 cup thinly sliced fresh basil
12 cup breadcrumbs (page 51) + 1 tablespoon butter, for topping ^* (optional)
INSTRUCTIONS
-
Assemble the Cuisinart® 9-Cup Continuous Feed Food Processor fitted with the continuous feed attachment. Place the fine shredding disc over the stem adapter.
-
Place a medium mixing bowl on the counter under the chute to catch ingredients.
-
Shred the Parmesan on High.
-
Reverse the disc to the fine slicing side. Slice into a separate bowl the garlic, shallots and peppers on High.
-
Using a separate mixing bowl, slice the carrots and then the zucchini and yellow squash on High, horizontally in the feed tube.
-
In a large pot, cook pasta according to package directions in salted water to al dente. When the pasta is almost done, remove 2 cups of the water, and then drain the pasta. Reserve, covered, in the colander set inside the cooking pot.
-
While pasta is cooking, put the olive oil into a large sauté pan over medium heat. Once the oil is hot and shimmers across the pan, add the garlic, shallot, and peppers with a pinch each of the salt and pepper. Sauté until fragrant and soft, 3 to 5 minutes.
-
Add the carrots, zucchini, and yellow squash with a pinch each of the salt and pepper. Cook until softened, about 5 more minutes.
-
Add the pasta to the vegetables with the peas and the remaining salt and pepper, tossing together until evenly combined.
-
Stir in the reserved cooking water, 14 cup at a time, until the pasta and vegetables have a creamy consistency. Stir in the lemon zest and juice, the basil, and Parmesan. Top with toasted breadcrumbs if desired and serve immediately.
Nutritional information per serving (based on 10 servings):
Calories 229 (15% from fat) • carb. 41g • pro. 9g • fat 4g • sat. fat 1g • chol. 4mg • sod. 343mg • calc. 87mg • fiber 2g
*For a crunchy topping, toast 12 cup of breadcrumbs in a 250°F oven with the butter. Stir together once butter has melted. Toast for about 10 to 15 minutes so that breadcrumbs are lightly golden. Finish with a pinch of salt.
Falafel with Middle Eastern Salad
The food processor makes it possible to whip up this Middle Eastern staple easily at home. Remember to soak the chickpeas the night before.
Yield: 24 falafel and 4½ cups salad
INGREDIENTS
Falafel
2 garlic cloves, peeled
1 small shallot, cut into 1-inch pieces
1 cup dried chickpeas, soaked overnight, drained and rinsed
1 teaspoon kosher salt
1 / 8 teaspoon freshly ground black pepper
1 teaspoon ground cumin
12 teaspoon ground coriander
18 teaspoon chili powder
^2/_3 cup packed fresh parsley, stems and leaves
2 tablespoons plus 12 cup unbleached all-purpose flour, divided
12 teaspoon baking soda
2 tablespoons water
Vegetable oil, if frying
Olive oil, if baking*
Salad
13 cup fresh parsley leaves, stems discarded
1 medium cucumber, halved widthwise
1 cup cherry tomatoes
6 small (2 to 3 inch) dill pickles (or about 12 cup quick-pickled vegetables (page 35)
2 tablespoons extra-virgin olive oil
1 tablespoon tahini
2 teaspoons za'atar spice blend
Pinch to ¼ teaspoon kosher salt
(to taste)
Pita, for serving
Tahini (optional)
INSTRUCTIONS
- Insert the universal blade into the work bowl of the Cuisinart® 9-Cup Continuous Feed Food Processor. Add the garlic and shallot, and pulse 5 to 8 times to chop. Add the chickpeas, salt, pepper, spices, parsley, and the 2 tablespoons of flour. Pulse 10 to 12 times to coarsely grind the chickpeas. Scrape down the sides of the bowl, and then process on High for 15 to 20 seconds, until finely ground. Reserve 23 cup in a separate bowl.
-
Dissolve the baking soda in the water, and with the unit running on High, pour through the feed tube. Process for 15 to 20 seconds to blend well. Add to bowl with the reserved mixture. Stir well to combine.
-
Using a tablespoon, scoop the chickpea mixture and shape into 24 balls (you can also make larger falafel using a 2-tablespoon scoop for 12 falafel). Place the balls on a tray or plate lined with waxed paper, and refrigerate for 30 minutes. Put the remaining 12 cup flour in a shallow bowl and set aside.
- Fit a 3-quart saucepan with a deep-fry thermometer, and fill with enough oil to reach a depth of 14 inch. Place over medium-high heat until the thermometer registers 375^ . Roll the falafel in the flour, shaking off any excess, and slide into the oil. Cook the falafel in batches, no more than 5 at a time, for 212 to 3 minutes, turning halfway through, until browned and crisp.
- Remove to a paper towel-lined sheet tray. Repeat with the remaining falafel.
- While the falafel are cooling, prepare the salad. Insert the universal blade into the work bowl. Add the parsley and pulse until roughly chopped.
- With the parsley still in the bowl, remove the universal blade and replace with the medium slicing disc. Slice the cucumber, pickles, and tomatoes. Transfer to a serving bowl. Add the olive oil, tahini, za'atar, and a pinch of the salt, and toss the salad. Taste and add salt as desired.
- Serve falafel with sliced pita and the salad on the side.
*Note: If choosing to bake instead, preheat the oven to 400°F with a rack in the middle position. Line a large baking sheet with parchment and drizzle with olive oil. Do not coat the falafel in flour. Place the falafel on the parchment. Drizzle with more oil, turning to coat the balls all over. Bake for 20 to 25 minutes, turning halfway through, until browned and crisp.
Nutritional information per serving (per falafel):
Calories 35 (92% from fat) • carb. 6g • pro. 2g • fat 1g • sat. fat 0g • chol. 0mg • sod. 14mg • calc. 13mg • fiber 2g
Nutritional information per serving ( 12 cup salad):
Calories 51 (69% from fat) • carb. 3g • pro. 1g • fat 4g • sat. fat 1g • chol. 0mg • sod. 347mg • calc. 30mg • fiber 1g
Lamb Meatballs
These Greek-inspired meatballs are terrific on their own, but when paired with pita and tzatziki, rice, and a green salad, they are a complete meal, set to impress.
Yield: 15 meatballs
INGREDIENTS
1 garlic clove, peeled
14 cup fresh Italian parsley leaves
14 cup fresh mint leaves
1½ pounds lamb shoulder, cut into 1-inch pieces
1 teaspoon kosher salt
12 teaspoon ground cumin
14 teaspoon freshly ground black pepper
1 ounce feta, broken into pieces
Tzatziki, for serving
Pita, warmed, for serving
INSTRUCTIONS
-
Preheat the oven to 400^ F with the rack in the middle position.
-
Insert the universal blade into the work bowl of the Cuisinart® 9-Cup Continuous Feed Food Processor. With the unit running on High, drop the garlic into processor to finely chop. Add the parsley and mint, and process to finely chop. Add the lamb, salt, cumin, and pepper. Using about 12 long pulses, process until roughly chopped. Add the feta and pulse a few times until evenly dispersed.
-
Divide the lamb mixture into 15 evenly sized balls. Transfer to a parchment- or foil-lined baking sheet. Put into the preheated oven and bake for 18 minutes.
- Serve with tzatziki and warm pita.
Nutritional information per meatball:
Calories 67 (39% from fat) • carb. 0g • pro. 10g • fat 3g • sat. fat 1g • chol. 31mg • sod. 203mg • calc. 17mg • fiber 0g
Smash Veggie Burgers
Smash burgers are beloved for their crispy crust and juicy, tender interior. This veggie variation is sure to be a “smash” hit!
Yield: 12 patties (6 double burgers)
INGREDIENTS
1½ teaspoons kosher salt, divided; more as needed
14 cup buckwheat
8 ounces shiitake mushrooms, stems removed
4 teaspoons olive oil, divided
1 15.5-ounce can black beans, drained and rinsed
14 yellow onion, peeled
3 tablespoons mayonnaise
2 tablespoons oat flour
1 tablespoon cornstarch
1 tablespoon almond butter
1 large egg yolk
1 teaspoon garlic powder
1 teaspoon onion powder
1 teaspoon smoked paprika
14 teaspoon chili powder
14 teaspoon freshly ground black pepper
14 cup cold water
12 slices Cheddar cheese
6 Burger Buns (page 54), toasted
Assorted toppings, such as lettuce, tomato, pickles, and ketchup
INSTRUCTIONS
- Preheat the oven to 350^ F.
- In a small pot of salted boiling water, cook the buckwheat until tender. Drain and set aside to cool completely. Reserve in a medium bowl.
- Insert the universal blade into the work bowl of the Cuisinart® 9-Cup Continuous Feed Food Processor. Add the mushrooms and pulse about 10 times until roughly chopped. Toss the mushrooms with the olive oil and 12 teaspoon of the salt, and spread evenly on a baking sheet. Evenly spread black beans on a separate baking sheet. Bake the mushrooms and black beans for 10 minutes, or until mushrooms shrink by half and the black beans appear dry and starting to crack.
- Add the onion to the work bowl and pulse until finely chopped. Add the onion and mushrooms to the bowl with the buckwheat.
- Add the black beans to the work bowl and pulse 5 times. Remove 12 cup of the beans and add to the buckwheat. Add the mayonnaise, oat flour, cornstarch, almond butter, egg yolk, 1 teaspoon of the salt, and the spices to the work bowl with the remaining beans and process on High. Stream in the cold water, and continue to process on High until the purée is smooth.
- In the medium bowl, mix the purée with the buckwheat, mushrooms, onions, and chopped black beans. Using a 2-ounce scoop, portion the mixture onto a baking sheet lined with
parchment paper and shape into patties, leaving a 3-inch space between the patties. Place another piece of parchment paper on top of the portioned patties. Press down on each patty with the bottom of a measuring cup to create 3-inch discs. Freeze the patties for at least 2 hours.
- To cook, heat the remaining 2 teaspoons of oil in a medium nonstick skillet or cast-iron pan. Place 2 patties in the pan and cook until a golden-brown crust begins to form. Flip and add a slice of Cheddar to each patty. Cook until crisp on the other side. Remove and stack 2 patties on a toasted bun. Serve with your favorite toppings.
Nutritional information per serving (1 double burger with cheese):
Calories 176 (52% from fat) • carb. 13g • pro. 9g • fat 10g • sat. fat 5g • chol. 39mg • sod. 593mg • calc. 174mg • fiber 4g
Plain or Seasoned Breadcrumbs
No need to buy breadcrumbs when you can make them fresh in your Cuisinart® Food Processor.
Yield: 1^2/_3 cups
INGREDIENTS
8 slices white bread
INSTRUCTIONS
- Preheat the oven to 325^ F. On a large baking sheet, put the bread slices in a single layer. Bake until the bread is completely dry, about 20 minutes. Transfer to a wire rack to cool for 5 to 10 minutes.
- Insert the universal blade into the work bowl of the Cuisinart® 9-Cup Continuous Feed Food Processor. Break toasted bread into medium-size pieces and add to work bowl. Pulse 6 to 8 times, then process on High until the desired texture is achieved, 30 to 60 seconds.
*Note: Breadcrumbs can also be made from unbaked day-old bread. Simply break into pieces and follow the instructions above until finely chopped.
Seasoned Breadcrumbs:
Add 14 teaspoon each kosher salt, dried oregano, dried basil, garlic powder, and onion powder to work bowl with bread pieces and process as above.
Nutritional information per serving (2 tablespoons):
Calories 43 (11% from fat) • carb. 9g • pro. 1g • fat 0g • sat. fat 0 g • chol. 0 mg • sod. 92mg • calc. 92mg • fiber 6g
Pizza Dough
Homemade pizza dough is the perfect start to family pizza night.
Yield: 1 pound of dough (one 14-inch pizza or two 8-inch pizzas)
INGREDIENTS
1^3/4 cups bread or unbleached all-purpose flour; more as needed
1 12 teaspoons instant yeast
1 teaspoon granulated sugar
^3/4 teaspoon kosher salt ^2/3 cup water, room temperature 2 teaspoons olive oil
INSTRUCTIONS
- Insert the universal blade into the work bowl of the Cuisinart® 9-Cup Continuous Feed Food Processor. Add the flour, salt, sugar, yeast, and olive oil to the bowl and pulse a few times to combine. With the machine running on Low, pour the water through the feed tube as fast as the flour absorbs it. Process until the dough cleans the sides of the work bowl and forms a ball. Continue to process for 30 seconds to knead the dough. Dough should be slightly sticky.
- Transfer the dough to a clean surface and knead by hand for an additional minute. Put the dough into a clean bowl and cover with a damp towel or plastic wrap. Let it rise in a warm, draft-free place for about 1 hour; dough should double in size.
- Place dough on a lightly floured surface and gently fold over to "punch" down. Form into desired crust size(s) as directed by recipe.
Nutritional information per serving (based on 8 servings):
Calories 92 (6% from fat) • carb. 19g • pro. 3g • fat 1g • sat. fat 0g • chol. 0mg • sod. 214mg • calc. 1mg • fiber 0g
Gluten-Free Pizza Dough
Yield: 1 pound of dough
INGREDIENTS
12 cup brown rice flour
12 cup white rice flour
14 cup arrowroot starch
3 tablespoons quinoa flour
2 tablespoons ground flax seeds
2 tablespoons tapioca flour
1½ tablespoons psyllium husk powder
12 teaspoon instant yeast
1 teaspoon granulated sugar
1¼ teaspoons baking powder
1 teaspoon kosher salt
1 cup water, 105^ F to 110^ F
2 tablespoons olive oil, for brushing
Pizza toppings
INSTRUCTIONS
- Insert the universal blade into the work bowl of the Cuisinart® 9-Cup Food Processor. Add the dry ingredients. Process on Low for 20 seconds to sift.
-
While running on Low, gradually add the water through the feed tube. Process until a dough ball forms. Continue processing for 30 seconds to knead.
-
Gather and shape into a smooth ball. Transfer to a clean bowl, cover, and let rise for 30 minutes before shaping and baking.
- To bake, preheat the oven to 400^ F. Shape the dough as directed by the recipe you're using. Brush the outer edge of the dough with the olive oil. Bake for 10 minutes, or until the dough is just starting to get firm at the edges but shows little to no color. Remove the dough and then top as desired. Return to the oven and then bake until the edge is brown and the toppings are hot, 10 more minutes.
- Refrigerate any extra dough overnight, or freeze for up to 1 month.
Nutritional information per serving:
Calories 98 (29% from fat) • carb. 16g • pro. 1g • fat 3g • sat. fat 0g • chol. 0mg • sod. 242mg • calc. 11mg • fiber 2g
Cauliflower Crust for Pizza
Try this cauliflower crust as a gluten-free alternative.
Yield: one 12-inch pizza crust
INGREDIENTS
4 ounces Parmesan, cut into 12 -inch pieces
1 head (about 1 pound) cauliflower, cut into 1-inch florets
2 large eggs
12 teaspoon kosher salt
14 teaspoon freshly ground black pepper
14 teaspoon onion powder
14 teaspoon garlic powder
INSTRUCTIONS
- Preheat the oven to 450°F. Line a baking sheet with parchment; reserve.
- Insert the universal blade into the work bowl of the Cuisinart® 9-Cup Continuous Feed Food Processor. Add the Parmesan and process on High to finely chop.
- Add the cauliflower and pulse 5 to 6 times to break up, and then process on High until finely chopped.
- Add the remaining ingredients and process on High to combine fully.
- Transfer the mixture to the prepared baking sheet. Form into a rectangle about 12 inch thick. Bake until golden brown and slightly firm, about 25 minutes. Cool slightly. Top with your favorite pizza toppings, and return to the hot oven to finish cooking.
Nutritional information per serving (based on 12 servings):
Calories 89 (52% from fat) • carb. 3g • pro. 8g • fat 6g • sat. fat 3g • chol. 68mg • sod. 422mg • calc. 188mg • fiber 1g
This flaky pastry is a classic all-butter dough that can be used for sweet or savory pies and tarts.
Yield: one 9- to 10-inch pie or tart crust
INGREDIENTS
1 cup unbleached all-purpose flour
2 tablespoons ice water
1 teaspoon fine sea salt
8 tablespoons (1 stick) unsalted butter, cold and cut into 12 -inch cubes
INSTRUCTIONS
- Insert the universal blade into the work bowl of the Cuisinart® 9-Cup Continuous Feed Food Processor. Add the flour and salt to the work bowl, and process on Low to sift.
- Add the cubed butter over the flour mixture. Pulse 8 to 10 times, until the mixture resembles coarse crumbs. Add 1 tablespoon of the ice water. Pulse to incorporate. Add the remaining water 1 teaspoon at a time, pulsing to incorporate, just until the mixture forms a dough that holds together when pinched (you may not need all the water).
- Form the dough into a flat disc. Wrap in plastic and refrigerate for at least 30 minutes before using.
- The dough keeps for up to a week in the refrigerator or in the freezer for up to 3 months.
*Note: For a sweet pastry dough, add 1 tablespoon granulated sugar with the dry ingredients.
Nutritional information per serving:
Calories 100 (66% from fat) • carb. 7g • pro. 1g • fat 7g • sat. fat 5g • chol. 20mg • sod. 98mg • calc. 0mg • fiber 0g
Burger Buns
These buns are a nice cross between a traditional bun and a fluffy brioche bun – an excellent base for any type of burger.
Yield: 6 buns
INGREDIENTS
2 cups unbleached all-purpose flour
12 cup whole-wheat flour
1 tablespoon granulated sugar
2 teaspoons instant yeast
1¼ teaspoons fine sea salt
2 tablespoons unsalted butter, room temperature
^3/_4 cup water, room temperature
1 large egg
Egg wash (1 egg whisked with 1 teaspoon water and pinch salt)
INSTRUCTIONS
-
Insert the universal blade in the work bowl of the Cuisinart® 9-Cup Food Processor. Add the flours, sugar, yeast, and salt to the bowl, and process on Low to sift. Add the butter and egg, and then, with the machine running on Low, pour the water mixture through the feed tube as fast as the flour absorbs it. Process on Low until the dough cleans the sides of the work bowl and forms a ball. Continue to process for 30 seconds to knead the dough. The dough should be slightly sticky.
-
Transfer the dough to a clean work surface. Knead by hand for about 1 minute to soften.
- Put the dough in a clean bowl, and cover with a damp towel or plastic wrap. Let it rise in a warm, draft-free place for about 90 minutes, or until double in size.
- Divide the dough into 6 pieces. Roll each into a smooth round, transfer to a parchment-lined pan, and cover with a damp towel or plastic wrap. Let the dough rise for an 30 to 40 minutes, or until nicely puffed.
- While the dough is rising, preheat the oven to 375^ F with a rack in the middle of the oven.
- Flatten each piece of dough slightly, and then brush the egg wash all over the top and sides.
- Put the pan in the preheated oven and bake until the buns are golden-brown, 15 to 18 minutes. Transfer to a wire rack to cool slightly before serving.
Nutritional information per serving
Calories 100 (66% from fat) • carb. 7g • pro. 1g • fat 7g • sat. fat 5g • chol. 20mg • sod. 98mg • calc. 0mg • fiber 0g
Pita Bread
The key to achieving the signature pocket in a pita bread is a smooth dough and a very hot oven and baking pan.
Yield: six 8-inch pitas
INGREDIENTS
2 cups unbleached all-purpose flour; more as needed
12 cup whole-wheat flour
1 12 teaspoons instant yeast
1 teaspoon kosher salt
Pinch granulated sugar
1 cup water, room temperature
1 tablespoon olive oil
INSTRUCTIONS
- Insert the universal blade into the work bowl of the Cuisinart® 9-Cup Continuous Feed Food Processor. Add the flours, yeast, salt, and sugar, and process on Low to sift. Run the food processor on Low and slowly add the water through the feed tube, followed by the olive oil. Continue to process for 40 seconds to knead. The dough should be soft, smooth, and slightly tacky.
- Turn the dough out onto a clean work surface and knead for another minute or two by hand to soften some more. Add additional flour if the dough seems too sticky, or a little water if it seems too dry.
- Transfer the dough to a clean bowl and cover with a damp towel or plastic wrap. Let the dough rise at room temperature for about 1 hour, or until doubled in size.
- Divide the dough into 6 pieces. On a lightly flour work surface, shape each into a ball. Cover the balls with a damp towel or plastic wrap and allow to rise for another 30 minutes.
-
Put a baking sheet in the middle of the oven and preheat to 500^ F.
-
While the oven is preheating, roll each round into a 6- to 7-inch circle. Starting with 2 or 3 at a time, transfer the dough circles to the hot pan and bake until lightly golden and puffed, 4 to 5 minutes. Transfer to a serving plate and cover loosely to keep warm. Repeat with the remaining dough.
- Serve warm, stuffed with your favorite fillings.
Nutritional information per pita:
Calories 199 (25% from fat) • carb. 33g • pro. 5g • fat 6g • sat. fat 1g • chol. 0mg • sod. 429mg • calc. 6mg • fiber 2g
Buttermilk Drop Biscuits
A simpler method for preparing biscuits, this takes out the shaping and cutting. Just scoop, bake, and serve.
Yield: 10 biscuits
INGREDIENTS
1½ cups unbleached all-purpose flour; more as needed
12 cup cake flour
1^3/4 teaspoons baking powder
14 teaspoon baking soda
1 teaspoon granulated sugar
12 teaspoon kosher salt Pinch freshly ground black pepper
8 tablespoons good-quality unsalted butter, cold and cubed
1 cup buttermilk, chilled
INSTRUCTIONS
- Preheat the oven to 450^ F with a rack in the middle position. Line two baking sheets with parchment paper; reserve.
- Insert the universal blade into the work bowl of the Cuisinart® 9-Cup Continuous Feed Food Processor. Add the dry ingredients and process on Low to sift. Add the butter, and then pulse until the butter is well coated with flour and the size of peas. While pulsing, slowly add the buttermilk through the feed tube.
- Turn the dough onto a lightly floured surface and fold over a few times to be sure all ingredients are well incorporated. Using a large scoop, about 13 cup in size, drop the dough onto the prepared baking pans, leaving about 2 inches of space between each one.
- Bake until golden-brown, 12 to 15 minutes. Transfer to a wire rack to cool slightly before serving.
Nutritional information per biscuit:
Calories 178 (47% from fat) • carb. 20g • pro. 3g • fat 9g • sat. fat 6g • chol. 26mg • sod. 242mg • calc. 45mg • fiber 0g
Cranberry Apple Pie
Cranberries are a perfect complement to apples in this delicious harvest-season pie.
Yield: 8 to 12 servings
INGREDIENTS
2 recipes Flaky Pie Crust (page 54), in two discs
Unbleached all-purpose flour, as needed for rolling dough
12 cup dried cranberries
12 cup granulated sugar; more for finishing
12 cup packed light brown sugar
14 cup ground arrowroot starch
12 teaspoon kosher salt
12 teaspoon ground cinnamon
14 teaspoon ground nutmeg
14 teaspoon ground allspice
3 cups whole cranberries, fresh or frozen, divided
3 large apples, such as Golden Delicious, Ginger Gold, or Pink Lady, peeled, cored, and halved
Juice of 12 medium lemon
1 tablespoon pure vanilla extract
1 large egg, lightly beaten with 1 teaspoon water
INSTRUCTIONS
-
Roll out one dough disc on a lightly floured surface to a 18 -inch-thick circle. Transfer to a 10-inch pie plate. Refrigerate while making the filling.
-
In a small heatproof bowl, cover the dried cranberries with hot water, and soak until plump.
-
Insert the universal blade into the Cuisinart® 9-Cup Continuous Feed Food Processor. Add the sugars, arrowroot, salt, and spices. Process on Low to combine. Transfer the sugar mixture to a large bowl.
-
Add 1½ cups of the fresh/frozen cranberries to the food processor, still fitted with the universal blade, and pulse until roughly chopped. Add the chopped cranberries and the remaining 1½ cups fresh/frozen cranberries to the sugar mixture.
-
Insert the medium slicing disc into the work bowl. Stand the apple halves upright in the feed tube and slice on High. Transfer to the cranberry-sugar mixture, and add the lemon juice and vanilla. Toss gently to coat.
-
Drain the dried cranberries, and add to the bowl with the rest of the filling. Toss gently.
-
Roll out the second dough disc into a 18 -inch-thick circle. If making a lattice top, cut the rolled pastry into 12 -inch strips.
-
Pour the filling into the refrigerated pie shell, and cover with the top crust. If making a lattice crust, weave the pastry dough as desired. If using the full pastry round, cut vent holes into the pie dough after the dough is in place. Crimp as desired.
-
Chill the pie in the refrigerator for 10 to 15 minutes.
-
Meanwhile, move an oven rack to the lowest position, and place a rimmed baking sheet on the rack. Preheat the oven to 450^ F.
-
Brush the top crust with the egg wash, and sprinkle with granulated sugar.
-
Place the pie on the rimmed baking sheet.
-
Bake for 15 minutes, or until the pastry is beginning to brown.
-
Lower the oven temperature to 350^ F, and bake until golden-brown, another 30 to 35 minutes.
- Allow to cool completely on a wire rack before cutting, 2 to 3 hours.
Nutritional information per serving (based on 12 servings):
Calories 443 (32% from fat) • carb. 75g • pro. 3g • fat 16g • sat. fat 10g • chol. 48mg • sod. 305mg • calc. 25mg • fiber 3g
Classic Carrot Cake with Cream Cheese Frosting
The food processor makes this classic cake a breeze – it does all the work from shredding the carrots to making the frosting.
Yield: one 2-layer cake, about 16 servings
INGREDIENTS
Nonstick cooking spray
Cake
2 cups unbleached all-purpose flour
2 teaspoons ground cinnamon
1½ teaspoons baking powder
12 teaspoon baking soda
1 teaspoon fine sea salt
1 cup walnuts, toasted
1 pound carrots (6 to 8 medium), peeled
1 cup granulated sugar
1 cup packed light or dark brown sugar
1 cup vegetable oil
4 large eggs
1½ teaspoons pure vanilla extract
Cream Cheese Frosting (yields about 3½ cups)
8 ounces cream cheese (1 standard package), cut into 8 pieces, room temperature
8 tablespoons (1 stick) unsalted butter, cut into 8 pieces, room temperature
2 ounces goat cheese, room temperature (sour cream or plain yogurt can be substituted)
^2/_3 cup confectioners' sugar
14 teaspoon fine sea salt
14 teaspoon pure vanilla extract
INSTRUCTIONS
- Preheat the oven to 350^ F with a rack in the middle position. Coat two 9-inch round baking pans with nonstick cooking spray, and line the bottoms with parchment; set aside.
- Insert the universal blade in the work bowl of the Cuisinart® 9-Cup Continuous Feed Food Processor. Add the flour, cinnamon, baking powder, baking soda, and salt. Process on Low for 30 seconds to sift. Transfer to a large mixing bowl.
- Put the walnuts in the work bowl and pulse 2 to 3 times to coarsely chop. Leaving the nuts in the bowl, remove the universal blade and replace it with the medium shredding disc. Shred the carrots on High. Add the nuts and carrots to the bowl with the dry ingredients.
- Remove the shredding disc and replace it with the universal blade. Add the sugars to the work bowl. In a large measuring cup, combine the oil, eggs, and vanilla. While the unit is running on Low, gradually add the wet ingredients through the feed tube. Process until well mixed, 30 to 45 seconds, stopping to scrape down the sides of the bowl as needed. Add the wet ingredients to the bowl of dry ingredients, and stir until just combined.
-
Pour the batter into the prepared pans. Bake for 35 minutes, or until a cake tester inserted in the center comes out clean. Cool completely in the pans.
-
Prepare the frosting. Clean the universal blade and insert in the cleaned work bowl. Add the cream cheese and butter, and process on High until smooth, about 60 seconds, stopping to scrape down the sides of the bowl. Add the goat cheese; process another 10 to 15 seconds. Add the sugar, salt, and vanilla, and process until completely smooth, another 15 to 20 seconds.
- Once the cake layers have cooled, invert onto a wire rack and peel off the parchment. Transfer one layer to a cake stand or plate, and spread evenly with frosting. Top with the second layer. Frost the top and sides of cake evenly using an offset spatula. Chill the cake slightly before serving.
Nutritional information per serving (based on 16 servings):
Calories 428 (53% from fat) • carb. 46g • pro. 6g • fat 26g • sat. fat 5g • chol. 63mg • sod. 319mg • calc. 229mg • fiber 2g
Banana-Chip "Ice Cream" with Peanut Butter Swirl
Frozen bananas become a rich, creamy, and guilt-free dessert!
Yield: 2 cups
INGREDIENTS
4 very ripe bananas, cut into 2-inch pieces, frozen
2 tablespoons coconut milk
14 teaspoon pure vanilla extract
Pinch fine sea salt
14 cup semisweet chocolate chips
14 cup unsweetened peanut butter
INSTRUCTIONS
- Insert the universal blade into the work bowl of the Cuisinart® 9-Cup Continuous Feed Food Processor. Put the bananas, coconut milk, vanilla, and salt in the work bowl. Use 10 long pulses to break up the bananas. Scrape the work bowl and then process for 2 to 3 minutes on High until smooth.
- Add the chips and pulse about 5 times to break up and incorporate. Add the peanut butter and continue to pulse to create a swirl.
- For best results, serve immediately. Alternatively, transfer to a freezer-safe container, cover the surface with plastic wrap, and freeze.
Nutritional information per serving (1/3 cup):
Calories 196 (41% from fat) • carb. 26g • pro. 6g • fat 23g • sat. fat 12g • chol. 36mg • sod. 183mg • calc. 6mg • fiber 4g
Pistachio Shortbread
The toasting of the pistachios is a step not to be missed – it brings out the oils of the nuts and is crucial to the true pistachio flavor in these cookies.
Yield: 30 cookies
INGREDIENTS
12 cup unsalted pistachios, toasted and cooled
2 tablespoons granulated sugar
8 tablespoons (1 stick) European-quality unsalted butter, room temperature and cut into 4 pieces
14 cup confectioners' sugar, sifted, plus more for dusting
12 teaspoon pure almond or vanilla extract
1 cup unbleached all-purpose flour
12 teaspoon kosher salt
1 large egg white, whisked well
1 to 2 tablespoons coarse sugar, such as turbinado
INSTRUCTIONS
- Put the pistachios and the 2 tablespoons granulated sugar into the work bowl of the Cuisinar® 9-Cup Continuous Feed Food Processor fitted with the universal blade. Pulse a few times, and then process on High for 20 seconds.
- Add the butter, confectioners' sugar, and vanilla. Pulse to combine, and then process on High.
- Add the flour and salt, and pulse until fully combined. Scrape down the work bowl, and pulse a few more times.
- Transfer the dough to a piece of parchment. Form into a 2-inch cylinder, and wrap in the parchment. Refrigerate overnight.
- Preheat the oven to 350^ F with the racks in the lower and upper third positions. Line two baking sheets with parchment paper.
- While the oven is preheating, remove the dough from the refrigerator, and then brush with the egg white. Put the coarse sugar in a long rimmed pan. Roll the egg-washed dough in the sugar, and then cut into 14 inch to 13 -inch-thick slices. Transfer the dough to the prepared baking pans.
- Bake until the cookies are just browned at the edges, about 10 minutes. Transfer to a wire rack until firm enough to move to a second wire rack to cool completely before serving.
Nutritional information per cookie:
Calories 60 (57% from fat) • carb. 6g • pro. 1g • fat 4g • sat. fat 2g • chol. 8mg • sod. 36mg • calc. 2mg • fiber 0g
Raspberry Swirl Cheesecake
The chocolate cookie crust is the perfect pairing for this beautiful, simple-to-make cheesecake. When serving, grate bittersweet chocolate over top for an extra decadent garnish.
Yield: one 8-inch cake, about 12 servings
INGREDIENTS
Nonstick cooking spray
Crust
12 chocolate sandwich cookies, broken into pieces
2 tablespoons unsalted butter, melted
Filling
16 ounces (2 standard packages) cream cheese, softened and room temperature
1 cup granulated sugar
14 teaspoon kosher salt
3 large eggs, room temperature
1 teaspoon pure vanilla extract
1 cup (8 ounces) plain Greek yogurt, room temperature
Raspberry Sauce
1 cup raspberries, fresh or frozen (defrosted)
2 tablespoons granulated sugar
INSTRUCTIONS
-
Preheat oven to 325°F. Place a baking pan with a depth of at least 14 inch on the bottom rack of the oven and fill with water. Position the other rack in the middle of the oven, directly over the water-filled pan. Lightly coat the inside of an 8-inch springform pan with nonstick spray.
-
Prepare the crust. Insert the universal blade in the work bowl of the Cuisinart® 9-Cup Continuous Feed Food Processor. Add the cookies and pulse 6 to 8 times to chop, then process on High to finely grind, about 20 seconds. Add the butter and pulse about 6 times to combine. Remove and press into the bottom of the prepared pan. Reserve.
-
Prepare the filling. Remove the universal blade to wipe out work bowl, then replace the blade. Add the cream cheese. Pulse about 5 times, scrape down sides of bowl, and process on High for 30 to 35 seconds until creamy. Add the sugar and salt and pulse a few times, then process on Low until homogenous, stopping to scrape down the sides of the bowl as needed. With the unit running on Low, add the eggs, one at a time, and vanilla, and process until combined.
-
Add the yogurt and pulse until well mixed.
-
Pour the cream cheese mixture into the prepared pan. Tap a few times to remove any air bubbles and reserve. Rinse bowl and blade and return to the unit.
-
Prepare the raspberry sauce. (Note: The raspberry sauce can be made up to 1 week in advance and stored in the refrigerator until ready to use.) Put the raspberries and sugar into the work bowl fitted with the universal blade. Process on High until smooth, 20 to 30 seconds. Pour through a fine-mesh strainer set over a clean bowl. Pour the strained raspberry sauce over the top of the cheesecake in a circular pattern and use a knife or skewer to make an attractive swirl.
-
If any of the water has evaporated from the baking pan in the oven, add some more. Place the springform pan on the middle rack. Bake for 1 hour, covering loosely with foil after 40 minutes, then turn off the oven after the full hour. Leave the cake in the oven for an additional hour. Transfer the cheesecake to a wire rack to cool completely, then cover and refrigerate for at least 8 hours before serving.
Nutritional information per serving (based on 12 servings):
Calories 311 (53% from fat) • carb. 31g • pro. 31g • fat 19g • sat. fat 10g • chol. 92mg • sod. 256mg • calc. 34mg • fiber 1g
Chocolate Hazelnut Spread
For a delectable treat, spread on warm toast.
Yield: 2 cups
INGREDIENTS
1½ cups skinned hazelnuts
1 cup (8 ounces) semisweet chocolate chips
2 tablespoons granulated sugar
12 teaspoon kosher salt
12 cup heavy cream
6 tablespoons unsalted butter, cut into 1-inch pieces, room temperature
INSTRUCTIONS
-
Preheat the oven to 350^ F. Spread the hazelnuts on a baking sheet, and toast until fragrant and lightly golden-brown, 5 to 8 minutes. Transfer to a wire rack to cool completely.
-
Put the chocolate chips in a small metal bowl. Place the bowl over a medium saucepan of simmering water, and stir until melted and smooth. Reserve.
-
Put the hazelnuts, sugar, and salt in the work bowl of the Cuisinart® 9-Cup Continuous Feed Food Processor fitted with the universal blade. Pulse 5 to 6 times to break up the hazelnuts, then process on High until hazelnuts resemble a thick paste.
-
Add the melted chocolate, cream, and butter to the hazelnut mixture. Process on High until smooth. Transfer to an airtight container and refrigerate for at least 30 minutes. Store in the refrigerator for up to 2 weeks.
Tip: For best results, remove from the refrigerator 30 minutes prior to serving.
Nutritional information per serving (1 tablespoon):
Calories 94 (73% from fat) • carb. 6g • pro. 1g • fat 8g • sat. fat 4g • chol. 11mg • sod. 39mg • calc. 10mg • fiber 1g
NOTES:
Cuisinart®
natural_image
Cuisine kitchen appliance with clear glass and white casing, labeled 'Cuisinart' (no visible text beyond branding)natural_image
3D rendered mechanical component with cylindrical shaft and flanged base (no visible text or symbols)4.
3.
3b.
3a.
2.
1.
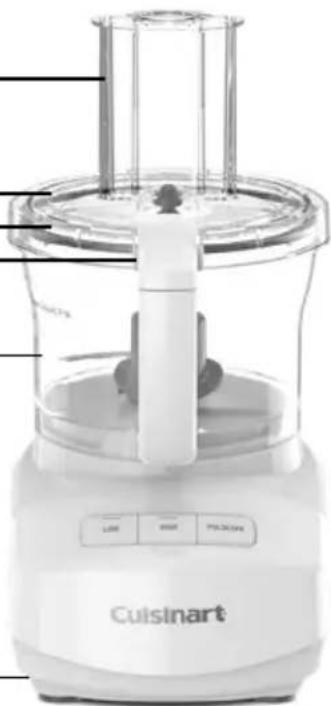
natural_image
Front view of a Cuisinart kitchen blender with control panel and menu (no visible text or symbols on the device itself)INSTRUCCIONES DE ENSAMBLAJE
natural_image
Two views of a kitchen appliance: top shows a cylindrical tool with a propeller, bottom shows a clear lid (no text or symbols visible)natural_image
Top-down view of a meal set with various dishes and food items on a white marble surface (no text or symbols visible)Brunches
"Scones" con chispas de chocolate....16
- IMPORTANT UNPACKING INSTRUCTIONS
- CAUTION:
- THE CUTTING TOOLS HAVE VERY SHARP EDGES.
- IMPORTANT SAFEGUARDS
- Getting Ready
- before cleaning. To unplug, grasp plug and pull from electrical outlet. Never pull cord.
- Operation
- Cleaning
- General
- SAVE THESE INSTRUCTIONS.
- CONTENTS
- PARTS
- The machine includes:
- ASSEMBLY INSTRUCTIONS
- Before First Use
- UNIVERSAL BLADE FOR CHOPPING, MIXING, AND DOUGH
- REVERSIBLE SLICING AND SHREDDING DISCS
- CONTINUOUS FEED ATTACHMENT
- MACHINE CONTROLS
- High and Low Control Buttons
- Pulse/Off Button
- MACHINE FUNCTIONS
- Using the Universal Blade for Chopping, Mixing, and Dough
- Chopping
- Puréeing
- Dough
- Using the Reversible Slicing and Shredding Discs
- CLEANING, STORAGE, AND MAINTENANCE
- FOR YOUR SAFETY
- TECHNICAL DATA
- TROUBLESHOOTING
- Food Processing
- Solution:
- Dough Kneading
- Continuous Feed
- Technical
- RECOMMENDED MAXIMUM WORK BOWL CAPACITY
- USER GUIDE
- WARRANTY
- Limited Three-Year Warranty
- CALIFORNIA RESIDENTS ONLY
- HASSLE-FREE REPLACEMENT WARRANTY
- Cuisinart
- Recipe Booklet
- Breakfast/Brunch
- Dips/Spreads
- Dressings/Sauces
- Soup/Salads/Sides
- Main Course
- Breads/Dough
- Desserts
- Chocolate Chip Scones
- INGREDIENTS
- INSTRUCTIONS
- Nutritional information per scone:
- Zucchini Spice Bread
- Nutritional information per serving:
- Spinach, Mushroom, and Gruyére Quiche
- Hash Browns
- Nutritional information per hash brown:
- Tropical Smoothie Bowl
- Crispy Shallot Butter
- Crispy Shallots
- Compound Butter
- Nutritional information per serving (1 tablespoon):
- Maple-Bacon Butter
- Vegetable Cream Cheese
- Honey Nut Butter
- Winter Squash Hummus
- Salsa Fresca
- Caramelized Onion Dip
- Guasacaca
- Simple Tomato or Pizza Sauce
- Tomato Sauce
- Pizza Sauce
- Pistachio-Arugula Pesto
- Sun-Dried Tomato and Almond Pesto
- Aioli
- Greek Vinaigrette
- Classic Caesar Dressing
- Nutritional information per serving (1 tablespoon
- Vegan Caesar Dressing
- Nutritional information per serving (2 tablespoons):
- Vietnamese Peanut Sauce
- Ginger-Sesame Dumpling Sauce
- Gazpacho
- Loaded Sweet Potato Soup
- Greek Salad
- Spicy Slaw
- Sliced Brussels Sprouts Caesar Salad
- Croutons
- Salad
- Nutritional information per serving ( 12 cup):
- Delicata Squash Gratin
- Pinch nutmeg
- Nutritional information per serving (based on 10 servings):
- Quick-Pickled Veggies
- Potato-Zucchini-Carrot Cakes
- Tahini and Miso Cucumber Salad
- Cauliflower Fried Rice
- Pizza with Pistachio-Arugula Pesto, Prosciutto, and Burrata
- Nutritional information per 12 cup serving:
- Margherita Pizza
- Vegetable Stir-Fry
- Shrimp Summer Rolls
- Vegetable Dumplings
- Nutritional information per serving (1 dumpling):
- Mushroom Bolognese
- Chicken Pot Pie
- Filling
- Nutritional information per serving (based on 8 servings):
- Cilantro-Lime Chicken
- Pasta Primavera
- Falafel with Middle Eastern Salad
- Falafel
- Nutritional information per serving (per falafel):
- Nutritional information per serving ( 12 cup salad):
- Lamb Meatballs
- Nutritional information per meatball:
- Smash Veggie Burgers
- Yield: 12 patties (6 double burgers)
- Plain or Seasoned Breadcrumbs
- Seasoned Breadcrumbs:
- Pizza Dough
- Gluten-Free Pizza Dough
- Cauliflower Crust for Pizza
- Nutritional information per serving (based on 12 servings):
- Burger Buns
- Nutritional information per serving
- Pita Bread
- Nutritional information per pita:
- Buttermilk Drop Biscuits
- Nutritional information per biscuit:
- Cranberry Apple Pie
- Classic Carrot Cake with Cream Cheese Frosting
- Nonstick cooking spray
- Cake
- Cream Cheese Frosting (yields about 3½ cups)
- Banana-Chip "Ice Cream" with Peanut Butter Swirl
- Pistachio Shortbread
- Nutritional information per cookie:
- Raspberry Swirl Cheesecake
- Crust
- Raspberry Sauce
- Chocolate Hazelnut Spread
- NOTES:
- Cuisinart®
- INSTRUCCIONES DE ENSAMBLAJE
- Brunches
Brand : CUISINART
Model : FP-9
Category : Food processor