
CN160241XB - Refrigerator BEKO - Free user manual and instructions
Find the device manual for free CN160241XB BEKO in PDF.


| Product Type | Refrigerator with Freezer |
| Brand | Beko |
| Model | CN160241XB |
| Energy Efficiency Class | G (Lighting source) |
| Cooling System | Dual Cooling System (separate circuits for fridge and freezer) |
| Refrigerant Type | R600a (flammable) |
| Total Net Capacity | Approximately 400 L (estimate based on similar models) |
| Fridge Compartment Capacity | Approximately 280 L |
| Freezer Compartment Capacity | Approximately 120 L |
| Freezing Capacity | Up to 10 kg in 24 hours (quick freeze function) |
| Noise Level | Approximately 42 dB (estimate) |
| Climate Class | SN-T (subnormal to tropical) |
| Power Supply | 220-240 V, 50-60 Hz |
| Dimensions (H x W x D) | Approximately 178 x 70 x 75 cm (estimate) |
| Weight | Approximately 75 kg (estimate) |
| Display Type | Digital LED display with touch controls |
| Special Features | HarvestFresh (blue light), Water Dispenser, Icematic, Quick Bottle Cooling, Dual Cooling, Eco-Fuzzy, Vacation Mode |
| Maintenance | Clean interior with bicarbonate solution; replace odor filter annually; defrost automatically |
| Safety Features | Door open alarm, child lock, Sabbath mode, automatic defrost |
| Spare Parts Availability | Original spare parts available for 10 years after purchase |
Frequently Asked Questions - CN160241XB BEKO
User questions about CN160241XB BEKO
0 question about this device. Answer the ones you know or ask your own.
Ask a new question about this device
Download the instructions for your Refrigerator in PDF format for free! Find your manual CN160241XB - BEKO and take your electronic device back in hand. On this page are published all the documents necessary for the use of your device. CN160241XB by BEKO.
USER MANUAL CN160241XB BEKO
natural_image
Simple line drawing of a pear and a carrot (no text or symbols)CN160237W-CN160236XB-CN160241XB-CN160238W
Dear Customer,
Please read this manual before using the product.
Thank you for choosing this product. We would like you to achieve the optimal efficiency from this high quality product which has been manufactured with state of the art technology. To do this, carefully read this manual and any other documentation provided before using the product and keep it as a reference.
Heed all information and warnings in the user manual. This way, you will protect yourself and your product against the dangers that may occur.
Keep the user manual. Include this guide with the unit if you hand it over to someone else.
The following symbols are used in the user guide:

Hazard that may result in death or injury.
NOTICE A hazard that may cause material damage to the product or its surroundings

Important information or useful tips on operation.

Read the user manual.

Risk of fire / Flammable materials

INFORMATION

flowchart
graph LR
    A["ENERG"] --> B["SUPPLIER'S NAME"]
    B --> C["MODEL IDENTIFIER"]
    C --> D["(*)"]
. The model information as stored in the product data base can be reached by entering following website and searching for your model identifier (*) found on energy label.
https://eprel.ec.europa.eu/
1- Safety Instructions 3
2 Your appliance 8
3 Installation 9
3.1. Appropriate installation location ..... 9
3.2. Installing the plastic wedges. 9
3.3. Electrical connection 10
3.4. Adjusting the feet. 10
3.5. Illumination lamp 10
3.6. Door open warning.....10
3.7. Transportation of the product ..... 11
4 Preparation 12
4.1. Things to be done for energy saving ..... 12
4.2. Recommendations on the fridge compartment.... 12
4.3. Initial use.... 13
4 Preparation 13
5 Using the product 14
5.1. Indicator panel.... 14
5.2. Dual cooling system 20
5.3. Freezing fresh food 20
5.4. Recommendations for preserving the frozen food 21
5.5. Placement of food 21
5.6. Deep-freeze information.... 21
5.7. Ice machine.... 22
5.8. Icematic 22
5.9. Ice container 23
5.10. Blue light/HarvestFresh 23
5.11.Egg holder. 23
5.12. Description and cleaning of odor filter . . . 24
5.13. Snack compartment ..... 24
5.14. Sliding storage container.... 25
5.15. Rotary storage container ..... 25
5.16. Crisper 26
5.17. Using the water dispenser 27
5.18. Filling the water dispenser's tank ..... 27
5.19. Cleaning the water tank 28
5.20. Drip tray 29
5.21. Humidity-controlled crisper (Ever Fresh) .. 29
5.22. Quick bottle cooling/quick ice making compartment.... 33
6 Maintenance and cleaning 36
7. Troubleshooting 37
1 Safety Instructions
- This section contains safety instructions that will help get protected against risks of personal injury or property damage.
- Our company shall not be responsible for damages that may arise when these instructions are not followed.

Installation and repair procedures must always be performed by the manufacturer, authorised service agent or a qualified person specified by the importer.

Only use original parts and
accessories.

Original spare parts will be provided for 10 years, following the product purchasing date.

Do not repair or replace any part of the product unless specified expressly in the user manual.

Do not make any technical modifications to the product.

1.1 Intended Use
- This product is not suitable for commercial use and it must not be used out of its intended use. This product is designed to be used in houses and indoor places.
For example:
- Personnel kitchens in stores, offices and other working environments,
- Farm houses,
- Areas used by customers at hotels, motels and other types of accommodation,
- Bed&breakfast type hotels, boardinghouses,
- Catering and similar non-retail applications.
This product should not be used outdoors with or without a tent above it such as boats, balconies or terraces. Do not expose the product to rain, snow, sun or wind.
There is the risk of fire!

1.2 - Safety for children, liverable persons and pets
- This product can be used by children at and above 8 years old and by persons with limited physical, sensory or mental capabilities or who lack experience and knowledge provided that they are supervised or trained on the safe use of the product and the risks it brings out.
- Children aged from 3 to 8 years are allowed to load and unload refrigerating products.
- Electrical products are dangerous for children and pets. Children and pets must not play with, climb or enter the product.
- Cleaning and user maintenance should not be performed by children unless they are supervised by someone.
-
Keep packaging materials away from children. There is the risk of injury and suffocation!
• Before disposing of the old or obsolete product: -
Unplug the product by gripping from the plug.
-
Cut the power cable and remove it from the appliance together with its plug
-
Do not remove the shelves or drawers so that it is harder for children to enter the product.
-
Remove the doors.
-
Keep the product in a way that it will not tip over.
-
Do not allow children play with the old product.
- Never throw the product into fire for disposal. There is the risk of explosion!
- If there is a lock on the door of the product, the key should be kept out of the reach of children.
Important instructions for safety and environment

1.3 - Electrical safety
- The product must be unplugged during installation, maintenance, cleaning, repairing and moving procedures.
- If the power cable is damaged, it must be replaced by a qualified person specified by the manufacturer, authorised service agent or importer in order to avoid potential dangers.
- Do not squeeze the power cable under or behind the product. Do not place heavy objects on the power cable. Power cable must not be bent excessively, pinched or get in contact with any heat source.
- Do not use extension cords, multi-sockets or adapters to operate the product.
- Portable multi-sockets or portable power sources can overheat and cause fire. Therefore, do not keep any multi-sockets behind or near the product.
- Plug must be easily accessible. If this is not possible, the electrical installation to which the product is connected must contain a device (such as a fuse, switch, circuit breaker, etc.) which conforms to the electrical regulations and disconnects all poles from the grid.
- Do not touch the power plug with wet hands.
- Remove the plug from the socket by gripping the plug and not the cable.
- Do not touch the plug with wet hands.
- When unplugging the appliance, don't hold the power cord, but the plug.

1.4 - Transportation safety
• Product is heavy; do not move it alone.
- Do not hold its door when moving the product.
- Pay attention not to damage the cooling system or the piping during transportation.
If the piping is damaged, do not operate the product and call the authorised service agent.

1.5 - Installation safety
- Call the authorised service agent for installation of the product. To make the product ready for use, check the information in the user manual to make sure that the electricity and water installations are suitable. If they are not, call a qualified electrician and plumber to have the necessary arrangements made. Otherwise, there is the risk of electric shock, fire, problems with the product, or injury!
- Prior to installation, check if the product has any defects on it. If the product is damaged, do not have it installed.
- Place the product on a clean, flat and solid surface and balance it with adjustable feet. Otherwise, the product may tip over and cause injuries.
- The installation location must be dry and well ventilated. Do not place carpets, rugs or similar covers under the product. Insufficient ventilation causes the risk of fire!
- Do not cover or block the ventilation openings. Otherwise, power consumption increases and your product may get damaged.
- Product must not be connected to supply systems such as solar power supplies. Otherwise, your product may get damaged due to sudden voltage changes!
- The more refrigerant a refrigerator contains, the larger the installation location must be. If the installation location is too small, flammable refrigerant and air mixture will accumulate in cases of refrigerant leakage in cooling system. The required space for each 8 gr of refrigerant is 1 m ^3 minimum. The amount of refrigerant in your product is indicated on the Type Label.
Important instructions for safety and environment
- Product must not be installed in places exposed to direct sunlight and it must be kept away from heat sources such as hobs, radiators, etc.
If it is inevitable to install the product close to a heat source, a suitable insulation plate must be used in between and the following minimum distances must be kept to the heat source:
- Minimum 30 cm away from heat sources such as hobs, ovens, heater units or stoves, - Minimum 5 cm away from electric ovens.
- Protection class of your product is Type I. Plug the product in a grounded socket that conforms the voltage, current and frequency values stated on the type label of the product. The socket must be equipped with a 10 A – 16 A circuit breaker. Our company shall not be liable for any damages that will arise when the product is used without grounding and electrical connection in accordance with the local and national regulations.
- Product must not be plugged in during installation. Otherwise, there is the risk of electric shock and injury!
- Do not plug the product in sockets that are loose, dislocated, broken, dirty, greasy or bear the risk of getting in contact with water.
- Route the power cable and hoses (if any) of the product in a way that they do not cause risk of tripping over.
- Exposing the live parts or power cable to humidity may cause short circuit. Therefore, do not install the product in places such as garages or laundry rooms where humidity is high or water may splash. If the refrigerator gets wet with water, unplug it and call the authorised service agent.
- Never connect your refrigerator to energy saving devices. Such systems are harmful to your product.

1.6- Operational safety
- Never use chemical solvents on the product. There is the risk of explosion!
- If the product malfunctions, unplug it and do not operate until it is repaired by the authorised service agent. There is the risk of electric shock!
- Do not place flame sources (lit candles, cigarettes, etc.) on or close to the product.
- Do not climb on the product. There is the risk of falling and getting injured!
- Do not damage the pipes of the cooling system with sharp or penetrating objects. The refrigerant that might come out when the refrigerant pipes, pipe extensions or surface coatings are punctured causes skin irritations and eye injuries.
- Unless recommended by the manufacturer, do not place or use electrical devices inside the refrigerator/deep freezer.
- Be careful not to trap your hands or any other part of your body in the moving parts inside the refrigerator. Pay attention not to squeeze your fingers between the door and the refrigerator. Be careful when opening and closing the door particularly if there are children around.
- Never eat ice cream, ice cubes or frozen food right after removing them from the refrigerator. There is the risk of frostbite!
- When your hands are wet, do not touch the inner walls or metal parts of the freezer or the food stored therein. There is the risk of frostbite!
- Do not place tins or bottles that contain carbonated drinks or freezable liquids in the freezer compartment. Tins and bottles may burst. There is the risk of injury and material damage!
- Do not place or use flammable sprays, flammable materials, dry ice, chemical substances or similar heat-sensitive materials near the refrigerator. There is the risk of fire and explosion!
Important instructions for safety and environment
- Do not store explosive materials that contain flammable materials, such as aerosol cans, in your product.
- Do not place containers filled with liquid onto the product. Splashing water on an electrical part may cause electric shock or the risk of fire.
- This product is not intended for storing medicines, blood plasma, laboratory preparations or similar medical substances and products subject to Medical Products Directive.
- Using the product against its intended purpose may cause the products stored inside it to deteriorate or spoil.
- If your refrigerator is equipped with blue light, do not look at this light with optical tools. Do not stare at UV LED lamp directly for a long time. Ultraviolet light may cause eye strain.
- Do not overload the product. Objects in the refrigerator may fall down when the door is opened, causing injury or damage. Similar problems may arise if any object is placed onto the product.
- To avoid injuries, make sure that you have cleaned all the ice and water that may have fallen or splashed on the floor.
- Change the position of the shelves/bottle holders on the door of your refrigerator only when they are empty. There is the risk of injury!
- Do not place objects that can fall down/tip over onto the product. Such objects may fall down when the door is opened and cause injuries and/or material damage.
- Do not hit or exert excessive force on glass surfaces. Broken glass may cause injuries and/or material damage.
- Cooling system of your product contains R600a refrigerant: Type of the refrigerant used in the product is indicated on the type label. This refrigerant is flammable. Therefore, pay attention not to damage the cooling system or the piping while the pro-
duct is in use. If the piping is damaged:
- Do not touch the product or the power cable,
- Keep away potential sources of fire that may cause the product to catch fire.
- Ventilate the area where the product is located. Do not use fans.
- Call the authorised service agent.
- If the product is damaged and you see refrigerant leak, please stay away from the refrigerant. Refrigerant may cause frostbite in case of skin contact.
For products with a Water Dispenser/Ice Machine
- Use only potable water. Do not fill the water tank with any liquids -such as fruit juice, milk, carbonated beverages or alcoholic drinks- that are not suitable for use in the water dispenser.
• There is the risk for health and safety! - Do not allow children play with the water dispenser or ice machine (Icematic) in order to prevent accidents or injuries.
- Do not insert your fingers or other objects into the water dispenser hole, water channel or ice machine container. There is the risk of injury or material damage!

1.7- Maintenance and cleaning safety
- Do not pull from the door handle if you need to move the product for cleaning purposes. Handle may break and cause injuries if you exert excessive force on it.
- Do not spray or pour water on or inside the product for cleaning purposes. There is the risk of fire and electric shock!
Important instructions for safety and environment
- Do not use sharp or abrasive tools when cleaning the product. Do not use household cleaning products, detergent, gas, gasoline, thinner, alcohol, varnish etc.
- Only use cleaning and maintenance products inside the product that are not harmful for food.
- Never use steam or steam assisted cleaners to clean or defrost the product. Steam gets into contact with the live parts in your refrigerator, causing short circuit or electric shock!
- Make sure that no water enters the electronic circuits or lighting elements of the product.
- Use a clean and dry cloth to wipe the foreign materials or dust on the pins of the plug. Do not use a wet or damp cloth to clean the plug. There is the risk of fire and electric shock!

1.8- HomeWhiz
- When you operate your product through HomeWhiz application, you must observe the safety warnings even when you are away from the product. You must also follow the warnings in the application.

1.9- Lighting
- Call the authorised service when it is required to replace the LED/bulb used for lighting.
2 Your appliance

- Door shelves of fridge compartment
- Display
- Water dispenser filling tank
- Egg section
- Water dispenser reservoir
- Rotary storage container
- Freezer compartment drawers
- Icematic drawer
- Icematic
-
Crisper
-
Water tank
- Crisper
- Chiller compartment
- Bottle shelf
- Odor filter
- Glass shelves of fridge compartment
- Fan
- Glass shelves of fridge compartment
- Freezer compartment
*optional

*optional: Figures in this user manual are given as an example and may not match the product exactly. If the relevant parts are not available in the product you purchased, the figure applies to other models.
3 Installation
Always have the installation and repairing procedures carried out by the Authorized Service Agent. Manufacturer shall not be held liable for damages that may arise from procedures carried out by unauthorized persons.
Refer to the nearest Authorized Service Agent for installation of the product. To make the product ready for use, make sure that the electricity installation is appropriate before calling the Authorized Service Agent. If not, call a qualified electrician to have any necessary arrangements carried out.
 | Preparation of the location and electrical installation at the place of installation is under customer's responsibility. |
 | Product must not be plugged in during installation. Otherwise, there is the risk of death or serious injury! |
 | WARNING: Installation and electrical connections of the product must be carried out by the Authorised Service Agent. Manufacturer shall not be held liable for damages that may arise from procedures carried out by unauthorised persons. |
 | WARNING: Prior to installation, visually check if the product has any defects on it. If so, do not have it installed. Damaged products cause risks for your safety. |
 | Make sure that the power cable is not pinched or crushed while pushing the product into its place after installation or cleaning procedures. |
3.1. Appropriate installation location

WARNING: If the door of the room where the product will be placed is too small for the product to pass, then the product's doors must be removed and the product must be turned aside to pass it through.
- Choose a place at where you would use the product comfortably.
- Install the product at least 30 cm away from heat sources such as hobs, ovens, heater cores and stoves and at least 5 cm away from electrical ovens. Product must not be subjected
to direct sun light and kept in humid places after installation.
- Your product requires adequate air circulation to function efficiently. If the product will be placed in an alcove, remember to leave at least 5 cm clearance between the product and the ceiling, rear wall and the side walls.
- If the product will be placed in an alcove, remember to leave at least 5 cm clearance between the product and the ceiling, rear wall and the side walls. Check if the rear wall clearance protection component is present at its location (if provided with the product). If the component is not available, or if it is lost or fallen, position the product so that at least 5 cm clearance shall be left between the rear surface of the product and the wall of the room. The clearance at the rear is important for efficient operation of the product.
- Do not place the product on the materials such as rugs or carpets.
- Place the product on an even floor surface to prevent jolts.
- Do not install the product in places where the temperature falls below 10^ C.

If two coolers are to be installed side by side, there should be at least 8 cm distance between them. Otherwise, adjacent side walls may get damp.
3.2. Installing the plastic wedges
Plastic wedges are used to create the distance for the air circulation between the product and the rear wall. Insert the 2 plastic wedges onto the rear ventilation cover as illustrated in the figure. To install the wedges, remove the screws on the product and use the screws given in the same pouch with the wedges.
Installation

natural_image
Technical line drawing of a laptop front panel with ventilation grilles and mounting holes (no text or symbols)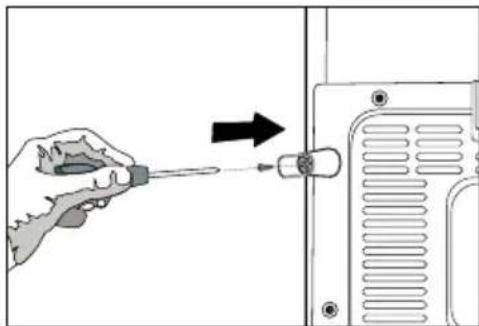
natural_image
Illustration of a hand using a screwdriver to adjust or install a component, with an arrow indicating direction (no text or symbols present)3.3. Electrical connection
Connect the product to a grounded outlet protected by a fuse complying with the values in the rating plate. Our company shall not be liable for any damages that will arise when the product is used without grounding in accordance with the local regulations.
- Electrical connection must comply with national regulations.
- Power cable plug must be within easy reach after installation.
- The voltage and allowed fuse or breaker protection are specified in the Rating Plate which is affixed to interior of the product. If the current value of the fuse or breaker in the house does not comply with the value in the rating plate, have a qualified electrician install a suitable fuse.
- The specified voltage must be equal to your mains voltage.
- Do not make connections via extension cables or multi-plugs.

WARNING: Damaged power cable must be replaced by the Authorized Service Agent.

WARNING: If the product has a failure, it should not be operated unless it is repaired by the Authorised Service Agent! There is the risk of electric shock!
3.4. Adjusting the feet
If the product stands unbalanced after installation adjust the feet. Taking help from someone to slightly lift the product will facilitate this process.

WARNING: First unplug the product. Product must not be plugged in when adjusting the feet. There is the risk of electric shock!

natural_image
Pure diagram of a beam supported at both ends with curved arrows indicating rotational motion (no text or symbols)Turn the front feet to balance the product. The corner where the foot exists is lowered when you turn in the direction of arrow and raised when you turn it in the opposite direction.
3.5. Illumination lamp
Do not attempt to repair yourself but call the Authorized Service Agent if the illumination lamps do not go on or are out of order.
The lamp(s) used in this appliance is not suitable for household room illumination. The intended purpose of this lamp is to assist the user to place foodstuffs in the refrigerator/freezer in a safe and comfortable way.
3.6. Door open warning
(This feature is optional)
An audio warning signal will be given when the door of your product is left open for 1 minute. This warning will be muted when the door is closed or any of the display buttons (if any) are pressed.
Installation
3.7. Transportation of the product
- Unplug the product before transporting it.
- Clean the interior of the product as recommended in the “Maintenance and cleaning” section.
- Secure the shelves, accessories, crisper and etc. in the product by adhesive tape before repackaging it.

Packaging must be tied with thick tapes or strong ropes and the rules of transportation printed on the package must be followed.

Original packaging and foam materials should be kept for future transportations.

Packaging materials are dangerous for the children. Keep packaging materials in a safe place away from reach of the children.
4 Preparation
4.1. Things to be done for energy saving

Connecting the product to electric energy saving systems is risky as it may cause damage on the product.
- For a freestanding appliance; ‘this refrigerating appliance is not intended to be used as a built-in appliance’;
- Do not leave the doors of your product open for a long time.
• Do not put hot food or drinks in your product. - Do not overload the product. Cooling capacity will fall when the air circulation inside is hindered.
- Do not place the product in places subject to direct sunlight. Install the product at least 30 cm away from heat sources such as hobs, ovens, heater cores and stoves and at least 5 cm away from electrical ovens.
• Store your food in product in closed containers. - You can load maximum amount of food to the freezer compartment of the product by removing the freezer compartment shelf of drawer. Declared energy consumption value of the product was determined with the freezer compartment shelf or drawer removed and with maximum amount of food loaded. There is no risk in using a shelf or drawer suitable for the shapes and sizes of the foods to be frozen.
- Thawing frozen food in fridge compartment will both provide energy saving and preserve the food quality.
- Since hot and humid air will not directly penetrate into your product when the doors are not opened, your product will optimize itself in conditions sufficient to protect your food. Functions and components such as compressor, fan, heater, defrost, lighting, display and so on will operate according to the needs to consume minimum energy under these circumstances.
- In case of multiple options are present glass shelves must be placed so that the air outlets at the backwall are not blocked, preferably air outlets are remaining below the glass shelf. This
combination may help impoving air distribution and energy efficiency.

The ambient temperature of the room where you install the product should at least be -5^ C. Operating your product under cooler conditions than this is not recommended.

Inside of your product must be cleaned.

If two coolers are to be installed side by side, there should be at least 4 cm distance between them.
4.2. Recommendations on the fridge compartment
- Do not allow the food to touch the temperature sensor in fridge compartment. To allow the fridge compartment keep its ideal storage temperature, sensor must not be hindered by food.
- The baskets/drawers that are provided with the chill compartment must always be in use for low energy consumption and for better storage conditions.

natural_image
Line drawing of a hand inserting a small rectangular object into a cabinet (no text or symbols)4 Preparation
- Food contact with the temperature sensor in the freezer compartment may increase energy consumption of the appliance. Thus any contact with the sensor(s) must be avoided.
- Do not put hot food and beverages inside the product.
4.3. Initial use
Before starting to use the product, check that all preparations are made in accordance with the instructions in sections "Important instructions for safety and environment" and "Installation".
- Clean the interior of the product as recommended in the “Maintenance and cleaning” section. Check that inside of it is dry before operating it.
- Plug the product into the grounded wall outlet. When the door is opened the interior illumination will turn on.
- Run the product without putting any food for 6 hours and do not open its door unless certainly required.
You will hear a noise when the compressor starts up. The liquids and gases sealed within the refrigeration system may also give rise to noise, even if the compressor is not running and this is quite normal.

Front edges of the product may feel warm. This is normal. These areas are designed to be warm to avoid condensation.

In some models, the instrument panel automatically turns off 5 minutes after the door has closed. It will be reactivated when the door has opened or pressed on any key.
5 Using the product
5.1. Indicator panel
Indicator panels may vary according to the product model.
Audio – visual functions on the indicator panel helps you in using your product.

- Fridge Compartment Indicator
- Error status indicator
- Temperature indicator
- Vacation function button
- Temperature setting button
- Compartment selection button
- Freezer compartment indicator
- Economy mode indicator
- Vacation function indicator
*optional
*Optional: Figures in this user manual are given as an example and may not match the product exactly. If the relevant parts are not available in the product you purchased, the figure applies to other models.
5 Using the product
1. Fridge compartment indicator
Fridge compartment light is illuminated while the fridge compartment temperature is set.
2. Error status indicator
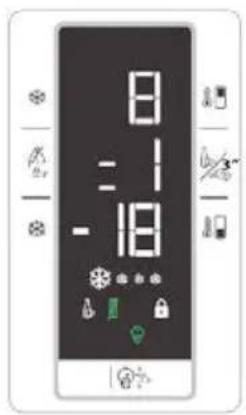
If your refrigerator does not perform enough cooling or in case of a sensor fault, this indicator is activated. When this indicator is activated, “E” is displayed on the freezer compartment temperature indicator, and numbers such as “1,2,3…” are displayed on the fridge compartment temperature indicator. These numbers on the indicator inform service personnel about the error.
3. Temperature indicator
Indicates freezer, fridge compartment temperature.
4. Vacation function button
Press on Vacation Button for 3 seconds to activate this function. When the vacation function is activated, “- -” is displayed on the fridge compartment temperature indicator and no active cooling is performed on the fridge compartment. It is not suitable to keep the food in the fridge compartment when this function is activated. Other compartments shall be continued to be cooled as per their set temperature.
To cancel this function press Vacation button again.
5. Temperature setting button
Changes the temperature of the relevant compartment between -24^ ... -18^ and 8^ ... 1^ .
6. Compartment selection button
Selection button: Press compartment selection button to switch between fridge and freezer compartments.
7. Freezer compartment indicator
Fridge compartment light is illuminated while the freezer compartment temperature is set.
8. Economy mode indicator
Indicates that the refrigerator operates in energy saving mode. This display shall be activated if the freezer compartment temperature is set to -18^ .
9. Vacation function indicator
Indicates that vacation is activated.
5 Using the product
\*optional

- Fridge compartment temperature setting button
- Key lock button
- Freezer compartment temperature setting button
- Error status indicator
- Key lock indicator
- Eco Extra Function Indicator
- Eco Extra / Vacation Button
-
Vacation function indicator
-
Icematic Off Indicator (*In some models)
- Economic usage indicator
- Quick freeze function indicator
- Quick freeze function button/ Icematic on-off button
- Freezer compartment temperature indicator
- Quick cool function
- Fridge Compartment Temperature indicator
- Quick cooling function indicator

*Optional: Figures in this user manual are given as an example and may not match the product exactly. If the relevant parts are not available in the product you purchased, the figure applies to other models.
Using your appliance
1. Fridge compartment temperature setting button
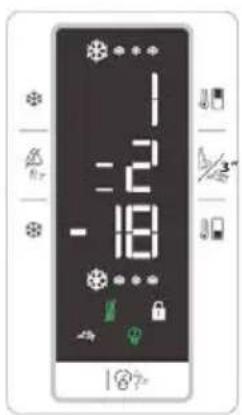
Press this button to set the temperature of the fridge compartment to 8, 7,6, 5,4,3, 2, 8... respectively. Press this button to set the fridge compartment temperature to the desired value.
2. Key lock button
Pressing and holding this button for 3 seconds will activate the key lock function and the key lock indicator will turn on. Pressing and holding this button again for 3 seconds will deactivate the key lock function.
3. Freezer compartment temperature setting button
Press this button to set the temperature of the freezer compartment to -18,-19,-20,-21,-22,-23,-24,-18... respectively. Press this button to set the freezer compartment temperature to the desired value.
4. Error status indicator
If your product does not perform enough cooling or in case of a sensor fault, this indicator is activated.
When this indicator is activated, “E” is displayed on the freezer compartment temperature indicator, and numbers such as “1,2,3…” are displayed on the fridge compartment temperature indicator. The numbers on the indicator inform service personnel about the error.

When you place hot food into the freezer compartment or if you leave the door open for a long time, an exclamation mark can be displayed for some time. This is not a failure; this warning will disappear when the food cools down.
5. Key lock indicator
Use this function if you want to prevent changing of the temperature setting of the
product. To activate it press and hold fridge compartment temperature setting button and freezer compartment temperature setting button simultaneously for 3 seconds.
6. Eco extra function indicator
Indicates that the Eco Extra function is active. If this function is active, your product will automatically detect the least usage periods and energy-efficient cooling will be performed during those times.

Economy indicator will be active while energy-efficient cooling is performed.

Press the relevant button to disable the function.
7. Eco extra / Vacation button
Pressing this button briefly will activate the Eco Extra function. Pressing and holding this button for 3 seconds will activate the Vacation function. Pressing this button again will deactivate the selected function.
8. Vacation function indicator
Indicates that the Vacation Function is active. When this function is active “- -” appears on the Fridge Compartment Temperature indicator and no cooling is performed in the fridge compartment. Other compartments will be cooled in accordance with the temperature set for them.

Press the relevant button to disable the function.
9. Icematic off indicator
Indicates whether the icematic is on or off. If On, then the icematic is not operating. To operate the icematic again press and hold the On-Off button for 3 seconds.
Using your appliance

Water flow from water tank will stop when this function is selected. However, ice made previously can be taken from the icematic.
10. Economic usage indicator
Indicates that the product is running in energy-efficient mode. This indicator will be active if the Freezer Compartment temperature is set to -18 or the energy efficient cooling is being performed due to Eco-Extra function.

Economic usage indicator is turned off when quick cooling or quick freeze functions are selected.
11. Quick freeze function indicator
Flashes in an animated style to indicate that the Quick Freeze function is enabled.
12. Quick freeze function button/ Icematic on-off button
Press this button to activate or deactivate the quick freezing function. When you activate the function, the freezer compartment will be cooled to a temperature lower than the set value. To turn on and off the icematic press and hold it for 3 seconds.

Use the quick freeze function when you want to quickly freeze the food placed in fridge compartment. If you want to freeze large amounts of fresh food, activate this function before putting the food into the product.

If you do not cancel it, Quick Freeze will cancel itself automatically after 24 hours or when the fridge compartment reaches to the required temperature.

This function is not recalled when power restores after a power failure.
13. Freezer compartment temperature indicator Indicates the temperature set for freezer compartment.
14. Quick cool function
The button has two functions. To activate or deactivate the quick cool function press it briefly. Quick Cool indicator will turn off and the product will return to its normal settings.

Use quick cooling function when you want to quickly cool the food placed in the fridge compartment. If you want to cool large amounts of fresh food, activate this function before putting the food into the product.

If you do not cancel it, quick cooling will cancel itself automatically after 1 hours or when the fridge compartment reaches to the required temperature.

If you press the quick cooling button repeatedly with short intervals, the electronic circuit protection will be activated and the compressor will not start up immediately.

This function is not recalled when power restores after a power failure.
15. Fridge compartment temperature indicator Indicates the temperature set for Fridge compartment.
16. Quick cooling function indicator
Flashes in an animated style to indicate that the Quick Cooling function is enabled.
Using your appliance
Sabbath Mode:\*optional
Press the Quick Cool Button for 3 seconds to activate or deactivate the Sabbath Mode. When Sabbath Mode is activated, the display, alarm, door opening or light buttons will not function:


If the user does not deactivate the Sabbath mode, the refrigerator will automatically cancel it in 76 hours.
Using your appliance
5.2. Dual cooling system
Your product is equipped with two separate cooling systems to cool the fresh food compartment and freezer compartment. Thus, air and odor in the fresh food compartment and frozen food compartment do not get mixed. Thanks to these two separate cooling systems, cooling speed is much higher then other refrigerators. Also additional power saving is provided since the defrosting is performed individually.
5.3. Freezing fresh food
- Place the food in the product wrapped or covered.
- Hot food must be cooled down to the room temperature before putting them in the product.
- The food that you want to freeze must be fresh and in good quality.
- Divided the food into portions according to your family's daily or meal based consumption needs.
-
Pack the food in an airtight manner to prevent them from drying even if they are going to be stored for a short time.
-
Materials to be used for packaging must be tear-proof and resistant to cold, humidity, odor, oils and acids and they must also be airtight. Moreover, they must be well closed and they must be made from easy-to-use materials that are suitable for deep-freezers.
- Frozen food must be used immediately after they are thawed and they should never be re-frozen.
- Do not freeze too large quantities of food at one time. The quality of the food is best preserved when it is frozen right through to the core as quickly as possible.
- Placing warm food into the freezer compartment causes the cooling system to operate continuously until the food is frozen solid.
- Take special care not to mix already frozen food and fresh food.
- If the product has a quick freeze function, activate the quick freeze function when you want to freeze the food.
| Freezer compartment setting | Fridge compartment setting | Remarks |
| -18°C 4°C This is the normal recommended setting. | ||
| -20, -24 or -24°C 4°C | These settings are recommended when the ambient temperature exceeds 30°C. | |
| Quick freeze 4°C | Use when you wish to freeze your food in a short time. Your product will return to its previous mode when the process is over. | |
| -18°C or colder 2°C | Use these settings if you think that your fridge compartment is not cold enough because of the hot ambient conditions or frequent opening and closing of the door. | |
| -18°C or colder Quick fridge | Use this function when you place too much into the fridge compartment or when you need to cool your food quickly. It is recommended that you activate quick fridge function 4-8 hours before placing the food. | |
Using your appliance
5.4. Recommendations for preserving the frozen food
- Frozen food that you have purchased should be stored in accordance with the frozen food manufacturer's instructions for a frozen food storage compartment.
Note the following to ensure that the high quality achieved by the frozen food manufacturer and the food retailer is maintained:
- Put packages in the freezer as quickly as possible after purchase.
- Ensure that contents are labeled and dated.
- Do not exceed "Use By", "Best Before" dates on the packaging.
5.5. Placement of food
| Freezer compartment shelves | Various frozen food such as meat, fish, ice cream, vegetables and etc. |
| Egg section Eggs | |
| Refrigerator compartment shelves | Food in pans, covered plates and closed containers |
| Door shelves of fridge compartment | Small and packaged food and beverage (such as milk, fruit juice, beer and etc.) |
| Crisper Vegetables and fruits | |
| Freshzone compartment | Delicatessen products (cheese, butter, salami and etc.) |
5.6. Deep-freeze information
Food must be frozen as rapidly as possible when they are put in a product refrigerator in order to keep them in good quality.
It is possible to preserve the food for a long time only at -18^ C or lower temperatures.
You can keep the freshness of food for many months (at -18^ C or lower temperatures in the deep freeze).
Divided the food into portions according to your family's daily or meal based consumption needs.
Pack the food in an airtight manner to prevent them from drying even if they are going to be stored for a short time.
Materials necessary for packaging:
- Cold resistant adhesive tape
- Self-adhesive label
- Rubber rings
- Pen
Materials to be used for packaging the foodstuff must be tear-proof and resistant to cold, humidity, dour, oils and acids.
Foods to be frozen should not be allowed to come in contact with the previously frozen items to prevent them from getting thawed partially.
Frozen food must be used immediately after they are thawed and they should never be re-frozen.
Using your appliance
5.7. Ice machine
\*optional
Icematic allows you to obtain ice from the product easily.
Using the icematic
- Remove the water tank from the fridge compartment.
- Fill water tank with water.
- Replace the water tank. First ice cubes will be ready in approximately four hours in the icematic drawer located in the freezer compartment.

While the water tank is completely filled, you will be able to obtain approximately 60-70 ice cubes.

The water within the tank should be renewed in every 2-3 weeks.

natural_image
Line drawing of a cabinet interior with drawers and appliances (no text or symbols)
natural_image
Technical line drawing of a mechanical assembly with no visible text or symbols
natural_image
Line drawing of a hand using a tool to lift a cylindrical object into a rectangular device (no text or symbols)5.8. Icematic
\*optional
Icematic allows you to obtain ice from the product easily.
Using the icematic
- Take out the icematic pulling it out carefully.
- Fill the Icematic with water.
- Place Icematic in place. About two hours later, the ice is ready.
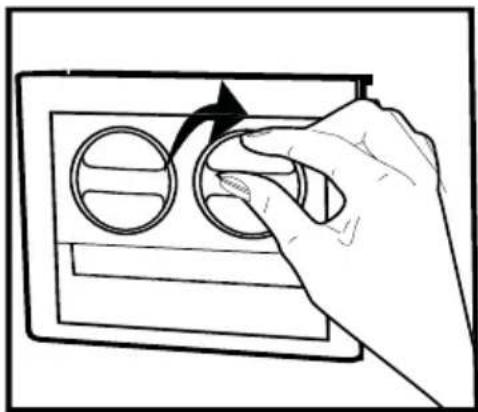
- To obtain ice, turn the knobs on the ice reservoirs clockwise by 90° degrees. Ice cubes in the reservoirs will fall down into the ice storage container below.
- You may take out the ice storage container and serve the ice cubes.

Do not remove the Icematic from its seating to obtain ice.

If you wish, you may keep the ice cubes in the ice storage container. The ice storage container is just for accumulating ice cubes. Do not put water in it. Otherwise, it will break.
natural_image
Hand inserting a circular component into a rectangular device (no text or symbols visible)
natural_image
Line drawing of a three-tier refrigerator with front panel and side compartments (no text or symbols)5.9. Ice container
\*optional
Icematic allows you to obtain ice from the product easily.
Using the ice container
- Remove the ice container from the freezer compartment.
- Fill the ice container with water.
- Place the ice container in the freezer compartment. About two hours later, the ice is ready.
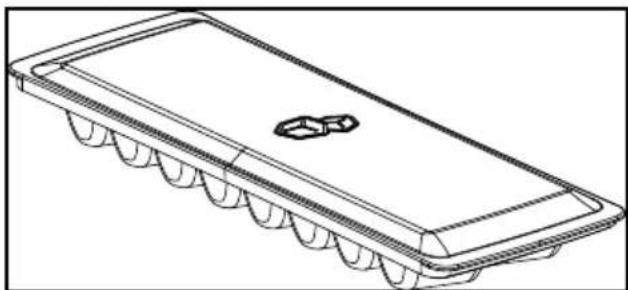
- Remove the ice container from the freezer compartment and bend it over the service plate. Ice cubes will easily fall down to the service plate.
natural_image
Line drawing of an integrated circuit chip with multiple pins and a small hexagonal component (no text or symbols)5.10. Blue light/HarvestFresh
*May not be available in all models
For the blue light,
Fruits and vegetables stored in the crispers that are illuminated with a blue light continue their photosynthesis by means of the wavelength effect of blue light and thus preserve their vitamin content.
ForHarvestFresh,
Fruits and vegetables stored in crispers illuminated with the HarvestFresh technology preserve their vitamins for a longer time thanks to the blue, green, red lights and dark cycles, which simulate a day cycle.
If you open the door of the refrigerator during the dark period of the HarvestFresh technology, the refrigerator will automatically detect this and enable the blue-green or red light to illuminate the crisper for your convenience. After you have closed the door of the refrigerator, the dark period will continue, representing the night time in a day cycle.
5.11. Egg holder
You can install the egg holder to the desired door or body shelf. If it will be placed on body shelves than the lower cooler shelves are recommended.

Never place the egg holder in the freezer compartment

Make sure that eggs are not in direct contact with other food products.

natural_image
Technical line drawing of a mechanical component with multiple circular cavities (no text or symbols)Using your appliance
5.12. Description and cleaning of odor filter
Odor filter prevents unpleasant odor build-up in your product.
- Pull the cover into which the odor filter is installed downwards from the front section and remove as illustrated.
- Leave the filter under sunlight for one day. Filter will be cleaned during this time.
- Install the filter back to its place.

Odor filter must be cleaned once in a year.

natural_image
Line drawing of a hand placing a component into a rack (no text or symbols)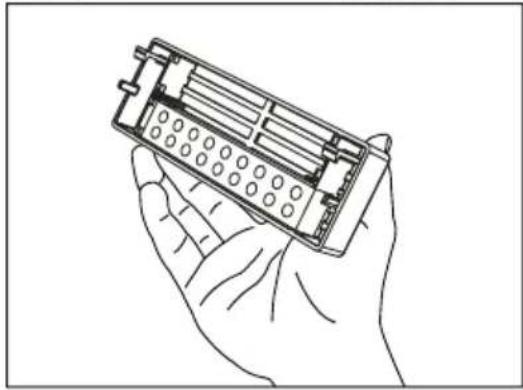
natural_image
Line drawing of a hand holding an electronic device with a grid-like internal structure (no text or symbols)
natural_image
Line drawing of two hands using a screwdriver to adjust or install a mechanical component (no text or symbols present)5.13. Snack compartment
It is used for storing food such as fish, red meat, chicken meat, and dairy products such as cheese, yoghurt and milk that need to be kept a few degrees cooler than the fridge compartment.

It is not recommended to place fruit and vegetables in the snack compartment. Especially tomatoes, eggplants, zucchini, cucumbers and lemons are sensitive to the cold. They should not be stored in the snack compartment.
You can increase the inner volume of your product by removing the snack compartment:
- Pull the compartment towards yourself until it rests and stops against the stopper.
- Lift the front section and pull towards yourself to remove the compartment from its seating.

natural_image
Line drawing of a front drawer with three drawers and a lid, no text or symbols presentUsing your appliance
5.14. Sliding storage container
\*optional
This accessory is designed to increase the usable volume of the door shelves. It allows you to easily place the tall bottles, jars and tins to the lower bottle shelf thanks to its ability to move right or left.

natural_image
Diagram of a mechanical component with arrows indicating motion or force direction (no text or symbols present)5.15. Rotary storage container
\*optional
Rotary storage container can also be moved to right or left. In this way, long bottles, jars or boxes can be placed easily in the bottom shelf (Fig. 1).
You can reach the food that you have placed into the shelf by grabbing and turning it from its right edge (Fig.2).
When you want to load or remove it to clean, turn it by 90 degrees, raise it up and pull towards yourself (Fig. 3-4).

Using your appliance

natural_image
Line drawing of an open refrigerator interior showing door, front panel, and side shelves (no text or symbols)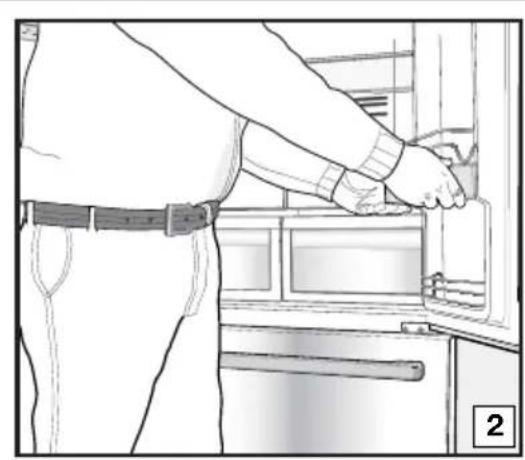
natural_image
Line drawing of a person using a door switch to adjust or install an appliance (no text or symbols visible)
natural_image
Line drawing of a refrigerator interior showing hand positioning and ventilation slots (no text or symbols)
natural_image
Line drawing of a refrigerator interior showing hand holding a tool, no text or symbols present
natural_image
Line drawing of a refrigerator interior showing a hand inserting a plug into the refrigerator (no text or symbols)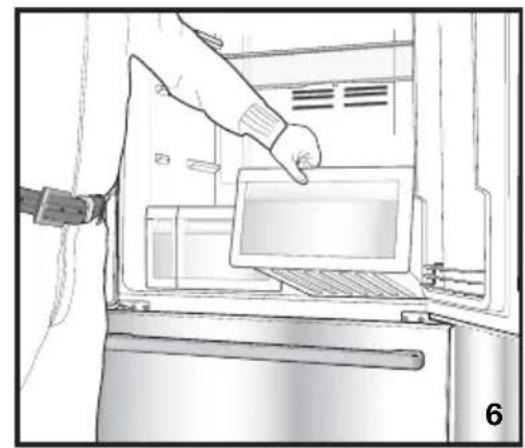
natural_image
Illustration of a hand inserting a device into an oven, showing the screen and tray (no text or symbols)
natural_image
Person opening a refrigerator with visible door and door panel (no text or symbols)5.16. Crisper
Crisper of the product is designed specially to keep the vegetables fresh without loosing their humidity. For this purpose, cool air circulation is intensified around the crisper in general. Remove the door shelves that stand against the crisper before removing the crispers.
Using your appliance
5.17. Using the water dispenser
\*optional

It is normal for the first few glasses of water taken from the dispenser to be warm.

If the water dispenser is not used for a long period of time, dispose of first few glasses of water to obtain fresh water.
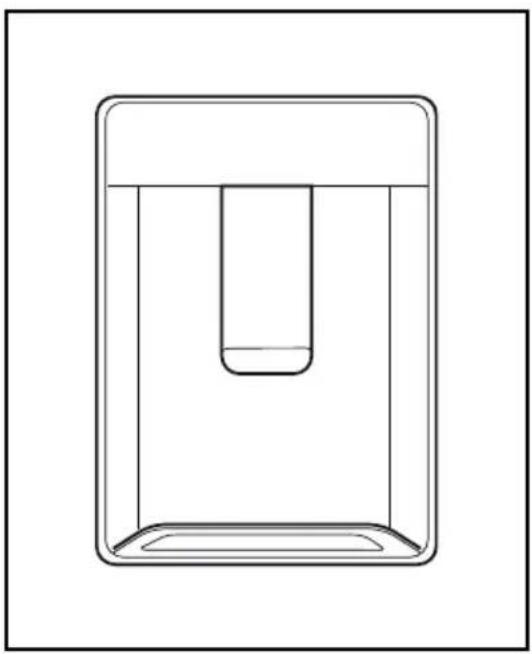
- Push in the lever of the water dispenser with your glass. If you are using a soft plastic cup, pushing the lever with your hand will be easier.
- After filling the cup up to the level you want, release the lever.
natural_image
Simple line drawing of a rectangular container with a central trough, no text or symbols present
Please note, how much water flows from the dispenser depends on how far you depress the lever. As the level of water in your cup / glass rises, gently reduce the amount of pressure on the lever to avoid overflow. If you slightly press the arm, the water will drip; this is quite normal and not a failure.
5.18. Filling the water dispenser's tank
Water tank filling reservoir is located inside the door rack.
- Open the cover of the tank.
- Fill the tank with fresh drinking water.
- Close the cover.

Do not fill the water tank with any other liquid except for water such as fruit juices, carbonated beverages or alcoholic drinks which are not suitable to use in the water dispenser. Water dispenser will be irreparably damaged if these kinds of liquids are used. Warranty does not cover such usages. Some chemical substances and additives contained in these kinds of drinks/liquids may damage the water tank.

natural_image
Technical line drawing of a mechanical component with two rectangular parts and a base plate (no text or symbols)
natural_image
Line drawing of a mechanical device with two arrows indicating direction (no text or symbols)Using your appliance

Use clean drinking water only.

Capacity of the water tank is 3 liters; do not overfill.
5.19. Cleaning the water tank
- Remove the water filling reservoir inside the door rack.
- Remove the door rack by holding from both sides.
- Grab the water tank from both sides and remove it with an angle of 45^ C.
- Remove the cover of the water tank and clean the tank.

Components of the water tank and water dispenser should not be washed in dishwasher.

natural_image
Technical line drawing of a mechanical assembly with exploded view (no text or symbols)
natural_image
Line drawing of a hand pressing down on a mechanical component with an upward arrow (no text or symbols)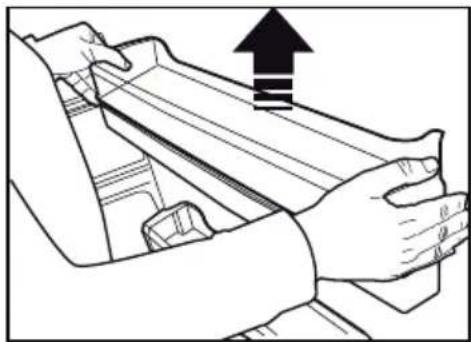
natural_image
Line drawing of hands operating a mechanical component with an upward arrow indicating motion (no text or symbols)

natural_image
Line drawing of a hand operating a mechanical bracket with a vertical guide and an upward arrow (no text or symbols)Using your appliance
5.20. Drip tray
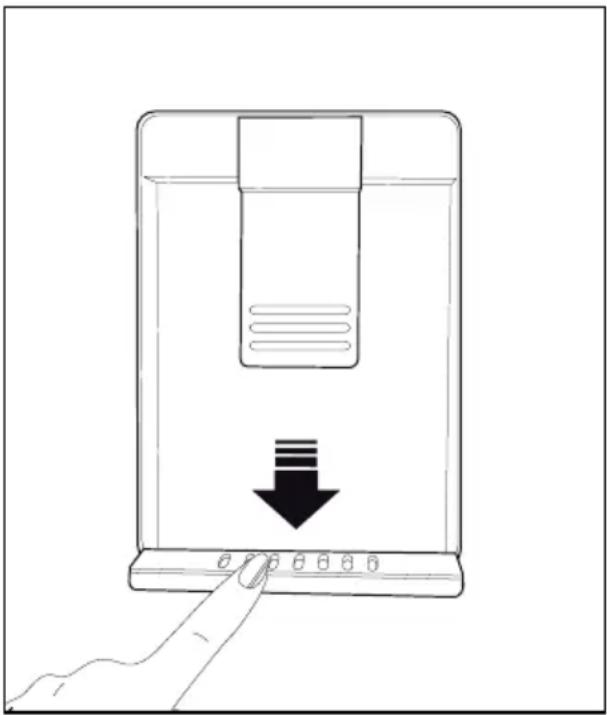
Water that dripped while using the water dispenser accumulates in the spillage tray.
Remove the plastic filter as shown in the figure. With a clean and dry cloth, remove the water that has accumulated.
natural_image
Line drawing of a device with a hand pointing to a button and a downward arrow indicating action (no text or symbols)5.21. Humidity-controlled crisper (Ever Fresh)
\*optional
Humidity rates of the vegetables and fruit are kept under control with the feature of humidity-controlled crisper and the food is ensured to stay fresh for longer.
Never leave the vegetables inside the crisper in their bags. If the vegetables are left inside their bags, this will cause them to decompose in a short period of time. When a high level of humidity is set, your vegetables keep their humidity content and can be preserved for a reasonable period of time without needing to leave them inside their bags. In case contacting with other vegetables is not preferred for hygiene concerns, use a perforated paper, foam and other similar packaging materials instead of a bag.
While the vegetables are being placed, specific gravity of the vegetables should be taken into consideration. Heavy and hard vegetables should be put at the bottom of the crisper and the lightweight and soft vegetables should be placed over.
Do not place together the pear, apricot, peach, etc. and apple in particular which have a high level of generation of ethylene gas in the same crisper with the other vegetables and fruit. The ethylene gas which is emitted by these fruit may cause the other fruit to ripen faster and decompose in a shorter time.
Do not take the crisper main body out of the refrigerator apart from the drawers unless you have to, and call for technical service if necessary. Before removing the crisper main body from its place, wipe and clean it with a wet piece of cloth.

- Freezer compartment temperature setting indicator
- Freezer compartment temperature setting function
- Quick freeze function button icematic on-off button (3") function
- Quick freeze function indicator
- Fridge compartment temperature setting indicator
- Fridge compartment temperature setting function
- Quick fridge function button
- Eco-Fuzzy (special economic usage) function
- Eco-Fuzzy (special economic usage) indicator
- Vacation function
-
Vacation function indicator
-
Alarm off warning function
- Energy saving indicator
- Key lock function
- Key lock indicator
- Power failure / High temperature / error warning indicator
- Quick bottle cooling/quick ice making selection function (Rapid Cooler)
- Quick bottle cooling/quick ice making function indicator
- Quick bottle cooling indicator (Rapid Cooler)
- Quick cooling indicator
- Quick ice making indicator *optional

*Optional: Figures in this user manual are given as an example and may not match the product exactly. If the relevant parts are not available in the product you purchased, the figure applies to other models.
Using your appliance
1. Freezer compartment temperature indicator
Indicates the temperature set for the Freezer Compartment.
2.Freezer compartment temperature setting function
Allows you to set the temperature of the freezer compartment. Press this button to set the temperature of the freezer compartment to -18, -19, -20, -21, -22, -23 and -24, respectively.
3. Quick freeze function button icematic on-off button (3") function
Quick freeze indicator is illuminated when the quick freeze function is active. To cancel this function, press the quick freeze button again. Quick freeze indicator will turn off and return to its normal settings. If you do not cancel it, the quick freeze will cancel itself automatically after 4 hours or when the freezer compartment reaches the required temperature. If you want to freeze large amounts of fresh food, press the quick freeze button before putting the food into the freezer compartment. If you press the quick freeze button repeatedly with short intervals, the electronic circuit protection will be activated and the compressor will not start up immediately. This function is not recalled when power restores after a power failure!
4. Quick freeze function indicator
This symbol flashes in an animated style when the quick freeze function is active.
5.Fridge compartment temperature setting indicator
Indicates the temperature set for the fridge compartment.
6.Fridge compartment temperature setting function
Allows you to set the fridge compartment's temperature. Press this button to set the
temperature of the fridge compartment to 8, 7, 6, 5, 4, 3, 2 degrees, respectively.
7. Quick fridge function button
When you press the quick fridge button, the temperature of the compartment will be colder than the adjusted values. This function can be used for food required to be cooled down rapidly in the fridge compartment. If you want to cool large amounts of fresh food, it is recommended to activate this function before putting the food into the fridge. Quick fridge indicator is illuminated when the quick fridge function is active. To cancel this function, press the quick fridge button again. The quick fridge indicator will turn off and the unit will return to its normal settings. If you do not cancel it, the quick fridge function will cancel itself automatically after 2 hours or when the fridge compartment reaches the required temperature.
This function is not recalled when power restores after a power failure.
8.Eco-Fuzzy (special economic usage) function
When you press the eco-fuzzy button, the eco-fuzzy function will be activated and the eco-fuzzy indicator will illuminate. The refrigerator will start operating in the most economic mode at least 6 hours later and the economic usage indicator will turn on when the function is active. To deactivate the eco-fuzzy function, You need to press the eco-fuzzy button again.
9.Eco-Fuzzy (special economic usage) indicator
This symbol illuminates when the eco-fuzzy function is active.
10. Vacation function
If you press and hold the eco fuzzy button for 3 seconds, the vacation function will be activated
Using your appliance
and the vacation indicator will illuminate. The cooling of the fridge compartment is stopped and the temperature of the fridge compartment is fixed to 15 degrees to prevent bad odors. When this function is active, the fridge compartment temperature indicator will not display the temperature. To deactivate the vacation function, press and hold the Eco-fuzzy button for 3 seconds.
11. Vacation function indicator
This indicator illuminates when the vacation function is active.
12. Alarm off warning function
In case of power failure/high temperature alarm, after checking the foods in the freezer compartment, press the alarm off button to clear the warning.
13. Energy saving function (display off) indicator
If the product doors are kept closed for a long time, the energy saving function is automatically activated and the energy saving symbol is illuminated. When the energy saving function is activated, all symbols on the display will turn off except for the energy saving symbol. When the energy saving function is activated, if any button is pressed or the door is opened, energy saving function will be canceled and the symbols on display will return to normal.
Energy saving function is activated during delivery from factory and cannot be canceled.
14.Key lock function
When you press and hold the key lock button for 3 seconds, the key lock function will be activated and the key lock indicator will illuminate. No button will operate when this function is active. Press and hold the key lock button for 3 seconds again to deactivate this function.
15.Key lock indicator
This indicator will illuminate when the key lock function is active.
16. Power failure / High temperature / error warning indicator
This indicator illuminates during power failure, high temperature failures and error warnings. During long-term power failures, the highest temperature value that the freezer compartment reaches will blink on the digital display. After checking the food located in the freezer compartment, press the alarm off button to clear the warning.
Please refer to "solutions recommended for troubleshooting" section on your manual if you observe that this indicator is illuminated.
17. Quick bottle cooling/quick ice making function selection
When the quick bottle cooling/quick ice making function button is pressed and held for 3 seconds, "1" will be displayed on the quick bottle cooling-quick ice making function indicator.
If this button is not pressed again in 1 minute, display will return to its previous view, the quick bottle cooling and quick ice making selection indicators will turn off.
After “1” is displayed, each press on the Quick bottle cooling-quick ice making button will increase the number on the display one by one. If “1” is displayed, the quick bottle cooling function can be enabled. If “2” is displayed, quick ice making function can be enabled. If you press and hold the quick bottle cooling-quick ice making button for 3 seconds while “1” is being displayed, the quick bottle cooling function will be enabled and the quick bottle cooling indicator will turn on. “1” will light up continuously and the icons on the left will light up as an animation. If you press
Using your appliance
and hold the quick bottle cooling-quick ice making button for 3 seconds while "2" is being displayed, the quick ice making button will be enabled and the quick ice making indicator will turn on. "2" will light up continuously and the icons on the left will light up as an animation.
If you short press the quick bottle cooling-quick ice making button while the function is enabled, no change will occur on the display. If a power outage occurs while the quick bottle cooling or quick ice making function is enabled, the function will resume where it left off once power is restored. Quick bottle cooling function lasts 15 minutes, and the quick ice making function lasts 40 minutes. Once the time for the selected function is over, the icons will go off.
After completing 3 cycles in the quick bottle cooling function and 1 cycle in the quick ice making function, wait for the refrigerator to cool down and for the compressor to stop. If you want to enable the function in the meantime, the display will show "0".
Function cannot be enabled. You will hear a warning if you press the quick bottle cooling-quick ice making button. Once the refrigerator has cooled down, you can enable the desired function again.
18. Quick bottle cooling/quick ice making function indicator
Displays the set function. If "1" is displayed, this means that the quick bottle cooling function will be or has been selected and if "2" is displayed, this means that the quick ice making function will be or has been selected.
19. Quick bottle cooling indicator
Displays the quick bottle cooling function.
20. Quick fridge button
This symbol flashes in an animated style when the quick fridge function is active.
21. Quick ice making indicator
Displays the quick ice making function
5.22. Quick bottle cooling/quick ice making compartment
(Rapid Cooler)
(This feature is optional)
You can use the quick bottle cooling compartment for making ice or cooling your beverages quickly.
This closed compartment, which is located at the lower left part in the fridge compartment, is cooled with the help of a separate fan and cooler surface.
After placing the icebox or the beverage you want to cool in this compartment, you can initiate the quick fridge function by pressing the relevant buttons on the indicator.
Using your appliance

When the cooling is done, the "=" symbol on the indicator disappears. After the process ends, remove the beverage or the ice you have placed in the compartment. If you want to cool them further, you can activate the same function again while your beverage or icebox is inside the compartment.

If you see "0" warning message on the display when you want to activate the quick bottle cooling function, wait for a while. This warning message may appear when you have used the compartment 4 times at frequent intervals. When you see this message, your refrigerator will not allow the compartment to be used for a while in order to deliver the best cooling performance and maintain the storage temperature of the food. When the inner temperatures of the refrigerator are balanced, the compartment will be ready to be used again. Please try again later.

If you see "0" warning message on the display when you want to activate the ice making function, wait for a while. This warning message may appear when you have used the compartment 2 times at frequent intervals. When you see this message, your refrigerator will not allow the compartment to be used for a while in order to deliver the best cooling performance and maintain the storage temperature of the food. When the inner temperatures of the refrigerator are balanced, the compartment will be ready to be used again. Please try again later.

Do not place any other material in this compartment other than beverages and the supplied icebox. Make sure that the caps of the beverages you are going to put in the compartment are closed.

Before activating the function, ensure that the door of the compartment is completely closed. This compartment has been designed to cool 1.5 liters of water at 20^ C down to 10^ C in 15 minutes. If you think that the beverage you are going to remove from the compartment is not cold enough, you can activate the compartment again.
Using your appliance

Do not leave a cold beverage inside the compartment for your own hygiene and safety. Keeping your fizzy drinks in the compartment for a long time may lead to risks such as cracking etc.
When the ice making function is over, the ice in the icebox may melt as the compartment will return to fresh food storing temperatures.
Do not leave frozen ice in the com- partment.
When this compartment is activated, the fan in the compartment will operate at the highest speed in order to deliver the best cooling performance in the shortest period of time. For this reason, the sound that will arise when the compartment is operating is normal.

natural_image
Hand pointing at a white appliance with a digital display (no visible text or symbols)
natural_image
Hand placing a plastic bottle into a rack inside a laboratory appliance (no visible text or symbols)
natural_image
Hand placing a white plastic sheet into an open oven (no visible text or symbols)6 Maintenance and cleaning
Cleaning your fridge at regular intervals will extend the service life of the product.

WARNING:
Unplug the product before cleaning it.
- Never use gasoline, benzene or similar substances for cleaning purposes.
- Never use any sharp and abrasive tools, soap, household cleaners, detergent and wax polish for cleaning.
- For non-No Frost products, water drops and frosting up to a fingerbreadth occur on the rear wall of the Fridge compartment. Do not clean it; never apply oil or similar agents on it.
- Only use slightly damp microfiber cloths to clean the outer surface of the product. Sponges and other types of cleaning cloths may scratch the surface
- Dissolve one teaspoon of bi-carbonate in half litre of water. Soak a cloth with the solution and wrung it thoroughly. Wipe the interior of the refrigerator with this cloth and the dry thoroughly.
- Make sure that no water enters the lamp housing and other electrical items.
- If you will not use the refrigerator for a long period of time, unplug it, remove all food inside, clean it and leave the door ajar.
-
Check regularly that the door gaskets are clean. If not, clean them.
-
To remove door and body shelves, remove all of its contents.
- Remove the door shelves by pulling them up. After cleaning, slide them from top to bottom to install.
- Never use cleaning agents or water that contain chlorine to clean the outer surfaces and chromium coated parts of the product. Chlorine causes corrosion on such metal surfaces.
6.1 Avoiding bad odours
- Materials that may cause odour are not used in the production of our refrigerators. However, due to inappropriate food preserving conditions and not cleaning the inner surface of the refrigerator as required can bring forth the problem of odour. Pay attention to following to avoid this problem:
- Keeping the refrigerator clean is important. Food residuals, stains, etc. can cause odour. Therefore, clean the refrigerator with bi-carbonate dissolved in water every few months. Never use detergents or soap.
- Keep the food in closed containers. Microorganisms spreading out from uncovered containers can cause unpleasant odours.
- Never keep the food that have passed best before dates and spoiled in the refrigerator.
6.2 Protecting the plastic surfaces
Do not put liquid oils or oil-cooked meals in your refrigerator in unsealed containers as they damage the plastic surfaces of the refrigerator. If oil is spilled or smeared onto the plastic surfaces, clean and rinse the relevant part of the surface at once with warm water.
7 Troubleshooting
Check this list before contacting the service. Doing so will save you time and money. This list includes frequent complaints that are not related to faulty workmanship or materials. Certain features mentioned herein may not apply to your product.
The refrigerator is not working.
- The power plug is not fully settled.
Plug it in to settle completely into the socket.
- The fuse connected to the socket powering the product or the main fuse is blown. >>> Check the fuses.
Condensation on the side wall of the cooler compartment (MULTI ZONE, COOL, CONTROL and FLEXI ZONE).
- The door is opened too frequently >>> Take care not to open the product's door too frequently.
- The environment is too humid. >>> Do not install the product in humid environments.
- Foods containing liquids are kept in unsealed holders. >>> Keep the foods containing liquids in sealed holders.
- The product's door is left open. >>> Do not keep the product's door open for long periods.
- The thermostat is set to too low temperature. >>> Set the thermostat to appropriate temperature.
Compressor is not working.
-
In case of sudden power failure or pulling the power plug off and putting back on, the gas pressure in the product's cooling system is not balanced, which triggers the compressor thermic safeguard. The product will restart after approximately 6 minutes. If the product does not restart after this period, contact the service.
-
Defrosting is active. >>> This is normal for a fully-automatic defrosting product. The defrosting is carried out periodically.
- The product is not plugged in. >>> Make sure the power cord is plugged in.
- The temperature setting is incorrect. >>> Select the appropriate temperature setting.
- The power is out. >>> The product will continue to operate normally once the power is restored.
The refrigerator's operating noise is increasing while in use.
- The product's operating performance may vary depending on the ambient temperature variations. This is normal and not a malfunction.
The refrigerator runs too often or for too long.
- The new product may be larger than the previous one. Larger products will run for longer periods.
- The room temperature may be high. >>> The product will normally run for long periods in higher room temperature.
- The product may have been recently plugged in or a new food item is placed inside. >>> The product will take longer to reach the set temperature when recently plugged in or a new food item is placed inside. This is normal.
- Large quantities of hot food may have been recently placed into the product. >>> Do not place hot food into the product.
- The doors were opened frequently or kept open for long periods. >>> The warm air moving inside will cause the product to run longer. Do not open the doors too frequently.
Troubleshooting
- The freezer or cooler door may be ajar. >>> Check that the doors are fully closed.
- The product may be set to temperature too low. >>> Set the temperature to a higher degree and wait for the product to reach the adjusted temperature.
- The cooler or freezer door washer may be dirty, worn out, broken or not properly settled. >>> Clean or replace the washer. Damaged / torn door washer will cause the product to run for longer periods to preserve the current temperature.
The freezer temperature is very low, but the cooler temperature is adequate.
- The freezer compartment temperature is set to a very low degree. >>> Set the freezer compartment temperature to a higher degree and check again.
The cooler temperature is very low, but the freezer temperature is adequate.
- The cooler compartment temperature is set to a very low degree. >>> Set the freezer compartment temperature to a higher degree and check again.
The food items kept in cooler compartment drawers are frozen.
- The cooler compartment temperature is set to a very low degree. >>> Set the freezer compartment temperature to a higher degree and check again.
The temperature in the cooler or the freezer is too high.
- The cooler compartment temperature is set to a very high degree. >>> Temperature setting of the cooler compartment has an effect on
the temperature in the freezer compartment. Wait until the temperature of relevant parts reach the sufficient level by changing the temperature of cooler or freezer compartments.
- The doors were opened frequently or kept open for long periods. >>> Do not open the doors too frequently.
- The door may be ajar. >>> Fully close the door.
- The product may have been recently plugged in or a new food item is placed inside. >>> This is normal. The product will take longer to reach the set temperature when recently plugged in or a new food item is placed inside.
- Large quantities of hot food may have been recently placed into the product. >>> Do not place hot food into the product.
Shaking or noise.
- The ground is not level or durable. >>> If the product is shaking when moved slowly, adjust the stands to balance the product. Also make sure the ground is sufficiently durable to bear the product.
- Any items placed on the product may cause noise. >>> Remove any items placed on the product.
The product is making noise of liquid flowing, spraying etc.
- The product's operating principles involve liquid and gas flows, >>> This is normal and not a malfunction.
There is sound of wind blowing coming from the product.
- The product uses a fan for the cooling process. This is normal and not a malfunction.
Troubleshooting
There is condensation on the product's internal walls.
- Hot or humid weather will increase icing and condensation. This is normal and not a malfunction.
- The doors were opened frequently or kept open for long periods. >>> Do not open the doors too frequently; if open, close the door.
- The door may be ajar. >>> Fully close the door.
There is condensation on the product's exterior or between the doors.
- The ambient weather may be humid, this is quite normal in humid weather. >>> The condensation will dissipate when the humidity is reduced.
The interior smells bad.
- The product is not cleaned regularly. >>> Clean the interior regularly using sponge, warm water and carbonated water.
- Certain holders and packaging materials may cause odour. >>> Use holders and packaging materials without free of odour.
- The foods were placed in unsealed holders. >>> Keep the foods in sealed holders. Micro-organisms may spread out of unsealed food items and cause malodour. Remove any expired or spoilt foods from the product.
The door is not closing.
- Food packages may be blocking the door. >>> Relocate any items blocking the doors.
- The product is not standing in full upright position on the ground. >>> Adjust the stands to balance the product.
- The ground is not level or durable.
Make sure the ground is level
and sufficiently durable to bear the product.
The vegetable bin is jammed.
- The food items may be in contact with the upper section of the drawer. >>> Reorganize the food items in the drawer.
If The Surface Of The Product Is Hot.
- High temperatures may be observed between the two doors, on the side panels and at the rear grill while the product is operating. This is normal and does not require service maintenance! Be careful when touching these areas.

WARNING:
If the problem persists after following the instructions in this section, contact your vendor or an Authorised Service. Do not try to repair the product.
This product is equipped with a lighting source of the "G" energy class.
The lighting source in this product shall only be replaced by professional repairers.
عميلنا العزيز،
https://eprel.ec.europa.eu/
25......ت Connectivity Charest Family
natural_image
Technical line drawing of a computer monitor rear panel with ventilation grilles and mounting holes (no text or symbols)
natural_image
Illustration of a hand using a screwdriver to adjust a component on a device (no text or symbols visible)natural_image
Diagram showing a rectangular structure with upward and downward arrows indicating rotational or directional motion, no text or symbols present.3.3

3.5
natural_image
Line drawing of a hand interacting with a wall-mounted device (no text or symbols)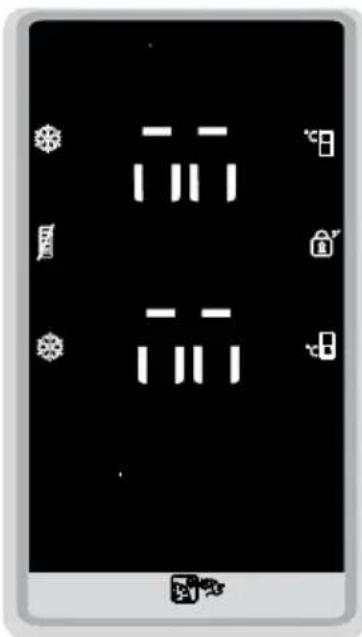
natural_image
Hand holding a circular component with an arrow indicating rotation (no text or symbols)natural_image
Line drawing of a cabinet interior with drawers and doors (no text or symbols)
natural_image
Technical line drawing of a mechanical assembly with a hand operating a bracket (no text or symbols)
natural_image
Line drawing of a three-tier appliance cabinet or rack unit with front panel and top control panel (no text or symbols)
natural_image
Line drawing of a hand using a device to lift a cylindrical component (no text or symbols)5.11
natural_image
Line drawing of a cabinet or storage unit with three compartments and a top panel (no text or symbols)natural_image
Line drawing of a hand inserting a spring into a grid-patterned object (no text or symbols)natural_image
Technical line drawing of a mechanical component with multiple circular cavities (no text or symbols)natural_image
Line drawing of a two drawer with drawers and a side drawer, no text or symbols presentnatural_image
Mechanical assembly diagram showing a component being inserted into a housing (no text or symbols visible)
natural_image
Line drawing of a hand inserting a component into a storage cabinet (no text or symbols)
natural_image
Line drawing of a hand holding an open electronic device (no text or symbols visible)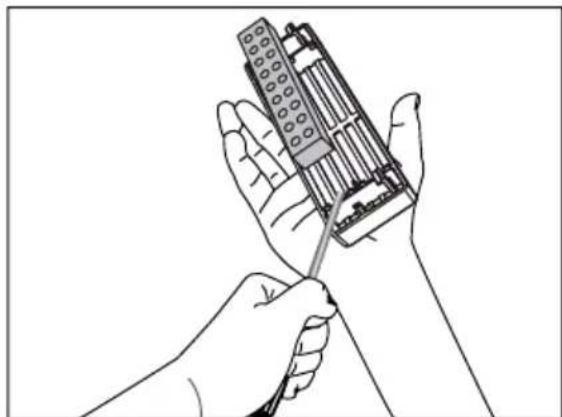
natural_image
Line drawing of two hands using a handheld tool to adjust or install a mechanical component (no text or symbols visible)5.15 . ارoration
*-acctيري

natural_image
Line drawing of an open refrigerator with visible doors, shelves, and a door handle (no text or symbols)
natural_image
Line drawing of a person using a door to clean or install an appliance (no text or symbols visible)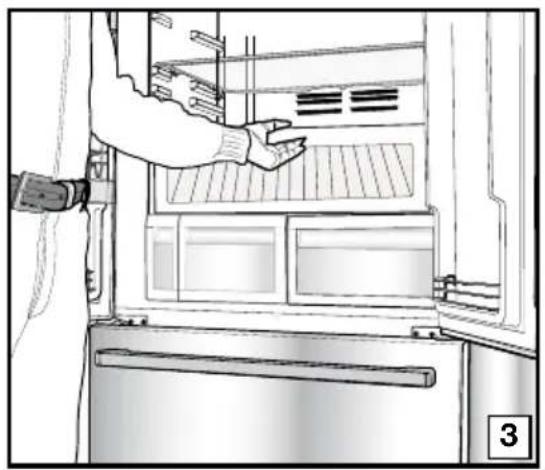
natural_image
Line drawing of a refrigerator interior showing hand positioning and ventilation slots (no text or symbols)
natural_image
Line drawing of a refrigerator interior showing hand cleaning the door panel (no text or symbols)
natural_image
Line drawing of a refrigerator interior with hand inserting a cable (no text or symbols)
natural_image
Illustration of a hand inserting a device into a microwave oven (no text or symbols visible)
natural_image
Person opening a refrigerator with visible door, showing interior shelves and hand interacting with the door (no text or symbols)5.16
ازج.
natural_image
Line drawing of a boat hull with two side compartments and a handle, no text or symbols present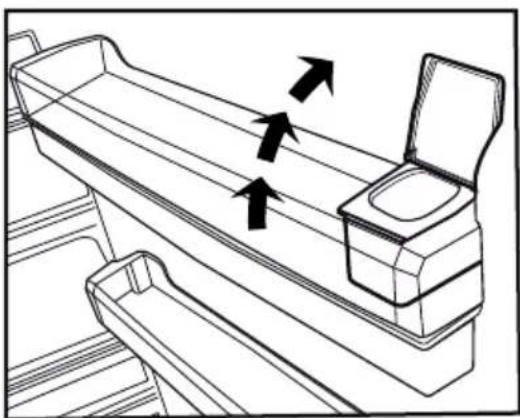
natural_image
Line drawing of a mechanical device with three arrows indicating direction (no text or symbols)
natural_image
Simple line drawing of a test tube inside a rectangular container (no text or symbols)natural_image
Line drawing of a hand pressing down on a mechanical component with an upward arrow (no text or symbols)natural_image
Line drawing of hands operating a mechanical device with an upward arrow indicating motion (no text or symbols)natural_image
Technical line drawing of a mechanical assembly with exploded view (no text or symbols)
natural_image
Line drawing of a hand operating a mechanical device with a bracket and mounting bracket (no text or symbols)5.21 5.21 (طازج)
5.20 . میاه
(اختياري)
مع خاصية درج التحكم بالرطوبة ت NUJI معدلات الرطوبة للا يلا يلا يلا يلا يلا يلا يلا يلا يلا يلا يلا يلا يلا يلا يلا يلا يلا يلا يلا يلا يلا يلا يلا يلا يلا يلا يلا يلا يلا يلا يلا يلا يلا يلا يلا يلا يلا يلا يلا يلا يلا يلا يلا يلا يلا يلا يلا يلا يلا يلاي لمدة أطول.
natural_image
Line drawing of a hand pressing down on a device with a downward arrow indicating compression or disassembly (no text or symbols)
natural_image
Hand pointing at a white appliance with a digital display (no visible text or symbols)
natural_image
Hand placing a plastic bottle into a rack inside a white laboratory appliance (no visible text or symbols)
natural_image
Hand placing a white plastic sample into an open oven (no text or symbols visible)https://eprel.ec.europa.eu/
10 בְּרָה 4
- ..... 4.3
11 5
-
..... 5.1
-
..... 5.2
-
..... 5.3
-
..... 5.4
-
..... 5.5
-
..... 5.6
-
..... 5.7
-
..... 5.8
-
..... 5.9
-
. . . . . . . . . . . . . . . . . . . . . . . . . . . . . . . . . . . . . . . . . . . . . . . . . . . . . . . 5.10
-
..... 5.11
-
..... 5.12
-
..... אַרְשׁה 5.13
-
..... 14.
-
..... 5.15
-
..... 5.16
-
..... 5.17
-
..... אַרְׁעֹת אַרְׁעֹת אַרְׁעֹת אַרְׁעֹת אַרְׁעֹת אַרְׁעֹת אַרְׁעֹת אַרְׁעֹת אַרְׁעֹת אַשָׁבּוֹן.5.18
-
..... 5.19
-
..... 5.20
-
..... מַרְׁת הַרְׁת אַרְׁת הַרְׁת.5.21 הַרְׁת הַרְׁת/הַרְׁת אַרְׁת הַרְׁת.5.22
31......
33 6
34 7
2
6 בַרְשָׁה 2
7 3
-
..... 3.1
-
..... 70079 1773 3.2
-
7000 3.3
-
..... 3.4
-
.....הכלהה 3.5
-
..... 3.6
-
3.7
9 4
• Industry sector development and regulation
.
.הכלההוּרָהוּרָהוּרָהוּרָהוּרָהוּרָהוּרָהוּרָהוּרָהוּרָהוּרָהוּרָהוּרָהוּרָהוּרָה
natural_image
Diagram showing a device with a lightning bolt and wiring, no text or symbols presentnatural_image
Simple line drawing of a rectangular frame with a numbered label '1' inside (no text or symbols beyond the number)natural_image
Technical diagram of a computer monitor rear panel showing internal compartments and mounting points (no text or labels)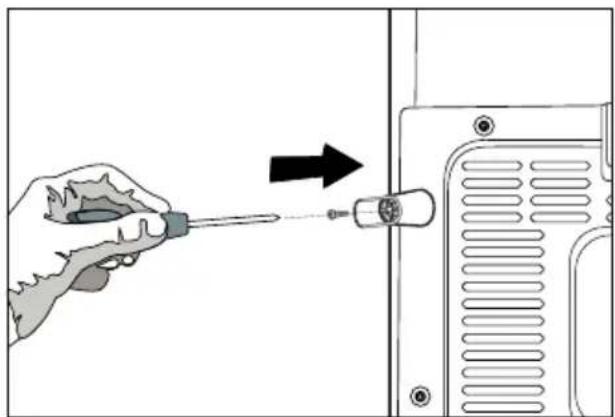
natural_image
Illustration of a hand using a screwdriver to adjust or install a device component (no text or symbols visible)natural_image
Diagram showing a rectangular structure with upward and downward arrows indicating rotational or directional motion, no text or symbols present.natural_image
Line drawing of a hand inserting a small rectangular object into a cabinet (no text or symbols)4.1.

9. Units gives you to sell

.הכלההוּרָהוּרָהוּרָהוּרָהוּרָהוּרָהוּרָהוּרָהוּרָהוּרָהוּרָהוּרָהוּרָהוּרָהוּרָה
• 'TD NY
natural_image
Hand holding a circular component with an arrow indicating rotation (no text or symbols)
natural_image
Line drawing of a vintage kitchen interior with appliances and fixtures (no text or symbols)
natural_image
Technical line drawing of a mechanical assembly with no visible text or symbols
natural_image
Line drawing of a three-tier refrigerator with front panel and side compartments (no text or symbols)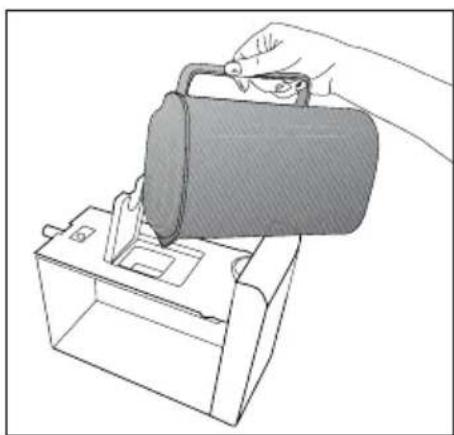
natural_image
Line drawing of a hand using a device to lift a cylindrical object into a box (no text or symbols)natural_image
Technical line drawing of a mechanical component with multiple circular cavities (no text or symbols)natural_image
Line drawing of a front drawer with three drawers and a side drawer (no text or symbols)הכלה 100% 5.14
*NGKIRK
natural_image
Mechanical assembly diagram showing a component being inserted into a housing (no text or symbols visible):בִרְהָרְהָרְהָרְהָרְהָרְהָרְהָרְהָרְהָרְהָרְהָרְהָרְהָרְהָרְהָרְהָרְהָרְ
natural_image
Line drawing of a hand inserting a component into a storage cabinet (no text or symbols)
natural_image
Line drawing of a hand holding an electronic device with a grid-patterned casing (no text or symbols)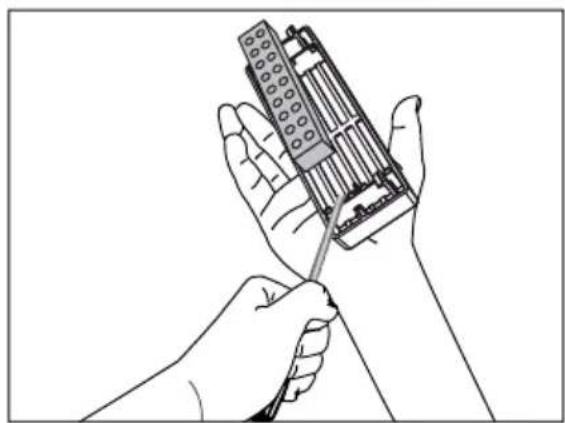
natural_image
Line drawing of hands using a screwdriver to adjust a mechanical component (no text or symbols present)5.15.
\*אַלְרָה
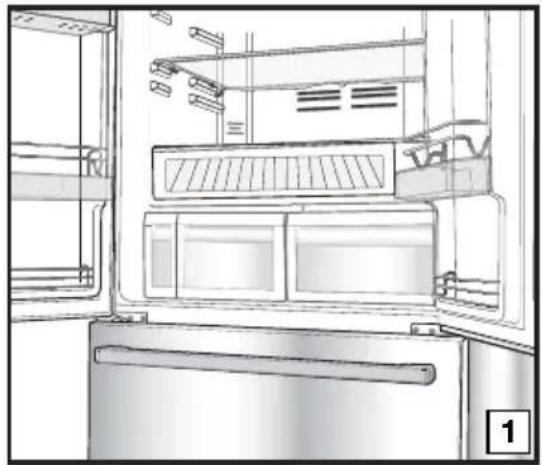
natural_image
Line drawing of an open refrigerator with doors, grilles, and ventilation slots (no text or symbols)
natural_image
Line drawing of a person using a door switch to open a refrigerator (no text or symbols)
natural_image
Line drawing of a refrigerator interior showing hand positioning and ventilation slots (no text or symbols)
natural_image
Line drawing of a refrigerator interior showing hand holding a tray, with no visible text or symbols
natural_image
Line drawing of a person inserting a plug into a refrigerator (no text or symbols)
natural_image
Line drawing of a hand inserting a device into a refrigerator (no text or symbols)
natural_image
Person opening a refrigerator with visible door and door panel (no text or symbols)5.16 .nli
natural_image
Line drawing of a mechanical component with two rectangular parts and a base, no text or symbols present
natural_image
Line drawing of a mechanical device with three arrows indicating direction (no text or symbols)natural_image
Simple line drawing of a test tube inside a rectangular container (no text or symbols)natural_image
Line drawing of a hand pressing down on stacked boxes with an upward arrow symbol (no text or labels)
natural_image
Illustration of hands operating a mechanical device with an upward arrow indicating motion (no text or symbols present)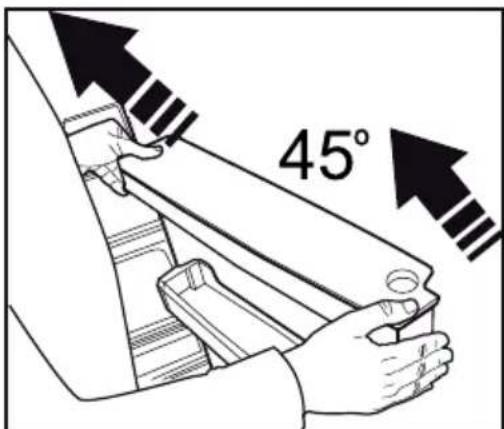

natural_image
Line drawing of a hand operating a mechanical bracket with a pull rod, showing no text or symbols5.19 . D'
natural_image
Technical line drawing of a mechanical assembly with exploded view (no text or symbols)natural_image
Line drawing of a hand pressing down on a device with a downward arrow indicating compression or disassembly (no text or symbols)
natural_image
Three-panel photo showing a hand inserting a plastic bottle into an oven, with no visible text or symbols.!in for BRIMAG posnives
הכלה
- Dear Customer,
- Please read this manual before using the product.
- INFORMATION
- 1- Safety Instructions 3
- Your appliance 8
- Installation 9
- Preparation 12
- Preparation 13
- Using the product 14
- Maintenance and cleaning 36
- Troubleshooting 37
- Safety Instructions
- Intended Use
- - Safety for children, liverable persons and pets
- Important instructions for safety and environment
- - Electrical safety
- - Transportation safety
- - Installation safety
- 1.6- Operational safety
- For products with a Water Dispenser/Ice Machine
- 1.7- Maintenance and cleaning safety
- 1.8- HomeWhiz
- 1.9- Lighting
- Your appliance
- Installation
- Appropriate installation location
- Installing the plastic wedges
- Installation
- Electrical connection
- Adjusting the feet
- Illumination lamp
- Door open warning
- (This feature is optional)
- Transportation of the product
- Preparation
- Things to be done for energy saving
- Recommendations on the fridge compartment
- Initial use
- Using the product
- Indicator panel
- Fridge compartment indicator
- Error status indicator
- Temperature indicator
- Vacation function button
- Temperature setting button
- Compartment selection button
- Freezer compartment indicator
- Economy mode indicator
- Vacation function indicator
- \*optional
- Using your appliance
- Fridge compartment temperature setting button
- Key lock button
- Freezer compartment temperature setting button
- Error status indicator
- Key lock indicator
- Eco extra function indicator
- Eco extra / Vacation button
- Vacation function indicator
- Icematic off indicator
- Economic usage indicator
- Quick freeze function indicator
- Quick freeze function button/ Icematic on-off button
- Freezer compartment temperature indicator Indicates the temperature set for freezer compartment.
- Quick cool function
- Fridge compartment temperature indicator Indicates the temperature set for Fridge compartment.
- Quick cooling function indicator
- Sabbath Mode:\*optional
- Dual cooling system
- Freezing fresh food
- Recommendations for preserving the frozen food
- Placement of food
- Deep-freeze information
- Ice machine
- Icematic
- Using the icematic
- Ice container
- Using the ice container
- Blue light/HarvestFresh
- For the blue light,
- ForHarvestFresh,
- Egg holder
- Description and cleaning of odor filter
- Snack compartment
- Sliding storage container
- Rotary storage container
- Crisper
- Using the water dispenser
- Filling the water dispenser's tank
- Cleaning the water tank
- Drip tray
- Humidity-controlled crisper (Ever Fresh)
- Freezer compartment temperature indicator
- 2.Freezer compartment temperature setting function
- Quick freeze function button icematic on-off button (3") function
- Quick freeze function indicator
- 5.Fridge compartment temperature setting indicator
- 6.Fridge compartment temperature setting function
- Quick fridge function button
- 8.Eco-Fuzzy (special economic usage) function
- 9.Eco-Fuzzy (special economic usage) indicator
- Vacation function
- Vacation function indicator
- Alarm off warning function
- Energy saving function (display off) indicator
- 14.Key lock function
- 15.Key lock indicator
- Power failure / High temperature / error warning indicator
- Quick bottle cooling/quick ice making function selection
- Quick bottle cooling/quick ice making function indicator
- Quick bottle cooling indicator
- Quick fridge button
- Quick ice making indicator
- Quick bottle cooling/quick ice making compartment
- (Rapid Cooler)
- Maintenance and cleaning
- WARNING:
- Avoiding bad odours
- Protecting the plastic surfaces
- Troubleshooting
- The refrigerator is not working.
- Condensation on the side wall of the cooler compartment (MULTI ZONE, COOL, CONTROL and FLEXI ZONE).
- Compressor is not working.
- The refrigerator's operating noise is increasing while in use.
- The refrigerator runs too often or for too long.
- Troubleshooting
- The freezer temperature is very low, but the cooler temperature is adequate.
- The cooler temperature is very low, but the freezer temperature is adequate.
- The food items kept in cooler compartment drawers are frozen.
- The temperature in the cooler or the freezer is too high.
- Shaking or noise.
- The product is making noise of liquid flowing, spraying etc.
- There is sound of wind blowing coming from the product.
- There is condensation on the product's internal walls.
- There is condensation on the product's exterior or between the doors.
- The interior smells bad.
- The door is not closing.
- The vegetable bin is jammed.
- If The Surface Of The Product Is Hot.
- 3.3
- 3.5
- 5.11
- . ارoration
- 5.21 (طازج)
- בְּרָה 4
- 5
- 6
- 7
- 2
- בַרְשָׁה 2
- 3
- 4
- Units gives you to sell
- הכלה 100% 5.14
- :בִרְהָרְהָרְהָרְהָרְהָרְהָרְהָרְהָרְהָרְהָרְהָרְהָרְהָרְהָרְהָרְהָרְהָרְ
- 5.15.
- \*אַלְרָה
Brand : BEKO
Model : CN160241XB
Category : Refrigerator