
VCW26 - Food Warmer Vulcan - Free user manual and instructions
Find the device manual for free VCW26 Vulcan in PDF.


| Product Type | Plate Warmer |
| Brand | Vulcan |
| Model | VCW26 |
| Dimensions (W x D x H) | 60 x 40 x 10 cm |
| Weight | 5 kg |
| Power Supply | 230 V ~ 50 Hz |
| Power Consumption | 500 W |
| Temperature Range | 30 °C - 80 °C |
| Material | Stainless Steel |
| Control Type | Dimmer Knob |
| Main Functions | Keep warm, heat plates, slow cooking |
| Safety Features | Overheat protection, auto shut-off |
| Cleaning | Wipe with damp cloth, do not immerse |
| Maintenance | Check cord regularly, avoid abrasive cleaners |
| Spare Parts | Heating element, power cord, control knob |
| Repairability Index | 7/10 |
| Certifications | CE, RoHS |
| Warranty | 2 years |
| Included Accessories | User manual, warranty card |
Frequently Asked Questions - VCW26 Vulcan
User questions about VCW26 Vulcan
0 question about this device. Answer the ones you know or ask your own.
Ask a new question about this device
Download the instructions for your Food Warmer in PDF format for free! Find your manual VCW26 - Vulcan and take your electronic device back in hand. On this page are published all the documents necessary for the use of your device. VCW26 by Vulcan.
USER MANUAL VCW26 Vulcan
natural_image
Exterior view of a VULCAN portable kitchen unit with open doors showing food inside (no text or symbols on the machine itself)
natural_image
Exterior view of a stainless steel industrial oven with open lid and side door, no visible text or symbols on the main body.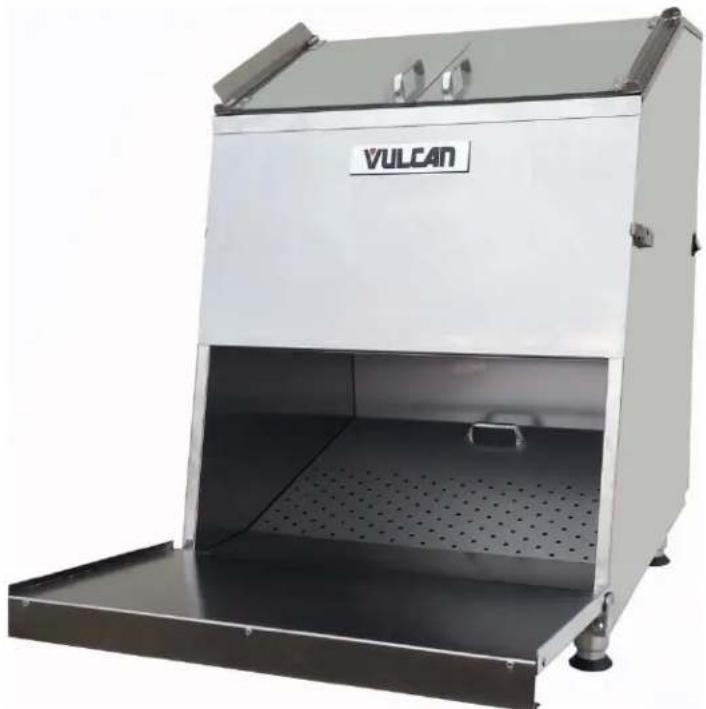
natural_image
Exterior view of a VULCAN industrial machine with open vent and metal casing (no text or symbols on the device itself)IMPORTANT FOR YOUR SAFETY
THIS MANUAL HAS BEEN PREPARED FOR PERSONNEL QUALIFIED TO INSTALL ELECTRICAL EQUIPMENT, WHO SHOULD PERFORM THE INITIAL FIELD START-UP AND ADJUSTMENTS OF THE EQUIPMENT COVERED BY THIS MANUAL.
FOR YOUR SAFETY
DO NOT STORE OR USE GASOLINE OR OTHER FLAMMABLE VAPORS OR LIQUIDS IN THE VICINITYOF THIS OR ANY OTHER APPLIANCE.
WARNING
Improper installation, adjustment, alteration, service, or maintenance can cause property damage, injury, or death.
Read the installation, operating and maintenance instructions thoroughly before installing or servicing equipment.
IN THE EVENT OF A POWER FAILURE, DO NOT ATTEMPT TO OPERATE THIS DEVICE.
TABLE OF CONTENTS
IMPORTANT FOR YOUR SAFETY .... 1
GENERAL 3
INTRODUCTION....3
INSTALLATION ALL MODELS....3
UNPACKING 3
LEGS INSTALLATION 3
LOCATION 3
INSTALLATION SPECIFIC TO MODELS VCD22 & VCD44 4
ELECTRICAL REQUIREMENTS....5
ELECTRICAL CODES & STANDARDS 5
ELECTRICAL CONNECTIONS 5
VCD22 & VCD44
OPERATION INSTRUCTIONS....6
CLEANING INSTRUCTIONS 6
VCW26 & VCW46
OPERATION INSTRUCTIONS 7
CLEANING INSTRUCTIONS 8
STAINLESS STEEL CARE 9
LOCKOUT / TAGOUT PROCEDURE 10
TROUBLESHOOTING....11
SERVICE & PARTS INFORMATION....11
GENERAL
INTRODUCTION
Vulcan Chip Warmers are produced with quality workmanship and material. Proper installation, usage, and maintenance of your warmer will result in many years of satisfactory performance.
It is suggested that you thoroughly read this entire manual and carefully follow all of the instructions provided.
As with any piece of food service equipment, this Chip Warmer requires a minimum of care and maintenance. Recommended procedures are contained in this manual and should become a regular part of the operation of the unit.
INSTALLATION (ALL MODELS)
Before installing, verify that the electrical service agrees with the specifications on the rating plate located on the lower back corner of the warmer. If the supply and equipment requirements do not agree, do not proceed with unpacking and installation. Contact your Vulcan Customer Service Department immediately. (Page 11)
UNPACKING:
The Warmer was inspected before leaving the factory. The transportation company assumes full responsibility for safe delivery upon acceptance of the shipment. Immediately after unpacking, check for possible shipping damage to the warmer.
If the warmer is found to be damaged, save the packaging material and contact the carrier within 15 days of delivery.
Carefully unpack warmer and place in a work accessible area.
- Remove banding holding the carton to the pallet.
- Carefully remove warmer from carton and place on floor or table.
- Remove any and all packaging materials inside unit.
- Peel off all vinyl protection film.
- Thoroughly clean the warmer as described in cleaning instructions in this manual.
LEGS INSTALLATION:
To install legs, carefully tip Chip Warmer onto its side. Screw legs into pre-drilled holes. Return warmer to the upright position.
LOCATION:
For efficient warmer operation, choose a location that will provide easy loading and unloading without interfering with the final assembly of food orders.
The installation location must allow adequate clearances for servicing and proper operation.
INSTALLATION SPECIFIC TO MODELS VCD22 & VCD44
ACCESS PANEL POSITIONING:
- Ensure that top Baffle notches are over carriage bolts.
- Insert Access Panel onto the back of the Chip Warmer. (Fig. 1)

(Fig. 1)
- On both sides of Access Panel, place clips into slots, then lock. (Fig. 2)

(Fig. 2)
SCOOP HOLDER INSTALLATION:
The Chip Scoop Holder will secure up to a 6" wide scoop.
- On either the left or right side of the Chip Warmer, loosen four side screws one revolution.
- Position the Chip Scoop Holder. (Fig. 3)
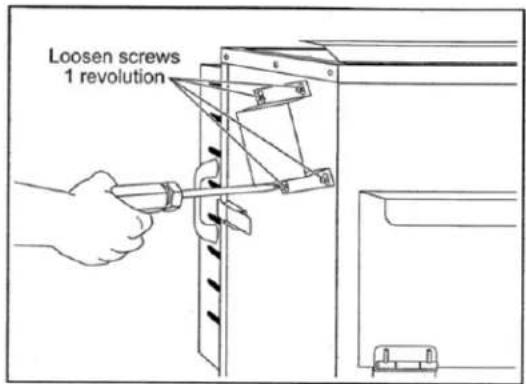
(Fig. 3)
- Tighten four side screws.
ELECTRICAL REQUIREMENTS
ELECTRICAL CODES & STANDARDS:
The warmer must be installed in accordance with:
In the United States of America:
- State and Local Codes.
- National Electrical Code, ANSI/NFPA-70 (latest edition.) Copies
may be obtained from: The
National Fire Protection
Association, Batterymarch Park, Quincy, MA 02269.
In Canada:
- Local Codes.
- Canadian Electrical Code, CSA
C22.1 (latest edition.) Copies
may be obtained from: The
Canadian Standard Association,
178 Rexcale Blvd., Etobicoke,
Ontario, Canada M9W 1R3.
ELECTRICAL CONNECTIONS:
The warmer is factory wired for 110/120 volt single phase operation. All 110/120 volt warmers are equipped with a 8 foot cord and NEMA 5-15 plug as standard equipment. Refer to wiring diagram in the back of this manual.
The cord and plug supplied is a suitable durable cord with a molded three-prong plug, and is provided with a proper strain relief.
⚠ WARNING All warmers are equipped with a three-prong plug. It is imperative that this plug must be connected into a properly grounded three-prong receptacle. If the receptacle is not the proper grounding type, contact an electrician. Do not remove the grounding prong from this plug.
Verify that the power source matches the Serial Data Plate located on the lower back corner of the warmer and the plug configuration before the connection is made. (Fig. 4)
SERIAL DATA PLATE

(Fig. 4.)
A separate disconnect switch or circuit breaker is recommended to be placed at a convenient location between the Chip Warmer and the electric power source.
To avoid damage to the power supply cord, cord retainer bushing, or electrical outlets, always check to be certain that the power cord is unplugged from the power source before moving the unit.
OPERATION
OPERATION INSTRUCTIONS (Models VCD22 & VCD44)
⚠ WARNING The Warmer and its parts are hot. Be very careful when operating, cleaning, or servicing the warmer.
- Switch Power Switch to ON position. Verify that switch illuminates. (Fig.5)
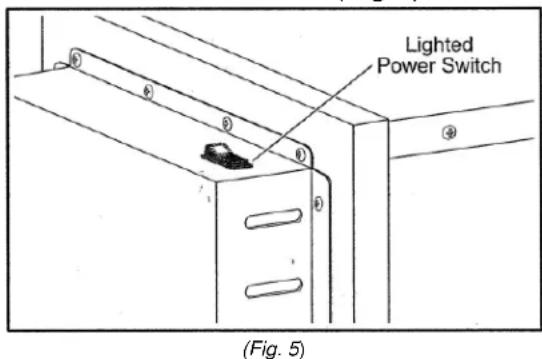
- The internal thermostat factory preset to 180° F. The
blower fan circulates heated air through the perforated removable chip tray located at the bottom of the interior of the cabinet (under the chips.)
- Open Top Door.
- Pour chips into Baffle.
Do not overfill. The Top Door must be able to fully close.
VCD22 holds approx. 22 gallons and VCD44 holds approx. 44 gallons of chips.
- Close Top Door.
- After approx. 30 to 40 minutes, open Front Door to access warmed chips.
7_is Use the Chip Scoop to remove desired amount of chips. - Close Front Door.
CLEANING INSTRUCTIONS (Models VCD22 & VCD44)
⚠ WARNING The Warmer and its parts are hot. Be very careful when operating, cleaning, or servicing the warmer.
⚠ WARNING Always unplug electrical power supply before cleaning.
The inside of the Chip Warmer must be cleaned each day.
At the end of the day, switch Power Switch to OFF position.
- Remove Access Panel by unlocking clips.
- Place Access Panel away from Chip Warmer.
- Remove Top Door.
- Remove all internal Baffles through back opening.
- Using a soft, clean cloth, clean Top Door and Baffles with a solution of mild detergent and
warm water. Rinse with a soft cloth and warm water. Wipe dry with a soft dry cloth.
Never spray the unit with a hose.
-
Using a soft, clean cloth, clean the inside of the unit with a solution of mild detergent and warm water. Rinse with a soft cloth and warm water. Wipe dry with a soft dry cloth.
-
Replace Top Door and all internal Baffles.
- Reattach Access Panel.
OPERATION INSTRUCTIONS (Models VCW26 & VCW46)
The Chip Warmer should be thoroughly cleaned before initial use.
⚠ WARNING The Warmer and its parts are hot. Be very careful when operating, cleaning, or servicing the warmer.
- Verify that the Chip Warmer is connected to the correct power source.
- The Lighted Power Switch is located on right back side of the Chip Warmer. Switch power switch to ON position. Verify that the switch illuminates. (Fig. 6)
POWER SWITCH

(Fig.6)
The power switch is what turns the unit on and off.
- The Thermostat knob is located in the back of the unit near the power switch. (Fig.7)
THERMOSTAT KNOB

(Fig.7)
Adjust the knob to the desired temperature setting. Once a desired temperature setting is determined, the knob can be left in this position until a temperature adjustment is needed.
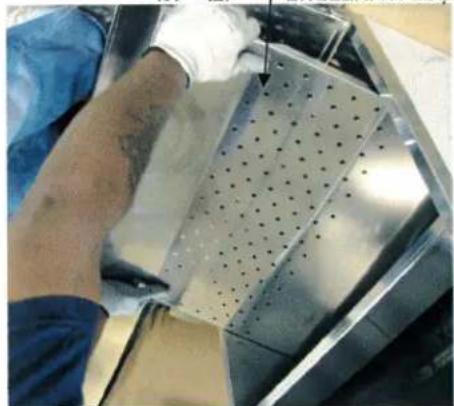
- Check the interior rear of warmer to ensure that it is heating. The blower fan circulates heated air through the perforated removable baffle located at the bottom of the interior of the cabinet (under the chips.) (Fig. 10)
- Open Top Doors.
- Pour chips into unit.
Do not overfill. The Top Doors must be able to fully close.
VCW26 holds approx. 26 gallons and VCW46 holds approx. 46 gallons of chips.
- Close Top Doors.
- After approx. 30 to 40 minutes, open Front Door to access warmed chips.
- Close Front Door after access.
SHUTDOWN
⚠ WARNING The Warmer and its parts are hot. Be very careful when operating, cleaning, or servicing the warmer.
At the end of the day:
- Switch Power Switch to OFF position.
- Clean unit following instructions in this manual.
CLEANING INSTRUCTIONS (Models VCW26 & VCW46)
⚠ WARNING The Warmer and its parts are hot. Be very careful when operating, cleaning, or servicing the warmer.
⚠ WARNING electrical power cleaning. Always supply unplug before
INTERIOR:
The inside of the Chip Warmer must be cleaned each day.
- Unplug electrical power supply.
- Allow warmer to cool before cleaning.
- Remove front panel by opening clips on each side of panel. (Fig.8)

CLIP (Fig. 8)
Slide Front Panel downward past the upper lip and lift away and remove from Chip Warmer. (Fig. 9)
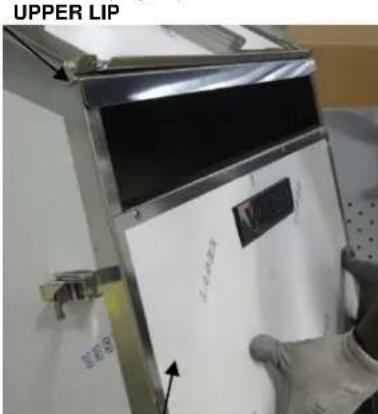
FRONT PANEL / (Fig. 9)
- Remove interior baffle at the bottom of the unit. A handle is located toward the back of the baffle. (Fig. 10)

natural_image
Person in blue shirt and white gloves handling a perforated metal tray inside a stainless steel enclosure (no text or symbols visible)INTERIOR BAFFLE (Fig. 10)
- Using a soft, clean cloth, clean inside of warmer with a solution of mild detergent and warm water. Rinse with warm water, and wipe dry.
Never spray the unit with a hose.
- Replace baffle and front panel using a reverse of the removal instructions.
EXTERIOR:
Refer to "STAINLESS STEEL CARE."
HEAVY-DUTY CLEANING:
For heavy-duty cleaning, use warm water, a degreaser, and soft cloth. Never rub in a circular motion -- rub gently in the direction of the steel grain.
Always rinse thoroughly.
Never spray the unit with a hose.
STAINLESS STEEL CARE
CLEANING:
Stainless Steel contains 70 – 80% iron, which will rust if not properly maintained. Stainless Steel also contains 12 – 30% chromium, which forms an invisible passive, protective film that shields against corrosion.
If the protective film remains intact, the stainless steel will remain intact. However, if the film is damaged, the stainless steel can break down and rust.
PREVENTIVE CARE:
To prevent stainless steel break-down, follow these steps:
- Never use any metal tools, scrapers, files, wire brushes, or scouring pads to clean the unit.
- Never use steel wool – which will leave behind particles that will rust.
- Never use acid-based or chloride containing cleaning solutions – which will down the protective film.
- Never rub in a circular motion. Always rub gently in the direction of the steel grain.
- Never leave any food products or salt on the surface. Many foods are acidic. Salt contains chloride.
EXTERIOR CLEANING:
Special stainless steel polishing cleaners can preserve and restore the protective film on the exterior of the unit.
Preserve the life of stainless steel with a regular application of a high-quality stainless steel polishing cleaner, as a final step to daily cleaning.
If signs of breakdown appear, restore the stainless steel surface. First, thoroughly clean, rinse, and dry the surface. Then, on a daily basis, apply a high-quality stainless steel polish according to manufacturer's instructions.
HEAT TINT:
Darkened areas, called “heat tint,” may appear on stainless steel exposed to excessive heat. Excessive heat causes the protective film to thicken. This is unsightly, but is not a sign of permanent damage.
To remove heat tint, follow the routine cleaning procedure. Stubborn heat tint will require heavy-duty cleaning. To break reduce heat tint, limit the exposure of equipment to excessive heat.
LOCKOUT / TAGOUT PROCEDURE

⚠ WARNING Always perform the LOCKOUT / TAGOUT PROCEDURE of your facility before removing any sheet metal panels or attempting to service this equipment.
The Lockout / Tagout Procedure is used to protect personnel working on an electrical appliance. Before performing any type of maintenance or service on an electrically operated appliance, follow these steps:
- In electrical box, place unit's circuit breaker into OFF position.
- Place a lock or other device on electrical box cover to prevent someone from placing circuit breaker ON.
- Place a tag on electrical box cover to indicate that unit has been disconnected for service and power should not be restored until tag is removed by maintenance personnel.
- Disconnect unit power cord from electrical outlet.
- Place a tag on cord to indicate that unit has been disconnected for service and power should not be restored until tag is removed by maintenance personnel
TROUBLESHOOTING
| SYMPTOM POSSIBLE CAUSE REMEDY | ||
| Chip Warmer not operating | Chip Warmer not plugged into power source. | Plug chip warmer into correct power source as indicated on serial data plate. |
| Lighted power switch not in ON position. VCW26 & VCW46 Thermostat knob not turned to desired temperature. | Press power switch to ON position. Check Thermostat knob located in back of unit. | |
| No power. | Contact Authorized Service Provider. | |
| Check GFCI switch on outlet. | ||
| GFCI or Ground Fault Circuit Indicator tripped. | Moisture problem. Dry moisture problem. | |
| Damaged: element, wire, power cord, etc. | Contact Authorized Service Provider. | |
| Chip Warmer is connected to power source, power is on, but not heating. | Damaged: element, wire, power cord, motor, etc. | Contact Authorized Service Provider. |
| Lighted power switch is illuminated, but circulating fan is not operating | Damped fan, etc. | Contact Authorized Service Provider |
SERVICE & PARTS INFORMATION
To obtain Service and Parts information concerning this model, contact the Vulcan Service Department at the address listed on the front cover of this manual or refer to our website: www.vulcanequipment.com for a complete listing of Authorized Service and Parts depots.
Customer Service 1-800-814-2028
Technical Service 1-800-814-2028
Service Parts 1-800-814-2028
When calling for service, have the model number and serial number available.
ECRAN INTRENE | (Fig. 10)
natural_image
Person wearing gloves handling a perforated metal tray (no visible text or symbols)PLAQUE SIGNAL STRUCTURE
natural_image
Exterior view of a white industrial machine with metal casing and ventilation grilles (no visible text or symbols)
natural_image
Exterior view of a modern industrial machine with open doors and internal compartments filled with food (no visible text or symbols)
natural_image
Exterior view of a white industrial enclosure with open doors and internal wood shavings (no visible text or symbols)* Ancienement VCD5
VCW46
VCW26
VCD44 ML-138069
VCD22* ML-138037
MODELES:
SERIES VCD ET VCW
CHAUFFE-CROUSTILLIES -
ET D'UTILISATION
MANUEL D'INSTALTAION
VILDA
- IMPORTANT FOR YOUR SAFETY
- FOR YOUR SAFETY
- WARNING
- TABLE OF CONTENTS
- IMPORTANT FOR YOUR SAFETY .... 1
- GENERAL 3
- INSTALLATION SPECIFIC TO MODELS VCD22 & VCD44 4
- ELECTRICAL REQUIREMENTS....5
- VCD22 & VCD44
- VCW26 & VCW46
- STAINLESS STEEL CARE 9
- LOCKOUT / TAGOUT PROCEDURE 10
- TROUBLESHOOTING....11
- SERVICE & PARTS INFORMATION....11
- GENERAL
- INTRODUCTION
- INSTALLATION (ALL MODELS)
- UNPACKING:
- LEGS INSTALLATION:
- LOCATION:
- INSTALLATION SPECIFIC TO MODELS VCD22 & VCD44
- ACCESS PANEL POSITIONING:
- SCOOP HOLDER INSTALLATION:
- ELECTRICAL REQUIREMENTS
- ELECTRICAL CODES & STANDARDS:
- In the United States of America:
- In Canada:
- ELECTRICAL CONNECTIONS:
- OPERATION
- OPERATION INSTRUCTIONS (Models VCD22 & VCD44)
- CLEANING INSTRUCTIONS (Models VCD22 & VCD44)
- The inside of the Chip Warmer must be cleaned each day.
- Never spray the unit with a hose.
- OPERATION INSTRUCTIONS (Models VCW26 & VCW46)
- SHUTDOWN
- CLEANING INSTRUCTIONS (Models VCW26 & VCW46)
- INTERIOR:
- EXTERIOR:
- HEAVY-DUTY CLEANING:
- Always rinse thoroughly.
- STAINLESS STEEL CARE
- CLEANING:
- PREVENTIVE CARE:
- EXTERIOR CLEANING:
- HEAT TINT:
- LOCKOUT / TAGOUT PROCEDURE
- TROUBLESHOOTING
- SERVICE & PARTS INFORMATION
Brand : Vulcan
Model : VCW26
Category : Food Warmer