
FZV 4010-E - Vacuum Cleaner Fieldmann - Free user manual and instructions
Find the device manual for free FZV 4010-E Fieldmann in PDF.


| Product Type | Electric Scarifier / Lawn Aerator |
| Model | FZV 4010-E |
| Rated Power | 1800 W |
| Working Width | 40 cm |
| Working Depth Adjustment | +6 mm to -12 mm |
| Collection Basket Capacity | 55 L |
| Weight | 12.8 kg |
| Protection Class | IPX4 (splash water protection) |
| Cylinder Speed | 3000 rpm |
| Sound Pressure Level | 85.56 dB(A) (K=3 dB(A)) |
| Guaranteed Sound Power Level | 104 dB(A) |
| Vibration Level | 5.508 m/s² (K=1.5 m/s²) |
| Voltage / Frequency | 230-240 V ~ 50 Hz |
| Intended Use | Private lawns and grass areas |
| Functions | Scarification and aeration |
| Blade / Cylinder Type | Scarification cylinder (blades) and aeration cylinder (springs) |
| Handle Adjustment | Height adjustable |
| Safety Features | Safety lock on start lever, automatic motor overload protection |
| Maintenance | Clean after each use; do not use water or high-pressure cleaners |
| Blade Replacement | Replaceable scarification and aeration cylinders |
| Recyclable Packaging | Yes |
Frequently Asked Questions - FZV 4010-E Fieldmann
User questions about FZV 4010-E Fieldmann
0 question about this device. Answer the ones you know or ask your own.
Ask a new question about this device
Download the instructions for your Vacuum Cleaner in PDF format for free! Find your manual FZV 4010-E - Fieldmann and take your electronic device back in hand. On this page are published all the documents necessary for the use of your device. FZV 4010-E by Fieldmann.
USER MANUAL FZV 4010-E Fieldmann
natural_image
Abstract black-and-white spiral pattern with no text or symbolsFIELDMANN®
Home & Garden Performance
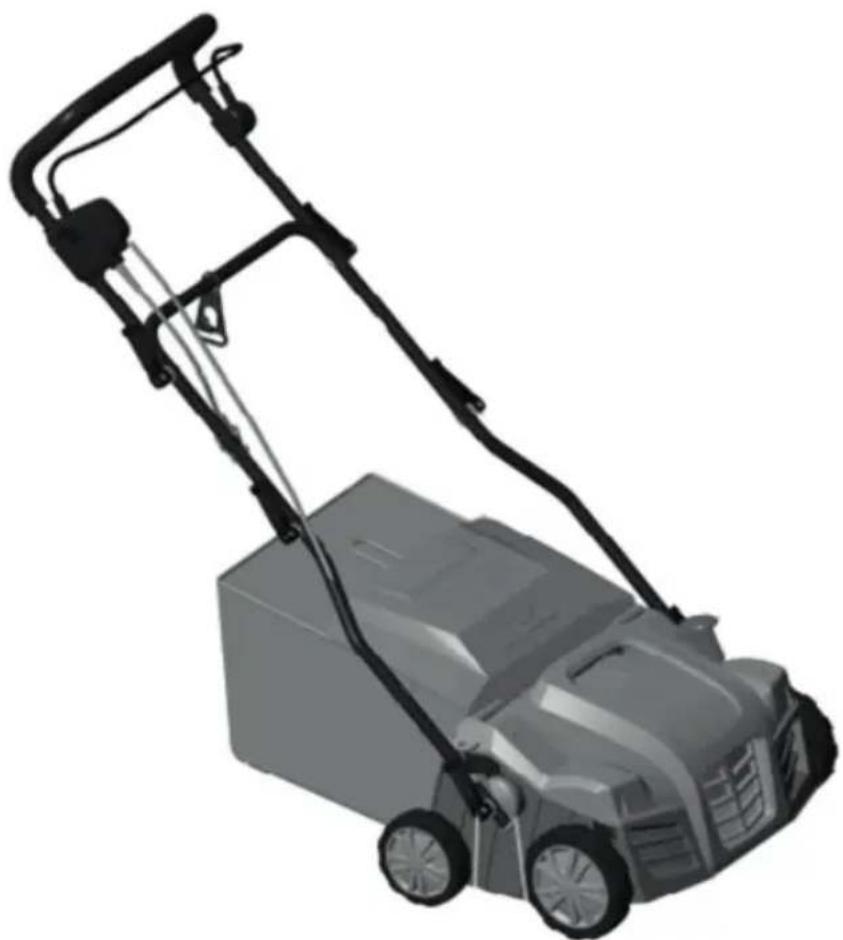
natural_image
3D rendering of a lawn mower with attached circuit board (no text or symbols visible)FZV 4010 E
English 1
Češťina....15
Slovenčina....29
Magyarul....43
Polski....57
ELECTRIC SCARIFIER
USER'S MANUAL
Dear customer,
thank you very much for the trust that you have expressed!
Before putting this machine into operation, it is imperative to read this user's manual! In it, you will find all the instructions for normal operation and for achieving a long lifetime of the machine. It is imperative to adhere to all safety instructions contained in this user's manual.
CONTENTS
- GENERAL SAFETY INSTRUCTIONS....2
Important safety notice....2
Packaging 2
User's Manual 2 - SYMBOLS 2
- SAFETY INSTRUCTIONS......4
Checks before every use....4
Proper use / Responsibility....4
Interrupting work....4
Electrical safety....5 - PURPOSE OF USE....5
Intended use 5 - DESCRIPTION OF THE MACHINE ....6
- ASSEMBLING THE MACHINE ....7
- REPLACING BLADES 9
- SETTING UP THE SCARIFIER ....10
Adjustment after wear ....10 - PUTTING INTO OPERATION....10
Starting....10
Turning off....10 - MAINTENANCE....11
Cleaning the scarifier 11 - SCARIFICATION / AERATION .... 11
- TECHNICAL SPECIFICATIONS....12
- DISPOSAL....12
DECLARATION OF CONFORMITY 13
1. GENERAL SAFETY INSTRUCTIONS
Important safety notice
Carefully unpack the product and take care not to throw away any part of the packaging before you find all the parts of the product.
Store the product in a dry place out of reach of children.
Read all warnings and instructions. Not following warnings or instructions may lead to injury by electrical shock, a fire and/or serious injuries.
Packaging
The product is packed in a package that prevents damage during transport. This package is a resource and so can be handed over for recycling.
User's Manual
Before you start working with the machine, read the following safety and usage instructions. Acquaint yourself with the operating elements and the correct use of the machine. Keep the user's manual in a safe place where it can be easily retrieved for future use. Save the original packaging, including the internal packing material, warranty card and proof of purchase receipt at least for the duration of the warranty.
If you need to ship this machine, pack it in the original cardboard box to ensure maximum protection during shipping or transport (e.g. when moving or when you need to send this product for repair).
NOTE: If you hand over the machine to somebody else, do so together with this user's manual.
Following the instructions in the included user's manual is a prerequisite for the proper use of the machine. The user's manual also contains operating, maintenance and repair instructions.
The manufacturer takes no responsibility for accidents or damages resulting from not following the instructions in this manual.
2. SYMBOLS
ATTENTION! Before putting into operation, carefully read the user's manual and the general safety instructions!
Do not work in the rain or in unfavourable climatic conditions!
ATTENTION! The blade of the scarifier continues to rotate for some time after it is turned off! Keep a safe distance! Attention, rotating blades!
 | Attention! Before putting into operation, carefully read the user's manual and the general safety instructions! |
 | Do not work in the rain or in unfavourable climatic conditions! |
 | Attention, the blade of the scarifier continues to rotate for some time after it is turned off! |
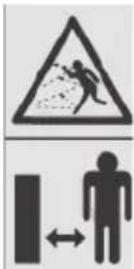 | Keep a safe distance! |
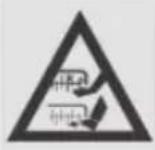 | Attention, rotating blades! Sharp blade/s. Protect yourself against injury and loss of fingers. |
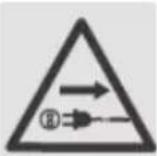 | Before setting up the machine or carrying out maintenance on the machine, or if the electric power cable has become jammed or is damaged, always turn off the motor and pull the plug out of the electric power socket! |
 | While working use protective aids. |
 | Before performing work on the machine, pull the power cord out of the electrical power socket. |
ELECTRIC SCARIFIER USER'S MANUAL
3. SAFETY INSTRUCTIONS
Thank you for purchasing this garden scarifier. Before you start using it, please carefully read this user's manual and save it for possible future use.
Checks before every use
*Check the electric scarifier before every use.
Do not use the electric scarifier if the safety mechanisms (start lever, safety brake, rear lid or cover) are damaged or worn out.
Never use the machine with a blocked or missing safety mechanism.

NOTE: Make sure that all nuts and bolts are pulled tight and that the scarifier is in good operating condition.
Before starting work, inspect the area that is to be aerated.
Check the work area for any foreign objects (e.g. stones, branches, rope) and remove them if necessary.
Proper use / Responsibility

ATTENTION! Danger! Danger of injury! The scarifier may cause serious injuries!
Do not place hands or feet near the scarification cylinder.
You are responsible for the safety of the methods of use described in these instructions.
Work only under good visibility.
Do not open the rear cover during use.
Acquaint yourself with the surroundings of your work area. Check for potential dangers, which may not be audible due to the noise of the machine.
Wear solid footwear and long pants to protect your legs.
Make sure that your legs are at a sufficient distance from moving parts.
Make sure that there are no other people (particularly children) or animals in the work area.
*Always push the scarifier at walking speed.
Operating position: make sure that you have safe foot support during operation.
Be especially careful when changing direction on a slope.

ATTENTION! Be extremely careful when walking backwards. You could stumble!
Do not use the electric scarifier in the rain or in damp or wet conditions.
Do not work with the scarifier near the edges of swimming pools or garden ponds.
Please adhere to all local restrictions related to noise levels.
Interrupting work

ATTENTION! Never leave the electric scarifier in the work area without supervision.
When you stop working, place the machine in a safe location. Unplug the power plug! If you stop working in order to move to a different work location, always turn the electric scarifier off while carrying it. Move the wear compensation lever into the transport position.
In the event that you hit an obstacle while scarifying, turn off the electric scarifier and remove the obstacle. Check the electric scarifier for damage and have it repaired if necessary.
Electrical safety
- Keep the extension cord away from the scarification cylinder!
*Never use the electric scarifier in the rain.
Please adhere to local residential noise restrictions.
It is necessary to regularly inspect the power / extension cord for damage and signs of wear and tear.
In the event that the power / extension cord is damaged, immediately unplug the power cord.
The socket on the extension cord must be water resistant providing protection against spraying water, or the power sockets for the extension cord must be made from rubber or must have a rubber cover.
* Extension cords must meet the requirements of DIN VDE 0620.
Only use approved extension cords with the corresponding conductor cross-sections. Please consult your electrician.
It is necessary to use connecting accessories for the extension cord.
For portable equipment used outdoors, we recommend the use of a residual current device with a maximum current rating of 30 mA. In Switzerland, the use of a residual current device is compulsory.
4. PURPOSE OF USE
Intended use
The FZV 4010 E Electric Scarifier is designed for aerating lawns and grass areas in private gardens and yards. It is not intended for use in public facilities, parks, sports fields, on roads, in agriculture or forestry.
ATTENTION! To prevent injury, the electric scarifier must not be used for trimming shrubs, hedges and bushes. Furthermore, the electric scarifier must not be used for levelling uneven terrain.
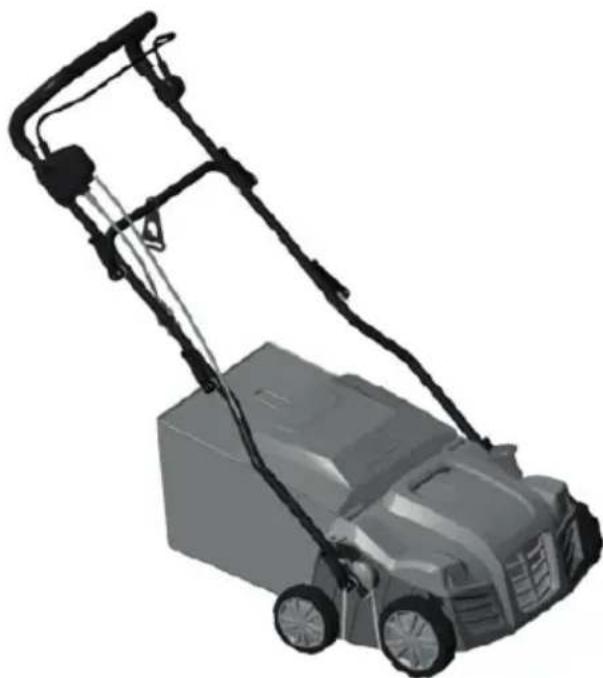
5. DESCRIPTION OF THE MACHINE (FIG. 1)
1
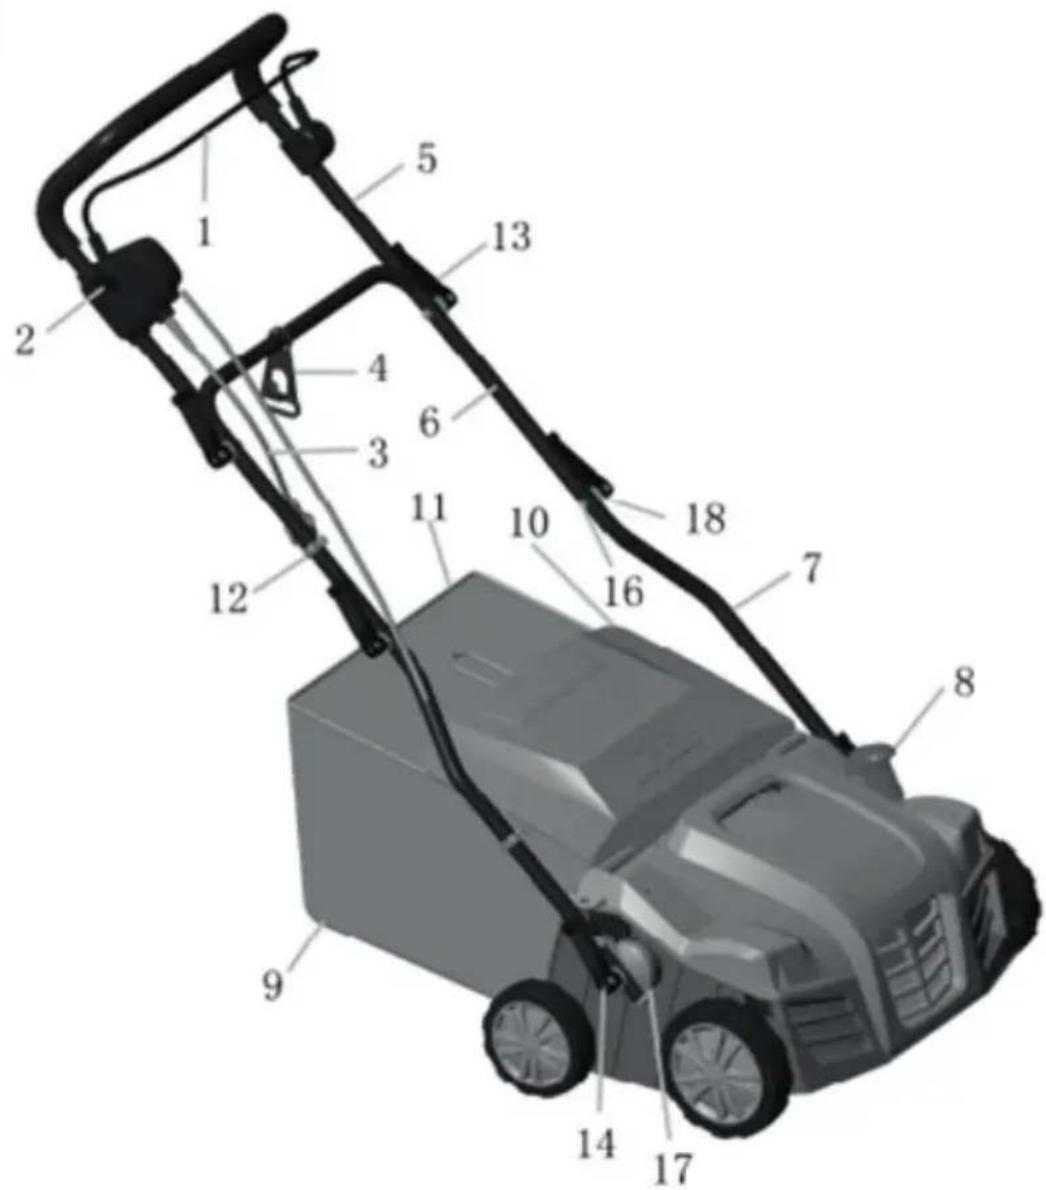
① Main switch
② Main switch safety lock
③ Power cord
④ Power cord retainer hook
⑤ Top part of the handle
⑥ Middle part of the handle
⑦ Bottom part of the handle
⑧ Working depth adjustment control
⑨ Basket
⑩ Basket cover
⑪ Grass catcher frame
⑫ Cable clip
⑬ & ⑭ Quick-acting lever
⑯ Handle screw
⑰ Handle height adjustment thorx
⑱ Handle screw washer
6. ASSEMBLING THE MACHINE
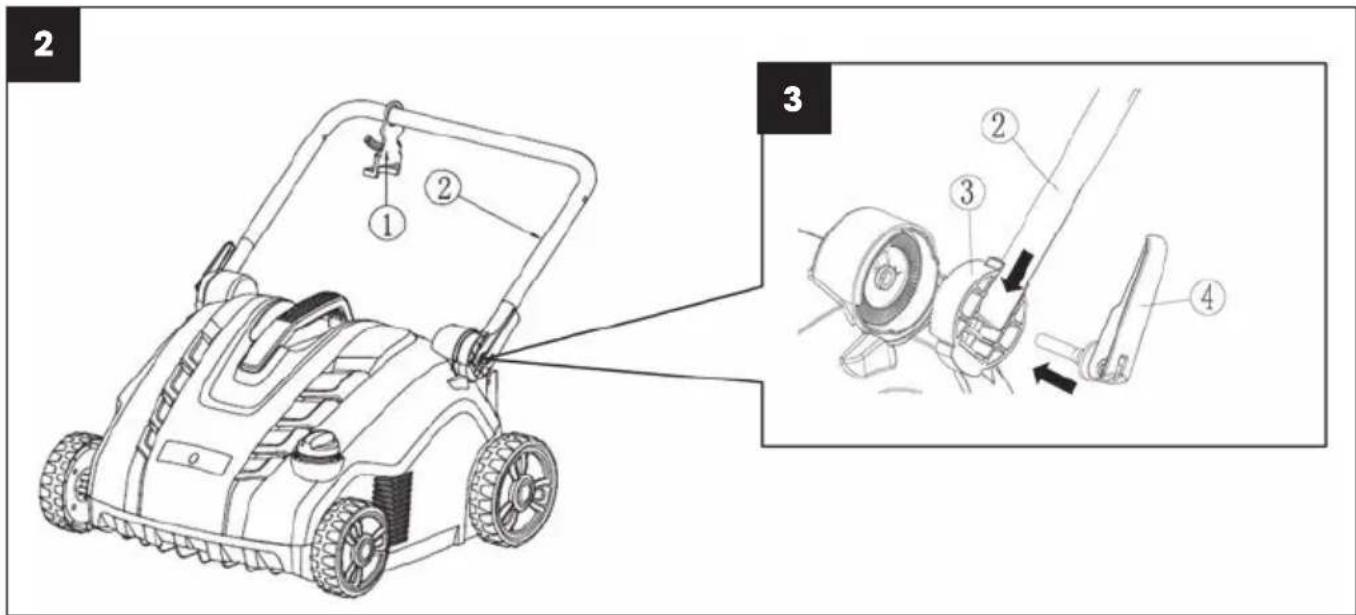
- Slide the cable fastening hook ① on to the bottom part of the handle ② (fig. 2).
- Insert the bottom part of the handle ② into the rotation unit ③. Then from the outside, screw the quick clamp lever ④ to the body of the scarifier (fig. 3).
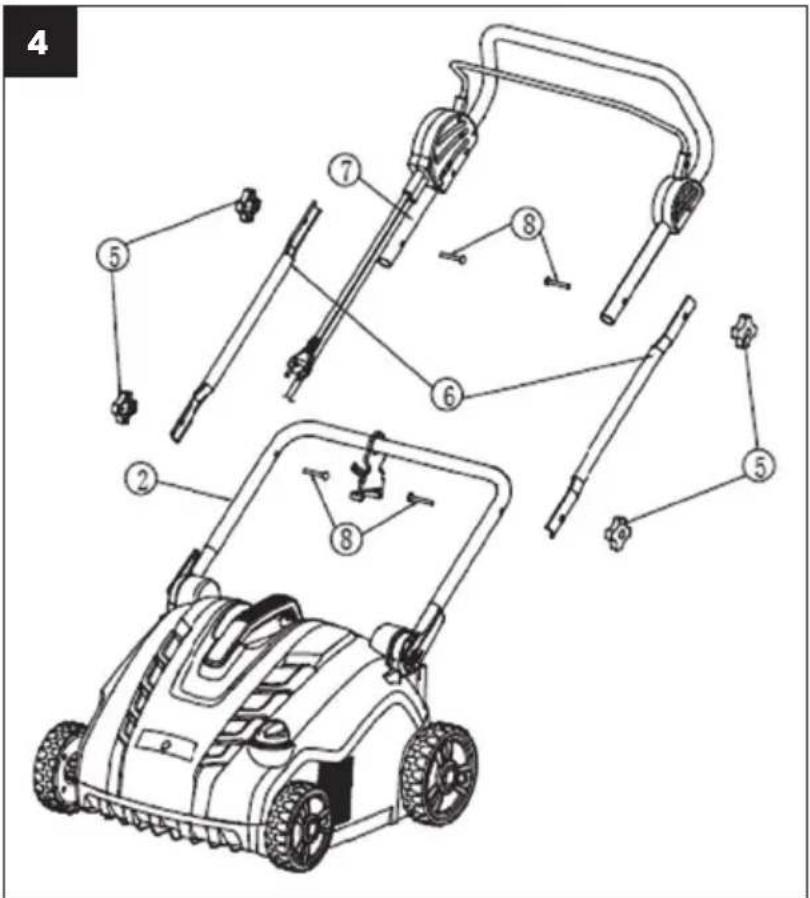
- Slide two retaining bolts ⑧ from the inside through the hole in the bottom handle ② and fasten to the central handle ⑥ using two wing nuts ⑤ (fig. 4).
- Slide two retaining bolts ⑧ from the inside through the hole in the top handle ⑦ and fasten to the central handle ⑥ using two wing nuts ⑤ (fig. 4).
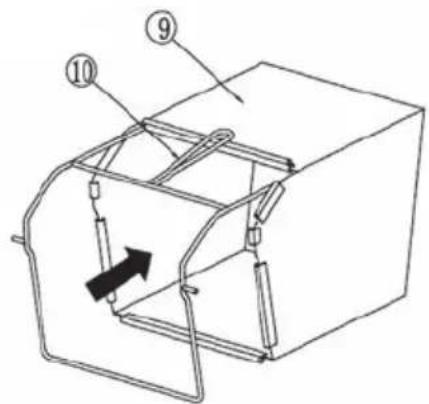
- Place the steel frame ⑩ into the textile collection basket ⑨ and attach all fastener to the left, right and rear poles of the frame.
Make sure that all fasteners are secured correctly (fig. 6).
6
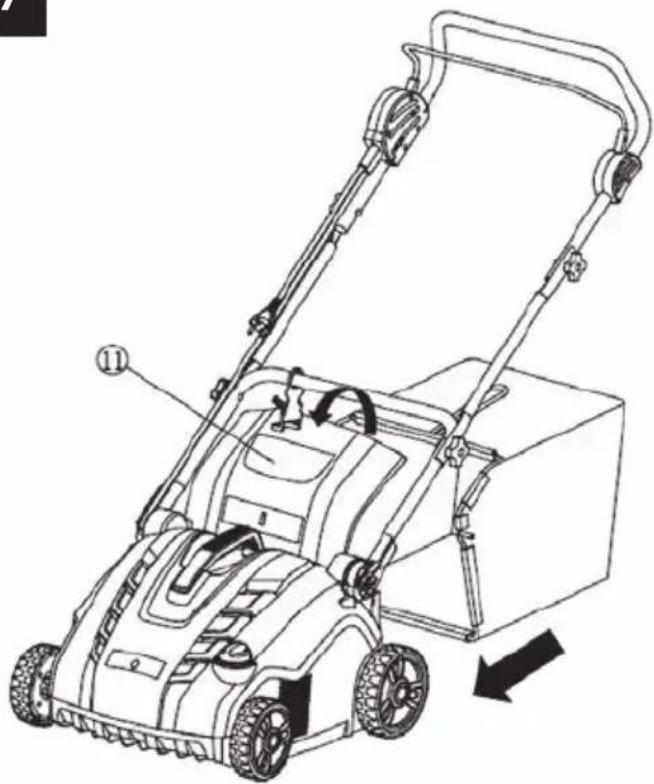
- Installation of the completely assembled collection basket on to the scarifier (fig. 7).
A. Lift up the protective cover ⑪.
B. Make sure that the ejection chute is clear and free of debris.
C. Place the fully assembled collection basket on to the fastening points in the rear part of the chassis, as shown.
D. Place the protective cover ⑪ on top of the collection basket. Check that the collection basket is seated correctly.
7
natural_image
Line drawing of a lawn mower with open lid and wheels, showing mechanical components and motion arrow (no text or symbols)
NOTE: For use without the grass catcher, the lawnmower may be used without the collection basket with the protective cover ⑪ in the lower position.
7. REPLACING BLADES

DANGER!
The cylinders may cause injuries!
Prior to replacement, disconnect the machine from the power grid and wait for the cylinder to come to a stop. When replacing, wear work gloves.
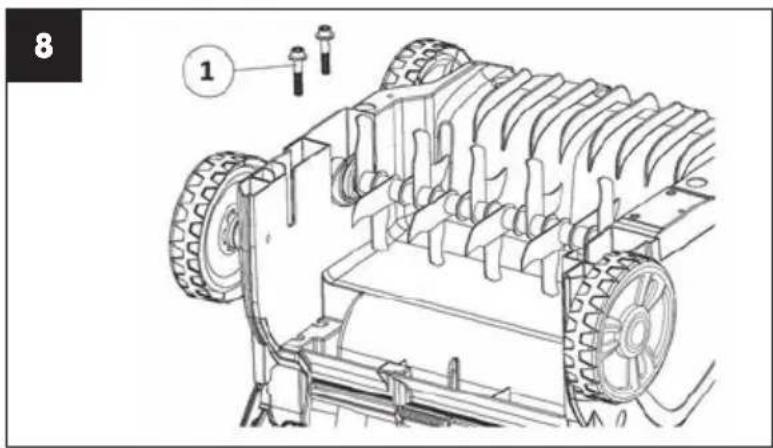
- Screw out the bolts ① on the underside of the chassis (fig. 8).
natural_image
Technical line drawing of a mechanical device with gears and rollers (no text or symbols)-
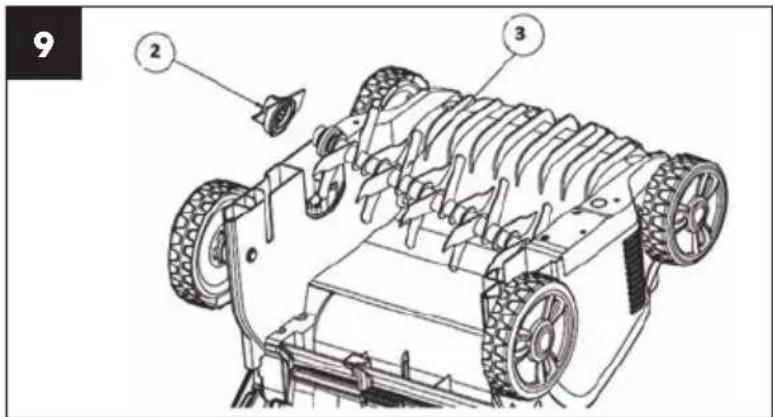
Lift the cylinder ③ at an angle and pull it out (fig. 9).
-
Remove the ball bearing housing ② from the cylinder shaft (fig. 9).
-
Slide the ball bearing housing ② on to another cylinder.
-
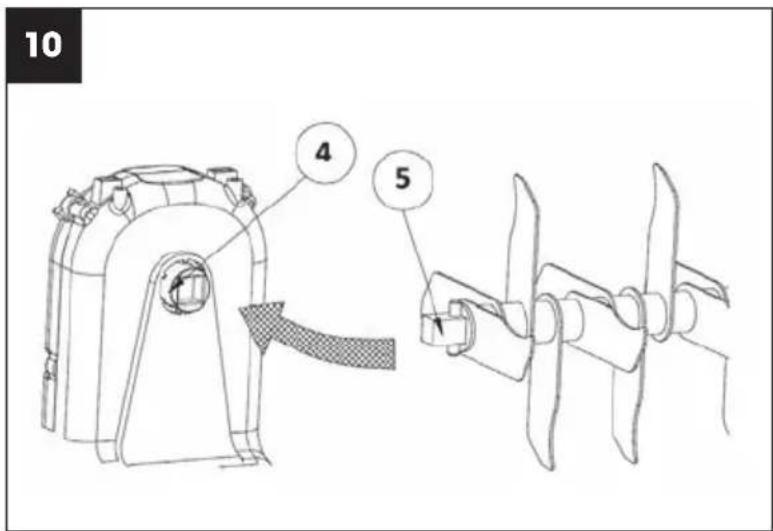
Slide the second cylinder on to the drive shaft so that the pin ⑤ fits into the respective part of the drive shaft ④ (fig. 10).
-
Screw the ball bearing housing ② to the underside of the chassis but do not tighten too much.
8. SETTING UP THE SCARIFIER

ATTENTION!
The working depth with the scarification cylinder should be no more than 3 mm. The aeration cylinder with springs should copy the contour of the ground during operation. Setting an excessive working depth may even without visible wear on the blades/springs result in damage to the scarification cylinder or the overloading and destruction of the motor. The lawn may also be damaged.
Adjustment after wear
To maintain the recommended working depth, use the working depth adjustment control (fig. 1, point 8).

NOTE: The blades and springs of the scarifier wear out depending on the manner in which they are used. The more intensively the scarifier is used, the greater the wear on the blades and springs.
Hard or very dry ground accelerates the wearing out process as does excessive use. In the event that, as a result of wear on the blades, the results of your work with the scarifier worsen, it is possible to adjust the scarification cylinders so that the working depth is constantly kept at the above-described depth.
9. PUTTING INTO OPERATION (FIG. 11)
Before starting it up again, check that the blade has come to a complete stop. Do not turn on and off in rapid succession.
Starting
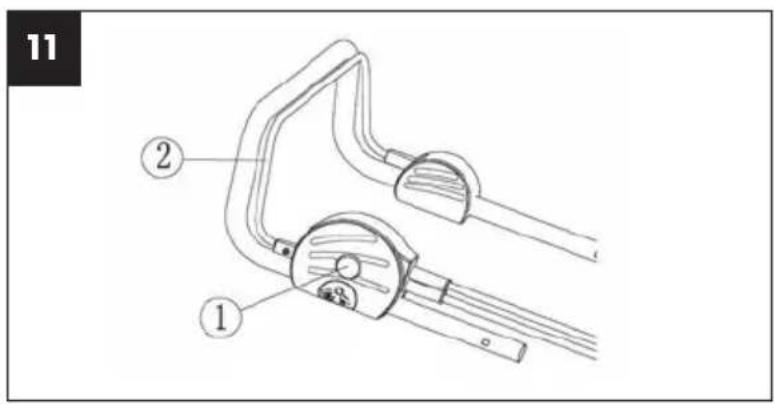
- Press and hold the safety button ①. Pull the starting lever ② to the handle.
- Release the safety button.
Turning off
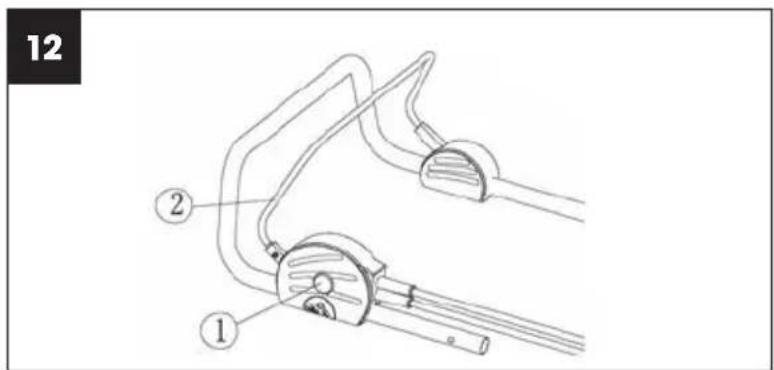
Release the starting lever ②.
10. MAINTENANCE
Cleaning the scarifier
ATTENTION! Danger! A rotating blade may cause injuries.
ATTENTION! Prior to maintenance, disconnect the machine from the power grid and wait for the scarification cylinder to come to a stop.
ATTENTION! While performing maintenance use work gloves.
The scarifier should be cleaned after every use.
ATTENTION! Risk of injury and material damage.
ATTENTION! Do not clean the scarifier under running water (especially not under high pressure).
ATTENTION! Do not use hard or pointed items for cleaning the scarifier.
Remove grass and accumulated debris from the wheels, scarification cylinder and the cover.
11. SCARIFICATION / AERATION
For comfortable work with the scarifier, it is best to start working at the location closest to the power source and to proceed away from the power source.
Scarify / aerate the lawn at a right angle from the power source and place the power cord on the side that has already been treated.
ATTENTION! Do not place too much strain on the motor when working, especially in demanding conditions. When the motor is put under strain, the motor speed will decline and you will hear a change in the noise of the motor. Whenever this happens, stop working, release the starting lever and reduce the scarification / aeration depth.
Otherwise the machine could be damaged.
NOTE: The motor is protected by a safety mechanism that is activated at the instant that the blades are caught or the engine is overloaded. Whenever this occurs, turn the machine off and pull the power plug out of the power source. The safety mechanism will reset only when the starting lever is released. Remove all obstacles and wait several minutes before resetting the safety mechanism and resuming work. At this point, do not play with the starting lever as this will extend the safety mechanism reset time. In the event that the machine turns off again, raise the height of scarification / aeration again, which will reduce the load on the motor.
12. TECHNICAL SPECIFICATIONS
Electric scarifier ...... FZV 4010-E
Rated power 1800 W
Working width 40 cm
Working depth ....+6 to -12 mm
Collection basket capacity 55 l
Weight.... 12,8 kg
Protection class IPX4
Cylinder operating speed 3000 rpm
Sound pressure level L_gg = 85,56~dB(A)~K = 3~dB(A)
Guaranteed sound power level.... L_wa = 104 dB(A)
Vibrations 5,508 m/s ^2 K=1.5 m/s ^2
13. DISPOSAL
INSTRUCTIONS AND INFORMATION REGARDING THE DISPOSAL OF USED PACKAGING MATERIALS
Dispose of used packaging material at a site designated for waste in your municipality.
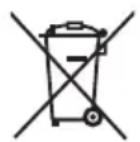
The power tool and its accessories are manufactured from various materials, e.g. metal and plastic. Take damaged parts to a recycling centre. Inquire at the relevant government department.

This product meets all the basic requirements of EU directives that apply to it.
Changes in the text, design and technical specifications may be made without prior notice and we reserve the right to make these changes.
User s manual in the original language.
DECLARATION OF CONFORMITY
Manufacturer:
FAST ČR, a.s.
Černokostelecká 2111, 100 00 Praha 10, Czech Republic
VAT no: CZ26726548
Product / brand: ELECTRICAL LAWN AERATOR AND SCARIFIER / FIELDMANN
Type/model: FZV 4010 E
230–240 V AC, 50 Hz, 1800 W, IPX4
The product is inline with directives and regulations listed below:
EC Council Directive Machinery 2006/42/EC
EC Directive for Electromagnetic Compatibility 2014/30/EU
EC Directive for RoHS 2011/65/EU
and norms:
EN 60335-1:2012+A11
EN 50636-2-92:2014
EN 62233:2008
EN 55014-1:2006+A1:2009+A2:2011
EN 55014-2:2015
EN 61000-3-11:2000
EN 61000-3-2:2014

Place of issuance: Prague
Chairman of the Board
Date of issuance: 1.5.2018
Name: Ing. Zdeněk Pech
Signature:
FAST FAST CR, a.s.
Čemokostelecká 1621, 251 01 Ričany
ICO: 26726548 tel.: +420/323204111
DIC: CZ26726548 fax: +420/ 323 204 110

natural_image
Abstract black-and-white spiral pattern with no text or symbolsFIELDMANN®
Home & Garden Performance
Model /Modell /Modelis:
Conditions of guarantee
This product is warranted for the period of 24 months from the date of purchase to the end-user. Warranty is limited to the following conditions. Warranty is referred only to the customer goods using for common domestic use. The claim for service can be applied either at dealer's shop where the product was bought, or at below mentioned authorized service shops. The end-user is obligated to set up a claim immediately when the defects appeared but only till the end of warranty period. The end-user is obligated to cooperate to certify the claiming defects. Only completed and clean (according to hygienic standards) product will be accepted. In case of eligible warranty claim the warranty period will be prolonged by the period from the date of claim application till the date of taking overthe product by end-user, or the date the end-user is obligated to take it over. To obtain the service under this warranty, end-user is obligated to certify his claim with duly completed following documents: receipt, certificate of warranty, certificate of installation...
This warranty is void especially if apply as follows: ■ Defects which were put on sale. ■ Wear-out or damage caused by common use. ■ The product was damaged by unprofessional or wrong installation, used in contrary to the applicable instruction manual, used in contrary to legal enactment and common process of use or used for another purpose which has been designed for. ■ The product was damaged by uncared-for or insufficient maintenance. ■ The product was damaged by dirt, accident of force majeure (natural disaster, fire, flood, ... ) ■ Defects on functionality caused by low duality of signal, electromagnetic field interference etc. ■ The product was mechanically damaged (e.g. broken button, fall...). ■ Damage caused by use of unsuitable media, fillings, expendable supplies (batteries) or by unsuitable working conditions (e.g. high temperatures, high humidity, quakes,...). ■ Repair, modification or other failure action to the product by unauthorized person ■ End-user did not prove enough his right to claim (time and place of purchase). ■ Data on presented documents differs from data on products. ■ Cases when the claiming product can not be identified according to the presented documents (e.g. the serial number or the warranty seal has been damaged).
fasthungary@fasthungary.hu
www.fasthungary.hu
Fast Poland, Sp. z o.o.
Sokołowska 10
PL 05-090 Puchaly
Poland
Tel.: +48 500 116 777
Fax: +48 22 869 96 13
fastpoland@fastpoland.pl
www.fastpoland.pl
natural_image
3D rendering of a lawn mower with attached ladder (no text or symbols visible)
FIELDMANN®
Home & Garden Performance
- FIELDMANN®
- ELECTRIC SCARIFIER
- USER'S MANUAL
- Dear customer,
- thank you very much for the trust that you have expressed!
- CONTENTS
- GENERAL SAFETY INSTRUCTIONS
- Important safety notice
- Packaging
- SYMBOLS
- SAFETY INSTRUCTIONS
- Checks before every use
- Proper use / Responsibility
- Interrupting work
- Electrical safety
- PURPOSE OF USE
- Intended use
- DESCRIPTION OF THE MACHINE (FIG. 1)
- ASSEMBLING THE MACHINE
- REPLACING BLADES
- DANGER!
- SETTING UP THE SCARIFIER
- ATTENTION!
- Adjustment after wear
- PUTTING INTO OPERATION (FIG. 11)
- Starting
- Turning off
- MAINTENANCE
- Cleaning the scarifier
- SCARIFICATION / AERATION
- TECHNICAL SPECIFICATIONS
- DISPOSAL
- INSTRUCTIONS AND INFORMATION REGARDING THE DISPOSAL OF USED PACKAGING MATERIALS
- DECLARATION OF CONFORMITY
- Manufacturer:
- The product is inline with directives and regulations listed below:
- and norms:
- Model /Modell /Modelis:
- Conditions of guarantee
Brand : Fieldmann
Model : FZV 4010-E
Category : Vacuum Cleaner