
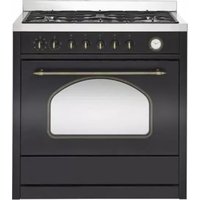
TGO910TBK - Oven Technika - Free user manual and instructions
Find the device manual for free TGO910TBK Technika in PDF.


| Product Type | Built-in Electric Oven |
| Brand | Technika |
| Model | TGO910TBK |
| Installation | Built-in |
| Width | 59.5 cm |
| Height | 59.5 cm |
| Depth | 56.5 cm |
| Weight | 32 kg |
| Power Supply | 230 V / 50 Hz |
| Power Consumption | 2.8 kW |
| Oven Capacity | 71 L |
| Number of Functions | 8 |
| Functions | Convection, Grill, Fan Forced, Defrost, Light, Pizza, Eco, Top/Bottom Heat |
| Control Type | Touch + Rotary Knobs |
| Display | LED Digital |
| Cleaning Type | Standard (Manual) |
| Door Type | Drop-down with triple glazing |
| Safety Features | Child Lock, Automatic Shut-off, Overheat Protection |
| Energy Efficiency Class | A |
| Spare Parts Availability | Heating elements, thermostat, door seal, control board, knobs |
| Repairability | Modular components, user-serviceable parts (e.g., door seal) |
| Accessories Included | 1 wire shelf, 1 baking tray, 1 grill rack |
Frequently Asked Questions - TGO910TBK Technika
User questions about TGO910TBK Technika
0 question about this device. Answer the ones you know or ask your own.
Ask a new question about this device
Download the instructions for your Oven in PDF format for free! Find your manual TGO910TBK - Technika and take your electronic device back in hand. On this page are published all the documents necessary for the use of your device. TGO910TBK by Technika.
USER MANUAL TGO910TBK Technika
natural_image
Line drawing of a microwave oven with front panel and door (no text or symbols)CONTENTS TABLE
Safety Instructions 4
Disposal 7
Use and Care 8
Oven and accessories 8
How to use your oven 8
Positioning the oven trays & shelves 9
Before using the first time ____ 9
Using the Controls 10
Oven Functions 14
Rotisserie (selected models only) ____ 1
Practical cooking advice 17
Cooking guide 20
Cleaning and maintenance
How to remove the oven door 22
Replacing the oven lamp 22
Installation 23
Cabinet details 23
Electrical connection 23
Technical data 24
Warranty 25
Using this manual
This Owner's Manual contains important information on safety and instructions intended to assist you in the operation and maintenance of your appliance. Please take the time to read this Owner's Manual before using your oven and keep this book for future reference.
Safety Instructions
Installation of this oven must be performed only by a licensed electrician. The installer is responsible for connecting the appliance to the mains power supply in observance of the relevant safety recommendations and local Australian codes.
Electrical safety
If the oven has been damaged in transport, DO NOT connect it.
- This appliance must be connected to the mains power supply only by an approved licensed electrician.
- In the event of a fault or damage to the appliance, do not attempt to operate it.
- Repairs should be performed by a licensed technician only. Improper repair may result in considerable danger to you and others. If your oven needs repair, contact a Service Centre or your dealer.
- If the supply cord is damaged, it must be replaced by the manufacturer or an authorised service agent or similarly qualifies person in order to avoid a hazard.
- Electrical leads and cables should not be allowed to touch the oven.
- The oven should be connected to the mains power supply by means of an approved circuit breaker or fuse.
- Never use multiple plug adapters or extension leads.
- The rating label is located either on the right side of the door or affixed to the bottom of side of the cavity front frame.
- The power supply of the appliance should be turned off when it is being repaired or cleaned.
• Take care when connecting electrical appliances to sockets near the oven.
WARNINGS
- The appliance should be turned off at the circuit breaker or board before replacing lamps to avoid the possibility of electric shock.
- During oven operation, the interior surfaces become very hot.
Safety during operation

- This oven has been designed only for non-commercial household use. It must not be altered in any way.
- During use, the oven interior surfaces become hot enough to cause burns. Do not touch heating elements or interior surfaces of the oven until they have had time to cool.
- Never store flammable materials in or near the oven.
- The oven surfaces become hot when the appliance is operated at a high temperature for an extended period of time.
- When cooking, take care when opening the oven door as hot air and steam can escape rapidly.
Safety during operation (Continued)
- When cooking dishes that contain alcohol, the alcohol may evaporate due to the high temperatures and the vapour can catch fire if it comes into contact with a hot part of the oven.
- Use of high-pressure water cleaners or steam jet cleaners is not permitted for cleaning.
- Frozen foods such as pizzas should be cooked on the wire grill. If the baking tray is used, it may become deformed due to the great variation in temperatures.
- DO NOT pour water into the oven bottom when it is hot. This could cause damage to the enamel surface.
- The oven door must be closed during cooking.
- DO NOT line the oven bottom with aluminium foil and do not place any baking trays or tins on it. The aluminium foil blocks the heat, which may result in damage to the enamel surfaces and cause poor cooking results.
- Fruit juices will leave stains, which can become indelible on the enamel surfaces of the oven. When cooking very moist cakes, use the deep pan.
- Does not rest bake ware on the open oven door.
- This appliance is not intended for use by persons (including children) with reduced physical, sensory or mental capabilities, or lack of experience and knowledge, unless they have been given supervision or instruction concerning the use of the appliance by a person responsible for their safety.
- Only use the temperature probe recommended for this oven.
- If a cooking time is not entered, the oven will shut itself off after the lengths of time indicated below.
- Always place oven racks in desired location while oven is cool. If a rack must be moved while oven is hot, do not let potholder contact the heating elements. Always use dry potholders. Moist or damp potholders on hot surfaces may result in burns from steam. Do not let potholder touch hot heating elements. Do not use a towel or other bulky cloth.
Child safety
- WARNING: Accessible parts may become hot during use. Children should be kept away. Children and pets should not be left alone or unattended in the area where the appliance is in use. They should never be allowed to play in its vicinity, whether or not the appliance is in use.
- Secure all loose garments, etc. before beginning. Tie long hair so that it does not hang loose, and do not wear loose fitting clothing or hanging garments, such as ties, scarves, jewelry, or dangling sleeves.
- When children become old enough to use the appliance, it is the legal responsibility of the parents or legal guardians to ensure that they are instructed in safe operation of the appliance by qualified persons.
- Do not allow anyone to climb, stand, lean, sit, or hang on any part of an appliance, especially on the door, warming drawer or storage drawer. This can damage the appliance, and the unit may tip over, potentially causing severe injury.
CAUTION:
- Items of interest to children should not be stored in an appliance, in cabinets above an appliance or on the backsplash. Children climbing on an appliance to reach items could be seriously injured.
Cleaning safety
WARNING
- Make sure the oven is cool before cleaning. We recommend turning the oven off prior to cleaning
- Clean and user maintenance shall not be made by children without supervision Do not clean the appliance while it is still hot. Some cleaners produce noxious fumes when applied to a hot surface. Wet cloths or sponges can cause burns from steam.
- DO NOT use a steam cleaner to clean the oven.
Oven exterior
- For cleaning both the interior and exterior of the oven, use a cloth and a mild cleaning agent or warm soapy water.
• Dry with kitchen paper or a dry towel. - Do not use scourers, caustic cleaners or abrasive products.
Stainless steel oven fronts
- Do not use steel wool, scouring pads or abrasives. They may damage the finish.
- For tough stains we recommend using Steel Power cream cleanser, apply cleanser, leave on for a period of time even overnight and polish off
• To remove fingerprints and water stain we recommend using Steel Kleen.
Aluminium oven fronts
- Wipe the plate gently with a soft cloth or microfiber cloth and a mild window cleaning detergent.
Oven interior
- Do not use coarse scouring pads or cleaning sponges.
• To avoid damaging the enameled oven surfaces, use commercially available oven cleaners. - To remove stubborn soil, use a special oven cleaner.
- Only use Non-Caustic oven cleaners
Oven door glass
- The oven door is equipped with three sheets of glass placed against each other. The inner & middle sheets can be removed for cleaning. If removed they need to be placed back in the correct order as they use a reflective coating has to face inward towards the oven cavity.
WARNING
- Whenever the door is separated from the oven, the clips should be flipped open.
- Do not use harsh abrasive cleaners or sharp metal scrapers to clean the oven door glass since they can scratch the surface, which may resulting in shattering of the glass.
- When the door is mounted, removing some of the parts (the door glass or some other part) from the door may result in injury.
Attention
- The glass may break if you use excessive force especially at the edges of the front sheet.
Accessories
- Wash all bakeware and accessories after each use and dry with a kitchen towel. To clean easily, soak in warm soapy water for about 30 minutes.
Disposal
Disposal Instructions
Disposing of the packaging material
- The material used to package this appliance is recyclable.
- Dispose of the packaging materials in the appropriate container at your local waste disposal facility
Disposing of old appliances
WARNING: Before disposing of old appliances, make them inoperable so that they cannot be a source of danger. Removal of doors is also advised.
To do this, disconnect the appliance from the mains supply and remove the mains lead.
To protect the environment, it is important that old appliances are disposed of in the correct manner.
- The appliance must not be disposed of with household rubbish.
- You can obtain information about collection dates and public refuse disposal sites from your local refuse department or council.
Oven and accessories
A. Control Panel
G. Oven Rack
H. Guides for sliding the racks or baking pan in and out
F. Baking Pan / Drip Tray

How to use your oven
This multi-function oven combines the advantages of traditional conventional ovens with those of the more modern fan assisted models in a single appliance. It is an extremely versatile appliance that allows you to choose easily and safely between different cooking modes.
Notice: The first time you use your appliance, we recommend that set the thermostat to the highest setting and leave the oven on for about half an hour with nothing in it, with the oven door shut. Then open the oven door and let the room air in. The odor that is often detected during this initial use is due to the evaporation of substances used to protect the oven during storage and until it is installed.
Notice: DO NOT place the drip tray provided on the bottom part of the oven cavity for catching grease or spills whilst using the oven. Bottom rack position should be utilized for this when grilling food or when using the rotisserie (only available on certain models). Also do not place aluminium foil to catch any spills either. If either are placed on the enamel base of the oven, damage can occur due to the intense heat created from the bottom heating element. Always place your cookware (dishes, aluminum foil, etc.) on the grid provided with the appliance inserted especially along the oven guides.
Positioning the oven trays & shelves
The Baking Pan or Oven Shelf can be located in any of the four height positions in the oven.
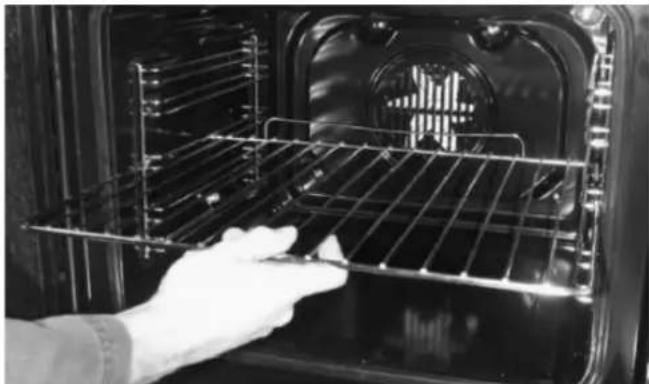
Refer to the ‘Cooking Guide Table’ for the recommended shelf position. When fitting the trays or shelves, ensure they are fitted between the two wires that are closest together as shown below. Oven Shelves have a stop so that they are not fully withdrawn by accident. To fully remove the Oven Shelves, lift the front of the shelf slightly and withdraw fully from the oven. Note that the Drip Tray / Baking pan does not have a stop position and can be fully withdrawn without interruption, so be careful not to accidentally fully withdraw the tray.
Fit Trays and Shelves between bars as shown right

natural_image
Close-up of a metal door with horizontal ribbed panels and white arrows pointing to the panel edges (no text or symbols visible)Locking Pin
To remove the Oven Shelf Support, push down on the wire below the locking pin, pull away from the oven wall until you can release the top of the support from the holes in the oven wall. Replace in reverse procedure.
natural_image
Person placing a grating into an oven with visible heat exchanger (no text or symbols)Oven Shelf fitted to chrome wire Shelf Support
Controls
Before using for the first time
Setting and changing the current time
The oven only operates when the time has been set.
When the appliance is connected to the electrical supply or when there has been a power cut, the symbol for Time flashes automatically.
- Use the or^ buttons, set the current time.
After about 5 seconds, the flashing stops and the clock displays the time of day set. The appliance is now ready for use.
- To change a time that has already been set, press the Clock functions button repeatedly until the symbol for Time: flashes. Use the ^or√buttons, set the current time.
Operating the Oven
The Electronic Oven Control
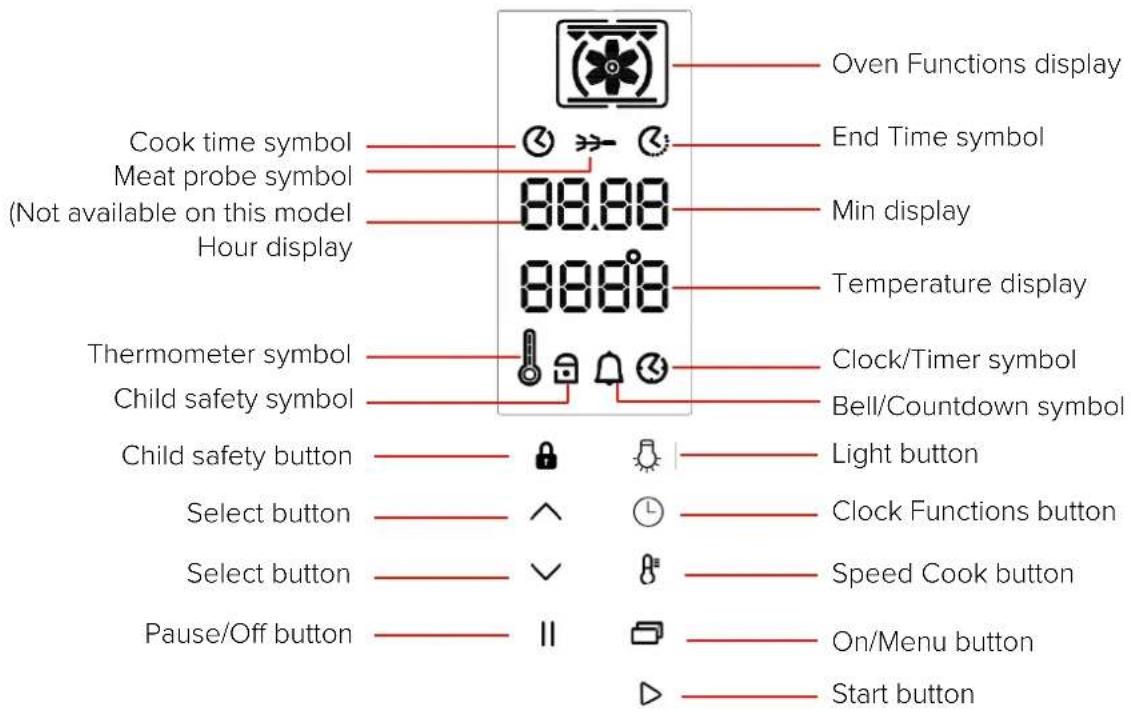
General Instructions
- When the selected function is lit, the oven begins to heat up or the time set begins to count down.
- The oven light is switched on as long as an oven function has started.
- The oven light goes off automatically when the oven is switched off.
- The oven light is switched on or off by pressing the light button.
- Press the Pause / Off | button once and the oven will pause cooking.
- Switch appliance off by pressing the Pause / Off button a second time.
Selecting the oven function
-
Switch on the oven with the Menu button.
-
Press the or^ buttons to select the desired oven function which will appear in the display.
- A suggested temperature appears on the temperature display.
- Press the start ▷ button, the oven begins to heat up.
Changing the oven temperature
-
Press the button first.
-
Press the or buttons to raise or lower the temperature.
The setting changes in steps of 5^ C.
Thermometer symbol
- The slowly rising thermometer symbol indicates the oven is heating up.
- The three segments of the thermometer symbol 🏠 lit up indicate the oven has reached the set temperature
Changing the oven function
To change the oven function, Press the ☐ menu button, the current function will show on the display.
Use the ∧ or ∨ buttons to select the desired oven function.
Switching off the oven
Switch the appliance off by pressing the Pause / Off || button twice.
Speed cook
After an oven function is selected, with the use of the additional function Speed cook ⚠, the empty oven can be pre-heated in a relatively short time. Important: Do not put the food to be cooked into the oven, until Speed cook is completed and the oven is operating using the desired function.
- Set the desired function. If necessary, change the suggested temperature. The thermometer symbol lights up:
The bars flashing one after another show that Speed cook is operating. When the set temperature is reached, the bars of the symbol 🖱 all light up. An audible signal sounds. The oven now continues heating according to the pre-set oven function and temperature. You can now place the food in the oven.
Clock functions

Countdown
To set a countdown. A signal sounds after the time has elapsed. This function does not affect the operation of the oven.

Cook time
To set how long the oven is to be in use.

End time
To set when the oven is to switch off.

Timer
To set, change or check the time (See also section "Before Using for the First Time")
General instructions
• After a clock function has been selected, the corresponding symbol flashes for approx. 5 seconds. During this time, the desired times can be set or modified using the ▲ or ▼ buttons.
- When the desired time has been set, the symbol continues to flash for approx. 5 seconds. After this the symbol lights up. The set Countdown ⏻ begins to count down.
- The time set for Cook time and End time begins to count down after the selected function starts.
Countdown
-
The countdown timer is only available with the oven in standby mode. Press the clock. Functions button ⏻. The bell symbol 🔊 flashes.
-
Set the desired Countdown time using the or^ buttons (max. 59 minutes).
After approx. 5 seconds the display shows the time remaining.
The symbol for Countdown 🔒 lights up.
When the set time has elapsed, the alarm will sound 30 times. Press any button to stop the alarm.
Cook time Ⓛ
- Select an oven function and using the or buttons, select the temperature.
- Press the Clock Functions button repeatedly until the symbol for Cook time flashes.
- Using the on buttons, set the desired cooking time.
The oven switches itself on. The symbol for Cook time ⏻ lights up.
By repeatedly pressing the Clock Functions ⏻ button, the current time can be called up.
When the time has elapsed, an audible signal sounds 3 times.
The oven switches itself off.
"0.00" is displayed and the symbol for Cook time Ⓛ flashes.
To turn off the audible signal:
Press any button.
End time
- Select an oven function and using or buttons, select the temperature.
- Press the Clock Functions button repeatedly until the symbol for End time flashes.
- Using the or^ buttons, set the desired switch-off (End)time.
The symbols for End time ⏚ and Cook time ⏚ light up.
The oven will automatically switch itself on.
By repeatedly pressing the Clock Functions ⏻ button, the current time can be called up.
When the time has elapsed, an audible signal sounds 3 times.
The oven switches itself off.
"0.00" is displayed and the symbols for End time Ⓛ and Cook time Ⓛ flash.
To turn off the audible signal:
Press any button.
Cook time ⏚ and End time ⏚ combined
Cook time ⏻ and End time ⏻ can be used simultaneously, if the oven is to be switched on and off automatically at a later time.
- Select an oven function and temperature.
- Using the Cook time function, set the time that the dish needs to cook for, e.g., 1 hour.
- Using the End time function, set the time at which the dish is to be ready, e.g. 14:05.
The symbols for Cook time ⏚ and End time ⏚ light up.
The oven switches on automatically at the time calculated, e.g. 13:05.
When the set cooking time has elapsed, an audible signal sounds 3 times.
The oven switches itself off, e.g. 14:05.
Child safety device
As soon as the child safety device is engaged, the appliance can no longer be switched on.
Activating the child safety device
Press and hold the button 📄 until 🔒 appears in the display.
The child safety device is now activated.
Deactivating the child safety device
Press and hold the button 📄 until 🔒 disappears from the display.
The child safety device is now deactivated and the appliance is again ready for use
Switching off the button beep
- Switch off the appliance using the Pause / Off || button twice.
- Press and hold ∧ and ∨ buttons at the same time until a signal sounds (approx.2 seconds).
The button beep is now switched off.
Switching on the button beep
Press and hold^ and ∨ buttons at the same time until a signal sounds (approx.2 seconds).
The button beep is now switched on again.
Oven functions

Conventional mode
The top and bottom heating elements come on. This is the classic, traditional type of oven which has been perfected, with exceptional heat distribution and reduced energy consumption. The conventional oven is still unequalled when it comes to cooking dishes made up of several ingredients, e. g. cabbage with ribs, Ancona style stockfish, tender veal strips with rice etc. Excellent results are achieved when preparing veal or beef-based dishes as well (braised meats, stew, goulash, wild game, etc.) which need to cook slowly and require basting or the addition of liquid. It nonetheless remains the best system for baking cakes as well as fruit and cooking using covered casserole dishes for oven baking. When cooking in convection mode, only use one dripping pan or cooking rack at a time, otherwise the heat distribution will be uneven. Using the different rack heights available, you can balance the amount of heat between the top and the bottom of the oven. Select from among the various rack heights based on whether the dish needs more or less heat from the top.

Fan Assist Mode
The top and bottom heating elements, as well as the fan, will come on ,guaranteeing constant heat distributed uniformly throughout the oven. This mode is especially recommended for cooking prepacked food quickly (as pre-heating is not necessary), such as for example: frozen or pre-cooked food) as well as for a few “home-made” dishes.
The best results when cooking using the “Fan Assist” mode are obtained if you use one cooking only (the second from the bottom), please see the table entitled “Practical Cooking Advice”.

Multi-Cooking Mode
The top circle and bottom heating elements, as well as the fan, will come on alternately. Since the heat remains constant and uniform throughout the oven, the air cooks and browns food uniformly over its entire surface. With this mode, you can also cook various dishes at the same time, as long as their respective cooking temperatures are the same. A maximum of 2 racks can be used at the same time, following the instructions in the section entitled: "Cooking On More Than One Rack".
This cooking mode is particularly recommended for dishes requiring a gratin finish or for those requiring considerably prolonged cooking times, such as for example: lasagne, pasta backs, roast chicken and potatoes, etc.. Moreover the excellent heat distribution makes it possible to use lower temperatures when cooking roasts. This results in less loss of juices, meat which is more tender and a decrease in the loss of weight for the roast. The Multi-cooking mode is especially suited for cooking fish, which can be prepared with the addition of a limited amount of condiments, thus maintaining their flavor and appearance. Excellent results can be attained when cooking vegetable-based side dishes. Desserts: this mode is also perfect for baking leavened cakes. Moreover, this mode can also be used to thaw quickly white or red meat and bread by setting the temperature to 80°C. To thaw more delicate foods, set the thermostat to 60°C or use only the cold air circulation feature by setting the thermostat to 0°C.

Pizza Mode
The bottom and circle heating elements, as well as the fan, will come on. This combination rapidly heats the oven due to the large amounts of power used by the appliance, which results in the production of considerable heat coming prevalently from the bottom. The pizza mode is ideal for foods requiring high temperature to cook, like pizzas and large roasts. Only use one oven tray or rack at a time. However, if more than one is used, these must be switched halfway through the cooking process.

Delicate cooking
The bottom heating element and the fan come on. Suitable for pastries, cakes and non-dry sweets in baking tins or moulds. Excellent results are also obtained in cooking requiring above all heat from the bottom. You are advised to put the pan on a low level.

Grill
The top central heating elements comes on. The extremely high and direct temperature of the grill makes it possible to brown the surface of meats and roasts while locking the juices in to keep them tender. The grill is also highly recommended for dishes that require a high temperature on the surface: beef steaks, veal, rib steak, filets, hamburgers etc.. Some grilling examples are included in the “Practical Cooking Advice” paragraph.

Fan Assisted Grill
The top central heating elements and the fan come on. This combination of features increases the effectiveness of the unidirectional thermal radiation of the heating elements through forced circulation of the air throughout the oven. This helps prevent food from burning on the surface, allowing the heat to penetrate right into the food. Excellent results are achieved with kebabs made with meats and vegetables, sausages, ribs lamb chops, chicken in a spicy sause, quail, pork chops, etc. This mode is also ideal for cooking fish steaks, like swordfish, stuffed cuttlefish etc.

Fan Forced
The rear heating element and the fan come on, guaranteeing delicate heat distributed uniformly throughout the oven. This mode is ideal for baking and cooking delicate foods-especially cakes that need to rise-and for the preparation of certain tartlets on 3 shelves at the same time. Here are a few examples: cream puffs, sweet and savory biscuits, savory puffs, Swiss rolls and small portions of vegetables au gratin, etc..

"Defrosting" Mode
The fan located on the bottom of the oven makes the air circulate at room temperature around the food. This is recommended for the defrosting of all types of food, but in particular for delicate types of food which do not require heat, such as for example: ice cream cakes, cream or custard desserts, fruit cakes. By using the fan, the defrosting time is approximately halved. In the case of meat, fish and bread, it is possible to accelerate the process using the “Fan Forced” mode and setting the temperature to 80^ C- 100^ C.
The rotisserie (selected modes only)
The rotisserie (only available on certain models)
To start the turnspit, proceed as follows:
- Insert the rotisserie rod "A" into the drive unit and groove "B" into bend "C";
- Turn the plastiv handle "D" anti clockwise and slide the rack into the oven runners ensuring that the rod
“E” slots into the hole “F”; - The rotisserie rack must always be fitted in the middle of the oven (second position from bottom);
- Press the Oven function selection ∧ or ∨ to select setting 📌/ 🌿

Cooling ventilation
In order to cool down the exterior of the appliance, this model is equipped with a cooling fan, which comes on automatically when the oven is hot.
When the fan is on, a normal flow of air can be heard exiting between the oven door and the control panel.
Note: When cooking is done, the fan stays on until the oven cools down sufficiently.
Automatic cutoff
As a safety precaution, the oven will automatically shut down the elements after prolonged use. This feature provides protection for cases where the oven has been left running and forgotten about. The oven light and display will stay on but the oven will stop heating.
Set Temperature: 1-105 degrees Run time: 16 hours
Set Temperature: 105-200 degrees Run time: 8 hours
Set Temperature: 200-250degrees Run time: 4hours
Practical Cooking Advice
Practical Cooking Advice
The oven offers a wide range of alternatives which allow you to cook any type of food in the best possible way. With time you will learn to make the best use of this versatile cooking appliance and the following directions are only a guideline which may be varied according to your own personal experience.
Preheating
If the oven must be preheated (this is generally the case when cooking leavened foods), the “Multi-Cooking” mode and the “Fast Forced” mode can be used to reach the desired temperature as quickly as possible in order to save on energy. Once the food has been placed in the oven, the most appropriate cooking mode can then be selected.
Cooking on More Than One Rack
If you have to cook food using several racks, use either the “Fan forced” mode or the “Multi-Cooking” mode, as these are the only modes that allow you to do so. When cooking delicate food on more than one rack, use the “Fan forced” mode, which allows you to cook on 3 racks at the same time (the 1st 3rd and 5th from the bottom). Some examples are included in the “Practical Cooking Advice” table. When cooking other food on several racks, use the “Multi-Cooking” mode keeping the following suggestions in mind:
- The oven is fitted with 5 racks. During fan assisted cooking, use two of the three central racks; the lowest and highest racks receive the hot air directly and therefore delicate foodstuffs could be burnt on these racks.
- As a general rule, use the 2nd and 4th rack from the bottom, placing the foodstuffs that require greater heat on the 2nd rack from the bottom. For example, when cooking meat roasts together with other food, place the roast on the 2nd rack from the bottom and the more delicate food on the 4th rack from the bottom.
- When cooking foodstuffs that require differing times and temperatures, set a temperature that is somewhere between the two temperatures required, place the more delicate food on the 4th rack from the bottom and take the food requiring less time out of the oven first.
- Use the dripping pan on the lower rack and the grid on the upper;
Using the "Fan Assist" Mode
Functional, fast and practical for those of you who use pre-packed products (such as for example: frozen or pre-cooked food) along with other food items. You will find useful suggestions in the “Practical Cooking Advice” table.
Using the Grill
This multi-function oven offers you 2 different grilling modes. Use the “grill” mode ☐, placing the food under the center of the grill (situated on the 3rd or 4th rack form the bottom) because only the central part of the top heating element is turned on. Use the bottom rack (1st from the bottom), placing the dripping pan provided to collect any sauce and /or grease and prevent the same from dripping onto the oven bottom. When using this mode, we recommend you set the thermostat to the highest setting. However, this does not mean you cannot use lower temperatures, simply by adjusting the thermostat knob to the desired temperature.
Setting “fan assisted grill”, is extremely useful for grilling foods rapidly, as the distribution of heat makes it possible not only to brown the surface, but also to cook the bottom part. Moreover, it can also be used for browning foods at the end of the cooking process, such as adding that gratin finish to pasta bakes, for example. When using this mode, place the grid on the 2nd or 3rd oven rack from the bottom (see cooking table) then, to prevent fat and grease from dripping onto the bottom of the oven and thus smoke from forming, place a dripping-pan on the 1st rack from the bottom. When using this mode, we advise you to set the thermostat to 200 °C, as it is the most efficient way to use the grill, which is based on the use of infrared rays. However, this does not mean you cannot use lower temperatures, simply by adjusting the thermostat knob to the desired temperature.
Therefore the best results when using the grill modes are obtained by placing the grid on the lower racks (see cooking table) then, to prevent fat and grease from dripping onto the bottom of the oven and smoke from forming, place a dripping-pan on the 1st oven rack from the bottom.
Baking Cakes
When baking cakes ,always place them in a preheated oven .Make sure you wait until the oven has been preheated thoroughly .Do not open the oven door during baking to prevent the cake from dropping. In general:
- Pastry is too dry: Increase the temperature by 10^ and reduce the cooking time.
- Pastry dropped: Use less liquid or lower the temperature by 10^ .
- Pastry is too dark on top: Place it on a lower rack, lower the temperature, and increase the cooking time.
- Cooked well on the inside but sticky on the outside: Use less liquid, lower the temperature, and increase the cooking time.
- The Pastry sticks to the pan: Grease the pan well and sprinkle it with a dusting of flour or use greaseproof paper.
- I used more than one level (in the function “ventilated oven”) and they are not all at the same cooking point
Use a lower temperature setting. It is not necessary to remove the food from all the racks at the same time.
Cooking Pizza
For best results when cooking pizza, use the "Pizza Mode":
- Preheat the oven for at least 10 minutes;
- Use a light aluminum pizza pan, placing it on the grid supplied with the oven. If the dripping pan is used,
- this will extend the cooking time, making it difficult to get a crispy crust;
- Do not open the oven door frequently while the pizza is cooking ;
- If the pizza has a lot of toppings (three of four), we recommend you add the mozzarella cheese on top halfway through the cooking process.
- When cooking pizza on two racks, use the 2nd and 4th with a temperature of 220^ and place the pizzas in the oven after having preheated it for at least 10 minutes.
Cooking Fish and Meat
When cooking white meat, fowl and fish, use temperature setting from 180^ C to 200^ C.
For red meat that should be well done on the outside while tender and juicy in the inside, it is a good idea to start with a high temperature setting (200°C-220°C) for a short time, then turn the oven down afterwards.
In general, the larger the roast, the lower the temperature setting. Place the meat on the center of the grid and place the dripping pan beneath it to catch the fat.
Make sure that the grid is inserted so that it is in the center of the oven. If you would like to increase the amount of heat from below, use the low rack heights .For savory roasts (especially duck and wild game), dress the meat with lard or bacon on the top.
Cooking Guide
| Selector k nob setting | Food to be cooked | Weight (in kg) | Cooking rack position from time bottom | Preheating time (Minutes) | Thermostat knob setting | Cooking time (Minutes) |
| 1 Conventional | Duck | 3 | 15 | 200 | 65-75 | |
| Roast veal or beef | 1 | 3 | 15 | 200 | 70-75 | |
| Pork roast | 1 | 3 | 15 | 200 | 70-80 | |
| Biscuits (short pastry) | - | 3 | 15 | 180 | 15-20 | |
| Tarts | 1 | 3 | 15 | 180 | 30-35 | |
| 2 Multi-Cooking | Pizza (on 2 racks) | 2-4 | 15 | 220 | 15-20 | |
| Lasagna | 1 | 3 | 10 | 200 | 30-35 | |
| Lamb | 1 | 2 | 10 | 180 | 50-60 | |
| Roast chicken +potatoes | 1 | 2-4 | 10 | 180 | 60-75 | |
| Mackerel | 1 | 2 | 10 | 180 | 30-35 | |
| Plum-cake | 1 | 2 | 10 | 170 | 40-50 | |
| Cream puffs (on 2 racks) | 0.5 | 2-4 | 10 | 190 | 20-25 | |
| Biscuits (on 2 racks) | 0.5 | 2-4 | 10 | 180 | 10-15 | |
| Sponge cake (on 1 rack) | 0.5 | 2 | 10 | 170 | 15-20 | |
| Sponge cake (on 2 racks) | 1.0 | 2-4 | 10 | 170 | 20-25 | |
| Savory pies | 1.5 | 3 | 15 | 200 | 25-30 | |
| 3 Defrosting All frozen food | ||||||
| 4 Grill 1 | Soles and cuttlefish | 4 | 5 | Max | 8-10 | |
| Squid and prawn kebabs | 1 | 4 | 5 | Max | 6-8 | |
| Cod filet | 1 | 4 | 5 | Max | 10 | |
| Grilled vegetables | 1 | 3/4 | 5 | Max | 10-15 | |
| Veal steak | 1 | 4 | 5 | Max | 15-20 | |
| Cutlets | 1 | 4 | 5 | Max | 15-20 | |
| Hamburgers | 1 | 4 | 5 | Max | 7-10 | |
| Mackerels | 1 | 4 | 5 | Max | 15-20 | |
| Toasted sandwiches | - | 4 | 5 | Max | 2-3 | |
| With rotisserie otisserie (where (Where prevent) | 1.0 | - | 5 | Max | 80-90 | |
| Veal on the spit | 1.5 | - | 5 | Max | 70-80 | |
| Chicken on the spit | 1.0 | - | 5 | Max | 70-80 | |
| Lamb on the spit | ||||||
| 5 Fan Assisted Grill | Grilled chicken | 1.5 | 3 | 5 | 200 | 55-60 |
| Cuttlefish | 1.5 | 3 | 5 | 200 | 30-35 | |
| With rotisserie (where prevent) | 1.5 | - | 5 | 200 | 70-80 | |
| Veal on the spit | 2.0 | - | 5 | 200 | 70-80 | |
| Chicken on the spit | 1.5 | - | 5 | 200 | 70-75 | |
| Chicken (on the spit)+potatoes (roasted) | - | 2 | 5 | 200 | 70-75 | |
| Lamb on the spit | 1.5 | - | 5 | 200 | 70-80 | |
| 6 BakiFigrced | Tarts | 0.5 | 3 | 15 | 180 | 20-30 |
| Fruit cakes | 1 | 2/3 | 15 | 180 | 40-45 | |
| Fruitcake | 0.7 | 3 | 15 | 180 | 40-50 | |
| Sponge cake | 0.5 | 3 | 15 | 160 | 25-30 | |
| Stuffed pancakes) on 2 racks) | 1.2 | 2-4 | 15 | 200 | 30-35 | |
| Small cakes (On 2 rakes) | 0.6 | 2-4 | 15 | 190 | 20-25 | |
| Cheese puffs (On2 cakes) | 0.4 | 2-4 | 15 | 210 | 15-20 | |
| Cream puffs (on 3 cakes) | 0.7 | 1-3-5 | 15 | 180 | 20-25 | |
| Biscuits (On 3 racks) | 0.7 | 1-3-5 | 15 | 180 | 20-25 | |
| Meringues (On 3 racks)Frozen food | 0.5 | 1-3-5 | 15 | 90 | 180 | |
| 7 Fan Assist | ||||||
| Pizza | 0.3 | 2 | - | 250 | 12 | |
| Courgette and prawn pie | 0.4 | 2 | - | 200 | 20 | |
| Country style spinach pie | 0.5 | 2 | - | 220 | 30-35 | |
| Turnovers | 0.3 | 2 | - | 200 | 25 | |
| Lasagne | 0.5 | 2 | - | 200 | 35 | |
| Golden Rolls | 0.4 | 2 | - | 180 | 25-30 | |
| Chicken morseis | 0.4 | 2 | - | 220 | 15-20 | |
| Pre-cooked food | ||||||
| Golden chicken wings | 2 0.4 - 200 | 20-25 | ||||
| Fresh Food | ||||||
| Biscuits(short pastry) | 0.3 | 2 | - | 200 | 15-18 | |
| Fruitcake | 0.6 | 2 | - | 180 | 45 | |
| Cheese puffs | 0.2 | 2 | - | 210 | 10-12 | |
| 8 Pizza 0.5 | Pizza | 3 | 15 | 220 | 15-20 | |
| Roast veal or beef | 1 | 2 | 10 | 220 | 25-30 | |
| Chicken 180 | 1 | 2/3 | 10 | 60-70 | ||
NB: cooking times are approximate and may vary according to personal taste. When cooking using the grill or fan assisted grill, the drip tray must always be placed on the 1st oven rack from the bottom.
Cleaning and maintenance
Before cleaning your oven, or performing maintenance, disconnect it from the power supply.
To extend the life of your oven, it must be cleaned frequently, keeping in mind that:
- The enameled or stainless steel parts should be washed with luke warm water without using any abrasive powders or corrosive substances which could ruin them; Stainless steel could get stained. If these stains are difficult to remove, use special products available on the market. After cleaning, it is advisable to rinse thoroughly and dry.
- The inside of the oven should preferably be cleaned immediately after use, when it is still warm, with hotwater and soap; The soap should be rinsed away and the interior dried thoroughly. Avoid using abrasive detergents (for example cleaning powders, etc) and abrasive sponges for dishes or acids (such as limescale remover, etc...) as these could damage the enamel. If the grease spots and dirt are particularly tough to remove, use a special product for oven cleaning, following the instructions provided on the packet. Never use a steam cleaner for cleaning inside of oven.
• If you use your oven for an extended period of time ,condensation may form. Dry it using a soft cloth. - There is a rubber seal surrounding the oven opening which guarantees its perfect functioning. Check the condition of this seal on a regular basis. If necessary, clean it and avoid using abrasive products or objects to do so. Should it become damaged, please contact you're nearest After-sales Service Center. We recommend you avoid using the oven until it has been repaired.
- Never line the oven bottom with aluminum foil, as the consequent accumulation of heat could compromise the cooking and even damage the enamel.
- clean the glass door using non-abrasive products or sponges and dry it with a soft cloth.
Use only non caustic oven cleaners purchased from hardware stores or supermarkets.
How to Remove The Oven door
For a more thorough clean, you can remove the oven door. Proceed as follows:
- Open the door fully; Lift up and turn the small levers situated on the two hinges;
- Grip the door on the two external sides, shut it slowly but not completely;
- Pull the door towards you, pulling it out of its seat; Reassemble the door by following the above procedures backwards.

Replacing the Oven Lamp
WARNING: Ensure that the appliance is switched off before replacing the lamp to avoid the possibility of electric shock
- Disconnect the oven from the power supply by means of the omnipolar switch used to connect the appliance to the electrical mains; or unplug the appliance if the plug is accessible;
- Remove the glass cover of the lamp - holder;
- Remove the lamp and replace with a lamp resistant to high temperatures (300°C) with the following characteristics:
Voltage: 220-240V
Wattage: 2X25W
Type: E 14

Replace the glass cover and reconnect the oven to the mains power supply.
Installation
Only a qualified persons in compliance with the instructions provided must install the appliance.
Appliances are fully assembled as in normal operation without any parts removed. The manufacturer declines all responsibility for improper installation, which may harm persons and animals and damage property.
Important: - The power supply to the appliance must be switched off before any adjustments or maintenance work is done on it;
Installation of Built-in Ovens
In order to ensure that the built-in appliance functions properly, the cabinet containing it must be appropriate. The figure below gives the dimensions of the cut-out for installation under the counter. In order to ensure adequate ventilation, the back panel of the cabinet unit must be removed. The oven must have a 20mm clearance between the oven and the rear timber panel. The oven requires a 50mm clearance from the bench top or cook top.
The oven must be completely sealed from adjacent cabinets to prevent condensation. The panels of the adjacent cabinets must be made of heat-resistant material. In particular, cabinets with a veneer exterior must be assembled with glues which can withstand temperatures of up to 100^ C. In compliance with current safety standards, contact with the electrical parts of the oven must not be possible once it has been installed. The oven must be secured by 4 screws to the cabinet.
Oven and Cabinet Dimensions
Electrical Connection
Those ovens equipped with a three-pole power supply cable are designed to operate with an alternating current. The wire for earthling the appliance is yellow-green in color. The oven must must connected on it's own dedicated circuit.

Fitting on a Power Supply Cable
Opening the terminal board:
- Using a screwdriver, prize the bolt on the side tabs of the terminal board cover;
- Unscrew the bolt, pull open the cover of the terminal board.
- To install the cable, proceed as follows:
- Remove the wire clamp screw and the three contact screws L-N –
- Fasten the wires beneath the screw heads using the following color scheme: Blue (N)
Brown (L) Yellow-Green
- Fasten the supply cable in place with the clamp and close the cover of the terminal board.
Connecting the supply cable to the mains
The appliance is usually supplied fitted with a power cord and 3 pinplug. Install the cooker so that the plug is easily accessible. Plug the 3-pin plug into a properly earthed, 15A general purpose power outlet on a separate dedicated circuit. The supply cable should be positioned so that it does not reach a temperature of more than 75^ along its entire length.
If the appliance is not supplied with a plug or if connecting the cable directly to the mains, connection to the electricity supply must be made by an authorised person in accordance with the Wiring Rules AS/NZS3000. The installation must include a suitable isolating switch with a minimum contact opening of 3mm between the appliance and the mains. The isolating switch should be sized according to the load on the data label and should comply with current regulations (the earth wire should not be interrupted by the circuit breaker).
Before making the connection check that:
- The switch, wiring and electrical system can support the appliance load (see data plate);
- The power supply system has an efficient earthing connection which complies with the provisions of current regulations.
- The power outlet or omnipoar circuit-breaker must be easily accessible once the cooker has been installed.
Replacing the power supply lead
If the supply cord or plug is damaged, it must be replaced by the manufacturer or its service agent or a similarly qualified person in order to avoid hazard.
Technical Data
| Model | TGO910TBK |
| Voltage & Frequency of Power Supply 220 | -240V ~ 50-60Hz |
| Volume (usable capacity) | 105 L |
| Output Power 3,166-3,660 W | |
| Net Weight Shipping | 50kg approx55 kg approx |
| Dimensions (W x H x D) | |
| Outside | 899 x 480 x 550mm |
| Inner | 657 x 435 x 351mm |
| Cutout | 900 x 482 x 570mm |

Meaning of crossed -out wheeled dustbin:
Do not dispose of electrical appliances as unsorted municipal waste, use separate collection facilities. Contact your local government for information regarding the collection systems available. If electrical appliances are disposed of in landfills or dumps, hazardous substances can leak into the groundwater and get into the food chain, damaging your health and well-being. When replacing old appliances with new ones, the retailer is legally obliged to take back your old appliance for disposals at least free of charge.
This warranty is provided in Australia by Glen Dimplex Australia Pty Limited ABN 69 118 275 460 (Phone number 1300 556 816) and in New Zealand by Glen Dimplex New Zealand Limited NZBN 9429000069823 (Phone number 09 274 8265) in respect of the Technika Professional product.
1. Technika Professional Express Warranty
Subject to the exclusions below, we warrant that the product will not have any electrical or mechanical breakdowns within:
a) In the case of Technika Professional products used for personal, domestic or household purposes, a period of 2 years from the date the product is purchased as a brand-new product from a retailer located in Australia / New Zealand.
b) In the case of Technika Professional products used for purposes other than personal, domestic or household purposes (including business or commercial use), a period of 90 days from the date the product is purchased as a brand-new product from a retailer located in Australia / New Zealand. Technika Professional products are designed and intended for domestic use only; and
c) All warranty repairs must be carried out by Glen Dimplex or their nominated service agent
Note: warranty periods detailed above may vary in line with agreements with select retail and builder partners and may differ between Australia and New Zealand.
The benefits conferred by this express warranty are in addition to the Consumer Guarantees referred to in section 3 and any other statutory rights you may have under the Australian / New Zealand Consumer Law and/or other applicable laws.
2. Warranty exclusions
This express warranty does not apply where:
a) The product has been installed, used or operated otherwise than in accordance with the product manual or other similar documentation provided to you with the product;
b) The product requires repairs due to damage resulting from accident, misuse, incorrect installation, insect or vermin infestation, improper liquid spillage, cleaning or maintenance, unauthorised modification, use on an incorrect voltage, power surges and dips, voltage supply problems, tampering or unauthorised repairs by any persons, use of defective or incompatible accessories or exposure to abnormally corrosive conditions, events independent of human control which occurred after the goods left the control of Glen Dimplex;
c) The repair relates to the replacement of consumable parts such as fuses and bulbs or any other parts of the product which require routine replacement;
d) You are unable to provide us with reasonable proof of purchase for the product;
e) the breakdown occurs after the expiry of the express warranty period set out in section 1 or
f) the product was not purchased in Australia / New Zealand as a brand-new product.
3. Consumer guarantees
Our goods come with guarantees that cannot be excluded under the Australian / New Zealand Consumer Law. You are entitled to a replacement or refund for a major failure and for compensation for any other reasonably foreseeable loss or damage. You are also entitled to have the goods repaired or replaced if the goods fail to be of acceptable quality and the failure does not amount to a major failure.
4. How to make a claim
You may make a claim under this warranty through our website, contacting our customer care line or via email. Contact details for Glen Dimplex Australia and New Zealand can be found at the end of this document
To make a valid claim under this warranty, you must:
a) Lodge the claim with us as soon as possible and no later than 14 days after you first become aware of the breakdown;
b) Provide us with the product serial number;
c) Provide us with reasonable proof of purchase for the product. This can take the form of a store receipt, new home handover form or other payment receipt documentation; and
d) If required by us, provide us (or any person nominated by us) with access to the premises at which the product is located at times nominated by us (so that we can inspect the product).
5. Warranty claims
If you make a valid claim under this warranty and none of the exclusions set out in section 2 apply, we will, at our election, either repair the product or replace the product with a product of identical specification (or where the product is superseded or no longer in stock, with a product of as close a specification as possible).
Goods presented for repair may be replaced by refurbished goods of the same type rather than being repaired. Refurbished parts may be used to repair the goods.
Products are designed and supplied for normal domestic use. We will not be liable to you under this warranty for business loss or damage of any kind whatsoever.
Glen Dimplex Australia Pty Ltd Glen Dimplex New Zealand Ltd
www.glendimplex.com.au
www.glendimplex.co.nz
Australia
New Zealand
Ph: 1300 556 816 Ph: 09 274 8265
customer.care.ha@glendimplex.com.au nztechserv@glendimplex.co.nz
NOTES
NOTES
READ THE INSTRUCTION BOOKLET BEFORE INSTALLING AND USING THE APPLIANCE.
The manufacturer will not be responsible for any damage to property or to persons caused by incorrect installation or improper use of the appliance.
The manufacturer is not responsible for any inaccuracies, due to printing or transcription errors, contained in this manual. In addition, the appearance of the figures reported is also purely indicative.
The manufacturer reserves the right to make changes to its products when considered necessary and useful, without affecting the essential safety and operating characteristics.
Glen Dimplex constantly seeks ways to improve the specifications and designs of their products.
Whilst every effort is made to produce up to date literature, this document should not be regarded as an infallible guide. Actual product only should be used to derive cut out sizes.
All appliances must be installed by a qualified person/s with adherence to the relevant electrical, plumbing and building codes, with compliance being issued as required by state or national legislation.
Additionally, all upright cookers must have the anti-tilt device installed correctly in adherence to the relevant standards by a licenced installer. For maximum effectiveness and efficiency all rangehoods should be installed with the use of ductwork, by a licenced installer with adherence to the relevant state and national building codes and regulations.
All Glen Dimplex appliances are for Domestic use only, and must be installed by a licence installer into Domestic Applications only, without exception and to the required Authorities guidelines. Any installation outside of this will VOID warranty. Alfresco areas are not a Domestic application.
TECHNIKA®
COOKING WITH PASSION
PROFESSIONAL SERIES
Distributed by:
Glen Dimplex Australia Pty Ltd Glen Dimplex New Zealand Ltd
For full terms and conditions, or to register your product warranty, please visit our website:
www.glendimplex.com.au
www.glendimplex.co.nz
For service advice, please contact the Customer Care Centre by phone or email below.
Australia
Ph: 1300 556 816
Ph: 09 274 8265
customer.care.ha@glendimplex.com.au
nztechserv@glendimplex.co.nz

- CONTENTS TABLE
- Using this manual
- Safety Instructions
- Electrical safety
- WARNINGS
- Safety during operation
- Safety during operation (Continued)
- Child safety
- CAUTION:
- Cleaning safety
- WARNING
- Oven exterior
- Stainless steel oven fronts
- Aluminium oven fronts
- Oven interior
- Oven door glass
- Attention
- Accessories
- Disposal
- Disposal Instructions
- Disposing of old appliances
- To do this, disconnect the appliance from the mains supply and remove the mains lead.
- Oven and accessories
- How to use your oven
- Positioning the oven trays & shelves
- Controls
- Before using for the first time
- Setting and changing the current time
- Operating the Oven
- The Electronic Oven Control
- General Instructions
- Selecting the oven function
- Changing the oven temperature
- Thermometer symbol
- Changing the oven function
- Switching off the oven
- Speed cook
- Clock functions
- Countdown
- Cook time
- End time
- Timer
- Cook time Ⓛ
- Cook time ⏚ and End time ⏚ combined
- Child safety device
- Activating the child safety device
- Deactivating the child safety device
- Switching off the button beep
- Switching on the button beep
- Oven functions
- Conventional mode
- Fan Assist Mode
- Multi-Cooking Mode
- Pizza Mode
- Delicate cooking
- Grill
- Fan Assisted Grill
- Fan Forced
- "Defrosting" Mode
- The rotisserie (selected modes only)
- The rotisserie (only available on certain models)
- Cooling ventilation
- Automatic cutoff
- Practical Cooking Advice
- Preheating
- Cooking on More Than One Rack
- Using the "Fan Assist" Mode
- Using the Grill
- Baking Cakes
- Cooking Pizza
- Cooking Fish and Meat
- Cooking Guide
- Cleaning and maintenance
- To extend the life of your oven, it must be cleaned frequently, keeping in mind that:
- How to Remove The Oven door
- Replacing the Oven Lamp
- Installation
- Only a qualified persons in compliance with the instructions provided must install the appliance.
- Installation of Built-in Ovens
- Oven and Cabinet Dimensions
- Electrical Connection
- Fitting on a Power Supply Cable
- Brown (L) Yellow-Green
- Connecting the supply cable to the mains
- Replacing the power supply lead
- Meaning of crossed -out wheeled dustbin:
- Technika Professional Express Warranty
- Warranty exclusions
- Consumer guarantees
- How to make a claim
- Warranty claims
- Australia
- READ THE INSTRUCTION BOOKLET BEFORE INSTALLING AND USING THE APPLIANCE.
- Glen Dimplex Australia Pty Ltd Glen Dimplex New Zealand Ltd
Brand : Technika
Model : TGO910TBK
Category : Oven