
TO610TBX - Oven Technika - Free user manual and instructions
Find the device manual for free TO610TBX Technika in PDF.


| Product Type | Built-in Electric Oven |
| Brand | Technika |
| Model | TO610TBX |
| Dimensions (H x W x D) | 595 x 595 x 575 mm |
| Oven Capacity | 65 Liters |
| Weight | 32 kg |
| Power Supply | 220-240 V ~ 50/60 Hz |
| Power Consumption | 2.5 kW (max) |
| Energy Efficiency Class | A |
| Oven Functions | Conventional, Fan Forced, Grill, Fan Grill, Defrost, Light |
| Temperature Range | 50°C - 250°C |
| Timer | Digital with Minute Minder and Auto Switch-off |
| Interior Light | Yes |
| Cleaning Type | Standard enamel, hand wash |
| Safety Features | Child Lock, Cool Touch Door, Auto Shut-off |
| Oven Door | Double-glazed, removable inner glass |
| Installation Type | Built-in |
| Accessories Included | 2 shelves, 1 drip tray, 1 grill pan |
| Spare Parts Availability | Yes (heating elements, thermostats, door gaskets) |
| Warranty | 2 years (parts and labor) |
Frequently Asked Questions - TO610TBX Technika
User questions about TO610TBX Technika
0 question about this device. Answer the ones you know or ask your own.
Ask a new question about this device
Download the instructions for your Oven in PDF format for free! Find your manual TO610TBX - Technika and take your electronic device back in hand. On this page are published all the documents necessary for the use of your device. TO610TBX by Technika.
USER MANUAL TO610TBX Technika
COOKING WITH PASSION
USER GUIDE
MULTIFUNCTION 60CM OVEN
TO610TBX
natural_image
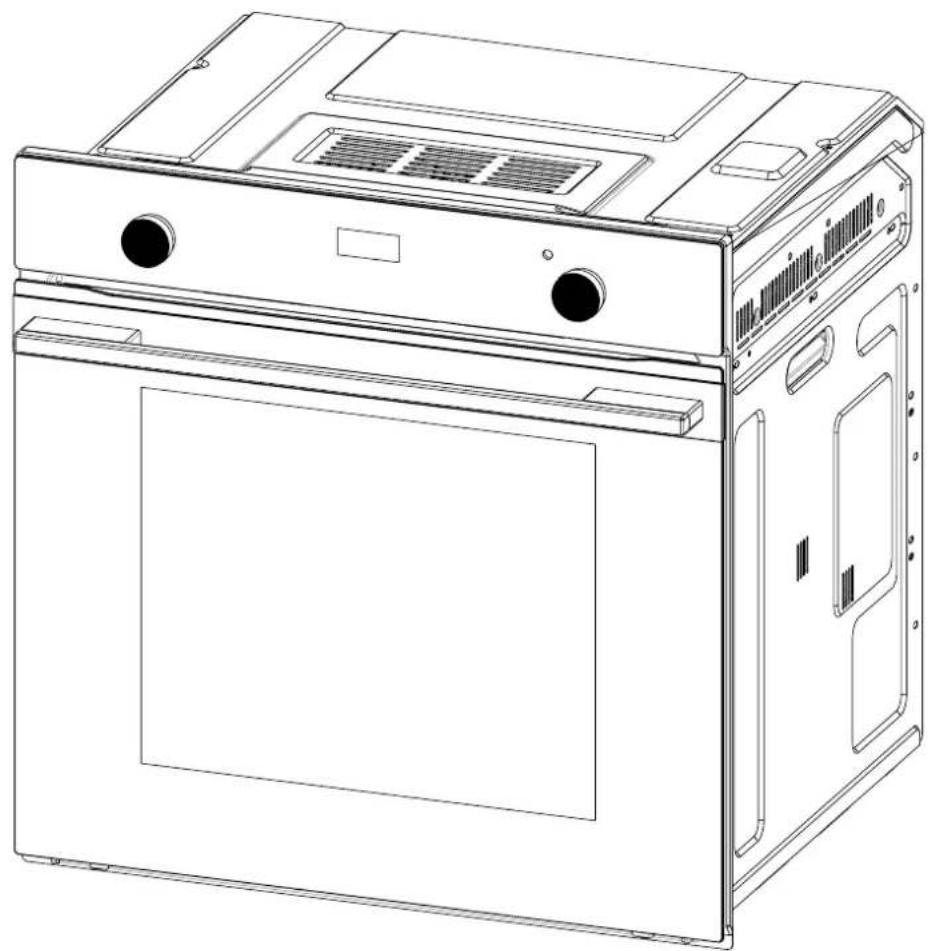
Line drawing of a standard oven with ventilation grilles and door (no text or symbols)For Your Safety 4
Use and Care
Controls 7
Oven & accessories 7
Positioning the oven trays & shelves 8
How to use your oven 9
Cooking modes 10
Electronic clock/ timer 12
The oven light 15
Cooling ventilation 15
Practical cooking advice 15
Cooking guide 19
Cleaning and maintenance 20
How to remove the oven door 21
Replacing the oven lamp 23
Disposal 23
Installation
Cabinet details 24
Electrical connection 25
Technical data 26
Warranty 27
We recommend that you read the instructions in this owner's manual carefully before use for the best performance and to extend the life of your appliance. It will provide you with all the information you need to ensure its safe installation, use and maintenance. Retain this owner's manual for future reference.
When handling the appliance, we recommend you always use the handles recessed into the sides of the oven to prevent personal injury or damage to the appliance.
To maintain the efficiency and safety of this appliance, we recommend that you do the following:
• Always call the Glen Dimplex service department if there are any faults with your appliance.
• Always use original spare parts available from Glen Dimplex.
- This appliance is designed for non-commercial, household use and it must not be altered in any way.
- WARNING: This appliance is a domestic kitchen appliance suitable for indoor installation. It is not suitable for outdoor installations such as alfresco kitchens or garages unless a qualified, competent installer has deemed the location and installation to be suitable & compliant.
- This appliance can only be used safely when it is correctly connected to an efficient earthing system in compliance with current electrical safety standards.
- If the supply cord is damaged, it must be replaced by the manufacturer or its service agent or a similarly qualified person in order to avoid a hazard.
- During use, the appliance becomes hot. Care should be taken to avoid touching heating elements inside the oven.
- WARNING: Accessible parts will become hot when in use.
• To avoid burns and scalds, children should be kept away.
- This appliance is not intended for use by persons (including children) with reduced physical, sensory or mental capabilities, or lack of experience and knowledge, unless they have been given supervision or instruction concerning use of the appliance by a person responsible for their safety.
- Young children should be supervised to ensure that they do not play with the appliance.
- DO NOT use a steam cleaner to clean the appliance.
Packaging items such as plastic bags, polystyrene, nails, etc. are potentially dangerous, and therefore appropriate measures must be taken to prevent children and the disabled from coming into contact with them.
Avoid the following:
- Touching the appliance with wet parts of the body.
• Using the appliance while barefoot. - Improper or dangerous operation.
- Obstructing the ventilation or heat dissipation slots.
- Allowing power supply cables of other appliances to come into contact with hot parts of the oven.
- Exposing the appliance to atmospheric agents such as rain, or direct sunlight.
• Using the oven for storage purposes.
• Using flammable liquids near the appliance.
Authorised personnel must be contracted to...
• Install the appliance according to these installation instructions and any local requirements.
- Replace the temperature probe if it is damaged. The probe is part of thermostat. Only use the temperature sensing probe recommended for this oven.
Glen Dimplex Service Department must be contacted...
- If in doubt about the operation of the appliance.
- If in doubt about the soundness of the appliance after removing it from its packaging.
- If the power supply cable has been damaged or needs to be replaced.
- If the appliance requires a service.
• If you need spare parts.
WARNINGS:
• DO NOT steam clean the oven.
- DO NOT use harsh abrasive cleaners or sharp metal scrapers to clean the oven door glass since they can scratch the surface, which may result in shattering of the glass.
- DO NOT install the appliance behind a decorative door in order to avoid overheating.
- Only use the appliance to cook food and nothing else.
- Check that the appliance has not been damaged immediately after it has been unpacked.
- Disconnect the appliance from the electrical mains if it is not functioning properly and before cleaning or performing maintenance.
- When left unused for a long period, unplug the appliance from the electricity mains.
- Use oven gloves to place cookware in the oven or when removing it.
• Always grip the oven door handle in the centre.
- Make sure the knobs are in the Off position when the appliance is not in use.
- Glen Dimplex will not accept any liability as a result of any damage due to incorrect installation or improper use.
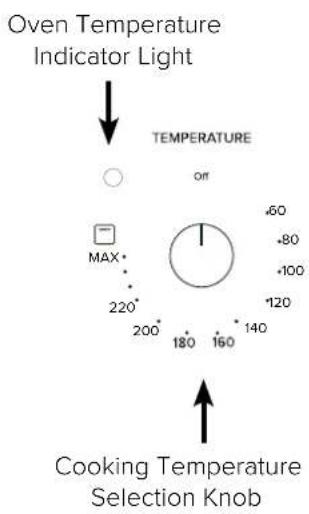
Controls
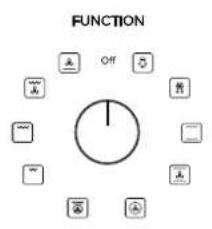
10 function model


Oven & Accessories
The oven is supplied with chrome wire shelf supports, a baking / grill tray and a removable grill insert. There are five shelf positions in the oven.

Attention: The oven comes with a soft close door feature which will only operate correctly when sufficient initial force is applied when closing. Should insufficient force be applied, the door may need to be closed manually.
Positioning the oven trays & shelves
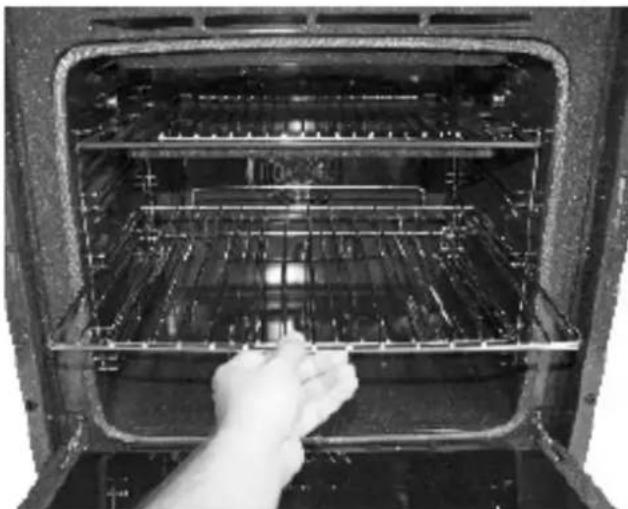
The Grill Tray or Oven Shelf can be located in any of the five height positions in the oven. Refer to the ‘Cooking Guide Table’ for the recommended shelf position. When fitting the trays or shelves, ensure they are fitted between the two wires that are closest together as shown below.
Oven Shelves have a stop so that they are not fully withdrawn by accident. To fully remove the Oven Shelves, lift the front of the shelf slightly and withdraw fully from the oven. Note that the Grill Tray does not have a stop position and can be fully withdrawn without interruption, so be careful not to accidentally fully withdraw the tray.
Fit Trays and Shelves between bars as shown right.

natural_image
Hand holding a tool interacting with a dark panel, showing directional arrows (no text or symbols)To remove the Oven Shelf Support, push down on the wire below the top locking pin, pull away from the oven wall until you can release the top of the support from the holes in the oven wall. Replace in reverse procedure.
Chrome Wire Shelf Support
natural_image
Interior view of an oven with a hand placing a component into the tray (no visible text or symbols)Shown With Oven Shelf
How to use your oven
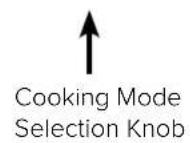
This Multi-function oven is an extremely versatile appliance that allows you to choose easily and safely between different cooking modes. The various cooking modes are selected by means of a cooking mode selection knob, located on the control panel.
To operate the oven:
- Ensure that manual mode or timer is selected (page 12)
- Turn the cooking mode selection knob to the desired cooking mode (explanation of cooking modes is on pages 10 to 11)
- Turn the cooking temperature selection knob to the desired temperature (cooking guide is on page 19) or to 'MAX' if Grilling.
- The first time you use your appliance, we recommend that you set the thermostat to the highest setting, set the cooking mode selection knob to a cooking mode and leave the oven on for about half an hour with nothing in it and the oven door closed. Then, open the oven door and allow the oven to cool. Any odour that may be detected during this initial use is due to the evaporation of substances used to protect the oven during storage.
Note: Place tray on the bottom shelf position of the oven to prevent any spillages from dripping onto the bottom of the oven. Never place anything (including foil and oven trays) on the bottom of the oven when it is in operation because this could damage the enamel. Only place your cookware (dishes, trays, aluminum foil, etc.) on the oven shelves provided with the appliance.

natural_image
Interior view of an oven with a hand holding a tool, showing the tray and interior structure (no text or symbols visible)If supplied, use the chrome wire handle shown left when removing the trays from the oven.
Cooking modes

Defrost mode
When set to ‘Defrost’ mode, the fan located at the back of the oven circulates room temperature air around the food. This is recommended for the defrosting of all types of food, but in particular for delicate types of food which do not require heat, for example: ice cream cakes, cream or custard desserts, fruit cakes, etc. By using ‘Defrost’ mode, the defrosting time is approximately halved.

Conventional Mode
The top and bottom heating elements come on. This is the classic, traditional type of oven which has been perfected, with exceptional heat distribution and reduced energy consumption. The conventional oven is still unequalled when it comes to cooking dishes made up of several ingredients, e. g. cabbage with ribs, Spanish style cod, Ancona style stockfish, tender veal strips with rice, etc. Excellent results are achieved when preparing veal or beef-based dishes as well (braised meats, stew, goulash, wild game, ham etc.) which need to cook slowly and require basting or the addition of liquid. It nonetheless remains the best system for baking cakes as well as fruit and cooking using covered casserole dishes for oven baking. When cooking in conventional mode, only use one dripping pan or cooking rack at a time, otherwise the heat distribution will be uneven. Using the different rack heights available, you can balance the amount of heat between the top and the bottom of the oven. Select from among the various rack heights based on whether the dish needs more or less heat from the top.

Fan Assist Mode
The top and bottom heating elements, as well as the fan, will come on, guaranteeing constant heat distributed uniformly throughout the oven. This mode is especially recommended for cooking prepacked food quickly (as pre-heating is not necessary), such as for example: frozen or pre-cooked food) as well as for a few “home-made” dishes. The best results when cooking using the “Fan Assist” mode are obtained if you use one cooking only (the second from the bottom), please see the table entitled “Practical Cooking Advice”.

Fan forced mode
When set to ‘Fan Forced’ mode, the fan element and the fan operate providing a delicate heat distributed uniformly throughout the oven. This mode is ideal for baking and cooking delicate foods on multiple shelves, especially cakes that need to rise such as cream puffs and for certain tartlets, sweet or savoury biscuits, savoury puffs, swiss rolls and small portions of vegetables, etc.

Intensive Bake mode
When set to Intensive Bake mode, the top element and fan element, as well as the fan will operate together. This enables uniform heat distribution throughout the oven, whilst also directing radiant heat from above for advanced convection cooking, helping you achieve extra crispy results. Ideal for oven frying your favourite frozen food such as chips, wedges, chicken wings and other similar products. This function can also be used as a convenient pre-heating mode, which can reduce the heat-up time by up to 25%.

Half Grill Mode
The top central heating element comes on. “Grill” directs radiant heat from the powerful upper element onto the food. You can use the “Grill” function for tender cuts of meat, steak, chops, sausages, fish, cheese toasties and other quick cooking foods. Grill with the oven door closed. Preheat your grill for 3 minutes to get the best results. This will help seal in the natural juices of steak, chops etc. for a better flavour. You can slide your grill dish into either of the2 spaces within the upper pairs of support rails. Grill food with the oven door closed.

Full Grill Mode
The top inside and outside heating elements come on . “Maxi grill” directs radiant heat from 2 powerful upper elements onto the food. You can use the “Maxi grill” function for tender cuts of meat, steak, chops, sausages, fish, cheese toasties and other quick cooking foods. Grill with the oven door closed. “Maxi grill” allows you to take full advantage of the large grill dish area and will cook faster than normal “Grill”. For best results it is recommended to preheat your grill for 3 minutes. This will help seal in the natural juices of steak, chops etc. for a better flavour. Grill food with the oven door closed.

Fan assisted grill mode
Select ‘Fan Assisted Grill’ mode with cooking mode selection knob and turn cooking temperature selection knob to the desired temperature setting. When set to Fan Assisted Grill mode, the top inner element and the fan operate. This mode increases the circulation of air throughout the oven, which helps prevent food from burning on the surface, allowing the heat to penetrate right into the food. Particularly suitable for kebabs made with meats and vegetables, sausages, ribs, lamb chops, chicken, quail, pork chops, fish steaks, stuffed cuttlefish etc. In Fan Assisted Grill mode, grill with the oven door closed.

Pastry Bake mode
Select ‘Delicate’ mode with the cooking mode selection knob and turn cooking temperature selection knob between 60^ C and 250^ C. When set to Delicate cooking mode, the bottom element and the fan will operate. This mode is suitable for pastries, cakes and nondry sweets in baking tins or moulds that require heat from the bottom. You are advised to put the pan on a low level.
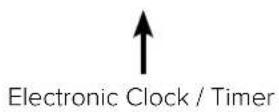
3 Button Digital Clock


This model has a digital display, 24hr clock with 3 control buttons. When the power is connected, the screen displays '12:00' and the bar above the Ⓛ symbol flashes.
Setting the time when power is first connected
To set the correct time, press the + or - button to advance forward or backward until the correct time is displayed. After 5 seconds the time will be locked in.
Adjusting the time
Press the function button repeatedly until the bar above Ⓛ flashes, then press + or - button to set the time. After 5 seconds the time will be locked in.
Manual operation setting
When power is first connected, the oven will be in manual operation as soon as the time is set. Manual operation will only be cancelled if the power to the oven is switched off or if an automatic cooking time is selected and the bar above 🏠 or 🏠 is flashing. See next section on 'Automatic setting'.
Automatic setting
Automatic setting of the oven allows you to select the end time, cooking time, temperature and cooking mode. The oven will switch on, cook according to the selected cooking mode and temperature and then switch off automatically.
- Press the function button repeatedly until the bar above button to set the time frame for cooking.
flashes, then press + or -
- Press the function button repeatedly until the bar above - button to set the time to switch off.
flashes and then press + or
- Set cooking temperature and cooking mode by turning the thermostat knob and selector knob.
After these settings, the bars above 🎨 and 🌘 will flash, indicating that the automatic cooking feature of the oven is set.
For example: if cooking time takes 45 minutes and you want it to finish at 14:00:
-
Press the function button repeatedly until the bar above 🎨 flashes and set the cooking time 45 minutes.
-
Press the function button repeatedly until the bar above #ishes and set the finish time to 14:00.
After the above setting, the current time is displayed and the bars above 🎨 and 🌘 will flash indicating that the automatic cooking feature is set. When the clock displays 13:15, the oven will start cooking automatically. While cooking the bar will flash.
When the clock displays 14:00, the oven automatically stops cooking. The alarm will sound and the bar will flash, press any button to stop the alarm.
Semi-automatic setting
There are two methods of semi-automatic cooking:
A. Start cooking now and set cooking time:
This semi-automatic setting of the oven allows you to start cooking immediately, set the cooking time (up to 10 hours), select the temperature and cooking mode. The oven will cook according to the selected cooking mode and temperature and then switch off automatically once the cooking time has elapsed.
- Press the function button repeatedly until the bar above flashes, then press + or - button to set the time frame for cooking.
- Set cooking temperature and cooking mode by turning the thermostat knob and selector knob.
The oven starts immediately, the bar above 🐘 will flash. After the cooking time has elapsed, the oven automatically stops cooking. The alarm will ring and the bar above 🐘 will flash, press any button to stop the alarm.
B. Start cooking now and set the finish time:
- Press the function button repeatedly until the bar above finishes, then press + or - button to set the time to finish cooking (up to 23 hours and 59 minutes)
- Set cooking temperature and cooking mode by turning the thermostat knob and selector knob.
The oven starts immediataely, the bar above 📋 will flash. When the finish time is reached, the oven automatically stops cooking. The alarm will ring and the above 📋 will flash, press any button to stop the alarm.
When any button is pressed during semi-automatic cooking, the set cooking time is displayed. If the finish time is set to the current time, the semi-automatic setting will be cancelled.
Timer
The digital countdown timer can be set up to 23 hours and 59 minutes maximum.
To set the timer, press the function button repeatedly until the bar above 🔒 flashes. Then press + or - button to set the countdown timer. After 5 seconds, the time will be set and begin to count down. When the set time is reached 🔒 disappears and the alarm will sound, press any button to stop the alarm.
Note: After pressing the function button, timer settings should be done within 5 seconds.
In case of a power failure, all settings including the time display will be lost. The time and any settings will need to be re-set.
The oven light
Set cooking mode selection knob to symbol 📁 to switch on the oven light/s. The oven light/s stay on when the oven is operating.
Cooling ventilation
In order to cool down the exterior of the appliance, this model is equipped with a cooling fan, which switches on automatically.
When the cooling fan is on, you will notice a flow of air exiting between the oven door and the control panel.
Note: When cooking is finished, the cooling fan continues to operate until the oven cools down and then switches off automatically.
PRACTICAL COOKING ADVICE
The oven offers a range of settings which allow you to cook any type of food in the best possible way. With time you will learn to make the best use of this versatile cooking appliance and the following directions are only a guideline which may be varied according to your own personal experience.
Preheating
If the oven needs to be preheated, the 'Intensive Bake' mode should be selected.
This is the most efficient mode, which will reach the desired temperature as quickly as possible using the least amount of energy.
Once the food has been placed in the oven, the desired cooking mode can then be selected.
Multi shelf cooking
If you want to cook food on several shelves, select the ‘Fan Forced’ or ‘Intensive Bake’ mode as these are the only cooking mode that allows you to do so.
When cooking delicate foods on more than one shelf, use the ‘Fan Forced’ mode. This mode allows you to cook on 3 shelves at the same time. Refer to the ‘Cooking Guide’ table.
Using the grill
This multi-function oven has 2 different grilling modes.
Use the “Half Grill / Full Grill” mode☐/☐, placing the food under the center of the grill (situated on the 3^rd or 4^th rack form the bottom).
When using ‘Grill’ mode, we recommend you set the thermostat to the highest setting.
However, this does not mean you cannot use lower temperatures, simply adjust the thermostat knob to the desired temperature.
Use ‘Fan assisted grill’ mode with the oven door closed. This mode is very useful for grilling foods rapidly, as the distribution of heat by the fan makes it possible not only to brown the surface, but also to cook the bottom of the food. It can also be used for browning foods at the end of the cooking process, such as adding that gratin finish to pasta bakes for example. When using ‘Fan assisted grill’ mode, place the food on the 2nd or 3rd oven shelf from the bottom, then place a dripping-pan on the 1st rack from the bottom to prevent fat and grease from dripping onto the oven floor. We recommend you set the thermostat to 200°C, as it is the most efficient temperature for ‘Fan assisted grill’ mode. However, this does not mean you cannot use lower temperatures, simply adjust the thermostat knob to the desired temperature.
Important: for best results and to save energy, always use the ‘Fan assisted grill’ with the oven door closed.
Baking cakes
When baking cakes, always place them in a preheated oven. Make sure you wait until the oven has been preheated thoroughly (the indicator light will turn off). To prevent heat loss and the cake from dropping, do not open the oven door during baking.
In general...
... if pastry is too dry
Increase the temperature by 10^ C and reduce the cooking time.
... if pastry has dropped
Use less liquid or lower the temperature by 10^ C.
... if pastry is too dark on top
Place it on a lower shelf, lower the temperature, and increase the cooking time.
... if cooked well on the inside but sticky on the outside
Use less liquid, lower the temperature, and increase the cooking time.
... if the pastry sticks to the pan
Grease the pan well and sprinkle it with a dusting of flour or use greaseproof paper.
... if I used multi shelf cooking and one shelf is more cooked
Use a lower temperature setting next time. It is not necessary to remove the food from all the racks at the same time.
Cooking pizza
- For best results when cooking pizza, use the ‘Fan Forced’ mode
- Preheat the oven for at least 10 minutes.
- Use a light aluminum pizza pan, placing it on the shelf supplied with the oven. Don't use the dripping pan since this will extend the cooking time, making it difficult to get a crispy crust.
- Do not open the oven door frequently while the pizza is cooking;
- If the pizza has a lot of toppings (three or four), we recommend you add the mozzarella cheese on top halfway through the cooking process.
- For best results, only use one shelf at a time, but it you want to cook on two shelves, use the 2nd and 4th racks from the bottom with a temperature of 220^ and swap them halfway through cooking.
Cooking fish and meat
When cooking white meat, fowl and fish, use a temperature setting from 180°C to 200°C.
For red meat that you want well done on the outside while tender and juicy in the inside, it is best to start with a high temperature setting (200°C-220°C) for a short time, then turn the oven down afterwards.
In general, the larger the roast, the lower the temperature setting.
Place the meat on the centre of the shelf and place the dripping pan beneath it to catch the fat. Make sure that the shelf is inserted so that it is in the centre of the oven. If you would like to increase the amount of heat from below, use a lower shelf height. For savoury roasts (especially duck and wild game), dress the meat with lard or bacon on the top.
Cooking guide
| Food to be cooked | Weight (in kg) | Cooking rack position from bottom | Preheating time (Minutes) | Thermostat knob setting | Cooking time (Minutes) |
 Defrosting Defrosting | |||||
| All frozen food | |||||
 Half Grill / Full Grill Half Grill / Full Grill | |||||
| Soles and cuttlefish | 1 | 4 | 5 | Max | 8-10 |
| Squid and prawn kebabs | 1 | 4 | 5 | Max | 6-8 |
| Cod filet | 1 | 4 | 5 | Max | 10 |
| Grilled vegetables | 1 | 3/4 | 5 | Max | 10-15 |
| Veal steal | 1 | 4 | 5 | Max | 15-20 |
| Cutlets | 1 | 4 | 5 | Max | 15-20 |
| Hamburgers | 1 | 4 | 5 | Max | 7-10 |
| Mackerels | 1 | 4 | 5 | Max | 15-20 |
| Toasted sandwiches | - | 4 | 5 | Max | 2-3 |
 Fan Assisted Grill Fan Assisted Grill | |||||
| Grilled chicken | 1.5 | 3 | 5 | 200 | 55-60 |
| Cuttlefish | 1.5 | 3 | 5 | 200 | 30-35 |
 Fan Forced Fan Forced | |||||
| Tarts | 0.5 | 3 | 15 | 180 | 20-30 |
| Fruit cakes | 1 | 2/3 | 15 | 180 | 40-45 |
| Fruitcake | 0.7 | 3 | 15 | 180 | 40-50 |
| Sponge cake | 0.5 | 3 | 15 | 160 | 25-30 |
| Stuffed pancakes (on 2 shelves) | 1.2 | 2-4 | 15 | 200 | 30-35 |
| Small cakes (on 2 shelves) | 0.6 | 2-4 | 15 | 190 | 20-25 |
| Cheese puffs (on 2 shelves) | 0.4 | 2-4 | 15 | 210 | 15-20 |
| Cream puffs (on 3 shelves) | 0.7 | 1-3-5 | 15 | 180 | 20-25 |
| Biscuits (on 3 shelves) | 0.7 | 1-3-5 | 15 | 180 | 20-25 |
| Meringues (on 3 shelves) | 0.5 | 1-3-5 | 15 | 90 | 180 |
 Intensive Bake Intensive Bake | |||||
| Pizza (on 2 racks) | 1 | 2-4 | 15 | 220 | 15-20 |
| Lasagna | 1 | 3 | 10 | 200 | 30-35 |
| Lamb | 1 | 2 | 10 | 180 | 50-60 |
| Roast chicken +potatoes | 1 | 2-4 | 10 | 180 | 60-75 |
| Mackerel | 1 | 2 | 10 | 180 | 30-35 |
| Plum-cake | 1 | 2 | 10 | 170 | 40-50 |
| Cream puffs (on 2 racks) | 0.5 | 2-4 | 10 | 190 | 20-25 |
| Biscuits (on 2 racks) | 0.5 | 2-4 | 10 | 180 | 10-15 |
| Sponge cake (on 1 cake) | 0.5 | 2 | 10 | 170 | 15-20 |
| Sponge cake (on 2 cakes) | 1.0 | 2-4 | 10 | 170 | 20-25 |
| Savory pies | 1.5 | 3 | 15 | 200 | 25-30 |
 Conventional Conventional | |||||
| Duck | 1 | 3 | 15 | 200 | 65-75 |
| Roast veal or beef | 1 | 3 | 15 | 200 | 70-75 |
| Pork roast | 1 | 3 | 15 | 200 | 70-80 |
| Biscuits (short pastry) | - | 3 | 15 | 180 | 15-20 |
| Tarts | 1 | 3 | 15 | 180 | 30-35 |
Cooking guide
| Food to be cooked | Weight (in kg) | Cooking rack position from bottom | Preheating time (Minutes) | Thermostat knob setting | Cooking time (Minutes) |
| Fan Assist / Pastry Bake | |||||
| Frozen food | |||||
| Pizza | 0.3 | 2 | - | 250 | 12 |
| Courgette and prawn pie | 0.4 | 2 | - | 200 | 20 |
| Country style spinach pie | 0.5 | 2 | - | 220 | 30-35 |
| Turnovers | 0.3 | 2 | - | 200 | 25 |
| Lasagne | 0.5 | 2 | - | 200 | 35 |
| Golden rolls | 0.4 | 2 | - | 180 | 25-30 |
| Chicken morseis | 0.4 | 2 | - | 220 | 15-20 |
| Pre-cooked food | |||||
| Golden chicken wings 0.4 2 - 200 | 20-25 | ||||
| Fresh food | |||||
| Biscuits (short pastry) | 0.3 | 2 | - | 200 | 15-18 |
| Fruitcake | 0.6 | 2 | - | 180 | 45 |
| Cheese puffs | 0.2 | 2 | - | 210 | 10-12 |
Note: Cooking times are approximate and may vary according to personal taste. When cooking using the grill or fan assisted grill, the dripping pan must always be placed on the 1st oven shelf from the bottom.
Cleaning and maintenance
Before cleaning your oven or performing maintenance, make sure that the cooking mode selection knob is set to ‘OFF’ and the cooking temperature selection knob is set to ‘OFF’. To extend the life of your oven, it must be cleaned frequently.
The enamelled or stainless steel parts should be washed with lukewarm water without using any abrasive powders or corrosive substances. If any stainless steel has difficult to remove stains, use cleaners specifically recommended to clean stainless steel. After cleaning any surface, it is advisable to rinse thoroughly and dry.
The inside of the oven should preferably be cleaned immediately after use, when it is still warm (but not hot), with warm water and soap. The soap should be rinsed away and the interior dried thoroughly. Avoid using abrasive detergents, scourers acidic cleaners such as lime scale remover, etc. as these could damage the enamel. If stains are particularly tough to remove, use cleaners specifically recommended to clean ovens and follow the instructions provided with the cleaner.
Never use a steam cleaner or caustic oven cleaners for cleaning inside the oven.
If you operate your oven for an extended period of time, or if you are cooking dishes that contain a lot of water, condensation may form on the oven door. Dry it using a soft cloth and try reducing the cooking temperature.
There is a seal surrounding the oven opening which is necessary to ensure the correct operation of the oven. Check the condition of this seal on a regular basis. If necessary, clean it but avoid using abrasive products or objects to do so. Should it become damaged, please contact Glen Dimplex Service Department. We recommend you avoid using the oven until it has been repaired.
Never place anything (including foil and oven trays) on the bottom of the oven when it is in operation because this could damage the enamel.
Clean the glass door using non-abrasive products or sponges and dry it with a soft cloth.
Do not use harsh abrasive cleaners or sharp metal scrapers to clean the oven door glass since they can scratch the surface, which may result in shattering of the glass. Use only non caustic oven cleaners purchased from hardware stores or supermarkets.
How to remove the oven door
You can remove the oven door for better access to the oven when cleaning. Proceed as follows to remove the door:
- Open the door fully (1).
- Lift up and turn the latch situated on each of the two hinges (2).
- Grip the door on the two external sides and close it approximately 3/4 way (3).
- Pull the door up towards you, lifting it out of the oven frame (4).
• To replace the door, use the reverse procedure.

natural_image
Interior view of an oven with a curved arrow indicating a process or transformation (no text or symbols present)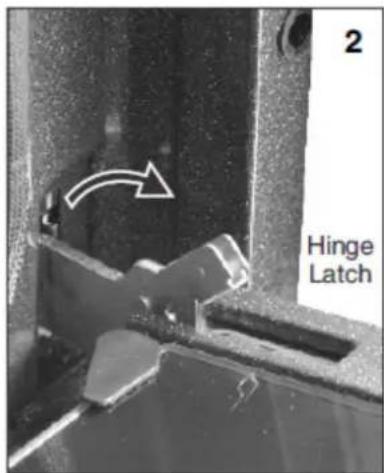

natural_image
Person installing or adjusting a door panel with an arrow indicating rotation (no text or symbols visible)
natural_image
Person using a tool to adjust or install a mechanical component, no visible text or symbolsHow to dismantle the oven door for cleaning
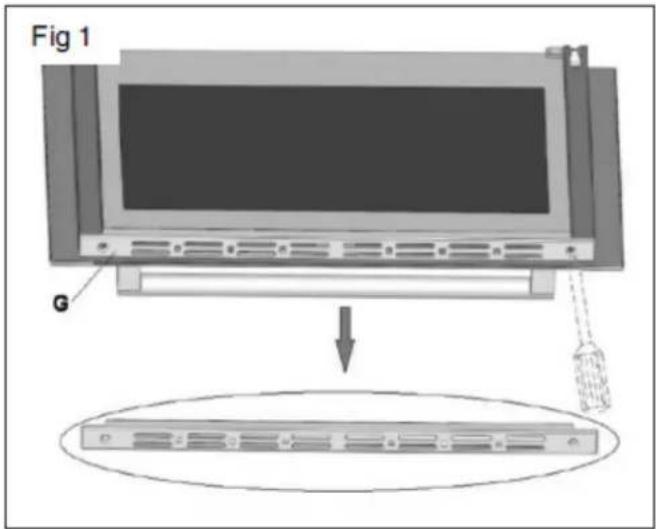
You can remove the inner door glass for better cleaning. Proceed as follows to remove the inner door glass:
- Remove the trim 'G' by unscrewing the 2 screws (fig.1)
• Gently slide out the inner pane of glass (fig.2) - Clean the glass with an appropriate cleaner. Dry thoroughly and place on a soft surface.
- Now you can also clean the inside of the outer glass.
- Use the reverse procedure to re-assemble the door glass.

natural_image
Diagram of a mechanical component with a downward arrow indicating force or direction, labeled Fig 2 (no text or symbols on the diagram itself)Replacing the oven lamp
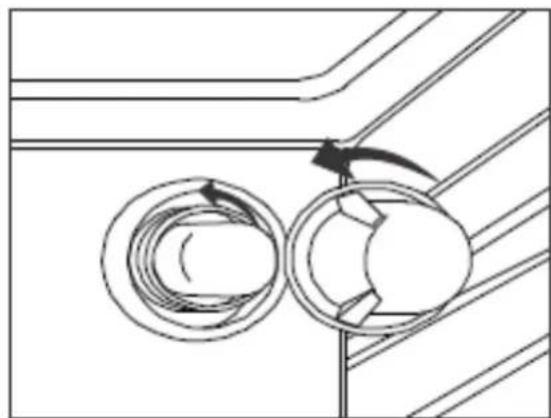
WARNING: Ensure that the appliance is switched off before replacing the lamp to avoid the possibility of electric shock. Remove the glass cover of the lamp-holder as shown below.
Remove the lamp and replace with a lamp resistant to high temperatures (300°C) with the following characteristics:
• Voltage: 220-240V
- Wattage: 25W
- Type: E 14
Replacement lamps are available from Glen Dimplex. Replace the glass cover and reconnect the oven to the mains power supply.
natural_image
Technical line drawing of a mechanical component with two circular parts and an arrow indicating rotation (no text or symbols)
natural_image
Symbol of a trash bin with crossed lines indicating no waste or discharge (no text or labels)Disposal
By ensuring this product is disposed of correctly, you will help prevent potential negative consequences for the environment and human health, which could otherwise be caused by inappropriate waste handling of this product.
The symbol on the product indicates that this product may not be treated as household waste. Instead it shall be handed over to the applicable collection point for the recycling of electrical and electronic equipment.
Disposal must be carried out in accordance with local environmental regulations for waste disposal.
For more detailed information about treatment, recovery and recycling of this product, please contact your local city council office.
IMPORTANT: Installation, assembly and electrical connections must be carried out by authorised personnel.
Cabinet details
In order to ensure that the built-in appliance functions properly, the cabinet containing it must be appropriate. The figure below gives the dimensions of the cut-out for installation under the counter or in a wall cabinet unit.

The panels of the adjacent cabinets must be made of heat resistant material. In particular, cabinets with a veneer exterior must be assembled with glues which can withstand temperatures of up to 75^ C.
In compliance with current safety standards, contact with the electrical parts of the oven must not be possible once it has been installed.
All parts, which ensure the safe operation of the appliance, must be removable only with the aid of a tool.
To fasten the oven to the cabinet, open the door of the oven and attach it by inserting the 4 wood screws into the 4 holes located on the perimeter of the frame.
Electrical connection
The appliance is usually supplied fitted with a power cord and 3 pin plug. Install the cooker so that the plug is easily accessible. Plug the 3-pin plug into a properly earthed, 15A general purpose power outlet preferably on a separate dedicated circuit. The supply cable should be positioned so that it does not reach a temperature of more than 75^ along its entire length. If the appliance is not supplied with a plug or if connecting the cable directly to the mains, connection to the electricity supply must be made by an authorised person in accordance with the Wiring Rules AS/NZS3000. The installation must include a suitable isolating switch with a minimum contact opening of 3mm between the appliance and the mains. The isolating switch should be sized according to the load on the data label and should comply with current regulations (the earth wire should not be interrupted by the circuit breaker).
Before making the connection check that:
- the switch, wiring and electrical system can support the appliance load (see data plate);
- the power supply system has an efficient earthing connection which complies with the provisions of current regulations;
- the power outlet or omnipoar circuit-breaker is easily accessible once the cooker has been installed.
Replacing the power supply lead
If the supply cord or plug is damaged, it must be replaced by the manufacturer or its service agent or a similarly qualified person in order to avoid hazard.
Warning:
All electrical connections must be made by a suitably qualified and licenced person in accordance with local regulations.
Glen Dimplex will not be held responsible for damages caused to cabinetry due to incorrect installation.
Technical data
Inner dimensions of the oven:
Width: 42.3cm
Depth: 40.7cm
Height: 39.2cm
Gross Oven Volume: 85. litres
Voltage and Frequency of Power Supply: 220-240V, 50-60Hz
This warranty is provided in Australia by Glen Dimplex Australia Pty Limited ABN 69 118 275 460 (Phone number 1300 556 816) and in New Zealand by Glen Dimplex New Zealand Limited NZBN 9429000069823 (Phone number 09 274 8265) in respect of the Technika product.
1. Technika Express Warranty
Subject to the exclusions below, we warrant that the product will not have any electrical or mechanical breakdowns within:
a) In the case of Technika products used for personal, domestic or household purposes, a period of 3 years from the date the product is purchased as a brand-new product from a retailer located in Australia / New Zealand.
b) In the case of Technika products used for purposes other than personal, domestic or household purposes (including business or commercial use), a period of 90 days from the date the product is purchased as a brand-new product from a retailer located in Australia / New Zealand. Technika products are designed and intended for domestic use only; and
c) All warranty repairs must be carried out by Glen Dimplex or their nominated service agent
Note: warranty periods detailed above may vary in line with agreements with select retail and builder partners and may differ between Australia and New Zealand.
The benefits conferred by this express warranty are in addition to the Consumer Guarantees referred to in section 3 and any other statutory rights you may have under the Australian / New Zealand Consumer Law and/or other applicable laws.
2. Warranty exclusions
This express warranty does not apply where:
a) The product has been installed, used or operated otherwise than in accordance with the product manual or other similar documentation provided to you with the product;
b) The product requires repairs due to damage resulting from accident, misuse, incorrect installation, insect or vermin infestation, improper liquid spillage, cleaning or maintenance, unauthorised modification, use on an incorrect voltage, power surges and dips, voltage supply problems, tampering or unauthorised repairs by any persons, use of defective or incompatible accessories or exposure to abnormally corrosive conditions, events independent of human control which occurred after the goods left the control of Glen Dimplex;
c) The repair relates to the replacement of consumable parts such as fuses and bulbs or any
c) The repair relates to the replacement of consumable parts such as fuses and bulbs or any other parts of the product which require routine replacement;
d) You are unable to provide us with reasonable proof of purchase for the product;
e) the breakdown occurs after the expiry of the express warranty period set out in section 1 or
f) the product was not purchased in Australia / New Zealand as a brand-new product.
3. Consumer guarantees
Our goods come with guarantees that cannot be excluded under the Australian / New Zealand Consumer Law. You are entitled to a replacement or refund for a major failure and for compensation for any other reasonably foreseeable loss or damage. You are also entitled to have the goods repaired or replaced if the goods fail to be of acceptable quality and the failure does not amount to amajor failure.
4. How to make a claim
You may make a claim under this warranty through our website, contacting our customer care line or via email. Contact details for Glen Dimplex Australia and New Zealand can be found at the end of this document
To make a valid claim under this warranty, you must:
a) Lodge the claim with us as soon as possible and no later than 14 days after you first become aware of the breakdown;
b) Provide us with the product serial number;
c) Provide us with reasonable proof of purchase for the product. This can take the form of a store receipt, new home handover form or other payment receipt documentation; and
d) If required by us, provide us (or any person nominated by us) with access to the premises at which the product is located at times nominated by us (so that we can inspect the product).
5. Warranty claims
5. Warranty claims
If you make a valid claim under this warranty and none of the exclusions set out in section 2 apply, we will, at our election, either repair the product or replace the product with a product of identical specification (or where the product is superseded or no longer in stock, with a product of as close a specification as possible).
Goods presented for repair may be replaced by refurbished goods of the same type rather than being repaired. Refurbished parts may be used to repair the goods.
Products are designed and supplied for normal domestic use. We will not be liable to you under this warranty for business loss or damage of any kind whatsoever.
Glen Dimplex Australia Pty Ltd
www.glendimplex.com.au
Australia
Ph: 1300 556 816
commercialcare.ha@glendimplex.com.au
Glen Dimplex New Zealand Ltd
www.glendimplex.co.nz
New Zealand
Ph: 09 274 8265
nztechserv@glendimplex.co.nz
NOTES
READ THE INSTRUCTION BOOKLET BEFORE INSTALLING AND USING THE APPLIANCE.
The manufacturer will not be responsible for any damage to property or to persons caused by incorrect installation or improper use of the appliance.
The manufacturer is not responsible for any inaccuracies, due to printing or transcription errors, contained in this manual. In addition, the appearance of the figures reported is also purely indicative.
The manufacturer reserves the right to make changes to its products when considered necessary and useful, without affecting the essential safety and operating characteristics.
Glen Dimplex constantly seeks ways to improve the specifications and designs of their products.
Whilst every effort is made to produce up to date literature, this document should not be regarded as an infallible guide. Actual product only should be used to derive cut out sizes.
All appliances must be installed by a qualified person/s with adherence to the relevant electrical, plumbing and building codes, with compliance being issued as required by state or national legislation.
Additionally, all upright cookers must have the anti-tilt device installed correctly in adherence to the relevant standards by a licenced installer.
For maximum effectiveness and efficiency all rangehoods should be installed with the use of ductwork, by a licenced installer with adherence to the relevant state and national building codes and regulations.
All Glen Dimplex appliances are for Domestic use only, and must be installed by a licence installer into Domestic Applications only, without exception and to the required Authorities guidelines. Any installation outside of this will VOID warranty. Alfresco areas are not a Domestic application.
TECHNIKA®
COOKING WITH PASSION
Distributed by:
Glen Dimplex Australia Pty Ltd
Glen Dimplex New Zealand Ltd
For full terms and conditions, or to register your product warranty, please visit our website:
www.glendimplex.com.au
www.glendimplex.co.nz
For service advice, please contact the Customer Care Centre by phone or email below.
Australia
Ph: 1300 556 816
commercialcare.ha@glendimplex.au
New Zealand
Ph: 09 274 8265
nztechserv@glendimplex.co.nz

- COOKING WITH PASSION
- MULTIFUNCTION 60CM OVEN
- Use and Care
- Installation
- Avoid the following:
- Authorised personnel must be contracted to...
- Glen Dimplex Service Department must be contacted...
- WARNINGS:
- Controls
- Oven & Accessories
- Positioning the oven trays & shelves
- How to use your oven
- To operate the oven:
- Cooking modes
- Defrost mode
- Conventional Mode
- Fan Assist Mode
- Fan forced mode
- Intensive Bake mode
- Half Grill Mode
- Full Grill Mode
- Fan assisted grill mode
- Pastry Bake mode
- Button Digital Clock
- Setting the time when power is first connected
- Adjusting the time
- Manual operation setting
- Automatic setting
- Semi-automatic setting
- Start cooking now and set cooking time:
- Start cooking now and set the finish time:
- Timer
- The oven light
- Cooling ventilation
- PRACTICAL COOKING ADVICE
- Preheating
- Multi shelf cooking
- Using the grill
- Baking cakes
- Cooking pizza
- Cooking fish and meat
- Cooking guide
- Cleaning and maintenance
- Never use a steam cleaner or caustic oven cleaners for cleaning inside the oven.
- How to remove the oven door
- How to dismantle the oven door for cleaning
- Replacing the oven lamp
- Disposal
- Cabinet details
- Electrical connection
- Before making the connection check that:
- Replacing the power supply lead
- Warning:
- Technical data
- Technika Express Warranty
- Warranty exclusions
- Consumer guarantees
- How to make a claim
- Warranty claims
- Glen Dimplex Australia Pty Ltd
- Australia
- Glen Dimplex New Zealand Ltd
- New Zealand
- READ THE INSTRUCTION BOOKLET BEFORE INSTALLING AND USING THE APPLIANCE.
- TECHNIKA®
Brand : Technika
Model : TO610TBX
Category : Oven