
AIPK1 - Access Control System Speco Technologies - Free user manual and instructions
Find the device manual for free AIPK1 Speco Technologies in PDF.


| Product Type | 2-Wire Analog Video Door Phone Outdoor Station |
| Model | AIOS06 (AIPK1 system) |
| Brand | Speco Technologies |
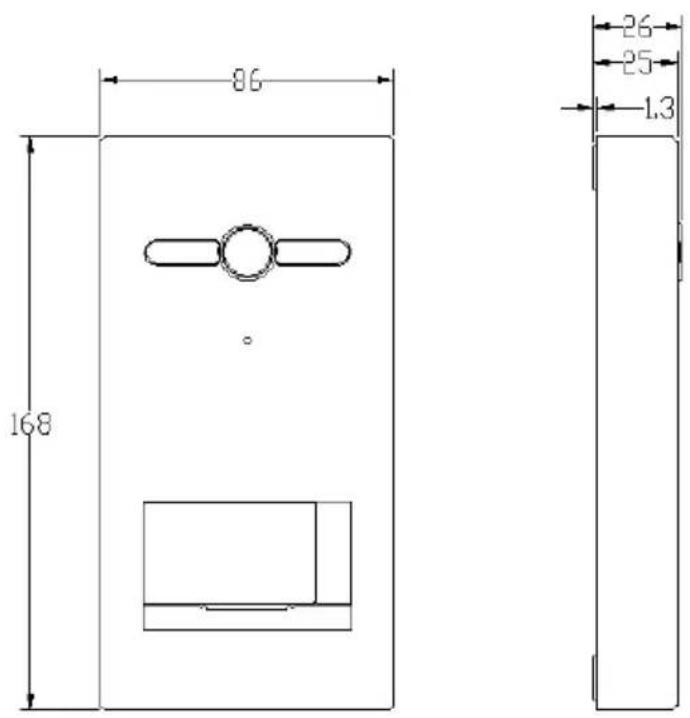
| Dimensions (H x W x D) | 168 x 86 x 26 mm |
| Weight | Approximately 0.3 kg (estimated) |
| Working Voltage | DC 24-32V |
| Working Temperature | -25°C to 55°C |
| Storage Temperature | -40°C to 70°C |
| Static Current | ≤ 20 mA (at DC 30V) |
| Working Current | ≤ 110 mA (at DC 30V) |
| Camera Type | CMOS |
| Camera View Angle | 90° (Horizontal) |
| Camera Resolution | 600 TVL |
| Minimum Illumination | 0.1 lux |
| Fill-in Light | Light Sensitive Diode |
| Main Functions | Video intercom, door unlocking, dual call buttons, external camera support |
| Unlock Time Adjustment | 1 to 10 seconds (potentiometer adjustable) |
| Calling Volume Adjustment | Adjustable via potentiometer |
| Address Setting | Selectable from 1 to 5 |
| Installation Height | Camera at 1.6 m above ground |
| Cleaning & Maintenance | Do not use wet cloth or chemicals; avoid strong magnetic fields, high temperature, and wet environments |
| Safety Precautions | Handle with care; avoid drops; do not disassemble |
Frequently Asked Questions - AIPK1 Speco Technologies
User questions about AIPK1 Speco Technologies
0 question about this device. Answer the ones you know or ask your own.
Ask a new question about this device
Download the instructions for your Access Control System in PDF format for free! Find your manual AIPK1 - Speco Technologies and take your electronic device back in hand. On this page are published all the documents necessary for the use of your device. AIPK1 by Speco Technologies.
USER MANUAL AIPK1 Speco Technologies
AIOS06 Outdoor Station

2-Wire Outdoor Station (Surface Mounting)
AIOS06 User Manual\_V1.0
- Please keep devices away from strong magnetic fields, high temperature and wet environments.



- Please handle with care, a drop or any hard impact will damage the device.

- Please do not use a wet cloth or chemicals to wipes devices.

- Please do not disassemble the device.
Content
Chapter 1 Function Overview ...... 1
1.1 Function.... 1
1.2 Parameter .... 1
Chapter 2 Product Introduction.... 2
2.1 Front View.... 2
2.2 Product Dimension 3
2.3 Interface Introduction.... 4
Chapter 3 Installation....5
3.1 Installation Height.... 5
3.2 Installation Steps 6
Chapter 4 User Instruction....8
4.1 Calling resident 8
4.2 Unlock 8
4.3 External camera extension 9
Chapter 5 Settings ...... 9
5.1 Factory Setting....9
5.2 Unlock Time Setting 9
5.3 Calling Volume Setting 9
5.4 Address Setting....9
Chapter 1 Function Overview
This product is an Outdoor Station in 2-wire analog video door phone system. Twin-core cable is adopted to connect into the system. It supports video intercom with Indoor Monitor and door unlocking. With the Relay Actuator Control Module connected, it also supports unlocking a 2^nd door.
1.1 Function
● Support calling to Indoor Monitor 1 and Indoor Monitor 2
- Adjustable unlock time
- Door status detection
● Support external camera extension (Camera Interface Module is needed)
1.2 Parameter
Working Parameter
Working Voltage: DC 24\~32V
Working Temperature: -25°C\~55°C
Storage Temperature: -40°C\~70°C
Static Current: ≤ 20mA (DC 30V)
Working Current: ≤ 110mA (DC 30V)
Dimension(H/W/D)168×86×26mm
Camera
Type: CMOS
View Angle: 90°(Horizontal)
White Balance: Automatic
Resolution: 600TVL
Min. Illumination: 0.1 lux
Fill-in Light Type: Light Sensitive Diode
Chapter 2 Product Introduction
2.1 Front View
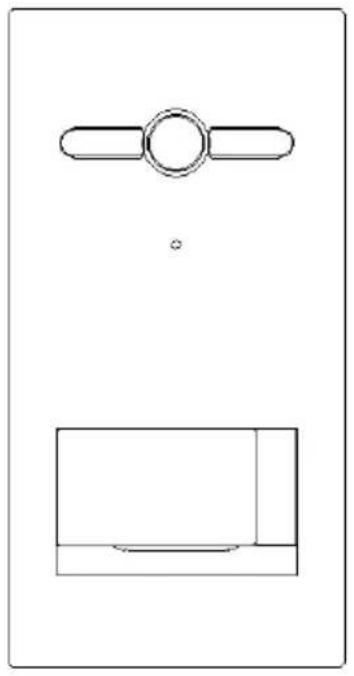
natural_image
Pure technical line drawing of a mechanical component with no text or symbols
2.2 Product Dimension
Unit: mm
2.3 Interface Introduction

Interface①
Unlock time setting;
Interface②
calling volume setting;
Interface③
BUS-A, BUS-B: Bus interface;
NO, COM, NC: Normal open/close interface;
GS: Door status detection interface;
DOOR SW: Unlock inside;
GND: Common ground.
Chapter 3 Installation
3.1 Installation Height
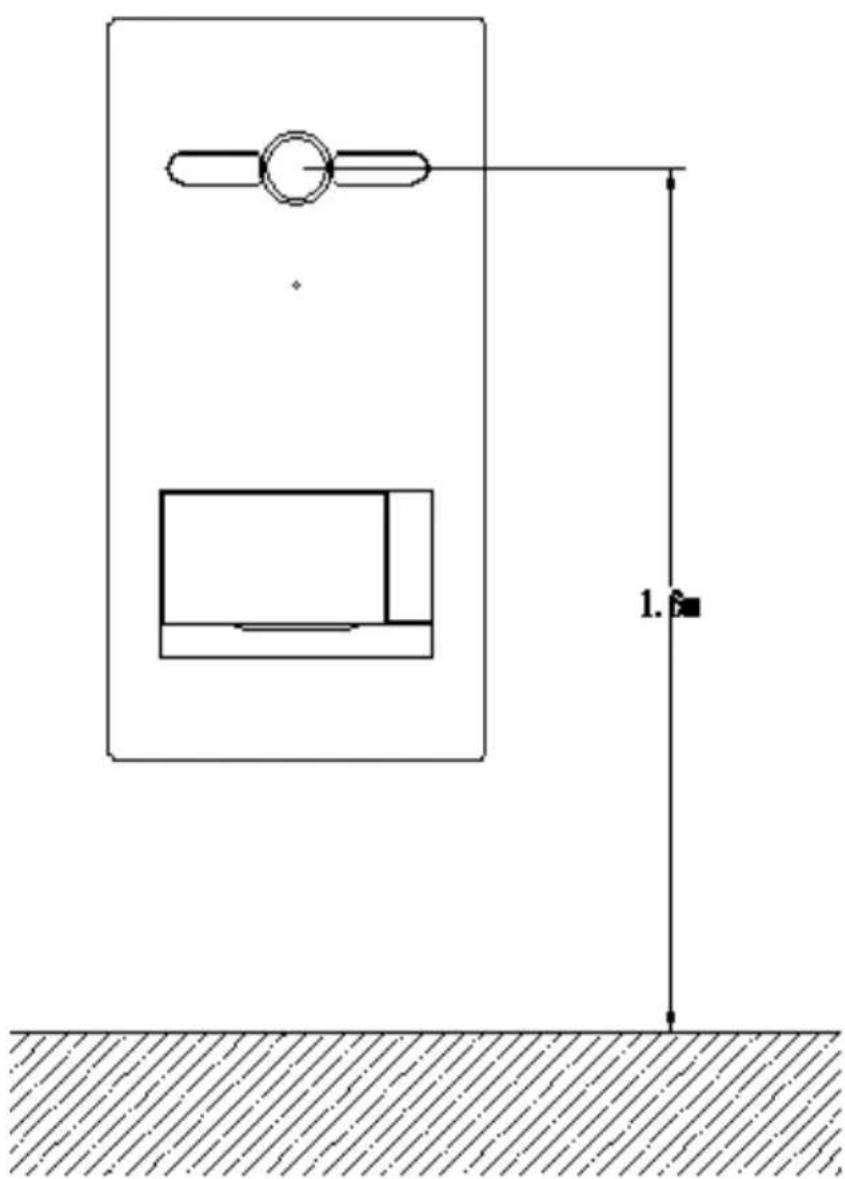
natural_image
Pure technical diagram showing a mechanical setup with a shaft and housing, no text or symbols presentSuggested Installation Height: camera is 1.6m above the ground
3.2 Installation Steps
Step 1: Drill holes on the wall according to the installation size (149.5×64.5mm), fix the capsules into the hole (it is recommended to align the device to the center of the reference line ), then place the device and fasten with self-tapping screws(Pic 2).

Step 2: Fill in the apartment's information, and install it in the name tag area, then complete the wiring (Pic 3).

natural_image
Technical line drawing of a mechanical assembly with no visible text or symbolsPic 2
Step 3: Assemble the metal case onto the device, and fasten with plum blossom screw (Pic 4).

Pic 3
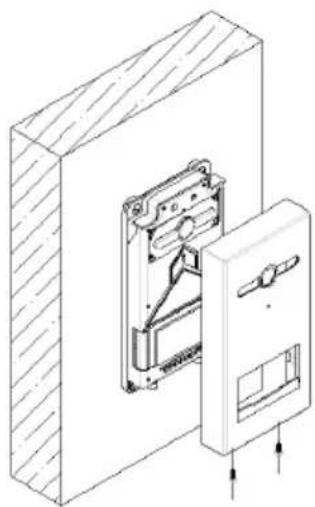
natural_image
Technical line drawing of a mechanical assembly with a wooden block and internal components (no text or symbols)Pic 4
3.3 System Wiring
Remarks:

flowchart
graph TD
    A["twin-core unlock signal line"] --> D["Indoor Monitor"]
    B["twin-core unlock signal line"] --> D
    C["2-wire cable"] --> D
    E["twin-core power line"] --> D
    F["Power Supply"] --> G["AC"]
    H["Outdoor Station"] --> I["Indoor Monitor"]
Remarks:
① The outdoor station is suitable for one or two apartments, and it is possible to make connection with large system.
② Supports multiple Indoor Monitors (maximum Qty is 4pcs) in one apartment, address of all Indoor Monitors in one apartment should be same.
Attention: When there's multiple monitors in one apartment, only one can be set as master Indoor Monitor, otherwise there will be an over-current. Please check the interface introduction for how to set a master Indoor Monitor.
③ When there are multiple Indoor Monitors in one apartment and a call is made, all Indoor Monitors will ring at the same time but only the screen of the master Indoor Monitor is turned on, and after one of the monitors pick up the call, the rest of the monitors hang up.
④ Power supply is limited, so only 2 monitors are allowed to be operated at the same time (intercom function is not limited).
⑤ The wiring above is recommended for two apartments. If there are multiple Indoor Monitors in one apartment, wiring with distributors (Star topology) are recommended.
Chapter 4 User Instruction
4.1 Calling resident
Single Calling Function Outdoor Station AIOS06 :
By short pressing the button of AIOS06 (Upper button/ Lower button), visitor starts to call the same Indoor Monitor 1, whose ringtone will echo back. Repeating pressing the buttons during the call, then the countdown will be reset (each call waits for 30 seconds); if there's no answer in 30 seconds, the call will end.
Dual Calling Buttons Outdoor Station:
It supports calling Indoor Monitor 1 and Indoor Monitor 2. By short pressing the lower button of the Dual Calling Buttons Outdoor Station, visitor starts to call Indoor Monitor 1. By short press the upper button of Dual Calling Buttons Outdoor Station, visitor starts to call Indoor Monitor 2. If the upper button is pressed while calling Indoor Monitor 1, then the call will be switched to Indoor Monitor 2 and the countdown will be reset (each call waits for 30 seconds). If there's no answer in 30 seconds, the call will be ended.
4.2 Unlock
1) Unlock by Indoor Monitor
Door can be opened by Indoor Monitor when it's communicating with Outdoor Station or under surveillance mode.
2) Unlock by external push button
As there is an interface for integration of external push buttons, when this is connected, a normal push button can be used to unlock the door.
4.3 External camera extension
Outdoor Station is supported to work with Camera Interface for external camera extension. As Outdoor Station is configured with Camera Interface, while Outdoor Station is calling Indoor Monitor, or Indoor Monitor is monitoring Outdoor Station, the displays can switch between different cameras. For further information please refer to the user manual of Camera Interface.
Chapter 5 Settings
5.1 Factory Setting
Cut off the power of the outdoor station and power on within 60 seconds, long press any button on the outdoor station for 3 seconds. After a long beep, factory reset is done.
5.2 Unlock Time Setting
The default unlock time is 1 second. There is an adjustable potentiometer on the back side of the outdoor station(①), unlock time can be adjusted by ratio of 180^ from 1 second to 10 seconds, lengthen in anticlockwise direction, shorten in clockwise direction.
5.3 Calling Volume Setting
The default calling volume is in middle value. There is an adjustable potentiometer on the back side of the outdoor station( ②), unlock time can be adjusted by ratio of 180^ .
Users can freely adjust the calling volume according to the installation environment.
5.4 Address Setting
In standby mode, press any button from outdoor station for 3 seconds, the device will beep twice to enter the address setting mode. Press the button to add address number from 1-5, after each short press, the device will beep different times to show what number it is with.
For example: a device with NO. 1 will beep once, if it's set to NO. 5, it will beep 5 times
after short press. When a device is already NO. 5, one short press will make this device become device NO. 1, cyclically.
After address setting, press any button for 3 seconds to exit setting mode with a long beep, or the setting mode will exit automatically if no operation for over 15 seconds.
- AIOS06 Outdoor Station
- 2-Wire Outdoor Station (Surface Mounting)
- AIOS06 User Manual\_V1.0
- Content
- Chapter 1 Function Overview ...... 1
- Chapter 2 Product Introduction.... 2
- Chapter 3 Installation....5
- Chapter 4 User Instruction....8
- Chapter 5 Settings ...... 9
- Chapter 1 Function Overview
- Function
- Parameter
- Working Parameter
- Camera
- Chapter 2 Product Introduction
- Front View
- Product Dimension
- Interface Introduction
- Interface①
- Interface②
- Interface③
- Chapter 3 Installation
- Installation Height
- Installation Steps
- System Wiring
- Remarks:
- Chapter 4 User Instruction
- Calling resident
- Unlock
- External camera extension
- Chapter 5 Settings
- Factory Setting
- Unlock Time Setting
- Calling Volume Setting
- Address Setting
Brand : Speco Technologies
Model : AIPK1
Category : Access Control System