
BMS4508 - Cooker Becken - Free user manual and instructions
Find the device manual for free BMS4508 Becken in PDF.


| Product Type | Freestanding Cooker |
| Brand | Becken |
| Model | BMS4508 |
| Dimensions (H x W x D) | 850 x 600 x 600 mm |
| Weight | Approx. 50 kg |
| Power Supply | 220-240 V, 50 Hz |
| Oven Capacity | 70 L |
| Hob Type | Gas hob with 4 burners |
| Hob Burners Power | Triple ring: 3.5 kW, Rapid: 3.0 kW, Semi-rapid: 1.8 kW, Auxiliary: 1.0 kW |
| Oven Functions | Conventional, Grill, Fan-assisted, Defrost |
| Energy Efficiency Class | A |
| Safety Features | Flame failure safety device, Child lock, Automatic shut-off |
| Cleaning | Easy-clean enamel interior, Removable inner door glass |
| Timer | Integrated digital timer with alarm |
| Ignition | Automatic ignition on hob and oven |
| Storage Drawer | Yes, for cookware |
| Spare Parts Availability | Authorized service centers |
Frequently Asked Questions - BMS4508 Becken
User questions about BMS4508 Becken
0 question about this device. Answer the ones you know or ask your own.
Ask a new question about this device
Download the instructions for your Cooker in PDF format for free! Find your manual BMS4508 - Becken and take your electronic device back in hand. On this page are published all the documents necessary for the use of your device. BMS4508 by Becken.
USER MANUAL BMS4508 Becken
Free standing gas/electric stove
Thank you for purchasing this product.
The quality of this appliance has been certified by several laboratory tests. This instructions manual is provided to simplify the use of the appliance as well as to guarantee a safe use.
Please read carefully the instructions and safety measures described in this manual.
We sincerely hope you will be satisfied when using your new appliance.
INDEX
1. SAFETY INSTRUCTIONS 4
1.1. Power Supply 5
1.2. Power Cord and Other Cables 5
1.3. Humidity and Water 5
1.4. Cleaning 6
1.5. General Precautions 6
2. OPERATING INSTRUCTIONS 10
2.1. Product Description 10
2.2. Product Usage 11
2.3. Maintenance 26
2.4. Troubleshooting 27
3. TECHNICAL SPECIFICATIONS 30
- POST-SALE SERVICE 32
- ENVIRONMENTAL PROTECTION 32
Free standing gas/electric stove | Cocina de gas/eléctrica independiente Fogão a gás/elétrico
BECKEN
1. SAFETY INSTRUCTIONS
 | WARNING |  |
| RISK OF ELECTRIC SHOCKDO NOT OPEN | ||
| Warning: to avoid the risk of electric shock, do not remove the cover. The interior does not contain any parts that can be repaired by the user. Ask for assistance from the Customer Support Service. | ||
Important Warnings
Before using your appliance read this instructions manual carefully and keep it in a safe place as you may need to consult it in the future.
Before turning on your appliance, and to ensure a safe and correct operation, do not use if:
- It has fallen to the ground;
- You notice any evidence of damage;
- Any anomaly occurs during its operation.
To avoid hazards or deterioration of your appliance through incorrect use it is advisable to read these instructions thoroughly.
Your appliance may not be used for other purposes than the ones intended and solely for household use. Any damage resulting from using the appliance outside this scope, any incorrect use, as well as any manual modifications to the product will not be covered and automatically voids the warranty.
[you can trust]
Assistance
In case of malfunction, take your appliance to the Customer Support Service for assistance.
This appliance can be used by children from the age of 8 and by people with reduced physical, sensorial or mental capabilities and/or lack of experience and knowledge if they have been given instructions on using the appliance safely and if they understand the hazards involved. Children may not play with the appliance. Cleaning and maintenance must not be carried out by children without supervision.
These instructions are also available at
www.suporteworten.pt
1.1. Power Supply
Make sure the main voltage is compatible with the appliance's. If this is not the case please consult the Customer Support Service.
1.2. Power Cord and Other Cables
Do not tangle the cord or pull it to disconnect the appliance. Also, keep the cord away from warm surfaces.
Never use the appliance if it has a damaged cable or socket.
Take it to the Customer Support Service for replacement.
1.3. Humidity and Water
Do not use your appliance in humid places. Do not allow the appliance to become wet under any circumstances
as this may be dangerous. To avoid fire hazard or electric shock do not expose your appliance to humidity or water. Furthermore, do not place your appliance under water (e.g. for cleaning).
1.4. Cleaning
Before cleaning, be sure to switch off the appliance and remove the plug from the main power supply. Always allow the unit to cool down before cleaning.
To clean the exterior of the product use a dry soft cloth only.
1.5. General Precautions
- Please follow the instructions in the user manual which will help you to properly install and operate this product and enjoy its advanced features. Please keep the instructions for future reference.
- Read all instructions before using the product.
- Maintenance and service operations are only to be carried out by authorized professionals.
- Any damage caused by manual modifications to the product is not covered by the warranty.
- If this product is used for other purposes than the ones originally intended, or if it is not correctly connected, the product may become damaged and the warranty will be voided.
[you can trust]
- Pieces of packaging (plastic bags, polystyrene etc.) must not be left within reach of children, as they are potentially dangerous. Please dispose of packaging thoughtfully by the appropriate means.
- WARNING: this appliance must be earthed!
- Please find all required information regarding your stove's power and ratings on the rating label located behind the appliance.
- Ensure that the electricity supply is off before installing your appliance.
- Ensure that the appliance is off before replacing the lamp to avoid the possibility of electric shock.
- If the supply cord is damaged, it must be replaced by the manufacturer, its services agent or similar qualified persons in order to avoid hazard.
- Usage of your appliance creates moisture and heat in the room; make sure your kitchen is well ventilated.
- Keep your stove's electrical cable away from hot areas; do not let it touch the appliance. Keep them away from sharp sides and heated surfaces.
- Prolonged intensive use of the appliance may call for additional ventilation, for example increasing the level of mechanical ventilation where present.
- When the stove is hot, never touch the stove glass with bare hands.
- This appliance is for cooking purposes only. It must not be used for other purposes like heating a room. All our appliances are only for domestic use, not for commercial use.
- Before using your appliance, keep curtains, paper or flammable items away from it. Do not keep combustible or flammable things in or near the appliance.
- Use oven mitts. Do not touch hot surfaces.
- Do not transport the stove holding it by its door handle.
- Do not use the stove in any potentially explosive atmosphere.
- If the current rate of the fuse in your installation is less than 16 Amp, have a qualified electrician fit a16 Amp fuse.
- When the oven is being used, some parts may become hot; children should be kept away and supervised at all times.
- Do not splash cool water onto an oven tray or inside the oven when the oven surface is still hot. Rising steam may cause burns and a sudden temperature exchange may cause damages on the surface of the stove.
[you can trust]
- WARNING: accessible parts may become hot during use. Young children should be kept away.
- WARNING: the appliance and its accessible parts become hot during use. Care should be taken to avoid touching heating elements. Children under the age of 8 should be kept away unless continuously supervised.
- Do not use harsh abrasive cleaners or sharp metal scrapers to clean the oven door glass given they can scratch the surface which may result in the glass shattering.
- This appliance is produced in accordance with the safety regulations. Incorrect use will harm people and damage the stove.
- The stove must be supplied via a suitable double pole isolating switch, with a minimum contact separation of 3 mm in all poles placed in a readily accessible position adjacent to the stove.
- Children should be supervised to ensure they do not play with the stove. Never let them play with the stove.
- The stove may be located in a kitchen, a kitchen/diner or bed/sitting room but not in a room containing a bath or shower.
- Caution: glass lids may shatter when heated. Turn off all burners before shutting the lid. Any spillage should be
removed from the lid before opening.
- Do not put flammable, combustible, explosive liquid able or deformable by heat any material in the oven against possible risk of danger even if your appliance is not in use.
- Bread may catch fire if the toasting time is too long. Close supervision is necessary during toasting.
- For cleaning the fan guard panel (optional) the stove must be switched off before removing the guard and after cleaning it. Afterwards, the guard must be replaced in its correct position into the stove.
- WARNING: before obtaining access to terminals, all supply circuits must be disconnected.
- WARNING: unattended cooking on a hob with fat or oil can be dangerous and may result in fire. NEVER try to extinguish a fire with water, but switch off the appliance and then cover flame e.g. with a lid or a fire blanket.
- WARNING: danger of fire: do not store items on the cooking surfaces.
- WARNING: If the surface is cracked, switch off the appliance to avoid the possibility of electric shock.
- The appliance is not intended to be operated by means of an external timer or separate remote-control system.
[you can trust]
Free standing gas/electric stove | Cocina de gas/eléctrica independiente Fogão a gás/elétrico
EN
11
BECKEN
2. Operating Instructions
2.1. Product Description
Appliance Symbols:
- Closed
Small flame
Big flame
★ Ignition
Grill & turnspit
Turbo fan
☐ Oven Burner / heating element
☐ Top heating element
☐ Oven & grill burner / heating element
Grill burner / heating element
Oven lamp
Turnspit

[you can trust]
2.2. Product usage
This user manual is prepared for more than one model. Some of the features specified in the Manual may not be available in your appliance. Warning: All our appliances are only for domestic use, not for commercial use.
THIS APPLIANCE SHALL BE INSTALLED IN ACCORDANCE WITH THE REGULATIONS IN FORCE AND ONLY USED IN A WELL VENTILATED SPACE. READ THE INSTRUCTIONS BEFORE INSTALLING OR USING THIS APPLIANCE
INSTALLATION ELECTRICAL CONNECTION
- The adjustment conditions for this appliance are stated on the rating label.
- Your appliance requires a 16 or 32 Ampere supply according to your stove's total power. Please find all required values on your stove's rating label. If necessary, installation by a qualified electrician is recommended.
- Your stove's electrical connection should only be made to earthed connections/sockets installed in compliance with local regulations. If there are no earthed connections/sockets in place where the stove will be installed, immediately contact a qualified electrician to install them. The manufacturer is not responsible for damages that will arise from the appliance not being earthed.
- Your stove is for use with a 220-240V AC or 230VAC mono phase and 230V/400V 3N for 3 phase 50-60 Hz electric supply. If your supply is different from the specified value, contact the Customer Support Service.
- When placing your stove on its location, ensure that it is at the counter level. Bring it to the counter level by adjusting the feet if necessary.
BECKEN
GAS CONNECTION
CAUTION: THE STOVE MUST ONLY BE INSTALLED IN A PERMANENTLY VENTILATED ROOM IN COMPLIANCE WITH THE APPLICABLE REGULATIONS.
This stove is not connected to a combustion products evacuation device. It must be installed and connected in accordance with current installation regulations. Particular attention must be paid to the relevant requirements regarding ventilation.

natural_image
Diagram of a greenhouse with an oven, air heating system, and airflow direction arrows (no text or labels)
natural_image
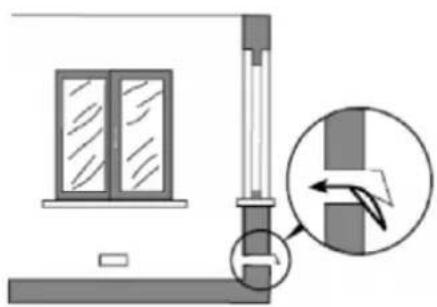
Diagram of a house interior showing fire extinguishing from a stove, with airflow arrows indicating heat distribution (no text or labels)The use of a gas stove produces heat and moisture in the room in which the appliance is installed. Ensure that the kitchen is well ventilated: keep naturel ventilation holes open or install a mechanical ventilation device (mechanical extractor hood).
Prolonged intensive use of the stove may call for additional ventilation, for example opening of a window, or more effective ventilation, like increasing the level of mechanical ventilation where present.
natural_image
Diagram showing a window and vertical structure with an arrow indicating direction (no text or symbols)
natural_image
Simple line drawing of a room with a door, window, and coffee cup (no text or symbols)[you can trust]
Connection and Security:
- Prior to installation, ensure that the local distribution conditions (nature of the gas and gas pressure) and the stove specifications are compatible.
- The stove specifications are stated on the label (or data plate).
- This stove is not connected to a combustion products evacuation device. It must be installed and connected in accordance with current installation regulations. Particular attention must be paid to the relevant requirements regarding ventilation.
- Please remove the silicon gasket from the gas inlet before connecting the gas.
- Fit the clamp to the hose. Push one of the hose until it goes to the end of the pipe.
- For the sealing control, ensure the control buttons in the control panel are closed, but the gas cylinder is open. Apply some soap bubbles to the connection - if there is any gas leakage, soap bubbles will form.
- The stove should be placed in a well ventilated place and should be installed on flat ground surface.
- Re-inspect the gas connection.
- When placing your stove on its location, ensure that it is at the counter level. Bring it to the counter level by adjusting the feet if necessary.
- Do not pass your stove's gas hose and electrical cable through heated areas, especially behind the stove. Do not move the gas connected stove. Given that any force applied shall loosen the hose, gas leakage may occur.
- Please use a flexible hose for the gas connection.
- Connect your stove to an LPG in the shortest way possible and without any leakage. The min. length is 40 cm and max. is 125 cm.
- When checking for gas leakages, never use a flame like a lighter, matches, cigarettes or similar.
BECKEN
Do not close the stovetop lid when the gas burner is on Caution: glass lids may shatter when heated. Turn off all burners before shutting the lid.

Connection scheme for LPG Connection scheme for NG


Correct Correct CorrectWrong
[you can trust]
WALL FIXING
(* Optional)
Before using the stove, in order to ensure its safe use, fix it to the wall using the chain and hooked screw supplied. Ensure the hook is screwed into the wall securely.
WARNING!
In order to prevent the stove from tipping over, you will need to secure the stove according to the instructions for installation.

Free standing gas/electric stove | Cocina de gas/eléctrica independiente Fogão a gás/elétrico
USAGE
Before using the stove, remove all flammable tapes, Styrofoam or any other packaging materials. Also remove the user manual and other flammable materials from inside of stove.
Using the stove's gas burners:
-
The knob frame or the command panel use a flame symbol to indicate which burner corresponds with which knob. Push forward and turn the corresponding knob in a counter-clockwise direction to the max. (+) symbol. To turn off the burner, turn the corresponding knobs clockwise until it stops. Shown on the knob are different symbols for off as , maximum flame as and minimum flame as .
-
If your stove is equipped with gas burners, an appropriate knob should be used in order to ignite the burners. Some models have automatic knob ignition; it is easy to ignite the burner by turning the knob. Also, burners can be ignited by pressing the ignition button or they can be ignited with a match.
- Do not operate continuously the igniter for more than 15 seconds. If the burner does not ignite, wait at least one minute before trying again. If any burners are extinguished for any reason, close the gas control valve and wait at least one minute before trying again.
- When the stove flame is extinguished, a control valve cuts off the gas automatically. To operate the gas burners with a gas security system, press the knob and turn it counter-clockwise. After ignition, wait nearly 510 second for gas security systems to activate. If the burner is extinguished for any reason, close the gas control valve and wait a minimum of one minute before trying again.
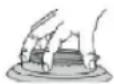
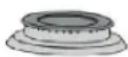
Before operating your hob please make sure that the burner caps are well positioned. The right placement of the burner caps are shown below.

Burner lid
Burner
Safety device (Optional)
Electronic Lighting Device (Optional)

BECKEN
USABLE SOUCEPAN DIAMETER
| Wok burner ∅ 24 - 28 cm | |
| Rapid Burner ∅ 22 - 26 cm | |
| Semi-rapid Burner ∅ 18 - 22 cm | |
| Auxiliary Burner ∅ 12 - 18 cm |
Gas oven:
The knob frame or the command panel use a flame symbol to indicate which burner corresponds with which knob.
Control for oven burner: Push forward and turn the corresponding knob in a counter-clockwise direction to the max. ⚠ (+) symbol. To turn off the burner, Burner lid Burner Safety device (Optional) Electronic Lighting Device (Optional) turn the corresponding knobs clockwise until it stops. Shown on the knob are different symbols for off as ● , maximum flame as ⚠ and minimum flame as ⚠.
Control for grill burner: Push forward and turn the corresponding knob clockwise to the max. ⚠(+) symbol.
Notes:
- When you start to operate oven burners, please do not close the oven door and wait 3 minutes with it open.
- If your stove has two separate control knob to operate the oven and grill burners, push and turn the corresponding knob counterclockwise to the max to turn it on.
- If your stove has a thermostat, the mentioned control knob should be positioned to the desired temperature value.
- If your stove has smart gas oven option (timer with cut off function), follow the recommendations as mentioned on the smart burner
- If your stove has a mechanical timer, the timer knob should be positioned to the desired timing value. When the end of the set cooking time is reached, you will heard a “bing” sound from the timer. The timer only warns the time is up; it does not operate the appliance
[you can trust]
Using an electrical stove:
- When your stove is operated first time, you might sense an odour from the heating elements being used for the first time. In order to get rid of this, operate them at 250 °C for 45-60 minutes while empty.
- The oven control knob should be positioned to the desired value; otherwise, the stove will not operate.
- The thermostat control knob should be positioned to the desired temperature value.
- The timer control knob should be positioned to the desired timing value. When the end of the set cooking time is reached, you will heard a "bing" sound from the timer and the stove will stop its operation. If you want to use the stove without the timer control, turn the timer control knob to the manual position, indicated with the symbol (optional).
- When the oven is being used, its door should not be opened frequently. Otherwise, heat circulation may be imbalanced and the cooking results may change.
- You should preheat the oven for 5-10 min before using it.
BECKEN
Table of cooking times:
| Woburner | Temperature (°C) | Rack position | Cooking time (min.) |
| Creamed cake 150 | - 170 2 30 - 35 | ||
| Pastry 200 - | 220 2 35 - 45 | ||
| Biscuit 160 - | 170 3 20 - 25 | ||
| Cookie 160 - | 170 3 20 - 35 | ||
| Cake 160 - 180 | 2 25 - 35 | ||
| Braided cookie 200 | - 220 2 30 - 40 | ||
| Filo pastry 180 | - 220 2 35 - 45 | ||
| Savoury pastry | 160 - 180 2 | 20 - 30 | |
| Lamb meat | 200 - 230 1 | 90 - 120 | |
| Veal 200 - 230 1 | 90 - 120 | ||
| Mutton | 210 - 230 1 | 90 - 120 | |
| Chicken (pieces) | 210 - 230 1 | 75 - 100 | |
| Fish | 190 - 210 2 40 | - 50 |
Note: results may vary according to area voltage and material's quality, amount of food and temperatures. Using a cake mould while for baking cakes provides better results.
[you can trust]
Nozzle change operation for stovetop gas burners:
- Start by closing all gas supply to the stove. Use a driver with a special head to remove and install the nozzle.
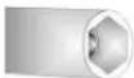
- Remove the nozzle from burner with a special nozzle driver and install the new nozzle.

natural_image
Three-panel illustration showing a mechanical assembly process: top-down view of a basin with rotating components, side-up view of a central component with rotation arrows, and top-right hand holding a tool (no text or symbols)- Close the nozzle by hand, open the gas valve and check for gas leakage using soap.
Free standing gas/electric stove | Cocina de gas/eléctrica independiente Fogão a gás/elétrico
BECKEN
Nozzle change operation for oven burners:
Remove the stove's back cover and remove the nozzle fixing body from the burner. Then, remove the nozzle from the injector body with a special nozzle driver used to change nozzles. After changing it, close the nozzle hole by hand, open gas valve and check for gas leakage using soap on the nozzle-body connection surface. Then, re-install the nozzle body on the burner using screws.

natural_image
Mechanical assembly diagram showing a screwdriver inserted into a pipe and clamped components (no text or labels)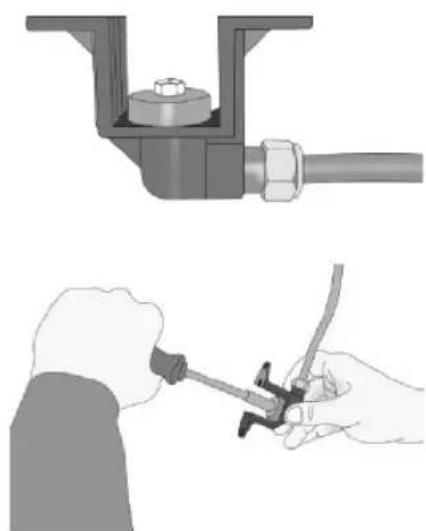
natural_image
Illustration showing two different techniques: a mechanical valve assembly and a hand holding a tool, both without any text or symbols.[you can trust]
Reduced Flame Adjustment:
In order to adjust your stove to the gas type, carefully adjust for a reduced flame by turning the middle screw or the one near the gas valve, as well as nozzle changes, using a small screwdriver.
| From LPG to Natural gas | From Natural gas to LPG | |
| Rapid burner 3 turns counter-clockwise | 3 turns clockwise | |
| Semi-rapid burner | 2.5 turns counter-clockwise | 2.5 turns clockwise |
| Wok burner 4 turns counter-clockwise | 4 turns clockwise | |
| Auxiliary burner 2 turns counter-clockwise | 2 turns clockwise | |
BECKEN
HEAT SHIELD
(* Optional)
natural_image
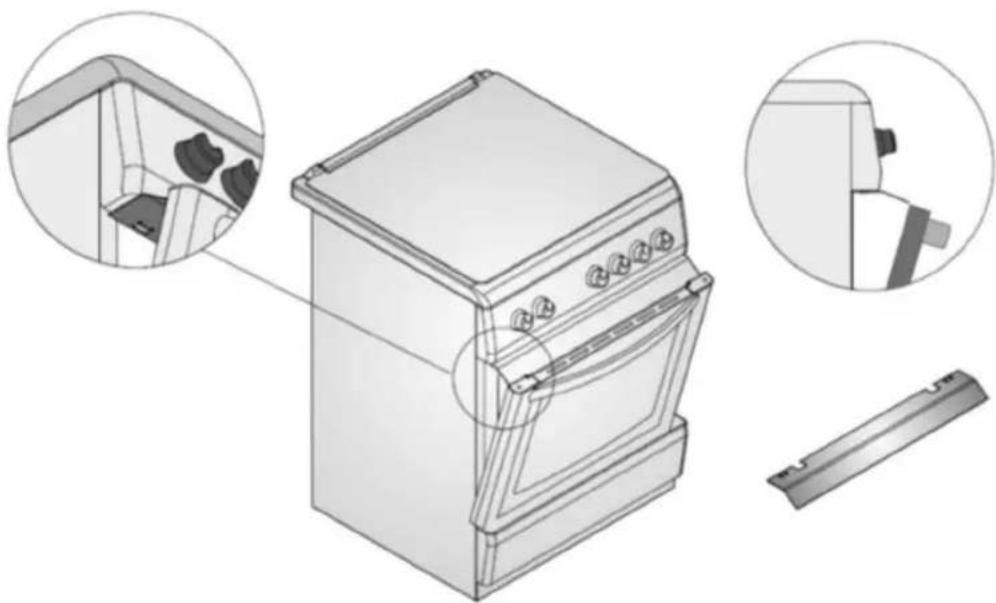
Illustration of a kitchen oven with close-up views of the lid and door (no text or symbols)A safety panel is designed to protect the control panel and the buttons when the oven is in Grill mode. Place the safety panel under control panel by opening the oven front cover glass.
Then, secure the safety panel in between the oven and front cover by gently closing the cover. Use this safety panel in order to avoid heat damaging the control panel and the buttons when the oven is Grill mode. Keep the cover open at the specified distance when cooking in Grill mode. The safety panel will provide an ideal cooking circumstance while protecting the control panel and buttons.
[you can trust]
USING THE TURNSPIT
(*) Optional
If your stove has a turnspit option please follows recommendations below. Install the turnspit hook to the fixing hole on the stove cavity. Put the desired food to be cooked on the turnspit and lock with the forks and screws. Install the turnspit on the turnspit motor as shown below and operate the turnspit system using the command knob on the control panel.


natural_image
3D technical illustration of a mechanical housing assembly with internal components and tool tips (no text or symbols)Free standing gas/electric stove | Cocina de gas/eléctrica independiente Fogão a gás/elétrico
BECKEN
2.3. Maintenance
- Disconnect the stove from the socket.
- While the oven is operating or shortly after it starts operating, it will be extremely hot. Avoid touching its heating elements.
- Never clean its interior, panel, lid, trays and all other oven parts using tools like hard brushes, a cleaning mesh or a knife. Do not use abrasive, scratching agents and detergents.
- After cleaning the interior of the oven with a soapy cloth, rinse it and then dry it thoroughly with a soft cloth.
- Clean the glass surfaces with a special glass cleaning agent.
- Do not clean the oven with steam cleaners.
- Before opening the oven's top lid, clean any spilled liquid from the lid. Before closing the lid, ensure that the stove table is cooled enough.
- Never use flammable agents like acid, thinner and gasoline when cleaning your oven.
- Do not wash any part of your oven in dishwasher.
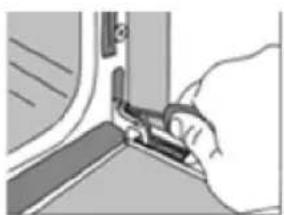
Removing the oven door:
natural_image
Illustration of a hand using a tool to adjust or install a component near a window (no text or symbols visible)
natural_image
Close-up of a mechanical joint or bracket with no visible text or symbols
natural_image
Illustration of a person leaning against a wall-mounted device (no text or symbols visible)Changing the oven lamp:
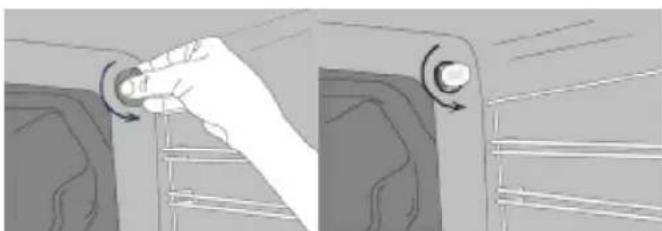
Let the stove's cavity and grill burner or heating elements cool down. Cut off the stove's electrical connection before changing the lamp. Replace it with a 15-25 W, 300 °C temperature resistant lamp.
natural_image
Illustration of a hand pressing down on a mechanical component with a circular motion indicator (no text or symbols)[you can trust]
2.4. Troubleshooting
Electrical equipment
| Problem Possible Causes Suggested Solutions | ||
| The oven is not working. | Fuse malfunction or automatic fuse blown. | Check the general fuse box and make the necessary corrections if there are any thrown breakers. Check the general fuse box to see if the automatic fuse or the breakers are thrown off. If the problem persists, contact the Customer Support Service for maintenance. |
| The device is unplugged from the grounded power socket. | Make sure the device is plugged in. | |
| The oven light is not working. | The stove's lamp is defective. | Replace the lamp. |
| There is no current. | Check the general fuse box and make the necessary corrections if there are any thrown breakers. Check the general fuse box to see if the automatic fuse or the breakers are thrown off. If the problem persists, contact the Customer Support Service for maintenance. | |
| The oven is not heating. | The stove temperature and/or cooking mode has not been set. | Set the cooking mode and temperature. |
| There is no current. | Check the general fuse box and make the necessary corrections if there are any thrown breakers. Check the general fuse box to see if the automatic fuse or the breakers are thrown off. If the problem persists, contact the Customer Support Service for maintenance. |
Gas equipment
| Problem Possible Causes Suggested Solutions | ||
| The gas burner does not spark ignition. | There is no any current. | Check the general fuse box and correct if there are any thrown breakers. |
| The main gas valve is turned off. | Turn on the main gas valve. | |
| The gas hose is bent. | Connect the gas hose out properly. | |
[you can trust]
| No gas comes from the gas burner. | The burner injectors are clogged. | Clean the injectors. |
| The gas hose is bent. | Connect the gas hose properly. | |
| Uneven flame / No flame. | The burner injectors are clogged. | Clean the injectors. |
| The burners might be wet. | Dry the burner parts carefully. | |
| The burner caps might not be placed correctly. | Make sure the caps and the burners are placed correctly. | |
| The main gas valve is turned off. | Turn on the main gas valve. | |
| The gas bottle is empty (LPG is used). | Replace with new bottle. |
If the problem persists:
- Cut the electricity connection to the stove (turn off the circuit breaker).
- Call the manufacturer, its services agent or a similarly qualified person.
IMPORTANT
Do not try to repair any appliance parts by yourself
- Technical Specifications
| SPECIFICATIONS 60 x 60 | |
| Outer width 600 mm | |
| Outer depth 660 mm | |
| Outer height 850 mm | |
| Inner width 445 mm | |
| Inner depth 445 mm | |
| Inner height 330 mm | |
| Oven lamp 15-25W | |
| Thermostat 50-250 °C | |
| Electric supply 220-240 V AC, or 230 V AC, 50-60 Hz. | |
| Bottom heating element 1300 W | |
| Top heating element | 850 W |
| Grill heating element | 2000 W |
[you can trust]
| BURNER INJECTOR VALUES ACCORDING TO THE GAS TYPE | LPG | Natural Gas | |||
| G30-30 mbar | G20-20 mbar | G25-25 mbar | G20-25 mbar | ||
| Wok Burner* | Injector | 0.90 mm | 1.20 mm | 1.20 mm | 1.20 mm |
| Power | 3.00 kW | 3.00 kW | 3.00 kW | 3.10 kW | |
| Consumption | 218 gr/h | 0.290 m^3/h | 0.311 m^3/h | 0.290 m^3/h | |
| Rapid Burner | Injector | 0.80 mm | 1.15 mm | 1.15 mm | 1.05 mm |
| Power | 2.50 kW | 2.50 kW | 2.50 kW | 2.50 kW | |
| Consumption | 182 gr/h | 0.234 m^3/h | 0.258 m^3/h | 0.237 m^3/h | |
| Semi-rapid Burner | Injector | 0.65 mm | 0.97 mm | 0.97 mm | 0.92 mm |
| Power | 1.70 kW | 1.70 kW | 1.70 kW | 1.70 kW | |
| Consumption | 124 gr/h | 0.168 m^3/h | 0.176 m^3/h | 0.160 m^3/h | |
| Auxiliary Burner | Injector | 0.50 mm | 0.72 mm | 0.72 mm | 0.70 mm |
| Power | 0.90 kW | 0.90 kW | 0.90 kW | 0.95 kW | |
| Consumption | 65 gr/h | 0.085 m^3/h | 0.093 m^3/h | 0.094 m^3/h | |
| Oven Burner | Injector | 0.75 mm | 1.05 mm | 1.05 mm | 1.00 mm |
| Power | 2.20 kW | 2.20 kW | 2.20 kW | 2.20 kW | |
| Consumption | 160 gr/h | 0.220 m^3/h | 0.233 m^3/h | 0.215 m3/h | |
| Grill Burner | Injector | 0.60 mm | 0.90 mm | 0.90 mm | 0.85 mm |
| Power | 1.40 kW | 1.40 kW | 1.40 kW | 1.40 kW | |
| Consumption | 102 gr/h | 0.140 m^3/h | 0.163 m^3/h | 0.138 m^3/h | |
BECKEN
4. Post-Sale Service
Becken has designed this appliance in order to guarantee maximum reliability. However, if a problem occurs do not attempt to open the appliance - there is a risk of electrical shock. If you are not able to solve the problem, please contact the Customer Support Service of any Worten, Modelo or Continente store in order to be assisted. Worten Equipamentos para o Lar provides a 2-year warranty for manufacturing defects from the date of purchase of the appliance.
WARNING: any attempt to repair the appliance without contacting the manufacturer or seller will void the warranty.
All users must be familiar with these instructions. Knowing what could go wrong can help prevent problems from occurring.
5. Environmental Protection
In order to protect the environment, we strive to reduce the volume of packaging used, limiting it to three easily sorted materials: cardboard, paper and plastic. The appliance is manufactured using recyclable materials after disassembled by a specialized company. Please comply with local regulations concerning the recycling of all materials.

natural_image
Symbol of a trash bin crossed with no signage or text (no readable text)[you can trust]
Free standing gas/electric stove | Cocina de gas/eléctrica independiente Fogão a gás/elétrico
EN
35
Estimado cliente:
natural_image
Diagram of a house interior with an oven, roof, and air duct (no text or symbols)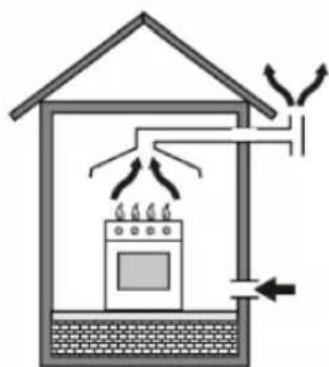
natural_image
Diagram of a house interior showing airflow from a stove to a roof, with no text or symbols present.natural_image
Diagram showing a window and vertical structure with an arrow indicating direction, no text or symbols present
natural_image
Simple line drawing of a room with a door, window, and coffee cup (no text or symbols)[you can trust]
Tapa del quemador
Quemador
natural_image
Three-panel illustration showing a water basin with mannequins, a central cylinder, and a hand holding a tool (no text or symbols)natural_image
Mechanical assembly diagram showing a valve, screwdriver, and connector components (no text or labels)
natural_image
Illustration of two hands performing manual repair: one using a pipe fitting with a bolt, the other holding a tool (no text or symbols present)[you can trust]
natural_image
Illustration of a kitchen oven with close-up views of the door and side panel (no text or symbols)natural_image
Technical illustration of a mechanical housing assembly with internal components and a tool (no text or symbols)Free standing gas/electric stove | Cocina de gas/eléctrica independiente Fogão a gás/elétrico
BECKEN
2.3. Mantenimiento
Removing the oven door:

[you can trust]
Changing the oven lamp:
natural_image
Illustration of a hand pressing down a button on a vehicle door panel (no text or symbols visible)natural_image
Symbol of a trash bin crossed with no visible text or numbers, accompanied by a horizontal line and a rectangular block below (no text or symbols present)Caro(a) cliente,
natural_image
Diagram of a greenhouse with an oven, air heating system, and airflow direction arrows (no text or labels)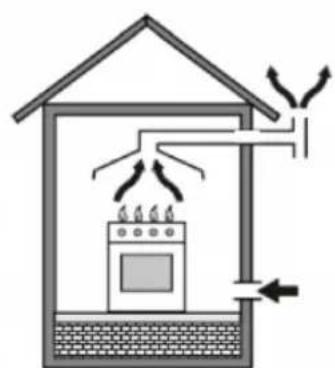
natural_image
Diagram of a house interior showing fire extinguishing from a stove, with airflow arrows indicating heat distribution (no text or labels)natural_image
Diagram showing a window and vertical structure with an arrow indicating direction (no text or symbols)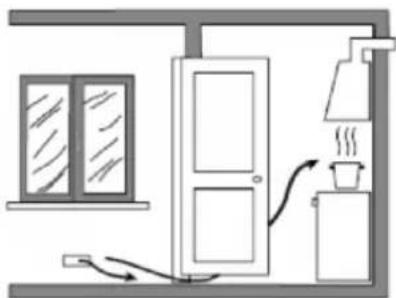
natural_image
Simple line drawing of a room with a door, window, and coffee cup (no text or symbols)[you can trust]
Correto Correto Corretolncorreto
[you can trust]
FIXAÇÃO À PAREDE
(* Opcional)
natural_image
Three-panel illustration showing a water basin with mannequins, a central cylinder, and a hand holding a tool (no text or symbols)natural_image
Mechanical assembly diagram showing a valve, screwdriver, and connector components (no text or labels)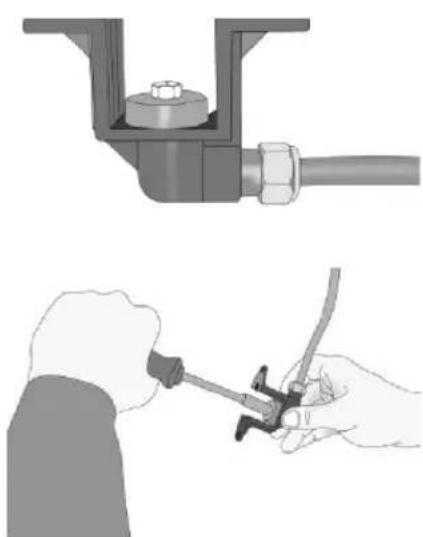
natural_image
Illustration of two hands performing manual tasks: one using a valve assembly and the other holding a tool (no text or symbols present)[you can trust]
natural_image
Illustration of a kitchen oven with close-up views of the door and side panel (no text or symbols)natural_image
Technical illustration of a mechanical housing assembly with internal components and a tool (no text or symbols)Free standing gas/electric stove | Cocina de gas/eléctrica independiente Fogão a gás/elétrico
BECKEN
2.3. Manutenção
natural_image
Illustration of a hand pressing down a button on a vehicle door panel (no text or symbols visible)natural_image
Symbol of a trash bin crossed with no visible text or numbersBECKEN
102
[you can trust]
Free standing gas/electric stove | Cocina de gas/eléctrica independiente Fogão a gás/elétrico
PT
103
BECKEN
104
[you can trust]
- Free standing gas/electric stove
- INDEX
- SAFETY INSTRUCTIONS 4
- OPERATING INSTRUCTIONS 10
- TECHNICAL SPECIFICATIONS 30
- BECKEN
- SAFETY INSTRUCTIONS
- Important Warnings
- Assistance
- Power Supply
- Power Cord and Other Cables
- Humidity and Water
- Cleaning
- General Precautions
- Operating Instructions
- Product Description
- Product usage
- INSTALLATION ELECTRICAL CONNECTION
- GAS CONNECTION
- Connection and Security:
- WALL FIXING
- WARNING!
- USAGE
- Using the stove's gas burners:
- Gas oven:
- Using an electrical stove:
- Nozzle change operation for stovetop gas burners:
- Nozzle change operation for oven burners:
- Reduced Flame Adjustment:
- USING THE TURNSPIT
- Maintenance
- Removing the oven door:
- Changing the oven lamp:
- Troubleshooting
- If the problem persists:
- IMPORTANT
- Post-Sale Service
- Environmental Protection
- Mantenimiento
- FIXAÇÃO À PAREDE
- Manutenção
Brand : Becken
Model : BMS4508
Category : Cooker