KBVVC4527 - Vacuum Cleaner Kubo - Free user manual and instructions
Find the device manual for free KBVVC4527 Kubo in PDF.


| Product Type | Upright Vacuum Cleaner |
| Brand | Kubo |
| Model | KBVVC4527 |
| Dimensions (L x W x H) | 12 x 12 x 48 inches |
| Weight | 15.4 lbs |
| Power Consumption | 1200 W |
| Voltage | 120 V / 60 Hz |
| Cord Length | 25 ft |
| Dust Capacity | 2.0 L |
| Filtration System | HEPA |
| Noise Level | 75 dB |
| Bagless | Yes |
| Cleaning Path Width | 15 inches |
| Brush Roll Type | Motorized |
| Attachments Included | Crevice tool, dusting brush, upholstery tool |
| Adjustable Suction | Yes |
| Filter Maintenance | Washable HEPA filter |
| Safety Certification | ETL |
Frequently Asked Questions - KBVVC4527 Kubo
User questions about KBVVC4527 Kubo
0 question about this device. Answer the ones you know or ask your own.
Ask a new question about this device
Download the instructions for your Vacuum Cleaner in PDF format for free! Find your manual KBVVC4527 - Kubo and take your electronic device back in hand. On this page are published all the documents necessary for the use of your device. KBVVC4527 by Kubo.
USER MANUAL KBVVC4527 Kubo
natural_image
Black robotic vacuum cleaner with a circular sensor and control panel, displayed alongside an adjacent smartphone (no visible text or symbols)Thank you for purchasing this product.
The quality of this appliance has been certified by several laboratory tests. This instructions manual is provided to simplify the use of the appliance as well as to guarantee a safe use.
Please read carefully the instructions and safety measures described in this manual.
We sincerely hope you will be satisfied when using your new appliance.
INDEX
1. SAFETY INSTRUCTIONS 4
1.1. Power Supply 5
1.2. Power Cord and Other Cables 6
1.3. Humidity and Water 6
1.4. Cleaning 6
1.5. General Precautions 6
2. OPERATING INSTRUCTIONS 8
2.1. Product Description 8
2.2. Product usage 9
2.3. Maintenance 27
2.4. Troubleshooting 33
3. TECHNICAL SPECIFICATIONS 36
- POST-SALE SERVICE 37
- ENVIRONMENTAL PROTECTION 37
1. SAFETY INSTRUCTIONS
 | WARNING |  |
| RISK OF ELECTRIC SHOCKDO NOT OPEN | ||
| Warning: to avoid the risk of electric shock,do not remove the cover. The interior doesnot contain any parts that can be repairedby the user. Ask for assistance from theCustomer Support Service. | ||
Important Warnings
Before using your appliance read these instructions manual carefully and keep it in a safe place as you may need to consult it in the future. Before turning on your appliance, and to ensure a safe and correct operation, do not use if:
- It has fallen to the ground;
- You notice any evidence of damage;
- Any anomaly occurs during its operation.
To avoid hazards or deterioration of your appliance through incorrect use it is advisable to read these instructions thoroughly.
Your appliance should not be used for other purposes than the ones intended and solely for household use. Any damage resulting from using the appliance outside this scope, any incorrect use, as well as any manual modifications to the
product will not be covered and automatically voids the warranty.
Assistance
In case of malfunction, take your appliance to the Customer Support Service for assistance.
This appliance can be used by children aged from 8 years and above if they have been given supervision or instruction concerning use of the appliance in a safe way and if they understand the hazards involved. Cleaning and user maintenance shall not be made by children unless they are older than 8 and supervised.
Keep the appliance and its cord out of reach of children aged less than 8 years.
Appliances can be used by persons with reduced physical, sensory or mental capabilities or lack of experience and knowledge if they have been given supervision or instruction concerning use of the appliance in a safe way and understand the hazards involved.
Children shall not play with the appliance. These instructions are also available at www.suporteworten.pt
1.1. Power Supply
Make sure the main voltage is compatible with the appliance's. If this is not the case, please consult the Customer Support Service.
1.2. Power Cord and Other Cables
Do not tangle the cord or pull it to disconnect the appliance. Also, keep the cord away from warm surfaces.
Never use the appliance if it has a damaged cable or socket.
Take it to the Customer Support Service for replacement.
1.3. Humidity and Water
Do not use your appliance in humid places. Do not allow the appliance to become wet under any circumstances as this may be dangerous. To avoid fire hazard or electric shock do not expose your appliance to humidity or water. Furthermore, do not place your appliance under water (e.g. for cleaning).
1.4. Cleaning
Before cleaning, be sure to switch off the appliance and remove the plug from the main power supply. Always allow the unit to cool down before cleaning.
To clean the exterior of the product, use a dry soft cloth only.
For more instructions on cleaning the item, see section "2.3. Maintenance".
1.5. General Precautions
- Please follow the instructions in the user manual which will help you to properly install and
operate this product and enjoy its advanced features. Please keep the instructions for future reference.
- Read all instructions before using the product.
- Maintenance and service operations are only to be carried out by authorized professionals.
- Any damage caused by manual modifications to the product is not covered by the warranty.
- If this product is used for other purposes than the ones originally intended, or if it is not correctly connected, the product may become damaged and the warranty will be voided.
- Instructions for use shall be provided with the appliance so the appliance can be used safely.
- The plug must be removed from the outlet before cleaning or performing maintenance jobs on the appliance.
- Only to be used with the power supply unit provided with the appliance.
- This appliance is intended for household use only.
2. OPERATING INSTRUCTIONS
2.1. Product Description

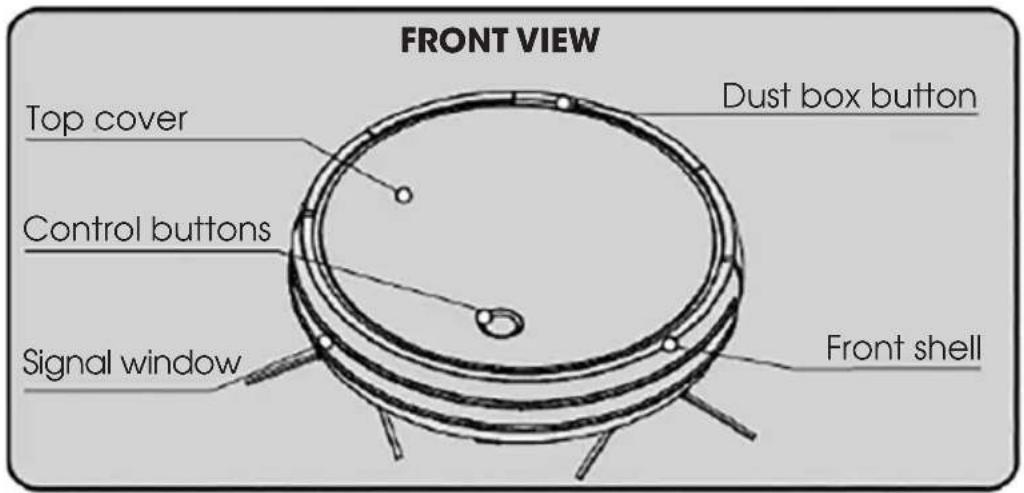
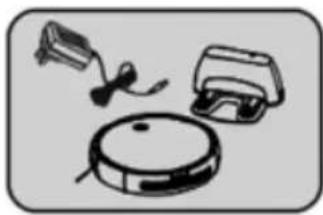
Main Body
*1 pc

Charging Station *1 pc

Side Brush
*2 pcs

Adaptor *1 pc

Instruction
*1 pc

Filter *1 pc

Clean Brush
*1 pc
Tips:
* There is one battery, two side brushes and one filter assembled in main body and there are two side brushes and one filter inside.
Accessories

2.2. Product usage
Safety Instruction
Before using the product, please observe the following safety precautions:
- Keep the instructions in a safe place where it can be found for future reference.
- When giving the product to others, please include the instructions.
- Improper operation will lead to serious personal injury and damage the product.
Caution
natural_image
Illustration of three cleaning devices: a vacuum cleaner, a washing machine, and a circular vacuum cleaner (no text or symbols)Only use the original adaptor, battery and charging station to avoid damaging the appliance and cause a fire due to electric shock and high voltage. If you find that the main body and accessories are damaged, please do not use the appliance and contact the Customer Support Service. No one is allowed to disassemble, perform maintenance or reassemble the machine.

natural_image
Illustration of a hand inserting a plug into an electrical outlet with a cross symbol (no text or labels)Unplug the appliance before any maintenance job. Do not touch the battery socket and the appliance when your hands are wet, otherwise it will cause electric shock. If the cord is damaged, to avoid danger, please contact the Customer Support Service and wait for professional personal to replace it.

natural_image
Illustration of a staircase with a circular object and a cross symbol (no text or labels)Don't use this product on stairs, hallways, etc without guardrail to prevent the vacuum cleaner from falling accidentally and causing personal injury.

natural_image
Simple line drawing of a pot with flames and a cross symbol (no text or labels)Do not place the machine near fire, inflammable, explosive and corrosive materials. Do not put your clothes or any part of your body (hair, finger, etc) into the main brush or the wheels, or it will cause personal injury.
Attention
natural_image
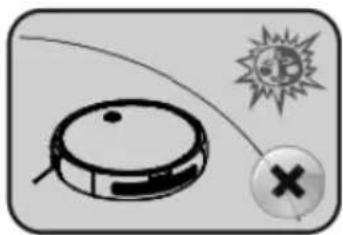
Simple line drawing of a robotic vacuum cleaner with a sun icon and a cross symbol (no text or labels)The appliance is for indoor use only.

natural_image
Illustration of a robotic vacuum cleaner with a magnifying glass and a checkmark (no text or symbols)Keep water, oil and other liquids away from the machine.

natural_image
Simple line drawing of a box with a coiled cable and a circular object (no text or symbols)Clean the floor of wires to avoid them becoming tangled into wheels and brushes.

natural_image
Illustration of a bottle, three cups, and a vacuum cleaner with a cross symbol (no text or labels)Remove all fragile objects.

natural_image
Two identical buttons with checkmarks and cross symbols, separated by a vertical line and a hatched base (no text or labels)The charging station and space isolator should be placed against the wall and a flat place, otherwise it may not work properly.
natural_image
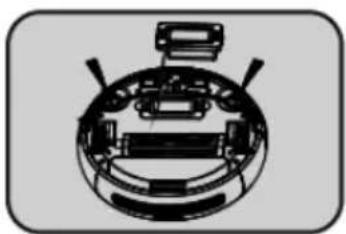
Diagram of a robotic vacuum cleaner with internal components and no visible text or symbolsTurn off the appliance when taking out the battery.

When not being used for a long time, disconnect the power.
natural_image
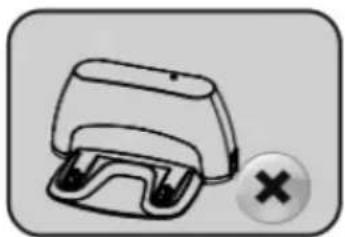
Simple line drawing of a device with a cross mark symbol (no text or labels)If the charging station is removed while working, the appliance may not be able to be recharged.

natural_image
Simple diagram showing broken fragments and a circular object with a cross, no text or symbols present.Check for shard objects such as glass, nails, etc prior to using the appliance to avoid damaging it.
natural_image
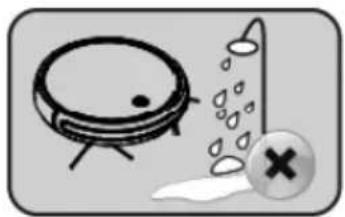
Simple line drawing of a cooking pot and shower with a cross mark (no text or symbols)Don't use this appliance in humid or flammable, explosive and corrosive environments.
Child Safety
• The appliance shall not be used by children.
- Children shall not play with the bag to avoid suffocation.
Battery
-
Only the original battery should be used with the appliance.
-
Please turn off the power switch before taking out the battery.
-
The battery must be taken out before discarding it.
-
If you want to replace the battery, please contact our Customer Support Service. Using the wrong battery can cause accidents.
-
If the battery leaks, please do not touch the liquid. Wipe the liquid with a dry cloth and put the battery into the recycling bin or bring it to a recycling centre. Do not throw it away.
- The battery includes hazardous substances, so please discard of it into the adequate recycling site according to local environmental protection rules and regulations.
Suitable Surfaces
The cleaner is suitable to the following surfaces:

natural_image
Close-up of a textured surface with diagonal striations and no visible text or symbolsWooden

natural_image
Close-up of a tiled floor with horizontal lines and a small object on the right side (no text or symbols visible)Tile
Carpet
Exception Clause
The following product circumstances are not covered by the warranty:
A. The damage to the product is a result of the user's operation and storage against our Manual;
B. The whole machine and its components have been out of warranty period;
C. The damage to the product is a result of repairs not or authorized by our company;
D. Proof of purchase can't be provided;
E. The model in the warranty card is inconsistent with that of the product for repair or it has been altered;
F. The damage to the product is a result of elements beyond control such as natural disasters;
G. Failure or damage to the product is a result of accidental or human factors (including but not limited to, liquid feeding, improper insertion and pulling, scratch, bumping, inappropriate voltage input, etc).
Product Installation
Please install the battery before using the cleaner.

- Connect the battery pack terminal to the appliance; then, press the battery pack into the battery box.
- Place the charging station on a flat ground surface against the wall. Clean up dust and other debris and stick the charging station on the floor. Then, insert the adapter into the socket.
Tips:
The charging station can't be placed on carpet. It is recommended to place it at a fixed position for a long time. Please don't move the charging station during cleaning.

- Place the charging station on a flat ground surface against the wall. Make sure no obstacles are within 3 meters and within 1 meter of it.
- Connect the adapter and charging station.
Control Button
natural_image
Simple circular diagram with concentric rings inside a rounded rectangle (no text or symbols)| Control Button | |
| Shortly press Turn On/off button | |
| In standby Double click | Recharge button |
Work Mode: Manual Mode

natural_image
Hand holding a small object over a circular device (no text or symbols visible)Auto Cleaning
Shortly-press the @button, the red indicator will light (standby mode). Then, click the button and the indicator will turn green and it will start cleaning automatically.

natural_image
Simple line drawing of a zigzag arrow pointing right, no text or symbols presentAuto Recharge
When the vacuum cleaner is in standby mode, double click the @button. The indicator will turn green and blink at the same time, meaning it has entered the auto-recharging mode.
Operation guideline of indicators
| No. | State Display Operation | ||
| 1 | Turn-off | ◎ Light-off | After 5 mins in standby mode, the appliance will enter deep sleep mode. In deep sleep mode, if it has low battery or if it remains in that mode for more than 8 hours, the appliance will power off. |
| 2 | Turn-on | ◎ Red Light-on | Short-press ◎ and enter the Standby mode. |
| 3 | Cleaning | ◎ Green Light-on | Short-press ◎ and enter the Auto Cleaning mode. |
| 4 | Recharge | ◎ Flash Green | Double click ◎ and it will enter the Recharge mode. |
| 5 | Charging | ◎ Flash Red | |
| 6 | Error | ◎ Flash red and beep | |
| 7 | Fully Charged | ◎ Light off | |
| 8 | Pairing mode | ◎ Flash Orange | In standby, long-press ◎ for 6 sec. until it ◎ links orange. |
Charging Methods Manual Charging:

Charging with the charging station:
Connect the adapter to the charging station and then insert it into the outlet. Place the appliance on the charging station to charge. (The green Ⓞ indicator will flash when looking for a charging station, the green indicator on charging station will be off when charging is completed successfully; the red Ⓞ indicator will flash during charging and remain on after fully charged).
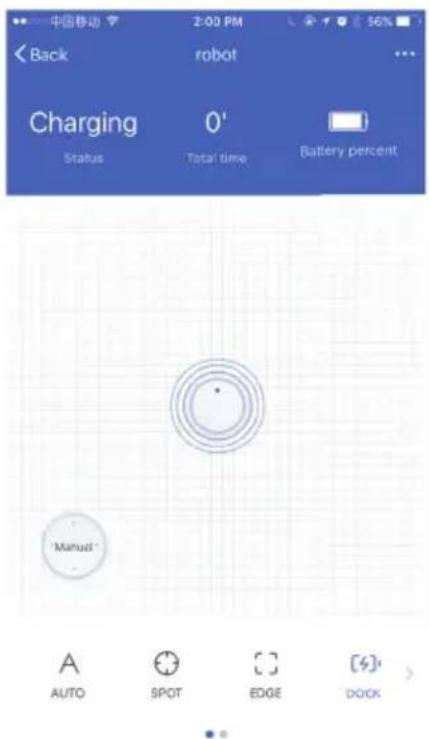
Click "DOCK" on the APP and the appliance will search for the dock station automatically

natural_image
Illustration of a robotic vacuum cleaner transforming into a connected device (no text or symbols)Auto Charging:
Automatic Charging:
When it appliance's battery is low, the green ◎ indicator will flash and enter the Recharge mode.
App Operation Guide ATTENTION
Due to software upgrades or other reasons, this guide's operation will not update regularly. This document is for reference only, unless otherwise prescribed. All statements, information and recommendations in this document do not constitute any express or implied warranties.
SUMMARY
The Tuya Smart app is an intelligent home application developed for Android and IOS platforms. This document intends to guide initial user's operation steps and inform on software precautions. The software publisher of this app will provide technical support to users, which may cooperate with our company. For specific service content and rules, refer to the app's user agreement.
ENVIRONMENT OF TEST AND USE
On an Android 4.0/IOS 7.0 or higher, search "Tuya smart" and download it by scanning the QR code (as shown below). Android user can use the App store.

PREPARATION
- Long press® until you hear a buzz sound and it starts blinking to enter pairing mode.
- Open your phone's "Setting" interface and enter to set your WLAN (Wireless LAN).
- Find this app on your app list and click to open it.
Registration
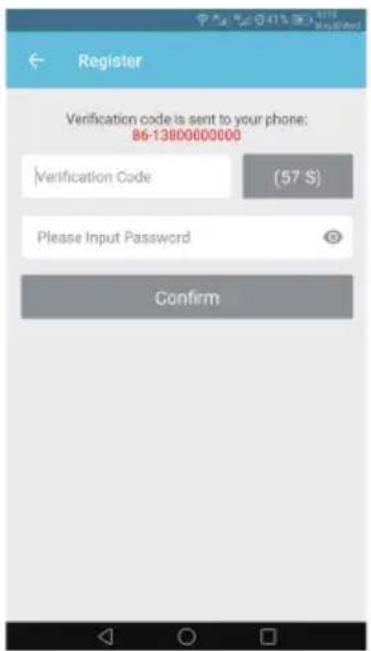
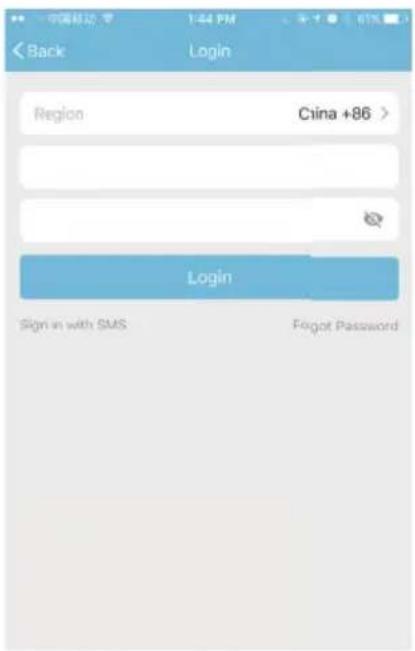
When you open the app, will enter the interface below. Press "Login" and enter a registered account number, phone number or email address and then enter a password to register. You can also click the "Register" button below.
Since there is no current registered user, you need to start by making your register. Enter the phone number or email address in the interface shown below and then click "Next".

flowchart
graph TD
    A["Login"] --> B["Register"]
    C["Silverstar Smart"] --> D["Login"]

Enter the verification code and password you want to set to complete registration. Click "Confirm" enter the login page.
If you are using an already existing account, just click "Login" to enter. If you log into an account and the password is wrong, you can click "Forgot Password" to reset your password.
Forgot your password
If you forget your, click "Forgot Password" to reset it. Press "Request Password", add your mobile number or email address and click "Next" to verify your identity.
Shown as follows, enter into safety verification, Enter the verification code and the new password and press "Confirm". If it fails, do it again.


Add Device
Click "Add Device" Select the device you want to
connect as "Robot vacuum".
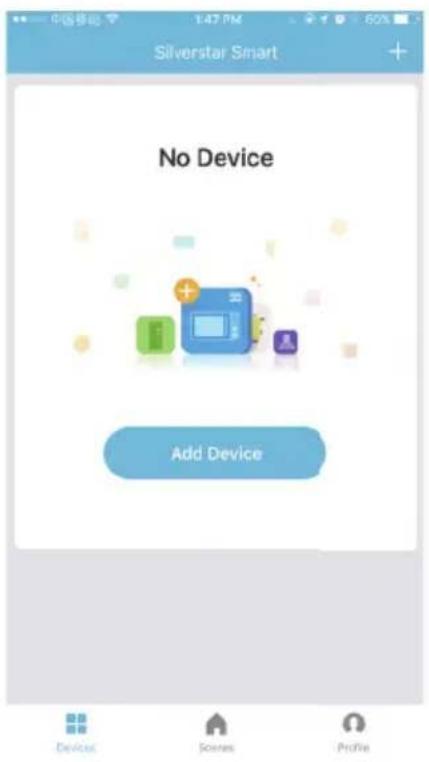

Long press the on/off button CLEAN for 5 seconds until the Wi-Fi indicator light flashes. Click "Confirm" and the indicator will blink rapidly.
Input your home Wi-Fi password and click "Confirm".


Wait for your mobile to connect to the Internet (as shown below)

The device has been added successfully. Click "Done" to access the interface below.

Operation Control Interface
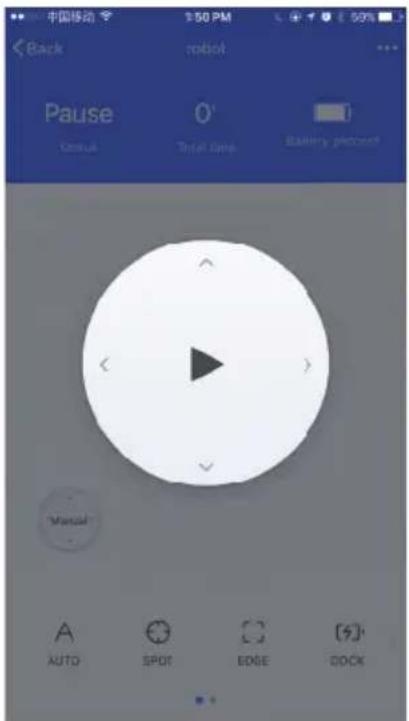
Enter into operation using the control interface as bellow:
On the operation control interface, click "Manual" to open the manual control panel stopping the standby mode. Click on any arrow to operate the robot accordingly.
![Back robot Pause Status 0' Total time Battery percent Manual AUTO SPOT EDGE [秒] DOCK](/content/2026/05/935373/images/13bee188e29f86925ac65d338633bf900407e2fa3807c4476235ae67ceefccd4.jpg)
Click the "Timer" function to set the current time.

Click "Timer" and then enter "Add Schedule" to set a cleaning schedule.

Add the schedule and, after setting the time, click "Save" as below.

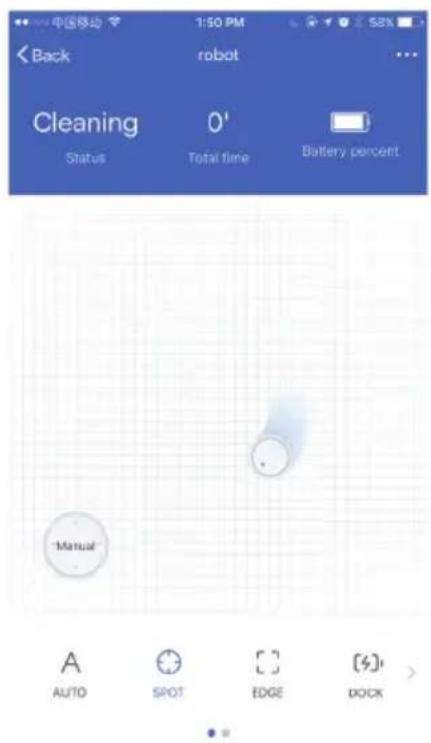
Click "SPOT" and the appliance will enter into spot cleaning as below
Click "DOCK" and the appliance will search for the dock station to recharge automatically.
2.3. Maintenance
Daily Storage
natural_image
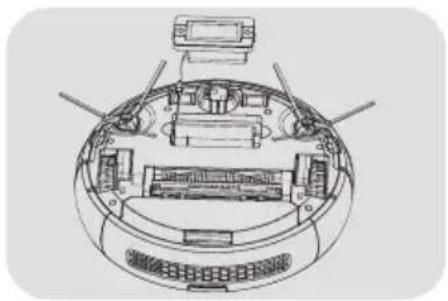
Top-down schematic of a vehicle dashboard with internal compartments and control panels (no text or labels)When not using the appliance for a long time, fully charge the battery first and then store it in a dry place.
Cleaning the Charging Poles Pieces

- Start by turning off the power switch or disconnect the appliance from the plug.
- Clean the charging pole pieces monthly with a dry cloth.
- Do not use oil when cleaning.
Cleaning the Dustbin
Assembling and Disassembling the Dustbin
natural_image
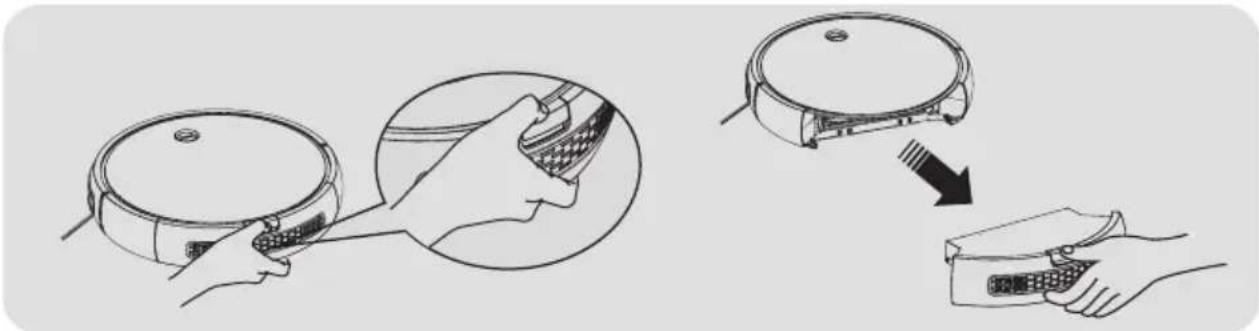
Illustration showing a robotic vacuum cleaner being processed with a device, including a close-up view of the component (no text or symbols present)Press and hold the dustbin button and then remove the dustbin.
Cleaning the dustbin

natural_image
Illustration of hands holding a mechanical component with an upward arrow indicating motion (no text or symbols)
natural_image
Illustration of two hands assembling a mechanical component, showing a curved assembly and a grid-like structure (no text or symbols)- Open the baffle, and then pour the dust. Recommendation: the dustbin should be cleaned regularly.
- Clean the dustbin with the cleaning brush.
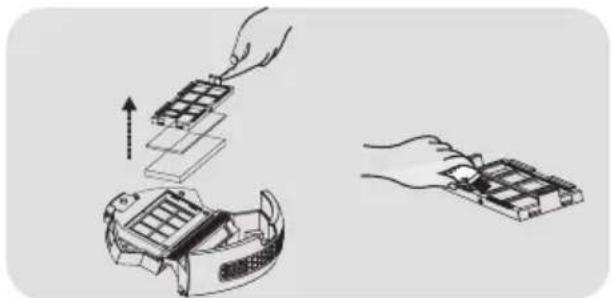
natural_image
Illustration of three steps of a robotic device with hand and base views (no text or symbols)- After removing the filter, wipe off the dust with the cleaning brush.

- The dustbin can be washed. (Note: the dust box should be completely air-dried before re-inserting it)
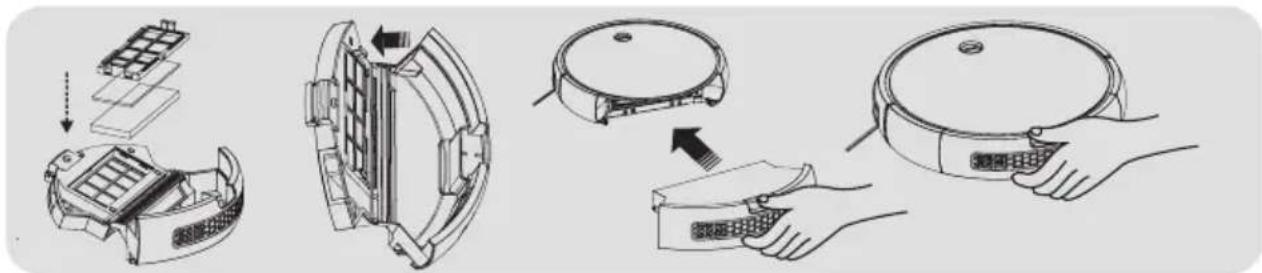
natural_image
Illustration of a robotic vacuum cleaner's internal components and assembly, showing exploded view and hand positioning (no text or symbols)- After cleaning, re-assemble the filter in the dustbin and then install the dustbin into the appliance.
Cleaning the Main Brush
Disassembling the Main Brush

natural_image
Line drawing of hands installing or adjusting a device on a circular base (no text or symbols)
natural_image
Illustration of a hand inserting into a device into a rack (no text or symbols visible)- Push the locking-bar buckle and lift it upward.
- Clutch the main brush and lift it upward.

natural_image
Line drawing of a robotic vacuum cleaner with internal components and a hand holding a flashlight (no text or symbols)- Take out the middle brushes and its scraper assembly.
Cleaning the main brush and the rubber brush

natural_image
Illustration of hands installing or adjusting electronic components on a device (no text or symbols visible)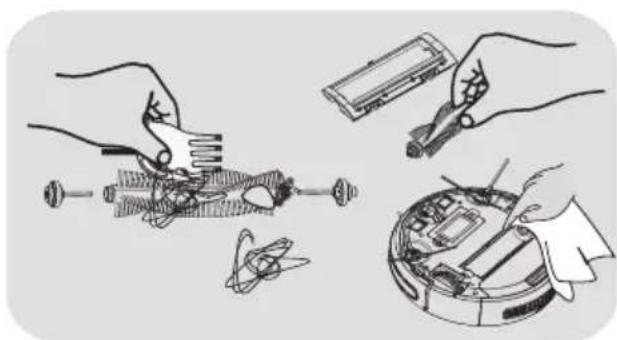
natural_image
Illustration of hands assembling electronic components with tools and a device (no text or symbols visible)- Please clean the main brush with the cleaning brush regularly.
- Please remove the hair and other entanglements on the main brush regularly.
Cleaning the Side Brush

natural_image
Technical line drawing of a mechanical component with no visible text or symbols
natural_image
Technical line drawing of a mechanical device with multiple components and no visible text or symbols- Unscrew the screws on the side brush with a screwdriver.
- Remove the side brush and remove any hairs and trash on and inside the cell.
Cleaning the Wheels

natural_image
Diagram of a device with hands operating the top panel and internal components, no visible text or symbolsClean the front, left and right wheels regularly with a cleaning brush.
Cleaning the Sensors
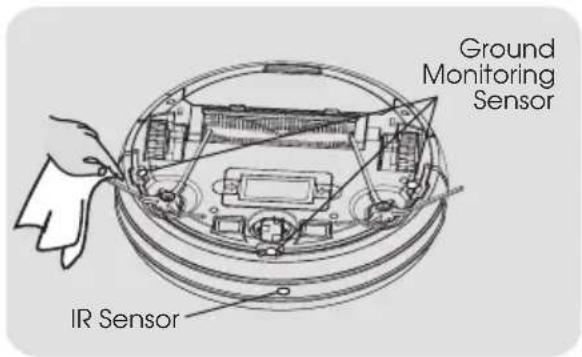
After each cleaning, use a dry cotton cloth to clean the transparent plate to prevent dust from being accumulated on the plate and to assure the appliance performs accordingly.
Use of mop with water tank
Only use the mop with water tank on hard floors.
Do not use it on carpet. Wet the mop with water before use. Remove and empty the water tank when you finish mopping and when charging to avoid leaving the charging location wet.

Water tank Mop
Assemble the mop water tank
Wash the mop
Wash the mop

natural_image
Illustration of hands installing or adjusting a device on a vehicle chassis (no text or symbols visible)
natural_image
Illustration of a hand pressing down on a device component with an arrow indicating motion (no text or symbols)
natural_image
Illustration of a faucet spraying water onto a leaf (no text or symbols)2.4. Troubleshooting
| Error-flash indicator | Fault Names Fault Forms Solutions | ||
| Red light flashes twice with one sound | Left wheel failure | The left wheel doesn’t rotate and is overloaded. | Check if there are twisters on the left wheel of the device. |
| Red light flashes three times with one sound | Right wheel failure | The right wheel doesn’t rotate and is overloaded. | Check if there are twisters on the right wheel of the device. |
| Red light flashes four times with one sound | Device taking off failure | The device takes off and stops in 1 second. | Take the device back to the floor. Do not suspend it in the air. |
| Red light flashes five times with one sound | Front wheel failure | The front wheel gets stuck and doesn’t rotate. | Check if there are twisters on the small front wheels. |
| Red light flashes six times with one sound | Ground inspection failure | There is a problem with the ground inspection. | Check if the sensing window at the bottom of the device is abnormally shielded. |
| Red light flashes seven times with one sound | Low electricity or battery | Battery power has been extremely low (but not at a critical point to recharge). | Return the device to the charging station for charging. |
| Red light flashes eight times with one sound | Front bumper failure | The impact switches on the left and right front shells can’t be restored. | Check if the device impact buffer is normal or not. |
| Red light flashes nine times with one sound | Main brush failure | The main brush wheel is overloaded or under loaded. | Check if there is foreign matters on the main brush of the device. |
| Red light flashes ten times with one sound | Side brush failure | The side-sweeper wheel is overloaded or under loaded. | Check if there is foreign matter on the side brush of the device. |
| Red light flashes eleven times with one sound | Wall inspection failure | There is a problem with the wall inspection. | Check if the transparent window of the wall inspection is shielded or obstructed by hair and cloth. |
| Red light flashes twelve times with one sound | Fan failure The | fan doesn’t rotate but with large current. | Check if the fan blades are loose or tangled in hair and cloth. |
| Red light flashes fourteen times with one sound | Charging failure | The device can’t be powered or show the charging state. | Check if the device is connected to the charging station. |
Warm tips: If corresponding faults cannot be corrected, please contact our Customer Support Service.
3. TECHNICAL SPECIFICATIONS
| Main Body Parameters Accessories Parameters | |||
| Working Voltage DC 14.8 V Adaptor | |||
| Rated Power 24 W | Output Voltage | DC 19 V | |
| Battery Li-ion battery Output Current 600 mA | |||
| Battery Capacity 2600 mAh | |||
| Charging Time About 5 H Charging Station | |||
| Working Time | 90-120 min | Input Voltage DC | 19 V |
| Work Temp Rang | -20 °C ~ 50 °C | ||
| Work Humidity Range | ≤ 80 % RH | ||
| Voice | ≤ 70 dB | ||
| N.W. | 4.6 Kg | ||
| Specification | ∅ 326 x 80 mm | ||
Note: we reserve the right to, due to technology, make design changes to improve products. The power of interpretation is owned by our company.
4. POST-SALE SERVICE
KUBO has designed this appliance in order to guarantee maximum reliability. However, if a problem occurs do not attempt to open the appliance - there is a risk of electrical shock. If you are not able to solve the problem, please contact the Customer Support Service of any Worten, Modelo or Continente store in order to be assisted. Worten Equipamentos para o Lar provides a 2-year warranty for manufacturing defects from the date of purchase of the appliance.
WARNING: any attempt to repair the appliance without contacting the manufacturer or seller will void the warranty.
All users must be familiar with these instructions. Knowing what could go wrong can help prevent problems from occurring.
5. ENVIRONMENTAL PROTECTION
In order to protect the environment, we strive to reduce the volume of packaging used, limiting it to three easily sorted materials: cardboard, paper and plastic. The appliance is manufactured using recyclable materials after disassembled by a specialized company. Please comply with local regulations concerning the recycling of all materials.

natural_image
Simple line drawing of a trash bin with crossed lines indicating no waste or restriction (no text or symbols)Estimado cliente:
natural_image
Illustration of three cleaning devices: a vacuum cleaner, a remote control unit, and a circular vacuum cleaner (no text or symbols)natural_image
Illustration of a hand using a power outlet to clean electrical wiring (no text or symbols)natural_image
Diagram of a staircase with railing and circular object, no text or symbols presentnatural_image
Simple line drawing of a pot with flames and a cross symbol (no text or labels)natural_image
Simple line drawing of a robot with a sun icon and cross symbol (no text or labels)natural_image
Illustration of a vacuum cleaner next to a droplet and a checkmark (no text or symbols)natural_image
Simple line drawing of a car interior with a circular object and a cross mark (no text or symbols)natural_image
Illustration of a bottle, cups, and a vacuum cleaner with a cross symbol (no text or labels)natural_image
Two identical panels showing checkmarks and an X symbol, separated by a vertical line and a hatched bottom section (no text or labels)natural_image
Diagram of a circular device with internal components and connectors (no text or symbols)natural_image
Simple line drawing of a mechanical component with a cross symbol (no text or labels)natural_image
Simple diagram showing a broken ring with broken fragments and a cross symbol, no text or labels present.natural_image
Simple line drawing of a cooking pot and a shower with a cross symbol (no text or labels)natural_image
Close-up of a textured surface with diagonal striations and no visible text or symbols
natural_image
Interior view of a tiled room with horizontal slats and a curved floor (no text or symbols visible)
natural_image
Uniform gray textured surface with no visible text, symbols, or distinct featuresnatural_image
Simple geometric diagram of a ring inside a rounded rectangle (no text or symbols)natural_image
Diagram showing a robotic vacuum cleaner transforming into a connected device (no text or symbols present)Carga automática:
PREPARACIÓN


Añadir dispositivo

natural_image
Top-down schematic of a vehicle dashboard with steering wheel, dashboard, and control panel (no text or labels)natural_image
Illustration showing a hand holding a kitchen appliance with a close-up view of the lid and a close-up of its side panel being inserted (no text or symbols present)natural_image
Two-step diagram showing hand positioning of a mechanical component, with one upward and the other rightward (no text or symbols)natural_image
Illustration of a robotic device with hand positioning and assembly process (no text or symbols)natural_image
Line drawing of hands installing or adjusting a device on a robotic head (no text or symbols)
natural_image
Illustration of a hand gripping a mechanical component inside a device (no text or symbols visible)natural_image
Line drawing of a hand holding a screwdriver next to an open circular device with internal components (no text or symbols)natural_image
Line drawing of hands installing or adjusting electronic components on a device (no text or symbols visible)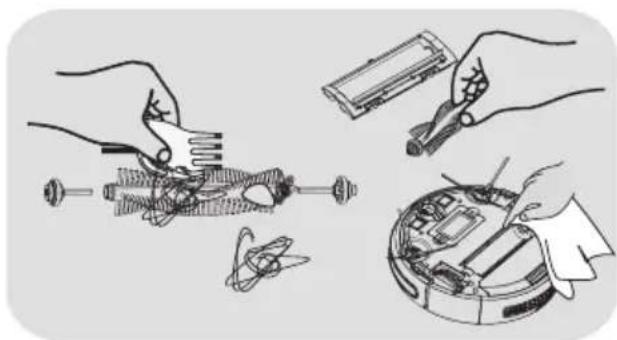
natural_image
Illustration of hands assembling electronic components with tools and a device (no text or symbols)natural_image
Technical line drawing of a circular mechanical or electrical component with internal components and directional arrows (no text or symbols)
natural_image
Technical line drawing of a mechanical assembly with exploded view and component layout (no text or symbols)natural_image
Diagram of a robotic device with hands operating the top panel and buttons, showing internal components (no text or symbols)Depósito de agua
Mopa
natural_image
Illustration of hands operating a mounted device with a grid and antenna (no text or symbols)
natural_image
Line drawing of a hand pressing down on a device component with an arrow indicating motion (no text or symbols)
natural_image
Illustration of a faucet spraying water onto a leaf (no text or symbols)natural_image
Simple line drawing of a trash bin with crossed lines indicating no waste or restriction (no text or symbols)Caro(a) cliente,
natural_image
Illustration of three cleaning devices: a vacuum cleaner, a remote control unit, and a circular vacuum cleaner (no text or symbols)natural_image
Illustration of a hand inserting a plug into an electrical outlet with a cross symbol (no text or labels)natural_image
Illustration of a staircase with railings and a circular object, no text or symbols presentnatural_image
Simple line drawing of a campfire with a fire and a drum (no text or symbols)natural_image
Simple line drawing of a circular object with a sun icon and a cross symbol (no text or labels)natural_image
Illustration of a robotic vacuum cleaner next to a pile of food and a checkmark (no text or symbols)natural_image
Simple line drawing of a car interior with a circular object and a cross mark (no text or symbols)natural_image
Illustration of a bottle, cups, and a vacuum cleaner with a cross symbol (no text or labels)natural_image
Two identical panels showing checkmarks and a cross symbol, separated by a vertical line and a hatched bottom section (no text or labels)natural_image
Diagram of a circular device with internal components and connectors (no text or symbols)natural_image
Simple line drawing of a mechanical device with a cross symbol (no text or labels)natural_image
Simple diagram showing a broken ring with broken fragments and a cross symbol (no text or labels)natural_image
Simple line drawing of a cooking pot and a shower with water droplets (no text or symbols)natural_image
Close-up of a textured surface with diagonal striations and no visible text or symbols
natural_image
Interior view of a tiled room with horizontal slats and a curved floor (no text or symbols visible)
natural_image
Uniform gray textured surface with no visible text, symbols, or distinct featuresPiso de madeira Mosaicos Tapetes e carpetes
Cláusula de exceção
natural_image
Simple circular diagram with concentric rings inside a rounded rectangle (no text or symbols)natural_image
Line drawing of a hand stirring a circular object with a spoon (no text or symbols)Limpeza automática
natural_image
Diagram showing a robotic vacuum cleaner transforming into a connected device (no text or symbols present)PREPARAÇÃO


Interface de controlo de funcionamento
natural_image
Top-down schematic of a vehicle's internal components, showing dashboard, steering wheel, and seating area (no text or labels)natural_image
Illustration showing a kitchen appliance being opened into a pan, with hands holding the pan (no text or symbols present)natural_image
Illustration of hands holding a mechanical component with an upward arrow indicating motion (no text or symbols)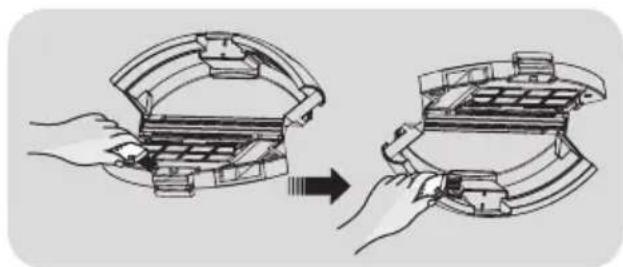
natural_image
Illustration of two hands assembling a mechanical component, showing internal structure and assembly (no text or symbols)natural_image
Illustration of a robotic device being processed with a hand, showing step-by-step assembly (no text or symbols)natural_image
Line drawing of hands installing or adjusting a device on a robotic vacuum cleaner's head (no text or symbols)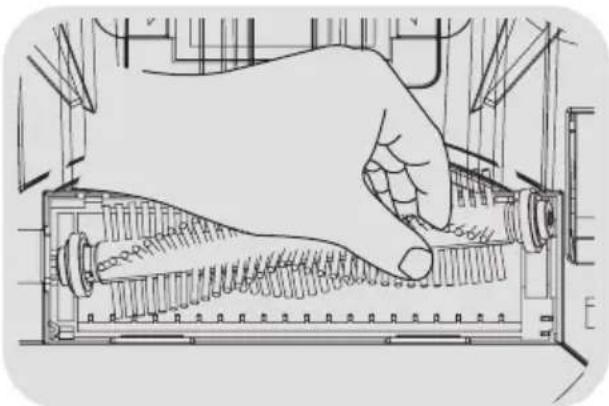
natural_image
Illustration of a hand inserting into a device into a rack (no text or symbols visible)natural_image
Line drawing of a robotic vacuum cleaner with internal components and a hand holding a flashlight (no text or symbols)natural_image
Illustration of hands installing or adjusting electronic components on a device (no text or symbols visible)
natural_image
Illustration of hands assembling electronic components with tools and a device (no text or symbols visible)natural_image
Technical line drawing of a mechanical assembly with no visible text or symbols
natural_image
Technical line drawing of a circular device with internal components and external wiring (no text or symbols)natural_image
Diagram of a computer monitor with hands operating the top panel (no text or symbols visible)Depósito de água
Esfregona
natural_image
Illustration of hands installing or adjusting a device component with an upward arrow (no text or symbols)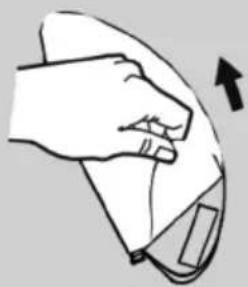
natural_image
Line drawing of a hand holding a device with an arrow indicating rotation (no text or symbols)
natural_image
Illustration of a faucet spraying water onto a leaf (no text or symbols)natural_image
Simple line drawing of a trash bin with crossed lines indicating no waste or restriction (no text or symbols)KUBO
- INDEX
- SAFETY INSTRUCTIONS 4
- OPERATING INSTRUCTIONS 8
- TECHNICAL SPECIFICATIONS 36
- SAFETY INSTRUCTIONS
- Important Warnings
- Assistance
- Power Supply
- Power Cord and Other Cables
- Humidity and Water
- Cleaning
- General Precautions
- OPERATING INSTRUCTIONS
- Product Description
- Tips:
- Accessories
- Product usage
- Safety Instruction
- Caution
- Attention
- Child Safety
- Battery
- Suitable Surfaces
- Exception Clause
- Product Installation
- Control Button
- Work Mode: Manual Mode
- Auto Cleaning
- Auto Recharge
- Operation guideline of indicators
- Charging Methods Manual Charging:
- Charging with the charging station:
- Auto Charging:
- Automatic Charging:
- App Operation Guide ATTENTION
- SUMMARY
- ENVIRONMENT OF TEST AND USE
- PREPARATION
- Registration
- Forgot your password
- Add Device
- Operation Control Interface
- Maintenance
- Daily Storage
- Cleaning the Charging Poles Pieces
- Cleaning the Dustbin
- Cleaning the Main Brush
- Cleaning the main brush and the rubber brush
- Cleaning the Side Brush
- Cleaning the Wheels
- Cleaning the Sensors
- Use of mop with water tank
- Troubleshooting
- TECHNICAL SPECIFICATIONS
- POST-SALE SERVICE
- ENVIRONMENTAL PROTECTION
- Carga automática:
- PREPARACIÓN
- Añadir dispositivo
- Cláusula de exceção
- Limpeza automática
- PREPARAÇÃO
- Interface de controlo de funcionamento
- KUBO
Brand : Kubo
Model : KBVVC4527
Category : Vacuum Cleaner