
TruFlat 14F512T - Television RCA - Free user manual and instructions
Find the device manual for free TruFlat 14F512T RCA in PDF.


| Type de produit | Television |
| Marque | RCA |
| Modele | TruFlat 14F512T |
| Taille de l'ecran | 14 pouces (CRT) |
| Alimentation | 120 V CA, 60 Hz |
| Consommation electrique | Environ 75 W (estimation) |
| Systeme audio | Haut-parleurs stereo integres, MTS (Stereo/SAP) |
| Modes sonores | Personnalise, Theatre, Concert, Discours |
| Couverture des canaux | VHF/UHF (TV) 2-69, Cable (CATV) 1-125 |
| Entrees | 75 ohms ANTENNE, AV (Video/Audio), S-Video |
| Telecommande | Infrarouge, piles AA (2) |
| Langues des menus | Anglais, Francais, Espagnol |
| Fonctions speciales | Recherche automatique des chaines, Favoris (5), Verrouillage parental (MPAA/TV), FPA Lock, Minuteur veille/extinction, Allumage programme, Sous-titres (C1, C2, C.Mute), Carnet, Calendrier, Presets image (Bright, Normal, Theater, Personal) |
| Securite | Prise polarisee, mise a la terre antenne, instructions de securite importantes (ne pas exposer a l'eau, ne pas obstruer les ouvertures) |
| Nettoyage | Chiffon doux et sec; ne pas utiliser de produits abrasifs ou ammoniacaux; ne pas pulveriser de liquide directement sur l'ecran |
| Reparabilite | Faire appel a un personnel qualifie; aucune piece reparable par l'utilisateur a l'interieur |
| Garantie | 1 an pieces, 90 jours main-d'oeuvre, 2 ans tube image |
| Informations generales | Fabrique par TTE Technology, Inc. (sous licence de Thomson S.A.); modele TruFlat 14F512T; manuel disponible en PDF sur notice-facile.com |
Frequently Asked Questions - TruFlat 14F512T RCA
User questions about TruFlat 14F512T RCA
0 question about this device. Answer the ones you know or ask your own.
Ask a new question about this device
Download the instructions for your Television in PDF format for free! Find your manual TruFlat 14F512T - RCA and take your electronic device back in hand. On this page are published all the documents necessary for the use of your device. TruFlat 14F512T by RCA.
USER MANUAL TruFlat 14F512T RCA
Television User's Guide
Changing En ter tain ment. Again.

CAUTION
RISK OF ELECTRIC SHOCK DO NOT OPEN

This symbol indicates that this product incorporates double insulation between hazardous mains voltage and user accessible parts. When servicing use only identical replacement parts.
Caution: To reduce the risk of electric shock, do not remove cover (or back). No user serviceable parts inside. Refer servicing to qualified service personnel.

This symbol indicates "dangerous voltage" inside the product that presents a risk of electric shock or personal injury.

This symbol indicates important instructions accompanying the product.
WARNING
To reduce the risk of fire or electric shock, do not expose this product to rain or moisture.
The apparatus shall not be exposed to dripping or splashing and no objects filled with liquids, such as vases, should be placed on the apparatus.
Refer to the identification/rating label located on the back panel of your product for its proper operating voltage.
FCC Regulations state that unauthorized changes or modifications to this equipment may void the user's authority to operate it.
Caution: To prevent electric shock, match wide blade of plug to wide slot, fully insert.
Caution: Using video games or any external accessory with fixed images for extended periods of time can cause them to be permanently imprinted on the picture tube (or projection TV picture tubes). ALSO, some network/program logos, phone numbers, black borders (sides, top and bottom), etc. may cause similar damage. This damage is not covered by your warranty.
Cable TV Installer: This reminder is provided to call your attention to Article 820-40 of the National Electrical Code (Section 54 of the Canadian Electrical Code, Part 1) which provides guidelines for proper grounding and, in particular, specifically that the cable ground shall be connected to the grounding system of the building as close to the point of cable entry as practical.
Important Stand and Base Safety Information
Choose the location for your TV carefully. Place the TV on a stand or base that is of adequate size and strength to prevent the TV from being accidentally tipped over, pushed off, or pulled off. This could cause personal injury and/or damage the TV. Refer to the Important Safety Instructions on page 2.
Product Registration
Please fill out the product registration card (packed separately) and return it immediately. For US customers: Your RCA Consumer Electronics product may also be registered at www.rca.com/productregistration. Registering this product allows us to contact you if needed.
Product Information
Keep your sales receipt to obtain warranty parts and service and for proof of purchase. Attach it here and record the serial and model numbers in case you need them. These numbers are located on the product.
Model No. ____ Serial No. ____ Purchase Date: ____
Dealer/Address/Phone: ____
IMPORTANT SAFETY INSTRUCTIONS
Read before operating equipment
- Read these instructions.
- Keep these instructions.
- Heed all warnings.
- Follow all instructions.
- Do not use this apparatus near water.
- Clean only with a dry cloth.
- Do not block any of the ventilation openings. Install in accordance with the manufacturer's instructions.
- Do not install near any heat sources such as radiators, heat registers, stoves, or other apparatus (including amplifiers) that produce heat.
- Do not defeat the safety purpose of the polarized or grounding type plug. A polarized plug has two blades with one wider than the other. A grounding type plug has two blades and a third grounding prong. The wide blade or third prong are provided for your safety. When the provided plug does not fit into your outlet, consult an electrician for replacement of the obsolete outlet.
- Protect the power cord from being walked on or pinched, particularly at plugs, convenience receptacles, and the point where they exit from the apparatus.
- Only use attachments/accessories specified by the manufacturer.
- Use only with a cart, stand, tripod, bracket, or table specified by the manufacturer or sold with the apparatus. When a cart is used, use caution when moving the cart/apparatus combination to avoid injury from tip-over.
- Unplug this apparatus during lightning storms or when unused for long periods of time.
- Refer all servicing to qualified service personnel. Servicing is required when the apparatus has been damaged in any way, such as if the power-supply cord or plug is damaged, liquid has been spilled or objects have fallen into the apparatus, or if the apparatus has been exposed to rain or moisture, does not operate normally, or has been dropped.
- This product may contain lead and mercury. Disposal of these materials may be regulated due to environmental considerations. For disposal or recycling information, please contact your local authorities or the Electronic Industries Alliance (www.eiae.org).
- Damage Requiring Service - The appliance should be serviced by qualified service personnel when:
A. The power supply cord or the plug has been damaged;
B. Objects have fallen or liquid has been spilled into the appliance;
C. The appliance has been exposed to rain;
D. The appliance does not appear to operate normally or exhibits a marked change in performance;
E. The appliance has been dropped or the enclosure damaged.
17. Tilt/Stability - All televisions must comply with recommended international global safety standards for tilt and stability proper ties of its cabinet design.
- Do not compromise these design standards by applying excessive pull force to the front, or top, of the cabinet, which could ultimately overturn the product.
- Also, do not endanger yourself, or children, by placing electronic equipment/toys on the top of the cabinet. Such items could unsuspectingly fall from the top of the set and cause product damage and/or personal injury.
18. Wall or Ceiling Mounting - The appliance should be mounted to a wall or ceiling only as recommended by the manufacturer.
19. Power Lines - An outdoor antenna should be located away from power lines.
20. Outdoor Antenna Grounding - If an outside antenna is connected to the receiver, be sure the antenna system is grounded so as to provide some protection against voltage surges and built up static charges.
Section 810 of the National Electrical Code, ANSI/NFPA No. 70-1984, provides information with respect to proper grounding of the mast and supporting structure, grounding of the lead-in wire to an antenna discharge unit, size of grounding connectors, location of antenna-discharge unit, connection to grounding electrodes, and requirements for the grounding electrode. See Figure below.
21. Object and Liquid Entry - Care should be taken so that objects do not fall and liquids are not spilled into the enclosure through openings.
22. Battery usage CAUTION - To prevent battery leakage that may result in bodily injury, property damage, or damage to the unit:
- Install all batteries correctly, with + and - aligned as marked on the unit.
- Do not mix batteries (old and new or carbon and alkaline, etc.).
- Remove batteries when the unit is not used for a long time.
23. Apparatus shall not be exposed to dripping or splashing and no objects fi lled with liquids, such as vases, shall be placed on the apparatus.
Note to the Cable TV system installer: This reminder is provided to call the Cable TV system installer's attention to Article 820-40 of the NEC (Section 54 of the Canadian Electrical Code, Part 1) that provides guidelines for proper grounding and, in particular, specifies that the cable ground shall be connected to the grounding system of the building, as close to the point of cable entry as practical.
Example of Antenna Grounding as per NEC - National Electrical Code
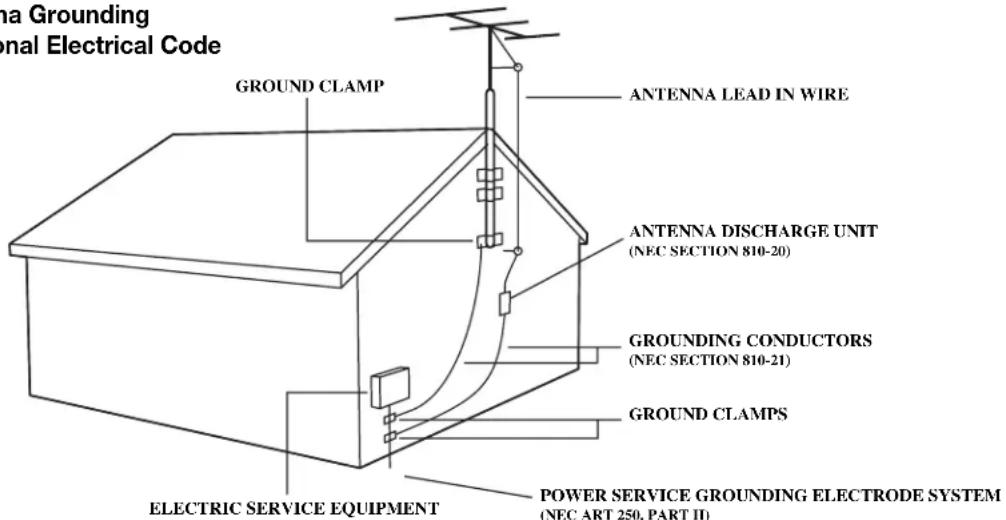
Table of Contents
Introduction
Safety/precaution 2
Table of Contents 3
Features 3
Getting Started
Basic Cable TV Connection 4
Basic Antenna Connection 5
Basic TV to VCR Connection 6
Description of Buttons on the TV 7
Remote Control 8
Setup Menus
Language 10
TV/Cable TV (CATV) 11
Auto Search (Setting TV Channels) 12
Manual Channel Tuning 13
Favorite Channel Setting 14
Adding or Erasing Channels 15
On-screen Menus
Picture Adjustments 16
Preset Picture Mode 17
Clock 18
On-Timer 19
Off-Timer 20
Closed Caption 21
Sleep Timer 22
Parental Lock
Understanding Parental Lock 23
Changing Your Password 24
Blocking Programming with Movie Ratings ..... 25
Blocking Programming with TV Ratings 26
Parental Lock Blocking Options 27
Child Lock 28
Sound
Sound Mode Selection 29
Sound Adjustments 30
Surround 31
Stereo and Second Audio Program 32
Others
Notebook 33
Calendar 34
Troubleshooting 35
Care and Cleaning 36
Limited Warranty 36-37
Here are a few of the special features of your new Color Television.
Automatic Channel Programming: Quick and easy selection of available stations.
Child Lock (FPA Lock): Locks the buttons on the front of the TV so it cannot be operated accidentally by young children.
Closed Captioning: Allows you to read TV program dialog or voice conversations as on-screen text.
Off-Timer: Turns off the TV at a preset time.
On-Timer: Turns on the TV at a preset time to a designated TV channel or video source.
On-screen Menus: On-screen text (in English, French, or Spanish) for setting TV controls.
Parental Lock: Allows you to block the viewing of certain TV channels if you do not want your children viewing inappropriate material.
Remote control: Operates your TV and navigates the menus.
Sleep Timer: Turns off the TV within an amount of time you specify. 10-120 minutes from the current time.
Picture Preset Mode: Lets you set the picture's color, tint, contrast, etc. for various types of programming. Settings include Bright, Normal, Theater, and Personal, which set the picture control as you want.
Sound Mode: Lets you set the TV's sound for the current programming. Choices include Personal, Theatre, Concert, or Speech.
Standard broadcast (VHF/UHF) or Cable TV channel capability.
Stereo Capability: Includes built-in amplifier twin-speaker system; allows reception of TV programs broadcast in stereo.
Basic Cable TV Connection
The Cable TV signal into your home may be a single cable (75 ohm) or may include a Cable Box. In either case, the connection to the TV is easy.
If your Cable TV signal comes directly via a 75 ohm coaxial cable, using the following steps:
1 Connect the Cable TV signal to the 75 ohm ANTENNA INPUT jack on the rear of the TV. Screw it down tight.
2 Plug the TV's power cord into a power outlet and turn on the TV. Set TV/CATV to CATV as detailed on page 11. Refer to AUTO SEARCH to set up your available TV channels. Details are on page 12.
If you have a Cable Box, use the following steps:
1 Connect the Cable TV signal to the IN jack on the Cable Box.
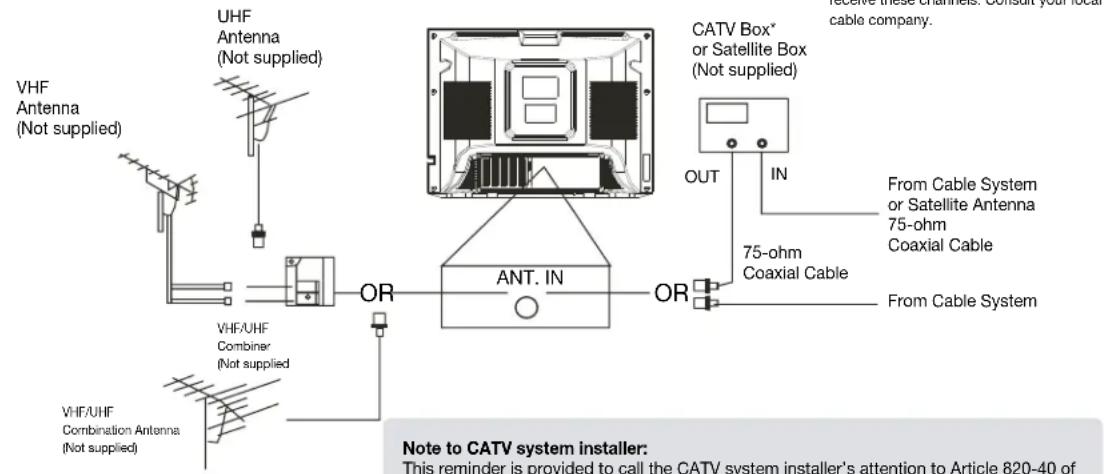
2 Connect a separate coaxial cable to the OUT jack on the Cable Box and to the 75 OHM ANTENNA INPUT jack on the rear of the TV.
3 Plug the TV's power cord into a power outlet and turn on the TV. Set TV/CATV to CATV as detailed on page 11.
4 Set the TV to channel 3 or 4 (the same as the channel 3/4 switch on your Cable Box if applicable). Change channels at the Cable Box.
Helpful Hints
An RF coaxial cable (to connect the Cable Box to the TV) may be supplied by the Cable TV company. It is not supplied with the TV.
You can connect a Satellite Receiver the same way you would connect a Cable Box.
Your Cable Box may have separate Audio and Video Out jacks instead. If so, use audio and video cables to connect the AUDIO/VIDEO OUT jacks of the Cable Box to the AUDIO/VIDEO INPUT jacks.
Press the INPUT button on the remote control to set the TV to the correct video input channel. For front inputs choose FRNT. For rear AV inputs choose VIDEO.
Your model has an S-Video input, choose S-VIDEO. Change the channel at the Cable Box.
Basic Antenna Connection
A combination antenna receives normal broadcast channels (VHF 2-13 AND UHF 14-69). Your connection is easy since you will connect the antenna to the 75 OHM ANTENNA INPUT jack on the rear of the TV.
1 If your antenna has a round cable (75 ohm) on the end, then you are ready to connect it to the TV. Go to the next step. If your antenna has fl at twin-lead wire (300 ohm), you first need to attach the antenna wires to the screws on a 300 to 75 ohm adapter (not supplied with your TV).
2 Push the round end of the adapter or antenna cable onto the 75 OHM ANTENNA INPUT jack on the rear of the TV. If the round end of the antenna cable is threaded, screw it down tight.
3 Plug the TV's power cord into a power outlet and turn on the TV. Set TV/CATV to TV mode as detailed on page 11. Refer to AUTO SEARCH to set up your available TV channels. Details are on page 12.
Before plugging the UHF/VHF Rod Antenna into the ANTENNA INPUT jack, check that the pin is not bent. If it is bent, straighten the pin as illustrated, then plug the pin into the jack.
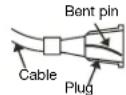
(Needs to be straightened)
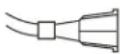
(Straight pin)
FCC WARNING -This equipment may generate or use radio frequency energy. Changes or modifi cations to this equipment may cause harmful interference unless the modifi cations are expressly approved in the instruction Manual. The user could lose the authority to operate this equipment if an unauthorized change or modifi cation is made.
Note to CATV system installer:
This reminder is provided to call the CATV system installer's attention to Article 820-40 of the NEC (Section 54 of the Canadian Electrical Code, Part 1) that provides guidelines for proper grounding and, in particular, specifi es that the cable ground shall be connected to the grounding system of the building as close to the point of cable entry as practical.
CABLE TV / ANTENNA CONNECTIONS
Helpful Hints
If you have separate UHF and VHF antennas, you need an optional combiner to connect the antennas to the TV.
Basic TV to VCR Connection
The basic component (VCR, DVD player etc.) to TV connection is described below. For other hookups, refer to your component's instruction manual.
1 Connect the audio cables (white and red) to the AUDIO INPUT jacks on the TV and to the AUDIO OUT jacks on the VCR (or other component). Match the cable color to the jack color.
2 If your component has an S-Video jack, connect an S-Video cable to the S-VIDEO jack on the back of the TV to the S-Video jack on the component. If your component doesn't have an S-Video jack go to item 3.
3 Connect a video cable (yellow) to the VIDEO INPUT jack on the TV and to the VIDEO OUT jack on your VCR (or other component).
4 Turn on the TV and the other component.
5 Press the INPUT button on the remote control until the correct video input channel appears in the upper right corner of the TV screen. When you play material on the VCR, DVD player, etc. that is connected to the AUDIO and VIDEO jacks it will appear on the TV on the video input channel. (The bottom of page 4 has a complete list.)
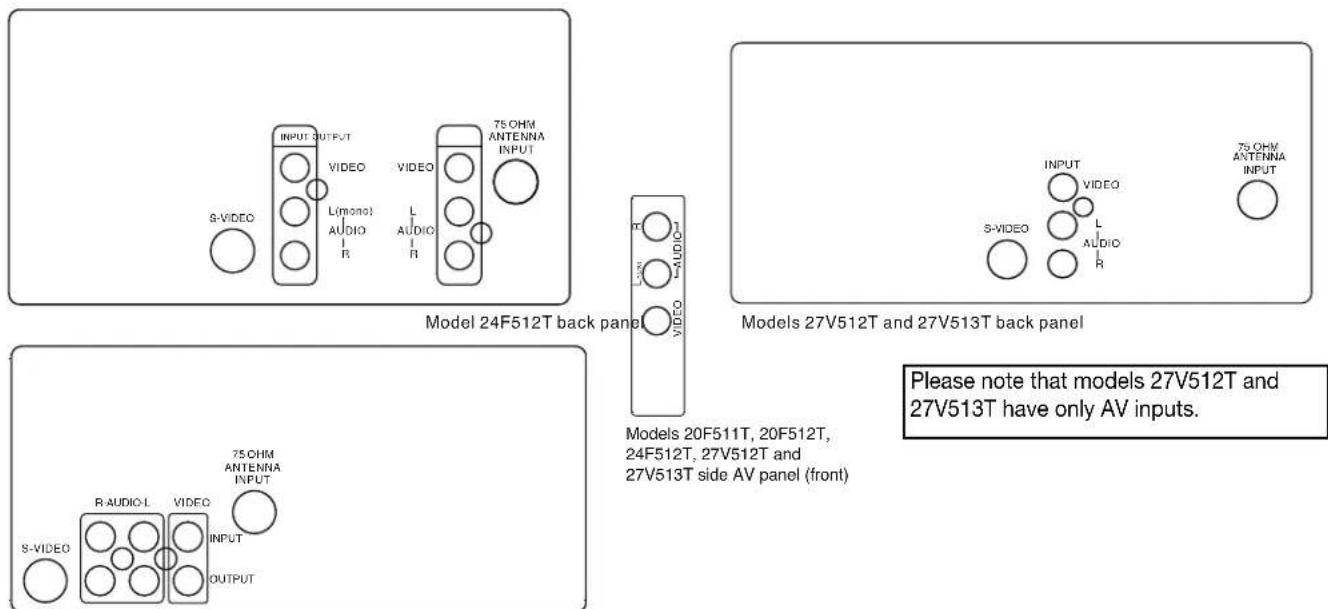
Models 20F511T, 20F512T back panel
Helpful Hints
Audio and video cables are not supplied with the TV. Audio cables are usually red and white. Video cables are usually yellow.
Your VCR may not have Audio and Video Out jacks, but only an RF or ANTENNA OUT jack.
Use a coaxial cable to connect the VCR's ANTENNA OUT jack to the TV's 75 OHM ANTENNA INPUT jack.
S-Video provides a clearer picture than the standard video (the yellow jack). Choose the S-VIDEO channel to view material playing on equipment connected to the S-VIDEO jack.
Use either S-VIDEO jack or VIDEO INPUT jacks. Do not use both at the same time for the same piece of equipment. This would interfere with the picture display. If both are used, S-VIDEO has priority over the yellow VIDEO INPUT jack.
Description of Buttons on the TV
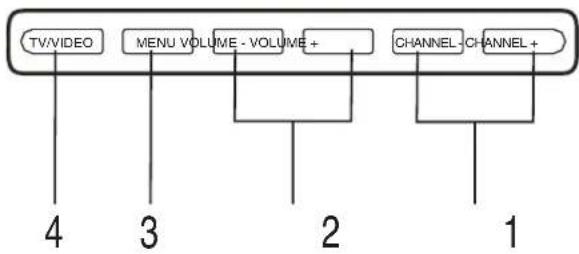
flowchart
graph TD
    A["TV/VIDEO"] --> B["4"]
    C["MENU VOLUME"] --> D["3"]
    E["VOLUME - VOLUME+"] --> F["2"]
    G["CHANNEL - CHANNEL+"] --> H["1"]
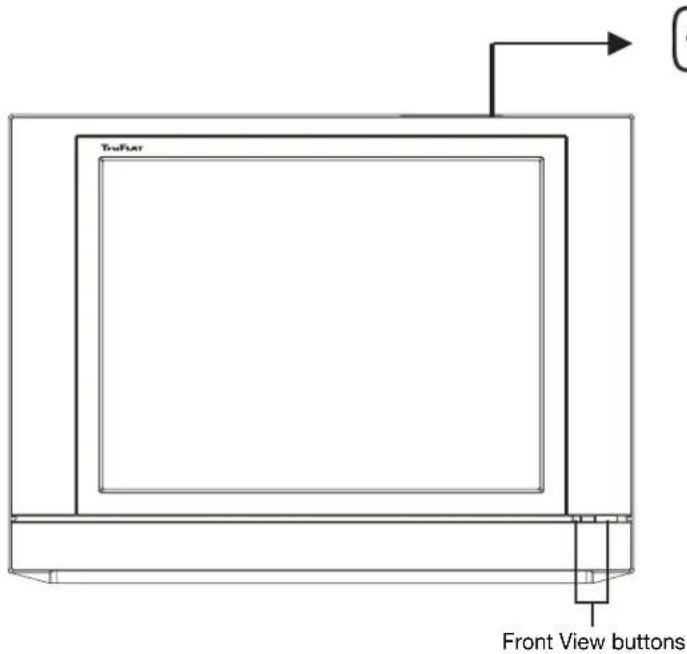
Front Panel Buttons (Models 20F511T, 20F512T and 24F512T)
If you cannot locate your remote, you can use the buttons on the front of your TV to operate many of the TV's features.
Your button layout and design may differ from above.
Front View
STANDBY (LED INDICATOR) Lights to show AC power is available.
SENSOR Receives infra-red signals from the remote.
POWER Turns the TV on and off.
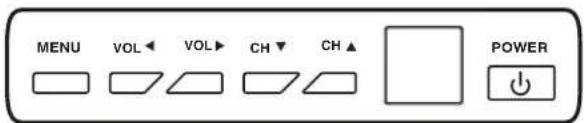
Front Panel Buttons (Model 27V512T and 27V513T)
Front View
MENU Brings up the Main menu. Press for the on-screen display to clear the screen.
VOLUME BUTTONS Press to decrease/increase the volume. In the menu system, acts like the right or left arrow buttons. Press to select highlighted items and make adjustments.
Top View
- CHANNEL BUTTONS Selects channel numbers. In the menu system, acts like the up or down arrow buttons. Use to highlight items.
- VOLUME BUTTONS Press to decrease/increase the volume. In the menu system, acts like the right or left arrow buttons. Press to select highlighted items and make adjustments.
- MENU Press to display the main menu. Press for the on-screen display to clear the screen.
- TV/VIDEO (INPUT) Choose between TV programming and the AV input.
CHANNEL BUTTONS Selects channel numbers. In the menu system, acts like the up or down arrow buttons. Use to highlight items.
SENSOR Receives infra-red signals from the remote.
POWER Turns the TV on and off. Lights to show TV is on.
Remote Control
Battery Installation
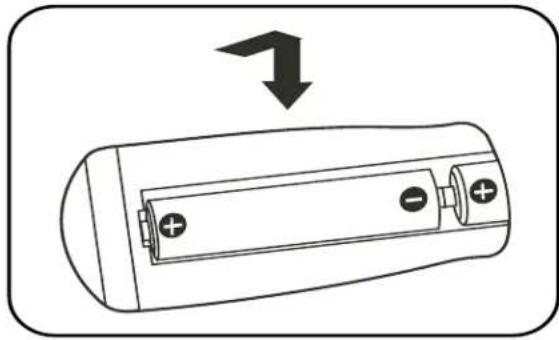
To load batteries into the remote control:
1 Remove the battery compartment lid on the rear of the remote. Press in the tab, then lift off the lid.
2 Place two AA batteries in the remote. Be sure the (+) and (-) ends of the batteries line up correctly (as marked inside the battery compartment).
3 Reattach the battery compartment lid.
Effectively Using the Remote Control
4 Point the remote control toward the remote sensor on the front of the TV when operating the TV with the remote control.
natural_image
Diagram of a battery with an arrow indicating downward motion (no text or symbols)Remote Control
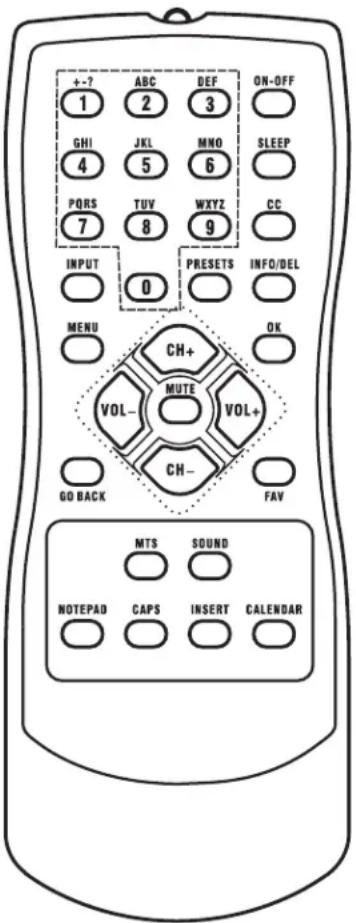
When operating the remote, point it directly at the front of the TV. Objects between the remote and the remote sensor can block the signal to the TV.
CALENDAR Press to display or close the calendar.
CAPS Press to toggle the entry mode between uppercase or lowercase letters. Details are on page 33.
CHANNEL +/- Buttons Press to select memorized TV channels. In the menu system, acts like the up or down arrow buttons and adjusts menu controls.
CC (C.Mute) Press to turn on/off C.Mute function directly. Details are on page 21.
INFO/DEL(ETE) Press to see the current channel number, and sound information on the TV screen. Press again to display the current time on the screen.
Press to remove a menu from the screen.
In Notebook mode, press to delete unwanted text. Details are on page 33.
INPUT Press to select TV channels or the Audio/Video IN channels. Page 4 has a complete list.
INSERT In Notebook mode, press to select INS(ERT) or OVR (overwrite). Details are on page 33.
FAV(ORITE) Press to browse the channels in your Favorite List. Details are on page 14.
GO BACK Press to return to the previously viewed channel.
MENU Press to see the TV's on-screen menu. Press to go back to the previous menu or to remove a menu from the screen.
MTS Press to select a sound mode if available with the TV programming: MONO, STEREO, and SAP. Details are on page 32.
MUTE Press to mute or restore the TV sound. Pressing the volume buttons (VOLUME + or VOL+) also will cancel mute and restore the sound.
NOTEPAD Press to display or close the NOTEBOOK window.
NUMBER Buttons When the TV/Cable menu option is in the TV position, all channels can be selected by using two buttons. For example, to select channel 2, press "0" then "2". You can also just press "2".
For channels 100 and above, press three number buttons of the channel directly. (You can select channels above 69 only if you have Cable TV. Make sure TV/CATV is set to CATV. Details are on page 11.)
In Notebook mode, press to enter a letter, a digit or a symbol. Details are on page 33.
OK Within the on-screen menu, press to select some special function, such as Favorite list, etc.
ON-OFF Press to turn the TV on or off. You also can turn on the TV by pressing the CHANNEL +/- buttons on the front of the TV.
PRESETS Press to select one of the four preset Picture settings (Bright, Normal, Theater or Personal). Details are on page 17.
SLEEP Press to select a time period (120 minutes to 10 minutes in 10-minute decrements) after which the TV will turn itself off. Details are on page 22.
SOUND Press to select one of the four sound settings (Theater, Concert, Speech or Personal). Details are on page 29.
VOLUME +/- Buttons Press to adjust the TV sound level. In the menu system, acts like the right or left arrow button and adjusts menu controls.
Language
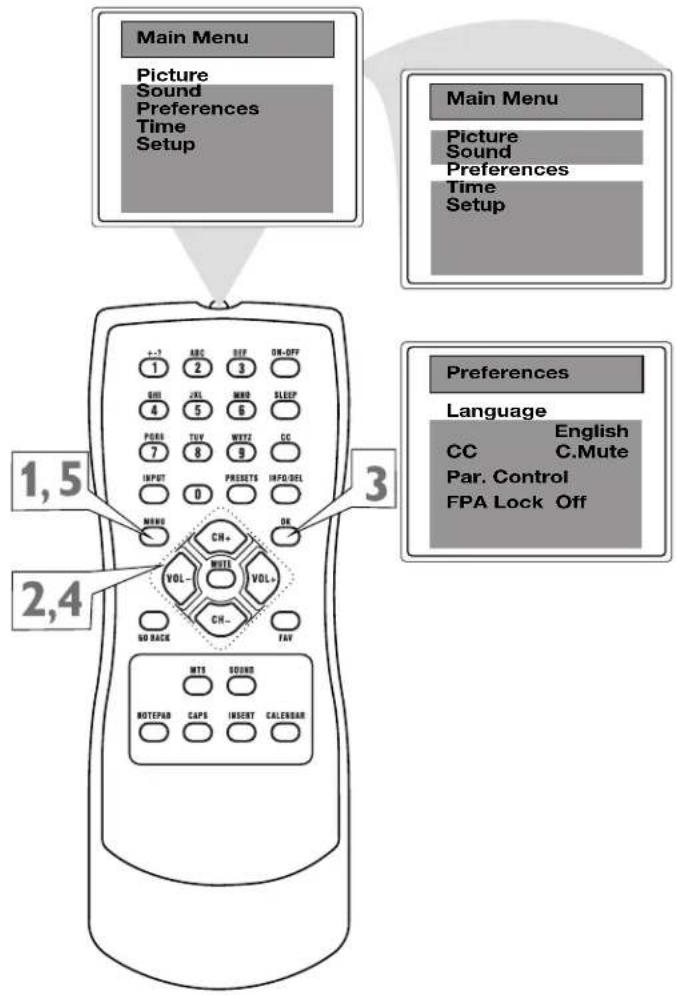
You can set the TV's on-screen menu to English, French or Spanish.
1 Press MENU to see the main menu.
2 Press CH+ or CH- to highlight Preferences.
3 Press OK to enter the Preferences submenu.
4 Language is highlighted. Press VOL+ or VOL- to select English, Francais (French), or Espanol (Spanish).
5 Press MENU repeatedly to exit the menu or the menu will automatically disappear within a few seconds if no buttons are pressed on the remote control.
Helpful Hints
The language control only affects the language of the TV menus. It does not change the other on-screen text features, such as Closed Captions.
TV/Cable TV (CATV)
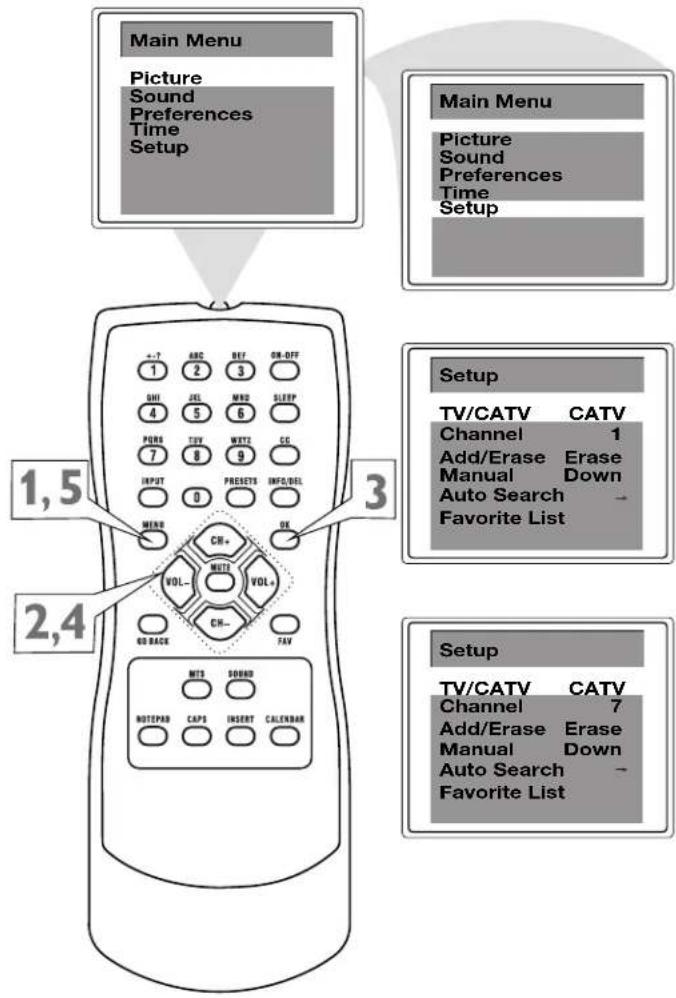
It is important for the TV to know what type of signal-Cable TV (CATV) or a normal antenna you are using. Choose your signal (Antenna or Cable):
1 Press MENU to see the main menu.
2 Press CH+ or CH- to highlight Setup.
3 Press OK to enter the Setup submenu.
4 TV/CATV is highlighted. Press VOL+ or VOL- to select TV or CATV.
Choose CATV if you have Cable TV service. (See page 4 for connection details.) If you do not have Cable TV service and you connected an antenna to the TV, choose TV. (See page 5 for connection details.)
5 Press MENU repeatedly to exit the menu or the menu will automatically disappear within a few seconds if no buttons are pressed on the remote control.
Helpful Hints
When CATV is selected, channels 1-125 are available.
When TV is selected, only channels 2-69 are available.
You cannot select the Setup menu if the TV is set to a video input channel (FRNT). Press INPUT repeatedly to get to regular TV programming.
Auto Search (Setting TV Channels)
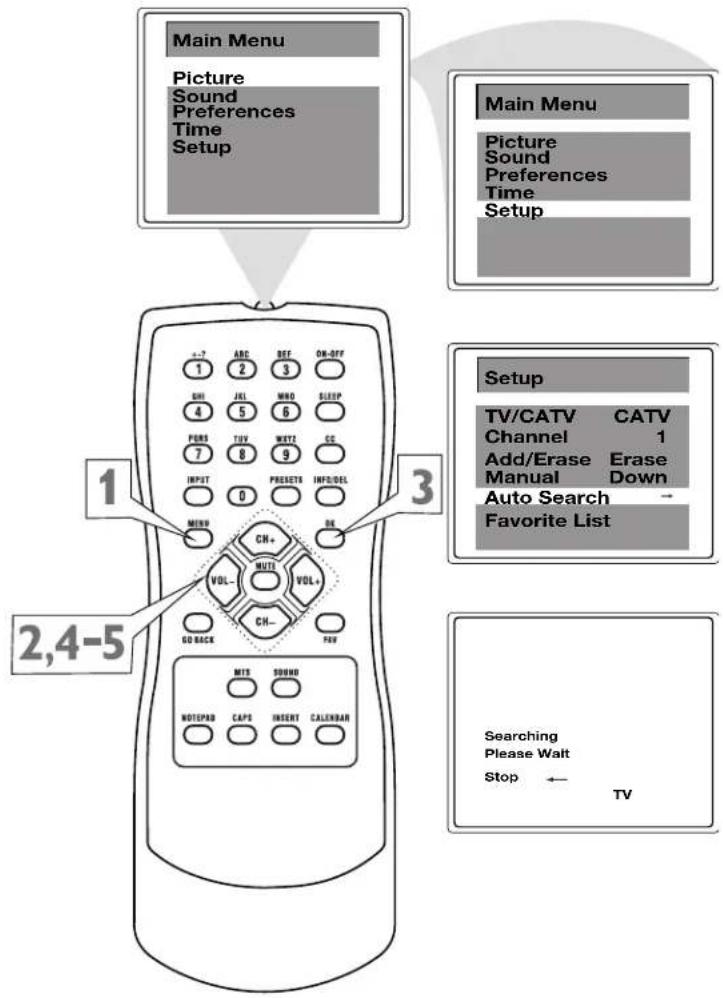
You can set your TV to receive local TV channels (from an antenna) or Cable TV channels (when you have Cable TV service). Then, use Auto Search to set up channels that are available for you. This makes it easy for you to select only the available TV stations when you press CH+ or CH-. Before you start Auto Search, make the Antenna or Cable TV connection described on pages 4 and 5. In the menu select TV or Cable (CATV) as described on page 11.
1 Press MENU to see the main menu.
2 Press CH+ or CH- to highlight Setup.
3 Press OK to enter the Setup submenu.
4 Press CH+ or CH- repeatedly to highlight Auto Search.
5 Press VOL+ to start programming TV channels. Press VOL- if you need to stop channel programming during the process.
When channel setup is completed, the TV will go to its lowest channel.
Helpful Hints
Press CH+ or CH- to see which channels are in the TV's memory. You can also select channels that have not been memorized using the number buttons on the remote control.
To delete unwanted channels from the TV's memory or to add more channels, see ADD/ERASE on page 15.
You cannot select the Setup menu if the TV is set to a video input channel (FRNT). Press INPUT repeatedly to get to regular TV programming.
Manual Channel Tuning
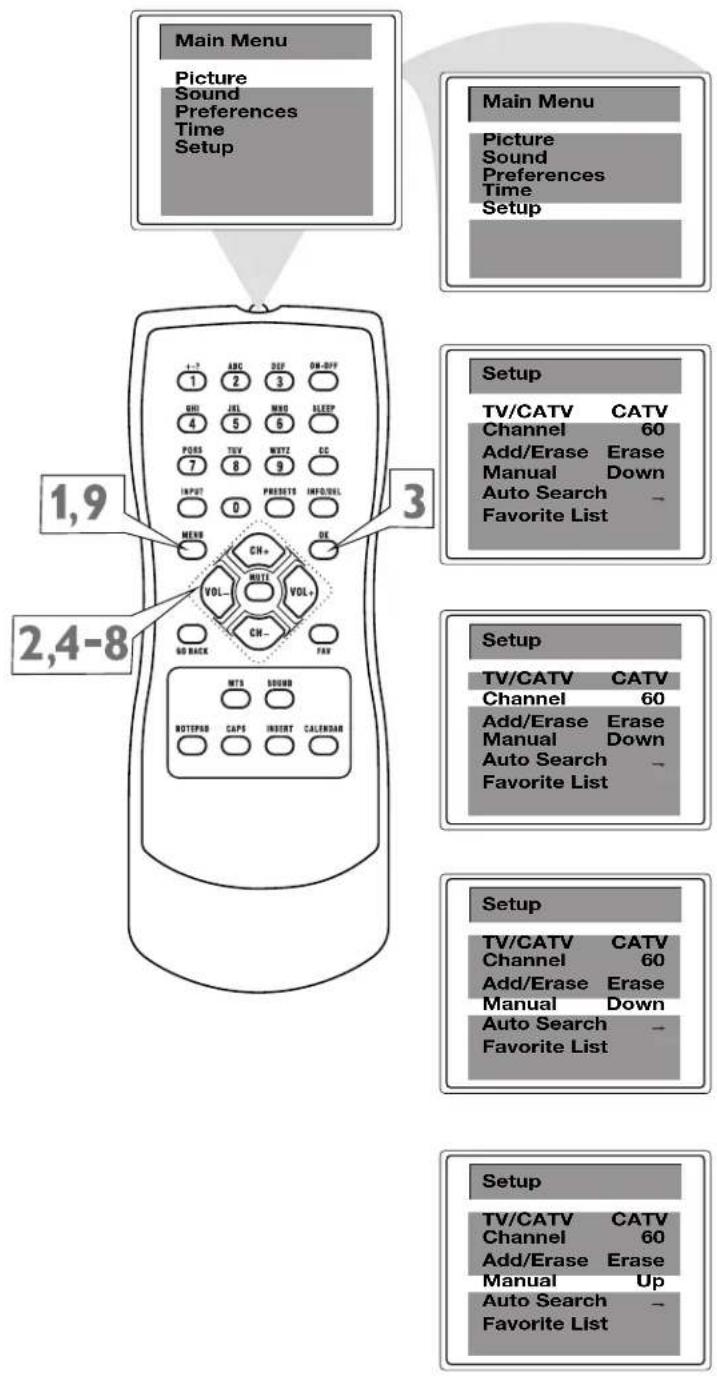
Manual Channel Tuning allows you to search for channels that may have been missed during the Auto Search process. For example, if you are looking for a channel between 60 and 70, start the search at channel 60 and go up.
1 Press MENU to see the main menu.
2 Press CH+ or CH- to highlight Setup.
3 Press OK to enter the Setup submenu.
4 TV/CATV is highlighted. Press VOL+ or VOL- to select TV or CATV (whichever you have). Details are on page 11.
5 Press CH+ or CH- repeatedly to highlight Channel.
6 Press VOL+ or VOL- to enter the channel number at which you want to begin the search.
7 Press CH+ or CH- repeatedly to highlight Manual.
8 Press VOL+ to start searching upward (for example, starting at channel 60 and going up to 61, 62, 63, etc.). Press VOL- when you find the channel you want. This stops the search. Otherwise the search will stop at the first available channel.
Or, press VOL- to start searching downward (for example, starting at channel 60 and going down to 59, 58, 57, etc.). Press VOL+ when you find the channel you want. This stops the search. Otherwise the search will stop at the first available channel.
9 Press MENU repeatedly to exit the menu or the menu will automatically disappear within a few seconds if no buttons are pressed on the remote control.
Helpful Hints
You cannot select the Setup menu if the TV is set to a video input channel (FRNT). Press INPUT repeatedly to get to regular TV programming.
Favorite Channel Setting
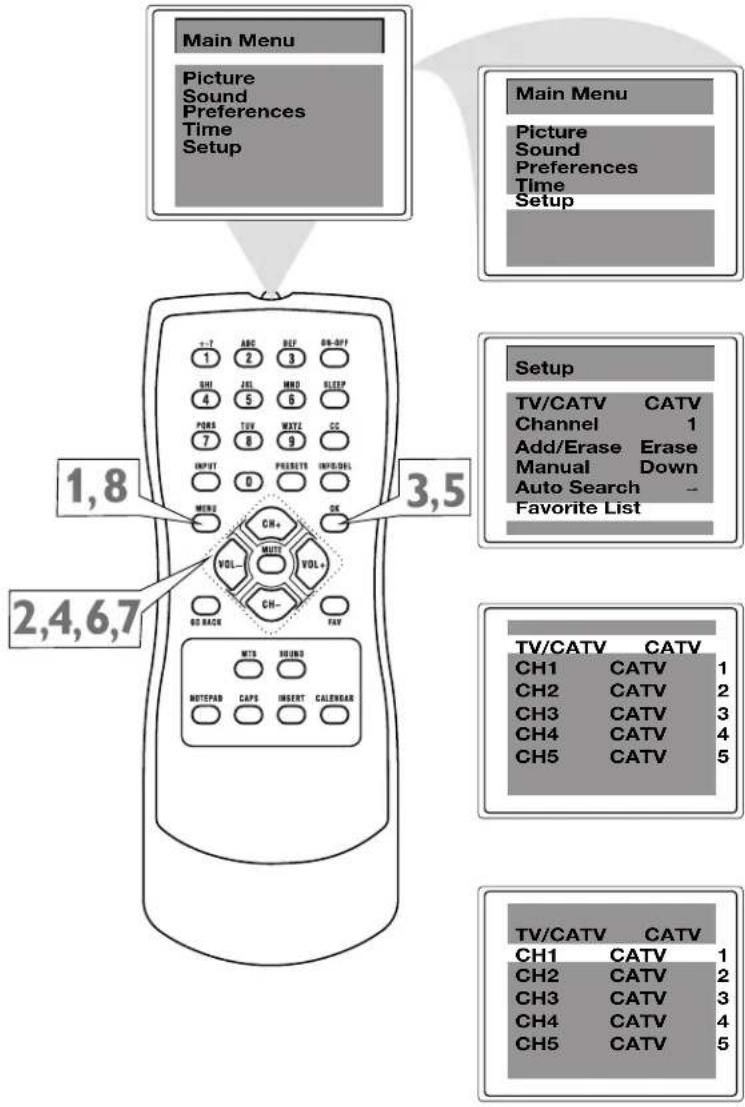
You can store fi ve channels you prefer into the Favorite List and recall these channels easily by pressing the FAV button on the remote control.
1 Press MENU to see the main menu.
2 Press CH+ or CH- to highlight Setup.
3 Press OK to enter the Setup submenu.
4 Press CH+ or CH- repeatedly to highlight Favorite List.
5 Press OK to display features of Favorite List.
6 TV/CATV is highlighted. Press VOL+ or VOL- to select TV or CATV (whichever you have).
7 Press CH+ or CH- to select CH1 (the fi rst channel position), then Press VOL+ or VOL- to enter a channel number you want to store at this position, such as CATV 8. Repeat to set the other four favorite channels.
8 Press MENU repeatedly to exit the menu or the menu will automatically disappear within a few seconds if no buttons are pressed on the remote control.
Helpful Hints
You cannot select the Setup menu if the TV is set to a video input channel (FRNT). Press INPUT repeatedly to get to regular TV programming.
Adding or Erasing Channels
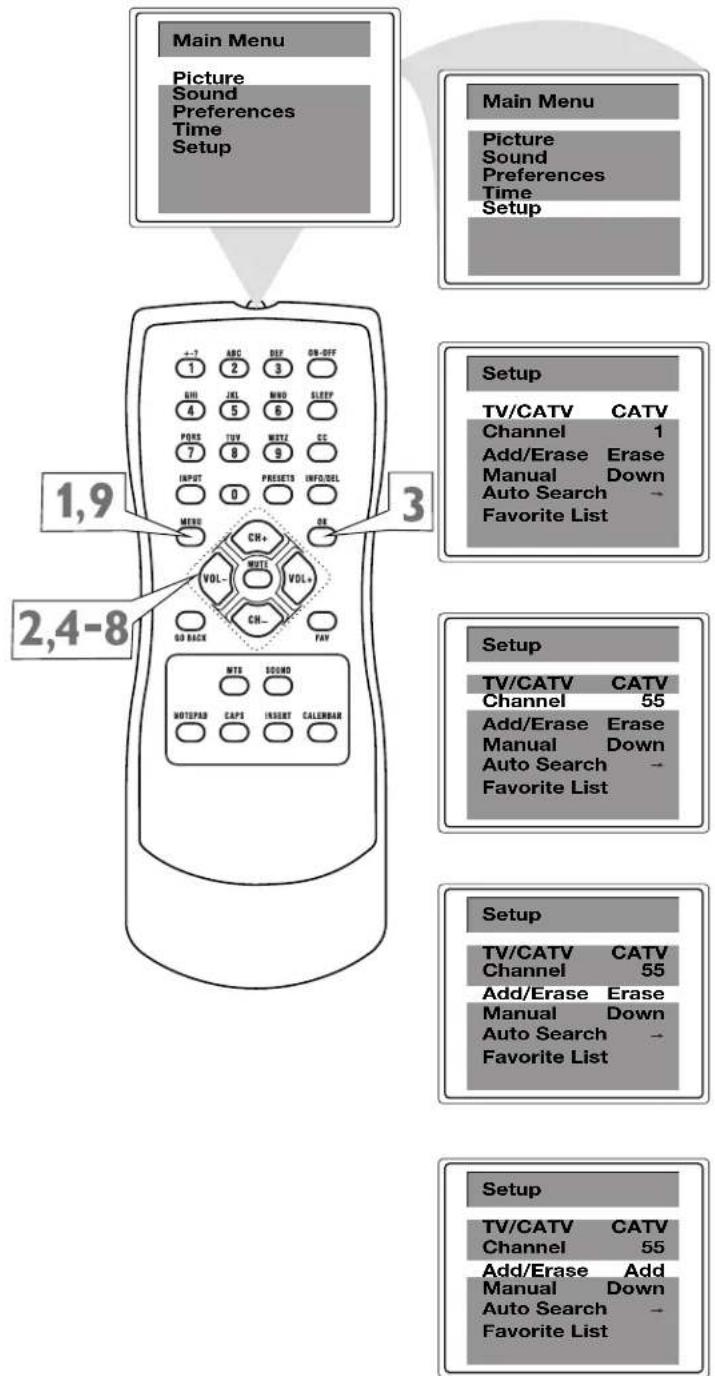
You can add or erase channels from the list in the TV memory.
1 Press MENU to see the main menu.
2 Press CH+ or CH- to highlight Setup.
3 Press OK to enter the Setup submenu.
4 TV/CATV is highlighted. Press VOL+ or VOL- to select TV or CATV (whichever you have). Details are on page 11.
5 Press CH+ or CH- repeatedly to highlight Channel.
6 Press VOL+ or VOL- to enter the channel number you want to add or erase.
7 Press CH+ or CH- repeatedly to highlight Add/Erase.
8 Press VOL+ or VOL- to choose Add or Erase.
If you select Add, the channel will be available when you press CH+ and CH- to move through channels.
Choosing Erase will remove the channel from the TV's memory. The channel will not be available when you fl ip through channels with the CH+ and CH- buttons.
9 Press MENU repeatedly to exit the menu or the menu will automatically disappear within a few seconds if no buttons are pressed on the remote control.
10 You won't see the change take effect until you scroll through the channels in memory using the CH+/- buttons.
Helpful Hints
You cannot select the Setup menu if the TV is set to a video input channel (FRNT). Press INPUT repeatedly to get to regular TV programming.
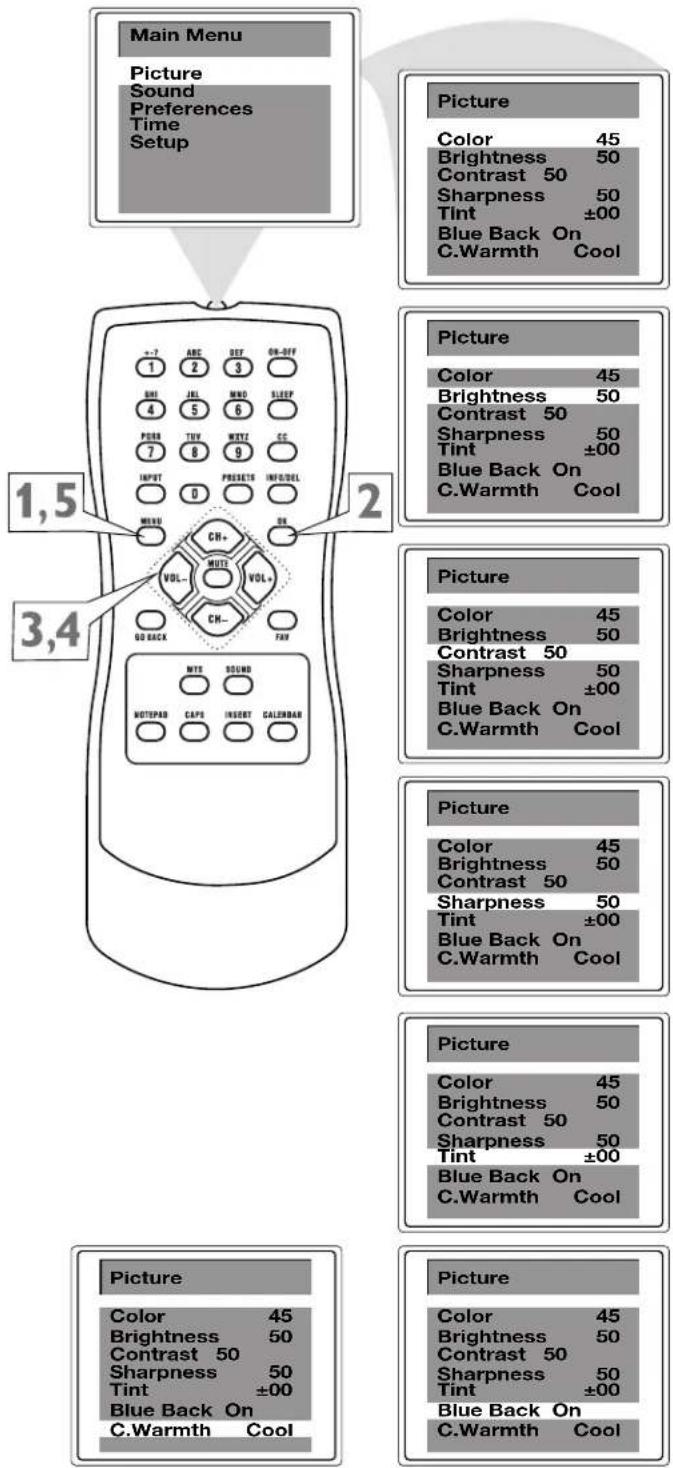
Picture Adjustments
To adjust your TV picture, select a channel and follow the steps below:
1 Press MENU to see the main menu.
2 Picture is highlighted. Press OK to enter the Picture submenu.
3 Press CH+ or CH- repeatedly to highlight your choice: Color, Brightness, Contrast, Sharpness, Tint, Blue Back (background), or C.Warmth (color temperature.)
4 Press VOL+ or VOL- to increase or decrease the element you choose. However, you can turn Blue Back to only On or Off (see below). You can choose Warm, Cool or Normal mode for color temperature.
5 Press MENU repeatedly to exit the menu or the menu will automatically disappear within a few seconds if no buttons are pressed on the remote control.
Helpful Hints
Color: Adjust to add or reduce color.
Brightness: Adjust to brighten the darkest parts of the picture.
Contrast: Adjust the distinction between the black and white parts of the picture. Sharpness: Improve picture detail.
Tint: Obtain natural skin tones.
Blue Back: Turn this option On or Off. If you choose On, a solid blue background screen will appear if the TV is on a weak channel (for example, if the reception is very poor or if the station has gone off the air for the night). After being such a channel for 15 minutes, the TV will turn itself off automatically.
C. Warmth: Set this option for warm, cool tones or somewhere in between (Normal).
Preset Picture Mode
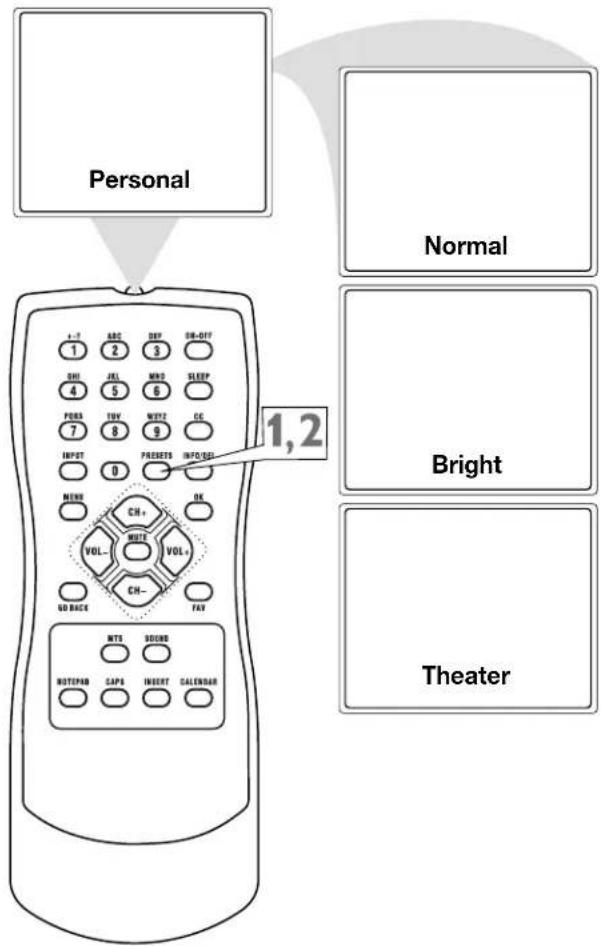
This function enables you to choose preset video settings for different types of programs and viewing conditions. Most picture settings are preset at the factory to automatically adjust the TV Brightness, Color, Contrast and Sharpness.
1 Press PRESETS on the remote control. The current preset picture setting will appear on the screen.
2 Press PRESETS repeatedly to select Personal, Normal, Bright or Theater. The Personal setting is what you specify with the picture adjustments as described on page 16. Personal is the only picture setting you can change. All others are set at the factory.
Clock
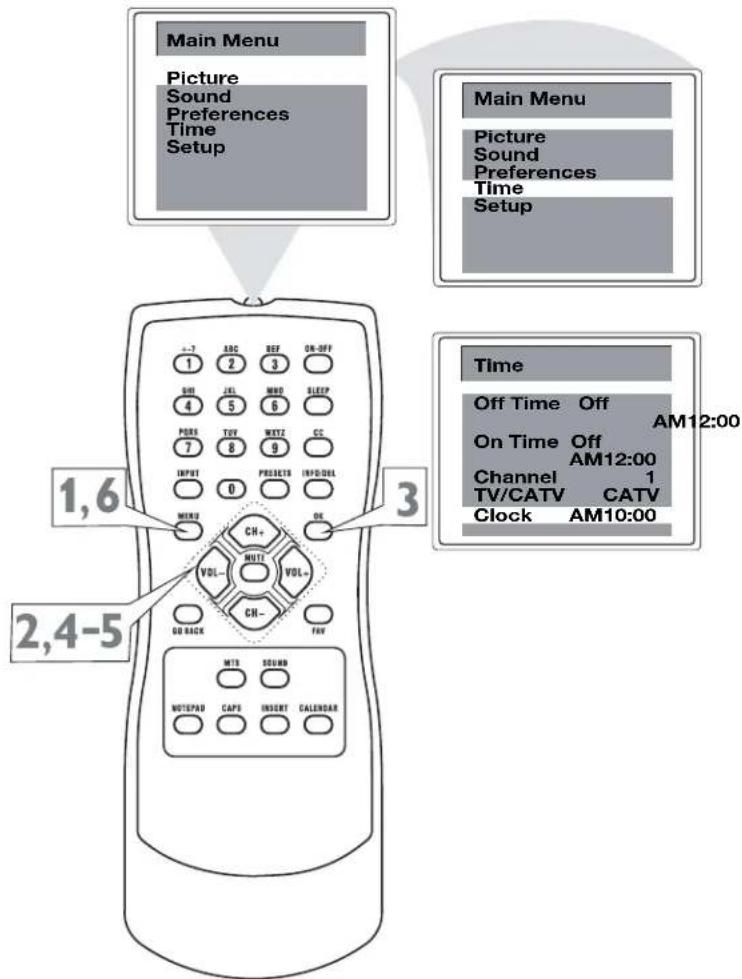
Follow these steps to set the clock.
1 Press MENU to see the main menu.
2 Press CH+ or CH- to highlight Time.
3 Press OK to enter the Time submenu.
4 Press CH+ or CH- repeatedly to highlight Clock.
5 Press VOL+ or VOL- to change the time in minutes. Press and hold the VOL+ or VOL- to change the time quickly in 10 minute increments; press OK. The highlight moves to the hour position. Use the VOL+/- buttons to set the hour.
6 Press MENU repeatedly to exit the menu or the menu will automatically disappear within a few seconds if no buttons are pressed on the remote control.
Helpful Hints
If the power fails, you must reset the clock.
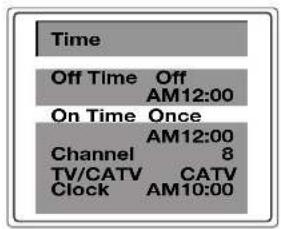
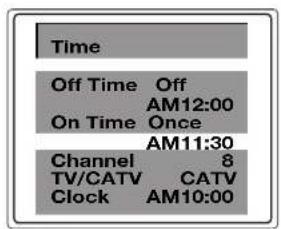
On-Timer
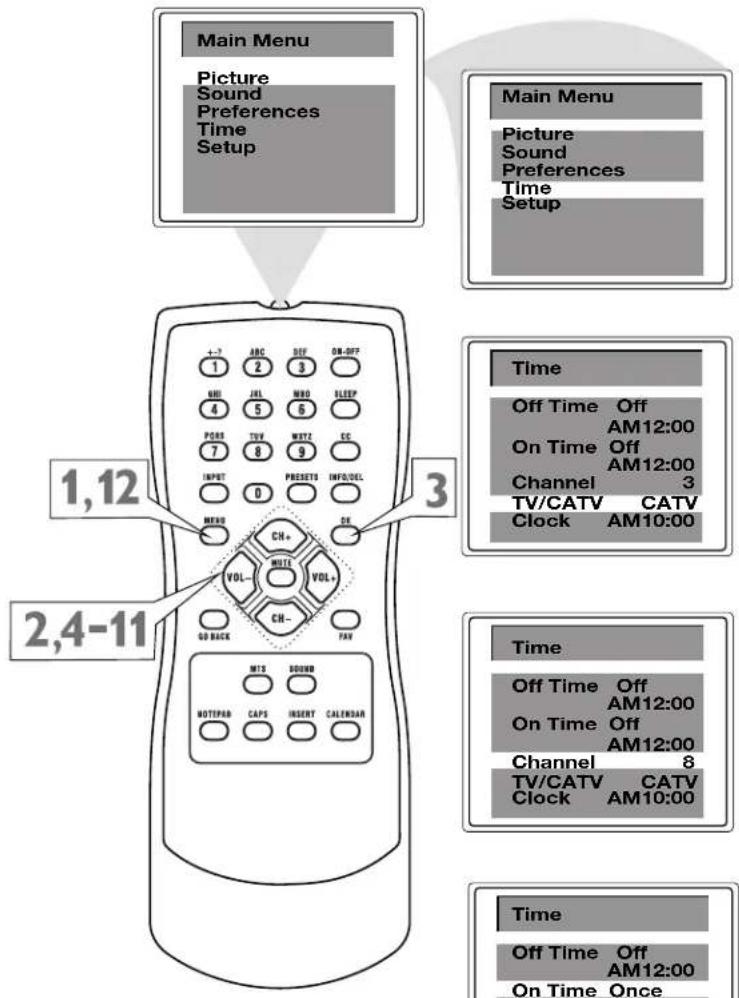
To turn on the TV to a specifi c channel at a specifi c time, use the On-Timer. Before you begin, set the clock correctly. Details are on page 18.
1 Press MENU to see the main menu.
2 CH+ or CH- to highlight Time.
3 Press OK to enter the Time submenu.
4 Press CH+ or CH- repeatedly to highlight TV/CATV.
5 Press VOL+ or VOL- to select TV or CATV, depending on whether you have Cable TV service or not. Details are on page 11.
6 Press CH+ or CH- repeatedly to highlight Channel.
7 Press VOL+ or VOL- to enter the channel number. This will be the channel to which the TV turns on at the specified time.
8 Press CH+ or CH- repeatedly to highlight On time.
9 Press VOL+ or VOL- to select Once (or Daily, Off).
If you select Once, the timer will turn on the TV one time within the next 24 hours only.
If you select Daily, the timer will turn on the TV at the same time and to the same channel every day.
Choose Off to cancel the On-timer.
10 Press CH+ or CH- repeatedly to highlight AM12:00 under the line of On Time.
11 Press VOL+ or VOL- to enter the On time. Hold down VOL+ or VOL- to change the time quickly in 10-minute increments; press OK. The hour is highlighted. Use the VOL+/- buttons to set the hour. This will be the time at which the TV will turn itself on.
12 Press MENU repeatedly to exit the menu or the menu will automatically disappear within a few seconds if no buttons are pressed on the remote control.
Off-Timer
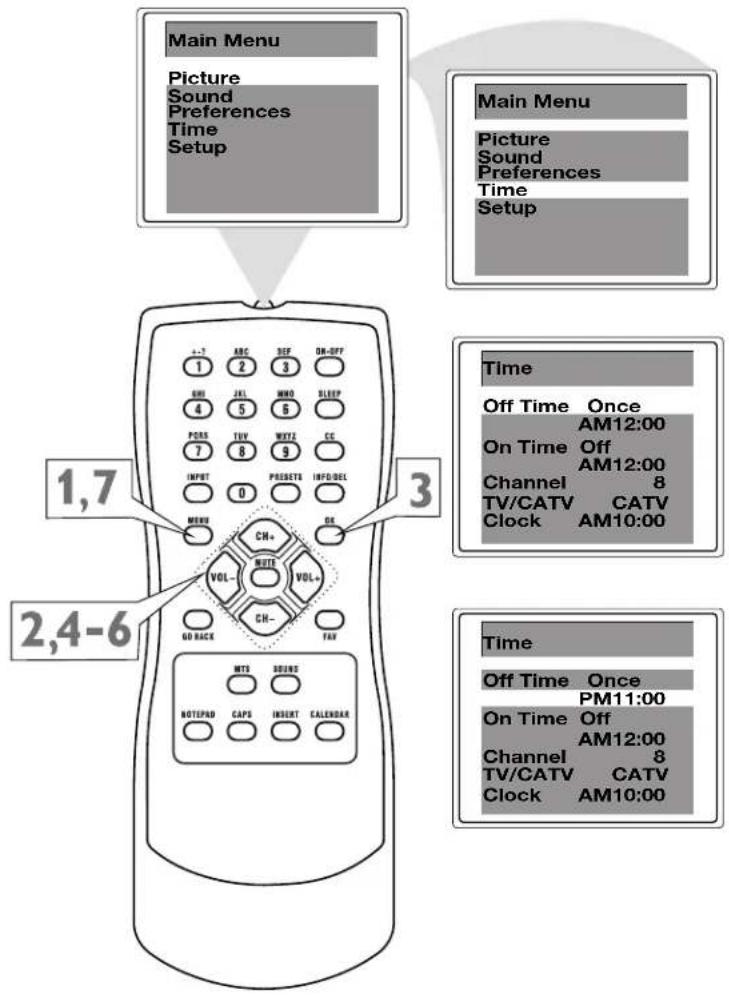
To turn off the TV at a specific time every day, use the Off-Timer. Before you begin, you must set the clock to the correct time. Details are on page 18.
1 Press MENU to see the main menu.
2 Press CH+ or CH- repeatedly to highlight Time.
3 Press OK to enter the Time submenu.
4 Off time is highlighted. Press VOL+ or VOL- to select Once, Daily or Off.
If you select Once, the timer will turn off the TV once.
If you select Daily, the timer will turn off the TV at the same time every day.
Choose Off to cancel the Off-timer.
5 Press CH+ or CH- repeatedly to highlight AM12:00 under the line of Off Time.
6 Press VOL+ or VOL- to enter the On time. Hold down VOL+ or VOL- to change the time quickly in 10-minute increments; press OK. The hour is highlighted. Use VOL+ or VOL- to set the hour. This will be the time at which the TV will turn itself off.
7 Press MENU repeatedly to exit the menu or the menu will automatically disappear within a few seconds if no buttons are pressed on the remote control.
Closed Caption
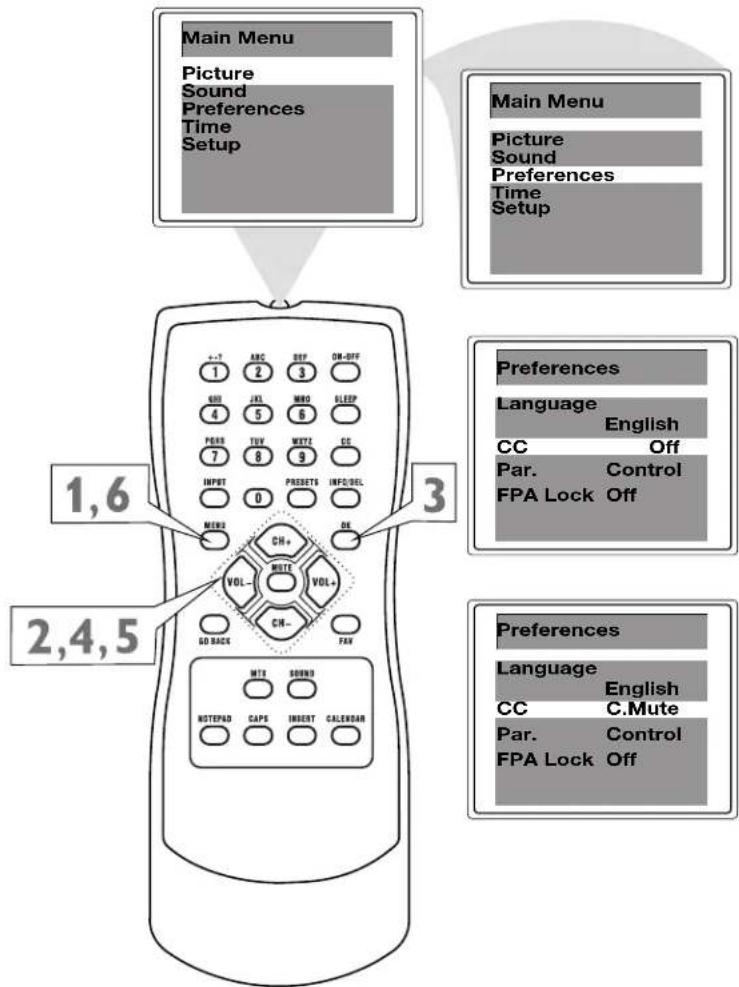
Closed captioning (CC) lets you read the voice content of TV programs on the TV screen. Designed to help the hearing impaired, on-screen text boxes will show dialog, conversation, and activity during TV programming.
1 Press MENU to see the main menu.
2 Press CH+ or CH- to highlight Preferences.
3 Press OK to enter the Preference submenu.
4 Press CH+ or CH- to highlight CC.
5 Press VOL+ or VOL- to select the closed caption you want (Off, C1, C2, or C.Mute). C.Mute sets the TV to show closed caption when you press MUTE. The TV volume will be disabled until you press MUTE or VOL+ again to restore the sound.
6 Press MENU repeatedly to exit the menu or the menu will automatically disappear within a few seconds if no buttons are pressed on the remote control.
Helpful Hints
Not all TV programs and commercials are broadcast with Closed Caption information. Neither are all Closed Caption modes transmitted by a station for a closed caption program.
See your TV listings for the stations and times of Closed Caption shows.
Press CC on the remote control to turn on/off C.Mute function directly. C.Mute On or C.Mute Off will appear on the screen accordingly.
Sleep Timer
Turns off the TV within an amount of time you specify (10-120 minutes from the current time).
1 Press SLEEP repeatedly to set the sleep timer from 120 to 10 minutes in 10-minute decrements.
2 After setting the sleep timer, Press SLEEP once to display the remaining time.
3 To cancel the sleep timer, Press SLEEP until "Off" appears.
4 Within 1 minute of the time set a clock icon will flash to remind you that the TV will turn itself off soon.
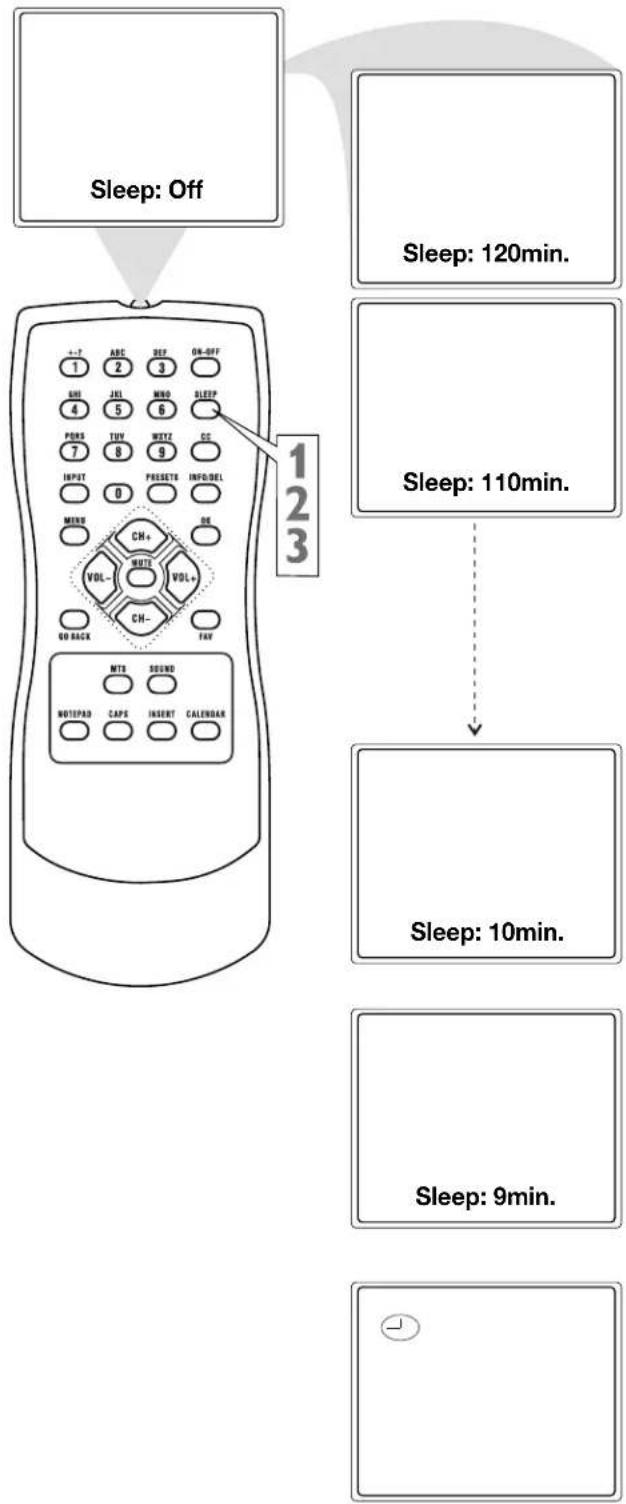
flowchart
graph TD
    A["Sleep: Off"] --> B["120min"]
    B --> C["Sleep: 110min"]
    C --> D["Sleep: 10min"]
    D --> E["Sleep: 9min"]
Understanding Parental Lock
Parental Lock processes program content advisories from broadcasters. Parental Lock can respond to the content advisories and block objectionable content (offensive language, violence, sexual situations, etc.) This is a great feature to censor the type of programming children watch. Parental Lock offers various blocking options from which to choose:
MASTER ENABLE: This is the “master switch” for Parental Lock. When ON, all blocking/censoring you have set is enabled. When OFF, all blocking is disabled.
BLOCK UNRATED: All unrated programs (based on Movie Ratings or TV Ratings) will be blocked if this feature is ON and MASTER ENABLE is ON.
BLOCK NO RATING: All programming with no content advisory data will be blocked if this feature is ON and MASTER ENABLE is ON.
After you set a password, you can block up to six ratings in TV Ratings or Movie Ratings. These ratings are set by the Motion Picture Association of America and TV broadcasters.
MPAA Ratings
(Motion Picture Association of America)
G: General Audience - All ages admitted. Most parents would find this program suitable for all ages. This type of programming contains little or no violence, no strong language, and little or no sexual dialog or situation.
PG: Parental Guidance Suggested - This programming contains material that parents may find unsuitable for younger children. It may contain one or more of the following: moderate violence, some sexual situations, infrequent coarse language, or some suggestive dialog.
PG-13: Parents Strongly Cautioned - This programming contains material that parents may find unsuitable for younger children under the age of 13. It contains one or more of the following: violence, sexual situations, coarse language, or suggestive dialog.
R: Restricted - This programming is specially designed for adults. Anyone under the age of 17 should only view this programming with an accompanying parent or adult guardian. It contains one or more of the following: intense violence, intense sexual situations, strong coarse language, or intensely suggestive dialog.
NC17: No children under the age of 17 will be admitted -This type of programming should be viewed by adults only. It contains graphic violence, explicit sex, or crude, indecent language.
X: Adult only - This type of programming contains one or more of the following: very graphic violence, very graphic and explicit sexual acts, very coarse and intensely suggestive language.
TV Ratings
(TV broadcaster)
TV-Y All children - Appropriate for all children. Designed for a very young audience, including children age 2-6. This type of programming is not expected to frighten younger children.
TV-Y7 Directed to Older Y7 Children - Designed for children age 7 and above. It may be appropriate for children who can distinguish between make-believe and reality. This programming may include mild fantasy and comic violence (FV or Fantasy violence).
TV-G General Audience - Most parents would fi nd this programming suitable for all ages. This type of programming contains little or no violence, no strong language, and little or no sexual dialog or situation.
TV-PG Parents Guidance PG Cautioned - Contains material that parents may find unsuitable for younger children. This type of programming contains one or more of the following: moderate violence (V), some sexual situations (S), infrequent coarse language (L), or some suggestive dialog (D).
TV-14 Parents Strongly Cautioned
- Contains material that parents may find unsuitable for children under 14 years of age. This type of programming contains one or more of the following: intense violence (V), intense sexual situations (S), strong coarse language (L), or intensely suggestive dialog (D).
TV-MA Mature Audience only -
Specially designed to be viewed by adults and may be unsuitable for children under 17. This type of programming contains one or more of the following: graphic violence (V), explicit sexual situations (S), or crude, indecent language (L).
Changing Your Password
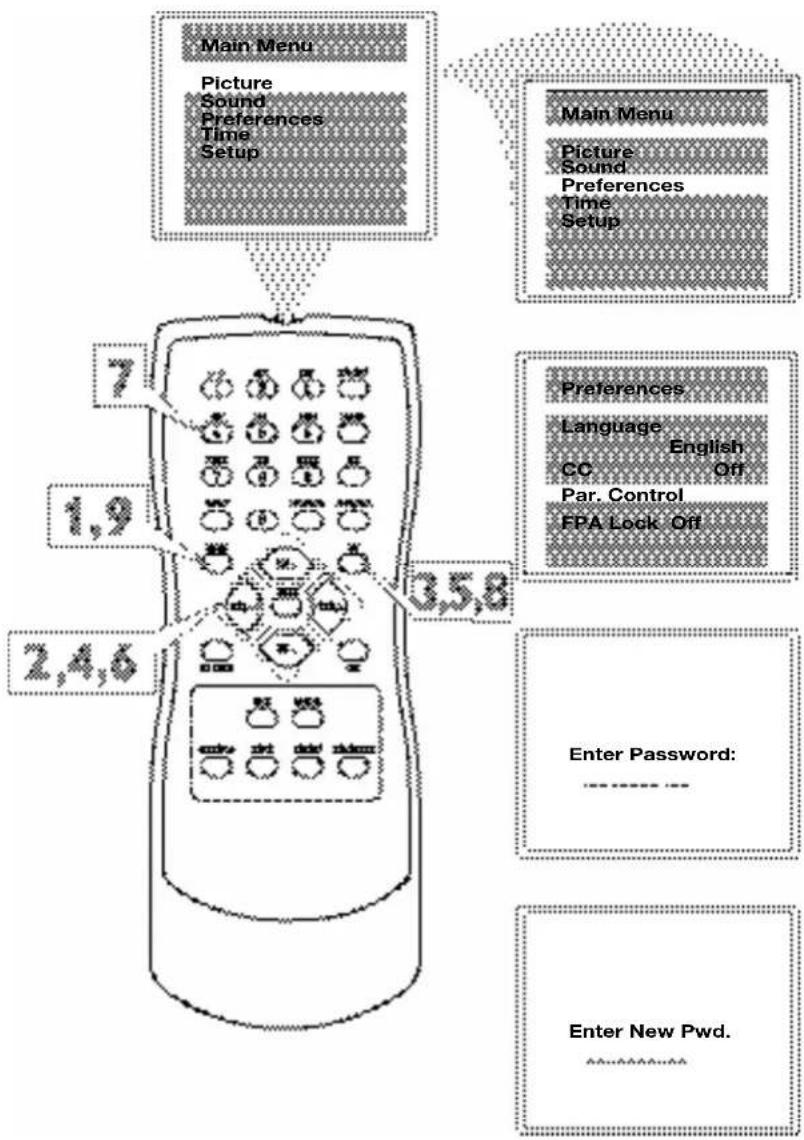
Over the next few pages, you will learn how to block programs and understand the rating terms for certain broadcasts. First, set your password.
1 Press MENU to see the main menu.
2 Press CH+ or CH- to highlight Preferences.
3 Press OK to enter the Preference submenu.
4 Press CH+ or CH- to highlight Par. (Parental) Control.
5 Press OK. Enter Password will appear on the screen.
If you want to set a new code, go to steps 6-8 directly. (You can press the number buttons to enter a four-digit code. The code "0000" is the default password. If you have not set a code previously, then "0000" is the code.)
Resetting Your Password
6 Press VOL+ on the remote and the CHANNEL + on the front of the TV at the same time. Enter New Pwd. will appear on the screen. (You must be in the Enter Password screen when attempting this.)
7 Press the number buttons to enter a four-digit code. The code will appear on the screen as you enter it.
8 Press OK to save the code.
9 Press MENU repeatedly to exit the menu or the menu will automatically disappear within a few seconds if no buttons are pressed on the remote control.
Helpful Hints
You cannot change Parental Lock settings without knowing the password.
If you forget your password you can reset it. Simultaneously press the VOL+ on the remote and the CH+ button on the front of the TV. The display will appear for you to enter your new password.
Blocking Programming with Movie Ratings
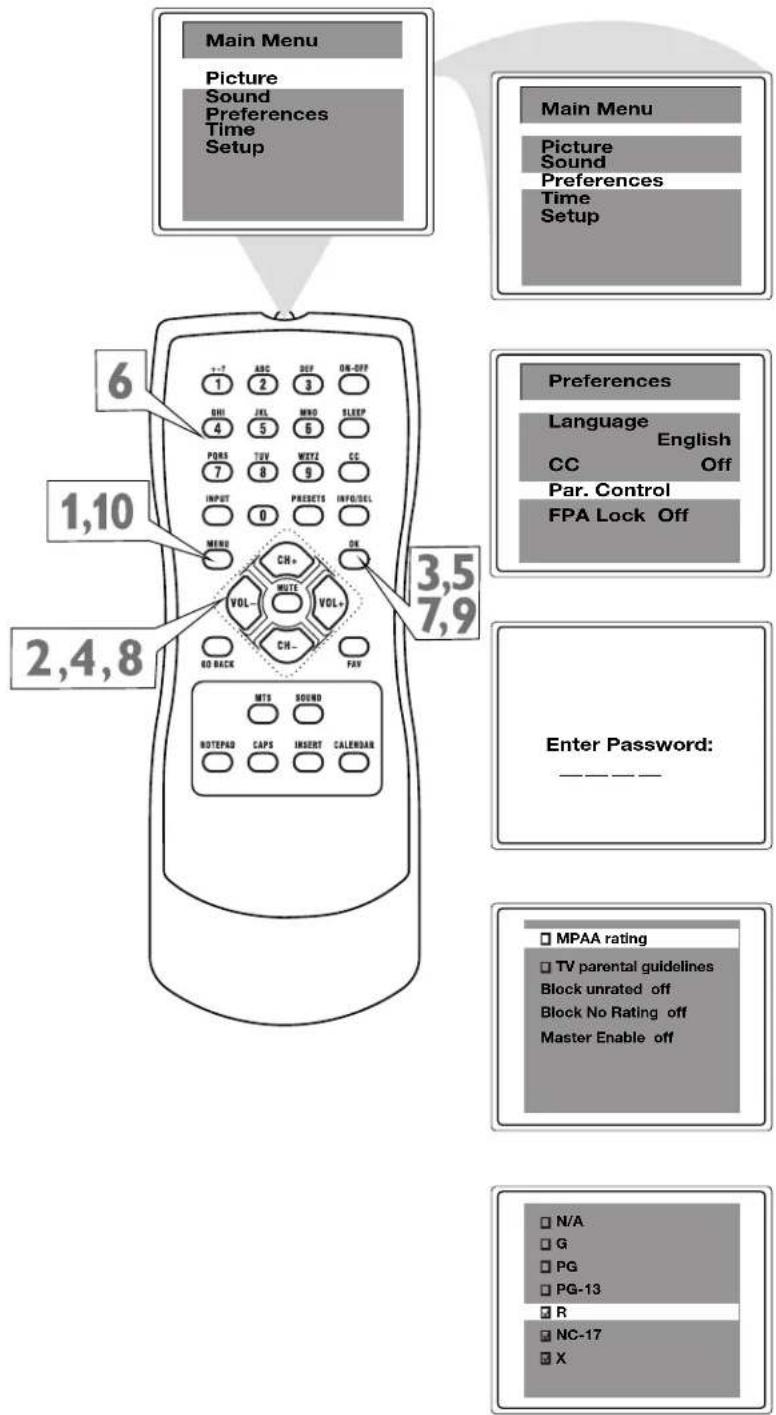
There are two types of ratings for Parental Lock. One is based on movie industry ratings. The other is based on TV industry ratings. Both can be used to censor programming. Let first look at the MPAA Rating options of Parental Lock.
1 Press MENU to see the main menu.
2 Press CH+ or CH- to highlight Preferences.
3 Press OK to enter the Preferences submenu.
4 Press CH+ or CH- to highlight Par. (Parental) Control.
5 Press OK to display the password screen.
6 Press the number buttons to enter your four-digit code. The Parental Lock setup menu appears on the screen and the MPAA rating is highlighted.
7 Press OK to display MPAA ratings (G, PG, PG-13, R, NC-17, and X).
8 Press CH+ or CH- to select the rating you want to block.
9 Press OK to block (or unblock) the rating. A check mark will appear to the left of the rating when blocked. When you block a rating, higher ratings are blocked automatically. To unblock all the ratings, select N/A.
10 Press MENU repeatedly to exit the menu or the menu will automatically disappear within a few seconds if no buttons are pressed on the remote control.
Helpful Hints
Blocking any rating (ON) will block all the higher ratings automatically. For example, if R is blocked manually, NC17 and X will be blocked automatically. To turn a rating OFF, set each rating individually.
Blocking Programming with TV Ratings
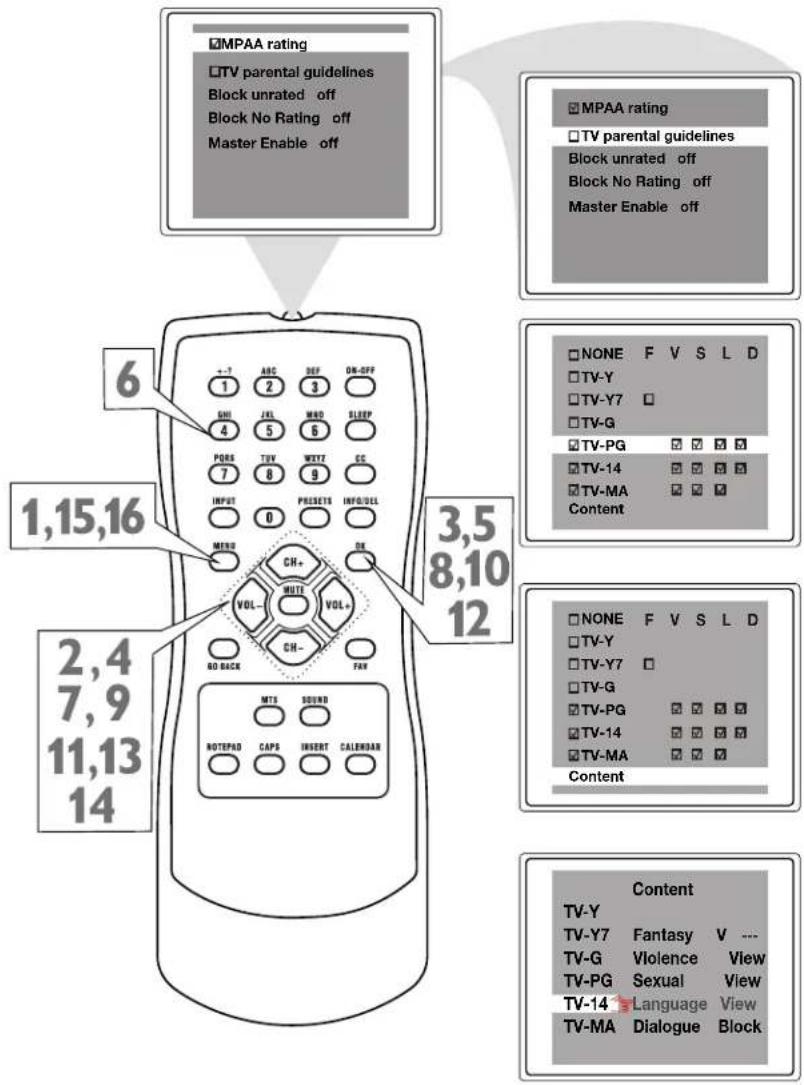
Some program ratings are based on TV industry ratings as described below.
1 Press MENU to see the main menu.
2 Press CH+ or CH- to highlight Preferences.
3 Press OK to enter the Preferences submenu.
4 Press CH+ or CH- to highlight Par. (Parental) Control.
5 Press OK to display the password screen.
6 Press the number buttons to enter your four-digit code. The Parental Lock setup menu appears on the screen.
7 Press CH+ or CH- to highlight TV parental guidelines.
8 Press OK to display the parental guidelines (TV-Y, TV-Y7, TV-G, TV-PG, TV-14, or TV-MA).
9 Press CH+ or CH- to select a rating.
10 Press OK to turn the rating on or off. A check mark appears when the rating is blocked. TV-Y and TV-G can be turned on (to block viewing) or off (to allow viewing) only.
TV-Y7, TV-PG, TV-14, and TV-MA can be customized to block V (violence), F (fantasy violence), S (sexual situations), L (coarse language), or D (suggestive dialog).
To do so, continue with these steps.
11 Press CH+ or CH- to highlight Content.
12 Press OK to enter the Content menu.
13 Press CH+ or CH- to select a rating, then press VOL+.
14 Press CH+ or CH- to select the content theme (Fantasy-V, Violence, Sexual, Language, or Dialog), then press OK to block or view it.
15 Press MENU to return to the Parental Guidelines screen and check your settings. A check mark appears when the rating is blocked.
16 Press MENU repeatedly to exit the menu or the menu will automatically disappear within a few seconds if no buttons are pressed on the remote control.
Helpful Hints
Any rating will block higher ratings automatically.
To unblock all the ratings, select NONE.
Notes:
- Blocking TV-Y, only TV-Y7
is blocked automatically. - Blocking TV-Y7, other ratings will not change.
Parental Lock Blocking Options
After setting your password, Parental Lock also offers these special blocking options.
1 Press MENU to see the main menu.
2 Press CH+ or CH- to highlight Preferences.
3 Press OK to enter the Preferences submenu.
4 Press CH+ or CH- to highlight Par. (Parental) Control.
5 Press OK to display the password screen.
6 Press the number buttons to enter your four-digit code. The Parental Lock setup menu appears on the screen.
7 Press CH+ or CH- to select Master Enable, Block Unrated, or Block No Rating.
MASTER ENABLE: this is the "master switch" for Parental Lock. When ON, all blocking/censoring you have set is enabled. When OFF, all blocking is disabled.
BLOCK UNRATED: All unrated programs based on movie ratings or TV ratings will be blocked if this feature is ON and MASTER ENABLE is ON.
BLOCK NO RATING: All programming with no content advisory data will be blocked if this feature is ON and MASTER ENABLE is ON.
8 Press VOL+ or VOL- to turn the blocking option On or Off.
9 Press MENU repeatedly to exit the menu or the menu will automatically disappear within a few seconds if no buttons are pressed on the remote control.
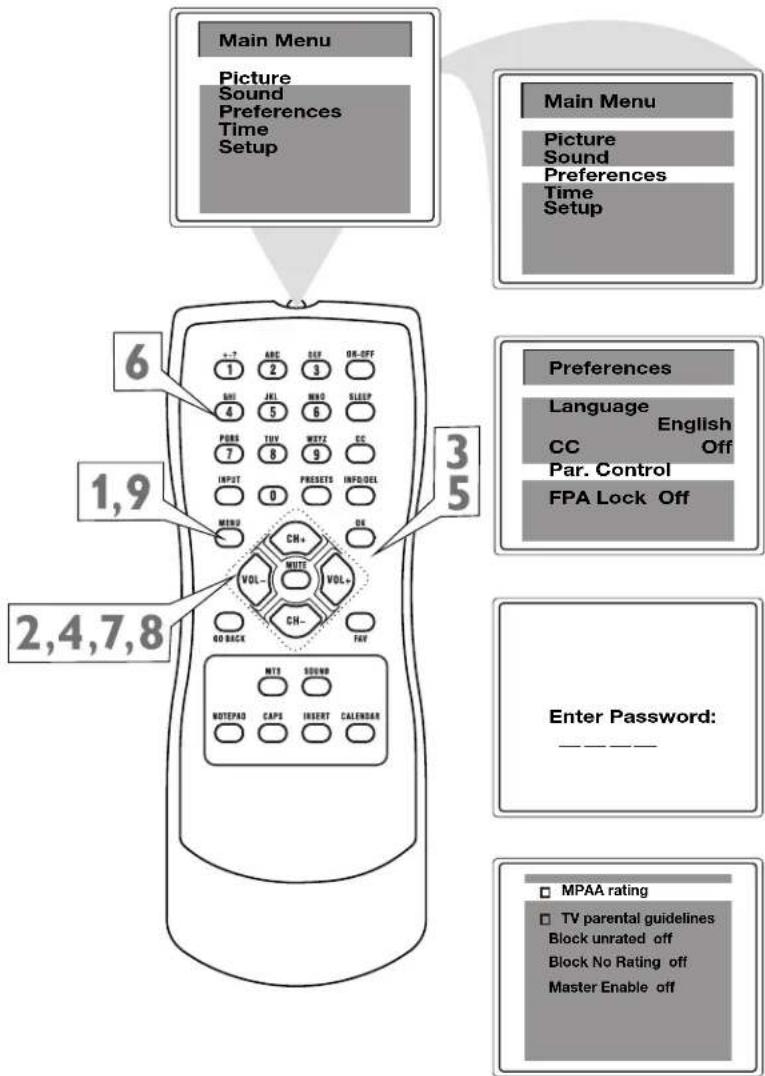
Child Lock
Child Lock allows you to lock the buttons on the front of the TV.
1 Press MENU to see the main menu.
2 Press CH+ or CH- to highlight Preferences.
3 Press OK to enter the Preferences submenu.
4 Press CH+ or CH- to highlight FPA (Front Panel) Lock.
5 Press VOL+ or VOL- to turn on or off FPA Lock. Choose On to disable all the buttons on the front of the TV. FPA Lock On will appear on the TV screen each time you press buttons on the front of the TV. You can still operate the TV with the remote control. You can still use the POWER button on the front of the TV, but only to turn off the TV (not on). Set FPA Lock to Off to cancel this feature so you can use the buttons on the front of the TV again.
6 Press MENU repeatedly to exit the menu or the menu will automatically disappear within a few seconds if no buttons are pressed on the remote control.
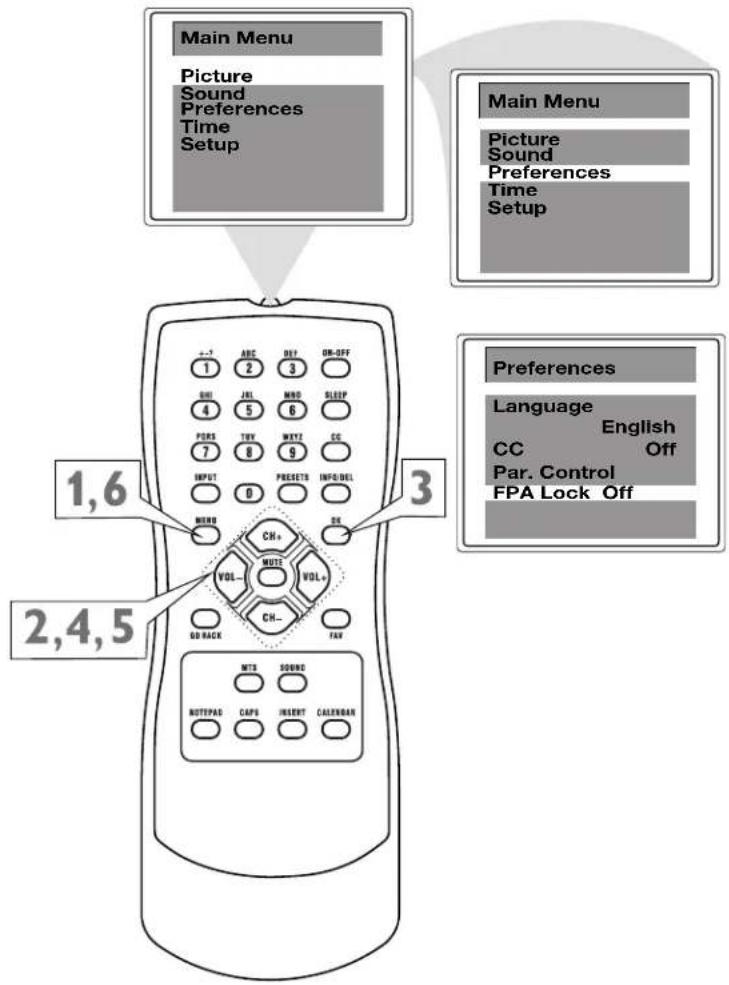
Sound Mode Selection
You can preset sound mode that best suits your current programming among Personal, Theater, Concert and Speech.
1 Press MENU to see the main menu.
2 Press CH+ or CH- to highlight Sound.
3 Press OK to enter the Sound submenu.
4 Press CH+ or CH- to highlight Sound Mode.
5 Press VOL+ or VOL- to select Personal, Theater, Concert, or Speech.
6 Press MENU repeatedly to exit the menu or the menu will automatically disappear within a few seconds if no buttons are pressed on the remote control.
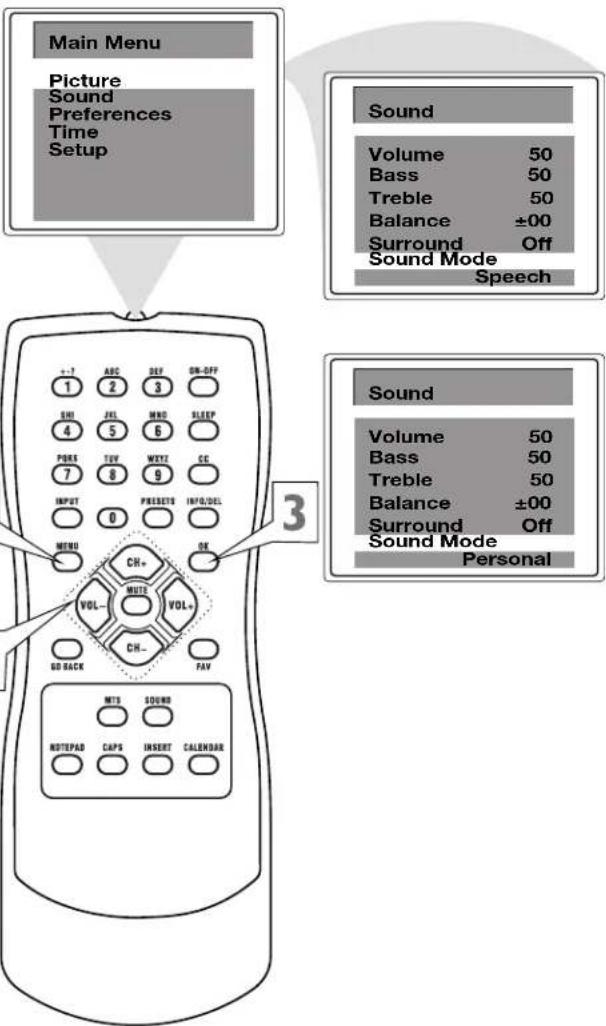
Helpful Hints
You can choose a sound mode setting quickly by pressing the SOUND button on the remote control.
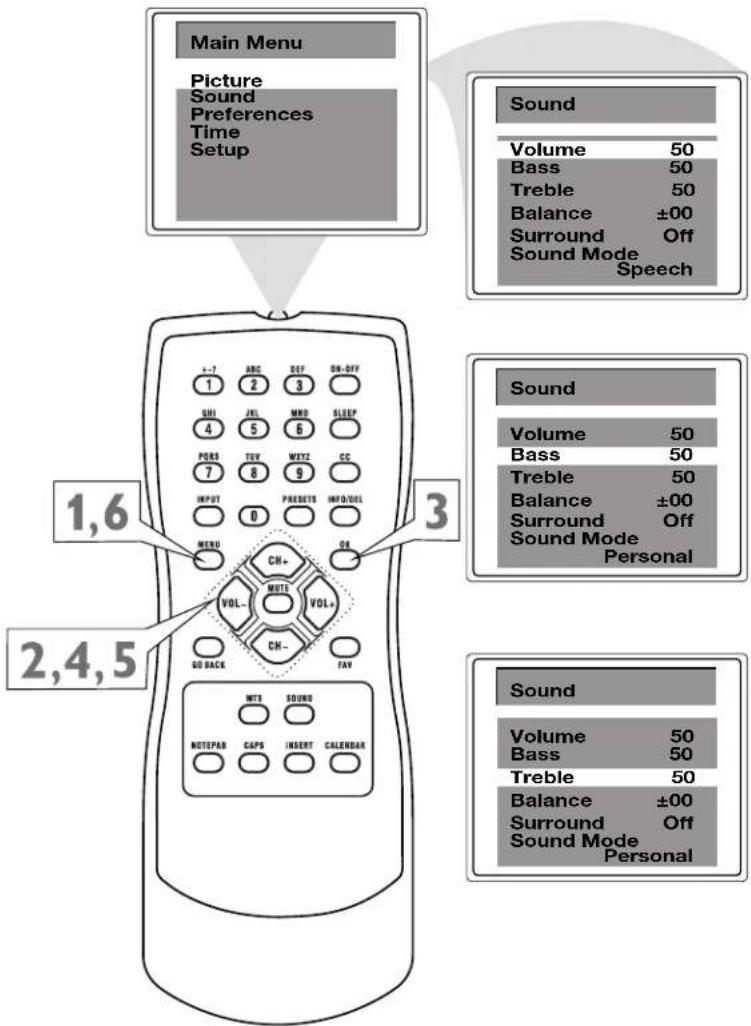
Sound Adjustments
You can adjust the low frequency (Bass) or high frequency (Treble). You can also adjust the Balance to increase the volume of the left and right sound channels.
1 Press MENU to see the main menu.
2 Press CH+ or CH- to highlight Sound.
3 Press OK to enter the Sound submenu.
4 Press CH+ or CH- to highlight Volume, Bass, Treble or Balance.
5 Press VOL+ or VOL- to adjust the option.
6 Press MENU repeatedly to exit the menu or the menu will automatically disappear within a few seconds if no buttons are pressed on the remote control.
Helpful Hints
Bass: Enhances the low frequency sounds.
Treble: Enhances the high frequency sounds.
Balance: Distributes the sound between the left and right speakers of the TV.
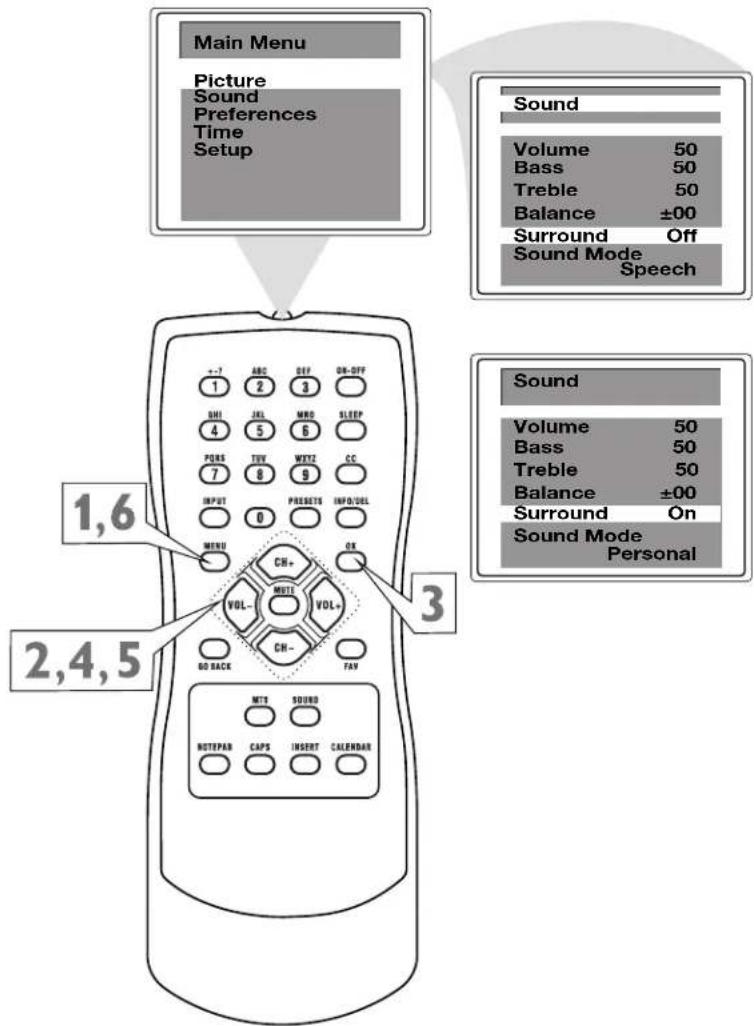
Surround
When stereo signals are available, this function enhances the stereo spatial effect.
1 Press MENU to see the main menu.
2 Press CH+ or CH- to highlight Sound.
3 Press OK to enter the Sound submenu.
4 Press CH+ or CH- repeatedly to highlight Surround.
5 Press VOL+ or VOL- to turn this option on or off.
6 Press MENU repeatedly to exit the menu or the menu will automatically disappear within a few seconds if no buttons are pressed on the remote control.
Stereo and Second Audio Program
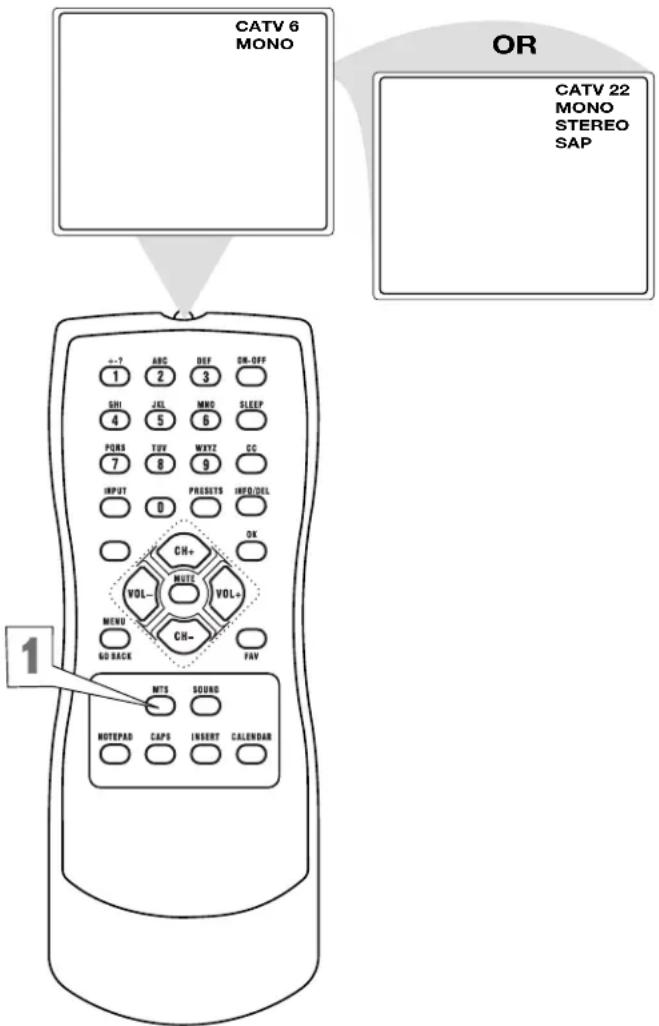
Multi-channel Sound (MTS) broadcasts enhance TV viewing by bringing you programs with high fi delity stereo sound. MTS also provides an extra channel called the Second Audio Program (SAP), which broadcasters can use to transmit a second language or for other purposes.
1 Press MTS on the remote control to select STEREO, MONO, or SAP. All the options will be available only when the current TV channel is broadcasting that option. Channels will not always carry programs that have all the MTS options.
If STEREO appears on the screen when you select a channel, stereo broadcasting is available with the current TV program. You can hear sound from the left and right speakers of the TV.
If the broadcast is not strong or clear, stereo sound is not available. Press the MTS button to change to MONO. This should eliminate the noise.
If MONO appears on the screen when you choose a channel, Stereo is not available.
If SAP appears when you select a channel, Second Audio Program broadcasting is available for the current TV program.
Press the MTS button to choose SAP and you may hear the program in a different language or some other audio.
Notebook
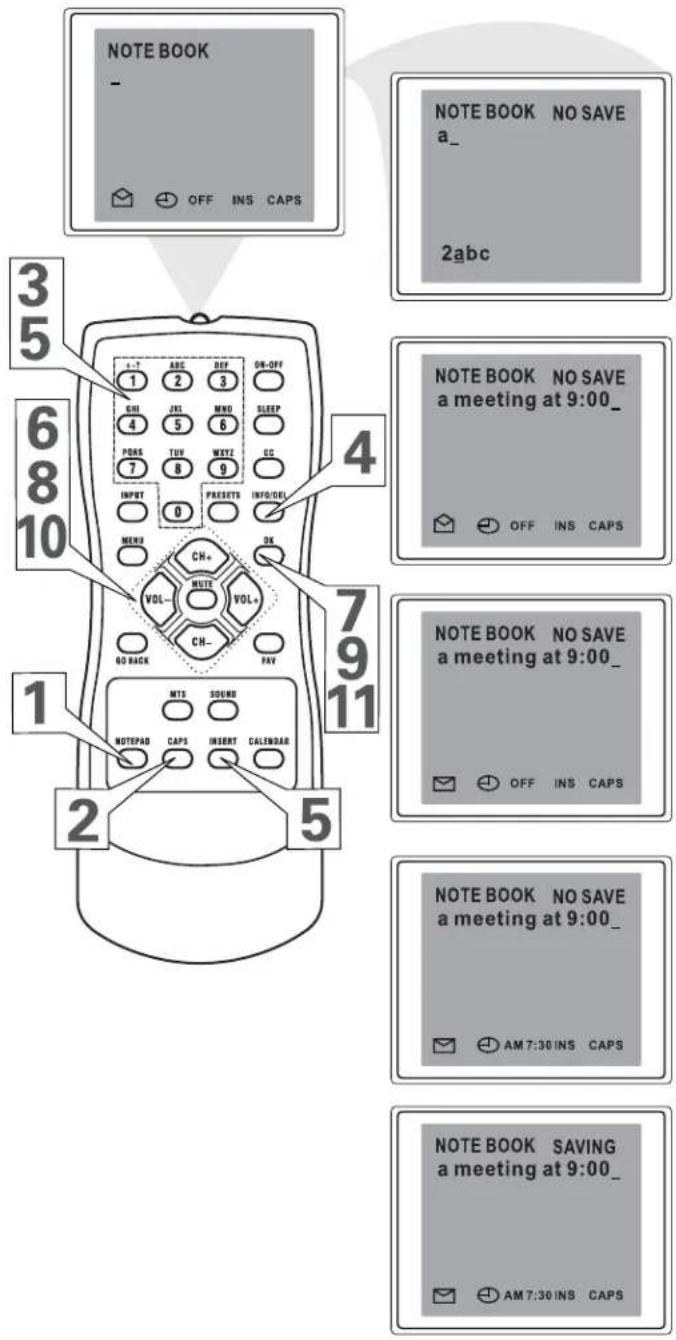
This feature enables you to store personal messages and can be used as a reminder.
1 Press NOTEPAD to display the notebook screen.
2 Press CAPS repeatedly to toggle the entry mode between uppercase or lowercase letters.
3 Use number buttons to enter letters, numbers, or some special symbols.
4 Press DEL(ETE) to delete the unwanted text.
5 Press INS(ERT) to select INS(ERT) or OVR(overwrite) on the screen, then use number buttons to insert or overwrite the letter or number in the text.
After fi nishing message inputting and editing, if you want to display the message when the TV is turned on, proceed with these steps:
6 Press CH+/CH- and VOL+/VOL- to select
7 Press OK to turn into , or vice versa.
If you select this icon, the notebook window with the stored message will be displayed on the screen first when the TV is turned on.
If you select this icon, the notebook window with the stored message will not be displayed on the screen when the TV is turned on.
If you want to display the message at a specified time, select the icon and proceed with these steps:
8 Press CH+/CH- and VOL+/VOL- to select OFF.
9 Press OK to turn OFF into AM 12:00.
10 Press CH+ or CH- to change the time in minutes. (Press and hold CH+ or CH- to change the time quickly in 10 minute increments.) e.g. AM 7:30, it means that the notebook window with stored message will be displayed on the screen automatically at AM 7:30. If the TV is in standby mode, the message cannot be displayed.
11 To save, press NOTEPAD to remove the notepad from the screen. Press NOTEPAD to make the notepad appear on the screen with the cursor back at the top left side of the screen. Press OK. "SAVING" appears on the screen. The Notebook screen disappears automatically.
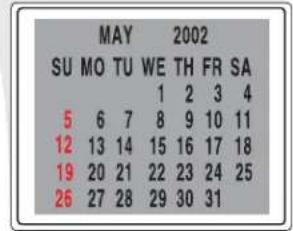
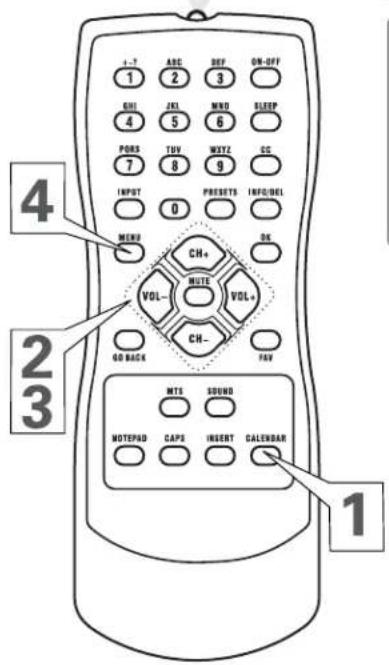
Calendar
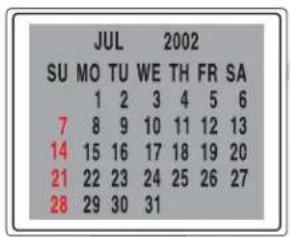
Calendar enables you to look up the date easily.
1 Press CALENDAR to display the calendar.
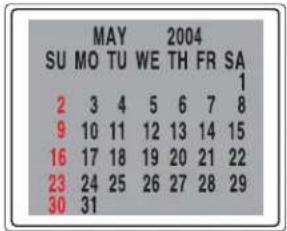
2 Press VOL+ or VOL- to display a previous or future month, e.g. MAY.
3 Press CH+ or CH- to display a previous or future year, e.g. 2004.
4 Press MENU repeatedly to exit the menu or the menu will automatically disappear within a few seconds if no buttons are pressed on the remote control.
Troubleshooting
Most problems you encounter with your TV can be corrected by consulting the following troubleshooting list.
Note for U.S. customers: If you prefer, we can provide you with the name of an Authorized Service Representative who will visit your home for a fee to install your electronic entertainment system and to instruct you in its operation. For details about this service, call 1-888-206-3359. For additional assistance while using your RCA product, please visit www.rca.com/customersupport.
TV Problems
TV won't turn on
• Make sure the TV is plugged in.
- Check the wall receptacle (or extension cord) to make sure it is "live" by plugging in something else.
- Something might be wrong with your remote control. Press the POWER button on the front of the TV. If the TV turns on, check the remote control.
- The Child Lock may be set. Go to page 28 for more information.
Buttons don't work
- The Child Lock may be set. Go to page 28 for more information.
TV turns off unexpectedly
- Sleep timer might have been activated. Go to page 22 for instructions.
- Off-Timer might have been activated. Go to page 20 for instructions.
- Electronic protection circuit may have been activated because of a power surge. If this happens frequently, the voltage in your house may be abnormally high or low.
Blank screen
- You may be on an inactive channel. Try another channel.
No sound, picture okay
- Maybe the sound is muted. Try pressing the volume up button to restore sound.
- If using S-Video remember to also connect the component's left and right audio output jacks to the TV's AUDIO jacks.
Can't select certain channel
- Channel may be blocked or not approved through Parental Controls.
- If using a VCR, check to make sure the TV/VCR button on the VCR is in the correct mode (press the TV/VCR button on your VCR).
Noisy stereo reception
• May be a weak station. Press MTS on the remote and choose Mono (instructions on page 32).
No picture, no sound but TV is on
- Maybe the signal type is set wrong. Go to the INPUT button description on page 9.
Sound okay, picture poor
- Check antenna connections. Make sure all of the cables are firmly connected to the jacks.
- Try adjusting sharpness to improve weak signals. Go to page 16 for more instructions.
Black box appears on the screen
- Closed caption might be on. Check CC in the Preferences menu. Go to page 21 for more instructions.
The Remote Control Doesn't Work
- Something might be between the remote and the remote sensor on the component. Make sure there is a clear path.
- Maybe batteries in the remote are weak, dead or installed incorrectly. Put new batteries in the remote.
Problems with Parental Controls
The rating limits don't work
- You must activate the settings. Go to the MAIN MENU (press MENU on your remote), select Par. (Parental) Control in the Preferences menu. Enter your password and turn on Master Enable (Go to page 27 for instructions).
I don't remember my password and I want to unlock the TV
- If you forget your password you can reset it. Simultaneously press the VOL+ on the remote and the CH+ button on the front of the TV. The display will appear for you to enter your new password.
The Parental Controls won't let me watch a program even though it's not rated as violent.
- Maybe the movie was given an NR (Not Rated) status. Check to see if BLOCK NO RATING is turned on in the Par. (Parental) Control menu. Go to page 25 for more instructions.
Care and Cleaning
CAUTION: Turn OFF your TV before cleaning.
You can clean the TV as required, using a soft lint-free cloth. Be sure to occasionally dust the ventilation slots in the cabinet to help assure adequate ventilation.
The TV's screen may be cleaned with a soft, lint-free cloth as well. Take care not to scratch or mar the screen. If necessary, you may use a cloth dampened with warm water. Never use strong cleaning agents, such as ammonia-based cleaners, or abrasive powder. These types of cleaners will damage the TV.
While cleaning do not spray liquid directly on the screen, or allow liquid to run down the screen and inside the TV. Also, never place drinks or vases with water on top of the TV. This could increase the risk of fire or shock hazard or damage to the TV.
Caution: Using video games or any external accessory with fixed images for extended periods of time can cause them to be permanently imprinted on the picture tube (or projection TV picture tubes). ALSO, some network/program logos, phone numbers, etc. may cause similar damage. This damage is not covered by your warranty.
Limited Warranty
What your warranty covers:
• Defects in materials or workmanship.
For how long after your purchase:
- 90 days from date of purchase for labor charges.
• One year from date of purchase for parts. - Two years from date of purchase for the picture tubes.
The warranty period for rental units begins with the first rental or 45 days from date of shipment to the rental firm, whichever comes first.
What we will do:
- Pay any Authorized RCA Television Service Center the labor charges to repair your television.
- Pay any Authorized RCA Television Service Center for the new or, at our option, refurbished replacement parts and picture tubes required to repair your television.
How you get service:
- For screen sizes of 26" and smaller: Take your RCA television to any Authorized RCA Television Service Center and pick up when repairs are complete.
- For screen sizes larger than 26": Request home or pick up, repair, and return service from any Authorized RCA Television Service Center, provided that your television is located within the geographic territory covered by an Authorized RCA Television Service Center. If not, you must take your television to the Service Center location at your own expense, or pay for the cost the Service Center may charge to transport your television to and from your home.
- To identify your nearest Authorized RCA Television Service Center, ask your dealer, visit www.rca.com, look in the Yellow Pages, or call 1-800-336-1900.
- Proof of purchase in the form of a bill of sale or receipted invoice which is evidence that the product is within the warranty period must be presented to obtain warranty service. For rental fi rms, proof of fi rst rental is also required.
What your warranty does not cover:
- Customer instruction. (Your Owner's Manual describes how to install, adjust, and operate your television. Any additional information should be obtained from your dealer).
• Installation and related adjustments.
• Signal reception problems not caused by your television.
• Damage from misuse or neglect. -
Batteries.
-
Customer replacement fuses.
- Damage from images burnt onto the screen.
- A television that has been modified or incorporated into other products or is used for institutional or other commercial purposes.
- A television purchased or serviced outside the U.S.A.
- Acts of nature, such as but not limited to lightning damage.
Product registration:
- Please complete and mail the Product Registration Card packed with your TV. It will make it easier to contact you should it ever be necessary. The return of the card is not required for warranty coverage.
Limitation of Warranty:
- THE WARRANTY STATED ABOVE IS THE ONLY WARRANTY APPLICABLE TO THIS PRODUCT. ALL OTHER WARRANTIES, EXPRESS OR IMPLIED (INCLUDING ALL IMPLIED WARRANTIES OF MERCHANTABILITY OR FITNESS FOR A PARTICULAR PURPOSE) ARE HEREBY DISCLAIMED. NO VERBAL OR WRITTEN INFORMATION GIVEN BY TTE TECHNOLOGY, INC., ITS AGENTS OR EMPLOYEES SHALL CREATE A GUARANTY OR IN ANY WAY INCREASE THE SCOPE OF THIS WARRANTY.
- REPAIR OR REPLACEMENT AS PROVIDED UNDER THIS WARRANTY IS THE EXCLUSIVE REMEDY OF THE CONSUMER. TTE TECHNOLOGY, INC. SHALL NOT BE LIABLE FOR INCIDENTAL OR CONSEQUENTIAL DAMAGES RESULTING FROM THE USE OF THIS PRODUCT OR ARISING OUT OF ANY BREACH OF ANY EXPRESS OR IMPLIED WARRANTY ON THIS PRODUCT. THIS DISCLAIMER OF WARRANTIES AND LIMITED WARRANTY ARE GOVERNED BY THE LAWS OF THE STATE OF INDIANA. EXCEPT TO THE EXTENT PROHIBITED BY APPLICABLE LAW, ANY IMPLIED WARRANTY OF MERCHANTABILITY OR FITNESS FOR A PARTICULAR PURPOSE ON THIS PRODUCT IS LIMITED TO THE APPLICABLE WARRANTY PERIOD SET FORTH ABOVE.
How state law relates to this warranty:
- Some states do not allow the exclusion nor limitation of incidental or consequential damages, or limitations on how long an implied warranty lasts, so the above limitations or exclusions may not apply to you.
- This warranty gives you specific legal rights, and you also may have other rights that vary from state to state.
If you purchased your television outside the United States:
- This warranty does not apply. Contact your dealer for warranty information.
Service calls which do not involve defective materials or workmanship are not covered by this warranty. Costs of such service calls are the sole responsibility of the purchaser.
This page intentionally left blank.
Visit the RCA website at www.rca.com
Please do not send any products to the Indianapolis address listed in this manual or on the carton. This will only add delays in service for your product.
TTE Technology, Inc.
10330 North Meridian Street
Indianapolis, IN 46290
©2004 TTE Technology, Inc.
RCA and associated marks are trademarks of THOMSON S.A. used under license to TCL-Thomson Electronics (TTE).
Printed in USA
TOCOM 1641309D
- Television User's Guide
- CAUTION
- WARNING
- Product Registration
- Product Information
- IMPORTANT SAFETY INSTRUCTIONS
- Read before operating equipment
- Table of Contents
- Introduction
- Getting Started
- Setup Menus
- On-screen Menus
- Parental Lock
- Sound
- Others
- Basic Cable TV Connection
- Helpful Hints
- Basic Antenna Connection
- CABLE TV / ANTENNA CONNECTIONS
- Basic TV to VCR Connection
- Description of Buttons on the TV
- Front Panel Buttons (Models 20F511T, 20F512T and 24F512T)
- Front View
- Front Panel Buttons (Model 27V512T and 27V513T)
- Top View
- Remote Control
- Battery Installation
- Effectively Using the Remote Control
- Language
- TV/Cable TV (CATV)
- Auto Search (Setting TV Channels)
- Manual Channel Tuning
- Favorite Channel Setting
- Adding or Erasing Channels
- Picture Adjustments
- Preset Picture Mode
- Clock
- On-Timer
- Off-Timer
- Closed Caption
- Sleep Timer
- Understanding Parental Lock
- MPAA Ratings
- TV Ratings
- TV-14 Parents Strongly Cautioned
- TV-MA Mature Audience only -
- Changing Your Password
- Resetting Your Password
- Blocking Programming with Movie Ratings
- Blocking Programming with TV Ratings
- Notes:
- Parental Lock Blocking Options
- Child Lock
- Sound Mode Selection
- Sound Adjustments
- Surround
- Stereo and Second Audio Program
- Notebook
- Calendar
- Troubleshooting
- TV Problems
- TV won't turn on
- Buttons don't work
- TV turns off unexpectedly
- Blank screen
- No sound, picture okay
- Can't select certain channel
- Noisy stereo reception
- No picture, no sound but TV is on
- Sound okay, picture poor
- Black box appears on the screen
- The Remote Control Doesn't Work
- Problems with Parental Controls
- The rating limits don't work
- I don't remember my password and I want to unlock the TV
- The Parental Controls won't let me watch a program even though it's not rated as violent.
- Care and Cleaning
- Limited Warranty
- Product registration:
- Limitation of Warranty:
- How state law relates to this warranty:
- If you purchased your television outside the United States:
- Visit the RCA website at www.rca.com
- TTE Technology, Inc.
Brand : RCA
Model : TruFlat 14F512T
Category : Television