
SURFboard SBX-1000P - Modem/Router Arris - Free user manual and instructions
Find the device manual for free SURFboard SBX-1000P Arris in PDF.


| Product Type | G.hn Powerline Network Extender |
| Model | SURFboard SBX-1000P |
| Brand | ARRIS |
| Technology | RipCurrent (G.hn) up to 1 Gbps over home AC wiring |
| Ethernet Port | 1 x 10/100/1000 Mbps Gigabit Ethernet |
| Security | AES 128-bit encryption; Pairing button for encrypted connections |
| Compatibility | Works with most routers, gateways, and cable modems; requires G.hn device for network |
| Dimensions (Approx.) | 3.5 x 2.4 x 1.2 inches (89 x 61 x 30 mm) |
| Weight (Approx.) | 5.3 oz (150 g) |
| Power Supply | Directly powered from AC outlet (120 VAC, 60 Hz) |
| Power Consumption | ~5 W typical |
| LED Indicators | G.hn Link Quality, G.hn Pairing, Ethernet 10/100 Mbps, Ethernet 1 Gbps |
| Controls | G.hn Pairing button, Reset button (restart or factory reset) |
| Management | Web Manager accessible at 192.168.100.254 (static IP required) |
| Firmware Upgrade | Via Web Manager; download from ARRIS support website |
| Installation | Plug-and-play; pair devices with Pairing button for encrypted network |
| Indoor Use Only | Yes; do not expose to moisture or rain |
| Operating Temperature | 0°C to 40°C (32°F to 104°F) |
| Safety Certifications | FCC Part 15 Class B, IC CAN ICES-3 (B)/NMB-3 (B) |
| Package Contents | SBX-1000P, Ethernet cable, Quick Start Guide, Warranty card |
Frequently Asked Questions - SURFboard SBX-1000P Arris
User questions about SURFboard SBX-1000P Arris
0 question about this device. Answer the ones you know or ask your own.
Ask a new question about this device
Download the instructions for your Modem/Router in PDF format for free! Find your manual SURFboard SBX-1000P - Arris and take your electronic device back in hand. On this page are published all the documents necessary for the use of your device. SURFboard SBX-1000P by Arris.
USER MANUAL SURFboard SBX-1000P Arris
SURFboard SBX-1000P
Network Extender
User Guide
STANDARD PN 365-095-28247 x.4
April 2017
ARRIS Copyrights and Trademarks
© 2016-2017 ARRIS Enterprises LLC. All Rights Reserved.
No part of this publication may be reproduced in any form or by any means or used to make any derivative work (such as translation, transformation, or adaptation) without written permission from ARRIS Enterprises LLC. ("ARRIS"). ARRIS reserves the right to revise this publication and to make changes in content from time to time without obligation on the part of ARRIS to provide notification of such revision or change.
ARRIS and the ARRIS logo are all trademarks of ARRIS Enterprises LLC. Other trademarks and trade names may be used in this document to refer to either the entities claiming the marks or the names of their products. ARRIS disclaims proprietary interest in the marks and names of others.
ARRIS provides this guide without warranty of any kind, implied or expressed, including, but not limited to, the implied warranties of merchantability and fitness for a particular purpose. ARRIS may make improvements or changes in the product(s) described in this manual at any time.
The capabilities, system requirements and/or compatibility with third-party products described herein are subject to change without notice.
Patent Notice
Protected under one or more of the following U.S. patents: http://www.arris.com/legal Other patents pending.
Table of Contents
1. Important Safety Instructions....5
FCC STATEMENTS 6
FCC Interference Statement 6
FCC DECLARATION OF CONFORMITY 6
INDUSTRY CANADA (IC) STATEMENT 6
CARING FOR THE ENVIRONMENT BY RECYCLING YOUR ARRIS EQUIPMENT .... 7
2. Product Overview 8
Introduction 8
About The Network Extender....8
What is RipCurrent? 9
What's in the Box? 9
System Requirements....9
About this Manual....10
Contact Information 10
3. Installing the Network Extender 12
LED Indicators 12
Indicator Lights for the SBX-1000P 13
Connectors and Controls....14
Configuring and Installing the Network Extender 14
Pairing Devices Over an Encrypted Connection (Advanced).... 15
Creating a G.hn Network with a Non-G.hn Router.... 16
4. Managing Your Network Extender.... 17
Setting Up a Static IP Address.... 17
Setting Up a Static IP Address in Windows 7, Windows 8, or Windows 10 ...... 17
Setting Up a Static IP Address in Mac OS X.... 18
Finding the Device ID and MAC Address 18
Start the Network Extender Web Manager.... 18
View the Network Extender Product Information 19
View the Network Extender Network Settings.... 19
Set Up Multicast Configuration 20
View the Advanced Configuration Settings 20
Update Your Network Extender Firmware 21
Restart Your Network Extender.... 22
Restart the Network Extender Using the Reset Button.... 22
Restart the Network Extender Using the Network Extender Web Manager ...... 22
Reset Your Network Extender to Factory Settings 23
Reset the Network Extender Using the Reset Button 23
Reset the Network Extender Using the Network Extender Web Manager...... 23
Exit the SBX-1000P Web Manager 24
- Protecting and Monitoring Your Network.... 25
Setting Up Custom Security.... 25
Defining Custom Security Values 25
Setting Up Unique IP Addresses 27
Changing the Login Password....27
- Installation Scenarios.... 29
Two SBX-1000P Extenders with a SURFboard G.hn-Enabled Router 29
Two SBX-1000P Extenders with a SURFboard Gateway and an SBX-AC1200P Wireless Extender....30
SBX-1000P Extender with a SURFboard Cable Modem and an SBX-AC1200P Wireless Extender....30
Two SBX-1000P Extenders with a SURFboard Wireless Router and an SBX-AC1200P Wireless Extender.... 31
SBX-1000P Extender with a SURFboard Cable Modem and a SURFboard G.hn-Enabled Router 31
SBX-1000P Extender with a SURFboard Cable Modem and Several G.hn-Enabled Devices.... 32
Important Safety Instructions
Read This Before You Begin — When using your equipment, basic safety precautions should always be followed to reduce the risk of fire, electric shock, and injury to persons, including the following:
- Read all of the instructions listed here and/or in the user manual before you operate this device. Give particular attention to all safety precautions. Retain the instructions for future reference.
This device must be installed and used in strict accordance with manufacturer's instructions, as described in the user documentation that is included with the device.
■ Comply with all warning and caution statements in the instructions. Observe all warning and caution symbols that are affixed to this device.
To prevent fire or shock hazard, do not expose this device to rain or moisture. The device must not be exposed to dripping or splashing. Do not place objects filled with liquids, such as vases, on the device.
This device was qualified under test conditions that included the use of the supplied cables between system components. To ensure regulatory and safety compliance, use only the interface cables and install them properly.
Do not overload outlets or extension cords, as this can result in a risk of fire or electric shock. Overloaded AC outlets, extension cords, frayed power cords, damaged or cracked wire insulation, and broken plugs are dangerous. They may result in a shock or fire hazard. - Do not connect the plug into an extension cord, receptacle, or other outlet unless the plug can be fully inserted with no part of the blades exposed.
■ Postpone installation until there is no risk of thunderstorm or lightning activity in the area.
Do not use this product near water: for example, near a bathtub, washbowl, kitchen sink or laundry tub, in a wet basement, or near a swimming pool. - Do not cover the device or block the airflow to the device with any other objects. Keep the device away from excessive heat and humidity and keep the device free from vibration and dust.
■ Wipe the device with a clean, dry cloth. Never use cleaning fluid or similar chemicals. Do not spray cleaners directly on the device or use forced air to remove dust.
For added protection, unplug the device from the wall outlet and disconnect the cables to avoid damage to this device due to lightning and power surges.
Upon completion of any service or repairs to this device, ask the service technician to perform safety checks to determine that the device is in safe operating condition. - Do not open the device. Do not perform any servicing other than that contained in the installation and troubleshooting instructions. Refer all servicing to qualified service personnel.
This device should not be used in an environment that exceeds 40° C (104° F).
SAVE THE ABOVE INSTRUCTIONS
FCC STATEMENTS
FCC Interference Statement
This equipment has been tested and found to comply with the limits for a Class B digital device, pursuant to part 15 of the FCC Rules. These limits are designed to provide reasonable protection against harmful interference in a residential environment. This equipment generates, uses, and can radiate radio frequency energy and, if not installed and used in accordance with the instructions, may cause harmful interference to radio communications. However, there is no guarantee that interference will not occur in a particular installation. If this equipment does cause harmful interference to radio or television reception, which can be determined by turning the device off and on, the user is encouraged to try to correct the interference by one or more of the following measures:
■ Reorient or relocate the device.
■ Increase the separation between the device and receiver.
■ Connect the equipment into an outlet on a circuit different from that to which the receiver is connected.
- Consult the dealer or an experienced radio/TV technician for help.
This device complies with Part 15 of the FCC Rules. Operation is subject to the following two conditions: (1) This device may not cause harmful interference, and (2) This device must accept any interference received, including interference that may cause undesired operation.

FCC CAUTION: Any changes or modifications not expressly approved by ARRIS for compliance could void the user's authority to operate the equipment.
FCC DECLARATION OF CONFORMITY
ARRIS Enterprises, Inc. 3871 Lakefield Drive, Suwanee, GA 30024, 1-215-323-1000, declares that the SURFboard SBX-1000P Network Extender complies with 47 CFR Parts 2 and 15 of the FCC rules as a Class B digital device.
INDUSTRY CANADA (IC) STATEMENT
CAN ICES-3 (B)/NMB-3 (B)
CARING FOR THE ENVIRONMENT BY RECYCLING YOUR ARRIS EQUIPMENT
Please do not dispose of this product or any included electronic accessories, i.e., power supply or battery, with your residential or commercial waste. ARRIS devices may be disposed of through the ARRIS Product Recycling program, further described on the Corporate Responsibility page of the ARRIS website. Go to http://www.arris.com, scroll to the bottom of the page, and click Corporate Responsibility.
You may also contact your local community authorities for information regarding where you may dispose of your ARRIS devices.
Product Overview
Introduction
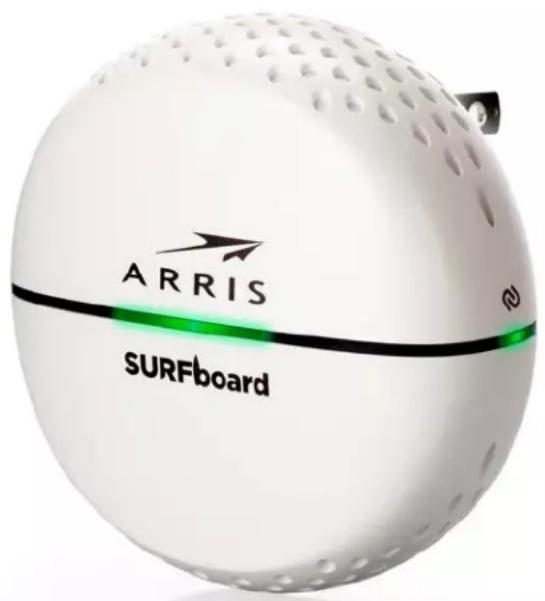
The SURFboard SBX-1000P Network Extender lets you transmit and receive data over power lines in your home. The SURFboard SBX-1000P Network Extender connects directly to any outlet in your home to extend and enhance your network connectivity.
About The Network Extender
The SBX-1000P Network Extender has the following features:
- RipCurrent™ Gigabit home networking (G.hn) transmits and receives data over your home power lines.
■ Supports multiple extenders on the same network.
■ Easy plug-and-play installation.
■ Compatible with most routers, gateways, and cable modems.
What is RipCurrent?
SURFboard RipCurrent is a technology that allows you to set up a high-speed home network that uses existing AC wiring and outlets. There's no need to run additional cables; your devices can communicate at data rates up to 1 Gbps using the network of power lines that already exists in your home.
The SBX-1000P uses its power plug to connect to the power lines that already exist in your home. RipCurrent is based on G.hn Power Line Communication (PLC), which is an ITU Specification managed by the HomeGrid™ Forum. This technology allows the SBX-1000P to distribute all data to each of the AC power outlets in the home. With a corresponding G.hn router, your network can be extended to any room, including basements, garages, or far reaching bedrooms. Connect entertainment devices, security cameras, gaming consoles, managed appliance, anything that uses IP (Internet Protocol).
The G.hn technology is more robust than previous home power line communication implementations to give you better ‘real world’ throughput and stability. G.hn proves much more efficient in an environment with multiple power line networks (such as apartment buildings or office buildings) with the capability of recognizing up to 250 other networks to avoid interference. G.hn communications are encrypted using the advanced standard AES 128-bit encryption for secure transmissions.
In order to ensure the best performance of your G.hn network, we recommend that you only use 3-prong grounded outlets. A 2-prong outlet will operate sufficiently, but with a lower throughput speed.
What's in the Box?
Make sure you have the following items before proceeding:
■ SURFboard SBX-1000P Network Extender.
■ Quick Start Guide.
- Ethernet cable.
■ Warranty card.
System Requirements
■ Two or more Ethernet-enabled computers, printers, smart TVs, or other devices that you want to connect.
■ 120VAC home wiring.
■ Two or more G.hn-capable devices, such as two SURFboard SBX-1000P Network Extenders, or any SURFboard Router with G.hn capability with a SBX-1000P Network Extender.
About this Manual
This manual covers the SURFboard SBX-1000P Network Extender. The model number is on the label affixed to the back of the Network Extender.

- MAC address.
- QR Code.
- Serial number.
- Model number.
Contact Information
Please visit the ARRIS Support website http://www.SURFboard.com/Support/SBX-1000P for self-help technical support and product documentation. We can also provide technical assistance via chat and email on the support website. ARRIS Support is available by phone at 877-466-8646. Please be prepared to provide your product's model number and serial number, which can be found on the Network Extender's label.
For information on additional SURFboard products, or to purchase SURFboard products (including other RipCurrent-enabled devices), visit http://www.surfboard.com.
For informational videos and tutorials about this and other ARRIS products, visit the ARRIS Everywhere YouTube channel at https://www.youtube.com/user/ARRISmarketing/featured.
Installing the Network Extender

Caution: This product is for indoor use only. Do not route the Ethernet cable(s) outside of the building. Exposure of the cables to lightning could create a safety hazard and damage the product.
If you are installing a Gigabit home networking router (SURFboard or a third-party router) with your SBX-1000P, please refer to the Installation and Configuration documentation for your device for setup instructions.
LED Indicators
The Network Extender has the following indicators:


- G.hn Link Quality LED: indicates the signal quality of the G.hn link and status of data transmission.
- G.hn Pairing LED: indicates the logical network connection status (not connected, connecting/pairing, connected/paired).
- 10/100 Mbps LED: indicates the status of the Ethernet 10/100 Mbps link.
- 1 Gbps LED: indicates the status of the 1 Gbps link.
Indicator Lights for the SBX-1000P
The Network Extender has several LED indicator lights to assist in troubleshooting.
| LED | Color/Behavior | Description |
| G.hn Link QualityOff No link. | Solid green | Excellent link (at least 80 Mbps). |
| Flashing green | Receiving/transmitting data, excellent link. | |
| Solid amber | Good link (between 40 Mbps and 80 Mbps). | |
| Flashing amber | Receiving/transmitting data, good link. | |
| Solid red | Fair link (less than 40 Mbps). | |
| Flashing red | Receiving/transmitting data, fair link. | |
| G.hn Pairing | Solid green | Pairing complete (encrypted). Connected to G.hn network with encryption enabled. |
| Flashing green | Pairing in progress (encrypted). Trying to connect to G.hn network. | |
| Solid red | Connection complete (unencrypted). Connected to G.hn network without encryption. | |
| Flashing red | Connection in progress (unencrypted). Trying to connect to G.hn network. | |
| Off No link. | ||
| Ethernet10/100 Mbpslink/activity | Solid amber | 10/100 Mbps link activated, but no activity. |
| Flashing amber | 10/100 Mbps activity. | |
| Ethernet 1 Gbpslink/activity | Solid green 1 Gbps link activated, but no activity. | |
| Flashing green 1 Gbps activity. | ||
Connectors and Controls
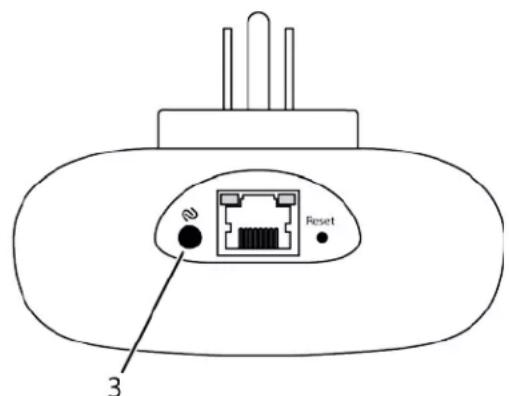
The Network Extender has the following connectors and controls:

-
Ethernet: Used to connect the Network Extender with a client device such as a computer, printer, gaming console, router, and so on.
-
G.hn Pairing button: Press and hold this button for three to five seconds to create an encrypted network to connect with other G.hn devices.

Note: If you hold the Pairing button for more than 10 seconds, the Network Extender resets its pairing defaults (that is, it loses any encrypted connection that it may have with other devices).
- Reset button: Can be used either to reset the Network Extender to its factory settings or to restart the Network Extender. Use a pointed non-metallic object to press and hold this button.
- Press and hold this button for three to five seconds to restart the Network Extender as if you power cycled the device.
- Press and hold this button for more than 10 seconds if you want to reset the Network Extender to its factory default settings and restart the device. Any customized settings that you have set will be lost.
Configuring and Installing the Network Extender
In order to use Gigabit home networking (G.hn), you must have at least two G.hn devices connected to your power grid. The devices will begin to communicate with each other as soon as they detect each other over the power grid. You can add additional devices later to expand your network.
You can use the RipCurrent network by just plugging in two or more G.hn-enabled devices into the electrical outlets in your home.
Pairing Devices Over an Encrypted Connection (Advanced)
To increase security, you can choose to pair the devices with each other over an encrypted connection. This step creates an encrypted network between two or more G.hn devices on a power grid. It also helps you to secure your local area network (LAN) by randomizing your domain name and password. Once your devices are paired over an encrypted connection, then any devices that have not been paired will not be able to connect to your network.

Important: If your Network Extender is not paired to another device over an encrypted connection, then the G.hn Pairing LED will appear red to indicate that the connection is not encrypted.
Follow these steps to create an encrypted connection and install your first G.hn devices:
- Plug in both devices in a location where you can see and easily access both devices. Power up both devices and wait for 15 seconds for the devices to fully boot before proceeding.
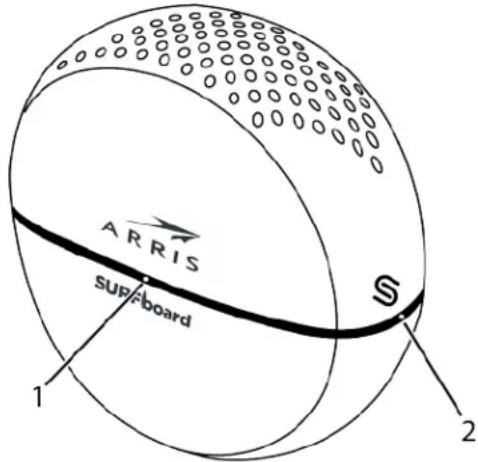
- Press the G.hn Pairing button (3 in the illustration shown below) on your Network Extender to initiate pairing on your Network Extender. Hold the button for two to three seconds. The Pairing LED (2) begins to flash green.
-
Go to the second device and follow the steps required to initiate pairing on that device. (These steps may be different, depending on the model number and manufacturer of the second device.)
-
When the devices begin communicating with each other, the Pairing LED 2 on the Network Extender begins to flash green.
-
When the Pairing LED stops flashing and becomes solid green (for an encrypted connection) or solid red (for an unencrypted connection), the pairing process is complete. It may take up to 60 seconds for the pairing process to complete.
-
Once the pairing process is complete, you can unplug the devices from the wall and move them to their permanent locations throughout the house. Use the enclosed Ethernet cable to connect to the client device, such as a computer, TV, or game console.
Repeat these steps to add additional devices to an existing G.hn network.

Note: The Link Quality LED 1 indicates the signal quality of the G.hn link. Green indicates an excellent link, amber indicates a good link, and red indicates a fair link. If the Link Quality LED is red, you may want to move your Network Extender to a new location to see if you can improve the quality of your G.hn link.

Note: If your pairing is not successful, you can reset the G.hn settings for the Network Extender by pressing and holding the pairing button for at least 10 seconds. Then, test your connection in unencrypted mode before trying to pair again.
Creating a G.hn Network with a Non-G.hn Router
If your router is not G.hn-capable, you can still create a G.hn network in your home using your SBX-1000P and another Network Extender. Use the enclosed Ethernet cable to attach your SBX-1000P to a LAN port on your router. The SBX-1000P will transmit data from your router over your home's electrical wiring.
You will need a second Network Extender to complete your G.hn network. Ideally, you should connect an SBX-1000P to your router to transmit data over your home's electrical wiring, and then install an SBX-AC1200P in a dead zone to extend your WiFi network into that area. Follow the instructions in Configuring and Installing the Network Extender (page 15) to connect the devices and complete your G.hn network.
Managing Your Network Extender
Use the Network Extender Web Manager to view and monitor the configuration settings and operational status of your SBX-1000P. You can also configure your network connections and security settings. See Protecting and Monitoring Your Network (page 25) for more information.

Note: To be sure that you access the Web Manager on the correct device, please unplug all other Network Extenders on the network. Attach each unit directly and configure each one individually. See Setting Up Unique IP Addresses (page 27) for more information.
Setting Up a Static IP Address
In order to use the Ethernet port on your SBX-1000P to view the Network Extender Web Manager, you must set up a static IP address on the computer that you will use to access the Network Extender Web Manager. Use the following procedures to set up a static address of 192.168.100.253 to the computer that you will use to access the configuration screens.

Important: When you have finished configuring your Network Extenders, you must also follow these procedures to return your computer to its original IP and subnet settings.
Setting Up a Static IP Address in Windows 7, Windows 8, or Windows 10
- Click the Start menu and type network and sharing into the Search box.
- Select Network and Sharing Center when it appears.
- Click Change adapter settings from the left-side menu.
- Right-click on your local area connection icon and select Properties.

Note: You may have more than one Internet connection listed here. If so, you will need to determine which adapter is your connection to the Internet.
- Select Internet Protocol Version 4 (TCP/IPv4) and click Properties.
- Click Use the following IP address and enter the following values:
• In the IP address field, enter 192.168.100.253.
• In the Subnet mask field, enter 255.255.255.0.
- Click OK, and then click OK to close the Local Area Connection Properties window.

Important: When you have finished configuring your Network Extenders, you must also follow these procedures to return your computer to its original IP and subnet settings.
Setting Up a Static IP Address in Mac OS X
- From the Apple menu, click System Preferences, and then click Network.
- Click Advanced.
- Click TCP/IP.
- In the Configure IPv4 field, select Manually.
- In the IPv4 Address field, enter 192.168.100.253.
- In the Subnet Mask field, enter 255.255.255.0.
- Click OK, and then click Apply.

Important: When you have finished configuring your Network Extenders, you must also follow these procedures to return your computer to its original IP and subnet settings.
Finding the Device ID and MAC Address
On your SURFboard RipCurrent router, go to the RipCurrent (G.hn) screen to view the Device ID, MAC address, and physical transmission and receiving speeds (Mbps) for your Network Extender.
Start the Network Extender Web Manager

Important: Before you can start the Network Extender Web Manager, you must set up a static IP address on the computer that you want to use to access the Network Extender Web Manager. See Setting Up a Static IP Address (page 17) for more information.

Important: If you access the Web Manager through the default IP address (192.168.100.254), you should unplug all of your SBX-1000P devices except for the one you are trying to manage. This will help to ensure that you are communicating with the correct device.
-
Use the enclosed Ethernet cable to connect to the Ethernet port on the bottom of the Network Extender. Insert the other end of the Ethernet cable into your computer's Ethernet port.
-
Open a browser window on your computer and navigate to http://192.168.100.254. The login screen appears.

- Type the default password and click Apply. The entry is case-sensitive.

Note: Your default password is password, and it is case-sensitive. We strongly recommend that you change the login password to prevent unauthorized access. See Changing the Login Password (page 27) for more information.
View the Network Extender Product Information
The Status - Device screen provides product information, including the serial number, MAC address, and firmware version.
To open the Status Device screen, click Status from the configuration screen.
STATUS - Device
| Hardware Information | |
| Device Name | SBX1000P |
| Device Description | HomeGrid |
| Device Manufacturer | Arris |
| Serial Number | F5TRUK211300002 |
| MAC Address | 3c.df:a9:d9:53:48 |
| HW Version | 2_0 |
| Software Information | |
| FW Version | SBX1000P-1.0.0-B04 |
| System Uptime | 93 sec |
View the Network Extender Network Settings
You can use the Basic - IP screen to view and change the IP address assigned to this device.
To open the Basic - IP screen, click Basic from the configuration screen and select IP from the drop-down menu.
BASIC - IP

Set Up Multicast Configuration
You can use the Advanced - Multicast screen to view and change the multicast settings for your SBX-1000P Network Extender.
To open the Advanced - Multicast screen, click Advanced from the configuration screen and select Multicast from the drop-down menu.
ADVANCED - Multicast


View the Advanced Configuration Settings
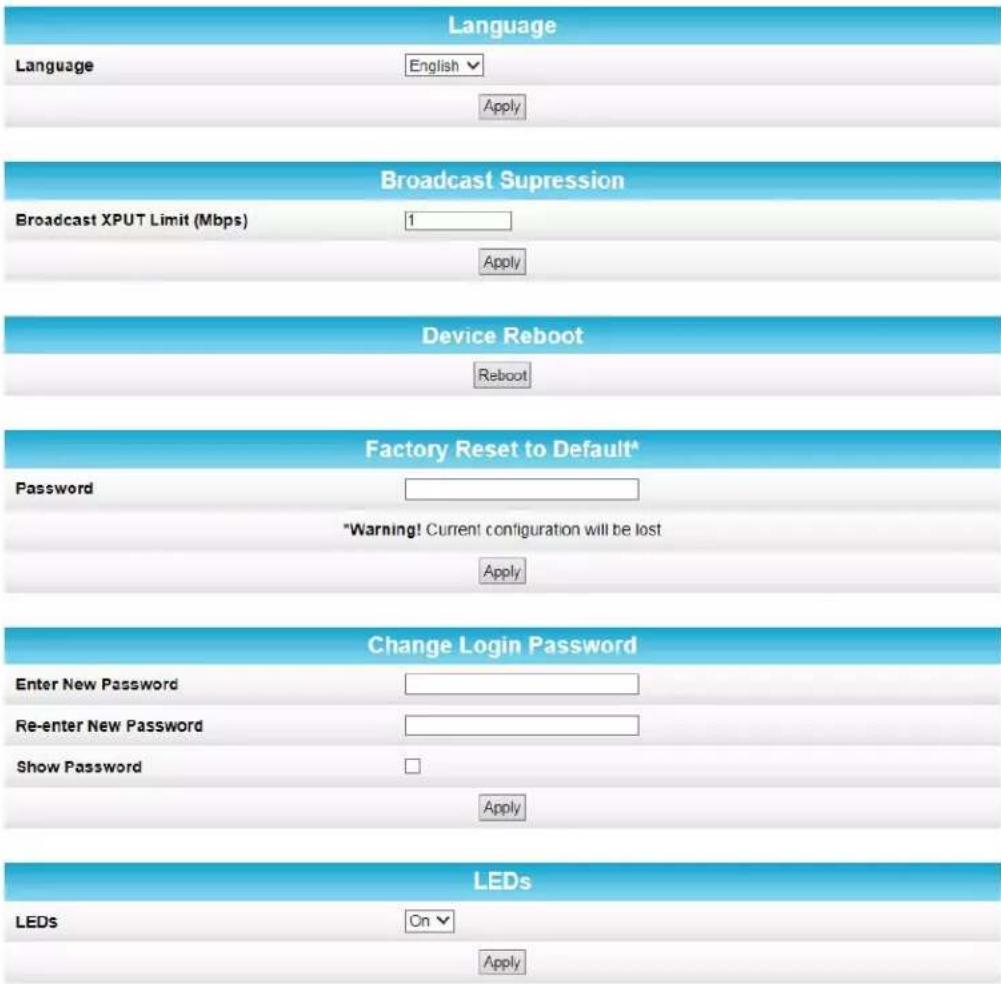
Use the Advanced - Configuration screen to view and change configuration information such as the language of the configuration screens and the login password for your network.
To open the Advanced - Configuration screen, click Advanced from the configuration screen and select Configuration.
Update Your Network Extender Firmware
You can update the firmware on your SBX-1000P Network Extender when ARRIS releases new firmware versions. The new firmware releases may contain updates for operational improvements or resolutions to problems. These updates will not delete or overwrite your personal user settings such as your password.
You can download the latest firmware release from http://www.SURFboard.com/Support/SBX-1000P. To load the new firmware release onto your SBX-1000P Network Extender:
-
Download the latest firmware release and save the firmware file to your hard drive.
-
Click Basic from the configuration screen and select Firmware Upgrade from the drop-down menu.
BASIC - Firmware Upgrade

-
Click Browse to locate the new firmware file.
-
Select the new firmware file and click Open.
-
Click Apply to load the new firmware onto your SBX-1000P Network Extender.
Restart Your Network Extender
At some point during operation, you may have to restart or reboot your SBX-1000P. This will not affect your configuration settings.
There are two methods for restarting your Network Extender:
■ Restart the Network Extender Using the Reset Button (page 22)
■ Restart the Network Extender Using the Network Extender Web Manager (page 22)
Restart the Network Extender Using the Reset Button
To restart your Network Extender as if you power cycled the device:
- Insert a pointed, non-metallic object into the indented Reset button on the bottom of the SBX-1000P. See Connectors and Controls (page 14) for more information.
- Press the button and release in three to five seconds.

Caution: Be sure that you release the button in less than five seconds. If you hold the button for more than 10 seconds, the SBX-1000P resets and restores all of its factory default settings.
Restart the Network Extender Using the Network Extender Web Manager
To restart your Network Extender as if you power cycled the device:
-
Click Advanced from the configuration screen and select Configuration.
-
Click Reboot from the Device Reboot section of the screen.

- Follow the prompts on the screen to restart your Network Extender and log back in.
Reset Your Network Extender to Factory Settings
If necessary, you can reset or restore the SBX-1000P configuration settings, including your password, back to the default factory settings. There are two methods for resetting the configuration on the SBX-1000P:
■ Reset the Network Extender Using the Reset Button (page 23)
■ Reset the Network Extender Using the Network Extender Web Manager (page 23)

Caution: This action will delete your current configuration settings (including your login password) and restore the configuration back to the factory defaults.

Note: After the configuration settings are restored, the Network Extender will reboot, and you will have to log on using the default login password (password).
Reset the Network Extender Using the Reset Button

Caution: This procedure will delete your current configuration settings (including your login password) and restore the configuration back to the factory default settings.
To reset your Network Extender to factory default settings:
- Insert a pointed, non-metallic object into the indented Reset button on the bottom of the SBX-1000P. See Connectors and Controls (page 14) for more information.
- Press and hold for at least 10 seconds, and then release.
Reset the Network Extender Using the Network Extender Web Manager

Caution: This procedure will delete your current configuration settings (including your login password) and restore the configuration back to the factory default settings.
To reset your Network Extender to factory default settings:
- Click Advanced from the configuration screen and select Configuration.
- In the Factory Reset to Default section, type your login password and click Apply.

Note: The default password is password (lower case).

- Follow the prompts on the screen to reset your Network Extender. Do not power off the Network Extender while it is resetting. The Network Extender will automatically reboot when the reset is complete.
- Log back in using the default password (password).
Exit the SBX-1000P Web Manager
To log out and close the SBX-1000P Web Manager:
- Click Logout button located in the upper right corner of the SBX-1000P Web Manager screen.
Protecting and Monitoring Your Network
Setting Up Custom Security
The SURFboard SBX-1000P Network Extender uses a default level of security when you set up your G.hn network. This level of security is sufficient in most situations. However, you may want to set up custom security if:
- you are concerned that physical access to the Pairing button might compromise your security (for example, if you are a small business or an adapter is being used in public area where there is a lack of security).
- you need to set up more than one separate network in a household or common area to avoid pairing mistakes.
- you are using your SURFboard Network Extender with an extender from another manufacturer.
Note: In situations where more than one G.hn network is set up in the same area, the networks will coordinate and share bandwidth, but security remains isolated.
If you need to set up custom security, you must first set up a static IP address on the computer that you will use to configure the Network Extender. Then, you will need to define custom security values for each extender in your network.
Defining Custom Security Values
On the RipCurrent page, the Domain Name and Pairing Password work together to establish the keys for network security. By default, the Domain Name is HomeGrid until the device is paired, and the Pairing Password is blank. After the device is paired using the G.hn Secure Pairing button, the Domain Name and Network Password will contain random characters.
If you add custom values to the Domain Name and Pairing Password fields, then the device will only pair with other devices if the values in those fields match exactly.

Important:
Once you have entered custom security values for the Domain Name and Pairing Password fields, you do not need to press the Pairing button to initiate the pairing process. However, you will need to enter the same Domain Name and Pairing Password on any additional devices that you wish to be a part of this G.hn network.
Before you complete these steps, you must set up a static IP address on your computer. For more information, see Managing Your Network Extender (page 17).
Follow these steps to define custom security values:
- Plug in both devices in a location where you can see and easily access both devices. Power up both devices and wait until all of the LEDs become solid.
- Use the enclosed Ethernet cable to connect to the Ethernet port on the bottom of the first device. Insert the other end of the Ethernet cable into your computer's Ethernet port.
- Open a browser window on your computer and navigate to http://192.168.100.254.
- Type your password in the Password field and click Apply.

Note: Your default password is password, and it is case-sensitive. We strongly recommend that you change the login password to prevent unauthorized access. See Changing the Login Password (page 27) for more information.
- Click the RipCurrent tab.
BASIC - RipCurrent
| Basic Settings | |
| MAC Address | 3c.df.a9.d9.53.1a |
| RipCurrent Node | 2 |
| Domain Name | bXfuI NCZQn4o3qtj3PfF1wnCUUC |
| Pairing Password | 05bUafyXFkve |
| Node Type* | END_POINT |
| Apply | |
| RipCurrent Profile | |
| RipCurrent Profile | PLC 50MHz with MIMO √ |
| Apply | |
| Connected G.hn Nodes | |||
| RipCurrent Node | MAC Address | Phy Tx (Mbps) | Phy Rx (Mbps) |
| 1 | 3c.df.a9.d9:53.48 | 318 | 366 |
- On the Basic - RipCurrent screen, enter the Domain Name and Pairing Password that you want to assign to this device. Then click Apply.

Important: The Pairing Password cannot be longer than 12 characters.

Important: Make note of the Domain Name and Pairing Password values that you use. You will need to enter these values again for every device that you add to this network.
- Repeat steps 2 through 6 with the second device and any additional devices that you may have. Be sure to enter the same Domain Name and Network Password values that you entered for the first device.

Note: Once you have entered custom security values for the Domain Name and Pairing Password fields, you do not need to press the Pairing button to initiate the pairing process. The devices will discover each other and begin to pair automatically.
- When the devices discover each other, the Pairing LEDs will begin to flash green.
-
When the Pairing LEDs stop flashing and become solid green, the pairing process is complete.
-
Once the pairing process is complete, you can unplug the devices from the wall and move them to their permanent locations throughout the house. Use the enclosed Ethernet cable to connect the client device, such as a computer, TV, or game console.
Setting Up Unique IP Addresses
In order to reach the configuration screens for a particular Network Extender, you must use an Ethernet cable to connect your computer to that Network Extender and then use a browser to navigate to http://192.168.100.254. This is the standard factory configuration for each Network Extender.

Note: To be sure that you access the Web Manager on the correct device, please unplug all other Network Extenders on the network. Attach each unit directly and configure each one individually.
Advanced users may want to consider setting up a unique IP address for each extender on the network. By doing so, you can connect your computer to any Network Extender in the network and then configure any Network Extender by navigating to the unique IP address for that device. The procedure to set up unique IP addresses for each Network Extender is outside the scope of this guide.
Changing the Login Password
The default password is "password" (lower case). You should change the login password to something other than the default password.
Perform the following steps to change the password.
- Access and log into the configuration interface.
-
Click the Advanced tab, then click Configuration.
-
In the Change Login Password section, enter the new password in both the Enter New Password field and the Re-enter New Password field.


Note: Passwords are case-sensitive. Valid characters are the numbers 0 to 9, the letters a through z (both upper and lower case), and printable special characters (such as \$, !, ?, &, #, @, and others.)
-
Click Apply.
-
Record the new password here: ____
Installation Scenarios
This section illustrates several different ways that the SBX-1000P Network Extender can be installed.
Two SBX-1000P Extenders with a SURFboard G.hn-Enabled Router

flowchart
graph TD
    A["Network"] --> B["SB Cable Modem"]
    B --> C["SB G.hn-enabled Router"]
    C --> D["AC Wall Outlet"]
    D --> E["Substation System"]
    E --> F["PC"]
    F --> G["Ethernet"]
    G --> H["Game console"]
    E --> I["SBX-1000P Extender"]
    I --> J["Substation System"]
    J --> K["Substation System"]
    K --> L["Substation System"]
    L --> M["Substation System"]
    M --> N["Substation System"]
    style A fill:#f9f,stroke:#333
    style B fill:#ccf,stroke:#333
    style C fill:#cfc,stroke:#333
    style D fill:#fcc,stroke:#333
    style E fill:#cff,stroke:#333
    style F fill:#ffc,stroke:#333
    style G fill:#cfc,stroke:#333
    style H fill:#fcc,stroke:#333
    style I fill:#cff,stroke:#333
    style J fill:#ffc,stroke:#333
    style K fill:#cfc,stroke:#333
    style L fill:#fcc,stroke:#333
    style M fill:#ffc,stroke:#333
Gigabit home networking throughout the house.
Two SBX-1000P Extenders with a SURFboard Gateway and an SBX-AC1200P Wireless Extender

flowchart
graph TD
    A["Global Network"] --> B["SB Gateway with built-in cable modem"]
    B --> C["Ethernet"]
    C --> D["AC Wall Outlet"]
    D --> E["SBX-1000P Extender"]
    E --> F["SBX-1000P Extender"]
    F --> G["SBX-AC1200P Wi-Fi Extender"]
    G --> H["Wireless Clients"]
    H --> I["Tablet"]
    I --> J["Smart phone"]
    K["Gigabit Home Networking over existing AC wiring"] --> D
    K --> F
    L["Gehn-enabled Smart TV"] --> M["Ethernet"]
    M --> N["Mobile Device"]
Extend your current internet service to any room, including wireless connectivity.
SBX-1000P Extender with a SURFboard Cable Modem and an SBX-AC1200P Wireless Extender

flowchart
graph TD
    A["Any Internet connection device"] --> B["SB Cable Modem"]
    B --> C["Ethernet"]
    C --> D["SBX-1000P Extender"]
    D --> E["Gigabit Home Networking over existing AC wiring"]
    E --> F["AC Wall Outlet"]
    E --> G["AC Wall Outlet"]
    F --> H["SBX-AC1200P Wi-Fi Extender"]
    G --> I["SBX-AC1200P Wi-Fi Extender"]
    style A fill:#f9f,stroke:#333
    style B fill:#ccf,stroke:#333
    style C fill:#cfc,stroke:#333
    style D fill:#fcc,stroke:#333
    style E fill:#ffc,stroke:#333
    style F fill:#cff,stroke:#333
    style G fill:#ffc,stroke:#333
    style H fill:#fff,stroke:#333
    style I fill:#fff,stroke:#333
Add wireless capability to your current DSL, cable, or satellite modem.
Two SBX-1000P Extenders with a SURFboard Wireless Router and an SBX-AC1200P Wireless Extender

flowchart
graph TD
    A["SB Cable Modem"] -->|Ethernet| B["SBX-1000P Extender"]
    B --> C["SBX-1000P Extender"]
    C --> D["SBX-AC1200P Wi-Fi Extender"]
    D --> E["Gigabit Home Networking over existing AC wiring"]
    E --> F["AC Wall Outlet"]
    F --> G["Wireless Clients"]
    G --> H["Tablet"]
    I["G. hn-enabled Smart TV"] --> J["Ethernet"]
    J --> K["Smart phone"]
    style A fill:#f9f,stroke:#333
    style B fill:#ccf,stroke:#333
    style C fill:#ccf,stroke:#333
    style D fill:#ccf,stroke:#333
    style E fill:#fff,stroke:#333
    style F fill:#fff,stroke:#333
    style G fill:#fff,stroke:#333
    style H fill:#fff,stroke:#333
    style I fill:#fff,stroke:#333
Extend your existing wired and wireless network to any room in the house.
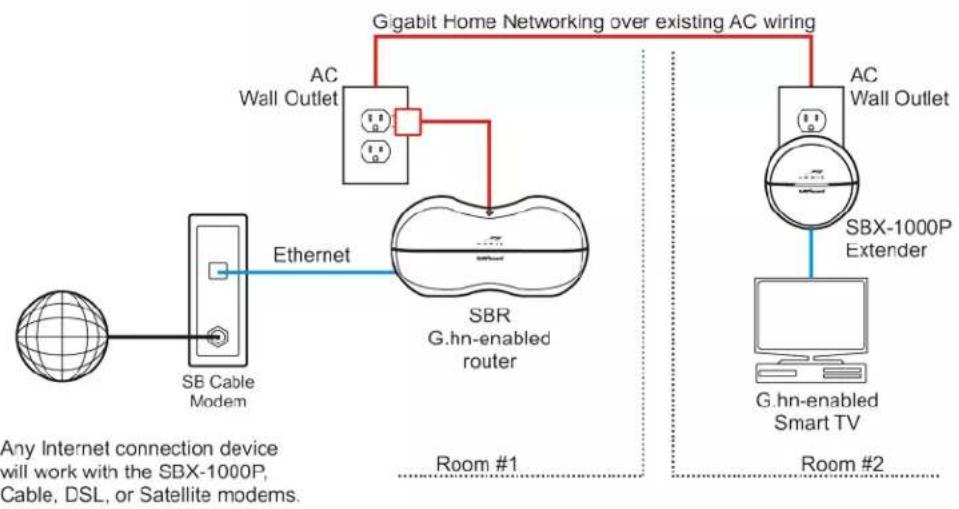
SBX-1000P Extender with a SURFboard Cable Modem and a SURFboard G.hn-Enabled Router
flowchart
graph TD
    A["SB Cable Modem"] -->|Ethernet| B["SBR G.hn-enabled router"]
    C["AC Wall Outlet"] -->|Gigabit Home Networking over existing AC wiring| B
    B --> D["Room #1"]
    B --> E["Room #2"]
    D --> F["G.hn-enabled Smart TV"]
    E --> F
    style A fill:#f9f,stroke:#333
    style B fill:#ccf,stroke:#333
    style C fill:#cfc,stroke:#333
    style D fill:#fcc,stroke:#333
    style E fill:#cff,stroke:#333
The SBX-1000P allows you to move your wireless router away from your current Internet connection device to a more convenient location.
SBX-1000P Extender with a SURFboard Cable Modem and Several G.hn-Enabled Devices

flowchart
graph TD
    A["Network"] --> B["SB Cable Modem"]
    B --> C["SB Router without built-in G.hn capability"]
    C --> D["Ethernet"]
    D --> E["SBX-1000P Extender"]
    E --> F["AC Wall Outlet"]
    F --> G["Gigabit Home Networking over existing AC wiring"]
    G --> H["G.hn-enabled Smart TV"]
    H --> I["G.hn-enabled Appliances"]
    I --> J["G.hn-enabled Electric Car Charger"]
    J --> K["Power Supply"]
Use the SBX-1000P to connect your other G.hn-enabled devices to the Internet.
Corporate Headquarters


- SURFboard SBX-1000P
- Network Extender
- ARRIS Copyrights and Trademarks
- Patent Notice
- Table of Contents
- Important Safety Instructions....5
- Product Overview 8
- Installing the Network Extender 12
- Managing Your Network Extender.... 17
- Important Safety Instructions
- SAVE THE ABOVE INSTRUCTIONS
- FCC STATEMENTS
- FCC Interference Statement
- FCC DECLARATION OF CONFORMITY
- INDUSTRY CANADA (IC) STATEMENT
- CARING FOR THE ENVIRONMENT BY RECYCLING YOUR ARRIS EQUIPMENT
- Product Overview
- Introduction
- About The Network Extender
- What is RipCurrent?
- What's in the Box?
- System Requirements
- About this Manual
- Contact Information
- Installing the Network Extender
- LED Indicators
- Indicator Lights for the SBX-1000P
- Connectors and Controls
- Configuring and Installing the Network Extender
- Pairing Devices Over an Encrypted Connection (Advanced)
- Creating a G.hn Network with a Non-G.hn Router
- Managing Your Network Extender
- Setting Up a Static IP Address
- Setting Up a Static IP Address in Windows 7, Windows 8, or Windows 10
- Setting Up a Static IP Address in Mac OS X
- Finding the Device ID and MAC Address
- Start the Network Extender Web Manager
- View the Network Extender Product Information
- STATUS - Device
- View the Network Extender Network Settings
- BASIC - IP
- Set Up Multicast Configuration
- ADVANCED - Multicast
- View the Advanced Configuration Settings
- Update Your Network Extender Firmware
- BASIC - Firmware Upgrade
- Restart Your Network Extender
- Restart the Network Extender Using the Reset Button
- Restart the Network Extender Using the Network Extender Web Manager
- Reset Your Network Extender to Factory Settings
- Reset the Network Extender Using the Reset Button
- Reset the Network Extender Using the Network Extender Web Manager
- Exit the SBX-1000P Web Manager
- Protecting and Monitoring Your Network
- Setting Up Custom Security
- Defining Custom Security Values
- Important:
- BASIC - RipCurrent
- Setting Up Unique IP Addresses
- Changing the Login Password
- Installation Scenarios
- Two SBX-1000P Extenders with a SURFboard G.hn-Enabled Router
- Two SBX-1000P Extenders with a SURFboard Gateway and an SBX-AC1200P Wireless Extender
- SBX-1000P Extender with a SURFboard Cable Modem and an SBX-AC1200P Wireless Extender
- Two SBX-1000P Extenders with a SURFboard Wireless Router and an SBX-AC1200P Wireless Extender
- SBX-1000P Extender with a SURFboard Cable Modem and a SURFboard G.hn-Enabled Router
- SBX-1000P Extender with a SURFboard Cable Modem and Several G.hn-Enabled Devices
Brand : Arris
Model : SURFboard SBX-1000P
Category : Modem/Router