
AI-100VO - Sorbet maker NewAir - Free user manual and instructions
Find the device manual for free AI-100VO NewAir in PDF.


| Product Type | Countertop Ice Maker |
| Model Number | AI-100 |
| Brand | NewAir |
| Rated Voltage | 115V / 60Hz |
| Current | 1.9 - 2.7 Amps |
| Power Consumption | 120 Watts |
| Daily Ice Production | Up to 28 lbs (12.7 kg) |
| Ice per Cycle | 9 cubes |
| Ice Cube Sizes | Small, Medium, Large (3 options) |
| Control Panel | Power and Select buttons with indicator lights |
| Indicators | Ice Full, Add Water, and Ice Size (S/M/L) |
| Automatic Shut-Off | When ice basket is full |
| Low Water Detection | Automatically stops; Add Water light turns on |
| Water Reservoir Capacity | Not specified; fill to MAX line |
| Water Drain | Drain cap on side for emptying reservoir |
| Cleaning Method | Diluted detergent; vinegar/lemon juice for descaling |
| Storage | Drain and dry thoroughly; cover during storage |
| Safety Features | Polarized plug, grounded 3-prong, no extension cord recommended |
| Warranty | 1 Year Limited Manufacturer's Warranty |
| Included Accessories | Ice basket, ice scoop, ice shovel |
Frequently Asked Questions - AI-100VO NewAir
User questions about AI-100VO NewAir
0 question about this device. Answer the ones you know or ask your own.
Ask a new question about this device
Download the instructions for your Sorbet maker in PDF format for free! Find your manual AI-100VO - NewAir and take your electronic device back in hand. On this page are published all the documents necessary for the use of your device. AI-100VO by NewAir.
USER MANUAL AI-100VO NewAir
natural_image
Orange square-shaped appliance with a circular vent and control panel (no visible text or symbols)OWNERS MANUAL
Read and save these instrucons.


A Name You Can Trust
Trust has to be earned and we will earn yours. Customer happiness is the focus of our business.
From the factory to the warehouse, from the sales oor to your home, the whole NewAir family promises to provide you with innovave products, exceponal service, and support when you need it the most.
Count on NewAir.
As a proud NewAir owner, welcome to our family. There are no robots here, real people shipped your product and real people are here to help you.
Thank you for your purchase and remember NewAir, A Name You Can Trust.
Call us today at 855-963-9247
Or email support@newair.com
For future reference, we recommend you each a copy of your sales receipt here and record the following informaon. You will need this informaon if it becomes necessary to contact the manufacturer for service inquiries.
Date of Purchase: ____
Serial Number: ____
Model Number: ____

Connect with us online.
READ AND SAVE THESE INSTRUCTIONS.
TABLE OF CONTENTS
Safety Informaon & Warnings 4
Parts List....5
Basic Parts Diagram....5
Control Panel Diagram 5
Assembly & Installaon 6
Operang Instrucons 7
Cleaning & Maintenance....8
Storage 8
Troubleshoong....9
Limited Manufacturer's Warranty 11
SPECIFICATIONS
| MODEL NO. | AI-100 |
| RATED VOLTAGE: | 115V / 60Hz |
| CURRENT : | 1.9/2.7 amps |
| POWER CONSUMPTION: | 120 was |
| CAPACITY (DAILY): | 28 pounds |
| CAPACITY (PER CYCLE): | 9 pieces |
| ICE SIZES: | 3 |
SAFETY INFORMATION & WARNINGS

As with any electrical appliance, basic safety precautions must be followed in order to reduce the risk of re, electrical shock and/or injury to persons or property. Be sure to read all instrucons before using this appliance and observe the following safety ps:
- Do not operate this appliance if it has a damaged cord.
- Only connect the ice maker to a properly polarized outlet. No other appliance should be plugged into the same outlet. Make sure the plug is fully inserted into the receptacle.
- An extension cord is not recommended, as it may overheat and become a re risk. If necessary, use an extension cord with a minimum size of No. 14 AWG and rated for no less than 1875 was.
- Do not place hands or objects on or near the ice maker's evaporator when it is in operaon.
- Do not run the power cord over carpeng or heat insulators. Do not cover the cord. Keep the cord away from high trac areas and never submerge it in water.
- Always turn o and unplug the ice maker from the power supply before cleaning and servicing.
- Exercise cauon and make sure there is supervision when this appliance is being used near children.
- In the ice maker is brought in from the outside in the winter, allow the ice maker to warm up to your room's temperature for a few hours before plugging it in.
- Do not clean your ice maker with ammable uids. The fumes can create a re hazard or cause an explosion.
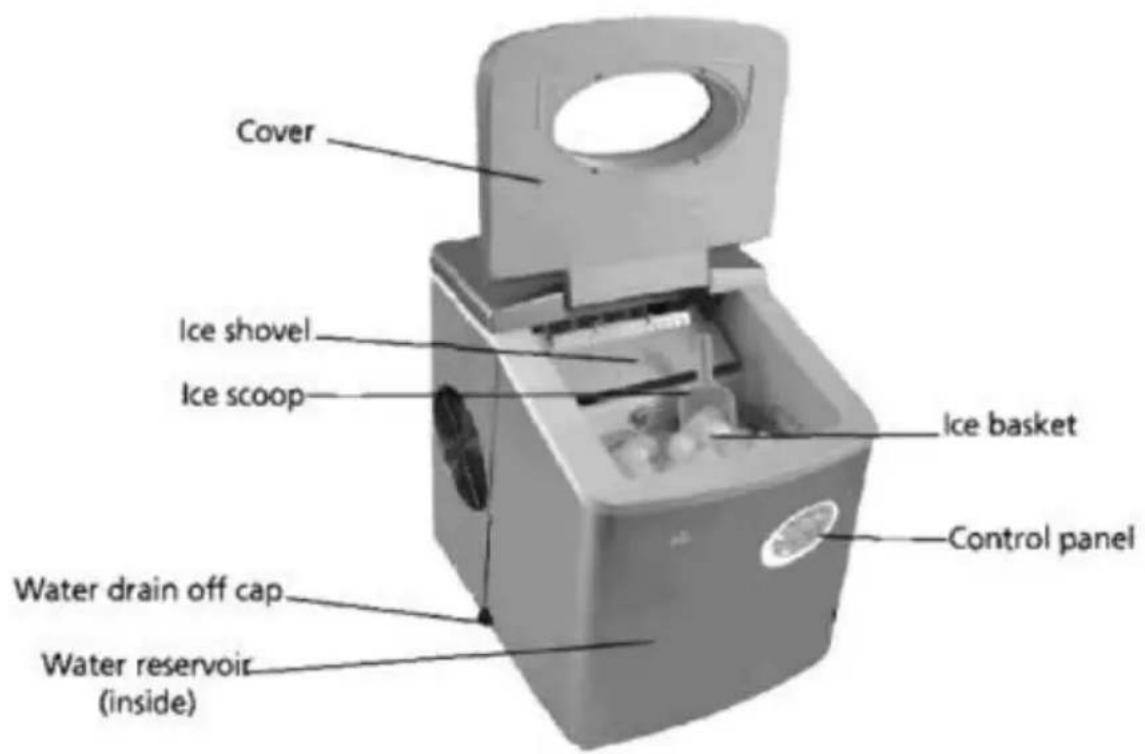
PARTS LIST
BASIC PARTS DIAGRAM
CONTROL PANEL DIAGRAM
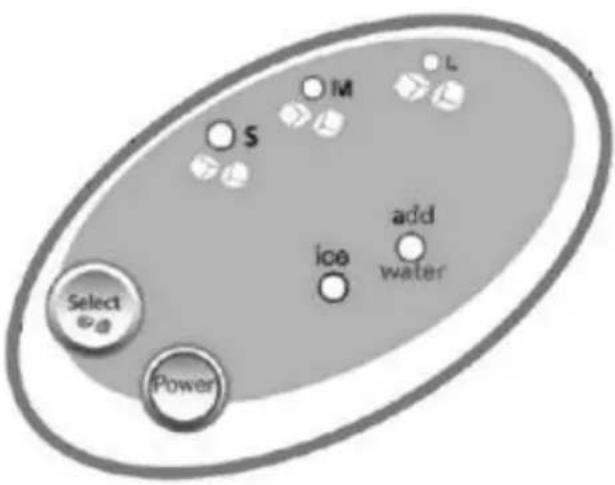
BUTTONS:
Power - Turns unit on and o
Select - Selects ice size
INDICATOR LIGHTS:
S - Small ice size selected
M - Medium ice size selected
L - Large ice size selected
Ice - Ice basket is full
Add water - Water reservoir is empty
ASSEMBLY & INSTALLATION
- Remove the exterior and interior packaging. Check that the ice basket and ice scoop are included. If any parts are missing, please contact customer service.
- Clean the interior with lukewarm water and a so cloth. Take out the ice basket and clean it.
- Place your ice maker in a locaon that is protected from direct sunlight and other heat sources (e.g., stove, furnace, and radiator). Make sure it is on a level surface with at least 5 inches of space between the back and sides of the unit and the wall.
- Allow one hour for the refrigerant uid to sele in the compressor before plugging the ice maker in.

NOTICE: Aer unpacking your ice maker, it must rest in an upright posion for at least one hour before you plug it in or the compressor may be damaged, shortening the life span of the unit.
- Plug in your appliance into an exclusive, properly installed and grounded wall outlet. Do not under any circumstances cut or remove the third (ground) prong from the power cord. Any quesons concerning power and/or grounding should be directed to a cered electrician.
We recommend you clean your ice maker thoroughly before using it. Please see Cleaning & Maintenance on page 6 of this guide.
OPERATING INSTRUCTIONS
- Press the "SELECT" buon to choose the ice cube size. If the ambient room temperature is lower than 60^ , it is recommended that you select small or medium sized ice cubes in order to prevent the ice from scking together.
- Open the unit's cover, remove the ice basket, and pour water into the water reservoir. Keep the water level below the "MAX" line marked inside the reservoir.
- Press the "POWER" buon on the control panel to begin the ice making cycle.
- The ice making cycle lasts anywhere from 6 to 15 minutes, depending on the size of the ice cubes you select and the ambient room temperature. Ice making me may vary significantly in extremely high room temperatures.
- Periodically verify the water level in the water reservoir when the ice maker is on. If the water level is too low, the ice maker will automacally stop and the “ADD WATER” indicator light will turn on. Press the “POWER” buon, Il the reservoir with water up to the level mark, and press the “POWER” buon again to restart the unit. Allow at least 3 minutes for the refrigerant inside the compressor to sele before restarng.
- The ice maker automacally stops working when the ice basket is full. The "ICE" indicator light will also turn on at this me.
- Change the water in the reservoir every 24 hours to ensure hygienic ice. If the ice maker will not be used for an extended period of me, drain the water from the reservoir by unplugging the drain o cap located on the side of the ice maker.
CLEANING & MAINTENANCE
- Unplug the unit and remove the ice basket.
- Clean the interior, including the water reservoir, with diluted detergent, warm water and a so cloth.
- Clean the outside of the ice maker with a mild detergent soluon and warm water.
- Dry the interior and exterior with a so cloth.
- Replace the ice basket and plug the unit in again.
To remove the build-up of calcium or other impurities, add a capful of vinegar or lemon juice to the water in the reservoir and run for two or three ice-making cycles. Drain and rell the reservoir with clean, warm water. Run two more cycles to rinse the vinegar or lemon-juice.
When the machine is not in use, open the water drain cap to completely drain the water reservoir.
STORAGE
Before storing your ice maker, clean it according to the direcons above and allow it to dry thoroughly (at least 24 hours) in order to prevent the growth of mold or mildew.
Store your ice maker in the original packaging, or cover with a so cloth or plasc sheet.
TROUBLESHOOTING
| Problem | Possible Cause | Soluon |
| The “ADD WATER” indicator light is on. | There is not enough water in the tank. | Press the “POWER” buon to turn o the unit. Fill the reservoir with water. Press “POWER” to restart. |
| The “ICE” indicator light is on. | The ice basket is full. | Remove ice from the basket. |
| The “ADD WATER” and “ICE” lights are both ashing. | The ice shovel may be incorrectly posioned. | Make sure the ice shovel is properly posioned. |
| Ice may be blocking the sensor. | Remove any ice that may be blocking the sensor. | |
| The ice making cycle appears to be normal but no ice is being produced. | The refrigerant may be leaking. | Consult a qualified technician. |
| A pipe in the cooling system may be blocked. | Consult a qualified technician. | |
| The ice cubes are too small. | The ambient temperature or water temperature may be too high. | Select large sized ice cubes by pressing the “SELECT” buon. |
| The compressor may need to warm up. | If this is the rst me the unit is being used, allow the ice maker to cycle a few mes. This should result in larger cubes. | |
| The ice has a “plasc” taste. | The unit’s interior may need to be cleaned. | Add a tablespoon of lemon juice or vinegar to a full tank of water and allow the ice maker to cycle a few mes. |
| The unit produces a large block of ice instead of cubes. | The ambient temperature may be too low. | Unplug the unit and let the ice thaw out. Allow the ice maker to defrost for a few hours and restart the unit. |
| The ice cubes have a cloudy appearance. | There may be trace minerals in your water or ice is being produced too quickly. | Ice cubes may develop cloudiness when water is frozen quickly. As ice develops on the surface of water, certain gases can no longer remain dissolved and begin to surface as microscopic bubbles. This cloudiness is normal. |
LIMITED MANUFACTURER'S WARRANTY
This appliance is covered by a limited manufacturer's warranty. For one year from the original date of purchase, the manufacturer will repair or replace any parts of this appliance that prove to be defective in materials and workmanship, provided the appliance has been used under normal operang conditions as intended by the manufacturer.
Warranty Terms:
During the rst year, any components of this appliance found to be defective due to materials or workmanship will be repaired or replaced, at the manufacturer's discreon, at no charge to the original purchaser. The purchaser will be responsible for any removal or transportaon costs.
Warranty Exclusions:
The warranty will not apply if damage is caused by any of the following:
- Power failure
- Damage in transit or when moving the appliance
- Improper power supply such as low voltage, defective household wiring or inadequate fuses
- Accident, alteraon, misuse or abuse of the appliance such as using non-approved accessories, inadequate air circulaon in the room or abnormal operang condions (extreme temperatures)
- Use in commercial or industrial applicaons
- Fire, water damage, the, war, riot, hostility or acts of God such as hurricanes, oods, etc.
- Use of force or damage caused by external inuences
- Parally or completely dismantled appliances
- Excess wear and tear by the user
Obtaining Service:
When making a warranty claim, please have the original bill of purchase with purchase date available. Once conrmed that your appliance is eligible for warranty service, all repairs will be performed by a NewAir™ authorized repair facility. The purchaser will be responsible for any removal or transportaon costs. Replacement parts and/or units will be new, re-manufactured or refurbished and is subject to the manufacturer's discreon. For technical support and warranty service, please email support@newairusa.com.

- OWNERS MANUAL
- A Name You Can Trust
- Count on NewAir.
- READ AND SAVE THESE INSTRUCTIONS.
- TABLE OF CONTENTS
- SPECIFICATIONS
- SAFETY INFORMATION & WARNINGS
- PARTS LIST
- BUTTONS:
- INDICATOR LIGHTS:
- ASSEMBLY & INSTALLATION
- OPERATING INSTRUCTIONS
- CLEANING & MAINTENANCE
- STORAGE
- TROUBLESHOOTING
- LIMITED MANUFACTURER'S WARRANTY
- Warranty Terms:
- Warranty Exclusions:
- Obtaining Service:
Brand : NewAir
Model : AI-100VO
Category : Sorbet maker