
TSSTTVDFL2-AF - Oven OSTER - Free user manual and instructions
Find the device manual for free TSSTTVDFL2-AF OSTER in PDF.


| Product Type | Countertop Convection Oven |
| Brand | Oster |
| Model | TSSTTVDFL2-AF |
| Dimensions (W x D x H) | 21.5 x 15.5 x 11.5 inches |
| Weight | 24.5 lbs |
| Power Rating | 1500 Watts |
| Voltage / Frequency | 120V / 60Hz |
| Capacity | 4.0 cubic feet |
| Rack Positions | 3 |
| Included Racks | 2 wire racks |
| Included Accessories | Baking pan, crumb tray |
| Control Type | Digital with LED display |
| Cooking Functions | Bake, Broil, Convection Bake, Convection Roast, Toast, Pizza, Keep Warm |
| Temperature Range | 150°F - 450°F |
| Timer | Up to 60 minutes |
| Interior Light | Yes |
| Crumb Tray | Removable, dishwasher safe |
| Safety Features | Auto shut-off, overheat protection |
| Housing Material | Stainless steel |
| Cleaning | Wipe interior and exterior with damp cloth; wash accessories in warm soapy water |
| Warranty | 1 year limited |
Frequently Asked Questions - TSSTTVDFL2-AF OSTER
User questions about TSSTTVDFL2-AF OSTER
0 question about this device. Answer the ones you know or ask your own.
Ask a new question about this device
Download the instructions for your Oven in PDF format for free! Find your manual TSSTTVDFL2-AF - OSTER and take your electronic device back in hand. On this page are published all the documents necessary for the use of your device. TSSTTVDFL2-AF by OSTER.
USER MANUAL TSSTTVDFL2-AF OSTER
natural_image
Front view of a white Oster microwave oven with control knobs and a clear glass door (no visible text or symbols on the device itself)Visit us at www.oster.com
P.N. 202714 Rev B
IMPORTANT SAFEGUARDS
When using electrical appliances, basic safety precautions should always be followed to reduce the risk of fire, electric shock, and/or injury to persons including the following:
-
Read all instructions before using this product.
-
This appliance generates heat during use. Do not touch hot surfaces. Use handles or knobs. Always protect your hands with non-slip oven mitts or similar.
-
To protect against electric shock, do not place or immerse cord, plugs, or appliance in water or other liquid.
-
This appliance is not intended for use by children or by persons with reduced physical, sensory, or mental capabilities, or lack of experience and knowledge. Close supervision is necessary when any appliance is used near children. Children should be supervised to ensure that they do not play with the appliance. Keep the appliance and its cord out of reach of children.
-
Unplug from outlet when not in use, before putting on or taking off parts and before cleaning. Allow to cool before putting on or taking off parts, and before cleaning. To disconnect, turn any control to OFF, then unplug power cord from outlet. Do not disconnect by pulling on cord. Always grasp the plug and pull to disconnect.
-
Do not operate any appliance with a damaged cord or plug or after the appliance malfunctions, or has been damaged in any manner. Do not attempt to replace or splice a damaged cord. Return appliance to the manufacturer (see warranty) for examination, repair or adjustment.
-
The use of accessory attachments not recommended by the appliance manufacturer may cause injuries.
-
Do not use outdoors or for commercial purposes.
-
Do not let cord hang over edge of table or counter, or touch hot surfaces.
-
Do not place on or near wet surfaces, or heat sources such as a hot gas or electric burner, or in a heated oven.
-
Extreme caution must be used when moving an appliance or removing a pan, containing hot oil or other hot liquids. Always protect your hands with non-slip oven mitts or similar.
-
Do not use appliance for other than intended use. Misuse can cause injuries. Intended for household countertop use only. Keep 6 inches (152 mm) clear from the wall and on all sides. Always use appliance on a dry, stable, level surface.
-
Oversize foods or metal utensils must not be inserted in a countertop oven as they may create a fire or risk of electric shock.
-
A fire may occur if the countertop oven is covered, touching or near flammable materials, including curtains, draperies, towels, walls, and the like, when in operation. Do not store any item on top of the appliance when in operation.
-
Do not clean with metal scouring pads. Pieces can break off the pad and touch electrical parts, creating a risk of electric shock.
-
Extreme caution should be exercised when using containers constructed of materials other than metal or glass.
-
Do not store any materials, other than manufacturers recommended accessories, in this oven when not in use. English 2 English 3
English-2 English-3
- Do not place any of the following materials in the oven: paper, cardboard, plastic, or any materials that may catch fire or melt.
- Do not cover crumb tray or any part of the oven with metal foil. This will cause overheating of the oven.
- Empty the crumb tray after each use.
- The glass door is made of tempered glass. Always inspect the glass door for chips, cracks or any other damage. Do not use the countertop oven if the glass door is damaged, as the glass may shatter during use.
- Do not use with a programmer, timer, wireless plug adapter or outlet that allows control remotely, or connect to a circuit that is regularly switched on and off by the utility.
SAVE THESE INSTRUCTIONS HOUSEHOLD USE ONLY
North American models with polarized plugs:
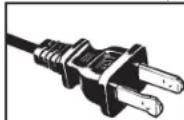
POLARIZED PLUG
This appliance has a polarized plug, (one blade is wider than the other). As a safety feature to reduce the risk of electrical shock, this plug is intended to fit in a polarized outlet only one way. If the plug does not fit fully in the outlet, reverse the plug. If it still does not fit, contact a qualified electrician.
Do not attempt to defeat this safety feature or modify the plug in any way. If the plug fits loosely into the AC outlet or if the AC outlet feels warm do not use that outlet.
POWER CORD INSTRUCTIONS:
A short power-supply cord or detachable power-supply cord is provided to reduce risks resulting from becoming entangled in or tripping over a longer cord. Longer detachable power-supply cords or extension cords are available and may be used if care is exercised in their use. If a long detachable power-supply cord or extension cord is used:
a. The marked electrical rating of the cord set or extension cord should be at least as great as the electrical rating of the appliance;
b. The cord should be arranged so that it will not drape over the countertop or tabletop where it can be pulled on by children or tripped over unintentionally; and
c. If the appliance is of the grounded type, the cord set or extension cord should be a grounding-type 3-wire cord.
Do not pull, twist or otherwise abuse the power cord.
NOTICES
- Some countertop and table surfaces are not designed to withstand the prolonged heat generated by certain appliances. Do not set the heated unit on a finished wood table. We recommend placing a hot pad or trivet under your countertop oven to prevent possible damage to the surface.
- During initial use of this appliance, some slight smoke and/or odor may be detected. This is normal with many heating appliances and will not recur after a few uses.
WELCOME
Congratulations on your purchase of OSTER® Compact Air Fry Countertop Oven! If you require service on your OSTER® Compact Air Fry Countertop Oven, do not return to place of purchase. Please contact us at www.oster.com or 1.800.334.0759.
LEARNING ABOUT YOUR COUNTERTOP OVEN

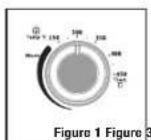
- Temperature Control Knob - Adjust the dial thermostat to the desired temperature. (See Figure 1)
- Function Selector Knob - Select cooking function by turning knob to desired setting. (See Figure 2)
- Timer Control Knob with Bell Signal – Set cooking time up to 60 minutes. Will automatically turn the oven OFF at the end of the cooking time. (See Figure 3)
- Removable Crumb Tray – For crumb or fallen food particles collection. Pulls out for easy cleaning.
- Removable Air Fry Tray / Metal Rack – Metal Rack that doubles as an Air Fry Tray for all your cooking needs.
- Tempered Glass Door – For front viewing of food.


- Baking Pan & Cookie sheet in one – Use for all your baking needs. See "Positioning Pan" section.
- Easy Clean Interior Walls – Allows fast clean up.
PREPARING TO USE YOUR COUNTERTOP OVEN FOR THE FIRST TIME
NOTE: During initial start up you may detect a slight smell and/or smoke. Turn the temperature to max and let run for approximately 5 minutes.
If you are using your Countertop Oven for the first time, please be sure to:
- Remove any stickers from the surface of the oven.
- Open oven door and remove all printed documents and paper from inside the Countertop Oven.
- Clean the rack and pan with hot water, a small amount of dishwashing liquid and a non-abrasive cleaning pad.
CAUTION: DO NOT IMMERSE THE BODY OF THE UNIT IN WATER.
- Dry the unit thoroughly before using.
- Select a location for the Countertop Oven. The location should be in an open area on a flat counter where the plug will reach an outlet.
- Plug the Countertop Oven into a 120 Volt AC electrical outlet.
CAUTION: When Countertop Oven is in use or cooling down, please be sure there is a 6-inch clearance between the Countertop Oven and any other surface including cords. Be sure the cord is not resting against the back of the Countertop Oven.
To Open the Oven Door:
Step 1: Grab the center of the handle underhanded with fingertips (See Figure 4).

natural_image
Line drawing of a hand inserting a plunger into a drawer (no text or symbols)Step 2: Pull down the oven door carefully (See Figure 5).

natural_image
Illustration of a hand holding a ruler inside a cabinet, with no visible text or symbolsCAUTION: This appliance generates heat during use. Do not touch hot surfaces. Always use handles or knobs per above instructions.

To Use the Toast Function (See Fig. 6)
Select desired rack position. (See "Positioning Rack" Section)
NOTE: Different types of bread require different settings. Lighter breads and waffles require lighter setting. Darker breads, muffins and English muffins require a darker setting.
Step 1. Place food on Metal Rack.
Step 2. Close glass door completely.
Step 3. Turn the Function dial to Toast. Both the top and bottom heater elements will operate.
Step 4. Turn the temperature control knob to the 450^/TOAST setting.
Step 5. To set the timer, turn the timer past the 20 minute mark to engage timer switch and set back to desired toast time.
Step 6. When toasting is complete, a bell will sound. Open door completely and remove food. For best toasting results, position the rack in the middle position.
WARNING: Cooked food, Metal Rack, and door can be very hot, handle with care. Do not leave Countertop Oven unattended.
TO USE THE TURBO CONVECTION HEAT FUNCTION (SEE FIG. 7)
The Turbo Convection Heat Function turns on a built in fan that circulates hot air in the oven chamber cooking your food faster and more evenly. Preheat oven 5-7 minutes at desired temperature with oven rack in place.
Step 1. Place baking pan with food inside on Metal Rack.
Step 2. Close glass door completely.
Step 3. Turn the Function dial to Turbo.
Step 4. Turn the Temperature dial to desired setting.
Step 5. Turn the Timer to desired cook time.
NOTE: If cook time is less than 20 minutes, you must turn Timer past the 20 minute mark to engage the timer then back to desired time.
Step 6. When baking is complete, open door completely and remove food.
WARNING: Cooked food, Metal Rack, and door can be very hot, handle with care. Do not leave Countertop Oven unattended.


radar
| Stage | Value | |---|---| | Warm | -400 | | Hot | -650 | | Dry | -300 | | Brill | -150 | | Bake | -100 | | Turb | -50 | | Air Fry | -25 | | Turn to 28 and to 30 | -15 | | Turn to 30 and to 35 | -10 | | Turn to 35 and to 40 | -5 | | Turn to 40 and to 45 | 0 | | Turn to 45 and to 50 | 5 | | Turn to 50 and to 55 | 10 | | Turn to 55 and to 60 | 15 | | Turn to 60 and to 65 | 20 | | Turn to 65 and to 70 | 25 | Figure 7FAQ ABOUT AIR FRYING
Should I toss my food in oil?
ANSWER: Not all foods will benefit from being tossed in oil prior to being air fried. Frozen foods and foods with a high fat content such as chicken wings or bacon do not require oil. To achieve crispy and browned results on foods such as hand-cut fries or vegetables, evenly coat food with about one tablespoon of oil.
Do I need to flip or toss my food halfway through the cooking cycle?
ANSWER: Large quantities of food can benefit from being flipped halfway through the cooking cycle to ensure even cooking and browning.
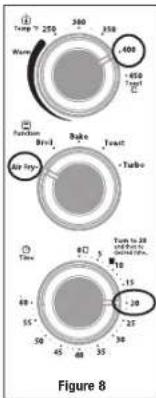
To Use the Air Fry Function (See Fig. 8)
Step 1. Place food evenly on Air Fry Tray. For foods with high amounts of fat or grease, it is recommended to place them on the Baking Pan over the Air Fry Tray.
Step 2. Carefully slide the Air Fry Tray into the top of middle rack position and close the countertop oven door.
Step 3. Turn the Function dial to Air Fry.
Step 4. Turn the Temperature dial to the desired temperature.
Step 5. Turn the Timer to desired cooking time.
NOTE: If cook time is less than 20 minutes, you must turn Timer past the 20 minute mark to engage the timer then back to desired time.
Step 6. When the Air Fry cycle is complete, open door completely and remove food.
WARNING: Cooked food, Air Fry Tray, Baking Pan, and door can be very hot, handle with care. Do not leave Countertop Oven unattended.
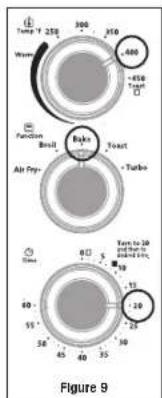
To Use the Bake Function (See Fig. 9)
Step 1. Place Baking Pan with food inside on Metal Rack.
Step 2. Close glass door completely.
Step 3. Turn the Function dial to Bake.
Step 4. Turn the Temperature dial to desired setting.
Step 5. Turn the Timer to desired cook time.
NOTE: If cook time is less than 20 minutes, you must turn Timer past the 20 minute mark to engage the timer then back to desired time.
Step 6. When baking is complete, open door completely and remove food.
WARNING: Cooked food, Metal Rack, and door can be very hot, handle with care. Do not leave Countertop Oven unattended.
English-9English-8
To Use the Broil Function (See Fig. 10)
Adjustable Broil allows the oven to broil at any temperature. Great for melting cheese at 150^ F or cooking fish at 400^ F. Adjust as needed.
Step 1. Place food on Baking Pan and place Baking Pan on Metal Rack.
Step 2. Slide Metal Rack into the middle rack position and close the countertop oven door.
Step 3. Turn the Function dial to Broil.
Step 4. Turn the Temperature dial to desired temperature.
Step 5. Turn the Timer to desired cook time.
NOTE: If cook time is less than 20 minutes, you must turn Timer past the 20 minute mark to engage the timer then back to desired time.
Step 6. When Broiling is complete, open door completely and remove food.
WARNING: Cooked food, Metal Rack, and door can be very hot, handle with care. Do not leave Countertop Oven unattended.

To Use the Warm Function (See Fig. 11)
Step 1. Place Baking Pan with food inside on Metal Rack. Step 2. Close glass door completely.
Step 3. Turn the Function dial to Bake.
Step 4. Turn the Temperature dial to the warm setting.
Step 5. Turn the Timer to desired warming time.
NOTE: If cook time is less than 20 minutes, you must turn Timer past the 20 minute mark to engage the timer then back to desired time.
Step 6. When warming is complete, open door completely and remove food.
WARNING: Cooked food, Metal Rack, and door can be very hot, handle with care. Do not leave Countertop Oven unattended.

POSITIONING RACK
- To accommodate a wide variety of foods the oven has 3 rack positions. The rack can be inserted in the oven in the upper, middle or lower rack guides. The rack will fit into either of the rack guides inside of the Countertop Oven. (See Figure Below)
- Before removing the rack allow the unit to cool.
- To remove the rack, open the oven door and pull the rack towards the front of the oven. The rack will slide on the rack guides on the inside of the oven.
PLEASE NOTE: the oven rack may tilt downward causing food to shift when the rack is pulled out, proceed with caution. - Positioning of the oven rack will depend on the size of the food and desired browning. Move the rack to the lower rack position to prevent top browning and move the rack to the upper rack position to prevent bottom burning.
- For best toasting and pizza results, position the rack in the middle rack guide.

English-12
AIR FRY COOKING CHART
| FOOD | Weight | Accessory | Function | Temperature (F) | Time (Min) | Oil? |
| Meat/Poultry/Fish | ||||||
| Breaded Chicken Breast | 1 lb Air | Fry Rack Air Fry 400 25 Min No | ||||
| Chicken Wings 20 oz Baking Pan Air Fry 425 35-40 Min No | ||||||
| Steak | 8 oz | Baking Pan Air Fry 450 15-20 Min No | ||||
| Pork Chips | 8 oz | Baking Pan Air Fry 400 30-35 Min No | ||||
| Hamburger | 4 oz | Baking Pan Air Fry 400 20-25 Min No | ||||
| Breaded Fish | 8 oz | Baking Pan Air Fry 400 15 Min No | ||||
| Bacon | 4 oz | Baking Pan Air Fry 450 10-13 Min No | ||||
| Potatoes | ||||||
| Hand-Cut Fries | 1/2 lb | Air Fry Rack | Air Fry | 425 | 25-30 Min | Yes |
| Hand-Cut Sweet Potato Fries | 1/2 lb | Air Fry Rack | Air Fry | 425 | 25-30 Min | Yes |
| Frozen Hash Brown | 1/2 lb | Baking Pan | Air Fry | 400 | 20-25 Min | Yes |
| Frozen Fries (Thick Cut) | 2/3 lb | Air Fry Rack Air Fry 450 20 Min No | ||||
| Frozen Fries (Thin Cut) | 7/2 lb Air | Fry Rack Air Fry 450 15-16 Min No | ||||
| Frozen Sweet potato fries | 2/3 lb | Air Fry Rack Air Fry 450 20-24 Min No | ||||
| Snacks | ||||||
| Frozen Chicken Nuggets | 1 lb Air | Fry Rack Air Fry 450 15-20 Min No | ||||
| Frozen Mozzarella Sticks | 3/4 lb | Air Fry Rack Air Fry 450 7-9 Min No | ||||
| Frozen Onion Rings | 6 oz | Air Fry Rack Air Fry 450 15 Min No | ||||
NOTE: Preheat at least 4 minutes before use.
NOTE: Cook times are estimates and may vary based on food type and preparation.
CLEANING YOUR COUNTERTOP OVEN
WARNING: to protect against electrical shock, do not immerse the appliance in water or any other liquid.
Step 1. Turn all knobs to "OFF" position and remove plug from electrical outlet. Allow to cool.
Step 2. Wipe unit down with damp cloth. Make sure to only use mild, soapy water. Abrasive cleaners, scrubbing brushes and chemical cleaners will damage the coating on this unit. WARNING: Do not clean with metal scouring pads. Pieces can break off the pad and touch electrical parts involving a risk of electrical shock.
Step 3. Remove crumb tray by pulling out of Countertop Oven.
Step 4. Shake off crumbs from crumb tray. Cleaning the crumb tray often will avoid any accumulations.
Step 5. Remove Metal Rack and clean with damp cloth or place in top rack of dishwasher.
This appliance has no user serviceable parts. Any servicing beyond that described in the Cleaning Section should be performed by an Authorized Service Representative only. See Warranty Section.
STORING YOUR COUNTERTOP OVEN
Allow the appliance to cool completely before storing. If storing the Countertop Oven for long periods of time make certain that the Countertop Oven is clean and free of food particles. Store the Countertop Oven in a dry location such as on a table or countertop or cupboard shelf. Other than the recommended cleaning, no further user maintenance should be necessary.
HELPFUL TIPS / TROUBLESHOOTING
| PROBLEM POTENTIAL CAUSE SOLUTION | ||
| Overcooked / Undercooked Foods. | Incorrect temperature or time setting.Rack placement. | You may have to adjust the time and temperature to desired taste.Because your Countertop Oven is smaller than your regular oven, it will heat up faster and generally cook in shorter periods offime.Refer to “Positioning Rack” Section, Page English-10.Rack may need to be adjusted to accommodate food. |
| Burnt Smell. • Food build-up inside oven, on heating elements or in crumb tray. | Refer to “Cleaning Your Countertop Oven” Section, Page English-11. | |
| Only one heating element is heating up. | Function setting selection determines which heating element will operate. | Check to see if the Broil or Warm setting is selected. |
| Heating elements do not stay ON. | Heating elements will cycle ON and OFF to maintain proper heat. | Confirm function setting is the correct one of choice. |
1 Year Satisfaction Guarantee
Sunbeam Products, Inc., or if in Canada, Newell Brands Canada ULC, (collectively "Sunbeam") warrants that for a period of one year from the date of purchase, this product will be free from defects in material and workmanship. Sunbeam, at its option, will repair or replace this product or any component of the product found to be defective during the guarantee period. Replacement will be made with a new or remanufactured product or component. If the product is no longer available, replacement may be made with a similar product of equal or greater value. This is your exclusive guarantee. Do NOT attempt to repair or adjust any electrical or mechanical functions on this product. Doing so will void this guarantee. This guarantee is valid for the original retail purchaser from the date of initial retail purchase and is not transferable. Keep the original sales receipt. Proof of purchase is required to obtain satisfaction guarantee performance. Sunbeam dealers, service centers, or retail stores selling Sunbeam products do not have the right to alter, modify or any way change the terms and conditions of this guarantee.
This guarantee does not cover damage resulting from any of the following: negligent use or misuse of the product, use on improper voltage or current, use contrary to the operating instructions, disassembly, repair or alteration by anyone other than Sunbeam or an authorized Sunbeam service center. Further, the guarantee does not cover: Acts of God, such as fire, flood, hurricanes and tornadoes.
What are the limits on Sunbeam's Liability?
Sunbeam shall not be liable for any incidental or consequential damages caused by the breach of any express, implied or statutory guarantee or condition. Except to the extent prohibited by applicable law, any implied guarantee or condition of merchantability or fitness for a particular purpose is limited in duration to the duration of the above guarantee. Sunbeam disclaims all other guarantees, conditions or representations, express, implied, statutory or otherwise. Sunbeam shall not be liable for any damages of any kind resulting from the purchase, use or misuse of, or inability to use the product including incidental, special, consequential or similar damages or loss of profits, or for any breach of contract, fundamental or otherwise, or for any claim brought against purchaser by any other party.
Some provinces, states or jurisdictions do not allow the exclusion or limitation of incidental or consequential damages or limitations on how long an implied guarantee lasts, so the above limitations or exclusion may not apply to you. This guarantee gives you specific legal rights, and you may also have other rights that vary from province to province, state to state or jurisdiction to jurisdiction.
How to Obtain Satisfaction Guarantee Service In the U.S.A.
If you have any question regarding this guarantee or would like to obtain guarantee service, please call 1-800-334-0759 and a convenient service center address will be provided to you.
In Canada
If you have any question regarding this guarantee or would like to obtain guarantee service, please call 1-800-667-8623 and a convenient service center address will be provided to you.
In the U.S.A., this guarantee is offered by Sunbeam Products, Inc., located in Boca Raton, Florida 33431. In Canada, this guarantee is offered by Newell Brands Canada ULC, located at 20 B Hereford Street, Brampton, Ontario L6Y 0M1. If you have any other problem or claim in connection with this product, please write to the Consumer Service Department.
PLEASE DO NOT RETURN THIS PRODUCT TO ANY OF THESE.
ADDRESSES OR TO THE PLACE OF PURCHASE.
English-16
PRECAUCIONES IMPORTANTES
natural_image
Illustration of a hand inserting a plunger into a drawer with horizontal bars (no text or symbols)natural_image
Line drawing of a hand holding a tool inside a cabinet, with no visible text or symbolsPREGUNTAS FRECUENTES Y RESPUESTAS SOBRE COMO FREÍR CON AIRE CALIENTE

Español-11
For product questions contact:
Sunbeam Customer Service
USA: 1.800.334.0759
Canada:1.800.667.8623
www.oster.com
© 2020 Sunbeam Products, Inc. All rights reserved. Distributed by Sunbeam Products, Inc., Boca Raton, Florida 33431.
Sunbeam Customer Service
- IMPORTANT SAFEGUARDS
- SAVE THESE INSTRUCTIONS HOUSEHOLD USE ONLY
- POLARIZED PLUG
- POWER CORD INSTRUCTIONS:
- NOTICES
- WELCOME
- PREPARING TO USE YOUR COUNTERTOP OVEN FOR THE FIRST TIME
- To Open the Oven Door:
- To Use the Toast Function (See Fig. 6)
- TO USE THE TURBO CONVECTION HEAT FUNCTION (SEE FIG. 7)
- FAQ ABOUT AIR FRYING
- To Use the Air Fry Function (See Fig. 8)
- To Use the Bake Function (See Fig. 9)
- To Use the Broil Function (See Fig. 10)
- To Use the Warm Function (See Fig. 11)
- POSITIONING RACK
- CLEANING YOUR COUNTERTOP OVEN
- STORING YOUR COUNTERTOP OVEN
- Year Satisfaction Guarantee
- PRECAUCIONES IMPORTANTES
- PREGUNTAS FRECUENTES Y RESPUESTAS SOBRE COMO FREÍR CON AIRE CALIENTE
Brand : OSTER
Model : TSSTTVDFL2-AF
Category : Oven