CG-200 - Camera DataVideo - Free user manual and instructions
Find the device manual for free CG-200 DataVideo in PDF.


| Product Type | Professional Video Camera |
| Brand | DataVideo |
| Model | CG-200 |
| Dimensions (W x H x D) | 200 x 150 x 250 mm |
| Weight | 2.5 kg |
| Power Supply | 12V DC / Battery (optional) |
| Power Consumption | 15 W |
| Image Sensor | 1/2.8-inch CMOS |
| Effective Pixels | 2.1 MP |
| Video Resolution | 1080p 60/50 fps |
| Lens Mount | Fixed (integrated) |
| Focal Length | 4.5 mm (wide angle) |
| Main Functions | Video recording, character overlay, live streaming |
| Storage Media | SD card (FAT32) |
| Connectivity | HDMI, USB, LAN |
| Cleaning | Use a dry, soft cloth; avoid solvents |
| Safety | Keep away from water and extreme temperatures |
| Spare Parts / Repairability | Contact authorized service centers |
| Warranty | 2 years (depending on region) |
| General Information | Professional video camera with built-in character generator for live productions |
Frequently Asked Questions - CG-200 DataVideo
User questions about CG-200 DataVideo
0 question about this device. Answer the ones you know or ask your own.
Ask a new question about this device
Download the instructions for your Camera in PDF format for free! Find your manual CG-200 - DataVideo and take your electronic device back in hand. On this page are published all the documents necessary for the use of your device. CG-200 by DataVideo.
USER MANUAL CG-200 DataVideo
WARNINGS AND PRECAUTIONS .... 5
WARRANTY 6
STANDARD WARRANTY....6
THREE YEAR WARRANTY....7
DISPOSAL 8
INTRODUCTION....9
FEATURES 9
MINIMUM COMPUTER REQUIREMENTS: 10
IMPORTANT NOTES: 10
EXAMPLE CG-200 SET UP WITH TC-200 12
SOFTWARE INSTALLATION 12
OVERVIEW - USER INTERFACE 15
SWITCHING THE PREVIEW PANE ON....16
SWITCHING THE HDMI OUTPUT ON.... 17
SETTINGS > PREFERENCES 17
Mode 19
HDMI Connection 19
Do not restore monitor configuration on exit....19
Alternative vertical sync method....19
Pages / Projects Folder location 19
Use large icons in toolbars.... 19
Setting a safety Margin 19
ADDING A SIMPLE CG OBJECT....20
OBJECT PROPERTIES DIALOGUE BOX....21
BACKGROUND 22
TEXT....22
TEXT SOURCE 22
PRESENTATION 22
CREATING A SIMPLE LOWER THIRD OVERLAY 23
ADDING A CLOCK....28
ADDING A STATIC LOGO....30
DISPLAYING AN IMAGE SEQUENCE.... 36
GROUPING 38
HOTKEYS 45
SCRIPTS......47
INTRODUCTION OF THE SCRIPT EDITOR 48
THE EXAMPLE OF THE SCRIPT EDITOR OPERATION....51
HOW TO CREATE A SCRIPT FILE 51
AUTOMATION 59
THE EXAMPLE OF THE AUTOMATION OPERATION....62
PLAY ON SPECIFIC TIME 62
PLAY ON HOTKEY....68
THE OBJECT NAVIGATOR....72
INTRODUCTION OF THE OBJECT NAVIGATOR....72
DISPLAYING THE CG-200 USER INTERFACE IN DIFFERENT LANGUAGES .... 76
ADVANCED – USING VARIABLES INSTEAD OF TEXT 78
FRAME TEXT 78
CLOCK VARIABLES 78
FORMAT STRING OPTIONS ARE: 78
CSV FILE 79
SERVICE AND SUPPORT 80
Disclaimer of Product & Services
The information offered in this instruction manual is intended as a guide only. At all times, Datavideo Technologies will try to give correct, complete and suitable information. However, Datavideo Technologies cannot exclude that some information in this manual, from time to time, may not be correct or may be incomplete. This manual may contain typing errors, omissions or incorrect information. Datavideo Technologies always recommend that you double check the information in this document for accuracy before making any purchase decision or using the product. Datavideo Technologies is not responsible for any omissions or errors, or for any subsequent loss or damage caused by using the information contained within this manual. Further advice on the content of this manual or on the product can be obtained by contacting your local Datavideo Office or dealer.
FCC Compliance Statement
This device complies with part 15 of the FCC rules. Operation is subject to the following two conditions:
(1) This device may not cause harmful interference, and
(2) This device must accept any interference received, including interference that may cause undesired operation.
Warnings and Precautions
-
Read all of these warnings and save them for later reference.
-
Follow all warnings and instructions marked on this unit.
-
Unplug this unit from the wall outlet before cleaning. Do not use liquid or aerosol cleaners. Use a damp cloth for cleaning.
-
Do not use this unit in or near water.
-
Do not place this unit on an unstable cart, stand, or table. The unit may fall, causing serious damage.
-
Slots and openings on the cabinet top, back, and bottom are provided for ventilation. To ensure safe and reliable operation of this unit, and to protect it from overheating, do not block or cover these openings. Do not place this unit on a bed, sofa, rug, or similar surface, as the ventilation openings on the bottom of the cabinet will be blocked. This unit should never be placed near or over a heat register or radiator. This unit should not be placed in a built-in installation unless proper ventilation is provided.
-
This product should only be operated from the type of power source indicated on the marking label of the AC adapter. If you are not sure of the type of power available, consult your Datavideo dealer or your local power company.
-
Do not allow anything to rest on the power cord. Do not locate this unit where the power cord will be walked on, rolled over, or otherwise stressed.
-
If an extension cord must be used with this unit, make sure that the total of the ampere ratings on the products plugged into the extension cord do not exceed the extension cord rating.
-
Make sure that the total amperes of all the units that are plugged into a single wall outlet do not exceed 15 amperes.

- Never push objects of any kind into this unit through the cabinet ventilation slots, as they may touch dangerous voltage points or short out parts that could result in risk of fire or electric shock. Never spill liquid of any kind onto or into this unit.
- Except as specifically explained elsewhere in this manual, do not attempt to service this product yourself. Opening or removing covers that are marked "Do Not Remove" may expose you to dangerous voltage points or other risks, and will void your warranty. Refer all service issues to qualified service personnel.
- Unplug this product from the wall outlet and refer to qualified service personnel under the following conditions:
a. When the power cord is damaged or frayed;
b. When liquid has spilled into the unit;
C. When the product has been exposed to rain or water;
d. When the product does not operate normally under normal operating conditions. Adjust only those controls that are covered by the operating instructions in this manual; improper adjustment of other controls may result in damage to the unit and may often require extensive work by a qualified technician to restore the unit to normal operation;
e. When the product has been dropped or the cabinet has been damaged;
f. When the product exhibits a distinct change in performance, indicating a need for service.
Warranty
Standard Warranty
- Datavideo equipment are guaranteed against any manufacturing defects for one year from the date of purchase.
- The original purchase invoice or other documentary evidence should be supplied at the time of any request for repair under warranty.
-
The product warranty period beings on the purchase date. If the purchase date is unknown, the product warranty period begins on the thirtieth day after shipment from a Datavideo office.
-
All non-Datavideo manufactured products (product without Datavideo logo) have only one year warranty from the date of purchase.
- Damage caused by accident, misuse, unauthorized repairs, sand, grit or water is not covered under warranty.
• Viruses and malware infections on the computer systems are not covered under warranty. - Any errors that are caused by unauthorized third-party software installations, which are not required by our computer systems, are not covered under warranty.
• All mail or transportation costs including insurance are at the expense of the owner. - All other claims of any nature are not covered.
• All accessories including headphones, cables, and batteries are not covered under warranty. - Warranty only valid in the country or region of purchase.
- Your statutory rights are not affected.
Three Year Warranty
- All Datavideo products purchased after July 1st, 2017 are qualified for a free two years extension to the standard warranty, providing the product is registered with Datavideo within 30 days of purchase.

- Certain parts with limited lifetime expectancy such as LCD panels, DVD drives, Hard Drive, Solid State Drive, SD Card, USB Thumb Drive, Lighting, Camera module, PCIe Card are covered for 1 year.
- The three-year warranty must be registered on Datavideo's official website or with your local Datavideo office or one of its authorized distributors within 30 days of purchase.
Disposal

natural_image
Symbolic illustration of a trash bin with crossed lines indicating no waste or discharge (no text or labels)For EU Customers only - WEEE Marking
This symbol on the product or on its packaging indicates that this product must not be disposed of with your other household waste. Instead, it is your responsibility to dispose of your waste equipment by handing it over to a designated collection point for the recycling of waste electrical and electronic equipment. The separate collection and recycling of your waste equipment at
the time of disposal will help to conserve natural resources and ensure that it is recycled in a manner that protects human health and the environment. For more information about where you can drop off your waste equipment for recycling, please contact your local city office, your household waste disposal service or the shop where you purchased the product.

CE Marking is the symbol as shown on the left of this page. The letters "CE" are the abbreviation of French phrase "Conformité Européenne" which literally means "European Conformity". The term initially used was "EC Mark" and it was officially replaced by "CE Marking" in the Directive 93/68/EEC in 1993. "CE
Marking" is now used in all EU official documents.
Introduction
Thank you for purchasing Datavideo CG-200, Character Generator software.
CG-200 is designed to be easy to learn and quick to use as well as offering lots of professional features. It allows producers to create professional overlays in the field with a Windows laptop instead of having to transport a high end desktop PC with PCIe cards fitted.
CG-200 outputs a computer generated video stream from a conventional laptop or PC running Windows via HDMI connection. Instead of RGB the output video format is 4:2:2 YCbCr+Alpha. Special hardware is required to separate picture and alpha channels such as Datavideo's TC-200 overlay box or a Datavideo Switcher such as the SE-2200, SE-2800, SE-2850 and the upcoming TC-100 box.
This manual will cover the CG-200 software only, a separate manual is provided with the TC-200 overlay box and SE-2200 switcher.
Features
PAL, NTSC and HD video resolutions up to 1080 supported
◆ HDMI / DVI / Display Port CG overlay output*.
◆ Supports Windows based TrueType / OpenType Fonts.
◆ Clock Function HH:MM or HH:MM:SS.
◆ Count down timer HH:MM:SS.
◆ Count up timer HH:MM:SS.
◆ Import images with alpha channel PNG, TGA and GIF
◆ Import text from a file CSV, RTF, TXT.
◆ Horizontal text crawls
◆ Vertical text rolls
◆ Simple object animations
◆ Text and Object transparency
◆ Timed and manually started transitions
Minimum computer requirements:
* Windows XP, Windows 7, Windows 8 or Windows 10
* DirectX 9.0c June 2010 or later
* DirectX 9 compatible graphics adapter with two outputs,
HDMI or DVI connector on second output,
at least 256 MB of video memory
Important notes:
* CG-200 uses Windows DirectX technology. To ensure that up-to-date version of DirectX is present on the user's system, CG-200 installer runs DirectX WebSetup.
Alternatively download full DirectX end-user redistributable:
https://download.cnet.com/Microsoft-DirectX-Redistributable-June-2010/3000-
2121 4-10176490.html
Please download the DirectX 9.0c offline installer from the above-mentioned website. Please double-click the downloaded file and then unzip the file to a temporary folder. Please double-click "DXSETUP.exe" from this folder for starting the installation of the DirectX 9.0c.
* Since internal Windows components are used to render CG text, CG-200 requires that ClearType technology (that is used by Windows to smooth text on LCD monitors) is turned off. CG-200 automatically turns it off on startup and restores user settings on exit. This may result in slightly deteriorated look of Windows user interface while running CG-200.
* As CG-200 uses Windows RTF component for rendering text, it depends on Windows DPI settings. If file was saved on a PC with different DPI setting, the text could appear larger or smaller. CG-200 warns user if such
a mismatch is detected.
* CG-200 is a real-time application that should update HDMI output 50 or 60 times each second. This requirement means that precious computer resources should not be consumed by other applications. Please try not to start any other foreground tasks when CG-200 is running.
* Desktop enhancements (like Windows Aero) are also consuming a lot of graphics adapter resources, that's why CG-200 turns it off on startup and restores user settings on exit.
* Exact pixel-to-pixel output is required on HDMI channel, otherwise separation of picture and alpha channels wouldn't work properly. Unfortunately some graphic adapter drivers enable overscan or underscan mode by default. This leads to either black borders at the edges of the picture or zoomed picture with parts of it not visible at all. It's not possible to turn this feature off programmatically so overscan/underscan should be disabled manually.
Example CG-200 Set Up with TC-200 Software Installation
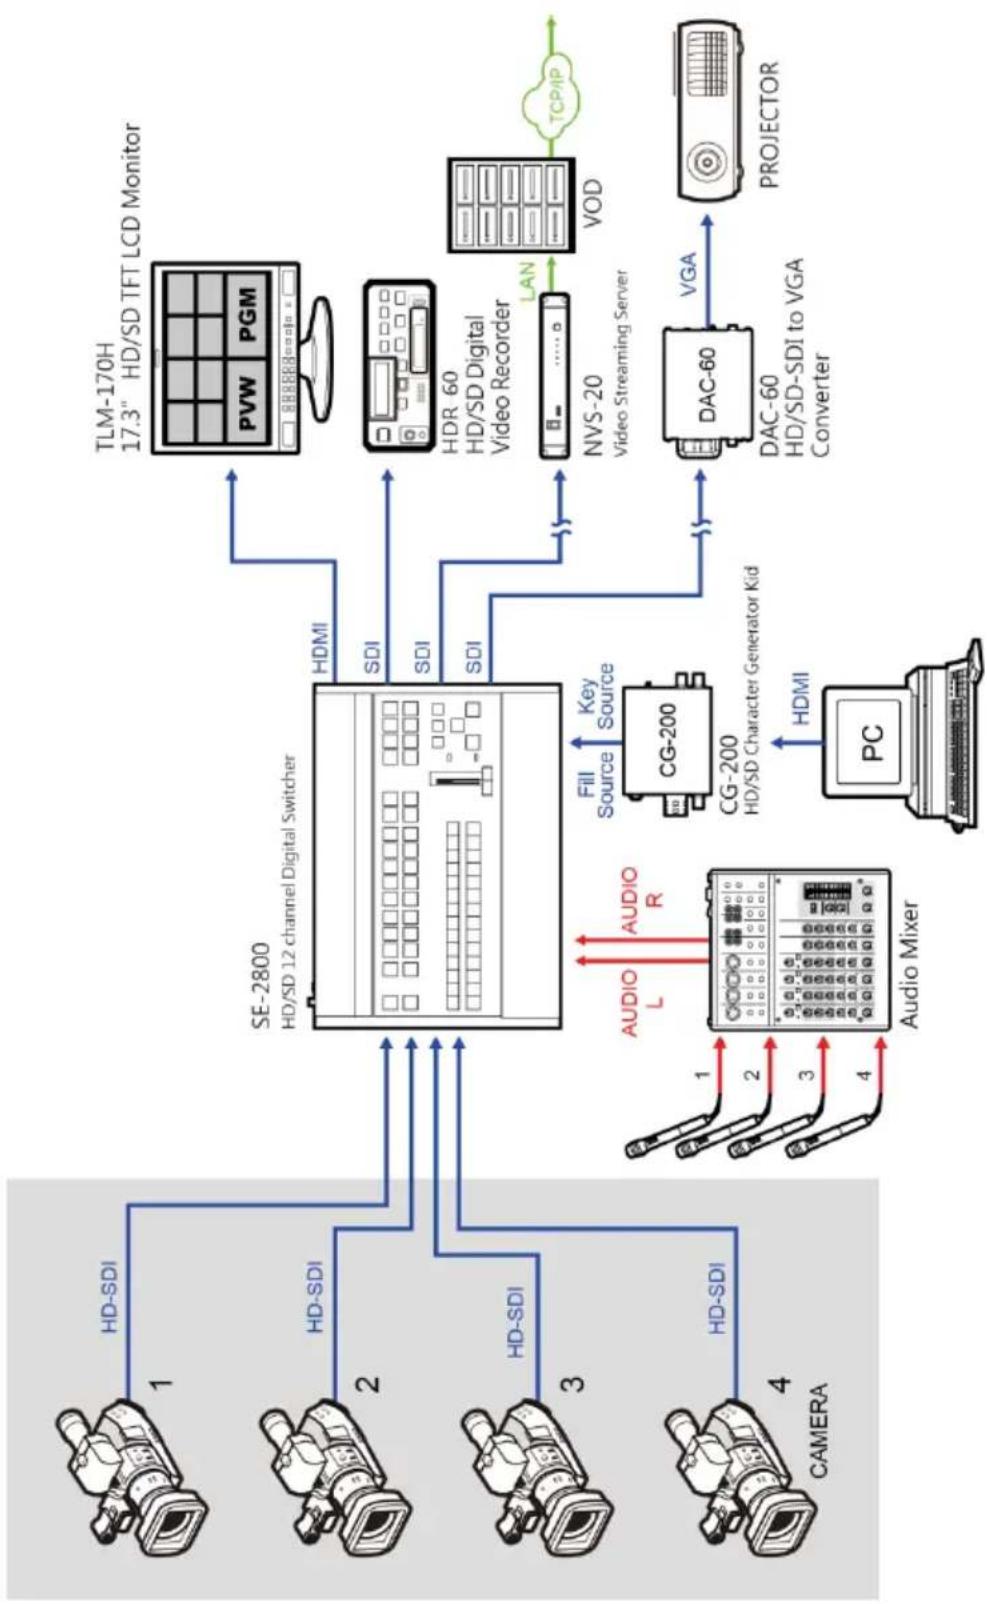
flowchart
graph TD
    A["HD-SDI Camera"] -->|1| B["SE-2800 HD/SD 12 channel Digital Switcher"]
    C["HD-SDI Camera"] -->|2| B
    D["HD-SDI Camera"] -->|3| B
    E["CAMERA"] -->|4| B
    B -->|HDMI| F["TLM-170H 17.3" HD/SD TFT LCD Monitor"]
    B -->|SDI| G["HVDC HD/SD Digital Video Recorder"]
    B -->|SDI| H["NVS-20 Video Streaming Server"]
    B -->|SDI| I["VOD"]
    B -->|LAN| J["TV"]
    B -->|TCP/IP| K["Projection"]
    B -->|Audio Mixer| L["Audio Mixer"]
    B -->|Audio R| M["Audio Mixer"]
    L --> N["CG-200 HD/SD Character Generator Kid"]
    M --> O["DG-60 DAC-60 HD/SD-SDI to VGA Converter"]
    N --> P["PCI"]
    O --> Q["PCI"]
    style A fill:#f9f,stroke:#333
    style C fill:#f9f,stroke:#333
    style D fill:#f9f,stroke:#333
    style E fill:#f9f,stroke:#333
    style B fill:#ccf,stroke:#333
    style F fill:#cff,stroke:#333
    style G fill:#cff,stroke:#333
    style H fill:#cff,stroke:#333
    style I fill:#cff,stroke:#333
    style J fill:#ffc,stroke:#333
    style K fill:#ffc,stroke:#333
    style L fill:#cfc,stroke:#333
    style M fill:#cfc,stroke:#333
    style N fill:#fcc,stroke:#333
    style O fill:#fcc,stroke:#333
    style P fill:#fcc,stroke:#333
    style Q fill:#fcc,stroke:#333
    style R fill:#fcc,stroke:#333
Step1: Please click the
CG-200 Install.exe icon to install CG-200
Software.
Step2: Follow the step by step install wizard.
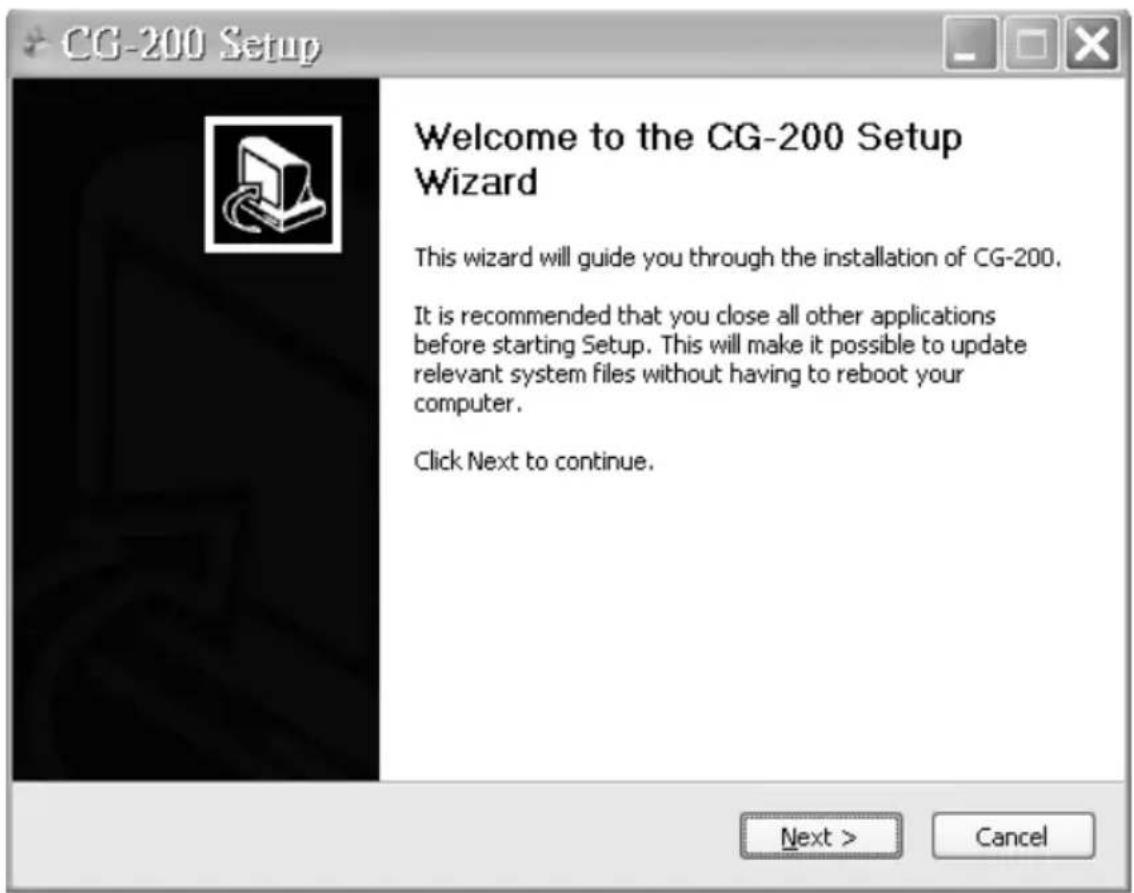
Step3: When finished, please double click the desktop icon to launch the software.
Initial Set Up Wizard
Setting the required video mode on first use is straight forward.
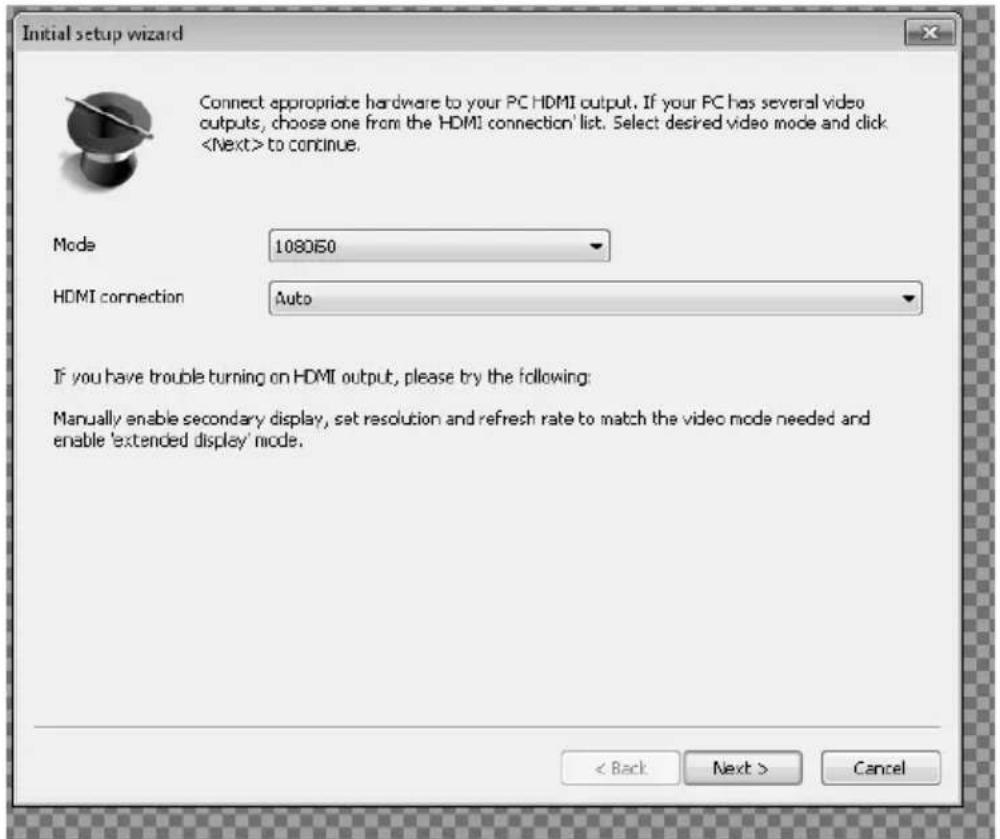
Click the drop down and choose your preferred mode then click Next.
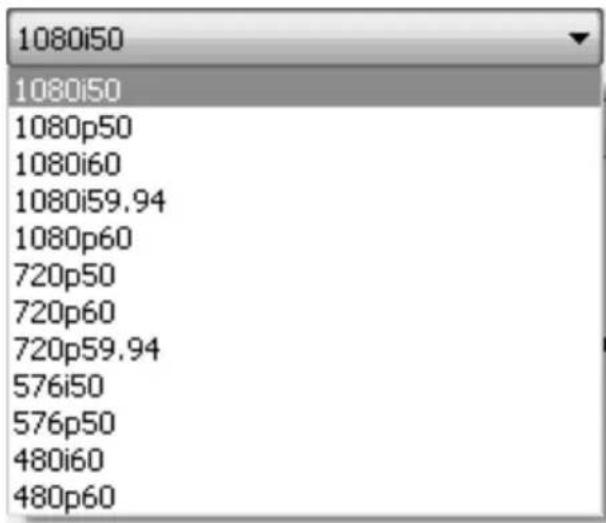
Note : The chosen resolution should match the output of your TC-200 overlay box and or the video equipment being used.
Overview - User Interface
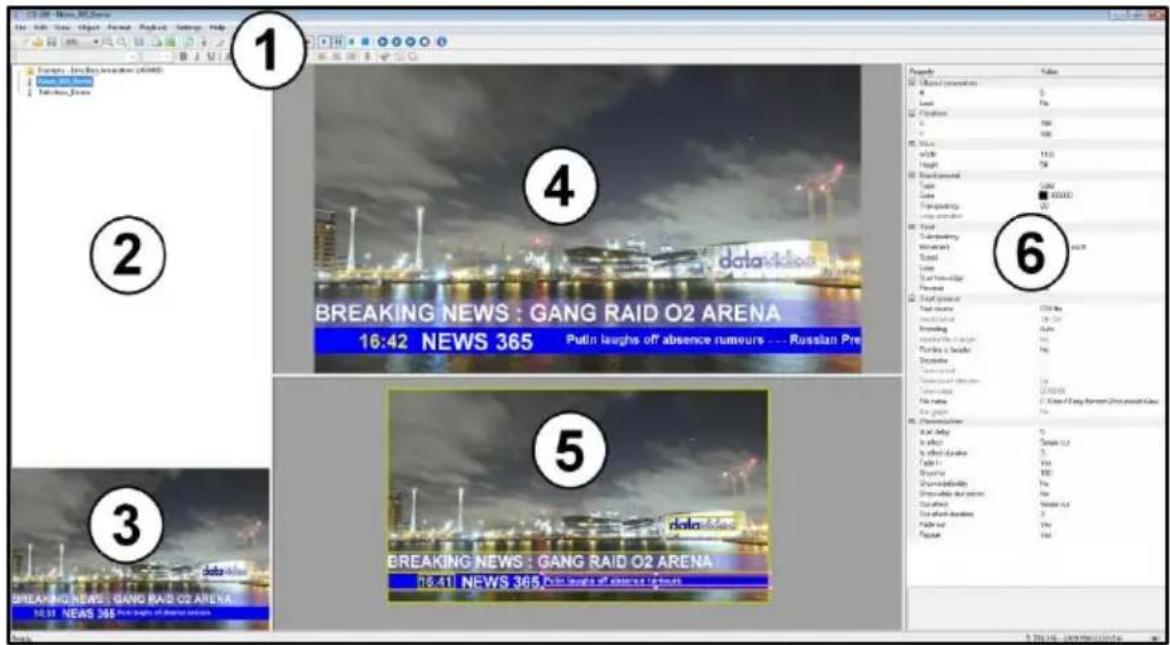
- Menus and Tool bars
- Page / Projects Pane
- Project Thumbnail Preview
- Preview Pane.
- Editing Pane.
- Properties Pane.
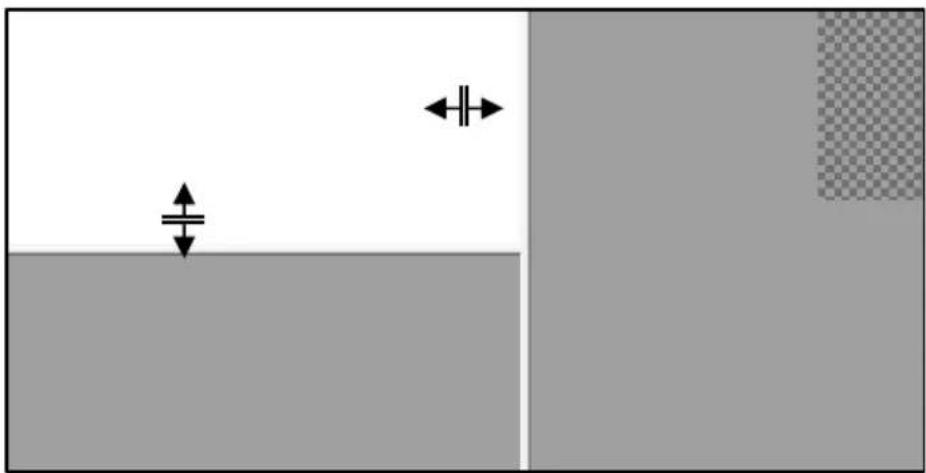
The CG-200 User Interface panes 2, 3, 4, 5 and 6 can be resized to suit your needs. Simply click and drag the pane edge using the mouse pointer.
natural_image
Abstract geometric diagram with shaded regions and directional arrows, no text or symbols presentSwitching the Preview pane on
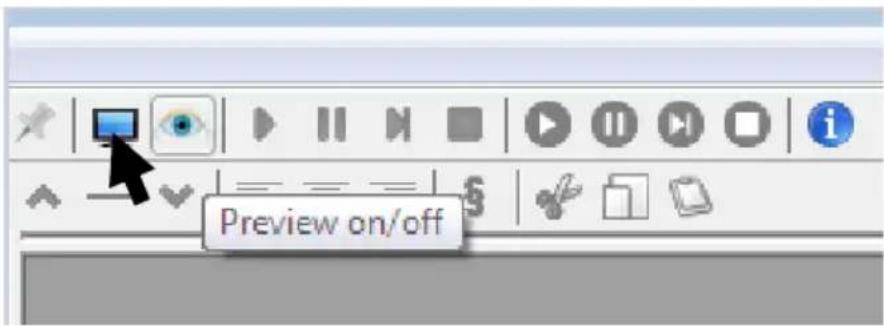
The Preview pane (4) is useful for playing back a CG project when editing or creating a CG project. It allows you to see how one or all elements in the project will be displayed when live on the HDMI output.
Press function key F9 to toggle the Preview pane (4) on or off. Alternatively click the Eye button on the top toolbar.
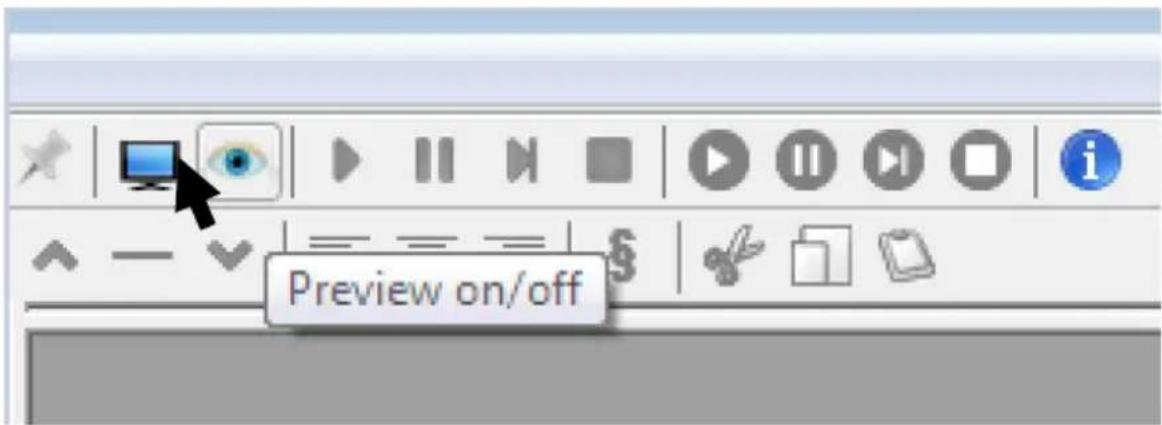
Short descriptions are shown when the mouse pointer is held over a selected toolbar button.
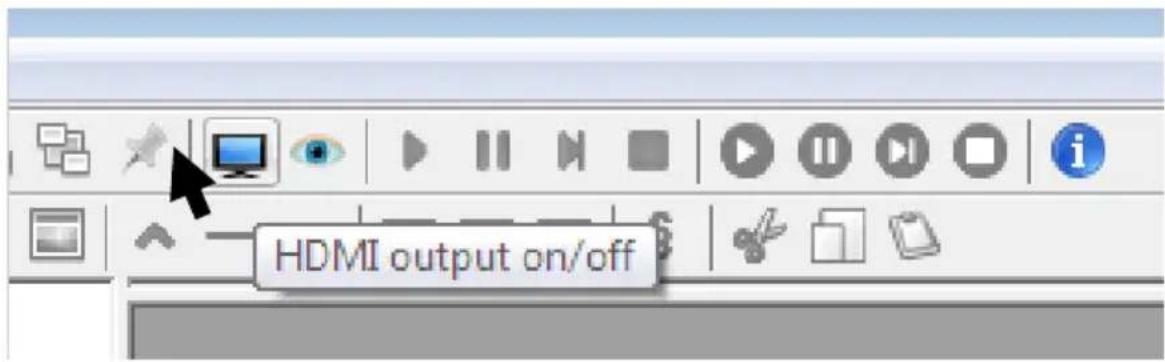
Switching the HDMI output on
This will allow the current CG project to be played out of the laptop to the TC-200 unit or a compatible video switcher such as the SE-2200.
Press function key F10 to toggle the CG HDMI output on or off. Alternatively click the Display button on the top toolbar.
Settings > Preferences
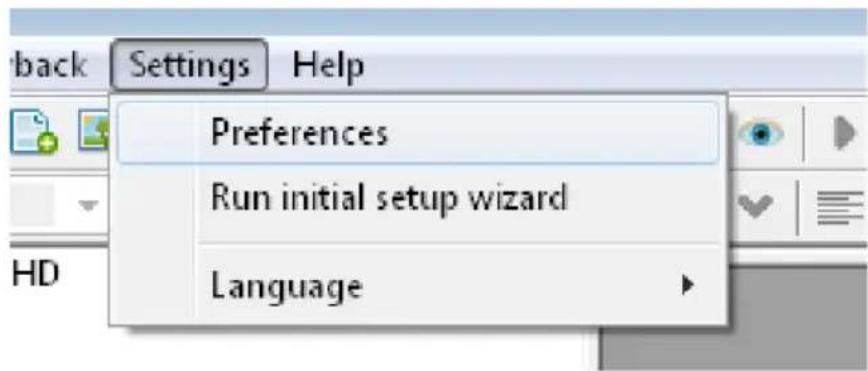
Preferences can be set from the drop down menu Settings.
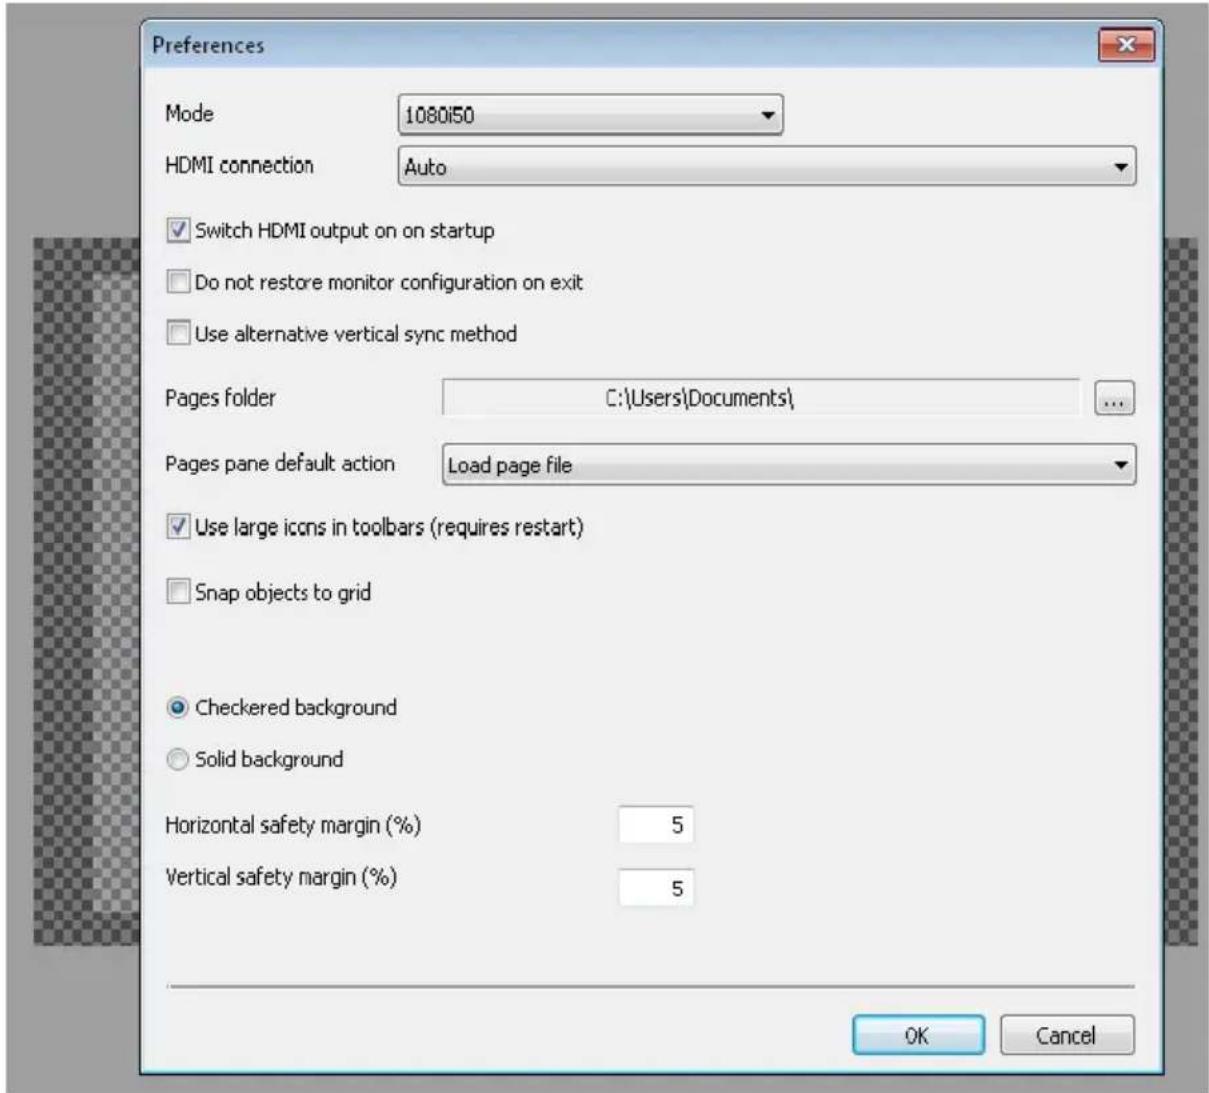
Mode
Choose the video mode to be used in the project. Preview and HDMI outputs may need to be toggled off first see page 17\~19.
HDMI Connection
The laptop HDMI output can be set to on automatically as soon as CG-200 is launched. If no HDMI device connection is detected an error may be displayed. This reminds you to have the HDMI cable connected to the TC-200 unit or video switche from the laptop.
Do not restore monitor configuration on exit
This tick option refers to the laptop monitor and Windows display mode. The laptop monitor mode is changed whilst CG-200 is running to allow for best performance on the HDMI output. It is best left not ticked in most cases.
Alternative vertical sync method
This setting is used in special circumstances where the external equipment needs a different sync reference. It is best left not ticked in most cases. If you experience video tearing or shattered CG movement, try to tick this option to improve above-mentioned situations.
Pages / Projects Folder location
Clicking on the configure button you can have CG-200 automatically navigate to the required folder on the laptop where your CG-200 pages and projects are stored. A folder and file tree is then displayed at start up in the Pages pane, see page 15 pane (2).
Use large icons in toolbars
If ticked then CG-200 must be restarted for the larger toolbar icons to be displayed.
Setting a safety Margin
A percentage of the overall display area can be designated as an outside edge safety margin for CG objects. This allows you to judge and avoid where CG text, shapes or images may be too close to the edge of the video area and so avoid objects being displayed incorrectly.
Adding a simple CG object
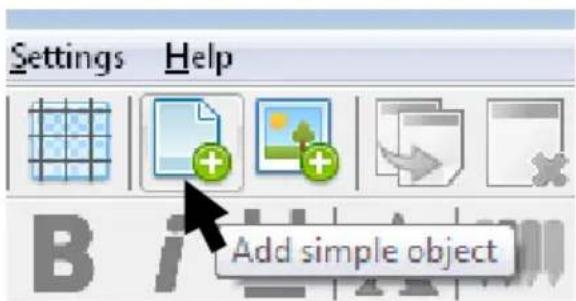
Click on the Add simple object toolbar button to create a CG object that can be defined as a text object.
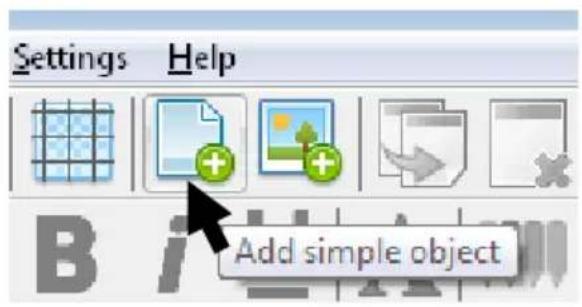
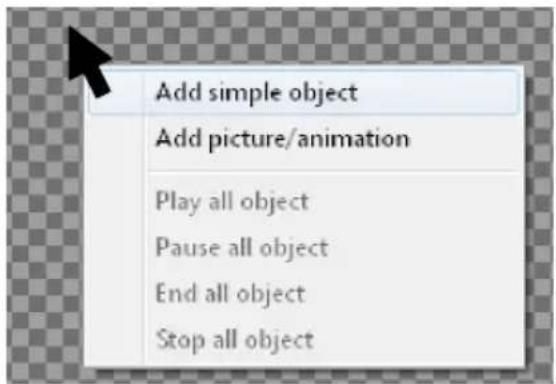
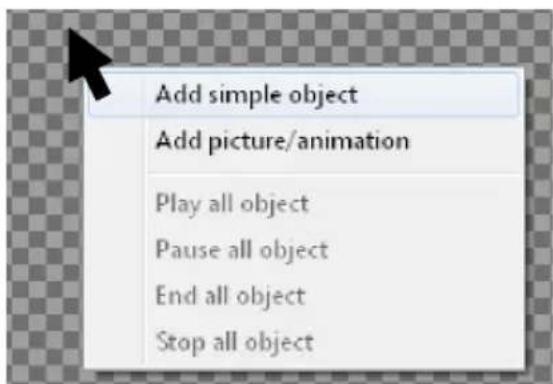
Alternatively use the right mouse button to click the checkered background area of this Editing pane. A menu box will appear, click Add simple object.
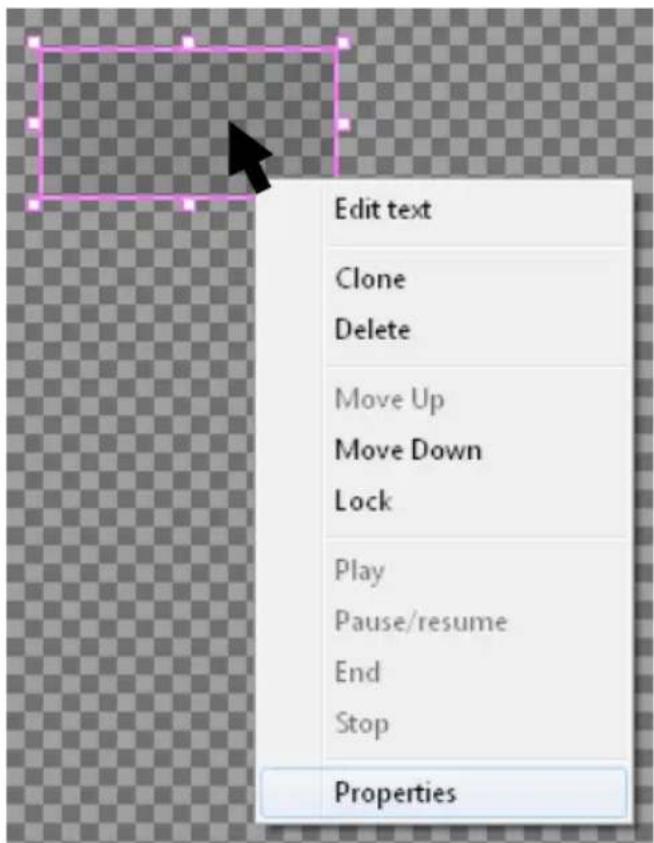
An empty CG object box will appear.
This CG object box can be moved to the required location and resized using the handles on its outside edge.
Once correctly located and sized use the right hand mouse button to click on the same object and choose Properties.
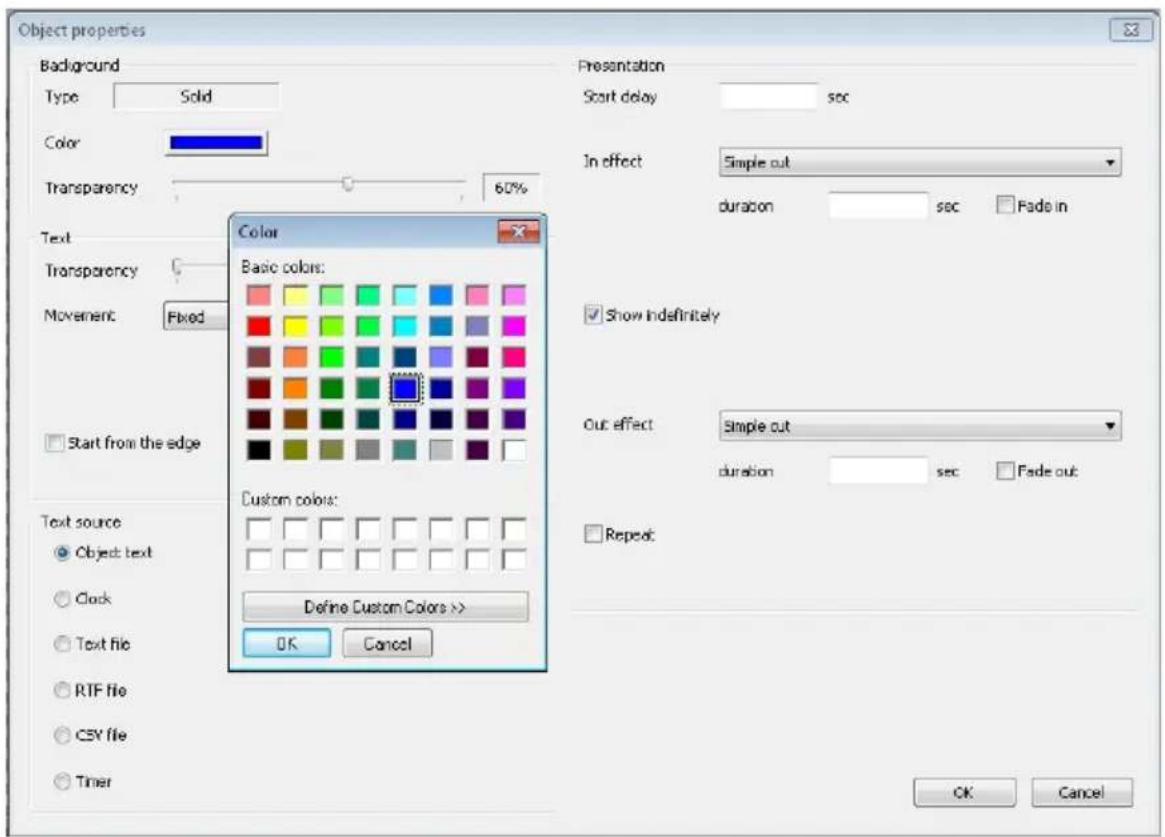
Object properties dialogue box
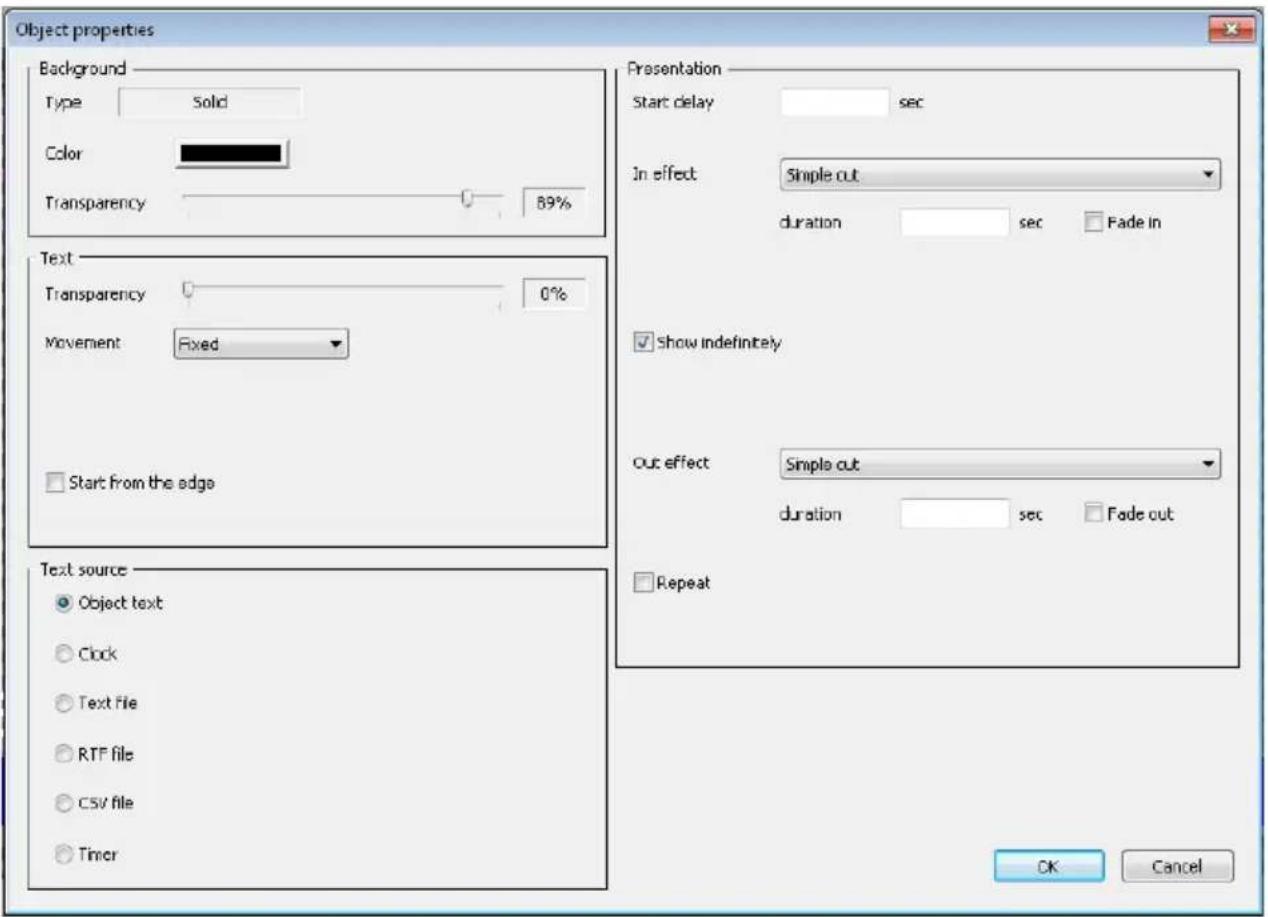
Background
The background of all CG objects (simple object & picture/oranimation) can be set within the Object Properties dialogue box shown on page 21.
The background of the object box can be set to a chosen colour and be made partially or fully transparent.
Text
The text of all CG objects (simple object & picture/oranimation) can be set within the Object Properties dialogue box shown on page 21.
The text of the object can also be set to a chosen colour and be made partially or fully transparent.
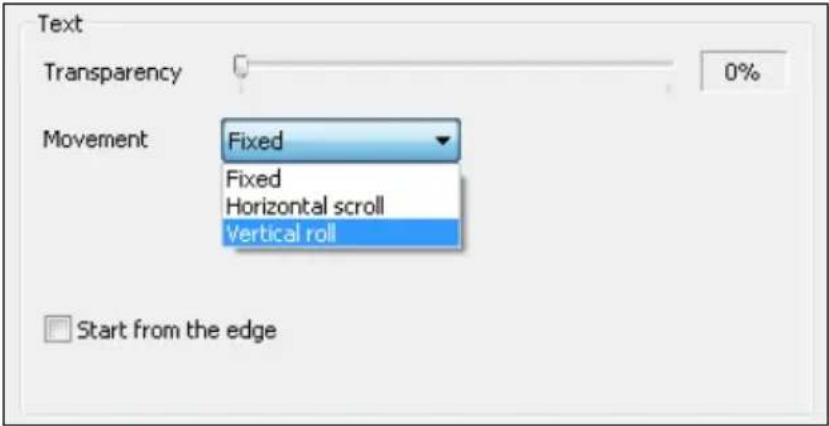
Text can be started from the edge of the box and also be defined with a movement such as Fixed, Horizontal scroll and Vertical roll.
Text Source
The text source of all CG objects (simple object & picture/oranimation) can be set within the Object Properties dialogue box shown on page 21.
Sources for the text can be set as:
Object text Directly typed into the object
Clock Using the laptop's Windows clock time as reference
Text File
RTF File Files held in the same CG Project/ Page folder
CSV File
Timer Count up or down
Presentation
The display of all CG objects (simple object & picture/oranimation) can be set within the Object Properties dialogue box shown on page 21.
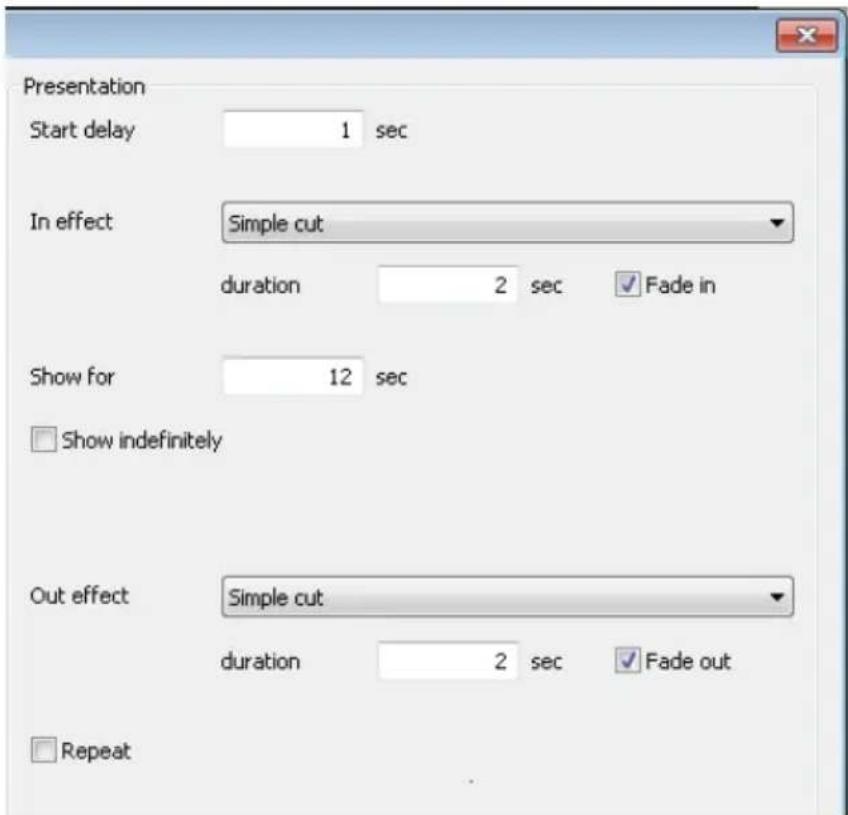
With options for start delay, effects in/out and duration, the presentation settings define how and when the current CG object is shown during playback of the CG Page file.
Creating a simple lower third overlay
To start a new CG-200 page or project use the drop down menu path File > New
You will be presented with a blank or checkered background that represents the video space for your chosen resolution.
Click on the Add simple object button on the top toolbar or right mouse click on the background space.
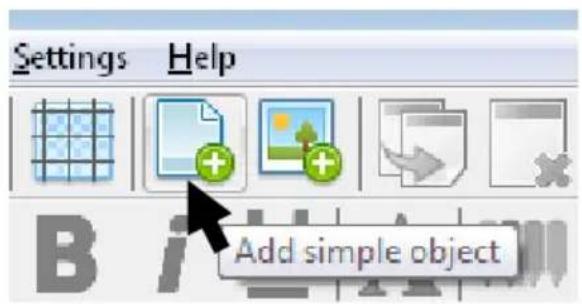
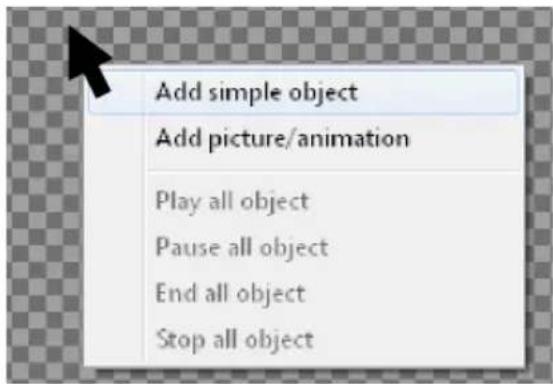
A new object box will be displayed. Drag it to a lower third position on top of the background area. Now stretch and resize the object box using the mouse pointer to create a lower third type oblong shape as below.
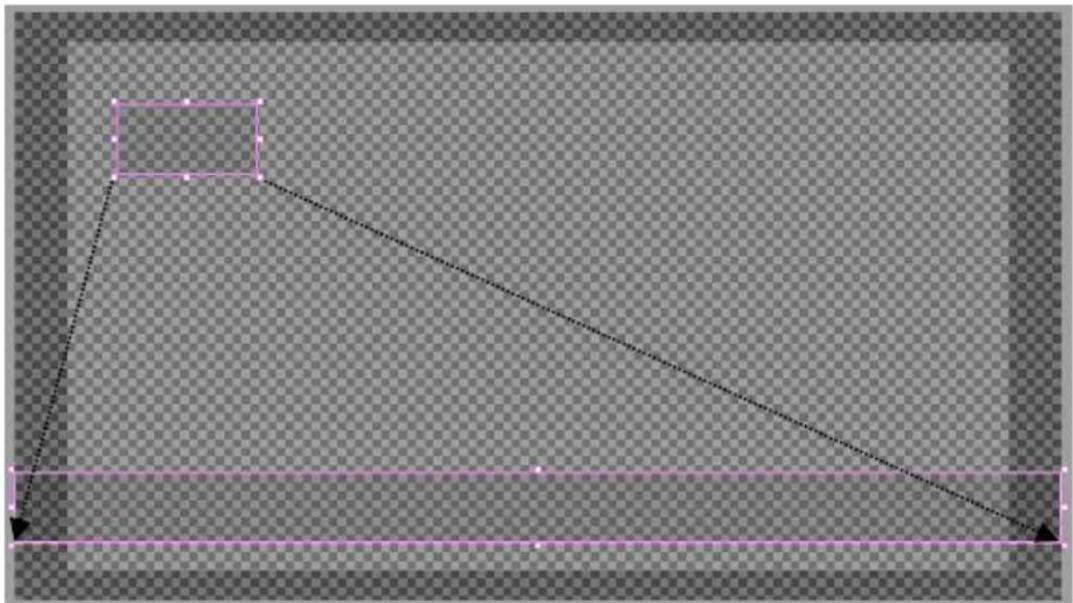
natural_image
Pure geometric diagram with a triangle and rectangle on a transparent background (no text or symbols)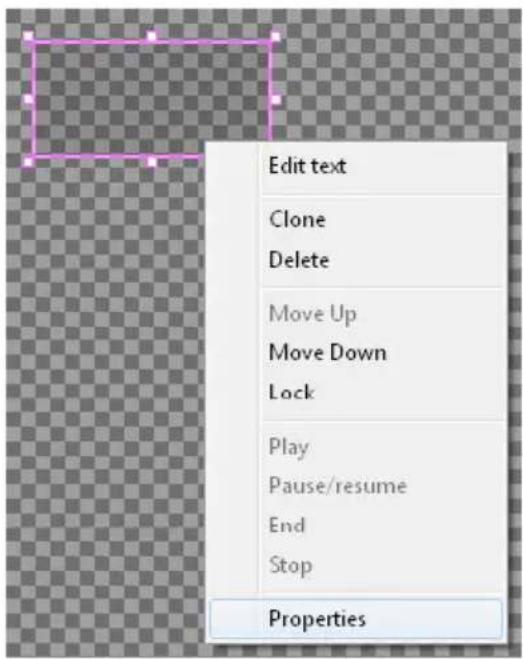
Once correctly located and sized, use the right hand mouse button to click on the same lower third object and choose Properties
This will display the properties dialogue box as shown below.
Set the colour and transparency of the background within the lower third object. The lower the transparency value the more solid the object will look and less video will show through the lower third box.
The lower third box now looks like this.
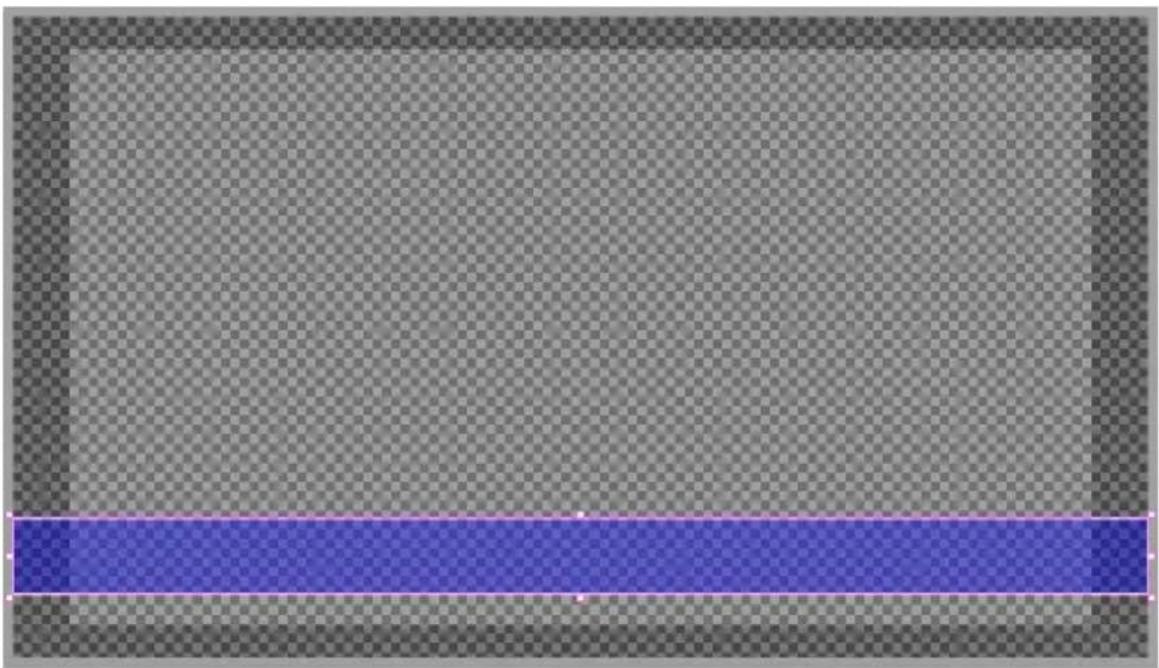
natural_image
Pixelated gray background with a blue horizontal bar at the bottom (no text or symbols)We can right mouse button click on this lower third object box and use the properties dialogue to decide how and when this will appear.
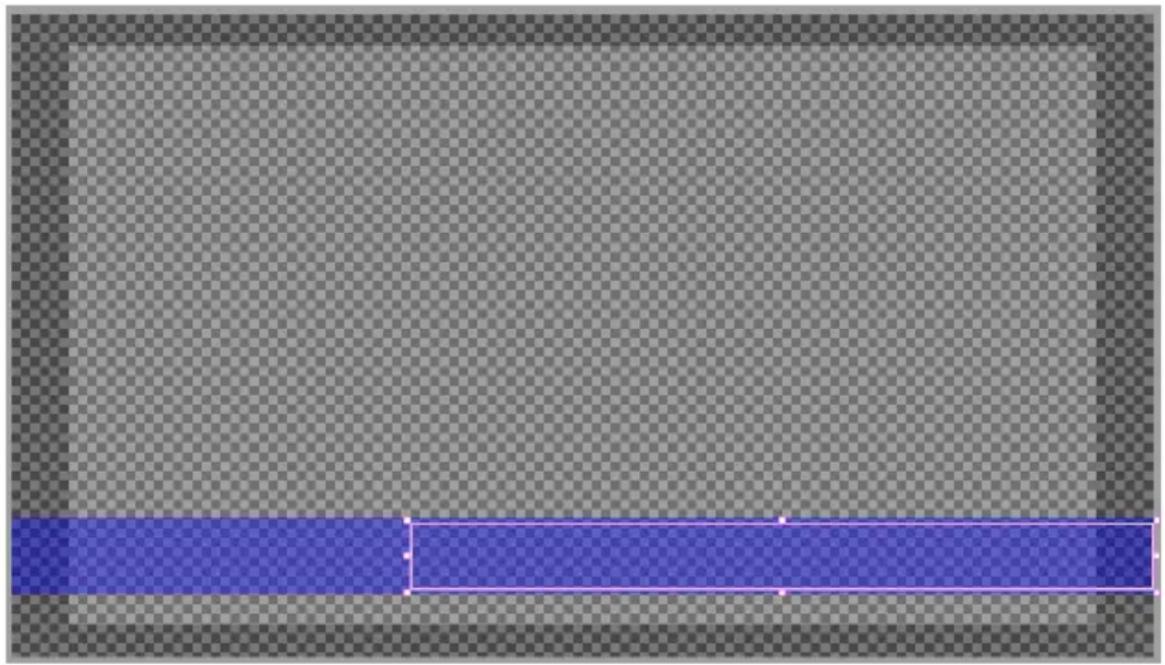
We now need to add some white solid text on top of this lower third. Create a second object box using the same process. The second box will be slightly smaller and shorter than the first object and will be 100% transparent as it will be placed over the lower third bar.
natural_image
Pure geometric pattern with a blue rectangular overlay on a gray background, no text or symbols present.Click on this second CG object to select it, now click the Edit Text button on the top tool bar.
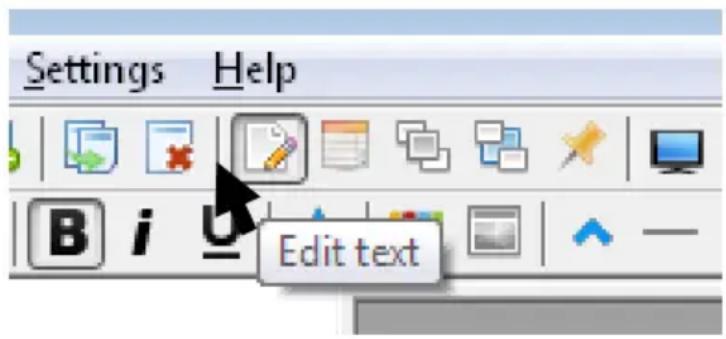
Text can now be entered into the second CG object for Guest Name and Organization.
Text font, size and colour can then be changed by using the lower toolbar as you would
do in other applications like MS Word.
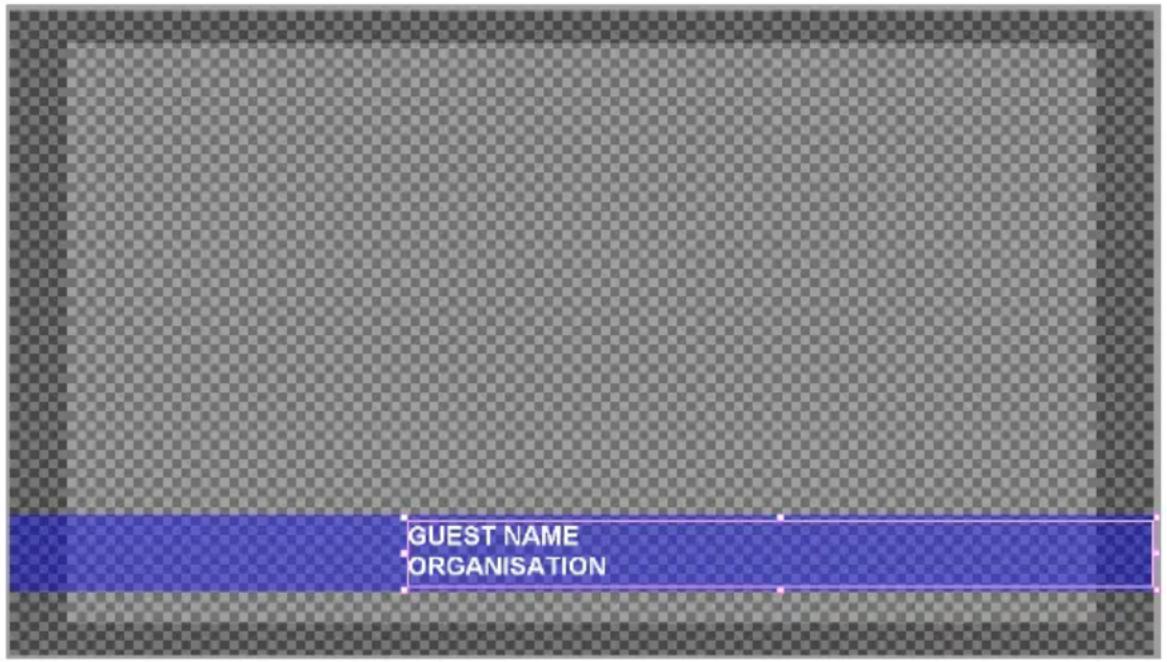
We can right-click the mouse button on this guest details object box and use the properties dialogue (see pages 21) to decide how and when this text will appear.
For now we will choose a simple wait 3 seconds, Fade in over 3 seconds. Hold on screen for 12 seconds and then fade out over 3 seconds. The 12 seconds matches the timing of the first CG object so that the lower third bar and the text appear and disappear in a co-ordinated way.
Using the Preview Pane described on page 16 we can playback what we have created so far to check that everything displays with the right timings.
Press function key F9 to toggle the Preview pane (4) on or off. Alternatively click the Eye button on the top toolbar.
So now all we need to do now is add a station/ programme logo and may be a clock to finish this page project.
Adding a clock
Click on the Add simple object button on the top toolbar or right mouse click on the background space.
A new object box will be displayed. Drag it to the lower third elements we created earlier. Resize the object to fit within the lower third bar.
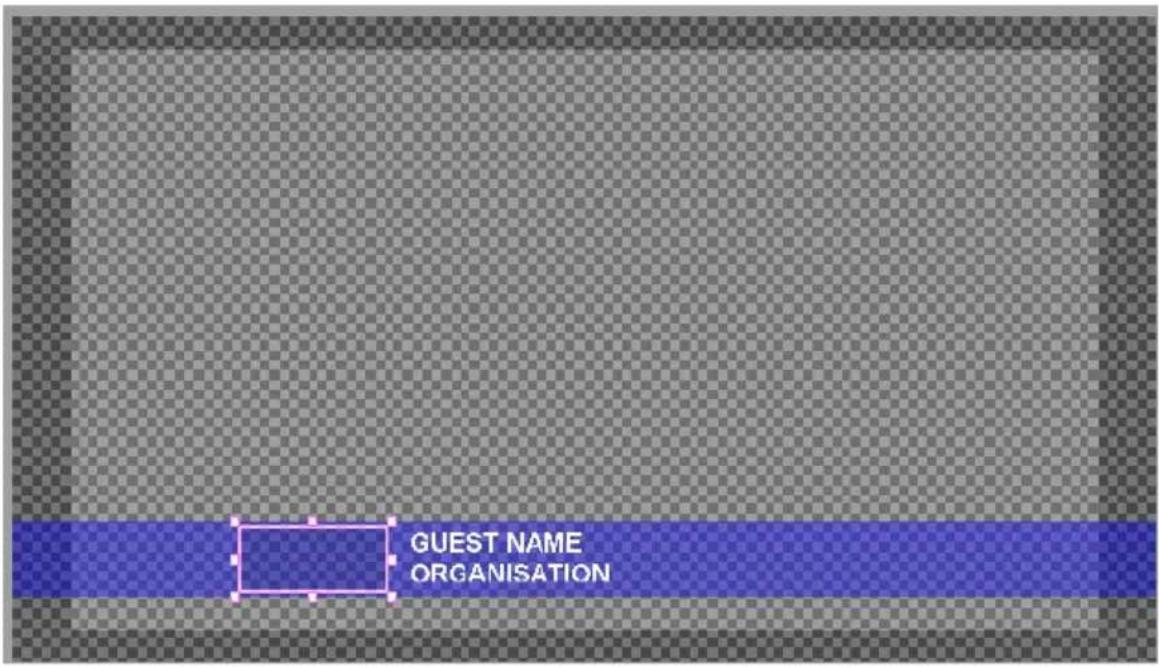
We can now use the object properties to define this object as a clock.
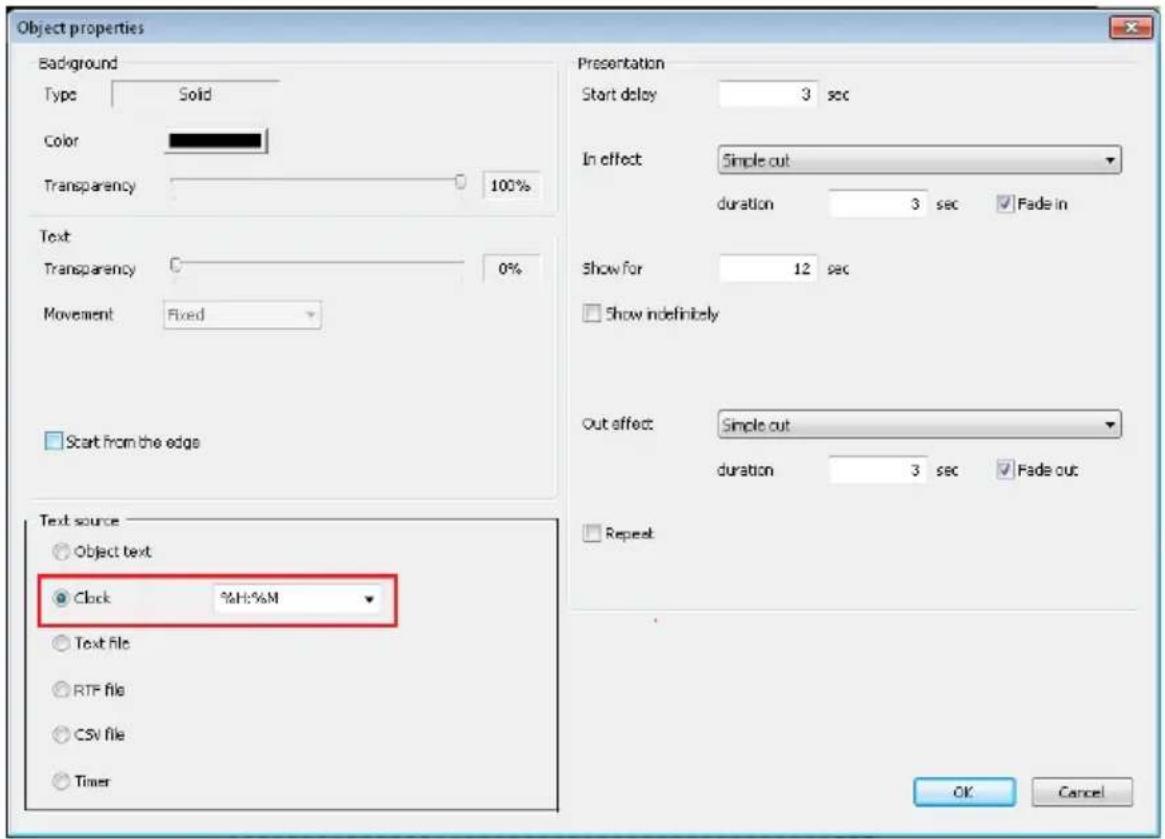
Use the radio button to select Clock as the text source for this CG object. The drop down next to this option allows other formats of time and date to be chosen but HH:MM should satisfy our requirement.
As before the text font, size and colour may also need to be changed slightly to match our lower third text, see pages 27.

Note: When changing the font, size and colour the programming field for clock is shown and not the actual time – this is normal.

Adding a static logo
Click on the Add picture/animation object button on the top toolbar or right mouse click on the background space.
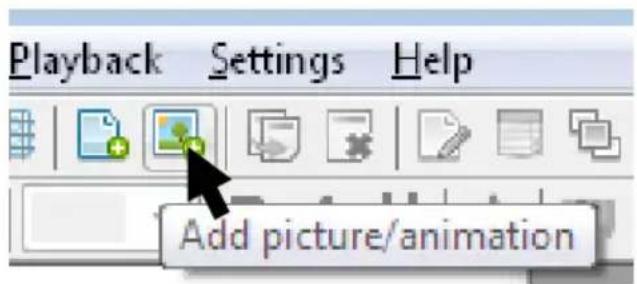
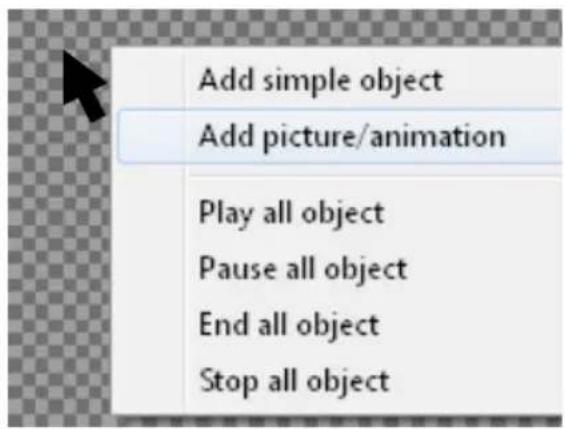
A new window will open allowing you to navigate to and chose the image file that you want to use for your programme or station logo.
Accepted image file types are:
.bmp Bitmap image
.jpg Jpeg image
.tga Targa image + alpha channel
.gif GIF image + alpha channel
.png PNG image + alpha channel
Once added the image will display full size. You may need to resize the image using the handles on the outside edge and move it to the desired location.


Using text from a prepared file
In order to have text change automatically within a CG text box we need to define the object's text source as a CSV, RTF or Text file in its Properties Dialogue box.
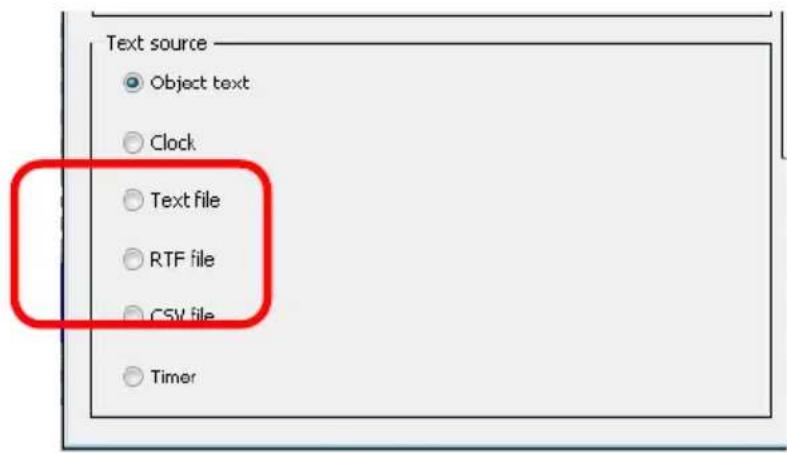
The file should be prepared in advance and saved in the same page or project folder so it can be found easily.
CSV or Comma Separated Value files can be created easily using MS Excel or something similar like Open Office.
An example of how the CSV file is filled out is shown below. Each cell in the first column represents a different line of text to be displayed in a defined vertical roll or horizontal crawl.
| A1 | BREAKING NEWS : GANG RAID O2 ARENA | |||||
| A | B | C | D | E | ||
| 1 | BREAKING NEWS : GANG RAID O2 ARENA | |||||
| 2 | BREAKING NEWS : PUTIN IN PUBLIC | |||||
| 3 | BREAKING NEWS : MUSEUM TOPS LIST | |||||
| 4 | BREAKING NEWS : COMET LANDER AWAKE | |||||
| 5 | BREAKING NEWS : SNOW ON WAY | |||||
| 6 | BREAKING NEWS : FA CUP WIN | |||||
| 7 | ||||||
| 8 | ||||||
Note: The text file cannot be open in two applications as the object will not run. Save & close the CSV file before running the CG project.
Once the text file has been created and saved the CSV file can then be referenced in the CG object's Properties Dialogue box. When CSV or RTF or Text is chosen via a radio button the selection window opens and the file can be linked to the CG text object being defined. Tick the 'Monitor for file changes' box in the object's properties so CG-200 updates automatically when the CSV file has updated.
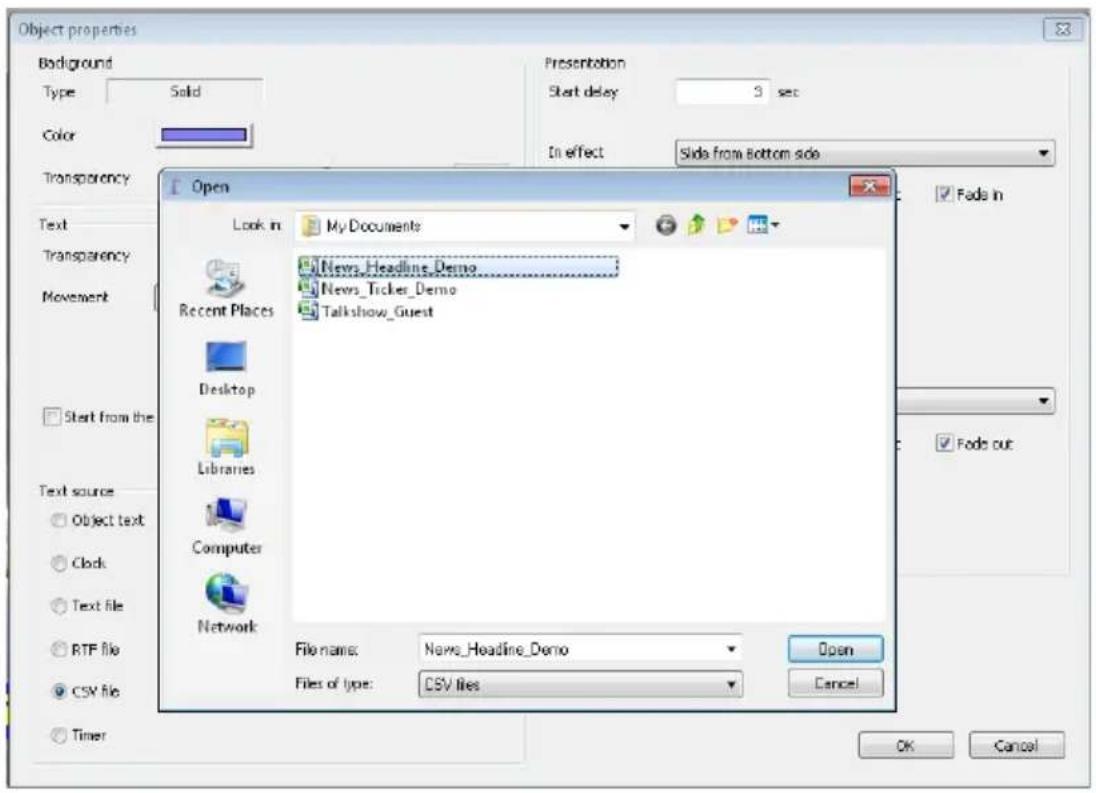
The text object can defined as Fixed, Horizontal Scroll or Vertical Roll. Presentation settings and timings should be changed according to the desired affect required, see pages 21 & 22.
Below is an example of a CG-200 project with four text objects displayed at the same time.

The NEWS 365 object on the lower bar is just a simple Fixed text object as described on page 22.
The BREAKING NEWS object is also Fixed text object but is linked to a CSV file. This box slides up from the darker bar below using the presentation settings, each time it repeats it shows a new line of text from the CSV file.
The time 15:27 shown on the lower bar is a text object set as CLOCK HH:MM.
To the right of the NEWS 365 is a horizontal scroll object linked to a different CSV file. This creates a news ticker tape like effect.
Note: The maximum number of object elements in one CG-200 page file is 255. The number of rows of text any underlying CSV files can only be limited by your imagination!
Displaying an image sequence
A set of individual images can be displayed in a sequence or set order. Each image is slightly different and when displayed in quick succession can look like an animated image, moving titles or even a spinning logo.
First create a simple text file [.txt] with the images listed in sequence on each line. It helps if the filenames for the images are numbered sequentially. After each filename add a semi-colon [ ; ] followed by the duration on screen in milliseconds [ms]. 1000 ms equals 1 second.
An example file structure could be:
fly0000.tga;20
fly0001.tga;20
fly0002.tga;20
fly0003.tga;20
fly0004.tga;20
fly0005.tga;20
In the example above fly0000.tga is the first filename in the sequence and fly0005.tga is the last file. Each file is displayed for 20 milliseconds. When the end of the list is reached the sequence repeats automatically.
Click on the Add picture/animation object button on the top toolbar or right mouse click on the background space.
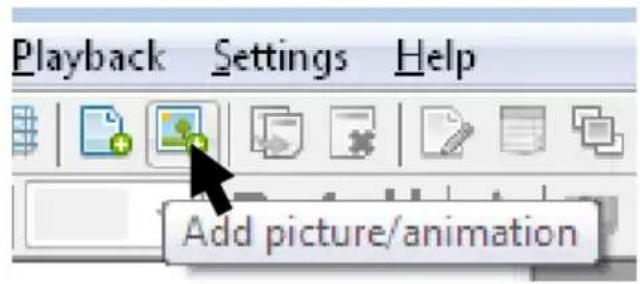
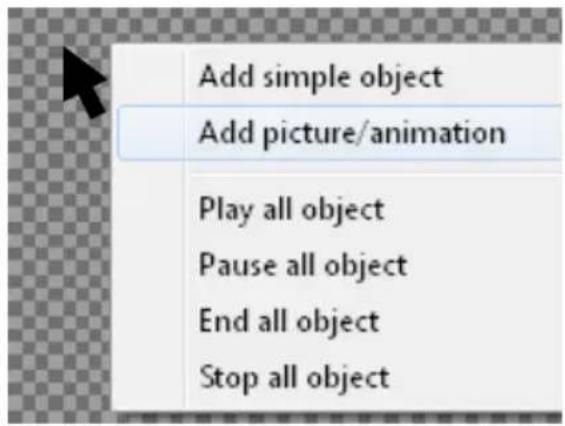
A new window will open allowing you to navigate to and chose the text [.txt] file that you want to use for your image sequence. If the text file has been correctly created and is stored in the same folder as the images then the first image in the sequence should be displayed. Position and resize the first image and the other images will playback in the same location and at the same size.
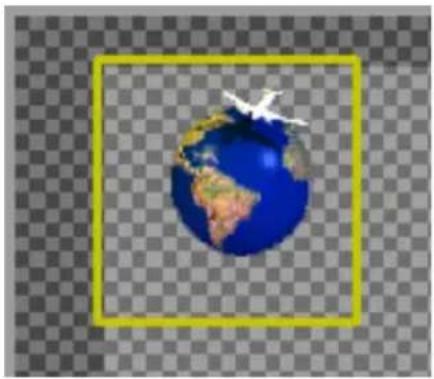
natural_image
Illustration of a globe with an airplane flying above it, set against a transparent checkerboard background (no text or symbols)First image
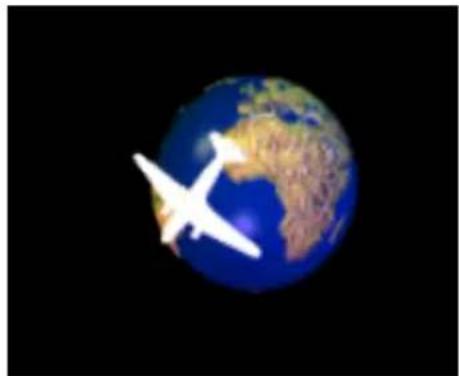
natural_image
Illustration of a white airplane flying over Earth, showing continents and oceans (no text or symbols)Sequence playback
Image sequences can be made from pre-produced targa, png or gif files. These file types can be used where a clear alpha channel is needed so the background video can show through as the image sequence is displayed. Third party software like Adobe Photoshop or After Effects can produce these Targa, GIF or PNG image sequences.
Bitmap and Jpeg files can also be used in an image sequence but the underlying image files may not have a see through alpha channel.
Grouping
Sometimes it's useful to control several objects on screen simultaneously. For example, users may need to show sports event score in two separate objects (like: home and visitors), but this two objects must be shown simultaneously. The only way to achieve this behavior in previous version was to create a separate page file and play it. However it would be difficult to control other objects like countdown timer at the same time.
The CG-200 software provides a new object property called “group”. It’s basically a tag which can be any text string. If several objects have the same “group” tag, they are always controlled together. If users double click on any of such objects to play it – all objects with the same “group” tag will be played. If users select any of such objects and clicks on “Stop”, “End” or “Pause”, this operation will be applied to all objects with the same “group” tag. By default objects have no “group” tag. When users click “group” property, it’s possible to select from existing “group” tags drop-down list or enter text manually.
Please see the steps which are shown as following to realize the details of the grouping feature.
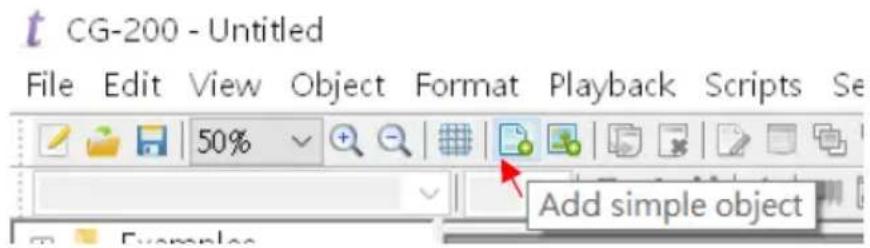
Step 1. Please press the button "Add simple object" which is shown as following diagram to create a new text box for entering texts.
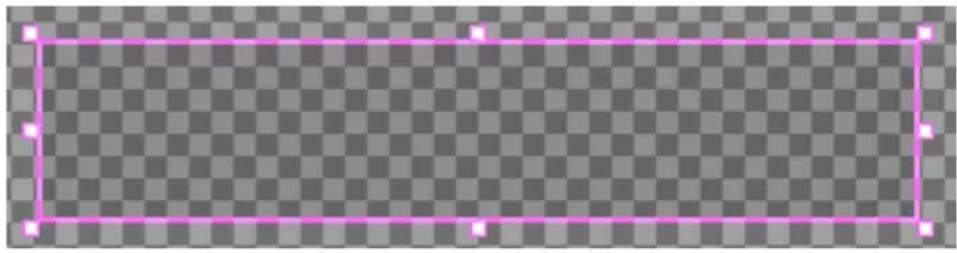
natural_image
A pixelated rectangular frame on a checkered background, no text or symbols present.Step 2. Please enter your desired texts into different text boxes and set your desired text properties which are shown as following example.
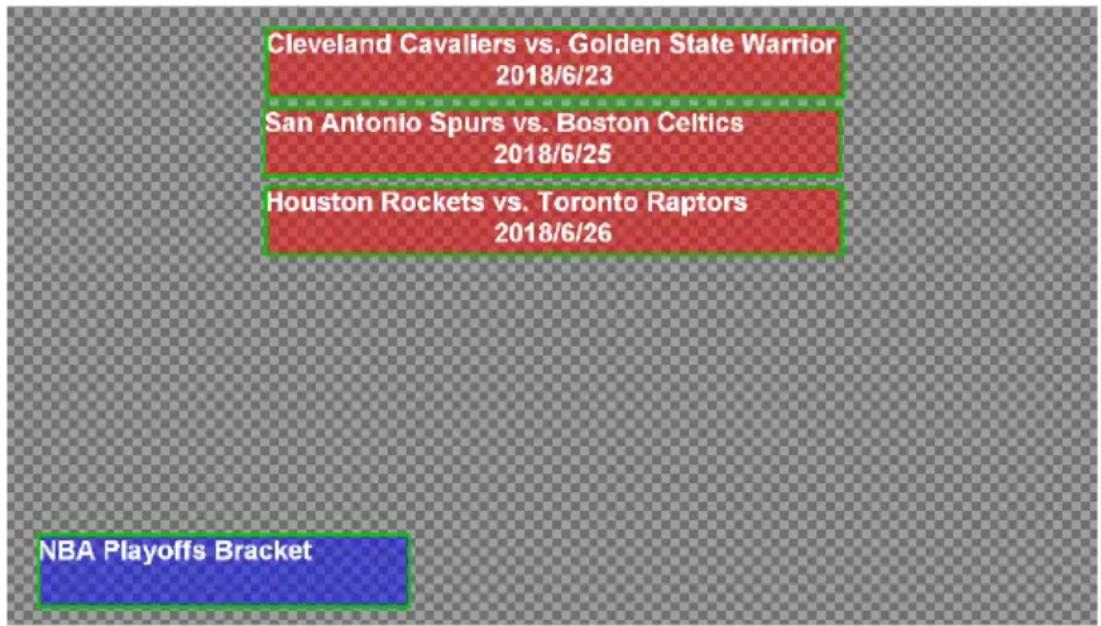
Step 3. Please select one of the text box that you want to change properties and then click the "Object properties button" as shown as follows. You can also select the properties option from the drop-down menu by right-clicking the mouse.
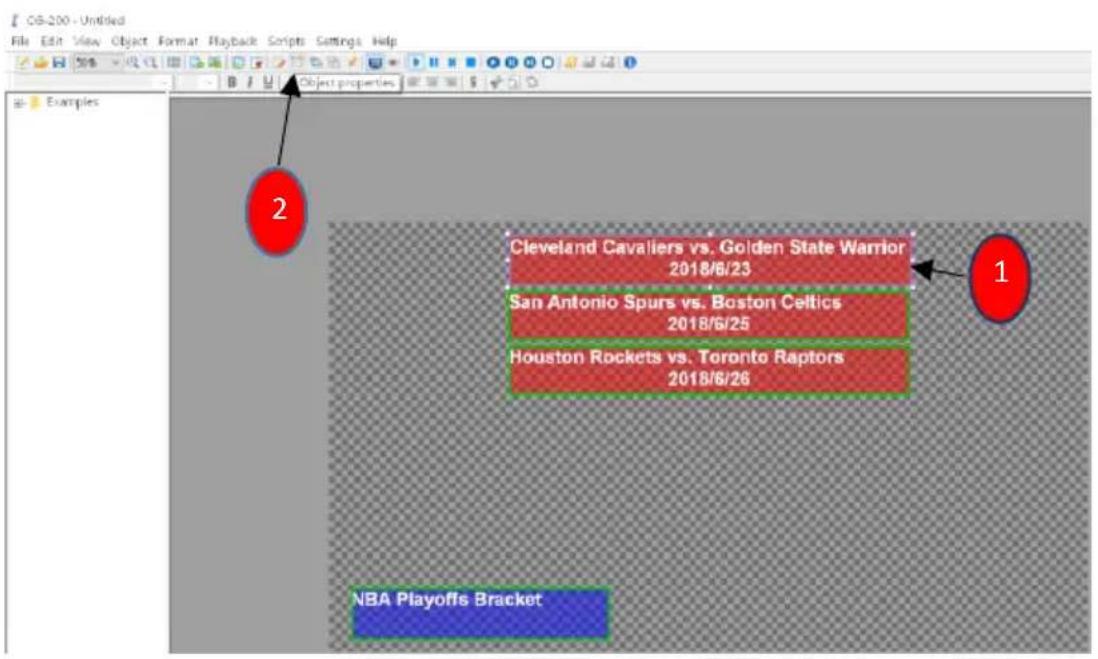
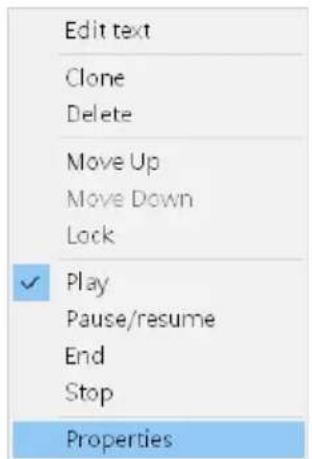
Step 4. You will see the "Group" option. You can manually enter the "Group" tag for the selected text box or select the desired "group" tag from the drop-down menu and then press the OK button as shown as follows. In this example, the word "Sport" is entered manually to be the "group" tag.
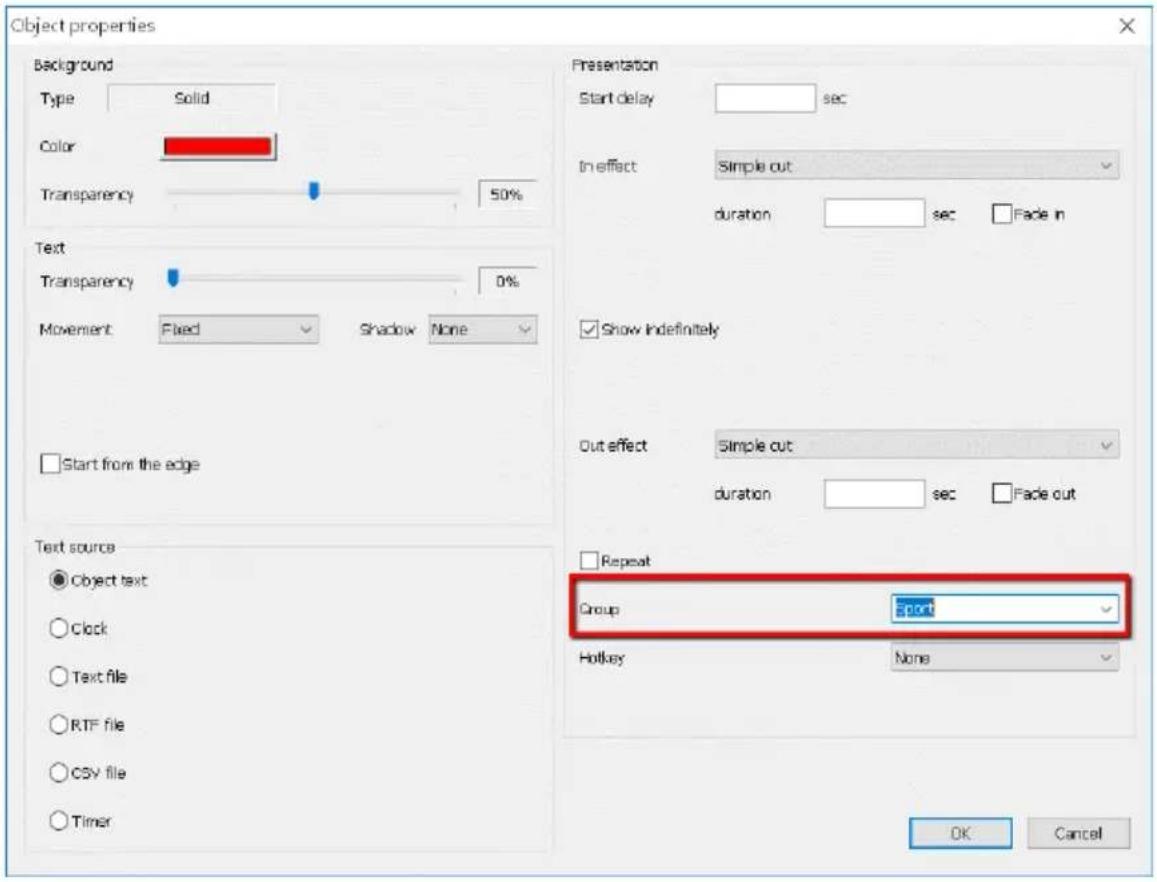
Step 5. Please repeat the step 4 to set other text boxes in the same group by using the same “group” tag.
Step 6. After all of the desired text boxes are set in the same group by using the same “group” tag, you can double-click just one object (text box) or you can just click the Play/Stop button and then all of the text boxes with the same “group” tag will be played/stopped at the same time. That means you can control multiple text boxes at the same time once they are set in the same group.
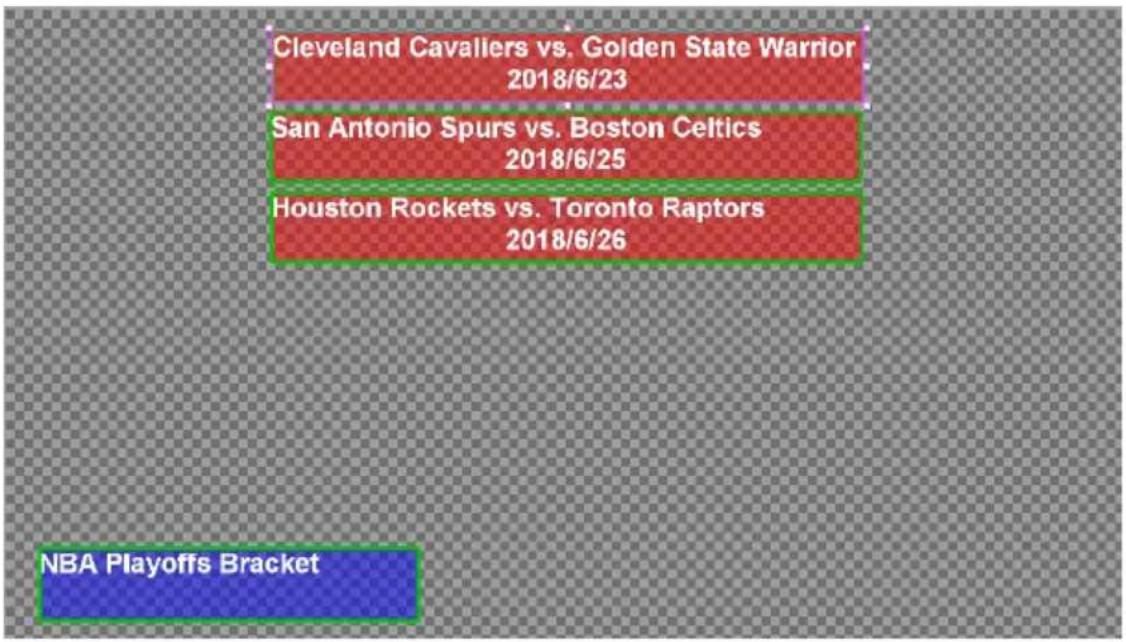
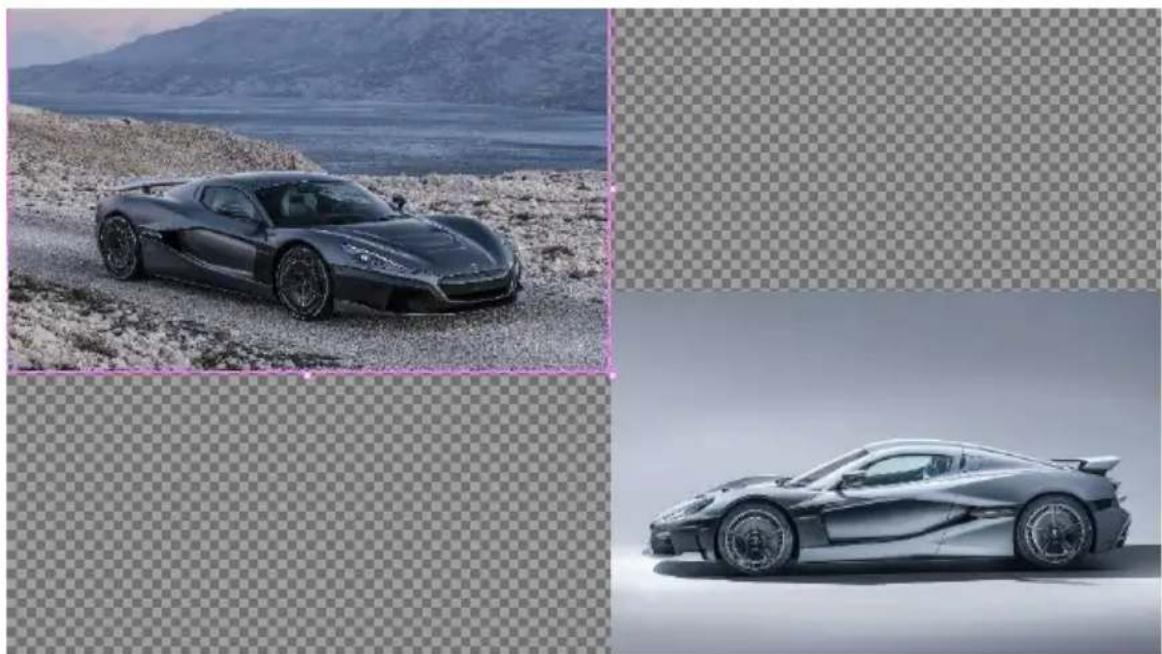
The grouping function can also be adopted for pictures. Please see following steps for grouping pictures.
Step 1. Please press the button "Add picture/animation" which is shown as following diagram to insert pictures.
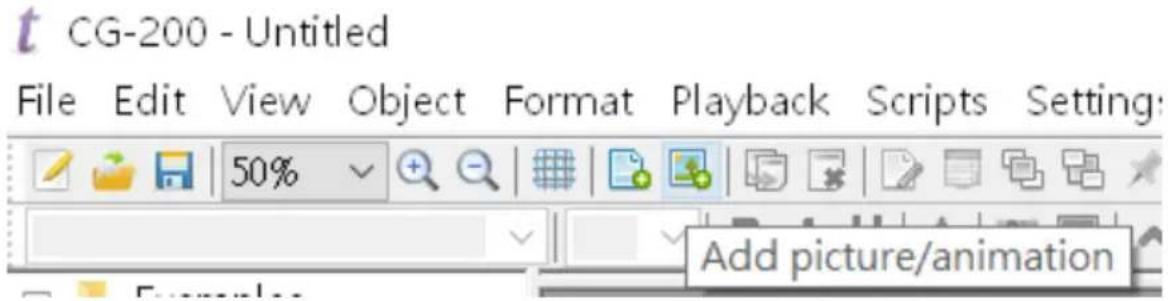
Step 2. Please insert your desired pictures and set your desired picture properties which are shown as following example.
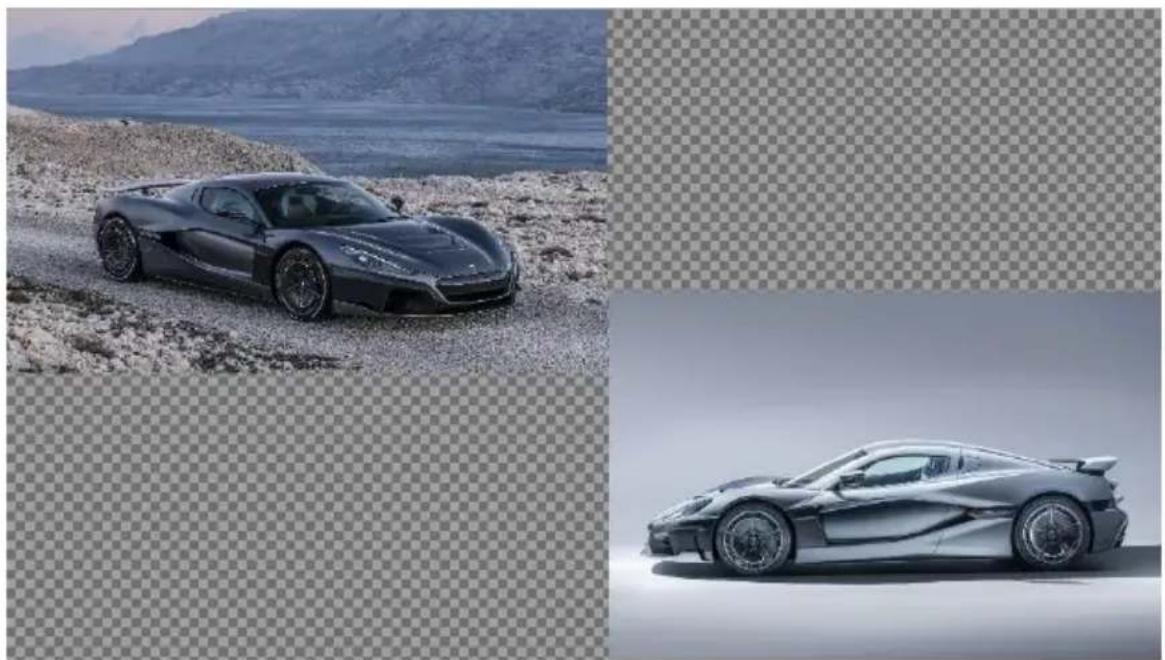
natural_image
Two luxury sports cars on a desert road with mountainous background (no visible text or symbols)Step 3. Please select one of the picture that you want to change properties and then click the “Object properties button” as shown as follows. You can also select the properties option from the drop-down menu by right-clicking the mouse.
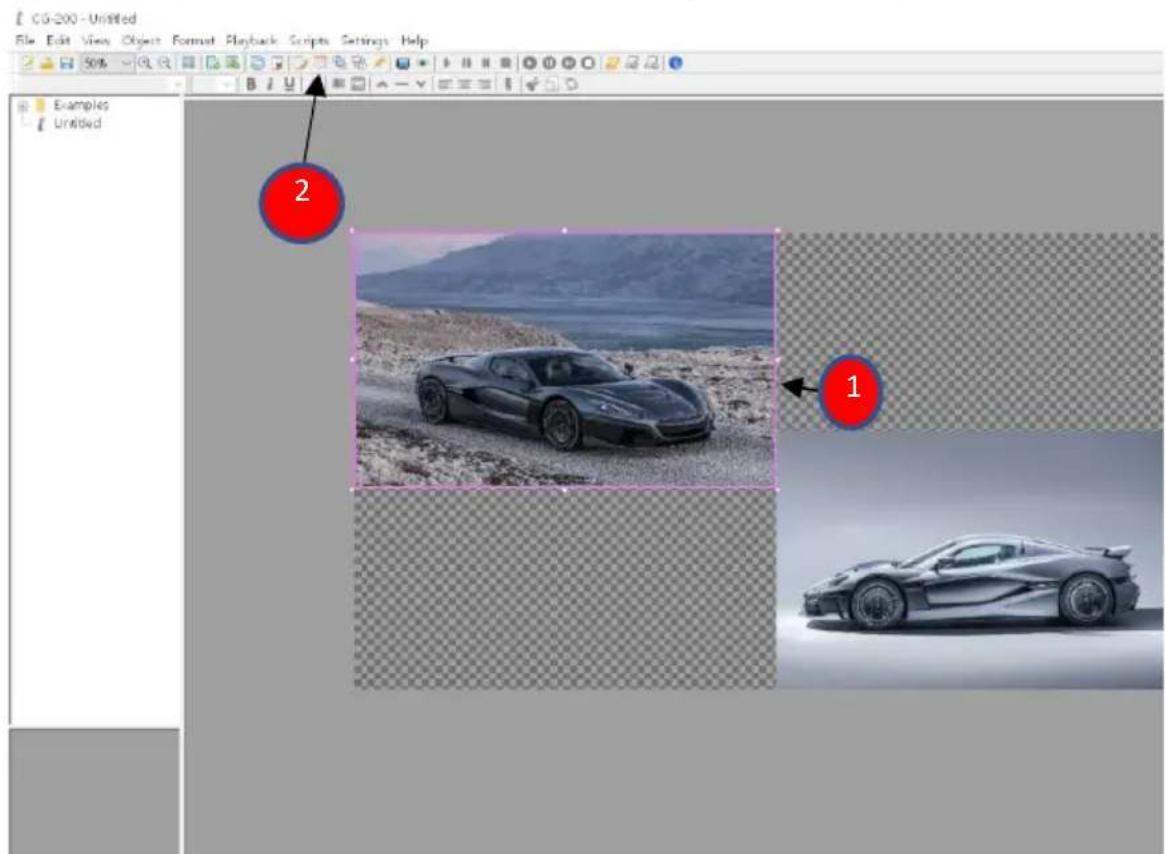
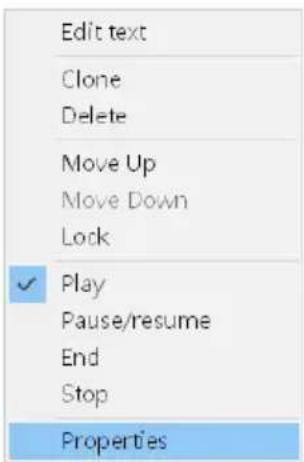
Step 4. You will see the "Group" option. You can manually enter the "Group" tag for the selected picture or select the desired "group" tag from the drop-down menu and then press the OK button as shown as follows. In this example, the word "car" is entered manually to be the "group" tag.
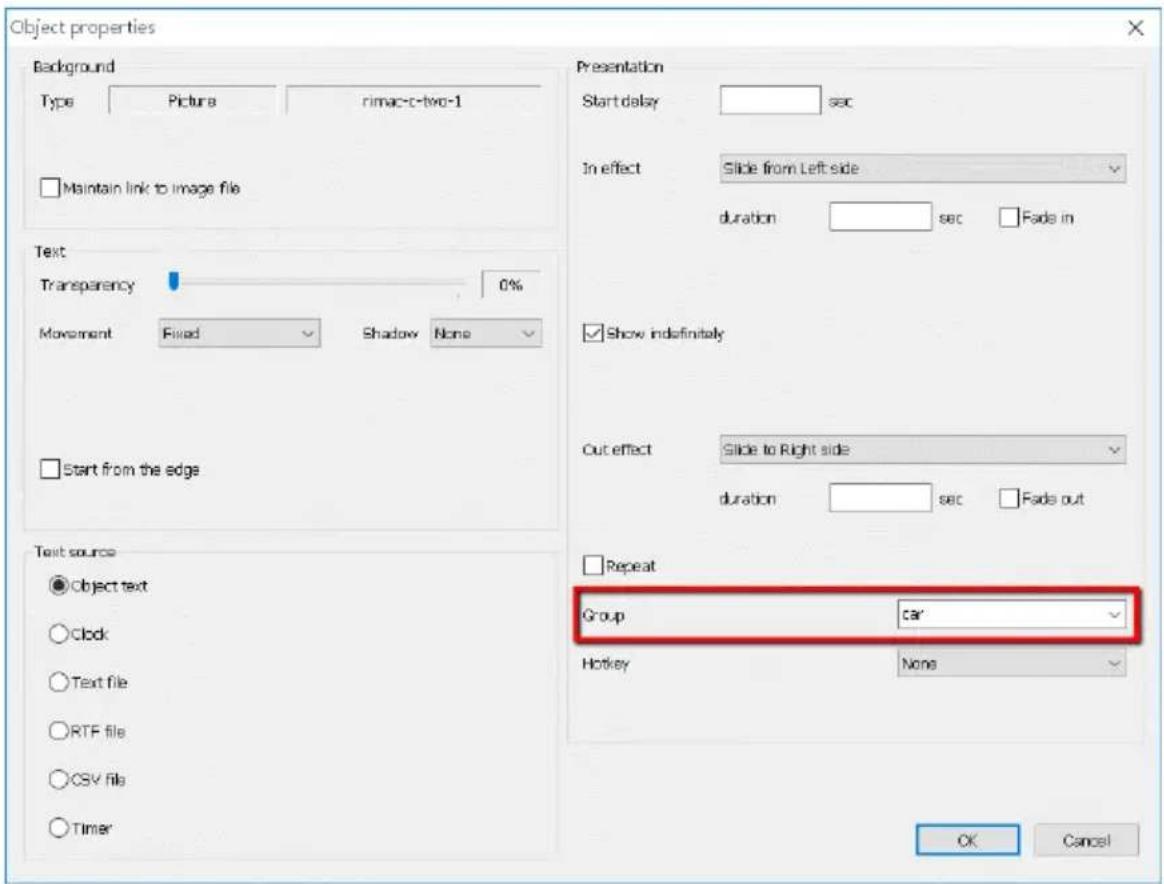
Step 5. Please repeat the step 4 to set other picture in the same group by using the same “group” tag.
Step 6. After all of the desired pictures are set in the same group by using the same “group” tag, you can double-click just one object (picture) or you can just click the Play/Stop button and then all of the pictures with the same “group” tag will be played/stopped at the same time. That means you can control multiple pictures at the same time once they are set in the same group.

natural_image
Two luxury sports cars on a desert road with mountainous background (no visible text or symbols)Hotkeys
Hotkeys are a way to simplify repeated operations. Instead of double clicking the object to start or end playback, users may assign a hotkey to this object and then simply press this key combination to achieve the same goal. Available hotkeys are Ctrl+0 to Ctrl+9 and Alt+0 to Alt+9. By default no hotkey is assigned to newly created
object.
Users may assign one hotkey to several objects at once. Pressing this key combination will affect all such objects simultaneously.
Please follow following steps for setting the hotkey.
Step 1. Please select the text box that you want to set the hotkey and then click the "Object properties" button from the tool bar or right-click the mouse to select "Properties" from the drop-down menu.
Step 2. After that, please set all of your desired properties in the properties window and then set the hotkey combination (Ctrl+0 to Ctrl+9/Alt +0 to Alt+9) as shown as follows.
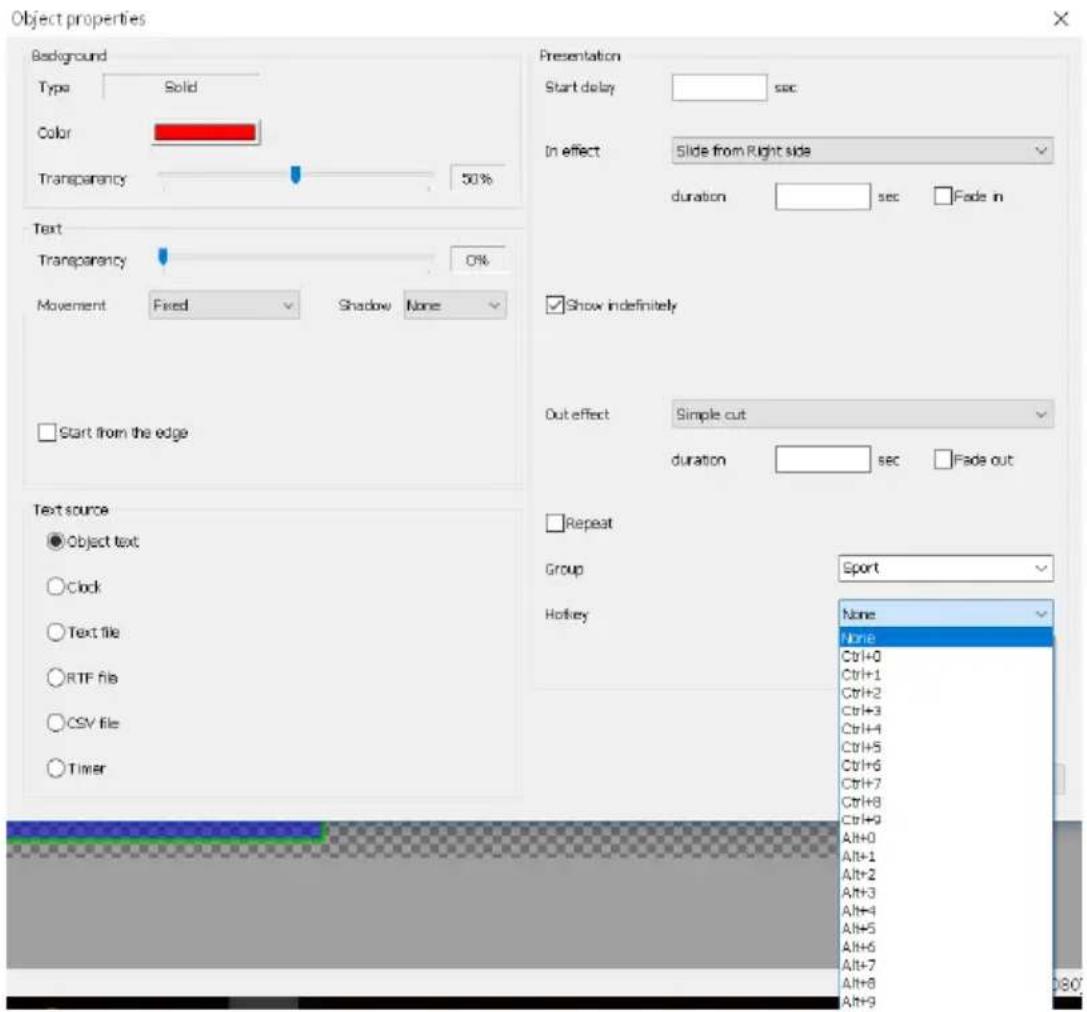
Step 3. After the hotkey combination is set, when you press a specific hotkey combination, the text box with that specific hotkey combination will be played. If you press the same hotkey again, then the text box with that specific hotkey stops playing. If there are more than one text boxes are set to be the same hotkey combination, users can play/stop multiple text boxes at one time.
Scripts
Scripts are used to automate a sequence of actions. For example, users may need to load page file, start playback for some of the objects, wait 10 seconds, play some other objects, wait again, when load another page file. This is also useful for demos.
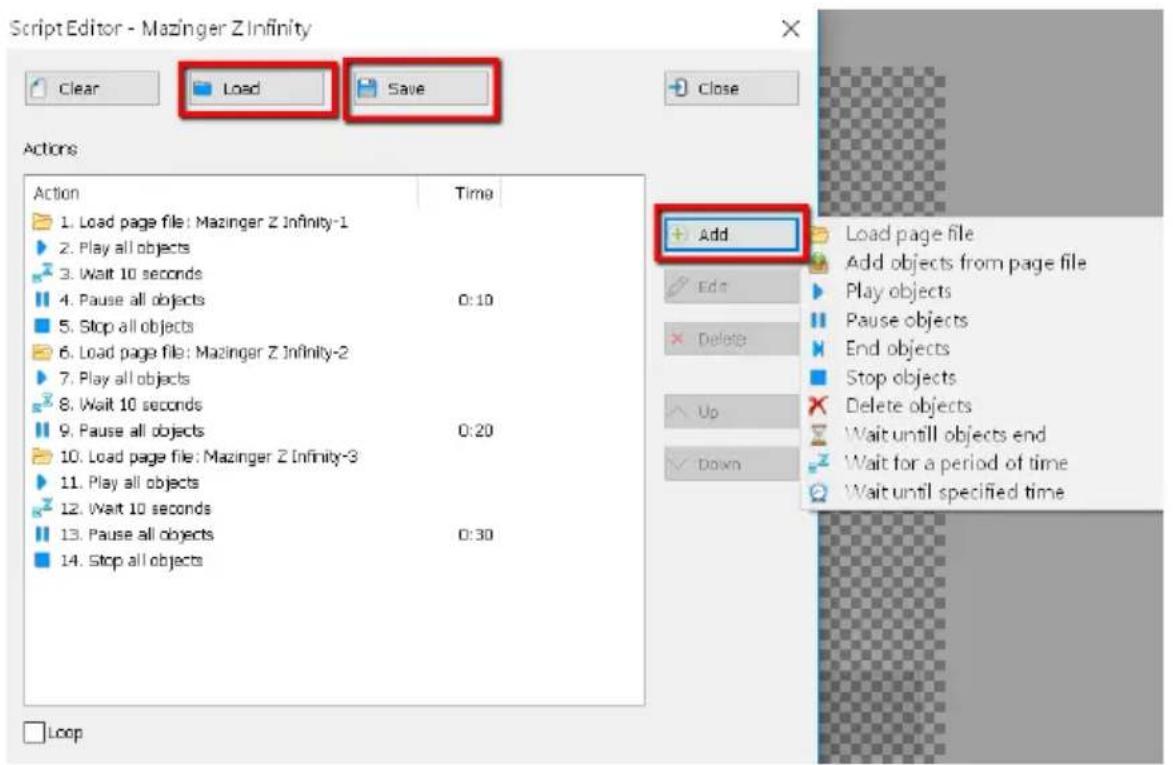
Script is just a sequence of actions. There's a script editor that allows to define scripts, save them to special files (.script) and load them later. Saved script files are visible in the left panel of CG-200 together with page files.
Action types are pretty much self-explanatory. Actions may be applied to all objects or only to objects with specific “group” name. Scripts can also be looped indefinitely (Loop checkbox).
Though number of script files isn't limited, there may only be one active script at any given time. Script playback status is shown in the status bar at the bottom of CG-200 window. Script playback is stopped if CG-200 encounters any error, like page file can't be loaded, etc. Script playback is also automatically stopped if users make any manual intervention, like loading page files, adding or deleting objects, etc.
Introduction of the Script Editor
Step 1. Please click the "Open script editor" button from the tool bar.
Step 2. The user interface of the script editor is shown as follows.
![Script Editor - examples_[1080][high] Clear Load Save Close Actions Action Time 1. Load page file: bbc_news_complex_[1080]... 2. Play all objects 3. Wait 60 seconds 4. End all objects 1:00 5. Wait untill all objects end 6. Load page file: bloomberg_[1080][high] 7. Play all objects 8. Wait 60 seconds 9. End all objects 2:00 10. Wait untill all objects end 11. Load page file: euronews_[1080][high] 12. Play all objects 13. Wait 60 seconds 14. End all objects 3:00 15. Wait untill all objects end 16. Load page file: euronews_arabic_[1080][...] 17. Play all objects 18. Wait 60 seconds 19. End all objects 4:00 Loop](/content/2026/05/934004/images/41642547e703978ad92b9292102ac63589af8e63bfa57195abd8597cd7c2beed.jpg)
| Buttons | Functions | |
| [THOW] Clear | This button is used to clear all actions. | |
| [2820] Load | This button can load pre-saved script files (.script) from users' PC/Notebook PC. | |
| [CHD4] Save | This button can help to save all changes. | |
| [OK75] Close | This button is used to close the script editor. | |
[79CH] Add [33C0] Edit  Delete [44CA] Jp Delete [44CA] Jp  Down Down | Load page file Add objects from page file Play objects Pause objects End objects Stop objects Delete objects Wait until objects end Wait for a period of time Wait until specified time | This "Add" button is used to add the desired action from the drop-down menu. Once the Add button is pressed, the drop down menu is shown. |
| [9421] Edit [X056] jt action Action Play objects [X0564] Apply to all objects [W252] Apply to group OK Cancel | Once the Edit button is pressed, a prompt window will be shown and it allows users to apply the selected action to all objects or to apply to a specific group. | |
| [0326] Delete | The Delete button is used to delete the selected action. | |
 | The up and down buttons are used to move the selected action to be the previous action or to be the next action. |
 | |
 | If this Loop checkbox is ticked, scripts can be looped indefinitely. |
Options for the Add button of the Script Editor
| Option | Function |
| Load page file | Press this option to load pre-saved page files. |
| Add objects from page file | Press this option to load pre-saved page files. |
| Play objects | Press this option to add the action “Play objects” into the script for all objects or objects in specific groups. |
| Pause objects | Press this option to add the action “Pause objects” into the script for all objects or objects in specific groups. |
| End objects | Press this option to add the action “End objects” into the script for all objects or objects in specific groups. |
| Stop objects | Press this option to add the action “Stop objects” into the script for all objects or objects in specific groups. |
| Delete objects | Press this option to add the action“Delete objects” into the script for all objects or objects in specific groups. |
| Wait until objects end | Press this option to add the action “Wait until objects end” into the script for all objects or objects in specific groups. |
| Wait for a period of time | Press this option to add the action “Wait for a period of time” into the script. Users can set the desired pause time through this option in sec. |
| Wait until specified time | Press this option to add the action “Wait until specified time” into the script. Users can determine a specific time in the format of HH:MM:SS for the selected script to wait by pressing this option. |
The Example of the Script Editor Operation
This manual will provide an example to show how to create a scrip file by the script editor of the CG-200 and how to play the script file. Please follow following steps to realize the operation of the script editor of the CG-200.
How to Create a Script File
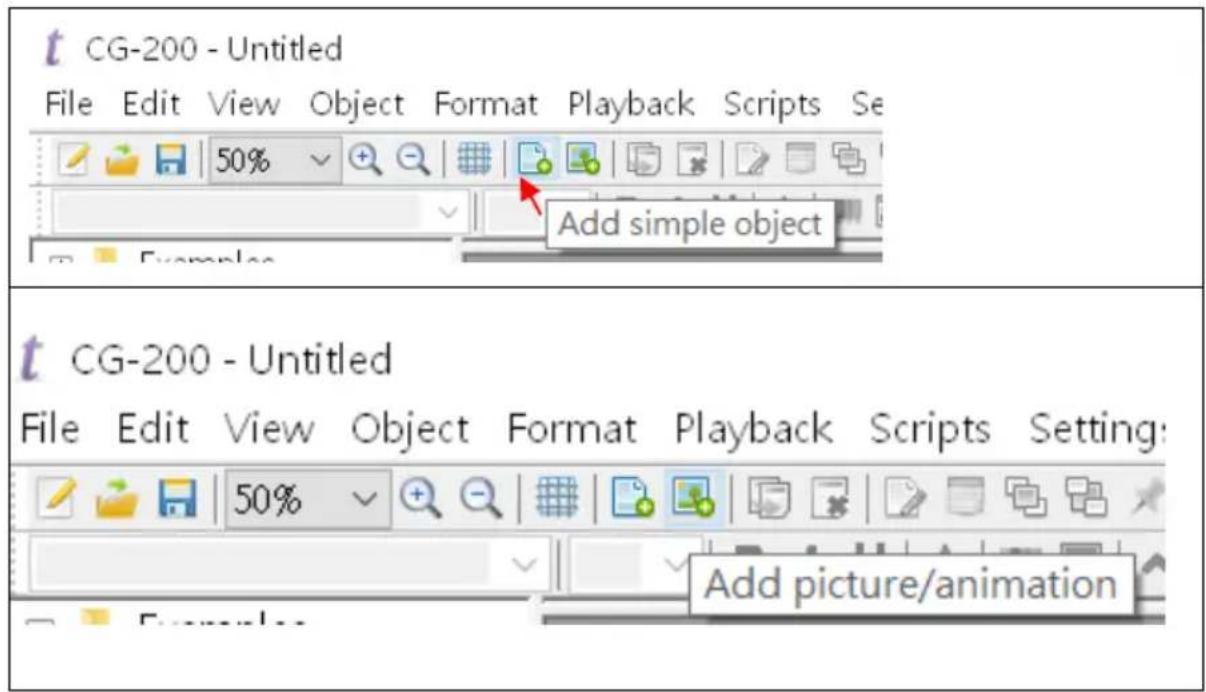
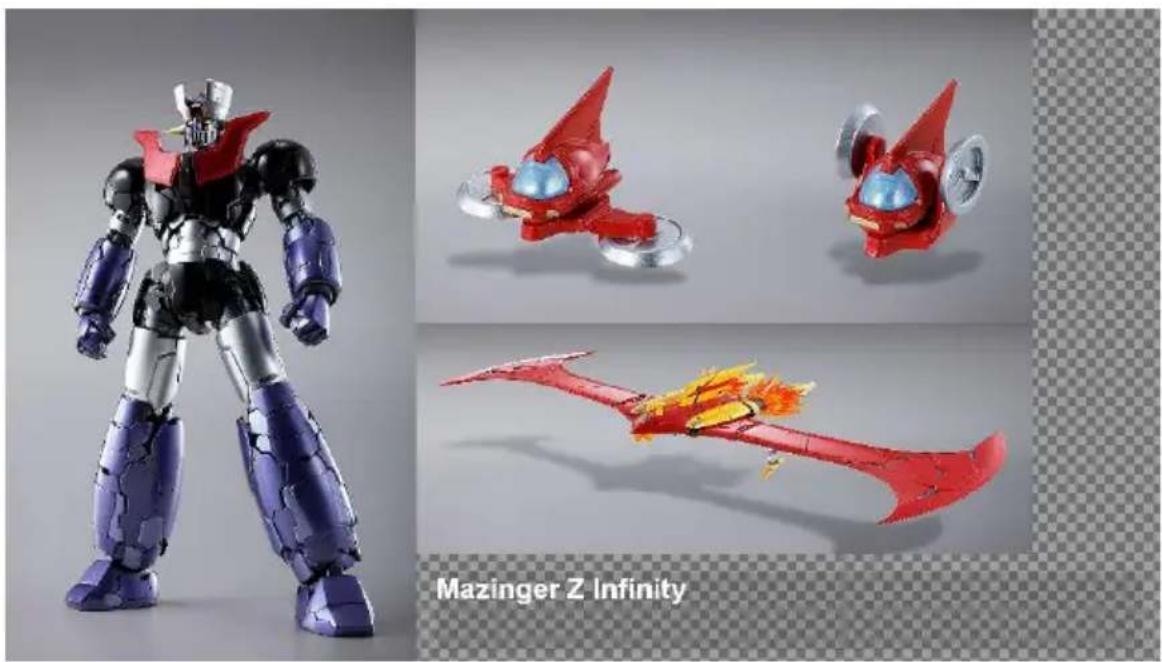
Step 1. At first, please create a page file by clicking the “Add simple object” button to add your desired texts or by clicking the “Add picture/animation” button to add your
desired pictures as shown as follows.
natural_image
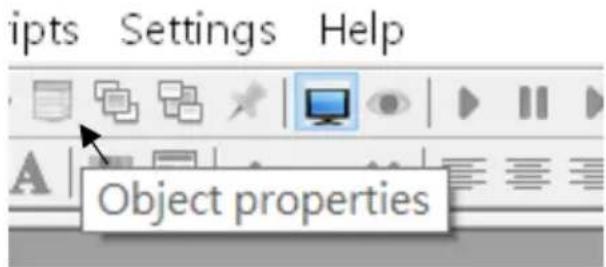
Mazinger Z Infinity robot model with three red and silver models, displayed against a transparent background (no text or symbols on the robots themselves)Step 2. After the desired texts and pictures are added, please set the properties of each inserted picture or text box by clicking the "Object properties" button from the tool bar or by selecting the "properties" option from the drop-down menu by right-clicking the mouse.
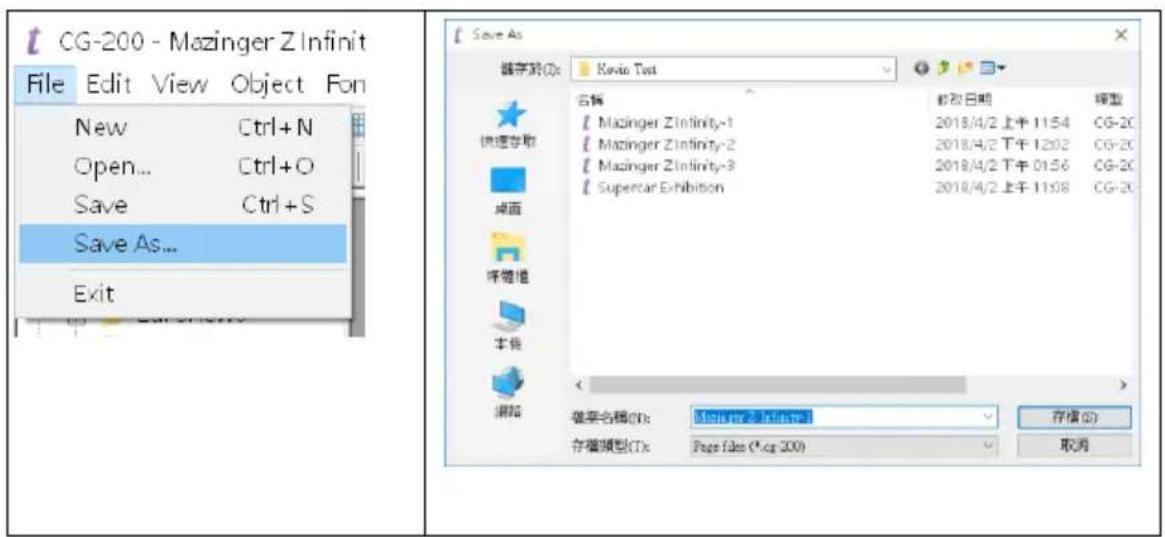
Step 3. Please click the "Save As" option from the "File" drop down menu to save this file as a page file.
Step 4. Please repeat the step 1, step 2 and step 3 to create more page files as you wish which are shown as following example.
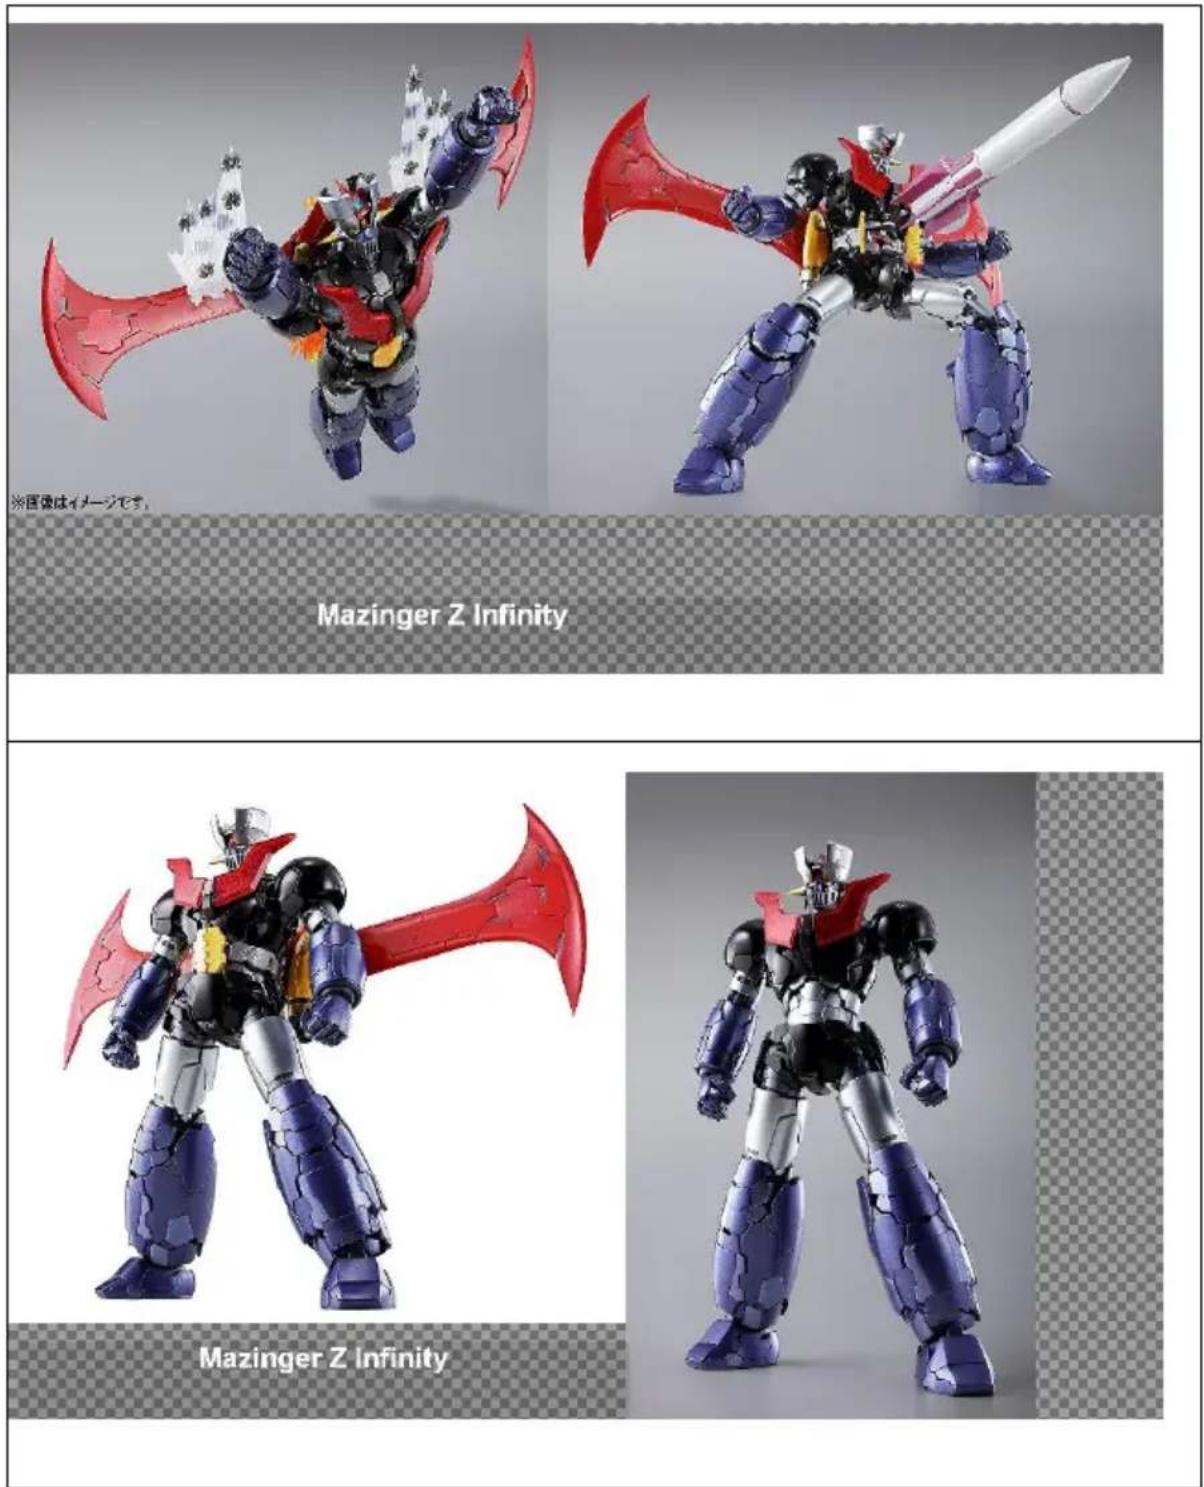
Step 5. Please click the "Open script editor" button from the tool bar and then click the "Add" button to add your desired actions. Users can also click the "Load" button to load the pre-saved script files (*.script).
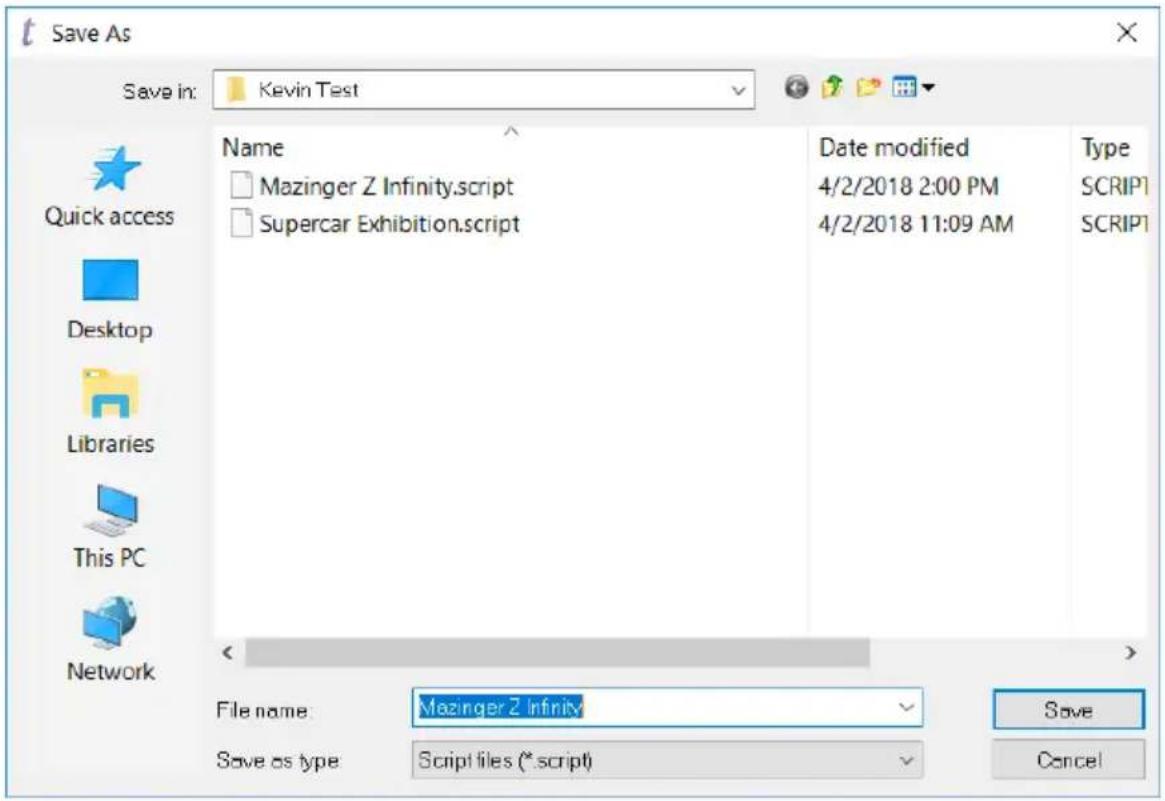
Step 6. After your desired script file is created, please click the save button to save the script file. Please pay attention that the script file must be saved under following path.
C:\Users\xxx (user's name)\Documents\CG-200\Examples\xxx folder
- xxx (user name): This user name will vary according to user's PC/Notebook PC setting.
- xxx folder: This means users have to create a new folder under the path of C:\Users\xxx (user's name)\Documents\CG-200\Examples to save their scripts.

Save
Step 7. After the desired script file is saved, the script file will be shown on the left side column of the main user interface of the CG-200 which is shown as follows.
![CS-200 - Vastings Z Infinity-1 File Edit View Object Format Playback Script Settings Help Examples BRC Bosunberg Euriseno Kevin Text Managers 2 Infinity 1 Managers 2 Infinity 2 Managers 2 Infinity 3 Managers 2 Infinity Superior Inhibition Erwin CS-200 Scrubix Henry Substance Use Example: Superior examples_1768[1/kg] examples_1768[1-val] examples_1768[1-val] examples_1768[1/kg] examples_1768[1-val] examples_1768[1/kg] examples_1768[1/kg] examples_1768[1/kg] examples_1768[1/kg] examples_1768[1/kg] examples_1768[1/kg] examples_1768[1/kg] examples_1768[1/kg] examples_1768[1/kg] examples_1768[1/kg] examples_1768[1/KW] Mazinger Z Infinity Mazinger Z Infinity/Avated Project View Ready](/content/2026/05/934004/images/f691a8ef7cdf2bb9d0107c4444166698de5f96b77319e2c70313d545817020b5.jpg)
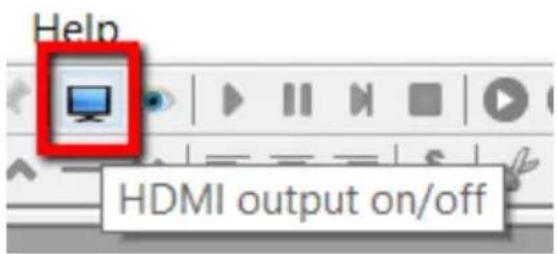
Step 8. Please click the “HDMI output on/off” button to turn the HDMI output on which is shown as follows.
Step 9. Please click the “Play script” button from the tool bar or just double-click the pre-saved script file from the left column of the main user interface and then the desired script will be played according to user’s settings.
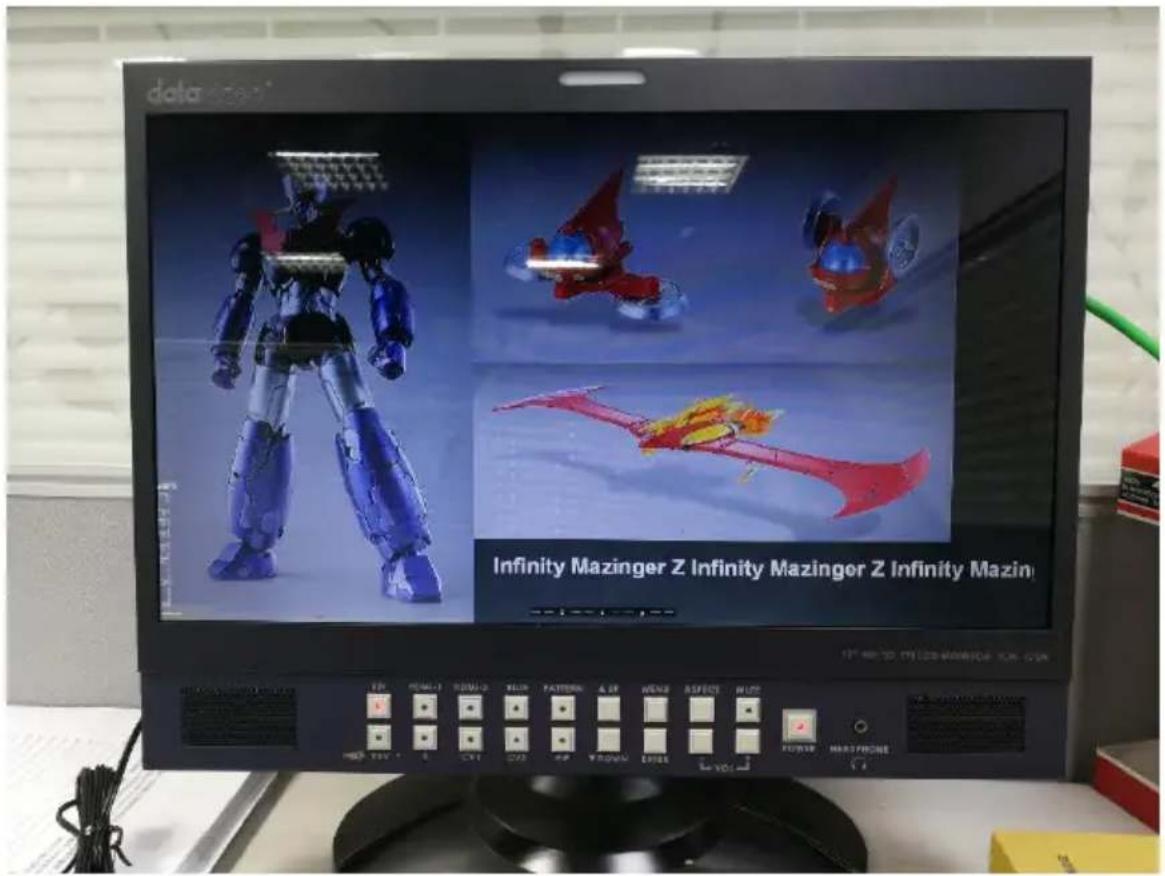
Automation
Sometimes users need to operate CG on schedule. Automation window allows tying scripts to specific date and time. One script can be also set to play when CG-200 starts. Note that if conditions to start script are not met (for example, CG-200 software isn't running at the specified time or HDMI output is not activated), script will not start and no error message will be shown.
Automation window also allows binding script files to hotkeys. Pressing key combination will load and play specified script. If “Global hotkey” is enabled, CG-200 doesn’t need to be running in foreground, the action will commence even if users are working in some other application at that time. Of course CG-200 should be at least started.
Hotkeys for scripts take precedence over hotkeys for objects. No checking is performed to verify that a hotkey is assigned to both object and script file, users should be careful with that.
Please follow following steps for setting the automation function of the CG-200.
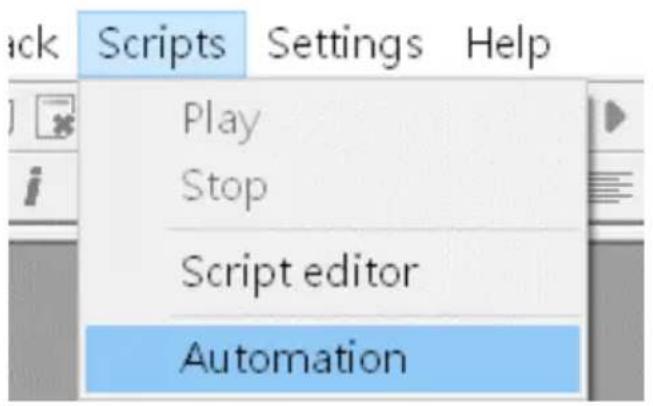
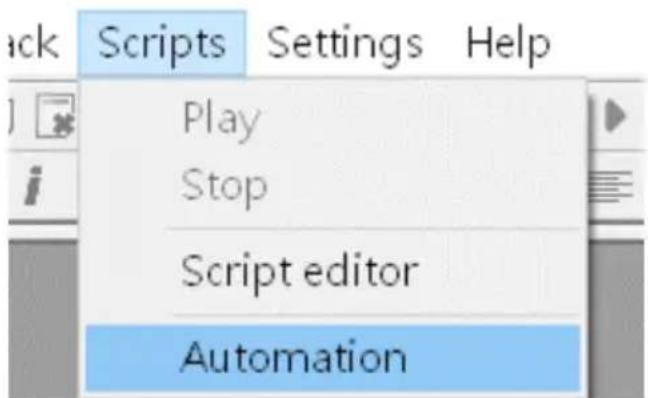
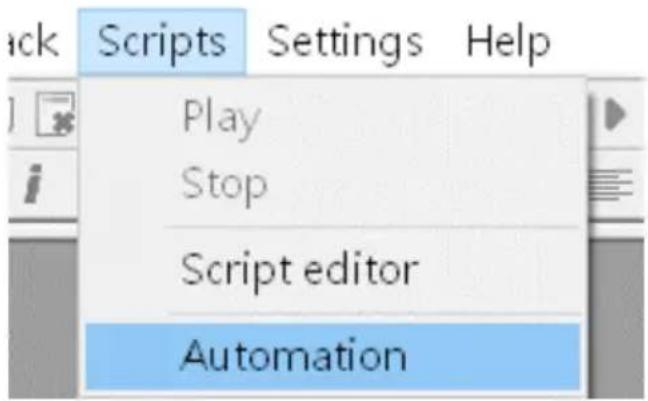
Step 1. Please click the menu option "Automation" from the drop-down menu "Scripts" which is shown as follows.
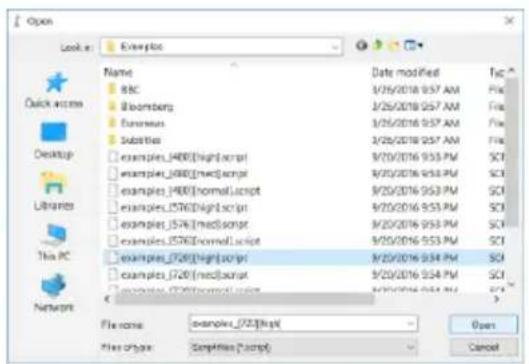
Step 2. After the Automation window is shown, please click the "Add" button to select a desired script file from your PC/Notebook PC.
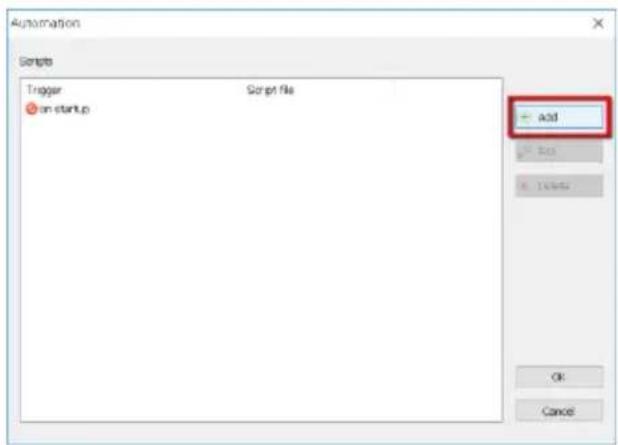
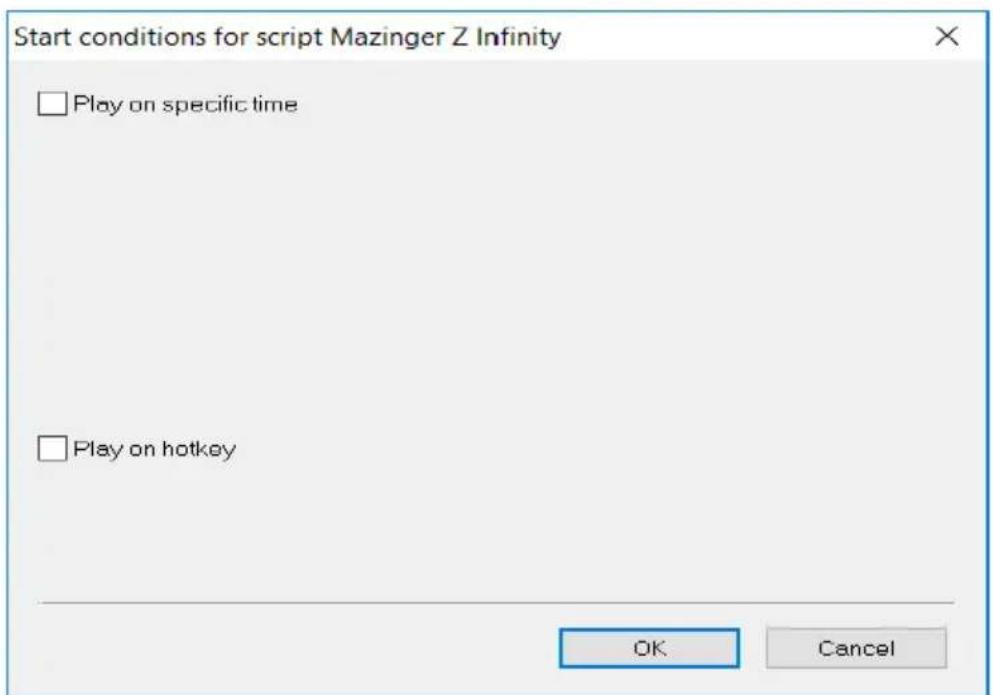
Step 3. After that, your will see a start condition window for the selected file. You will see two checkboxes for your to choose, one is "Play on specific time" and the other is "Play on hotkey".
![Start conditions for script examples_[720][high] □ Play on specific time □ Play on hotkey OK Cancel](/content/2026/05/934004/images/9429b45d6c4673842f1ce65609060dfc827b8619c7996366ceaf40ac59b5ab7f.jpg)
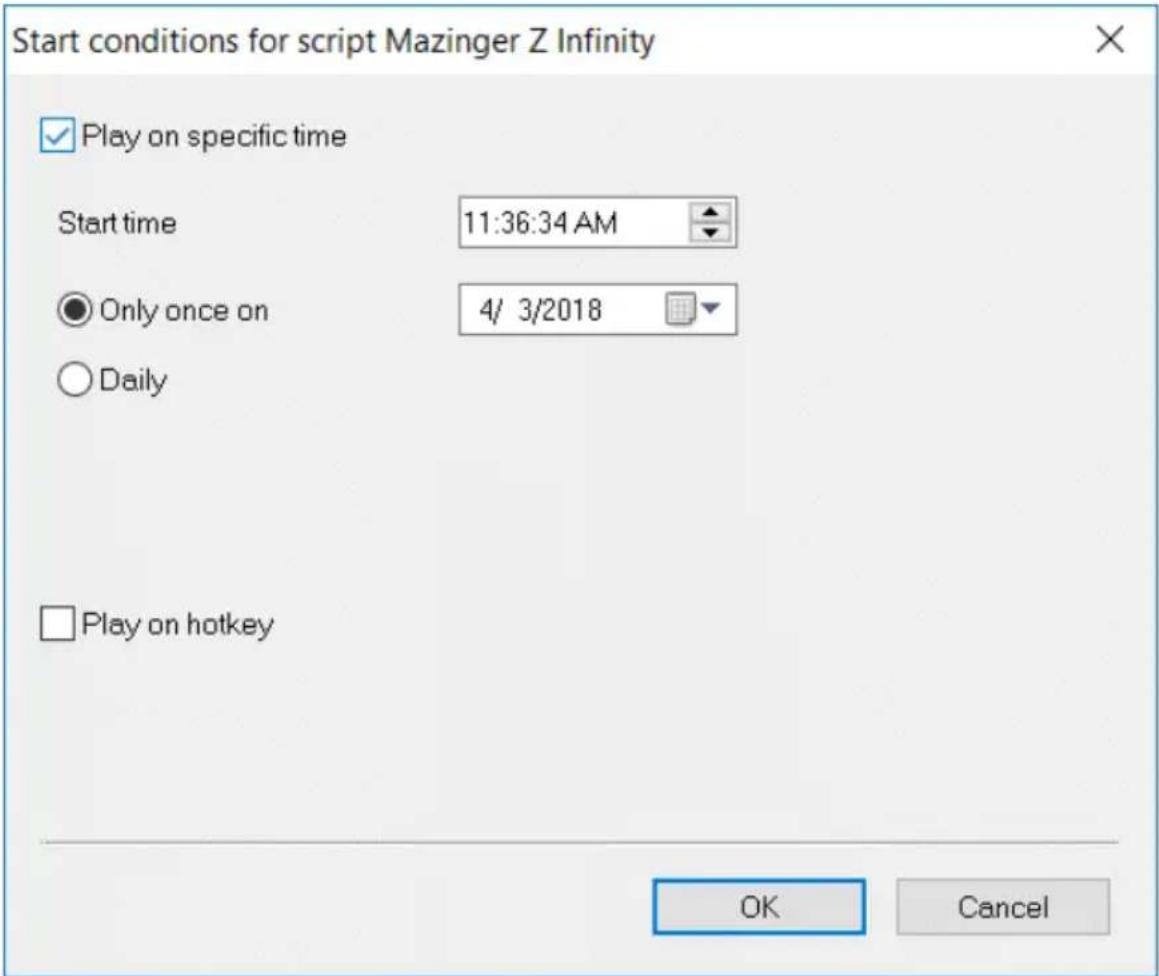
Step 4. If "Play on specific time" is ticked, you can set the schedule and frequency for playing the selected script.
![Start conditions for script examples_[720][high] ✓ Play on specific time Start time 10.05.01 AM ✓ Monday Only once on ✓ Tuesday ● Daily ✓ Wednesday ✓ Thursday ✓ Friday ✓ Saturday ✓ Sunday ✓ Play on hotkey OK Cancel](/content/2026/05/934004/images/25f045038d71ff9e6c1faa75cef4c303a3110e82b4874dad83bc79531d740b5a.jpg)
Step 5. If “Play on hotkey” is ticked, you can determine the hotkey combination (from Ctrl+0 to Ctrl+9 & Alt+0 to Alt+9) for loading and playing the selected script. If the “Global hotkey” checkbox is ticked, it is no need for the CG-200 software to be run in foreground, the action will commence even if users are working in some other application at that time. Of course CG-200 should be at least started.
![Start conditions for script examples_[720][high] □ Play on specific time □ Play on hotkey Ctrl+0 □ Global hotkey OK Cancel](/content/2026/05/934004/images/80b7f66ed4382cb45d02393e534d8c95fd5498a2632526397a3e688acd80355d.jpg)
The Example of the Automation Operation
This manual will provide an example to show how the automation function works. Please follow following steps to realize the operation of the automation function of the CG-200.
Play on Specific Time
Step 1. Please make sure that the HDMI output on/off button on the tool bar is on. After the desired script file is created by users, please select the “Automation” option from the “Scripts” drop-down menu which is shown as follows.
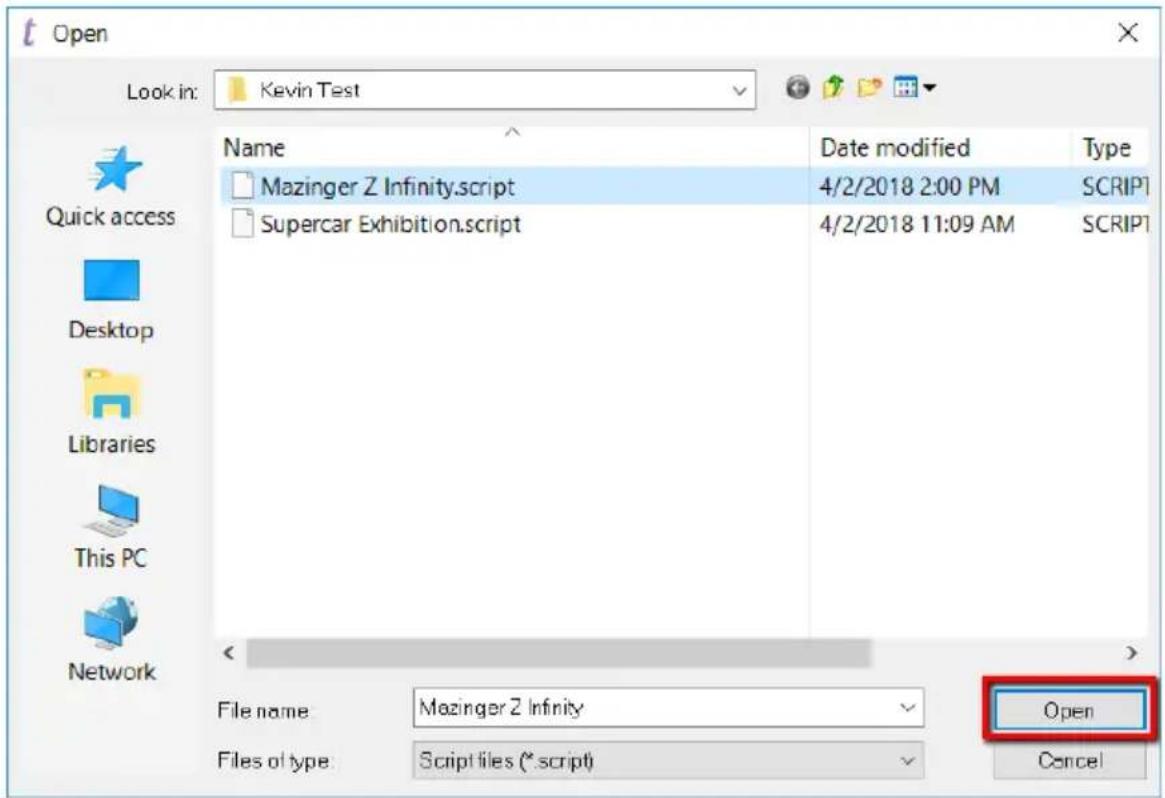
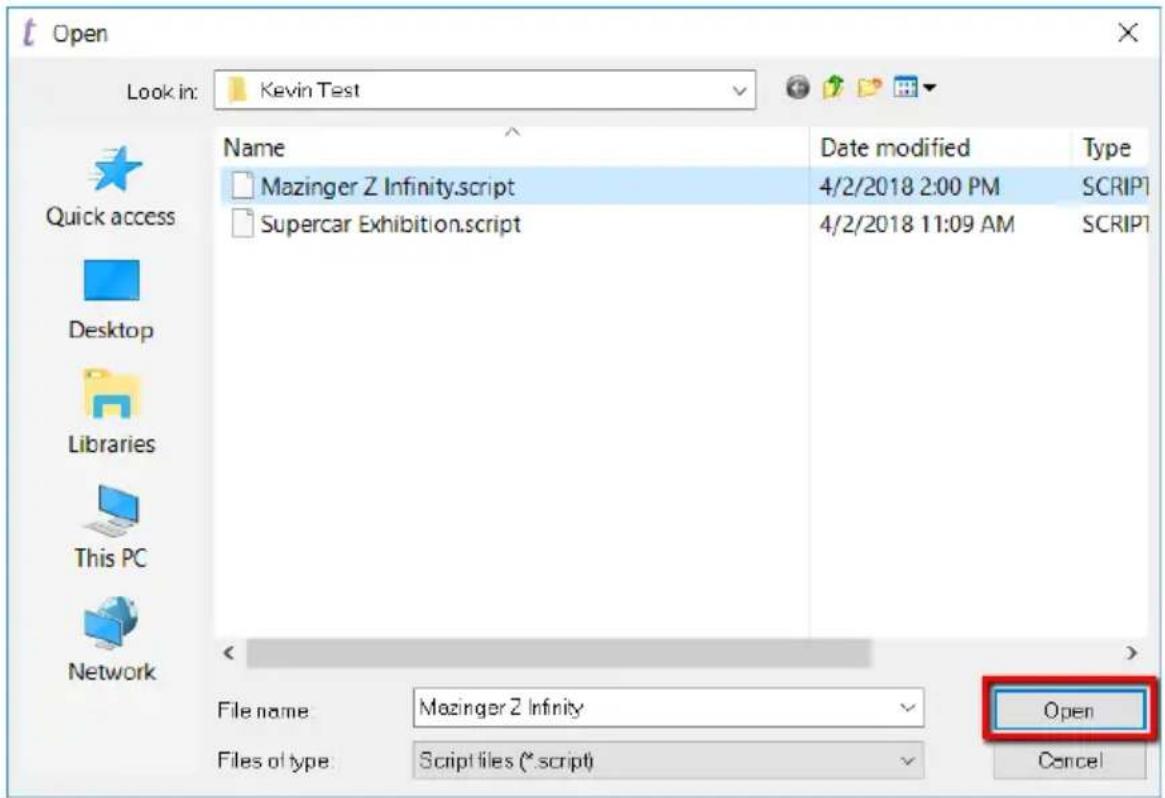
Step 2. After the Automation window is prompted, please click the "Add" button to open the script file that you want to apply the automation function as shown as follows. In this example, the name of the script file is "Mazinger Z Infinity.script".
![Automation Scripts Trigger on startup [11:03:29][03.04.2018] Script file Mazinger Z Infinity Add Edit Delete OK Cancel](/content/2026/05/934004/images/e442ef63ae3ff001751c32f7bd18d4dbc3f8067fb425811a0b363301527f552d.jpg)
Step 3. After that, a start condition window is prompted for users to set the schedule or frequency of the automation.
Step 4. If the “Play on specific time” checkbox is ticked, users can set the start time and frequency for playing the desired script which is shown as follows. After that, please press the “OK” button to confirm the setting.
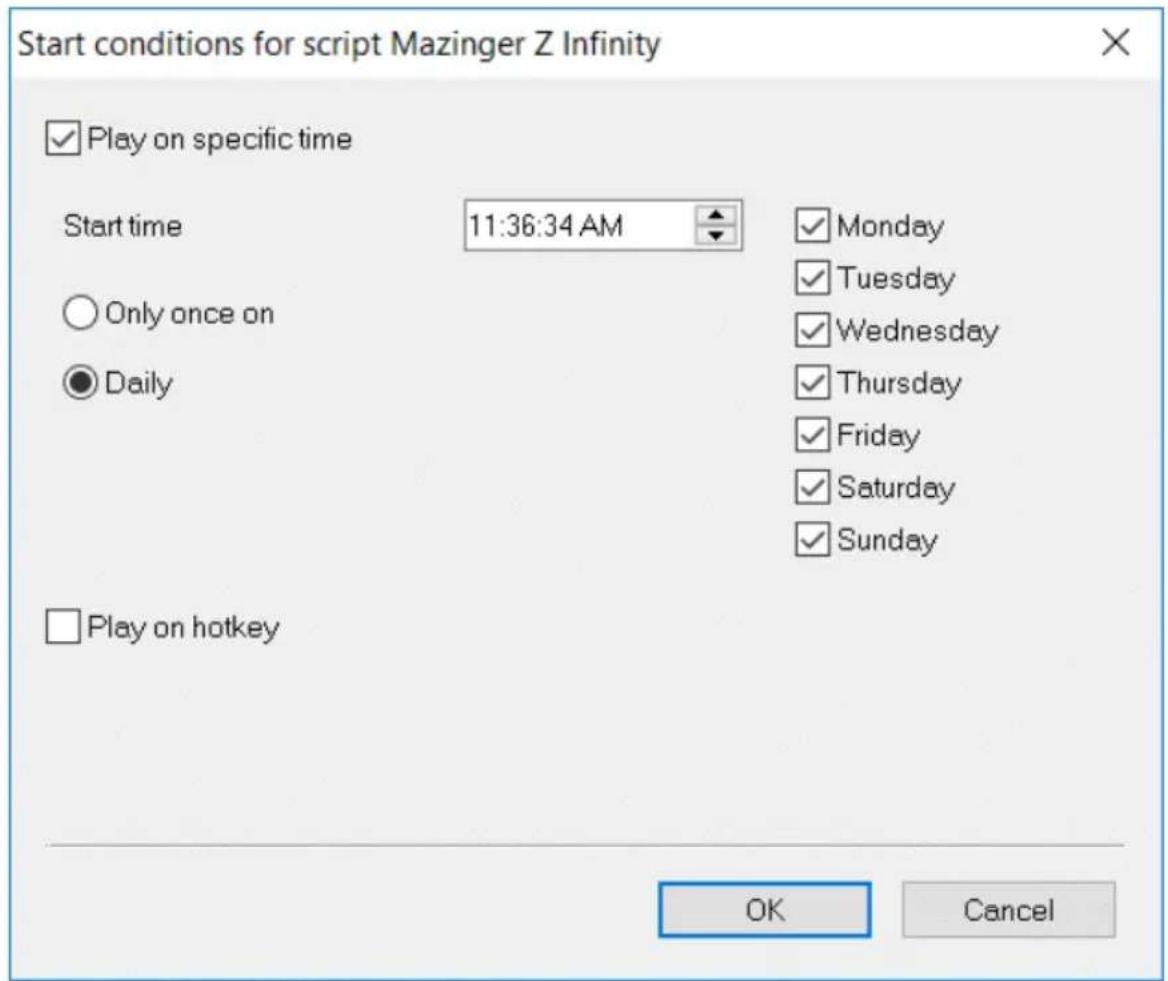
Step 5. Once the script playing time and schedule are set and the "OK" button is pressed, the Automation window will be shown as follows. What users have to do is to press the OK button and the desired script will be played precisely at the preset schedule.
![Automation Scripts Trigger on startup [11:03:29][03.04.2018] [Mazinger Z Infinity [11:53:34][03.04.2018] Mazinger Z Infinity Script file Add Edit Delete OK Cancel](/content/2026/05/934004/images/e4eef5fb0590d83a5253f33b4484b3c29957ab39e840cf8535848b1434076344.jpg)
Step 6. Please make sure the CG-200 software is opened in advance, and the script file will be played precisely at the preset schedule.
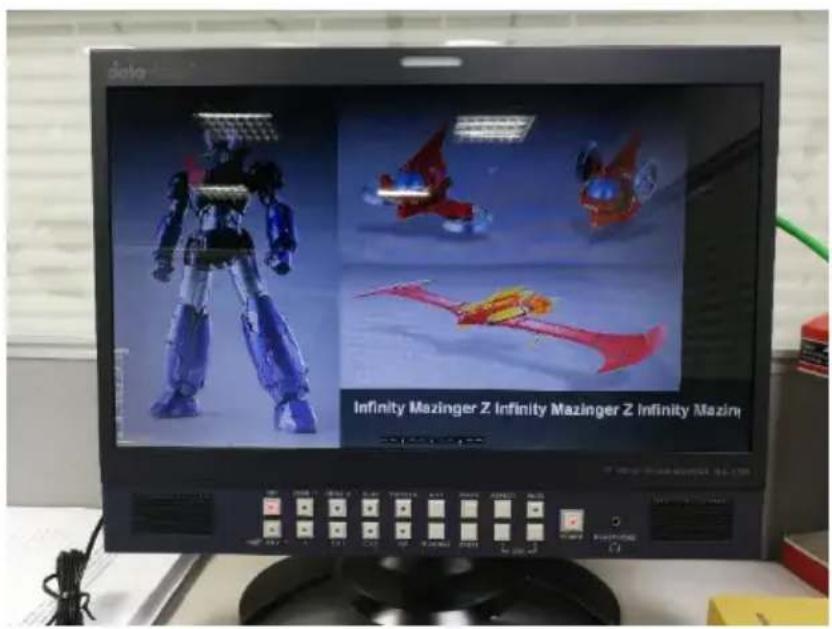
Play on Hotkey
Step 1. Please make sure that the HDMI output on/off button on the tool bar is on. After the desired script file is created by users, please select the “Automation” option from the “Scripts” drop-down menu which is shown as follows.
Step 2. After the Automation window is prompted, please click the "Add" button to open the script file that you want to apply the automation function as shown as follows. In this example, the name of the script file is "Mazinger Z Infinity.script".
![Automation Scripts Trigger on startup [11:03:29][03.04.2018] Script file Mazinger Z Infinity Add Edit Delete OK Cancel](/content/2026/05/934004/images/e3d8174c1fbdfa1773dddbeaf8ac4f07a62a5e5abf6bec36a906a934c465b8eb.jpg)
Step 3. After that, a start condition window is prompted for users to set the schedule or frequency of the automation.
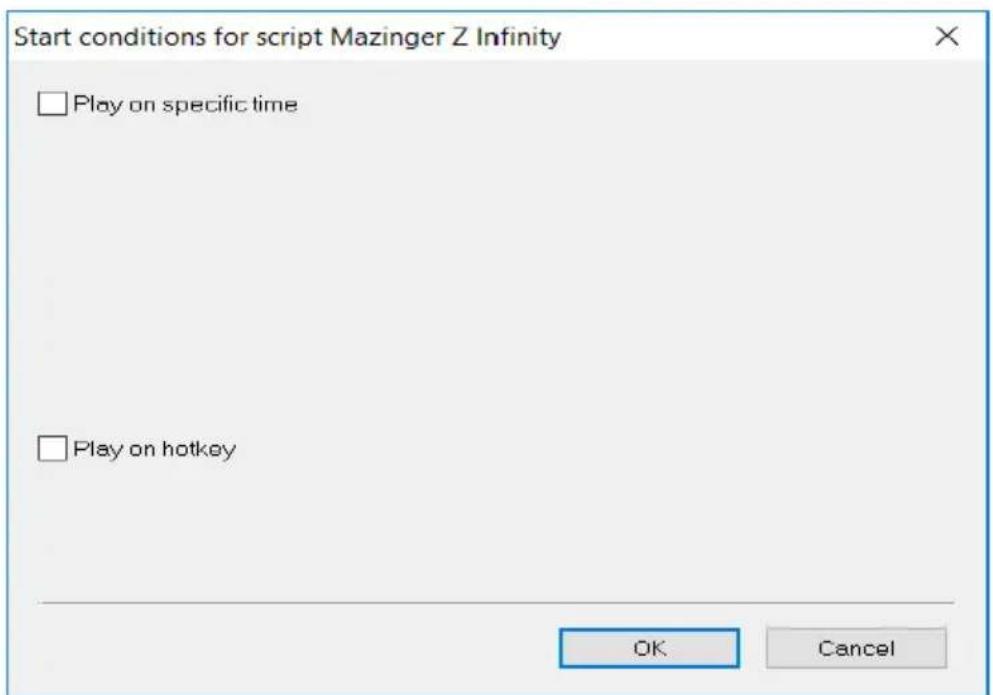
Step 4. If the "Play on hotkey" and "Global hotkey" checkbox are ticked, and the hotkey combination is set in advance. What users have to do is to click the "OK" button which is shown as follows.
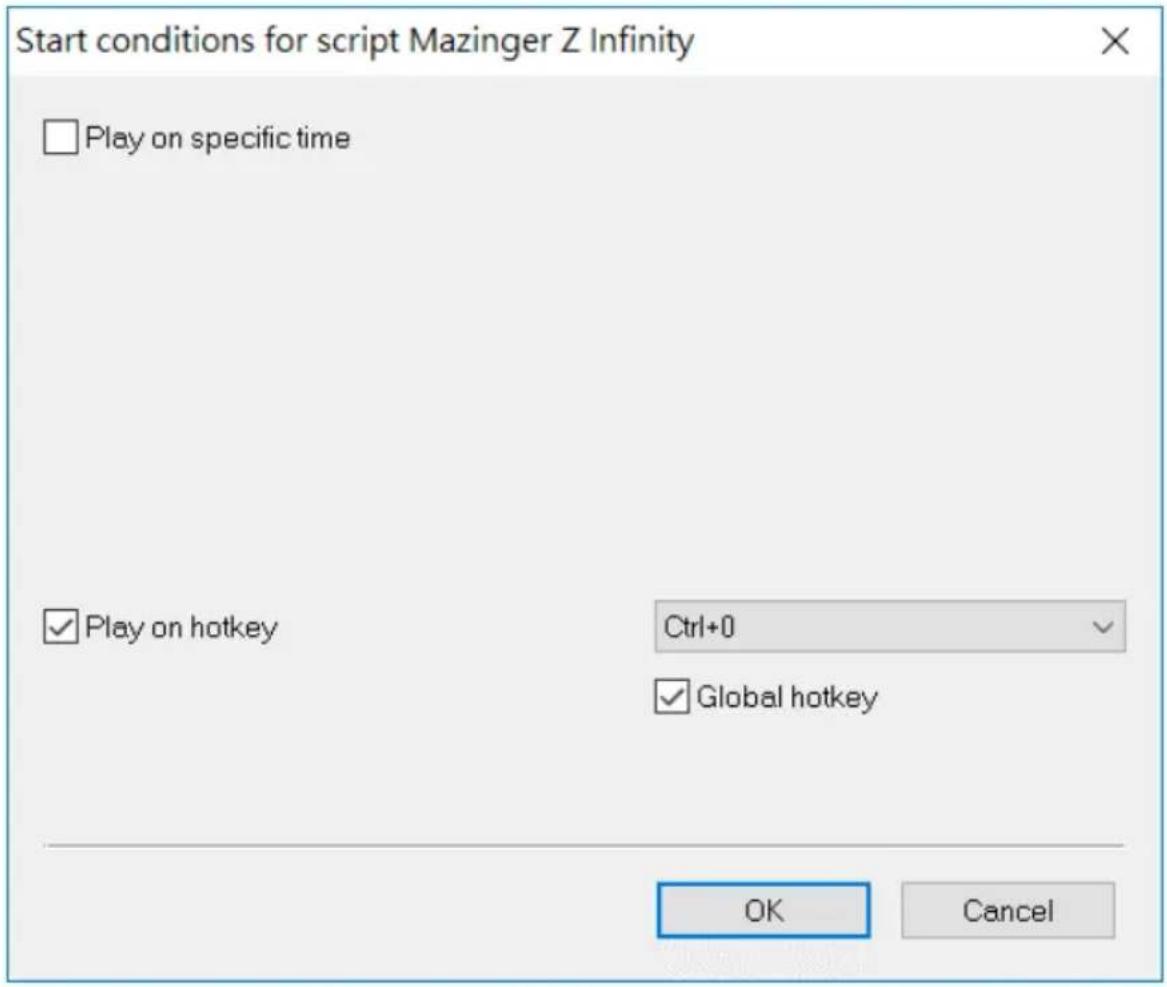
Step 5. Please click the “OK” button again. After that, when users press the preset key combination, the selected script file “Mazinger Z Infinity.script” will be played. Once the hotkey is set for the script playing and the CG-200 software is opened, even users are using other software, they can play the selected script file by pressing the preset key combination.
![Automation Scripts Trigger on startup [Ctrl+0] Script file Maxinger Z Infinity Add Edit Delete OK Cancel](/content/2026/05/934004/images/ebc02736688154196050689433316fca47a5b0e49db2144b6e9221e9754e6f3f.jpg)
The Object Navigator
Introduction of the Object Navigator
The CG 200 provides the “Object Navigator” feature for users. The “Object Navigator” is basically a list of objects on the current page in the editor window. Objects are always sorted by their Z-order from bottom to top.
For each object, its number, group name, sample text, playback and lock status will be displayed. Users can select and then right-click an object for clicking the properties option from the drop-down menu. Moreover, users can simply double-click the object in the Object Navigator for playing/stopping the object. The Object Navigator is very convenient for playing the pages as it allows users to see which objects are playing in a rapid way.
The Object Navigator is shown in the left panel. The Object Navigator replaces the Pages List. The “F3” key can be used for switching between the Object Navigator and Pages List quickly. Furthermore, users can use the “Show/hide object navigator” button which is shown on the toolbar for switching.
Steps for using the "Object Navigator"
Please follow following steps for using the "Object Navigator".
Step 1. Please insert your desired texts or pictures into the CG-200 by using the “Add simple object” or “Add picture/animation” button from the toolbar.
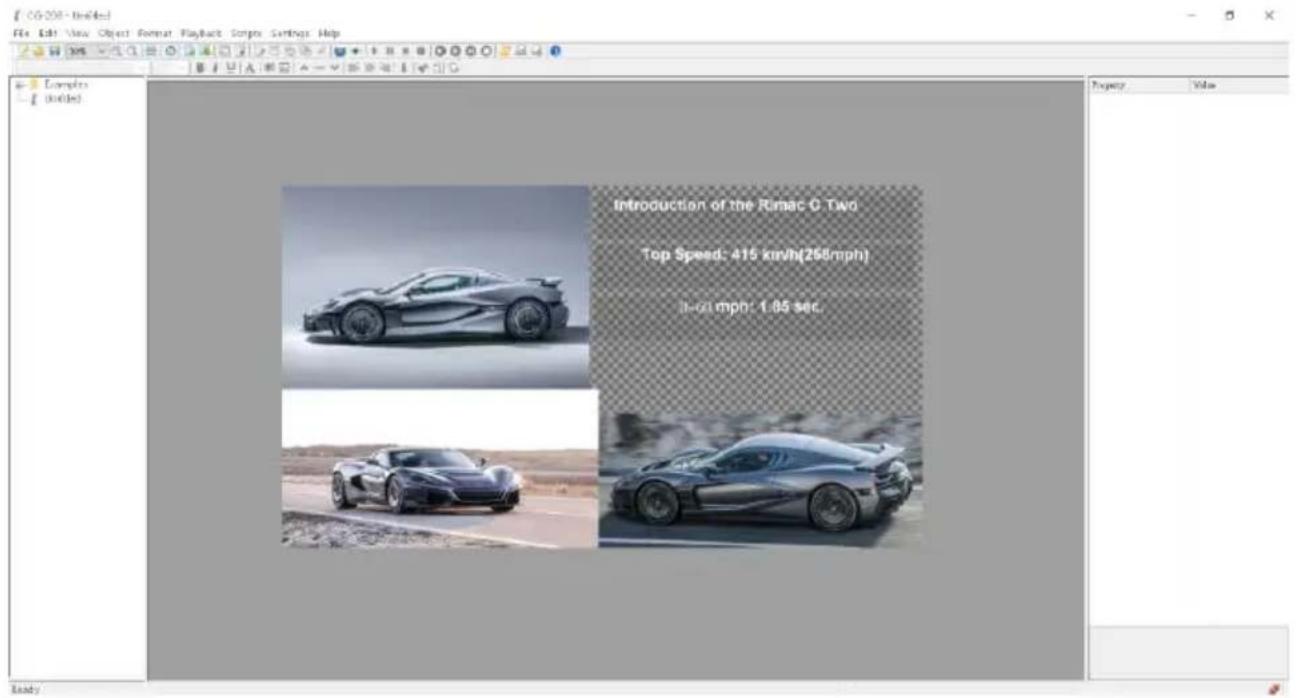
Step 2. After your desired texts and pictures are inserted, please press the
"Show/hide object navigator" button — Show/hide object navigator on the toolbar or the "F3"
key on the keyboard of your PC for showing the Object Navigator panel.
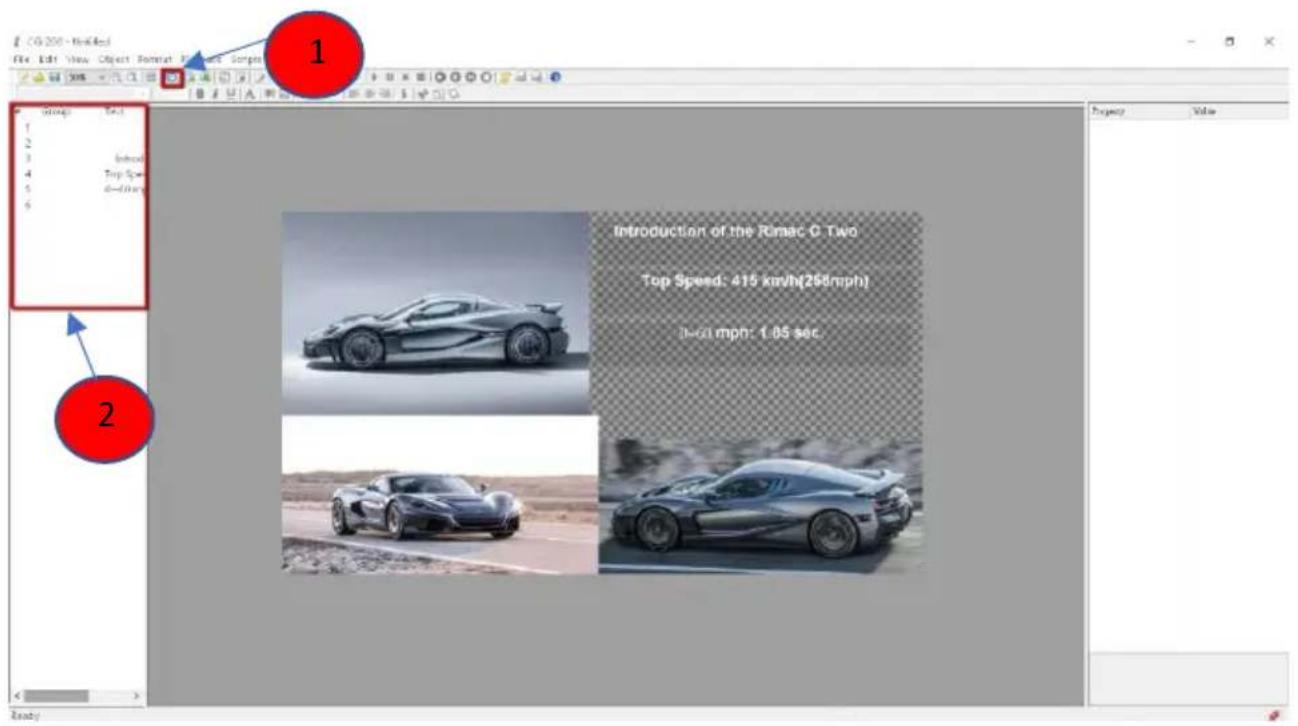
Step 3. After the Object Navigator panel is shown, users can see all objects are listed in the panel. Users can right-click the mouse to select the properties option from the drop-down menu for modifying properties of the selected object.
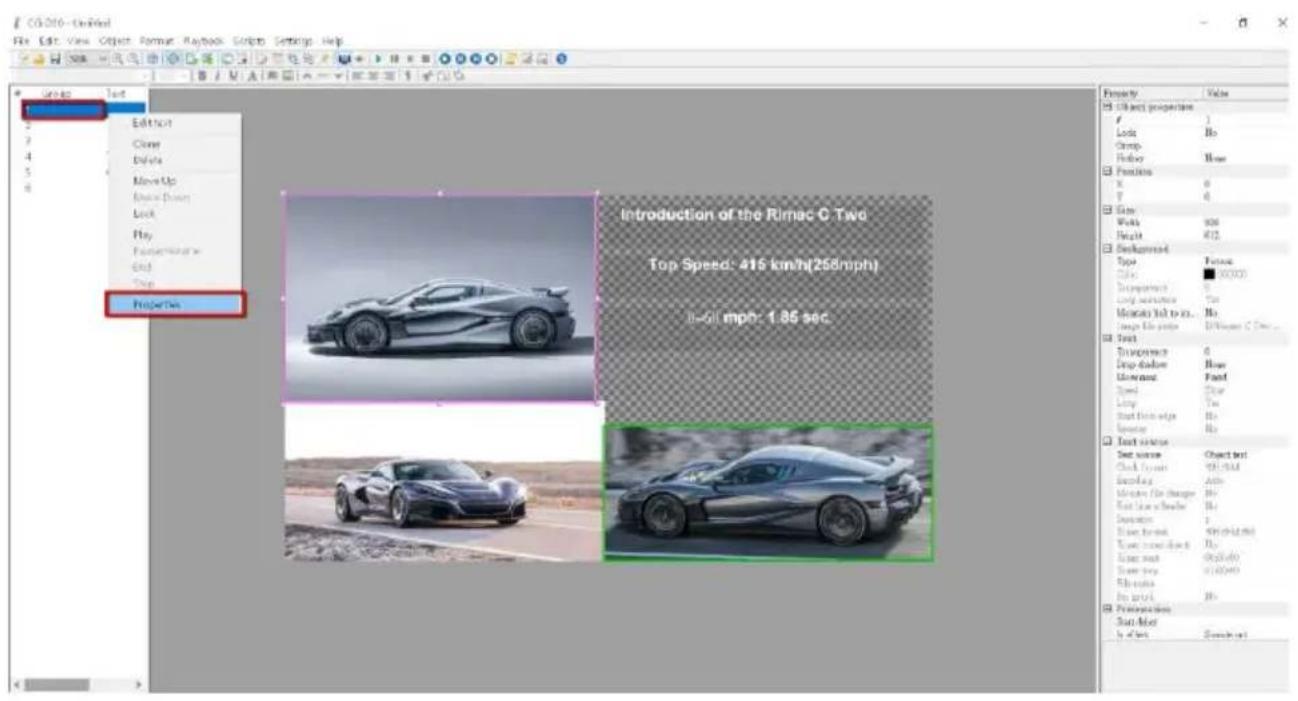
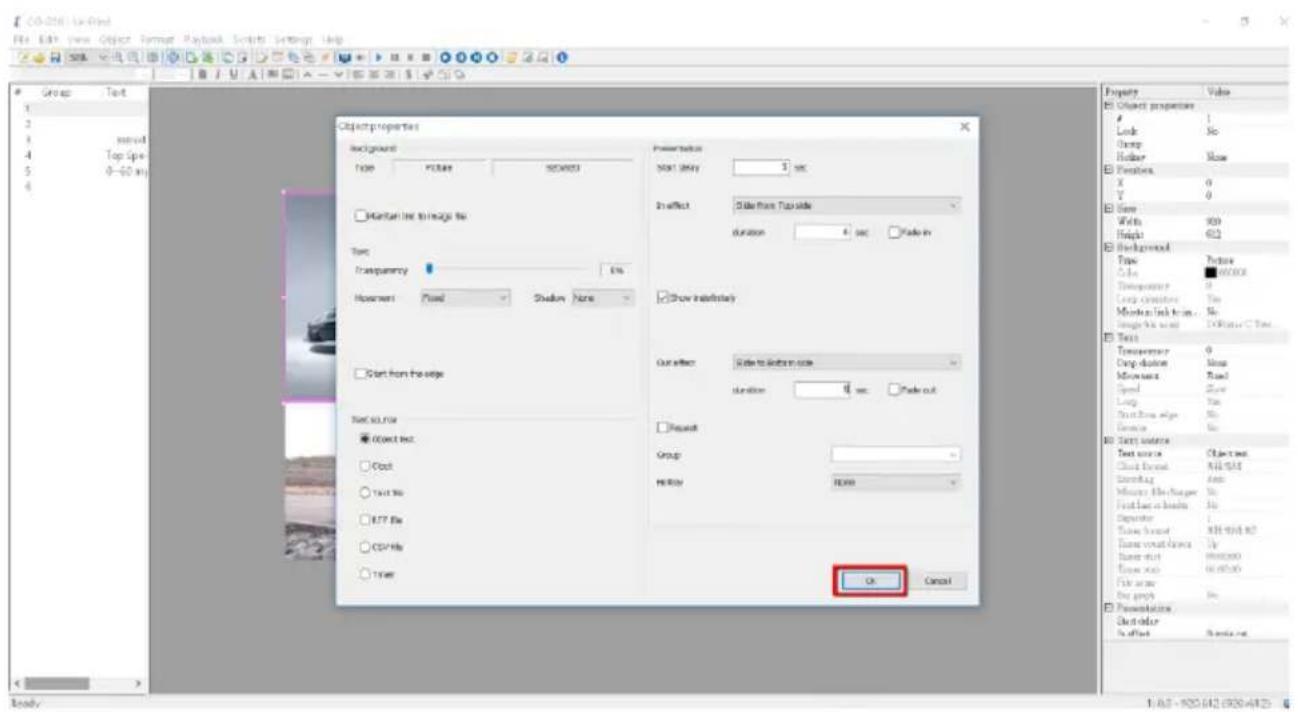
Step 4. After all properties are set for the selected object, users can click the "HDMI
output on/off button" 📋 HDMI output on/off on the toolbar and then double-click the object in the "Object Navigator" panel for playing/stopping the object.
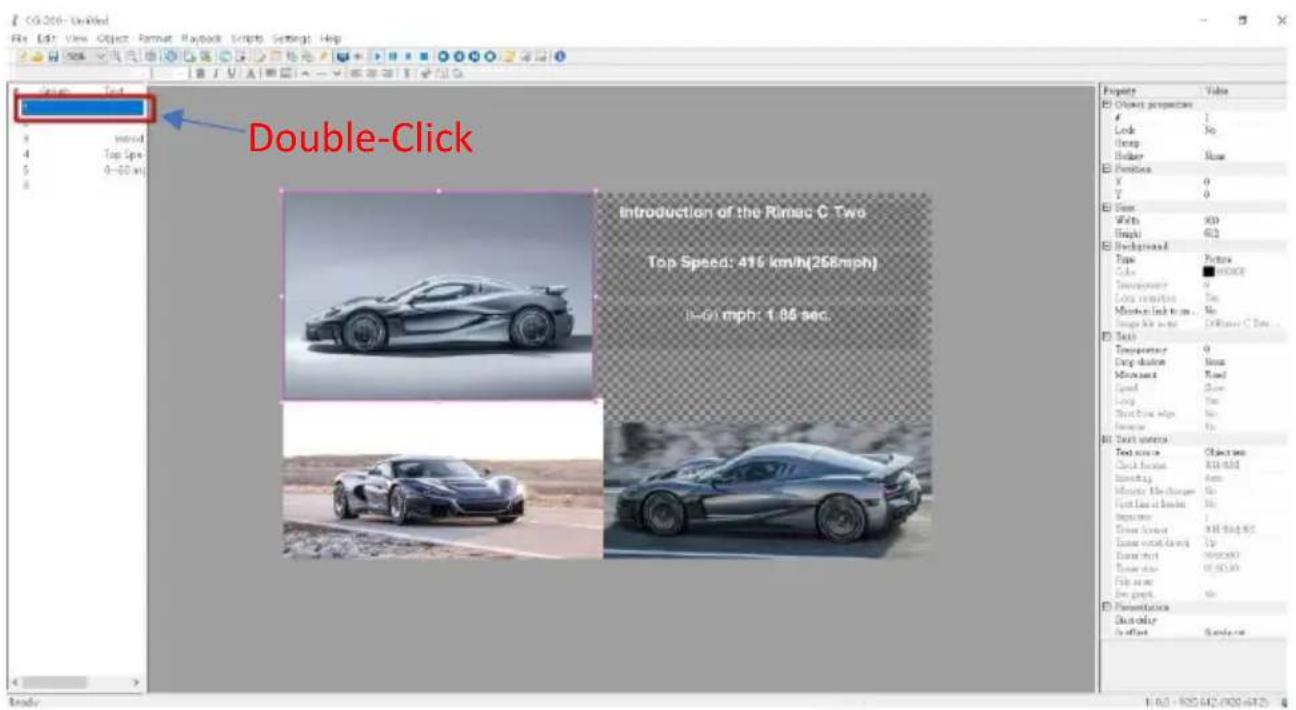
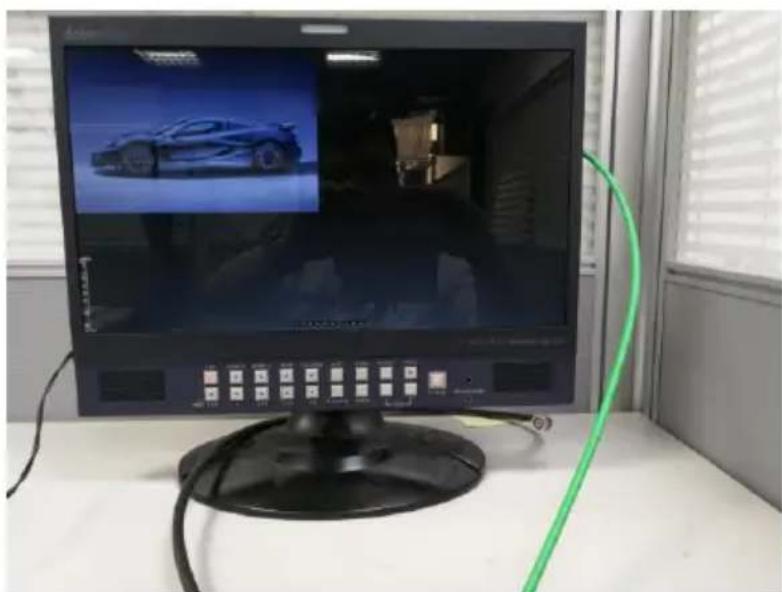
Step 5. After double-clicking, the selected object will be shown on the external connected monitor.
natural_image
Computer monitor displaying a car interior with a green cable and control panel, placed on a white desk near a window (no visible text or symbols)Displaying the CG-200 User Interface in Different Languages
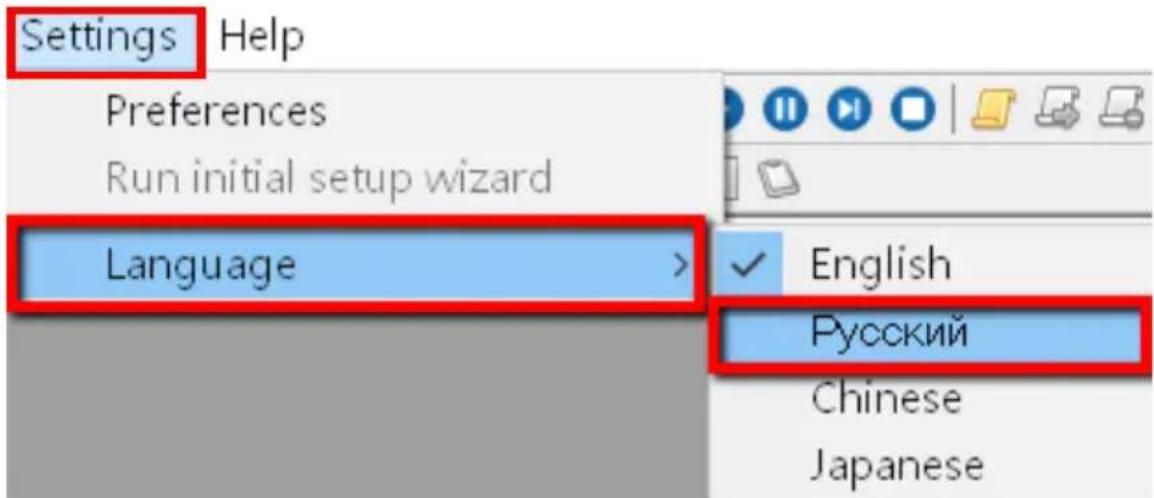
For the user friendly and convenient considerations, the CG-200 software provides user interface in four different languages including English, Russian, Chinese and Japanese. Please see following steps for changing different languages.
Step 1. Please click the “Settings” tab and then select the “Language” option from the drop-down menu. There are four languages including English, Russian, Chinese and Japanese for users to select. Please select your desired language for the CG-200 user interface. After the desired language is selected, the CG-200 user interface will be shown in target language (Take Russian for example).
I: CG-2010-14/31
natural_image
Two sports cars in action on a desert road, one silver and one black, with no visible text or symbols.
Text entered when the frame or object is created is used as-is, without any modifications.
Clock variables
The %1% variable used in the frame / object text will be replaced by current system date and time. If the %1% variable is not found, the time text would be replaced. The Format of the string is used to select which date/time values the user needs to display. The default format string is %H:%M which translates to hours and minutes in the 24-hour format.
Format string options are:
%a - Abbreviated weekday name
%A - Full weekday name
%b - Abbreviated month name
%B - Full month name
%c - Date and time representation appropriate for locale
%d - Day of month as decimal number (01 - 31)
%H - Hour in 24-hour format (00 - 23)
%I - Hour in 12-hour format (01 - 12)
%j - Day of year as decimal number (001 - 366)
%m - Month as decimal number (01 - 12)
%M - Minute as decimal number (00 - 59)
%p - Current locale's A.M./P.M. indicator for 12-hour clock
%S - Second as decimal number (00 - 59)
%U - Week of year as decimal number (00 - 53) based on Sunday
%w - Weekday as decimal number (0 - 6; Sunday is 0)
%W - Week of year as decimal number (00 - 53) based on Monday
%x - Date representation for current locale
%X - Time representation for current locale
%y - Year without century, as decimal number (00 - 99)
%Y - Year with century, as decimal number
%z, %Z - Either the time-zone name or time zone abbreviation Text in the clock frame is updated every second.
CSV file
Each variable in the frame text will be replaced by the value of the corresponding column in the linked CSV file. This powerful feature can be used for news scrollers and stock market quote tickers.
CG-200 includes example projects to give a better understanding how this works.
The following extra properties are available for CSV files:
First line is header – if checked, first line of the file is treated as header (column names) and column names are used as names of the variables. If unchecked – first line of the file is treated as a regular line and variable names %1%, %2%, %3%, ...are used.
Separator – choose comma or semicolon as the columns separator in the underlying CSV file.
CG-200 recognizes different encodings for text and CSV files:
Auto – Make an educated guess at the encoding based on file header and contents. This option should work for most files.
ANSI/OEM – text file uses 7-bit ANSI or 8-bit OEM encoding. Not suitable for Chinese characters.
UNICODE/UNICODE Big-Endian – text file uses 16-bit UNICODE Little-Endian or Big-Endian encoding. Windows Notepad uses this format.
UTF-8 – text file uses UTF-8 encoding. a common format for Internet.
Service & Support
It is our goal to make your products ownership a satisfying experience. Our supporting staff is available to assist you in setting up and operating your system. Please refer to our web site www.datavideo.com for answers to common questions, support requests or contact your local office below.

Please visit our website for latest manual update. www.datavideo.com/product/CG-200
datavideo
www.datavideo.com

@DatavideoUSA @DatavideoIndia2016
@DatavideoEMEA @Datavideojapan
@DatavideoTaiwan @DatavideoLatam
@DatavideoAsia @DatavideoBrasil

@Datavideo
@Datavideo_EMEA
@Datavideo Taiwan

@DatavideoUSA
@DVTWDVCN

@DatavideoUSA
@DatavideoEurope
All the trademarks are the properties of their respective owners.
Datavideo Technologies Co., Ltd. All rights reserved 2020
- ADDING A SIMPLE CG OBJECT....20
- OBJECT PROPERTIES DIALOGUE BOX....21
- CREATING A SIMPLE LOWER THIRD OVERLAY 23
- ADDING A CLOCK....28
- ADDING A STATIC LOGO....30
- DISPLAYING AN IMAGE SEQUENCE.... 36
- GROUPING 38
- HOTKEYS 45
- SCRIPTS......47
- AUTOMATION 59
- THE OBJECT NAVIGATOR....72
- DISPLAYING THE CG-200 USER INTERFACE IN DIFFERENT LANGUAGES .... 76
- ADVANCED – USING VARIABLES INSTEAD OF TEXT 78
- SERVICE AND SUPPORT 80
- Disclaimer of Product & Services
- FCC Compliance Statement
- Warnings and Precautions
- Warranty
- Standard Warranty
- Three Year Warranty
- Disposal
- For EU Customers only - WEEE Marking
- Introduction
- Features
- Minimum computer requirements:
- Important notes:
- Initial Set Up Wizard
- Overview - User Interface
- Switching the Preview pane on
- Switching the HDMI output on
- Settings > Preferences
- Mode
- HDMI Connection
- Do not restore monitor configuration on exit
- Alternative vertical sync method
- Pages / Projects Folder location
- Use large icons in toolbars
- Setting a safety Margin
- Adding a simple CG object
- Object properties dialogue box
- Background
- Text
- Text Source
- Presentation
- Creating a simple lower third overlay
- Adding a clock
- Adding a static logo
- Using text from a prepared file
- Displaying an image sequence
- Grouping
- Hotkeys
- Scripts
- Introduction of the Script Editor
- The Example of the Script Editor Operation
- How to Create a Script File
- C:\Users\xxx (user's name)\Documents\CG-200\Examples\xxx folder
- Save
- Automation
- The Example of the Automation Operation
- Play on Specific Time
- Play on Hotkey
- The Object Navigator
- Introduction of the Object Navigator
- Steps for using the "Object Navigator"
- Displaying the CG-200 User Interface in Different Languages
- Clock variables
- Format string options are:
- CSV file
- Service & Support
- datavideo
Brand : DataVideo
Model : CG-200
Category : Camera