GO KMU-100 Studio - Camera DataVideo - Free user manual and instructions
Find the device manual for free GO KMU-100 Studio DataVideo in PDF.


| Product Type | Studio Camera |
| Brand | DataVideo |
| Model | GO KMU-100 Studio |
| Image Sensor | 1/2.8-inch CMOS |
| Effective Pixels | 2.1 Megapixels |
| Video Output | 3G-SDI, HDMI |
| Lens | 12x optical zoom, f=3.9-46.8mm |
| Horizontal Viewing Angle | 72.5° (wide) to 6.3° (tele) |
| Pan/Tilt Range | Pan: ±170°, Tilt: -30° to +90° |
| Pan/Tilt Speed | Pan: 0.1°-100°/s, Tilt: 0.1°-80°/s |
| Control Protocol | VISCA, Pelco-D, Pelco-P |
| Dimensions (W x H x D) | 140 x 170 x 165 mm |
| Weight | 1.8 kg (approx.) |
| Power Supply | DC 12V, 1.5A (PoE+ optional) |
| Power Consumption | 18W (max) |
| Operating Temperature | 0°C to 40°C |
| Storage Temperature | -20°C to 60°C |
| Cleaning | Use a soft dry cloth. Avoid solvents. |
| Safety | Use only specified power adapter. Keep away from moisture. |
| Spare Parts | Contact DataVideo support for replacement parts. |
| Repairability | Repairs should be performed by qualified technicians. |
Frequently Asked Questions - GO KMU-100 Studio DataVideo
User questions about GO KMU-100 Studio DataVideo
0 question about this device. Answer the ones you know or ask your own.
Ask a new question about this device
Download the instructions for your Camera in PDF format for free! Find your manual GO KMU-100 Studio - DataVideo and take your electronic device back in hand. On this page are published all the documents necessary for the use of your device. GO KMU-100 Studio by DataVideo.
USER MANUAL GO KMU-100 Studio DataVideo
2-CHANNEL 4K TO
8-CHANNEL HD PORTABLE
WARNINGS AND PRECAUTIONS....3
WARRANTY 4
STANDARD WARRANTY....4
THREE YEAR WARRANTY....4
DISPOSAL....4
INTRODUCTION 5
FEATURES 5
GO KMU-100 STUDIO....6
INSTALLATION....7
TRANSPORT & PLACEMENT 7
OPENING THE CASE 7
SETTING UP THE TLM-102 - DUAL 10.1" LCD MONITOR....7
HOW TO CONNECT INTERNAL CABLES 8
POWERING ON....12
POWERING OFF....12
PACKING AWAY....12
DIMENSIONS ....13
WEIGHTS....15
SPECIFICATIONS....15
SERVICE AND SUPPORT......16
Disclaimer of Product and Services
The information offered in this instruction manual is intended as a guide only. At all times, Datavideo Technologies will try to give correct, complete and suitable information. However, Datavideo Technologies cannot exclude that some information in this manual, from time to time, may not be correct or may be incomplete. This manual may contain typing errors, omissions or incorrect information. Datavideo Technologies always recommend that you double check the information in this document for accuracy before making any purchase decision or using the product. Datavideo Technologies is not responsible for any omissions or errors, or for any subsequent loss or damage caused by using the information contained within this manual. Further advice on the content of this manual or on the product can be obtained by contacting your local Datavideo Office or dealer.
FCC Compliance Statement
This device complies with part 15 of the FCC rules. Operation is subject to the following two conditions:
- This device may not cause harmful interference, and
- This device must accept any interference received, including interference that may cause undesired operation.
Warnings and Precautions
The GO KMU-100 Studio is HEAVY, the weigh is about 14kg. At least two people are required to move this unit. It needs two people to move the GO KMU-100 Studio out of the carton. If the system is packed in the 19" flight case, it needs one person only to move the GO KMU-100 Studio.
The GO KMU-100 Studio should be always moved and placed in a horizontal position; do not place or try to move the unit in any other position as damage or injury could result.
Always use a trolley to safely transport the unit over distances of 2 metres or more.
- Read all of these warnings and save them for later reference.
- Follow all warnings and instructions marked on this unit.
- Unplug this unit from the wall outlet before cleaning. Do not use liquid or aerosol cleaners. Use a damp cloth for cleaning.
- Do not use this unit in or near water.
- Do not place this unit on an unstable cart, stand, or table. The unit may fall, causing serious damage.
- Slots and openings on the cabinet top, back, and bottom are provided for ventilation. To ensure safe and reliable operation of this unit, and to protect it from overheating, do not block or cover these openings. Do not place this unit on a bed, sofa, rug, or similar surface, as the ventilation openings on the bottom of the cabinet will be blocked. This unit should never be placed near or over a heat register or radiator. This unit should not be placed in a built-in installation unless proper ventilation is provided.
- This product should only be operated from the type of power source indicated on the marking label of the AC adapter. If you are not sure of the type of power available, consult your Datavideo dealer or your local power company.
- Do not allow anything to rest on the power cord. Do not locate this unit where the power cord will be walked on, rolled over, or otherwise stressed.
- If an extension cord must be used with this unit, make sure that the total of the ampere ratings on the products plugged into the extension cord do not exceed the extension cord rating.
- Make sure that the total amperes of all the units that are plugged into a single wall outlet do not exceed 15 amperes.
- Never push objects of any kind into this unit through the cabinet ventilation slots, as they may touch dangerous voltage points or short out parts that could result in risk of fire or electric shock. Never spill liquid of any kind onto or into this unit.
- Except as specifically explained elsewhere in this manual, do not attempt to service this product yourself. Opening or removing covers that are marked "Do Not Remove" may expose you to dangerous voltage points or other risks, and will void your warranty. Refer all service issues to qualified service personnel.
- Unplug this product from the wall outlet and refer to qualified service personnel under the following conditions:
a. When the power cord is damaged or frayed;
b. When liquid has spilled into the unit;
c. When the product has been exposed to rain or water;
d. When the product does not operate normally under normal operating conditions. Adjust only those controls that are covered by the operating instructions in this manual; improper adjustment of other
controls may result in damage to the unit and may often require extensive work by a qualified technician to restore the unit to normal operation;
e. When the product has been dropped or the cabinet has been damaged;
f. When the product exhibits a distinct change in performance, indicating a need for service.
Warranty
Standard Warranty
- Datavideo equipment are guaranteed against any manufacturing defects for one year from the date of purchase.
- The original purchase invoice or other documentary evidence should be supplied at the time of any request for repair under warranty.
- The product warranty period begins on the purchase date. If the purchase date is unknown, the product warranty period begins on the thirtieth day after shipment from a Datavideo office.
- All non-Datavideo manufactured products (product without Datavideo logo) have only one year warranty from the date of purchase.
- Damage caused by accident, misuse, unauthorized repairs, sand, grit or water is not covered under warranty.
• Viruses and malware infections on the computer systems are not covered under warranty. - Any errors that are caused by unauthorized third-party software installations, which are not required by our computer systems, are not covered under warranty.
- All mail or transportation costs including insurance are at the expense of the owner.
- All other claims of any nature are not covered.
- All accessories including headphones, cables, and batteries are not covered under warranty.
- Warranty only valid in the country or region of purchase.
- Your statutory rights are not affected.
Three Year Warranty
- All Datavideo products purchased after July 1st, 2017 are qualified for a free two years extension to the standard warranty, providing the product is registered with Datavideo within 30 days of purchase.
- Certain parts with limited lifetime expectancy such as LCD panels, DVD drives, Hard Drive, Solid State Drive, SD Card, USB Thumb Drive, Lighting, Camera module, PCIe Card are covered for 1 year.
- The three-year warranty must be registered on Datavideo's official website or with your local Datavideo office or one of its authorized distributors within 30 days of purchase.

Disposal

For EU Customers only - WEEE Marking
This symbol on the product or on its packaging indicates that this product must not be disposed of with your other household waste. Instead, it is your responsibility to dispose of your waste equipment by handing it over to a designated collection point for the recycling of waste electrical and electronic equipment. The separate collection and recycling of your waste equipment at the time of disposal will help to conserve natural resources and ensure that it is recycled in a manner that protects human health and the environment. For more information about where you can drop off your waste equipment for recycling, please contact your local city office, your household waste disposal service or the shop where you purchased the product.

CE Marking is the symbol as shown on the left of this page. The letters "CE" are the abbreviation of French phrase "Conformité Européenne" which literally means "European Conformity". The term initially used was "EC Mark" and it was officially replaced by "CE Marking" in the Directive 93/68/EEC in 1993. "CE Marking" is now used in all EU official documents.
Introduction
The Datavideo GO KMU-100 Studio is a small studio video production system. The system integrates virtual camera, video switching and audio delaying for synchronization, monitoring, encoding and streaming functionalities in one box. With two 4K cameras, the KMU-100 plus can create up to 8 different virtual cameras for built-in video switching.
Features
- Total solution with suitcase design, rugged protection and easy to carry.
• Full integration including Switching, Streaming, Virtual Camera, Recording and Monitoring. - Power center for supplying power to all devices: pushing one button to boot the whole system.
• Quad link/12G SDI for broadcast quality. - Recorded on USB thumb drives or SD card (Class 10), record + stream bitrate up to 30Mbps.
Front Panel
TLM-102: Foldable 4RU rack mount dual monitor providing connections for SDI and HDMI videos
KMU-100 Plus: 2 Channel 4K multi-camera processor for converting up to 2 4K UHD input signals to up to 8 HD output signals.
AD-100M: Audio Delay Box for users to adjust audio delay related parameters such as Audio Delay on/off, delay time and attenuation.
NVS-25 H.264 video streaming server for streaming HDMI, SDI and CVBS videos over the Ethernet network.
RMC-185 Plus: RMC-185 plus is an RS-422 interface control panel for the KMU-100+ which provides physical switcher-like operating experience for users.
Rear Panel
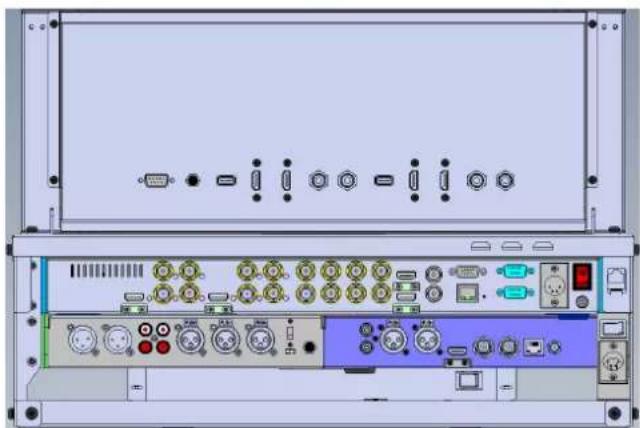
RMK-6: The LAN port provides video stream OUT to destination devices.
DC IN socket connects the 12V power and supplies power to all integrated devices. The switch acts as a central switch for the entire system.

Installation
Transport & Placement
The GO KMU-100 Studio is heavy and the weight is about 14kg – Do not attempt to lift or move it on your own. It's recommended to have at least two people to move the GO KMU-100 Studio out of the carton. If the GO KMU-100 Studio is packed in the 19" flight case, it needs one person only to move the system.
Always use a trolley to safely transport the GO KMU-100 Studio over distances of 2 Metres or more. The unit should be always moved and placed in a horizontal position; do not place or try to move the unit in any other way as damage or injury could result.
Place the GO KMU-100 Studio on a strong, stable, flat surface that is capable of supporting the weight. Do not use a folding or single leg table to support the GO KMU-100 Studio.
Opening the Case
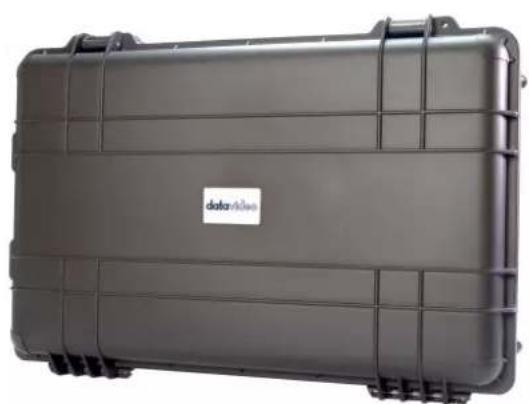
- Rest the HC-800 on a flat horizontal surface with the carry handle facing the user
- Open the buckles on two sides of the carry handle.
- Lift open the cover
- Remove the GO KMU-100 Studio system from the case.

Setting up the TLM-102 - Dual 10.1" LCD Monitor
- Bring the LCD panel into an upright viewing position.
- After that, please refer to following chapter "How to Connect Internal Cables" to connect all the cables according to the instructions.
- After all of the cables are connected properly, just remember to turn on the power switch and then it's time for you to enjoy the efficiency and the convenience of the GO KMU-100 Studio.
How to Connect Internal Cables
Cable requirements:
• Cable No. 1-5: DC Plug Cable built into the RMK-6
• Cable No. 6: HDMI Cable (50 CM)
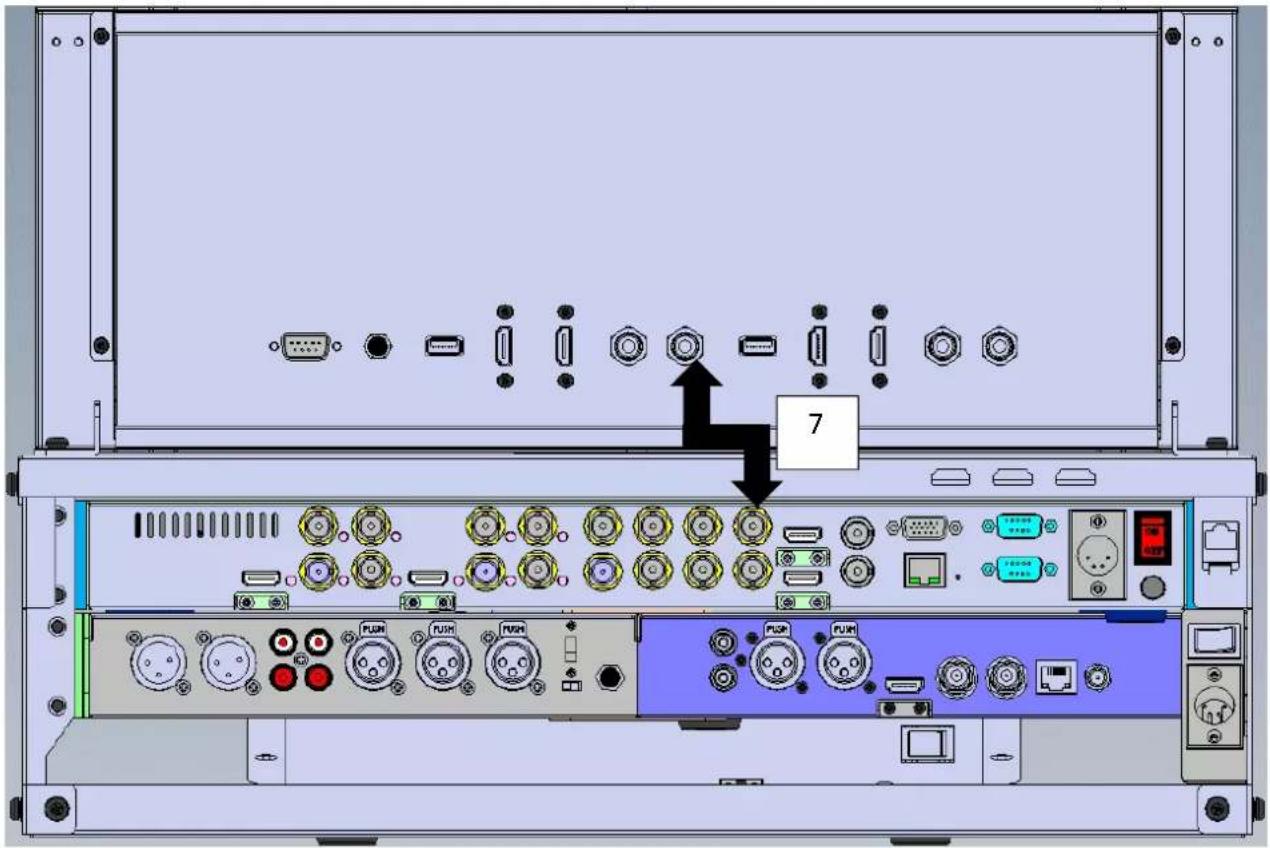
• Cable No. 7: BNC 180 Degree to 180 Degree Cable (50 CM)
• Cable No. 8: HDMI Cable (30CM)
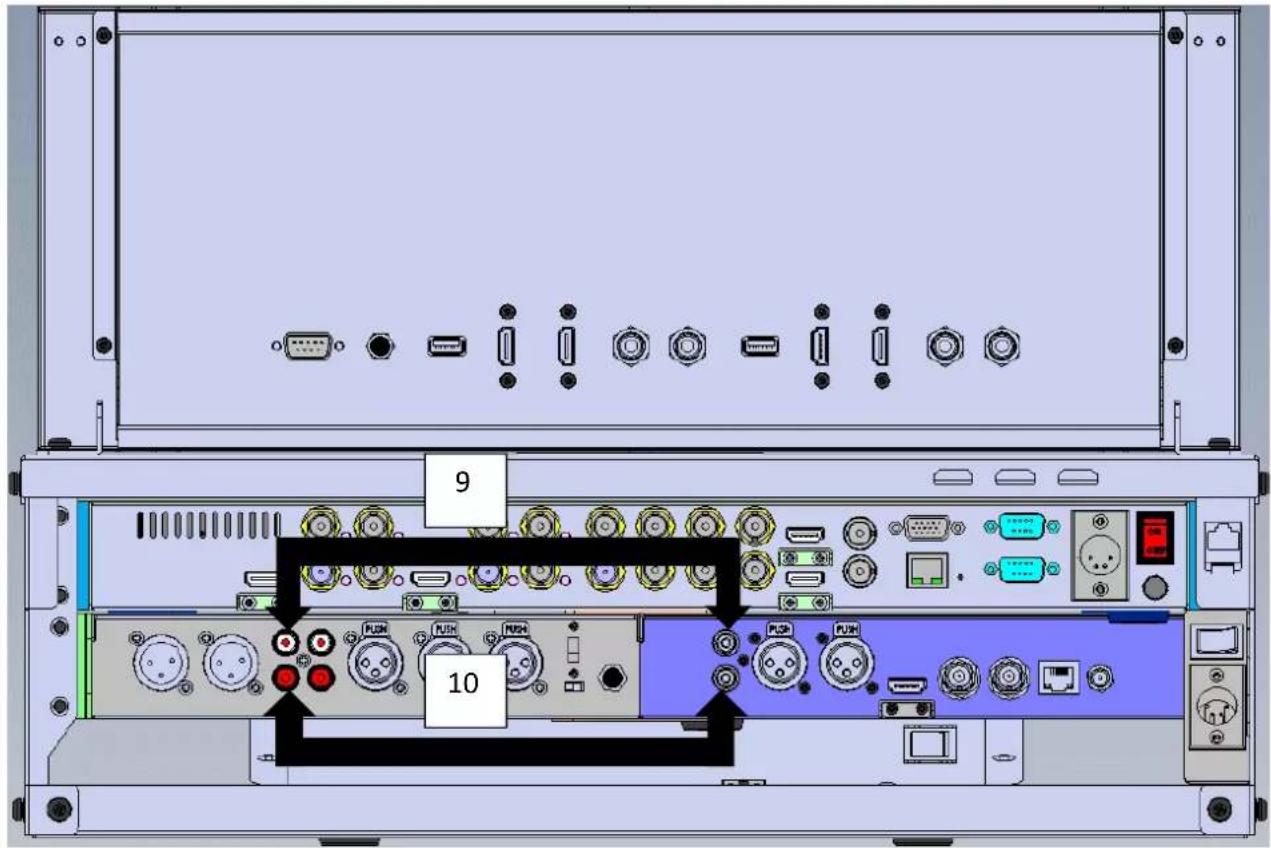
• Cable No. 9: RCA Cable (35 CM)
• Cable No. 10: RCA Cable (35 CM)
• Cable No. 11: Ethernet Cable (40CM)
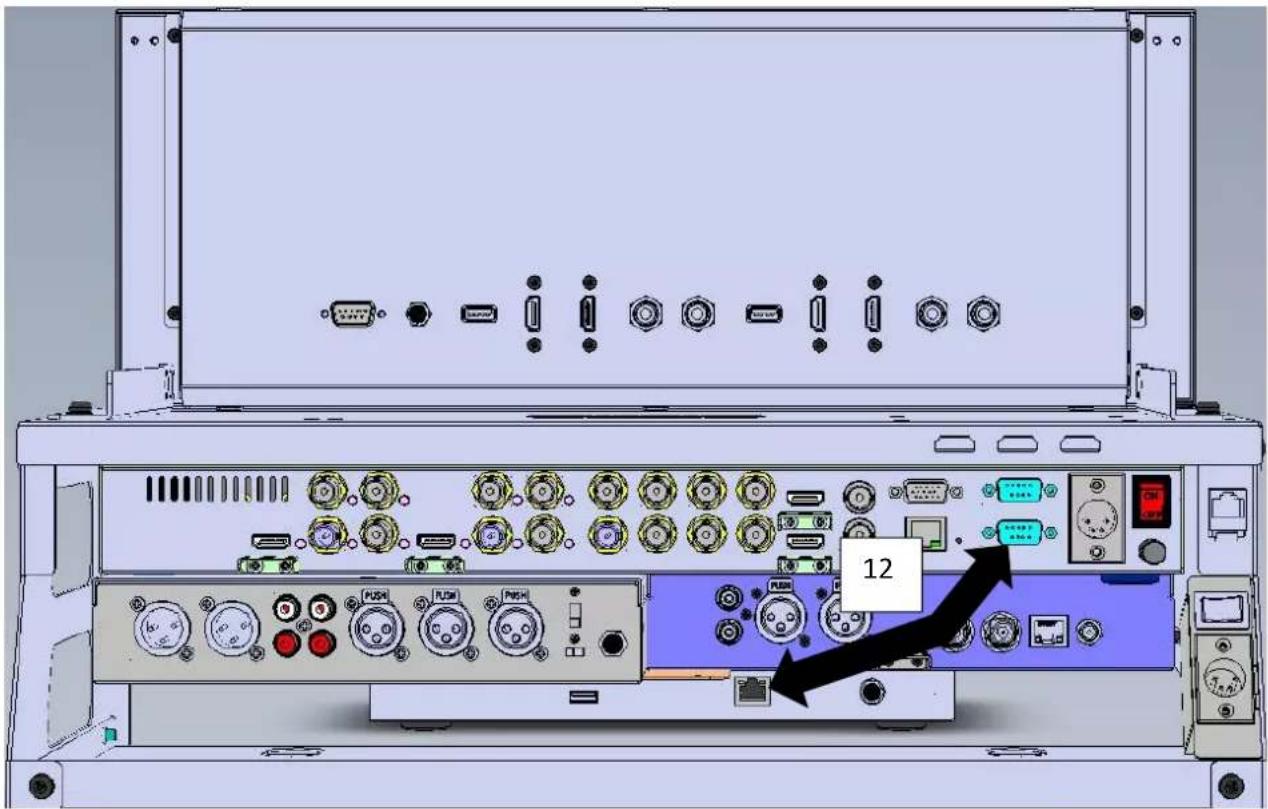
- Cable No. 12 RS-422 D-sub 9 pin to RJ-45 adapter cable (150 CM)
- Please connect the Cable No. 6 (HDMI cable) from the HDMI Output B on the rear panel of the KMU-100 to the HDMI IN1 on the rear panel of the TLM-102.
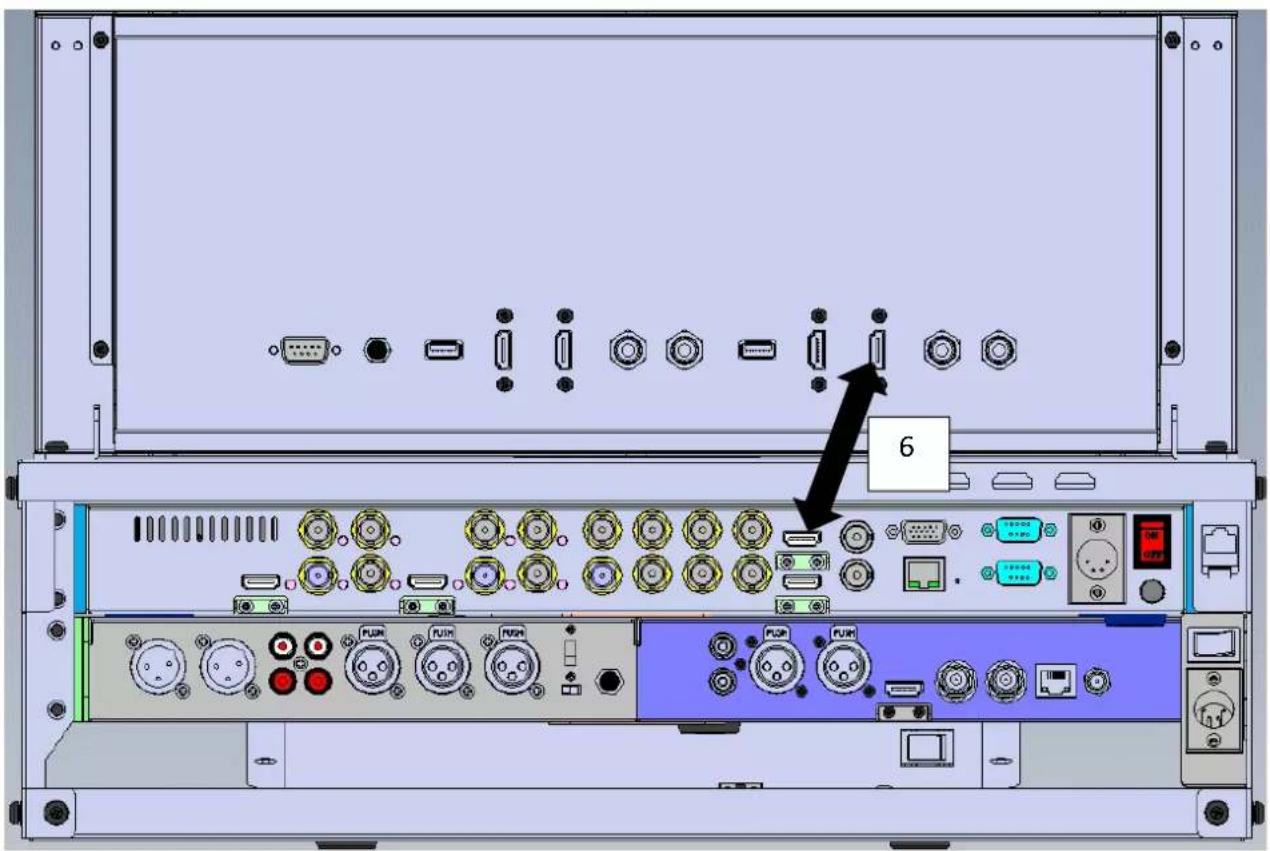
- Please connect the Cable No.7 (BNC 180 Degree Cable) from the SDI Output 8 on the rear panel of the KMU-100 to the SDI IN2 on the rear panel of the TLM-102.
- Please connect the Cable No. 8 (HDMI Cable) from the HDMI Output A on the rear panel of the KMU-100 to the HDMI Input on the rear panel of the NVS-25.

- Please connect the Cable No. 9 & Cable 10 (RCA Cables) from the RCA OUT on the rear panel of the AD-100M to the RCA IN on the rear panel of the NVS-25.
- Please connect the Cable No. 11 (Ethernet Cable) from the LAN interface on the rear panel of the NVS-25 to the LAN port on the inner side of the real panel of the RMK-6.

- Please connect Cable No. 12 (RS-422 to RJ-45 adapter cable) from the RS-422 interface on the rear panel of the KMU-100 to the RJ-45 interface on the rear panel of the RMC-185.
- First locate the DC jack on the RMK-6 and on the inner side of the DC jack, you should find five DC plug cables attached. Connect Cable No. 1 / 2 / 3 / 4/5 (DC Plug Cable) to the RMC-185, TLM-102, KMU-100, NVS-25 and AD-100M DC jacks respectively and secure by tightening the outer fastening ring.

Powering On
Each product built into the GO KMU-100 Studio receives DC power from the power connection on the rear of the RMK-6 unit of the GO KMU-100 Studio.
Please ensure the RMK-6 is fed with a DC power supply before attempting to switch on the GO KMU-100 Studio.
If a product within the GO KMU-100 Studio fails to start after the power switch on the rear of the RMK-6 is switched on please locate the on/off switch for that product which has not yet started.
For further advice on using a product within the GO KMU-100 Studio please refer to the related manual.
Powering Off
Before powering off the GO KMU-100 Studio via the power switch on the rear of the RMK-6 please ensure that the NVS-25 has been stopped.
Packing Away
Carefully fold the 10.1" TLM-102 monitor to its horizontal 1U shipping position. Please remember to secure its position so it cannot move when in transit.
Now return the GO KMU-100 Studio to the HC-800 case and the product is ready to be moved.
Dimensions


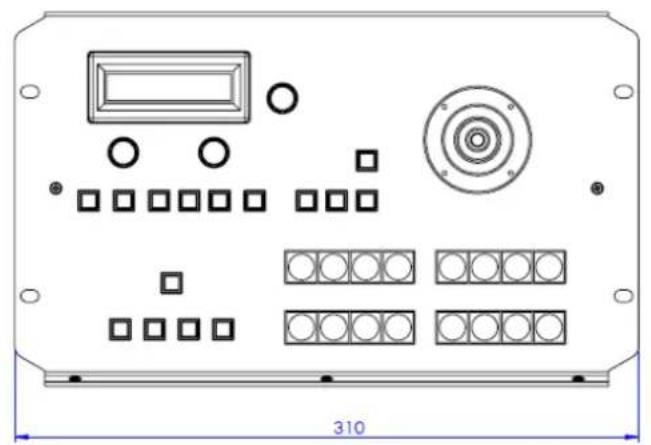
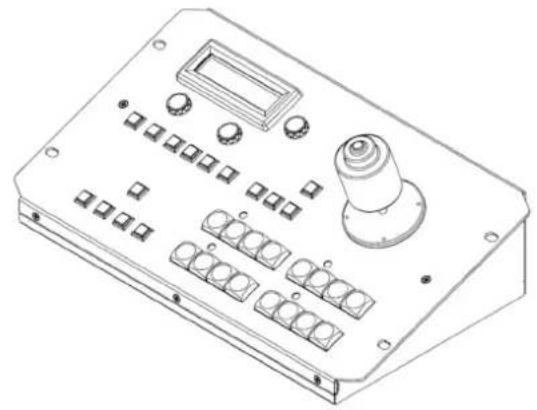
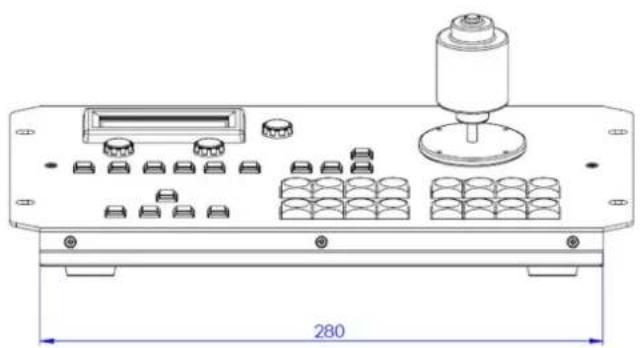

All dimensions in mm.
Weights
The GO KMU-100 Studio is heavy and the weight is about 14kg. If you want to move the GO KMU-100 Studio from the carton, it needs two people. If the GO KMU-100 Studio is packed in the 19" flight case, it needs one person only to move the GO KMU-100 Studio.
A minimum of two people are required to lift or move this product. There are two carry handles on either side of the product, please use these handles to safely share the weight between the people lifting the unit.
Always use a trolley to safely transport the GO KMU-100 Studio over distances of 2 Metres or more.
The unit should be always moved and placed in an upright position; do not place or try to move the unit in any other way as damage or injury could result.
Place the GO KMU-100 Studio on a strong, stable, flat surface that is capable of supporting the weight. Do not use a folding or single leg table to support the GO KMU-100 Studio.
Specifications
The GO KMU-100 Studio is a combination of Datavideo products, for the specifications of a particular product please refer to its related manual.
| Device Model | |
| Video Processor/Switcher | KMU-100 Plus |
| KMU Controller RMC-185 Plus | |
| Audio Delay AD-100M | |
| Recorder NVS-25 | |
| Streaming Encoder NVS-25 | |
| Monitor TLM-102 | |
| Rack Mount Frame RMK-6 | |
Service & Support
It is our goal to make owning and using Datavideo products a satisfying experience. Our support staff is available to assist you to set up and operate your system. Contact your local office for specific support requests. Plus, please visit www.datavideo.com to access our FAQ section.
| China Shinghua | Datavideo Technologies China Co601,Building 10,No.1228,Rd,Jiangchang,Jingan District,ShanghaiTel:+86 21-5603 6599Fax:+86 21-5603 6770E-mail:service@datavideo.cn | Hong Kong | Datavideo Hong Kong LtdG/F.,26 Cross LaneWanchai, Hong KongTel:+852-2833-1981Fax:+852-2833-9916E-mail:info@datavideo.com.hk | Singapore | Datavideo Technologies (S) PTE LtdNo. 178 Paya Lebar Road #06-03Singapore 409030Tel:+65-6749 6866Fax:+65-6749 3266E-mail:sales@datavideo.sg |
| China Datang | Datavideo Technologies China CoNo. 812, Building B, Wankai Center,No.316, Wan Feng Road, Fengtai District,Beijing, ChinaTel:+86 10-8586 9034Fax:+86 10-8586 9074E-mail:service@datavideo.cn | India Noda | Datavideo India NoidA-132, Sec-63,Noida-201307,IndiaTel:+91-0120-2427337Fax:+91-0120-2427338E-mail:sales@datavideo.in | Taiwan | Datavideo Technologies Co. Ltd10F. No. 176, Jian 1st Rd.,Chung HoDistrict, New Taipei City 235, TaiwanTel:+886-2-8227-2888Fax:+886-2-8227-2777E-mail:service@datavideo.com.tw |
| China Chongdu | Datavideo Technologies China CoB-823,Meinian square,No.1388,Middle of Tianfu Avenue,Gaoxin District,Chengdu, SichuanTel:+86 28-8613 7786Fax:+86 28-8513 6486E-mail:service@datavideo.cn | India Kochi | Datavideo India Kochi2nd Floor- North Wing, Govardnan Building.Opp. NCC Group Headquarters, Chittoor Road,Cochin- 682035Tel:+91 4844-025336Fax:+91 4844-047696E-mail:sales@datavideo.in | United States | Datavideo Corporation7048 Elmer AvenueWhittier, CA 90602,U.S.A.Tel:+1-562-696 2324Fax:+1-562-698 6930E-mail:sales@datavideo.com |
| China Fuzhou | Datavideo Technologies China CoA1-2318-19 Room,No.8, Aojiang Road,Taijiang District,Fuzhou,Fujian,ChinaTel:0591-83211756 · 0591-83210187Fax:0591-83211262E-mail:service@datavideo.cn | Netherlands | Datavideo Technologies Europe BVFloridadreef 1063565 AM Utrecht,The NetherlandsTel:+31-30-261-96-56Fax:+31-30-261-96-57E-mail:info@datavideo.nl | ||
| China Junjin | Datavideo Technologies China Co902, No. 1 business building,Xiangtai Square, No. 129,Yingxiongshan Road, Shizhong District,Jinan City, Shandong Province, ChinaTel:+86 531-8607 8813E-mail:service@datavideo.cn | Singapore | Datavideo Visual Technology(S) Pte LtdNo. 178 Paya Lebar Road #06-07Singapore 409030Tel:+65-6749 6866Fax:+65-6749 3266E-mail:info@datavideovirtualset.com | France | Datavideo France s.a.r.l.Cité Descartes 1, rue Albert EinsteinChamps sur Marne 774477 -Marne la Vallée cedex 2Tel:+33-1-60370246Fax:+33-1-60376732E-mail:info@datavideo.fr |
Please visit our website for latest manual update.
https://www.datavideo.com/product/GO+KMU-100+Studio
datavideo
www.datavideo.com
All the trademarks are the properties of their respective owners. Datavideo Technologies Co., Ltd. All rights reserved 2018
Feb.-18.2018
Version E2


- DISCLAIMER OF PRODUCT AND SERVICES
- FCC COMPLIANCE STATEMENT
- WARNINGS AND PRECAUTIONS
- WARRANTY
- STANDARD WARRANTY
- THREE YEAR WARRANTY
- DISPOSAL
- FOR EU CUSTOMERS ONLY - WEEE MARKING
- INTRODUCTION
- FEATURES
- FRONT PANEL
- REAR PANEL
- INSTALLATION
- TRANSPORT & PLACEMENT
- OPENING THE CASE
- SETTING UP THE TLM-102 - DUAL 10.1" LCD MONITOR
- HOW TO CONNECT INTERNAL CABLES
- CABLE REQUIREMENTS
- POWERING ON
- POWERING OFF
- PACKING AWAY
- DIMENSIONS
- WEIGHTS
- SPECIFICATIONS
- SERVICE & SUPPORT
Brand : DataVideo
Model : GO KMU-100 Studio
Category : Camera