
Arocam C2 - Security Camera Hollyland - Free user manual and instructions
Find the device manual for free Arocam C2 Hollyland in PDF.


| Product Type | Security Camera |
| Brand | Hollyland |
| Model | Arocam C2 |
| Dimensions | 7.5 x 7.5 x 12 cm |
| Weight | 350 g |
| Power Supply | DC 12V / PoE |
| Resolution | 1080p Full HD |
| Night Vision | Up to 30m IR |
| Field of View | 90° |
| Connectivity | Wi-Fi / Ethernet |
| Storage | MicroSD up to 128GB |
| Weatherproof | IP66 |
| Motion Detection | Yes |
| Two-Way Audio | Yes |
| Maintenance | Clean lens with soft cloth |
| Safety | Indoor/Outdoor use |
| Spare Parts | Not included |
| General | User manual available |
Frequently Asked Questions - Arocam C2 Hollyland
User questions about Arocam C2 Hollyland
0 question about this device. Answer the ones you know or ask your own.
Ask a new question about this device
Download the instructions for your Security Camera in PDF format for free! Find your manual Arocam C2 - Hollyland and take your electronic device back in hand. On this page are published all the documents necessary for the use of your device. Arocam C2 by Hollyland.
USER MANUAL Arocam C2 Hollyland
USB High-Definition Live Camera

natural_image
Line drawing of a cylindrical device with labeled buttons (SUNION, POWER) at the base, no text or symbols on the device itself.User Manual
English (V1.0)
Copyright Notice
All contents of this manual, whose copyright belongs to our Corporation cannot be cloned, copied or translated without the permission of the company. Product specifications and information which were referred to in this document are for reference only. We may change, delete, or update any content at any time and without prior notice.

Notice
This is class A production. Electromagnetic radiation at specific frequencies may affect the image quality of TV in home environment.
Catalogue
1 Note 1
2 Packing List....1
3 Quick Start....1
4 About Product....2
4.1 Features....2
4.2 Specifications....2
4.3 Interfaces and Keys....4
4.4 Dimension....4
4.5 Installation ....5
4.6 Remote Control....6
5 GUI Settings....7
5.1 MENU 7
5.2 EXPOSURE 7
5.3 COLOR....8
5.4 IMAGE....8
5.5 P/T/Z 8
5.6 NOISE REDUCTION 9
5.7 SETUP 9
5.8 COMMUNICATION SETUP....9
5.9 RESTORE DEFAULT....9
6 WEB Settings....10
6.1 Visit Camera....10
6.2 Control Camera....10
6.3 Video Settings....11
6.4 Image Settings....12
6.5 Audio Settings 12
6.6 System Settings....12
6.7 Network Settings....13
6.8 Device Information....14
6.9 Download the Upgrade Program ....14
7 Troubleshooting....14
1 Note
● During the installation and operation, all electrical safety regulations of the country and region of use must be strictly observed.
- Please use the power adapter that comes standard with this product.
- Do not connect multiple devices to the same power adapter (exceeding capacity of the adapter may generate excessive heat or cause fire).
- Do not rotate the camera by hand, otherwise it may cause mechanical failure.
- When installing this product on a wall or ceiling, make sure the device securely and there are no obstacles within the rotation range; Do not power on until all installations are completed.
● To avoid heat build-up, please keep smooth ventilation around the device.
- If the device smokes, smells, or makes noises, please turn off the power and unplug the power cord immediately, then contact the dealer in time.
● This device is not waterproof, please keep the device dry. - This product has no user serviceable parts, damage caused by disassembly by the user is not covered by the warranty.

Specific frequencies of electromagnetic field may affect the image of the camera!
2 Packing List
| Name Quantity | |
| Camera | 1 |
| Power Adapter 1 | |
| USB Cable 1 | |
| Remote Control 1 | |
| User Manual 1 |
3 Quick Start
1) Please check connections are correct before starting.
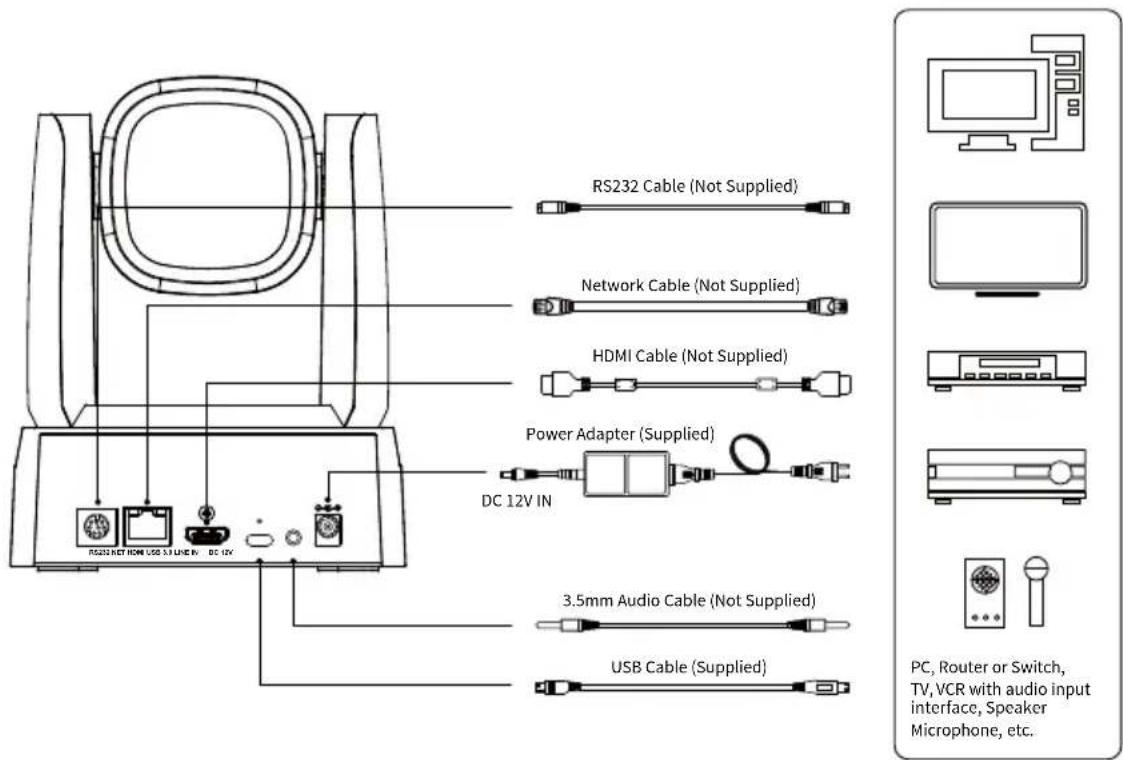
2) Connect the power adapter to the power connector on the rear panel of the camera. The power indicator on the front panel of the camera turns on.
3) After the camera is powered on, it starts to initialize, right up to the limit position, and then both horizontal and vertical go to the middle position. When the motor stops running, it means that the initialization is completed. (Note: If preset 0 is saved, PTZ will move to preset 0)
4 About Product
4.1 Features
● Full Function USB Interface
Full function USB interface, compatible with USB 3.0 and USB 2.0, support video and encoding image output, support the UVC V1.1 and UAC 1.0 protocol.
● 1080P Full HD
High-quality 1/2.8-inch HD CMOS sensor with 2.07 million effective pixels for high-quality images up to 1920x1080. The output frame rate is up to 60fps/s to present clear and realistic high-definition video and vividly showing the expressions and movements of the characters.
- 72.5° Wide-angle Lens
Exclusively customized 72.5° high-quality ultra-wide-angle lens, support 12x optical zoom.
● Low Illumination
The new CMOS image sensor with ultra-high SNR can effectively reduce the image noise under low illumination. The application of 2D and 3D noise reduction algorithm greatly reduces the image noise even under the condition of ultra-low illumination, it keeps the picture clean and clear, and the SNR of image is as high as 55dB.
- Remote Control
Camera can be controlled remotely through the RS232 serial port.
● Leading Auto Focus Technology
Using advanced focusing algorithm and TOF module assists focusing, the lens can focus quickly, accurately and stably.
● Multiple Interfaces
Support audio and video output through HDMI, USB 3.0 and network interface.
- Portrait
Support portrait output.
● Two Power Supply Modes
Simultaneously support USB 5V and DC 12V power supply.
- Easy to Use
No need to download the driver, USB output plug and play to take a convenient and simple user experience.
4.2 Specifications
| Camera | |
| Signal System | 1080P60, 1080P50, 1080P30, 1080P25, 720P60, 720P50 |
| Sensor | 1/2.8 inch, CMOS, Max Effective Pixel: 2.07M |
| Scanning Mode Progressive | |
| Lens | 12x, f = 3.5mm ~ 42.3mm, F1.8 ~ F2.8 |
| Minimum Illumination | 0.5 Lux @ (F1.8, AGC ON) |
| Shutter 1/30s ~ 1/10000s | |
| White Balance | Auto, Indoor, Outdoor, One Push, Manual, VAR |
| Backlight Compensation | Support |
| Digital Noise Reduction | 2D&3D Digital Noise Reduction |
| Signal Noise Ratio | ≥55dB |
| Horizontal Angle of View | 72.5° ~ 6.9° |
| Vertical Angle of View | 44.8° ~ 3.9° |
| Horizontal Rotation Range | ±170° |
| Vertical Rotation Range | -30° ~ +90° |
| Pan Speed Range | 2.7° ~ 35.7°/s |
| Tilt Speed Range | 2.7° ~ 31.5°/s |
| H & V Flip Support | |
| Image Freeze Support | |
| Number of Preset | 255 |
| Preset Accuracy 0.1° | |
| USB Features | |
| Operate System | Windows 7, Windows 8, Windows 10, Mac OS X, Linux, Android |
| Color System/Compression | YUY2/MJPEG |
| Video Format | ● YUY2: 1080P@30fps (max.)● MJPEG: 1080P@30fps (max.) |
| USB Audio UAC1.0 | |
| USB Video Communication Protocol | UVC 1.1 |
| UVC PTZ Support | |
| Network Features | |
| Video Compression | H.264/ MJPEG |
| Video Stream First/Second Stream | |
| First Stream Resolution | 1920x1080, 1280x720 |
| Second Stream Resolution | 1280x720, 640x360 |
| Bit Rate for First Stream | 32Kbps ~ 20480Kbps |
| Bit Rate for Second Stream | 32Kbps ~ 6144Kbps |
| Bit Rate Control CBR, VBR | |
| Frame Rate | 50Hz: 1fps ~ 50fps, 60Hz: 1fps ~ 60fps |
| Audio Compression | AAC |
| Audio Bit Rate 96Kbps, 128Kbps, 256Kbps | |
| Protocols | TCP/IP, HTTP, RTSP, RTMP(S), ONVIF, DHCP, Multicast, etc. |
| Input/Output Interface | |
| LINE INInterface | 1 x LINE IN: 3.5mmLine In Interface |
| CommunicationInterface | 1 x RS232 IN: 8pin MinDIN, Max Distance: 30m,Protocol: VISCA/Pelco-D/Pelco-P |
| NetworkInterface | 1 x NET: 10M/100MAdaptive Ethernet Port |
| USB Interface 1 x USB 3.0: Type C | |
| HDMI Interface 1 x HDMI: Version 1.4b | |
| Power Jack | JEITA type (DC IN 12V)/USB Type-C (DC IN 5V) |
| Physical Parameter | |
| Input Voltage DC 12V/USB 5V | |
| Input Current | 12V 1.0A (max.)/5V 1.5A (max.) |
| OperatingTemperature | -10°C ~ 40°C |
| StorageTemperature | -40°C ~ 60°C |
| PowerConsumption | 12W (max.) |
| Dimension (mm) 142.2 x 151.9 x 175.8 | |
| Net Weight 1.5Kg | |
4.3 Interfaces and Keys

| Item Name | ||
| 1 | RS232 | Interface |
| 2 | Network | Interface |
| 3 | HDMI | Interface |
| 4 USB 3.0 Interface | ||
| 5 LINE IN Interface | ||
| 6 DC 12V Interface | ||
4.4 Dimension
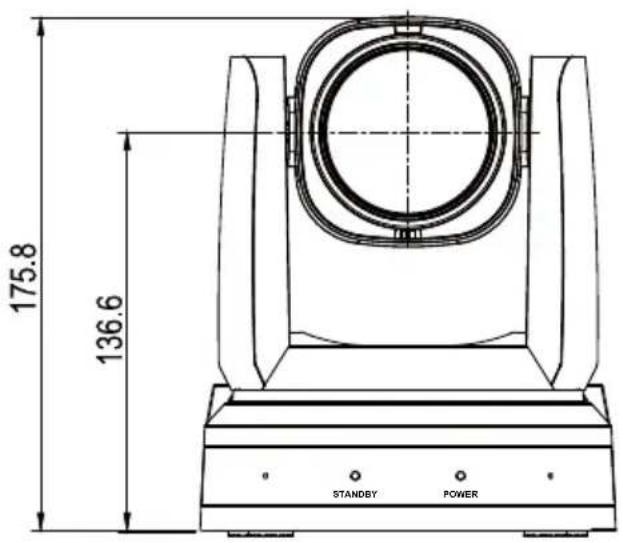


4.5 Installation


Note
The installation diagram is for reference only. The brackets and screws are not standard. For
packing accessories, please refer to the actual product.
4.6 Remote Control

Key Description
1. ⏻ (Standby) Key
Press to enter standby mode. Press again to resume to normal mode.
Note: The power consumption in standby mode is approximately half of that in normal mode.
2. Number Key
To set preset or call preset.
3.\*Key
Use with other keys.
4. PRESET Key
Set preset: Store a preset position.
[PRESET] + Number key (0-9): Set a
corresponding preset position.
5. HOME Key
Confirm selection or press to turn PTZ back to the middle position.
6. ↗ (Return) Key
Press to return to the previous menu.
7. ZOOM Key
● SLOW: Zoom In [+] or Zoom Out [-] slowly.
- FAST: Zoom In [+] or Zoom Out [-] fast.
8. L/R SET Key
Press with 1 or 2 key to set the direction of the Pan-Tilt.
- Simultaneously press L/R SET + 1 [STD]: Set the Pan-Tilt turn the same direction as the PTZ control key.
- Simultaneously press L/R SET + 2 [REV]: Set the Pan-Tilt turn the opposite direction as the PTZ control key.
9. FOCUS Key
Focus adjustment:
Press [AUTO] to adjust the focus automatically.
Press [MANUAL] to adjust the focus manually.
When in manual focus mode, press [FAR] to focus on far object or [NEAR] to focus on near object.
10. CAMERA SELECT Key
Camera selection:
Press to select and control the camera.
11. # Key
Use with other keys.
12. IR Remote Control Key
[*] + [#] + [F1]: Address 1
[*] + [#] + [F2]: Address 2
[*] + [#] + [F3]: Address 3
[*] + [#] + [F4]: Address 4
13. RESET Key
Clear the preset position:
[RESET] + Number key (0-9).
Or: [*] + [#] + [CLEAR PRESET]: Erase all the preset individually.
14. PTZ Control Key
Press arrow button to perform panning and tilting. Press [HOME] button to face the camera back to front.
15. MENU Key
Enter or exit OSD MENU.
16. BACKLIGHT Key
Backlight ON/OFF: Press repeatedly to enable or disable the backlight compensation.
NOTE:
● Effective only in auto exposure mode.
- If there is a light behind the subject, the subject will become dark, press the backlight key to enable the backlight compensation. Press again to disable this function.
17. P/T RST (PTZ Reset) Key
Press to preset Pan/Tilt self-test.
Image Freezing Function
- Manual freeze: Press the [F4] key to open the freezing function, “Freeze” will be displayed on the left upper corner. To cancel the freeze function, press [F4] key again, “Unfreeze” shows on the left upper corner and it will be disappeared automatically five seconds later.
- Image freeze when recalling the preset: After enable the “Image Freeze” function by the OSD menu setting, the screen will remain the previous image when recalling the preset. The screen will switch to the preset image after the camera turn to the preset position.
Shortcut Set
[*] + [#] + [1]: OSD menu default English
[*] + [#] + [3]: OSD menu default Chinese
[*] + [#] + [4]: Display current IP address
[*] + [#] + [6]: Quickly recover the default
[*] + [#] + [8]: Check the camera version
[*] + [#] + [9]: Quickly set up inversion
[*] + [#] + [MANUAL]: Restore to default IP address.
5 GUI Settings
5.1 MENU
Press [MENU] key to display the main menu. Use the arrow key to move the cursor to desired item and press the [HOME] key to confirm to enter the corresponding sub-menu.
MENU
▶ Exposure
Color
Image
P/T/Z
Noise Reduction
Setup
Communication Setup
Restore Default
[Home] Enter
[Menu] Exit
5.2 EXPOSURE
When in main menu page, move the cursor to [Exposure] and press [HOME] key to confirm to enter the exposure page as below.
EXPOSURE
▶ Mode
Auto
ExpCompMode
Of
Backlight
Of f
Gain Limit 1
Anti-Flicker
50Hz
Meter
Average
DRC
3
SelectItem
Change Value
[Menu] Back
Mode: Auto, Manual, SAE, AAE, Bright.
ExpCompMode: On, Off (Effective only in Auto mode).
ExpComp: -7 \~ +7 (Effective only in
ExpCompMode item to On).
Backlight: On, Off (Effective only in Auto mode).
Bright: 0 \~ 17 (Effective only in Bright mode).
Gain Limit: 0 \~ 15 (Effective only in Auto, SAE, AAE, Bright mode).
Anti-Flicker: Off, 50Hz, 60Hz (Effective only in Auto, AAE, Bright mode).
Meter: Average, Center, Smart, Top (Effective only in Auto, SAE, AAE, Bright mode).
Iris: F1.8, F2.0, F2.4, F2.8, F3.4, F4.0, F4.8, F5.6, F6.8, F8.0, F9.6, F11.0, Close (Effective only in Manual, AAE mode).
Shutter: 1/30, 1/40, 1/50, 1/60, 1/70, 1/80, 1/90, 1/100, 1/110, 1/120, 1/130, 1/140, 1/150, 1/160, 1/170, 1/180, 1/190 (Effective only in Manual, SAE mode).
Gain: 0 \~ 7 (Effective only in Manual mode).
DRC: 0 \~ 8.
5.3 COLOR
When in main menu page, move the cursor to [Color] and press [HOME] key to confirm to enter the color page as below.
![COLOR ► WB Mode Auto RG Tuning 0 BG Tuning +1 Saturation 100% Hue 7 AWB Sens High Select▲Item Change▲Value [Menu] Back](/content/2026/05/933940/images/a9a7e94532dc77339d240b178e77448e578f33bd5b77a251ae5cc4a189c99944.jpg)
WB-Mode: Auto, Indoor, Outdoor, One Push, Manual, VAR.
RG Tuning: -10 \~ +10 (Effective only in Auto, One Push and VAR mode).
BG Tuning: -10 \~ +10 (Effective only in Auto, One Push and VAR mode).
Saturation: 60% \~ 200%.
Hue: 0 \~ 14.
RG: 0 \~ 255 (Effective only in Manual mode).
BG: 0 \~ 255 (Effective only in Manual mode).
AWB Sens: High, Middle, Low (Effective only in Auto, One Push mode).
Color Temp: 2500K \~ 8000K (Effective only in VAR mode).
5.4 IMAGE
When in main menu page, move the cursor to [Image] and press [HOME] key to confirm to enter the image page as below.
![IMAGE ► Luminance 7 Contrast 7 Sharpness 5 Flip-H Of f Flip- V Off B&W-Mode Of f Gamma EXT Style Default Select▲▼ Change▲▼ Value [Menu] Back](/content/2026/05/933940/images/5fd561f155e696dc782e68112e977b87e3b07f14895357a0e5cdc1fe43e1ce4b.jpg)
Luminance: 0 \~ 14.
Contrast: 0 \~ 14.
Sharpness: Auto, 0 \~ 15.
Flip-H: On, Off.
Flip-V: On, Off.
B&W-Mode: On, Off.
Gamma: EXT, Default, 0.45, 0.5, 0.56, 0.63.
Style: Default, Beauty, Jewelry.
5.5 P/T/Z
When in main menu page, move the cursor to [P/T/Z] and press [HOME] key to confirm to enter the P/T/Z page as below.
![P/T/Z ► SpeedByZoom On AF-Zone Front AF-Sense High Display Info On Image Freeze Of f Call Preset Speed 22 Pre Zoom Speed 5 ▲▼Select Item Change-Value [Menu] Back](/content/2026/05/933940/images/c9cb4bf71b52fe0fe2174eb5c9603cf02fb333c879073fcc8960e63d81efbcfc.jpg)
SpeedByZoom: On, Off.
AF-Zone: Front, Top, Center, Bottom.
AF-Sense: Low, Normal, High.
Display Info: On, Off.
Image Freeze: On, Off.
Call Preset Speed: 1 \~ 24.
Pre Zoom Speed: 0 \~ 7.
5.6 NOISE REDUCTION
When in main menu page, move the cursor to [Noise Reduction] and press [HOME] key to confirm to enter the noise reduction page as below.
NOISE REDUCTION
NR2D-Level
Auto
NR3D-Level
Auto

Select Item

Change Value
[Menu] Back
NR2D Level (2D Noise Reduction): Auto, Off, 1 \~ 5.
NR3D Level: (3D Noise Reduction): Auto, Off, 1 \~ 8.
5.7 SETUP
When in main menu page, move the cursor to [Setup] and press [HOME] key to confirm to enter the setup page as below.
SETUP
Language
EN
Video Format 1080P30
USB Mode BULK
USB Audio ON
Aux Focus ON
Select Item
Change Value
[Menu] Back
Language: EN, Chinese.
Video Format: 1080P30.
USB Mode: BULK, ISOC.
USB Audio: On, Off.
Aux Focus: On, Off.
5.8 COMMUNICATION SETUP
When in main menu page, move the cursor to [Communication Setup] and press [HOME] key to confirm to enter the communication setup page as below.
COMMUNICATION SETUP
![Protocol VISCA V_Address 1 V_AddrFix Off Net Mode Serial Baudrate 9600 ▲▼Select Item ◀▶Change Value [Menu] Back](/content/2026/05/933940/images/39920c3add8a253c7f7e2e433e05eb4fab6d623e41a11690680fd82bc87356f3.jpg)
Protocol: Auto, VISCA, PELCO-D, PELCO-P.
V_Address: 1 \~ 7 (Effective only in Auto, VISCA protocol).
V_AddrFix: On, Off (When set to On, useless in 8830 01 FF Command. Effective only in Auto, VISCA protocol).
P_D_Address: 0 \~ 254 (Effective only in Auto, PELCO-D protocol).
P_P_Address: 0 \~ 31 (Effective only in Auto, PELCO-P protocol).
Net Mode: Serial, Paral (Effective only in Auto, VISCA protocol).
Baudrate: 2400, 4800, 9600, 38400.
5.9 RESTORE DEFAULT
When in main menu page, move the cursor to [Restore Default] and press [HOME] key to confirm to enter the restore default page as shown in below figure.
RESTORE DEFAULT
▶ Restore? No
◄►Change Value
[Home] OK
[Menu] Back
Restore: Yes, No.

Note
GUI menu and parameters are
subject to change without notice.
6 WEB Settings
6.1 Visit Camera
Visit http://192.168.100.88 to pop up the login window, then input username (default: admin) and password (default: admin). After login, it will show as below:
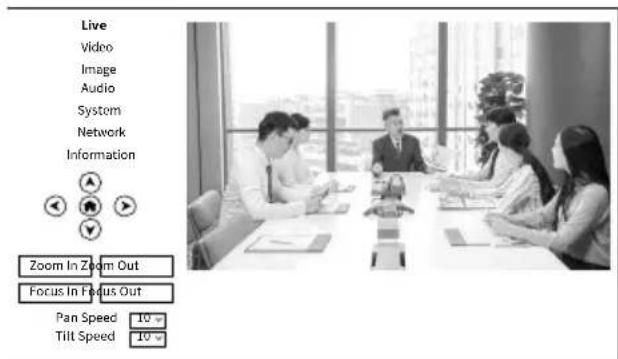
6.2 Control Camera
All pages include two menu bars:
Real Time Monitoring: Video image displaying with function buttons.
Parameter Setup: Parameter configurating.
A. Video Viewing Window
The video viewing window is same as video resolution, the bigger the resolution, the bigger the playing area. Double click the viewing window to show full screen, double click again, to return to initialized size.
Status bar in viewing window shown as below:

1) Video Pause: Click to pause the real-time video, click again to resume.
2) Audio Control: Click to adjust the volume or mute.
3) Full screen switch button.
B. PTZ Setup
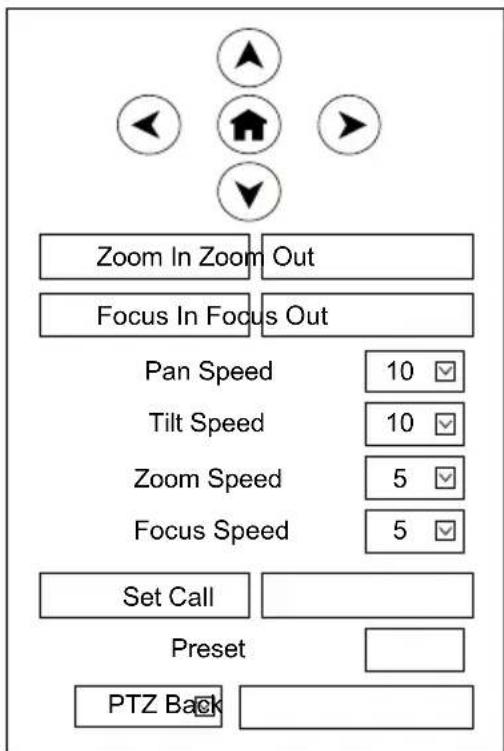
1) Pan and Tilt Control
The direction arrows and home button allow you to manually drive the camera to desired position.
2) Zoom
Zoom In and Zoom Out buttons allow for wide or narrow view of the space.
3) Focus
Focus In and Focus Out button allow for fine manual focus adjustment if the camera has any auto focusing problems on difficult object.
4) PTZ Speeds
Pan speed rate can be set to 1 \~ 24, Tilt speed rate can be set to 1 \~ 20. Zoom and Focus speed rate can be set to 0 \~ 7.
5) PTZ Presets
When the PTZ turns to the position that you would like to return to later, you can set presets for quick recall.
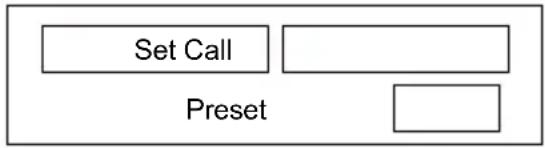
Type a number (0 \~ 254) into the preset box and click "Set" button to save.
flowchart
graph TD
    A["Set Call"] --> B["Preset"]
When the PTZ turn to other position, input the preset number and click "Call" button to turn the PTZ back to the preset position.
6) PTZ/OSD Dropdown
Move the cursor to dropdown menu, select and click "OSD" to open the on-screen menu and do menu settings on the interface.
C. Language Selection

flowchart
graph TD
    A["Chinese"] --> B["EnglishLanguage"]
Click to select “Chinese” or “English” to change the language of the webpage.
6.3 Video Settings

1) Video Format
Support 50Hz (PAL) and 60Hz (NTSC) formats.
2) Encode Level
Support baseline, mainprofile and highprofile.
3) Encode Codec
Support H264 and MJPEG.
4) Resolution
First stream support 1920x1080, 1280x720. Second stream support 1280x720; 640x360. The bigger the resolution, the clearer the image, and the larger the code stream, the more network bandwidth will be taken.
5) Bit Rate
You can specify the bit rate, the larger the bit rate, the clearer the image. The configuration of the bit rate needs to be combined with the network bandwidth. When the network bandwidth is narrow and the bit rate is configured larger, the video stream cannot be transmitted normally, and the visual effect will be worse.
6) Frame Rate
You can specify the size of the frame rate, the greater the frame rate, the smoother the image; the smaller the frame, the more beating the image.
7) I Key Frame Interval
Set the interval between two I frames, the bigger the interval, the slower the response when opening the image for the first time.
8) Bit Rate Control
Two modes for bit rate control: CBR (Constant Bit Rate): Video coder will be coding according to the preset speed. VBR (Variable Bit Rate): Video coder will adjust the speed based on preset speed to gain the best image quality.
9) Slice Split Enable
Enable or disable the Slice Split function.
10) Split Mode
Split Mode Fixed bytes.
11) Slice Size
Size for slice.
6.4 Image Settings
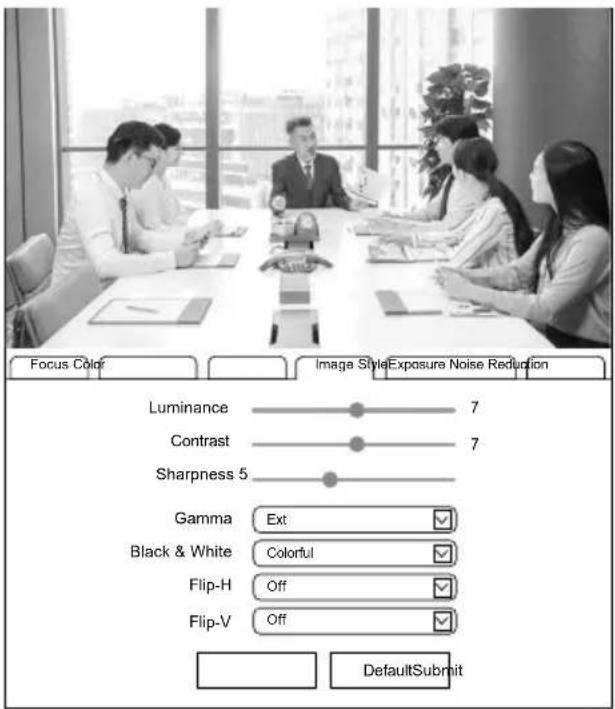
1) Luminance
Image Bright: 0\~14 (Default is 7).
2) Contrast
Image Contrast: 0\~14 (Default is 7).
3) Sharpness
Image sharpness: Auto, 0 \~ 15 (Default is 5).
4) Gamma
Options: EXT, Default, 0.45, 0.5, 0.56, 0.63 (Default is EXT).
5) Black & White
Options: Colorful, Black & White (Default is Colorful).
6) Flip-H
Turn on/off the Flip-H function.
7) Flip-V
Turn on/off the Flip-V function.
6.5 Audio Settings

1) Audio Switch
Enable or disable audio switch.
2) Audio Type
Audio type AAC.
3) Sample Rate
Sample rate 32K.
4) Bit Rate
Bit rate 96K, 128K, 256K selectable.
5) Input Type
Input type LINE IN.
6) ADTS Options
Options: On, Off.
6.6 System Settings
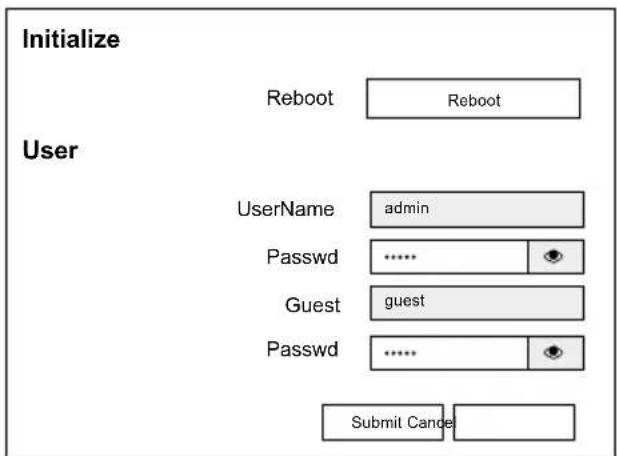
1) Reboot
Click "Reboot" to restart system.
2) Username and Password
Modify the password of username and guest (use letters and Numbers only).
6.7 Network Settings
Lan Settings

Port Settings

RTMP(S) Settings
SRT Settings

RTSP Settings
RTSP Auth On Off
ONVIF Settings
Multicast Settings

NTP Settings

1) Lan Settings
The default the IP address is 192.168.100.88, the MAC address cannot be modified.
2) Port Settings
A. HTTP Port
The IP address identifies a network device and multiple network programs can run on the device, each network program uses the network port for data transmission. The port setting on this page is to set up which port the WEB SERVER program uses to transmit. During port mapping, it needs to be consistent with the port number (default is 80).
B. RTSP Port
Set up the RTSP port, default is 554.
C. TCP Port
Set up the TCP port, default is 5678.
D. UDP Port
Set up the UDP port, default is 1259.
E. Sony Visca
Sony Visca 52381.
3) RTMP(S) Settings
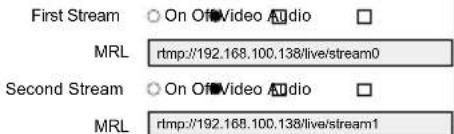
Set the MRL of RTMP(S) and select "on", "off", "video" and "audio" functions to enable or disable video and audio in the two streams.
4) SRT Settings
Turn On/Off SRT and set up the SRT Port, Encryption and Password.
5) RTSP Settings
Turn On/Off the RTSP Auth.
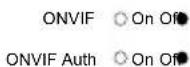
6) ONVIF Settings
Turn On/Off the ONVIF and ONVIF Auth.
7) Multicast Settings
Turn On/Off Multicast, set up the Multicast Address (default is 224.1.2.3) and Port (default is 6688; 6688 is the multicast port of the first stream and 6690 is the multicast port of the second stream).
8) NTP Settings
Turn On/Off NTP time sync, Main time show and Sub time show; select the Time Zone; set up the Server address, Time interval and the Time Show Position of the two streams.
6.8 Device Information


The above information is for reference only, please refer to the real product for the actual specification.
6.9 Download the Upgrade Program
If you need the camera upgrade program, please contact the manufacturer.

WEB interface and parameters are
subject to change without notice.
7 Troubleshooting
Image
● The monitor shows no image
1) Check that the camera power supply is connected, the voltage is normal, and the power indicator is always on.
2) Turn off the power switch to check whether the camera is self-testing.
3) Check the cable of video platform and TV whether in correct connection.
- Image jitters after the camera is properly connected
1) Check whether the camera installation is stable.
2) Check whether any vibrating machinery or object near the camera.
● There is no video image in Browser
IE browser does not support H5, you need to use VLC plug-in to view videos. Please visit VLC website (http://www.videolan.org/vlc) to download and install the 32-bit VLC media player, after installation, the video image will be displayed normally when visit the camera. Other mainstream browsers already support H5 and do not need to install the VLC plug-in.
- Unable to access camera through Browser
1) Using PC to access the network to test that the network access can work properly to eliminate the network fault caused by cable and PC virus until the PC and camera can ping each other.
2) Disconnect the network, connect camera with PC separately and reset the IP address of PC if necessary.
3) Check that the IP address, subnet mask and gateway settings for camera is correct.
4) Check that the MAC address is conflicts.
5) Check that the web port is modified, the default setting is 80.
- Forget the IP address or login password
The default IP address is: 192.168.100.88; the default username and password are both: admin.
Control
- Remote control does not work
1) Check and replace with new batteries.
2) Check whether the camera is in normal working mode.
3) Check whether the address key of remote control can match the camera. - Serial port cannot control
1) Check whether the protocol, address and baud rate of camera are consistent.
2) Check whether the control line is properly connected.

natural_image
World map with digital circuit patterns overlay, no visible text or symbols
- USB High-Definition Live Camera
- User Manual
- English (V1.0)
- Copyright Notice
- Catalogue
- Note
- Quick Start
- About Product
- Features
- ● Full Function USB Interface
- ● 1080P Full HD
- - 72.5° Wide-angle Lens
- ● Low Illumination
- - Remote Control
- ● Leading Auto Focus Technology
- ● Multiple Interfaces
- - Portrait
- ● Two Power Supply Modes
- - Easy to Use
- Specifications
- Installation
- Remote Control
- Key Description
- ⏻ (Standby) Key
- Number Key
- 3.\*Key
- PRESET Key
- HOME Key
- ↗ (Return) Key
- ZOOM Key
- L/R SET Key
- FOCUS Key
- CAMERA SELECT Key
- # Key
- IR Remote Control Key
- RESET Key
- PTZ Control Key
- MENU Key
- BACKLIGHT Key
- P/T RST (PTZ Reset) Key
- Image Freezing Function
- Shortcut Set
- GUI Settings
- MENU
- MENU
- EXPOSURE
- EXPOSURE
- COLOR
- IMAGE
- P/T/Z
- NOISE REDUCTION
- NOISE REDUCTION
- SETUP
- SETUP
- COMMUNICATION SETUP
- COMMUNICATION SETUP
- RESTORE DEFAULT
- RESTORE DEFAULT
- WEB Settings
- Visit Camera
- Control Camera
- Video Viewing Window
- PTZ Setup
- 1) Pan and Tilt Control
- 2) Zoom
- 3) Focus
- 4) PTZ Speeds
- 5) PTZ Presets
- 6) PTZ/OSD Dropdown
- Language Selection
- Video Settings
- 1) Video Format
- 2) Encode Level
- 3) Encode Codec
- 4) Resolution
- 5) Bit Rate
- 6) Frame Rate
- 7) I Key Frame Interval
- 8) Bit Rate Control
- 9) Slice Split Enable
- 10) Split Mode
- 11) Slice Size
- Image Settings
- 1) Luminance
- 2) Contrast
- 3) Sharpness
- 4) Gamma
- 5) Black & White
- 6) Flip-H
- 7) Flip-V
- Audio Settings
- 1) Audio Switch
- 2) Audio Type
- 3) Sample Rate
- 4) Bit Rate
- 5) Input Type
- 6) ADTS Options
- System Settings
- 1) Reboot
- 2) Username and Password
- Network Settings
- 1) Lan Settings
- 2) Port Settings
- 3) RTMP(S) Settings
- 4) SRT Settings
- 5) RTSP Settings
- 6) ONVIF Settings
- 7) Multicast Settings
- 8) NTP Settings
- Device Information
- Download the Upgrade Program
- Troubleshooting
- Image
- Control
Brand : Hollyland
Model : Arocam C2
Category : Security Camera