
TV-NVR104 - Security Camera TRENDNET - Free user manual and instructions
Find the device manual for free TV-NVR104 TRENDNET in PDF.


| Product Type | Network Video Recorder (NVR) |
| Model | TV-NVR104 |
| Brand | TRENDnet |
| Video Channels | 4 channels |
| Video Compression | H.265, H.264 |
| Recording Resolution | Up to 8MP per channel |
| Hard Drive Support | 1 SATA HDD up to 8TB |
| Network Interface | 1 x Gigabit Ethernet RJ-45 |
| PoE Support | 4 x PoE (802.3af/at) ports |
| Power Supply | DC 12V, 2A |
| Power Consumption | ≤ 24W (without HDD) |
| Dimensions (W x D x H) | 200 x 200 x 45 mm |
| Weight | Approximately 1.5 kg |
| Operating Temperature | 0°C to 40°C |
| Storage Temperature | -10°C to 60°C |
| Humidity | 10% to 90% (non-condensing) |
| Remote Access | Via TRENDnet app or web browser |
| Compatible Cameras | TRENDnet IP cameras and ONVIF compliant |
| Maintenance | Keep vents clean; avoid moisture |
| Cleaning | Wipe with dry cloth; no liquids |
| Safety Certifications | CE, FCC |
| Spare Parts Availability | Power adapter, remote control (if applicable) |
| Repairability | Professional repair recommended |
Frequently Asked Questions - TV-NVR104 TRENDNET
User questions about TV-NVR104 TRENDNET
0 question about this device. Answer the ones you know or ask your own.
Ask a new question about this device
Download the instructions for your Security Camera in PDF format for free! Find your manual TV-NVR104 - TRENDNET and take your electronic device back in hand. On this page are published all the documents necessary for the use of your device. TV-NVR104 by TRENDNET.
USER MANUAL TV-NVR104 TRENDNET
natural_image
White wireless router device with 'TRENDINET' branding on top (no other text or symbols visible)4-Channel 1080p HD PoE NVR
TV-NVR104
TRENDnet User's Guide TV-NVR104
Table of Contents
Table of Contents....2
Product Overview 7
Features....7
Package Contents....7
Hardware 8
PoE Ports....8
Storage Bay 8
Network Port 8
Display Ports 8
Audio Ports....8
USB Ports 8
Mouse Included 8
Management 8
Remote Access 8
Camera Setup 8
Live View....8
Camera Management 8
Video Recording....8
Recording Time....8
Scheduled Recording....8
Advanced Playback....9
Video Export....9
Dynamic DNS Support 9
IPv6....9
Free Apps....9
TV-NVR104 Front View....10
TV-NVR104 Back Panel....10
Installation Overview ...... 11
Things you need to install the system....11
Free Mobile App....12
Hard Drive Installation....13
Compatible Hard Drive....13
Mounting Your Hard Drive ....13
Wiring the System....15
Connect NVR to your network (optional)....15
Connect to the cameras....15
Connecting the power supply....15
Connect to the monitor or TV....16
Connect the mouse....16
NVR Installation....16
Camera Installation....16
Viewing angle....16
Weather conditions....16
Basic System Setup .... 18
Soft Keyboard Instruction....18
Keyboard styles....18
Setup Wizard 20
Start Recording....24
Instant Playback....24
TRENDnet User's Guide TV-NVR104
System Management (local) 25
Using the Short Menu....25
Shortcut Menu 27
Instant playback....27
Audio....27
PTZ control....27
Digital zoom....29
Image settings 30
Live view strategy....30
Close....30
Using the Main Menu.... 31
Login to the Management Pages....31
Restore Default Password....32
Logout, start up, or shut down the NVR.... 33
Startup your NVR....33
Shutdown your NVR....33
Rebooting your NVR....33
Log out from NVR management....33
Camera Settings Menu 34
Camera Connection Settings....34
Camera installations....34
On screen Display Settings....40
Display Settings....40
PTZ settings....42
Basic pan and tilt....42
Advanced PTZ....42
Preset positions....43
Pattern....43
Patrol....44
Motion Detection....45
Motion detection settings....45
Privacy Mask....48
Video Tamper....49
Video tamper settings....49
Video Loss....51
Video loss settings....51
System Configuration Menu 53
System Settings....53
General....53
DST settings 54
More settings....54
Network....55
General....55
DDNS....56
NTP 56
Email 57
UPnP....58
More settings....58
Live View....59
General....59
TRENDnet User's Guide TV-NVR104
View....60
Exceptions 61
User Accounts....62
Add....62
Edit....62
Permission....62
System Maintenance Menu 64
System information....64
NVR information....64
Camera information 64
Recording Information....65
Network Information....65
Hard Disk Storage Information....66
Log Information....67
Log Search 67
Log Export 68
Save and Load NVR System Settings....69
Firmware Upgrade....70
Local Upgrade 70
Remote Upgrade....70
Factory Default....71
Network Monitoring....72
Traffic 72
Network Tools....72
Network Statistics 73
Hard Drive Maintenance....74
S.M.A.R.T Settings 74
Bad Sector Detection....75
Hard Drive Management....76
Format/Initiate the Hard Drive 76
Advanced Storage Quota Settings....76
Scheduled recording 77
Schedule....77
Video Settings....80
Sub Stream....81
Advanced recording setting....82
Holiday scheduling....83
Backup Video Recordings....84
Export....84
Video playback....86
Playback screen....86
Search for video recordings 87
Time line....87
Playback buttons....87
Playback operations....88
Playback modes....89
Access your NVR with the Web Browser....92
Default Settings and Factory Reset....92
System Requirement....92
Logging-in to the NVR for the First Time (Windows)....92
TRENDnet User's Guide TV-NVR104
Logging-in to the Camera for the First Time (OS X)....95
Live View....101
Playback....103
Search for video recordings....103
Time Line 103
Play video....104
Slice images from video playback....104
Download recorded videos....105
Where can I find saved files? 105
Log....106
Search for logs....106
Where can I find saved files? 106
System Information....107
System Configuration....108
Device Settings....108
User Accounts....108
Time Settings....109
Daylight Savings....110
Live View Settings 111
Maintenance 112
Network Settings....113
TCP/IP 113
Port....114
DDNS....114
Video Settings....115
Video Format....115
On Screen Display Settings....116
Text Overlay....116
Privacy Mask....117
Video Recording....117
Holiday Settings....118
Events 120
Motion Detection....120
Video Tampering....122
Exception....123
Email 124
Storage 125
Storage Management....125
Appendix 126
Turn on network discovery on Windows....126
Direct video access - RTSP 126
How to setup a static IP address on your computer ....127
Windows 8....127
Windows 7....128
OS X....130
Install your NVR System on Your Network....132
Manage your IP addresses ....133
Compatible Camera List....134
Regulations....135
TRENDnet User's Guide TV-NVR104
Federal Communication Commission Interference Statement....135
FCC Radiation Exposure Statement....135
Europe - EU Declaration of Conformity....136
Safety 136
EMC....136
Directives 136
RoHS....137
Power over Ethernet....137
Limited Warranty....138
TRENDnet User's Guide TV-NVR104
Product Overview

natural_image
White wireless router device with ventilation grille and 'TRENDAY' branding (no additional text or symbols visible)TV-NVR104
Features
TRENDnet's standalone 4-Channel 1080p HD PoE NVR, model TV-NVR104, offers a comprehensive video display, storage, and management solution. The NVR networks and powers up to four PoE cameras* and auto-recognizes select TRENDnet cameras. Install up to a 4 TB hard drive (sold separately) to record over three weeks of continuous video from four 1080p PoE cameras**. Quickly review and export archived video with advanced playback.
Package Contents
TV-NVR104 package includes:
• TV-NVR104 Network Video Recorder
• Network cable (1.8 m / 6 ft.)
• Multi-Language Quick Installation Guide
- CD-ROM (User's Guide)
• Power adapter (48V DC, 1A)
If any package content is missing or damaged, please contact the retail store, online retailer, or reseller/distributor from which the product was purchased.
*See list of compatible cameras
**6.5 days of continuous video per camera with four cameras recording 1280 x 960 at 30 fps and set to medium VBR
TRENDnet User's Guide TV-NVR104
Hardware
PoE Ports
Plug and play PoE network cameras* to the four PoE (IEEE 802.3af) ports with a total PoE budget of 35 Watts
Storage Bay
A 3.5" SATA I/II bay supports up to a 4 TB HDD/SSD (sold separately)
Network Port
Ethernet network port
Display Ports
HDMI and VGA display ports
Audio Ports
Audio in and out ports
USB Ports
One USB port for the included mouse and one for configuration backup and firmware upgrade
Mouse Included
Includes a mouse and does not require a keyboard
Management
Remote Access
Access the NVR over the internet
Camera Setup
Auto-recognizes compatible TRENDnet cameras* and works with most PoE network cameras
Live View
Single camera and quad-view modes with variable-time auto-scan function
Camera Management
For each camera, manage on screen display, image settings, PTZ functionality, motion detection, privacy masks, tamper detection, and video loss
Video Recording
Record up to Full 1080p HD video at 30 fps in H.264 compression
Recording Time
- Over three weeks of recording per camera with a 4 TB HDD (sold separately) and 4x 1080p cameras at 30 fps with medium VBR
- Over one month of recording per camera with a 4 TB HDD (sold separately) and 4x 720p cameras at 30 fps with medium VBR
Scheduled Recording
Create weekly continuous and motion detection recording schedules for each camera with video overwrite when storage is full
TRENDnet User's Guide TV-NVR104
Advanced Playback
Advanced archived video playback with a quick reference timeline and calendar
Video Export
Quickly export specific video types over a specified time
Dynamic DNS Support
Support for dyn.com and NO-IP.org
IPv6
IPv6 support
Free Apps
See live video on a mobile device with free Apple® and Android® apps
*See list of compatible cameras
TRENDnet User's Guide TV-NVR104
TV-NVR104 Front View

Power: Solid: The power is on.
Off: The power is off.
Storage: Blink: The system is reading or writing the built-in storage.
Off: The system is not accessing the storage.
Network: The LEDs on network port are always off
TV-NVR104 Back Panel
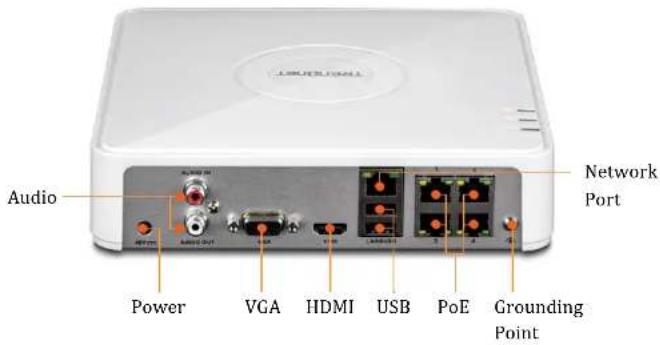
Power: Power socket of camera (48V DC, 1.04A)
Note: Use only the adapter that came with your camera
Audio Out: RCA connector to speaker (1.0Vp-p, 1kΩ)
VGA: Connect to VGA monitor with 1024 x 768 resolution or higher.
HDMI: Connect to monitor or HDTV with HDMI interface
USB: Connect to optical mouse and/or external USB flash drive for file import or export.
Network Connect to your office or home network for remote
Port: access and viewing
PoE: Connect 802.3af (15.4W Max.) cameras.
Grounding Connect to grounding wire. This is especially
Point: important when you install your camera outdoor.
Installation Overview
Things you need to install the system
You can simply setup your surveillance system as a standalone system or integrate the system with your own computer network. To setup a basic network surveillance system, you'll need the TV-NVR104 and additional parts:
- NVR: TV-NVR104 is a network video recorder. The package does not come with the hard disk drive for video recording. I leaves you the space to choose the favorite size and brand name of hard drive. Please purchase the hard drive meets the following requirements:
- 3.5" internal hard drive
- The storage up to 4TB
o SATA I or SATA II interface
o Video or Surveillance grade of hard drive
- Camera: you need at least one network camera to build your network surveillance system. Choose cameras from the following camera lists for your system.
TRENDnet Plug-and-Play all-weather PoE Cameras: A brand new series of TRENDnet Plug-and-Play all-weather PoE cameras were developed for easy installation and management. It is recommended using this series of cameras for the best overall system performance.
Plug-and-Play cameras:
| Model | Description |
| TV-IP310PI | Outdoor 3MP Full HD PoE Day/Night Network Camera |
| TV-IP311PI | Outdoor 3MP Full HD PoE Dome Day/Night Network Camera |
| TV-IP312PI | Outdoor 3 MP Full HD 1080p PoE IR Network Camera |
| TV-IP320PI | Outdoor 1.3 MP HD PoE IR Network Camera |
| TV-IP320PI2K | Outdoor 1.3 MP HD PoE IR Network Camera Twin Pack |
| TV-IP321PI | Outdoor 1.3 MP HD PoE Dome IR Network Camera |
| TV-IP322WI | Outdoor 1.3 MP HD WiFi IR Network Camera |
| TV-IP430PI* | 2MP Outdoor Speed Dome |
| TV-IP450P* | Outdoor 1.3 MP HD PoE+ Speed Dome Network Camera |
| TV-IP450PI* | Outdoor 1.3 MP HD PoE IR Speed Dome Network Camera |
* Require extra PoE injector. Please read the camera user's guide for more detail.
TRENDnet Cameras: If you have following cameras, you can install them on the TV-NVR104 for recording and advanced playback.
Outdoor PoE cameras:
| Model | Description |
| TV-IP302PI | Outdoor Megapixel HD PoE Day/Night Internet Camera |
| TV-IP342PI | Outdoor 2MP Full HD Vari-Focal PoE Day/Night Dome Network Camera |
| TV-IP343PI | Outdoor 2MP Full HD Vari-Focal PoE Day/Night Network Camera |
Indoor PoE cameras:
| Model | Description |
| TV-IP572P | Megapixel HD PoE Internet Camera |
| TV-IP572PI | Megapixel HD PoE Day/Night Internet Camera |
| TV-IP672P | Megapixel HD PoE Day/Night PTZ Internet Camera |
TRENDnet User's Guide TV-NVR104
TV-IP662PI
Megapixel HD PoE Day/Night PTZ Network Camera
- Display Monitor or HDTV: The TV-NVR104 come with 2 display ports: HDMI and VGA. You can connect either or both of them to the monitor or HDTV and setup one on your desktop and one in storefront. The package does not include the video cable. You need to prepare appropriate cable to connect to the displays.
- Internet (optional): You can attach your TV-NVR104 to your existing network, or you can make it a standalone network system. If you decide to use your existing computer network for video surveillance, the network management and bandwidth control should be carefully planned. By connecting the TV-NVR104 to the Internet, you can access your NVR for remote viewing and playback. You have to specially taking care of the static IP management. Please reference Manage your IP addresses on page 133.
Free Mobile App
TRENDnet IPView is a free mobile app you can download from Google Play store for Android mobile device or from Apple app store for iOS devices. You can see the video live view wherever you are and whenever you are. Appropriate port forwarding setting is required when you access the video remotely. See your router's user guide for more detail on how to setup the port forwarding.
TRENDnet User's Guide TV-NVR104
Hard Drive Installation
Compatible Hard Drive
The TV-NVR104 is compatible with 3.5" SATA I or SATA II hard drives up to 4 TB storage. To ensure uninterrupted 24/7 recording, it is recommended that you select a drive rated for video or surveillance applications.
Mounting Your Hard Drive
Note: Static electricity can damage the TV-NVR104. Before handling the unit, discharge any static electricity by touching a metal object, or use an anti-static wrist strap.
- Remove the four retaining screws from the bottom panel of the TV-NVR104.

natural_image
Illustration of a screwdriver interacting with a device, showing a magnified view of the component (no text or symbols present)- The top cover is slotted vertically. From the back of the unit, gently slide the cover up to separate it from the lower panel.
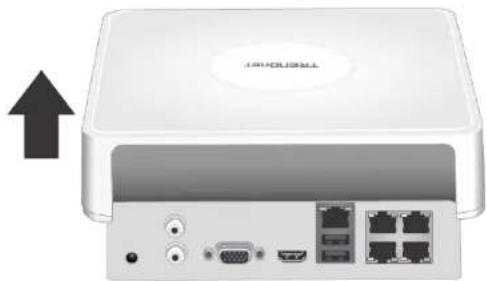
natural_image
White electronic device with ports and an upward arrow indicator (no readable text or symbols)- Attach the SATA cable to the hard drive (sold separately) and control board. SATA connectors are keyed to prevent improper installation.

natural_image
Diagram showing connections between an electronic device with connectors and a hard drive (no text or symbols present)TRENDnet User's Guide TV-NVR104
- Mount the hard drive to the TV-NVR104's drive bay using the mounting screws included with your hard drive.
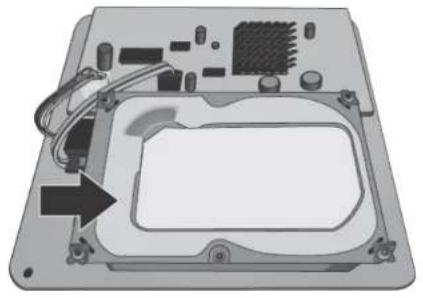
natural_image
Interior view of an electronic device showing internal components and a highlighted area with an arrow (no text or symbols visible)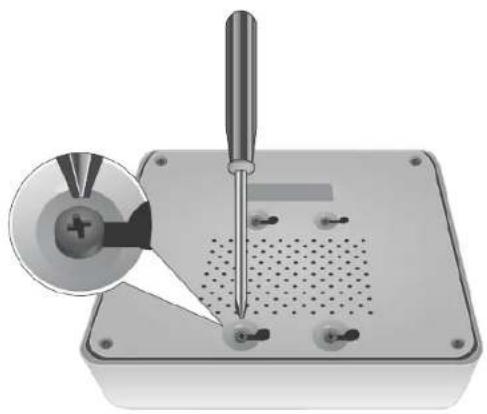
natural_image
Illustration of a soldering iron on a base with a magnified inset showing the tip and pin (no text or symbols)- Reattach the top cover to the unit. Make sure the lower panel lines up with the slots on the cover.

natural_image
Front view of a white network device with ports and an arrow pointing downward (no text or symbols on the device body)- Put the screws back on which was removed earlier.

natural_image
Illustration of a soldering iron on a device with a magnified inset showing a star-shaped component (no text or symbols)TRENDnet User's Guide TV-NVR104
Wiring the System
It is recommended to setup and test the whole system on your table before physically wiring and mounting the cameras. A reference connection diagram is showed below.
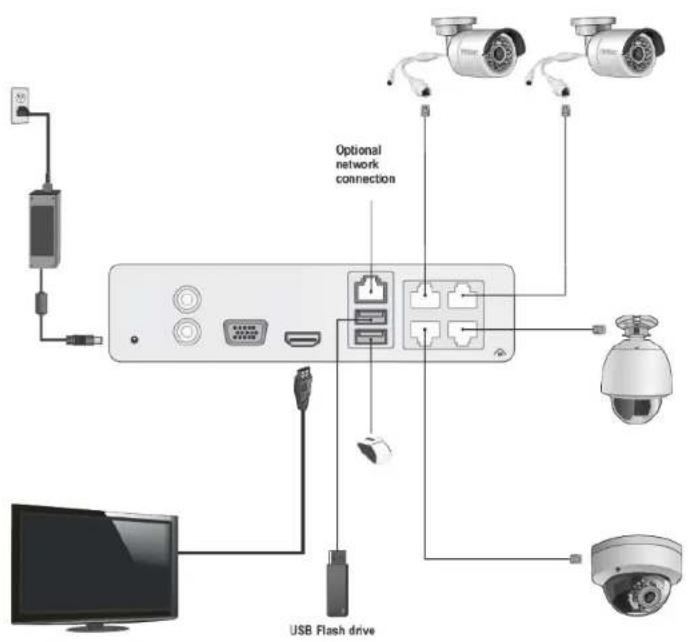
Connect NVR to your network (optional)
If you want to remote access the NVR and want to install the TV-NVR104 on your home network, you can connect the NVR to the network in the first beginning, by connecting one end of your network cable to your home router or network switch, and then connect the other end of the cable to the network port on TV-NVR104.
The TV-NVR104 install cameras automatically after power up. If you decide the let the NVR gets its IP dynamically or setup the IP address to your network, please setup your NVR without camera connected. After the IP set up, power off the NVR and then going through the installation again.
Connect to the cameras
Using the Cat 5e or Cat 6 Ethernet network cables connect the camera's PoE network port to any of the PoE network ports on the TV-NVR104. The TV-NVR104 powers up the PoE cameras over the network cable. If you have non-PoE camera, 802.3at PoE camera (TV-IP430PI and TV-IP450P), or proprietary PoE camera (TV-IP450PI), you have to connect the power separately. Please reference to the camera user's guide for more detail.
Connecting the power supply
- Connect the 48V DC power adapter to the TV-NVR104 power port.
- Connect the power cables to the power adapters.
- Plug the power cables into a power source.
- Connect the grounding point to a ground wire.

TRENDnet User's Guide TV-NVR104
Connect to the monitor or TV
Connect a monitor to either the HDMI or VGA port.

Connect the mouse
Connect the included mouse to one of the USB ports.

NVR Installation
Setup a safe and secured place for your NVR. Place it in a locked or not easy accessed place can add up the physical level security. Connecting to a UPS (Uninterruptible Power Supply) is recommended so you can keep video recording even there is a power outage.
Provide a good ventilation and away from clusters and damp environment is also important to the location of your NVR device. Make the NVR installation accessible for annual maintenance to clean up the fan or replace the hard drive is a decent consideration for maintenance.
Camera Installation
There are number of factors involved in a successful camera installation. Follow the suggested installation steps and go through the check lists. This guide will help you make your camera installation smoothly and easily.
Viewing angle
Different camera has different view angle. Choose the location where has good angle to shoot the image you expect to see. The motion detection area should also be considered when installing the camera.
Weather conditions
All TRENDnet outdoor cameras are good for indoor and outdoor locations. The camera can work under a wide range of weather conditions. For severe weather conditions, a camera housing with temperature and moisture control is recommended. Using the camera in milder weather conditions will help extend the camera's product life and preserve the quality of the video image. Do not use the indoor camera for outdoor.
TRENDnet User's Guide TV-NVR104
- Moisture: Avoid damp or moist environments whenever you can. The all-weather cameras are IP66 grade water proof camera, and it will work in moist environments. However, rain may affect the picture quality, especially at night, water may reflect the light from the infra-red illumination and degrade picture quality.
- Temperature: All cameras works within a specified temperature range. Areas with severe temperatures should be avoided when installing the camera. It's recommended that you use an enclosure with a heater and blower if you plan on using this camera outside of the specified temperature range.
- Sunlight: Avoid direct sun light exposure into the lens. Direct sun light will damage the image sensor. If sunlight is necessary for your viewing purposes, provide protection for the image sensor.
- Lighting: Consider installing your camera faces the same direction of the light sources. Shooting images with top-down position outdoor or next to the existing light source are good choices. Avoid the light source if it creates a shade that darkens the viewing area.
TRENDnet User's Guide TV-NVR104
Basic System Setup
Soft Keyboard Instruction
To set up your TV-NVR104 with the mouse, you can invoke the soft keyboard on the screen to enter the text.
Keyboard styles
There are three keyboard styles available, English letter, numeric, and special characters. The default keyboard style is English letter keyboard in lower case letter mode. Click the keyboard style button if you want to change it into another style.

List of keyboard styles

English keyboard (default)

Numeric keyboard

Special characters
English keyboard
Click on the letter of your choice to enter the text. Click on the toggle button on lower left corner to switch between upper case and lower case (default)
English keyboard

Lower case (default)

Upper case
Numeric keyboard
Click on to change the English keyboard to numeric keyboard.

TRENDnet User's Guide TV-NVR104
Special characters
Click on to the lower left corner to enable the special character menu. Click on or on upper right corner to browse through the special characters. Click on the special character of your choice.
Special characters






TRENDnet User's Guide TV-NVR104
Setup Wizard
- Setup wizard will show up after the TV-NVR104 is powered up. Click Next to start the wizard.

- Click the text field to the right of Admin Password. Enter the default administrator password of admin. Click the text field to the right of New Admin Password to enter a new administrator password.

- Enter the new password again in the Confirm text field and then click Next.
TRENDnet User's Guide TV-NVR104
4. Click the selection list to the right of Time Zone.
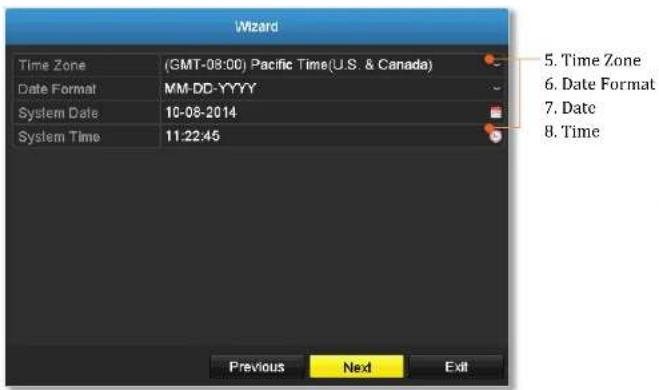
5. Select your time zone.

TRENDnet User's Guide TV-NVR104
- Click the selection list to the right of Date Format and then select a date format.

- Click the selection list to the right of System Date.
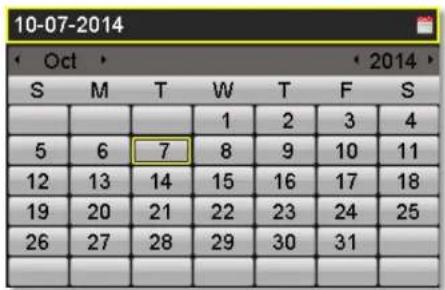
- Select the year by clicking on left or right arrow.
- Select the month by clicking on left or right arrow.
-
Select the day by clicking on the date.
-
Click the selection list to the right of System Time and then enter the time with 24-hour format.

- Click Next.

TRENDnet User's Guide TV-NVR104
- Select the hard drive and then click Init to initiate your hard. Wait for the hard drive initialization. Click OK when it is done (The status will show Normal.)

TRENDnet User's Guide TV-NVR104
Start Recording
You can start recording immediately just with a few clicks. In Live View, right click on the mouse. A short menu will come up. Choose Start Recording and then Continuous Record.

Click Yes to start continuous recording. (For more advanced video recording features, please see Scheduled recording on page 77 for more details.)
Instant Playback
Move your mouse pointer over the camera display you want to playback the video and select the display by click on it. The instant playback tool bar will show up.

Click on 📋 to playback the last 5 minutes of recording. (For more advanced video playback features, please see the Video playback on page 86 for more details.)
TRENDnet User's Guide TV-NVR104
System Management (local)
With the basic system setup, your system is now up and running. Now, you can use your mouse pointer and monitor to view, set up, and manage your network video recorder.
Using the Short Menu
Right click your mouse while you are viewing the live video. The short menu will be popped out.

Short Menu
Menu: Click to show the main menu (see page 31 for Main Menu instructions)
Single Screen:
Display video live view one at a time. Click on Single Screen and then choose the camera you want. (The video you choose will be replaced with other video if the auto-switch is on, and the auto-switch is on by default.)

Multi-screen:
Display all four video live views at the same time. By default, the video live view is set in the Multi-screen mode. If you are now in Single Screen mode, click on Multi-Screen and then choose 2 x 2 to switch to multi-screen live view mode.

TRENDnet User's Guide TV-NVR104
Previous Screen: In Single Screen mode, you can manually switch the video to the previous channel.
Next Screen: In Single Screen mode, you can manually switch the video to the next channel.
Stop/ Start Auto-switch: Start (default) or stop automatic live view switch. The live view video will be changed by channel sequence.
Start Recording: Start Continuous or Motion Detection recording.

To set up motion detection area, or stop continuous and motion detection recordings, you need to navigate to the detailed settings through the main menu.
Playback: Click Playback to go full playback menu. For more information, please reference the please see the Video playback on page 86 for more details.

Output Mode: Select a monitor display setting from Standard, Bright, Gentle, and Vivid of your choice. Click OK to confirm your choice.
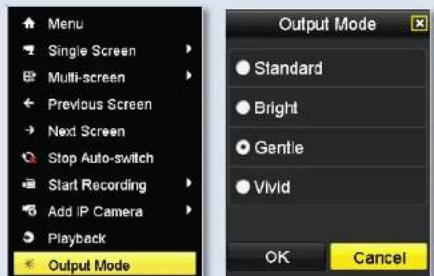
TRENDnet User's Guide TV-NVR104
Shortcut Menu
Each video in live view has a short cut menu to perform the frequent adjustments of the video. Move your mouse pointer over the camera display you want to bring up the Shortcut Menu. Click on the video. The frame of the video shows active (yellow frame). And then click on the button of the selected jobs.

natural_image
Four-panel photo collage showing a multi-story building, parked cars in parking lot, outdoor courtyard with fence, and indoor security gate (no visible text or symbols)
Instant playback
Click on to playback the last 5 minutes of recording.
Audio
Click on to enable the audio on selected channel. Click to write the audio.
PTZ control
Click on to proceed PTZ operations.
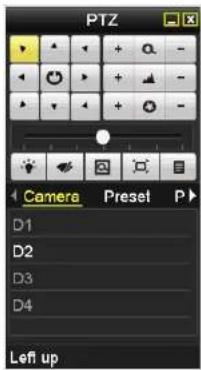
The PTZ menu will show up on the screen.
Basic pan and tilt
Click the buttons you want to pan or tilt the camera. Adjust the distance of each step of moving by sliding the Speed. Each step can have farther distance when sliding the Speed toward the right, and vice versa.

TRENDnet User's Guide TV-NVR104
Advanced PTZ
You can further control zoom, focus, and aperture with compliant PTZ camera. Click on + or - to adjust zoom, focus and aperture (iris). Click button, the camera will turning it around continuously. Click the button again to stop moving.

Special features
(Feature availability depends on camera models)


Turn on or turn off external lighting

Turn on or turn off external wipe on the camera

Zoom operation.
Zoom In: Click and drag area from left to right to zoom in the defined area.
Zoom Out: Drag area from right to the left to zoom out that area.
PTZ menu: Right click on the mouse brings the hidden PTZ menu back.

Center operation. Point and click on the video.
The camera will move the camera and make the pointed spot the center of the video.

Menu. Bring up the advanced PTZ menu.
Navigation
Quickly adjust the PTZ camera point and shooting area with presets.
Switch Use and buttons to switch between
between the different preset lists: Camera, Preset, Patrol, lists; and Pattern.

Camera: Select the viewing video channel

Preset: Select the preset PTZ position. Use the scroll bar to see more presets.

Patrol: Select the preset PTZ patrol. Click to start patrol and click stop patrol.
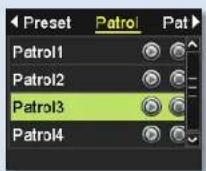
TRENDnet User's Guide TV-NVR104
Pattern: Select the preset PTZ pattern. Click 📋 to start pattern playback and click 📋 stop patrol.

Digital zoom
Click on a tenable digital zoom. A small navigation window will be showed up in the lower right corner of the screen. Drag and drop or double click to define the area you want to zoom in. The defined area is showed in red rectangular. Right click to exit the digital zoom mode.

natural_image
Interior view of a modern building with glass doors and silhouettes of people walking (no visible text or signage)TRENDnet User's Guide TV-NVR104
Image settings
Click on to adjust the video display settings.

 | Use the slider or enter a number (0-255) to adjust the image brightness. Default: 128 |
 | Use the slider or enter a number (0-255) to adjust the image contrast. Default: 128 |
| [KSSK] | Use the slider or enter a number (0-255) to adjust the color saturation. The greater number means the color will be more saturated. Default: 128 |
 | Use the slider or enter a number (0-255) to adjust the image HUE setting. Default: 128 |
Live view strategy
Click on to manage the live view strategy. The Real-time strategy allocate all resources to minimize the delay of video delivery. When the network is congested, the video may be interrupted. Fluency strategy makes larger video buffer to save and play video back. It makes the communication more robust, but the live view playback timing is delayed. Balanced strategy set up the good enough video buffer to take care of the playback fluency while maintain the network robustness.

Close
Click on to close the shortcut menu.
TRENDnet User's Guide TV-NVR104
Using the Main Menu
Right click your mouse while you are viewing the live video. The short menu will be popped out. Mouse over the Menu and click the button to bring up the Main Menu.
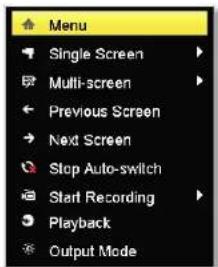
Login to the Management Pages
The NVR will ask you to enter the password every time you want to login to the management page. Enter the password and then click on OK to bring up the main menu.
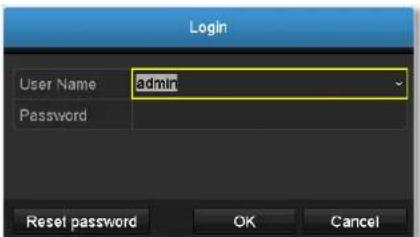

TRENDnet User's Guide TV-NVR104
For security purposes, if you find yourself in need of restoring the TV-IPNVR104 to factory default settings you will need to contact support.
Click Reset Password and provide the Serial Number to the support agent for a temporary access code.

This code is time sensitive; please ensure you reset the password immediately.
USA/Canada phone support:
Toll Free English: (855) 373-4741
• Monday – Friday: 7:00 AM – 5:30 PM, PST
After hours 24/7: (866) 845-3673
Global Support:
Find the support number for your country at: www.trendnet.com/contact
Online Support:
www.trendnet.com/support/helpdesk
In the call or email, you need to supply the serial information. Click Reset Password to get the information. The serial number is a calculated number based on your NVR identity and start up time. Please do not power off your NVR before you complete the password reset process. Otherwise, the secure code you get from the support center may not work to reset the password to factory default.


Do not power off your NVR while you are requesting the Secure Code.
TRENDnet User's Guide TV-NVR104
Logout, start up, or shut down the NVR
The TV-NVR104 is a class A network equipment designed for 24/7 operation. Just plug-in the power source, the TV-NVR104 is up and running. When you want to change the NVR settings, manage the cameras proceed system maintenance or software upgrade, you need to log in, log out, restart, or shut down your NVR gently.
Pulling out the power source may cause unexpected hard drive damage and system malfunction which is not a suggested way to power down your NVR.
Startup your NVR
Make sure the power supply is plugged into an electrical outlet. It is highly recommended that an uninterruptible power supply (UPS) to be used in conjunction with the unit.
Shutdown your NVR
Bring up the main menu. Click on Shutdown Menu

Shutdown sub menu is showing up.

Click Shutdown to gracefully end the recording sessions and prepare the hard drive for shutting down. Then click the Yes to confirm that you want to shut down the NVR.

Rebooting your NVR
Click Reboot to reboot your NVR without power down.
Log out from NVR management
When you have done the NVR settings and managements, you'll want to lock your NVR before you leave. Click Logout to exit the NVR management.
Note: You can also set automatic time out. The default setting is 5 minutes without management interaction.
TRENDnet User's Guide TV-NVR104
Camera Settings Menu
Setting and manage your cameras by bring up the main menu. Click on
Camera Settings Menu

Camera Connection Settings

Camera installations
The TRENDnet Plug-and-Play all-weather PoE cameras are the best choices in working with the TV-NVR104. Other TRENDnet cameras are also work with TV-NVR104, but the installation process is different. Please reference the compatible camera list on page 127 for more details.
IP Camera
Camera No. The camera number is also called channel number. All video recordings and camera settings are using this sequential number as the major index number.
Status:
This column shows the camera connection status. The camera is online. You can click on the icon to show the video and identify which camera you are setting.

The camera is not connected to NVR
IP Camera This is the IP address detected by the NVR or set Address: statically to the camera.
Edit: Click this icon to edit the camera connection settings. The default settings is plug-and-play.
Camera Name: This is the camera name. The default name is the camera model name. You can set it up on your camera directly or set it up in NVR for compatible cameras.
TRENDnet User's Guide TV-NVR104
| Protocol: | This is the camera product group. You can choose from TRENDnet 1, TRENDnet 3, or ONVIF installation with other brand name cameras. |
| Model Number: | This is the model number of the camera. The model number will be showed up automatically for compatible cameras. |
| Management Port: | Different camera management protocols has different management port number. Please see the compatible camera list for more detail. |
| PoE Password Set: | If you install TRENDnet Plug-and-Play all-weather PoE camera with its factory default setting, the TV-NVR104 will set the camera away from the default and load the TV-NVR104 password as camera access password for security reason. If your Plug-and-Play camera was manually setup and then installed with TV-NVR104 using Plug-and-Play installation, the password on the camera will not be changed. To synchronize the password, you can click this button to change the password on the camera to the same password of TV-NVR104.When you click this button, all Plug-and-Play camera passwords are synchronized. |
| Refresh: | Click refresh to refresh the camera list. Only the cameras listed with valid camera index number (1 to 4) are connected to the NVR. Other cameras listed on the table are cameras found on the network, but not connected. You can double click on the listed camera. The detailed information will be showed up. The information is valuable for camera manual settings. |

Back: Click on this button or right click on the mouse to go back to live view.
| Net Receive Idle Bandwidth: | The TV-NVR104 can process total 25Mbps video streams. This reference number indicates how much more network capacity is available now. |
TRENDnet User's Guide TV-NVR104
Plug-and-Play installation
This is an effort free installation. Just to make sure all your cameras are set to factory default and connect the Plug-and-Play cameras to the PoE ports. One for each port. The NVR will detect the camera and install it automatically. Here's a list of TRENDnet Plug-and-Play all-weather PoE cameras:
| Model | Description |
| TV-IP310PI | Outdoor 3MP Full HD PoE Day/Night Network Camera |
| TV-IP311PI | Outdoor 3MP Full HD PoE Dome Day/Night Network Camera |
| TV-IP312PI | Outdoor 3 MP Full HD 1080p PoE IR Network Camera |
| TV-IP320PI | Outdoor 1.3 MP HD PoE IR Network Camera |
| TV-IP320PI2K | Outdoor 1.3 MP HD PoE IR Network Camera Twin Pack |
| TV-IP321PI | Outdoor 1.3 MP HD PoE Dome IR Network Camera |
| TV-IP322WI | Outdoor 1.3 MP HD WiFi IR Network Camera |
| TV-IP430PI* | 2MP Outdoor Speed Dome |
| TV-IP450P* | Outdoor 1.3 MP HD PoE+ Speed Dome Network Camera |
| TV-IP450PI* | Outdoor 1.3 MP HD PoE IR Speed Dome Network Camera |
* TV-IP430PI is a 802.3at PoE camera. Please acquire additional PoE+ injector to power this camera. TV-NVR104 PoE provides only 802.3af power supply which is NOT good enough for TV-IP430PI full operation. TV-IP450P is also a 802.3at PoE camera and TV-IP450PI is a proprietary PoE camera. Both TV-IP450P and TV-IP450PI cameras come with PoE injector in their package. Please use the PoE injectors to power those cameras.

Plug-and-Play installation will find a free IP address and set your camera with that available IP address. Please see Manage your IP addresses on page 133 for more detail.
If you changed the IP Camera settings before, click the Edit icon and then select Plug-and-Play on Adding Method and then click OK to save the settings.

TRENDnet User's Guide TV-NVR104
Manual installation
The following cameras are working with TV-NVR104 and need to be setup manually. Setup your camera with a static IP address is recommended. To setup static IP in cameras, you need a computer to access your camera. The general camera setup process is described here for your convenience. For more detailed information, please reference to the individual camera user's guide.
Outdoor PoE cameras:
| Model | Protocol | Port | Description |
| TV-IP302PI | ONVIF | 80 | Outdoor Megapixel HD PoE Day/Night Internet Camera |
| TV-IP342PI | ONVIF | 80 | Outdoor 2MP Full HD Vari-Focal PoE Day/Night Dome Network Camera |
| TV-IP343PI | ONVIF | 80 | Outdoor 2MP Full HD Vari-Focal PoE Day/Night Network Camera |
Indoor PoE cameras:
| Model | Protocol | Port | Description |
| TV-IP572P | TRENDnet 1 | 80 | Megapixel HD PoE Internet Camera |
| TV-IP572PI | TRENDnet 1 | 80 | Megapixel HD PoE Day/Night Internet Camera |
| TV-IP672P | TRENDnet 1 | 80 | Megapixel HD PoE Day/Night PTZ Internet Camera |
| TV-IP662PI | TRENDnet 1 | 80 | Megapixel HD PoE Day/Night PTZ Network Camera |
Prepare your computer
Prepare a computer with Windows or OS X to access the camera.
If you don't have the network available, simply connect your computer to the network port of TV-NVR104 and connect camera on one of the PoE port. The TV-NVR104 does not have DHCP server and cannot assign IP address to your computer. So, you have to setup your computer with a static IP. (Please see How to setup a static IP address on your computer on page 127 for detail) Setup your computer's IP with camera default
network range (192.168.10.x/ 255.255.255.0) and avoid 192.168.10.30 (camera default IP address) and 192.168.10.60 (TV-NVR104 default address) such as 192.168.10.10.
Setup your camera

Setup one camera at a time, so you can identify which default IP address is for which camera.
-
Reset your camera and plug-in to one of the PoE port of TV-NVR104.
-
Visit the camera from your computer by entering 192.168.10.30 default IP in the browser address line.
-
Navigate to network IP address. Unselect DHCP and enter the static IP address and DNS address if necessary. (For email notification) Save the setting and reboot your camera.

TRENDnet User's Guide TV-NVR104
- Repeat steps 1 to 3 to setup all your cameras.
Camera Manual Setting in TV-NVR104
- Navigate to Camera Management.

- Click the Edit icon and then select Manual on Adding Method.

- Enter the camera IP address.

- Select the camera protocol according to the camera model number. (See camera list above).
TRENDnet User's Guide TV-NVR104

- Select the camera management port according to the camera model number. (See camera list above).

- The NVR defaults to your camera's highest set video stream (Stream 1, listed as "Channel 1"). To use other video stream, select the stream or channel number from the menu.
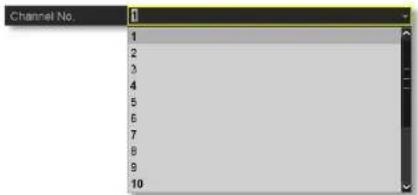
- Enter camera access user name.

- Enter camera access password.
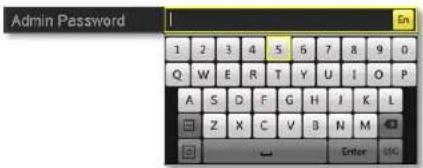
- Click OK to save the settings.
TRENDnet User's Guide TV-NVR104
On screen Display Settings
Compatible camera on screen display can be changed directly through camera access or through NVR.
Note: Please reference compatible camera list for more details.
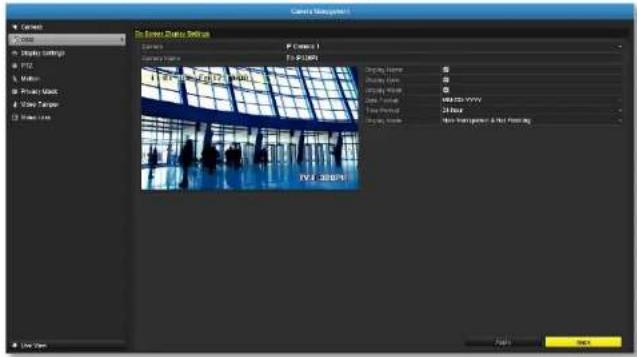
Camera: Click to choose the camera you want to change the settings.
Camera Name: The name of the chosen camera.
Display Name: Check this box to display camera name.
Display Date: Check this box to display system time.
Display Week: Check this box to display time of the week.
Time Format: Select 12 or 24-hour time format.
Date Format: Select the date format
Display Mode: Choose how the text will show on the screen.
Move the yellow or red box to position the text. Click Apply to apply the change.
Display Settings
Adjust video image quality, lightness, and color settings here.
Note: Please reference compatible camera list for more details.

Camera: Click to choose the camera you want to change the settings.
Camera Name: The name of the chosen camera.
Brightness: Use the slider or enter a number (0-255) to adjust the image brightness. Default: 128
Contrast: Use the slider or enter a number (0-255) to adjust the image contrast. Default: 128
Saturation: Use the slider or enter a number (0-255) to adjust the color saturation. The greater number means the color will be more saturated. Default: 128
HUE: Use the slider or enter a number (0-255) to adjust the image HUE setting. Default: 128
TRENDnet User's Guide TV-NVR104
Mirror:

Choose horizontal, vertical or both to adapt to the physical installation.
Click Apply to apply the settings.
TRENDnet User's Guide TV-NVR104
PTZ settings
Control PTZ camera's video shooting position, patrol route, zoom, focus, and iris.
Note: Please reference compatible camera list for more details.
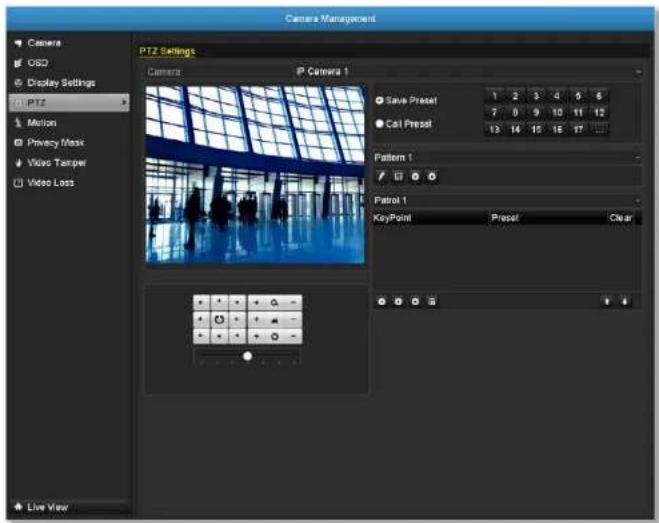
Camera: Click to choose the camera you want to change the settings.
Basic pan and tilt
All compatible PTZ cameras can do the basic pan and tilt to adjust the video shooting position. Click the buttons you want to pan or tilt the camera. Adjust the distance of each step of moving by sliding the Speed. Each step can have farther distance when sliding the Speed toward the right, and vice versa.
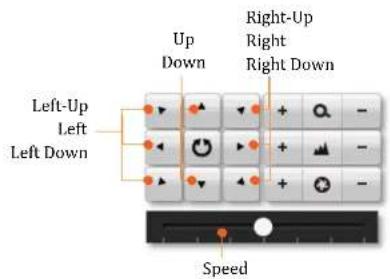
Advanced PTZ
You can further control zoom, focus, and aperture with compliant PTZ camera. Click on + or - to adjust zoom, focus and aperture (iris). Click 📍 button, the camera will turning around continuously. Click the button again to stop policing.

TRENDnet User's Guide TV-NVR104
Preset positions
Set and recall the video views and settings for easier navigate and patrol.
To set up a preset:
- Move your camera to the position you want with arrow keys.
- Adjust the zoom, focus and aperture.
- Select Save Preset.
- Click the number of preset.

You can setup up to 255 presets depends on camera's capability. To access preset number more than 17, click on The preset selection screen will pop up. Click up/down arrow to select the preset number you want.

To recall a preset:
- Select Call Preset.
- Click the number of preset.
Pattern
Setup the patter to perform the navigation automatically.
To edit the pattern:
- Click to start recording the pattern.
- Use preset (Select Call Preset and then click on number) or PTZ buttons to move your camera.
- Click □stop and save recording.

Running the pattern of behaviors:
- Click to start running the pattern.
- Click to stop recording.
TRENDnet User's Guide TV-NVR104
Patrol
Setup detailed patrol route with key points, speed toward the key point and stop by duration.
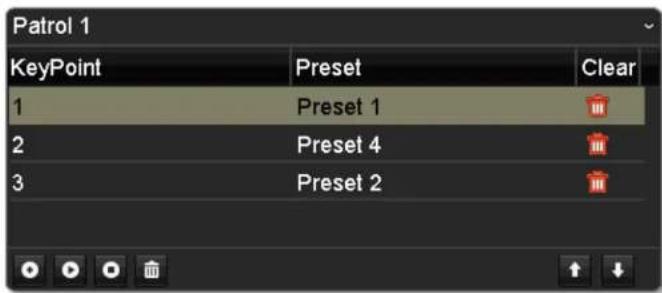
To edit the patrol
Note: please setup all preset positions before you edit the patrol route.
- Click ☐ to add a key point. Select the preset number, duration you want to stay on this key point and the speed you want to go this key point and then click OK.

- To erase a key point, click 📋 on the key point. If you want to edit a key point, just erase the key point and then add a new one.
- Click to move the order of the patrol key points.
- Click clean up all key points.
Start or stop a patrol:
- Click to start patrol.
- Click to stop patrol.
TRENDnet User's Guide TV-NVR104
Motion Detection
Set up how the motion detection event will be triggered and what actions will be triggered.
Note: Please reference compatible camera list for more details.

Camera: Click to choose the camera you want to change the settings.
Enable Motion Check this box to enable motion detection. Click Detection: Apply to apply the choice.
Settings: Setup the motion detection detail.
Sensitivity: Move the slider to adjust detection sensitivity. Sliding to the right means the motion event is easier to be triggered.
Draw Area: Click and drag on the area you want to set up the motion detection or click Full Screen for the whole image area. The red grids represent the motion detection area. Click Clear to clear the motion detection areas.
Motion detection settings
Click Settings to bring out the detailed set up menu.
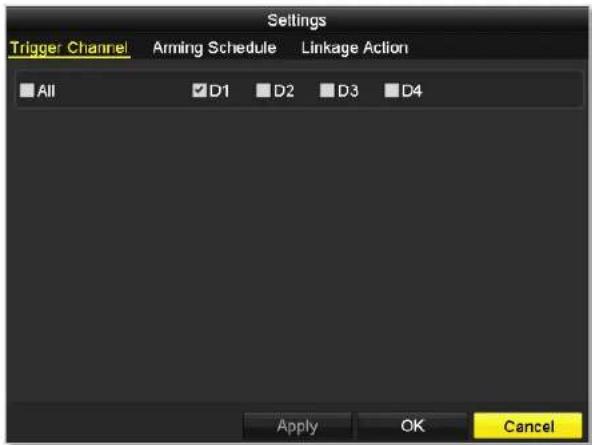
Trigger channel
By default, a motion detection generated by the camera will only trigger the events on that channel. If you want to trigger event on other channels, select the channel number or select All for all channels.
TRENDnet User's Guide TV-NVR104
Arming schedule

- Select day of the week you want to edit on the row of Week.

- Enter the period of time you want to actively detect the motion events.

Copy to:
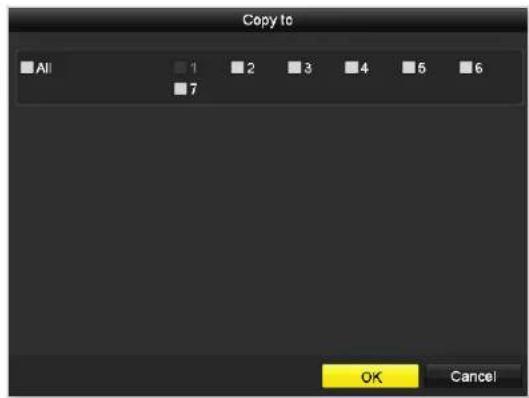
To quickly setup the same schedule over the week, click Copy. Click another day of the week (1: Monday, 2: Tuesday, 3: Wednesday, 4: Thursday, 5: Friday, 6: Saturday and 7: Sunday). Click All to select the whole week. Click OK after you select the day of the week you want to copy to.
TRENDnet User's Guide TV-NVR104
Linkage action
When motion event detected, the corresponding actions will be executed.

| Full Screen Monitoring: | Switch the video on the VGA/HDMI monitor to the camera detected motion event. |
| Audible Warning: | Activate the audible on board buzzer. |
| Send Email: | Send email to notify the system manager. |
TRENDnet User's Guide TV-NVR104
Privacy Mask
Create a masking area to keep your privacy.
Note: Please reference compatible camera list for more details.
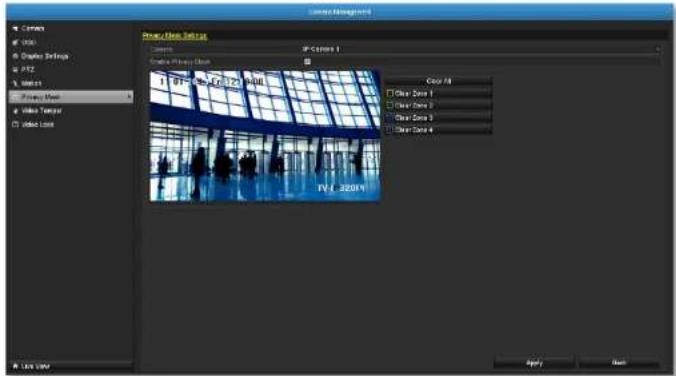
| Camera: | Click to choose the camera you want to change the settings. |
| Enable Privacy Mask: | Check this box to enable privacy masking. |
| Draw Area: | Click and drag on the area you want to set up the privacy mask. |
| Clear All: | Click this button to clear all the masking area. |
| Clear Zone 1 to 4: | Click this button to clear specific masking area. |
Click Apply to apply the changes
TRENDnet User's Guide TV-NVR104
Video Tamper
Detects if a camera has been tampered with and surveillance is compromised. You can set up video tamper notifications to alert the system manager to check the camera.
Note: Please reference compatible camera list for more details.
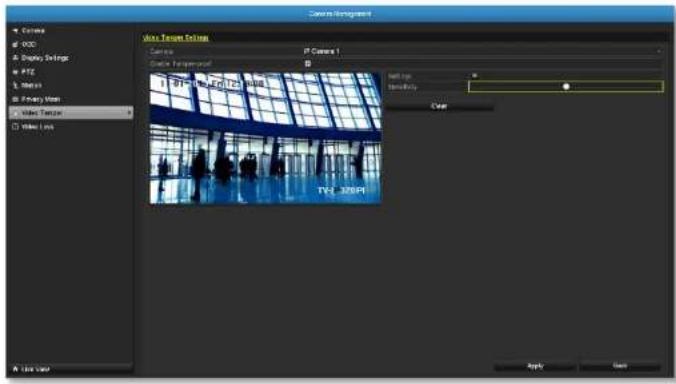
| Camera: | Click to choose the camera you want to change the settings. |
| Enable Tamper-proof: | Check this box to enable video tamper. |
| Draw Area: | Click and drag on the area you want to set up the video tamper. |
| Clear: | Click this button to clear the video tamper area. |
| Sensitivity: | Move the slider to adjust detection sensitivity.Sliding to the right means the motion event is easier to be triggered. |
Click Apply to apply the changes
Video tamper settings
Click Settings to bring out the detailed set up menu.
Arming Schedule
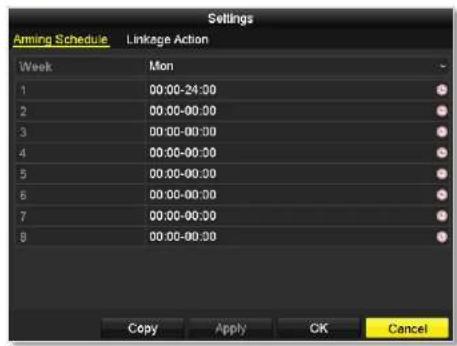
- Select day of the week you want to edit on the row of Week.
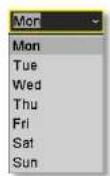
- Enter the period of time you want to actively detect the motion events.

TRENDnet User's Guide TV-NVR104
Copy to:
To quickly setup the same schedule over the week, click Copy. Click another day of the week (1: Monday, 2: Tuesday, 3: Wednesday, 4: Thursday, 5: Friday, 6: Saturday and 7: Sunday). Click All to select the whole week. Click OK after you select the day of the week you want to copy to.

Linkage action
When motion event detected, the corresponding actions will be executed.
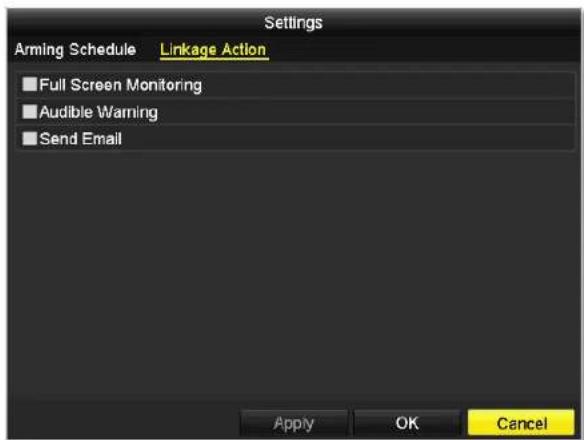
Full Screen Switch the video on the VGA/HDMI
Monitoring: monitor to the camera detected motion event.
Audible Warning: Activate the audible on board buzzer.
Send Email: Send email to notify the system manager.
TRENDnet User's Guide TV-NVR104
Video Loss
Detects if a camera has lost its video. You can set up video loss notifications to alert the system manager to check the camera.
![Camera Environment Movie Loss Movie 1 A Camera 1 Cinema: Video Loss Room T1 87.2000 (E2) [72] 5000 5000 fps TV 2000P Back Movie Loss](/content/2026/05/933536/images/19a62bf520aa01d7b32f2af3193fe881b2a356c6627f832025593b173e882775.jpg)
Camera: Click to choose the camera you want to change the settings.
Click Apply to apply the changes
Video loss settings
Click Settings to bring out the detailed set up menu.
Arming Schedule
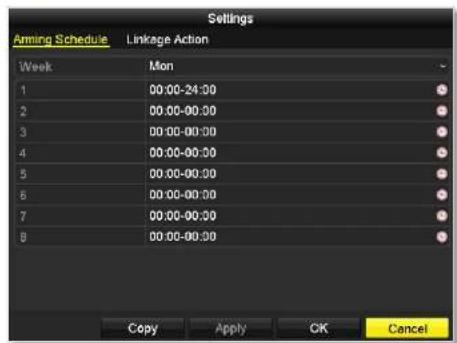
- Select day of the week you want to edit on the row of Week.

- Enter the period of time you want to actively detect the motion events.

TRENDnet User's Guide TV-NVR104
Copy to:
To quickly setup the same schedule over the week, click Copy. Click another day of the week (1: Monday, 2: Tuesday, 3: Wednesday, 4: Thursday, 5: Friday, 6: Saturday and 7: Sunday). Click All to select the whole week. Click OK after you select the day of the week you want to copy to.

Linkage action
When motion event detected, the corresponding actions will be executed.
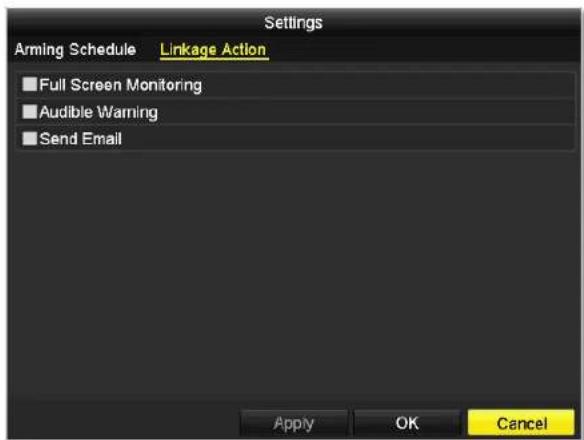
Full Screen Switch the video on the VGA/HDMI
Monitoring: monitor to the camera detected motion event.
Audible Warning: Activate the audible on board buzzer.
Send Email: Send email to notify the system manager.
TRENDnet User's Guide TV-NVR104
System Configuration Menu
Setting and manage your NVR system by bring up the main menu. Click on
System Configuration Menu

System Settings
General
Set up the basic time, display resolution, and operation settings here.
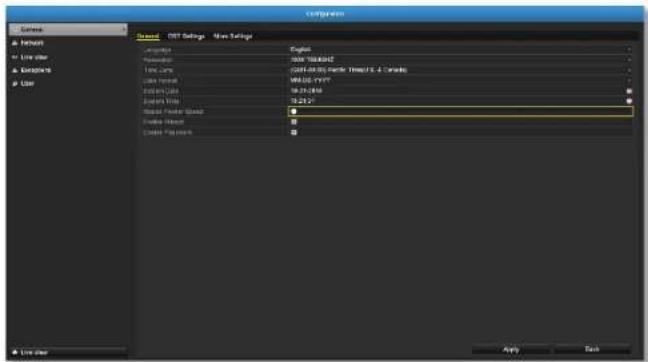
General
| Language: | The TV-NVR104 GUI is setting to English. |
| Resolution: | The default monitor resolution is set to the lowest option (1024 by 768) to maximize the monitor compatibility. Choose a better resolution for your monitor to see better quality video. |
| Time Zone: | Click the selection list to the right of Time Zone. |
| Date Format: | Click the selection list to the right of Date Format and then select a date format. |
| System Date: | Click the selection list to the right of System Date. |
| System Time: | Click the selection list to the right of System Time and then enter the time with 24-hour format. |
| Mouse Pointer Speed: | Setting the mouse cursor moving speed.Adjusting to the right for faster speed. |
| Enable Wizard: | Enable or disable setup wizard every time the system is boot up. Default: Enabled. |
| Enable Password: | You need to login for system management.Enable password will ask entering password when login. Uncheck this box will set the management free to anyone physically access the NVR. Default: Enabled. |
Click Apply to apply the changes.
TRENDnet User's Guide TV-NVR104
DST settings
Set up Daylight Saving Time.
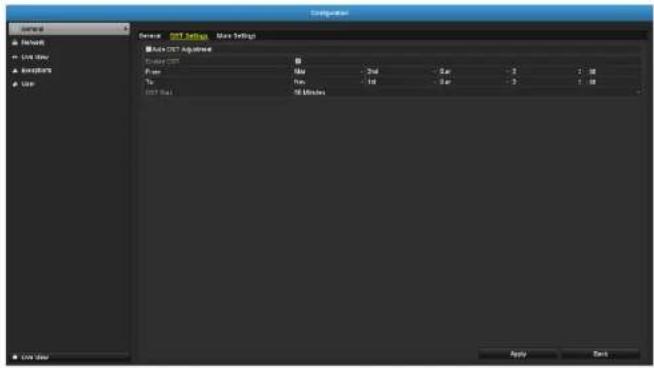
Daylight saving time
| Auto DST adjustment: | The daylight saving time adjustment is setting to automatic adjustment according to the time zone setting by default. If you want to set the daylight settings manually, uncheck this box to disable the automatic DST adjustment. |
| Enable DST: | Manually enable or disable daylight saving time adjustment. |
| From / To: | Enter the daylight saving time starting and end dates. |
| Time Zone: | Click the selection list to the right of Time Zone. |
| DST Bias: | Choose the amount of time shifting for daylight saving adjustment. |
Click Apply to apply the changes.
More settings
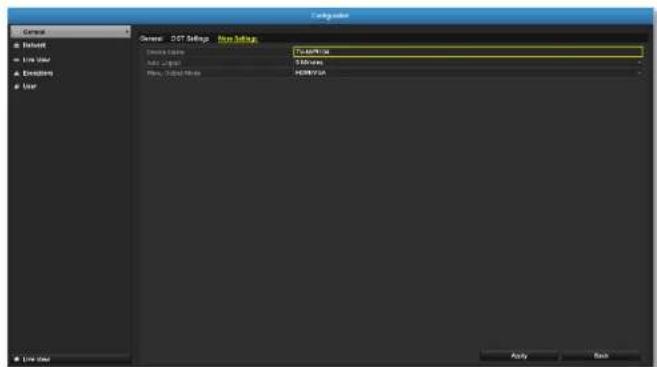
More settings
| Device Name: | This is the name of the NVR. Default: TV-NVR104 |
| Auto logout: | Set up the timeout to logout NVR management after management inactive for a period of time. |
| Menu Output Mode: | The video output is active for both HDMI and VGA interfaces. |
Click Apply to apply the changes.
TRENDnet User's Guide TV-NVR104
Network
Set up NVR network, DDNS, NTP, Email, and UPnP settings.
General
Setup the network interface connecting to the Internet.

Network General Settings
| NIC Type: | Choose one of the Ethernet duplex and speed to match your network. Default: 10/100M Auto detection. |
| Enable DHCP: | Check this box if the IP address is assigned by DHCP server. |
| IPv4 Address: | The IPv4 dynamic or static address |
| IPv4 Subnet Mask: | Network range of the subnet |
| IPv4 Default Gateway: | The default route going further from TV-NVR104 IPv4 subnet |
IPv6 Address 1: IPv6 self-assigned address including the subnet prefix expression in the end of the string.
IPv6 Address 2: IPv6 static address including the subnet prefix expression in the end of the string.
IPv6 Default The default route going further from IPv6 subnet Gateway:
MAC Address: The MAC address of the NVR network interface.
MTU: Maximum transmission unit. The maximum field size in the Ethernet packet. Default: 1500
Preferred DNS: Enter your first IPv4 or IPv6 DNS server address
Alternate DNS: Enter your second IPv4 or IPv6 DNS server address
Click Apply to apply the changes.
DDNS
Dynamic Domain Name Service, DDNS, allows you to find your NVR from the Internet with an easy to remember domain name.
NTP
Network Time Protocol Service. The accuracy of the system clock is important for scheduling and accurate logging. You can automatically check the time accuracy with a network time server (NTP server).
DDNS
Enable DDNS: Check this box to enable DDNS Service.
DDNS Type: Select a DDNS service provider: dyn.com or no-ip.com.
Server Address: Enter the DDNS server address.
Device Domain Enter your registered domain/host name on
Name: selected DDNS service.
Status: The DDNS connection status.
User Name: Enter the account name.
Password: Enter the password.
Confirm: Enter the password again.
Click Apply to apply the changes.
NTP settings
Enable NTP: Check this box to enable NTP Service.
Interval: The time interval that the TV-NVR104 will synchronize the time with NTP server. Default: 60 minutes
NTP Server: Specify a time server (NTP server) to synchronize with. (e.g. pool.ntp.org)
NTP Port: The server port number. Default: 123.
Click Apply to apply the changes.
TRENDnet User's Guide TV-NVR104
Set up email accounts for notifications.
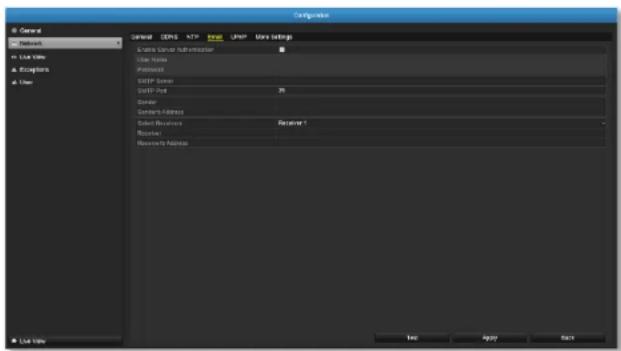
| Enable Server Authentication: | Check this box if your server requires a password in order to send email. Most email servers require authentication when sending an email. |
| User name: | Enter the user name of outgoing email account |
| Password: | Enter the password |
| SMTP Server: | Simple Mail Transportation Protocol Server address, the outgoing email server address. It may has address the same as your incoming email server, maybe not. Please ask your email service provider for detail. |
| SMTP Port: | Service port number for outgoing email.* |
| Sender: | Enter the name to be appeared as the email sender. |
| Sender's Address: | Enter sender's email address. |
| Select Receiver: | Select the pull down menu to select the receiver you want to set up the detail. You can send to 3 |
accounts at the same time, but just set up separately.
Receiver: The receiver's name.
Receiver's The receiver's email address.
Address:
*Note: Many ISPs does not allow service port 25 going through their network. Please consult your email service provider and ISP for detail.
Click Apply to apply the changes.
Click Test to test if all the information are entered correctly.
TRENDnet User's Guide TV-NVR104
UPnP
Universal Plug-and-Play is a device discovery protocol set. It allows your camera to easily be found, for example, on a Windows operation system.
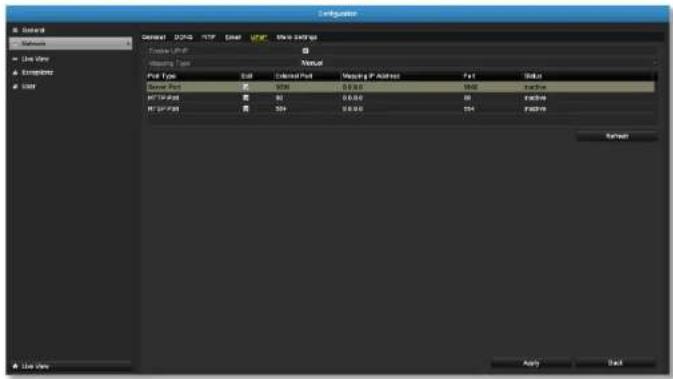
UPnP
| Enable UPnP: | Check this box to enable UPnP connection. |
| Mapping Type: | Choose Manual or Auto port mapping. |
UPnP List
| Port Type: | The service type on the UPnP port |
| Edit: | Click the icon to manually edit the port mapping. |
| External Port: | Choose the port number for mapping. |
| Mapping IP Address: | 0.0.0.0 is the TV-NVR104 self-address. |
| Port: | Local port number. |
| Status: | UPnP Status. |
Click Apply to apply the changes.
More settings
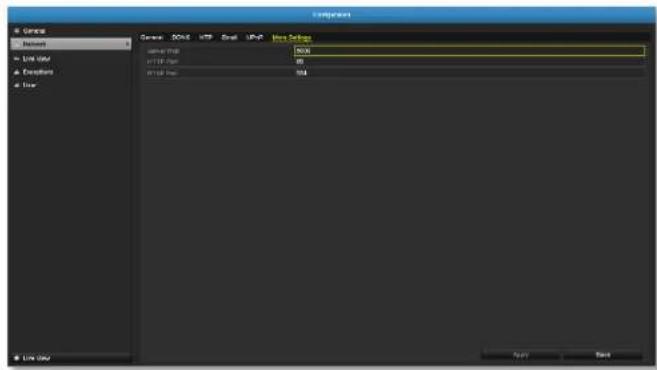
More Settings
| Server Port: | The service port number for NVR management. The default service port of TV-NVR104 is 8000. |
| HTTP Port: | The default web access port. You can change the port number. The default port number is 80. |
| RTSP Port: | The Real-Time Streaming Protocol port for video streaming. You can change the port. The default port number is 554. |
Click Apply to apply the changes.
TRENDnet User's Guide TV-NVR104
Live View
Change the live view settings.

General
| Live view general settings | |
| Video Output Interface: | The video output interface is VGA or HDMI |
| Live View Mode: | Choose the default Live View mode to be 1x1 single video on the screen or 2x2 four video on the screen at the same time. Default: 2x2. |
| Dwell Time: | Set up how long each display will be showed up on the screen. There's no effect on 2x2 display mode. On 1x1 mode, each video will be shown on the screen for Dwell Time and then change to the next video. Default: 10 seconds. |
| Enable Audio Output: | Enable or disable audio output on the NVR. Default: disabled |
Event Output: Define where the video is going out when event triggered. The TV-NVR104 is set to both VGA and HDMI.
Full Screen When event triggered full screen display, who Monitoring long the video is going to stay on the screen. Dwelling Time: Default: 10 seconds.
Click Apply to apply the changes.
TRENDnet User's Guide TV-NVR104
View
Setting live view display arrangement and sequence.

Live View Layout and Sequence Settings
| Video Output Interface: | The video output interface is VGA or HDMI |
| Camera List: | Installed cameras will be listed here by channel. |
| Layout Panel: | Preview how the layout the video display.To remove a camera from the display, just click× on the selected cell D3 × to remove the channel number. X ×To assign a channel to a display cell, choose the camera from the camera list.Note: Each video channel can be assigned to one display cell. Click on camera when it is not assigned and double click on the list if it is currently assigned to other display cell. |
Missing Video: If you assign a channel to a display cell and there's no video stream, the cell is showing TRENDnet. To remove the TRENDnet message, just remove the channel assignment on the display cell.
Control Panel:
: Single channel display
: Quad channel display
: Automatic channel assignment
: Remove all channel assignments
: Previous page
: Next Page
P-17: Current page / Total page
Note: In single channel display, you can set up the display sequence with the page numbers.
Click Apply to apply the changes.
TRENDnet User's Guide TV-NVR104
Exceptions
Setup the action when exception happened. Select the exception you want to monitor and then choose the audible warning or email notification. Click Apply to apply the changes and remember to setup your email account if you choose the email notification (see page 56 for set up details.)
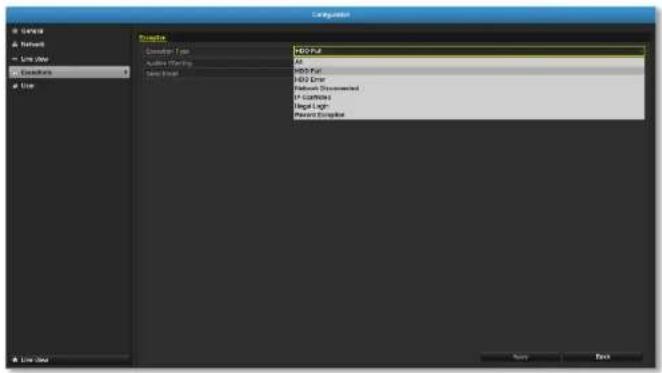
Exception Type
| All: | Any of the following exceptions will trigger the notification. |
| HDD Full: | By default, the recording video does not overwrite when the hard drive is full. You can set up an audio warning or send email to system manager to remove the recording. (You can also setup the NVR for automatic overwrite the recordings when the disk is full. Please see page 82 for more detail.) |
| HDD Error: | When the hard drive reading or writing error, the NVR can make audible sound or send email to |
| system manager for the error. You can use the hard drive maintenance tools on the NVR checking and managing your hard drive. See page 74 for more detail.) | |
| Network Disconnected: | The exception is triggered when network port is disconnected. |
| IP Conflicted: | The NVR is constantly monitoring if there's an IP conflict is happening. Exception is triggered when there's an IP conflict. |
| Illegal Login: | Exception is triggered when NVR detect the attempt login with wrong credential. |
| Record Exception: | Exception will be triggered when anything goes wrong during video recording process. |
TRENDnet User's Guide TV-NVR104
User Accounts
You can setup up to 16 user accounts to access the camera's video stream with a web browser or real time video stream (RTSP). Only one administrator account (username: admin) can be setup to configure the TV-NVR104 and cannot be deleted.
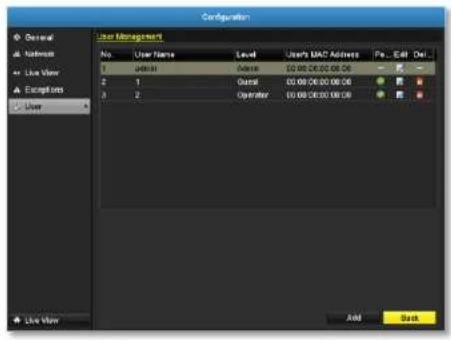
Add
Click Add button to add an account

Add account
User: Enter the user name.
Password: Enter the password.
Confirm: Enter the password again.
Level: Select the user's level from Guest or Operator for the preset permissions. By default, an operator can view the video and operate the camera pan, tilt, and zoom. Guest can only view the video. NVR settings are only allowed to be changes with administrator account.
User's Enter the user's MAC address limit the access to add on MAC security. Leave it 00:00:00:00:00 as wild card address Address: if you don't limit the access.
Edit
on user to change the account settings.
Permission
Click Permission on user to change the account permission settings.

TRENDnet User's Guide TV-NVR104
Permission: Local configuration
| Local Log Search: | Search the NVR log with local login. |
| Local Parameters Settings: | Setting NVR with local login. |
| Local Camera Management: | Manage cameras on NVR with local login. |
| Local Advanced Operation: | Setting NVR advanced features with local login. |
| Local Shutdown / Reboot: | Access the shutdown menu with local login. |

Permission: Remote configuration
| Remote Log Search: | Search the NVR log with web login. |
| Remote Parameters Settings: | Setting NVR with web login. |
| Remote Camera Management: | Manage cameras on NVR with web login. |
| Remote Advanced Operation: | Setting NVR advanced features with web login. |
| Web Shutdown / Reboot: | Access the shutdown menu with web login. |


Permission: Camera configuration
| Camera | The camera management permission list: |
| Permission: | Remote Live View: Viewing video through the network.Local Manual Operation: Manage camera settings with local NVR login.Remote Manual Operation: Manage camera settings with web login.Local Playback: Allow recording playback on connected monitor.Remote Playback: Allow recording playback via network access.Local PTZ Control: Allow camera PTZ operations through NVR with local NVR login.Remote PTZ Control: Allow camera PTZ operations through the network.Local Video Export: Allow exporting video through USB port. |
| Channels: | Select D1 ~ D4 channels to apply the permission to selected channel(s). Select IP Camera for all channels. |
Click Apply to apply the changes.
TRENDnet User's Guide TV-NVR104
System Maintenance Menu
Manage your NVR system by bring up the main menu. Click on System
Maintenance Menu

System information
System Information is displaying here for system maintenance.
NVR information

NVR Information
| Device Name: | Human readable device name for easy identification. You can change this name in System configuration > More settings on page 54. |
| Model: | The model name of the TV-NVR104. |
| Serial Number: | The unique identification number of this device. |
| Firmware Version: | Firmware version |
| Encoding Version: | Encoding version |
Camera information

Camera Information
| Camera No.: | The channel number camera assigned into. |
| Camera Name: | Camera device name |
| Status: | Showing the camera is connected or disconnected. |
| Motion Detection: | Showing the status and setup of the camera motion detection. |
| Tamper-proof: | Showing the status and setup of the camera video tamper detection. |
| Video Loss: | Showing the status and setup of the video loss detection. |
TRENDnet User's Guide TV-NVR104
Recording Information

NVR Recording Status Information
| Camera No.: | The channel number camera assigned into. |
| Recording Status: | Showing the status and setup of the video recording. |
| Frame Rate: | Showing the camera recording frame rate. |
| Bitrate: | Showing the camera recording video stream bitrate in thousands bits per second. |
| Resolution: | Showing the camera recording video resolution. |
| Record Type: | Showing the type of recording. |
| Encoding Parameters: | Showing the encoding parameters. |
Network Information
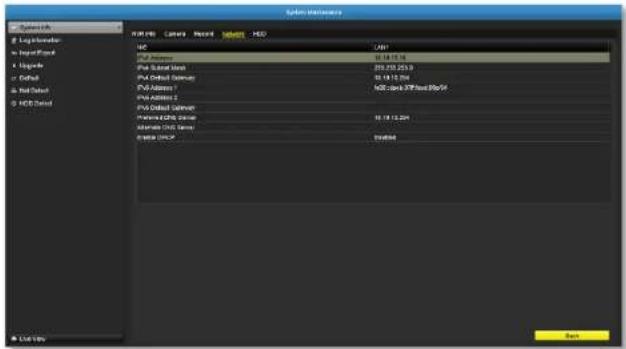
NVR Network Interface Information
| NIC: | Network Interface Card. LAN1 is the assigned network interface which represent to the non-PoE network port. |
| IPv4 Address: | The IPv4 address on this interface |
| IPv4 Subnet Mask: | Network range of the subnet |
| IPv4 Default Gateway: | The default route going further from TV-NVR104 IPv4 subnet |
| IPv6 Address 1: | IPv6 self-assigned address including the subnet prefix expression in the end of the string. |
| IPv6 Address 2: | IPv6 static address including the subnet prefix expression in the end of the string. |
| IPv6 Default Gateway: | The default route going further from IPv6 subnet |
| Enable DHCP: | The IP address is assigned by DHCP server or not. |
TRENDnet User's Guide TV-NVR104
Hard Disk Storage Information

HDD Status Information
| Label: | Index of the HDD. TV-NVR104 has only one hard drive which is assigned on number one. |
| Status: | Showing the hard drive working condition. |
| Capacity: | The total hard drive storage capacity after formatting. |
| Free space: | Displays how much space is available free for video recordings. |
| Property: | R/W: Allow read and write. |
| Type: | Local: The hard drive is installed on the NVR. |
| Group: | The HDD on NVR is assigned to the group 1. |
TRENDnet User's Guide TV-NVR104
Log Information
All NVR activities are registered on the log. Find the activity by searching with time range and log type. Click Search to start the search.
Log Search
![System Settings Log Information Log Data Upgrade Export AutoCAD HOLD LOGS Log Book Date Time 10.27.2014 10.27.2014 10.27.2014 10.27.2014 10.27.2014 10.27.2014 10.27.2014 10.27.2014 10.27.2014 10.27.2014 Key Type Date Main Type Parameters Play Output 1 2 3 4 5 6 7 8 9 10 11 12 13 14 15 16 17 18 19 20 21 22 23 24 25 26 27 28 29 30 31 32 33 34 35 36 37 38 39 40 41 42 43 44 45 46 47 48 49 50 51 52 53 54 55 56 57 58 59 60 61 62 63 64 65 66 67 68 69 70 71 72 73 74 75 76 77 78 79 80 81 82 83 84 85 86 87 88 89 90 91 92 93 94 95 96 97 98 99 100 Information 05:27:20 05:00:23 Local HKEY information NA - ● ● ● ● ● ● ● ● ● ● ● ● ● ● ● ● ● ● ● ● ● ● ● ● ● ● ● ● ● ● ● ● ● ● ● ● ● ● ● ● ● ● ● ● ● ● ● ● ● ● ● ● ● ● ● ● ● ● ● ● ● ● ● ● ● ● ● ● ● ● ● ● ● ● ● ● ● ● ● ● ● ● ● ● ● ● ● ● ● ● ● ● ● ● ● ● ● ● ● ● ▼ Operation 05:27:20 05:00:23 Local Operation Logit NA - ■ ■ ■ ■ ■ ■ ■ ■ ■ ■ ■ ■ ■ ■ ■ ■ ■ ■ ■ ■ ■ ■ ■ ■ ■ ■ ■ ■ ■ ■ ■ ■ ■ ■ ■ ■ ■ ■ ■ ■ ■ ■ ■ ■ ■ ■ ■ ■ ■ ■ ■ ■ ■ ■ ■ ■ ■ ■ ■ ■ ■ ■ ■ ■ ■ ■ ■ ■ ■ ■ ■ ■ ■ ■ ■ ■ ■ ■ ■ ■ ■ ■ ■ ■ ■ ■ ■ ■ ■ ■ ■ ■ ■ ■ ■ ■ ■ ■ ■ ■ ▼ Information 05:27:20 05:00:23 Local HKEY information NA - ★ - ★ - ★ - ★ - ★ - ★ - ★ - ★ - ★ - ★ - ★ - ★ - ★ - ★ - ★ - ★ - ★ - ★ - ★ - ★ - ★ - ★ - ★ - ★ - ★ - ★ - ★ - ★ - ★ - ★ - ★ - ★ - ★ - ★ - ★ Information 05:27:20 05:00:23 Local Operation Logit NA - ★ - ★ - ★ - ★ - ★ - ★ - ★ - ★ - ★ - ★ - ★ - ★ - ★ - ★ - ★ - ★ - ★ - ★ - ★ - ★ - ★ - ★ - ★ - ★ - ★ - ★ - ★ - ★ - ★ - ★ - ★ - ★ - ★ Information 05:27:20 05:00:23 Local Operation Logit NA - ★ - ★ - ★ - ★□ Yes □ No □ Data □ Power □ Max □ ■ □ □ □ □ □ □ □ □ □ □ □ □ □ □ □ □ □ □ □ □ □ □ □ □ □ □ □ □ □ □ □ □ □ □ □ □ □ □ □ □ □ □ □ □ □ □ □ □ □ □ ▢ ▢ ▢ ▢ ▢ ▢ ▢ ▢ ▢ ▢ ▢ ▢ ▢ ▢ ▢ ▢ ▢ ▢ ▢ ▢ ▢ ▢ ▢ ▢ ▢ ▢ ▢ ▢ ▢ ▢ ▢ ▢ ▢ ▢ ▢ ▢ ▢ ▢ ▢ ▢ ▢ ▢ ▢ ▢ ▢ ▢ ▢ ▢ ▢ ▢ ▸ ■ A Report 05:27:20 05:00:23 Local Operation Logit NA - ★-★★★☆□ Yes (Yes) [Yes] [No] [No] [No] [No] [No] [No] [No] [No] [No] [No] [No] [No] [No] [No] [No] [No] [No] [No] [No] [No] [No] [No] [No] [No] [No] [No] [No] [No] [No] [No] [No] [No] [No] [No] ■ A Report 05:27:20 05:00:23 Local Operation Logit NA - ★-★★★☆□ Yes (Yes) [Yes] [No] [No] [No] [No] [No] [No] [No] [No] [No] [No] [No] [No] [No] [No] [No] [No] [No] [No] [No] [No] ■ A Report 05:27:20 05:00:23 Local Operation Logit NA - ★-★★★☆□ Yes (Yes) [No] [No] [No] [No] [No] [No] [No] [No] [No] [No] [No] [No] [No] [No] [No] [No] [No] ■ A Report 05:27:20 05:00:23 Local Operation Logit NA - ★-★★★☆□ Yes (Yes) [Yes] [No] [No] [No][No] [No] [No][No] [No] [No][No] [No] [No][No] [No] ■ A Report 05:27:20 05:00:23 Local Operation Logit NA - ★-★★★☆□ Yes (Yes) [Yes] [No] [No][No] [No][No] [No][No] [No][No] [No][No]](/content/2026/05/933536/images/1c2ec8efba9f628cb69903c2ecbe6660e3176e12713784516011e32e6dcc8db0.jpg)
Log Search
Start Time: The starting time of a log search.
End Time: The end time of the time range for the log search.
Major Type: Filter the search by type of logs: all, alarm, exceptions, operation, and information.
Minor Type: Filter the search by type of logs. Select the major type and then choose the minor type.
Alarm: Start motion detection, stop motion detection, start temper-proof, stop tamper-proof, and IP Camera Alarm.
Exception: video loss, illegal login, HDD full, HDD error, IP conflict, network disconnect, recording exception, IP camera
disconnection, IP camera address conflict, recording buffer overflow.
Operation:
• power on, abnormal shutdown
- Local operations: shutdown, reboot, login, logout, configure parameters, upgrade, start recording, stop recording, PTZ control, lock file, unlock file, initialize HDD, add IP camera, delete IP camera, set IP camera, playback by file, playback by time, export configuration file, import configuration file, export recordings, restore administrator's password, operate tag, and HDD detect.
- Remote operations: reboot, login, logout, configure parameters, upgrade, start recording, stop recording, PTZ control, lock file, unlock file, initialize HDD, add IP camera, delete IP camera, set IP camera, playback / download by file, playback / download by time, export configuration file, import configuration file, export recordings, interrogate parameters, interrogate working status, start-two way audio, stop two-way audio, alarm arming, alarm disarming, and operate tag.
Information: local HDD information, HDD S.M.A.R.T. start recording, stop recording, delete expired recording, and system running status.
TRENDnet User's Guide TV-NVR104
Export
Click Export on this page to export log on the list.

Click Export again to export the log to the USB drive of your choice. Select the USB drive on the Device Name and then click Refresh if you want to change the drive. Click New Folder to create a new folder on current directory. Click Format to format this USB storage.
Log Export
To export all logs saved on NVR, click the Log Export tab, select the hard drive, and then click Export.

Click Export again to export the log to the USB drive of your choice. Select the USB drive on the Device Name and then click Refresh if you want to change the drive. Click New Folder to create a new folder on current directory. Click Format to format this USB storage.
TRENDnet User's Guide TV-NVR104
Save and Load NVR System Settings
To save current or load previous TV-NVR104 settings, choose the Import / Export page and then export the file to the USB drive or import the file.

Click Export to export the settings to a file on the USB drive of your choice. Select the USB drive on the Device Name and then click Refresh if you want to change the drive. Click New Folder to create a new folder on current directory. Click Format to format this USB storage.
TRENDnet User's Guide TV-NVR104
Firmware Upgrade
Local Upgrade
TRENDnet may periodically release firmware upgrades that might add features or fix problems associated with your TRENDnet model and version. To find out if there is a firmware upgrade available for your device, please check your TRENDnet model and version using the link.
http://www.trendnet.com/downloads/
- If a firmware upgrade is available, download the firmware to your computer.
- Unzip the file to a folder on your computer.
- Read the firmware upgrade instruction for specific version update information.
- Log into the TV-NVR104.
- Getting to this Maintenance page to upgrade firmware.
Extract the firmware file from the downloaded zip file and then save it to the USB drive. Plug in the USB drive to one of the available USB slot on the NVR. Choose Upgrade page and then click on Upgrade.
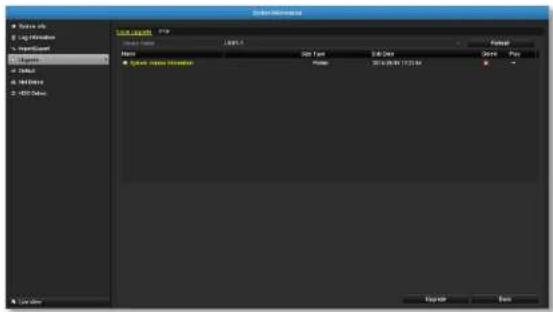
Remote Upgrade
You can setup the upgrade over the network with FTP protocol. To proceed FTP upgrade, you need to prepare a FTP server on the local network with username: ftp and password: ftp. Place the firmware file on the root directory when the ftp account is logging in the FTP server.
Navigate to the remote upgrade (FTP) page. Enter the FTP server address, and then click on Upgrade.
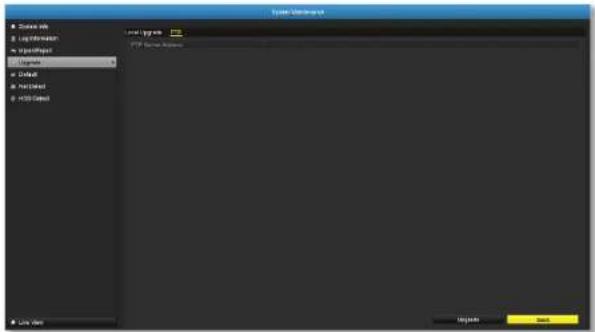
TRENDnet User's Guide TV-NVR104
Factory Default
To reset your TV-NVR104 to the factory default, navigate to this Default page and then click on OK to reset all TV-NVR104 settings back to factory default.
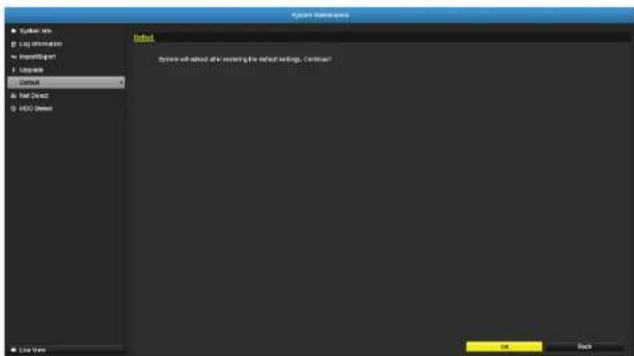
TRENDnet User's Guide TV-NVR104
Network Monitoring
Traffic
To monitor the network traffic, navigate to the traffic chart.

Traffic
| LAN1: | The network interface. |
| Sending: | The network traffic generated from the NVR. |
| Receiving: | The network traffic receiving by the NVR. |
| Link Status: | The network linking status. |
| Type: | Type of network, Ethernet. |
| MAC Address: | Media Access Address of the network interface. |
| MTU: | Maximum Transmission Unit in bytes. |
| NIC Type: | Type of the network card. Speed and duplexing. |
Network Tools
Use network tools (Network Detection) on the NVR to test the network status.

Network delay and packet loss test
The basic PING test tool. Enter the testing destination IP address and then click on the Test.


TRENDnet User's Guide TV-NVR104
Network packet export
Capture packets and save to external USB storage for network analysis. Plug-in your USB network drive and then click Export to export the packet capture files. Click Refresh to list the directory on your USB storage again.

Network Statistics
To review the network statistic information, navigate to the Network Statistics page. Click Refresh to update the information.

TRENDnet User's Guide TV-NVR104
Hard Drive Maintenance
S.M.A.R.T Settings
The S.M.A.R.T. (Self-Monitoring, Analysis and Reporting Technology) is a monitoring technology to detect and report on various performance and reliability factors to help predict and prevent disk failures.

S.M.A.R.T. Settings
| Continue to use: | Check the Continue to use this disk when self-evaluation is failed if you want it to do so. Click Apply if you change this setting. |
| HDD: | The Disk number. The TV-NVR104 has one HDD. |
| Capacity: | The total hard drive storage capacity after formatting. |
| Self-test Status: | Showing the self-testing status. |
| Self-test Type: | Choose a type of S.M.A.R.T. test: short, expanded, and conveyance tests. |
S.M.A.R.T.: Click to start S.M.A.R.T. test.
Temperature: The temperature of the hard drive in Celsius.
Power on days: Days the hard drive is on.
Self-evaluation: The result of self-evaluation.
All-evaluation: Functional evaluations.
S.M.A.R.T. Detailed S.M.A.R.T. hard drive information.
Information:
TRENDnet User's Guide TV-NVR104
Bad Sector Detection
Detect if there's any bad sector on the disk drive.

Bad Sector Detection
HDD No.: The Disk number. The TV-NVR104 has one HDD.
Capacity: The total hard drive storage capacity after formatting.
Type of Select key area detection or full detection.
Detections:
Detect: Click this button to start bad sector detection.
HDD Capacity: The storage capacity of the hard drive.
Block Capacity: The block capacity.
Status: The status of bad sector detection.
Error count: The total error count detected.
Error Info. Detailed sector damage or shield information.
Pause: Pause the bad sector detection once it start running.
TRENDnet User's Guide TV-NVR104
Hard Drive Management
Manage and allocate your storage space by bring up the main menu. Click
on HDD Maintenance Menu

Format/Initiate the Hard Drive
Select the hard drive and then click on Init to format and initialize the hard drive.

Advanced Storage Quota Settings
To set up the disk quota for each channel video recording, select the camera and then enter the maximum recording capacity.
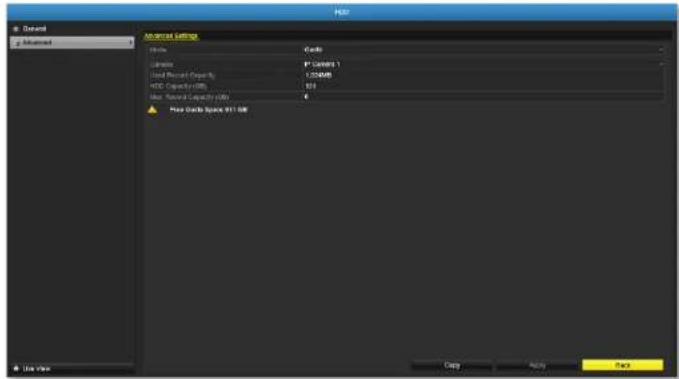
Storage quota settings
Mode: Quota setting
Camera: Select the camera you want to setup the storage quota.
Used Record The storage space spend in recording for the Capacity: specific channel.
HDD Capacity: The storage capacity of the hard drive.
Max. Record Allocate the recording space to selected video Capacity: channel in gigabytes.
Click Copy to copy the same quota setting to other channel.
Click Apply to apply the changes.
TRENDnet User's Guide TV-NVR104
Scheduled recording
Setup the video recording settings by bring up the main menu. Click on
Scheduled Recording Menu

Schedule
Select the video channel, type of recording, and then click and drag on the weekly schedule. Click Edit to bring up the detailed schedule setting table or click Copy to copy the same schedule to other channel.

- Select channel.
- Select recording type. Choose from Continuous or Motion recording. If you want to clear out some scheduled recording time, choose None.

TRENDnet User's Guide TV-NVR104
- Select the time slots you want to make the scheduled recording. Each time slot represents a half hour interval. The row number represents the week of the day starting from Monday.

heatmap
| | 14 | 16 | 18 | 20 | 22 | 24 | |---|---|---|---|---|---|---| | 1 | Blue | Blue | Blue | Blue | Blue | Blue | | 2 | Blue | Blue | Green | Blue | Blue | Blue | | 3 | Blue | Green | Green | Blue | Blue | Blue | | 4 | Blue | Green | Green | Blue | Blue | Blue | | 5 | Blue | Blue | Blue | Blue | Blue | Blue | | 6 | Blue | Green | Green | Green | Green | Green | | 7 | Blue | Green | Green | Green | Green | Green |- If you want to define the schedule in finer intervals, click on Edit button.

- Make your selection and then click Apply to apply the changes.
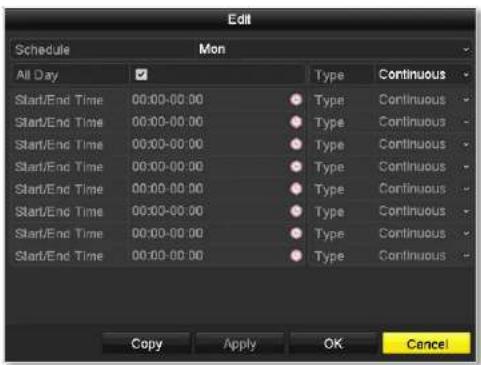
Schedule: Select the day of the week
All Day: Select if you want to setup the all-day recording.
Start/End Time: Specify the starting and end of recording time in 24-hour format.
Type: Select Continuous or Motion Detection recording
TRENDnet User's Guide TV-NVR104
Copy to:
To quickly setup the same schedule over the week, click Copy. Click another day of the week (1: Monday, 2: Tuesday, 3: Wednesday, 4: Thursday, 5: Friday, 6: Saturday and 7: Sunday). Click All to select the whole week. Click OK after you select the day of the week you want to copy to.
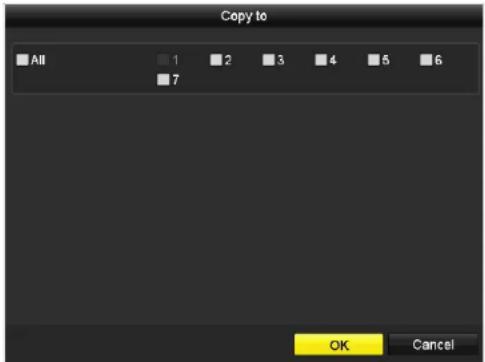
TRENDnet User's Guide TV-NVR104
Video Settings
Set up the video quality for recording (main stream), the higher video quality require larger storage space and better network condition. Please choose the best profile of your choice.
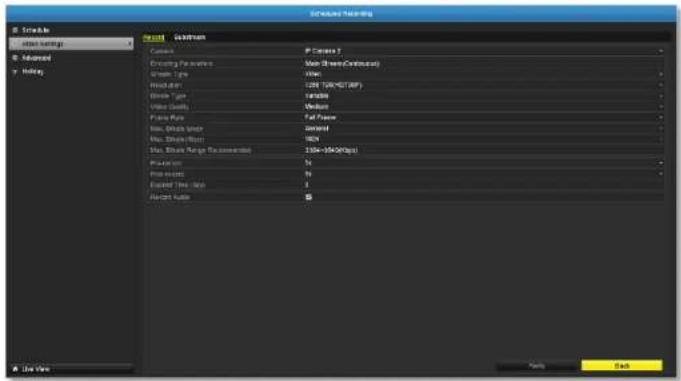
Note: Settings in this section are not available all cameras. The NVR will prompt the message to remind you the setting is not available on selected camera.

Main Stream (Record) Settings
Camera: Select the camera you want to change the recording video quality.
| Encoding Parameters: | The type of video from the camera. |
| Stream Type: | Select you want to stream video only or video and audio. |
| Resolution: | Select the video resolution. |
| Bitrate type: | The bitrate is the rate of information generated from the video. The higher bitrate means more data and more traffic and better video quality. Constant bitrate generates same amount of information over the same period of time.Variable bite rate takes one step further to compress the information whenever it can, therefore, generates the same or lower amount of information compare to the constant bitrate. |
| Video Quality: | Select the video compression algorithm. |
| Frame rate: | Select the frame rate to decide how many pictures you want to take in each second. |
| Max. Bitrate Mode: | Select General to set the maximum bitrate in certain brackets. Choose Customized to set the maximum bitrate on your own. |
| Max. Bitrate: | The maximum information allowed to record on the NVR in thousands of bits per second. |
| Max. Bitrate Range Recommended: | Recommended bitrate setting. |
| Pre-Record: | If the recording is triggered by the motion event, this value specifies to start recording some period of time before the motion event happened. |
| Post-Record: | If the recording is triggered by the motion event, this value specifies to record video some period of time after the motion event happened. |
| Expired Time: | Lock the recording video for some period of time (in days) to prevent accidentally been overwrite or delete. |
| Record Audio: | Recording audio or not. |
TRENDnet User's Guide TV-NVR104
Sub Stream
The sub stream video is mainly for NVR live view. Change your camera option to lower resolution if your camera generates too much information to the NVR for live view.

Sub Stream
Camera: Select the camera you want to change the recording video quality.
Stream Type: Streaming type is video only.
Resolution: Select the video resolution.
Bitrate type: The bitrate is the rate of information generated from the video. The higher bitrate means more data and more traffic and better video quality. Constant bitrate generates same amount of information over the same period of time. Variable bite rate takes one step further to compress the information whenever it can, therefore, generates the same or lower amount of information compare to the constant bitrate.
Video Quality: Select the video compression algorithm.
Frame rate: Select the frame rate to decide how many pictures you want to take in each second.
Max. Bitrate Select General to set the maximum bitrate in Mode: certain brackets. Choose Customized to set the maximum bitrate on your own.
Max. Bitrate: The maximum information allowed to record on the NVR in thousands of bits per second.
Max. Bitrate Range Recommended bitrate setting. ommended:
TRENDnet User's Guide TV-NVR104
Advanced recording setting
Setup if the NVR can overwrite the previous video recording or not. If you checked this option, the NVR will overwrite old recordings when the disk is full. Otherwise the NVR will send Disk Full Notification to let administrator knows that the disk is full and cannot proceed any recording.

TRENDnet User's Guide TV-NVR104
Holiday scheduling
Recording video in holidays may have different requirements. You can set up to 11 holidays of a year sharing the same holiday profile.
Set up the holiday schedule by click on button.
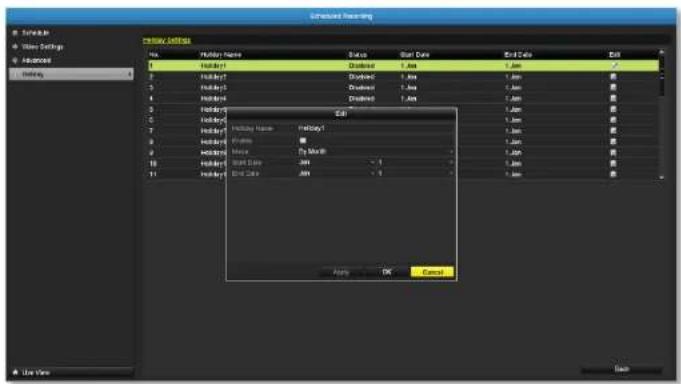
Edit Holiday Schedule
Holiday Name: Change the holiday name to meaningful name instead of index numbers.
Enable: Enable or disable this holiday rule.
Mode: Select the holiday is for a day, a week or a month.
Day mode: Select the start and end dates to specify the period of holidays. This setting is good for one time only. It does not repeat periodically.
Week mode: Select the start and end dates of the week to specify the period of holidays. This setting is repeating every year.
Month mode: Select the start and end dates to specify the period of holidays. This setting is repeating every year.
Start Date: Select the day when the holiday starts.
End Date: Select the day when the holiday ends.
Click Apply button to apply the change and click the OK button to finish the editing.
TRENDnet User's Guide TV-NVR104
Backup Video Recordings
Quickly and backup and export your video recordings with the file exporting menu. Bring up the main menu then click on Export Menu

icon.
Export
Select the video channel and range of time and then click on Search to search the video you want to export. Click Quick Export if you want to export all video recordings.
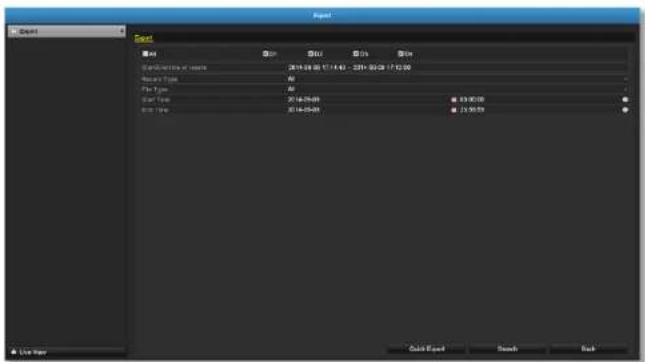
Quick export
Click Export again to export all the video recordings to the USB drive of your choice. Select the USB drive on the Device Name and then click Refresh if you want to change the drive. Click New Folder to create a new folder on current directory. Click Format to format this USB storage.

TRENDnet User's Guide TV-NVR104
Export with search
Select the video clips you want to export by check or uncheck the video clip. Then click Export to export the video recordings.

Click to preview the video clip.

Click to lock the video clip. When video is locked, the video clip is not going to be overwrite accidentally. To unlock the video clip, click . The warning message will remind you again you are unlocking the video clip. Click Yes if you want to proceed unlock.

Click Export again to export the video recordings to the USB drive of your choice. Select the USB drive on the Device Name and then click Refresh if you want to change the drive. Click New Folder to create a new folder on current directory. Click Format to format this USB storage.

TRENDnet User's Guide TV-NVR104
Video playback
Bring up the main menu then click on Export Menu

Playback screen
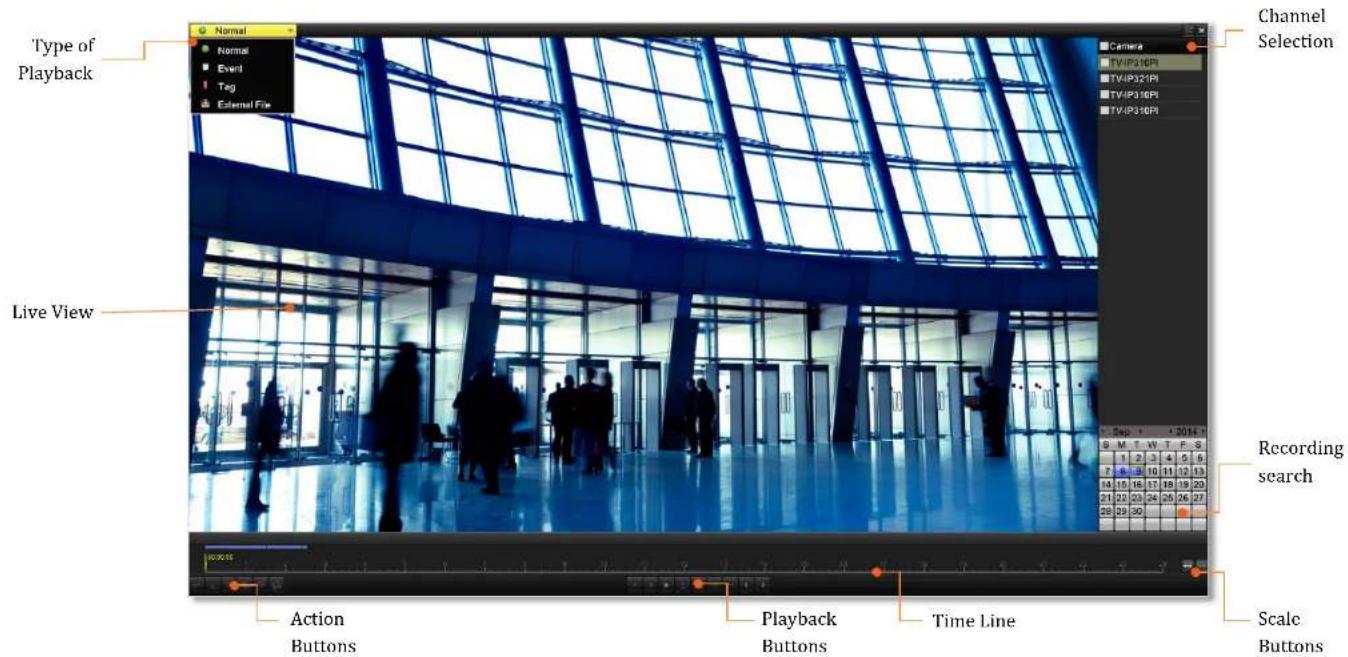
TRENDnet User's Guide TV-NVR104
Search for video recordings
Check on the camera you want to see the playback or check on Camera to select all channels. Then, choose the date for the recording. If there are video recording in selected channel, the date on the calendar will show blue. Double click the date to start playback.

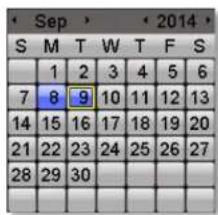
Time line
There is a play back head in the center of the time line represented in a yellow vertical line. To look for a specific video recording, move the play head by clicking and dragging it. If the recording is short, zoom in by clicking button. Click to zoom out the time scale.
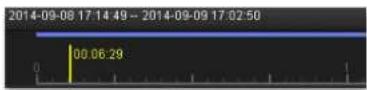
Playback buttons
Use playback controls to play back the video recording.

| Click this button to play the video backward. | |
| Click this button to play the video. | |
| Click this button to pause video playback. | |
| Click this button to stop playback. | |
| Click this button to skip forward 30 seconds. | |
| Click this button to skip backward 30 seconds. | |
| Click this button increase playback speed*. | |
| Click this button decrease playback speed*. | |
| Click this button to jump to the next day. | |
| Click this button to jump to the previous day. |
* Note: There are 5 steps of playback speed you can choose from: 1/4, 1/2, 1, 2, and 4 times of original speed.
TRENDnet User's Guide TV-NVR104
Playback operations
More playback operations such as mute the audio, clip a customized video, add and manage tags, and zoom in the viewing are available on the action buttons section.


The audio is on. Click this button to mute the audio.

The audio is muted. Click this button to enable audio.

Click this button to start video clipping.

Click this button to stop video clipping. You can make multiple video clips. When you finish all clipping and exi the live view, the NVR will prompt and asking you to say the video clips.


Click this button to add a tag with default tag name.

Click this button to add a tag with customized tag name.

Click this button to manage the tags

Click this button to zoom in the live view.
Tagging
Tagging on video recordings help you to mark the critical time of video recording and easier tracking and editing. Find the video is critical and click on 📋 to make the tag with default tag name "tag". Click on 📋 to make the tag with customized tag name. Search the video on Tagged video playback mode explained in following sections.
Zoom
Click room the playback. A navigate window will show up on right lower screen corner. Drag and drop or double click to define the area you want to zoom in. The defined area is showed in red rectangular. Right click to exit the zoom mode.

natural_image
Interior view of a modern building with glass doors and silhouettes of people walking (no visible text or signage)TRENDnet User's Guide TV-NVR104
Playback modes
The video playback not only can playback the video recorded on the hard drive indexed by the time. You can also search the video with motion detection event, tag, or playback the video stored on the USB external hard drive.

Event
To search video with motion detection event, click and select the Event playback mode.
Select the channel you want to search the motion detection. Enter the start and stop time. And, then click on Search.


The motion recording events are showed on the list. Click to view the video.
Use the scroll bar to browse the recordings and adjust the pre-play and post-play between 5 seconds and the maximum amount of a single section of recording to decide the length of playback before and after the motion event.


TRENDnet User's Guide TV-NVR104
Tag
If you set up the tags and want to search video with the tags, click and select the Tag playback mode.

Select the channel you want to search the tags. Enter the start and stop time. If you want to search for specific tag name, enter the tag name or leave it blank for all tags. And, then click on Search.


The tags searched are showed on the list. Click to view the video.
Use the scroll bar to browse the recordings and adjust the pre-play and post-play between 5 seconds and the maximum amount of a single section of recording to decide the length of playback before and after the motion event.


TRENDnet User's Guide TV-NVR104
External file
To playback the video files saved on the USB drive, click and select the
External File playback mode.
Select the USB device to browse the files. Click Refresh to update the list when necessary.

Click to view the video and use the playback control to control the playback.

TRENDnet User's Guide TV-NVR104
Access your NVR with the Web Browser
Default Settings and Factory Reset
To manage your TV-NVR104 through the web browser, you have to setup the network connection first. If you didn't set up your NVR attaching to your home/business network, please enable NVR's DHCP client (see page 55 for details). Click Apply and then restart the NVR. If you have already installed your cameras, you have to manually change their settings. (You don't have to do anything for plug-and-Play models connected directly on PoE ports.) Check the network status (see page 65 Network Information) when necessary to make sure the NVR gets the IP address from your network.
Here's the list of your NVR's factory default settings:
System Default
| Management IP: | 192.168.10.60 |
Administrator name: admin
Administrator password: admin
Note: If you are not having a brand new TV-NVR104, you may not know what password was setup on the NVR. In this case, you have to call our 24-hour tech support to get temporary access code to reset the NVR. See page 32 for more details.
System Requirement
To access you NVR with the browser, you need a Windows or OS X based computer and up-to-date browser (Internet Explorer, Safari, Chrome, or Firefox). A web browser plug-in must be installed to supported computer and browser to watch the video.
You need to setup the IP address in the same network of TV-NVR104. (192.168.10.x network or your home network). For example, setup your computer with 192.168.10.2 static IP address.
For Windows system, please go to the next paragraph.
For OS X system, please go directly to page 95.
Logging-in to the NVR for the First Time (Windows)
- Connect your computer to you home network and look for the NVR by browsing your Network in File Explorer and then double click the icon to visit the NVR. (If your computer does not configured to find sharing resources, you can reference "Turn on


TV-NVR104 (192.168.10.60)
network discovery on Windows" on page 126.) Or, you can find the TV-NVR104 IP address assigned by your home gateway by visiting home gateway's web management page, and then press Enter.
- Enter the user name, admin, and the password you setup through the basic setup. If you didn't setup your password, the change password
TRENDnet User's Guide TV-NVR104
window will pop up on step 9 to guide you through the password changing. The default password is admin.
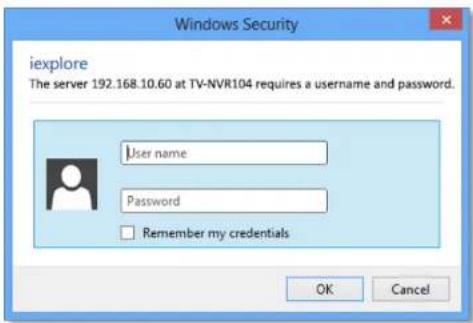
- The NVR management page will detect if you installed the camera video streaming plug-in or not. Click the link to download the plug-in from TV-NVR104.
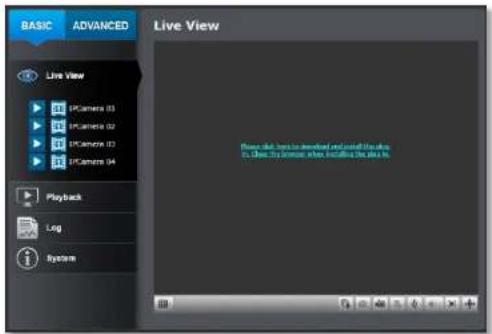
- Download the plug-in to your computer and then and close your browser. Launch the plug-in installation to install the plug-in.

- Permission request may show up depends on the Internet security settings on your computer. Click More Info and then Run anyway to install the plug-in.

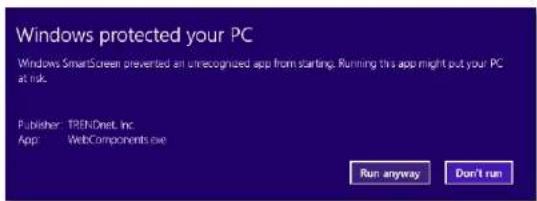
TRENDnet User's Guide TV-NVR104
- Click Next to install the plug-in.

- Click Finish to finish the installation.

- Open the browser and login again.
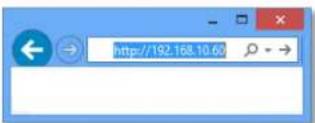
- (Go to step 11 if you already changed your password). The TV-NVR104 will ask you to change your password from default setting. Please enter the new password twice and click OK. The password must be between 8 and 16 characters. (Alphanumeric: a-z, A-Z, 0-9, !, @, #, \$).
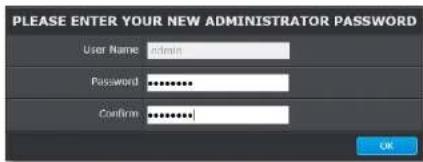
- Enter the user name admin and new password again to start secured session.

TRENDnet User's Guide TV-NVR104
- The Live View page will show up and begin streaming video.

Note: If you were not go through the basic setup, the camera plug-and-play process will begin after you setup the password. Wait a few minutes and press F5 to refresh the browser for the live video.
Logging-in to the Camera for the First Time (OS X)
- Open the web browser on your computer. In the address bar, enter the IP address of the camera 192.168.10.60. (If you have a DHCP server on your network, the IP address will be assigned dynamically. For example, if you have a home gateway on your network and you plug-in the camera on the same network, then you can find the camera IP address on your home gateway), and then press Enter.
- Enter the user name, admin, and the default password, admin, and then click OK.

TRENDnet User's Guide TV-NVR104
- The camera management page will detect if you installed the camera video streaming plug-in or not. Click the link to download the plug-in from the TV-NVR104.

Internet connection is required to download the plug-in. If you do not have Internet access, you can find the plug-in on the CD comes with the package under /Mac folder.

- Quit your browser completely by command-Click on the browser icon and then click Quit before installing the plug-in.

- Go to the Finder and navigate to the Download folder. Command-Click the WebComponents.pkg and then click Open. (If you are install the plug-in from the CD, just browse to /Mac folder and double click the WebComponents.pkg file.)

TRENDnet User's Guide TV-NVR104
6. Click Open to start installation.
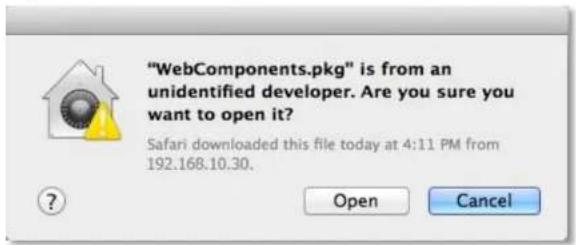
7. Click Continue to install the plug-in.

8. Select a destination to install the plug-in. Then click Continue.
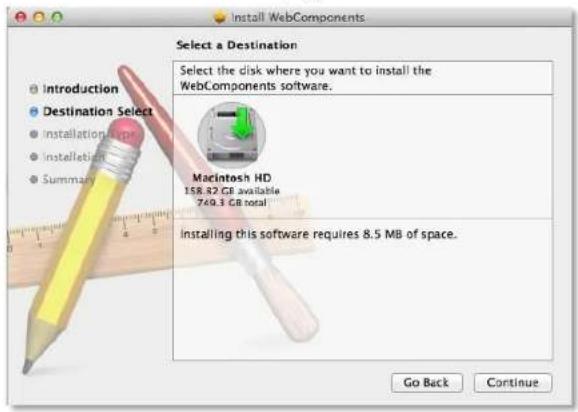
9. Use the default location and click Install.

TRENDnet User's Guide TV-NVR104
10. Enter your password and click Install Software

11. Installation will process automatically.

12. Click Close to exit the installation.
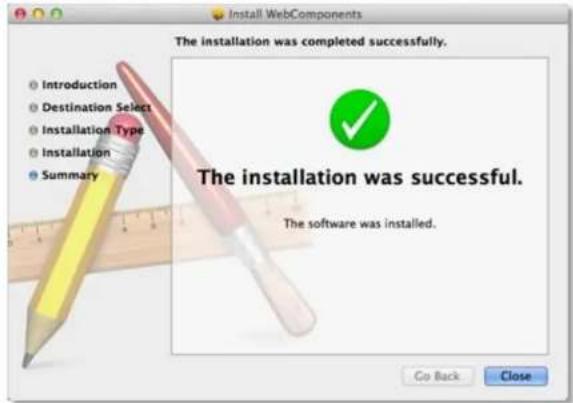
13. Open the browser and login again with the default IP 192.168.10.30 or the IP that was dynamically assigned by your router.
TRENDnet User's Guide TV-NVR104
- Enter the user name, admin, and the default password, admin, and then click OK.

- Click Trust (You'll have to do this again when your camera changes to a new IP address.)

- The TV-NVR104 will ask you to change your password from the default setting. Please enter the new password twice and click OK. The password must be between 8 and 16 characters. (Alphanumeric: a-z, A-Z, 0-9, !, @, #, \$).
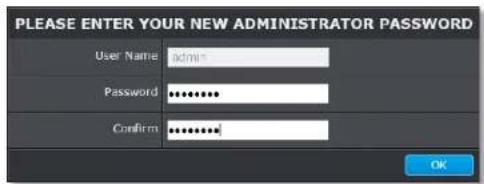
- Enter the user name admin and new password again to start secured session.
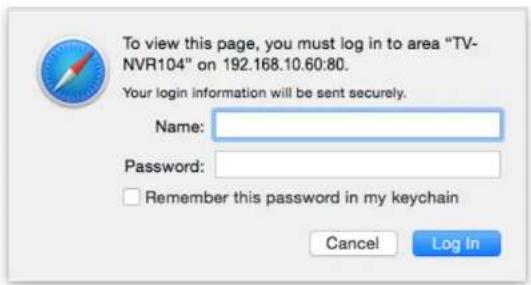
TRENDnet User's Guide TV-NVR104
- The Live View page shows up and the video starts to stream.
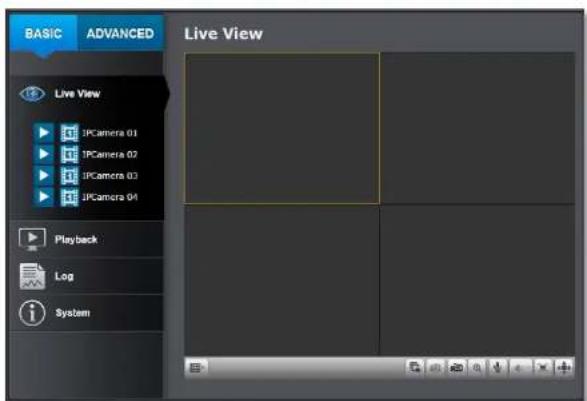

If you were not go through the basic setup, the camera plug-and-play process will begin after you setup the password. Wait a few minutes and press command-R to refresh the browser for the live video.
TRENDnet User's Guide TV-NVR104
Live View
After you log-in into the camera management page, you'll see the Live View page.

Start/Stop Streaming
12 Video Stream
Display Mode
Start/Stop All Streams
Snapshot
Start/Stop Recording
Zoom
Microphone
Speaker
PTZ Control
TRENDnet User's Guide TV-NVR104
Start/Stop Streaming
Click this button to start or stop streaming. Select the display cell by click on it, (The yellow frame will wrap around the selected display cell.) then click on the icon of the stream you want. If the channel has been selected by others, stop that streaming before you change.
Video Stream
Click this button to choose the video stream between main stream and sub stream. 1: main stream; 2: sub stream.
Display Mode
Click this button to select the display mode to display a single video on the screen or display four videos on the screen at the same time.
Start/Stop All Streams
Click this button to start or stop all video streams.
Snapshot
Select the video you want to take a snapshot and then click this icon to take a video snapshot.
Start/Stop Recording
Select the video you want to record and then click this icon to start or stop video recording.
Zoom
Select single video display and then click once to enable zoom. When enabled, click and drag the area on the picture to zoom in. Right click to resume 100% zoom. Click the icon again to disable zoom. The zoom function works in full screen mode as well.
Microphone
Select the video channel and then click on this button to start/stop talking through the camera.
Speaker
Select the video channel and then click on this button to start/stop listening from the camera. Use the slide below to adjust the volume.
PTZ Control
Click this button to bring up the PTZ user interface.

Where can I find saved files?
Videos and snapshots captured from Live View will be saved to your computer. See Live View Settings on page 111 for more details.
TRENDnet User's Guide TV-NVR104
Playback
You can playback the video recording one at a time at this page. You can also download the video clip and snapshots to your local computer. Select the video channel on the left hand side and then search for the video.

Search for video recordings
Click the date selection, and then choose a date as the date range of searching. Click Search to start searching.

Time Line
There is a play back head in the center of the time line represented in a yellow vertical line. To look for a specific video recording, move the time line by clicking and dragging it. If the recording is short, zoom in by clicking button. Click to zoom out the time scale. If you know the exact time of the day you are looking for, click then enter the time you want to playback.
Different types of recordings are identified differently. The scheduled recordings are marked in blue, and the recordings triggered by motion detection are marked in red.


Click and drag the time line to move your time manually.

Click this button to zoom in the scale

Click this button to zoom out of the scale

Click this button to specify a specific time of the day.

And then click to confirm selection and then click X to close this dialog box.
TRENDnet User's Guide TV-NVR104
Play video
Use playback controls to play back the video recording.


Click this button to play the video.

Click this button to pause video playback.

Click this button to stop playback.

Click this button increase playback speed*.

Click this button decrease playback speed*.

Click to playback video frame by frame. Click again for the nextframe
* Note: There are 5 steps of playback speed you can choose from: 1/4, 1/2, 1, 2, and 4 times of original speed.
Slice images from video playback
You can take snapshots from playback video or make new video clips from the video you are playing back.


Click this button to stop video playback streams.

Click this button to take a snapshot of current playback.

Click this button to start clipping a video from playback.

Click this button or anywhere on the timeline to stop clipping a video from playback.

Click this button to download the files.

Click this button to enable or disable the audio playback.

Click this button for full screen playback.
TRENDnet User's Guide TV-NVR104
Download recorded videos
To save complete video sections, you can download the files directly.

Click button to download files.

Check the time of the recording, select the videos you want to download, and then click Download.
Where can I find saved files?
Videos and snapshots captured from Playback will be saved to your computer. See Live View Settings on page 111 for details.
TRENDnet User's Guide TV-NVR104
Log
The log of the TV-NVR104 is saving on the hard disk drive. You can search the relevant records and save to your local computer.

Search for logs
Click the type of log and then the Start Time and End Time. Click Search to start searching.
Total 129 Items First Page Prev Page 1/2 Next Page Last Page
Click First Page, Prev Page, Next Page, and Last Page to show the logs. Click Save Log to save the logs to your computer.
Where can I find saved files?
Videos and snapshots captured from Playback will be saved to your computer. See Live View Settings on page 111 for details.
TRENDnet User's Guide TV-NVR104
System Information
System Information page shows the TV-NVR104's basic information. Click System then click System Info to show the page.

Basic Information
| Device Name: | Human readable device name for easy identification. |
| Firmware Version: | Firmware version |
| MAC Address: | The MAC address of Ethernet Interface |
| System Time: | The system time setup in the camera. Keeping this time correct is important for recording, scheduled control and logging accurately. |
Network Information
| IP Address: | IP address of the TV-NVR104 |
| Subnet Mask: | Network range of IP address |
| Default Gateway: | The default route going from the TV-NVR104 subnet. |
| Primary DNS: | Primary DNS server address |
| Secondary DNS: | Secondary DNS server address |
TRENDnet User's Guide TV-NVR104
System Configuration
Device Settings
Setup your system name for easy identification. This device name will also be recognized by other network camera software as the name of this camera. OSD, On Screen Display, camera name is referring to this setting as well.
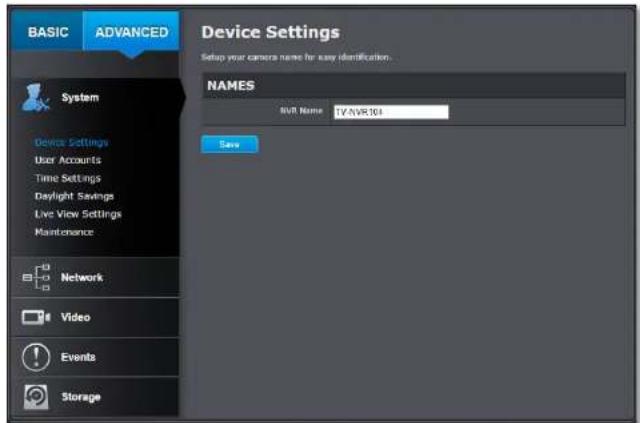
Enter the customized device name and the click on Save to save the settings.
User Accounts
You can setup up to 16 user accounts to access the NVR's video stream with a web browser or real time video stream (RTSP). Only one administrator account can be setup to configure the TV-NVR104 and cannot be deleted.
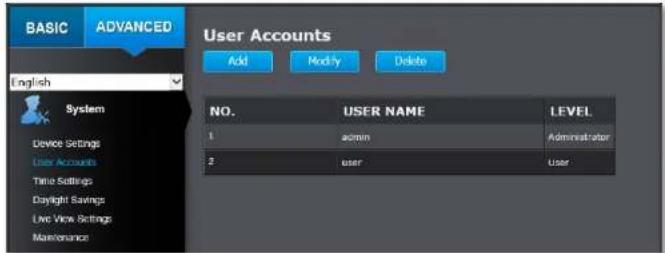
User Accounts
Add: Click Add button to add one user account
Modify: To change a user's name and password, highlight the user by clicking on it. Then, click Modify button. You can change the user's name and password. You can also change the administrator's password here. But, the administrator's name is fixed, you cannot change that.

Click OK to save the changes.
TRENDnet User's Guide TV-NVR104
Time Settings
The accuracy of the system clock is important for scheduling and accurate logging. You can synchronize the system time with your computer, or automatically check the time accuracy with a network time server (NTP server).
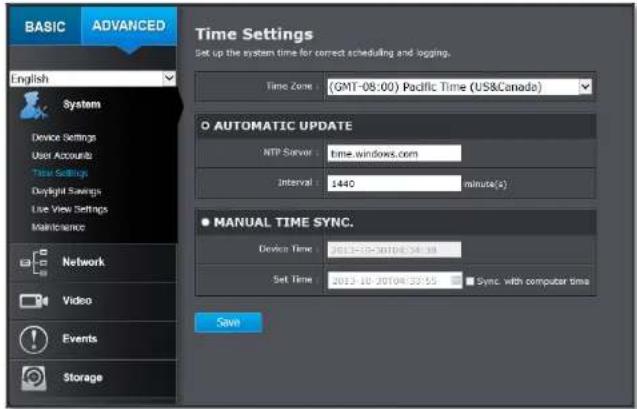
Automatic Update
NTP Specify a time server (NTP server) to synchronize with. Server: (e.g. pool.ntp.org) Interval: The time interval that the TV-NVR104 will synchronize the time with NTP server. Default: 1440 minutes (24 hours)
Click Save to save the changes
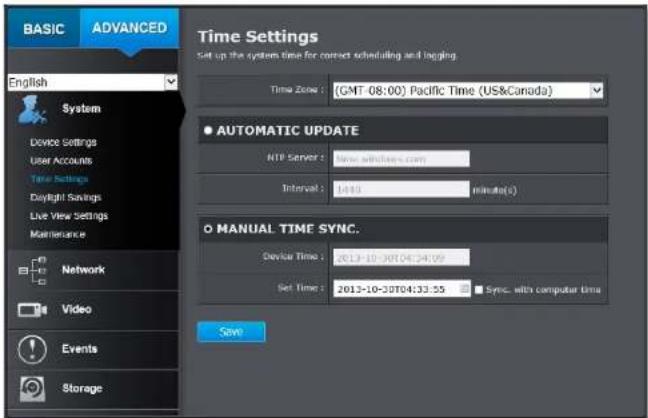
Manual Time Sync
Device The system time of this camera.
Time:
Set Time: Click the calendar icon and manually select the date. Check the Sync. with computer time to copy the time from your computer.
Click Save to save the changes
TRENDnet User's Guide TV-NVR104
Daylight Savings
Setup daylight savings.
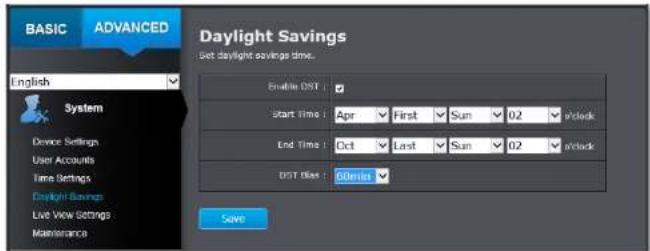
Automatic Update
Enable DST: Check this box if your time zone has daylight savings.
Start Time: Enter the date that daylight savings starts
End Time: Enter the date that daylight savings ends
DST Bias Enter how much time the daylight saving adjusted by daylight savings.
Click Save to save the changes
TRENDnet User's Guide TV-NVR104
Live View Settings
Setup the live view video quality, file size and file saving directories.
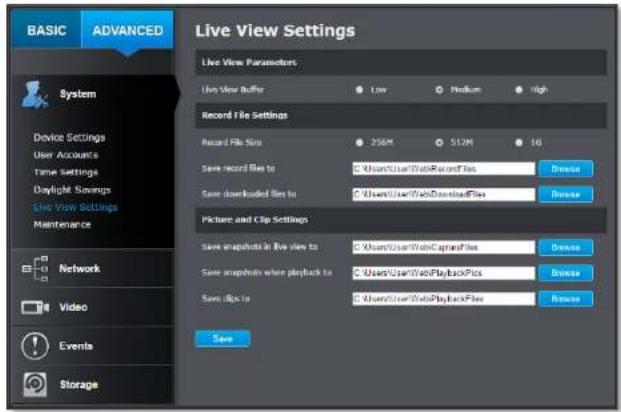
Live View Parameters
Live View Buffer: Configure the buffer size for live view video stream. With low buffer size setting, you can get real-time video stream, but the video may be stop and go if the network is congested. With high buffer setting, you can have smooth video streaming, but the video is delayed from the time happening. Medium size can have moderate video stream smoothness and time delay.
Record File Settings
| Record file size: | This size of live view video recording. You can choose 256MB, 512MB, or 1GB a file. Smaller file size is good for many short recordings. |
| Save record files to: | By default, files will be saved under the folder with your user name, under the subdirectory TRENDnet/RecordFiles. ClickBrowseand then choose a new destination if you want to save the file somewhere else. |
| Save downloaded files to: | By default, files will be saved under the folder with your user name, under the subdirectory TRENDnet/DownloadFiles. ClickBrowseand then choose a new destination if you want to save the file somewhere else. |
Picture and Clip Settings
| Savesnapshots inlive view to: | By default, files will be saved under the folder with your user name, under the subdirectoryTRENDnet/SnapshotFiles. ClickBrowseand then choose a new destination if you want to save the file somewhere else. |
| Savesnapshotswhenplayback to: | By default, files will be saved under the folder with your user name, under the subdirectoryTRENDnet/PlaybackPics. ClickBrowseand then choose a new destination if you want to save the file somewhere else. |
| Save clips to: | By default, files will be saved under the folder with your user name, under the subdirectoryTRENDnet/PlaybackFiles. ClickBrowseand then choose a new destination if you want to save the file somewhere else. |
Click Save to save the changes
TRENDnet User's Guide TV-NVR104
Maintenance
You can restart, load camera settings and upgrade the camera firmware on this page.
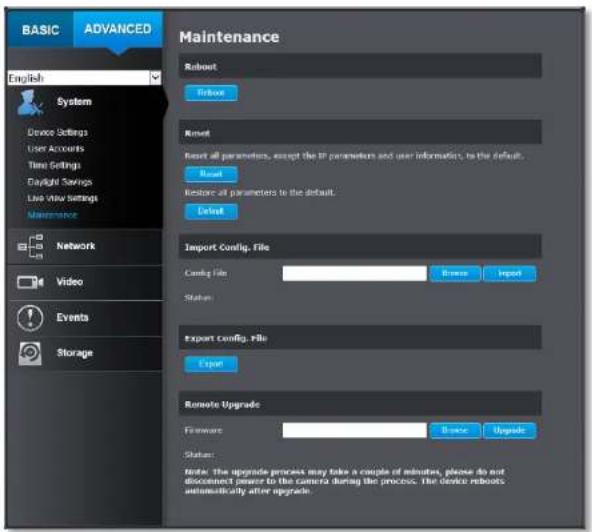
Reboot
Reboot: Click this button to reboot this camera.
Reset
Reset: Reset all camera parameters, except the IP parameters and user information.
Default: Load complete factory default to the camera.
Import Config. File
Config File: To load previously saved settings, click Browse to find the configuration file and then click Import.
Status: Shows the status in loading configuration file.
Export Config. File
Export: Click Export to download configuration file. The file will be downloaded to the Download folder by default.
Remote Upgrade
Firmware: Click Browse to find the latest firmware and then click Upgrade.
Status: Shows the status in firmware upgrade.
TRENDnet may periodically release firmware upgrades that might add features or fix problems associated with your TRENDnet model and version. To find out if there is a firmware upgrade available for your device, please check your TRENDnet model and version using the link.
http://www.trendnet.com/downloads/
- If a firmware upgrade is available, download the firmware to your computer.
- Unzip the file to a folder on your computer.
- Read the firmware upgrade instruction for specific version update information.
- Log into the TV-NVR104.
- Getting to this Maintenance page to upgrade firmware.
TRENDnet User's Guide TV-NVR104
Network Settings
TCP/IP
Setup your basic IPv4 and IPv6 network settings on this page.

Network Interface
| Duplex and Speed: | Choose one of the Ethernet duplex and speed to match your network. Default: auto. |
| MAC Address: | Click this button to reboot this camera. |
| MTU: | Maximum transmission unit. The maximum field size in the Ethernet packet. |
| Primary DNS: | Enter your first IPv4 or IPv6 DNS server address |
| Secondary DNS: | Enter your second IPv4 or IPv6 DNS server address |
IPv4
| DHCP: | Check this box if the IP address is assigned by DHCP server. |
| IPv4 Address: | The IPv4 dynamic or static address |
| Subnet Mask: | Network range of the subnet |
| Default Gateway: | The default route going further from TV-IPNVR104 IPv4 subnet |
IPv6
| IPv6 Address: | IPv6 self-assigned address of TV-NVR104 |
| IPv6 Default Gateway: | The default route going further from TV-NVR104 IPv6 subnet |
TRENDnet User's Guide TV-NVR104
Port
You can change the service port numbers of TV-NVR104 and enable/disable RTSP or HTTP services.
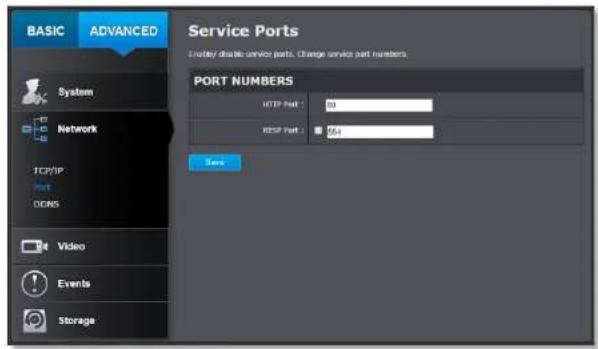
Port Numbers
| HTTP Port: | The default web access port. You can change the port number. However, you cannot disable the web service. The default port number is 80. |
| RTSP Port: | The Real-Time Streaming Protocol port for video streaming. You can change the port number or disable the service by uncheck the box. The default port number is 554. |
Click Save to save the changes
DDNS
Dynamic Domain Name Service, DDNS, allows you to find your camera from the Internet with an easy to remember domain name.
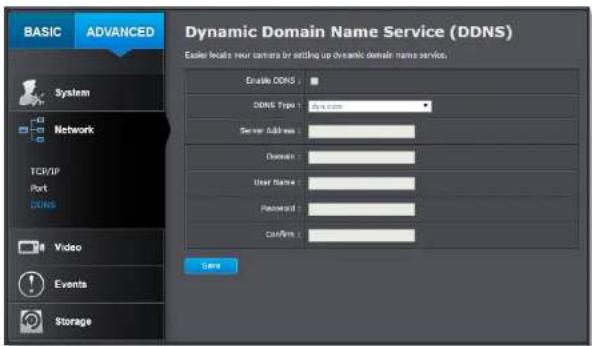
DDNS
| Enable DDNS: | Check this box to enable DDNS Service. |
| DDNS Type: | Select a DDNS service provider. |
| Server Address: | Enter the DDNS server address. |
| Domain: | Enter your registered domain/host name on selected DDNS service. |
| User Name: | Enter the account name. |
| Password: | Enter the password. |
| Confirm: | Enter the password again. |
Click Save to save the changes
TRENDnet User's Guide TV-NVR104
Video Settings
Video Format
Adjust the settings of video streams.

Channel: Select which video stream for video format changes.
Stream Type: Choose the main stream or sub stream of the video channel to change its video formats.

Resolution: Resolution of the video stream.
Bitrate Type: Choose between variable bit rate and constant bit rate for video compression. The default is variable rate.
Video Quality: Choose the video quality. The default is medium quality.
Frame Rate: Choose the capturing frame rate. Reduce the frame rate to reduce the capture file size.
Max. Bitrate: Choose the maximum video sampling bit rate.
Click Save to save the changes
TRENDnet User's Guide TV-NVR104
On Screen Display Settings
Display the camera name and the time the video. Select the video channel you want to change the setting, then change the settings. Move the red box to position the text. Click on Save to save the changes.
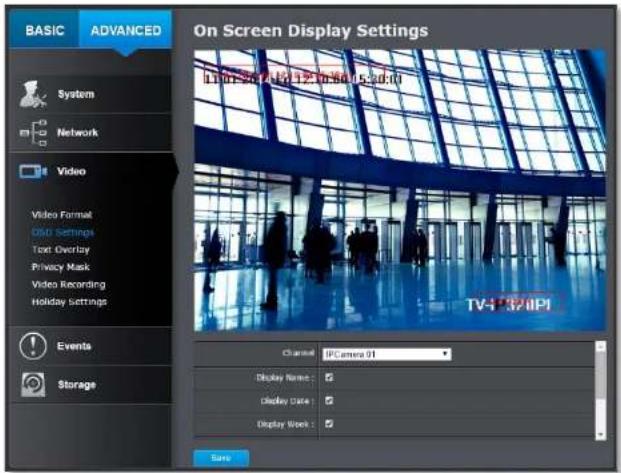
Channel: Select the video channel you want to edit.
Display Check this box to display the product name that Name: was setup in the device settings.
Display Date: Check this box to display system time.
Display Week: Check this box to display time of the week.
Time Format: Select 12 or 24-hour time format.
Date Format: Select the date format
Display Mode: Choose how the text will show on the screen.
Text Overlay
Display extra information on the screen over the image. Move the red box to position the text. Click on Save to save the changes.

Channel: Select the video channel you want to edit.
Check Box: Check this box to enable text overlay.
Text Field: Enter the text you want to display. The length of the text is decided by limitation of the camera.
TRENDnet User's Guide TV-NVR104
Privacy Mask
Create a masking area to keep your privacy. You can create up to four independent masking areas by clicking and dragging on the screen.
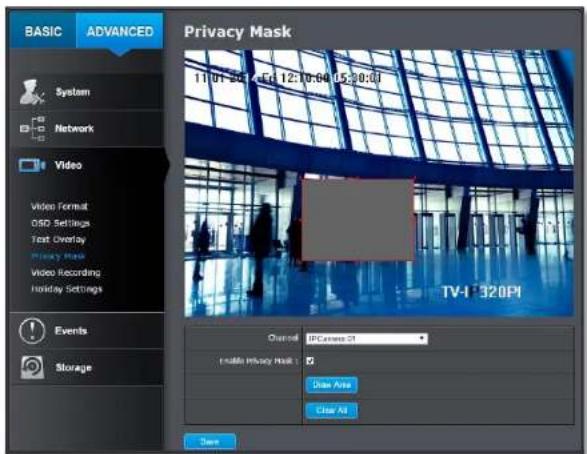
Channel: Select the video channel you want to edit.
Enable Privacy Check this box to enable privacy masking. Mask:
Stop Drawing: Click this button to stop drawing.
Clear All: Click this button to clear all the masking areas.
Click Save to save the changes
Video Recording

Channel: Select the video channel you want to edit.
Enable Check this box and then click Save to enable Record video recording.
Schedule:
Pre-record: Recording time before trigger event.
Post-record: Recording time after trigger event.
Overwrite: Select Yes to allow older recordings to be overwritten.
Record Audio: Record audio when the camera has audio capability.
Expire Time: Specify how many days you want to lock the recording.
Click Save to save the changes
TRENDnet User's Guide TV-NVR104
Edit: Click Edit to edit the recording schedule. The Edit Schedule window will pop up.

- Select day of the week you want to edit.
- Select All Day or Customized schedule of the day.
- Set the time period and the event you want to trigger the video recording continuous (always recording) or motion detection.
- Click Select All or the weekday you want to have the same schedule on different day.
- Click another day of the week by clicking on its tab to set the next schedule. Click OK when you have finished your settings.
Holiday Settings
Recording video in holidays may have different requirements. You can set up to 11 holidays of a year sharing the same holiday profile.
Set up the holiday schedule by click on button.
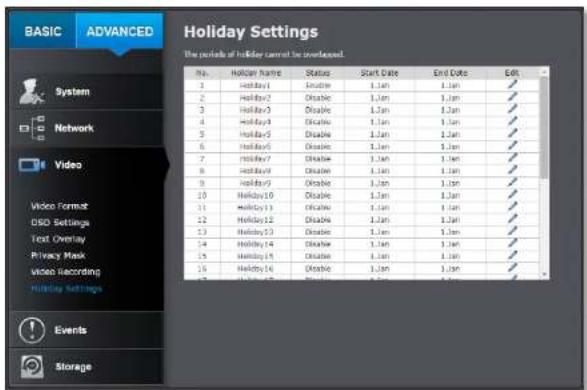
TRENDnet User's Guide TV-NVR104
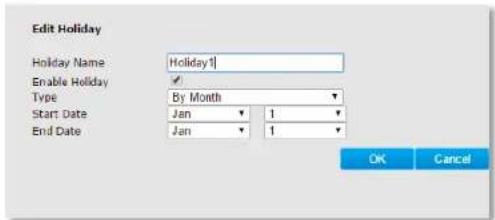
Edit Holiday Schedule
Holiday Name: Change the holiday name to meaningful name instead of index numbers.
Enable: Enable or disable this holiday rule.
Type: Select the holiday is for a day, a week or a month.
Day mode: Select the start and end dates to specify the period of holidays. This setting is good for one time only. It does not repeat periodically.
Week mode: Select the start and end dates of the week to specify the period of holidays. This setting is repeating every year.
Month mode: Select the start and end dates to specify the period of holidays. This setting is repeating every year.
Start Date: Select the day when the holiday starts.
End Date: Select the day when the holiday ends.
Click OK to save the changes
TRENDnet User's Guide TV-NVR104
Events
Motion Detection
Set up how the motion detection event will be triggered and what actions will be triggered.
Note: This feature is camera dependent.

Channel: Select the video channel you want to edit.
Enable Check this box to enable motion detection. Click Motion Save to save the choice.
Detection:
Draw Click Draw Area button to start drawing. Click and drag on the area you want to set up the motion detection. The number of areas you can set up depends on camera models. Click Stop Drawing to stop drawing motion detection areas. The red grids represent the motion detection area.

Sensitivity: Move the slider to adjust detection sensitivity.
Clear All: Click this button to clear all the set up areas.
TRENDnet User's Guide TV-NVR104
Arming Schedule
Edit: Click Edit to edit the recording schedule. The Edit Schedule window will pop up.

- Select day of the week you want to edit.
- Select All Day or Customized schedule of the day.
- Set the time period and the event you want to trigger the video recording continuous (always recording) or motion detection.
- Click Select All or the weekday you want to have the same schedule on different day.
- Click another day of the week by clicking on its tab to set the next schedule. Click OK when you have finished your settings.
Notification
Full Screen Switch the video on the VGA/HDMI monitor to Monitoring: the camera detected motion event.
Audible Activate the audible on board buzzer. Warning:
Send Email: Send email to notify the system manager.
Trigger Use this motion event as the trigger to invoke channel: actions in other channels.
Click Save to save the changes
TRENDnet User's Guide TV-NVR104
Video Tampering
Set up how the video tampering detection event will be triggered and what actions will be triggered. When video is suddenly blocked or blacken, tampered, the video tamper notifications will alert the system manager to check the camera.
Note: This feature is camera dependent.

Channel: Select the video channel you want to edit.
Enable Check this box to enable tamper detection. Click Tamper Save to save the settings.
Detection:
Draw Area: Click Draw Area button to start drawing. Click and drag on the area you want to set up the tamper detection. Click Stop Drawing to stop drawing motion detection areas. The gray block represents the detection area.
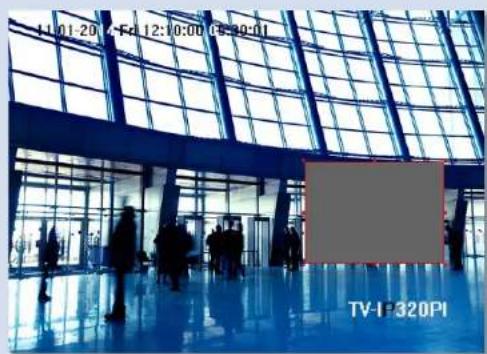
Sensitivity: Move the slider to adjust detection sensitivity.
Clear All: Click this button to clear all the set up areas.
TRENDnet User's Guide TV-NVR104
Arming Schedule
Edit: Click Edit to edit the recording schedule. The Edit Schedule window will pop up.
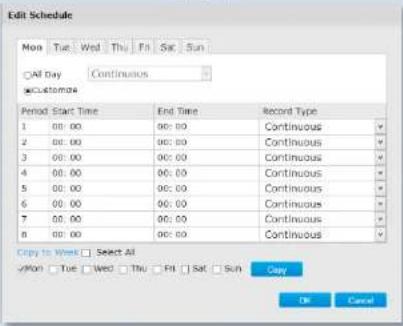
- Select day of the week you want to edit.
- Select All Day or Customized schedule of the day.
- Set the time period and the event you want to trigger the video recording continuous (always recording) or motion detection.
- Click Select All or the weekday you want to have the same schedule on different day.
- Click another day of the week by clicking on its tab to set the next schedule. Click OK when you have finished your settings.
Notification
Full Screen Switch the video on the VGA/HDMI monitor to Monitoring: the camera detected motion event.
Audible Activate the audible on board buzzer.
Warning:
Send Email: Send email to notify the system manager.
Click Save to save the changes
Exception
Provide notifications for other system events, set up your notifications here.

Notification
Exception First, choose the exception type, and then choose Type: the corresponding action.

Audible Activate the audible on board buzzer. Warning:
Send Email: Check this box to send an e-mail notification when motion is detected.
Click Save to save the changes
TRENDnet User's Guide TV-NVR104
Set up email accounts for notifications.

Sender
| Sender: | Enter the name to be appeared as the email sender. |
| Sender's Address: | Enter sender's email address. |
| SMTP Server: | Simple Mail Transportation Protocol Server address, the outgoing email server address. It may be has address as your incoming email server, |
| maybe not. Please ask your email service provider for detail. | |
| SMTP Port: | Service port number for outgoing email.* |
| Authentication : | Check this box if your server requires a password in order to send email. Most email servers require authentication when sending an email. |
| User name: | Enter the user name of outgoing email account |
| Password: | Enter the password |
| Confirm: | Enter the password again to confirm that the password was entered correctly. |
Click Save to save the changes
| Receiver | |
| Receiver 1: | The first receiver's name. |
| Receiver 1's Address: | The first receiver's email address. |
| Receiver 2: | The second receiver's name. |
| Receiver 2's Address: | The second receiver's email address. |
| Receiver 3: | The third receiver's name. |
| Receiver 3's Address: | The third receiver's email address. |
Click Save to save the changes
*Note: Many ISPs does not allow service port 25 going through their network. Please consult your email service provider and ISP for detail. TV-NVR104 does not support SSL or TLS. Please select the right email service for the notifications.
TRENDnet User's Guide TV-NVR104
Storage
Storage Management
To setup and initiate the hard drive remotely, check the hard disk drive and then click on Format.

| Format: | Select the storage volume and then click Format to format your hard disk drive. This action will format the volume for video recording. Placeholder files (formatting files) will be created to make sure disk allocation is appropriate and the file searching is optimized. |
| Capacity: | The total capacity of the hard disk can be used for video recording and log. |
| Free Space: | The free space left for video recording and log. |
| Status: | The disk status. |
| Property: | This network storage is read only or can be read and write. |
TRENDnet User's Guide TV-NVR104
Appendix
Turn on network discovery on Windows
The TV-NVR104 is UPnP enabled device. Find your camera is easy with Windows network discovery. If your network discovery is turned off, go to Control Panel >> Network and Internet >> Network and Sharing Center >> Advanced sharing settings and then select Turn on network discovery. Click Save changes to save the changes. If you still have difficulty to find your camera with network discovery, check it out if it has to network discovery setting on other network profiles.

Direct video access - RTSP
To access the video directly through RTSP, just visit the camera IP address on port 554 by default.
To access the video through NVR, you need to enter the IP address, port number and leading path "/Streaming/Channels" then specify the channel number. The channel number is 2 digits leading with zero. For example: rtsp://192.168.10.60:554/Streaming/Channels/01 to view the channel 1 video on TV-NVR104 which located on 192.168.10.60.
TRENDnet User's Guide TV-NVR104
How to setup a static IP address on your computer
Note: Before setup, make sure that you have a unique static IP address available which will not cause the network address collision.
Windows 8
- Open the Charms bar by moving the mouse to the top right corner of the screen or press the Windows Key + C and click on Search.

- Type "network" in the search box and click Settings to focus your search.
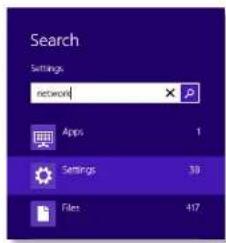
- Choose View Network Connections
- Click Properties on the selected network adapter.
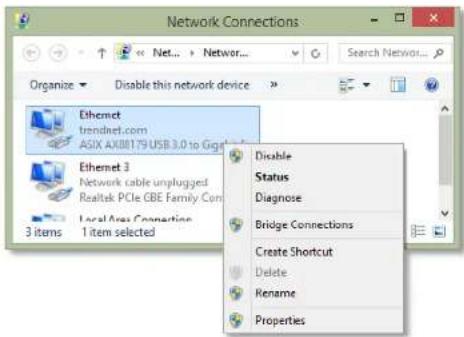
- Select Internet Protocol Version 4 (TCP/IPv4) and then click Properties.

TRENDnet User's Guide TV-NVR104
- Click Use the following address and enter the static IP address and related information. For setting up the TRENDNET PRODUCT, you can enter 192.168.10.10 as your IP address, 255.255.255.0 as the Subnet mask. Leave the other fields blank. Click OK to apply the changes.

Windows 7
- Click Control Panel from the Start menu.

- Type "network" in the search box to focus your selection. Click on Network and Sharing Center

TRENDnet User's Guide TV-NVR104
- Click Change adapter settings on the left-hand side.
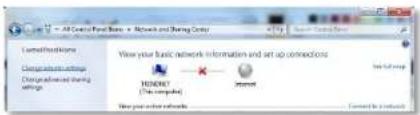
- Click Properties on the selected network adapter.

- Select Internet Protocol Version 4 (TCP/IPv4) and then click Properties
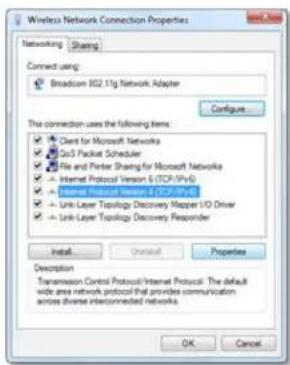
- Click Use the following address and enter the static IP address and related information. For setting up the TRENDNET PRODUCT, you can enter 192.168.10.10 as the IP address, 255.255.255.0 as the Subnet mask. Leave other fields blank. Click OK to apply the changes.

TRENDnet User's Guide TV-NVR104
OSX
- Click the Apple logo in the top-left corner of your screen. Click on System Preferences... . In the Internet and Wireless section, click on Network.
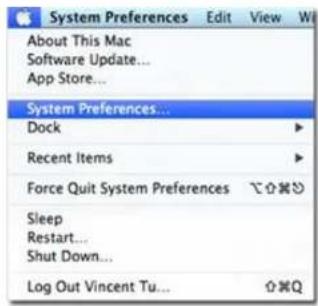
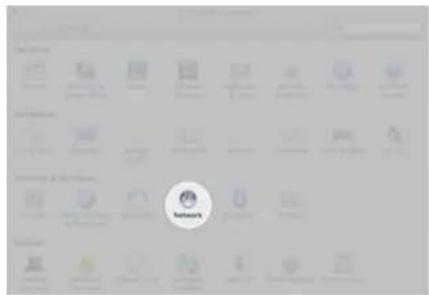
- Select the network card you want to configure on the left banner (e.g. Wi-Fi). Click Advanced.

- Choose TCP/IP. In Configure IPv4, select Manually. Input the static IP address, subnet mask, and your router IP address. (In order to setup the TRENDNET PRODUCT, you can put in 192.168.10.10 as the IP address, 255.255.255.0 as the subnet mask and leave router in blank. Click OK to exit advanced setup.

TRENDnet User's Guide TV-NVR104
- Click Apply to apply the changes.

TRENDnet User's Guide TV-NVR104
Install your NVR System on Your Network
To enable remote network access to the TV-NVR104, you need to install your NVR onto your network. Make sure your whole NVR system, TV-NVR104 and cameras, is working on the same network segment your router defined. Reserve a pool of IP addresses for NVR and all cameras. Assigning virtual server or firewarll to the TV-NVR104 IP address. You can then access your NVR and network cameras everywhere over the network.
The other option to setup the NVR and cameras on your network is using DHCP. The TV-NVR104 DHCP client is default disabled. You can enable DHCP client manually.
- Go page 55 General Network Settings to enable the TV-NVR104 getting its IP address from your router DHCP.
- Reboot your TV-NVR104.
It is recommended that you make your router assign your TV-NVR104 to the same IP address by creating the DHCP reservation list.
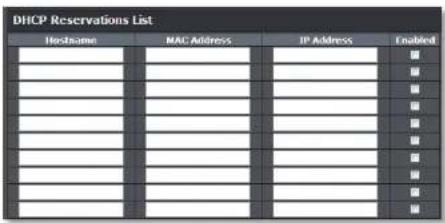

Do not plug-in the Plug-and-Play camera with default setting if you want your router assign the addresses to your cameras.

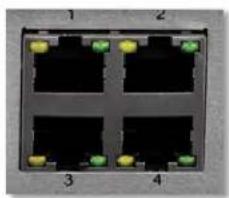
natural_image
Front view of a four-pin network switch or connector (no text or symbols visible)The IP address of Plug-and-Play camera will be altered once the camera setting in NVR is Plug-and-Play and you plug the camera into one of the PoE port. To disable the Plug-and-Play installation, you need to navigate to Edit IP Camera (see page 16 for more detail) and select the Adding Method to Manual. The IP Camera No. here is mapping to the PoE number port number.
- Reset your cameras if you connects them to the network before. (To reset the TV-IP320PI camera, you need to power off the camera. Then press and hold the reset button. And then power the camera on while keep holding the reset button. Keep holding the reset button for 10 seconds and let the camera restore all factory defaults. For other cameras, please reference to the camera's user guide.)
- Plug in the cameras to the PoE ports and supply the power when necessary.
TRENDnet User's Guide TV-NVR104
- All the cameras are no getting the assigned IP address from your router.
- Go the Edit IP Camera menu and enter the IP address, protocol, and management port number information.
Manage your IP addresses
When you build up and merge your surveillance system on your company or home network, appropriate IP address management is one of the key factor to make sure the system stability. Assigning your NVR and cameras with static IPs when you connect the network cameras and NVR on your company or home network.
Make sure those static IPs are away from DHCP pool setup on your router. If you didn't setup static IP for cameras and NVR and everything is connected to your network, IP conflict may happen in certain point of time.
TRENDnet User's Guide TV-NVR104
Compatible Camera List
TRENDnet cameras are compatible with TV-NVR104. For the best performance and interoperability, the following camera models are suggested:
| Model | Protocol | Default Port | Description | Basic PTZ | Adv. PTZ | Audio |
| TV-IP302PI | ONVIF | 80 | Outdoor Megapixel HD PoE Day/Night Internet Camera | NA | NA | NA |
| TV-IP310PI | TRENDnet3 | 8000 | Outdoor 3MP Full HD PoE Day/Night Network Camera | NA | NA | NA |
| TV-IP311PI | TRENDnet3 | 8000 | Outdoor 3MP Full HD PoE Dome Day/Night Network Camera | NA | NA | NA |
| TV-IP312PI | TRENDnet3 | 8000 | Outdoor 3 MP Full HD 1080p PoE IR Network Camera | NA | NA | NA |
| TV-IP320PI | TRENDnet3 | 8000 | Outdoor 1.3 MP HD PoE IR Network Camera | NA | NA | NA |
| TV-IP320PI2K | TRENDnet3 | 8000 | Outdoor 1.3 MP HD PoE IR Network Camera Twin Pack | NA | NA | NA |
| TV-IP321PI | TRENDnet3 | 8000 | Outdoor 1.3 MP HD PoE Dome IR Network Camera | NA | NA | NA |
| TV-IP322WI | TRENDnet3 | 8000 | 1.3MP Outdoor IR Dome | NA | NA | NA |
| TV-IP342PI | ONVIF | 80 | Outdoor 2MP Full HD Vari-Focal PoE Day/Night Dome Network Camera | NA | NA | Yes |
| TV-IP343PI | ONVIF | 80 | Outdoor 2MP Full HD Vari-Focal PoE Day/Night Network Camera | NA | NA | Yes |
| TV-IP430PI* | TRENDnet3 | 8000 | 2MP Outdoor Speed Dome | Yes | Yes | Yes |
| TV-IP450P* | TRENDnet3 | 8000 | Outdoor 1.3 MP HD PoE+ Speed Dome Network Camera | Yes | Yes | Yes |
| TV-IP450PI* | TRENDnet3 | 8000 | Outdoor 1.3 MP HD PoE IR Speed Dome Network Camera | Yes | Yes | Yes |
| TV-IP572P | TRENDnet1 | 80 | Megapixel HD PoE Internet Camera | NA | NA | Yes |
| TV-IP572PI | TRENDnet1 | 80 | Megapixel HD PoE Day/Night Internet Camera | NA | NA | Yes |
| TV-IP672P | TRENDnet1 | 80 | Megapixel HD PoE Day/Night PTZ Internet Camera | Yes | NA | Yes |
| TV-IP662PI | TRENDnet1 80 | Megapixel HID PoE Day/Night PTZ Network Camera | Yes | NA | Yes |
* TV-IP430PI and TV-IP450P cameras require 802.3at PoE+ power supply. TV-IP450PI camera require proprietary PoE power supply. Please supply the power separately instead of dragging power from the TV-NVR104. Dragging PoE power supply over the budget (35W) may cause the system breakdown.
Regulations
Federal Communication Commission Interference Statement
This equipment has been tested and found to comply with the limits for a Class B digital device, pursuant to Part 15 of the FCC Rules. These limits are designed to provide reasonable protection against harmful interference in a residential installation. This equipment generates uses and can radiate radio frequency energy and, if not installed and used in accordance with the instructions, may cause harmful interference to radio communications. However, there is no guarantee that interference will not occur in a particular installation. If this equipment does cause harmful interference to radio or television reception, which can be determined by turning the equipment off and on, the user is encouraged to try to correct the interference by one of the following measures:
- Reorient or relocate the receiving antenna.
- Increase the separation between the equipment and receiver.
- Connect the equipment into an outlet on a circuit different from that to which the receiver is connected.
- Consult the dealer or an experienced radio/TV technician for help.
FCC Caution: Any changes or modifications not expressly approved by the party responsible for compliance could void the user's authority to operate this equipment.
This device complies with Part 15 of the FCC Rules. Operation is subject to the following two conditions: (1) This device may not cause harmful interference, and (2) this device must accept any interference received, including interference that may cause undesired operation.

IMPORTANT NOTE:
FCC Radiation Exposure Statement
This equipment complies with FCC radiation exposure limits set forth for an uncontrolled environment. This equipment should be installed and operated with minimum distance 20cm between the radiator & your body.
This transmitter must not be co-located or operating in conjunction with any other antenna or transmitter.
The availability of some specific channels and/or operational frequency bands are country dependent and are firmware programmed at the factory to match the intended destination. The firmware setting is not accessible by the end user.
TRENDnet User's Guide TV-NVR104
Europe - EU Declaration of Conformity
TRENDnet hereby declare that the product is in compliance with the essential requirements and other relevant provisions under our sole responsibility.

Safety
EN 60590-1: 2006+A11: 2009+A1: 2010+A12: 2011+A2: 2013
EMC
EN 55022: 2010 + AC: 2011 Class A
EN 50130-4: 2011
This product is herewith confirmed to comply with the Directives.
Directives
Low Voltage Directive 2006/95/EC
EMC Directive 2004/108/EC
RoHS Directive 2011/65/EU
REACH Regulation (EC) No. 1907/2006
| Česky [Czech] | TRENDnet tímto prohlašuje, že tento TEW-735AP je ve shodě se základními požadavky a dalšími příslušnými ustanoveními směrnice 2004/108/ES, 2006/95/ES a 2009/125/ES. |
| Dansk [Danish] | Undertegnede TRENDnet erklærer herved, at følgende udstyr TEW-735AP overholder de væsentlige krav og øvrige relevante krav i direktiv 2004/108/EF, 2006/95/EF og 2009/125/EF. |
| Deutsch [German] | Hiermit erklärt TRENDnet, dass sich das Gerät TEW-735AP in Übereinstimmung mit den grundlegenden Anforderungen und den übrigen einschlägigen Bestimmungen der Richtlinie 2004/108/EG, 2006/95/EG und 2009/125/EG befindet. |
| Eesti [Estonian] | Käesolevaga kinnitab TRENDnet scadme TEW-735AP vastavust direktiivi 2004/108/ EÜ, 2006/95/ EÜ ja 2009/125/ EÜ põhinõuctele ja nimetatud direktiivist tulenevatcle teistele asjakohastele säctctele. |
| English | Hereby, TRENDnet, declares that this TEW-735AP is in compliance with the essential requirements and other relevant provisions of Directive 2004/108/CE2006/95/CE, and 2009/125/CE. |
| Español [Spanish] | Por medio de la presente TRENDnet declara que el TEW-735AP cumple con los requisitos esenciales y cualesquiera otras disposiciones aplicables o exigibles de la Directiva 2004/108/CE, 2006/95/CE y 2009/125/CE. |
| Ελληνική [Greek] | ME THN ΠΑΡΟΥΣΑΤRENDnet ΔΗΛΩΝΕΙ OTI TEW-735AP ΣΥΜΜΟΡΦΩΝΕΤΑΙ ΠΡΟΣ ΤΙΣ ΟΥΣΙΩΔΕΙΣ ΑΠΑΙΤΗΣΕΙΣ ΚΑΙ ΤΙΣ ΑΟΙΠΕΣ ΣΧΕΤΙΚΕΣ ΔΙΑΤΑΣΕΙΣ ΤΗΣ ΟΔΗΓΙΑΣ 2004/108/EK, 2006/95/EK, 2009/125/EK και. |
| Français [French] | Par la présente TRENDnet déclare que l'appareil TEW-735AP est conforme aux exigences essentielles et aux autres dispositions pertinentes de la directive 2004/108/CE, 2006/95/CE et 2009/125/CE. |
| Italiano [Italian] | Con la presente TRENDnet dichiara che questo TEW-735AP è conforme ai requisiti essenziali ed alle altre disposizioni pertinenti stabilite dalla direttiva 2004/108/CE, 2006/95/CE e 2009/125/CE. |
| Latviski [Latvian] | AršoTRENDnetdeklarč, ka TEW-735AP atbilstDirektivas 2004/108/EK, 2006/95/EK un 2009/125/EK būtiskajāmprasibām un citiemar to saistītajiemnoteikumiem. |
| Lietuvių [Lithuanian] | Šiuo TRENDnet deklaruojá, kad šis TEW-735AP atitinka esminius reikalavimus ir kitas 2004/108/EB, 2006/95/EB ir 2009/125/EB Direktyvos nuostatas. |
| Nederlands [Dutch] | Ilicbij verklaart TRENDnet dat het toestel TEW-735AP in overcenstenning is met de essentiële cisen en de andere relevante bepalingen van richtlijn 2004/108/EG, 2006/95/EG en 2009/125/EG. |
TRENDnet User's Guide TV-NVR104
| Malti [Maltese] | Hawnhekk, TRENDnet, jiddikjara li dan TEW-735AP jikkonforma mal-htigijiet essenzjali u ma provvedimenti ohrajn relevanti li hemm fid-Dirrettiva 2004/108/KE, 2006/95/KE u 2009/125/KE. |
| Magyar [Hungarian] | Alulirott, TRENDnet nyilatkozom, hogy a TEW-735AP megfelel a vonatkozó alapvető követelményeknek és az 2004/108/EK, 2006/95/EK és a 2009/125/EK irányelv egyéb előírásainak. |
| Polski [Polish] | Niniejszym TRENDnet oświadcza, že TEW-735AP jest zgodny z zasadniczymi wymogami oraz pozostałymi stosownymi postanowieniami Dyrektywy 2004/108/WE, 2006/95/WE i 2009/125/WE. |
| Português [Portuguese] | TRENDnet declara que este TEW-735AP está conforme com os requisitos essenciais e outras disposições da Directiva2004/108/CE, 2006/95/CE e 2009/125/CE. |
| Slovensko [Slovenian] | TRENDnet izjavlja, da je ta TEW-735AP v skladu z bistvenimi zahtcvami in ostalimi relevantnimi določili direktive2004/108/ES, 2006/95/ES in 2009/125/ES. |
| Slovensky [Slovak] | TRENDnettymtovyhlasuje, že TEW-735AP splňazákladnépožiadavky a všetkypríslušnéustanovenia Smernice 2004/108/ES, 2006/95/ES a 2009/125/ES. |
| Suomi [Finnish] | TRENDnet vakuuttaa tâten että TEW-735AP tyyppinen laite on direktiivin2004/108/EY, 2006/95/EY ja 2009/125/EY oleellisten vaatimusten ja sită koskevien direktiivin muiden ehtojen mukainen. |
| Svenska [Swedish] | Härmed intygar TRENDnet att denna TEW-735AP står I överensstänmelse med dc väsentliga egenskapskrav och övriga relevanta bestämmelser som framgår av direktiv 2004/108/EG, 2006/95/EG och 2009/125/EG. |
RoHS
This product is RoHS compliant.


Power over Ethernet
The TV-NVR104 has 4 PoE ports and works as a Power Sourcing Equipment (PSE). The 4 PoE ports 15.4 Watts per port to a Powered Device (PD). The network port is standard 10/100 Ethernet port. The total power budget available for all PoE cameras is 35 Watts.
WARNING: The switch should be connected only to PoE networks without routing to the outside plant.
TRENDnet User's Guide TV-NVR104
Limited Warranty
TRENDnet warrants its products against defects in material and workmanship, under normal use and service, for the following lengths of time from the date of purchase.
• TV-NVR104 - 2 Years Warranty
If a product does not operate as warranted during the applicable warranty period, TRENDnet shall reserve the right, at its expense, to repair or replace the defective product or part and deliver an equivalent product or part to the customer. The repair/replacement unit's warranty continues from the original date of purchase. All products that are replaced become the property of TRENDnet. Replacement products may be new or reconditioned. TRENDnet does not issue refunds or credit. Please contact the point-of-purchase for their return policies.
TRENDnet shall not be responsible for any software, firmware, information, or memory data of customer contained in, stored on, or integrated with any products returned to TRENDnet pursuant to any warranty.
There are no user serviceable parts inside the product. Do not remove or attempt to service the product by any unauthorized service center. This warranty is voided if (i) the product has been modified or repaired by any unauthorized service center, (ii) the product was subject to accident, abuse, or improper use (iii) the product was subject to conditions more severe than those specified in the manual.
Warranty service may be obtained by contacting TRENDnet within the applicable warranty period and providing a copy of the dated proof of the purchase. Upon proper submission of required documentation a Return Material Authorization (RMA) number will be issued. An RMA number is required in order to initiate warranty service support for all TRENDnet products. Products that are sent to TRENDnet for RMA service must have the RMA number marked on the outside of return packages and sent to TRENDnet prepaid, insured and packaged appropriately for safe shipment. Customers shipping from outside of the USA and Canada are responsible for return shipping fees. Customers shipping from outside of the USA are responsible for custom charges, including but not limited to, duty, tax, and other fees.
WARRANTIES EXCLUSIVE: IF THE TRENDNET PRODUCT DOES NOT OPERATE AS WARRANTED ABOVE, THE CUSTOMER'S SOLE REMEDY SHALL BE, AT TRENDNET'S OPTION, REPAIR OR REPLACE. THE FOREGOING WARRANTIES AND REMEDIES ARE EXCLUSIVE AND ARE IN LIEU OF ALL OTHER WARRANTIES, EXPRESSED OR IMPLIED, EITHER IN FACT OR BY OPERATION OF LAW,
STATUTORY OR OTHERWISE, INCLUDING WARRANTIES OF MERCHANTABILITY AND FITNESS FOR A PARTICULAR PURPOSE.
TRENDNET NEITHER ASSUMES NOR AUTHORIZES ANY OTHER PERSON TO ASSUME FOR IT ANY OTHER LIABILITY IN CONNECTION WITH THE SALE, INSTALLATION MAINTENANCE OR USE OF TRENDNET'S PRODUCTS.
TRENDNET SHALL NOT BE LIABLE UNDER THIS WARRANTY IF ITS TESTING AND EXAMINATION DISCLOSE THAT THE ALLEGED DEFECT IN THE PRODUCT DOES NOT EXIST OR WAS CAUSED BY CUSTOMER'S OR ANY THIRD PERSON'S MISUSE, NEGLECT, IMPROPER INSTALLATION OR TESTING, UNAUTHORIZED ATTEMPTS TO REPAIR OR MODIFY, OR ANY OTHER CAUSE BEYOND THE RANGE OF THE INTENDED USE, OR BY ACCIDENT, FIRE, LIGHTNING, OR OTHER HAZARD.
LIMITATION OF LIABILITY: TO THE FULL EXTENT ALLOWED BY LAW TRENDNET ALSO EXCLUDES FOR ITSELF AND ITS SUPPLIERS ANY LIABILITY, WHETHER BASED IN CONTRACT OR TORT (INCLUDING NEGLIGENCE), FOR INCIDENTAL, CONSEQUENTIAL, INDIRECT, SPECIAL, OR PUNITIVE DAMAGES OF ANY KIND, OR FOR LOSS OF REVENUE OR PROFITS, LOSS OF BUSINESS, LOSS OF INFORMATION OR DATE, OR OTHER FINANCIAL LOSS ARISING OUT OF OR IN CONNECTION WITH THE SALE, INSTALLATION, MAINTENANCE, USE, PERFORMANCE, FAILURE, OR INTERRUPTION OF THE POSSIBILITY OF SUCH DAMAGES, AND LIMITS ITS LIABILITY TO REPAIR, REPLACEMENT, OR REFUND OF THE PURCHASE PRICE PAID, AT TRENDNET'S OPTION. THIS DISCLAIMER OF LIABILITY FOR DAMAGES WILL NOT BE AFFECTED IF ANY REMEDY PROVIDED HEREIN SHALL FAIL OF ITS ESSENTIAL PURPOSE.
Governing Law: This Limited Warranty shall be governed by the laws of the state of California.
Some TRENDnet products include software code written by third party developers. These codes are subject to the GNU General Public License ("GPL") or GNU Lesser General Public License ("LGPL").
Go to http://www.trendnet.com/gpl or http://www.trendnet.com Download section and look for the desired TRENDnet product to access to the GPL Code or LGPL Code. These codes are distributed WITHOUT WARRANTY and are subject to the copyrights of the developers. TRENDnet does not provide technical support for these codes. Please go to http://www.gnu.org/licenses/gpl.txt or http://www.gnu.org/licenses/lgpl.txt for specific terms of each license.
June 12, 2015
TV-NVR104 (v1.0R) User's Guide V1.0
TRENDNET®
Product Warranty Registration
Please take a moment to register your product online. Go to TRENDnet's website at http://www.trendnet.com/register
TRENDnet
20675 Manhattan Place
Torrance, CA 90501. USA
Copyright ©2015. All Rights Reserved. TRENDnet.
- 4-Channel 1080p HD PoE NVR
- TRENDnet User's Guide TV-NVR104
- Table of Contents
- System Management (local) 25
- Shortcut Menu 27
- Using the Main Menu.... 31
- Logout, start up, or shut down the NVR.... 33
- Camera Settings Menu 34
- System Configuration Menu 53
- System Maintenance Menu 64
- Hard Drive Management....76
- Scheduled recording 77
- Backup Video Recordings....84
- Video playback....86
- Access your NVR with the Web Browser....92
- System Configuration....108
- Network Settings....113
- Video Settings....115
- Events 120
- Storage 125
- Appendix 126
- Regulations....135
- Product Overview
- Features
- Package Contents
- Hardware
- PoE Ports
- Storage Bay
- Network Port
- Display Ports
- Audio Ports
- USB Ports
- Mouse Included
- Management
- Remote Access
- Camera Setup
- Live View
- Camera Management
- Video Recording
- Recording Time
- Scheduled Recording
- Advanced Playback
- Video Export
- Dynamic DNS Support
- IPv6
- Free Apps
- Installation Overview
- Things you need to install the system
- Free Mobile App
- Hard Drive Installation
- Compatible Hard Drive
- Mounting Your Hard Drive
- Wiring the System
- Connect NVR to your network (optional)
- Connect to the cameras
- Connecting the power supply
- Connect to the monitor or TV
- Connect the mouse
- NVR Installation
- Camera Installation
- Viewing angle
- Weather conditions
- Basic System Setup
- Soft Keyboard Instruction
- Keyboard styles
- List of keyboard styles
- English keyboard
- Numeric keyboard
- Special characters
- Setup Wizard
- Click the selection list to the right of Time Zone.
- Select your time zone.
- Start Recording
- Instant Playback
- System Management (local)
- Using the Short Menu
- Short Menu
- Single Screen:
- Multi-screen:
- Shortcut Menu
- Audio
- PTZ control
- Basic pan and tilt
- Advanced PTZ
- Special features
- Navigation
- Digital zoom
- Image settings
- Live view strategy
- Close
- Using the Main Menu
- Login to the Management Pages
- USA/Canada phone support:
- Global Support:
- Online Support:
- Logout, start up, or shut down the NVR
- Startup your NVR
- Shutdown your NVR
- Rebooting your NVR
- Log out from NVR management
- Camera Settings Menu
- Camera installations
- Plug-and-Play installation
- Manual installation
- Prepare your computer
- Setup your camera
- On screen Display Settings
- Display Settings
- PTZ settings
- Preset positions
- To set up a preset:
- To recall a preset:
- Pattern
- To edit the pattern:
- Running the pattern of behaviors:
- Patrol
- Start or stop a patrol:
- Motion Detection
- Motion detection settings
- Trigger channel
- Arming schedule
- Copy to:
- Linkage action
- Privacy Mask
- Video Tamper
- Video tamper settings
- Video Loss
- Video loss settings
- System Configuration Menu
- System Settings
- General
- DST settings
- Live User
- Network
- DDNS
- NTP
- NTP settings
- List View
- UPnP
- View
- Exceptions
- User Accounts
- Add
- Add account
- Edit
- Permission
- System Maintenance Menu
- System information
- Log Information
- Log Search
- Operation:
- Export
- Log Export
- Save and Load NVR System Settings
- Firmware Upgrade
- Local Upgrade
- Remote Upgrade
- Factory Default
- Network Monitoring
- Traffic
- Network Tools
- Network packet export
- Network Statistics
- Hard Drive Maintenance
- S.M.A.R.T Settings
- Bad Sector Detection
- Detections:
- Hard Drive Management
- Format/Initiate the Hard Drive
- Advanced Storage Quota Settings
- Storage quota settings
- Schedule
- Video Settings
- Main Stream (Record) Settings
- Sub Stream
- Advanced recording setting
- Holiday scheduling
- Edit Holiday Schedule
- Backup Video Recordings
- Quick export
- Export with search
- Video playback
- Playback screen
- Search for video recordings
- Time line
- Playback buttons
- Playback operations
- Tagging
- Zoom
- Playback modes
- Event
- Tag
- External file
- Access your NVR with the Web Browser
- Default Settings and Factory Reset
- System Requirement
- Logging-in to the NVR for the First Time (Windows)
- Logging-in to the Camera for the First Time (OS X)
- Click Open to start installation.
- Click Continue to install the plug-in.
- Select a destination to install the plug-in. Then click Continue.
- Use the default location and click Install.
- Enter your password and click Install Software
- Installation will process automatically.
- Click Close to exit the installation.
- Open the browser and login again with the default IP 192.168.10.30 or the IP that was dynamically assigned by your router.
- Start/Stop Streaming
- Video Stream
- Display Mode
- Start/Stop All Streams
- Snapshot
- Start/Stop Recording
- Microphone
- Speaker
- Playback
- Play video
- Slice images from video playback
- Download recorded videos
- Where can I find saved files?
- Log
- Search for logs
- System Configuration
- Device Settings
- Time Settings
- Automatic Update
- Manual Time Sync
- Daylight Savings
- Live View Settings
- Live View Parameters
- Maintenance
- Reboot
- Reset
- Import Config. File
- Export Config. File
- Network Settings
- TCP/IP
- Port
- Video Format
- Text Overlay
- Schedule:
- Holiday Settings
- Events
- Detection:
- Notification
- Video Tampering
- Warning:
- Exception
- Storage
- Storage Management
- Appendix
- Turn on network discovery on Windows
- Direct video access - RTSP
- How to setup a static IP address on your computer
- Windows 8
- Windows 7
- OSX
- Install your NVR System on Your Network
- Manage your IP addresses
- Compatible Camera List
- Regulations
- Federal Communication Commission Interference Statement
- FCC Radiation Exposure Statement
- Europe - EU Declaration of Conformity
- Safety
- EMC
- Directives
- RoHS
- Power over Ethernet
- Limited Warranty
- TRENDNET®
- Product Warranty Registration
Brand : TRENDNET
Model : TV-NVR104
Category : Security Camera