
DHP30-R - Pump EvoHeat - Free user manual and instructions
Find the device manual for free DHP30-R EvoHeat in PDF.


| Product Type | Heat Pump (Air-to-Water) |
| Model | DHP30-R |
| Brand | EvoHeat |
| Dimensions (H x W x D) | Approximately 1000 x 500 x 800 mm |
| Weight | Approximately 65 kg |
| Power Supply | 230V / 50Hz, Single Phase |
| Heating Capacity | 10 kW (approx.) |
| Cooling Capacity | 8 kW (approx.) |
| Refrigerant | R32 or R410A |
| Operating Temperature Range | -20°C to 43°C |
| Noise Level | Approximately 55 dB(A) |
| COP (Coefficient of Performance) | Up to 4.5 at 7°C ambient |
| Main Functions | Heating, Cooling, Domestic Hot Water |
| Maintenance | Clean air filters monthly; check refrigerant pressure annually |
| Safety Features | Overload protection, anti-freeze, high-pressure switch |
| Spare Parts | Replaceable filters, fan motor, compressor (contact service) |
| Warranty | 2 years (standard) |
Frequently Asked Questions - DHP30-R EvoHeat
User questions about DHP30-R EvoHeat
0 question about this device. Answer the ones you know or ask your own.
Ask a new question about this device
Download the instructions for your Pump in PDF format for free! Find your manual DHP30-R - EvoHeat and take your electronic device back in hand. On this page are published all the documents necessary for the use of your device. DHP30-R by EvoHeat.
USER MANUAL DHP30-R EvoHeat
natural_image
Three metallic refrigerators with digital display screens and a smartphone displaying a 30% water logo (no readable text or symbols on devices)Installation & Operation
Read this manual carefully before installing or operating this unit
Contents
- Preface 3
- Specifications 4
2.1 Dimensions for the DHP-R Advanced Units....4
- Installation and Connection....5
3.1 Installation of System 5
3.2 Location of Installation....6
3.3 3.3 Location & minimum clearances....6
3.4 Plumbing of the Unit 7
3.5 Electrical Wiring of the Unit....8
3.6 Initial Start-up of the Unit....8
- Usage and Operation....9
4.1 Controller Interface Introduction....9
4.1.1 Main Interface 9
4.1.2 Button Descriptions 9
4.2 Controller Functions....10
4.2.1 Booting and Shutdown....10
4.2.2 Mode Switch and Target Temperature Setting....10
4.2.3 Target Temperature Setting 10
4.2.4 Clock Setting....11
4.2.5 Time Setting 11
4.2.6 Timing Settings 12
4.2.7 Silent Setting and Silent Timing 13
4.2.8 The Silent Button (DHP40-R & 50-R Only)....13
4.2.9 Timing Silent Function (DHP40-R & 50-R Only)....14
4.2.10 Fault History 15
4.2.11 Colour Display Calibration 15
4.3 Parameter List and Breakdown Table....16
4.3.1 Electronic Control Fault Table.... 16
4.3.2 Parameter List .... 18
4.4 Interface Drawing....18
4.4.1 Wire Control Interface Diagram and Definition 18
4.4.2 Controller Interface Diagram and Definition 18
- Appendix....20
5.1 Caution and Warnings 20
5.2 Cable Specifications.... 23
5.3 EvoHeat Warranty....24
5.3 Warranty Registration Form 25
1. Preface
To provide our customers with quality, reliability and versatility, this product has been made to strict production standards. This manual includes all the necessary information about installation, debugging, discharging and maintenance. Please read this manual carefully before you open or maintain the unit. The manufacturer of this product will not be held responsible if someone is injured or the unit is damaged as a result of improper installation, debugging, or unnecessary maintenance. It is vital that the instructions within this manual are always adhered to. The unit must be installed by qualified personnel.
- The unit can only be repaired by a qualified installer centre, personnel or an authorised dealer.
- Maintenance and operation must be carried out according to the recommended time and frequencies, as stated in this manual.
• Use genuine standard spare parts only.
- Failure to comply with these recommendations will invalidate the warranty.
- The EvoHeat DHP-R Advanced heats the swimming pool water and keeps the temperature constant. For split type unit, the indoor unit can be discretely hidden or semi-hidden to suit a luxury house.
Our heat pump has the following characteristics:
Durable
The heat exchanger is made of PVC & titanium tube which can withstand prolonged exposure to swimming pool water.
Installation flexibility
The unit can be installed outdoors or indoors.
Quiet operation
The unit comprises an efficient rotary/ scroll compressor and a low-noise fan motor, which guarantees its quiet operation.
Advanced controlling
The unit includes micro-computer controlling, allowing all operation parameters to be set. Operation status can be displayed on the CP302 wire controller.
2. Specifications
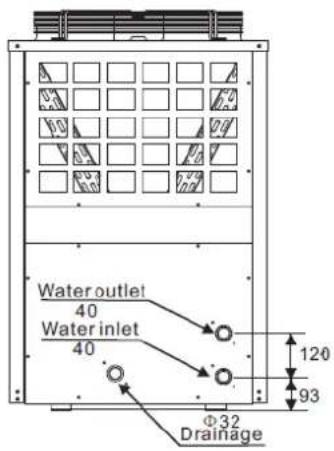
2.1 Dimensions for the DHP-R Advanced Units
Vertical vision

Horizontal vision
| DHP\SIZEmm | A | B | C | D | E | F | G |
| 20-R/30-R | 640 | 640 | 720 | 378 | 656 | 686 | 40 |
| 40-R/50-R | 700 | 700 | 845 | 400 | 720 | 745 | 40 |
DHP603-R


3. Installation and Connection
3.1 Installation of System

flowchart
graph LR
    A["Chlorinator cell"] --> B["Water outlet"]
    B --> C["Pool"]
    C --> D["Water inlet"]
    C --> E["Sand filter (or other type filter)"]
    C --> F["Water pump"]
    F --> C
    G["Valve"] --> H["Water supply"]
Installation Items
The factory only provides the main unit and the water unit; the other items in the illustration are necessary spare parts for the water system that are to be provided by users or the installer.
Attention
Please follow these steps when starting for the first time:
- Open valve and charge water.
- Make sure that the pump and the water-in pipe have been filled with water.
- Close the valve and start the unit
The schematic diagram is for reference only. Please check the water inlet/outlet label on the heat pump while plumbing the unit.
3. INSTALLATION AND CONNECTION
3.2 Swimming Pool Heat Pumps Location
Before installation it is very important to ensure 4 variables are carefully checked to allow the unit to operate correctly:
- Adequate Air Flow
- Correct water flow volume
- Correct electrical connection & supply
- Heater condition
*For indoor pools please consult the supplier. DO NOT place the unit in an enclosed area, where the units discharge air can be re-circulated. In an enclosed area take measures to evacuate the cold waste air out of the room. Conversely make sure there is adequate air entering the room to supply the heat pump.
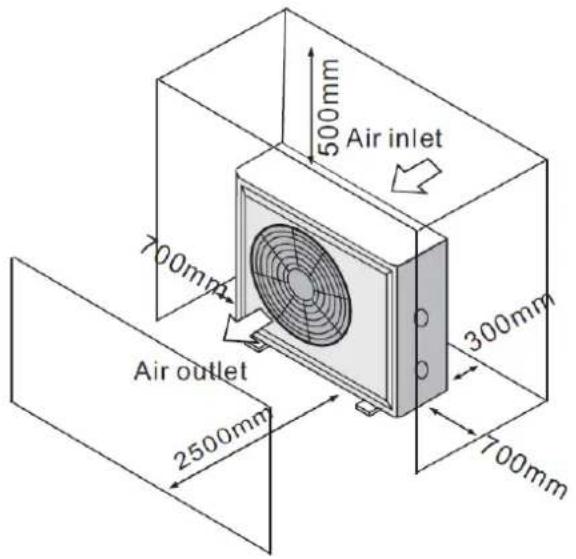

3.3 Location & minimum clearances
Evo recommend the heat pump should ONLY be installed in a location with appropriate ventilation. See above for minimum airflow clearances.
The Evo pool heat pump should be installed with a minimum clearance of at least 3.5m to the water's edge. Furthermore, EvoHeat recommend installing the heat pump no greater than 7.5 meters away from the water's edge due to heat loss from the piping. If you do not have a location with these suggested clearances, please contact our EvoHeat Tech Support Specialist on 1300 859 933 to discuss appropriate installation locations.
The heat pump should be installed a maximum of 5m below the water level of the pool/spa.
Make sure the heat pump is not located where large amounts of water may run-off from a roof into the unit. Sharp sloping roofs without gutters will allow excessive amounts of rain water mixed with debris from the roof to be forced through the unit. A water deflector may be needed to protect the heat pump.
If installing the heater on an existing pump/filtration system the heater must be installed AFTER the filter and BEFORE the chlorinator/sanitizer.
The heat pump should be installed on a flat level surface. In the event that a suitable location is unavailable contact Evo Industries for specialist technical advice.
3.4 Plumbing of the Unit
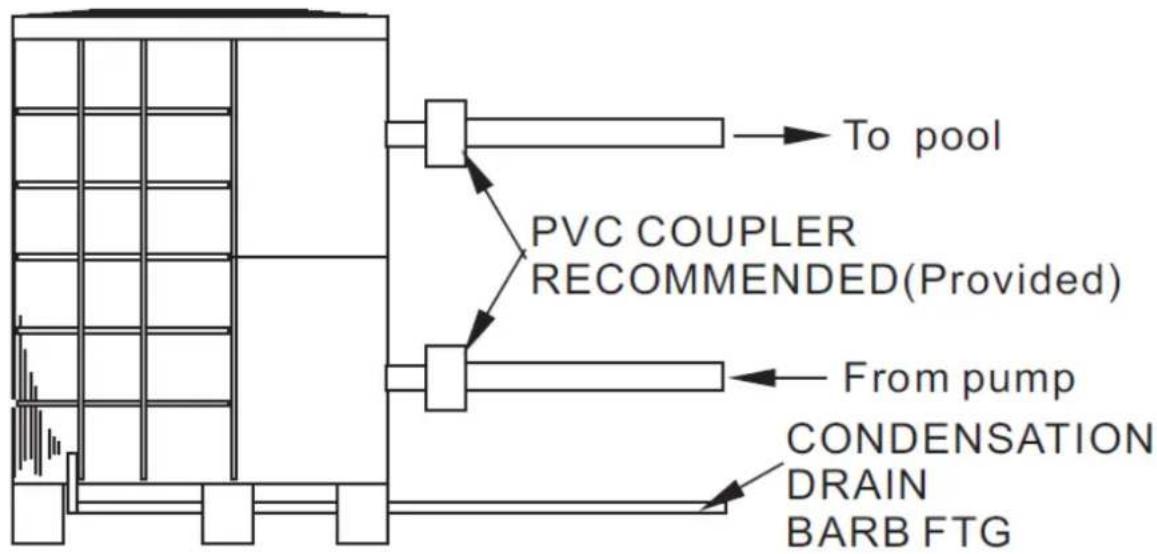
The Swimming Pool Heat Pumps exclusive rated flow titanium heat exchanger requires no special plumbing arrangements except bypass (please set the flow rate according to the nameplate).
The water pressure drop is less than 10kPa at max flow rate. Since there is no residual heat or flame temperatures, the unit does not need copper heat sink piping. PVC pipe can be run straight into the unit.
Location: Connect the unit in the pool pump discharge (return) line downstream of all filter and pool pumps, and upstream of any chlorinators, ozonators or chemical pumps.
Standard models have slip glue fittings which accept 40mm NB PVC pipe for connection to the pool or spa filtration piping. By using a 50 NB to 40NB you can plumb 50NB PVC piping straight into the unit.
Give serious consideration to adding a quick coupler fitting at the unit inlet and outlet to allow easy draining of unit for winterizing and to provide easier access should servicing be required.
flowchart
graph TD
    A["CONDENSATION DRAIN BARB FTG"] --> B["From pump"]
    B --> C["PVC COUPLER RECOMMENDED(Provided)"]
    C --> D["To pool"]
Condensation
Since the Heat pump cools down the air about 4 -5°C, water may condense on the fins of the horseshoe shaped evaporator. If the relative humidity is very high, this could be as much as several litres an hour. The water will run down the fins into the basepan and drain out through the barbed plastic condensation drain fitting on the side of the basepan. This fitting is designed to accept 3/4" clear vinyl tubing which can be pushed on by hand and run to a suitable drain. It is easy to mistake the condensation for a water leak inside the unit.
NB: A quick way to verify that the water is condensation is to shut off the unit and keep the pool pump running. If the water stops running out of the basepan, it is condensation. AN EVEN QUICKER WAY IS to TEST THE DRAIN WATER FOR CHLORINE - if the is no chlorine present, then it's condensation.
3.5 Electrical Wiring of the Unit
NOTE: Although the unit heat exchanger is electrically isolated from the rest of the unit, it simply prevents the flow of electricity to or from the pool water. Grounding the unit is still required to protect you against short circuits inside the unit. Bonding is also required.
The unit has a separate molded-in junction box with a standard electrical conduit nipple already in place. Just remove the screws and the front panel, feed your supply lines in through the conduit nipple and wire-nut the electric supply wires to the three connections already in the junction box (four connections if three phase). To complete an electrical hookup, connect the heat pump by electrical conduit, UF cable or other suitable means as specified (as permitted by local electrical authorities) to a dedicated AC power supply branch circuit equipped with the proper circuit breaker, disconnect or time delay fuse protection.
Disconnect
A disconnect means (circuit breaker, fused or un-fused switch) should be located within sight of and readily accessible from the unit, this is common practice on commercial and residential air conditioners and heat pumps. It prevents remotely-energizing unattended equipment and permits turning off power at the unit while the unit is being serviced.
3.6 Initial Start-up of the Unit
NOTE: For the unit to heat the pool or spa, the filter pump must be running to circulate water through the heat exchanger.
Start-up Procedure - After installation is completed, you should follow these steps:
- Turn on your filter pump. Check for water leaks and verify flow to and from the pool.
- Turn on the electrical power supply to the unit, then press the key ON/OFF on the wire controller, it should start in several seconds.
- After running a few minutes make sure the air leaving the top (side) of the unit is cooler (Between 5-10 °C)
- With the unit operating turn the filter pump off. The unit should also turn off automatically.
- Allow the unit and pool pump to run 24 hours per day until desired pool water temperature is reached. When the water-in temperature reaches the desired setting, the unit just shuts off. The unit will now automatically restart (if your pool pump is running) when the pool temperature drops more than 2 degrees below set temperature.
Time Delay
The unit is equipped with a 3-minute built-in solid state restart delay included to protect control circuit components and to eliminate restart cycling and contactor chatter. This time delay will automatically restart the unit approximately 3 minutes after each control circuit interruption. Even a brief power interruption will activate the solid state 3-minute restart delay and prevent the unit from starting until the 5-minute countdown is completed. Power interruptions during the delay period will have no effect on the 3-minute countdown.
4. Usage and Operation
4.1 Controller Interface Introduction
4.1.1 Main Interface

4.1.2 Button Descriptions
| NO. | Name | The button function |
| 1 | ON/OFF | Press to start /shut off the unit |
| 2 | Parameter | Click this button to view the unit state and the parameter |
| 3 | CLOCK | Press to set the clock, the timer on or timer off.When the timer was starting,the button is green |
| 4 | Fault display | Click to view fault history |
| 5 | Silent setting | Click to turn on/off silent function and to set timing Low speed function. |
| 6 | MODE | Click to enter mode setting and the target temp.Setting interface |
| 7 | Temp. curve | Click to view the temp. and power curve |
| 8 | WaterInlet Temp. | Click to enter mode setting and the target temp.Setting interface |
| 9 | LOCK | Click to lock the screen , Input "22" to unlock the screen by press the "lock button" |
4.2 Controller Functions
4.2.1 Booting and Shutdown
As shown in figure 4.1.1:
In shutdown status, click (1) then the unit will be booted.
In booting status, click (1) and the unit will shut down.
4.2.2 Mode Switch and Target Temperature Setting
In the main interface, click mode button or inlet water temperature setting button, interface displays as follows:
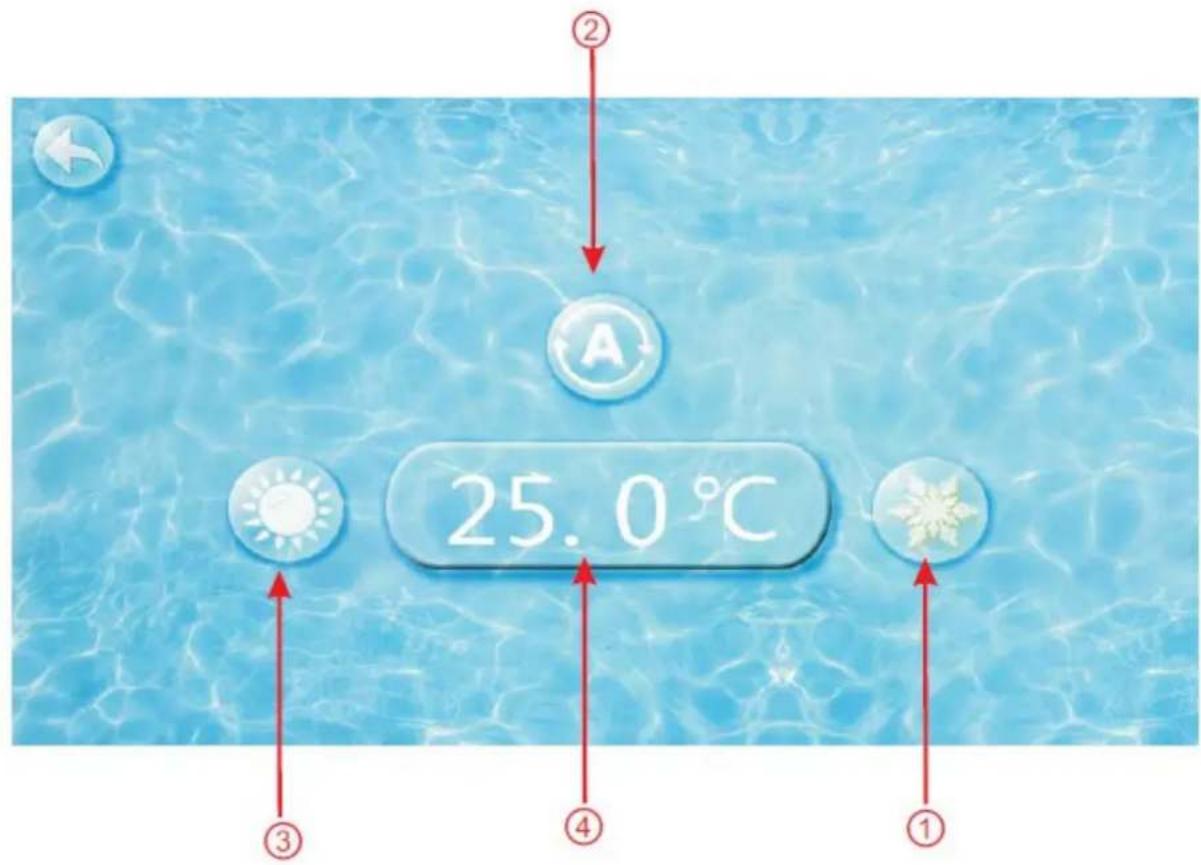
Click the refrigeration mode button (1), automatic mode button (2) or heating mode button (3) then you can select the corresponding mode.
Note: When the unit is designed for single automatic mode or single thermal mode, the mode can not be switched.
4.2.3 Target Temperature Setting
Click the temperature set button (4), you can set the target temperature.
4.2.4 Clock Setting
In the main interface, click on the clock Settings button, interface displays as follows:

4.2.5 Time Setting
Click on the time Settings button ①, interface displays as follows:

Click the value to set time directly, the click confirm button to save the Settings.
For example: setup time: the 30-11-2016 16:00:00, input 30 11 16 16 00 00, the time change then click confirm button.
Note: if the input format is not correct, the wrong time will be saved by clicking confirm button.
4.2.6 Timing Settings
Click the timing set button ② to enter timing setinterface.

| NO. | Name | Button color | Button function |
| 1 | Timing sta button | Start: greenEnd: gray | Click this button to start or end timing start setting function |
| 2 | Timing on setting | Click to set start time of the timing | |
| 3 | Timing end button | Open: redEnd: gray | Click this button to start or end timing end setting function |
| 4 | Timing off setting | Click to set end time of the timing |

When the timer was starting, the clock button is green in the main interface
4.2.7 Silent Setting and Silent Timing
Click the silent setting button, and the interface displays as follows:

4.2.8 The Silent Button (DHP40-R & 50-R Only)
Click the silent button ①, the unit will enter the silent mode, and interface displays as follows:
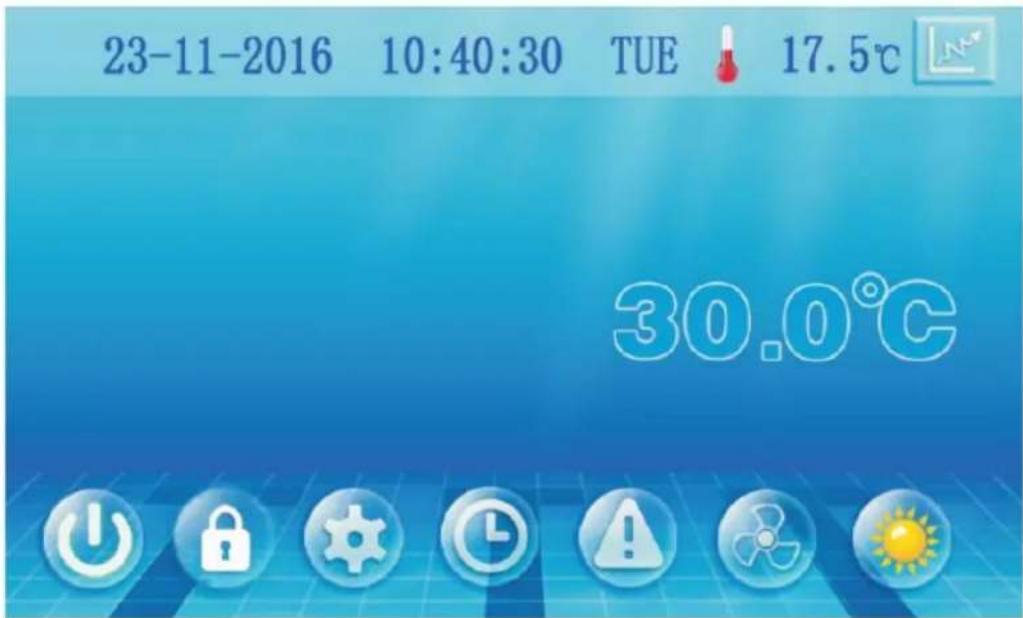
Click the silent button ① again, to exit the silent mode.
4.2.9 Timing Silent Function (DHP40-R & 50-R Only)
Click timing silent button and interface displays as follows:

| NO. | Name | Colur | Function |
| 1 | Timing silent off | Used: red Unused:gray | Click to use or unuse timing off function |
| 2 | Timing silent on | Use:green Unused:gray | Click to use or unuse timing on function |
| 3 | Timing silent start time | Click this button to set the timing silent start time | |
| 4 | Timing silent end time | Click this button to set the timing silent end time |
Start time and end time setting value must be among the range of 0:00-23:00, and setting value can be precise to hour digit.
For example above, click "ON" to use timing silent, the unit will start the silent at 0:00 points and end at 4:00; click "OFF" to unuse the timing silent, but if the unit is in timing silent mode, it will exit silent timing immediately.
4.2.10 Fault History
In the main interface click fault display key, interface displays as follows:

If no failure, main interface displays static " "
When fault occurs, the fault icon will flash between the "#!" "!", the failure interface will record time, code, name of the fault.
After troubleshooting, if you do not check the failure record, the main interface will display static " ! "; if you check the failurerecord, the main interface will displays static " ! ";
Failure record is in reverse order, according to the happening time. Press the "Clean" key, you can delete the fault record.
4.2.11 Colour Display Calibration
Keep clicking quickly on the blank area at any interface until you hear a long beep. You will then enter the calibration interface. Click "+" to start calibration. When you hear the beep again, you will finish calibration and exit.
Note: The wire controller can display the temperature unit as “°F” or “°C” according to the model you bought.
4.3 Parameter List and Breakdown Table
4.3.1 Electronic Control Fault Table
| Protect/fault | Fault display | Reason | Elimination methods |
| Standby | Non | ||
| Normal boot | Non | ||
| Inlet Temp. Sensor Fault | P01 | The temp. sensor is broken or short circuit | Check or change the temp. sensor |
| Outlet Temp. Sensor Fault | P02 | The temp. sensor is broken or short circuit | Check or change the temp. sensor |
| Ambient Temp. Sensor Faulty | P04 | The temp. sensor is broken or short circuit | Check or change the temp. sensor |
| Coil Temp. Sensor Fault | P05 | The temp. sensor is broken or short circuit | Check or change the temp. sensor |
| Suction Temp. Sensor Fault | P07 | The temp. sensor is broken or short circuit | Check or change the temp. sensor |
| Discharge Temp. Sensor Fault | P081 | The temp. sensor is broken or short circuit | Check or change the temp. sensor |
| High Pressure Prot. | E01 | The high pressure switch is broken | Check the pressure switch and cold circuit |
| Low Pressure Prot. | E02 | Low pressure1 protection | Check the pressure switch and cold circuit |
| Flow Switch Prot. | E03 | No water/little water in system | Check the pipe water flow and water pump |
| Anti-freezing Prot. | E07 | Water flow is not enough | Check the pipe water flow and whether water system is jammed or not |
| Primary Anti-freezing Prot. | E19 | The ambient temp. is low | |
| Secondary Anti-freezing Prot. | E29 | The ambient temp. is low | |
| Inlet and oulet temp. too big | E06 | Water flow is not enough and low differential pressure | Check the pipe water flow and whether water system is jammed or not |
| Low Temperature Protection | Non | The environment temp. is low | |
| Comp. Overcurrent Prot. | E051 | The compressor is overloaded | Check whether the system of the compressor running normally |
| Exhaust air over Temp Prot. | P082 | The compressor is overloaded | Check whether the system of the compressor running normally |
| Communication Fault | E08 | Communication failure between wire controller and mainboard | Check the wire connection between remote wire controller and main board |
| Antifreeze Temp. Sensor Fault | P09 | Antifreeze temp sensor is broken or short circuited | Check and replace this temp sensor |
| Waterway Anti-freezing Prot. | E05 | Water temp. or ambient temp. is too low | |
| EC Fan Feedback Fault | F051 | There is something wrong with fan motor and fan motor stops running | Check whether fan motor is broken or locked |
| Pressure Sensor Fault | PP | The pressure sensor is broken | Check or change the pressure sensor or pressure |
| Fan Motor1 Fault | F031 | 1. Motor in locked-rotor state2. The wire connection between DC-fan motor module and fan motor is in bad contact | 1. Change a new fan motor2. Check the wire connection and make sure they are in good contact |
| Low AT Protection | TP | Ambient temp is too low | |
| Fan Motor2 Fault | F032 | 1. Motor in locked-rotor state2. The wire connection between DC-fan motor module and fan motor is in bad contact | 1. Change a new fan motor2. Check the wire connection and make sure they are in good contact |
| Communication fault (Speed control module) | E081 | Speed control module and main board communication fail | Check the communication connection |
Frequency Conversion Board Fault Table
| Protection/fault | Fault Display | Reason | Elimination Methods |
| Drv1 MOP alarm | F01 | MOP drive alarm | Recovery after the 150S |
| Inverter offline | F02 | Frequency conversion board and main board communication failure | Check the communication connection |
| IPM Protection | F03 | IPM modular protection | Recovery after the 150S |
| Comp. Driver Failure | F04 | Lack of phase, step or drive hardware damage | Check the measuring voltage, check frequency conversion board hardware |
| DC Fan Fault | F05 | Motor current feedback open circuit or short circuit | Check whether current return wires connected motor |
| IPM Overcurrent | F06 | IPM input current is large | Check and adjust the current measurement |
| Inv. DC Overvoltage | F07 | DC bus voltage>Dc bus over-voltage protection valve | Check the input voltage measurement |
| Inv. DC Lessvoltage | F08 | DC bus coltagecheck the input voltage measurement | Check the input voltage measurement |
| Inv. Input Lessvolt. | F09 | The input voltage is low, causing the input current to be high | Check the input voltage measurement |
| Inv. Input Overvolt. | F10 | The input voltage is too high, more than outage protection current RMS | Check the input voltage measurement |
| Inv. Sampling Volt. | F11 | The input voltage sampling fault | Check and adjust the current measurement |
| Comm. Err DSP-PFC | F12 | DSP and PFC connect fault | Check the communication connection |
| Input Over Cur. | F26 | The equipment load is too large | |
| PFC Fault | F27 | The PFC Circuit protection | Check the PFC switch tube tube short circuit or not |
| IPM Over heating | F15 | The IPM module is overheat | Check and adjust the current measurement |
| Weak Magnetic Warn | F16 | Compressor magnetic force is not enough | |
| Inv. Input Out Phase | F17 | The input voltage lost phase | Check and measure the voltage adjustment |
| IPM Sampling Cur. | F18 | IPM sampling electricity is at fault | Check and adjust the current measurement |
| Inv. Temp. Probe Fail | F19 | Sensor is short circuit or open circuit | Inspect and replace the sensor |
| Inverter Overheating | F20 | The transducer is overheating | Check and adjust the current measurement |
| Inv. Overheating Warn | F22 | Transducer temperature is too high | Check and adjust the current measurement |
| Comp. Overcut. Warn | F23 | Compressor electricity is large | The compressor over-current protection |
| Input Over cur. Warn | F24 | Input current is too large | Check and adjust the current measurement |
| EEPROM Error Warn | F25 | MCU error | Check whether the chip is damaged, replace the chip |
| V15V over/undervoltage fault | F28 | The V15V is overloaded or undervoltage | Check the V15V input voltage is range 13.5V~16.5V or not |
4.3.2 Parameter List
| Meaning | Default | Remarks |
| Refrigeration target temperature set point | 27°C | Adjustable |
| Heating the target temperature set point | 27°C | Adjustable |
| Automatic target temperature set point | 27°C | Adjustable |
4.4 Interface Drawing
4.4.1 Wire Control Interface Diagram and Definition
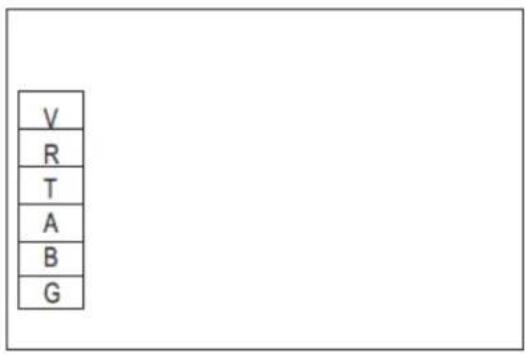
| Sign | Meaning |
| V | 12V (power + ) |
| R | No use |
| T | No use |
| A | 485A |
| B | 485B |
| G | GND (power - ) |
4.4.2 Controller Interface Diagram and Definition
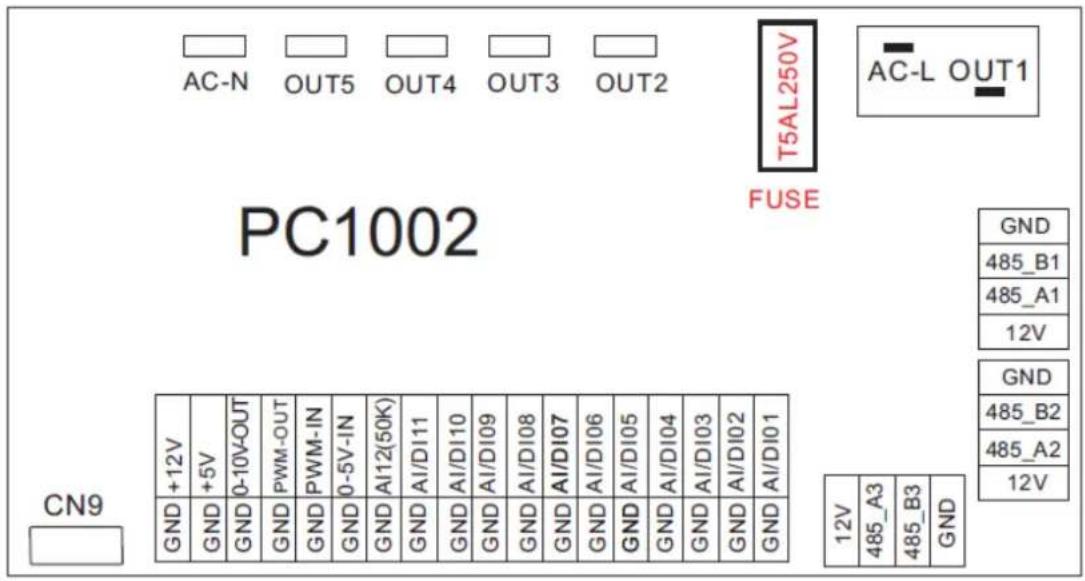
Main board of the input and output interface instructions below
| Number | Sign | Meaning |
| 01 | OUT1 | Compressor (output 220-230VAC) |
| 02 | OUT2 | Water pump (output 220-230VAC) |
| 03 | OUT3 | 4-way valve (output 220-230VAC) |
| 04 | OUT4 | High speed of fan (output 220-230VAC) |
| 05 | OUT5 | Low speed of fan (output 220-230VAC) |
| 06 | AC-L | Live wire (input 220-230VAC) |
| 07 | AC-N | Neutral wire (input 220-230VAC) |
| 08 | AI/DI01 | Emergency switch (input) |
| 09 | AI/DI02 | Water flow switch (input) |
| 10 | AI/DI03 | System low pressure (input) |
| 11 | AI/DI04 | System high pressure (input) |
| 12 | AI/DI05 | System suction temperature (input) |
| 13 | AI/DI06 | Water input temperature (input) |
| 14 | AI/DI07 | Water output temperature (input) |
| 15 | AI/DI08 | System fan coil temperature (input) |
| 16 | AI/DI09 | Ambient temperature (input) |
| 17 | AI/DI10 | Mode switch (input) |
| 18 | AI/DI11 | Master-slave machine switch/antifreeze temperature (input) |
| 19 | AI12(50K) | System Exhaust temperature (input) |
| 20 | 0_5V_IN | Compressor current detection/pressure sensor (input) |
| 21 | PWM_IN | Master-slave machine switch/feedback signal of EC fan (input) |
| 22 | PWN_OUT | AC fan control (output) |
| 23 | 0_10V_OUT | EC fan control (output) |
| 24 | +5V | +5V (output) |
| 25 | +12V | +12V (output) |
| 26 | GND485_B1485_A112V | Frequency Conversion board communications |
| 27 | ||
| 28 | ||
| 29 | ||
| 30 | GND485_B2485_A212V | Color line controller communication |
| 31 | ||
| 32 | ||
| 33 | ||
| 34 | CN9 | Electronic expansion valve |
| 35 | GND485_B3485_A312V | The port for centralized control |
| 36 | ||
| 37 | ||
| 38 |
5. Appendix
5.1 Caution and Warnings
The unit can only be repaired by qualified personnel or an authorised dealer.
This appliance is not intended for use by persons (including children) with reduced physical sensory or mental capabilities, or lack of experience and knowledge, unless they have been given supervision or instruction concerning use of the appliance by a person responsible for their safety.
Children should be supervised to ensure that they do not play with the appliance.
Please make sure that the unit and power connection have good earthing, otherwise there is a risk of electrical shock.
If the supply cord is damaged, it must be replaced by the manufacturer, our service agent or a similarly qualified person in order to avoid a hazard.
Directive 2002/96/EC (WEEE):
The symbol depicting a crossed-out waste bin that is underneath the appliance indicates that this product at the end of its useful life, must be handled separately from domestic waste, and must be taken to a recycling centre for electric and electronic devices or handed back to the dealer when purchasing an equivalent appliance.
Directive 2002/95/EC (RoHs): This product is compliant with directive 2002/95/EC (RoHs) concerning restrictions for the use of harmful substances in electric and electronic devices.
The unit CANNOT be installed near flammable gas. If there is any leakage of the gas a fire can occur.
Make sure that there is circuit breaker for the unit, lack of circuit breaker can lead to electrical shock or fire.
The heat pump located inside the unit is equipped with an over-load protection system. It does not allow for the unit to start for at least 3 minutes from a previous stoppage.
The unit can only be repaired by the qualified personnel of an installer center or an authorized dealer.
Installation must be performed in accordance with the NEC/CEC by authorized person only (for North America market)
USE SUPPLY WIRES SUITABLE FOR 75°C.
Caution: Single wall heat exchanger, not suitable for potable water connection.


5.2 Cable Specifications
Single Phase Unit
| Nameplate maximum current | Phase line | Earth line | MCB | Creepage Protector | Signal line |
| No more than 10A | 2 × 1.5mm^2 | 1.5mm^2 | 20A | 30mA less than 0.1 sec | n x 0.5mm^2 |
| 10~16A | 2 × 2.5mm^2 | 2.5mm^2 | 32A | 30mA less than 0.1 sec | |
| 16~25A | 2 × 4mm^2 | 4mm^2 | 40A | 30mA less than 0.1 sec | |
| 25~32A | 2 × 6mm^2 | 6mm^2 | 40A | 30mA less than 0.1 sec | |
| 32~40A | 2 × 10mm^2 | 10mm^2 | 63A | 30mA less than 0.1 sec | |
| 40~63A | 2 × 16mm^2 | 16mm^2 | 80A | 30mA less than 0.1 sec | |
| 63~75A | 2 × 25mm^2 | 25mm^2 | 100A | 30mA less than 0.1 sec | |
| 75~101A | 2 × 25mm^2 | 25mm^2 | 125A | 30mA less than 0.1 sec | |
| 101~123A | 2 × 35mm^2 | 35mm^2 | 160A | 30mA less than 0.1 sec | |
| 123~148A | 2 × 50mm^2 | 50mm^2 | 225A | 30mA less than 0.1 sec | |
| 148~186A | 2 × 70mm^2 | 70mm^2 | 250A | 30mA less than 0.1 sec | |
| 186~224A | 2 × 95mm^2 | 95mm^2 | 280A | 30mA less than 0.1 sec |
Three Phase Unit
| Nameplate maximum current | Phase line | Earth line | MCB | Creepage Protector | Signal line |
| No more than 10A | 2 × 1.5mm^2 | 1.5mm^2 | 20A | 30mA less than 0.1 sec | n x 0.5mm^2 |
| 10~16A | 2 × 2.5mm^2 | 2.5mm^2 | 32A | 30mA less than 0.1 sec | |
| 16~25A | 2 × 4mm^2 | 4mm^2 | 40A | 30mA less than 0.1 sec | |
| 25~32A | 2 × 6mm^2 | 6mm^2 | 40A | 30mA less than 0.1 sec | |
| 32~40A | 2 × 10mm^2 | 10mm^2 | 63A | 30mA less than 0.1 sec | |
| 40~63A | 2 × 16mm^2 | 16mm^2 | 80A | 30mA less than 0.1 sec | |
| 63~75A | 2 × 25mm^2 | 25mm^2 | 100A | 30mA less than 0.1 sec | |
| 75~101A | 2 × 25mm^2 | 25mm^2 | 125A | 30mA less than 0.1 sec | |
| 101~123A | 2 × 35mm^2 | 35mm^2 | 160A | 30mA less than 0.1 sec | |
| 123~148A | 2 × 50mm^2 | 50mm^2 | 225A | 30mA less than 0.1 sec | |
| 148~186A | 2 × 70mm^2 | 70mm^2 | 250A | 30mA less than 0.1 sec | |
| 186~224A | 2 × 95mm^2 | 95mm^2 | 280A | 30mA less than 0.1 sec |
If the unit is to be installed outdoors, ensure that a UV resistant cable is used.
5.3 EvoHeat Warranty
-
The titanium heat exchanger tubing is guaranteed against corrosion for a period of twenty-five (25) years from the date of purchase when used with chlorine, salt, bromine or sea water. (*25 year warranty on the titanium heat exchanger is valid for Evo heat pumps purchased post 15.05.2018. If purchased prior please refer to your original operating manual for warranty details).
-
The compressor is guaranteed for (3) years from the date of purchase.
-
All other parts are guaranteed for two (2) years from the date of purchase.
-
This warranty covers all labour for twelve (12) months from the date of purchase.
-
This warranty excludes any defect or injury caused by or resulting from misuse, abuse, neglect, accidental damage, improper voltage, vermin infestation, incompetent installation, any fault not attributable to faulty manufacture or parts, any modifications which affect the reliability or performance of the unit.
-
This warranty does not cover the following:
a. Natural Disasters (hail, lightening, flood, fire etc.)
b. Rust or damage to paintwork caused by a corrosive atmosphere
c. When serviced by an unauthorized person without the permission of Evo Industries
d. When a unit is installed by an unqualified person
e. Where a unit is incorrectly installed
f. When failure occurs due to improper or faulty installation
g. Failure due to improper maintenance (refer Operating Instructions)
h. 'No Fault Found' service calls where the perceived problem is explained within the
Operation Instructions
i. Costs associated with delivery, handling, freighting, or damage to the product in transit.
- If warranty service is required, you should:
a. contact Evo Industries Australia on 1300 85 99 33 or via our Contact page on our web site
b. provide a copy of your receipt as proof of purchase
c. have completed the online warranty registration or provide a completed warranty card.
- Home service is available within the normal operating area of your Evo Industries authorized Service Centre. Service outside this area will incur a traveling fee. Unless otherwise specified to the purchaser, the benefits conferred by this express warranty and additional to all other conditions, warranties, rights and remedies expressed or implied by the Trade Practices Act 1974 and similar consumer protection provisions contained in legislation of the States and Territories and all other obligations and liabilities on the part of the manufacturer or supplier and nothing contained herein shall restrict or modify such rights, remedies, obligations or liabilities
5.3 Warranty Registration Form
To register your Warranty, please enter the following details or go online at https://evoheat.com.au/warranty-registration/ to register directly at our website.
Fields with a start (*) must be filled in. For information about what Evo Industries Australia will do with your personal details, please refer to our Privacy Disclaimer on our website.
Family Name: *
Given Name: *
Preferred Title: *
Age Group: * 18-24
25-34
35-44
45-54
55-64
64+
Street Address: *.
Suburb: *
Postcode: *
State: *
Email: *
Please tell us about which EvoHeat product you bought, who you bought it from and what you will be using it for:
Product & Model: *
Serial Number: *
Authorised Installer: *
Date Purchased: *
Date Installed: *
Recept Number: *
Company Bought From: *
Did you purchase the item when you purchased your pool?:
If you purchased it after the pool, how many years did you wait?:
What size is your pool or spa?:
Why did you choose an EVOHEAT product?:


- Installation & Operation
- Contents
- Preface
- Durable
- Installation flexibility
- Quiet operation
- Advanced controlling
- Specifications
- Installation and Connection
- Installation of System
- Installation Items
- Attention
- Swimming Pool Heat Pumps Location
- Location & minimum clearances
- Plumbing of the Unit
- Condensation
- Electrical Wiring of the Unit
- Disconnect
- Initial Start-up of the Unit
- Time Delay
- Usage and Operation
- Controller Interface Introduction
- Main Interface
- Button Descriptions
- Controller Functions
- Booting and Shutdown
- Mode Switch and Target Temperature Setting
- Target Temperature Setting
- Clock Setting
- Time Setting
- Timing Settings
- Silent Setting and Silent Timing
- The Silent Button (DHP40-R & 50-R Only)
- Timing Silent Function (DHP40-R & 50-R Only)
- Fault History
- Colour Display Calibration
- Parameter List and Breakdown Table
- Electronic Control Fault Table
- Interface Drawing
- Wire Control Interface Diagram and Definition
- Controller Interface Diagram and Definition
- Appendix
- Caution and Warnings
- Cable Specifications
- EvoHeat Warranty
- Warranty Registration Form
Brand : EvoHeat
Model : DHP30-R
Category : Pump