
ZPad Plus RFID - Access Control System ZKTeco - Free user manual and instructions
Find the device manual for free ZPad Plus RFID ZKTeco in PDF.


| Product Type | Access Control System (Fingerprint, Face, RFID, Password) |
| Model | ZPad Plus RFID |
| Brand | ZKTeco |
| Display | 5-inch Touch Screen (TFT) |
| Fingerprint Sensor | ZK Optical Sensor (SilkID) |
| Card Reading | RFID (125kHz/13.56MHz) |
| Face Recognition | Yes (Camera) |
| User Capacity | Up to 3,000 users |
| Transaction Log Capacity | Up to 100,000 records |
| Authentication Methods | Fingerprint, RFID Card, Password, Face |
| Communication | Ethernet (1x RJ45), Wi-Fi (802.11 b/g/n) |
| Relay Output | 1 x Relay (Door / Siren control) |
| Power Supply | 12V DC, 1.5A |
| Operating Temperature | 0°C to 45°C |
| Operating Humidity | 20% to 80% RH |
| Dimensions (W x H x D) | 200 x 80 x 30 mm |
| Weight | 0.5 kg |
| Languages | English, Spanish, French, German, etc. |
| Internal Memory | 256 MB RAM, 512 MB Flash |
| Firmware Update | Via USB or Network |
Frequently Asked Questions - ZPad Plus RFID ZKTeco
http://: .User questions about ZPad Plus RFID ZKTeco
0 question about this device. Answer the ones you know or ask your own.
Ask a new question about this device
Download the instructions for your Access Control System in PDF format for free! Find your manual ZPad Plus RFID - ZKTeco and take your electronic device back in hand. On this page are published all the documents necessary for the use of your device. ZPad Plus RFID by ZKTeco.
USER MANUAL ZPad Plus RFID ZKTeco
- This document introduces the user interface and menu operations of ZPad Plus.
- All design and specification declared are subject to change without notice in advance.
Version History
| Version Date Description | ||
| 1.0 | 08/02/2019 | Initial Version |
| 1.0.1 18/02/2019 | Development changes introduced in the manual | |
| 1.1 29/04/2019 | Latest changes introduced in the manual | |
| 1.3 06/12/2019 | Latest changes introduced in the manual | |
Important Claim
Firstly, thank you for purchasing this facial and fingerprint hybrid terminal, before use, please read this manual carefully to avoid unnecessary damage. ZKTeco Europe (the company) reminds you that proper usage will improve the use effect and authentication speed.
No written consent by our company by any unit or individual allows to excerpt, copy the contents of this manual in part or in full, also the distribution in any form.
The product described in the manual may include software which copyrights are shared by licensors including our company. Except for the permission of the relevant holder, it is explicitly forbidden to copy, distribute, revise, modify, extract, decompile, disassemble, decrypt, reverse engineering, leasing, transfer, sub-license the software, as other acts of copyright infringement, limitations applied to law excluded.

Due to the constant renewal of products, the company cannot assure the compliance between the product and the information contained in this document, including the technical parameters of the product. Please forgive any change without notice.
Table of Contents
About This Manual 2
Version History....3
Important Claim....4
- Device operation....7
1.1.Finger Placement....7
1.2.How to use touch screen 7
1.3. Card Placement ....8
1.4. Desktop Screen....8
1.5. Punching Operation ....8
1.5.1. 1:N Verification ....8
1.5.2. 1:1 Verification....11
1.5.3. Force Attendance Event Selection....13
-
Applications ....14
-
Employee Management 15
3.1.Add a New Employee....15
Fingerprint Enroll....18
Card Enroll ....18
Password Enroll....19
3.2. Edit existing employee ....20
3.3. Delete a registered employee....21
-
T&A Records 22
-
Messages Management....23
5.1. Add a New Message ....23
5.2. Message Display....26
5.3. Messages Edit....27
5.4. Messages Delete 28
- Attendance Events Management ....29
6.1.Add a New Attendance Event 29
+ Events ....31
6.2. Edit an Attendance Event....31
6.3. Delete an Attendance Event....33
- Roles Management....35
7.1.Add a New Role 35
7.2. Editing an Existing Role....37
7.3. Deleting an Existing Role....38
- T&A Settings....40
8.1. Punch Settings....40
8.2.Manage Data 41
8.3. Push Settings....42
8.4. Web Server 42
8.5. Relay Settings....43
8.6. Data Info....44
- System Settings ....45
9.1.General Settings....45
9.2. Network....46
-
Wired Ethernet....47
-
Wi-Fi....48
9.3. Test Hardware....49
9.4.Device Info....49
9.5.Location....50
- Firmware Updater....51
1. Device operation
1.1. Finger Placement
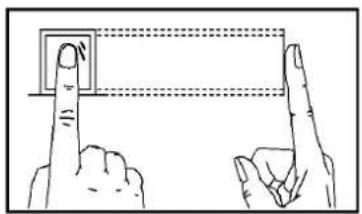
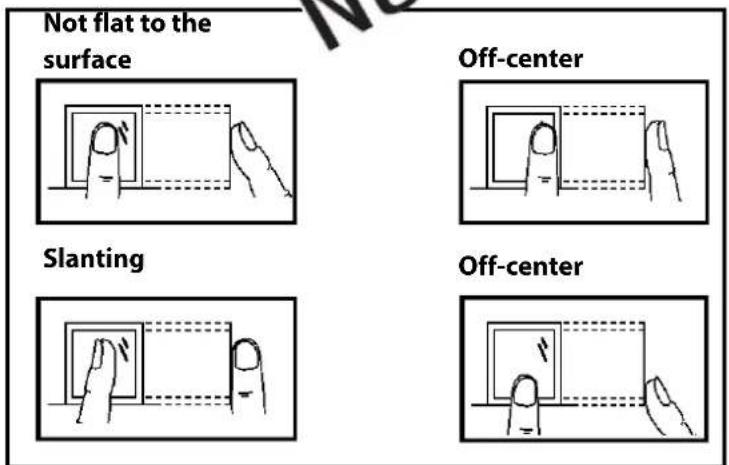
Recommended fingers: The index finger, middle finger or the ring finger; the thumb and pinkie finger are not recommended (since they often present more difficulties to be recognized).
The finger is flat to the surface and centered in fingered guide.
natural_image
Illustration of two hands pointing at a rectangular object with dotted lines indicating alignment or measurement (no text or symbols)YES
1.2. How to use touch screen
Use finger pulps slid or click the touch screen. The fingertip and fingernail may affect the using of the touch screen.

natural_image
Simple line drawings of a blue circle and an orange X on gray bars, with no text or symbols present.1.3. Card Placement
RFID Cards must be placed below the fingerprint sensor in order to be recognized.
1.4. Desktop Screen
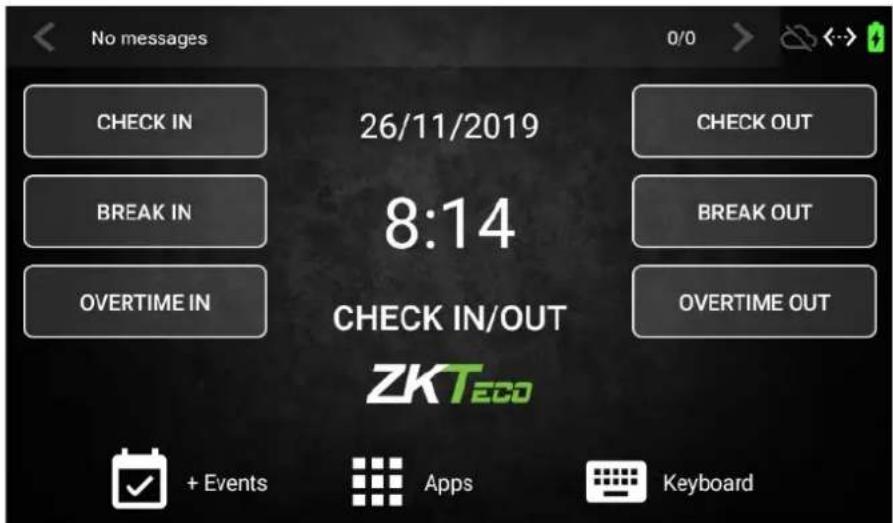
The device has different widgets on the desktop at the factory status: The basic attendance events, which are Check In, Check Out, Break In, Break Out, Overtime In and Overtime Out. access to the rest of the functions, which are + Events, Keyboard and Apps, the display of the Current Date and Time, the status of the push communication, the status of the network connection and the battery status.
Below the current time, the selected attendance event is displayed. If there is no selected event, Check In/Out will appear
1.5. Punching Operation
As said previously the basic attendance events are Check In, Check Out, Break In, Break Out, Overtime In and Overtime Out. These are the events that are created in the device by default. It is possible to add more attendance events which will appear on the desktop as those or they will be accessed by the + Events function, in the lower left position of the screen.
It is also possible to register a punch with no event selected. In this case, the default attendance event Check In/Out will be selected.
The operation of registering a punch in the device depends on the configuration of the verification and if the if the selection of an attendance event is set to mandatory
1.5.1. 1:N Verification
This is the default and most used configuration. If no extra configuration is done, this is how the punches are registered in the device. This type of verification consists in the device comparing
the punch registered to all the values of the same type of punch in the database. The operation is as follows.
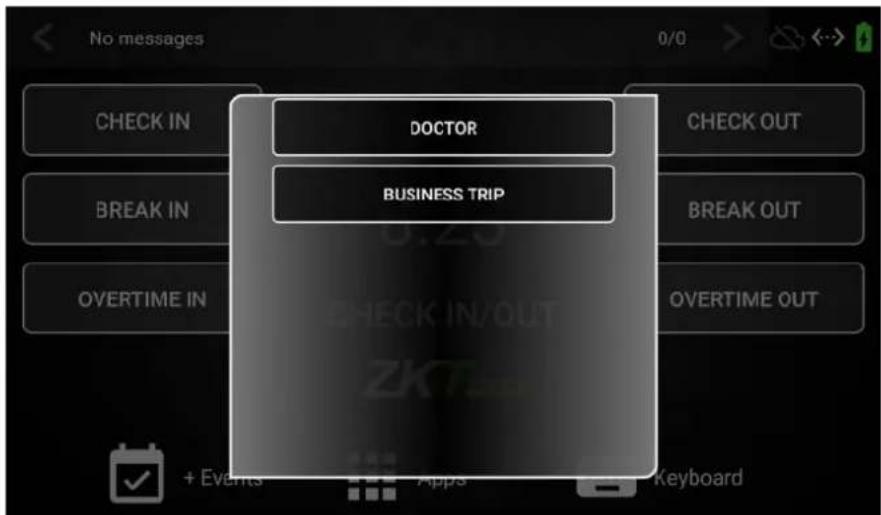
- Select the event that the punch is going to be set, either from the desktop, either from + Events. This is optional. If no attendance event is selected, a default Check In/Out attendance event is selected.
It is possible to select an event in the desktop or in the +Events screen.
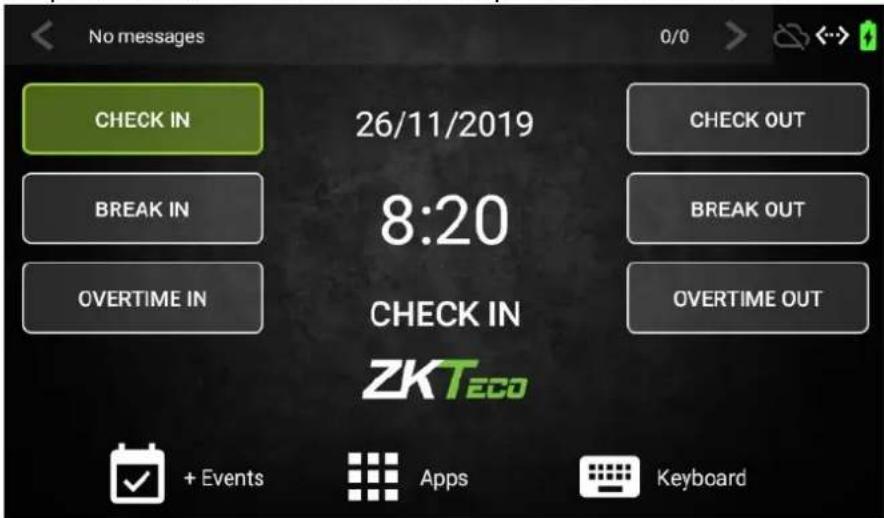
Desktop
-
Events
-
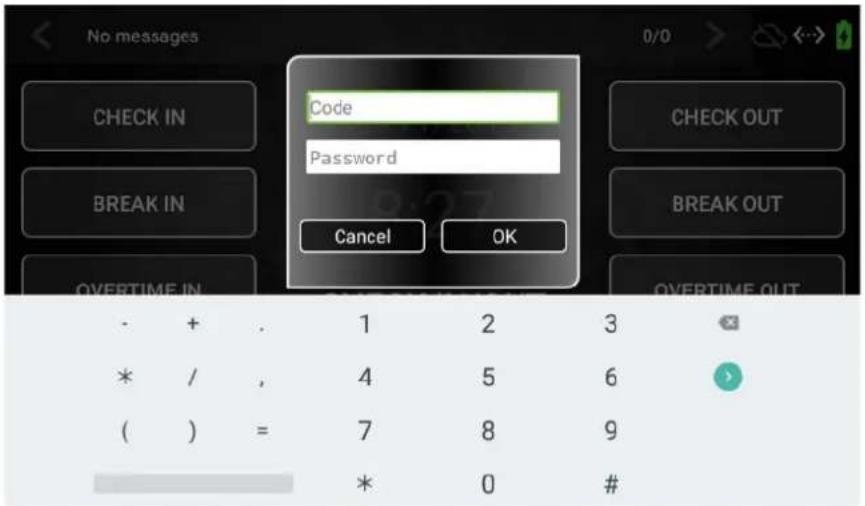
Punch the device by Fingerprint or by Card. If the punch is going to be registered by Code, click on Keyboard in order to input Code and Password
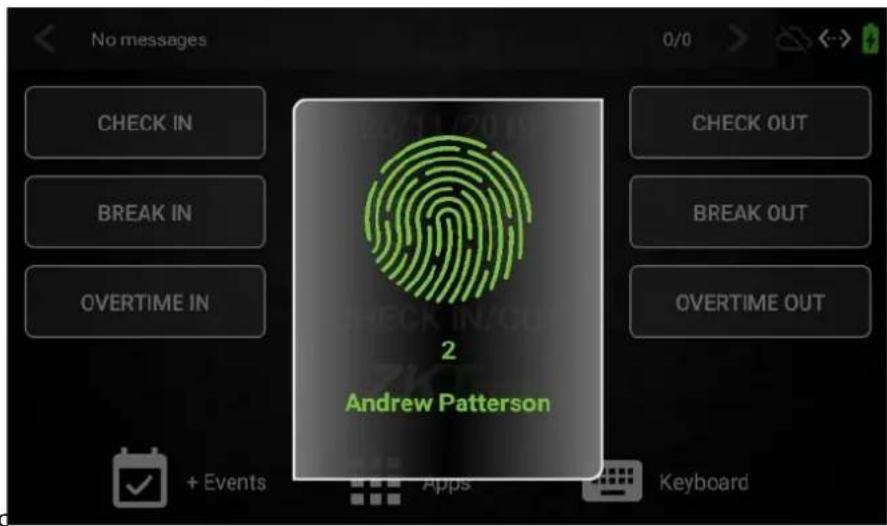
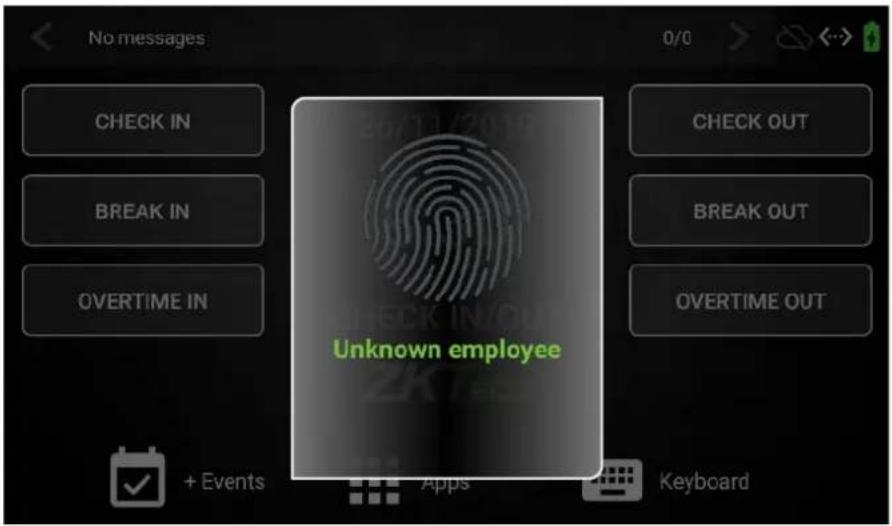
- The device will test if the Fingerprint, Card or Code/Password set corresponds to a registered employee. If the device can identify the employee, a positive verification message will be shown.
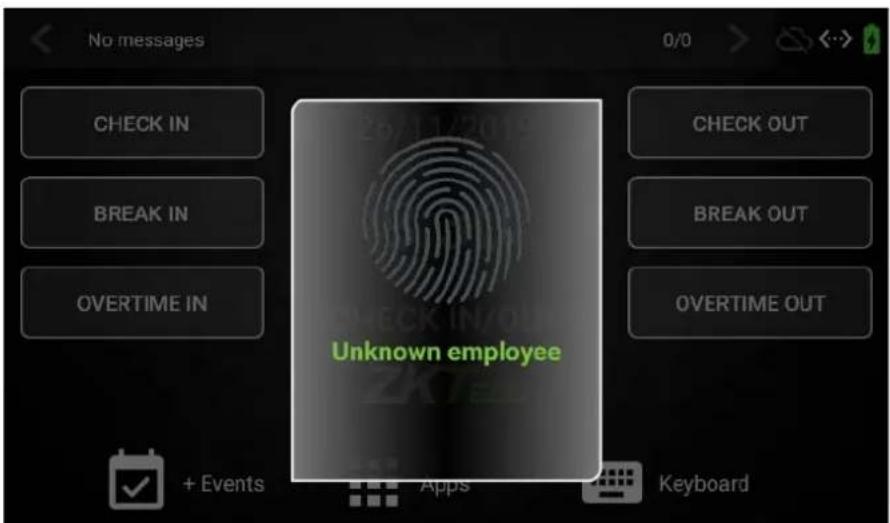
- On the contrary, a negative verification message will be shown.
1.5.2. 1:1 Verification
The device can also perform a 1:1 Verification. This kind of verification consist in the employee identifying itself first by Code and registering the punch with Fingerprint or Card after this identification. This punch data is compared only to the identified employee data. This is used to provide an extra layer of security, or when the Fingerprints of the employees or Cards are difficult to read by the device.
The punching operation when this kind of identification is selected is the following:
- Select the event that the punch is going to be set, either from the desktop, either from + Events. This is optional. If no attendance event is selected, a default Check In/Out attendance event is selected.
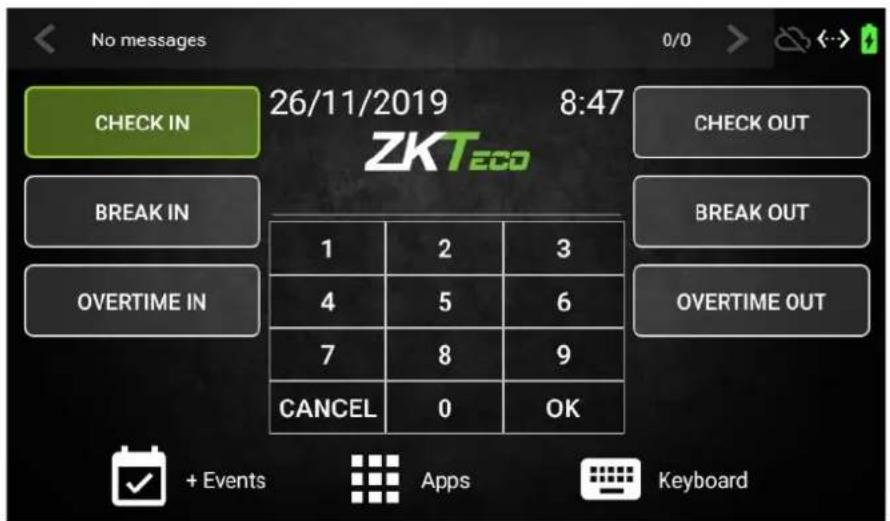
Desktop
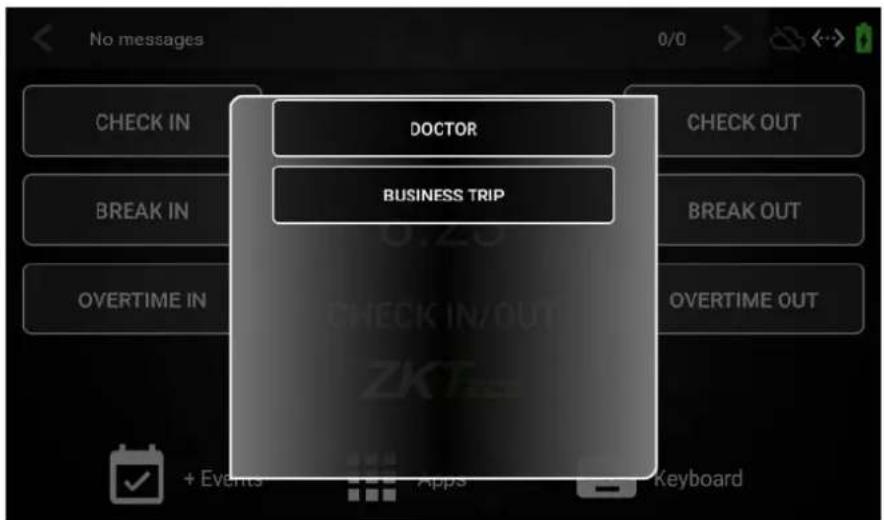
+Events
2. Input the employee Code and click OK
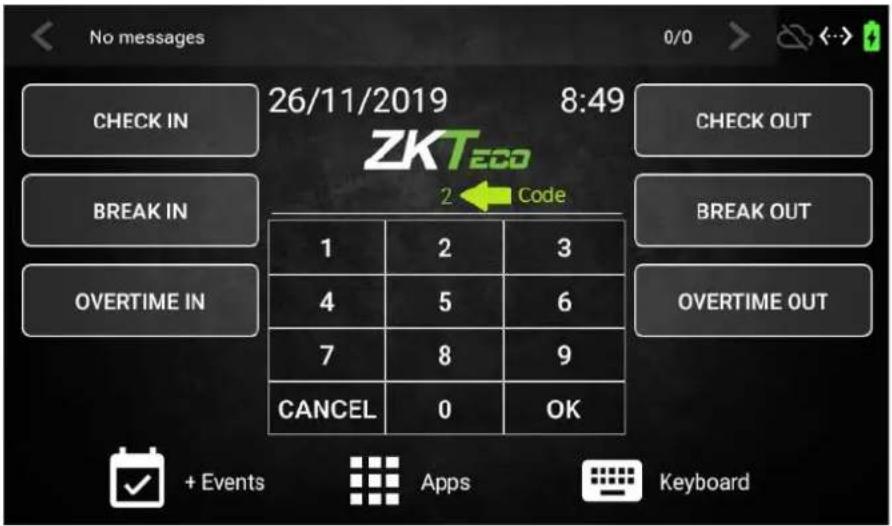
- Punch the device by Fingerprint or Card. The device will only issue a positive verification if the punching registered corresponds to the user whose code has been entered.
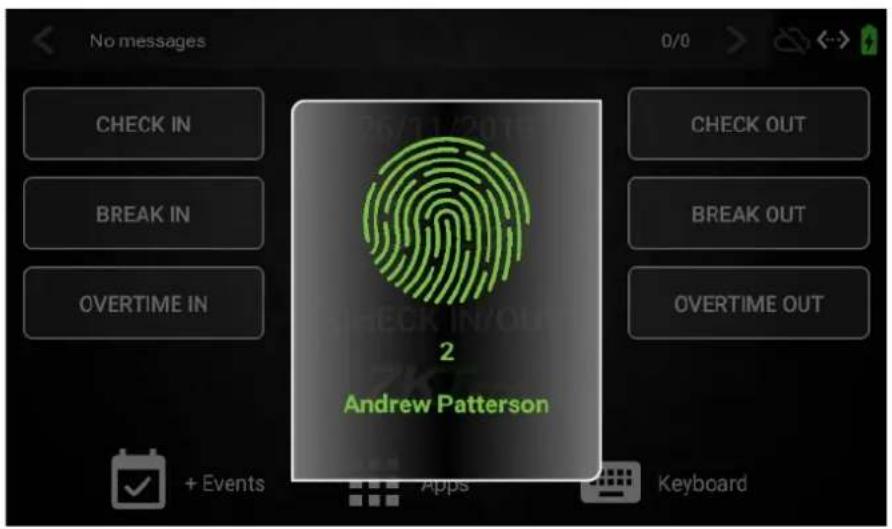
- On the contrary, a failed verification message will be issued.
1.5.3. Force Attendance Event Selection
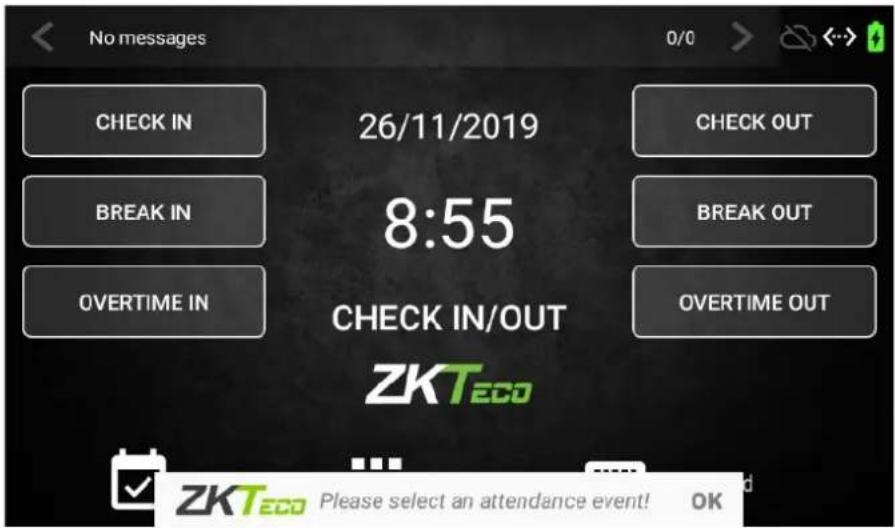
In the previous section it is specified that the selection of an attendance event prior to the punching is optional. The device can be configured so it is mandatory to set an attendance event prior to the punching. If this is activated (View T&A Settings – Punch Settings) section trying to set a punch without selecting an attendance event first will show the following warning on screen.
2. Applications
Click Apps to enter the Applications interface. These are the apps shown when an administrator clicks on the Apps icon.
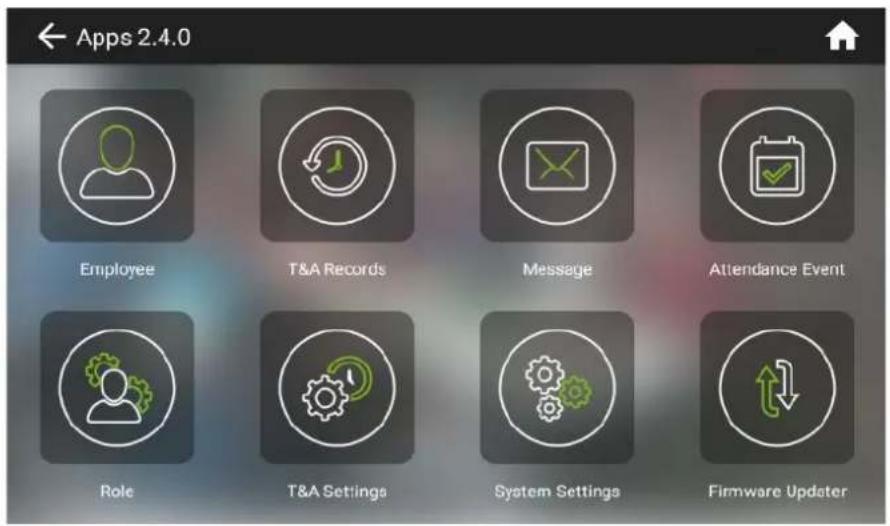
| App Name Usage | |
| Employee | Add, edit or delete the basic employee information: enroll Pin, Name, Fingerprint, Card and Password; assign Department as required. |
| T&A records | List of registered punches. The device shows the list of registered punches by date. Punches are identified by User Photo, Name, Code, Punch type and Date |
| Message | Add or delete public or personal messages as required. |
| Attendance Events | Add, edit or delete attendance events as required. |
| Role | Set permissions for the different functionalities of the device |
| T&A settings | List of available T&A settings, in order to configure the behavior of the device as needed |
| System settings | List of system settings, such as Network Configuration, Language, Date&Time, etc. |
| Firmware Updater | Internal software update. Only select this option when required by the distributor. |
These are the apps shown when a user with no permissions clicks on the apps icon:
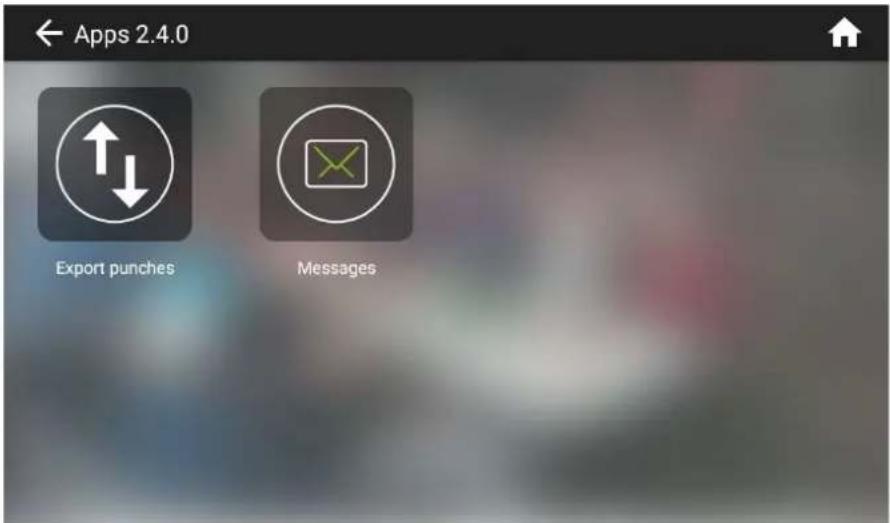
| App Name Usage | |
| Export Punches | Use this app to export the punches of the logged user to a USB disk connected to the terminal |
| Message | View the messages directed to the logged user |
3. Employee Management
This app manages the employees of the device, allowing the registry, modification or deletion of the employees of the company the device.
In order to register an employee, its Code, Name, and at least an identification method, such as Fingerprint, Card or Password must be provided. Optional fields are Department and Role.
When there is a change in the employees, it must be carried over to the device in order to maintain the correctness of the information. That is why the modification of an already registered employee is possible
Lastly, when an employee is dismissed, it must be deleted from the device in order to delete them from the registries of the company.
Click Employee on the Apps page in order to access the employee app.
3.1. Add a New Employee
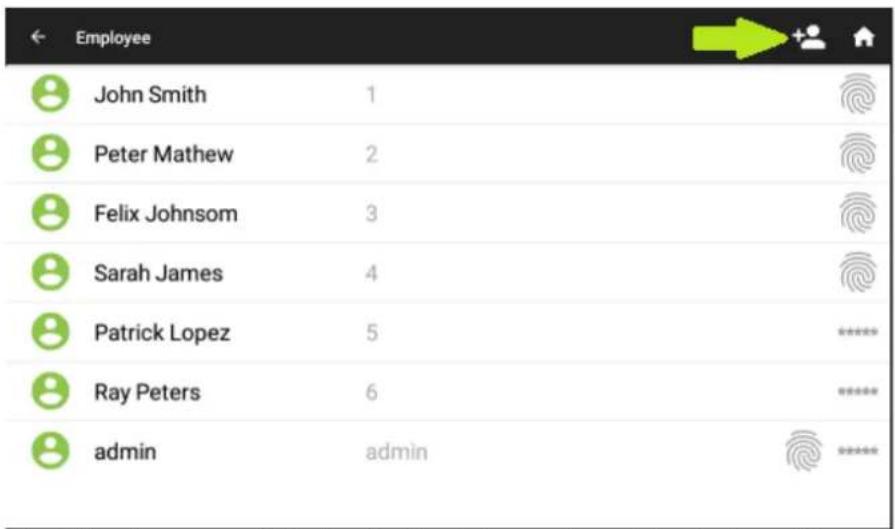
These are the steps needed to add a new employee to the device.
- On the Employee app click on the New Employee icon (marked with the green arrow in the following screenshot)
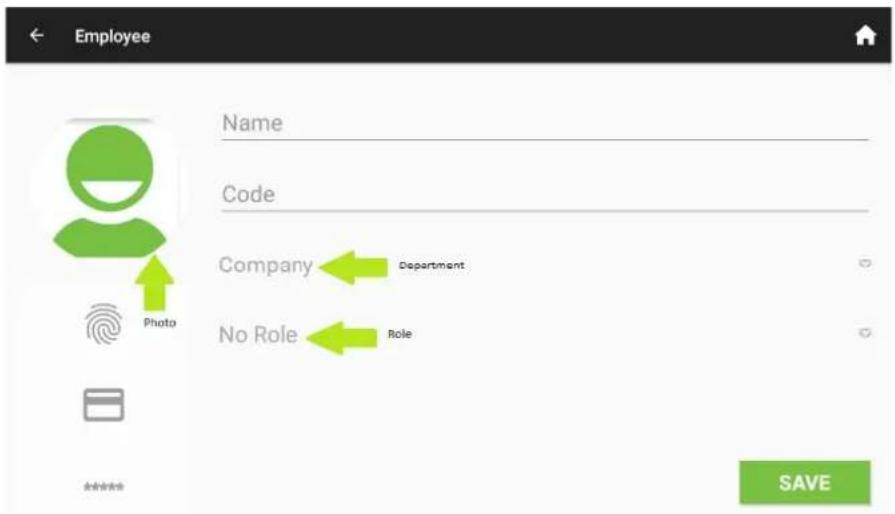
- In the following screen, fill in the details of the employee. The Code and Name fields are mandatory, but the Department and Role fields are optional. Click on the smiley face in order to add a photo of the employee, which will be set as a User Photo
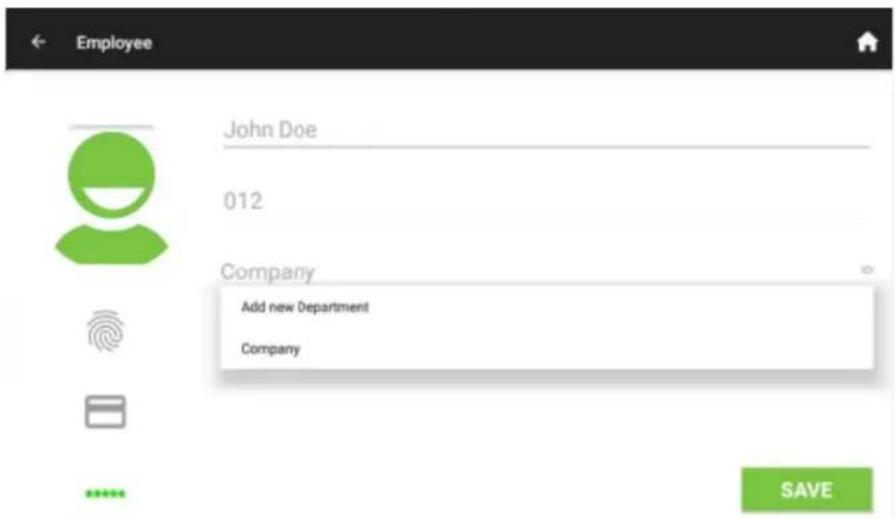
- When selecting the Department, there is an option to create a New Department.
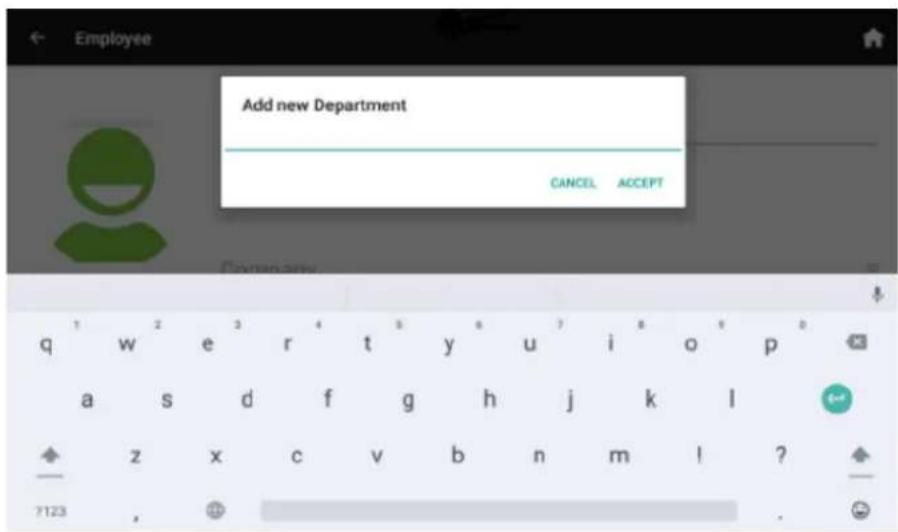
- The following dialog is presented in order to create de Department, which will be assigned automatically to the employee being registered
- Click on any of the punch types available in order to enroll a Fingerprint, Card or Password for the Employee
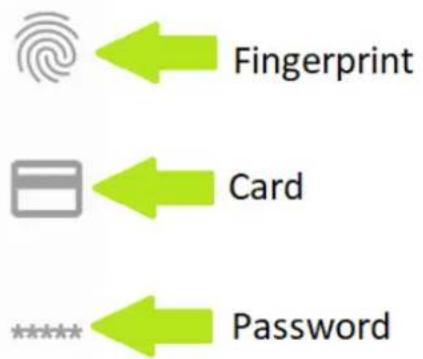
flowchart
graph TD
    A["Fingerprint"] --> B["Card"]
    B --> C["Password"]
Fingerprint Enroll
- If Fingerprint is selected, a finger selection screen will open
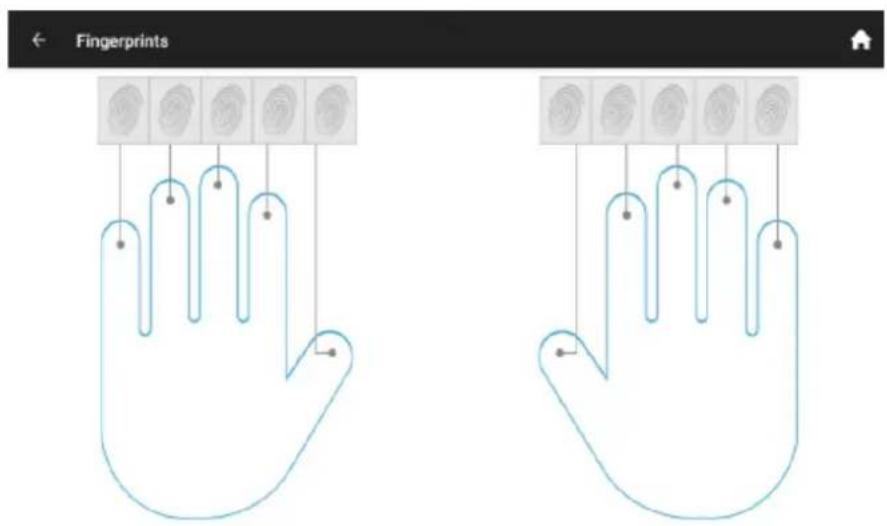
- Select the finger to enroll and punch the device three times in order to save the enrollment
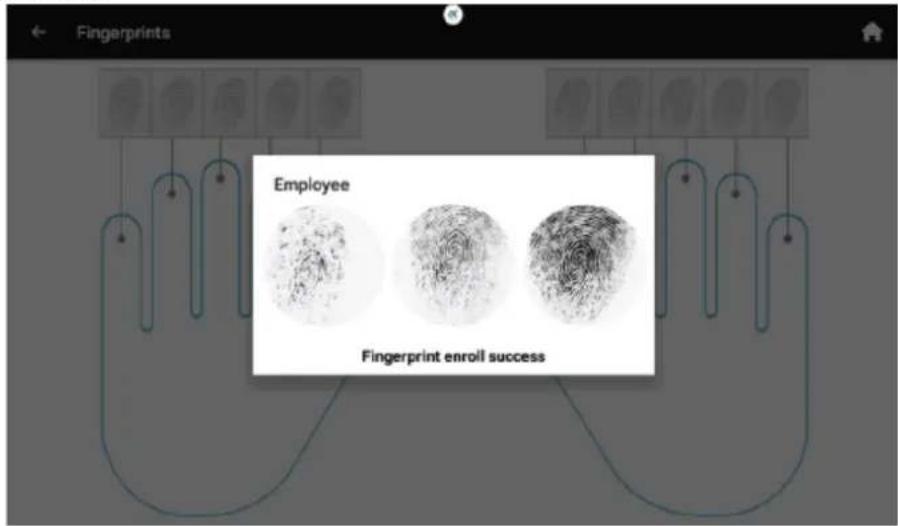
- Once all the wanted fingerprints are enrolled, click on the left arrow, on the upper left position in order to go back to the previous screen.
Card Enroll
- To enroll a card, click on the Card icon. Punch the card in the screen that appears next to enroll the card to the employee.
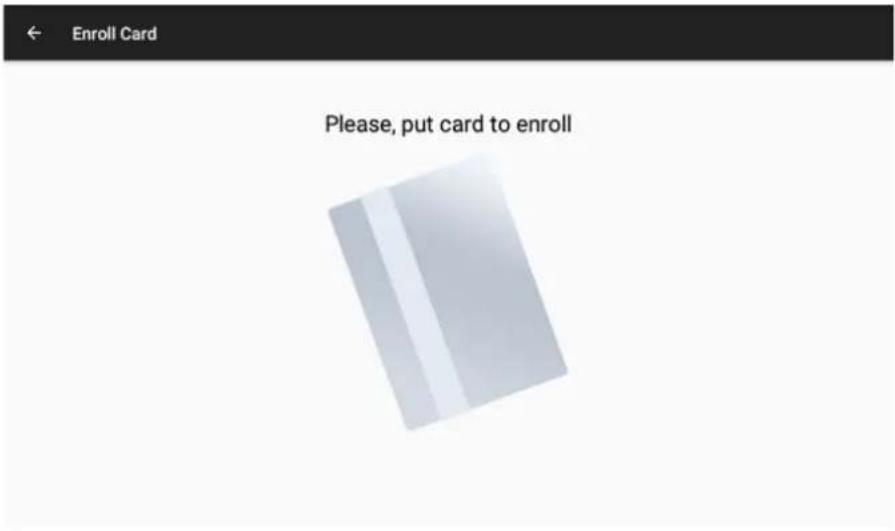
- Once the card is enrolled, click on the left arrow on the upper left position in order to go back to the previous screen
Password Enroll
- In order to enroll a password, click on the ***** icon. It is required to input the password twice in order to save the password. Warning: Do not forget to click on SAVE on this screen in order to save the password, as clicking on the upper left arrow will NOT save the password.
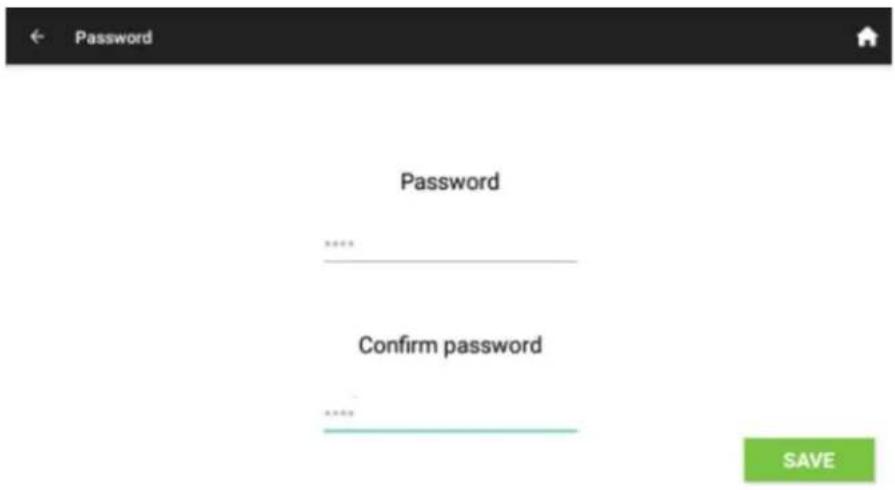
- Click on SAVE in order to register the employee. From now on the employee is available in order to register punches.
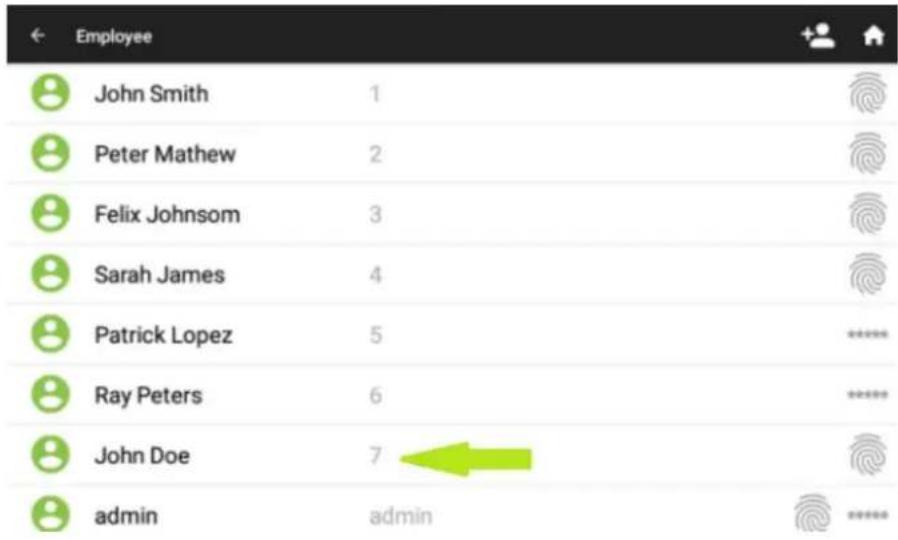
bar
| Employee | Admin Count | | :--- | :--- | | John Smith | 1 | | Peter Mathew | 2 | | Felix Johnsom | 3 | | Sarah James | 4 | | Patrick Lopez | 5 | | Ray Peters | 6 | | John Doe | 7 | | admin | admin |3.2. Edit existing employee
As creating a new employee, it is possible to edit and existing employee.
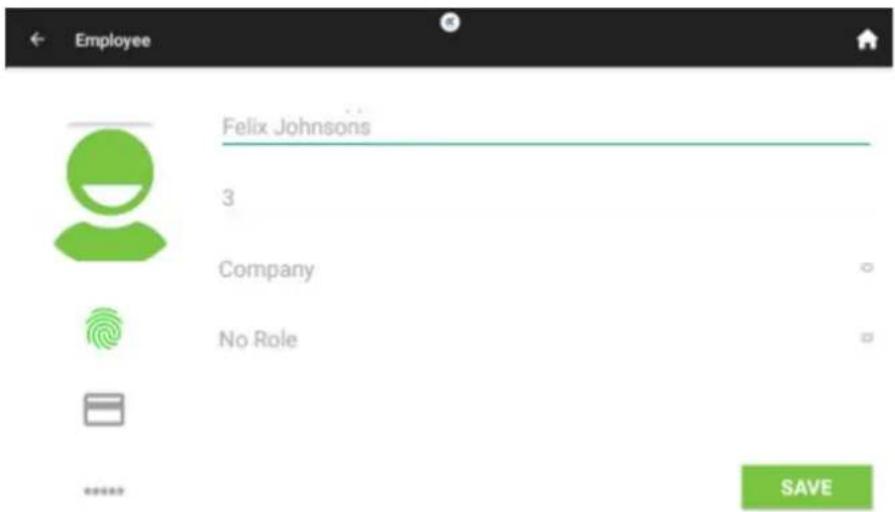
- Select the Employee that needs to be edited, to do it, just click once on it. In the following example the employee no.3 is going to be edited
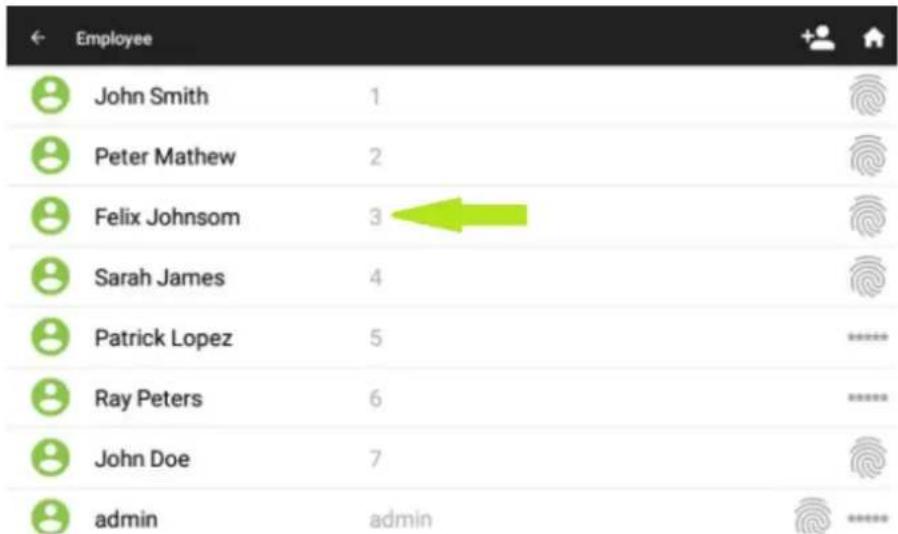
- The details of the employee will be shown on screen. The Code of the Employee cannot be edited. In order to edit any other of the fields, just click on the field to be edited, and after editing click SAVE.
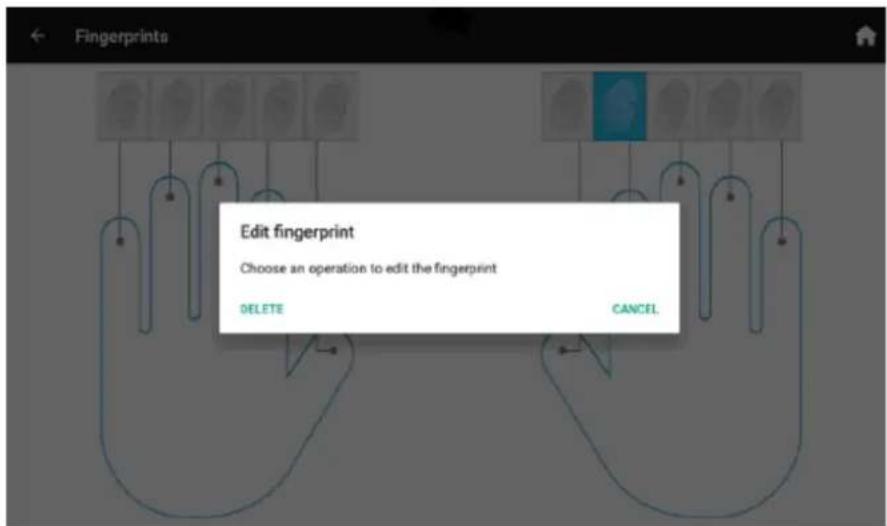
- Enrolling a Fingerprint, Card or Password to an existing Employee is done as it was done when registering the employee. If a Fingerprint, Card or Password is already enrolled and we want to change it, a dialog asking if we want to Delete the previous punch type or we want to cancel the operation. In the example, we are trying to edit the enrollment of a fingerprint.
- Remember to SAVE after doing all the edits needed. If the upper left arrow is clicked the changes will NOT be saved.
3.3. Delete a registered employee.
When an Employee is dismissed, it is possible to delete the registry in the device. Be careful doing this as any of the T&A records of this employee will also be deleted. The process to delete an existing employee is the following.
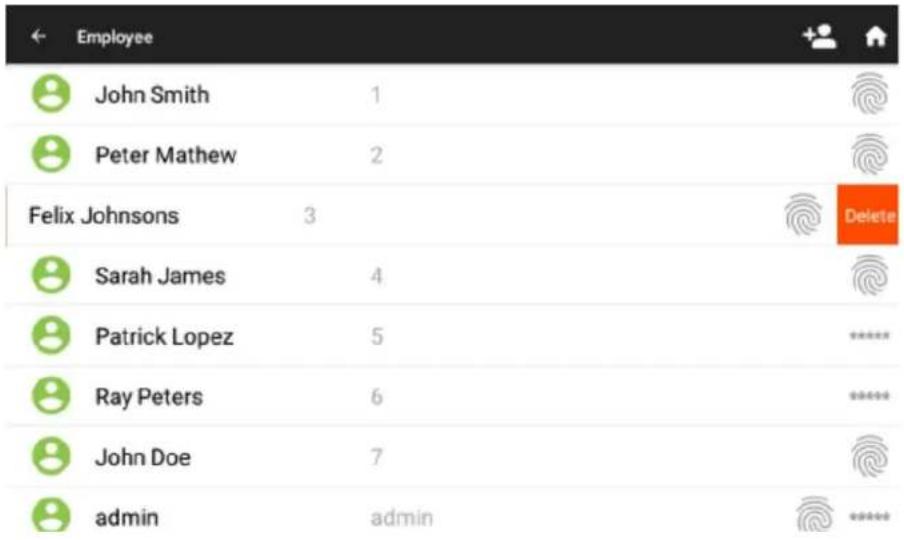
- On the Employees screen, swipe left the employee that needs to be deleted. A red Delete icon will show on the right of the screen.
bar
| Employee | Count | | :--- | :--- | | John Smith | 1 | | Peter Mathew | 2 | | Felix Johnsons | 3 | | Sarah James | 4 | | Patrick Lopez | 5 | | Ray Peters | 6 | | John Doe | 7 | | admin | admin |- Click on the Delete icon to delete the employee. A confirmation message will appear for safety.
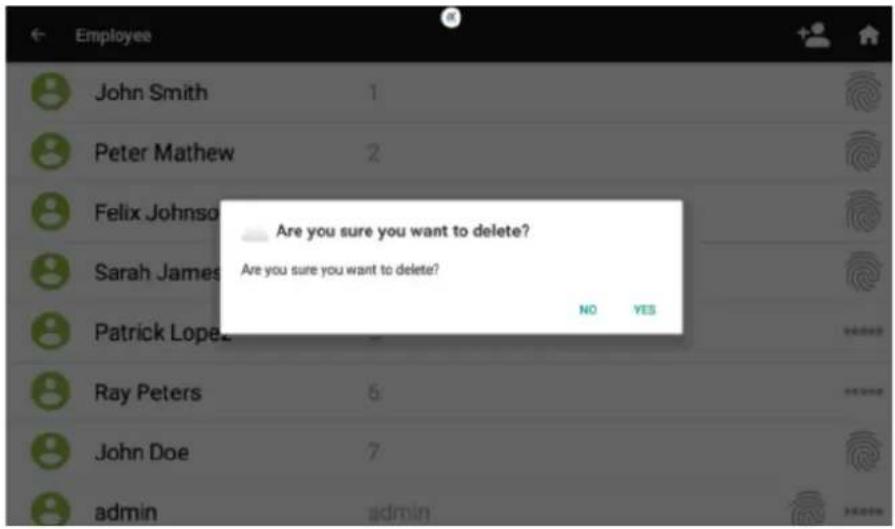
- After the confirmation the employee will effectively be deleted. This operation cannot be undone.
4. T&A Records
The T&A Records app shows the list of punches registered by the device. It does NOT let the user to delete the records or edit them in any way. Swiping down in the list will show previous punches.
| ← T&A Records 1.6.3 | Filter by name/code | ||||
| [STAT] | andres | 5 | Check Out | 07/12/2019 12:47 PM | |
| [Y705] | andres | 5 | Check Out | 07/12/2019 12:47 PM | |
| [YY28] | andres | 5 | Check In | 07/12/2019 12:46 PM | |
 | andres | 5 | Check Out | 07/12/2019 12:36 PM | |
| [7068] | andres | 5 | Check In | 07/12/2019 12:35 PM | |
 | veronica castro | 1 | Check Out | 07/12/2019 12:33 PM | |
The fields of the punch records that are shown are the following.
- User photo
- Name
- Code
- Attendance Event
• Type of punch (Fingerprint, Card or Password) - Date and Time
It is also possible to show only the records of a specified user by setting its name or code.
5. Messages Management
A Message is a piece of information that will be delivered to the Employees through the device. Messages can be sent to one Employee only, a specific list of Employees or publicly. A message directed to an employee, or a list of employees will be shown when punching, while public, non-directed messages will be shown on the Desktop, with no punching needed in order to see them. Messages are managed through the Messages app
5.1. Add a New Message
- On the Messages app click on the New Message icon (marked by the green arrow in the following screenshot).
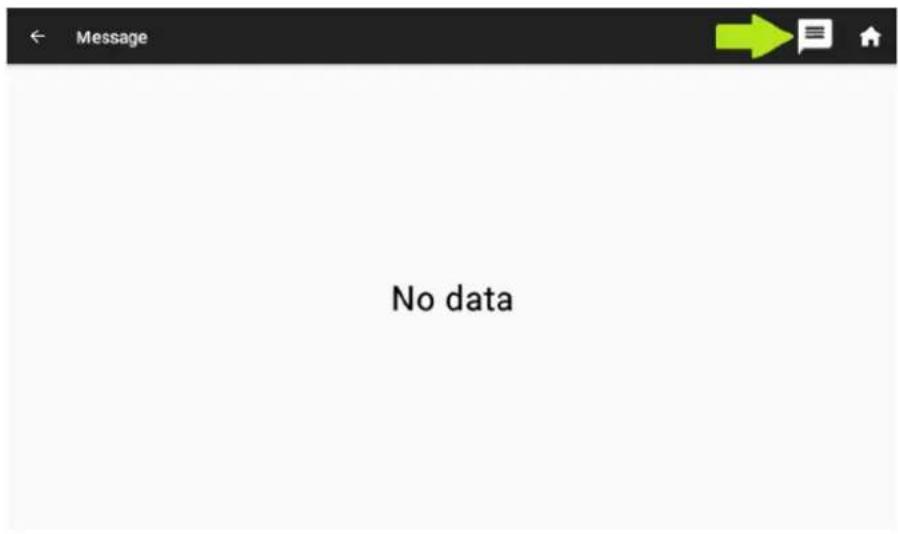
- First, click on Please enter message to set the contents of the message
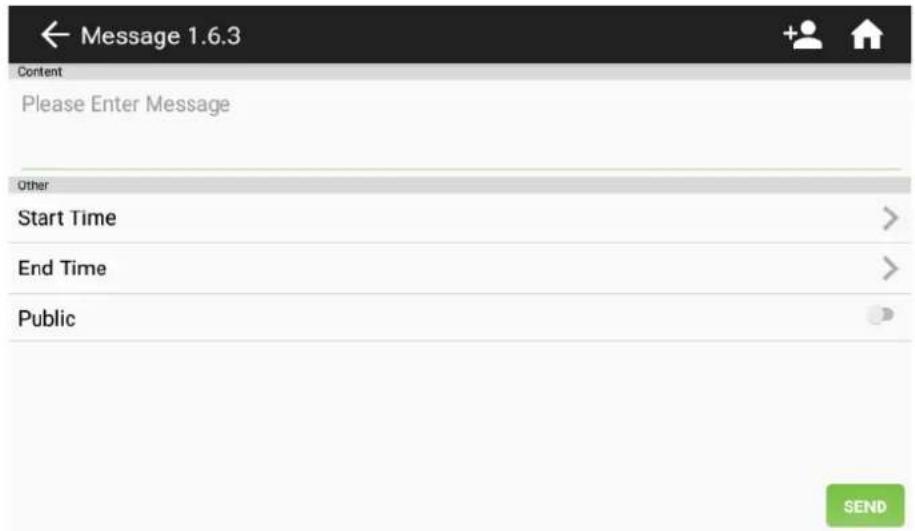
- Once the contents of the message have been written, choose if the message is directed to a specific employee, a list of employees, which will be done by clicking on Receiver, or is directed to all the employees, by setting to ON the Public field.
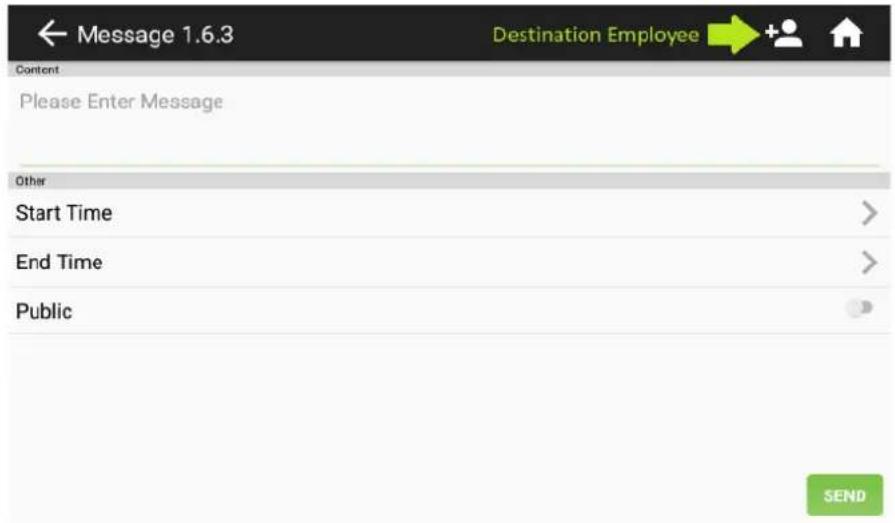
- When clicking on Receiver, an Employee selection screen will open, in order to select the employees that are going to receive the message. Notice that it is possible to select all the employees, this will NOT make the message Public, as Public messages are delivered without punching, and a Message configured like this will not. Once the employees have been selected. Click OK
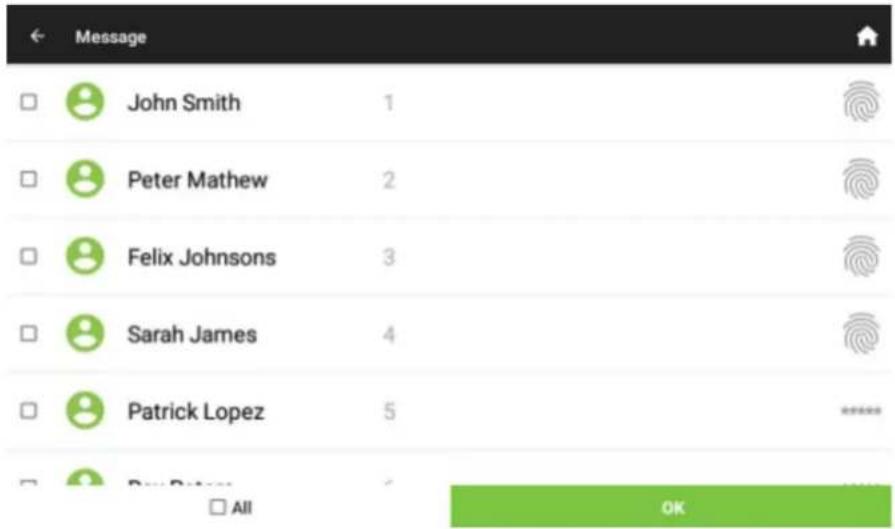
- Start and End Time mark the time in between the message will be shown. Both options show the same options. First, the date of start/end is asked.
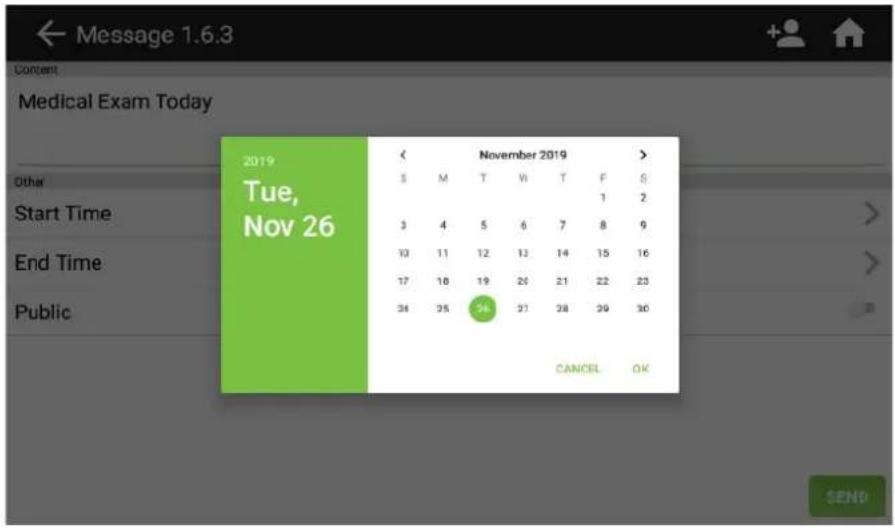
- After clicking OK, the time is asked.
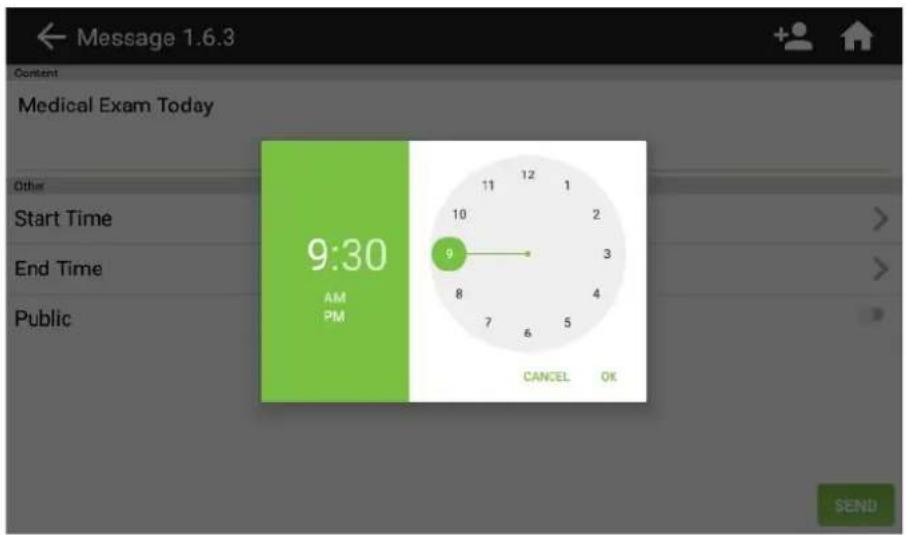
- Once time has also been selected in both start and end time, we have all the details needed. Click SEND to save the message and to display it when the time comes.
5.2. Message Display
In the following screenshot we have a public message "Welcome" and an employee-specific message "Medical Exam Today"
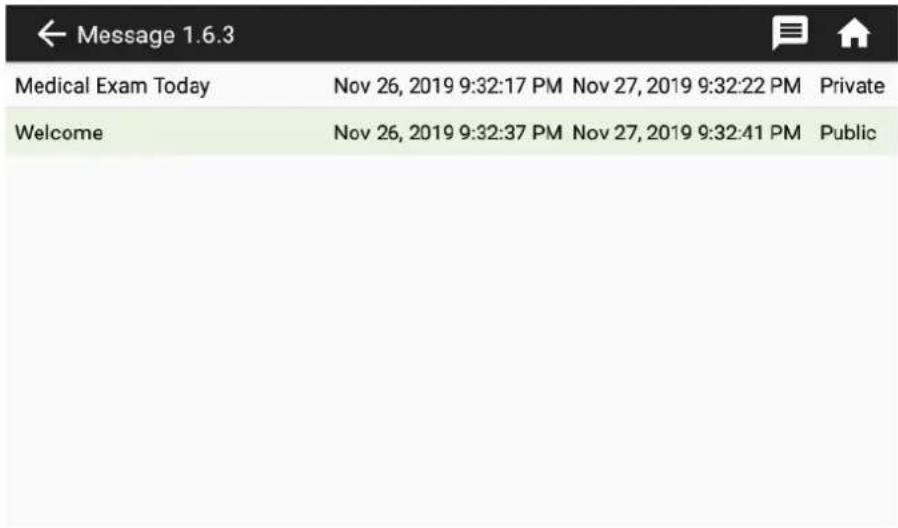
The following screenshot shows how Messages are shown on the desktop. In the center of the screen the employee specific message is being shown after the employee punching while in the top of the screen the public message is being shown
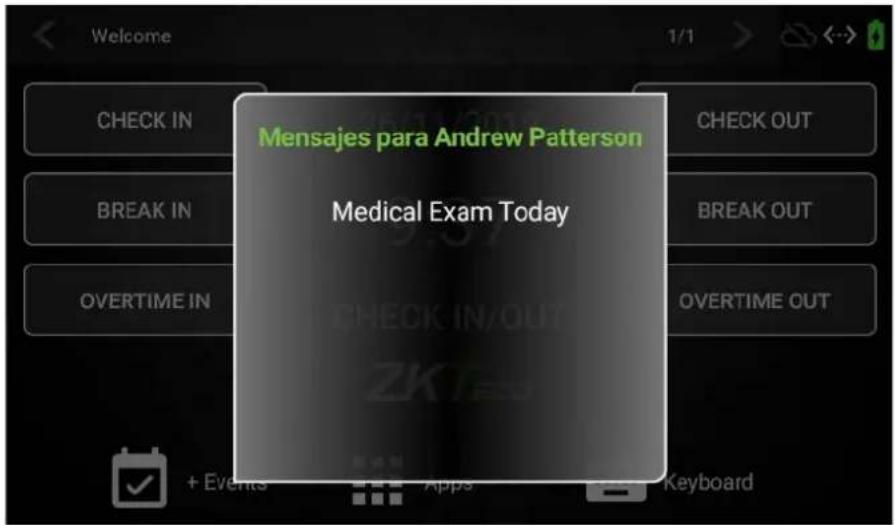
Notice that to the right of the public message a 1/1 appears, meaning that the message being shown is the first about 1 message. The arrow on the right would scroll between messages if they existed.
5.3. Messages Edit
It is possible to edit an existing message.
- Click on one of the existing messages in the list of created messages.
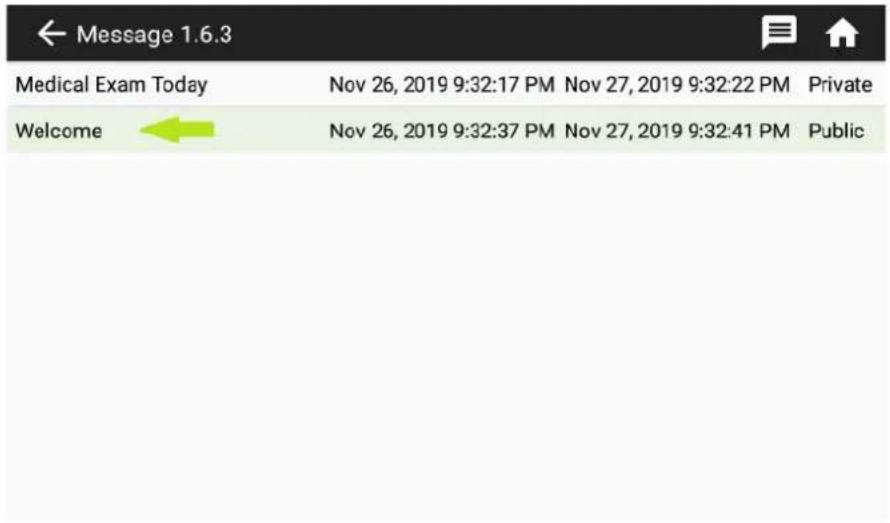
- Edit any of the fields and click SEND
5.4. Messages Delete
By configuration, it is possible to configure that expired messages are deleted every 24 hours (View T&A Settings section on this manual). Also, a message can be deleted manually with the following process.
- On the Messages app, swipe left the message that needs to be deleted, and a red Delete icon will appear to the right of the screen
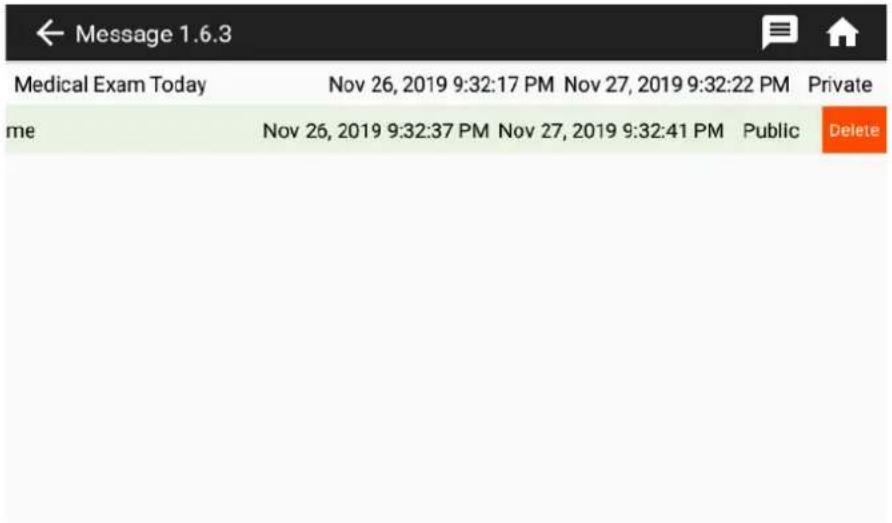
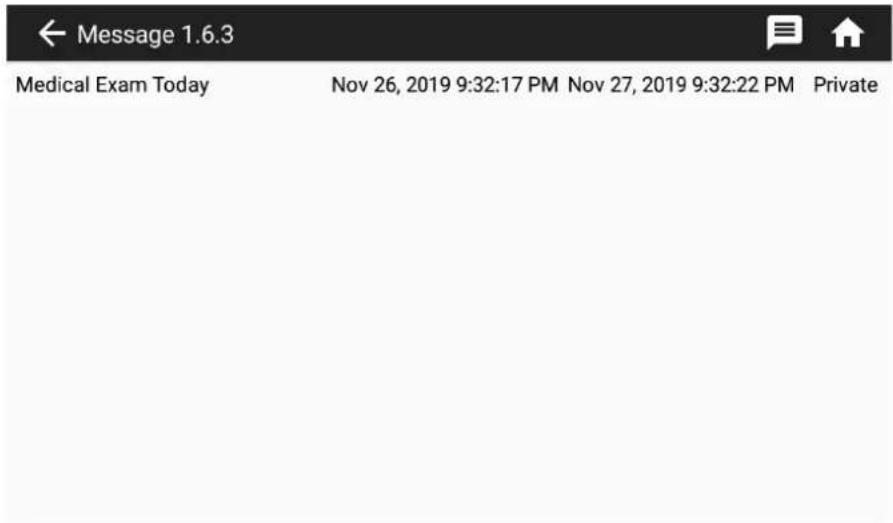
- When clicking the Delete icon, a confirmation message will appear. Once the delete is confirmed, the message will disappear from the events list.
6. Attendance Events Management
Attendance events are the "reasons" to register a punch, being in punches or out punches. The device includes a list of basic attendance events that can be expanded to meet any needs. Attendance events are managed in the Attendance Events app.
6.1. Add a New Attendance Event
- On the Attendance Events app, click on the New Event icon (marked with a green arrow in the following screenshot).
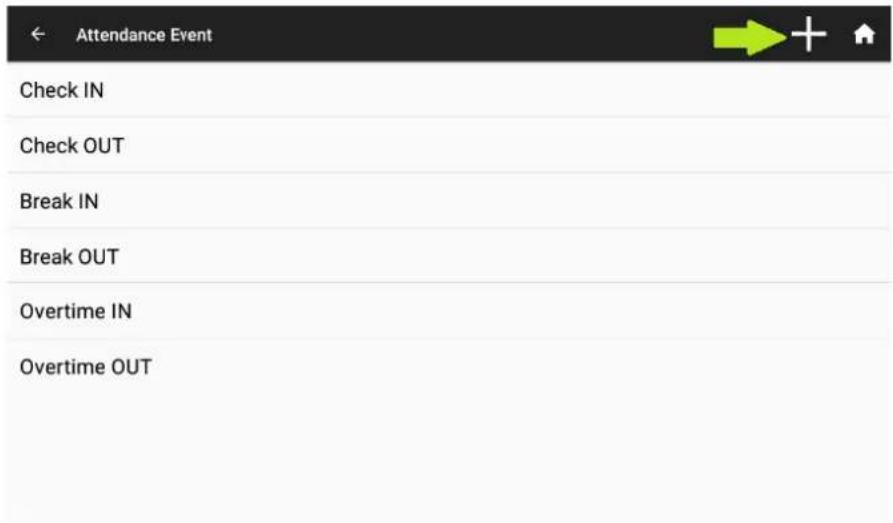
- Fill in the Code and Name of the Event.
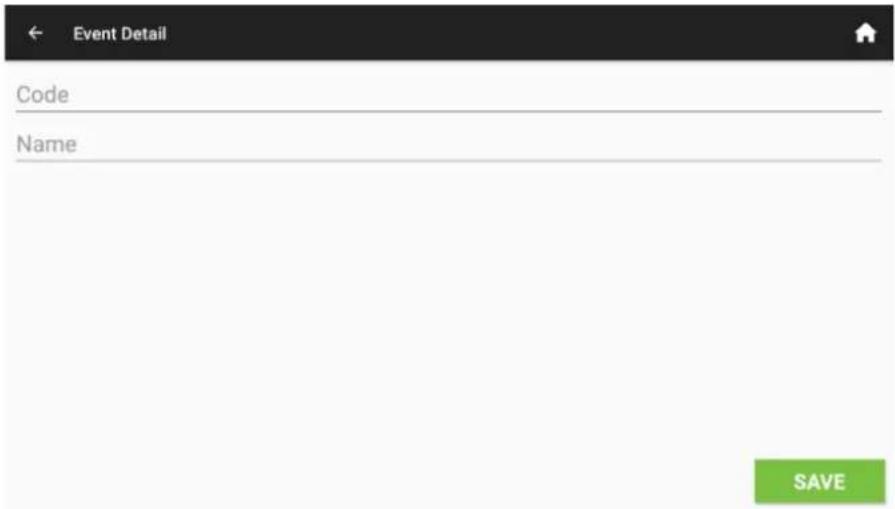
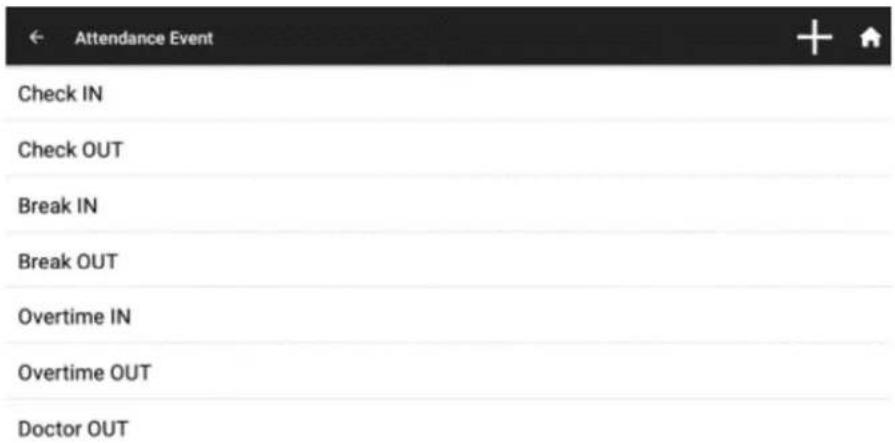
- Click SAVE and the event will appear next to the rest of the events in the list. In the following screenshot, we have created an event named "Doctor OUT" with Code no. 7
- The event "Doctor OUT" is shown in the desktop next to the rest of the events
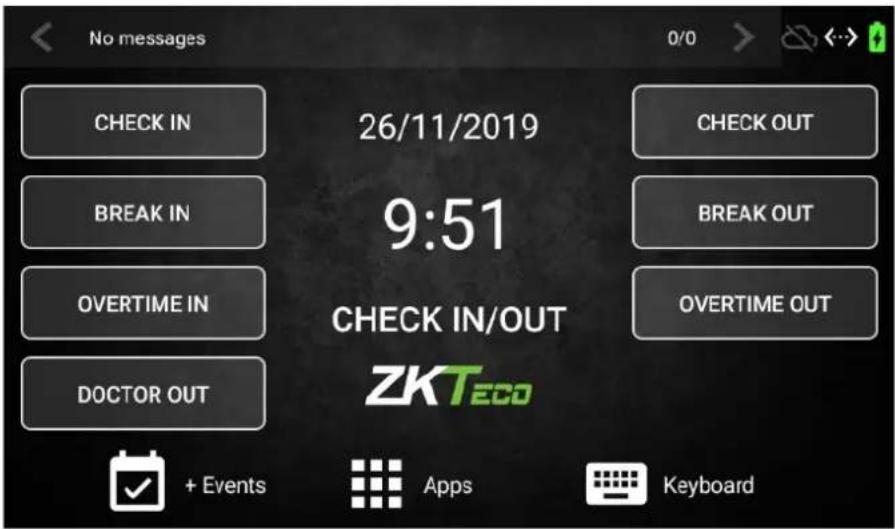
+ Events
Warning: The desktop will only show events with codes 1-8. Events with a superior Code number will be shown on the + Events screen.
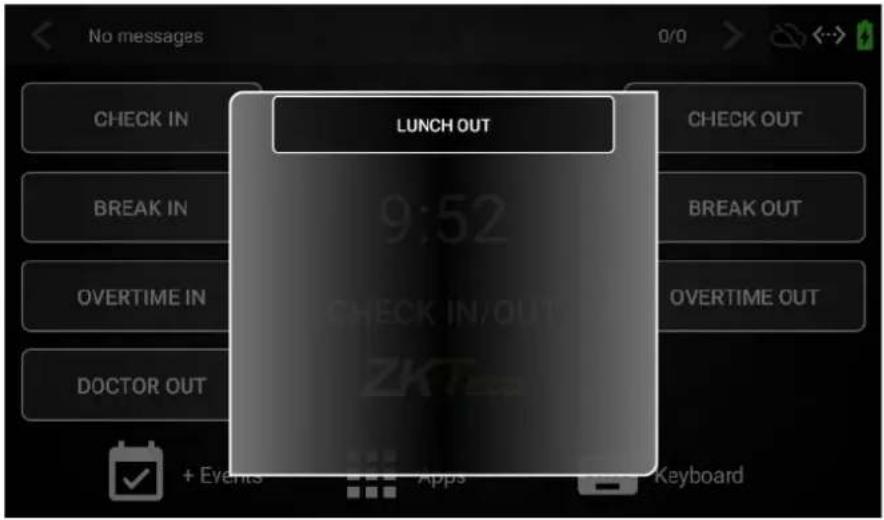
- In the following example, an event with code no. 10 has been created with the name "Lunch Out"
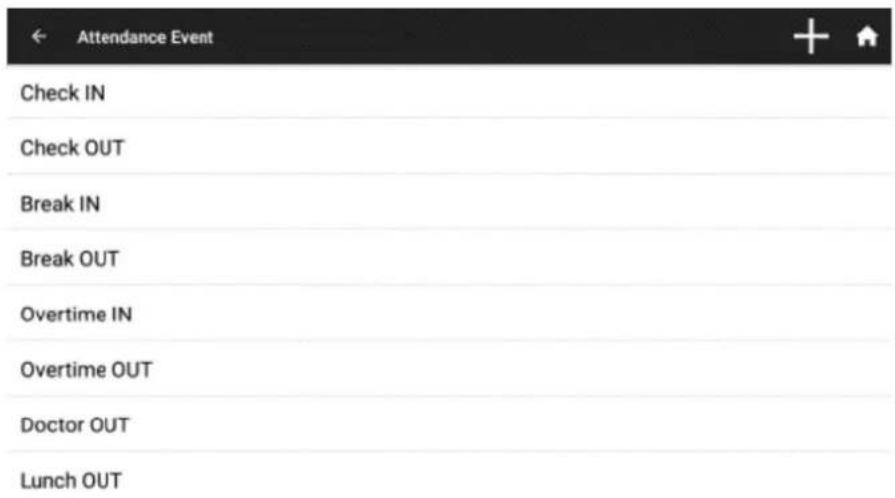
- Notice that as the event has Code superior to 8, it appears inside the + Events screen
6.2. Edit an Attendance Event
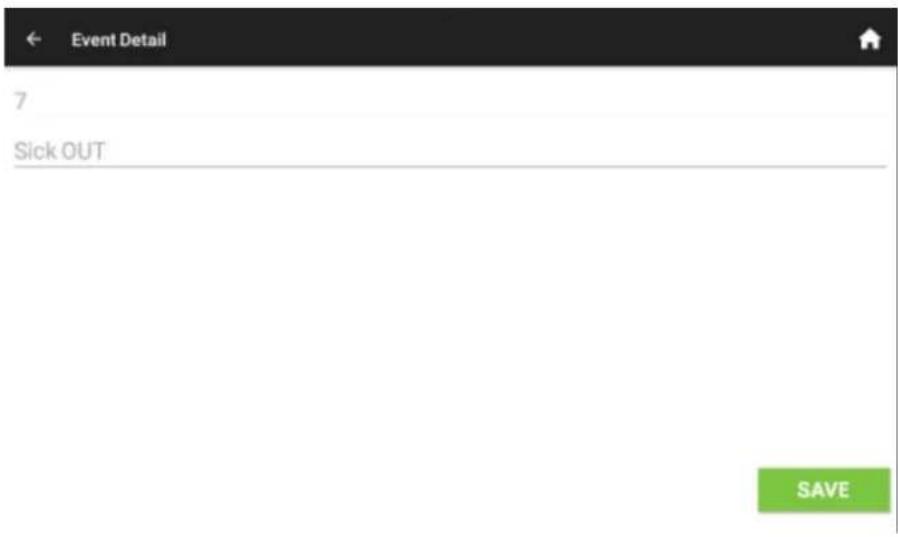
User-created attendance events can be modified. The only field that can be modified is the name. The basic attendance events that the device includes cannot be modified in any way
- In the following screenshot the event Doctor OUT is going to be edited.
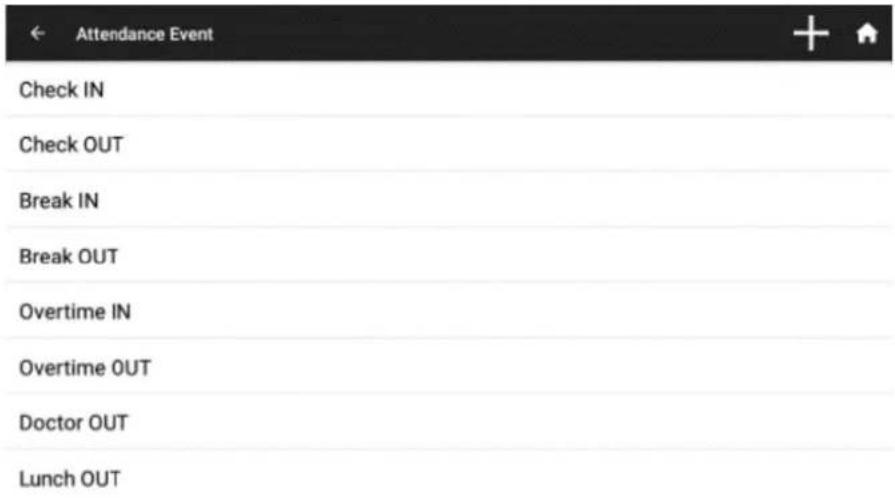
- After editing the name, click SAVE in order to save the name change.
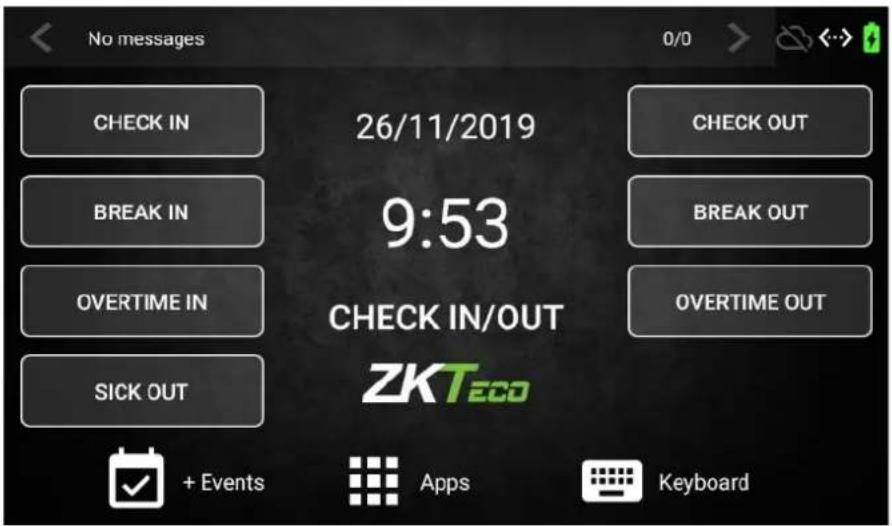
- The event list in the desktop has changed in order to show the changes.
6.3. Delete an Attendance Event
Basic attendance events that come by default with the device can NOT be deleted, but user-generated ones can, the process is as follows.
- In the Attendance events app, swipe left the event that needs to be deleted. A red Delete icon will appear in order to delete the event.
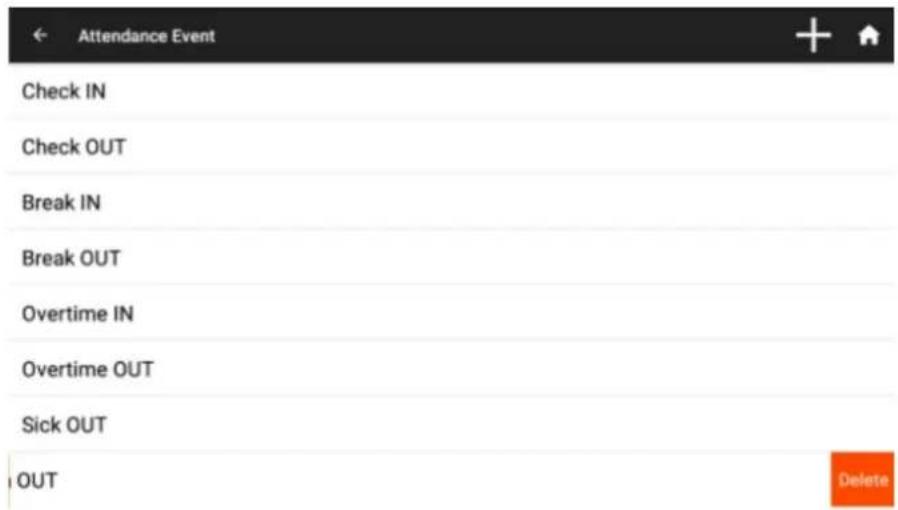
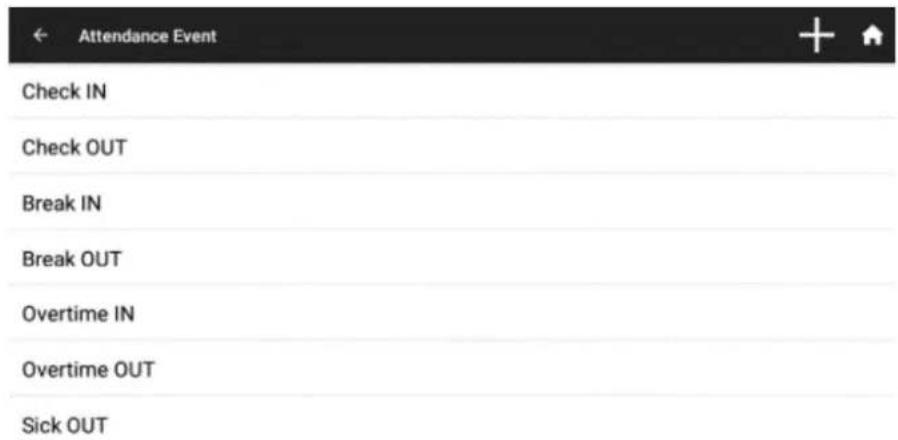
- After clicking Delete and confirming the event list will be updated without the deleted event.
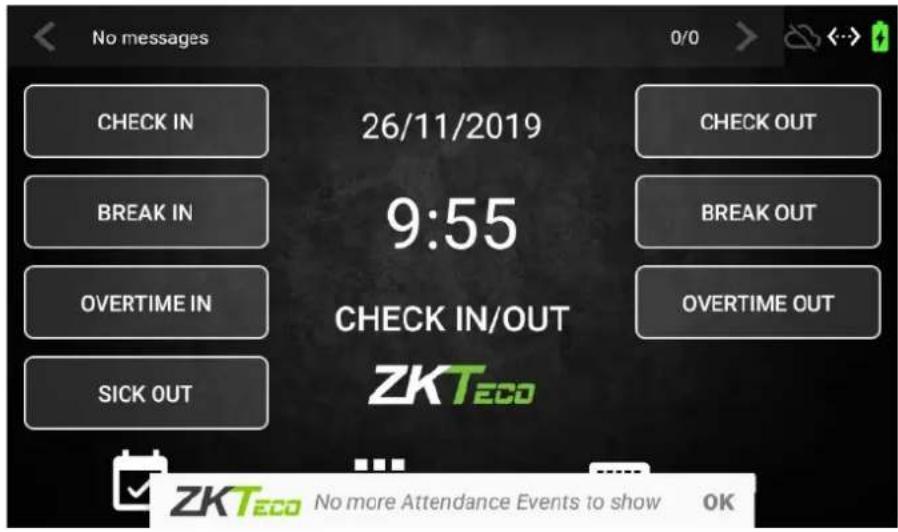
- The event list in the desktop or the + Events screen is updated accordingly. The following screenshot shows the message that appears on screen when no events exist that should be in the + Events screen
7. Roles Management
In the ZPad Plus environment, Roles are the set of permissions that can be assigned to an employee or a group of employees regarding the functions of the device. For example, a role can be set that forbids the editing of T&A Settings but allows the checking of T&A Records. Another role can be set that allows only the punching, with no additional permissions.
Roles are managed in the Roles app. It is not possible to manage an addition, modification or deletion permission individually. When a role includes a permission, it means that the whole operation of the permission being set is allowed. Except for the webserver permission, the permissions of the role assigned to an employee define the apps the employee can access in the apps page.
Roles that can be set include the following permissions:
- Roles manager: Lets the assigned employee access the Roles App
• System administrator: Lets the assigned employee access the System Settings - Webserver user: The assigned employee can access the webserver as an administrator.
Warning: The assigned employee also needs to have a Password created in order to access the web server as an administrator.
• T&A Manager: Lets the user access the Employees App and the T&A Settings App - Apps Dashboard: The assigned employee can only access the Messages app and the T&A Records app. Disabling this permission also disables the rest of the permissions except the Webserver permission
By default, the device includes a Super Admin role that has full permissions. If no employees are assigned to the Super Admin role, no restrictions will be enforced when accessing the apps.
The user, having the required role, can create new Roles, edit the existing user-made roles and delete any of the existing user-made roles.
7.1. Add a New Role
Once created, the role needs to be assigned to employees in order that its configured restrictions are enforced. The process to add a new role to the device is as follows.
- In the Roles app, click on the + sign on the top right on the screen to add a New Role (marked in the screenshot with a green arrow).
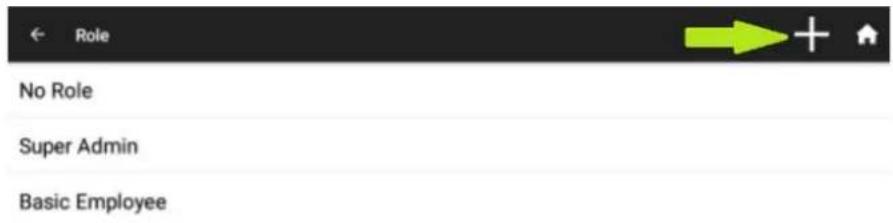
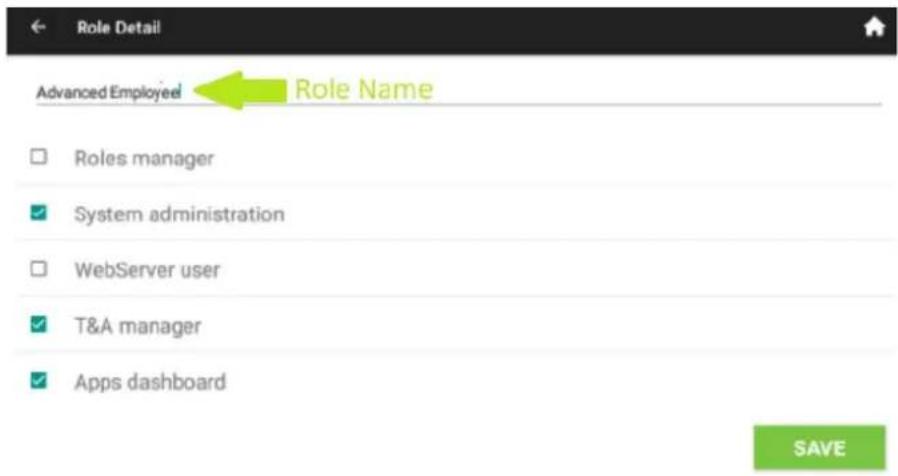
- Input the name of the Role, and the permissions that will include. Click SAVE to save the role.
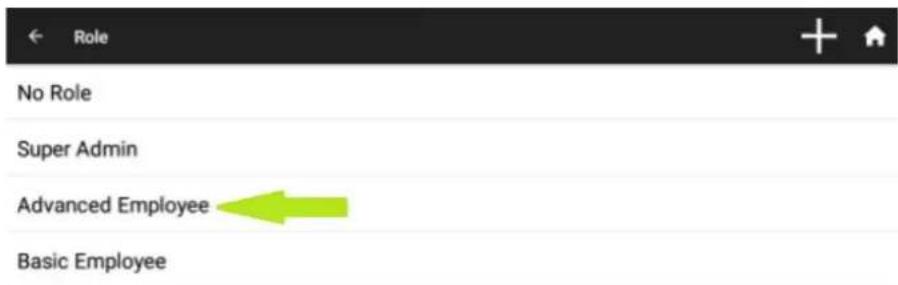
- The role created will appear in the list of roles. Notice that user-created roles are sorted alphabetically on the roles app.
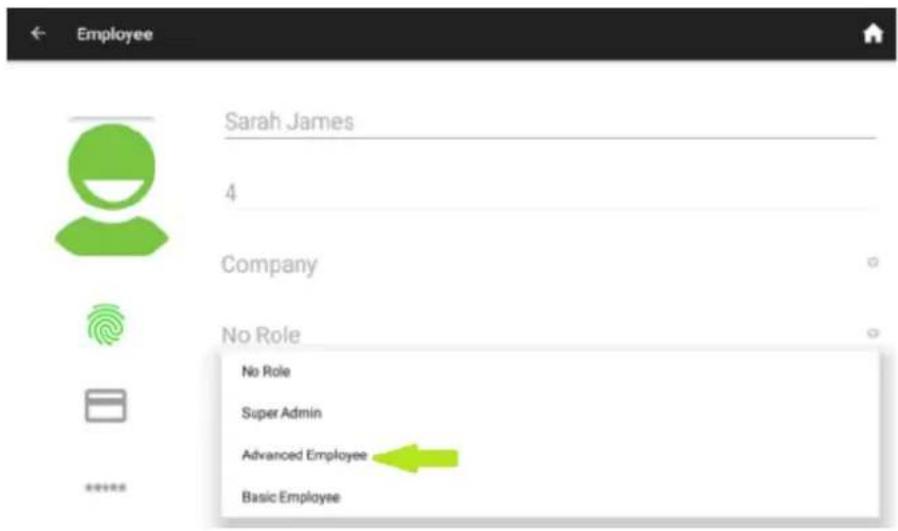
- From now on, the role can be assigned to employees.
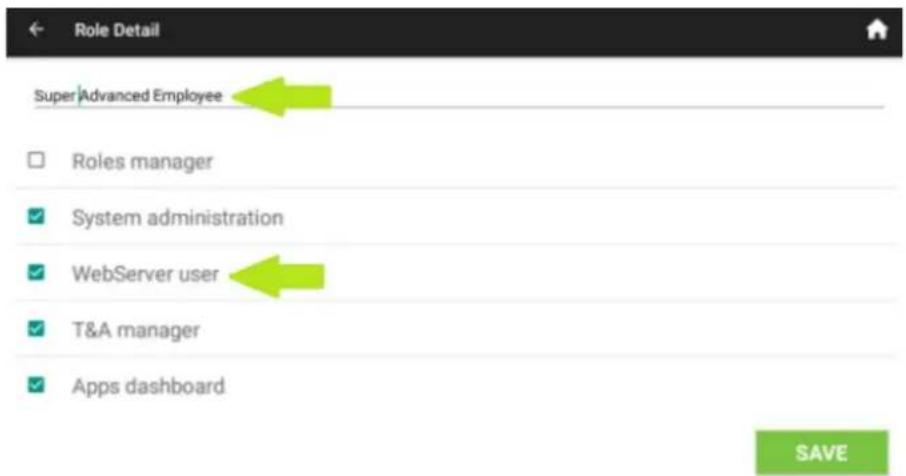
7.2. Editing an Existing Role
As it was explained in a previous section, the Super Admin role cannot be edited. The process for editing an existing user-made role is as follows.
- In the Roles app, click on the Role that needs to be edited.
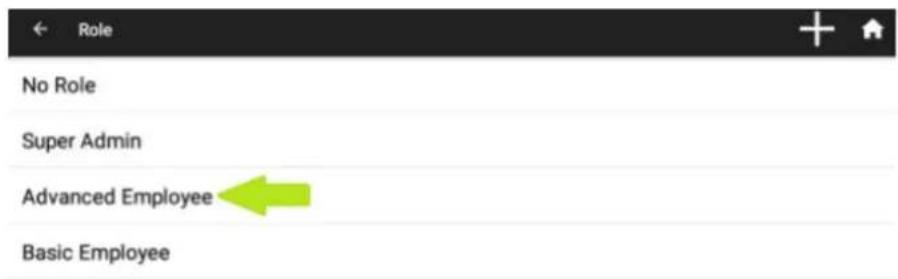
- The name or the permissions of the role can be edited. In the following screenshot both are going to be edited. Click SAVE when done.
7.3. Deleting an Existing Role
The process for deleting a user-made role is as follows. Warning: The deletion of a role that is assigned to an employee will set the employee role-less. This is important because if there are no employees assigned to the Super Admin role, all restrictions in the apps will NOT be enforced anymore.
- In the Roles app, swipe left the role that needs to be deleted. A red Delete icon will appear on screen.
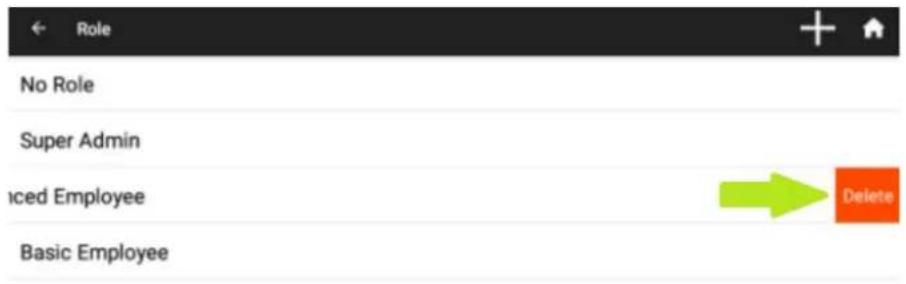
- When clicking on the Delete icon, a confirmation message will appear. After confirming the delete, the role will disappear from the list and all the employees that role had been assigned will no longer have a role assigned to them.
| Role |
| No Role |
| Super Admin |
| Basic Employee |
8. T&A Settings
All functionalities regarding the behavior of the punching are configured in this app. Also, the data stored in the device and the report of the punches (to other software or the webserver) are configured in this app.
8.1. Punch Settings
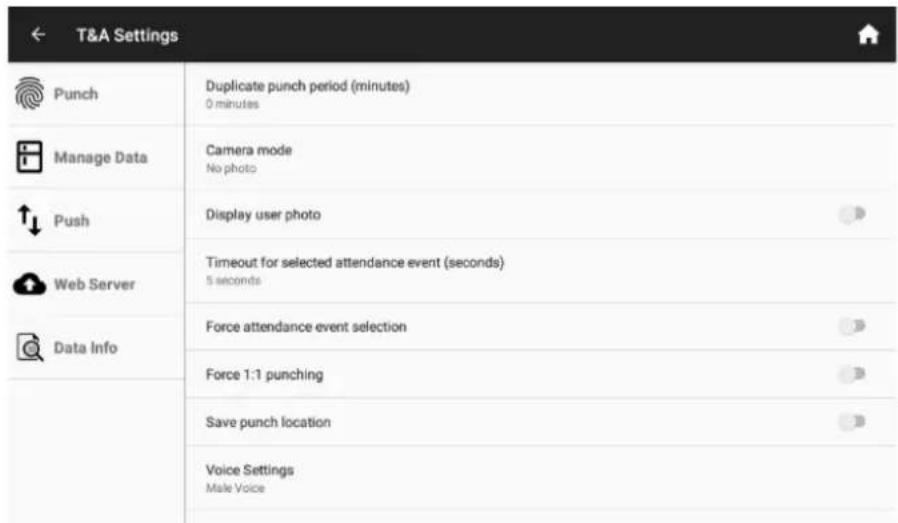
- Duplicate punch period. The device will not allow punching by the same employee during the specified period.
- Camera Mode. Specifies the behavior of the camera when punching the device. The options are:
2.1 No photo. The device will not take a photo when punching
2.2. Take photo. The device will take a photo when punching, but the photo will not be saved
2.3. Take photo and save on success. The device will take a photo and save it if the punch is successful
2.4 Take photo and always save. The device will take a photo and save it whether the punch is successful or not.
- Display user photo. Specifies if the photo registered to the employee will be shown when punching the device.
- Timeout for selected attendance event (seconds). Specifies the time on which an event selection (prior to punching) will be discarded if no punch is registered.
- Force attendance event selection. If this option is ON, it will be mandatory to select an attendance event on the desktop before registering a punch.
- Force 1:1 punching. If this option is ON, a Code will be needed in order to identify the employee, and a second method to effectively register the punch. For example, a Code in order to identify the employee, and a fingerprint to register the punch.
- Voice Settings. Establishes if the voice of the device is a male voice or a female voice.
-
Update SikId Library: Displays the current version of the SilkID sensor library and permits the update
-
MCU Version: Displays the current MCU (microcontroller Unit) version
8.2. Manage Data
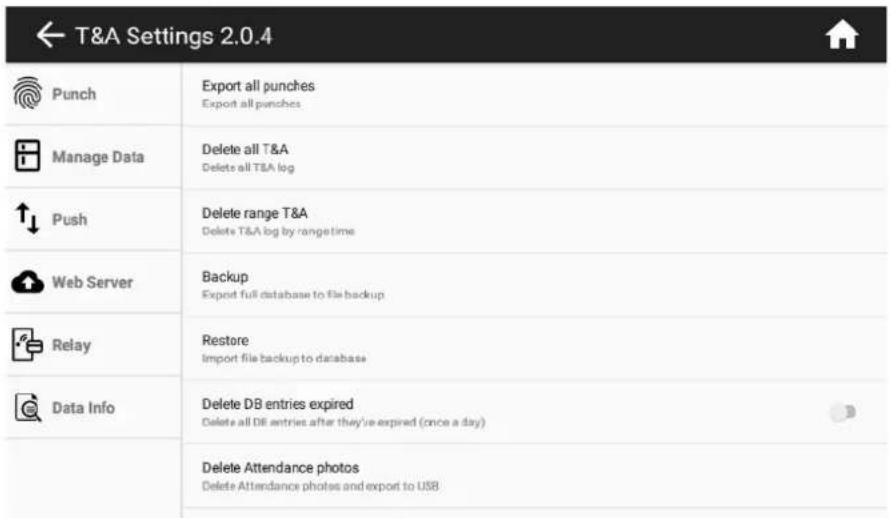
- Export all punches. Exports all the registered punches in the device
- Delete all T&A. Deletes all T&A records from the device
- Delete range T&A. Deletes all T&A records from the device in a date range.
- Backup. Exports the database of the device to a file which will be placed on the root of a USB-drive connected to the device.
- Restore. Restores the database of the device from a file which will be looked for on the root of a USB-drive connected to the device.
- Delete DB entries expired. Set it to ON for the expired messages to be deleted once every 24 hours.
- Delete Attendance photos. Deletes the photos stored on the device that have been done when punching the device with the adequate configuration (view Punch Settings). Allows the user to do a backup of the photos taken to a USB-drive connected to the device.
- Delete all Data. Deletes all data from device. The result will be a factory-new device.
8.3. Push Settings
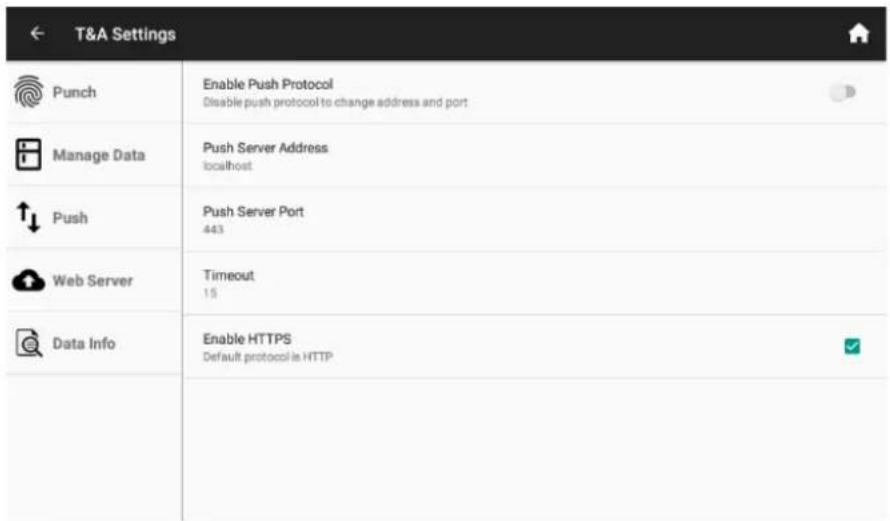
- Enable Push Protocol. The push protocol lets the device communicate with the software that use this protocol. It can communicate with GoTimeCloud, ZKTime Enterprise + Extractor, WDMS, BioTime 7 and BioTime 8. Please ask your distributor sales representative for more information.
- Push Server Address. Internet address where the push server is located.
- Push Server Port. Communication configuration aspect in order to be able to connect to a push server.
- Timeout. Communication configuration aspect in order to be able to connect to a push server.
- Enable HTTPS. Makes it mandatory to the device to only connect to a push server via a secured connection.
8.4. Web Server
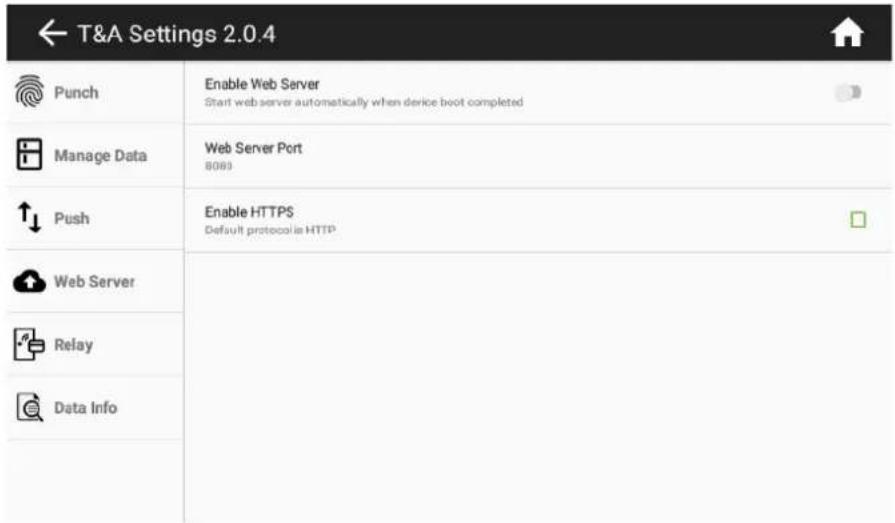
If the Web Server is activated, it is possible to access the device from the same local area network
with a standard internet browser. From the Web Server all Employee, Events and Messages can be managed, along with Reporting Options (Refer to the BioTimeWeb User Manual for more information on the subject). The device shows the address needed in order to access the webserver when the Enable Web Server option is set to ON, the port needed to connect and if the connection needs to be secure with HTTPS.
8.5. Relay Settings
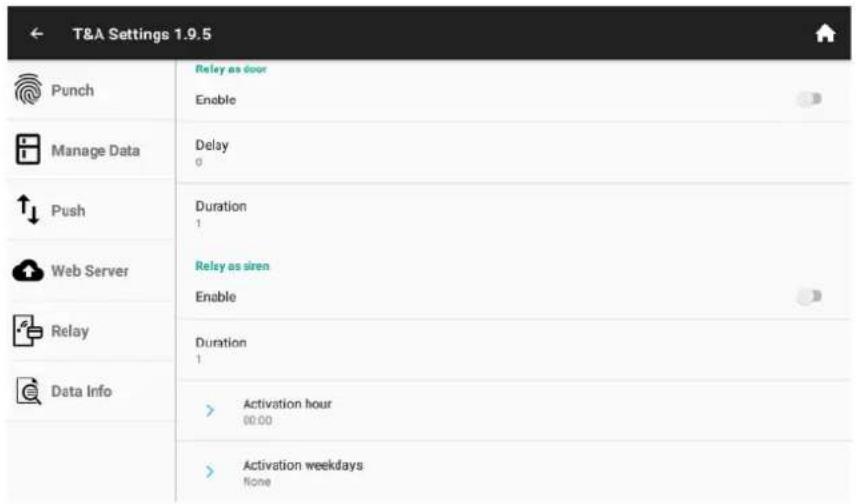
The ZPad Plus device integrates a relay that can be used for access control among other functionalities. The behavior of the relay is configured in this section.
Relay as a door
- Enable. When the relay is enabled, on each punch the relay will be activated according to the setting of the following configuration aspects.
- Delay. Seconds delay from the punching to the relay activation
- Duration. Seconds during the relay will be activated.
Relay as a siren
- Enable. When the relay is enabled, the relay will activate at the specified hour
- Duration. Seconds during the relay will be activated.
- Activation hour. Time of activation of the relay.
- Activation Weekdays. Select which days the relay will be activated.
8.6. Data Info
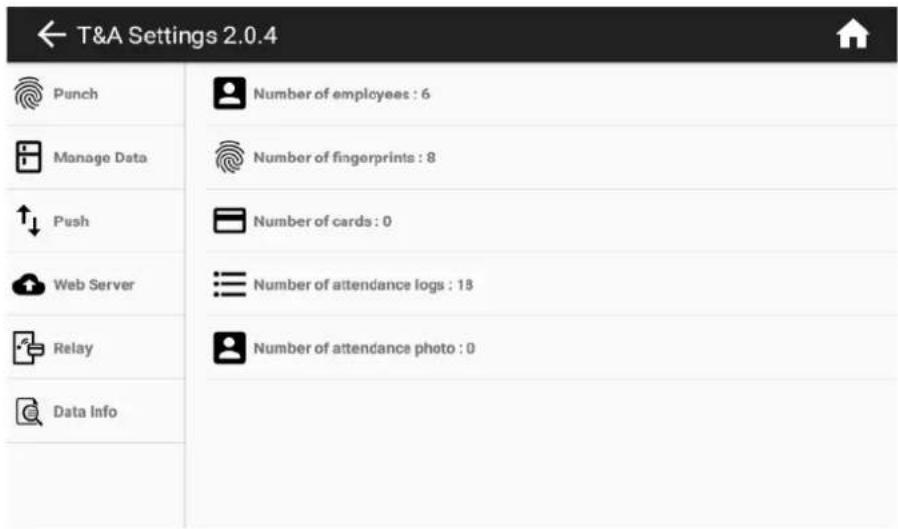
In this section, the number of records for the different aspects of the device are explained. There is no option to delete or edit the records as they are not needed.
9. System Settings
Internal configurations of the device such as network configuration, language, date and time of the device are set in this app
9.1. General Settings
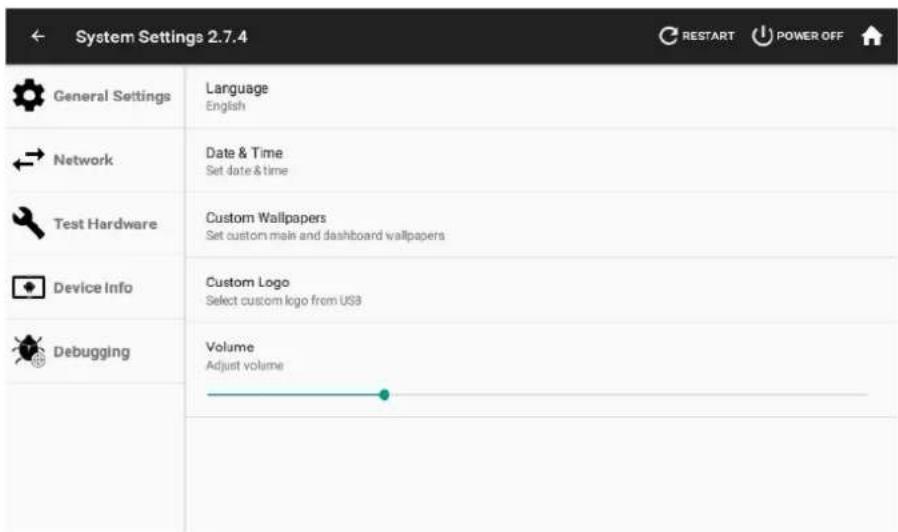
- Language. It is possible to set the device in the following languages: English, Spanish, Czech, Simplified Chinese, Italian, Portuguese, German, French, Turkish, Polish, and Romanian. The change in the language of the device will change the language of the menus accordingly.
2. Date&Time
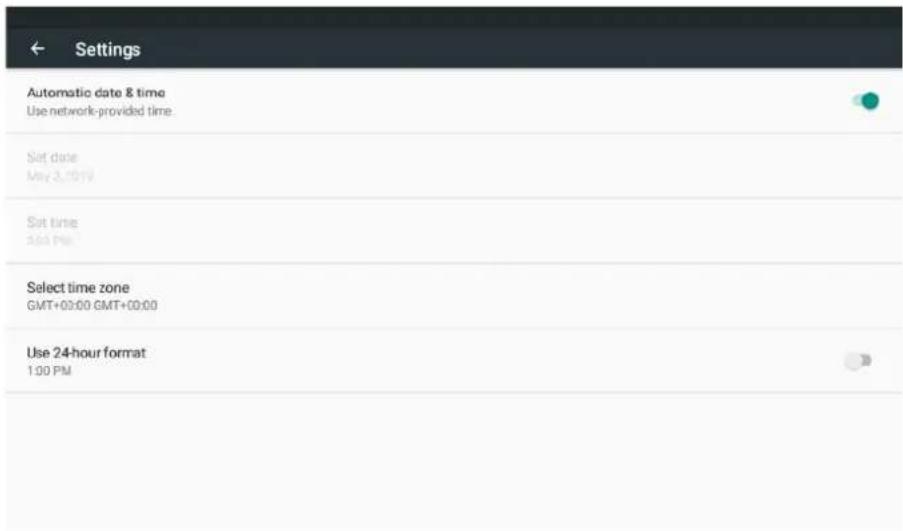
2.1. Automatic Date and Time. When set to ON, current date and time will be retrieved from the internet
2.2. Set date. Only available when Automatic date and time is set to OFF.
2.3. Set time. Only available when Automatic date and time is set to OFF.
2.4. Select time zone. Time zone where the device is installed.
2.5. Use 24-hour format. Display the time in 12- or 24-hour format
- Custom Wallpapers. The wallpaper is the background image of the desktop
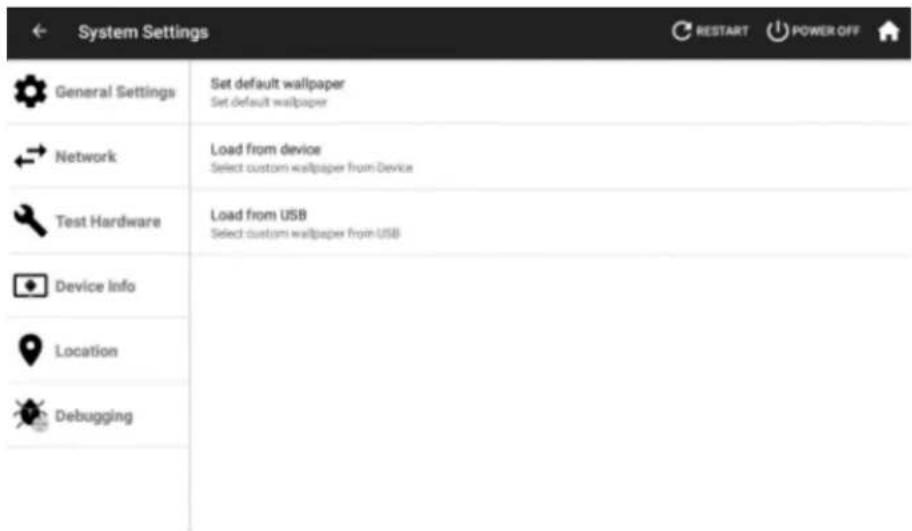
3.1. Set default wallpaper. Cancels back any wallpaper change that had been done
3.2. Load from device. Set a wallpaper image from the images present in the device.
3.3. Load from USB. Set a wallpaper image from the images present in a connected USB-drive. Warning: Supported files are png, and jpg. The filename must not contain spaces.
- Custom Logo. Lets the user to modify the logo shown on the dashboard of the device. The logo file has to be in a USB drive connected to a device.
9.2. Network
The device can be connected to the network through a wired Ethernet connection or Wi-Fi. In order to select either one or the other connection type, click on Network on the System Settings app, marked with a green arrow on the following screenshot.
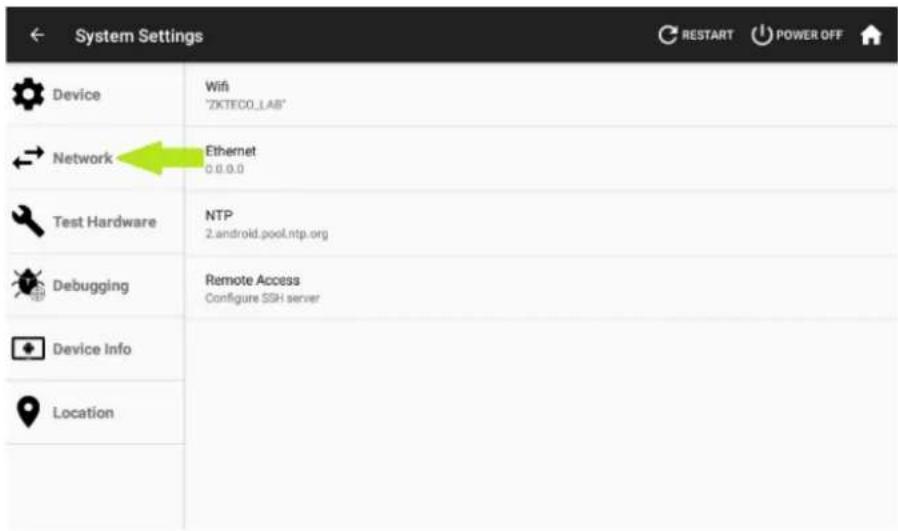
From here we can select whereas a wired ethernet connection will be used or Wi-Fi by clicking on Ethernet or Wifi
1. Wired Ethernet.
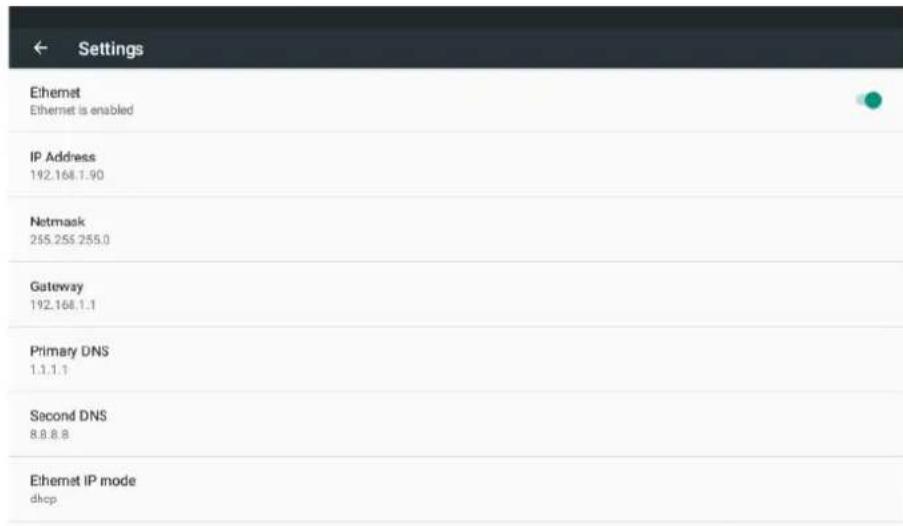
- Ethernet: Switch to turn on or off the ethernet interface
• IP address: Current IP address of the device
• Netmask: Netmask of the device.
• Gateway: IP address of the router that provides internet connection to the device
• Primary and Secondary DNS: Domain name server information - Ethernet IP mode: Select between DHCP (the IP address of the device will be assigned by the router) or Static (All the details of the connection as IP Address, Gateway, Netmask and DNS will be provided by the user).
2. Wi-Fi
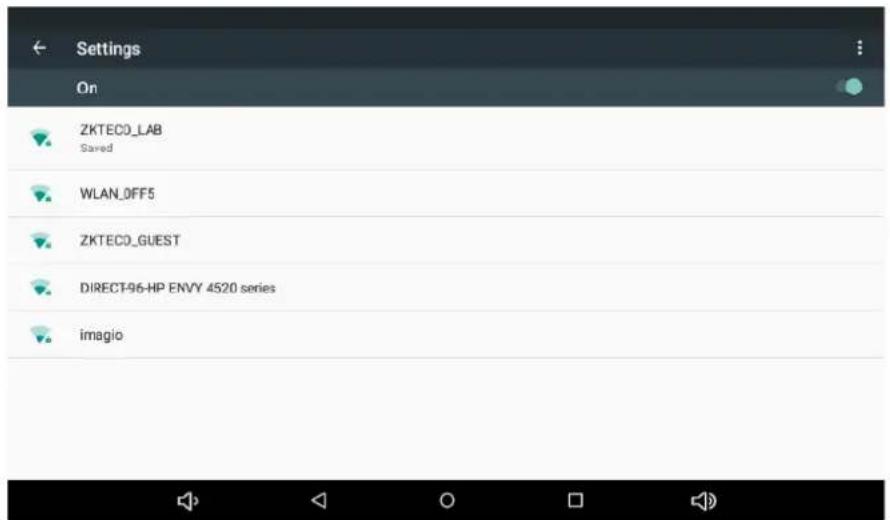
- By selecting one of the detected Wi-Fi networks below the details needed in order to establish a connection are shown.
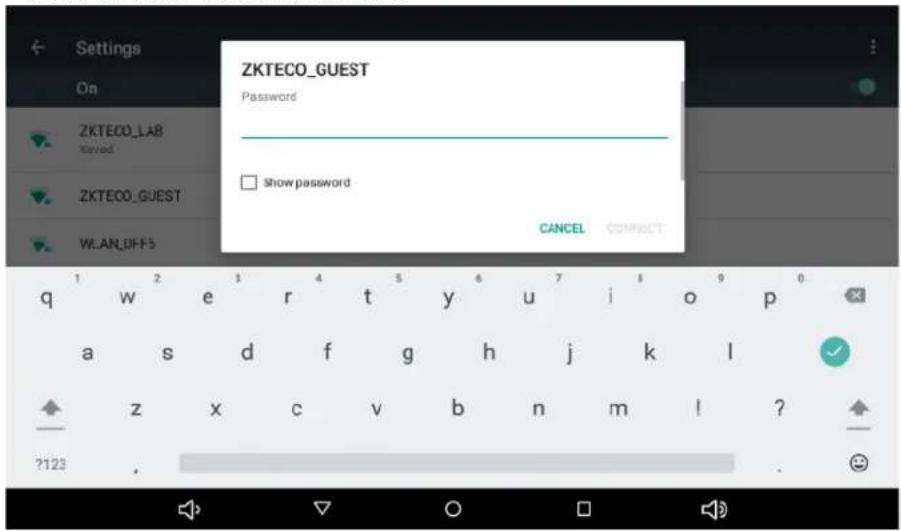
In the Network section of the system settings, the NTP time server and SSH server of the device can be configured. Refer to your ZKTeco distributer for more information.
9.3. Test Hardware
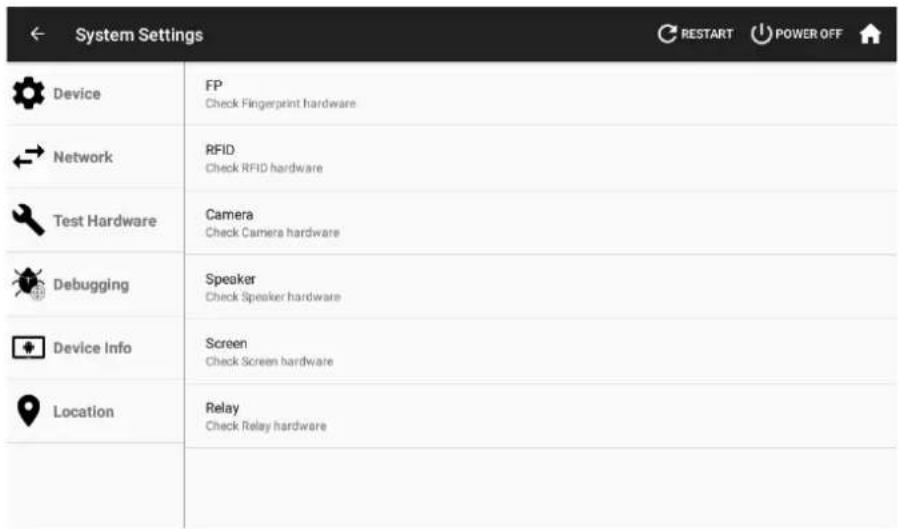
In this section, a test of all the hardware parameters can be performed. In case of any issues with the hardware of the device refer to this section in order to test the functionality.
9.4. Device Info
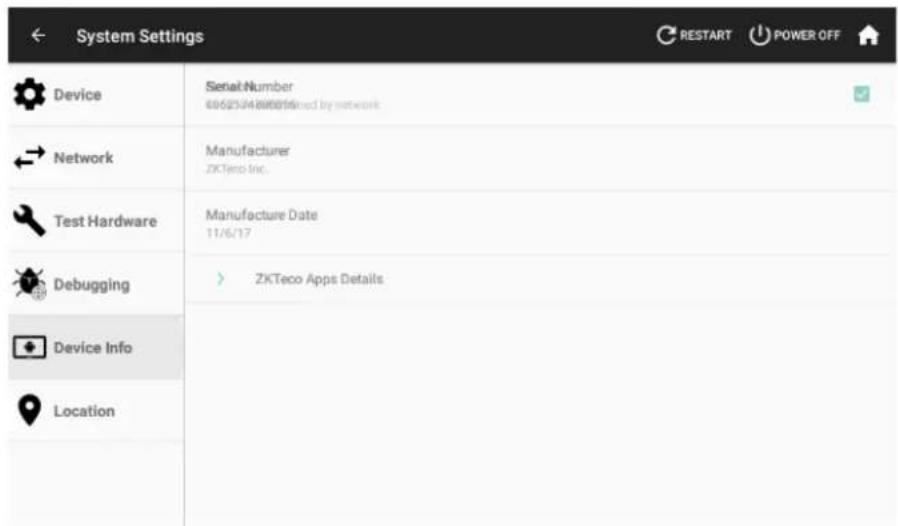
Actual device info such as Serial number, manufacture date, app version and percentage of memory and storage use is shown on this section.
9.5. Location
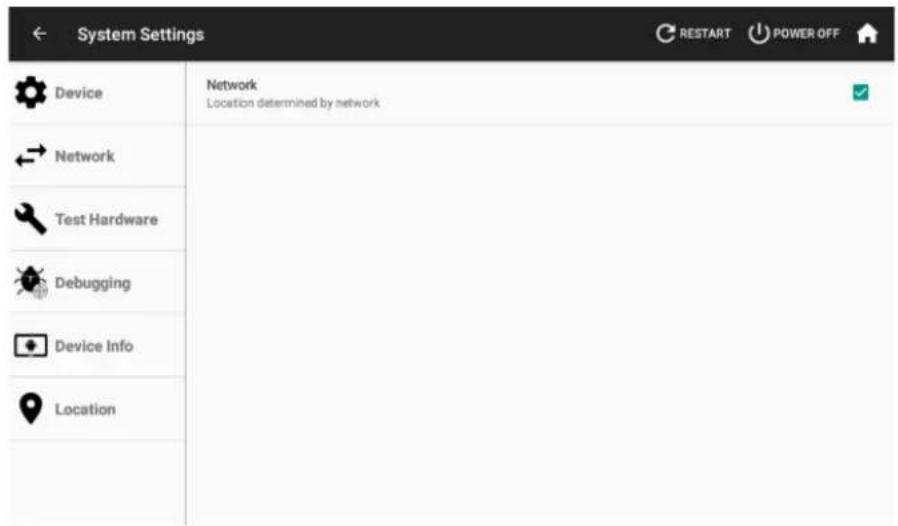
The gathering of location information by the device is activated on this section. If the location is disabled, the Save Punch Location option in the T&A Settings will not work.
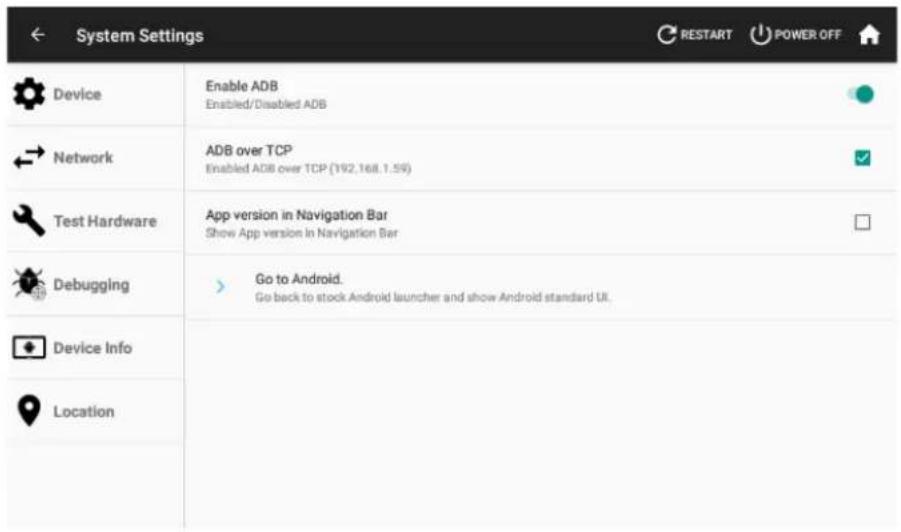
Developer-only information is shown on this section. Do not enter unless specifically directed by your ZKTeco distributor.
10. Firmware Updater
This section explains the process of the update of the ZPad Plus device. As the development of the ZPad Plus continues, new versions of the apps will be available. The process of updating this apps is handled by the firmware updater. It is important not to use this app unless specifically directed by your ZKTeco distributor.
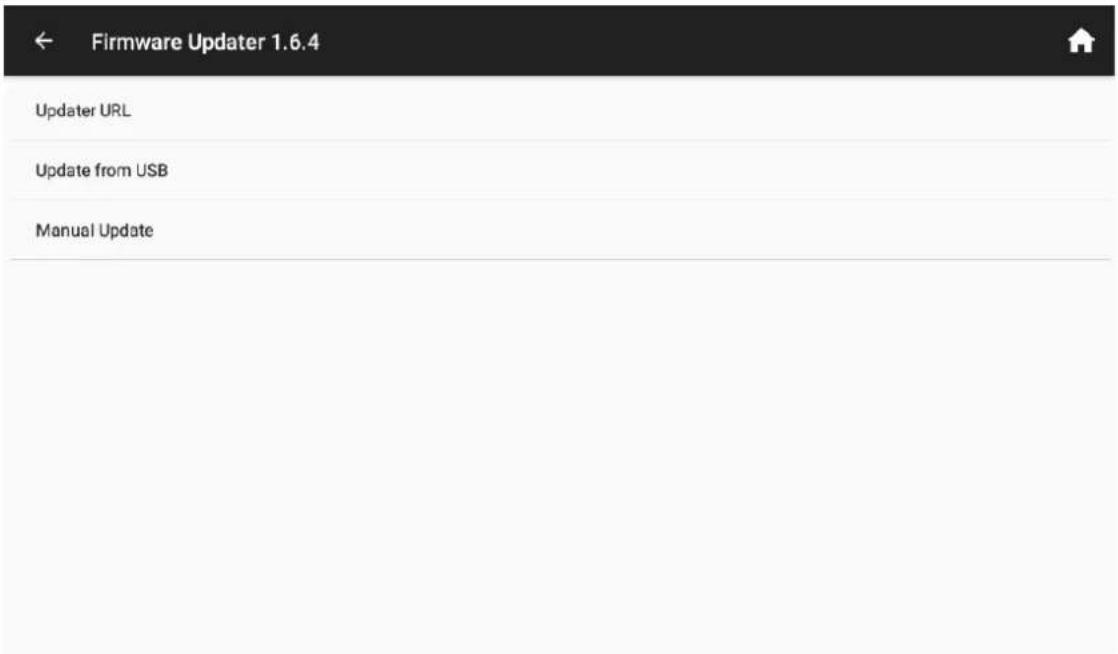
Updater URL. Internet address where app updates will be looked for.
Update from USB. Look for updates in a USB-drive connected to the device.
Manual Update. Execute the update from APK files already present in the device.
- Important Claim
- Table of Contents
- Device operation
- Finger Placement
- How to use touch screen
- Card Placement
- Desktop Screen
- Punching Operation
- 1:N Verification
- 1:1 Verification
- Force Attendance Event Selection
- Applications
- Employee Management
- Add a New Employee
- Fingerprint Enroll
- Card Enroll
- Password Enroll
- Edit existing employee
- Delete a registered employee.
- T&A Records
- Messages Management
- Add a New Message
- Message Display
- Messages Edit
- Messages Delete
- Attendance Events Management
- Add a New Attendance Event
- + Events
- Edit an Attendance Event
- Delete an Attendance Event
- Roles Management
- Add a New Role
- Editing an Existing Role
- Deleting an Existing Role
- T&A Settings
- Punch Settings
- Manage Data
- Push Settings
- Web Server
- Relay Settings
- Relay as a door
- Relay as a siren
- Data Info
- System Settings
- General Settings
- Date&Time
- Network
- Wired Ethernet.
- Wi-Fi
- Test Hardware
- Device Info
- Location
- Firmware Updater
Brand : ZKTeco
Model : ZPad Plus RFID
Category : Access Control System