ML-56 COB CW - Machine à effets Eurolite - Free user manual and instructions
Find the device manual for free ML-56 COB CW Eurolite in PDF.


| Product Type | LED Spotlight (Effect Machine) |
| Model | Eurolite ML-56 COB CW |
| Light Source | 1 x 100W COB LED (Cold White) |
| Color Temperature | 2900 - 6000 K (adjustable via warm white blend) |
| Beam Angle | 35° |
| DMX Channels | 4 |
| DMX Connection | 3-pin XLR |
| Control Modes | DMX512, Stand-alone, Master/Slave |
| Functions | Dimmer, Strobe (adjustable speed), CW/WW color blend, dimmer speed adjustment |
| Display | LED display with 4 buttons |
| Power Supply | 100-240 V AC, 50/60 Hz (switch-mode) |
| Power Consumption | 90 W |
| Dimensions (L x W x H) | 255 x 290 x 320 mm |
| Weight | 3.6 kg |
| Mounting | Floor stand via bracket, overhead rigging with safety bond |
| Minimum Distance to Flammable Surfaces | 0.50 m |
| Minimum Distance to Lighted Object | 0.30 m |
| Cooling | Passive (convection), ensure 50 cm clearance |
| Maximum Ambient Temperature | 45°C |
| Protection Class | I (grounded) |
| Cleaning | Use soft dry cloth; disconnect from mains before cleaning |
| Spare Parts & Accessories | Barndoors, Fresnel lens, filter frame, safety bond, DMX cables, flightcases |
| Included Items | Power cord with safety plug, color filter frame |
Frequently Asked Questions - ML-56 COB CW Eurolite
User questions about ML-56 COB CW Eurolite
0 question about this device. Answer the ones you know or ask your own.
Ask a new question about this device
Download the instructions for your Machine à effets in PDF format for free! Find your manual ML-56 COB CW - Eurolite and take your electronic device back in hand. On this page are published all the documents necessary for the use of your device. ML-56 COB CW by Eurolite.
USER MANUAL ML-56 COB CW Eurolite
natural_image
Line drawing of a mechanical device with no visible text or symbolsInhaltsverzeichnis
Table of contents
Deutsch
EINFÜHRUNG 3
Master/Slave Modus 10
Control Board 10
SAFETY INSTRUCTIONS 13
OPERATING DETERMINATIONS.... 15
DESCRIPTION 16
Features 16
Overview 16
INSTALLATION 17
Overhead rigging.... 17
Connection with the mains....18
DMX-512 connection / connection between fixtures.... 19
OPERATION 19
Stand-alone mode....19
Master/Slave-operation....19
Control Board 20
DMX-controlled operation 20
CONTROLLING: 20
DMX-protocol 21
CLEANING AND MAINTENANCE 21
TECHNICAL SPECIFICATIONS....22
This user manual is valid for the article numbers 41607370, 41607371
Keep this device away from rain and moisture! Unplug mains lead before opening the housing!
For your own safety, please read this user manual carefully before you initially start-up.
Every person involved with the installation, operation and maintenance of this device has to
- be qualified
- follow the instructions of this manual
- consider this manual to be part of the total product
- keep this manual for the entire service life of the product
- pass this manual on to every further owner or user of the product
- download the latest version of the user manual from the Internet
INTRODUCTION
Thank you for having chosen a EUROLITE LED ML-56 COB CW/WW 100W Floor. If you follow the instructions given in this manual, we are sure that you will enjoy this device for a long period of time.
Unpack your LED ML-56 COB CW/WW 100W Floor.
SAFETY INSTRUCTIONS
CAUTION!
Be careful with your operations. With a dangerous voltage you can suffer a dangerous electric shock when touching the wires!
This device has left our premises in absolutely perfect condition. In order to maintain this condition and to ensure a safe operation, it is absolutely necessary for the user to follow the safety instructions and warning notes written in this user manual.

Important:
Damages caused by the disregard of this user manual are not subject to warranty. The dealer will not accept liability for any resulting defects or problems.
If the device has been exposed to drastic temperature fluctuation (e.g. after transportation), do not switch it on immediately. The arising condensation water might damage your device. Leave the device switched off until it has reached room temperature.
English
Please make sure that there are no obvious transport damages. Should you notice any damages on the A/C connection cable or on the casing, do not take the device into operation and immediately consult your local dealer.
This device falls under protection-class I. The power plug must only be plugged into a protection class I outlet. The voltage and frequency must exactly be the same as stated on the device. Wrong voltages or power outlets can lead to the destruction of the device and to mortal electrical shock.
Always plug in the power plug last. The power plug must always be inserted without force. Make sure that the plug is tightly connected with the outlet.
Never let the power-cord come into contact with other cables! Handle the power-cord and all connections with the mains with particular caution! Never touch them with wet hands, as this could lead to mortal electrical shock.
Never modify, bend, strain mechanically, put pressure on, pull or heat up the power cord. Never operate next to sources of heat or cold. Disregard can lead to power cord damages, fire or mortal electrical shock.
The cable insert or the female part in the device must never be strained. There must always be sufficient cable to the device. Otherwise, the cable may be damaged which may lead to mortal damage.
Make sure that the power-cord is never crimped or damaged by sharp edges. Check the device and the power-cord from time to time.
If extension cords are used, make sure that the core diameter is sufficient for the required power consumption of the device. All warnings concerning the power cords are also valid for possible extension cords.
Always disconnect from the mains, when the device is not in use or before cleaning it. Only handle the power-cord by the plug. Never pull out the plug by tugging the power-cord. Otherwise, the cable or plug can be damaged leading to mortal electrical shock. If the power plug or the power switch is not accessible, the device must be disconnected via the mains.
If the power plug or the device is dusty, the device must be taken out of operation, disconnected and then be cleaned with a dry cloth. Dust can reduce the insulation which may lead to mortal electrical shock. More severe dirt in and at the device should only be removed by a specialist.
There must never enter any liquid into power outlets, extension cords or any holes in the housing of the device. If you suppose that also a minimal amount of liquid may have entered the device, it must immediately be disconnected. This is also valid, if the device was exposed to high humidity. Also if the device is still running, the device must be checked by a specialist if the liquid has reduced any insulation. Reduced insulation can cause mortal electrical shock.
There must never be any objects entering into the device. This is especially valid for metal parts. If any metal parts like staples or coarse metal chips enter into the device, the device must be taken out of operation and disconnected immediately. Malfunction or short-circuits caused by metal parts may cause mortal injuries.
HEALTH HAZARD!
Never look directly into the light source, as sensitive persons may suffer an epileptic shock (especially meant for epileptics)!
Keep away children and amateurs!
Never leave this device running unattended.
OPERATING DETERMINATIONS
This device is a lighting effect for creating decorative effects. This product is allowed to be operated with an alternating voltage of 100-240 V, 50/60 Hz and was designed for indoor use only.
This device is designed for professional use, e.g. on stages, in discotheques etc.
Lighting effects are not designed for permanent operation. Consistent operation breaks will ensure that the device will serve you for a long time without defects.
Do not shake the device. Avoid brute force when installing or operating the device.
When choosing the installation-spot, please make sure that the device is not exposed to extreme heat, moisture or dust. There should not be any cables lying around. You endanger your own and the safety of others!
This device must never be operated or stockpiled in surroundings where splash water, rain, moisture or fog may harm the device. Moisture or very high humidity can reduce the insulation and lead to mortal electrical shocks. When using smoke machines, make sure that the device is never exposed to the direct smoke jet and is installed in a distance of 0.5 meters between smoke machine and device. The room must only be saturated with an amount of smoke that the visibility will always be more than 10 meters.
The ambient temperature must always be between -5^ C and +45^ C. Keep away from direct sunlight (particularly in cars) and heaters.
The relative humidity must not exceed 50 % with an ambient temperature of 45^ C.
This device must only be operated in an altitude between -20 and 2000 m over NN.
Never use the device during thunderstorms. Over voltage could destroy the device. Always disconnect the device during thunderstorms.
The symbol ·s m determines the minimum distance from lighted objects. The minimum distance between light-output and the illuminated surface must be more than this value.
This device is only allowed for an installation via the mounting bracket. In order to safeguard sufficient ventilation, leave 50 cm of free space around the device.
The housing must never touch surrounding surfaces or objects.
Make sure that the area below the installation place is blocked when rigging, derigging or servicing the fixture.
Always fix the fixture with an appropriate safety bond.
The maximum ambient temperature T_a = 45^ C must never be exceeded.
Operate the device only after having become familiarized with its functions. Do not permit operation by persons not qualified for operating the device. Most damages are the result of unprofessional operation!
Never use solvents or aggressive detergents in order to clean the device! Rather use a soft and damp cloth.
Please use the original packaging if the device is to be transported. Make sure that you pack the device in the original state.
Please consider that unauthorized modifications on the device are forbidden due to safety reasons!
Never remove the serial barcode from the device as this would make the guarantee void.
If this device will be operated in any way different to the one described in this manual, the product may suffer damages and the guarantee becomes void. Furthermore, any other operation may lead to dangers like short-circuit, burns, electric shock, crash etc.
DESCRIPTION
Features
COB spot with100 W LED in cold and warm white
• Equipped with a 100 W LED in CW/WW
- Flicker-free projection
- Functions: CW/WW color blend, dimmer and strobe effect with adjustable speed
- Dimmer speed (step response) adjustable
- DMX-controlled operation or stand-alone operation with Master/Slave function
- Beam angle 35^
- Addressing and setting via Control Board with LED display and four operating buttons
- Ideal as floor spot via additional bracket
- Locking possibility at the brackets
- With color filter frame
- Optional barndoors available
- Ready for connection with power cord and safety plug
- Switch-mode power supply for operation between 100 and 240 Volts
- DMX512 control possible via any commercial DMX controller
• Available in silver or in black
Overview
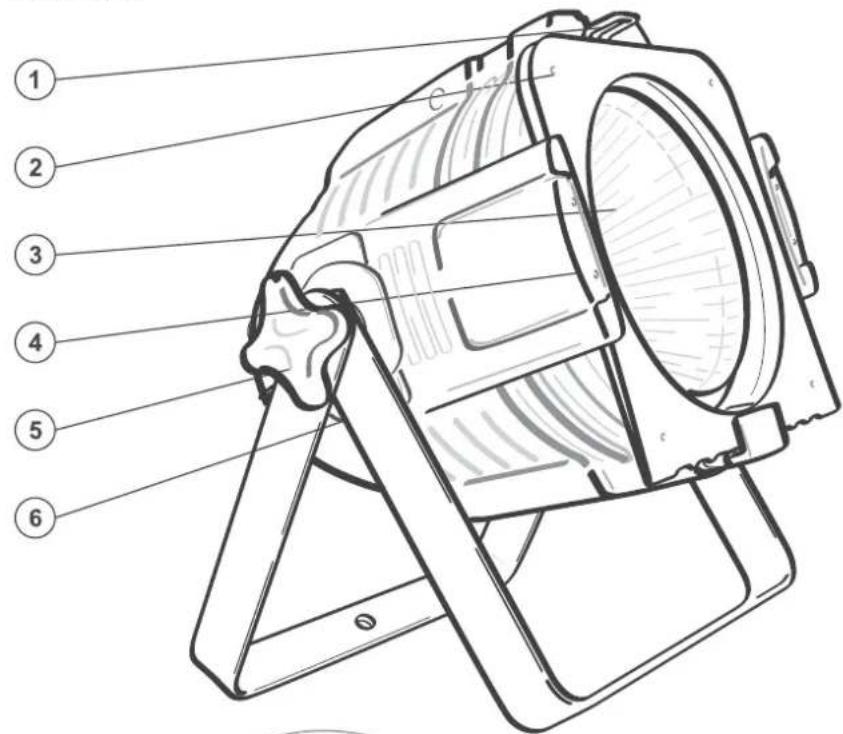
(1) Clamp mounting for color filter frame
(2) Color filter frame
(3) LED
(4) Clip for color filter frame
(5) Fixation screw
(6) Floor stand/mounting bracket
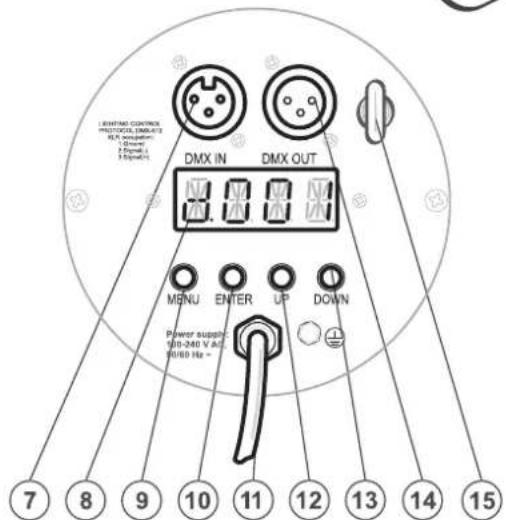
(7) DMX Input
(8) Display
(9) Menu button
(10) Enter button
(11) Power supply
(12) Up button
(13) Down button
(14) DMX Output
(15) Attachment eyelet
INSTALLATION
Overhead rigging
DANGER TO LIFE!
Please consider the EN 60598-2-17 and the respective national standards during the installation! llation must only be carried out by an authorized dealer!
The installation of the device has to be built and constructed in a way that it can hold 10 times the weight for 1 hour without any harming deformation.
The installation must always be secured with a secondary safety attachment, e.g. an appropriate catch net. This secondary safety attachment must be constructed in a way that no part of the installation can fall down if the main attachment fails.
When rigging, derigging or servicing the device staying in the area below the installation place, on bridges, under high working places and other endangered areas is forbidden.
The operator has to make sure that safety-relating and machine-technical installations are approved by an expert before taking into operation for the first time and after changes before taking into operation another time.
The operator has to make sure that safety-relating and machine-technical installations are approved by an expert after every four year in the course of an acceptance test.
The operator has to make sure that safety-relating and machine-technical installations are approved by a skilled person once a year.
Procedure:
The device should be installed outside areas where persons may walk by or be seated.
IMPORTANT! OVERHEAD RIGGING REQUIRES EXTENSIVE EXPERIENCE, including (but not limited to) calculating working load limits, installation material being used, and periodic safety inspection of all installation material and the device. If you lack these qualifications, do not attempt the installation yourself, but instead use a professional structural rigger. Improper installation can result in bodily injury and or damage to property.
The device has to be installed out of the reach of people.
If the device shall be lowered from the ceiling or high joists, professional trussing systems have to be used. The device must never be fixed swinging freely in the room.
Caution: Devices in hanging installations may cause severe injuries when crashing down! If you have doubts concerning the safety of a possible installation, do NOT install the device!
Before rigging make sure that the installation area can hold a minimum point load of 10 times the device's weight.
DANGER OF FIRE!
When installing the device, make sure there is no highly-inflammable material (decoration articles, etc.) within a distance of min. 0.5 m.
Mount the device with both brackets to your trussing system using an appropriate clamp.
For overhead use, always install an appropriate safety bond.
You must only use safety bonds and quick links complying with DIN 56927, shackles complying with DIN EN 1677-1 and BGV C1 carbines. The safety bonds, quick links, shackles and the carbines must be sufficiently
English
dimensioned and used correctly in accordance with the latest industrial safety regulations (e. g. BGV C1, BGI 810-3).
Please note: for overhead rigging in public or industrial areas, a series of safety instructions have to be followed that this manual can only give in part. The operator must therefore inform himself on the current safety instructions and consider them.
The manufacturer cannot be made liable for damages caused by incorrect installations or insufficient safety precautions!
Pull the safety bond through the attachment eyelet and over the trussing system or a safe fixation spot. Insert the end in the quick link and tighten the safety screw.
The maximum drop distance must never exceed 20 cm.
A safety bond which already held the strain of a crash or which is defective must not be used again.
Adjust the desired inclination-angle via the mounting-bracket and tighten the fixation screws.
DANGER TO LIFE!
Before taking into operation for the first time, the installation has to be approved by an expert!
Connection with the mains
Connect the device to the mains with the power-plug.
The occupation of the connection-cables is as follows:
| Cable | Pin | International |
| Brown | Live | L |
| Blue | Neutral | N |
| Yellow/Green | Earth |
The earth has to be connected!
If the device will be directly connected with the local power supply network, a disconnection switch with a minimum opening of 3 mm at every pole has to be included in the permanent electrical installation.
The device must only be connected with an electric installation carried out in compliance with the IEC-standards. The electric installation must be equipped with a Residual Current Device (RCD) with a maximum fault current of 30 mA.
Lighting effects must not be connected to dimming-packs.
DMX-512 connection / connection between fixtures

The wires must not come into contact with each other, otherwise the fixtures will not work at all, or will not work properly.

Please note, the starting address depends upon which controller is being used.

Only use a DMX-cable and 3-pin XLR-plugs and connectors in order to connect the controller with the fixture or one fixture with another.
Occupation of the XLR-connection:
DMX-output
XLR mounting-socket:
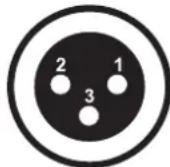
1: Ground
2: Signal (−)
3: Signal (+)
DMX-input
XLR mounting-plug:
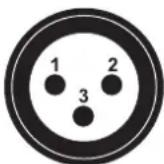
1: Ground
2: Signal (−)
3: Signal (+)
If you are using controllers with this occupation, you can connect the DMX-output of the controller directly with the DMX-input of the first fixture in the DMX-chain. If you wish to connect DMX-controllers with other XLR-outputs, you need to use adapter-cables.
Building a serial DMX-chain:
Connect the DMX-output of the first fixture in the DMX-chain with the DMX-input of the next fixture. Always connect one output with the input of the next fixture until all fixtures are connected.
Caution: At the last fixture, the DMX-cable has to be terminated. Plug the terminator with a 120 Ω resistor between Signal (−) and Signal (+) in the DMX-output of the last fixture.
OPERATION
After you connected the spot to the mains, the LED ML-56 COB CW/WW 100W Floor starts running.
The display lights up and you can choose the desired mode via the buttons MODE, ENTER, UP, DOWN.
The device has two operating modes. It can be operated in Stand Alone or in DMX-controlled mode.
Stand-alone mode
In the stand-alone mode, you can do without a controller. Disconnect the EUROLITE LED ML-56 COB CW/WW 100W Floor from the controller and call the desired setting. Please refer to the instructions under Control Board.
Master/Slave-operation
The master/slave-operation enables that several devices can be synchronized and controlled by one master-device.
On the rear of the LED ML-56 COB CW/WW 100W Floor you can find an XLR-jack (DMX Out) and an XLR-plug (DMX In), which can be used for connecting several devices.
English
Choose the device which is to control the effects. Set the desired Master-mode on the master-device. This device then works as master-device and controls all other slave-devices, which are to be connected to the master-device via a DMX cable. Connect the DMX out connectors with the DMX input plug of the next device.
Set the Slave-mode on every slave-device. Please refer to the instructions under Control Board.
Control Board
The Control Board offers several features: you can simply set the starting address, run the pre-programmed program or select a DMX channel mode.
Browse through the menu by pressing Menu. Press Enter in order to select the desired menu. You can change the selection by pressing Up or Down. Press Enter in order to confirm. You can leave every mode by pressing Menu. The functions provided are listed in the following sections.
| Menu | Sub menu | Description | |
| STAT | C.000 | 000-255 | Dimmer intensity of LED colorsC = Cold White (CW), W = Warm White(WW)Strobe effect 0 – 20 (increasing) |
| W.000 | 000-255 | ||
| ST.00 | 00-20 | ||
| RUN | DMX | DMX controlled mode | |
| SLAV | Slave mode | ||
| DMX | d001-512 | DMX address settingDefault setting : 001 | |
| TEMP | CURR | Temperature inside of the device | |
| SET | DIM | OFF | Dimmer speed (step response)Off : Response characteristics of LEDsDIM 1: Response characteristics of halogen lamps, fastDIM 2: Response characteristics of halogen lamps, middleDIM 3: Response characteristics of halogen lamps, slowDIM 4: Response characteristics of halogen lamps, very slow |
| DIM1 | |||
| DIM2 | |||
| DIM3 | |||
| DIM4 | |||
DMX-controlled operation
You can control the devices individually via your DMX-controller. Every DMX-channel has a different occupation with different features.
The Control Board allows you to assign the DMX fixture address, which is defined as the first channel from which the LED ML-56 COB CW/WW 100W Floor will respond to the controller.
Please, be sure that you don't have any overlapping channels in order to control each LED ML-56 COB CW/WW 100W Floor correctly and independently from any other fixture on the DMX-chain.
If several LED ML-56 COB CW/WW 100W Floor are addressed similarly, they will work synchronically.
If you set, for example, the address to channel 5, the device will use the channels 5 to 8 for control.
Controlling:
After having addressed the LED ML-56 COB CW/WW 100W Floor, you may now start operating it via your lighting controller.
Note:
After switching on, the device will automatically detect whether DMX 512 data is received or not. If there is data received at the DMX-input, a dot will flash on the display. If there is no data received, the dot will not flash.
This situation can occur if:
- the XLR plug (cable with DMX signal from controller) is not connected with the input of the device.
- the controller is switched off or defective, if the cable or connector is defective or the signal wires are swap in the input connector.
DMX-protocol
| Channel | Decimal | Hexad. | Percentage | S/F | Feature | |||
| 1 | Dimmer intensity | |||||||
| 0 | 255 | 00 | FF | 0% | 100% | F | Gradual adjustment of the dimmer intensity from 0 to 100 % | |
| 2 | Cold White | |||||||
| 0 | 255 | 00 | FF | 0% | 100% | F | Cold White 0 - 100 % increasing | |
| 3 | Warm White | |||||||
| 0 | 255 | 00 | FF | 0% | 100% | F | Warm White 0 - 100 % increasing | |
| 4 | Strobe | |||||||
| 0 | 10 | 00 | 0A | 0% | 4% | S | No function | |
| 11 | 255 | 0B | FF | 4% | 100% | F | Strobe-effect with increasing speed | |
CLEANING AND MAINTENANCE
DANGER TO LIFE!
Disconnect from mains before starting maintenance operation!
We recommend a frequent cleaning of the device. Please use a soft lint-free and moistened cloth. Never use alcohol or solvents!
There are no serviceable parts inside the device. Maintenance and service operations are only to be carried out by authorized dealers.
Should you need any spare parts, please use genuine parts.
If the power supply cable of this device becomes damaged, it has to be replaced by authorized dealers only in order to avoid hazards.
Should you have further questions, please contact your dealer.
TECHNICAL SPECIFICATIONS
| Power supply: 100-240 V AC, 50/60 Hz ~ | |
| Power consumption: 90 W | |
| DMX control channels: 4 | |
| DMX512 connection: 3-pin XLR | |
| Flash-rate: | 17 |
| Number of LEDs: 1 | |
| LED type: Array Cluster 100 W, CW/WW | |
| Color temperature: 2900 - 6000 K | |
| Beam angle: 35° | |
| Dimensions (LxWxH): 255 x 290 x 320 mm | |
| Weight: | 3.6 |
| Maximum ambient temperature T_a : | 45°C |
| Maximum housing temperature T_c : | 55°C |
| Min.distance from flammable surfaces: 0.50 m | |
| Min.distance to lighted object: 0.30 m | |
| Accessory: | |
| Barndoors LED ML-56 spot bk No. 51913698 | |
| Fresnel lens for LED COB ML-56, black | No. 51913841 |
| Filter frame 189x189mm, bk | No. 51913686 |
| TPC-10 Coupler, silver | No. 59006856 |
| Safety bond AG-5 3x600mm up to 5kg | No. 58010360 |
| DMX cable XLR 3pin 5m bl | No. 3022785K |
| DMX cable XLR 3pin 5m bk Neutrik | No. 30227812 |
| DMX cable XLR 3pin 5m bk Hicon | No. 30307458 |
| DMX cable XLR 3pin 5m bk Neutrik | No. 30307471 |
| Flightcase for 8x ML-56/ML-64 | No. 31000620 |
| Flightcase for 8x PAR-64/ML-56 | No. 31000820 |
Hz
kg
Please note: Every information is subject to change without prior notice. 04.12.2015 ©
- Inhaltsverzeichnis
- Table of contents
- Deutsch
- INTRODUCTION
- SAFETY INSTRUCTIONS
- CAUTION!
- Important:
- English
- HEALTH HAZARD!
- OPERATING DETERMINATIONS
- DESCRIPTION
- Features
- COB spot with100 W LED in cold and warm white
- INSTALLATION
- Overhead rigging
- DANGER TO LIFE!
- Procedure:
- DANGER OF FIRE!
- Connection with the mains
- DMX-512 connection / connection between fixtures
- Occupation of the XLR-connection:
- Building a serial DMX-chain:
- OPERATION
- Stand-alone mode
- Master/Slave-operation
- Control Board
- DMX-controlled operation
- Controlling:
- Note:
- CLEANING AND MAINTENANCE
- TECHNICAL SPECIFICATIONS
Brand : Eurolite
Model : ML-56 COB CW
Category : Machine à effets