
Design Personal Pro 41039 - Blender Gastroback - Free user manual and instructions
Find the device manual for free Design Personal Pro 41039 Gastroback in PDF.


| Product Type | Personal Blender |
| Model | Design Personal Blender Pro (Art.-No. 41039) |
| Power Supply | 230 V AC, 50 Hz |
| Maximum Power Consumption | 1000 W |
| Motor Base Dimensions (W x D x H) | Approx. 15.2 cm x 15.2 cm x 17.6 cm |
| Weight (motor base only) | Approx. 2.32 kg |
| Power Cord Length | Approx. 110 cm |
| Jar Capacity (large) | 0.7 L |
| Jar Capacity (small) | 0.5 L |
| Jar Material | BPA-free Eastman Tritan™ copolyester (impact and shatter resistant) |
| Grinding Jar Material | Stainless steel (for dry ingredients only) |
| Blade Assembly | Stainless steel, sharp blades, contoured base, serrated central blades |
| Motor Base Features | 1000 W high velocity motor, rubber feet, rear ventilation slots |
| Safety Features | Interlock mechanism, thermal safety switch, safety lock |
| Self-Cleaning Function | Yes, run with cold water for up to 10 seconds |
| Dishwasher Safe Parts | Jars, lids, and blade assembly (top rack only) |
| Accessories Included | 3 leak-free sealing lids with flap, 1 large jar (0.7 L), 2 small jars (0.5 L), 1 stainless steel grinding jar, blade assembly |
Frequently Asked Questions - Design Personal Pro 41039 Gastroback
User questions about Design Personal Pro 41039 Gastroback
0 question about this device. Answer the ones you know or ask your own.
Ask a new question about this device
Download the instructions for your Blender in PDF format for free! Find your manual Design Personal Pro 41039 - Gastroback and take your electronic device back in hand. On this page are published all the documents necessary for the use of your device. Design Personal Pro 41039 by Gastroback.
USER MANUAL Design Personal Pro 41039 Gastroback
natural_image
Product photo of a kitchen blender with clear plastic and black lid (no visible text or symbols)natural_image
Product photo of a ASTROBACK blender with green, black, and red color filters, accompanied by small food containers and a hand holding a clear drink (no text or symbols visible on main objects)IHREN »DESIGN PERSONAL BLENDER PRO« KENNENLERNEN
natural_image
Two glass containers filled with fresh green and yellow fruit, one with a lid and the other with a clear liquid (no text or symbols visible)GASTROBACK®
Operating Instructions
natural_image
Product photo of a kitchen blender with clear plastic and black lid (no visible text or symbols)Art.-No. 41039 »Design Personal Blender Pro«
Read all provided instructions before first use!
Model and attachments are subject to change!
For household use only!

We attach a certain importance to your safety. Thus, we ask you to read all provided instructions and information in this booklet carefully and completely, before you start running the appliance. This will help you to know all functions and properties of your new appliance. We especially ask you to adhere strictly to the safety information mentioned in these instructions.
TABLE OF CONTENTS
Knowing Your New »Design Personal Blender Pro« 32
Important Safeguards 34
General Safety Instructions 34
Important Safeguards for Electrical Appliances 36
Moving Parts—Risk of Injuries 37
Technical Specifications 38
Properties of Your New »Design Personal Blender Pro« 38
Tips for Best Results 40
Before First Use....41
Operation 42
Solving Problems 45
Care and Cleaning 47
Storage....49
Notes for Disposal 50
Information and Service....51
Warranty 51
DEAR CUSTOMER!
Congratulations! Your new »Design Personal Blender Pro« will make the preparation of your dishes and delightful beverages much more easier.
The »Design Personal Blender Pro« is a high powered innovative tool with a compact design and outstanding performance. It is perfect for ice crushing, chopping, blending, and nutrient and vitamin extraction. Blend To Go with the convenient, leak-free sealing lid. Create your delicious favourite drinks in a rush and be out the door in time!
These instructions for use will inform you about the various functions and features which makes it easy to take pleasure in your new »Design Personal Blender Pro«.
natural_image
Product photo of a kitchen blender with green, black, and red shades, accompanied by a hand holding a glass (no text or symbols visible)KNOWING YOUR NEW »DESIGN PERSONAL BLENDER
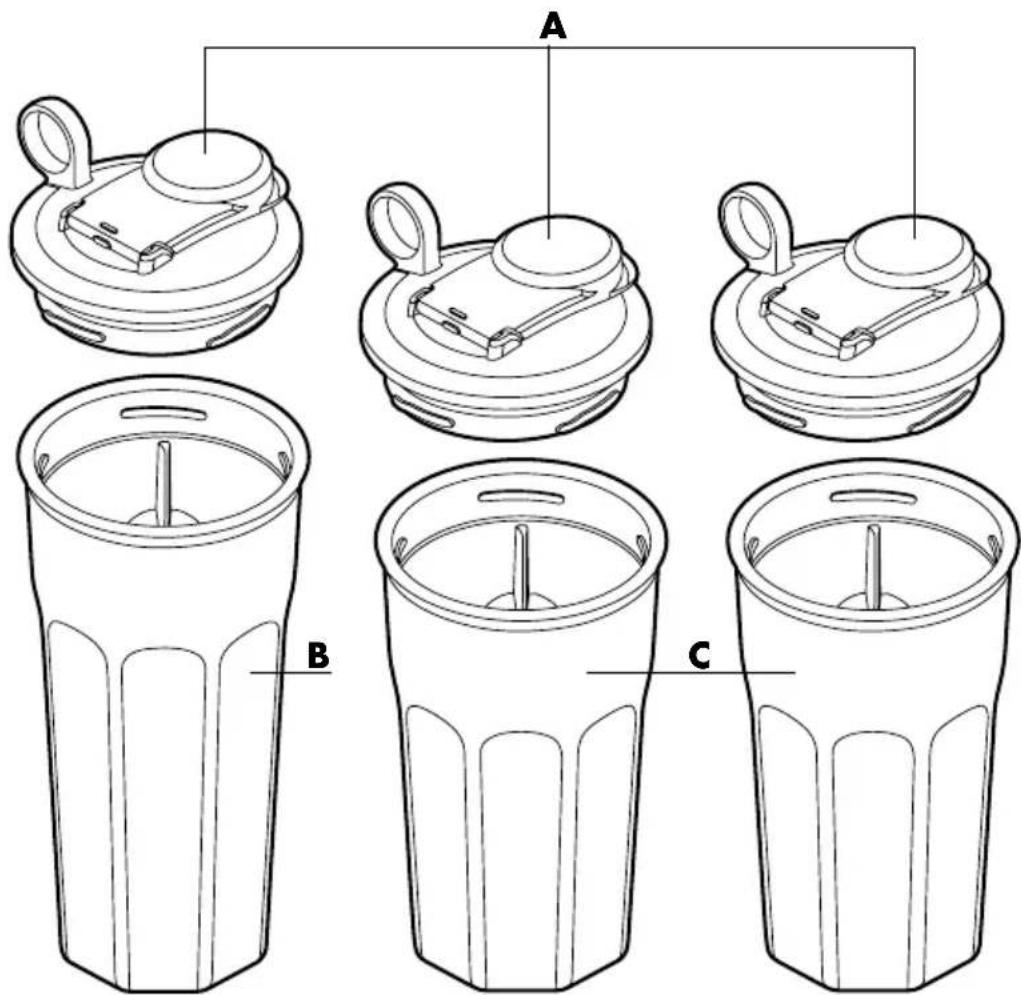
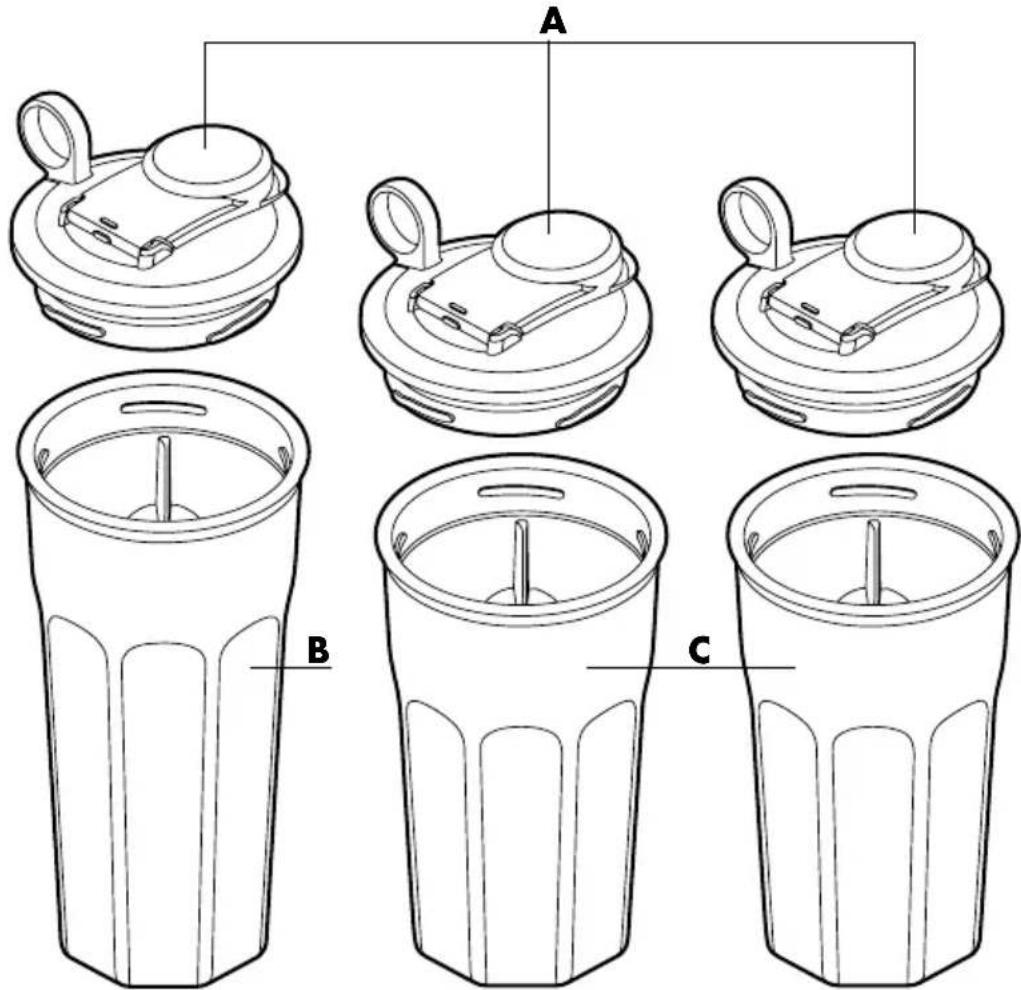
A 3 leak-free sealing lids with flap – simply fold up the flap to pour
B 1 large jar* - 0.7 litres
c 2 Small jars* - 0.5 litres
* The jars are made of BPA free and especially tough Eastman Tritan™ copolyester, withstanding extreme use and repeated dishwasher cleaning. Tritan™ is impact and shatter resistant and will stay clear and durable even after hundreds of cycles of dishwasher cleaning.
Tip:
The lids and jars are interchangeable to your like. If you wish to purchase additional jars and lids, contact your vendor.
natural_image
Line drawing of a conical object with vertical ridges (no text or symbols)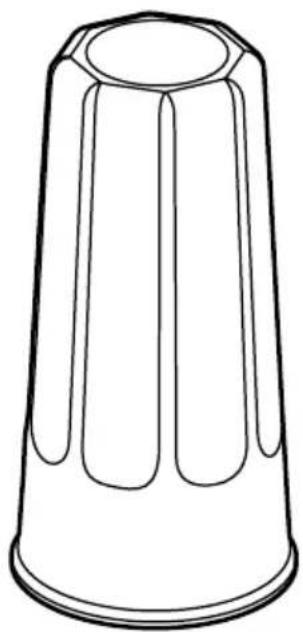
natural_image
Line drawing of a conical object with vertical ridges (no text or symbols)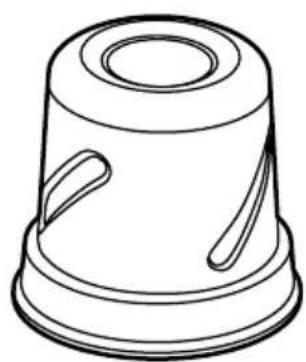
natural_image
Line drawing of a conical mechanical component with two side slots (no text or symbols)E
natural_image
Technical line drawing of a mechanical component with a central hub and four blades (no text or symbols)F
natural_image
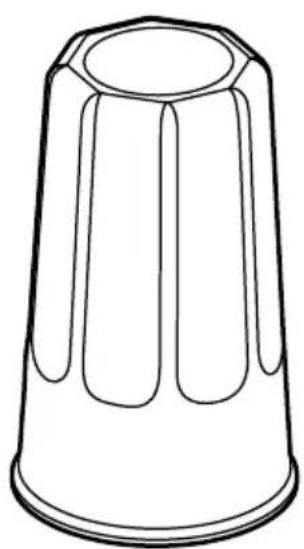
Technical line drawing of a cylindrical mechanical component with internal features (no text or symbols)D Durable stainless steel grinding jar – grind fresh nuts, protein powder, seeds and spices in appropriate batches
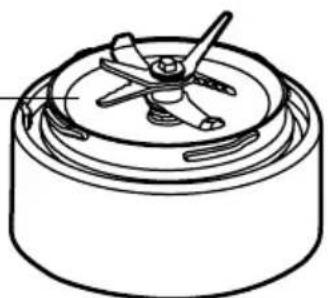
E Blade assembly—for crushing, chopping and mixing in a rush
The knives are contoured to the base of the blade assembly to create a rapid circulation; serrated central blades ensure extra cutting performance.
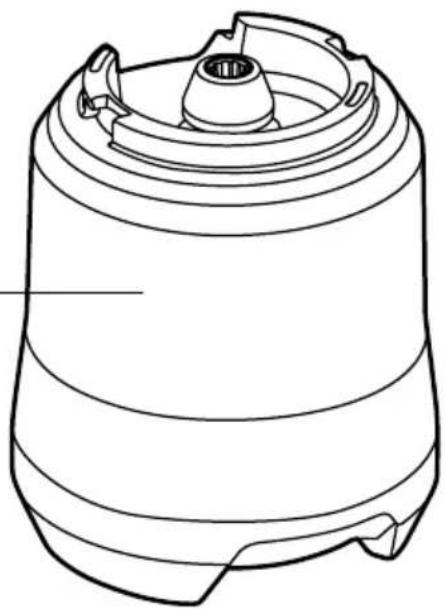
F Powerful high velocity 1000 W motor base
Rubber feet ensure a stable stand on smooth surfaces
IMPORTANT SAFEGUARDS
Carefully read all instructions before operating this appliance and save for further reference. Do not attempt to use this appliance for any other than the intended use, described in these instructions. Any other use, especially misuse, can cause severe injuries or damage by electric shock, moving parts, or fire.
These instructions are an essential part of the appliance. Do not pass the appliance without this booklet to third parties.
Any operation, repair and technical maintenance of the appliance or any part of it other than described in these instructions may only be performed at an authorised service centre. Please contact your vendor.
GENERAL SAFETY INSTRUCTIONS
- This appliance is for household use only and NOT intended for use in moving vehicles. Do not operate or store the appliance in humid or wet areas or outdoors. Any use of accessories, attachments or spare parts that are not recommended by the manufacturer or damaged in any way may result in injuries to persons and/or damage.
- Check the entire appliance regularly for proper operation (e.g. check for distortion, discolouration, cracks, leaks, worn out seals, corroded pins of the power plug). Do not operate the appliance, when liquids are on the motor base or accumulate beneath the appliance. Do not operate the appliance, when the appliance or any part of it is likely to be damaged, to avoid risk of fire, electric shock or any other injuries to persons and/or damage. The appliance or its parts are likely to be damaged, if the appliance has been subject to inadmissible strain (e.g. over heating, mechanical or electric shock), or if there are any cracks (e.g. jar is broken, cracked or leaking), excessively frayed or melted parts (e.g. threads, seals), or distortions, or if the appliance is not working properly. If one of these cases occur during operation, immediately unplug the appliance, and get in contact with an authorized service centre for examination and/or repair. Do not attempt to use the appliance when it is damaged. Do not attempt to open the motor base.
- Operate the appliance on a well accessible, stable, level, dry, and suitable large table or counter that is resistant against water, heat and fat.
- Always keep the appliance and the table or counter clean and dry, and wipe off spilled liquids immediately. Do not place any clothes or tissue or other foreign objects under or on the appliance during operation, to avoid risk of fire, electric shock and overheating. Do not block the ventilation slots at the rear of the appliance to maintain proper air circulation. Do not place the appliance over a power cord or near the edge of the table or counter, or on wet or inclined surfaces (e.g. sink or drain board).
- During operation keep the appliance in an appropriate distance of at least 20 cm on each side. Leave at least 50 cm of free space above the appliance.
- This appliance is NOT intended for use by persons (including children) with reduced physical, sensory or mental capabilities, or lack of experience and knowledge, unless they have been given supervision or instruction concerning use of the appliance by a person responsible for their safety. Children must always be supervised to ensure that they do not play with the appliance or any parts of the appliance or the packaging. Always keep the appliance where it is dry, frost-free, and clean, and where young children cannot reach it. Do not leave the appliance or any part of it unattended, when in reach of young children.
- Do not place the appliance or any part of it on or near hot surfaces (e.g. burner, heater or oven). Do not use any parts of the appliance with any other device or for any purpose not described in this booklet. Before operation, always ensure that the appliance is assembled and connected completely and correctly according to the instructions in this booklet. Do not handle the appliance or any part of it with violence.
- Do not use any hard, sharp or edged objects (e.g. knives, forks) with the appliance. For example, use cooking utensils made of wood or plastic to remove your food. Keep your hands, hair, clothing, as well as any foreign objects away from the coupling on top of the motor base, while the appliance is connected to the power supply, to avoid the risk of severe injuries and damage. Do not place any foreign objects (e.g. clothes, cooking utensils) in the jar to avoid damage.
- To avoid overheating, with runny ingredients do not operate the motor continuously for more than 1 minute at a time. With heavy loads (dry or hard ingredients like carrots, fillings up to the MAX filling level) may not be processed for more than 10 seconds at a time. Allow the motor to rest for 2 minutes before continuing. If the blades get stuck or agitate noticeably slow, stop operation immediately by removing the jar and add some liquid, or reduce the amount of ingredients in the jar.
- Do not process alcoholic or carbonated foods to avoid hazards of fire or increasing pressure. Only use the appliance for processing edible food. Hard ingredients (e.g. cassia bark, star anise, whole clove, or dry corn kernels) should not be ground/blended as they may damage the blades. Do not overfill the jar above the MAX filling level to avoid overload and leakage. However, do not operate the appliance with the jar empty.
- Before operation, always ensure that there are no foreign objects in the jar or on the coupling of the motor base, and the blade assembly is installed properly on the jar and will not leak. Ensure that the motor base will not tilt or wobble on the table or counter.
- Do not expose the jars to extreme temperature changes to avoid damage. The jars, lids, and blade assembly are not intended to be used in the microwave
oven. Do not place any part or accessories of the appliance in the microwave oven to avoid damage.
- In the base of the blade assembly, there is a silicone gasket seal ensuring an air-tight fit with the jars. The gasket seal may become loose during cleaning and food may stick to the gasket seal due to operation. Thus, after cleaning and always before twisting on the jar, ensure that the gasket seal is properly in place and clean. Do not attempt to operate the appliance with the jar and blade assembly not properly assembled and/or with the jar leaking to avoid risk of injuries and damage!
- Always wipe off spilled liquids immediately. If liquids run out or are spilled on the motor base, immediately unplug the appliance and remove the jar from the motor base. However, DO NOT remove the jar from the motor base while the appliance is still running.
- Do not process hot or even warm food to avoid increase of pressure within the jar. Always leave hot food cool down before filling it into the jar.
- Do not leave the appliance unattended, when it is connected to the power supply. Always unplug the appliance, before moving, or cleaning the appliance, or when the appliance is not in use. Always hold the housing at both sides near the bottom for moving the appliance. Do not hold the appliance at the power cord or jar for moving the appliance. Do not place any hard and/or heavy objects on the appliance or any part of it or in the jars.
- Do not use any abrasive cleaners, cleaning pads (e.g. metal scouring pads), or any corrosive chemicals (e.g. bleach) for cleaning. Do not immerse the motor base or power cord in water or any other liquid. Do not spill or drip any liquids on the motor base or on the power cord to avoid risk of fire and electric shock.
- Do not place the motor base or the power cord in an automatic dishwasher.
- Do not leave any food dry on the appliance or any part of it. Do not leave any food go bad within the jars. Always clean the appliance after each use to prevent an accumulation of baked-on foods (see: 'Care and Cleaning'). Always keep the appliance and its parts, where it is clean.
IMPORTANT SAFEGUARDS FOR ELECTRICAL APPLIANCES
The appliance is driven electrically. Place the appliance near a suitable wall power socket to connect the appliance directly to a protected mains power supply with protective conductor (earth/ground) connected properly. Ensure that the voltage rating of your mains power supply corresponds to the voltage requirements of the appliance (230 V, 50 Hz, AC, rated for at least 10 A).
The installation of a residual current operated circuit breaker (r.c.c.b.) with a maxi-
mum rated residual operating current of 30 mA in the supplying electrical circuit is strongly recommended. If in doubt, contact your electrician for further information.
In various foreign countries, the specifications for power supplies are subject to incompatible norms. Therefore it is possible that power supplies in foreign countries do not meet the requirements for safe operation of the appliance. Thus, before operating the appliance abroad, ensure that safe operation is possible.
- Do not to use any desk top multi socket outlet or extension cord. To avoid an unexpected start of the motor, do not use any external timer, or remote control systems.
- Always handle power cords with care. The pins of the power plug must be smooth and clean. Always completely unwind the power cord before use. Do not place the appliance on a power cord. Power cords may never be knotted, twisted, pulled, strained or squeezed. Do not let the plug or power cord hang over the edge of the table or counter. The power cord may not touch hot surfaces or sharp edges. Ensure that no one will pull the appliance by the power cord. Take care not to entangle in the power cord. Always grasp the plug to disconnect the power cord. Do not touch the appliance or power plug with wet hands with the appliance connected to the power supply.
- Always ensure that the motor base and the exterior of the jar and blade assembly are completely dry, before assembling the appliance, to avoid risk of electric shock or fire. DO NOT drip or spill any liquids on the motor base or power cord. When liquids overflowed, run out or are spilled on the motor base or power cord, immediately unplug the appliance. Thereafter, clean the appliance and let it dry for at least 1 day (see: 'Care and Cleaning').
MOVING PARTS – RISK OF INJURIES
WARNING! The »Design Personal Blender Pro« is designed for processing food. For this purpose, extremely sharp blades are rotating on high speed. Thus, improper handling could cause severe injuries and damage. Please keep this in mind.
- Do not insert your hands or any foreign objects (e.g. clothes, brushes, cooking utensils) in the coupling on top of the motor base, with the appliance connected to the power supply. Always unplug the appliance before cleaning or moving the appliance or disassembling any parts.
- To reduce the risk of injuries, DO NOT try to defeat the interlock mechanism. Do not attempt to operate the appliance with the jar and/or blade assembly damaged in any way or leaking.
- The blades of the blade assembly are very sharp. When handling the blade assembly, always hold it by the base. Do not touch the blades. Do not attempt to sharpen or disassemble the blades.
- Ensure to fasten the blade assembly securely and leak-free on the jar, before assembling the jar to the motor base. The threads of the jar and blade assembly and lids may not be over-tightened or tilted to avoid leakage and damage to the threads.
- Do not attempt to mount the blade assembly without the jar onto the motor base to avoid severe injuries and damage.
- Due to vibration the appliance may move around on the table or counter during operation. Do not leave the appliance unattended while connected to the power supply. Do not place the appliance near the edge of the table or counter.
TECHNICAL SPECIFICATIONS
| Model: Art.-No.: 41039 »Design Personal Blender Pro« | |
| Power supply: 230 V AC, 50 Hz | |
| Maximum power consumption: | 1000 W |
| Length of power cord: approx. | 110cm |
| Weight (motor base only): approx. | 2.32 kg |
| Dimensions (motor base only): approx. | 15.2 cm x 15.2 cm x 17.6 cm (wxdxh) |
| Capacity: large jar: 0.7 Litre, small jar: 0.5 Litre | |
| Certification: | |
PROPERTIES OF YOUR NEW
»DESIGN PERSONAL BLENDER PRO«
Your new »Design Personal Blender Pro« can prepare delightful, healthy drinks. However, it is suited for chopping hard food (e.g. nuts) or even crushing ice as well. For this, your new »Design Personal Blender Pro« is agitating very sharp knives on high speed. Conveniently, the blade assembly is twisted on top of the jar, and for operation, the jar is mounted upside down on the motor base. The gasket seal in the base of the blade assembly prevents leaking.
In most cases, the best results are achieved by agitating the appliance in pulses.
After operation, you simply unscrew the blade assembly. This makes emptying and cleaning of the blades assembly and jar effortless.
Conveniently, you may use the jar for storing your food. For this, after operation close the jar with one of the lids. The jars and lids are interchangeable to your like.
Due to the tightly sealable flap of the lid,, beverages can be poured without removing the lid.
IMPORTANT: Do not process alcoholic or carbonated or warm or hot food. For operation, the jar is closed airtight. Thus, in these cases, high pressure could build up in the jar causing leakage and damage to the appliance. Additionally, opening the jar after operation could be difficulty, and the contents could splash vigorously. Thus, always leave hot food cool down before operation!
For milling and grinding of hard ingredients (e.g. nuts), use the grinding jar and process your food in small batches. However, do not fill in any liquids into the grinding jar. The grinding jar works in a similar way to the other jars. Attach the blade assembly in the same way, and place the jar upside down on the motor base for operation (see: 'Operation'). For most cases, we recommend operating the appliance in pulses.
SAFETY CONCEPT
⚠ WARNING: For your protection and convenience, your new »Design Personal Blender Pro« is equipped with some safety features. Do not attempt to damage or by-pass the safety interlocks! Do not attempt to operate the appliance using others than the designated parts (e.g. jars, blade assembly).
- The blender has a built-in safety lock. Thus, the motor will operate only with the appliance assembled correctly. See: 'Assembling the Appliance'. However, do not attempt to operate the motor base without the jar and blade assembly in place.
- If the appliance overheats, a thermal safety switch will shut off the motor. Thus, if the motor stops unexpectedly, just unplug the appliance and remove the jar to prevent the motor from starting unexpectedly when the thermal safety switch resets. Let the appliance cool down for approximately 30 minutes. Thereafter, you can use the appliance again.
Note:
Tripping of the thermal safety switch indicates that the appliance is being loaded too heavily or with excessive continuous use. Reduce the amount of ingredients, add some more liquid, or allow more time in between operation to prevent it from happening again. This will help preserve the life of the motor.
TIPS FOR BEST RESULTS
You may use your new »Design Personal Blender Pro« for several types of food. Adhere to the following table to get an overview.
| Purpose Type of Food | |
| Chopping Nuts, chocolate (use | the grinding jar) |
| Grating Cheese, bread crumbs | (use the grinding jar) |
| Blending Batters, dips | |
| Sauces Vinaigrette, salad dressings, simple sauces | |
| Frozen Blending Ice, frozen fruit, ice cream | |
| Nutrient Juices and Smoothies | Fruits, vegetables, herbs, spices |
- Do not blend hot or even warm food. For operation, the jars are closed airtight by the blade assembly. There is no venting for steam to be released.
- Avoid blending longer than required to reach the desired consistency. Do let the motor agitate for more than 1 minute continuously. Otherwise, the ingredients in the jar may become warm. Thus the internal pressure may increase. This will affect the seals and make it difficult to open the jar after operation. Additionally, the contents of the jar may splash when opened. Allow the jar to cool down and open carefully.
- Do not use the stainless steel grinding jar for any type of liquid ingredients. The grinding jar must be used dry.
- Do not process more than 1/3 - 1/2 cup at a time in the grinding jar, to get an even result.
- When grinding nuts, it is recommended to only process to a meal consistency. The grinding jar is not suitable to make nut butters.
- With the transparent jars, always add liquids for optimum blending. If the ingredients do not circulate during blending, add some more liquid.
- If the results are lumpy, try reducing the amount and blending in batches.
- If foods are thick, operate the appliance in pulses. For this, twist the jar to start and stop the motor as needed. This will help the ingredients to circulate.
- Do not exceed the MAX filling levels of the jars.
- When crushing ice, do not fill in more than 4 ice cubes derived from a standard ice tray at a time. This applies to frozen fruit also. Cut fruits into cubes of 2cm at the maximum, before freezing.
BEFORE FIRST USE
⚠ WARNING: DO NOT let young children play with the appliance, or any part of it, or the packaging! The blades of the blade assembly are very sharp. Only touch the blade assembly by its base. Ensure that the ratings of your power supply are as indicated on the model label of the appliance. See: 'Important Safeguards for Electrical Appliances'.
- Unpack the appliance and all accessories carefully.
- Check that no parts are damaged or missing (see: 'Knowing Your New »Design Personal Blender Pro«').
- Carefully remove all shipping materials, stickers, and promotional materials. However, DO NOT remove the model label.
⚠ WARNING: Always unplug the appliance before cleaning. Do not immerse the motor base or power cord in water or other liquids or spill any liquids on the motor base or power cord. Do not use any abrasive cleaners for cleaning to avoid damage to the surfaces. Do not place the motor base or power cord in an automatic dishwasher.
-
Before first use and after a longer period of storage, clean the jars, lids and blade assembly in warm dishwater.
-
Wipe the exterior of the motor base with a damp sponge or cloth, and dry the appliance and all parts thoroughly. See: 'Care and Cleaning'.
| Note: |
| Jars, lids and blade assembly are dishwasher safe. For this, unscrew the blade assembly from the jar before placing in the dishwasher. Place all accessories of the appliance on the top rack. |
| Note: |
| On first use, you may notice an odour coming from the motor base. This is normal and will dissipate with use. |
OPERATION
⚠ WARNING - RISK OF INJURIES: Always ensure that the appliance and all its parts and accessories are out of reach of young children. The appliance is intended for cutting and blending food. For this, the appliance is using sharp blades in high speed rotation. Thus, improper use or misuse may cause severe injuries and damage. Always unplug the appliance, before moving or cleaning the appliance. Do not leave the appliance unattended while in use.
The blades are very sharp. Use extreme caution when handling the blade assembly. Only hold the blade assembly by its base.
Do not block the ventilation slots at the rear of the motor base. Do not leave the appliance operating unattended. Always ensure that the jar is leak-free before operation. If there are any liquids running out during operation, immediately remove the jar from the motor base and unplug the appliance. See: 'Solving Problems'.
To avoid overheating, with runny ingredients do not operate the motor continuously for more than 1 minute. Dry ingredients may not be processed continuously for more than 10 seconds. Allow the motor to rest for at least 1-2 minutes before continuing. If the blades get stuck or agitate noticeably slow, stop operation immediately and add some liquid, or reduce the amount of ingredients in the jar.
Never run the appliance with the jar empty to avoid overheating.
Do not use any hard or edged objects (e.g. knives, metal scrapers) with the appliance to avoid damage to the surfaces. Only use cooking utensils made of wood or plastics.
Only use the stainless steel grinding jar for grinding and milling dry food (e.g. nuts, chocolate, hard cheese). Do not fill in any liquids. Always remove inedible parts (kernels, stalks, shells). Do not process extremely hard ingredients (e.g. cassia bark, star anis, dried corn kernels) to avoid damage to the blades.
Tip:
Jars and lids are interchangeable to your like.
ASSEMBLING THE APPLIANCE
- Prepare your food. Remove all inedible parts and cut your food in cubes of sufficient size (approx. 1-2 cm).
⚠️ CAUTION: Only fill the jar up to the MAX filling level at the maximum to avoid overload of the motor. Do not fill in alcoholic, carbonated, or hot, or even warm food as the jar must be closed airtight for operation. Thus, these ingredients would cause hazards due to an increase of pressure within the jar.
Do not fill any liquids into the grinding jar. The grinding jar is suited for dry ingredients only.
- Place the motor base on a suitable surface near a suitable wall power outlet (see: 'General Safety Instructions' and 'Important Safeguards for Electrical Appliances').
- Ensure that all parts are in proper working order.
- Add the ingredients to the jar. However, at the maximum fill the transparent jars to the MAX filling level. Fill the grinding jar only with 1/3 - 1/2 cup of dry ingredients at the maximum. Ensure, that the brim of the jar is completely clean, to get an airtight seal with the blade assembly.
IMPORTANT: In the base of the blade assembly, there is a silicone gasket seal ensuring an airtight fit with the jars. Due to the heat from some dishwashers the gasket seal could become loose.
- Ensure that the silicone gasket seal in the base of the blade assembly is in place correctly and completely clean. Then place the blade assembly onto the jar and twist the blade assembly onto the jar until you get a good seal (approx. 1/8 revolutions).
- Turn the jar upside down and ensure that the jar is completely leak-free and closed tight.
The unit is now ready for use.
PROCESSING YOUR FOOD
- Insert the plug into the power supply outlet to start operation.
- Place the jar onto the motor base, aligning one of the arrows on the blade assembly with the arrow on the motor base.
IMPORTANT: As soon as you turn the jar clockwise on the motor base the motor starts agitating.
To avoid overheating, with runny ingredients do not operate the motor continuously for more than 1 minute. Dry ingredients may not be processed continuously for more than 10 seconds. Allow the motor to rest for 1-2 minutes before continuing. However, the appliance will process your food within seconds. Thus, in most cases, processing more than a few seconds will not be necessary. If the blades get stuck or agitate noticeably slow, stop operation immediately and add some liquid, or reduce the amount of ingredients in the jar.
The grinding jar is suited for grinding and milling dry ingredients and could get hot during operation. After processing continuously for 10 seconds, leave the motor and grinding jar cool down for at least 1 minute.
- Slightly press on the jar while turning the jar clockwise until the arrow on the blade assembly points to LIQUIFY. The motor starts agitating immediately. Do not leave the appliance operating unattended.
- Most types of food should be processed in short pulses. For this, turn the jar to and fro several times.
- When your food has reached the desired consistency, turn the jar counter-clockwise and pull it straight up to remove it.
Tip:
When processing hard ingredients using the grinding jar and the jar is too hot to touch, grasp the blade assembly to turn the jar. In this case, you should generally decrease the processing time.
- Unplug the appliance, if you do not wish to use it again.
- Turn the jar upright and wait some seconds for the food to drip from the blades. Then unscrew the blade assembly by turning it counter-clockwise. Only hold the blade assembly by its base to avoid cutting yourself.
- Take out your food.
Tip:
You may store your food in the jar quite a while closed by one of the designated lids. Twist the lid to seal and pour out as you like. However, you should not use the jar for storing food in general to avoid discolouration and excessive wear. Do not leave any food go bad within the jars.
- After each usage, clean the appliance according to the instructions in chapter 'Care and Cleaning'.
IMPORTANT: Do not leave the appliance unattended while connected to the power supply. Always unplug the motor base when the appliance is not in use. After cleaning, it is best to store the blade assembly attached to an empty jar when not in use.
SOLVING PROBLEMS
If any problems occur during operation, you will find solutions in this section.
| Problem Reason The | Solution | |
| The appliance doesn’t turn onAND/ORthe motor doesn’t startAND/ORthe blade assembly doesn’t rotate. | The appliance is not live. | Ensure that the appliance is plugged in.Ensure that the wall power outlet is live. |
| The safety interlock is active, because the blade assembly or the jar is not installed correctly. | The blade assembly must be screwed correctly onto the jar and may not be misaligned. Turn the blade assem-bly approx. 1/8 revolutions clockwise onto the jar. See:‘Assembling the Appliance’. | |
| The blade assembly is blocked. | Disconnect the appliance from the power supply and remove the obstacles in the jar. Cut your food in smaller pieces before processing. Process in smaller portions and in short pulses. See: ‘Processing Your Food’. | |
| The thermal safety switch is active. | Unplug and leave the appliance cool down for approx. 30 minutes. Then try again. | |
| There is a severe pro-blem. | Unplug the appliance and call your customer service for sup-port. See: ‘Information and Service’. | |
| Motor stops during operation without any apparent reason. | The thermal safety switch is active. | Unplug and leave the appliance cool down for approx. 30 minutes. Then try again. |
| Food is too finely chopped or too watery. | The food has been over processed. | The appliance will process your food in a few seconds. Use short operating for best results. |
| The food is unevenly chopped and lumpy. | Ingredients cling to the inner walls of the jar. | Operate the appliance in short pulses to get an even result. |
| The jar is overfilled. Process your food in smaller batches. For frozen ingredients,pulse in short intervals of 2-5 seconds. | ||
| The pieces of food are too large. | Cut your food in smaller pieces (2 cm at the maximum). | |
| You can not get snow from ice cubes. | The ice has not been cold enough and has been thawed already. | For best result use ice straight from the freezer. |
| You are not pulsing pro-perly. | Try operating in short intervals. | |
| The jar has been wet,when filling in the ice. | Make sure the jar is completely dry before adding ice. | |
| Problem Reason The Solution | ||
| The Jar is leaking. The blade assembly or the lid is not installed correctly. Leaking may occur, if it is misaligned when twisted onto the jar. | Install the blade assembly or lid according to the instructions in section ‘Assembling the Appliance’. The blade assembly or lid may not be tilted. | |
| The gasket seal is not properly in place. | Ensure that the gasket seal at the base of the blade assembly is inserted properly. See: ‘Assembling the Appliance’. | |
| Residues of food are on the gasket seal or brim of the jar. | Before closing the jar, ensure that the gasket seal and the brim of the jar are completely clean. | |
| The appliance does not turn off when removing the jar. | This is a severe problem. Immediately unplug the appliance and call your customer service for support. See: ‘Information and Service’. | |
CARE AND CLEANING
⚠ WARNING: Always unplug the appliance, before moving, disassembling, or cleaning the appliance. Do not hold your hands or any foreign objects into the coupling on the motor base with the appliance still connected to the power supply.
Always handle the blade assembly with caution to avoid injuries, as the blades are very sharp. Only touch the blade assembly by its base. Do not attempt to remove the blades from the base of the blade assembly or attempt to separate the blades.
Do not use scouring pads, abrasive cleaning agents or aggressive liquids (e.g. bleach, solving agents) for cleaning the appliance or any parts of it, to avoid damage to the surfaces. Do not use any hard or sharp-edged objects for cleaning. Do not immerse the motor base or the power cord in water or any other liquid. Do not spill or drip any liquids on or in the motor base or power cord to avoid risk of fire and electric shock. Jars, lids and blade assembly may be cleaned in an automatic dishwasher in the top rack. However, DO NOT clean the motor base or power cord in an automatic dishwasher. Do not use violence!
In general, you should avoid to leave any food dry on the jar after processing. As well, you should not store food for an extended period of time in the jar. After processing, remove and rinse the blade assembly and, if desired, close the jar with a provided lid. To clean the jar, use warm dishwater and proceed according to the following instructions. This way, you avoid the build-up of dried-on food on the jar, lid and blade assembly, and keep the appliance hygienically clean.
Do not operate the appliance with warm or hot liquids. The grinding jar is NOT intended for usage with any liquids.
CLEANING THE MOTOR BASE
⚠️ CAUTION: Do not clean the motor base or power cord in an automatic dish-washer.
- Unplug the appliance.
- Wipe the motor base with a slightly damp cloth. Then wipe dry. Thereafter, leave the motor base dry naturally for approx. 30 minutes, where it is out of reach of young children.
USING THE SELF-CLEANING FEATURE
You may clean jar and blade assembly effortlessly, via running the appliance for 10 seconds with some cold water. Just proceed according to the following instructions.
IMPORTANT: Do not fill the jar over the MAX filling level to avoid overload to the motor. Do not fill in hot or even warm liquids. Do not process the dishwater for more
than 10 seconds to avoid an increase of temperature and thus an increase of pressure within the jar.
- Empty the jar completely and rinse the jar and blade assembly with clear tap water.
Tip:
Possibly, fibrous foods leave stubborn residues on the blades. Before running the following cleaning process, remove these residues via a small soft brush (e.g. a clean toothbrush) and rinse with clear tap water.
- Fill the jar up to the MAX filling level with cold dishwater. Then replace the blade assembly.
- Operate the appliance for 10 seconds at the maximum.
- Thereafter remove the jar, and unplug the appliance. Remove the blade assembly and discard the dishwater. Rinse the jar and blade assembly thoroughly with clear tap water.
Tip:
If some leftover particles dried onto the inner walls of the jar, fill the jar again with about 100 ml lukewarm dishwater and twist on the blade assembly. Then shake the jar shortly. Leave the jar soak for approx. 10-20 minutes. Then repeat the cleaning procedure beginning mit step 3.
- If the parts are clean, dry all parts thoroughly and leave dry naturally where the parts are out of reach of young children.
Tip:
If this method is not sufficient, you should clean the parts according to the instructions below.
REMOVING ODOURS AND STUBBORN RESIDUES
Strong smelling spices such as cumin and coriander and various vegetables as onion, garlic, peperoni, and carrots may leave an odour or stain the blade assembly, jars, or lids. Additionally, if food dried on the surfaces a somewhat more thorough cleaning of the jar, lid, and blade assembly, may be required. In this case, you may clean jar, lid and blade assembly according to the following instructions.
⚠️ CAUTION: Do not use any hard or sharp-edged objects for cleaning. Do not use any aggressive or abrasive cleaners.
Ensure not to damage the gasket seal in the base of the blade assembly, as it ensures an airtight fit with the jars. After cleaning, always ensure that the gasket seal is pro-
perly in place. Especially the heat from some dishwashers may cause the gasket seal to become loose. Ensure not to get cut, while handling the blade assembly.
Tip:
If there are stubborn residues sticking on the parts, you may soak the jars, lids, and blade assembly in warm dishwater for 10 minutes before cleaning. However, do not soak the parts, after citrus has been processed (see: 'After Processing Citrus Fruits').
- Clean the jar, lid, and blade assembly in warm dishwater, using a soft nylon brush.
However, you may clean these parts in an automatic dishwasher. For this, place the lid, jar, and blade assembly on the top rack. With an automatic dishwasher featuring temperature control, select a low temperature.
- Dry the parts thoroughly after cleaning, and thereafter let dry naturally for approx. 1 hour, where the parts are out of reach of young children. Ensure that the silicone gasket seal at the base of the blade assembly is securely in place.
IMPORTANT: For short time storage of the appliance, it is good advice, to re-install the blade assembly on an empty and clean jar, to avoid unintentionally touching the blades.
AFTER PROCESSING CITRUS FRUITS
IMPORTANT: Do not soak the jar, after citrus has been blended. Exposure to citrus oil may affect the transparency and life time of the Tritan™ jars.
After processing, wash the jar in dishwater, rinse with clear tap water thoroughly, and wipe dry immediately. Thereafter allow to dry naturally for approx. 30 minutes.
STORAGE
⚠ WARNING: Young children must be supervised that they do not play with the appliance or any part of it. When the appliance is not in use, always unplug the appliance. Do not leave the appliance unattended while connected to the power supply to avoid hazards due to electric shock, moving parts, or fire.
Always clean the appliance and all its parts before storing to avoid accumulation of dried-on food (see: 'Care and Cleaning').
The blades of the blade assembly are very sharp. Always ensure that no-one will touch the blades unintentionally. Only touch the blade assembly by its base.
Note:
When storing the appliance for a longer period of time, you should NOT assemble the blade assembly to a jar as, after several days, this could cause the build-up of a musty odour.
Wrap the blade assembly in a clean cloth. This way, the blades are safe from dust and unintended touch.
⚠️ CAUTION: Do not hold the appliance by the power cord or jar for moving the appliance. To move the appliance, always grasp the motor base at both sides to avoid damage.
Ensure to store the appliance where it is clean, dry and safe from frost, direct sunlight and inadmissible strain (mechanical or electric shock, heat, moisture) and where it is out of reach of young children. Do not place any hard or heavy objects on the appliance or any part of it.
Always handle the power cord with care. Cables may never be knotted, twisted, pulled, strained, or squeezed. Lay the power cord loosely around the motor base.
Lay the accessories besides the motor base. Do not use any parts or accessories of the appliance for any other appliance or any other purpose than described in this booklet.
IMPORTANT: Do not lock the jar onto the motor base for storage. With the jar mounted and locked, the motor will start immediately, when the appliance is connected to the power supply.
NOTES FOR DISPOSAL
Dispose of the appliance and packaging must be effected in accordance with the corresponding local regulations and requirements for electrical appliances and packaging. Please contact your local disposal company. Do not dispose of electrical appliances as unsorted municipal waste, use separate collection facilities. Contact your local government for information regarding the collection systems available. If electrical appliances are disposed of in landfills, dumps, or refuse incineration, hazardous substances can leak into the groundwater or can be emitted into air, thus getting into the food chain, and damaging your health and well-being. When replacing old appliances with new once, the retailer is legally obligated to take back your old appliance for disposal at least for free of charge.
INFORMATION AND SERVICE
Please check www.gastroback.de for further information. For technical support, please contact GASTROBACK Customer Care Center by phone: +49 (0)4165/22 25-0 or e-mail info@gastroback.de.
WARRANTY
We guarantee that all our products are free of defects at the time of purchase. Any demonstrable manufacturing or material defects will be to the exclusion of any further claim and within 2 years after purchasing the appliance free of charge repaired or substituted. There is no Warranty claim of the purchaser if the damage or defect of the appliance is caused by inappropriate treatment, over loading or installation mistakes. The Warranty claim expires if there is any technical interference of a third party without a written agreement. The purchaser has to present the sales slip in assertion-of-claim and has to bear all charges of costs and risk of the transport.
Note:
Customers from Germany and Austria: For repair and service, please send GASTROBACK products to the following address: GASTROBACK GmbH, Gewerbestr. 20, D-21279 Hollenstedt, Germany.
Customers from other countries: Please contact your dealer.
Please agree that we cannot bear the charge of receipt. Submission of appliances: Please ensure packing the appliance ready for shipment without accessories. Add the sales slip and a short fault description. The processing time after receipt of the defective appliance will be approx. 2 weeks; we will inform you automatically. After the warranty period, please send defective appliances to the given address. You will get a free quotation and, thereafter, can decide, whether we shall repair the appliance to the costs possibly accrued, send back the defective appliance for free of charge, or dispose of the appliance for free of charge.
The appliance is intended for household use only and NOT suited for commercial usage. Do not attempt to use this appliance in any other way or for any other purpose than the intended use, described in these instructions. Any other use is regarded as unintended use or misuse, and can cause severe injuries or damage. There is no warranty claim of the purchaser if any injuries or damages are caused by unintended use.
GASTROBACK GmbH
- IHREN »DESIGN PERSONAL BLENDER PRO« KENNENLERNEN
- GASTROBACK®
- Operating Instructions
- TABLE OF CONTENTS
- DEAR CUSTOMER!
- KNOWING YOUR NEW »DESIGN PERSONAL BLENDER
- Tip:
- IMPORTANT SAFEGUARDS
- GENERAL SAFETY INSTRUCTIONS
- IMPORTANT SAFEGUARDS FOR ELECTRICAL APPLIANCES
- MOVING PARTS – RISK OF INJURIES
- PROPERTIES OF YOUR NEW
- »DESIGN PERSONAL BLENDER PRO«
- SAFETY CONCEPT
- Note:
- TIPS FOR BEST RESULTS
- BEFORE FIRST USE
- OPERATION
- Never run the appliance with the jar empty to avoid overheating.
- ASSEMBLING THE APPLIANCE
- PROCESSING YOUR FOOD
- SOLVING PROBLEMS
- CARE AND CLEANING
- CLEANING THE MOTOR BASE
- USING THE SELF-CLEANING FEATURE
- REMOVING ODOURS AND STUBBORN RESIDUES
- AFTER PROCESSING CITRUS FRUITS
- STORAGE
- NOTES FOR DISPOSAL
- INFORMATION AND SERVICE
- WARRANTY
- GASTROBACK GmbH
Brand : Gastroback
Model : Design Personal Pro 41039
Category : Blender