
Advanced Vital 40145 - Juicer Gastroback - Free user manual and instructions
Find the device manual for free Advanced Vital 40145 Gastroback in PDF.


| Product Type | Slow Juicer (masticating juicer) |
| Model Number | Art.- No. 40145 |
| Dimensions | Approx. 190 x 185 x 420 mm (depth x width x height) |
| Weight | Approx. 3.7 kg |
| Power Supply | 220-240 V AC, 50/60 Hz |
| Power Consumption | Max. 150 W |
| Speed of Rotation | Approx. 70 rpm |
| Maximum Continuous Operation | 15 minutes |
| Required Break Duration | Approx. 30 minutes |
| Juice Container Capacity | Up to 800 ml (with scale) |
| Pulp Container | Included |
| Drip-Stop Feature | Yes, manual shutter at juice spout |
| Motor Direction | Forward and reverse (switch) |
| Safety Features | Safety interlock, electronic brake, overload/overheat protection with reset switch |
| Juicing System Parts | Pusher, juicer cover with feed chute, filter sleeve with stainless steel separating mesh, rubber blade sleeve, juice collector, pulp outlet, juice spout |
| Materials | Stainless steel housing, BPA-free plastic parts (assumed) |
| Cleaning | Dishwasher-safe removable parts (juicing system and containers); motor base wipe clean only |
| Spare Parts Availability | Contact vendor for replacement parts (filter sleeve, rubber blade sleeve, sealing ring, etc.) |
| Repair Service | Authorized service centre; manual advises against self-repair |
| Certification | CE |
| Warranty | 2 years from date of purchase (manufacturing defects) |
Frequently Asked Questions - Advanced Vital 40145 Gastroback
User questions about Advanced Vital 40145 Gastroback
0 question about this device. Answer the ones you know or ask your own.
Ask a new question about this device
Download the instructions for your Juicer in PDF format for free! Find your manual Advanced Vital 40145 - Gastroback and take your electronic device back in hand. On this page are published all the documents necessary for the use of your device. Advanced Vital 40145 by Gastroback.
USER MANUAL Advanced Vital 40145 Gastroback
natural_image
Exterior view of a modern Gastrostatic brand cooktop (no signage or text visible on the device itself)BEDIENUNGSANLEITUNG
Art.- Nr. 40145 » Slow Juicer Advanced Vital «
natural_image
Exterior view of a modern stainless steel Gastroback tea maker (no signage or text visible on the device itself)OPERATING INSTRUCTIONS
Art.- No. 40145 » Slow Juicer Advanced Vital «
Read all provided instructions before first usage!
Model and attachments are subject to change
For household use only!
Deutsch
English
TABLE OF CONTENTS
Important Safeguards 52
General Safety Instructions....52
Important Safeguards for Electrical Appliances 55
Moving Parts – Risk of Injuries 56
Technical Specifications....57
Knowing Your New Slow Juicer 58
Properties of Your New Juicer 59
Drip-Stop Feature 59
Power Switch for Forward and Reverse Operation 60
Safety Features 60
Safety Interlock and Electronic Break of the Motor 60
Protection Devices 61
Method of Operation and Making Breaks....62
Tips for Best Results....62
Purchasing and Storing Fruit and Vegetables....63
Preparing Your Food for Juicing 63
The Best Method 64
The Best Blend 65
Using the Pulp 65
Before First Use....66
Operation....66
Assembling the Juicing System....67
Juicing Your Food 69
Using Reverse Operation....72
Methods for Removing Obstacles....73
Resetting the Protection Device 74
Solving Problems....75
Care and Cleaning 80
Disassembling the Juicing System 81
Thorough Cleaning of the Juicing System 82
Removing Residues of Fibres from the Filter Sleeve 83
Cleaning the Motor Base 84
Storage 84
Notes for Disposal....86
Information And Service 86
Warranty 87
IMPORTANT NOTE - PLEASE READ CAREFULLY - BEFORE YOU USE THE DEVICE!
All GASTROBACK® products are intended for food processing of food products and groceries. For reasons of health protection and hygiene, products that are used on a daily basis or used only once, are not allowed to be returned. Check the goods just as you would do in a retail store.
You only have to pay for a possible loss in value of the goods, if this loss of value is due to a non-necessary for the examination of the nature, characteristics and function of the goods handling.
An unnecessary way to check the nature, characteristics and function of the goods is the processing of food products or groceries into food and drinks.
If you have any questions about GASTROBACK® products, if your unit is not working properly straight away or if you need any accessories or spare parts for your GASTROBACK® product please contact our customer service before returning.
Monday to friday (except on holidays) from 8am to 4pm
E-Mail: info@gastroback.de
DEAR CUSTOMER!
Your new SLOW JUICER ADVANCED VITAL is juicing fruit, vegetables, greens, and fresh herbs via squeezing, whereas most other types of juicers cut the ingredients to small pieces. The squeezing method may be successful even with types of food that will not give off sufficient amounts of juices by cutting systems. Additionally, the SLOW JUICER ADVANCED VITAL is operating with noticeably reduced noise and less vibrations, thus making the usage much more convenient for the user. The electronically controlled motor enables safe operation by stopping immediately when switched off.
The information in this booklet will easily and quickly inform you on the features and handling of your new Slow Juicer.
We hope that you will enjoy your new SLOW JUICER ADVANCED VITAL.
Carefully read all instructions, before operating this appliance and save for further reference. Do not attempt to use this appliance in any other way and for any other purpose, than described in these instructions (intended use). Any other use, especially misuse, can cause severe injuries and damage by electric shock, moving parts, or fire.
These instructions are an essential part of the appliance. Do not pass the appliance without this booklet to third parties. Any operation, repair and technical maintenance of the appliance or power cord or any other part of it other than described in these instructions may only be performed at an authorised service centre (see: 'Warranty').
The appliance is intended for juicing food that is fit for consumption. Any use of accessories, attachments, or spare parts that are not recommended by the manufacturer or damaged in any way may result in injuries to persons and/or damage.

GENERAL SAFETY INSTRUCTIONS
- Do not leave the appliance unattended, when it is connected to the power supply! Always unplug the appliance, when it is not in use. DO NOT leave the appliance switched on uselessly. This appliance is for household use only and NOT intended for use in moving vehicles. Do not operate or store the appliance in humid or wet areas or outdoors.
- Check the entire appliance regularly for proper operation (e.g. check for distortion, excessively frayed or melted parts, cracks, leaks, corroded pins of the power plug, over-heating). Do not operate the appliance, when the appliance or any part of it is likely to be damaged, to avoid risk of fire, electric shock, or any injuries to persons and/or damage. The appliance or its parts are likely to be damaged, if the appliance has been subject to inadmissible strain (e.g. moisture in the motor base, over-heating, mechanical or electric shock), or if there is any damage, or if the appliance or the safety interlocks are not working properly. If one of these cases occur during operation, immediately unplug the appliance, and get in contact with an authorized service centre for examination and/or repair. Do not attempt to repair the appliance or any part of it on your own.
- Always grasp the appliance at the motor base for moving it. Do not hold the appliance at the juicer post, drive rotor, power cord, or mounted juicing system for moving the appliance. Do not place any hard and/or heavy objects on or in the appliance or any part of it. Take care that no one will pull the appliance by the power cord.
- Operate the appliance on a well accessible, stable, level, clean, dry, and suitable large table or counter that is resistant against water. Always keep the appliance and its parts in sufficient distance to the edge of the table or counter and to other objects. During operation, due to vibrations, the appliance could move around, thus demanding close supervision! For operation, leave at least 1 m of free space above and at least 20 cm of free space on each side of the completely assembled appliance, to avoid damage due to splashes and enable unhindered handling.
- Do not place any clothes or tissue or other foreign objects under or on the appliance during operation, to avoid risk of fire, electric shock and overheating. The ventilation slits in the bottom of the motor base may not be blocked. For operation, do not place the appliance over a power cord or on metal surfaces (e.g. sink or drain board).
- Do not place the appliance or any part of it on or near hot surfaces (e.g. burner, heater, or oven). Do not heat any parts or accessories of the appliance via any sources of heat (e.g. range, pot warmer, oven).
- This appliance may be used or handled by persons with reduced physical, sensory or mental capabilities, or lack of experience and knowledge (including children from 8 years and above), if they have been given supervision and/or instruction concerning the use of the appliance, by a person responsible for their safety, and if they understand and consider the involved hazards. Even cleaning may not be performed by children without supervision. Children must always be supervised to ensure that they do not play with the appliance or any part of the appliance or the packaging. Always keep the appliance where it is dry, frost-free, and clean, and where children younger than 8 years cannot reach it. Do not leave the appliance or any part of it unattended, when they are in reach of children younger than 8 years. The appliance is designed for processing edible food. Do not fill in
any other material or foreign objects, to avoid injuries and damage due to fire, electric shock, over-heating, and harmful substances. To avoid damage to the appliance: Always completely remove any extremely hard and inedible parts of your food, before processing (i.e. shells, stones, stalks). Splinters of extremely hard parts could be sharp-edged and cause injuries, when getting into your food. Do not process frozen or hot food. Do not operate the appliance continuously for more than 15 minutes to avoid overheating and for ensuring a prolonged working life. After 15 minutes of continuous operation, make a break of at least 30 minutes (see: 'Properties of Your New Juicer / Method of Operation and Making Breaks'). Before operating the juicing system, ensure to open the drip-stop shutter of the juice spout (folded up position). To avoid overflow of the juice collector and blockage during juicing, ensure that the juices are running through the juice spout without obstacles and the pulp is falling easily and freely through the pulp outlet. Empty the containers for juice and pulp in time. Under no circumstances, allow the juice collector to be filled above the upper rim of the separating mesh.
- Always ensure to assemble the appliance correctly and completely, before switching on the appliance. Do not let the appliance operate, while it is empty. Do not handle the appliance or any part of it with violence.
- Do not use any hard or sharp-edged objects with the appliance (e.g. forks, knives, scrapers). If required, only use the provided pusher for pushing down your food.
- Always switch off the appliance (power switch to the central position "O"), and unplug the appliance, before removing the juicing system, or cleaning or moving the motor base.
- Do not use any abrasive cleaners, cleaning pads (e.g. metal scouring pads), or any corrosive chemicals (e.g. bleach, disinfectants) for cleaning (see: 'Care and Cleaning'). Discolourations caused by some types of food do not affect the performance of the appliance. Do not place the motor base in an automatic dishwasher!

IMPORTANT SAFEGUARDS FOR ELECTRICAL APPLIANCES
The appliance is operated electrically. Place the appliance near a suitable wall power outlet to connect the appliance directly to a protected mains power supply with protective conductor (earth/ground) connected properly. Ensure that the ratings of your mains power supply correspond to the requirements of the appliance (220 - 240 V AC, 50/60 Hz, rated for at least 8 A). The installation of a residual current operated circuit breaker (r.c.c.b.) with a maximum rated residual operating current of 30 mA in the supplying electrical circuit is strongly recommended. If in doubt, contact your electrician for further information.
- In various foreign countries, the specifications for power supplies are subject to incompatible norms. Therefore, it is possible that power supplies in foreign countries do not meet the requirements for safe operation of the appliance. Thus, before operating the appliance abroad, ensure that safe operation is possible.
- Do not use any desk top multi socket outlet, external timer, remote control system, or extension cord. The power outlet must always be easily accessible for unplugging the appliance immediately in case of any malfunction or danger.
- Always handle power cords with care. The pins of the power plug must be smooth, dry, and clean without discolourations. Do not attempt to operate the appliance with the power cord damaged in any way to avoid risk of overheating, fire, and electric shock. If the power cord is damaged, it must be replaced by an authorised service centre in order to avoid risk of electric shock, overheating, and fire.
- Do not place the appliance on a power cord. Power cords may never be knotted, twisted, pulled, strained or squeezed. Do not let the plug or power cord hang over the edge of the table or counter. The power cord may never touch hot surfaces, sharp edges, or any moving parts. Ensure that no one pulls the appliance by the power cord or entangles in the power cord. Always grasp the plug to disconnect the power cord. Do not touch the appliance or power plug with wet hands, while the appliance is connected to the power supply.
• To avoid that liquids run onto the motor base causing electric shock,
overheating, and fire: Do not operate the appliance with the sealing ring or rubber flap at the juice collector damaged or not inserted correctly. Do not attempt to remove the squeezing auger, while the juicing system is still placed on the motor base. Do not pour any liquids into the juicing system, while the juicing system is placed on the motor base. Do not overfill the feed chute and the juice collector to avoid overflow (see: 'Operation / Juicing Your Food'). Always keep the motor base and power cord dry.
- Do not place or immerse the motor base or power cord in water or any other liquid. If liquids run out or are spilled onto the exterior of the appliance and/or liquids accumulate under the motor base, immediately unplug the appliance. Always wipe off spilled liquids immediately. If in doubt, check, whether the sealing ring of the juicing system and the rubber flap of the pulp outlet are undamaged and mounted correctly, before operating the appliance again. Otherwise, liquids could run out, causing risk of short circuit and electric shock.

MOVING PARTS - RISK OF INJURIES
- Before disassembling any parts or moving the appliance: always switch off (power switch to the central position "O") and unplug the appliance.
- Do not attempt to corrupt the safety interlocks of the appliance to avoid severe injuries and damage due to the moving parts (squeezing auger, rubber blade sleeve). Do not handle the appliance or any part of it with violence.
- DO NOT insert your fingers or any foreign objects (e.g. hair, wide parts of your clothing, cooking utensils, brushes) into the feed chute or the outlets of the juice collector (pulp outlet, juice spout), while the juicing system is placed on the motor base and the appliance is connected to the power supply. For juicing, do not attempt to use any other utensils but the provided pusher to push down the food in the feed chute.
- During operation, do not hold your face over the appliance. Liquids or hard parts of the processed food could be hurled out.
TECHNICAL SPECIFICATIONS
| Model: | Slow Juicer Advanced Vital |
| Art.- No.: | 40145 |
| Power supply: | 220-240 V AC, 50/60 Hz |
| Power consumption: | max. 150 W |
| Length of power cord: | approx. 105 cm |
| Weight: | approx. 3.7 kg |
| Dimensions: | approx. 190 x 185 x 420 mm (depth x width x height) |
| Maximum operating time: | max. 15 minutes (continuous) |
| Required break duration: | approx. 30 minutes |
| Speed of rotation: | approx. 70 rpm |
| Certification: | CE |
These specifications may change without notice.
KNOWING YOUR NEW SLOW JUICER
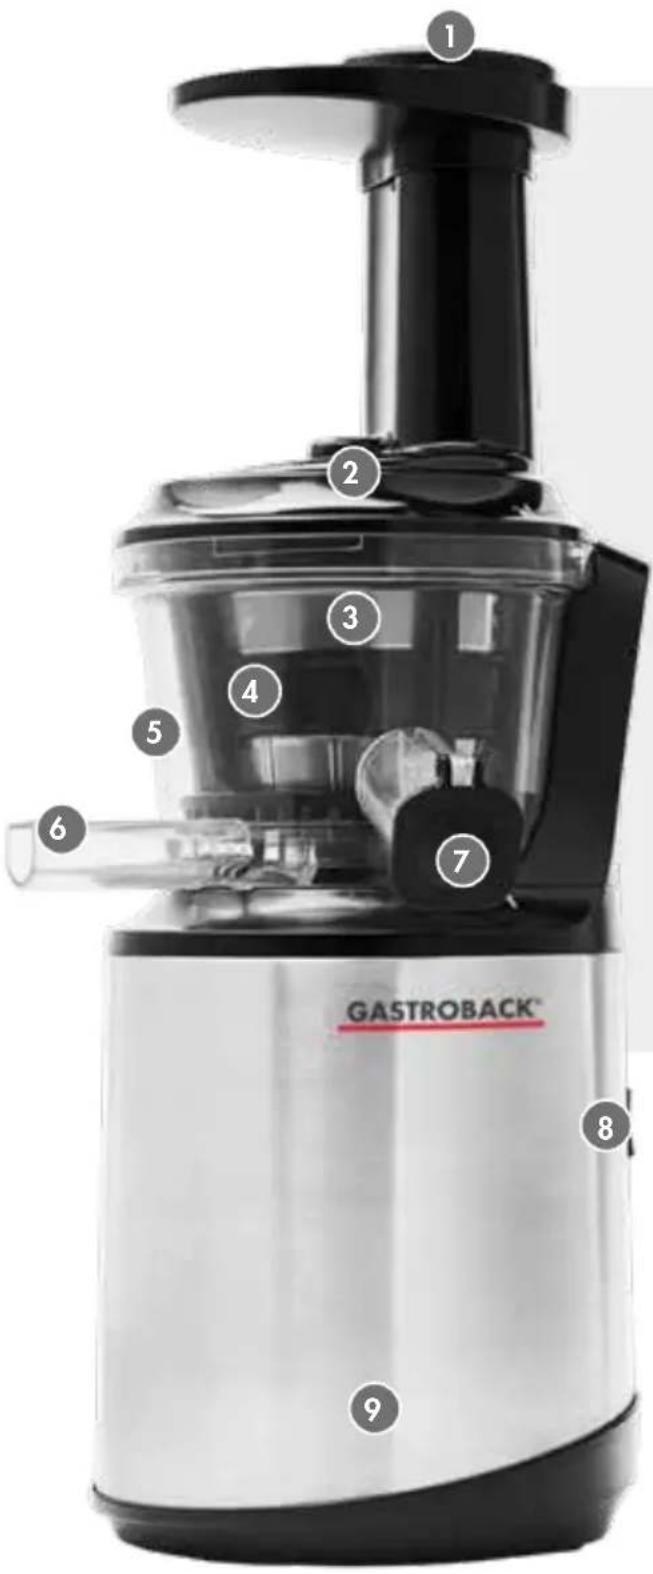
1 PUSHER
2 JUICER COVER WITH FEED CHUTE
3 FILTER SLEEVE WITH STAINLESS STEEL SEPARATING MESH
4 RUBBER BLADE SLEEVE
5 JUICE COLLECTOR
6 PULP OUTLET
7 JUICE SPOUT WITH DRIP-STOP
8 POWER SWITCH
9 HARD-WEARING MOTOR BASE WITH STAINLESS STEEL HOUSING
Accessories:
• Pulp container — For accumulating the pulp
• Juice container with scale – For up to 800 ml juice
• Cleaning brush – For the sieve of the filter sleeve
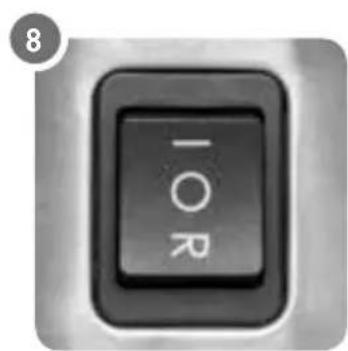
- : Switching the motor on - forward
○ : Switching the motor off
R : Switching the motor on — reverse
PROPERTIES OF YOUR NEW JUICER
The SLOW JUICER ADVANCED VITAL is intended for juicing fruit and vegetables, as well as juicy greens and herbs (see: 'Tips for Best Results'). Common types of juicers cut the ingredients in very small and fine pieces, filtering the outcome. The SLOW JUICER ADVANCED VITAL uses squeezing tools for pressing out the juices—a method, that can be successful even with types of food that cannot be juiced via cutting devices.
- The heavy-duty motor can well extract even fibre-rich vegetables (e.g. celery). Due to the slow motion of the motor, the appliance is operated on a low level of noise and vibrations.
- When switching off the motor, via an integrated, electronic brake the motor stops immediately. To meet the requirements of different types of food, the motor can be operated in reverse direction ("R"; see: 'Power Switch for Forward and Reverse Operation'). This feature may help to remove obstacles from the juicing system without disassembling the system (see: 'Operation / Methods for Removing Obstacles').
- The rubber blade sleeve removes the juices and fine particles and fibres from the separating mesh of the filter sleeve, thus reducing the risk that fine residues of pulp clog the juicing system.
- The rubber flap at the pulp outlet ensures that the pulp does not fall out of the filtering area of the juicing system, before the juices are extracted as far as ever possible.
- Each part of the juicing system, coming in contact with food during operation, can be removed after operation. Thus, the juicing system can be cleaned via warm dishwater or in an automatic dishwasher (see: 'Care and Cleaning').
- Safety interlocks prevent operation of the motor, if the juicing system is not assembled correctly (see: 'Safety Features').
- For keeping your workspace clean, a manually operated drip-stop shutter at the juice spout avoids dripping, when removing the juice container after operation (see: 'Drip-Stop Feature').
- The provided containers for juices are designed for fitting perfectly to the motor base. Therefore, juices and pulp are not spilled during operation. However, you may use any type of fitting container for collecting the juices and pulp during juicing.
DRIP-STOP FEATURE
At the juice spout, a drip-stop shutter is located. After switching off the motor and before removing the juice container. For using this feature fold the black flap at the juice spout down to the closed position. This will keep your working space clean.
IMPORTANT - Do not forget to open the drip-stop shutter, before juicing the next portion. Otherwise, the juice collector could overflow. The drip-stop shutter points upwards when it is open.
POWER SWITCH FOR FORWARD AND REVERSE OPERATION
The power switch at the motor base controls 3 functions:
"I": Activates the motor in forward motion and starts making juice. The motor runs continuously until you switch off the appliance via the power switch.
“O”: Switching the power switch to the central position stops the motor.
"R": Activates the motor in reverse operation. You need to hold the reverse position pressed, because in this position the power switch will spring back.
You may try reverse operation, when ingredients stick within the juicing system. Additionally, this function may be useful, when fibres fill the juice collector increasingly, or when very juicy ingredients are processed. Agitate the motor in forward and reverse operation in turn for getting the optimum amount of juices and preventing the juice collector from blockage.
IMPORTANT - Switch the power switch to the central stop position ("O") each time before you toggle to the opposite direction or unplug the appliance. This will help to maintain a long lifetime of the motor.
SAFETY FEATURES
The appliance is equipped with various safety features for enabling safe operation. Under no circumstances, attempt to corrupt or shortcut the safety features. Do not operate the appliance any more, when you notice that any of these features is not in proper operating condition. Instead, return the appliance to an authorized service centre for examination and repair.
Safety Interlock and Electronic Break of the Motor
A safety interlock ensures correct and safe operation of the SLOW JUICER ADVANCED VITAL and protects you form injuries and damage, if the appliance is not assembled in a safe way. Do not attempt to corrupt the safety interlock.
WARNING – If the motor does not start when switched on, always switch off (power switch to „O“) and unplug the appliance, before looking for the reason (see: ‘Solving Problems’). When switched on (power switch in the upper “I” position), the motor will start agitating IMMEDIATELY as soon as the safety interlock is engaged. To prevent the movable parts of the appliance from keeping running unintentionally, when you switch off the motor, the integrated electronic break stops the motor immediately.
Protection Devices
For enabling an elongated lifetime, the SLOW JUICER ADVANCED VITAL stops operation automatically, when the motor is overloaded or overheated. Activation of the protection devices may occur on the following conditions:
- The juicing system is overfilled. Only use the pusher, when required. By the squeezing auger most ingredients are pulled into the juicing system automatically. Only fill in single pieces of food one by one and wait for each piece to be processed, before filling in the next one.
- Hard and fibrous pieces of food block the squeezing auger. The motor is agitating noticeably slowly.
- Too much food is processed in continuous operation for a too long time (more than approx. 15 minutes). Make breaks of approx. 30 minutes in time (see: 'Method of Operation and Making Breaks').
- Extremely hard parts of the ingredients (e.g. stalks, stones, or hard shells) block the drive of the juicing system completely.
When the protection devices have been triggered, switch off the motor (power switch to "O") and unplug the appliance. Remove any obstacles (see: 'Care and Cleaning / Disassembling the Juicing System'). Leave the motor cool down for 30 - 40 minutes.
Thereafter, you may put the appliance into operation again (see: 'Operation / Resetting the Protection Device').
NOTE
You may use the time required for cooling down (30 - 40 minutes) for removing any obstacles and blockages in the juicing system and preparing another portion of your food. After solving the problem and leaving the motor cool down, you can reactivate the appliance.
METHOD OF OPERATION AND MAKING BREAKS
The high-performance motor of the appliance is designed for an elongated working life when operated in usual household use. For preserving the working life of the motor, avoid overloading and overheating (see: 'Safety Features').
IMPORTANT - For saving energy and avoiding overheating of the motor, do not let the appliance operate uselessly.
When operating the appliance continuously for a too long period (more than 15 minutes), or if the juicing system is blocked, the protection devices may be triggered, stopping operation at once (see: 'Safety Features'). Therefore, It is a good idea to make breaks of approx. 30 minutes in time. Use this time for emptying the containers for juice and pulp, preparing another portion of food, and/or ensuring that the system is free of obstacles.
Before starting juicing, fill 1-2 pieces of food into the feed chute to avoid operating the appliance with the juicing system completely empty. With the pieces of food in the feed chute, switch on the motor. During juicing, it is best to fill in the pieces of food separately and let the squeezing auger take them in one by one to avoid overload and for getting the maximum possible amount of juice. Only if required, press on the pieces of food during juicing via the pusher.
If you notice that the motor runs unusual slowly, you may switch to reverse operation for removing the obstacles (see: 'Operation / Using Reverse Operation'). If required, process your food in smaller portions and/or, if applicable, process hard ingredients combined with soft food.
TIPS FOR BEST RESULTS
- Each type of fruit and vegetables has an individual content of juices. Additionally, the amount of juices you can get, depends on the type, quality, and freshness of the ingredients.
- Recipes for juices do not require exact amounts and juicing is always done with high tolerances. Exact proportions are not crucial for getting delightful drinks.
- Almost all types of fruit and vegetables will turn out well with this juicer, including berries, leafy vegetables, grasses, herbs, and sprouts. Best suited are fruit and vegetables that give off their juices easily by squeezing.
CAUTION – Do not process any types of food that contain large amounts of oils to avoid damage to the juicing system.
PURCHASING AND STORING FRUIT AND VEGETABLES
- You can save money and get really fresh ingredients, when buying seasonal products. Avoid long periods of storage.
- In most cases, it is best to buy your ingredients in small portions just before processing and consumption. This holds especially for highly perishable food (e.g. greens, most berries).
- Some types of fruit and vegetables may need some time for ripening (e.g. kiwi fruit, peaches, mangoes). In these cases, wash your food carefully after purchasing and check your food daily. Avoid missing the correct time for consumption.
- Most fruit and vegetables may be stored at a cool place (approx. 12-15°C). Some types of fruit and vegetables may go off, when stored at a temperature below 10°C (e.g. bananas, some citrus fruit).
- Only delicate food (e.g. some greens, stalks of celery, cucumbers, herbs) need to be stored in the refrigerator. Fresh herbs and delicate greens should be packed in an airtight bag or box and consumed before long.
- After storing your food for some time, just before juicing, soak your food in clear, cold water. Process your food after it has absorbed a sufficient amount of water. This may help to extract the valuable nutrients.
- For preserving the nutrients, you should consume freshly prepared juices immediately.
PREPARING YOUR FOOD FOR JUICING
- Start the preparation of your ingredients by thoroughly washing under running water.
- Just before juicing, remove any parts that are not suited for consumption, like inedible shells and skins, stalks, seeds. For example, this holds for kiwi fruit (skin), pineapple (shell and stalk), peaches (stones), apples (seeds, stalks), dates (stones), and cherries (stones).
IMPORTANT - Always remove hard parts and defrost frozen food completely, before juicing. Otherwise, these parts could damage the juicing system. Leave hot food cool down before juicing.
- Citrus fruit must be peeled before juicing. Depending on the type of fruit, the juice may be very sour. It may the better to add these juices to other juices for refining the taste. Depending on the desired consistency of the juice, you may get good results, when juicing citrus fruit in turn with other ingredients.
- Cut the ingredients to pieces of approx. 5x3x2cm to make them fit easily into the feed chute. You should roll up or fold the leaves of hard-fibred ingredients (e.g. celery) before juicing. This may prevent the fibres from wrapping around the squeezing auger.
- Fibre-poor ingredients (e.g. carrots) should be extracted with fibre-rich ingredients (e.g. celery). Attempt to cut large carrots lengthwise into 4 equal parts.
- You should avoid processing sugar cane, coconut, beans, or cereals (e.g. rice). However, if you really wish to, always cook or at least soak these ingredients in water for a sufficient time to make them soft and juicy.
THE BEST METHOD
- Do not allow the juice collector to be filled above the separating mesh, because with the juice collector overfilled, juice and pulp cannot flow out easily, and the juice could run out. This may occur especially with very juicy ingredients.
- To avoid overflow, when extracting juicy types of food (e.g. cucumbers, cherries, tomatoes), you should alternate operation in forward and reverse direction repeatedly for getting the optimum amount of juice.
- When juicing various ingredients with different consistency, you will get the best results, when alternating hard and soft ingredients and/or fibrous and juicy ingredients. This way, the pulp of the hard or fibrous ingredients is flushed from the filter sleeve intermediately, and the juicer extracts the optimum amount of juices.
- For processing herbs, sprouts, or small leaves of greens, wrap these ingredients in a large leaf of lettuce or spinach. If possible, add these ingredients intermediately to other large ingredients. Repeatedly, alternate the direction of operation (forward and reverse) for getting the highest possible amount of juice.
- You may insert small tomatoes in a whole into the feed chute. Large tomatoes must be cut to fitting pieces.
- You cannot speed up filling your juice container by pressing the food down via the pusher. Instead, the juices will not be sufficiently separated from the pulp. To get the largest possible amount of juice and to avoid overloading the motor, feed the pieces one by one into the feed chute. Only if required, push the pieces down slowly via the provided pusher until the squeezing auger takes in the food automatically. When extracting fibre-rich ingredients with low water content, cut the ingredients to small pieces, before putting them into the feed chute slowly. Cut cigar-shaped ingredients in short pieces of approx. 5 cm in length. This way, you avoid that long fibres wrap around the squeezing auger and filter sleeve, clogging the juicing system.
- Insert cigar-shaped fruit and vegetables (e.g. carrots, cucumbers, celery) with the tip (root or flower) down into the feed chute.
- Even some time after operation, the juice may drip from the juice spout of the juice collector. You can stop dripping via the drip-stop shutter (see: 'Properties of Your New Juicer / Drip-Stop Feature'). However, do not forget to re-open the drip-stop shutter, before juicing another portion.
- You can keep your working space clean, when holding a sufficiently large tray at hand for placing the parts of the juicing system on it, when disassembling the juicing system. To avoid discolouration and damage to the surfaces of the containers of your juicer, you should not store the juices or pulp within the containers of the appliance.
THE BEST BLEND
- It is quite easy to create a healthy and delightful juice drink. Combine your favourite ingredients for getting the colour, flavour, and consistency according to your individual liking: e.g. sweet little tomato, yellow tomato or green tomato all have the particular taste of tomatoes, and may be used to prepare juice of different colours.
- With each batch of food you process, the amount of juices and the intensiveness of flavours could differ a little. You may like this bit of daily variation.
- You avoid the typical brownish discolouration of apple juice or pulp by adding a splash of lemon juice. Alternatively, add a piece of lemon during juicing. However, you should avoid adding citric acid/juice to tomato juice for conservation, as this may influence the taste and healthfulness unpleasantly.
- Ingredients with high content of starch and fibres go perfectly with very juicy ingredients.
- Strong aromas should be used very sparingly, when combined with delicate flavours.
USING THE PULP
- Starch and fibres are the major part of the pulp, but as well, it contains a lot of nutrients, essential for your daily diet. There are many ways of using the pulp. However, to avoid high loss of vitamins and a lack in taste, as with the juices, you should consume the pulp at the day of preparation.
- You can use the pulp for yogurt and fromage frais, for filling roulades and Swiss roles, and for thickening soups and sauces. Cover the pulp of sweet fruit with
batter for baking it in the oven. Additionally, you may like it spiced to taste as a sandwich spread or for custard.
- The pulp is too valuable for domestic waste. If you do not wish to consume it, you may dispose of the pulp as compost.
BEFORE FIRST USE
⚠ WARNING – DO NOT let children play with the appliance or any part of it or the packaging! Always unplug the appliance before cleaning or moving it, before assembling or disassembling any parts, and when the appliance is not in use. Do not place or immerse the motor base or power cord in water or other liquids or spill any liquids on the exterior of the appliance. Do not use any abrasive or corrosive cleaners for cleaning to avoid damage to the surfaces. Do not place the motor base in an automatic dishwasher.
- Unpack the appliance and all parts and accessories carefully. Check that no parts are damaged or missing (see: 'Knowing Your New Slow Juicer'). Carefully remove all packaging, shipping materials, stickers, and promotional materials. However, DO NOT remove the model label or warning labels.
- Before first use and after an elongated period of storage, clean all parts of the appliance (see: 'Care and Cleaning').
OPERATION
The SLOW JUICER ADVANCED VITAL is designed for separating juices and pulp of fresh food (see also: 'Properties of Your New Juicer' and 'Tips for Best Results'). The appliance is not suited for very hard, frozen, hot, and/or dried ingredients (e.g. dried spices, nuts, seeds). Do not process any food with high content of oil or fat to avoid damage to the juicing system. Always remove very hard parts of your food before juicing.
⚠ WARNING – Always ensure that the appliance and all its parts and accessories are out of reach of children younger than 8 years. Always switch off (power switch to "O") and unplug the appliance, before assembling or disassembling any parts. Do not leave the motor base unattended, while it is connected to the power supply.
WARNING – Do not operate the appliance, when the sealing ring on top of the inner tube of the juice collector is missing, damaged, polluted, or not mounted correctly. Ensure that the exterior and sealing surfaces of the juice collector and the shaft of the squeezing auger are clean and dry, before assembling the juicing system on the motor base. Otherwise, residues of food and liquids may get into the motor base and/or cause damage and leakage. At the bottom of the juice collector the rubber flap seals the pulp outlet. Before operating the appliance, always ensure that the rubber flap is inserted correctly and firmly in the pulp outlet. Do not overfill the juice collector to avoid overflow. Do not allow the filling level in the juice collector move up beyond the upper rim of the separating mesh. During juicing, ensure that juices and pulp run into the containers without obstacles. Otherwise, caused by overflow of the juice collector, the juice could run on or under the motor base.
WARNING – If any liquids run out during operation or are accumulating under the motor base, immediately unplug the appliance. DO NOT remove the squeezing auger from the juice collector with the juice collector still mounted on the motor base, because this may cause the juices run out onto the motor base. Always remove the juicing system from the motor base by pulling the juice collector upwards, before taking out the squeezing auger (see: 'Care and Cleaning / Disassembling the Juicing System').
If liquids have run onto the motor base, clean the motor base and leave the motor base dry naturally for at least 1 day (see: 'Solving Problems' and 'Care and Cleaning').
Ensure to place the appliance on a suitable, level working space. Always keep the appliance in a sufficient distance to the edge of the working space and to other objects. Due to vibrations during operation, the appliance might move around on the working space. While the motor is agitating, always have an eye on it.
IMPORTANT - The motor may operate continuously for max. 15 minutes. Then, make a break of approx. 30 minutes. For reducing energy consumption and preventing overheating, always switch off the appliance intermediately, while preparing another portion of food, and when making a break.
ASSEMBLING THE JUICING SYSTEM
- Place the motor base on a suitable, dry, and clean surface (see: 'General Safety Instructions') with the power switch facing to the right side.
- Ensure that the dark central sealing ring of the juice collector is clean and undama-
ged. Install the central sealing ring at the top of the inner tube. The groove of the sealing ring must be attached to the rim of the inner tube even and without wrinkles.
- Push the dark rubber flap at the bottom of the juice collector into the slit of the pulp outlet. Firmly and evenly press the rubber flap into the slit.
⚠ WARNING – Before operating the appliance, always ensure that the sealing ring is mounted correctly on the inner tube of the juice collector, and the pulp outlet is closed correctly via the rubber flap. Also ensure that the exterior of the juice collector and the shaft of the squeezing auger are clean and dry, before mounting these parts to avoid that residues of food and liquids get into the motor base and/or cause leakage of the sealing ring.
- Place the juice collector on the motor base with the pulp outlet facing to the left. Align the white marking lines at the bottom of the juice collector and at the top plate of the motor base (in front of the juicer post). If required, rotate the juice collector to and fro a little until the juice collector slips down onto the motor base, coming to a stable stand.
- Insert the rubber blade sleeve into the juice collector. With the rubber blade sleeve assembled correctly, the small, dark cogwheel at the bottom of the juice collector rotates, when turning the rubber blade sleeve.
- Insert the filter sleeve into the juice collector. On the upper rim of the filter sleeve, there is a small arrow. Align this arrow with the white marking line at the juicer post of the juicer base, while pressing the juice collector down gently until it is mounted stable and cannot be turned.
- Insert the squeezing auger with the gear rim facing downwards into the filter sleeve and push the squeezing auger without violence down into the filter sleeve until the squeezing auger is placed without wobbling in the filter sleeve. If required, move the squeezing auger to and fro a little to make it settle stably within the filter sleeve.
NOTE
With the parts positioned correctly, the rim of the filter sleeve protrudes the juice collector approx. 14 mm and only the upper stainless steel shaft of the squeezing auger sticks out of the filter sleeve.
⚠️ CAUTION – Do not use violence. You cannot lock the juicer cover, if there is still a gap between juicer cover and juice collector. In most cases, the squeezing auger needs to be pushed down a little deeper. It may help to move the squeezing auger a little for this.
- With the open lock icon facing to the white marking line on the juicer post, place the juicer cover onto the juice collector. If required, turn the juicer cover a little, until the juicer cover settles down on the juice collector without any gap. Then turn the juicer cover clockwise until it engages into place with a distinctly audible snapping noise. The closed lock icon at the juicer cover and the white marking line on top of the juicer post must be levelled up now.
-
Insert the pusher into the feed chute of the juicer cover. Position the containers for juice and pulp under the juice spout and pulp outlet.
-
Ensure to open the drip-stop shutter of the juice spout by folding it up to the open position. The appliance is now ready for juicing.
NOTE
You should use the provided containers for juice and pulp. However, you may place any fitting and sufficiently large container (e.g. jugs, drinking glasses, or mugs) under the juice spout and/or pulp outlet. Keep in mind that splashing could occur and juices could run down at the exterior of the used containers. However, due to the extra-wide juice spout, splashing may occur only rarely.
IMPORTANT - Due to vibrations, the appliance could move around on the work space during operation. Therefore, keep an eye on the position of the appliance and the containers for juice and pulp to avoid that juices and pulp run down at the sides of the containers.
JUICING YOUR FOOD
CAUTION – Do not operate the appliance while the juicing system is completely empty. Before starting the motor, fill a few pieces of the prepared food into the feed chute to avoid damage to the squeezing auger and filter sleeve. Before filling in food, always ensure that you have mounted the juicing system completely and correctly (see: 'Assembling the Juicing System').
NOTE
For keeping your workspace clean, it is good advice to hold a sufficiently large tray at hand, where you can lay the parts of the juicing system aside, when opening the juicing system.
NOTE
A lot of useful tips for preparing and processing your food are given in chapter 'Tips for Best Results'.
- Prepare the ingredients by carefully washing them and removing all inedible parts (e.g. stalks, shells, skins, and seeds; see: 'Tips for Best Results / Preparing Your Food for Juicing'). Cut large ingredients to slices that may fall easily through the feed chute. Prepare the appliance for operation (see: 'Assembling the Juicing System'). Ensure to place sufficient containers under the juice spout and pulp outlet. Ensure that the drip-stop shutter is in the open position (facing upwards). Ensure to switch off the appliance (power switch to the central "O" position).
CAUTION – With the juicing system mounted and the power switch in operating position "I", the appliance starts operation immediately, when connecting the appliance to the power supply. Thus, always ensure to switch off the appliance via the power switch (central position "O"), before plugging in the power plug.
⚠ WARNING – For crushing the food within the juicing system, the squeezing auger takes in your food automatically. To avoid severe injuries and damage, do not grasp into the feed chute with your hands. Ensure that no foreign objects get into the feed chute (e.g. hair, parts of your clothes, cooking utensils), while the appliance is connected to the power supply. If required, only use the dedicated pusher. During operation, do not hold your face over the feed chute, because parts of the food and splashes of juice could be hurled out.
- Loosely fill a few pieces of the prepared food into the feed chute.
- Insert the power plug into a sufficient wall power outlet (see: 'Important Safeguards for Electrical Appliances').
- Switch on the appliance at the power switch (upper position "I"). With the appliance assembled correctly, the motor starts operation, spinning the rubber blade sleeve and squeezing auger. Usually, the squeezing auger takes in the food automatically. In most cases, there is no need to use the food pusher. The juices run out through the juice spout, and the pulp is pressed out of the pulp outlet in small heaps.
- In the same speed, the food is taken in by the squeezing auger, you may fill in further pieces of food. However, do not leave the motor operate continuously for more than 15 minutes.
⚠️ CAUTION – Ensure that the juice collector is not filled above the upper rim of the separating mesh to avoid overflow. Always immediately unplug the appliance, when liquids run onto the motor base and/or run out below the juice collector. Clean and dry the appliance, when liquids have been spilled on the motor base (see: 'Care and Cleaning').
NOTE
If the usage of the pusher is required, press your food down slowly and evenly, but do not apply too much pressure to get the optimum amount of juices. When pressing too hard, the pulp will be very wet and there will be only little juice. Additionally, the juicing system may get clogged easily.
During operation, ensure to avoid overfilling the containers for juice and pulp. Check, whether the juices are running and pulp is produced. The pulp must fall easily and without obstacles into the pulp container (see: 'Methods for Removing Obstacles' and 'Solving Problems').
NOTE
When extracting juicy types of fruit and vegetables, you may repeatedly operate the juicer in forward and reverse operation for a while for getting the optimum amount of juice (see: 'Using Reverse Operation').
IMPORTANT - Before toggling to reverse operation and back, always switch to the off position ("O") to make the motor stop completely. If reverse operation does not work for getting the juicing system free of obstacles, you need to disassemble the juicing system (see: 'Care and Cleaning / Disassembling the Juicing System'). However, do not attempt to remove the squeezing auger, while the juicing system is placed on the motor base. Otherwise, liquids could run onto the motor base.
- When the motor stalks or runs unusually slowly during juicing, try reverse operation intermediately via the lower position of the power switch ("R"; see: 'Methods for Removing Obstacles').
- For juicing larger amounts of food, make breaks of approx. 30 minutes after every 15 minutes of continuous operation. During your breaks, switch off the motor (power switch to the central position "O"), and unplug the appliance. You may use the breaks for preparing the next portion.
-
After juicing, switch the power switch to "O", and unplug the appliance. Remove the juicing system from the motor base (see: 'Care and Cleaning / Disassembling the Juicing System').
-
Empty and rinse all parts of the juicing system immediately after juicing. Then clean all used parts (see: 'Care and Cleaning / Thorough Cleaning of the Juicing System').
NOTE
You should not store juices and pulp in the containers of the appliance to avoid that food dries on the surfaces. Additionally, some food may cause discolouration. For storage, fill the products into sufficient containers and clean the containers of the appliance immediately after usage. Pulp and juices may be stored in the refrigerator for 1 day at the maximum. However, for always getting the optimum benefits of vitamins and other valuable nutrients, it is best to always freshly prepare and consume your juices.
⚠️ CAUTION – If any extremely hard, sharp-edged parts of the food (e.g. pieces of stones) get clamped between the filter sleeve and squeezing auger, you need to remove and disassemble the juicing system for removing the obstacle (see: 'Care and Cleaning / Disassembling the Juicing System'). Do not attempt to get this type of obstacle out via reverse operation to avoid damage to the filter sleeve and squeezing auger.
When you are processing very juicy ingredients or the squeezing auger and filter sleeve get blocked by tough fibres of the ingredients, it might be useful to intermediately and repeatedly try reverse operation for a short time (see: 'Properties of Your New Juicer / Power Switch for Forward and Reverse Operation').
- Switch to the central position "O" for stopping the motor. Then switch to the lower reverse position ("R"). You need to hold the reverse position pressed as long as the motor shall run in reverse operation, because in this position the power switch will spring back.
- Let the motor operate, until the ingredients are moved up. Then, release the power switch. Switch to the upper forward position ("I") again.
- When the juicer runs again as usual, you may continue juicing by filling in the next pieces of food. Otherwise, try again by repeating steps 1 and 2.
IMPORTANT - If this procedure is not successful, you need to remove the complete juicing system for clearing away the obstacle, before you can continue operation (see: 'Care and Cleaning / Disassembling the Juicing System').
METHODS FOR REMOVING OBSTACLES
During juicing, check for the juice running out of the juice spout freely. Additionally, the pulp must move automatically through the pulp outlet in small heaps. Without pulp and juice coming out, check if the juicing system is blocked.
⚠ WARNING – To avoid risk of injuries, do not grasp into the juicing system or insert any foreign objects into the juicing system, while the appliance is live. Always switch off (power switch to "O") and unplug the appliance, before opening the juicer cover.
WARNING – Do not let the filling level within the juice collector move up beyond the upper rim of the separating mesh. Additionally, do not attempt to remove the squeezing auger with the juice collector mounted on the motor base. Otherwise, overflow of the juice collector could occur with liquids running onto the motor base. If liquids ran onto the motor base, in any case, immediately unplug the appliance and clean the appliance (see: 'Care and Cleaning').
CAUTION – Switch off the appliance at once, if any extremely hard parts of the food get clamped between the filter sleeve and juice collector. You need to remove and disassemble the juicing system for removing these obstacles to avoid damage to the filter sleeve and juice collector (see: 'Care and Cleaning / Disassembling the Juicing System').
- Start your search for obstacles at the feed chute: Pieces of food may be wedged together within the feed chute or the squeezing auger cannot take them in.
What you may try about it: Use the pusher for gently and slowly pushing your food down until the squeezing auger takes it in automatically.
- Ingredients containing a lot of tough fibres could clog the juice collector and/or block the separating mesh of the filter sleeve. This may occur especially, when filling too much hard pieces into the feed chute simultaneously and/or applying hard pressure to the pusher during juicing.
What you may try about it: Repeatedly applying reverse operation may be useful (see: 'Using Reverse Operation').
- Residues of pulp could clog the pulp outlet or juice spout. As a final result, this may lead to overflow.
What you may try about it: When the filling level in the juice collector moved up almost to the upper rim of the separating mesh, you need to remove the complete juicing system and pour out the juices over a sufficient bowl. Then rinse the
pulp outlet and/or juice spout thoroughly. If applicable and performed in time, process fibrous ingredients and very juicy ingredients in alternation. However, do not let the filling level move up above the upper rim of the separating mesh.
- When reverse operation and alternation of ingredients do not work, you need to remove the juicing system from the motor base. Thereafter, disassemble and clean the parts for removing the obstacles (see: 'Care and Cleaning / Removing Residues of Fibres from the Filter Sleeve').
NOTE
When the motor stops unexpectedly after an elongated period of continuous operation, the protection device may have been triggered (see: 'Solving Problems' and 'Resetting the Protection Device').
RESETTING THE PROTECTION DEVICE
IMPORTANT - Do not let the motor operate continuously for more than 15 Minutes. Let the motor cool down for at least 30 Minutes after each 15 Minutes of continuous operation. Additionally, if the motor gets stuck due to hard pieces of food clamped between the squeezing auger and filter sleeve, immediately switch off the motor (power switch to "O"; see: 'Methods for Removing Obstacles').
If the protection device has been triggered, the motor stops operation immediately. Even after cooling down the motor does not work (see: 'Properties of Your New Juicer / Safety Features'). You need to reset the protection device manually for operating the appliance again.
- Switch off (power switch to "O") and unplug the appliance.
- Remove the juicing system from the motor base (see: 'Care and Cleaning / Disassembling the Juicing System'). Remove any obstacles and let the motor cool down for 30 - 40 minutes.
- With the motor cooled down, turn the motor base upside down. The protection switch ("reset") is located at the bottom of the motor base. Press the protection switch. If required, use a ballpoint pen or pencil.
- Thereafter, reassemble the juicing system correctly and completely (see: 'Assembling the Juicing System'). Thereafter, you may operate the appliance quite as usual.
SOLVING PROBLEMS
Many problems during operation may be solved easily by observing the hints, given in 'Properties of Your New Juicer', 'Tips for Best Results' and 'Operation'. Additionally, you will find solutions in the following table.
| Problem Reason The Solution | ||
| Emergency stop required? Unplug the appliance. | ||
| The juice collector does not fit stably onto the motor base. | Wrong orientation of the juice collector. | Align the pulp outlet of the juice collector to the left with the white marking lines on the bottom of the juice collector and top of the motor base levelled up (see: 'Operation / Assembling the Juicing System'). |
| You cannot engage the juicer cover. There is still a gap between juice collector and juicer cover. | The filter sleeve is in wrong orientation. | Turn the filter sleeve until the arrow on the rim of the filter sleeve points to the white marking line at the juicer post. The filter sleeve fits into the juice collector only in the correct orientation (see: 'Operation / Assembling the Juicing System'). |
| The squeezing auger sticks out the filter sleeve too far. Possibly, the small cogwheel at the bottom of the juice collector is not in fitting orientation. | When the squeezing auger is installed correctly, only the central shaft of the squeezing auger protrudes the rim of the filter sleeve. Without violence move the squeezing auger a little to and fro, while pushing the squeezing auger gently down. If this is not successful, pull the filter sleeve upwards a little and turn the rubber blade sleeve by some degrees. Then, try to push down the assembly and the squeezing auger sufficiently. | |
| Wrong orientation of the juicer cover. | For assembling the juicer cover, the feed chute must face to the right rear side of the appliance (approx. 1 o'clock position). Align the white open lock icon at the bottom of the juicer cover and the marking line of the juicer post. | |
| The motor does not move, although the power switch is turned to "I" (forward) or "R" (reverse) and/or the motor stops during juicing unexpectedly. | The appliance is not live. Check, if the power plug is still inserted correctly in an appropriate wall power outlet and the used power outlet is live (connect a lamp). | |
| The juicing system is not installed correctly. The safety interlocks prevent operation.Solution | Switch off and unplug the appliance. Check, whether the juicer cover is locked correctly with the closed lock icon on the juicer cover and the white marking line on the juicer post levelling up. Always ensure to install the juicing system completely and correctly (see: 'Operation / Assembling the Juicing System'). | |
| Problem Reason The | ||
| The juicing system is blocked by fibrous types of food. | You may attempt to loosen the obstacle via reverse operation (see: 'Operation / Using Reverse Operation'). If the motor does not start immediately, switch off and unplug the appliance. Remove the juicing system from the motor base and remove the obstacle manually (see: 'Care and Cleaning / Disassembling the Juicing System'). | |
| Extremely hard parts of the food block the juicing system. | Immediately switch off and unplug. Wait approx. 30-40 minutes. During this time, remove the obstacle manually (see: 'Care and Cleaning / Disassembling the Juicing System'). Before processing your food, carefully remove all inedible and very hard parts of your food! | |
| The motor is overloaded or overheated. The protection device is active. | Switch off and unplug the appliance. Leave the appliance cool down for 30-40 minutes. Then push in the reset switch at the bottom of the appliance (see: 'Properties of Your New Juicer / Safety Features'). Do not let the appliance operate continuously for more than 15 minutes. After each 15 minutes of operation, make a break of at least 30 minutes. | |
| Malfunction occurred. Immediately unplug the appliance. Get in contact with an authorized service centre. | ||
| The squeezing auger does not take in the food. You need to use the pusher. | The pieces of food are too large. | Cut your food to smaller pieces (see: 'Tips for Best Results / Preparing Your Food for Juicing'). |
| Juice sprays out and splashes at the juice spout. | Some types of juices get frothy during juicing. | If possible, process this type of food in combination with other foodstuffs. Avoid using the pusher. Repeatedly, let the motor run forward and reverse in alternation. |
| The drip-stop is not open-ed correctly. | Ensure that the drip-stop shutter is folded completely open and pointing upwards. | |
| You get an insufficient amount of juice, OR there is no juice at all, OR the pulp is very wet. | Only little amount of juices in your food. | If possible, process these types of food in turn with other, juicy ingredients (see: 'Tips for Best Results'). The amount of juices you can get from individual batches of ingredients may vary to a high degree. After storage, soak your food in cold water, before juicing (see: 'Tips for Best Results'). |
| The drip-stop is closed. Before juicing, always ensure that the drip-stop is opened completely (dark drip-stop shutter at the juice spout in the upper position). | ||
| The juice spout is clogged. | If required, remove residues of pulp from the juice spout (see: 'Operation / Methods for Removing Obstacles'). If the problem occurs frequently, check the filter sleeve for damage. If required, get in contact with your vendor for replacement. | |
| You are working too fast. Perhaps you are using the pusher. | Slow down. Only fill in the pieces of food one by one. Avoid using the pusher. Repeatedly, let the motor operate forward and reverse in turn. | |
| The juicing system is clogged. Long fibres are wrapped around the squeezing auger and filter sleeve. | Intermediately use reverse operation (see: 'Operation / Using Reverse Operation'). If the problem persists, remove the obstacles manually (see: 'Care and Cleaning / Disassembling the Juicing System'). Cut fibrous food to shorter length. Fold or roll up leaves. Try to process fibrous foodstuffs in turn with soft and juicy ingredients. | |
| The rubber flap at the pulp outlet is damaged or blocked. | Disassemble the juicing system (see: 'Care and Cleaning / Disassembling the Juicing System'). Check the rubber flap. If required, get in contact with your vendor. | |
| The filter sleeve is dama- ged or clogged. | Disassemble the juicing system (see: 'Care and Cleaning / Disassembling the Juicing System'). Check the filter sleeve. If required, clean the filter sleeve (see: 'Care and Cleaning / Removing Residues of Fibres from the Filter Sleeve'). Replace the filter sleeve, if the filter sleeve is bent or broken. For this, get in contact with your vendor. | |
| The rubber blade sleeve is missing or damaged. | Disassemble the juicing system (see: 'Care and Cleaning / Disassembling the Juicing System'). Check the rub- ber blade sleeve. The rubber blade must be smooth and correctly in place. If required, get in contact with your vendor. | |
| Liquid runs out at the rim of the motor base and/or is accumulating under the motor base. Immediately unplug the appliance and remove the juicing system from the motor base. Clean and dry the appliance (see: 'Care and Cleaning') and leave the motor base dry naturally for 1 day. Use this time for checking the possible reasons mentioned here. | The pulp outlet and/or juice spout are blocked. | The juice collector may not be filled above the upper rim of the separating mesh.— Cut fibrous types of food to shorter length.— Ensure to open the drip-stop shutter at the juice spout, before juicing (see: 'Properties of Your New Juicer / Drip-Stop Feature').— Check the pulp outlet for any obstacles (see: 'Operation / Methods for Removing Obstacles').— Fill the pieces of food in one by one.— Only use the food pusher, if the squeezing auger does not take them in automatically. |
| The sealing ring is missing, or polluted by residues of fibres, or damaged. | Check, whether the sealing ring is clean and undamaged and mounted correctly on the inner tube of the juice collector (see: 'Operation / Assembling the Juicing System'). Do not operate the appliance without the sealing ring in place. If required, get in contact with your vendor for replacement. | |
| The rubber blade sleeve is missing or damaged. | Check the rubber blades for damage. Do not use the appliance without the rubber blade sleeve. If required, get in contact with your vendor for replacement. | |
| The rubber flap at the pulp outlet is missing or damaged. | Check, if the rubber flap is pushed into the slit of the pulp outlet completely and firmly (see: 'Operation / Assembling the Juicing System'). Check the rubber flap for damage. If required, get in contact with your vendor for examination and repair. | |
| The juicing system is clogged. | Clean the juicing system (see: 'Care and Cleaning / Thorough Cleaning of the Juicing System'). Replace the filter sleeve, if the separating mesh is still clogged after thorough cleaning. For this, get in contact with your vendor. | |
| Excessive amounts of pulp are building up in the juicing system. | You are processing very fibrous types of food. | — Try to process fibrous types of food in turn with soft and juicy ingredients.— Cut fibrous types of food to shorter length.— Try reverse operation (see: 'Operation / Using Reverse Operation').— Remove and rinse the juicing system with some warm water (see: 'Care and Cleaning / Disassembling the Juicing System'). |
| You are working too fast. Only fill in the pieces of food one by one. Only use the pusher, if it is required really. Intermediately, let the motor agitate in reverse operation (see: 'Operation / Using Reverse Operation'). | ||
| The pulp outlet is clogged. Switch off the juicer and unplug from the power supply.Remove obstacles (see: 'Operation / Methods for Remo-ving Obstacles'). | ||
| The juicing system can-not be removed from the motor base. | The juicer cover is still locked to the juicer post. | At first unlock the juicer cover. Then pull up the juice collector for removing the juicing system from the motor base.Do not use violence. |
| You cannot disassemble the squeezing auger and filter sleeve. | The surfaces of the squee-zing auger and filter sleeve stick together due to residues of food. | Soak the parts for some minutes in warm dishwater.Then try again. If required, press on the hexagonal shaft of the squeezing auger for pushing the squeezing auger out (see: 'Care and Cleaning / Removing Residues of Fibres from the Filter Sleeve'). |
| Very hard parts for the food are caught between the filter sleeve and juice collector. | Hold the filter sleeve upside down over a soft surface (e.g. a folded kitchen cloth). Then, carefully press out the squee-zing auger (see: 'Care and Cleaning / Removing Residues of Fibres from the Filter Sleeve'). Always remove all very hard and inedible parts from your food, before juicing (e.g. stones, stalks, hard shells). Hard parts can damage the filter sleeve and squeezing auger. | |
CARE AND CLEANING
⚠ WARNING – Always ensure that all parts of the appliance are out of reach of children younger than 8 years. Always switch off (power switch to the central position "O") and unplug the appliance, before cleaning the appliance. Do not insert your hands or any foreign objects into the feed chute, juice spout, or pulp outlet, while the appliance is connected to the power supply.
CAUTION – If any liquids run out during operation or are accumulating under the motor base, immediately unplug the appliance. After operation, DO NOT remove the squeezing auger from the juice collector with the juicing system on the motor base, to avoid that juices run out onto the motor base (see: 'Disassembling the Juicing System').
Do not spill or pour any liquids on or in the motor base or power cord. Do not place or immerse the motor base or power cord in any liquids to avoid risk of fire, electric shock, and damage. Always keep the motor base dry and clean. DO NOT place the motor base or power cord in an automatic dishwasher!
⚠️ CAUTION – The plastic parts may get deformed, when treated with very high temperature. Do not place any parts of the appliance on hot surfaces. You may clean the removable parts (juicing system) and the containers of the appliance in an automatic dishwasher. If possible, select a low temperature and place the parts in the upper rack. Always handle the parts of the appliance with care.
IMPORTANT - Do not use abrasive cleaning agents or aggressive cleaners for cleaning the appliance or any part of it (e.g. bleach, solving agents, disinfectants), to avoid damage to the surfaces and the sealing ring. To avoid damage to the surfaces and loss of performance, do not use any hard or sharp-edged objects for cleaning (e.g. scoring pads, metal cooking utensils). Do not use violence!
NOTE
Some types of fruit, spices, or vegetables (e.g. capsicum, carrots, citrus fruit, curcuma) may cause discolouration or opaque stains at the transparent plastic parts. This will not influence the performance of the affected parts. Nevertheless, you should not leave any food dry on the surfaces. Especially food that could easily lead to discolouration and stains on the transparent plastic parts should be removed immediately after processing. Avoid storing the juices or pulp within the containers of the appliance to avoid stains.
DISASSEMBLING THE JUICING SYSTEM
CAUTION – Do not attempt to remove the juicing system (parts that can be removed from the motor base) with violence, to avoid damage to the safety interlocks. Always unlock the juicer cover first. The squeezing auger seals the central tube of the juice collector, thus preventing the juices from running onto the motor base. For disassembling the juicing system, always remove the juice collector from the motor base with the squeezing auger still in place. To avoid overflow: Do not let the appliance operate, when the filling level in the juice collector reached already the upper rim of the separating mesh.
NOTE
It is good advice to hold a sufficiently large tray at hand for placing the parts of the juicing system on it. This may help to keep your working space clean and dry.
- If possible and when overflow of the juice collector may not occur, let the appliance operate until remaining pieces of food in the feed chute are taken in. Then switch the power switch to the central position ("O"). Unplug the appliance.
- To avoid that juices still drip out of the juice spout, close the drip-stop shutter at the juice spout by folding the drip-stop shutter downwards and push it into the juice spout.
- Remove the containers for juice and pulp. Turn the juicer cover counter-clockwise for unlocking it.
- With the juicer cover, squeezing auger, filter sleeve and rubber blade sleeve still mounted, grasp the juice collector at both sides, holding the juicer cover with your thumbs in place, and pull the juice collector upwards for removing the juicing system from the motor base. Place the juicing system on an even and level surface that is resistant against water and fruit acids. Remove the pusher and juicer cover.
- If the juice collector is still filled with residues of juices and wet pulp: hold the squeezing auger with your finger in place, while turning the juice collector upside down over a sufficiently large plastic bowl. Let the runny residues in the juice collector flow out.
- Grasp the rim of the filter sleeve and pull the filter sleeve, rubber blade sleeve and squeezing auger out. Pull off the rubber blade sleeve.
- Turn the filter sleeve upside down for letting the squeezing auger fall into your hand.
IMPORTANT - If hard parts are clamped between the filter sleeve and squeezing auger and/or residues of pulp and juices are sticking to the surfaces, it might be difficult to remove the squeezing auger from the filter sleeve. Do not use violence to avoid damaging the separating mesh of the filter sleeve.
NOTE
You should rinse the parts of the juicing system immediately after removing them to avoid that any residues of fibres dry on the surfaces.
- If the squeezing auger does not come out of the filter sleeve easily, soak the filter sleeve and squeezing auger for some minutes in warm dishwater. Then place the filter sleeve upside down over a soft surface (e.g. folded kitchen cloth). At the bottom of the filter sleeve, carefully press onto the stainless steel shaft of the squeezing auger to release the squeezing auger, while pulling the filter sleeve upwards. This way, carefully press the squeezing auger out of the filter sleeve.
- Pull the dark sealing ring out of the juice collector.
- Thoroughly clean the parts of the juicing system as described in the following section.
THOROUGH CLEANING OF THE JUICING SYSTEM
- Disassemble the juicing system (see above: 'Disassembling the Juicing System').
IMPORTANT - You may clean the parts of the juicing system in an automatic dishwasher. Please take into account that, after the cleaning cycle of the automatic dishwasher, some fibres of your food could still clog the separating mesh of the filter sleeve. During the drying phase, these residues dry on the surfaces, and thereafter stick really stubbornly. With the separating mesh clogged even partly, you may notice a great negative influence on the performance of the appliance. Thus, it may be better to clean the filter sleeve manually anyway (see: 'Removing Residues of Fibres from the Filter Sleeve').
CAUTION – Do not use any abrasive cleaners or hard objects for cleaning. Residues of food adhere to scratched surfaces much firmer. Ensure that the sealing ring of the juice collector will not get lost during cleaning. This holds especially for cleaning in an automatic dishwasher. Additionally, ensure that the sealing ring cannot fall onto the heating elements of the dishwasher during cleaning to avoid damage.
-
Wash the parts via a soft cloth or a soft nylon brush in warm dishwater. If residues of food stick stubbornly to the surfaces, you may soak the parts for approx. 10 minutes in warm dishwater for some minutes, before cleaning.
-
Ensure that the small black cogwheel at the bottom of the juice collector turns freely. Carefully brush out any residues.
- If the pulp outlet needs thorough cleaning, at the bottom of the juice collector pull the rubber flap out of the pulp outlet. Thereafter, brush out any residues of pulp via the provided cleaning brush of the appliance. For cleaning you may get access to the inner side of the rubber flap by folding the rubber flap up a little. After loosening the residues, rinse the parts under running tap water.
- Especially the separating mesh must be completely clean. Hold the filter sleeve up to the light for checking, if any residues of fibres still clog the pores of the separating mesh (see: 'Removing Residues of Fibres from the Filter Sleeve').
- If required, wash the containers of the appliance in warm dishwater too.
- Thoroughly rinse all parts with clear tap water and wipe dry all parts.
- Leave the parts dry naturally for approx. 1/2 hour, where they are out of reach of children younger than 8 years and animals.
You should re-assemble the juicing system after cleaning (see: 'Operation / Assembling the Juicing System').
REMOVING RESIDUES OF FIBRES FROM THE FILTER SLEEVE
Fine fibres may clog the pores of the separating mesh in the filter sleeve. In this case, juices and pulp cannot be separated furthermore and overflow may occur. The best way for checking the separating mesh for clogged pores or damage is to hold the filter sleeve up to the light.
CAUTION – Handle the filter sleeve and rubber blade sleeve with care to avoid damage to the separating mesh and rubber blades.
IMPORTANT - If the filter sleeve is damaged (e.g. bent or broken, penetrated) or the rubber blades are missing or worn out, the parts must be replaced. Get in contact with your vendor. To avoid damage during juicing and cleaning, remove all extremely hard and sharp-edged parts of the food before juicing. For example: stones of cherries may bent the separating mesh; sharp-edged parts of the stones of some types of peaches could stick to the fruit pulp and penetrate the separating mesh.
- If the pores of the separating mesh are clogged, soak the filter sleeve approx. 10 minutes in warm dishwater.
- Brush the separating mesh at both sides via the provided cleaning brush or another small, soft nylon brush (e.g. a clean tooth brush). The provided cleaning
brush is suited best. Move the used brush in circles.
- Thoroughly rinse the filter sleeve under running tap water. Then dry the filter sleeve and check the result.
- If the pores are clogged still, repeat the steps 1 to 3.
NOTE
To maintain the performance of the juicer, replace the filter sleeve, when it is impossible to get the separating mesh free of residues again. Stubborn residues cannot build-up so easily, when the filter sleeve is cleaned thoroughly always immediately after juicing.
CLEANING THE MOTOR BASE
- After operation, always switch off (power switch to the central "O" position) and unplug the appliance. Remove the juicing system from the motor base (see: 'Disassembling the Juicing System'). Leave the motor base cool down.
⚠️ CAUTION – Always keep the motor base dry. Do not spill or drip any liquids onto the motor base. Do not use any hard objects to avoid damage to the surfaces and safety interlocks.
- For removing any residues and splashes, wipe the exterior of the motor base and power cord with a slightly damped, soft cloth. Ensure that liquids do not run onto the motor base.
- After cleaning, polish with a soft dry cloth and leave the motor base dry naturally for approx. 30 minutes, where the motor base and power cord are out of reach of children younger than 8 years and animals.
STORAGE
WARNING – Do not let children play with the appliance or any part of it. When the appliance is not in use, always turn the power switch to the central "O" position and unplug the appliance. Do not leave the motor base connected to the power supply, while it is not in use.
Do not hold the appliance by the power cord, drive rotor, juicer post, or any part of the juicing system for moving the appliance to avoid damage. Instead, grasp the motor base at both sides. The power cord may never be knotted, twisted, pulled, strained or squeezed. Do not let the power plug or power cord hang over the edge of the table or board.
Do not place any hard or heavy objects on or in the appliance or any part of it. Do not use any parts or accessories of the appliance for any other appliance or any other purpose than described in this booklet.
IMPORTANT - Please store the appliance in a frost free, clean, and dry place where it is protected against excessive load (e.g. mechanical or electric shock, moisture, heat, direct sunlight) and out of reach of children younger than 8 years and animals.
- Clean the appliance and all used parts before storing (see: 'Care and Cleaning'). We recommend to mount the juicing system on the motor base (see: 'Operation / Assembling the Juicing System'). This will protect the parts of the juicing system against dust and loss.
- The juice container may be stored within the pulp container. Lay the cleaning brush into the juice container.
- Grasp the appliance at the bottom of the motor base and place the appliance on a clean, stable, and level surface, where the appliance cannot fall down or fall over. Lay the power cord loosely around the motor base. You should store the containers of the appliance and the cleaning brush with the appliance.
NOTES FOR DISPOSAL
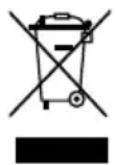
Dispose of the appliance and packaging must be effected in accordance with the corresponding local regulations and requirements for electrical appliances and packaging. Please contact your local disposal company.
Do not dispose of electrical appliances as unsorted municipal waste, use separate collection facilities. Contact your local government for information regarding the collection systems available. If electrical appliances are disposed of in landfills, dumps, or refuse incineration, hazardous substances can leak into the groundwater or can be emitted into air, thus getting into the food chain, and damaging your health and well-being as well as poisoning flora and fauna. When replacing old appliances with new once, the vendor is legally obligated to take back your old appliance for disposal at least for free of charge.
INFORMATION AND SERVICE
Please check www.gastroback.de for further information.
For technical support, please contact Gastroback Customer Care Center by phone: +49 (0)4165/22 25-0 or e-mail info@gastroback.de.
Please refer to our home page for a copy of these operating instructions in pdf format.
WARRANTY
We guarantee that all our products are free of defects at the time of purchase. Any demonstrable manufacturing or material defects will be to the exclusion of any further claim and within 2 years after purchasing the appliance free of charge repaired or substituted. There is no Warranty claim of the purchaser if the damage or defect of the appliance is caused by inappropriate treatment, over loading or installation mistakes. The Warranty claim expires if there is any technical interference of a third party without a written agreement. The purchaser has to present the sales slip in assertion-of-claim and has to bear all charges of costs and risk of the transport.
Note
Customers from Germany and Austria: For repair and service, please send Gastroback products to the following address:
Gastroback GmbH, Gewerbestr. 20, D-21279 Hollenstedt, Germany.
Please agree that we cannot bear the charge of receipt.
Submission of appliances: Please ensure packing the appliance ready for shipment without accessories. Add the sales slip and a short fault description. The processing time after receipt of the defective appliance will be approx. 2 weeks; we will inform you automatically. After the warranty period, please send defective appliances to the given address. You will get a free quotation and, thereafter, can decide, whether we shall repair the appliance to the costs possibly accrued, send back the defective appliance for free of charge, or dispose of the appliance for free of charge.
The appliance is intended for household use only and NOT suited for commercial, industrial or trade usage. Do not attempt to use this appliance in any other way or for any other purpose than the intended use, described in these instructions. Any other use is regarded as unintended use or misuse, and can cause severe injuries or damage. There is no warranty claim of the purchaser if any injuries or damages are caused by unintended use.
GASTROBACK®
GASTROBACK GmbH
Gewerbestraße 20. 21279 Hollenstedt / Germany Telefon +49(0)4165/2225-0 • Telefax +49(0)4165/2225-29 info@gastroback.de • www.gastroback.de
- BEDIENUNGSANLEITUNG
- OPERATING INSTRUCTIONS
- TABLE OF CONTENTS
- IMPORTANT NOTE - PLEASE READ CAREFULLY - BEFORE YOU USE THE DEVICE!
- DEAR CUSTOMER!
- GENERAL SAFETY INSTRUCTIONS
- IMPORTANT SAFEGUARDS FOR ELECTRICAL APPLIANCES
- MOVING PARTS - RISK OF INJURIES
- KNOWING YOUR NEW SLOW JUICER
- Accessories:
- PROPERTIES OF YOUR NEW JUICER
- DRIP-STOP FEATURE
- POWER SWITCH FOR FORWARD AND REVERSE OPERATION
- SAFETY FEATURES
- Safety Interlock and Electronic Break of the Motor
- Protection Devices
- NOTE
- METHOD OF OPERATION AND MAKING BREAKS
- TIPS FOR BEST RESULTS
- PURCHASING AND STORING FRUIT AND VEGETABLES
- PREPARING YOUR FOOD FOR JUICING
- THE BEST METHOD
- THE BEST BLEND
- USING THE PULP
- BEFORE FIRST USE
- OPERATION
- ASSEMBLING THE JUICING SYSTEM
- JUICING YOUR FOOD
- METHODS FOR REMOVING OBSTACLES
- RESETTING THE PROTECTION DEVICE
- SOLVING PROBLEMS
- CARE AND CLEANING
- DISASSEMBLING THE JUICING SYSTEM
- THOROUGH CLEANING OF THE JUICING SYSTEM
- REMOVING RESIDUES OF FIBRES FROM THE FILTER SLEEVE
- CLEANING THE MOTOR BASE
- STORAGE
- NOTES FOR DISPOSAL
- INFORMATION AND SERVICE
- WARRANTY
- GASTROBACK GmbH
Brand : Gastroback
Model : Advanced Vital 40145
Category : Juicer