
EB-IWB82W-008 - Whiteboard Mach Power - Free user manual and instructions
Find the device manual for free EB-IWB82W-008 Mach Power in PDF.


| Product Type | Interactive Whiteboard (Smart Board) |
| Brand | Mach Power |
| Model | EB-IWB82W-008 |
| Screen Size (Diagonal) | 82 inches |
| Weight (Approximate) | 25 kg |
| Mounting Type | Wall-mounted or stand (not specified) |
| Power Supply | USB powered or via AC adapter (typical) |
| Operating System Compatibility | Windows XP/7/8/10, 2000, Vista |
| Minimum System Requirements | 1 GB RAM, 1 GB free HDD, 1280x800 resolution, USB port |
| Software Included | eClass software (full version) |
| Software Modes | Standard (full screen), Window, Desktop, Annotation, Teacher/Student |
| Writing Tools | Hard pen, soft pen, texture pen, laser pen, highlighter, smart pen, brush, magic pen, multi-color pens |
| Erasure Methods | Area eraser, point eraser, background erase, clear page |
| Multimedia Support | Video, Flash, 3DS objects, images, documents (Office, PDF) |
| Resource Library | Built-in with discipline-specific resources (math, science, English) |
| Cross-Platform Interaction | Supports interactive user management, exams, real-time sync |
| Accessories | Pens (included), eraser (included), optional stands (not specified) |
| Maintenance / Cleaning | Use a soft, dry cloth. Avoid abrasive cleaners. |
| Safety Instructions | Keep away from liquids; do not disassemble; use proper mounting. |
| Spare Parts & Repairability | Contact Mach Power support for replacement pens or repair services. |
| Warranty | Standard manufacturer warranty (check with retailer) |
| Place of Manufacture | China |
| Certifications | CE, FCC (assumed) |
Frequently Asked Questions - EB-IWB82W-008 Mach Power
User questions about EB-IWB82W-008 Mach Power
0 question about this device. Answer the ones you know or ask your own.
Ask a new question about this device
Download the instructions for your Whiteboard in PDF format for free! Find your manual EB-IWB82W-008 - Mach Power and take your electronic device back in hand. On this page are published all the documents necessary for the use of your device. EB-IWB82W-008 by Mach Power.
USER MANUAL EB-IWB82W-008 Mach Power
natural_image
Illustration of a glowing light bulb on a dark blue background (no text or symbols)manual
eClass
machpower®
windows
Index
1. Software introduction 4
2. Installation 4
2.1 Runtime environment 4
2.2 Install eClass 4
3. Use instruction 6
3.1 Each mode function 6
3.1.1 Standard mode (full screen mode) 6
3.1.1.1 Menu 7
3.1.1.2 Switch to desktop mode 11
3.1.1.3 Gadgets 11
3.1.1.4 Resource Library 22
3.1.1.5 Select 23
3.1.1.6 Writing 25
3.1.1.7 Special line 26
3.1.1.8 Erase 26
3.1.1.9 Geometry 26
3.1.1.10 Handwriting recognition, text 26
3.1.1.11 Fill 27
3.1.1.12 Screen roaming 27
3.1.1.13 Undo 28
3.1.1.14 Redo 28
3.1.1.15 Previous page 28
3.1.1.16 Index page 28
3.1.1.17 Next page 29
3.1.1.18 Add page 29
3.1.2 Windows mode 29
3.1.3 Desktop mode 31
3.1.4 Annotation mode 32
3.1.5 Teacher/Student mode 32
3.2 Functions of each scene 32
3.2.1 English scene 33
3.2.2 Math Scene 33
3.2.3 Scientific scene 33
3.2.4 Standard Scene 34
3.3 Cross-platform interaction 34
3.3.1 Interactive User Management and Interactive Features 34
1. Software brief introduction
eClass is suitable for smart board teaching in class, providing writing, erasing, annotation, drawing, roaming, interactive classroom, paperless testing and other whiteboard features, also provide sub-disciplinary teaching tools, multimedia (video / flash / 3ds) demonstration and other powerful Interactive teachings and demonstration experiences.
The user-friendly experience, convenient operation experience, multi-disciplinary scenes, cross-platform classroom interactivity include (classroom raising hands, asking questions, classroom small test), fully experience the advantages of eClass.
- Convenient operation experience
• Multi-disciplinary scenes - Convenient and practical tools
• Intelligent handwriting and voice recognition/deacon function - Intelligent connect function(picture connect/text connect search/local file connect)
• Abundant multimedia teaching resources(flash/3ds) - No need any special hardware devices, can use pens to write in multicolor at the same time
- Personalized custom settings. Users can move the common function to any position in the page to operate based on their needs. To satisfy user's need in every details.
- Cross-platform classroom interactivity function eClass, enjoy the new experience of technology frontier with you.
2. Installation
2.1 Runtime Environment
- Windows xp/7/8/10,2000,VISTA system
• Microsoft Office 2003 and above version
• Microsoft Media 10.0 and above version - Normal PC
- 1G and above RAM
- 1G and above free Hard disk
• Resolution :1280 x 800 and above - USB interface
2.2 Install eClass

Choose setup. exe application installation program, double click program icon , popup install interface as below Figure 2-2-1, the process of installation is very easy and convenient, no need to repeat clicking "next step".

(Figure2-2-1 interface of ready to install)
"Click "INSTALL" into installation interface (Figure2-2-2)

(Figure2-2-2 interface of Software installation process)
Installation completed as Figure 2-2-3

(Figure2-2-3interface of Installation completed)
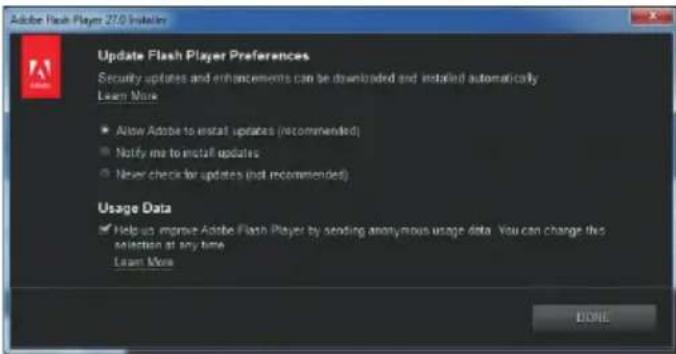
After the software is installed, if the system has Flash Player installed, click "Finish" to complete the installation, or silently install Flash Player, if you do not install the flash player then open the flash interactive teaching resources will not be displayed properly, as shown in Figure 2-2-4 Click INSTALL.

(Figure2-2-4 install flash)
After Flash Player installation finished, click FINISH. Same time, as Figure 2-2-5 show, window will close automatically, software installation finished.
(Figure2-2-5 Installation finished)
3. Use instruction
After the software installation is completed, double-click the icon on your desktop or select eClass from the all Programs list and start running eClass application. The first run Double-click to run

A small icon appears in the lower right corner of the screen

Indicates the PC currently connect to the hardware device

Indicates the PC currently cannot connect to the hardware device
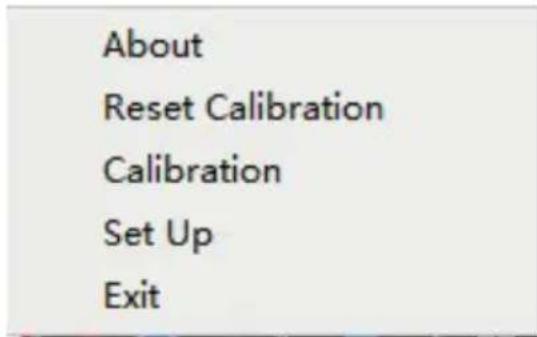
Right-click icon shows the menu function (Figure 3-1) The default Touch server is four-point positioning, start the shortcut keys, boot automatically, open the service program and connect the hardware device, will open a variety of gestures include (palm start software, palm eraser, palm flip page) and so on. Open the service program settings to start the shortcut keys, 25 shortcut keys on the hardware devices can also shortcut the software.
(Figure 3-1 right click Touch server shows menu function)
Authorization mechanism
The software needs to be registered or connected to the related whiteboard, the function can be fully used, the trial period of 10 days. The software will pop up warning notice when the software is not registered or not connected to the product
Lack of functional modules under various systems
- System Win XP without function of reading aloud
- There are languages of hand-writing recognition or voice recognition that Microsoft don't support, eClass also don't support the recognition
- Win XP, Win 7 Home Edition only support one touch writing
3.1 Each mode function
eClass application includes standard mode (full screen mode), window mode, desktop mode, annotation mode, teacher / student
3.1.1 Standard mode(full screen mode)
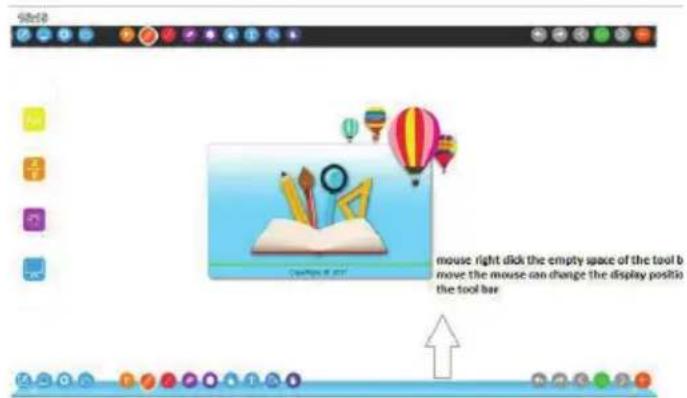
Under standard mode, function of tool bar from left to right: Menu, Switch to desktop mode, standard mode, Tool, Resources, Choose, Writing, Special line, Eraser, Geometric figure, Hand-writing recognition, Text, Fill, Roam, Undo, Redo,
Previous page, Index page, Next page, Add page. As figure(3-1-1). (Remark: Only choose Roam bottom could have page zoom in and zoom out, roam reset button; Only choose an object could have cut, copy, delete button; After doing copy operation and there is paste button.) Click the arrow beside the Click the left and right arrows on the toolbar to switch the left and right display positions of all the buttons. Common functions can be moved to the page display, easy operation as shown in Figure 3-1-2.
(Figure2-2-4 install flash)

(Figure2-2-4 install flash)
3.1.1.1 Menu
Click will pop up the menu as figure 3-1-1-1-1. The menu provides new ,open, insert, save, export, auto save, languages, mode( four modes: standard mode, window mode, tesktop mode, annotation mode), exit, email, print, software system setting, about(include: version information, online update, register), log in classroom user and other function items.

(Figure 3-1-1-1-1 start menu)

New. Click this icon to open a new blank file, each file can contain multi pages based on user's need.

Open. Click this icon to open documents, videos, pictures, texts, 3DS and other format files, specific format as figure
3-1-1-1-2. When open a document or file, will skip to the first page of the document by default, convenient for demonstration.
Open file format like Office and PDF will be considered as inserting the pictures.

(Figure 3-1-1-1-2 The support format for Opening)

Insert. Click this icon can insert pictures, videos into current page, specific format as figure 3-1-1-1-3

(Figure 3-1-1-1-3 Insert objects in different format)

Save. Click this icon to save current file as .ty format file by default

Export/Save as. Click this icon to save current file as picture, word, ppt., pdf, html and other formats, specific format
as figure 3-1-1-1-4.

(Figure 3-1-1-1-4 Support format type for software export/save as)

Auto Save. Click this icon can do the setting for starting auto save for current operation files, the time of auto save
measured in minutes, the smallest unit, auto save every minute, the biggest unit cannot exceed 100 minutes, can be set to automatically save the path. As figure 3-1-1-1-5 do the setting.

(Figure 3-1-1-1-5 Setting dialog box for current file auto save)

Language. Click the icon to switch the language of the current software. Software language displayed by default is the
system language. Currently, the 22 languages are supported as shown in Figure 3-1-1-1-1. Unsupported language system, will be start the English by default after installing the software.

Mode. Click this icon can switch the operation mode of the software. Operation mode includes standard mode, win-
dow mode, desktop mode, annotation mode, Teacher/student mode.

Exit. Click this icon to exit eClass software. If the file is empty, or already set to be auto saved, or already saved will exist
directly, otherwise will be a hint that if need to save and close.

Email. Clicking this icon will pack all the contents of the document into a compressed file as an image file and add
it to the email attachment, all you need to do is add recipients and email contents and send all the contents of the eClass current page. If the PC does not install the mailbox function, will be prompted, please install a valid mailbox.

Print. Click on the icon to print the current file. You can set the print page, print all, print the current page, print a few
pages in the middle, as shown in Figure 3-1-1-1-6 dialog box (if there is no data under the default printer, the computer does not have a printer installed, "print" Button cannot be clicked, click on the middle of the print icon button is to set the printer as shown in Figure 3-1-1-1-7, different operating systems or different printer models may display different pages), click Print.

(Figure.3-1-1-1-6 The dialog box popped up by clicking Software Print)

(Figure 3-1-1-1-7Click the printer settings icon in the print dialog box to pop up the interface)

Setting. Click the icon to open the software settings form. The form contains three custom tool settings on the toolbar,
the settings for the text search engine (Baidu, Wikipedia, Google), right-click pop-up time settings when operating the whiteboard, the default drawing color, the default background color, the default drawing Line width, Toolbox pop-up toolbox
display time settings, page playback speed settings, dial set random number, as shown in Figure 3-1-1-1-8, the user can be set according to need, without restarting the software to take effect.

(Figure 3-1-1-1-8 Software default setting)

About. Click the icon to display the icon as shown in Figure 3-1-1-1-9. The current software version information isayed, including checking online upgrade and online registration.

Click "check update". If there is a new version, as shown in Figure 3-1-1-1-9 (1), if the current version is the new version, see Figure 3-1-1-1-9 (2) prompt.

(Figure 3-1-1-1-9(1)Prompted to update)

(Figure 3-1-1-1-9(2)The current version is the latest version)
Click to register.
- If the computer is already registered then the click button is gray, indicating that the product has been registered.
- If not registered, click button is blue, click to pop up the dialog box shown in Figure 3-1-1-1-10.
- Click on the machine code to register offline, for details, please contact us.
· Online registration, according to the register code we provide after you purchasing the machine, enter it, click register. - If using the software without register, it won't be any warning for 7 days. After 7 days, each time start the software will have warning" the remaining three days free trial"3 days after trial, if there is no registration, then every 5 minutes during use will be prompted to "connect the product or use the registration.

(Figure 3-1-1-1-1 Registration dialog box)

Android interaction. Detail information please check interaction manual.
3.1.1.2 Switch to desktop mode
Click switch to desktop mode,detail please check 3.1.3desktop mode.
3.1.1.3 Gadgets
Gadgets including Magnifier, video playback, screen capture, page playback, clock, page taping, spotlight, small visualize, curtain, small drawing board, silence, lock screen, page display grid, page display ruler, grid and ruler settings. As shown in Figure 3-1-1-3- (1).

(Figure 3-1-1-3-(1) Small tool)
Click this icon among the small tool will pop up magnifier function, magnification can be enlarged and reduced, as figure 3-1-1-3-1.

(Figure 3-1-1-3-1 magnifier function)
Click the button in the gadget to open the dialog box, open the video, click the button in the upper right corner of the video window to open other videos, click the button to maximize the window to play the video, click the button you can annotate in the video playing window, the button icon becomes , Erase the annotation, the button icon becomes , at this time the video window can move freely. Click the button to take a screenshot of the current video playing screen, and insert the picture into the whiteboard page. Click the button you can set the current video loop. As shown in Figure 3-1-1-3-2.

natural_image
Classroom scene with children seated at desks, one girl partially visible in foreground (no text or symbols)(Figure 3-1-1-3-2 Display video function)
Click the button in the gadget to pop up the screenshot dialog box, click on the screenshot of the free area to insert the image into the software page, click the eClass current page Free Area Screen capture Insert the image into the software page, click the mouse to click the window Screen capture Insert the image to the software page, click Cut screen full screen insert picture to software. Figure 3-1-1-3-3.

(Figure 3-1-1-3-3 Screenshot function)
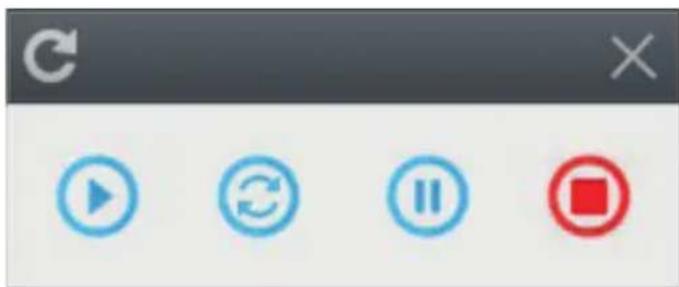
Click the button in the gadget to pop up the playback dialog box, the playback includes the functions: play, loop, pause, stop. Figure 3-1-1-3-4.
(Figure 3-1-1-3-4 playback function)
Click the button in the gadget to pop up the clock, you can set to display the current time mechanical mode or electronic digital mode, can also be used for countdown. As shown in Figure 3-1-1-3-5.

(Figure 3-1-1-3-5 Clock function)
Click the button in the gadget to pop up the screen recording dialog box, the functions include: start recording, stop recording to save, open recording video playback. Figure 3-1-1-3-6.

(Figure 3-1-1-3-6 screen recording)
Click 🤨 on the tool button, the page will appear spotlight function, the default is a circular, 100% transparency, this feature can highlight the key content of the page, non-key content will be blocked.
Click on the edge of the shape to make adjustments to the highlighted range. Drag the black area to move the highlight of the spotlight. Right and top right corner of the menu button to set the circle, rectangle, triangle, perspective (if the screen has pictures, you can see behind the picture), transparency adjustment (100%, 80%, 50%), exit. This feature, you can save on the page, the next time you open the saved file, will continue to display. Spotlight only exists in the current page, a new page or turn to the next page, the occlusion effect will remain in the previous page, return to the current page to see. Figure 3-1-1-3-7.

(Figure 3-1-1-3-7 Spotlight function)
Click the button in the tool, could invoke the camera function, or invoke the function of an external visualize, you can also record video in real time, you can enter the captured images to eClass software page.
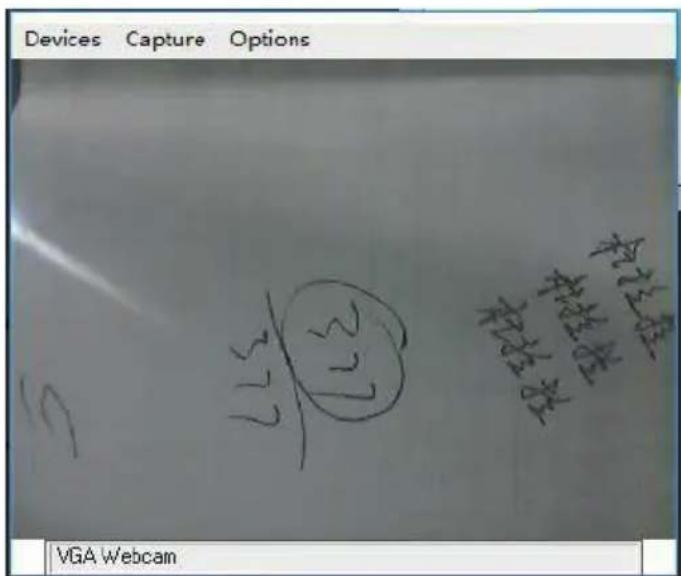
(Figure 3-1-1-3-8 Visualize function)
Click the button in the gadget to pop up the function of the curtain, its function is similar to spotlight, block the screen. Can be up and down shading, surrounded by occlusion, left and right occlusion, background color: blue, black, gray, transparency: (100%, 80%, 50%). Figure 3-1-1-3-9

(Figure 3-1-1-3-9 Curtain function)
Click the button in the gadget to open the function of the mini-board. click the black sidebar to drag the mini-bo-
ard to the top, and you can freely control the size of the sketchpad. Can be written directly on the small board, click the button to erase the handwriting on the small board, click the button to close the small board. Figure 3-1-1-3-10.

(Figure 3-1-1-3-10 sketchpad function)
Click the 📄 on the gadget, the screen shown in Figure 3-1-1-3-11 interface, suitable for classroom testing, or maintain classroom order. Double-click any area of the interface, the interface can be closed.

(Figure 3-1-1-3-11 Silence function interface)
Click the lock on the Gadgetto open the lock screen function. As shown in Figure 3-1-1-1-12, the eClass software is locked and no software operations are currently available. Click the left lock drag to the right, you can unlock, restore all operations.

(Figure 3-1-1-3-12 Lock screen interface)
Click the button, page shows or hides the grid. As shown in Figure 3-1-1-3-13. Click the gadget button to display or hide the ruler on the page. As shown in Figure
Click the gadget button to pop up the grid and ruler setting dialog box, you can set the grid size and color of the displayed page, ruler color and size. As shown in Figure 3-1-1-3-13.

(Figure 3-1-1-3-13 Page grid and ruler function)
Discipline tools include calculator, table, insert histogram, insert pie chart, virtual lab, 3D math tools, math functions, chemical element sheets, page subtitle scrolling, protractor, ruler, compass, isosceles triangle. Edit the formula online. As shown in Figure 3-1-1-3- (2).
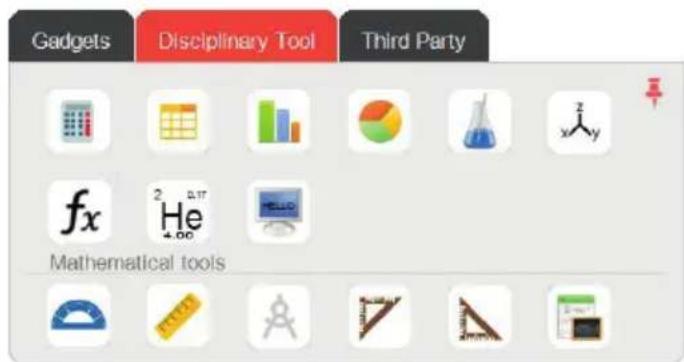
(Figure 3-1-1-3-(2)Disciplinary Tool)
Click the button to open the calculator function, as shown in the figure 3-1-1-3-14
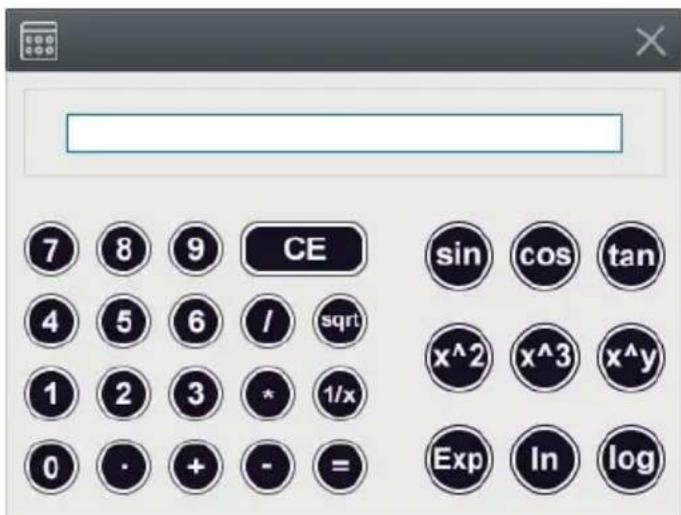
(Figure 3-1-1-3-14 Calculator function)
Click the button to pop up the form dialog box, the default 5 rows and 8 columns of the table, insert the table can be combined, split, insert the ranks, delete ranks and other operations, can change the form properties freely. As shown in Figure 3-1-1-3-15.
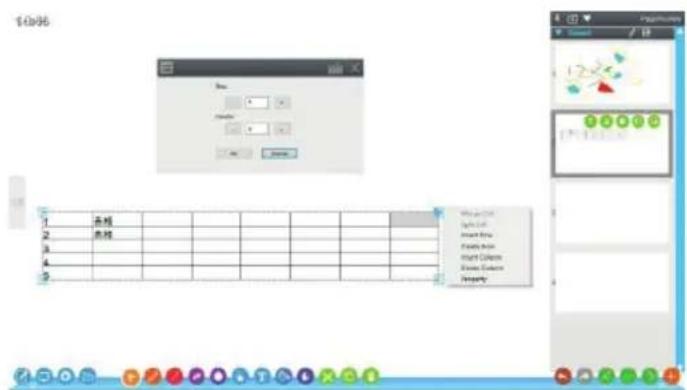
Click the button to open the Insert Histogram Settings dialog box, as shown in Figure 3-1-1-3-16. After setting the parameters, click OK to insert the histogram into the page as shown in Figure 3-1-1-3-17. Data can be saved, can be modified.

(Figure 3-1-1-3-16 parameters setting for Histogram and pie chart)
Click the button to insert a pie chart into the page, the same as the histogram.

bar
| Category | Value | |---|---| | M1 | 5.0 | | M2 | 7.0 | | M3 | 8.0 | | M4 | 6.0 | The chart displays the absolute values for each category on the left Y-axis, while the pie chart visually breaks down the proportional distribution across categories on the right Y-axis. The legend uses different colors to differentiate categories.(Figure 3-1-1-3-16 parameters setting for Histogram and pie chart)
Click the button Figure 3-1-1-3-18.

to open the Virtual Lab function for simple physical and chemical experiments. As shown in

Click the button x z to open the math 3D tool. If it is not installed, a prompt will pop up. Please install GeoGebra software.
Click the button fx pop-up math functions, the default comes with a common 16 kinds of function formula. Can freely edit the mathematical function formula, automatically draw the corresponding function image. As shown in Figure 3-1-1-3-19.

line
| Axis | Value | |---|---| | Row 1 | 5.0 | | Row 2 | 5.0 | | Row 3 | 5.0 | | Row 4 | 5.0 | | Row 5 | 5.0 | | Row 6 | 5.0 | | Row 7 | 5.0 | | Row 8 | 5.0 | | Row 9 | 5.0 | | Row 10 | 5.0 | | Row 11 | 5.0 | | Row 12 | 5.0 | | Row 13 | 5.0 | | Row 14 | 5.0 | | Row 15 | 5.0 | | Row 16 | 5.0 | | Row 17 | 5.0 | | Row 18 | 5.0 | | Row 19 | 5.0 | | Row 20 | 5.0 | | Row 21 | 5.0 | | Row 22 | 5.0 | | Row 23 | 5.0 | | Row 24 | 5.0 | | Row 25 | 5.0 | | Row 26 | 5.0 | | Row 27 | 5.0 | | Row 28 | 5.0 | | Row 29 | 5.0 | | Row 30 | 5.0 | | Row 31 | 5.0 | | Row 32 | 5.0 | | Row 33 | 5.0 | | Row 34 | 5.0 | | Row 35 | 5.0 | | Row 36 | 5.0 | | Row 37 | 5.0 | | Row 38 | 5.0 | | Row 39 | 5.0 | | Row 40 | 5.0 | | Row 41 | 5.0 | | Row 42 | 5.0 | | Row 43 | 5.0 | | Row 44 | 5.0 | | Row 45 | 5.0 | | Row 46 | 5.0 | | Row 47 | 5.0 | | Row 48 | 5.0 | | Row 49 | 5.0 | | Row 50 | 5.0 | | Row 51 | 5.0 | | Row 52 | 5.0 | | Row 53 | 5.0 | | Row 54 | 5.0 | | Row 55 | 5.0 | | Row 56 | 5.0 | | Row 57 | 5.0 | | Row 58 | 5.0 | | Row 59 | 5.0 | | Row 60 | 5.0 | | Row 61 | 5.0 | | Row 62 | 5.0 | | Row 63 | 5.0 | | Row 64 | 5.0 | | Row 65 | 5.0 | | Row 66 | 5.0 | | Row 67 | 5.0 | | Row 68 | 5.0 | | Row 69 | 5.0 | | Row 70 | 5.0 | | Row 71 | 5.0 | | Row 72 | 5.0 | | Row 73 | 5.0 | | Row 74 | 5.0 | | Row 75 | 5.0 | | Row 76 | 5.0 | | Row 77 | 5.0 | | Row 78 | 5.0 | | Row 79 | 5.0 | | Row 80 | 5.0 | | Row 81 | 5.0 | | Row 82 | 5.0 | | Row 83 | 5.0 | | Row 84 | 5.0 | | Row 85 | 5.0 | | Row 86 | 5.0 | | Row 87 | 5.0 | | Row 88 | 5.0 | | Row 89 | 5.0 | | Row 90 | 5.0 | | Row 91 | 5.0 | | Row 92 | 5.0 | | Row 93 | 5.0 | | Row 94 | 5.0 | | Row 95 | 5.0 | | Row 96 | 5.0 | | Row 97 | 5.0 | | Row 98 | 5.0 | | Row 99 | 5.0 | | End of the chart is a visual representation of the data in a table format (e.g., bar, line, pie, etc.). The table contains the row numbers and corresponding values from the 'Space' tab at the bottom of the table.(Figure 3-1-1-3-19 Math function)
Click the button to display the function table, double-click the element, and the voice reads out the name of the current element and displays the details of the currently selected element. You can set the background color of the element and set the game mode to help memorize the element. As shown in Figure 3-1-1-20.

(Figure 3-1-1-3-20 Element table function)
Click the button 📄 the screen will display the subtitle information, click the button 📋 to stop on the desktop, a fixed location, click the button 🔍 to set the scroll text information, text color, scroll direction, scroll speed, text size and so on. Click the button 📋 to turn off the subtitle function. As shown in Figure 3-1-1-21.
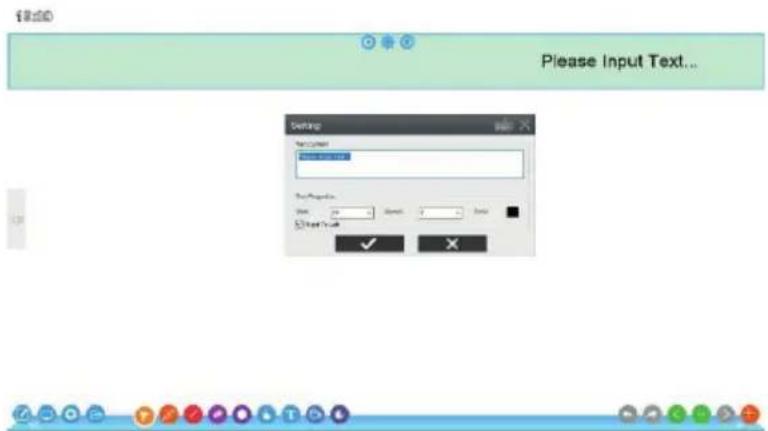
(Figure 3-1-1-3-21 Screen rolling subtitles function)
Click the button to open the protractor tool. Click to rotate it. Click to change the tool size.
Click ✗ to close Protractor tool. Can draw radian, click the scale and drag along the scale to draw the line and cursor angle. Pull the two cursors so that they align with the sides of the corner, and the protractor automatically displays the angle.
Click the button to open the straightedge. Click the tool to rotate it. Click to extend the tool. Click to close the ruler tool, can draw a straight line, and draw a line to operate as the same with protractor.

Click the button to open the compass tool. The tool can rotate and draw a circle / arc. Drag the circle of the compass right foot to adjust the radius of the circle, and drag the compass pen to draw a circle.
Click the button to open the isosceles triangle, as the same function with straightedge.
Click the button to open the right triangle, the same function with straightedge. As shown in Figure 3-1-1-3-22.

(Figure 3-1-1-3-22 Math tool function)
Click the button to open the online editing formula function, enter the formula, will generate equations, click the screen capture function, and insert the formula to the page display. As shown in Figure 3-1-1-3-23
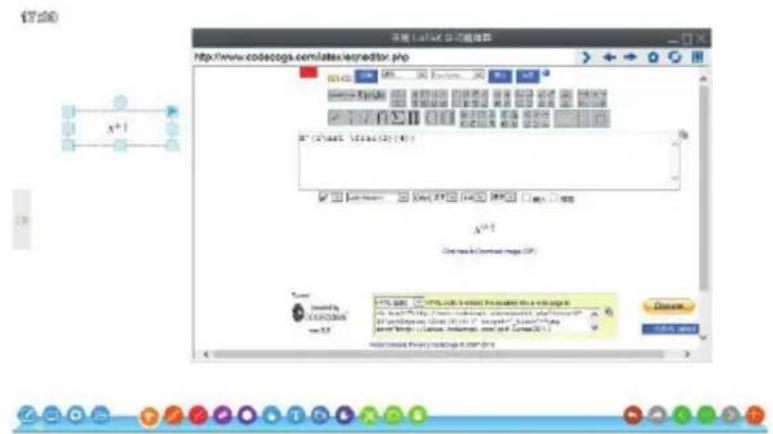
(Figure 3-1-1-3-23 Online formula editing)
Third-party tools include three customized features, system property settings, browser, random turntable, integrated math gadget. Figure 3-1-1-3- (3)
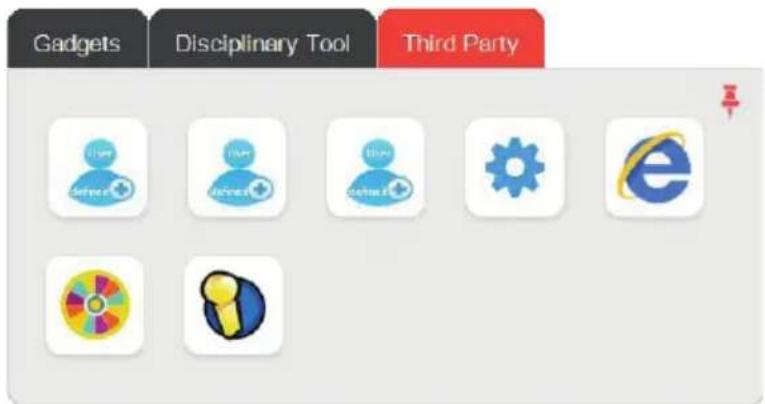
(Figure 3-1-1-3-(3)Third-party tools)
Click the third-party tool button, open the function of customized settings, if not setting, will prompt to set up and use. Click the third-party tool button, open the software system settings, and follow Settings.
Click the third-party tools 📔 button, open the browser function, the default open display page is the default system
IE home page. This feature is convenient for teachers to use network resources teaching, the use of web screenshots, resources will be inserted into the software page display. As shown in Figure 3-1-1-3-24

(Figure 3-1-1-3-23 Online formula editing)
Click the button 🤒 to open the random turntable function, which can be used for random name, class games, sweepstakes and other operations. As shown


(Figure 3-1-1-3-24random turntable)
Click the third-party tools a button, open the mathematical synthesis gadget function. As shown in Figure 3-1-1-3-25

(Figure 3-1-1-3-25 Integrated Math Gadget)
3.1.1.4 Resource Library
Click pop-up Figure 3-1-1-1-14 Library. The library is automatically hidden when you drag resources into the page while unlocked. Click the icon , you can pin the resources interface on the page, it is more convenient to drag and drop multiple resources. Click the icon + , you can add local resources to the Library for the next use. Click the icon to search for image resources from the Internet.

(Figure 3-1-1-4-1 Resources Library interface)
Open my resources "mathematics" folder, you can edit and calculate common mathematical formulas, as shown in Figure 3-1-1-1-15

(Figure 3-1-1-4-2 Math formula)
Open the flash folder, you can see a lot of flash interactive resources: Figure 3-1-1-4-3, biological resources:

(Figure 3-1-1-4-3flash interactive resources-Cardiac circulatory system)
Open the 3D Model folder, open the 3ds format file, as shown in Figure 3-1-1-4-4:

(Figure 3-1-1-4-4 Open 3DS format file)
3.1.1.5 Select
Click rotate the selected stroke object, drag to clone, move, delete, cut, copy, sort, combination (multi-object), mirror, flip, change the size of the property and other operations.
- Mirror, horizontal mirror, vertical mirror.
- Flip, Flip Horizontal, Flip Vertical, 90 ° Clockwise, 90 ° Clockwise.
- Layer, top layer display, move down one layer, move up one layer, the bottom layer display.
- Lock, X-axis lock, Y-axis lock, lock, unlock.
- Combination, multiple objects combined into an object, cancel the combination
- Property, set the line object type, color, thickness, transparency properties, as shown in Figure 3-1-1-5-2

flowchart
graph TD
    A["Start"] --> B{Decision}
    B -->|Yes| C["Process Step"]
    B -->|No| D["End"]
    C --> E["Action Icon"]
    E --> F["Control Panel"]
    F --> G["Settings Icon"]
    G --> H["Display Icon"]
    H --> I["Monitor Icon"]
(Figure 3-1-1-5-1 Select operation)

(Figure 3-1-1-5-1 Select operation)
When the selected object is a picture, an image connection function is added in the right-click operation, as shown in Figure3-1-1-5-3. The picture on the page is added with a connection, connection type such as webpage, video, picture, music and the others. Add a picture of the cube as shown in the picture, click on the connection icon in the upper left corner of the picture, you can get more about the cube picture resources from Google.
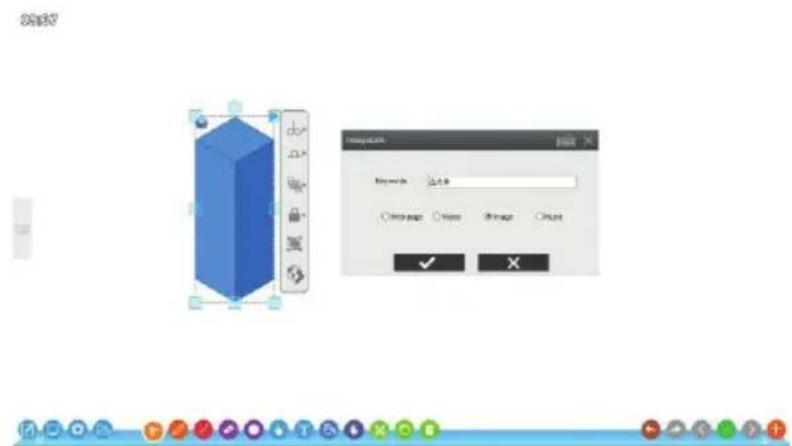
(Figure 3-1-1-5-3 Picture connection function)
If selected the object is text, right-click voice reading, edit changes, web search. As shown in Figure 3-1-1-5-3, Search engine can be set Wikipedia, Baidu Encyclopedia, Google and so on.

3.1.1.6 Writing
Click on the icon to open all the current types of pens, including hard and soft pens, texture pens (writing texture is the selected image texture), laser pens (line drawing will flash). Highlighter (marker, can be applied to the text, but will not cover the back of the content, translucent pen), smart pen (automatic recognition, line, circle, ellipse, rectangle, angle, irregular geometric figures, etc.), brush, Magic pen (circle can draw a spotlight, highlight the focus, draw a rectangle will be the same size of the magnifying glass). Annotation pen (when screen freezes, when the annotation will not have any effect on the content of the page), two-color pen (on the whiteboard can also write 2 Color, the same with multi-color pens), four-color pen, six-color pen, eight-color pen, ten color pen, solid line, dotted line, dotted line, single dotted line, double dotted line and so on. Can set the line width and 60 colors, as shown in Figure 3-1-1-6-1:

(Figure 3-1-1-6-1 Writing property)
3.1.1.7 Special line
Click on the icon 📋 to open the special line dialog box, as shown in Figure 3-1-1-7-1. You can use straight line, dotted line, solid arrow, dot straight line arrow, horizontal line, vertical line, semi-circular arrow, fan shape, rubber band and 10 lines respectively on the page drawing operation. Selected by default is a straight line.
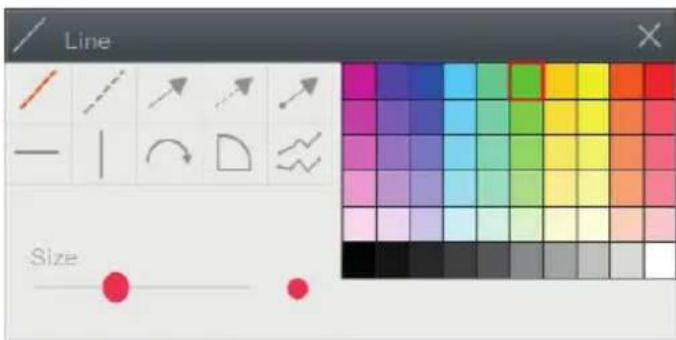
(Figure 3-1-1-7-1 Special line tool box)
3.1.1.8 Erase
you can select the eraser, default eraser is area eraser, as shown in Figure 3-1-1-8-1, erasers are point rub, background erase, empty the page.
- Area eraser can erase all objects, but opened document like word, ppt, pdf cannot be erased
- Point eraser can erase hard pen, soft pen, texture pen, laser pen, highlighter, brush, pictures and so on.
- Clear background can erase all background images
- Clean page, you can remove all pages of the object

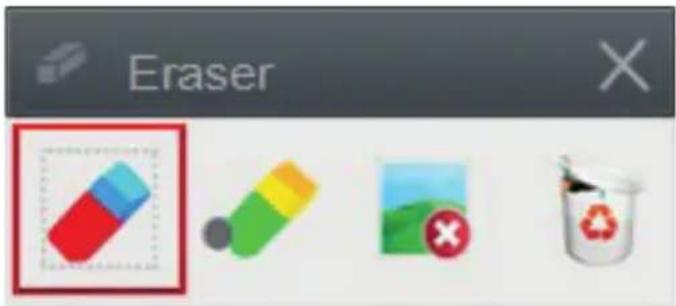
(Figure 3-1-1-8-1 Eraser dialog box)
3.1.1.9 Geometry
Click pop-up graphics sub-menu shown in Figure 3-1-1-9-1, you can use the coordinates, rectangles, rounded rectangles. Orthogonal trapezoid, right triangle, isosceles triangle, rhombus, pentagon, hexagon, octagon, cross, ellipse, perfect circle, cylinder, conical cylinder, cone, sphere, all sides Body, pentahdron, triangle cube, cube together 24 kinds of graphics to draw on the page. The default shape is rectangle, no fill color.

3.1.1.10 Handwriting recognition, text
Click the icon 📋, write directly on the page, you can achieve handwriting recognition, as shown in Figure 3-1-1-10-1:

(Figure 3-1-1-10-1 handwriting recognition)
Click the icon T, click on the page to determine the location of the input text, and then click the keyboard for text input, you can set the font, font size, font bold, italic, underline, font color, clear written content, connections and so on. As shown in Figure 3-1-1-10-2.

(Figure 3-1-1-10-2 Insert text)
Connection operation, you can connect local computer files, also Internet address. As shown in Figure 3-1-1-10-3. Click on the local file link to open the file from the software

3.1.1.11 Fill
Click the icon to fill the closed area of the page, as shown in Figure 3-1-1-11-1:

(Figure 3-1-1-11-1 Fill effect)
3.1.1.12 Screen roaming
Click the button click on the current page (or click the left mouse button) and move to move all the objects on the current page.
Click the button to zoom out all the objects on the current page once.
Click the button to zoom in all the objects on the current page once.
Click the button to restore all the current page roaming, zoom out, and zoom in operation, the page reset.
copy / cut, paste
Select the object need be to cut / copied, click the cut / copy button on the toolbar to cut / copy the object, click button to paste the cut / copied object onto the desired page. Select object need to be deleted, click the button to delete.
3.1.1.13 Undo
Click to undo the previous step, this button is inactive when there is no object can be returned.
3.1.1.14 Redo
Click to restore the previous undo operation, the button is not activated before undoing the object
3.1.1.15 Previous page
When the current page is not the first page, click the button to switch to the c the previous page of the current, when it is the first page, the button gray cannot be clicked.
3.1.1.16 Index page
Click the button to view all page information of the file, as shown in Figure 3-1-1-17-1, you can manage the page by creating a new group and save the contents of a group as a .ty file separately according to the group name.
Click the button 📄 on the index page to move the current page to the previous page of the current page to display and exchange the page location.
Click the button on the index page to move the current page to the next page of the current page to display and exchange the page location.
Click the button on the index page to delete the current page. There will be prompted to confirm the deletion of the current page.
Click the button on the index page to clone the current page, cloned a page similar to the current page on the last page of the current group
Click the button on the index page to set the current page background color, background image, page flipping effect, highlighting effect and other attributes, as shown in Figure 3-1-1-17-2.

(Figure 3-1-1-10-1 handwriting recognition)

(Figure 3-1-1-17-1 Index page, pages management)
3.1.1.17 Next page
When it is not the last page, click the button to switch to the next page of the current page. When it is last page, the gray button cannot be clicked.
3.1.1.18 Add page
Click the button + to create a new page on the last page of the current group.
3.1.2 Windows mode
Click to start menu mode button, you can switch to the window mode (lesson preparation mode), in this mode the software is not full-screen displayed, but set aside the taskbar space. You can switch between other applications and eClass software when the teacher prepares lessons. As shown in Figure 3-1-2-1
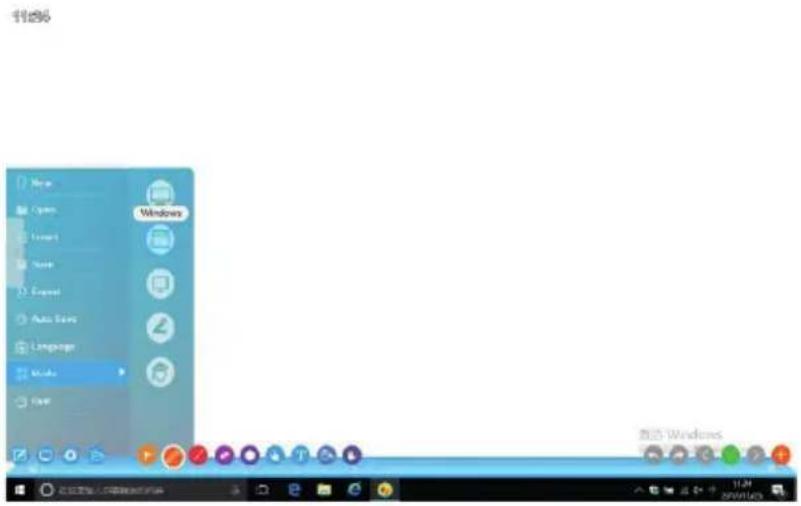
3.1.3 Desktop mode
Click the button in the Start Menu mode or the button on the toolbar to switch to desktop mode.
Click the button to enter the desktop annotation state as shown in Figure 3-1-3-1. At this time, you can use the hard pen, soft pen, texture pen, laser pen, highlighter pen, smart pen, brush, magic pen, etc. to annotate the current interface (By default, the color and line width of the brush in screen annotation mode are the same as the color and line width in standard mode)
Click the button to switch the mouse operation mode.
Click to select the type of pen used for annotation, as shown in Figure 3-1-3-2
Click to switch the color and line width of the comment pen, the default is the color and line width in standard mode, as shown in Figure 3-1-3-3.
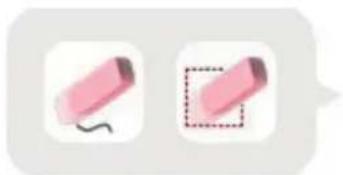
Click to erase the annotation of the screen. As shown in Figure 3-1-3-4, two erasing methods are used. Click to clear the annotation.
Click to use various tools in the desktop mode. The specific tools shown in Figure 3-1-3-5
Click 📄 to save the current screen content image, document (office/pdf) format.
Click to exit the desktop mode, it will prompt whether to save the current page to the eClass page

natural_image
Vertical toolbar with icons for art, painting, color, pencil, screwdriver, floppy disk, and pencil (no text or symbols)(Figure 3-1-3-1 Screen annotation mode)

natural_image
Grid of nine colored pencil and pen icons arranged in two rows (no text or symbols)(Figure 3-1-3-2 Annotation pen type)

natural_image
Color palette interface with seven solid color swatches and two blue dots on a white background (no text or symbols)(Figure 3-1-3-3Switch pen color and line width of screen annotation)
natural_image
Two pink eraser icons, one with a curved line and the other outlined in a dashed box (no text or symbols)(Figure 3-1-3-4 Two erase ways of screen annotation mode)

(Figure 3-1-3-5 gadgets can be used in desktop mode)
3.1.4 Annotation mode
Click the button to enter the annotation mode, you can comment on the office file, as shown in Figure 3-1-4-1 annotated ppt. file. Click the button to clear the annotation. Click the button to annotate on the currently open document. Click the button to erase the annotation. Click the button to save the annotation in the document. Open the original document still can check the annotation. Click the button to move the non-first current page to the previous page. Click the button to move the non-last current page to the next page. The annotation handwriting is automatically embedded in the original document, and the current page is cloned into the eClass page to leave a record.
Click to close the document and exit annotation mode.

flowchart
graph TD
    A["教用用户"] --> B["考试"]
    A --> C["规定/解锁"]
    A --> D["同步"]
    A --> E["查看"]
    F["学生用户"] --> G["课程/问答"]
    F --> H["发送文件"]
    I["学生"] --> J["单手"]
    K["管理员"] --> L["用户管理"]
    K --> M["异常日志管理"]
    K --> N["试卷管理"]
    K --> O["账户管理"]
    P["服务部"] --> Q["授课人员"]
    P --> R["授课人员管理"]
    P --> S["试卷管理"]
    P --> T["账户管理"]
(Figure 3-1-1-17-1 Index page, pages management)
3.1.5 Teacher/Student mode
Click the Start Menu button and the button to switch between teacher mode and student mode. All functions of the teacher mode are completely open, but some functions of the student mode are not open. This function is mainly used for the interactive function client's option. If the interactive client uses the windows tablet instead of the Android tablet, the client needs to install the eClass software on the windows tablet client and log on to the student user. Then the student needs to click this function and switch to the student mode to use the software, otherwise a prompt will appear, or if you are buying in bulk, you can apply for the serial number to register with each student.
3.2 Functions of Each Scene
eClass application software sets different disciplinary scenes according to different disciplines, including English scenes, math scenes, scientific scenes, standard scenes, and different disciplines to provide different teaching tools. Users can apply different disciplinary scene teaching according to the current discipline. In standard mode, click on the left button of the page to pop up the scene mode selection interface, as shown in Figure 3-2-1. Among them, each set of scene canvases is separated, mutually independent, coexisting with each other, and the page list of each scene only displays the page list of the current scene; each scene including the standard scene can be switched to each other.

(Figure 3-1-1-17-1 Index page, pages management)
3.2.1 English scene
Click the button to enter the English scene. The functions of the toolbar from left to right are: menu, switch to desktop mode, tools, resource library, selection, writing, special lines, eraser, online translation, handwriting recognition, text, speech recognition, Roaming, undo, redo, previous page, index page, next page, add page. See Figure 3-2-1-1.
Click ABC to pop up an online translation dialog for translation in various languages
Click the button to enter the text into the eClass software page. It is recommended to use the microphone and use this function in a relatively quiet environment.
*For other functions, see 3.1.1 Standard mode

(Figure 3-2-1-1 English Scene)
3.2.2 Math scene
Click the button to enter the math scene. The functions of the toolbar from left to right are: menu, switch to desktop mode, tools, library, selection, writing, special lines, eraser, geometry, handwriting recognition, text, math tool box, Roaming, Undo, Redo, Previous Page, Index Page, Next Page, Add Page. The fill function is displayed in the geometry tool box interface.
Click the button to pop up the math toolbox (Figure 3-2-2-2). Specific functions see the tool.
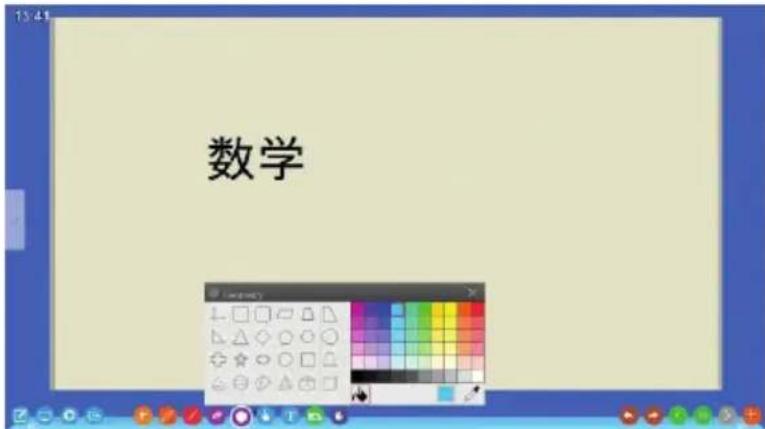
(Figure 3-2-1-1 Math Scene)
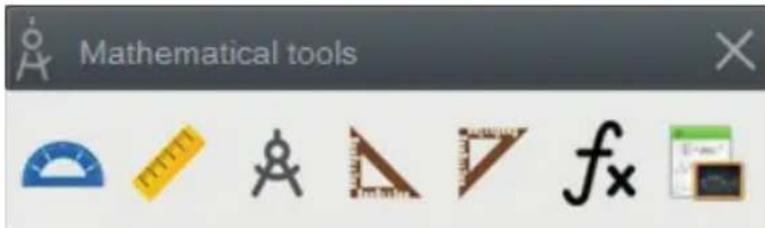
(Figure 3-2-2-2Math tool dialog in math scene)
3.2.3 Scientific scene
Click the button to enter the scientific scene. The functions of the toolbar from left to right are: menu, switch to desktop mode, tools, repository, selection, writing, special lines, eraser, geometry, handwriting recognition, text, science toolbox, Roaming, Undo, Redo, Previous Page, Index Page, Next Page, Add Page. The fill function is displayed in the geometry tool box interface.
Click the button to pop up the Science Toolbox, as shown in Figure 3-2-3-2. For details, see the tools.
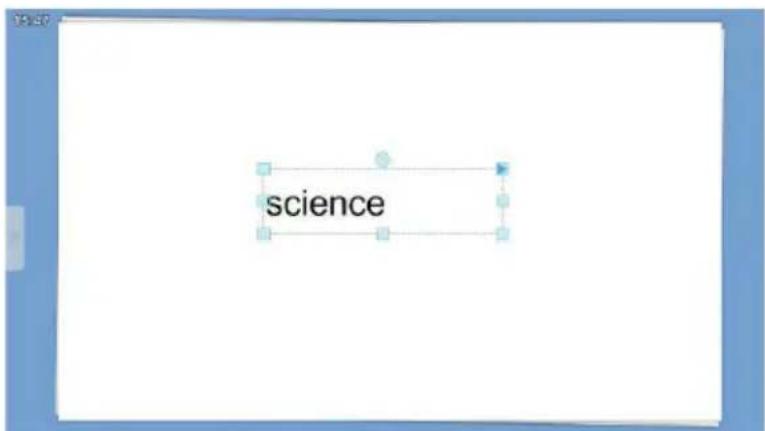
(Figure 3-2-3-1 scientific scene)

(Figure 3-2-3-2 Scientific tools box)
3.2.3 Standard scene
Click the button to restore the standard scene, which is the standard mode.

(Figure 3-2-4-1 Standard Scene)
3.3 Cross-platform interaction
3.3.1 Interactive User Management and Interactive Features
This function requires one of the computer installation servers to work properly. After the installation is complete, double-click the desktop icon. The login screen appears, as shown in Figure 3-3-1. The default user name is: admin Password: 123456. After logging in, you can see the default teacher and student users are shown in Figure 3-3-2. According to their own actual situation, delete the default user, increase their own students and teacher users. After this is set up, you can use the existing user name and password to implement the login operation in the eClass software, as shown in the 3-3-3 login interface

(Figure 3-3-1 Android user management and test management software log in interface)

(Figure 3-3-2 User management interface)
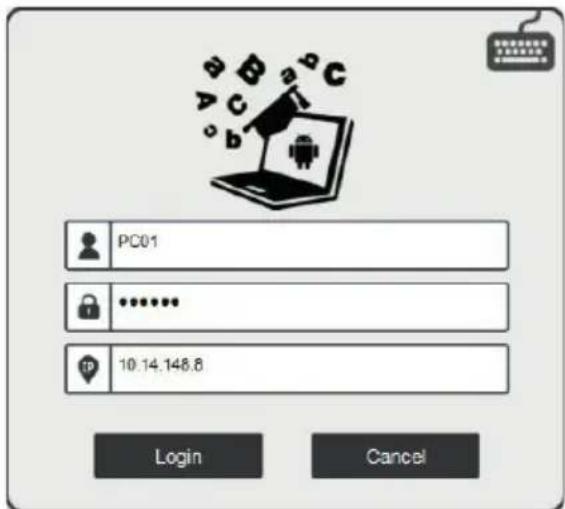
(Figure 3-3-3 Log in interface)
After the login is successful, the software displays the interactive interface, including an online user list (at least one teacher and one student user are required to display the user list), lock all online students, synchronize page content to all online students, and view all online students Page, exam. The eClass software interface is shown in Figure 3-3-4

(Figure 3-3-4 Android interaction function)
Online user list: including black screens, allowing clients to synchronize, locking the client, synchronizing to a specified client, viewing a specified client page, and sending a file to a specified user. Send messages (questions/answers), client raise hands, and other operations. Function description is shown in Figure 3-3-5:
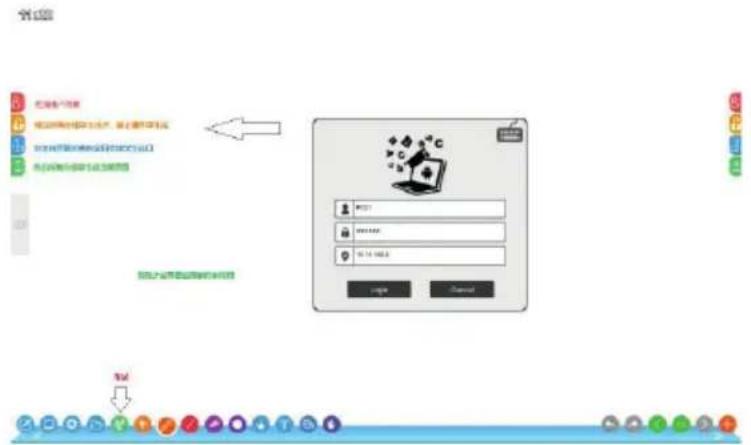
(Figure 3-3-5Classroom interactive function commentary)
Examination. After login, click the button and the dialog box as shown in Figure 3-1-1-1-15 appears.
- Start the exam and stop the exam (If you click Stop exam, if you didn't submit the exam, consider that you did not take the exam), check the exam (you can view all the contents of the current exam). Figure 3-1-1-1-16 student end test interface.

(Figure 3-1-1-1-15 Start examination interface)
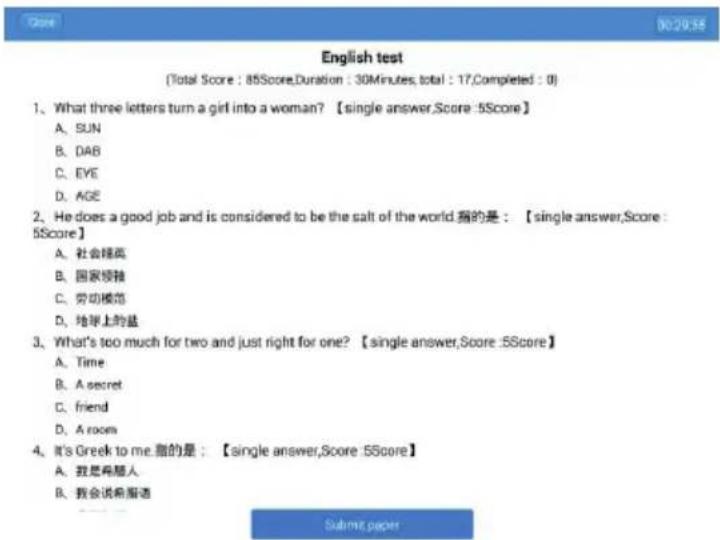
(Figure 3-1-1-1-16 Student taking examination interface)
Explain the papers. Explain the correct papers, explain student papers, export student papers to word format, as shown in figure 3-1-1-1-16

(Figure 3-1-1-1-16 Explain the test of Student)
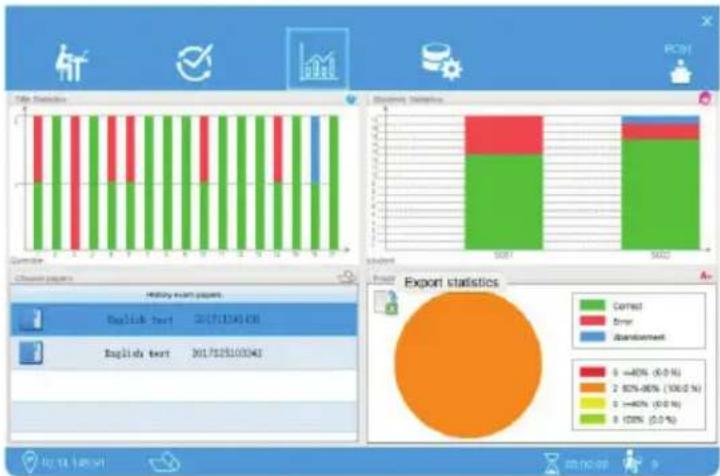
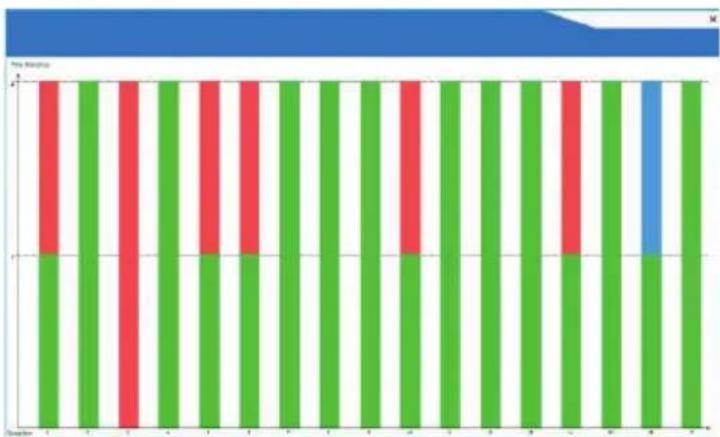
Statistics. According to the topic statistics (double-click to enlarge the display), according to the student statistics (double-click to enlarge the display), according to the score statistics, select the test papers that need statistics. Click the Export button to export the statistics to the excel table. See Figure 3-1-1-1-17-19.
bar
| Category | Correct (%) | Error (%) | Breakdown (%) | | :--- | :--- | :--- | :--- | | Correct | 50.7 | 20.3 | 10.6 | | Error | 0.0 | 0.0 | 0.0 | | Breakdown | 0.0 | 0.0 | 0.0 | The pie chart displays the percentage distribution of exports by category (Correct vs. Error) for two distinct groups. The Export statistics table below is also provided for English text. Please input the data for all categories. The Export statistics table is in English.(Figure 3-1-1-1-17Exam statistics info)
bar
| Category | Red Bar | Green Bar | Blue Bar | |---|---|---|---| | 1 | 1 | 1 | 0 | | 2 | 0 | 1 | 0 | | 3 | 1 | 1 | 0 | | 4 | 1 | 1 | 0 | | 5 | 1 | 1 | 0 | | 6 | 1 | 1 | 0 | | 7 | 1 | 1 | 0 | | 8 | 1 | 1 | 0 | | 9 | 1 | 1 | 0 | | 10 | 0 | 1 | 1 |(Figure 3-1-1-1-18 Double-click on the title to enlarge the display)

(Figure 3-1-1-1-19Export statistics to excel file)
Interaction. After the teacher and the student log in, interactive operation, the teacher screen is synchronized to the student screen in real time, as shown in Figure 3-1-1-1-19-21.

(Figure 3-1-1-1-19 Teachers' lesson interface)
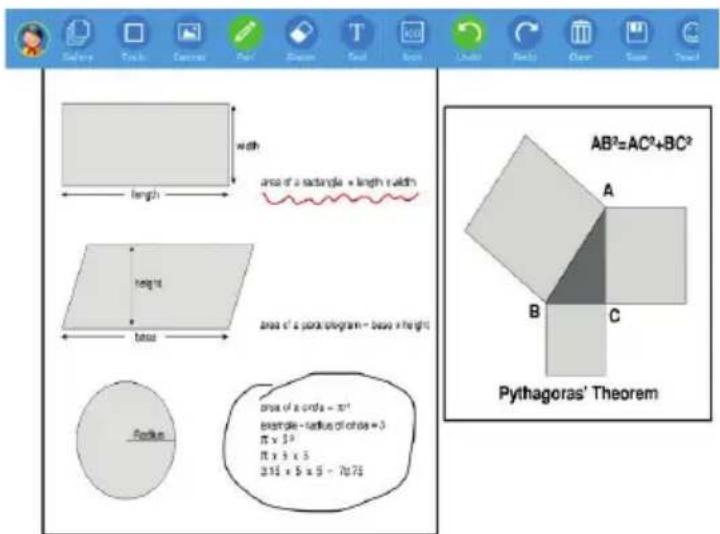
(Figure 3-1-1-1-20 Student display interface)

(Figure 3-1-1-1-19 Classroom interaction)
The above is the entire content of the eClass application software manual. The manual version is subject to change without notice.
Thank you again for choosing our company's products!
Indice
natural_image
Classroom scene with children seated at desks, one girl partially visible in foreground (no text or symbols)line
| Parameter | Value | | :--- | :--- | | x | 1.00 | | y | 0.26 | | z | 1.00 | | c | 1.00 | | d | 3.02 | | e | 1.00 | | f | 0.00 | | g | 1.00 | | h | 1.00 | | i | 1.00 | | j | 1.00 | | k | 1.00 | | l | 1.00 | | m | 1.00 | | n | 1.00 | | o | 1.00 | | p | 1.00 | | q | 1.00 | | r | 1.00 | | s | 1.00 | | t | 1.00 | | u | 1.00 | | v | 1.00 | | w | 1.00 | | x,y,z,e,p,l,m,n,o,p,q,r,s,u,v,w,y,z,k,l,m,n,o,p,q,r,s,u,v,w,y,z,k,l,m,n,o,p,q,r,s,u,v,w,y,z,k,l,m,n,o,p,q,r,s,u,v,w,y,z,k,l,m,n,o,p,q,r,s,u,v,w,y,z,k,l,m,n,o,p,q,r,s,u,v,w,y,z,k,l,m,n,o,p,q,r,s,u,v,w,y,z,k,l,m,n,o,p,q,r,s,u,v,w,y,z,k,l,M,N,N,N,N,N,N,N,N,N,N,N,N,N,N,N,N,N,N,N,N,N,N,N,N,N,N,N,N,N,N,N,N,N,N,N,N,N,N,N,N,N,N,N,N,N,N,N,N,N,N,N,N,N,N,N,N,N,N,N,N,N,N,N,N,N,N,N,N,N,N,N,N,N,N,N,N,N,N,N,N,N,N,N,N,N,N,N,N,N,N,N,N,N,N,N,N,N,N,N,N-N,K,K,L,K,L,M,K,L,M,K,L,M,K,L,M,K,L,M,K,L,M,K,L,M,K,L,M,K,L,M,K,L,M,K,L,M,K,L,M,K,L,M,K,L,M,K,L,M,K,L,M,K,L,M,K,L,M,K,L,M,K,L,M,K,L,M,K,L,M,K,L,M,K,L,M,K,L,M,K,L,M,K,L,M,K,L,M,K,L,M,K,L,M,K,L,M,K,L,M,K,L,M,K,L,M, K,K,L,M,K,L,M,K,L,M,K,L,M,K,L,M,K,L,M,K,L,M,K,L,M,K,L,M,K,L,M,K,L,M,K,L,M,K,L,M,K,L,M,K,L,M,K,L,M,K,L,M,K,L,M,K,L,M,K,L,M,K,L,M,K,L,M,K,L,M,K,L,M,K,L,M,K,L,M,K,L,M,K,L,M,K,L,M,K,L,M,K,L,M,K,L,M,K,L,M,k,L,M,k,L,M,k,L,M,k,L,M,k,L,M,k,L,M,k,L,M,k,L,M,k,L,M,k,L,M,k,L,M,k,L,M,k,L,M,k,L,M,k,L,M,k,L,M,k,L,M,k,L,M,k,L,M,k,L,M,k,L,M,k,L,m,k,m,k,m,k,m,k,m,k,m,k,m,k,m,k,m,k,m,k,m,k,m,k,m,k,m,k,m,k,m,k,m,k,m,k,m,k,m,k,m,k,m,k,m,k,m,k,m,k,m,k,m,k,m,k,m,k,m,k,m,k,m,k,m,k,m,k,m,k,m,k,m,k,m,k,m,k,m,k,m,k,m,k,m,k,m,k,m,k,m,k,m,k,m,k,m,k,m,k,m.k,m,k,m,k,m,k,m,k,m,k,m,k,m,k,m,k,m,k,m,k,m,k,m,k,m,k,m,k,m,k,m,k,m,k,m,k,m,k,m,k,m,k,m,k,m,k,m,k,m,k,m,k,m,k,m,k,m,k,m,k,m,k,m,k,m,k,m,k,m,k,m,k,m,k,m,k,m,k,m,k,m,k,m,k,m,k,m,k,m,k,m,k,m,k,m,k,m,k,mk,l,h,j,l,h,j,l,h,j,l,h,j,l,h,j,l,h,j,l,h,j,l,h,j,l,h,j,l,h,j,l,h,j,l,h,j,l,h,j,l,h,j,l,h,j,l,h,j,l,h,j,l,h,j,l,h,j,l,h,j,l,h,j,l,h,j,l,h,j,l,h,j,l,h,j,l,h,j,l,h,j,l,h,j,l,h,j,l,h,j,l,h,j,l,h,j,l,h,j,l,h,jl,g,h,j,l,h,j,l,h,j,l,h,j,l,h,j,l,h,j,l,h,j,l,h,j,l,h,j,l,h,j,l,h,j,l,h,j,l,h,j,l,h,j,l,h,j,l,h,j,l,h,j,l,h,j,l,h,j,l,h,j,l,h,j,l,h,j,l,h,j,l,h,j,l,h,j,l,h,j,l,h,j,l,h,j,l,h,j,l,h,j,l,h,j,l,h,j,l,h,j,l,t,u,v,w |natural_image
Illustration of various drafting tools including protractor, compass, ruler, and triangular ruler (no text or symbols present)3.1.1.6 Scrittura

(Figure 3-1-1-10-1 handwriting recognition)
natural_image
Grid of nine colored pencil and pen icons arranged in two rows (no text or symbols)natural_image
Color palette interface with seven square color swatches and a blue dot on the right (no text or symbols)natural_image
Two pink erasers, one with a curved line and the other outlined in red (no text or symbols)natural_image
Grid of app icons including computer, magnifying glass, lightbulb, flask, clock, play button, video camera, and document icon (no text or labels)bar_stacked
| Category | Correct (%) | Error (%) | Development (%) | | :--- | :--- | :--- | :--- | | English text | 81(7126343) | 0 | 0 | | English text | 20(7125103542) | 0 | 0 | | Total | 81(7126343) | 0 | 0 | | Export statistics: | Correct (Green): 0 | Correct (Red): 0 | Error (Blue): 0 | Development (Red: 0-80%, Blue: 80%-90%, Yellow: 0-40%, Green: 0-100%) | | Export statistics: | 0-80% (0.6%) | 0 | 0 | 0 | | 80%-90% (-100.0%) | 0 | 0 | 0 | | 0-40% (0.6%) | 0 | 0 | 0 | | 100% (0.6%) | 0 | 0 | 0 |bar
| Category | Red (%) | Green (%) | Blue (%) | |---|---|---|---| | Group 1 | 35 | 65 | 0 | | Group 2 | 35 | 65 | 0 | | Group 3 | 35 | 65 | 0 | | Group 4 | 35 | 65 | 0 | | Group 5 | 35 | 65 | 0 | | Group 6 | 35 | 65 | 0 | | Group 7 | 35 | 65 | 0 | | Group 8 | 35 | 65 | 0 | | Group 9 | 35 | 65 | 0 | | Group 10 | 35 | 65 | 0 | | Group 11 | 35 | 65 | 0 | | Group 12 | 35 | 65 | 0 | | Group 13 | 35 | 65 | 0 | | Group 14 | 35 | 65 | 0 | | Group 15 | 35 | 65 | 0 | | Group 16 | 35 | 65 | 0 | | Group 17 | 35 | 65 | 0 | | Group 18 | 35 | 65 | 0 | | Group 19 | 35 | 65 | 0 | | Group 20 | 35 | 65 | 0 | | Group 21 | 35 | 65 | 0 | | Group 22 | 35 | 65 | 0 | | Group 23 | 35 | 65 | 0 | | Group 24 | 35 | 65 | 0 | | Group 25 | 35 | 65 | 0 | | Group 26 | 35 | 65 | 0 | | Group 27 | 35 | 65 | 0 | | Group 28 | 35 | 65 | 0 | | Group 29 | 35 | 65 | 0 | | Group 30 | 35 | 65 | 0 | | Group 31 | 35 | 65 | 0 | | Group 32 | 35 | 65 | 0 | | Group 33 | 35 | 65 | 0 | | Group 34 | 35 | 65 | 0 | | Group 35 | 35 | 65 | 0 | | Group 36 | 35 | 65 | 0 | | Group 37 | 35 | 65 | 0 | | Group 38 | 35 | 65 | 0 | | Group 39 | 35 | 65 | 0 | | Group 40 | 35 | 65 | 0 | | Group 41 | 35 | 65 | 0 | | Group 42 | 35 | 65 | 0 | | Group 43 | 35 | 65 | 0 | | Group 44 | 35 | 65 | 0 | | Group 45 | 35 | 65 | 0 | | Group 46 | 35 | 65 | 0 | | Group 47 | 35 | 65 | 0 | | Group 48 | 35 | 65 | 0 | | Group 49 | 35 | 65 | 0 | | Group 50+ (Group) = [Quartile] / [Value] / [Quartile] / [Value] / [Value] / [Value] / [Value] / [Value] / [Value] / [Value] / [Value] / [Value] / [Value] / [Value] / [Value] / [Value] / [Value] / [Value] / [Value] / [Value] / [Value] / [Value] / [Value] / [Value] / [Value] / [Value] / [Value] / [Value] / [Number] / [Number] / [Number] / [Number] / [Number] / [Number] / [Number] / [Number] / [Number] / [Number] / [Number] / [Number] / [Number] / [Number] / [Number] / [Number] / [Number] / [Number] / [Number] / [Number] / [Number] / [Number] / [Number] / [Number] / [Number] / [Value] / [Value] / [Value] / [Value] / [Value] / [Value] / [Value] / [Value] / [Value] / [Value] / [Value] / [Value] / [Value] / [Value] / [Value] / [Value] / [Value] / [Value] / [Value] / [Value]For any information and product updates
visit our website www.machpower.it
Mach Power ® is a registered trademark
All Rights Reserved
- eClass
- Index
- Software introduction 4
- Installation 4
- Use instruction 6
- Software brief introduction
- Installation
- Runtime Environment
- Install eClass
- Use instruction
- Authorization mechanism
- Lack of functional modules under various systems
- Each mode function
- Standard mode(full screen mode)
- Menu
- Switch to desktop mode
- Gadgets
- Resource Library
- Select
- Writing
- Special line
- Erase
- Geometry
- Handwriting recognition, text
- Fill
- Screen roaming
- Undo
- Redo
- Previous page
- Index page
- Next page
- Add page
- Windows mode
- Desktop mode
- Annotation mode
- Teacher/Student mode
- Functions of Each Scene
- English scene
- Math scene
- Scientific scene
- Standard scene
- Cross-platform interaction
- Interactive User Management and Interactive Features
- Indice
- Scrittura
Brand : Mach Power
Model : EB-IWB82W-008
Category : Whiteboard