
FMK550 - Car kit American International - Free user manual and instructions
Find the device manual for free FMK550 American International in PDF.


| Product Type | Car Stereo Installation Kit |
| Brand | American International |
| Model | FMK550 |
| Compatible Vehicle Makes | Ford, Lincoln, Mercury, Mazda (1995-2011 models) |
| Mounting Options | DIN sleeve and ISO mount |
| Included Components | Installation kit, mounting brackets, screws, spacer nubs, backstrap |
| Material | Plastic, Metal |
| Color | Black |
| Installation Difficulty | Moderate (vehicle-specific dash disassembly required) |
| Unique Feature | Spacer nubs for tighter fit on Ford vehicles |
| Application Notes | Spacer nubs may need filing for some models (e.g., Ford Ranger) |
| Radio Size Compatibility | Single DIN and ISO mountable radios |
| Pocket Included | Yes, with adjustable position (top or bottom) |
| Backstrap Support | Included for rear support in certain vehicles |
| Maintenance | Wipe clean with dry cloth |
| Safety Note | Ensure radio is securely mounted to prevent movement |
| Manufacturer | American International Industries, Inc. |
| Warranty | Not specified; refer to manufacturer |
Frequently Asked Questions - FMK550 American International
User questions about FMK550 American International
0 question about this device. Answer the ones you know or ask your own.
Ask a new question about this device
Download the instructions for your Car kit in PDF format for free! Find your manual FMK550 - American International and take your electronic device back in hand. On this page are published all the documents necessary for the use of your device. FMK550 by American International.
USER MANUAL FMK550 American International
For information about other American International automotive accessories visit our website at:
http://www.aius.net

American International
WWW.AIUS.NET
2500 East Francis Street Ontario, CA 91761, U.S.A.
USA Sales (800) 336-6500
Canada Sales (888) 922-3006
CUSTOMER HELP LINE
USA 800-323-4329 • Canada 800-245-8777
iFMK550

American International
Car Stereo Installation Kits & Accessories

natural_image
Technical line drawing of a mechanical housing assembly with multiple views and mounting brackets (no text or symbols)VEHICLE APPLICATIONS
| Ford1995-10 CROWN VICTORIA1997-08 ECONOLINE VAN (club Wagon)2001-07 ESCAPE2000-05 EXCURSION1998-06 EXPEDITION (Non Navigation)1995-05 EXPLORER2000-06 EXPLORER Sport Trac1999-04 F-SERIES TRUCKS2004 F-150 (Heritage Only)2001-04 MUSTANG1995-11 RANGER1999-03 WINDSTARFord Commercial Vehicles1999-08 E-1501997-08 E-2501999-08 E-3501999-08 E-4502002-04 F-2502002-04 F-3502002-04 F-450 | Ford Commercial Vehicles Cont.2002-04 F-5502002-07 F-6502003-04 F-750Lincoln2003-05 AVIATOR2001-02 BLACKWOOD1995-97 CONTINENTAL1995-98 MARK VIII1999-06 NAVIGATOR1995-02 TOWN CARMazda1995-10 B-SERIES P/U'sMercury2001-02 COUGAR (flat face radios only)1995-10 GRAND MARQUIS1997-05 MOUNTAINEER2003-04 MARAUDER2005-07 MARINER |
©2015 AMERICAN INTERNATIONAL INDUSTRIES, INC. TECH Ver. 11/14 PRINT Ver. 01/15
TABLE OF CONTENTS
| FORD Page | LINCOLN | Page | ||
| 1995-10 | Crown Vic * 3 | 2003-08 | Aviator | 9 |
| 1997-08 | Econoline Van (Club Wagon) * 6 | 1995-97 | Continental * | 3 |
| 2001-07 | Escape * 7 | 1995-98 | Mark VIII * | 3 |
| 2000-05 | Excursion * 6 | 1999-03 | Navigator * | 7 |
| 1998-02 | Expedition * (Non Navigation) 7 | 1995-02 | Town Car * | 3 |
| 2003-06 | Expedition (Non Navigation) 5 | MAZDA | ||
| 1995-01 | Explorer (All) * 8 | 1995-10 | B-Series P/U * 6 | |
| 2002-05 | Explorer 4 | MERCURY | ||
| 1999-03 | F-Series Trucks (All) * 6 | 2001-02 | Cougar * | 8 |
| 2004 | F-150 Heritage model only * 6 | 1995-10 | Grand Marquis * | 3 |
| 2001-04 | Mustang 4 | 2003-05 | Marauder * | 3 |
| 1995-11 | Ranger * 6 | 2005-07 | Mariner * | 7 |
| 1999-03 | Windstar * 6 | 1997-01 | Mountaineer * | 8 |
| 2002-05 | Mountaineer | 4 | ||
THIS KIT CONTAINS
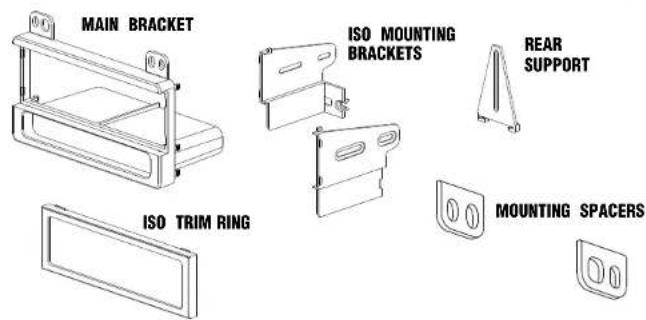
NOTES
Due to variances on Ford, Lincoln, Mercury and Mazda radio openings, this installation kit has been uniquely designed with spacer nubs. These spacer nubs take up the play between the installation kit and mounting locations for a tighter fit.
Spacer nubs may have to be filed down or cut off to allow locking tabs to fully engage on some vehicles. (i.e. Ford Ranger)
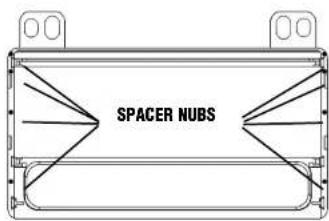
NOTES:
2003-05 Lincoln Aviator
NOTES:
- Carefully pry the top center Vent Panel assembly upward and remove.
- Remove the (2) 9/32 screws securing the top of the radio trim bezel.
- Carefully pry the lower sides of the radio trim bezel slightly forward to release and remove the radio trim bezel.
- Carefully pry the clock/vent assembly below the radio forward, disconnect the harness and remove clock/vent assembly.
- Remove the (2) 9/32 screws securing the radio to the sub-dash and save metal bar for reinstallation.
- Carefully pull radio forward, disconnect the wire harnesses and antenna lead and remove radio.
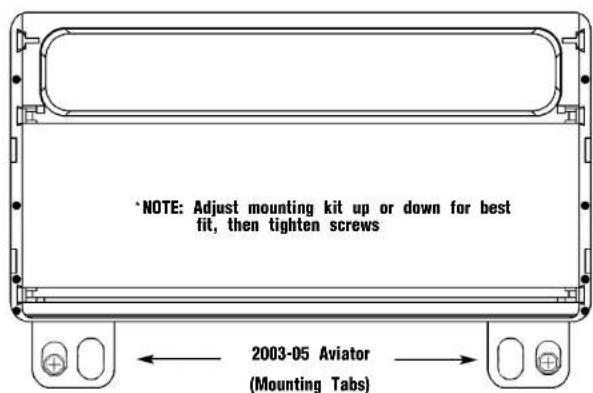
NOTES:
- Pocket must be on top.
- You must use the factory style rear support bracket (included).
- Attach a backstrap from the back of the pocket to the backstrap hole on your radio.

(Mounting Spacers)

DIN MOUNT ASSEMBLY INSTRUCTIONS
NOTE: Kit must be mounted in dash prior to bending tabs on sleeve
- Insert DIN sleeve from your new radio into the radio opening of the installation kit as shown in Fig. A.
- Depress the tabs from inside the sleeves opening upward, outward, and downward to secure the installation kit to the sub-dash.
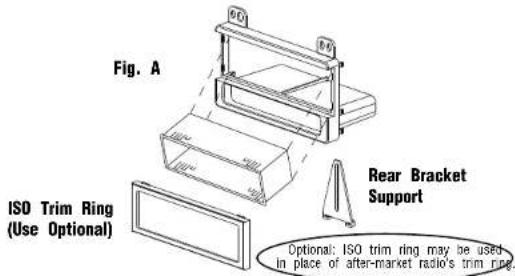
ISO MOUNT ASSEMBLY INSTRUCTIONS
- Attach left and right mounting brackets to rear of kit as shown in Fig. B and set to back of pocket using screws provided with kit.
- Insert ISO mountable radio between ISO mount brackets and loosely attach to sic of radio using screws provided with radio when possible or screws supplied with
- Attach ISO trim ring to face of kit.
- Slide radio forward or backward for desired look and tighten screws.

1995-10 Ford Crown Vic
1995-97 Lincoln Continental
1995-98 Lincoln Mark VIII
1995-02 Lincoln Towncar
1995-10 Mercury Grand Marquis
2003-07 Mercury Marauder
NOTES:
- Pocket must be on top for all vehicle applications.
- You cannot ISO mount on these applications.
- You must use the Din mounting sleeves on these applications.
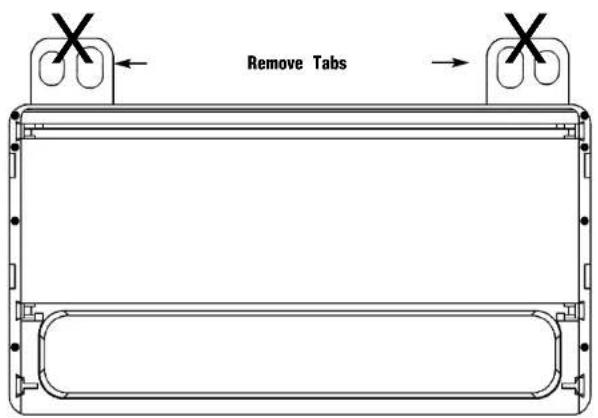
- Remove the Mustang mounting tabs for these applications.

Spacer Nubs
* See Notes on Page 1
2001-02 Mercury/Cougar
NOTES:
- This kit only fits Cougar vehicles with a flat face Ford radio, not the curved type (i.e. Ford Focus style).
- Remove the Mustang mounting tabs for this application.

1995-01 Explorer (all models)
1997-01 Mountaineer
NOTES:
- Pocket can be mounted on the top or the bottom.
- Break off the top right locking tab of the kit. (As shown in Fig. A & B)
- These vehicles can only be ISO mounted if the pocket is on top.
- Remove the Mustang mounting tabs for these applications.
FIG A

See Notes on Page 1
NOTE: See page 4 for 2002-05 Explorer/Mountaineer instructions.
FIG B

1998-02 Ford Expedition
1997-02 Lincoln Navigator
NOTES:
- This kit may be mounted in vehicle dash with pocket on top or bottom.
- You may have to remove the factory rear support bracket, or modify the top of the subdash to allow for the radio or pocket to fit properly.
- Remove the Mustang mounting tabs for these applications.

2001-07 Ford Escape
2005-07 Mercury Mariner
NOTES:
- Pocket can be on top or bottom.
- File the top right side of the radio subdash opening so the side is straight up and down.
- Remove the Mustang mounting tabs for this application.

2001-04 Ford Mustang
DASH DISASSEMBLY:
1 For Stickshift models-Twist off the shift knob (counter clockwise) and remove.
2 Gently lift up on the trim around the gear shift lever, disconnect the harness at slide the rubber boot off the end of the shifter knob.
3 Gently unsnap the trim bezel from around the radio, disconnect the harnesses a remove the trim bezel.
4 Remove the (4) 9/32 screws securing the radio to the subdash.
5 Slide the Radio forward, disconnect the harnesses an antenna lead and remove the radio
2002-05 Ford Explorer/Mercury Mountaineer
DASH DISASSEMBLY:
1 Gently pry outward on dash trim panel & remove.
2 Remove (2) screws securing radio to sub-dash.
3 Pull radio forward, disconnect wire harness & antenna lead & remove radio.
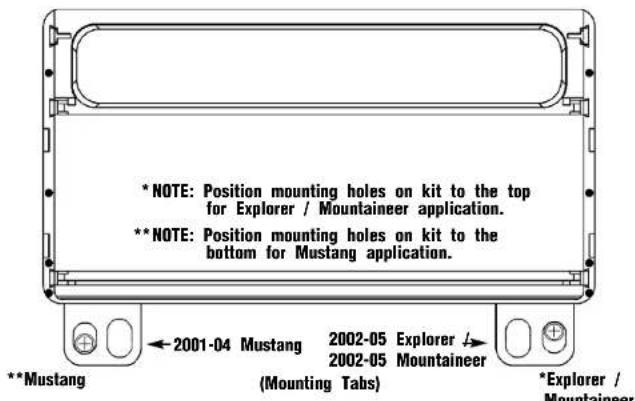
NOTES:
- Pocket must be on top.
- Attach mounting spacers to backside of mounting tabs (if desired).
- Attach a backstrap from the back of the pocket to the backstrap hole on your

(Mounting Spacers)

2003-06 Ford Expedition w/out Factory Navigation
DASH DISASSEMBLY:
- Set the emergency brake.
- Remove the (2) 9/32 screws from above the instrument gauges.
- Lower the steering column all the way down.
- Carefully pry outward on the dash trim bezel.
- Disconnect the wire harnesses from the headlamp switches and the climate controls and remove the panel.
- Remove the (2) 9/32 screws securing the factory radio to the sub-dash.
- Pull the radio forward, disconnect the wire harnesses and antenna lead and remove radio.


(Mounting Spacers)
NOTES:
- Pocket must be on top.
- Attach mounting spacers to backside of mounting tabs (if desired).
- Attach a backstrap from the back of the pocket to the backstrap hole on your radio.
1997-08 Ford Econoline Vatclub Wagon)
2000-05 Ford Excursion
2004 Ford F-150 Heritage
1999-03 Ford F-Series\$All)
1995-11 Ford Ranger
1999-03 Ford Windstar
1995-10 Mazda B-Series P/U
NOTES:
- This kit may be mounted in vehicle dash with pocket on top or bottom.
- For all ISO Mount applications, you must use the factory style rear support brack
- Remove the Mustang mounting tabs for these applications.
Spacer Nubs
* See Notes on Page 1

Brand : American International
Model : FMK550
Category : Car kit