
A3UQ34GFAB - Uncategorized LG - Free user manual and instructions
Find the device manual for free A3UQ34GFAB LG in PDF.


| Product Type | Wall Mounted Air Conditioner |
| Model | A3UQ34GFAB |
| Brand | LG |
| Power Supply | 220-240 V ~ 50/60 Hz |
| Rated Current (Cooling) | 0.2 A (typical for similar models) |
| Refrigerant | R32 (as per typical LG units) |
| Cooling Capacity | Approx. 2.5 kW (estimation based on model series) |
| Heating Capacity | Approx. 3.0 kW (if heat pump model) |
| Operating Modes | Cooling, Heating, Dehumidification, Fan, Auto Changeover |
| Fan Speeds | High, Medium-High, Medium, Medium-Low, Low, Natural Wind |
| Airflow Direction | Vertical (auto swing) and Horizontal (manual) |
| Jet Mode | Yes (cooling or heating for 30 minutes) |
| Timer | On/Off Timer, Sleep Timer (up to 7 hours) |
| Special Functions | Comfort Sleep, Energy Saving, Energy Control, Ion Care, Auto Clean, Smart Diagnosis |
| Remote Control | Wireless with LCD display |
| Air Filter | Washable, clean every 2 weeks |
| Dimensions (Indoor Unit) | Approx. 837 x 305 x 190 mm (W x H x D) (typical LG wall unit) |
| Weight (Indoor Unit) | Approx. 9.5 kg (estimation) |
| Installation | Professional installation required |
| Safety Certifications | Complies with European safety standards |
Frequently Asked Questions - A3UQ34GFAB LG
User questions about A3UQ34GFAB LG
0 question about this device. Answer the ones you know or ask your own.
Ask a new question about this device
Download the instructions for your Uncategorized in PDF format for free! Find your manual A3UQ34GFAB - LG and take your electronic device back in hand. On this page are published all the documents necessary for the use of your device. A3UQ34GFAB by LG.
USER MANUAL A3UQ34GFAB LG
Read this owner's manual thoroughly before operating the appliance and keep it handy for reference at all times.
This manual is the simplified version of original manual. You can obtain the original manual from www.lg.com.
TYPE: WALL MOUNTED
TABLE OF CONTENTS
This manual is produced for a group of products and may contain images or content different from the model you purchased.
This manual is subject to revision by the manufacturer.
SAFETY INSTRUCTIONS ...... 3
IMPORTANT SAFETY INSTRUCTIONS 4
OPERATION 9
Notes for Operation 9
Parts and Functions....9
Wireless Remote Control.... 10
Restarting the Air Conditioner Automatically 15
Using the Mode Function.... 15
Using the Jet Mode Function....16
Using the Fan Speed Function 17
Using the Air Flow Direction Function.... 17
Setting the On/Off Timer 18
Using the Sleep Function(Optional).... 19
Using the Comfort Sleep Function(Optional) 19
Using the Energy Display Function(Optional).... 20
Using the Light Off Function(Optional) 20
Using the Comfort Air Function(Optional) 21
Using the Energy Saving Function(Optional) 21
Using the Energy Control Function(Optional) 21
Using Special Functions 22
Smart Appliance Connectivity 23
MAINTENANCE 24
Clean the Air Filter 26
SAFETY INSTRUCTIONS
The following safety guidelines are intended to prevent unforeseen risks or damage from unsafe or incorrect operation of the appliance.
The guidelines are separated into ‘WARNING’ and ‘CAUTION’ as described below.

This symbol is displayed to the indicate matters and operations that can cause risk. Read the part with this symbol carefully and follow the instructions in order to avoid risk.

WARNING
This indicates that the failure to follow the instructions can cause serious injury or death.

CAUTION
This indicates that the failure to follow the instructions can cause the minor injury or damage to the product.

WARNING
To reduce the risk of explosion, fire, death, electric shock, injury or scalding to persons when using this product, follow basic precautions, including the following:
Children in the Household
This appliance is not intended for use by persons (including children) with reduced physical, sensory or mental capabilities, or lack of experience and knowledge, unless they have been given supervision or instruction concerning use of the appliance by a person responsible for their safety. Children should be supervised to ensure that they do not play with the appliance.
For use in Europe:
This appliance can be used by children aged from 8 years and above and persons with reduced physical, sensory or mental capabilities or lack of experience and knowledge if they have been given supervision or instruction concerning use of the appliance in a safe way and understand the hazards involved. Children shall not play with the appliance. Cleaning and user maintenance shall not be made by children without supervision.

WARNING
To reduce the risk of explosion, fire, death, electric shock, injury or scalding to persons when using this product, follow basic precautions, including the following:
Installation
- Do not install the air conditioner on an unstable surface or in a place where there is danger of it falling.
- Contact an authorized service center when installing or relocating the air conditioner.
• Install the panel and the cover of the control box safely.
Do quidis stagas air conditioner in a place where flammable li such as gasoline, propane, paint thinner, etc., are stored.
- Make sure that the pipe and the power cable connecting the indoor and outdoor units are not pulled too tight when installing the air conditioner.
- Use standard circuit breaker and fuse that conform to the rating of the air conditioner T 3.15 A / 250.V
Do refrigerant air or gas into the system except with the specific Use in housing, nonmable gas (nitrogen) to check for leak and to purge compressed air or flammable gas may cause fire or explosion.
- The indoor/outdoor wiring connections must be secured tightly, and the cable should be routed properly so that there is no force pulling the cable from the connection terminals. Improper or loose connections can cause heat generation or fire.
• Install dedicated electric outlet and circuit breaker before using the air conditioner.
- Do not connect the ground wire to a gas pipe, a lightning rod, or a telephone ground wire.
Operation
- Be sure to use only those parts listed in the service parts list. Never attempt to modify the equipment.
• Make sure that children do not climb on or hit the outdoor unit. - Dispose of the batteries in a place where there is no danger of fire.
- Use only the refrigerant specified on the air conditioner label.
- Cut off the power supply if there is any noise, smell, or smoke coming from the air conditioner.
- Do not leave flammable substances such as gasoline, benzene, or thinner near the air conditioner.
- Contact an authorized service center when the air conditioner is submerged by flood waters.
- Do not use the air conditioner for an extended period time in a small place without proper ventilation.
- In the event of a gas leak (such as Freon, propane gas, LP gas, etc.) ventilate sufficiently before using the air conditioner again.
- To clean the interior, contact an authorized service center or dealer. Using harsh detergents may cause corrosion or damage to the unit.
- Be sure to ventilate sufficiently when the air conditioner and a heating appliance such as a heater are used simultaneously.
- Do not block the inlet or outlet of air flow.
- Do not insert hands or other objects through the air inlet or outlet while the air conditioner is operating.
- Make sure that the power cable is neither dirty, loose, nor broken.
- Never touch, operate, or repair the air conditioner with wet hands.
- Do not place any objects on the power cable.
- Do not place a heater or other heating appliances near the power cable.
- Do not modify or extend the power cable. Scratches or peeling insulation on the power cables may result in fire or electric shock, and should be replaced.
- Cut off the power supply immediately in the event of a blackout or a thunderstorm.
- Take care to ensure that power cable could not be pulled out or damaged during operation.
- Do not touch refrigerant pipe or water pipe or any internal parts while the unit is operation or immediately after operation.
Maintenance
- Do not clean the appliance by spraying water directly onto the product.
- Before cleaning or performing maintenance, disconnect the power supply and wait until the fan stops.
Technical Safety
- Installation or repairs made by unauthorized persons can pose hazards to you and others.
- The information contained in the manual is intended for use by a qualified service technician who is familiar with the safety procedures and equipped with the proper tools and test instruments.
- Failure to read and follow all instructions in this manual can result in equipment malfunction, property damage, personal injury and/or death.
- The appliance shall be installed in accordance with national wiring regulations.
- When the power cord is to be replaced, the replacement work shall be performed by authorized personnel using only genuine replacement parts.
- This appliance must be properly grounded to minimize risk of electric shock.
- Do not cut or remove the grounding prong from the power plug.
- Attaching the adapter ground terminal to the wall receptacle cover screw does not ground the appliance unless the cover screw is metal, uninsulated, and the wall receptacle is grounded through house wiring.
- If you have any doubt whether the air conditioner is properly grounded, have the wall receptacle and circuit checked by a qualified electrician.
- The refrigerant and insulation blowing gas used in the appliance require special disposal procedures. Consult a service agent or a similarly qualified person before disposing of them.
- If the supply cord is damaged, it must be replaced by the manufacturer or its service agents or similarly qualified person in order to avoid a hazard.

CAUTION
To reduce the risk of minor injury to persons, malfunction, or damage to the product or property when using this product, follow basic precautions, including the following:
Installation
- Do not install the air conditioner in an area where it is directly exposed to sea wind(salt spray).
• Install the drain hose properly for the smooth drainage of water condensation.
• Exercise caution when unpacking or installing the air conditioner. - Do not touch the leaking refrigerant during installation or repair.
- Transport the air conditioner with two or more people or use a forklift.
- Install the outdoor unit such that it is protected from direct sunlight. Do not place the indoor unit in a place where it is directly exposed to sunlight via the windows.
- Safely dispose of packing materials such as screws, nails or batteries using proper packaging after installation or repair.
- Install the air conditioner in a place where the noise from the outdoor unit or the exhaust fumes will not inconvenience the neighbors. Failure to do so may result in conflict with the neighbors.
Operation
- Remove the batteries if the remote control is not to be used for an extended period of time.
- Make sure that the filter is installed before operating the air conditioner.
- Be sure to check if there is a refrigerant leak after installing or repairing the air conditioner.
- Do not place any object on the air conditioner.
- Never mix different types of batteries, or old and new batteries for the remote control.
- Do not let the air conditioner run for a long time when humidity is very high or when a door or a window has been left open.
Stop by in the relative control if there is a fluid leak in the ba or skin are exposed to the leaking battery fluid, wash off with clean water.
- Do not expose people, animals, or plants to the cold or hot wind from the air conditioner for extended periods of time.
If the leaking battery fluid has been swallowed, wash off the inside of the mouth thoroughly and consult a doctor.
- Do not drink the water drained from the air conditioner.
- Do not use the product for special purposes, such as preserving foods, works of art, and etc. It is an air conditioner for consumer purposes, not a precision refrigeration system. There is risk of damage or loss of property.
- Do not recharge or disassemble the batteries.
Maintenance
- Never touch the metal parts of the air conditioner when remoy the air filter.
- Use a sturdy stool or ladder when cleaning, maintaining, or repairing the air conditioner at a height.
- Never use strong cleaning agents or solvents when cleaning the air conditioner or spray water. Use a smooth cloth.
User must carry routine checkup & cleaning to avoid unit's poor performance. In case of special situation, the job must be carried out by service person only.
Electrical Specifications :
AMNQ09GSJAA, AMNQ12GSJAA 220 \~ 240 V 50/60 Hz 0.2 A•
• A2NQ180SKA50/60MHNQ24GSKAA
Notes for Operation
Suggestion for Energy Saving
- Do not cool excessively indoors. This may be harmful for your health and may consume more electricity.
- Block sunlight with blinds or curtains while you are operating the air conditioner.
- Keep doors or windows closed tightly while you are operating the air conditioner.
- Adjust the direction of the air flow vertically or horizontally to circulate indoor air
- Speed up the fan to cool or warm indoor air quickly, within a short period of time.
- Open windows regularly for ventilation. The indoor air quality may deteriorate if the air conditioner is used for long durations.
•Clean the air filter once every 2 weeks. Dust and impurities collected in the air filter may block the air flow or weaken the cooling / dehumidifying functions.
Parts and Functions
Indoor Unit Outdoor Unit
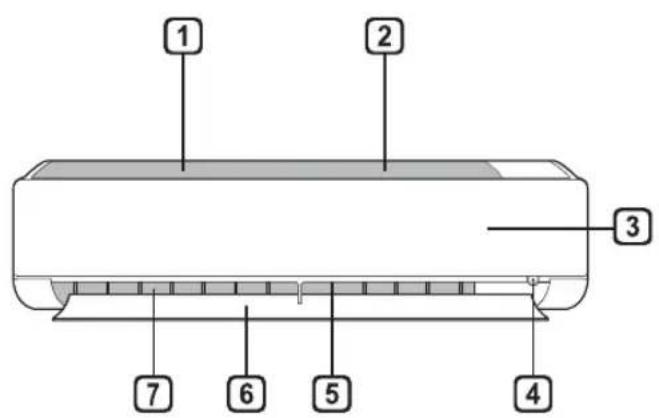
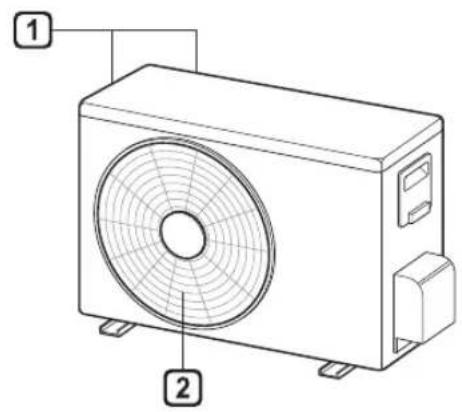
1 Air Filter
② Air Intake
3 Front Cover
4 On/Off Button
5 Air Deflector (Vertical louver)
6 Air Deflector (Horizontal vane)
7 Air Outlet
1 Air Intake Vents
② Air Outlet Vents
NOTE
- The number and location of operation lamps may vary according to the model of the air conditioner.
• The feature may be changed according to the type of model.
Wireless Remote Control
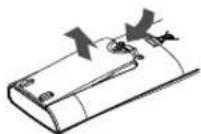
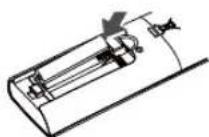
Inserting Batteries
If the display screen of the remote control begins to fade, replace the batteries. Insert AAA (1.5 V) batteries before using the remote control.
1 Remove the battery cover.
2 Insert the new batteries and make sure that the + and - terminals of the batteries are installed correctly.
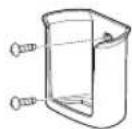
Installing the Remote Control Holder
To protect the remote control, install the holder where there is no direct sunlight.
1 Choose a safe and easily accessible location.
2 Fix the holder by fastening 2 screws firmly with a screwdriver.
Operating method
Point the remote control towards the signal receiver at the right side of the air conditioner to operate it.
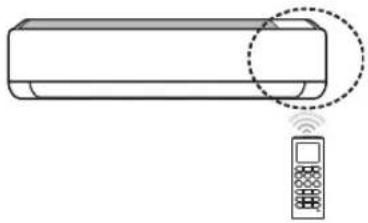
natural_image
Line drawing of a remote control unit with a dashed circle highlighting its position, alongside a mobile phone icon (no text or symbols)NOTE
- The remote control may operate other electronic devices if it is directed towards them. Make sure to point the remote control towards the air conditioner signal receiver.
- For proper operation, use a soft cloth to clean the signal transmitter and receiver.
- In case of a function not provided in the product, no buzzer sound occurs from the product when a button for such function on the remote control is pressed except for Air Flow Direction( SWING) Energy Display( SW ) Air Purification function(
Setting the Current Time
1 Insert batteries.
- The icon below blinks at the bottom of the display screen.

2 Press or button to select the minutes.
3 Press SET/CANCEL button to finish.
NOTE
- The On/Off Timer is available after setting the current time.
Using the °C/°F Conversion Function(Optional)
This function changes unit between ^ and ^ .
- Press and hold button about 5 seconds.
Operating the Air Conditioner Without the Remote Control
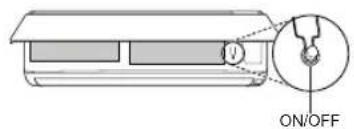
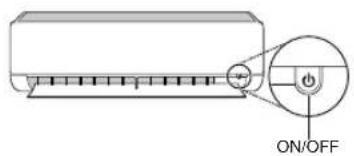
You can use the ON/OFF button of the indoor unit to operate the air conditioner when the remote control is unavailable.
1 Open the front cover (Type1) or horizontal vane(Type2).
2 Press the ON/OFF button.
Type1
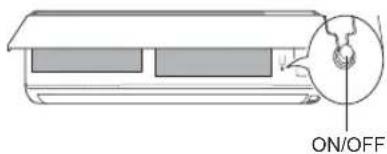
Type2
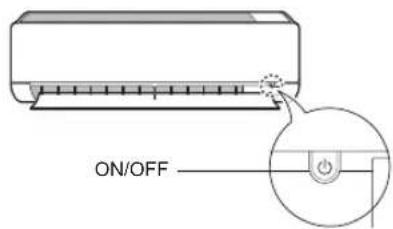
NOTE
- The stepping motor may be broken, if the horizontal vane opens rapidly.
• The fan speed is set to high. - The feature may be changed according to the type of model.
- The temperature cannot be altered when using this emergency On/Off button.
- For cooling & heating models, the temperature is set from 22 °C to 24 °C.
Using Wireless Remote Control
You can operate the air conditioner more conveniently with the remote control.
![2 * MODE FAN SPEED TEMP JET MODE VW [3 s] SWING SWING ROOM TEMP C--[5 s] SET UP DIAGNOSIS[3 s] FUNC. SET CANCEL TIMB R CANCEL LG RESET](/content/2026/05/932070/images/ecfc0ba61901e22e48325d80c5b55eaa3b23ced5235158102b5a906674d08086.jpg)
| 1 Button | 2 Display Screen | Description |
| - To turn | on/off the air conditioner. | |
| 88° | To adjust the desired room temperature in cooling, heating or auto changeover mode. | |
| MODE | To select the cooling mode. | |
| To select the dehumidification mode. | ||
| To select the fan mode. | ||
| To select the auto changeover/auto operation mode. | ||
| JET MODE | Po | To change room temperature quickly. |
| FAN SPEED | To adjust the fan speed. | |
| To adjust the air flow direction vertically or horizontally. |
NOTE
- * buttons may be changed according to the type of model.
![2 MODE FAN SPEED TEMP JET MODE SWING ROOM TEMP °C~4 [5 s] SET UP FUNC. SET CANCEL TIMER CANCEL LG RESET](/content/2026/05/932070/images/06df158e34ce6b715bb9cfb14b9167a482bfc6a56be082892cfa5451e34c8670.jpg)
| 1 Button | 2 Display Screen | Description |
| To turn on/off air conditioner automatically at desired time. | ||
| SET/CANCEL | - | To set/cancel the special functions and timer. |
| - To cancel the timer settings. | ||
| - To adjust time. | ||
| *LIGHT OFF | - | To set the brightness of the display on the indoor unit. |
| ROOM TEMP | To display the room temperature. | |
| °C←°F [5 s] To change unit between °C and °F | ||
| *ENERGY SAVING | To minimize power consumption. | |
| *COMFORT AIR | To adjust the air flow to deflect wind. | |
| kW [3 s] - | To set whether or not to display information regarding energy. | |
| *ENERGY CTRL | To bring the effect of the power saving. | |
| *COMFORT SLEEP | To make a comfortable sleeping environment. | |
| DIAGNOSIS [5 s] | - | To conveniently check maintenance information of a product. |
NOTE
- * buttons may be changed according to the type of model.
- When connected to the Multi Outdoor unit, the Energy Display, Energy Control, Silent and Smart Diagnosis function may not be supported.
![2 MODE FAN SPEED TEMP JET MODE LW [3 s] SWING ROOM TEMP C--[5 s] SET UP FUNC. SET CANCEL TIMER CANCEL LG RESET](/content/2026/05/932070/images/b8f643bb116980ad9ff8bfb2f569bb3b2c486cccc3cda5f10e6dac4952bca68f.jpg)
| 1 Button | 2 Display Screen | Description |
| The Ion generator uses millions of ions to help improve indoor air quality. | ||
| To keep your skin moisturized by generating ion clusters. | ||
| To lower indoor humidity quickly. | ||
| To remove moisture generated inside the indoor unit. | ||
| RESET - To | initialize the remote control settings. | |
NOTE
• Some functions may not be supported, depending on the model.
- * buttons may be changed according to the type of model.
- Press the SET/CANCEL button to operate the selected FUNC.
Restarting the Air Conditioner Automatically
When the air conditioner is turned on again after a power failure, this function restores the previous settings.
Disabling Auto Restart
1 Open the front cover (Type1) or horizontal vane(Type2).
2 Press the ON/OFF button and hold it for 6 seconds, then The unit will beep twice and the lamp will blink twice 4 times.
- To re-enable the function, press the ON/OFF button and hold it for 6 seconds. The unit will beep twice and the lamp will blink 4 times.
Type1
Type2
NOTE
- The feature may be changed according to the type of model.
- If you press and hold the ON/OFF button for 3 – 5 seconds, instead of 6 seconds, the unit will switch to the test operation. In the test operation, the unit blows out strong cooling air for 18 minutes and then returns to factory default settings.
Using the Mode Function
This function allows you to select the desired function.
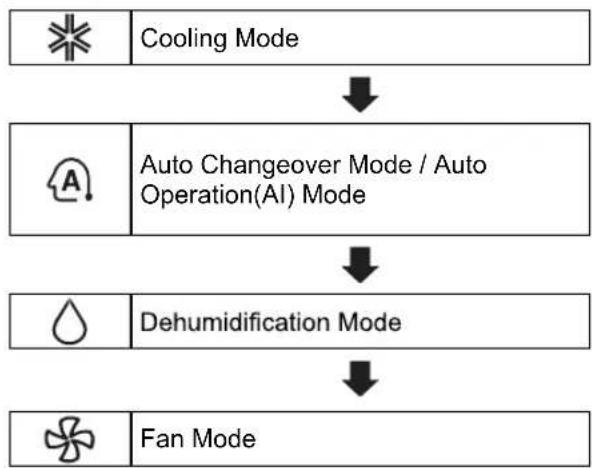
flowchart
graph TD
    A[" cooling Mode "] --> B[" Auto Changeover Mode / Auto Operation(Al) Mode "]
    B --> C[" Dehumidification Mode "]
    C --> D[" Fan Mode "]
Cooling Mode
1 Turn the appliance on.
2 Press MODE button repeatedly to select the Cooling Mode.
• ✱ is displayed on the display screen.
3 Press or button to set the desired temperature.
Dehumidification Mode
This mode removes excess moisture from a highly humid environment or during the rainy season, in order to prevent molding from setting in. This mode adjusts the room temperature and the fan speed automatically to maintain the optimal level of humidity.
1 Turn the appliance on.
2 Press MODE button repeatedly to select the Dehumidification Mode.
• is displayed on the display screen.
NOTE
- In this mode you cannot adjust the room temperature, it is adjusted automatically.
- The room temperature is not displayed on the display screen.
Fan Mode
This mode only circulates the indoor air without changing the room temperature.
1 Turn the appliance on.
2 Press MODE button repeatedly to select the Fan Mode.
• is displayed on the display screen.
3 Press FAN SPEED button to adjust the fan speed.
Auto Operation(Artificial Intelligence)
Multi Model
This mode automatically sets the fan speed and temperature depending on the room temperature.
1 Turn the appliance on.
2 Press MODE button repeatedly to select the Auto Operation.
A is displayed on the display screen.
3 Press or button to select the desired operation code if the temperature is higher or lower than the desired temperature.
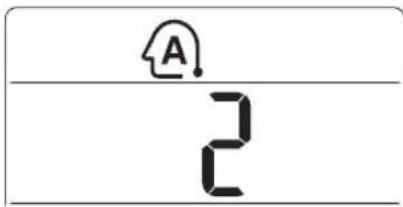
| Code Description | |
| 2 Cold | |
| 1 A little cold | |
| 0 Maintain room temperature | |
| -1 A little hot | |
| -2 Hot | |
NOTE
- In this mode, you cannot adjust the fan speed, but you can set the air deflector to rotate automatically.
Using the Jet Mode Function
Changing Room Temperature Quickly
This function allows you to cool indoor air quickly during the summer or warm it quickly during winter.
- The Jet Mode function is available with Cooling, Heating and Dehumidification Mode.
1 Turn the appliance on.
2 Press MODE button repeatedly to select the desired mode.
3 Press JET MODE button.
- P_0 is displayed on the display screen.
NOTE
- Jet Heating Mode is not available on some models.
- In Jet Cooling Mode, strong air blows out at temperature of 18 °C for 30 minutes.
- In Jet Heating Mode, strong air blows out at temperature of 30 °C for 30 minutes.
- This function may operate differently from the remote control display.
Using the Fan Speed Function
Adjusting the Fan Speed
- Press FAN SPEED button repeatedly to adjust the fan speed.
| Display Screen Speed | |
 | High |
 | Medium - High |
 | Medium |
 | Medium - Low |
| [HD8] | Low |
| - Natural Wind | |
NOTE
- The fan speed of natural air adjusts automatically.
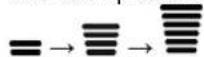
- The fan speed icons are displayed on some indoor units.

- Indoor unit display is displayed only 5 seconds and return to the setting temperature on some models.
Using the Air Flow Direction Function
This function adjusts the direction of the air flow vertically (horizontally).
- Press ☐ button repeatedly and select the desired direction. - Select ☐ no adjust the direction of the air flow automatically.
NOTE
- Adjusting the air flow direction horizontally may not be supported, depending on the model.
- Adjusting the air deflector arbitrarily may cause product failure.
- If you restart the air conditioner, it starts to operate with the previously set direction of air flow, so the air deflector may not match the icon displayed on the remote control. When this occurs, press or SWING button to adjust the direction of the air flow again.
- This function may operate differently from the remote control display.
Setting the On/Off Timer
This function sets the air conditioner to turn on/off automatically at desired time.
Setting the On Timer
1 Press button repeatedly.
- The icon below blinks at the bottom of the display screen.
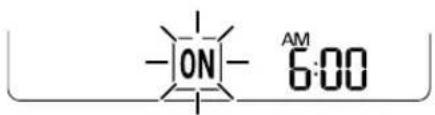
2 Press or button to select the minutes.
3 Press SET/CANCEL button to finish.
- After setting the timer, current time and ON on are displayed on the display screen indicating that the desired time is set.
Canceling the On Timer
1 Press button repeatedly.
- The icon below blinks at the bottom of the display screen.
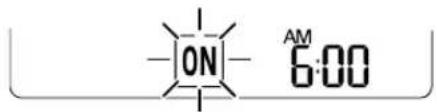
2 Press SET/CANCEL button to cancel the setting.
Setting the Off Timer
1 Press button repeatedly.
- The icon below blinks at the bottom of the display screen.
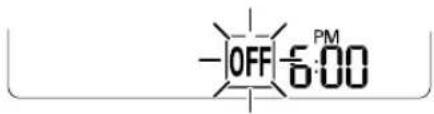
2 Press or button to select the minutes.
3 Press SET/CANCEL button to finish.
- After setting the timer, current time and ONE on are displayed on the display screen indicating that the desired time is set.
Canceling the Off Timer
1 Press button repeatedly.
- The icon below blinks at the bottom of the display screen.
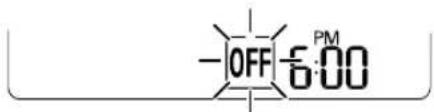
2 Press SET/CANCEL button to cancel the setting.
Canceling the Timer Setting
- Press button to cancel all timer settings.
Using the Sleep Function(Optional)
This function turns off the air conditioner automatically when you go to sleep.
1 Turn the appliance on.
2 Press button repeatedly.
- The icon below blinks at the bottom of the display screen.
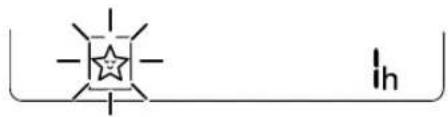
3 Press ☑ button to select the hour (up to 7 hours).
4 Press SET/CANCEL button to finish.
• IS displayed on the display screen.
NOTE
• H is displayed on some indoor units.
- Indoor unit display is displayed from 1H to 7H, which is displayed only 5 seconds and then return to the setting temperature.
- In the Cooling and Dehumidification Mode, the temperature increases by 1 °C after 30 minutes and additional 1 °C after another 30 minutes for a more comfortable sleep.
- The temperature increases up to 2 °C from the preset temperature.
- Although the remark for fan speed on the display screen may be changed, the fan speed is adjusted automatically.
Using the Comfort Sleep Function (Optional)
This function sets optimal air current, air flow, and timer to help comfortable sleep.
- This function is available with Cooling, Heating, Dehumidification, Fan Mode and Air Purification function.
1 Turn the appliance on.
2 Press COMFORT SLEEP button.
or are displayed on the display screen.
NOTE
• Some functions cannot be used while the Comfort Sleep function is in operation.
- In this function, you can control temperature and air flow.
- Sleep timer setting hours can be changed.
- The default setting is 7 hours. It can be modified by Sleep function.
Using the Energy Display Function(Optional)
This function displays the amount of electricity generated on the indoor display as the product operates.
Display the Current Energy Usage
1 Turn the appliance on.
2 Press button and hold it about 3 seconds.
- The instantaneous power consumption(8) is displayed for a while on some indoor units.
NOTE
- It is not displayed on the wireless remote control.
• The unit of the displayed value is kW. - If it is more than 99 kW, which is the range of expression, maintain it as 99 kW.
- Display wattage under 10 kW with 0.1 kW unit, and display one over 10 kW with 1 kW unit.
- The actual power may differ from the power displayed.
- When connected to the Multi Outdoor unit, this function may not be supported.
Using the Light Off Function(Optional)
Display Screen Brightness
You can set the brightness of the indoor unit display screen.
- Press LIGHTOFF
Using the Comfort Air Function(Optional)
Comfort Vane Operation
This function conveniently sets the vane to a preset position to deflect the supply air away from blowing directly onto the occupants in the room.
1 Turn the appliance on.
2 Press COMFORTER repeatedly and select the desired direction.
• or is displayed on the display screen.
NOTE
• or is displayed on some indoor units.
- This function is disabled when you press MODE or JET MODE button.
- This function is disabled and auto swing of vertical direction is set up when you press 📊 button.
- When this function is off, the horizontal vane operates automatically depending on the set mode.
Using the Energy Saving Function (Optional)
This function minimizes power consumption during Cooling and increases the set temperature to the optimal level for a more comfortable environment. The temperature automatically settles at 22 °C if desired temperature is below 22 °C. The temperature remains constant if it is above 22 °C
1 Turn the appliance on.
2 Press MODE button repeatedly to select the Cooling Mode.
3 Press ENERGY SAVING button.
e is displayed on the display screen.
Using the Energy Control Function(Optional)
1 Turn the appliance on.
2 Press ENERGY CTRL
- Press ENERG repeatedly to select each step.
NOTE
- 1 step: The power Input is decreased by 20% compared to rated power input.
- 80 is displayed on the display screen.
- 2 step: The power Input is decreased by 40% compared to rated power input.
- _n60_s is displayed on the display screen.
- 3 step(Optional): The power Input is decreased by 60% compared to rated power input.
- 40 is displayed on the display screen.
• L(1 step), L(2 step) is displayed on some indoor units.
• This function is available with Cooling Mode.
- Capacity may decrease when Energy Control mode is selected.
- Desired temperature is displayed about 5 seconds if you press FAN SPEED, ^ or ↓ button.
- Room temperature is displayed about 5 seconds if you press ROOM TEMP button.
- When connected to the Multi Outdoor unit, this function may not be supported.
Using Special Functions
1 Turn the appliance on.
2 Press FUNCTION repeatedly to select the desired function.
3 Press SET/CANCEL button to finish.
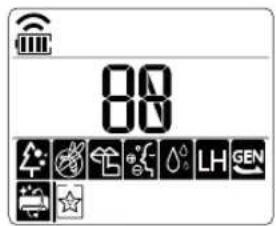
| Display Screen | Description |
| [4Z40] | To purify the air by removing particles that enters the indoor unit. |
| [OKWS] | To keep your skin moisturized by generating ion clusters. |
| [1442] | To lower indoor humidity quickly. |
 | To remove moisture generated inside the indoor unit. |
NOTE
- Some functions may not be supported, depending on the model.
- Some functions may operate differently from the remote control display.
Canceling Special Functions
1 Press FUNCTION repeatedly to select the desired function.
2 Press SET/CANCEL button to cancel the function.
Air Purification / Plasma Purification (Optional)
These functions supply clean and fresh air by ion particles and filter.
| Function Display Description | ||
| Ionizer | Ion particles from lonizer sterilize the aerial bacteria and other harmful substances. | |
| Plasma | It removes microscopic contaminants from the intake air completely to supply clean and fresh air. | |
NOTE
- You can use this function without turning the air conditioner on.
- Both the plasma lamp and the cooling lamp light up while Smoke Away/Plasma is in operation on some models.
- Do not touch ionizer during operation.
- This function may operate differently from the remote control display.
- If you wish to stop, press AORPLARIMA button again.
- When AirPurified while the unit is stopped, Air Purification will start independently.
- Plasma filter is a technology developed by LG to get rid of microscopic contaminants in the intake air by generating a plasma of highly charged electrons. This plasma kills and destroys the contaminants completely to provide clean and hygienic air.
- This function can be used in any operation mode and any fan speed can be used while the plasma filter is functioning.
- Some functions may not be supported, depending on the model.
Using the Ion Care Function (Optional)
This function keeps your skin moisturized by generating ion clusters which is absorbed into the surface of skin.
is displayed on the display screen about 3 seconds.
NOTE
- This function is available with Cooling, Fan Mode and Air Purification function.
Using the Jet Dry Function (Optional)
This function maximizes the performance of dehumidification.
☐, P are displayed on the display screen.
NOTE
- This function is available with Cooling, Dehumidification, Auto Operation, Fan Mode and Air Purification function.
- This function is not available with Sleep function.
- This function is disabled when you press MODE button.
Using the Auto Clean Function (Optional)
In the Cooling and Dehumidification Mode, moisture is generated inside the indoor unit. This function removes such moisture.
• is displayed on the display screen.
NOTE
- Some buttons cannot be used while the Auto Clean function is in operation.
- If you turn off the power, the fan operates for 30 minutes and cleans the inside of the indoor unit.
Smart Appliance Connectivity
Using the Smart Diagnosis Function(Optional)
Smart Diagnosis allows users to conveniently check maintenance information of a product.
- Easily checking operational status of the air conditioner.
- Easily understanding the error messages.
• Helping to improve device performance and expand product life.
1 Search and download LG A/C Smart Diagnosis in Google play or App store.
2 Click the Reaktive on the main screen on your phone.
3 Press and hold the ROOM TEMP button about 5 seconds aim at the indoor unit.
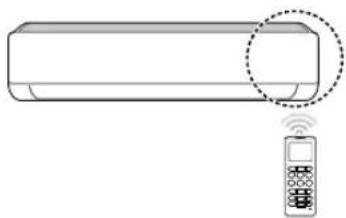
natural_image
Diagram of a horizontal cylinder connected to a remote control with a circular annotation highlighting the portion of the cylinder (no text or symbols present)4 Hold your phone close to the indoor unit.
- Buzzer beeps will be received by your phone.
5 Confirm the received information on your phone.
NOTE
- Be sure to keep ambient noise to a minimum or the phone may not correctly receive the buzzer beeps from the indoor unit.
- When connected to the Multi Outdoor unit, this function may not be supported.
MAINTENANCE

WARNING
- Turn off the power and unplug the power cord before you perform any maintenance; otherwise it may cause electric shock.
If the air conditioner will not be used for an extended period of time, dry the air conditioner to maintain in best condition. Clean the product regularly to maintain optimal performance and to prevent possible breakdown
- Dry the air conditioner in Fan mode for 3 to 4 hours and disconnect the power. There may be internal damage if moisture is fell in its components.
- Before using the air conditioner again, dry the inner components of the air conditioner in Fan mode for 3 to 4 hours. This will help to remove the odor generated from moisture.
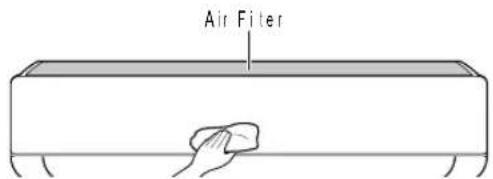
- The feature may be changed according to the type of model.
| Type Description | Interval | |
| Air filter | Clean with a vacuum or hand wash. 2 weeks | |
| Ionizer(Optional) | Use dry cotton bud to remove any dust Every 6 months | |
| Indoor unit | Clean the Indoor unit surface by using a soft, dry cloth. Regularly | |
| Have a professional clean the condensate drain pan. | Once a year | |
| Have a professional clean the condensate drain pipe. | Every 4 months | |
| Replace the remote control batteries. Once a year | ||
| Outdoor unit | Have a professional clean the heat exchanger coils and the panel vents.(Consult with technician). | Once a year |
| Have a professional clean the fan. | Once a year | |
| Have a professional clean the condensate drain pan. | Once a year | |
| Have a professional verify that all the fan assembly is firmly tightened. | Once a year | |
| Clean the electric components with air. Once a year | ||

CAUTION
- Never use water that is higher than 40^ when you clean the filters. It may cause deformation or discoloration.
- Never use volatile substances when you clean the filters. They may damage the surface of the product.
- Do not wash the Micro Dust Filter with water, because the filter can be damaged (Optional).
- Do not wash the Triple filter with water, because the filter can be damaged (Optional).
Clean the Air Filter
Clean the air filters once every 2 weeks, or more, if necessary.
NOTE
• The air filter can be broken when it is bended.
- When the air filter is not assembled correctly, dust and other substance come into the indoor unit.
Type1
1 Turn off the power and unplug the power cord.
2 Open the front cover.
- Lift up both sides of the cover slightly.
3 Hold the knobs of the air filters, pull them down slightly and remove them from the indoor unit.
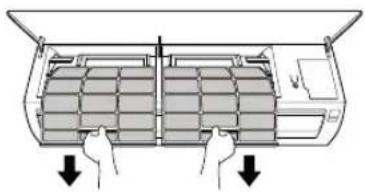
natural_image
Diagram of a car air conditioner unit with hands operating it, showing internal compartments and cooling fins (no text or labels)4 Clean the filters with a vacuum cleaner or with ukewarm water with neutral detergent.
5 Dry the filters in the shade.
6 Insert the hooks of the air filters into the front cover.
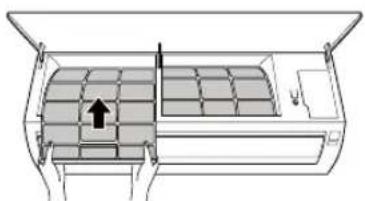
natural_image
Diagram of an air conditioner unit with airflow direction indicated by arrows (no text or symbols)7 Check the side of the iron: cover for correct assembly of the air filters.
Type 2
If you look at the indoor unit from above it, can assemble the top filter easily.
1 Turn off the power and unplug the power cord.
2 Hold the knob of air filter, lift it up slightly.
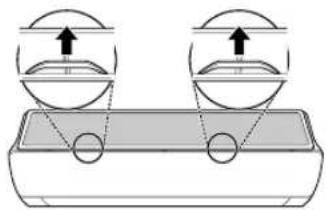
natural_image
Diagram showing two identical containers with upward arrows indicating motion or force, no text or symbols present.3 Remove it from the indoor unit.
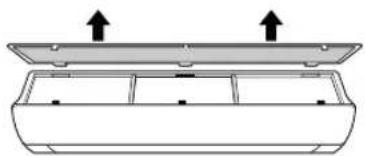
natural_image
Diagram of a rectangular container with two upward arrows indicating top-down orientation (no text or symbols)4 Clean the filter with a vacuum cleaner or with lukewarm water with neutral detergent.
5 Dry the filter in the shade.
6 Insert the hooks of the air filter into the front cover.
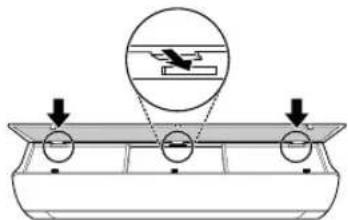
7 Push down hooks to assemble the air filter.
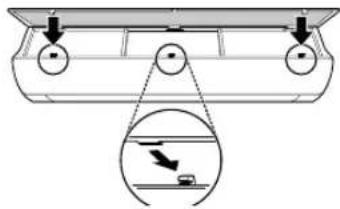
8 Check the side of the iron: cover for correct assembly of the air filter.
MANUAL DEL PROPIETA AIRE ACONDICIONADO
① Filtro de aire
2 Entrada de aire
3 Panel frontal
4 Botón ENCENDIDO/APAGADO
5 Deflector de aire (Rejilla vertical)
6 Deflector de aire (Rejilla horizontal)
7 Salida de aire
natural_image
Diagram of a remote control unit with a dashed circle highlighting its position, alongside a mobile phone icon (no text or symbols present)NOTA
natural_image
Diagram of a device with two panels, showing hand gestures and downward arrows indicating action or movement (no text or symbols present)natural_image
Diagram of an air conditioner unit with airflow direction indicated by arrows (no text or labels)natural_image
Diagram showing two identical containers with circular ends, each containing a sphere above it and an upward arrow indicating direction (no text or symbols)natural_image
Diagram of a rectangular device with two upward arrows indicating top-down components (no text or symbols present)1 Filtro de ar
② Entrada de ar
③ Cobertura frontal
4 Botão Ligar/Desligar
5 Defletor de ar (persiana vertical)
6 Defletor de ar (persiana horizontal)
7 Saída de ar
1 Aberturas da entrada de ar
natural_image
Diagram of a remote control unit with a mobile phone and signal icon, no text or symbols presentOBSERVAÇÃO
natural_image
Diagram of a car air conditioner unit with two doors and hand gestures (no text or symbols)natural_image
Diagram of an air conditioner unit with internal compartments and airflow direction arrows (no text or labels)natural_image
Diagram showing two identical views of a container with circular ends, each with an upward arrow indicating direction (no text or symbols present)natural_image
Diagram of a rectangular device with two upward arrows indicating top-down components (no text or symbols present)Col. San Lorenzo Industrial
- TABLE OF CONTENTS
- SAFETY INSTRUCTIONS ...... 3
- OPERATION 9
- MAINTENANCE 24
- SAFETY INSTRUCTIONS
- WARNING
- CAUTION
- Children in the Household
- For use in Europe:
- Installation
- Operation
- Maintenance
- Technical Safety
- Electrical Specifications :
- Notes for Operation
- Suggestion for Energy Saving
- Parts and Functions
- Indoor Unit Outdoor Unit
- NOTE
- Wireless Remote Control
- Inserting Batteries
- Installing the Remote Control Holder
- Operating method
- Setting the Current Time
- Insert batteries.
- Using the °C/°F Conversion Function(Optional)
- Operating the Air Conditioner Without the Remote Control
- Type1
- Type2
- Using Wireless Remote Control
- Restarting the Air Conditioner Automatically
- Disabling Auto Restart
- Using the Mode Function
- Cooling Mode
- Dehumidification Mode
- Fan Mode
- Auto Operation(Artificial Intelligence)
- Multi Model
- Using the Jet Mode Function
- Changing Room Temperature Quickly
- Using the Fan Speed Function
- Adjusting the Fan Speed
- Using the Air Flow Direction Function
- Setting the On/Off Timer
- Setting the On Timer
- Canceling the On Timer
- Setting the Off Timer
- Canceling the Off Timer
- Canceling the Timer Setting
- Using the Sleep Function(Optional)
- Using the Comfort Sleep Function (Optional)
- Using the Energy Display Function(Optional)
- Display the Current Energy Usage
- Using the Light Off Function(Optional)
- Display Screen Brightness
- Using the Comfort Air Function(Optional)
- Comfort Vane Operation
- Using the Energy Saving Function (Optional)
- Using the Energy Control Function(Optional)
- Using Special Functions
- Canceling Special Functions
- Air Purification / Plasma Purification (Optional)
- Using the Ion Care Function (Optional)
- Using the Jet Dry Function (Optional)
- Using the Auto Clean Function (Optional)
- Smart Appliance Connectivity
- Using the Smart Diagnosis Function(Optional)
- Clean the Air Filter
- Type 2
- MANUAL DEL PROPIETA AIRE ACONDICIONADO
- NOTA
- OBSERVAÇÃO
Brand : LG
Model : A3UQ34GFAB
Category : Uncategorized