
DB10 - Subwoofer Fluance - Free user manual and instructions
Find the device manual for free DB10 Fluance in PDF.


| Product Type | Powered Subwoofer |
| Brand | Fluance |
| Model | DB10 |
| Speaker Configuration | Front Firing Powered Subwoofer with Integrated Amplifier |
| Low Frequency Driver | 10-inch Polypropylene with Rubber Surround |
| Amplifier Power (Peak / RMS) | 120W / 45W |
| Low-Pass Crossover Range | 40Hz - 180Hz (adjustable) |
| Frequency Response | 38Hz - 180Hz (+/-3dB) Anechoic |
| Inputs | RCA (LFE/Low Level), High Level Speaker Wire Inputs |
| Phase Adjustment | Yes (Normal/Reverse switch) |
| Auto Power On/Off | Yes (signal detection: 3mV at 100Hz, 5mV at 1kHz) |
| Power Supply | 120V AC, 60Hz |
| Dimensions (L x W x H) | 15.7 x 11.9 x 16 inches |
| Weight | 24.7 lbs |
| Warranty | 2 Years (parts and labor) |
| Included Accessories | Quick Start Guide, 2-Year Warranty, Lifetime Customer Support |
| LED Indicator | Green = Power On, Red = Protection Mode |
| Protection Features | Overheat protection, overload protection |
| Driver Material | Polypropylene cone with rubber surround |
Frequently Asked Questions - DB10 Fluance
User questions about DB10 Fluance
0 question about this device. Answer the ones you know or ask your own.
Ask a new question about this device
Download the instructions for your Subwoofer in PDF format for free! Find your manual DB10 - Fluance and take your electronic device back in hand. On this page are published all the documents necessary for the use of your device. DB10 by Fluance.
USER MANUAL DB10 Fluance
natural_image
Line drawing of a rectangular electronic device with circular and square components (no text or symbols)Instruction Manual
Thank you for your purchase of this Fluance product. Please read this manual carefully before using the product to ensure proper use. Keep this manual in a safe place for future reference.
fluance.com
FLUANCE®
Fluance believes everyone should experience audio in its truest form, recreating the performance the way the artist intended. Utilizing only superior components and expert audio engineering, their products are a testament to the performance that can be achieved when a passion for music takes center stage. The perfect complement to any audiophile's lifestyle, you'll be enjoying live performances in your home for years to come.
Table of Contents
What's Included....4
Back Panel Layout....4
First Time Setup 5
Step One 5
Step Two 5
Step Three 5
Step Four (Optional)....6
Step Five 6
Additional Settings....6
Crossover Settings....6
Auto Setting 7
Phase Setting....7
FAQ 8
Troubleshooting 9
Specifications....10
Fluance Warranty 11
Warranty Information....11
Important Safety Instructions....12
FCC & IC Information....13
What's Included
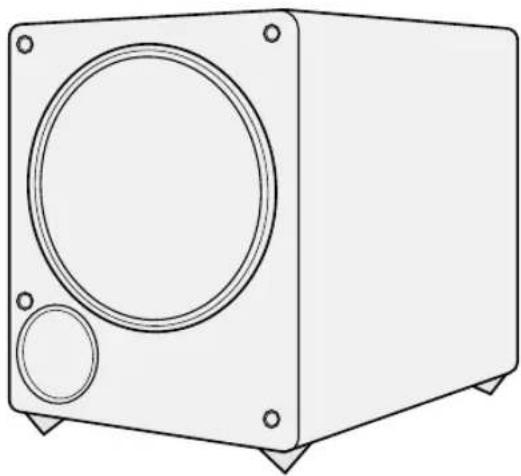
• High Performance Subwoofer
- Quick Start Guide
• 2 Year Warranty
• Lifetime Customer Support
natural_image
Line drawing of a rectangular electronic device with circular and square panels (no text or symbols)Back Panel Layout

- Volume - Adjust to reduce/increase the intensity of the sound emitted from the DB10.
- PWR - Power LED indicator.
- Crossover - Adjust to reduce/increase the frequency range of the DB10. The frequency range is less than 40Hz to 180Hz.
- Power - ON / AUTO / OFF (AUTO: The subwoofer will power on automatically when it detects a signal from the home theater receiver.)
- Phase - REVERSE / NORMAL (Adjust to ensure the DB10 is in phase with the rest of your speaker system. The DB10 will be in phase if the bass response sounds full and balanced.)
- LFE / Low Level Input - Connect subwoofer cable to receive signal from home theater receiver.
- Speaker Inputs - Connect speaker wire to receive signal from home theater receiver.
First Time Setup
Step One
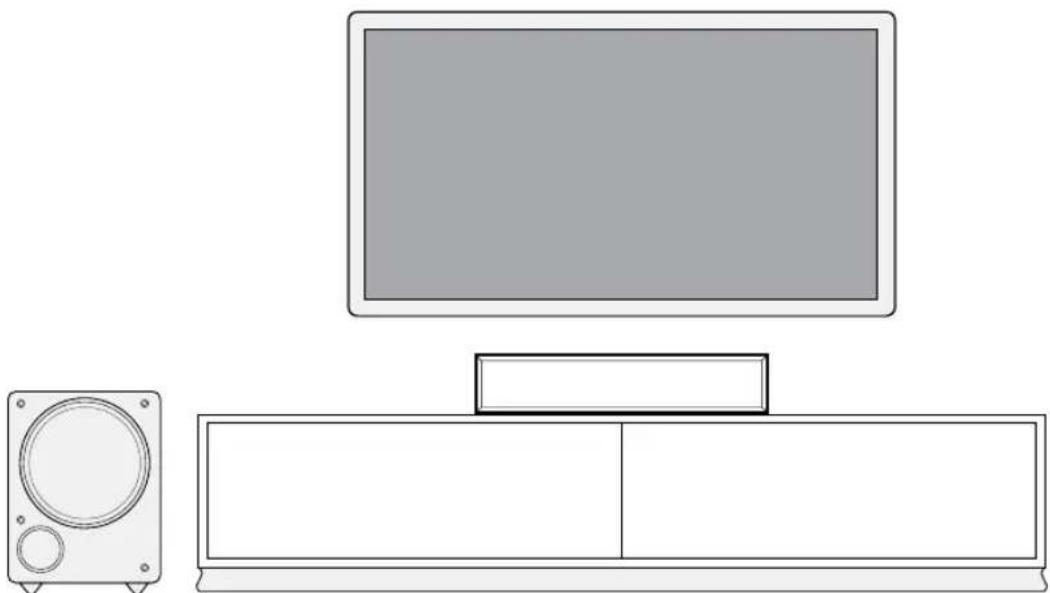
Place the Subwoofer in the most optimal position.
natural_image
Line drawing of a desktop computer setup with monitor, speaker, and TV stand (no text or symbols)Important!
Fluance recommends having the woofer face the listener while being positioned near the front channel speakers in a corner if possible.
Step Two Step Three
Attach the Subwoofer Cable to the LFE/LOW Level Input on the backside of the Subwoofer.

Attach the same Subwoofer Cable to the Subwoofer Output of your home theater receiver.
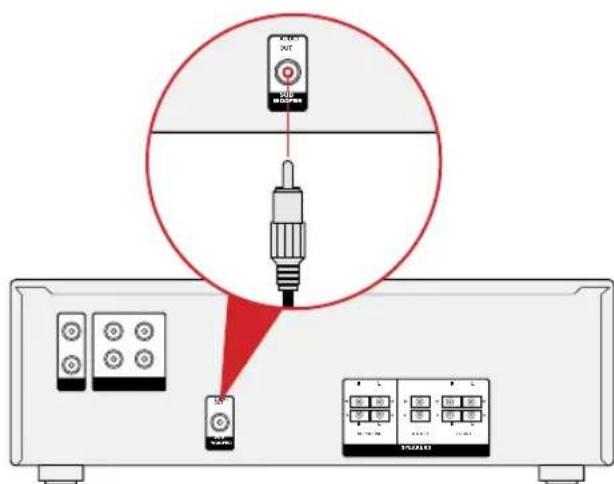
Step Four (Optional) Step Five
Attach Speaker Wire to the speaker inputs of the Subwoofer. Attach same Speaker Wire to the channel outputs of your choice on the home theater receiver. Refer to receiver manual for setup instructions.


Connect the Power Adapter to the wall outlet. Set the Power Switch to either ON or AUTO.

Additional Settings
Crossover Settings
The Volume/Crossover settings can be adjusted with the Volume/Crossover knob located on the back panel of the Subwoofer. The Crossover setting changes the cut off frequency for the Subwoofer.

Auto Setting
By selecting the Auto setting, the Subwoofer will automatically turn on when it detects a signal from the home theater receiver. The auto setting turns the Subwoofer on when the frequency signal reaches a required voltage. A 100Hz signal requires 3mV and a 1KHz signal requires 5mV.

Phase Setting
If your speaker system or DB10 is out of phase, it means that the driver/woofer is moving in the opposite direction of the other drivers/woofers. This causes frequencies to be canceled out, which can result in a poor listening experience. By adjusting the phase setting of the DB10, you can ensure the DB10's woofer is moving in the same direction as your other speakers, which will result in a more pleasant listening experience.

FAQ
What is the purpose of the speaker wire inputs?
The speaker wire inputs can be used as an alternative to connect your DB10 to your home theater receiver, however, Fluance recommends using the LFE/Low Level input connected via subwoofer cable. LFE (Low Frequency Effect) refers to a channel specifically intended for deep, low-pitched sounds ranging from 3-120Hz.
How do I adjust the volume / change the crossover settings?
The volume/crossover settings can be adjusted via the volume/crossover knob located on the back panel of the DB10. The crossover setting changes the cut off frequency for the subwoofer.
What is the auto setting and what are the parameters?
By selecting the auto setting the DB10 will automatically turn on when it detects a signal from the home theater receiver. The auto setting turns the subwoofer on when the frequency signal reaches a required voltage. A 100Hz signal requires 3mV and a 1KHz signal requires 5mv.
What is the phase setting and what is the optimal setting?
If your speaker system or DB10 is out of phase. It means that the driver/woofer is moving in the opposite direction of the other drivers/woofers. This causes frequencies to be canceled out, which can result in a poor listening experience. By adjusting the phase setting of the DB10, you can ensure the DB10's woofer is moving in the same direction as your other speakers, which will result in a more pleasant listening experience.
What does the LED behavior mean?
Green LED = Power On
Red LED = Protection Mode
What is Protection Mode?
Amplifier Protection Mode is a shutdown state that amplifiers can enable to prevent serious damage to the unit or other components in the system. Protection Mode can be activated in two scenarios:
- Unit is overheated - Ensure the area surrounding the DB10 is at room temperature, power off and unplug the power adapter.
- The unit is not installed properly - consult the included quick start guide and manual, ensure no wires are touching.
Troubleshooting
| Issue Troubleshooting Steps | |
| No Power | ·Ensure the subwoofer is plugged into a known good power source·Confirm that the subwoofer power switch is set to ON or AUTO·Ensure the Power LED is lit |
| No Audio | ·Ensure the subwoofer has power and that the PowerLED is lit Green. If Power LED is Red ensure the subwoofer is at room temperature, power off and unplug the power adapter. Then confirm that the subwoofer is installed properly with no wires touching·Confirm the subwoofer is connected to the receiver·Confirm the receiver's subwoofer output is set to ON·Ensure the subwoofer volume control is set to above 0% |
| Distorted or Poor Audio | ·Confirm subwoofer is in phase with other speakers·Ensure woofer is not physically damaged·Ensure grill is securely fastened or removed·Confirm all components are secured tightly·Check that the bass ports are not blocked and there are no foreign objects/obstructions·Confirm that the floor spikes are secure·Remove screws on woofer and check that the woofer is securely connected to the amplifier |
Specifications
| Specifications DB10 | |
| Speaker Configuration | Front Firing Powered Subwoofer with Integrated Amplifier |
| Low Frequency Driver 10 Inch Polypropylene with Rubber Surround | |
| Amplifier Power Peak 120W / RMS | 45W |
| Low-Pass Crossover Range 40Hz - 180Hz | |
| Frequency Response | 38Hz - 180Hz (+/- 3dB) Full Range Anechoic Measurement35Hz - 180Hz (+/- 6dB) Full Range Anechoic Measurement |
| Inputs RCA Input / High Level Input / Speaker Levels | |
| Dimensions (L X W X H) 15.7 x 11.9 x 16 inches | |
| Weight 24.7 lbs | |
| Phase Adjustment Yes | |
| Auto Function | Yes - (100Hz signal input requires 3mV, 1KHz signal input requires 5mV) |
| Power 120V (60Hz) | |
Specifications are subject to change without notice. Measurements and weights may vary slightly.
Fluance Warranty
Warranty Information
Fluance gives the following warranty to the original customer of each new Fluance product purchased from a dealer authorized by Fluance. Fluance warrants that each new product, under normal use, is free from defects, subject to the terms and conditions set forth. If a defect should occur within the warranty period, repairs will be made free of charge for parts and labor when such defects are determined by us to be attributable to faulty materials or workmanship at time of manufacture.
Warranty Period
The Fluance products listed below are warranted for parts and labor for the stated period from the date of original purchase and are subject to the terms and conditions of the warranty.
Home Audio Passive Speakers: Lifetime Warranty
Active/Powered Speakers: 2 Year Warranty
HiFi Turntables: 2 Year Warranty
Warranty Exclusions
- Products purchased from a dealer not authorized by Fluance.
- Products with the serial number defaced, altered or missing.
- Defects resulting from disaster, accident, abuse, misuse, lightning, power surges, neglect, unauthorized modification or water damage.
- Defects or damage as a result of repairs performed by a person or party not authorized by Fluance.
- Defects or damage occurring during shipping (claims should be made with the shipping company).
To Obtain Warranty Service
Should your Fluance product require warranty service, please contact your Fluance Authorized Dealer and send your product fully insured and freight prepaid to the nearest Fluance authorized service center. Before sending to Fluance, you will be required to get a Return Authorization Number from your dealer.
Products shipped without a valid Return Authorization Number will be refused. To avoid possible shipping damage, make sure the product is properly packaged and well protected. Include a copy of your original bill of sale as proof of warranty along with your name, home and/or work telephone number(s), a complete return address and a detailed description of the faults.
Products repaired within warranty will be returned freight prepaid. This warranty in itself is not considered a valid proof of purchase. When applying for warranty repairs, you must present the original copy of your bill of sale as proof of warranty.
WARNING:
TO REDUCE THE RISK OF FIRE OR ELECTRIC SHOCK, DO NOT EXPOSE THIS APPARATUS TO RAIN OR MOISTURE
CAUTION:
TO REDUCE THE RISK OF ELECTRIC SHOCK, DO NOT REMOVE COVER (OR BACK). NO USER SERVICEABLE PARTS INSIDE. REFER SERVICING TO QUALIFIED SERVICE PERSONNEL.

WARNING
RISK OF ELECTRIC SHOCK DO NOT OPEN


The lightning flash with arrowhead symbol within an equilateral triangle is intended to alert the user to the presence of uninsulated dangerous voltage within the product's enclosure that may be of sufficient magnitude to constitute a risk of electric shock to persons.

The exclamation point within an equilateral triangle is intended to alert the user to the presence of important operating and maintenance (servicing) instructions in the literature accompanying the appliance.
To prevent fire or shock hazard, do not use this plug with an extension cord, receptacle or other outlet unless the blades can be fully inserted to prevent blade exposure. To prevent fire or shock hazard, do not expose this appliance to rain or moisture.
- Read these instructions.
- Keep these instructions.
- Heed all warnings.
- Follow all instructions.
- Do not use this apparatus near water.
- Clean only with dry cloth.
- Do not block any ventilation openings. Install in accordance with the manufacturer's instructions.
- Do not install near any heat sources such as radiators, heat registers, stoves, or other apparatus (including amplifiers) that produce heat.
- Do not defeat the safety purpose of the polarized or grounding type plug. A polarized plug has two blades with one wider than the other.
A grounding type plug has two blades and a third grounding prong. The wide blade or the third prong is provided for your safety. If the provided plug does not fit into you outlet, consult an electrician for replacement of the obsolete outlet. - Protect the power cord from being walked on or pinched particularly at plugs, convenience receptacles, and point where they exit from the apparatus.
- Only use attachments / accessories specified by the manufacturer.
-
Unplug this apparatus during lightning storms or when unused for long periods of time.
-
Refer all servicing to qualified service personnel. Servicing is required when the apparatus has been damaged in any way, such as power-supply cord or plug is damaged, liquid has been spilled or objects have fallen into the apparatus, the apparatus has been exposed to rain or moisture, does not operate normally, or has been dropped.
-
This appliance shall not be exposed to dripping or splashing water and no object filled with liquids such as vases shall be placed on the apparatus.
-
Do not overload wall outlet. Use only power source as indicated.
-
Use replacement parts as specified by the manufacturer.
-
The product may be mounted to a wall only if recommended by the manufacturer.
-
Upon completion of any service or repairs to this product, ask the service technician to perform safety checks.
-
Avoid installing this unit in places exposed to direct sunlight or close to heat radiating appliances such as electric heaters, on top of other stereo equipment that radiates too much heat, places lacking ventilation or dusty areas, places subject to constant vibration and/or humid or moist areas.
-
Do not attempt to clean this unit with chemical solvents as this might damage the finish. Use a clean dry cloth.
-
Operate controls and switches as described in the manual. Before turning on the power, make certain that power cord is properly installed.
-
When moving the apparatus, be sure to first disconnect the power cord.
- Use caution when wearing loose clothing or articles near the spinning turntable.
FCC & IC Information
This equipment has been tested and found to comply with the limits for a Class B digital device, pursuant to Part 15 of the FCC Rules. This digital apparatus does not exceed the Class B limits for radio noise emissions from digital apparatus as set out in the Radio Interference Regulations of Industry Canada.
These limits are designed to provide reasonable protection against harmful interference in a residential installation. This equipment generates, uses and can radiate radio frequency energy and, if not installed and used in accordance with the instructions, may cause harmful interference to radio communications. However, there is no guarantee that interference will not occur in a particular installation. If this equipment does cause harmful interference to radio or television reception, which can be determined by turning the equipment off and on, the user is encouraged to try to correct the interference by one or more of the following measures:
- Re-orient or relocate the receiving antenna.
- Increase the separation between the equipment and receiver.
- Connect the equipment into an outlet on a circuit different from that to which the receiver is connected.
- Consult the dealer or an experienced radio/TV technician for help.
This device complies with Part 15 of the FCC Rules. Operation is subject to the following two conditions:
(1) This device may not cause harmful interference, and
(2) This device must accept any interference received, including interference that may cause undesired operation
Important!
Since digital circuitry may cause interference to other radio or television tuners nearby, switch this unit off when not in use or move it away from the affected radio/television tuner.
Notes
Notes
FLUANCE®
fluance.com

- Instruction Manual
- FLUANCE®
- Table of Contents
- What's Included
- Back Panel Layout
- First Time Setup
- Step One
- Step Two Step Three
- Step Four (Optional) Step Five
- Additional Settings
- Crossover Settings
- Auto Setting
- Phase Setting
- FAQ
- What is the purpose of the speaker wire inputs?
- How do I adjust the volume / change the crossover settings?
- What is the auto setting and what are the parameters?
- What is the phase setting and what is the optimal setting?
- What does the LED behavior mean?
- What is Protection Mode?
- Troubleshooting
- Specifications
- Fluance Warranty
- Warranty Information
- Warranty Period
- Warranty Exclusions
- To Obtain Warranty Service
- WARNING:
- CAUTION:
- WARNING
- FCC & IC Information
- Important!
- Notes
Brand : Fluance
Model : DB10
Category : Subwoofer