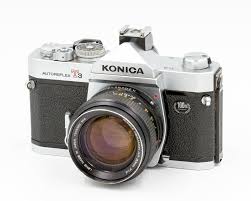
AUTOREFLEX T3 - SLR camera KONICA MINOLTA - Free user manual and instructions
Find the device manual for free AUTOREFLEX T3 KONICA MINOLTA in PDF.


| Product type | 35 mm SLR camera |
| Dimensions (approx.) | 142 × 95 × 51 mm |
| Weight (approx.) | 620 g (without lens or batteries) |
| Power source | 2 mercury batteries 1.35 V (type National H-C, Mallory PX-675 or Eveready EPX-675) |
| Shutter type | Metal focal-plane, speeds from 1 s to 1/1000 s + Bulb |
| Light metering | Variable TTL metering (full aperture or stopped-down), AEC shutter-priority system |
| Viewfinder | Pentaprism with microprisms and split-image rangefinder, displays shutter speed and aperture |
| Lens mount | KONICA AR mount (bayonet) |
| ISO sensitivity range | ASA 25 to 3200 (DIN equivalent) |
| Compatible film | 35 mm film in cartridge (135) |
| Main functions | Automatic (AEC), manual, semi-automatic, multi-exposure, mechanical self-timer (10 s) |
| Flash sync | M/X socket, hot shoe, X-sync up to 1/125 s |
| Maintenance and cleaning | Clean the body with a brush and blower; for lenses, use a soft cloth moistened with pure alcohol or ether; store in a dry place with a desiccant (silica gel) |
| Safety | Off/On switch locking the shutter; remove batteries if not used for a long time; avoid touching the mirror and internal parts |
| Spare parts and repairability | Available accessories: close-up lenses, extension tubes, bellows, adapters, X-20/X-14 flashes, etc.; interchangeable Hexanon AR lenses |
| General information | Professional SLR camera with automatic exposure control (AEC) through TTL metering; manufactured by KONICA, 1970s |
Frequently Asked Questions - AUTOREFLEX T3 KONICA MINOLTA
User questions about AUTOREFLEX T3 KONICA MINOLTA
0 question about this device. Answer the ones you know or ask your own.
Ask a new question about this device
Download the instructions for your SLR camera in PDF format for free! Find your manual AUTOREFLEX T3 - KONICA MINOLTA and take your electronic device back in hand. On this page are published all the documents necessary for the use of your device. AUTOREFLEX T3 by KONICA MINOLTA.
USER MANUAL AUTOREFLEX T3 KONICA MINOLTA
Basic Manipulation for AEC Photographing 6
Name of Each Part 8
Major Specifications of KONICA Autoreflex-T3 12
Inserting of Mercury Batteries 13
(Meter On/Off Switch and Shutter Lock Control)
Check of Batteries 15
Film Loading 17
Shutter-Ready Indicator 22
Film-Type Reminder Slot 23
Shutter 24
Lens Interchange 25
Aperture 26
Automatic and Non-automatic Controls 29
"Control Center" Viewfinder 33
Looking at Meter inside Viewfinder 34
AEC Photography 36
Manual Picture-Taking 37
Hints for Unusual Exposure Situations 40
Training of Camera 42
Focusing 44
Depth-of-Field 46
Use of Self-Timer 52
Film Rewind 54
Multiple Exposure 56
Time Exposures 58
Flash Photography 60
Photographing in Stopped-Down Metering System 63
Accessories 66
Maintenance of Camera and Lens 79
INHALTSVERZEICHNIS
- The KONICA Autoreflex-T3 is a fully automatic SLR*(TTL-AEC system) in which preference is given to shutter speed. It is also usable in manual shooting.
- The KONICA Autoreflex-T3 has a TTL meter of the variable metering type in which the kind of metering that is fitted to the picture coverage angle of a given interchangeable lens is selected. Metering may be done either at the full opening of the taking lens or with the lens stopped down, and this feature is common to all interchangeable lenses.
- All kinds of information necessary for picture-taking, such as the shutter speed and aperture value, and the meter needle may be instantly ascertained in the field of view of the finder.
- The lens used in your camera is a high-quality and high-performance color-coated Hexanon which displays its full force in color photography.
- Your camera makes it possible to produce perfect multiple exposures, and there are no shears in picture area at all.
- The shutter is of a metal plane type and excels in winterization. It is synchronized to strobos at shutter speeds of up to 1/125 sec. Both hot shoe clip and M.X synchro sockets are available on your camera.
- Each manipulation control is equipped with a safety lock. For example, your camera is provided with a shutter button lock which concurrently serves as the meter switch to prevent erroneous manipulation, an EE release button designed to prevent the EE system from being accidentally put into operation, and a self-timer button.
*SLR (TTL-AEC): Single-Lens Reflex (Through-The-Lens Metering, Automatic Exposure Control)
BASIC MANIPULATION FOR AEC PHOTOGRAPHING
-
Insert Mercury Batteries (P. 13)
-
Load Film (P.17)
-
Set Film Speed (P.21)
-
Set AE Mark (P.36)
(1)Shutter Release Button (14) Film Wind Lever
(2) Film Counter (15) Film Speed Indicator
(3) Meter On/Off Switch (16) Film speed Indicator
and Shutter Lock Window (ASA)
Control
(4) AEMark (17) Shutter-Ready Indicator
(5) Self Timor, Lover and
Depth-of-Field Lever
(6) Self-set Button (20) Shutter Speed Dial
(7) Depth-of-Field Scale (21) Focal Plane Mark
(8) Distance Scale (22) Film Rewind Crank
(9) Manual Aperture Scale (23) Film Rewind Knob
(10) Hexanon Lens (24) Flash Contact (M, X)
(11) Focusing Ring (25) Stran Eyelet
(12) Aperture Ring (26) Lens Mounting/Dis
(13) AE Release Button (27) Lens Release Button
Type: 35mm TTL-AEC SLR with focal plane shutter.
Film: 35mm film in cartridge.
Picture Size: 24 × 36 ~mm
Standard Lenses: Hexanon AR 50mm f/1.7 (5 groups, 6 elements), AR 50mm f/1.4 (6 groups, 7 elements), AR 57mm f/1.2 (6 groups, 7 elements) Each with AE lock, closest taking distance 0.45 m, Color Dynamic Coating.
Mount:Konica Mount II of bayonet type, 47mm in diameter with 40.5mm flange back.
Aperture Mechanism: Fully automatic exposure control (AEC) system, minimum aperture 16. Equipped with a device for checks on depth-of-field.
Shutter: Vertically scanning metal focal plane Hi-synchro shutter "Copal Square-S" with built-in multiple-exposure device.
Shutter Speeds: B, 1 - 1/1000 sec. in equally graduated 1:1 progression and single-spindle non-rotating dial. Time exposure possible.
Synchro-Flash: "X" synchro contact for hot shoe clip. Synchronized with all shutter speeds at M synchrocontact with M, FP and MF classes of bulbs and with electronic flash at X synchro contact at 1/125 sec.
Self-Timer: Operation time variable in seconds with full operation extending to about 10 sec. Equipped with safety lock.
Finder: Pentaprism eye-level finder with magnification at 0.78X (with 50mm lens at infinity) and field of view set at about 92% of the actual field of picture. Equipped with focusing screen of real image-alignment type using standard Micro Dia Prism type (or optional split-image type).
Visible in Finder: Meter needle, exposure warning marks, shutter speed reading, aperture value, value of lens at full opening and mark for AEC range, manual indicator mark, index point for stopped-down metering, power source check mark.
Mirror: Front edge vertically lifted. Fully quick return system.
Exposure Adjustment: Fully automatic exposure (AEC system), variable TTL metering system with 2 supersensitive CdS cells.
- Fully automatic aperture lens of AEC type (metering at full lens opening):
Correct aperture reading system coupled to film speed, shutter speed and at-full-lens-opening aperture value.
- Preset, normal aperture lens (stopped-down metering): Index-point alignment system (match-needle) coupled to film speed, shutter speed and aperture.
Power Source for Meter: Two 1.35V mercury battery cells, Meter on/off switch and shutter lock control which concurrently serves as shutter lock of automatic release type.
AEC Coupling Range: EV1.5 (f/1.2, 1/2 sec.) to EV18(f/16, 1/1000 sec.) with f/1.2 lens and ASA 100.
Film Speed: ASA 12 to 3200 (DIN 12 to 36).
Exposure Memory Device: Shutter release button used.
Film Loading: Konica EL type.
Film Wind: Cocking in single action with top lever (with wind of 162^ and play of 30^ ). Equipped with wind completion indicator and double-exposure prevention device.
Film Counter: Indicates number of exposures and automatically returns. Hinged back cover and memo holder.
Film Rewind: Crank type. Rewind button automatically returns.
Dimensions and Weight (Body only)
150(w) x 95(h) x 45(d) mm, 740g.
6''(w) × 3^3/4''(h) × 1^3/4''(d) , 26 ozs.
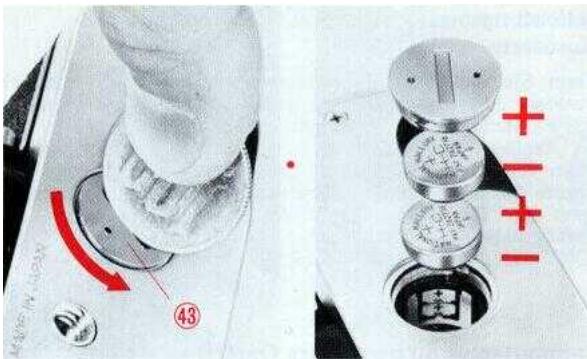
The KONICA Autoreflex-T3's TTL meter takes two 1.35V mercury batteries as its electric source. Wipe the separately enclosed mercury battery cells with a piece of dry and clean cloth and put them into the mercury battery chamber.
- Turn the cover of the Mercury Battery Chamber (43) counterclockwise with a coin or something alike and detach it from the chamber.
- Insert the two cells into the mercury battery chamber, the "+" side up, as indicated in the figure printed on the seal inside the chamber.
Turn the cover of the mercury battery chamber clockwise and make sure that it has been screwed tightly.
EINLEGEN DER QUECKSILBERBATTERIEN
MISE EN PLACE DES PILES AU MERCURE
Meter On/Off Switch and Shutter Lock Control
When the Meter Switch (3) around the Shutter, Release Button (1) is turned counterclockwise and set to "OFF," the meter will be switched off and the shutter button locked. Turn off the switch when your camera is to be carried around with the film wind lever cocked. You do not have to turn the switch, as the switch will be automatically turned on when the film wind lever is cocked with the switch set to "OFF".
A mercury battery will be fully usable over a period of one year in normal circumstances. There will be a sudden drop in voltage when its days are numbered. When the meter needle visible in the finder is immovable at a bright place, it means that the battery has run down. You may also check the battery in the following manner:
- While the Lens Release Button (27) is kept depressed, take off the lens, as it is turned counterclockwise. (See P.25)
- Lift the outer ring around the Shutter Speed Dial (20) and set the film speed to ASA 100.
- Turn the shutter speed dial and set it to 1/125 sec.
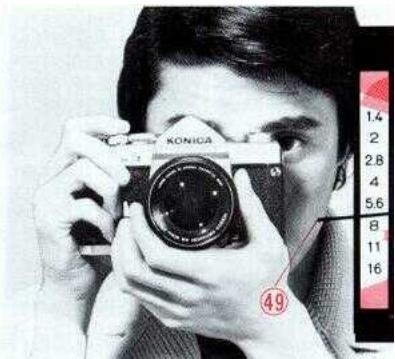
- While the finder is being looked into, detach the Meter Switch (3) from the position of "OFF" and depress it in the direction of "C". If the meter needle (49) comes in alignment with the Battery Check Mark (50) between the aperture readings of f/8 and 11, it means that the battery is fully serviceable. If the needle has failed to
come to that point or gone farther down from that point, it is advisable to change the battery with a new one.
- Note that the all the marks necessary for the checking of the battery are colored in red. Make sure that the meter needle will come over the red mark when the film and shutter speeds are set to the red and the lever is depressed in the direction of the red-colored alphabet "C". Check the battery in the correct order shown on the battery check seal on the bottom of the camera body.
- The meter takes two 1.35V National H-C, Mallory PX-675 or Eveready EPX-675 mercury battery cells. Care must be exercised in selecting the cells as there are cells which look identical in shape but differ in stipulated voltage, such as battery cells.
- In the event that your camera is not to be used over a long span of time, take out the mercury battery cells and keep them in a place free from moisture.
The KONICA Autoreflex-T3 takes 35mm roll film, which comes in a cartridge. For film loading, avoid the direct sunlight and do it in the shade. If there is no shade, one way would be to use the shadow of your body.
FILMEINLEGEN
Lift and turn the external ring of the Shutter Speed Dial (20) and align the reading equivalent to the speed of the film loaded in your camera with the index mark of the Film Speed Indicator Window (ASA) or (DIN). When they are aligned, the ring drops and is fixed into position.
- The ASA and DIN scales visible in the film speed indicator window indicate the degrees to which film is sensitive to light. The film speed of your film is indicated on the box in which it is contained and in its instruction booklet. (Figures in brackets refer to intermediate points of sensitivity).
| (2500) | (2000) | (1250) | (1000) | (640) | (500) | (320) | (250) | (160) | (125) | (80) | (50) | (32) | (20) | (16) | |||
| ASA | 3200 | · | 1600 | · | 800 | · | 400 | · | 200 | · | 100 | · | 64 | · | 25 | · | 12 |
| DIN | 36 | · | 33 | · | 30 | · | 27 | · | 24 | · | 21 | · | 19 | · | 17 | · | 12 |
| (35) | (34) | (32) | (31) | (29) | (28) | (26) | (25) | (23) | (22) | (20) | (18) | (16) | (14) | (13) |
Slightly pull out the film wind lever, and it will be easier to put your finger on the lever. From there, turn the film wind lever until it stops, and the film will be transported by one frame and the shutter charged. Simultaneously, the film counter will advance by one reading, and Shutter-Ready Indicator (17) will change from red to green, showing that the film wind has been completed. The lever may be cocked for a second time when the shutter has been released.
To take note of the name and type of the film loaded in your camera and its ASA film speed, cut off the flap of the film cartridge box and insert it into the Film-Type Reminder Slot (40). A small sheet of note may be inserted, instead.
A shutter is designed to control the amount of light reaching the film surface in terms of time and photographically to fix an image of a subject on it. The shutter speed scale has calibrations of B and 1 to 1/1000 sec. and the denominator of each speed is indicated on the shutter speed dial. The shutter speed may be adjusted simply by bringing a reading in line with the index mark.
- Shutter speed calibrations are also visible in the viewfinder, thus making it possible to ascertain the speed while looking through the viewfinder.
- "B" stands for time exposure and is used when there is the need for the exposure of over one second. (Page 58).
- The red figure of "125" is the maximum shutter speed for synchronization with an electronic flash.
. Do not turn the shutter speed dial when the shutter button is depressed.
VERSCHLUSS
To Dismount the Lens: While the Lens Release Button (27) is depressed, grip the lens barrel and revolve it counterclockwise. Pull out the lens when the red dots of the barrel and camera have been aligned with each other.
To Mount a Lens: Bring the red dot of the lens in line with the lens mount index mark (red dot) on the camera body and gently sink the lens barrel into the camera. Grip the lens barrel and turn it clockwise until it clicks into position.
OBJEKTIVWECHSEL
CHANGEMENT D'OBJECTIF
- When the lens is detached, see to it that dust will not come in the camera and lens barrel and the lens surface will not be either scratched or marred with fingerprints. Under any circumstances, do not touch the inner parts of the camera.
- When the lens is taken out of the camera over a certain length of time, use a camera body cap and a mount cap which is snapped on to the rear part of the lens.
BEMERKUNG:
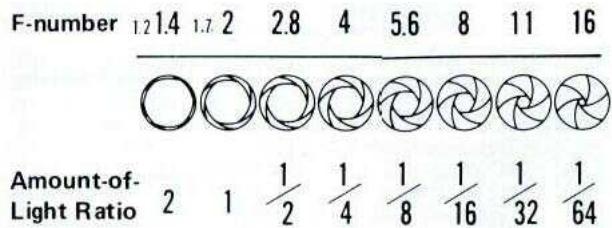
The lens aperture is designed to control the amount of light reaching the film surface in terms of area and the depth of field (see Page 46). Your camera's AEC system will automatically determine the correct aperture value, once the AE mark on the aperture ring is aligned with the index mark. Manual aperture is also usable (Page 39). In either event, the fully automatic aperture system will work and the lens will be stopped down to a determined f-number only during the split moment when the shutter is depressed and then automatically return to the full opening after a picture has been taken.
- The amount of light going through the lens will reduce in proportion to a rise in the aperture value. The correlation, as indicated in the above figure, is such that the brightness of the lens reduces by half in proportion as the aperture enlarges by one reading.
- The lens having the AE Release Button (13) at its aperture ring is equipped with an AE lock. In the event that the camera is released from the electric eye system and used for manual aperture, depress this button and turn it.
- The aperture is continually variable, and therefore an intermediate point between readings on the aperture ring is usable.
BLENDE
The Autoreflex-T3 is the world's first professional Through-The-Lens metering 35mm Single-Lens Reflex camera to have fully automatic AEC exposrue control. The AEC meter system establishes contact to all KONICA Hexanon AR lenses by means of a meter-actuated coupling lever. When the shutter release is depressed, the spring loaded aperture in the lens is tripped to close to the limit determined by this coupling lever. This limit is the precise aperture required for a perfect exposure at that instant when you press the button.
With a KONICA Hexanon AR lens installed in your Autoreflex-T3 there is no need to waste time before shooting to match the needle to a mark. You only need to focus and compose, then press the shutter release - remaining assured all the time that correct exposure is being taken care of. Full concentration can thus be made on the spontaneous or esthetic needs of your photography. In actuality, the KONICA Autoreflex-T3 offers not one but three optional methods of arriving at the correct of desired exposure.
AEC Metering: With a KONICA Hexanon AR (Automatic Exposure) lens, the needle in the viewfinder serves only to let you know at which f/stop the fully automatic metering system will make the picture for you. Shutter and diaphragm are cross-coupled. Thus if you choose a high shutter speed to stop action, the diaphragm will be set for a wider opening automatically. On the other hand, should you need a smaller stop for greater Depth-of-Field, simply turn the Shutter Speed Dial (20) to a slower speed. The needle in the information center of the Viewfinder will keep you informed. At the same time, you can read the shutter speed setting below the viewing area (see page 33).
Stopped-Down Exposure Metering: With KONICA and other lenses having manual or preset diaphragm (not AE), as well as with extension rings and bellows, the Stopped-Down method is used. Here the exposure is read at the actual aperture used to make the picture. The needle in the Control Center is then simply brought to the Index Mark opposite the f/1.4 figure. This can also be done by changing the shutter speed setting. Leterally thousands of lenses can be used with this system. In addition to KONICA AutoReflex lenses, lenses in mounts for KONICA FP, Pentax/Praktica, Exakta/Topcon and Nikon/Nikkormat can be used for the Stopped-Down metering with the Autoreflex-T3 via their respective KONICA Lens Adapters.
Manual Exposure Settings: Should you have some special exposure idea in mind, you need only move the diaphragm ring of your KONICA Hexanon AR lens from the AE setting to any f/stop desired. Thus, with this and the other metering systems just discussed, exposure with the KONICA Autoreflex-T3 becomes a versatile tool which gives you freedom to exploit its automation or to choose other exposure methods. (See page 39)
NOTE: The KONICA Autoreflex-T3 does not take any fully automatic AE aperture lens prepared for the Autoreflex as it is. Make sure that you sue it after it has been remodeled into a lens for use on the Autoreflex-T3 (with f-numbers). Remodeling work is quite simple.
(47) Manual Aperture Indicator Mark
(48) Mark Indicating F-number at Full Lens opening
(49) Meter Needle
(50) Battery Check Mark
(51) Aperture Scale
F-NUMBER FOR CORRECT EXPOSURE: When the Meter Needle (49) stops within the range of correct exposure, the f-number on the aperture sacle (51) to which the meter needle points is the aperture to which the taking lens will be set when the shutter is released for a shot.
CORRECT EXPOSURE RANGE: For an AR lens which is not f/1.2 in brightness, the Mark Indicating the F-number (48) at the Full Lens Opening shows the f-number at the full opening of the lens used on your camera. If the meter needle is aligned with this red mark, pictures will be under-exposed. The mark indicating the f-number at the full opening of the lens will move down if the meter is not coupled. In other words, the mark will also show the range where the meter is coupled. In AE picture-taking, therefore, the area sandwiched between the upper and lower red marks is the correct exposure range.
INDICATION OF SHUTTERTPEED SCALE: The speed at which the shutter will be released is indicated on the Shutter Speed Scale (46) in the lower part of the viewfinder.
MANUAL INDICATOR MARK: When the AE device is released and the camera is set to manual picture-taking or when the stopped-down metering system is used, the Manual Aperture Indicator Mark (47) "M" will appear over the meter window, showing that a picture is not to be taken under AEC system.
INDEX POINT FOR STOPPED-DOWN METERING: For stopped-down metering, the meter needle will be brought in line with the Index Point for Stopped-down Metering (45) to secure a correct exposure. (Refer to "Stopped-down Metering" on Page 63.)
BATTERY CHECK MARK: The Battery Check Mark (50) is used to check the device's ability of the mercury battery cells which serve as the electric source of the meter. (Refer to "Battery Check" on Page 15.)
KONTROLLZENTRUM IM SUCHER
This method is commonly used when pictures are taken under the AEC system with an AR lens having the AE mark.
1. Set Your Camera to AE Mark.
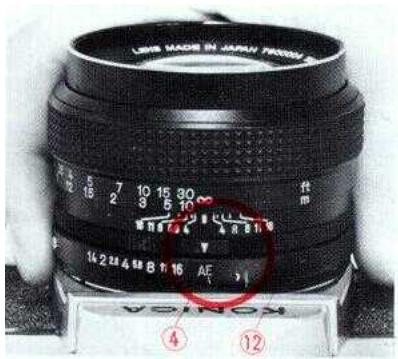
Turn the Aperture Ring (12) and bring the AE Mark (4) in line with the index point. The AE lock will click into position.
2. Determine Shutter Speed.
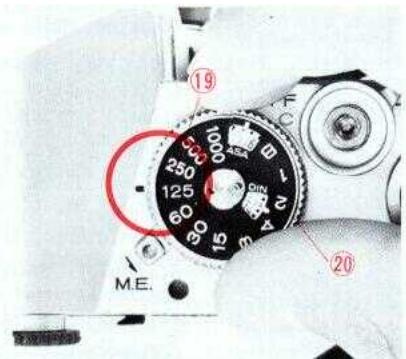
Turn the Shutter Speed Dial (20), select a reading on the Shutter Speed Scale (19) suitable for your subject and bring it in line with the index mark. In normal circumstances, it is convenient to set the shutter speed to 1/125 sec. for outdoor shooting and 1/30 sec. for indoor picture-taking.
3. Look Through Viewfinder.
Train your camera at the subject, look through the viewfinder, focus the lens, frame your subject and look at the Meter Needle (49) in the viewfinder. If the meter needle is not aligned with the upper or lower red mark (exposure limit mark), You will always be able to secure correct exposure.
When the meter needle indicates an under-exposure, choose a slower shutter speed. When it indicates an over-exposure, select a faster shutter speed. Correct exposure may be secured as long as the meter needle is not aligned with the upper or lower red mark.
In the event that you want to give priority to the selection of a lens aperture over a shutter speed because of a desired depth of field, turn the shutter speed dial and make an adjustment so that the needle will indicate the desired f-number. No intermediate points between shutter speed readings are usable, so make sure that the shutter speed dial clicks into position.
- It will be quite meaningless even if the meter is visible within the correct exposure range with the shutter speed dial set to the "B" reading. Do not use this method.
When a picture is to be taken while using the manual aperture button in ascertaining a time exposure or when it is to be taken with a flash light, release the AEC system and set your camera to manual aperture. While the AE Release Button (13) is depressed, turn the Aperture Ring (12), detach the AE mark from the index mark and determine an exposure according to the Manual Aperture Scale (9).
HINTS FOR UNUSUAL EXPOSURE SITUATIONS
The compound dual CdS metering system in the Autoreflex-T3 is very selective, and is generally not unduly affected by subject matter outside its primary exposure reading range. It is programmed to obtain its primary exposure data from the main subject area. This is deemed to be the lower center third of the total area. The peripheral upper and marginal two thirds contribute in a lesser degree to the compound exposure date. There are however a number of unusual situations that require special handling.
SUGGESTIONS POUR DES CONDITIONS EXCEPTIONNELLES D'EXPOSITION
Against-the-Light Shots: In such situations the light can shine directly into the camera and adversely affect readings for the main portion of the subject. In most cases temporarily changing the film speed setting to a value one-half (1/2) that of the actual film speed will give an extra stop exposure to correct the situation. In extreme cases, use the regular film speed but move the camera in close to read the important subject areas. After taking a reading, depress the Shutter Release Button partially, which will lock the meter needle at the close-up reading; move back, and then depress the Shutter Release Button the rest of the way to make the exposure.
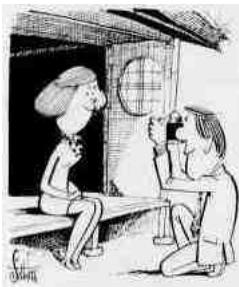
Very Light or Dark Backgrounds: When a small light subject is against a large dark background, the meter may read the entire area as a dark subject and overexpose the main subject Conversely, with a small dark subject against a large light background, the meter may read the entire area sa light subject and underexpose the main subject. In this case, a close-up reading as described under "Against-the-Light Shots" can be found helpful.
NOTE: Should you temporarily change the ASA setting to get more exposure in backlighted situations, do not forget to reset your meter to the normal rating for regular shots.
Hold your Camera Tight
To take a sharp picture, the important thing is to hold your camera in a stable manner to prevent it from being jarred when the shutter button is depressed. Hold your camera in both hands and make it stable by holding it against your face and pressing the elbow of your hand supporting the camera against your body.
Particularly, it is more difficult to hold the camera, the long side up, than to hold it, the long side down. It would be advisable to get yourself accustomed to the vertical holding of your camera.
- In taking pictures at slow shutter speeds or with a telephoto lens, the camera is likely to be jarred if it is hold in the hands. Here, the use of a tripod and a cable release is advisable. The tripod will be fixed to the Tripod Socket (42) of the underside of the camera and the cable release to the tap-hole of the shutter button.
Die Camera fest
The Focusing Screen (53) is of the Micro Dia Prism type or has a built-in rangefinder of the Split-Image type. The focusing method is the same for both systems.
With Micro Dia Prism Type: While the finder is being looked into, turn the Focusing Ring (11) so that the image in the Micro Dia Prism at the center of the field of view may be clearly seen. If it is out of focus, the image will look rugged. With Split-Image Type: While the finder is being looked into, turn the Focusing Ring (11) so that the horizontally sectioned halves of the image in the split-image area at the center of the field of view may be seen as a single image. If it is out of focus, the upper and lower halves will look slipped out of place.
- When a taking lens darker than f/4.5 is used or when close-ups are taken, it will become difficult to focus the lens with the Micro Dia Prism or Split-Image at the center. Focus the lens, using the Mat Plane (54) around the center.
- In the case of the split-image type, train your camera, the long side upright, for focusing when you take pictures of a subject with paralleled lines.
W
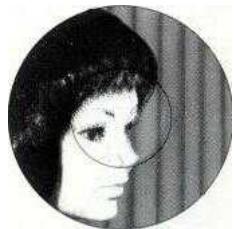
When the lens is not focused ....
When the lens is focused......
When the lens is focused on a subject at some distance, not only the subject but also a certain area around the subject will be sharply delineated in a photograph, and this area is known as a Depth-of-Field and has the following features.
a. The bigger the f -numher, the larger the Depth-of-Field.
b. The farer the distance at which the lens is focused, the bigger the Depth-of-Field is.
c. When the lens is focused on a subject, the Depth-of-Field is bigger for the section in front of the subject than the area behind the subject.
d. The shorter the focal length, the bigger the Depth-of-Field.
The Depth-of-Field may be ascertained either with the depth-of-field scale or with the manual aperture. As for details, reference is made to the table of depth-of-field.
Using Table of Depth-of-Field: The Depth-of-Field Scale (7) is so calibrated that readings identical to those of the lens aperture are provided on both sides of the Distance Scale Index Mark (55). For example, let us assume that the distance between the film plane and the subject on which a 50mm f/1.4 lens has been focused is 15 feet. The Depth of Field will be 12 to 19 feet for f/4 and 8 feet to (infinity) for f/16.
INFRARED FILM COMPENSATION MARK: The point of focus is somewhat different in infrared photography as compared to normal photography. After the lens has been focused as in normal photography, read the calibration on the Distance Scale (8) aligned with the Distance Scale Index Mark (55) and bring this reading in line with the Infrared Film Compensation Mark (56) before the shutter is released for a shot.
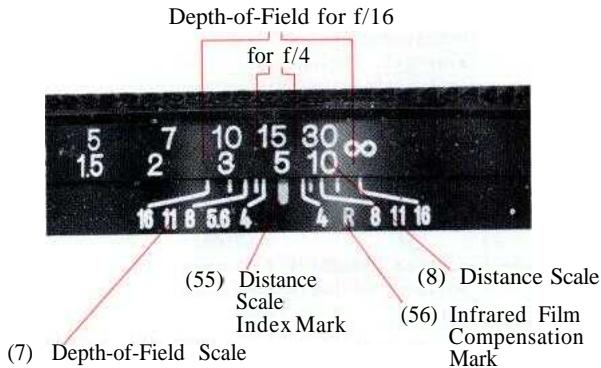
FOCAL PLANE MARK: The distances shown on the distance scale are those between subjects and the Focal Plane Mark "O" (21) which indicates the position of the film plane.
The AR series of lens with an AE mark incorporates an automatic aperture system and therefore the finder is kept bright with the lens opened to the full degree. When the Depth-of-Field Lever (5) has been flipped down toward the lens, the lens will be stopped down to the aperture reading indicated by the meter needle for AEC and the preset reading for manual. Look into the finder, and you will be able to see the depth of field at the given aperture.
- Don't release the shutter while the depth-of-field lever is kept depressed.
Depth-of-Field Table (57mm f/1.2)
Permissible Aberrated Circle Diameter 3/100mm (Unit: Feet)
| Distance Aperture | 1.5 | 1.75 | 2.0 | 2.5 | 3.0 | 3.5 | 4.0 | 5.0 | 7.0 | 10.0 | 15.0 | 30.0 | ∞ |
| F1.2 | 1.49 1.51 | 1.74 1.75 | 1.99 2.00 | 2.48 2.51 | 2.97 3.03 | 3.46 3.54 | 3.95 4.05 | 4.92 5.08 | 6.84 7.16 | 9.67 10.34 | 14.23 15.76 | 27.07 33.35 | 282.03 ∞ |
| F1.4 | 1.49 1.51 | 1.74 1.75 | 1.98 2.01 | 2.48 2.51 | 2.97 3.03 | 3.45 3.54 | 3.94 4.06 | 4.91 5.09 | 6.82 7.19 | 9.62 10.40 | 14.12 15.90 | 26.66 34.01 | 241.79 ∞ |
| F2 | 1.49 1.51 | 1.73 1.76 | 1.98 2.01 | 2.47 2.52 | 2.95 3.04 | 3.44 3.56 | 3.92 4.08 | 4.87 5.13 | 6.74 7.27 | 9.47 10.59 | 13.79 16.34 | 25.48 36.15 | 169.35 ∞ |
| F2.8 | 1.48 1.51 | 1.73 1.76 | 1.97 2.02 | 2.46 2.53 | 2.94 3.06 | 3.41 3.59 | 3.89 4.11 | 4.82 5.19 | 6.65 7.39 | 9.28 10.84 | 13.37 16.97 | 24.07 39.46 | 121.06 ∞ |
| F4 | 1.48 1.52 | 1.72 1.77 | 1.96 2.03 | 2.44 2.55 | 2.91 3.09 | 3.38 3.62 | 3.84 4.17 | 4.75 5.27 | 6.51 7.57 | 9.00 11.25 | 12.80 18.02 | 22.22 45.77 | 84.84 ∞ |
| F5.6 | 1.47 1.52 | 1.71 1.78 | 1.95 2.04 | 2.42 2.58 | 2.88 3.12 | 3.34 3.67 | 3.79 4.24 | 4.66 5.39 | 6.33 7.83 | 8.66 11.84 | 12.10 19.63 | 20.17 58.22 | 60.69 ∞ |
| F8 | 1.47 1.53 | 1.70 1.79 | 1.93 2.06 | 2.39 2.61 | 2.84 3.18 | 3.28 3.76 | 3.70 4.35 | 4.53 5.58 | 6.09 8.25 | 8.20 12.86 | 11.19 22.70 | 17.72 98.62 | 42.58 ∞ |
| F11 | 1.45 1.54 | 1.68 1.81 | 1.91 2.09 | 2.35 2.66 | 2.78 3.25 | 3.20 3.86 | 3.61 4.49 | 4.38 5.83 | 5.81 8.84 | 7.68 14.43 | 10.24 28.23 | 15.39 ∞ | 31.06 ∞ |
| F16 | 1.44 1.57 | 1.66 1.84 | 1.87 2.14 | 2.29 2.74 | 2.70 3.38 | 3.09 4.06 | 3.46 4.77 | 4.15 6.32 | 5.40 10.07 | 6.96 18.15 | 8.97 47.83 | 17.65 ∞ | 21.45 ∞ |
Depth-of-Field Table (50mm f/1.7 - 50mmf/1.4) Permissible Aberrated Circle Diameter 3/100mm (Unit: Meter)
| Distance Aperture | 0.45 | 0.5 | 0.6 | 0.7 | 0.8 | 1.0 | 1.2 | 1.5 | 2.0 | 3.0 | 5.0 | 10.0 | ∞ |
| F1.4 | 0.440.45 | 0.490.50 | 0.590.61 | 0.690.71 | 0.790.81 | 0.981.02 | 1.171.22 | 1.461.54 | 1.932.07 | 2.853.16 | 4.605.46 | 8.4612.01 | 56.42∞ |
| F1.7 | 0.440.45 | 0.490.50 | 0.590.61 | 0.690.71 | 0.790.81 | 0.981.01 | 1.171.23 | 1.451.54 | 1.922.08 | 2.823.19 | 4.515.56 | 8.1612.47 | 46.41∞ |
| F2 | 0.440.45 | 0.490.50 | 0.590.61 | 0.690.70 | 0.780.81 | 0.981.02 | 1.171.23 | 1.451.55 | 1.912.09 | 2.803.22 | 4.455.65 | 7.9612.96 | 40.62∞ |
| F2.8 | 0.440.45 | 0.490.51 | 0.590.61 | 0.680.71 | 0.780.82 | 0.971.03 | 1.151.24 | 1.431.57 | 1.882.13 | 2.733.32 | 4.275.97 | 7.3914.83 | 29.04∞ |
| F4 | 0.440.46 | 0.490.51 | 0.580.61 | 0.680.72 | 0.770.83 | 0.961.04 | 1.141.26 | 1.401.60 | 1.832.20 | 2.633.48 | 4.036.54 | 6.6818.94 | 20.35∞ |
| F5.6 | 0.440.46 | 0.480.51 | 0.580.62 | 0.670.73 | 0.760.84 | 0.941.06 | 1.121.29 | 1.371.65 | 1.772.29 | 2.513.73 | 3.747.47 | 5.9230.11 | 14.56∞ |
| F8 | 0.430.46 | 0.480.52 | 0.570.63 | 0.660.74 | 0.750.85 | 0.921.09 | 1.091.34 | 1.321.73 | 1.692.44 | 2.354.16 | 3.399.54 | 5.06270.12 | 10.22∞ |
| F11 | 0.430.47 | 0.470.52 | 0.560.64 | 0.650.75 | 0.730.87 | 0.901.13 | 1.051.39 | 1.271.83 | 1.602.66 | 2.174.89 | 3.0314.61 | 4.29∞ | 7.46∞ |
| F16 | 0.420.48 | 0.470.53 | 0.550.66 | 0.630.78 | 0.710.91 | 0.861.20 | 1.001.51 | 1.192.04 | 1.483.15 | 1.946.90 | 2.58138.38 | 3.43∞ | 5.16∞ |
Depth-of-Field Table (57mm f/1.2)
Permissible Aberrated Circle Diameter 3/100mm (Unit: Meter)
| Distance Aperture | 0.45 | 0.5 | 0.6 | 0.7 | 0.8 | 1.0 | 1.2 | 1.5 | 2.0 | 3.0 | 5.0 | 10.0 | ∞ |
| F1.2 | 0.440.45 | 0.490.50 | 0.590.60 | 0.690.70 | 0.790.81 | 0.991.01 | 1.181.21 | 1.471.52 | 1.952.04 | 2.903.10 | 4.735.29 | 8.8911.15 | 86.01∞ |
| F1.4 | 0.440.45 | 0.490.50 | 0.590.60 | 0.690.71 | 0.790.81 | 0.981.01 | 1.181.22 | 1.471.53 | 1.952.05 | 2.883.12 | 4.695.34 | 8.7411.39 | 73.74∞ |
| F2 | 0.440.45 | 0.490.50 | 0.590.61 | 0.690.71 | 0.790.81 | 0.981.02 | 1.171.22 | 1.461.54 | 1.932.07 | 2.843.17 | 4.575.51 | 8.3312.19 | 51.64∞ |
| F2.8 | 0.440.45 | 0.490.50 | 0.590.61 | 0.690.71 | 0.780.81 | 0.971.02 | 1.161.23 | 1.441.56 | 1.902.10 | 2.783.25 | 4.425.75 | 7.8313.44 | 36.92∞ |
| F4 | 0.440.46 | 0.490.51 | 0.590.61 | 0.680.71 | 0.780.82 | 0.971.03 | 1.151.25 | 1.421.58 | 1.872.15 | 2.703.37 | 4.216.14 | 7.1915.89 | 25.87∞ |
| F5.6 | 0.440.46 | 0.490.51 | 0.580.61 | 0.680.72 | 0.770.83 | 0.951.05 | 1.131.27 | 1.401.61 | 1.822.22 | 2.603.54 | 3.966.77 | 6.4921.02 | 18.51∞ |
| F8 | 0.440.46 | 0.480.51 | 0.580.62 | 0.670.73 | 0.760.84 | 0.941.07 | 1.111.30 | 1.361.67 | 1.752.33 | 2.463.84 | 3.647.99 | 5.6640.86 | 12.98∞ |
| F11 | 0.430.46 | 0.480.52 | 0.570.63 | 0.660.74 | 0.750.86 | 0.921.10 | 1.081.35 | 1.311.74 | 1.682.48 | 2.314.29 | 3.3110.35 | 4.89∞ | 9.47∞ |
| F16 | 0.430.47 | 0.470.53 | 0.560.64 | 0.650.76 | 0.730.88 | 0.891.14 | 1.041.43 | 1.251.89 | 1.562.79 | 2.105.36 | 2.8820.46 | 3.98∞ | 6.54∞ |
USE OF SELF-TIMER
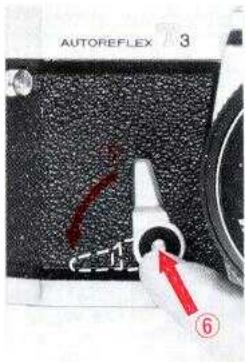
The self-timer of the KONICA Autoreflex-T3 is usable in AEC, manual and flash photography. Use the self-timer when you are to take pictures of your companions and yourself and when it is to take the place of a cable release to prevent your camera from being accidentally jarred.
While the Self-set Button (6) is kept depressed, turn the Self-Timer Lever (5) counterclockwise to the full extent and press down the shutter release button, and the shutter will be released in about 10 sec. The self-timer may be set before or after the film wind lever is cocked.
Instead of fully turning it, the self-timer may be set midway to reduce the time lag before the shutter release.
NOTE: When the self-timer is used in AEC photography, note that strong light accidentally comes in the camera through the eyepiece as the shutter button is depressed and it leaves a strong impact on exposure. When the shutter button is to be depressed, therefore, look through the viewfinder or cover the eyepiece with a hand to prevent strong light from accidentally coming through the eyepiece. When the shutter button is to be depressed with your eye detached from the eyepiece, make sure that you do not stand right in front of your camera. Otherwise, the exposure will be determined on the basis of brightness of your clothing.
SELBSTAUSLOSER
After a pre-determined number of pictures have been taken on the film loaded in your camera, the film will be wound back into the original cartridge.
If the back cover of your camera is opened without rewinding the film, the film will be exposed to light and the whole of the film will become useless.
-
When the film wind lever no longer moves further after the advance of the last frame of the film, do not try forcibly to cock the lever. Put the lever back to the original position.
-
Depress the Film Rewind Button (41) on the underside of your camera. Once it is depressed, the button will remain sunken.
- Flip up the Film Rewind Crank (22) and turn it in the direction indicated by an arrow mark on the crank. This action will take the exposed film back into the cartridge.
- The film rewind action comes to an end when there is a sudden easing of the load on the film rewind crank. Avoid the direct sunlight and open the back cover to take out the cartridge.
The film counter will return to the original position "S" when the back cover is opened.
- The film rewind button will also return to the original position when the film wind lever is wound.
FILMRÜCKSPULUNG
The Multiple-Exposure Lever (18) is situated under the shutter speed dial. With this lever kept pressed down in the direction indicated by the arrow mark, cock the film wind lever, only the shutter will be charged but the film will not be wound (nor will the film counter advance). This will make it possible to expose one and the same frame of the film as often as you want.
(1) Give the initial exposure.
(2) Cock the film wind lever with the multiple-exposure lever kept depressed in the arrow marked direction.
(3) Give a second exposure.
Repeat this series of action as often as you want.
- For an easy manipulation, insert the nib of a ball-point pencil into the hole at the center of the multiple-exposure lever.
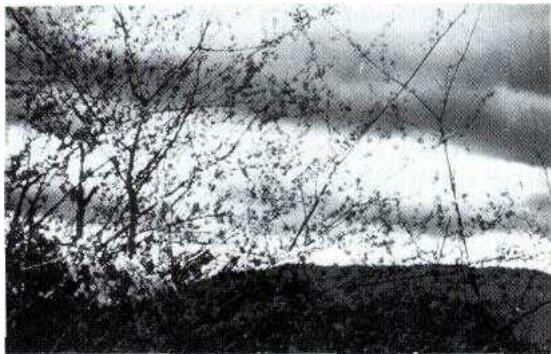
If the shutter speed dial is set to "B", the shutter will be open as long as the shutter release button is pressed down. This method is usable for more than one second of exposure. When such a long time exposure is required, turn the Shutter Lock Control (3) and set it to "OFF" while the shutter release button is kept depressed. In this way, the film will be exposed even if your finger is detached from the button. When the shutter lock control is returned to "ON", the shutter will be closed and the film will no longer be exposed.
- The AEC system is unusable for time exposure. Set your camera to manual for aperture determination.
- To prevent your camera from being accidentally jarred, it is necessary to prepare a tripod and cable release. The KONICA Cable Release 3 with a lock has a "T" stopper, so that it may be put to use for time exposure without a releast lock lever.
NOTE: Don't turn the shutter speed dial during time exposure. Nor must it be turned while the self-timer is in operation.
ZEITAUFNAHMSN
For beautiful pictures, use flash bulbs or a electronic flash in a situation where AEC photography is impracticable, such as in a dark room and at night. Flash bulbs or electronic flash are also usable in day light flash photography as auxiliary lights. The M and X Flash Contacts (24) are provided to the side panel of the camera body. When a flash unit with a cord is used, connect the plug with the M contact. With an electronic flash, connect the plug with the X contact. The Synchro Contact (31) on the eyepiece assembly is prepared for the KONICA's exclusive Hot Shoe Clip. The KONICA X-20 or X-14 small electronic flash equipped with a hot shoe (cord-less) will be electrically connected, when it is fitted to the clip.
BLITZLICHTAUFNAHMSN
PHOTOGRAPHIE AU FLASH
O - Synchronized X - Not synchronized
- Determine the Exposure: Flash bulbs are coupled to all shutter speeds. Electronic flash are synchronized with shutter speeds of up to 1/125 sec. AEC photography is impracticable in flash photography in which flashes are used as the main lighting source. Here, your camera must be set to manual. In general, the aperture value is determined by dividing the guide number of the flash bulb or electronic flash with the taking distance.
For example, when the guide number of your electronic flash is 64 with ASA 80/125 and the taking distance is 8 feet, the equation will be 64:8 = 8 . The correct exposure may be obtained with the aperture set to f / 8 .
The AR lens provided with an AE mark is so designed that light can be measured at the full opening of the lens with automatic aperture either in AE or manual photography. Exposure will be determined in the stopped-down metering system for the following instances, however.
- When an ARP lens equipped with manually present aperture or an ARM lens with manual click aperture is used.
- When automatic aperture cannot be put to use due to the utilization of an extension ring and bellows.
- When a KONICA FS, FP or FM, or a lens produced by other camera manufacturer is used for the Autoreflex-T3 together with a lens mount adapter.
Exposure Determination
The aperture scale visible in the viewfinder is not usable for the stopped-down metering system. Turn either the aperture ring or the shutter speed dial and align the Meter Needle (49) with the Index Point for Stopped-down Metering (45) situated at the reading "f/1.4" to secure a correct exposure.
If the combination of aperture and shutter speed is improper, the needle will not come in alignment with the index mark. Pictures will be under-exposed when the needle is situated above the index mark and it will be over-exposed when it is located under the mark. Here, make an adjustment either with aperture or shutter speed.
- In the stopped-down metering system, the eyepiece tends to be affected by adverse light than in the system in which light is measured at the full lens opening. Determine the exposure while your eye is put as close to the eyepiece as possible. The needle swings in a very slow pace. Take a picture after it has been ascertained that the needle is aligned with the index mark.
- In the event that a manually preset aperture lens is to be used on your camera, set the preset aperture ring to the reading of the smallest lens aperture in advance and then turn the aperture ring. This action will make easier the manipulation.
- Microphotographic pictures are also taken under the stopped-down metering system. Make an adjustment either with shutter speed or according to the brightness of the light source since no aperture is available.
Bunonodx
e e
nnnnne nnnnne
mssx


Belichtungsregelung
As the KONICA Autoreflex-T3 is of the TTL type, there is no need to worry about a filter factor according to the type of filter used on your camera. It is advisable to use a filter to boost photographic effects.
KONICA-Filter
| COLOR | NAME | EFFECTS |
| Colorless* | UV (L39) | Absorbs ultra-violet. Prevents excess bluishness with color film. No change in the overall color rendition. Also used for atmospheric haze. |
| Light Yellow | Y1(Y44) | Absorbs blue, violet and ultra-violet. Gives natural rendition in outdoor black and white shooting. Makes white clouds stand out against a blue sky. For use with B/W films only. |
| Yellow | Y2(Y48) | |
| Dark Yellow | Y3(Y52) | |
| Orange | O1 (056) | Absorbs blue very strongly, also some green. Makes blue skies dark and dramatic in black and white. For extra contrast in architectural work. For use with B/W films only. |
| Red | R1 (R60) | Absorbs blue and green. Blue skies rendered almost black. Use for pseudo night shots. Use only for black and white film, or for infrared film. |
| Yellowish Green | PO 0 | In black and white photography, renders greens better than yellow filter. Also prevents washed-out flesh tones when head is against sky which is to be darkened. For use with B/W films only. |
| Light Gray | ND 2 | No effect on rendition in either black and white or color work. Used to reduce light intensity, where highest shutter speed or smallest f/stop used, will still not prevent overexposure. In very bright light permits large opening for selective focus effect. |
| Gray | ND 4 | |
| Dark Gray | ND 8 | |
| Light Pink* | SKYLIGHT | For color and B/W film. Absorbs ultra-violet and prevents excess bluishness in color shots of distance scenes. Can also be used with B/W film. |
| Light Amber | A 2 | Reduces color temperature. Adds warmth to shadows in snow, beach scenes. Prevents bluishness on cloudy days, in open shade. |
| Light Blue | B 2 | Raises color temperature. Suppresses excess redishness in scenes made by reddish early morning or late afternoon sunshine. |
| Blue | B 8 | For use with clear (white) flash bulbs and daylight type color film. Prevents excessively reddish rendition. |
| Dark Blue | B 12 | For use with 3200K studio flood lamps and daylight type color film. Prevents reddish rendition. |
- Filters most commonly used in color photography are marked with an asterisk * above.
- Lens Hoods
The use of a lens hood is indispensable to the prevention of unnecessary rays from falling on the taking lens. It is advisable to use a lens hood suited for the coverage of the lens mounted on your camera.
- Gegenlichtblende
- Body Cap and Mount Cap
The body cap is designed to protect the inner parts of the camera and the rear part of the lens when the lens is detached from the camera. It is of the bayonet type.
- Semi-Hard Case Front Cover for 135mm Telephoto Lens
Usable even when a 135mm 100mm or 85mm telephoto lens is mounted on the camera.
Made of rubber, it is for use on the eyepiece assembly. This gadget makes the finder easier to look through and prevents the eye from getting fatigued. It also serves to prevent reverse light from coming into the viewfinder.
- Augenmuschel
- Eyesight Correction Lenses
For long- and short-sighted persons, it is advisable to use an eyesight adjustment lenses on the eyepiece frame. It will become easier to look into the viewfinder even without a pair of glasses. The lenses come in the six types of +3, +2, +1, -1, -2 and -3 Dioptrie. With eyecup.
The magnifier, as it is equipped to the eyepiece assembly of the camera, is designed to blow up for viewing the image which appears at the center of the finder. Accurate focusing is assured for close-up, copying, telephoto photography and microscope photography.
Einstellupe
The use of the Angle Finder makes it possible to look into the viewfinder from above the camera. This gadget is quite handy when pictures are taken at a low level, such as in copying and microphotography.
Winkelsucher 3
- Attachment Lens 55
Simply by screwing this lens in on the taking lens, close-up pictures may be taken under the AEC system.
No. 1 for 65 to 32cm (25" to 1212''
No. 2 for 37 to 26cm (14" to 11")
No. 1 plus No.2 for 29 to 24cm (11½" to 9")
Vorsatzlinse 550
Placed in between the camera body and the taking lens, it is used in doing copying work on literatures and documents and taking pictures of insects and flowers. With a combination of a set of base rings and three intermediate rings, it is feasible to take blow-ups of 1X in magnification with a standard lens and of 2X with a reverse ring, which is available as an accessory.
Zwischenringsatz 3
- KONICA Cable Release 3
Use of the Kona Cable Release is advisable to prevent the camera from being accidentally jarred when pictures are taken at slow shutter speeds.
- KONICA Drahtausloser 3
- Auto Ring 2 and Double Cable Release 2
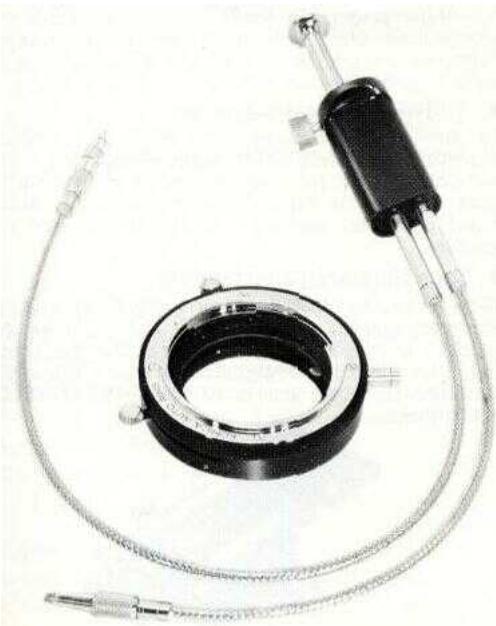
The use of an extension ring will not permit the taking lens to serve as an automatic aperture one. Focusing may be done easily with a double cable release and the lens is closed down to a given f-number immediately before the shutter is released.
As the amount of extension of the Auto Ring is 14mm , its use with a standard lens will make it possible to take close-ups at closer distances than with an attachment lens.
Equipped to the Macro Hexanon AR 105mm f/4 lens, this adapter makes it possible to take pictures in AEC photography from infinity to 0.23X magnification. This helicoid is also usable on lenses, 28 to 300~mm in focal length for close-up work in AEC photography.
Schneckengangadapter
The focusing rail is used when a camera on whose lens an attachment lens or the Extension Ring 3 is fitted is mounted on a tripod. Without changing the magnification ratio, focusing can be done simply moving the camera back and forth.
This accessory serves as the clip for the hot shoe (cord-less) fitted to the KONICA Autoreflex-T3. A small electronic flash or a flash gun will be electrically connected, if it is fitted to the clip.
This accessory is required when a small flash gun or electronic flash is fitted.
Zubehörschuh 3
With this flashcube, 4 flashes may be emitted in succession. An AG cube adapter is usable on this miniature flashgun.
KONICA Wurfelblitz
A small electronic flash with a guide number of 64 (ASA 80/125) and features extremely short flash intervals of 4 to 5 seconds.
- 400 flashes with AA alkali batteries
- Serviceable both as cord-less and cord-type strobo.
This is a small electronic Flash with a guide number of 45 (ASA 80/125) for exclusive use on the hot shoe (cord-less). *200 flashes with AA alkali batteries
This gadget makes it possible to take a broad range of close-ups and blow-ups in a continuous manner. It is a high-performance close-up device of the bellows type. With Auto Bellows, the diaphragm is usable as an automatic one both in normal photography and reverse photography. The focusing system also facilitates focusing. The Macro Stand, which makes efficient the taking of blow-ups of postal stamps and fine specimens, or Slide Copier 2, which facilitates slide copying and film reversing, may be equipped.
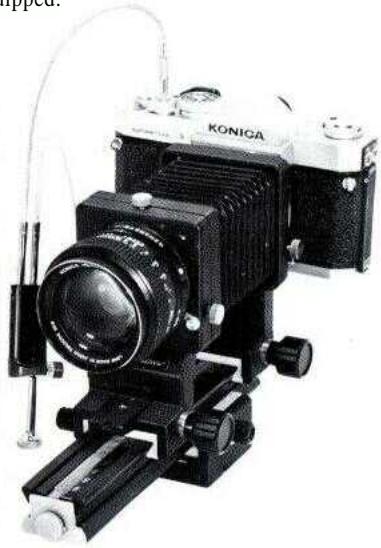
Even with the Bellows, it is possible to take pictures in reverse photography in which the lens is put into reverse position, but the reverse adapter system in which a lens of the 55mm screw filter is usable makes possible the taking of blow-ups larger in diameter.
Umkehradapter
This is an adapter indispensable for reverse photography and slide copying with a 57mm f/1.2 lens and reverse adapter.
Balgenadapter 57mm f/1.2
- 57mm f/1.2 Balgadapter
This adapter is required for reverse photography with the slide copier and used together with a reverse adapter. The Slide Copier Adapter is usable at the magnification factors of 1.5X to 4X .
- Microscope Adapter 2
This adapter makes it possible to take microphotographic pictures only with the object and eyepiece lenses of a microscope. While looking through the camera finder, it is possible to check the field of view and whether or not the lens is accurately focused and to take pictures while the subject is being observed.
- Mikroskop-Adapter 2
Raccord microscope 2
This gadget is quite handy in taking close-ups of drawings, literatures and photos in dimensions of up to 11 - 5 / 8'' X 16 - 1 / 2'' . The focusing rail, which is available as an accessory, makes it possible the fine focusing of the taking lens, thus facilitating a slight change in the position of the picture frame as well as focusing.
Kopierständer 2
- In wiping the camera body and lens barrel, take off dust with a brush and blower before they are cleaned with a piece of soft cloth. Use a brush or blower in taking out dust inside the camera and do not go as far as to wipe the mirror, which is a special plane mirror.
- Use a soft brush in taking off dust on the surface of the lens. In the event that it is marred with fingerprints or water drops, prepare a piece of well washed, clean cotton cloth and dampen it with a small quantity of absolute alcohol (it is advisable to mix it with ether). Lightly wipe the lens surface in a whirlpool starting at the center.
- To store the camera and lens, choose a place free from moisture. Take out the mercury battery cells. The best and safest method will be to keep them in a polyethylene bag together with a desiccant, such as silicagel.
- INHALTSVERZEICHNIS
- BASIC MANIPULATION FOR AEC PHOTOGRAPHING
- EINLEGEN DER QUECKSILBERBATTERIEN
- MISE EN PLACE DES PILES AU MERCURE
- Meter On/Off Switch and Shutter Lock Control
- FILMEINLEGEN
- VERSCHLUSS
- OBJEKTIVWECHSEL
- CHANGEMENT D'OBJECTIF
- BEMERKUNG:
- BLENDE
- KONTROLLZENTRUM IM SUCHER
- Determine Shutter Speed.
- Look Through Viewfinder.
- HINTS FOR UNUSUAL EXPOSURE SITUATIONS
- SUGGESTIONS POUR DES CONDITIONS EXCEPTIONNELLES D'EXPOSITION
- Hold your Camera Tight
- Die Camera fest
- W
- USE OF SELF-TIMER
- SELBSTAUSLOSER
- FILMRÜCKSPULUNG
- ZEITAUFNAHMSN
- BLITZLICHTAUFNAHMSN
- PHOTOGRAPHIE AU FLASH
- Exposure Determination
- Belichtungsregelung
- KONICA-Filter
- - Lens Hoods
- - Gegenlichtblende
- - Body Cap and Mount Cap
- - Semi-Hard Case Front Cover for 135mm Telephoto Lens
- - Augenmuschel
- - Eyesight Correction Lenses
- Einstellupe
- Winkelsucher 3
- - Attachment Lens 55
- Vorsatzlinse 550
- Zwischenringsatz 3
- - KONICA Cable Release 3
- - KONICA Drahtausloser 3
- - Auto Ring 2 and Double Cable Release 2
- Schneckengangadapter
- Umkehradapter
- Balgenadapter 57mm f/1.2
- - 57mm f/1.2 Balgadapter
- - Microscope Adapter 2
- - Mikroskop-Adapter 2
- Raccord microscope 2
- Kopierständer 2
Brand : KONICA MINOLTA
Model : AUTOREFLEX T3
Category : SLR camera