
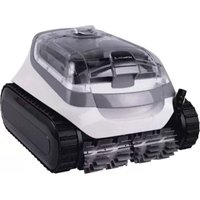
S20 - Pool Robot ASTRALPOOL - Free user manual and instructions
Find the device manual for free S20 ASTRALPOOL in PDF.


| Product Type | Automatic Pool Cleaner (Suction-Side) |
| Brand | AstralPool |
| Model | S20 |
| Power Source | Powered by pool circulation pump (suction-side) |
| Flow Control | AD Flow Valve with 3 settings: High (3), Medium (2), Low (1) |
| Debris Modes | Large debris and small debris (factory setting: small debris) |
| Cleaning Pattern | Random roaming with forward, backward, and pivoting movements |
| Wall Climbing | Yes (dependent on water flow and pool surface condition) |
| Power Scrubbers | Yes – generates down force for climbing and directs debris into cleaner mouth |
| Hose Sections Included | 9 Twist-Lock Hose Sections (each approx. 1 m) + 1 Leader Hose with Float |
| Included Components | Cleaner Body, AD Flow Valve & Connector, Universal Weir Cuff, 90 Degree Elbow, Flow Regulator Valve, AD Valve Connector |
| Filter System | Utilizes pool's existing filtration system; requires regular cleaning of skimmer and pump baskets |
| Safety Features | Suction entrapment prevention (use IAPMO SPS 4 compliant fittings); disconnect before entering pool |
| Maintenance | Debris removal from engine; replace brushes seasonally; store on side or back; avoid direct sunlight |
| Installation | Must be installed by trained technician per AS/NZ 3000-2018; includes vacuum plate and hose assembly |
| Warranty | Register at www.astralpool.com.au/warranty |
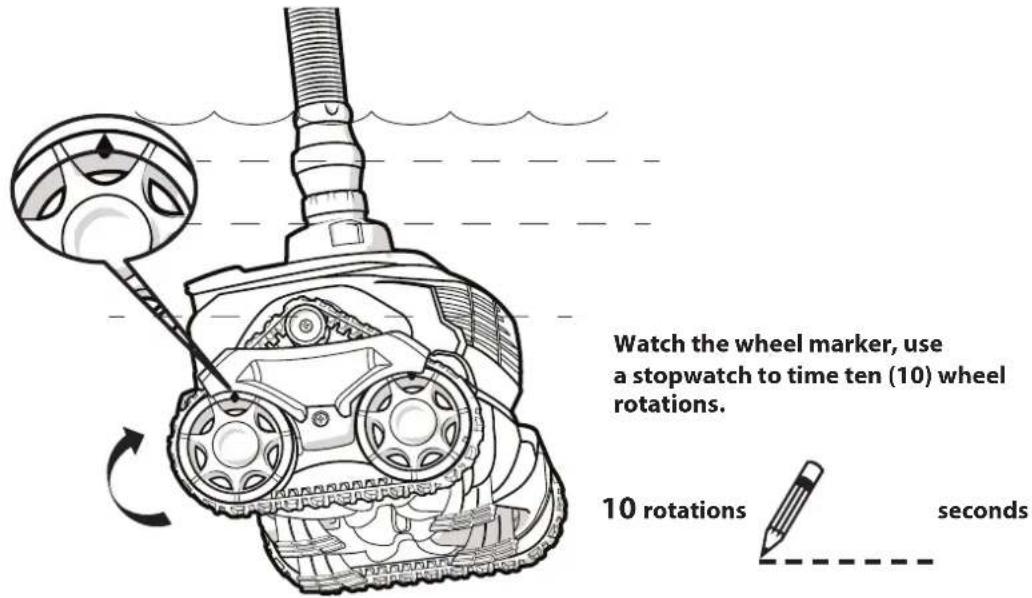
| Flow Adjustment Method | Count time for 10 wheel revolutions; adjust AD Flow Valve accordingly (26-50s: increase flow; 10-19s: decrease flow; 20-25s: optimal) |
| Compatible Pool Types | In-ground pools with suction-side plumbing; caution for vinyl liner pools |
| Dealer Support | Contact local AstralPool dealer or service center for adjustments and repairs |
| User Manual | Available for free download in multiple languages |
Frequently Asked Questions - S20 ASTRALPOOL
User questions about S20 ASTRALPOOL
0 question about this device. Answer the ones you know or ask your own.
Ask a new question about this device
Download the instructions for your Pool Robot in PDF format for free! Find your manual S20 - ASTRALPOOL and take your electronic device back in hand. On this page are published all the documents necessary for the use of your device. S20 by ASTRALPOOL.
USER MANUAL S20 ASTRALPOOL
natural_image
Line drawing of a futuristic robotic device with no visible text or symbolsS20
POOL CLEANER
WARNING
FOR YOUR SAFETY - This product must be installed and serviced by a trained Swimming Pool Technician in accordance with the latest applicable version of AS/NZ 3000-2018, along with any other applicable local and national installation codes/standards", and any other local applicable regulations. Before installing this product, read and follow all warning notices and instructions that accompany this product. Failure to follow warning notices and instructions may result in property damage, personal injury, or death. Improper installation and/or operation will void the warranty.
Improper installation and/or operation can create unwanted electrical hazard which can cause serious injury, property damage, or death.
Important Information
WARNING
RISK OF SUCTION ENTRAPMENT HAZARD, WHICH, IF NOT AVOIDED, CAN RESULT IN SERIOUS INJURY OR DEATH. Ensure that your vacuum suction fittings installed in your pool for connection of your suction-side pool cleaner are certified as being compliant with applicable safety standards such as IAPMO SPS 4. Do not block the suction fittings with any part or your body. Do not expose your hair, loose clothing, jewelry, etc. to any suction outlet fittings in the pool/spa.
Notice for Vinyl Liner Pools: Before installing your pool cleaner, examine the interior of your pool carefully. If the vinyl liner is brittle or has stones, wrinkles, roots or metal corrosion in contact with the underside of the liner, or has damage to the base material or supporting walls, do not install the cleaner before having a qualified professional perform the necessary repairs or liner replacement. AstralPool Group Australia Pty Ltd (AstralPool) will not be responsible for liner damage caused by a cleaner which is in disrepair, pattern removal from a vinyl liner, or a cleaner used in a pool having an aged or deteriorated liner. Please see Limited Warranty.
- Clean the skimmer basket, pump basket and pool filter before installing the cleaner and on a regular basis thereafter.
- Always disconnect the cleaner from the skimmer before cleaning or backwashing the pool filter. After cleaning or backwashing, let the filtration system run for at least five (5) minutes before re-connecting the cleaner.
- Remove the cleaner from the pool before chemical or shock treatments. Wait a minimum of four (4) hours after super chlorination before re-installing the cleaner.

Read owner's manual completely before operating the cleaner.
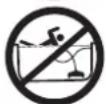
Remove cleaner before entering the pool.

Do not operate outside of the pool.

Do not let children play with cleaner.

Keep hands from moving parts.
Introduction
Congratulations on the purchase of your new AstralPool S20 automatic pool cleaner. Your AstralPool S20 is designed and manufactured for easy installation. Before installing the cleaner, please take a few moments to become familiar with its components and to review the items listed under Important Information.
Like most mechanical devices, the AstralPool S20 requires periodic adjustments, routine maintenance, and the replacement of certain hardworking parts. Be sure to have the AstralPool S20 checked occasionally by your local AstralPool dealer or service center.
Always insist on genuine AstralPool replacement parts. Non-AstralPool parts are not made to our specifications. They may have an adverse effect on the operation of your AstralPool S20 or may even damage it.
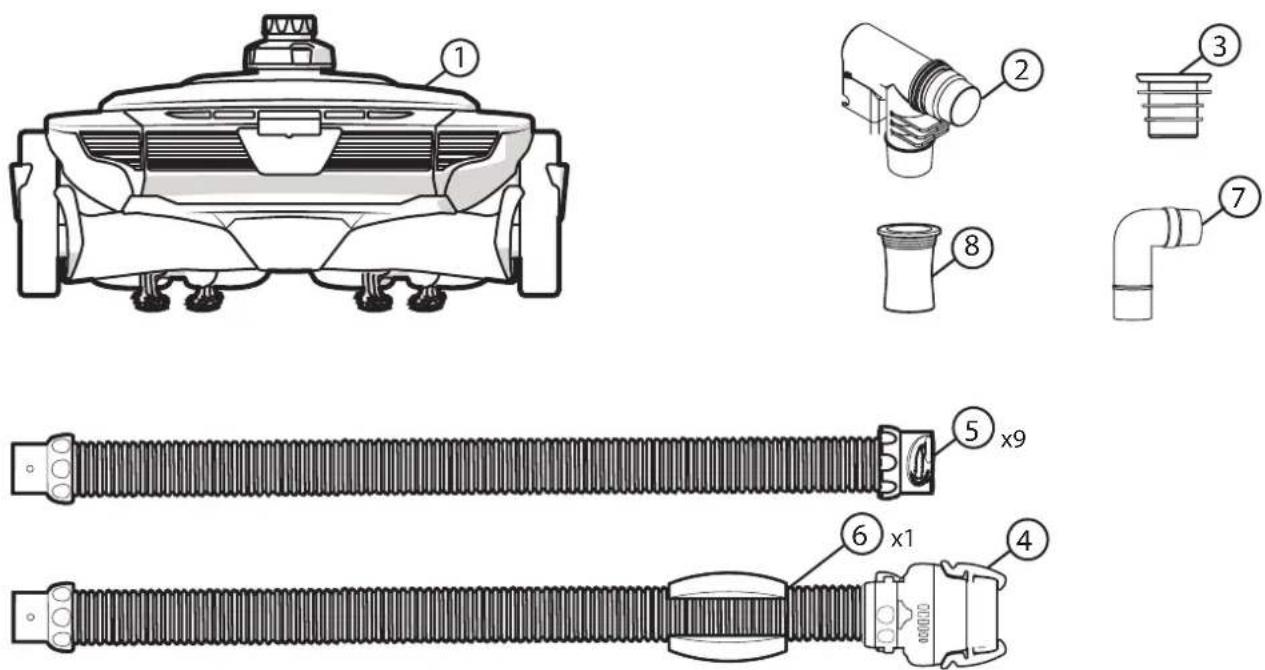
AstralPool S20 Complete Cleaner
-
Cleaner Body (1)
-
Twist-Lock Hose Section (9)
-
AD Flow Valve & Connector (1)
-
Leader Hose with Float (1)
-
Universal Weir Cuff (1)
-
90 Degree Elbow (1)
-
Flow Regulator Valve (1)
-
AD Valve Connector (1)
Installation
1. Before You Start
For best AstralPool pool cleaner performance, you will need to follow the following steps of the installation.
- Following manufacturer's instructions, clean the filter and empty the skimmer and the pump strainer basket.
-
If your main drain is connected to the skimmer box, block off access.
-
Manually vacuum the pool.
-
Ensure circulation system is operating at maximum water flow, or you will need to re-adjust when it comes to clean the filter baskets.
-
Adjust water flow, from all return inlets: -
a) downward and toward each other OR
b) downward and toward the centre of the pool.

Typical Water Piping Configuration
If return inlet directional fittings can't be directed far enough down to prevent water flow affecting the natural movement of the AstralPool hose, you will need to install AstralPool return line diverters. These are available from your local AstralPool dealer.
2. AD Flow Valve
The AD Flow valve works by regulating the flow through the pool cleaner to the pump. As the filter collects debris, the valve will automatically maintain the correct flow.
The installation of the AD Flow valve will depend upon the type of skimmer box and Vac plate you have. It is either installed straight in from the top of the Vac plate or from the bottom of the Vac plate.
See the 4 different cases below.
1st case: with WaterCo® Skimmer Box/Vac Plate
Screw in the AD Flow valve connector into the top of the Vac plate. Screw in all the way then back off one full turn.
2nd case: with Poolrite® Skimmer Box/Vac Plate
Screw in the AD Flow valve connector into the bottom of the Vac plate. Screw in all the way then back off one full turn.
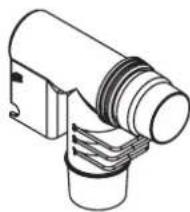
3rd case: with Speed Regulator/Skimtrol® Vac Plate
Simply connect the 90 Degree Elbow into the top of the Vac Plate (use a weir cuff, if necessary).
natural_image
Technical line drawing of a mechanical component with threaded ports and a flanged base (no text or symbols)
natural_image
Two views of a mechanical component: top view shows a circular impeller with radial blades, bottom view shows a flanged circular housing with internal features (no text or symbols visible)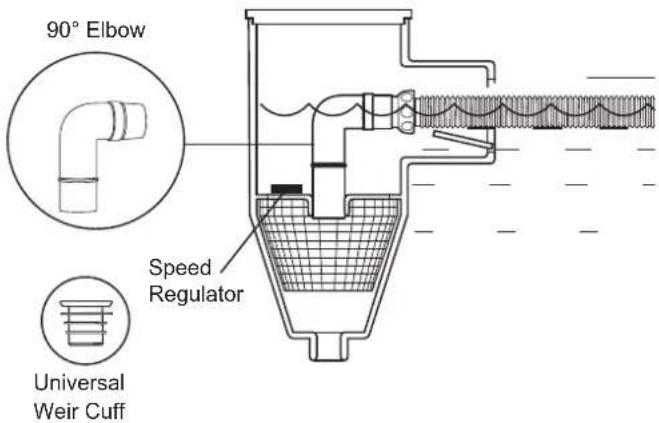
4th case: with any other type of Skimmer Box and Vac plate
Simply insert the AD Flow valve directly into the universal weir cuff which will then fit into the top of the Vac plate.

NOTE: The AD Flow valve has three settings: High (3), Medium (2) and Low (1). To deliver the maximum pool cleaning efficiency, the AD Flow valve comes preset at a factory setting of 2. You will need to adjust the AD Flow valve when and if a problem occurs.
3. Assemble the Hose Sections
WARNING
To avoid any serious injury, turn off the pool pump before proceeding to this step.
Start to connect one of the standard hose to the skimmer box Vac plate. Then continue adding lengths of standard hose sections until you reach the furthest point of the pool, opposite to the skimmer box. THEN add the leader hose section.
See below examples.

4. Connecting Cleaner Head to Flow Regulator Valve
- Attach the Flow Regulator Valve to the leader hose (a), if necessary, and connect AstralPool S20 cleaner head to the Flow Regulator Valve (b).

5. Re-connecting to Skimmer Box
- Temporarily disconnect hose from skimmer, turn on pool filter pump
- Flood the hose with water, turn off pool filter pump, reconnect hose to skimmer box, then turn pool filter pump back on.
6. Check Cleaner Flow
Watch the wheel marker, use a stopwatch to time ten (10) wheel rotations. Make a note of the result.
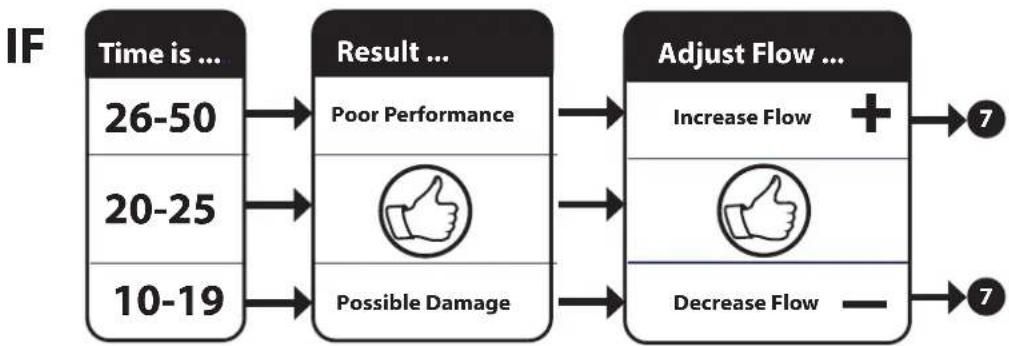
flowchart
graph LR
    A["Time is ... 26-50"] --> B["Result ... Poor Performance"]
    C["Time is ... 20-25"] --> B
    D["Time is ... 10-19"] --> B
    B --> E["Adjust Flow ... Increase Flow + Decrease Flow -"]
    E --> F["7"]
    E --> G["7"]
7. Adjust Flow if Necessary, Using the AD Flow Valve
The AD Flow Valve has three settings: (1) Low, (2) Medium, and (3) High. The valve comes with a factory setting of (2).
- Adjust the AD Flow Valve to setting (3) to increase flow.
— Adjust the AD Flow Valve to setting (1) decrease flow.

natural_image
Technical line drawing of a mechanical assembly with a magnified inset showing internal components (no text or symbols)Care and Maintenance
The AstralPool S20 cleaner cycles on/off with the pool filtration pump, vacuuming and cleaning the pool surface randomly throughout the pool. The climbing ability of the cleaner is dependent on the pool's shape and available water flow. If AstralPool S20 is not climbing your walls, ensure the flow is correct by counting wheel speed. Also, ensure the pools surface is not covered in algae as this slippery surface will affect the cleaner's traction.
During each coverage pattern cycle, the AstralPool S20 cleaner travels both forward and backwards, and pivots to the right and left. The power scrubbers underneath the cleaner create down force for climbing and stability as well as directing debris into the cleaner mouth.
Removing the Cleaner Out of Your Pool
Always turn the filter pump off and disconnect the head of the cleaner from the leader hose section when you take the AstralPool cleaner out of the pool.
Backwashing the Pool Filter
Always disconnect the AstralPool S20 from the skimmer box before cleaning or backwashing the pool filter. After cleaning or backwashing, let the filtration system run for at least five (5) minutes to flush out the suction lines before re-connecting the cleaner.
Adding Chemicals to the Pool
Remove the cleaner from the pool for at least four (4) hours when adding chemicals.
Removing Debris from Engine
WARNING
To avoid any serious injury, make sure that the cleaner is disconnected from the hose and the suction pump used for the cleaner is turned prior to starting this process.
- Push the latch release button on the top of the cleaner to open the cover.
- Open the lid and inspect the engine. Remove any debris.
- If necessary, pull the engine by the engine blades and remove it. No tools are required.
- Reinstall the engine. Make sure the engine is positioned with the large wheel on the right side (marked A) when reinstalling.
- Close engine top and ensure the latch clicks in place.

Cleaner Vacuum Mode
Your cleaner is designed to operate with two vacuum options:
- Large Debris: For vacuuming large debris, such as leaves. It is recommended that you return the cleaner to small debris factory setting after large debris cleaning.
- Small Debris (factory setting): For vacuuming smaller and heavier debris, such as sand, silt and small stones. The pool cleaner is sent from the factory in this mode.
WARNING
To avoid any serious injury, make sure that the cleaner is disconnected from the hose and the suction pump used for the cleaner is turned prior to starting this process.
Convert to large debris cleaning mode:
- Locate slot on underside of cleaner. Insert a flat tool into the modular inlet adaptor.
- Lift up the inlet adaptor and then pull it out of the vacuum inlet.

natural_image
Line drawing of a hand using a tool to cut or adjust a mechanical component with no visible text or symbolsConvert to small debris cleaning mode:
- Place the modular inlet adaptor in the vacuum inlet of the pool cleaner.
- Push down on the modular inlet adaptor until it clicks into place.

natural_image
Technical illustration of a tracked robotic vehicle with visible blades and wheels, showing mechanical components and motion direction (no text or symbols)Replacing Brushes Regularly
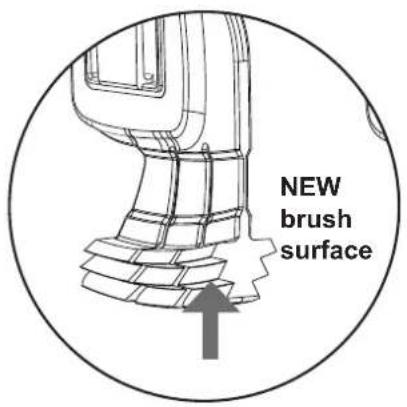
To maintain optimal cleaning, it is recommended to replace the scrubbing brushes each season or when significant wear is visible. To remove brushes, squeeze the yellow plastic clip between two fingers and pull out. Type of pool surface may also increase rate of wear to brushes.

Everyday Storing
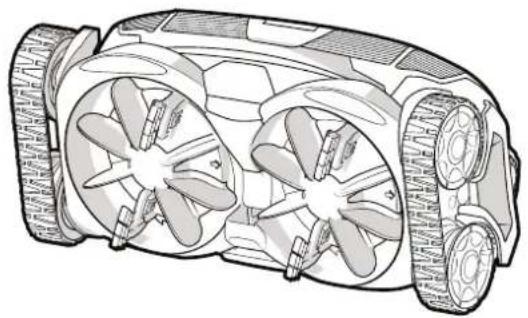
Never store the cleaner in direct sunlight. Always remove the hose from the cleaner head. Do not coil the hose, even for short time. Hose may develop a memory which can affect cleaner performance. Store the cleaner on its side or back to avoid damage to the turbine and brushes.
natural_image
Technical line drawing of a mechanical device with four blades and a central hub (no text or symbols)Troubleshooting
If you experience a problem with your AstralPool S20, please follow the troubleshooting steps below to restore performance. If further assistance is required, contact AstralPool Consumer Care at 1300 186 875. Please have your serial number and date of purchase available when you call.
Problem Solution
| Cleaner does not move or moves slowly(+25 seconds for 10 wheel revolutions) | Count Wheel Revolutions, flow may need to be adjusted via AD Valve/Skimtrol plate.Confirm that the main drain is closed.Check for debris jammed in engine. Backwash filter and empty pump basket.Remove yellow inlet adaptor located at the bottom of the pool cleaner. Refer to Care & Maintenance, ‘Removing inlet throat adaptor’.Check for air in system. If water level in pump basket drops or you see excessive air bubbles in the pump basket or coming from the return lines, there is air in the system. Tighten all fittings at pump. |
| Cleaner patterns, does not cover entire pool. | Count Wheel Revolutions, flow may need to be adjusted via AD Valve/Skimtrol®plate.Ensure return fittings are directed down. Add a return diverter if necessary.Make sure hose is not kinked or coiled. Lay in sun to straighten if necessary.Verify correct hose float positioning on the leader hose.Observe the cleaner for more than five (5) minutes and ensure that each drive track is periodically reversing. If it is not, contact you dealer or service center for help.Confirm proper hose length. |
| Cleaner gets stuck at steps. | Observe the cleaner for more than five (5) minutes and ensure that each drive track is periodically reversing. If it is not, contact you dealer or service center for help.Ensure the swivel on top of the cleaner rotates freely.Count Wheel Revolutions, flow may need to be adjusted via AD Valve/Skimtrol plate.Confirm proper hose length. Shorten if necessary.Adjust return to pool eyeball to help move the cleaner off the step. |
| Cleaner won’t climb walls. | Count Wheel Revolutions, flow may need to be adjusted via AD Valve/Skimtrol plate.Verify correct hose float positioning on the leader hose.Check and confirm water chemistry is within correct readings. Adjust as required. If pool has algae, treat and remove algae. |
| Cleaner climbs too much(-18 seconds for 10 wheel revolutions) | Count Wheel Revolutions, flow may need to be adjusted via AD Valve/Skimtrol plate.Verify correct hose float positioning on the leader hose. |

For full warranty terms and conditions and to register your warranty, simply visit www.astralpool.com.au/warranty and complete your details. Or scan the QR code and be taken directly to the registration page.
Record your equipment details here for quick reference:
Model No.: ____
Serial No.: ____
- S20
- POOL CLEANER
- WARNING
- Important Information
- Introduction
- AstralPool S20 Complete Cleaner
- Installation
- Before You Start
- AD Flow Valve
- Assemble the Hose Sections
- Connecting Cleaner Head to Flow Regulator Valve
- Re-connecting to Skimmer Box
- Check Cleaner Flow
- Adjust Flow if Necessary, Using the AD Flow Valve
- Care and Maintenance
- Removing the Cleaner Out of Your Pool
- Backwashing the Pool Filter
- Adding Chemicals to the Pool
- Removing Debris from Engine
- Cleaner Vacuum Mode
- Convert to large debris cleaning mode:
- Convert to small debris cleaning mode:
- Replacing Brushes Regularly
- Everyday Storing
- Troubleshooting
Brand : ASTRALPOOL
Model : S20
Category : Pool Robot