
DHO8122TB - Heating Defy - Free user manual and instructions
Find the device manual for free DHO8122TB Defy in PDF.


| Brand | Defy |
| Model | DHO8122TB |
| Product Type | Oil-filled radiator heater |
| Power Supply | AC 220-240V ~ 50Hz |
| Power Levels | Low (800W), Medium (1200W), High (2000W) |
| Nominal Heat Output | 1.4 kW |
| Minimum Heat Output | 0.8 kW |
| Maximum Continuous Heat Output | 1.4 kW |
| Auxiliary Electricity Consumption (at nominal heat output) | 1.391 kW |
| Auxiliary Electricity Consumption (standby) | 0.001 kW (0.632 W) |
| Seasonal Space Heating Energy Efficiency | 36.8% |
| Control Type | Electronic with remote control |
| Modes | Normal, Fast-Heating, Energy Saving, Anti-Freezing |
| Temperature Range | 5°C (Anti-Freezing) to 35°C (Normal) |
| Timer Range | 0-24 hours (both on and off timer) |
| Safety Features | Thermal cut-off, tip-over switch, overheat protection |
| Assembly Required | Yes (wheel assembly included) |
| Cleaning | Wipe with soft damp cloth; do not use detergents or abrasives |
| Remote Control Batteries | 2 x AAA (not included) |
| Dimensions | Not specified in manual |
| Weight | Not specified in manual |
| Warranty | 1 year (carry-in service) |
Frequently Asked Questions - DHO8122TB Defy
User questions about DHO8122TB Defy
0 question about this device. Answer the ones you know or ask your own.
Ask a new question about this device
Download the instructions for your Heating in PDF format for free! Find your manual DHO8122TB - Defy and take your electronic device back in hand. On this page are published all the documents necessary for the use of your device. DHO8122TB by Defy.
USER MANUAL DHO8122TB Defy
natural_image
Line drawing of a multi-tiered electric heater with wheels and control panel (no text or symbols)Please read this user manual first!
Dear Customer,
Thank you for preferring a Defy product. We hope that you get the best results from your product which has been manufactured with high quality and state-of-the-art technology. Therefore, please read this entire user manual and all other accompanying documents carefully before using the product and keep it as a reference for future use. If you handover the product to someone else, give the user manual as well. Follow all warnings and information in the user manual.
Meanings of the symbols
Following symbols are used in the various section of this manual:

Important information or useful hints about usage.

Warning for hazardous situations with regard to life and property.

Warning to actions that must never perform.

Warning for electric shock.

Warning for danger of fire.

Warning for hot surfaces.

Do not cover it.

This product has been produced in environmentally friendly, modern facilities
CONTENTS
1 Important safeguards 4
2 Part figure 8
3 Assembly instructions 9
4 Operation 10
5 Others 13
5.1 Saftey features.... 13
5.2 Cleaning and maintenance instruction 13
5.3 Main technology specifications....13
1 Important safeguards
When using any electrical appliance, basic precautions should always be followed to reduce the risk of fire, electrical shock and injury to persons, including the following:
- Read all instructions before using heater.
- This heater is hot when in use. To avoid burns, do not let bare skin touch hot surfaces. Keep combustible materials such as furniture, pillows, bedding, papers, clothes and curtains at least 3 feet (0.9m) from the heater. Allow heater to cool before moving and then use the built-in handle for easy movement.
Extreme caution is necessary when heater is used by or near children and whenever heater is left unattended.
• Always unplug the heater when it is not in use.
Do not operate any heater with a damaged cord or plug, or after the heater malfunctions, or has been dropped or damaged in any manner. Return heater to the manufacturer for examination, electrical or mechanical adjustment, or repair.
- Do not use heater outdoors. This product is intended for normal household indoor use only.
This heater is not intended for use in bathrooms, laundry areas or similar moist indoor locations. Never locate heater where it may fall into a bathtub or other water container.
- Do not run power cord under carpeting. Do not cover cord with throw rugs, runners or the like. Arrange cord away from traffic areas and where it will not be tripped over.
To disconnect heater, set controls to Off, then remove plug from outlet.
1 Important safeguards
Keep this heater clean. Do not allow foreign objects to enter any ventilation or exhaust opening as this may cause electric shock, or fire, or damage the heater.
- To prevent a possible fire, do not block air intakes or exhaust in any manner. Do not use on soft surfaces, like a bed, where openings may become blocked.
A heater has hot and arcing or sparking parts inside. Do not use it in areas where gasoline, paint, or flammable liquids are used or stored.
Use this heater only as described in this manual. Any other use not recommended by the manufacturer may cause fire, electric shock, or injury to persons.

Warning: In order to avoid overheating, do not cover the heater.
Do not use this heater in the immediate surroundings of a bath, a shower or a swimming pool.
- The heater must not be located immediately below a socket outlet.
If the supply cord is damaged, it must be replaced by the manufacturer or its service agent or a similarly qualified person in order to avoid a hazard.
- This appliance is not intended for use by persons (including children) with reduced physical, sensory or mental capabilities, or lack of experience and knowledge, unless they have been given supervision or instruction concerning use of the appliance by a person responsible for their safety.
1 Important safeguards
Correct disposal of this product
This symbol indicates that this product shall not be disposed with other household wastes at the end of its service life. Used device must be returned to official collection point for recycling of electrical and electronic devices. To find these collection systems please contact to your local authorities or retailer where the product was purchased. Each household performs important role in recovering and recycling of old appliance. Appropriate disposal of used appliance helps prevent potential negative consequences for the environment and human health.

natural_image
Symbol of a trash bin crossed with no text or labels, accompanied by a black rectangular block below (no readable text or symbols)- This heater is filled with a precise quantity of special oil. Repairs requiring opening of oil-container are only to be made by the manufacturer or his service agent who should be contacted if there is an oil leak. When scrapping the heater, follow the regulations concerning the disposal of oil.
- This appliance is not intended for use by persons (including children) with reduced physical, sensory or mental capabilities, or lack of experience and knowledge, unless they have been given supervision or instruction concerning use of the appliance by a person responsible for their safety.
1 Important safeguards
- Children should be supervised to ensure that they do not play with the appliance.

Warning: Some parts of this product can become very hot and cause burns. Particular attention has to be given where children and vulnerable people are present.

Warning: In order to avoid overheating, do not cover the heater.
This appliance is not intended for use by persons (including children) with reduced physical, sensory or mental capabilities, or lack of experience and knowledge, unless they have been given supervision or instruction concerning use of the appliance by a person responsible for their safety. Children should be supervised to ensure that they do not play with the appliance. Do not use this heater if it has been dropped; Do not use if there are visible signs of damage to the heater; Use this heater on a horizontal and stable surface. Do not use this heater in small rooms when they are occupied by persons not capable of leaving the room on their own, unless constant supervision is provided. Do not use the heater in green house and building sites. If you are not using the heater, switch off and plug out.
2 Part figure
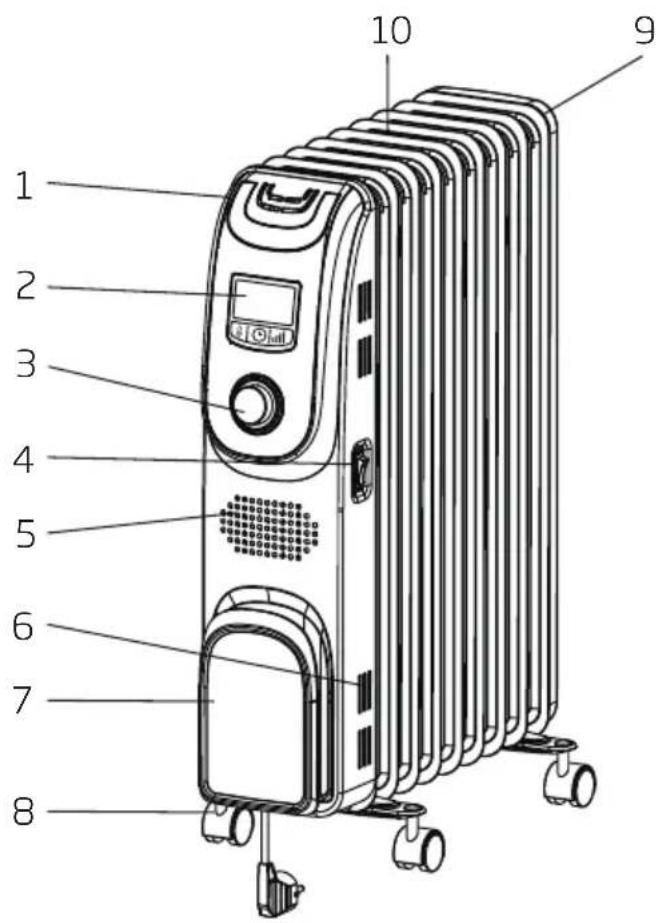
- Control panel
- Display screen
- Control knob
- Power switch
-
Air inlet
-
Thermovent
- Cordwrap
- Wheel assembly
- Rear cover
- Radiators
3 Assembly instructions
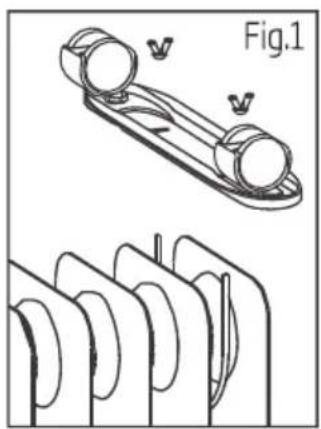
Unpack your heater and find the wheel-holding plate and butterfly nuts between the fins assemblies.
- Make sure the heater is unplugged and in the "Off" position.
- Turn the heater upside down.
- Attach the wheel-holding plates onto the heater as Fig.1 shows. The U plate is fixed between the last tow fins and the other one is fixed under metal control box.
Fix the castors to the vertical axis of both the wheel holding plates.
- Insert the butterfly nuts and tighten them securely.
- Turn the heater upright.
Your heater is now ready to use.
natural_image
Technical line drawing of a mechanical component with curved grooves and a labeled section 'Fig.1' (no text or symbols on the diagram itself)
Warning: Risk of fire. Do not operate heater without wheel assemblies attached. Operate heater in upright position only (wheels on bottom, controls on top). Any other position could create a hazardous situation. Ensure that the surface beneath the heater is clean and free of any obstructions. It is not recommended that this heater be placed on high-pile carpeting or any other surface that impedes the flow of air underneath the heater.
4 Operation
Power on the heater, press the Power switch at the lower side to On position, the power indicator lights on and buzzer makes sound to enter into the standby mode.


[On/Off]
Under Standby mode, press the ⏻ knob (or remote controller ⏻ button), the heater enters into the Normal mode, works with highest power, and automatically set the temperature at 35^ C, or recover to the state of the last standby state (Note: when the power is not cut off). Repeatedly press the knob until the heater recovers to the Standby state.
[Mode Switch]
Under Working State, press the button M, the heater switches between Low -- Middle-- High--Fast-Heating Mode -- Energy Saving Mode -- Anti-Freezing Mode -- Low. Or repeatedly press the remote controller button Ⓜ to switch between Normal Mode -- Fast-Heating Mode -- Energy Saving Mode -- Anti-Freezing Mode -- Normal Mode.
[Level Switch]
Under Working State, press the button M, the heater switches between Low - Middle -- High - Fast-Heating Mode -- Energy Saving Mode -- Anti-Freezing Mode -- Low. Or under normal mode, repeatedly press the remote controller button Ⓜ to switch between High (orange) -- Middle (red) -- Low (green) -- High (orange).
[Temperature setting]
Under Normal mode, press the 🔊 button to check the current setting temperature, and the temperature icon flashes. Turn the knob to adjust the setting temperature, it will automatically exit the enquiry setting interface if it is not operated within 3s, and display the setting temperature.
4 Operation
[Timing On]
Under Off state, press the ⏻ button (or remote controller ⏻ button) to enter into the timing enquiry interface, the setting time and timing icon ⏻ flashed, turn the knob to adjust the setting time, it will automatically exit the enquiry setting interface if it is not operated within 3s. When the setting is 0, it cancels Timing On.
After reaching the Timing On time, the heater automatically turns on and works at the last standby state. The time setting range is 0-24H, the adjustment unit in hour.
[Timing Off]
Under On state, press the button (or remote controller ☐ button) to enter into the timing enquiry interface, turn the knob to adjust the setting time, it will automatically exit the enquiry setting interface if it is not operated within 3s. When the setting is 0, it cancels Timing Off. After reaching the Timing Off time, the heater automatically enters into the standby state and stops work. The time setting range is 0-24H, the adjustment unit in hour.
[Remote and]
When working mode is on, press the 🔒 button on control panel, press "▲" or "▼" to adjust temperature within 5°C to 35°C. Press the ⏻ button on remote controller, press "▲" or "▼" to adjust time within 024 hours.
[Introduction on mode]
Normal mode ⚙: under this mode, the heater works at the setting level, after reaching the setting temperature, it stops heating and the setting temperature flashes.
Energy saving mode ECO: under this mode, the heater works normally, the level and setting temperature are not adjustable, the heater works at default setting temperature (22°C). (In Energy saving mode, if the setting temperature flashes, it means the heater is under energy saving heat preservation work state). The indicator light circle indicates green.
Anti-Freezing mode ☒: under this mode, press the knob to adjust the level, but the setting temperature is not adjustable, the heater works at default anti-freezing temperature (5°C). (In Anti-Freezing mode, if the setting temperature flashes, it means the heater is under anti-freezing heat preservation work state). The indicator light circle indicates orange.
[Memory Function]
When the power of the heater is not cut off or the heater keeps under Standby mode, it can memorize the last working mode and setting temperature and works at the setting temperature after turning on, the memory data will be reset if the power supply of the heater is cut off, and the setting temperature of the heater recovers to the default setting (Normal mode, high, setting temperature is 35^ C) when turning on.
4 Operation
Inserting batteries
- Press down on the battery compartment cover and slide it out.
- Insert the batteries, making sure that the positive terminals are facing the proper direction marked inside the battery compartment.
- Close the cover by sliding it in.

Note:
- Use 2 "AAA" batteries (not included).
- Do not mix old and new batteries.
- Do not mix alkaline, standard (carbon-line) or rechargeable (nickel-cadmium) batteries.
- Remove the batteries from remote if is to be left unused for a long period of time.


Warning: This heater includes a thermal cut-off that shuts the heater off if it overheats due to abnormal conditions. If this occurs, turn the heater "off", unplug it, and inspect and remove any objects on or adjacent to the heater. Allow it to cool for a few minutes, and then plug it back in and resume normal operation.
5 Others
5.1 Saftey features
Thermal cut-off: This heater includes a thermal cut-off that shuts the heater off if it overheats due to abnormal conditions. If this occurs, turn the heater off, unplug it, and inspect and remove any objects on or adjacent to the heater. Allow it to cool for a few minutes, and then plug it back in and resume normal operation.
Tip-over switch: This heater includes a safety tip-over protection feature that will shut the heater off in case it is tipped over. If, at any time, the heater tips over, please put the heater back in the upright position. The heater will resume its normal operation.
5.2 Cleaning and maintenance instruction
- The electric heater should be cleaned regularly to wipe out the dust on the surface of flanges. As this may influence the radiating efficiency.
- Disconnect electricity supply and allow radiator to cool, wipe out dust with a soft damp cloth. Do not use detergent or abrasives.
- Do not scrap the surfaces of flanges with sharp hard tools, to avoid surfaces getting rusty, because of damage of the paint coat.
5.3 Main technology specifications
Power supply: AC220-240V \~ 50Hz
| Model | Power regulation range (w) | ||
| Lo Med | Hi | ||
| DHO 8122T B | 800 1200 2000 | ||
| DHO 8123T B | 1000 1300 2300 | ||
* All performance parameters in the table above were measured before delivery and are for reference only.
Table 2
Information requirements for electric local space heaters
| Model identifier(s): | ||||||
| Item | Symbol | Value | Unit | Item | Unit | |
| Heat output | Tpye of heat input, for electric storage local space heaters only (select one) | |||||
| Nominal heat output | P_nom | 1.4 | kW | manual heat charge control, with integrated thermostat | [no] | |
| Minimum heat output (indicative) | P_min | 0.8 | kW | manual heat charge control with room and/or outdoor temperature feedback | [no] | |
| Maximum continuous heat output | P_max,c | 1.4 | kW | electronic heat charge control with room and/or outdoor temperature feedback | [no] | |
| Auxiliary electricity consumption | fan assisted heat output | [no] | ||||
| At nominal heat output | el_max | 1.391 | kW | Type of heat output/room temperature control (select one) | ||
| At minimum heat output | el_min | 0.771 | kW | single stage heat output and no room temperature control | [no] | |
| In standby mode | el_SB | 0.001 | kW | Two or more manual stages, no room temperature control | [no] | |
| with mechanic thermostat room temperature control | [no] | |||||
| with electronic room temperature control | [yes] | |||||
| electronic room temperature control plus day timer | [no] | |||||
| electronic room temperature control plus week timer | [no] | |||||
| Other control options (multiple selections possible) | ||||||
| room temperature control, with presence detection | [no] | |||||
| room temperature control, with open window detection | [no] | |||||
| with distance control option | [no] | |||||
| with adaptive start control | [no] | |||||
| with working time limitation | [no] | |||||
| with black bulb sensor | [no] | |||||
| Contact details | Defy Appliances (Pty) Ltd.Customer Care Line 086 100 3339 | |||||
| *Electricity consumption in standby mode is 0.632W | ||||||
| The seasonal space heating energy efficiency of all local space heaters except commercial local space heaters, η_S(%) | 36.8% | |||||
Branches
If you have followed the instructions and still have a problem, contact the customer care line on 086 100 3339. They will be able to advise you on any aspect of the appliance.
South African Branches:
BLOEMFONTEIN
Unit Number 5
Monument Business Park
50 Monument Road
Oranjesig, Bloemfontein
Bloemfontein.Service@defy.co.za
CAPE TOWN
5A Marconi Rd. Montague Gardens, 7441
CapeTown.Service@defy.co.za
DURBAN
135 Teakwood Road, Jacobs,
Durban, 4052
Durban.Service@defy.co.za
EAST LONDON
Robbie de Lange Road, Wilsonia,
East London, 5201
EastLondon.Service@defy.co.za
GAUTENG, MIDRAND
127 15th Road, Cnr Pharmaceutical & 15th Rd,
Midrand, Gauteng
GautengService@defy.co.za
POLOKWANE
87 Nelson Mandela Drive, Superbia 0699
Polokwane.Service@defy.co.za
PORT ELIZABETH
112 Patterson Road, North End, Port Elizabeth 6001
PortElizabeth.Service@defy.co.za
Sub-Saharan Africa Branches:
ZAMBIA: SOUTHGATE INVESTMENTS LTD
Plot 1606, Sheki Sheki Road
P.O. Box 33681
Lusaka, 10101, Zambia
Tel: +260 0211 242332/3
Fax: +260 0211 242933
sgiservicecentre@microlink.zm
NAMIBIA: ATLANTIC DISTRIBUTORS (PTY) LTD
10 Tienie Louw Street, Northern Industrial Area
P.O. Box 21158, Windhoek, Namibia
Tel: (061) 216162
Fax: (061) 216134
atlantic@mweb.com.na
ZIMBABWE: TRADECOMAFRICA
Trade Com Africa, 183 Loreley Crescent
Msasa, Harare, Zimbabwe
Tel: +263 4 486165/6
Cell: +263 772 469010
Cell: +263 772 469011
BOTSWANA: RAY MORGAN AGENCIES
RMA Service Centre, Plot 48, East Gate
Gaborone International Commerce Park
Kgale View, Gaborone
Botswana
Tel: +267 390 3996 / 390 3912
Fax: +267 318 7376
Cell: +267 7134 6539
service@rma.co.bw; raja@rma.co.bw
SWAZILAND: LYNDS DISTRIBUTORS
P.O Box 716, Mbabane, Swaziland, H100
Tel: (00268) 2515 4310/8
Fax: (00268) 2518 4318
MOZAMBIQUE: COOL WORLD. LDA
This certificate is issued by DEFY APPLIANCES (PTY) LIMITED manufacturers of Defy and Ocean products, hereinafter the Company, to the original purchaser only, of the appliance described on the certificate and shall constitute the only warranty given in respect of this appliance.
The Company warrants to the original purchaser that for a period of ONE YEAR from date of purchase the appliance is free from defect under normal domestic use, both in workmanship and material, subject to the following conditions.
- Carry-in service. Small appliances are repaired in our service centres and are not collected from the customers home. Faulty units must be delivered to the purchasing dealer or to the nearest Company Service Centre for warranty repairs.
- Vitreous enamelware, fuses and lamps are specifically excluded from these warranties. It is an express condition of these warranties that the purchaser takes due care and attention in the use and maintenance of the appliance. Abuse, misuse in conflict with operating instructions, connection to incorrect voltages and subjection to commercial use shall release the Company from its obligations.
- This warranty shall become void and cease to operate if the appliance is dismantled by, or any repairs to the appliance are effected by any persons not duly authorised by the Company, or if substitute parts not approved by the Company are used in the appliance, or if the serial number of the appliance is removed.
- The Company shall not be responsible for damages resulting from fire, flood, civil disturbances or any Act of God. The Company shall not, in terms of these warranties be responsible nor held liable for any consequential loss or damage of any kind caused by or due to the failure or malfunction of the appliance. The Company shall not be responsible for damages caused by insect and/or animal infestation.
- The Company shall not be responsible for transportation or other costs other than those incurred within the provisions of Point 1 of this Certificate.
- For warranties in the Republic of South Africa and Sub-Saharan Africa, please contact the customer care line. Please refer to the previous page for respective South African branches and Sub-Saharan Africa branches.
- Where service is requested under warranty and no fault or defect can be found by the Company, all costs incurred will be for the purchaser's account.
- This Certificate as well as your invoice will serve as proof of purchase. For the purpose of warranty, it will be essential to produce this Certificate and invoice. Failure to do so, will render the purchaser liable for service costs.
KEEP THIS CERTIFICATE AND SALES INVOICE AS PROOF OF PURCHASE FOR WARRANTY PURPOSES.


- Please read this user manual first!
- Meanings of the symbols
- CONTENTS
- Others 13
- Important safeguards
- Correct disposal of this product
- Part figure
- Assembly instructions
- Operation
- [On/Off]
- [Mode Switch]
- [Level Switch]
- [Temperature setting]
- [Timing On]
- [Timing Off]
- [Remote and]
- [Introduction on mode]
- [Memory Function]
- Inserting batteries
- Note:
- Others
- Saftey features
- Cleaning and maintenance instruction
- Main technology specifications
- Branches
- South African Branches:
- BLOEMFONTEIN
- CAPE TOWN
- DURBAN
- EAST LONDON
- GAUTENG, MIDRAND
- POLOKWANE
- PORT ELIZABETH
- Sub-Saharan Africa Branches:
- ZAMBIA: SOUTHGATE INVESTMENTS LTD
- NAMIBIA: ATLANTIC DISTRIBUTORS (PTY) LTD
- ZIMBABWE: TRADECOMAFRICA
- BOTSWANA: RAY MORGAN AGENCIES
- SWAZILAND: LYNDS DISTRIBUTORS
- MOZAMBIQUE: COOL WORLD. LDA
- KEEP THIS CERTIFICATE AND SALES INVOICE AS PROOF OF PURCHASE FOR WARRANTY PURPOSES.
Brand : Defy
Model : DHO8122TB
Category : Heating