APX2120 - Loudspeaker CLARION - Free user manual and instructions
Find the device manual for free APX2120 CLARION in PDF.


| Product Type | 2-channel car audio amplifier |
| Brand | Clarion |
| Model | APX2120 |
| Maximum Power Output | 200W |
| Continuous Rated Power (4 ohms) | 60W x 2 (THD ≤0.1%, 10Hz-20kHz, 14.4V) |
| Bridged Power (4 ohms) | 100W x 1 |
| 2-Ohm Power | 90W x 2 |
| Frequency Response | 20Hz - 30kHz (full range) |
| Input Sensitivity (RCA) | 200mV - 5.5V |
| Input Sensitivity (Speaker Level) | 2V - 9V |
| Input Impedance | 22k ohms |
| Signal-to-Noise Ratio | ≥85dB (A-weighted) |
| Channel Separation | ≥60dB |
| IM Distortion | ≤0.1% |
| Crossover Type | Electronic 12dB/octave, fully adjustable |
| Crossover Frequency Range | 50Hz - 300Hz |
| Bass Boost | Narrow-band (high-Q) centered at 45Hz, adjustable |
| Protection Circuits | Thermal, speaker short, over-current |
| Remote Turn-On | Soft start muting to prevent thump |
| Dimensions (W x D x H) | 10 5/8" x 10 7/8" x 2 3/4" |
| Construction | Aluminum heat sink, gold-plated connectors |
| Fuse | On-board automotive-type (value not specified) |
| Included Accessories | High-level speaker input harness, owner's manual |
Frequently Asked Questions - APX2120 CLARION
User questions about APX2120 CLARION
0 question about this device. Answer the ones you know or ask your own.
Ask a new question about this device
Download the instructions for your Loudspeaker in PDF format for free! Find your manual APX2120 - CLARION and take your electronic device back in hand. On this page are published all the documents necessary for the use of your device. APX2120 by CLARION.
USER MANUAL APX2120 CLARION
Thank you for purchasing this Clarion product.
- Please read this owner's manual in its entirety before operating this equipment.
• After reading this manual, keep it handy, such as in your glove compartment. - Save your sales receipt. The warranty at the end of this manual and your sales receipt are essential for warranty service.
FCC Approval
This equipment has been tested and found to comply with the limits for a Class B digital device, pursuant to Part 15 of the FCC Rules. These limits are designed to provide reasonable protection against harmful interference in a residential installation. This equipment generates, uses, and can radiate radio frequency energy and, if not installed and used in accordance with the instructions, may cause harmful interference to radio communications. However, there is no guarantee that interference will not occur in a particular installation. If this equipment does cause harmful interference to radio or television reception, which can be determined by turning the equipment off and on, the user is encouraged to consult the dealer or an experienced radio/TV technician for help.
2 APX2120/APX4240/APX1300



Contents
- FEATURES .... 4
- PRECAUTIONS .... 5
Installation 5 - CONTROLS 6
- OPERATIONS 7
Setting the operating level 7
Improving bass sound....7
Designing a more advanced system 7
Connecting a source unit without RCA outputs 7
Care and maintenance 8 - INSTALLATION AND WIRING 8
What is included in the box 8
Mounting precautions 8
Wiring precautions 9
Power and speaker connections 10
Applications 11
Setting the gain 14
Setting the crossover 15
Setting the bass boost 15
Final system checks 15 - TROUBLESHOOTING 16
- GLOSSARY 17
- SPECIFICATIONS 17
- LIMITED WARRANTY INFORMATION .... 18
APX2120/APX4240/APX1300 3

English



1. FEATURES
The Clarion APX2120, APX4240, and APX1300 amplifiers fit a variety of system configurations and provide these features:
• Full frequency response with low distortion and exceptional signal-to-noise performance
- Advanced circuitry design provides bridgeable outputs for use in a variety of applications
- Independent electronic crossovers, each with a 12dB per octave slope and full adjustment range (from 50Hz to 300Hz) to aid in audio system design
- Bass boost circuit to reinforce low frequency signals that may be lost due to subwoofer box design
- Adjustable input level controls with ground loop isolation to accept a wide range of input signals
- Remote turn-on with "soft start" muting to prevent turn-on "thump"
- Protection circuits for overheating and speaker shorts
• 2-Ohm load capable of driving a variety of speaker systems
• Gold-plated input/output connectors and an on-board automotive-type fuse
• Aluminum heat sink for efficient heat dissipation
- Low profile, compact footprint to accommodate space limitations
4 APX2120/APX4240/APX1300

2. PRECAUTIONS
- Do not operate this product in ways other than those described in this manual.
- Do not disassemble or modify this product.
- Do not pour liquid or poke foreign objects into the unit. Water and humidity will damage internal circuitry.
- If the unit becomes wet, turn off all power and ask your authorized Clarion dealer to clean or service the unit.
Failure to observe these precautions may damage your car or the amplifier, and may void the warranty.
WARNING
Exposure to continuous sound levels of 85dB or higher may result in hearing loss. Although Clarion products are capable of producing high sound pressure levels, please use your product at reasonable levels.
While operating your vehicle, please observe all local sound ordinances for your safety.
Installation
Installation of mobile audio and video components requires experience with a variety of mechanical and electrical procedures. Although this manual provides general installation and operation instructions, it does not show the exact installation methods for your particular vehicle.
If you do not have the required knowledge and experience to successfully complete the installation, consult an authorized Clarion dealer about professional installation options.
APX2120/APX4240/APX1300 5



- CONTROLS
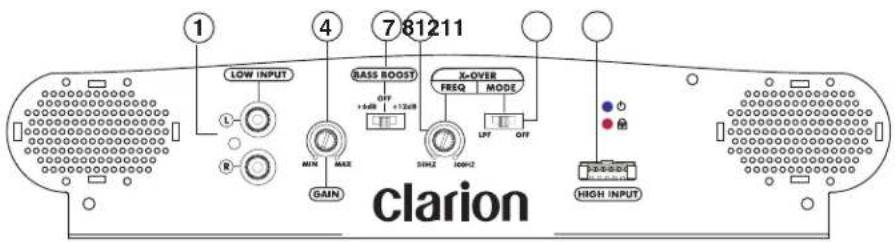
APX1300 controls and input connections
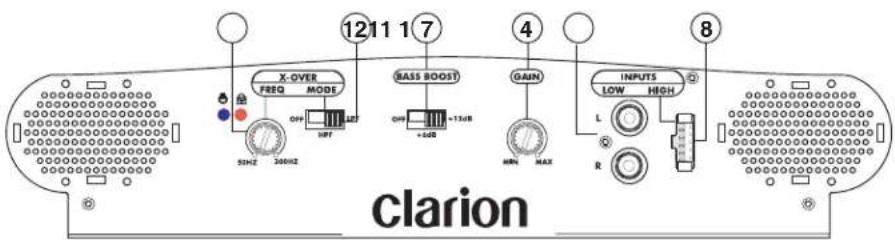
APX2120 controls and input connections
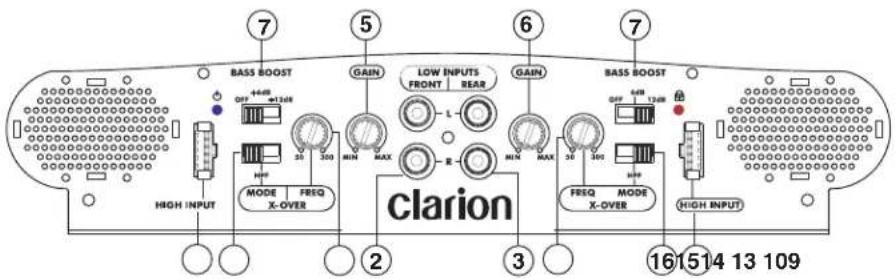
APX4240 controls and input connections
- RCA input jacks
- Front RCA input jacks
- Rear RCA input jacks
- Gain control
- Front gain control
- Rear gain control
-
Bass boost control
-
Speaker level inputs
- Front speaker level inputs
- Rear speaker level inputs
- Frequency control
-
X-Over mode switch
-
Front frequency control
- Front X-Over mode switch
- Rear frequency control
- Rear X-Over mode switch
6 APX2120/APX4240/APX1300




4. OPERATIONS
Setting the operating level
The gain controls allow you to set the nominal operating level of the amplifier from 250mV to 2.5V for RCA inputs or 500mV to 5V for speaker level inputs. This wide adjustment range accommodates virtually any source unit brand.
Improving bass sound
The amplifiers feature a narrow-frequency band bass boost circuit (known as "high-Q"). The bass boost control acts much like an equalizer with switchable gain fixed at 45Hz.
Use this control to tune low-frequency audio response to compensate for a less than ideal subwoofer enclosure design. The added boost produces rich, full bass tones that are normally difficult to reproduce in the car audio environment.
Note:
If you don't want to boost the bass frequencies, set this control to "OFF."
Designing a more advanced system
Freq (Hz) controls
The crossover frequency is fully adjustable between 50Hz and 300Hz. Use the high-pass/low-pass filter controls, along with your speaker manufacturer's recommended crossover frequencies, to quickly design a more advanced system.
Note:
If you set either of the X-Over mode switches "OFF," varying the Freq (Hz) control has no effect.
X-Over mode switches
These switches are equipped with 12dB per octave electronic filters for precise frequency attenuation with minimal phase distortion. To activate each filter, slide the X-Over mode switch to either HP or LP (APX4240 and APX2120 only).
Connecting a source unit without RCA outputs
The speaker level inputs provide connections for a high-level stereo source. Use them if your source unit does not have RCA outputs.
APX2120/APX4240/APX1300 7
English



Care and maintenance
Cleaning the cabinet
Use a soft, dry cloth to gently wipe dust and dirt from the unit.
Do not use benzene, thinner, car cleaner, or other cleaners. These substances may damage the unit or cause the paint to peel.
Servicing the unit
In the event that trouble arises, never open the case or disassemble the unit. The internal parts are not serviceable by the user. Opening any components will void the warranty.
CAUTION!
Changes or modifications to this product not approved by the manufacturer will void the warranty and will violate FCC approval.
5. INSTALLATION AND WIRING
Read these instructions and the following precautions carefully.
What is included in the box
In addition to this manual, the box contains:
- Amplifier
• High-level speaker input harness
Mounting precautions
If you lack the necessary skills, do not install the amplifier yourself. See your authorized Clarion dealer for installation recommendations.
- This unit is exclusively for vehicles with a negative ground, 12V power supply.
- This unit requires additional mobile audio components for proper operation.
- Choose a location in the vehicle that provides adequate ventilation around the amplifier. Although any moving air dissipates heat, cool air should run along the length of the fins rather than across them.
CAUTION
Although Clarion amplifiers include heat sinks and protection circuits, mounting an amplifier in a tight space without any air movement will damage the unit's internal circuitry over time.
8 APX2120/APX4240/APX1300

- Mount the amplifier on a rigid surface away from subwoofer enclosures or to any area that is prone to vibration. Do not install the amplifier on plastic or on any other combustible material.
- For easy system setup, mount the amplifier so that the front panel controls are accessible after installation.
- Always use great care when attaching anything to a vehicle! Check clearances on all sides of the planned installation before drilling any holes or installing any screws.
- Make sure the holes you drill will not cut into the fuel tank, fuel lines, break lines (under the chassis) or electrical wiring.
Wiring precautions
Read all wiring precautions. If you are not sure of the connections, contact your authorized Clarion dealer.
- Before you start, make sure the source unit's power switch is off.
WARNING!
To prevent short circuits during installation, disconnect the vehicle's negative (-) battery lead before making any power connections.
- Extra cable can cause signal loss and act as an antenna for noise. Use only high-quality RCA cables that are no longer than necessary to make a direct connection with the source unit and amplifiers.
- Make sure each connection is clean and secure. Insulate final connections with electrical tape or shrink tubing.
CAUTION
Improper connections may damage the equipment.
- When routing RCA cables, keep the cables away from the power cables and output speaker wires.
- A good chassis ground connection is critical to minimize resistance and avoid noise problems. Use the shortest wire possible. Clean off any paint prior to making connections. Securely connect the ground wire to the car chassis and the source unit ground.
- Add an external fuse to the amp's positive (+) power lead and connect it as close as possible to the vehicle's plus (+) battery terminal. Use a fuse rated to the total current consumption of the amplifier. Adding an external fuse protects the electrical system from short circuits that can result in a fire.
- Do not open the case. There are no user-serviceable parts inside. If you require assistance, consult your Clarion dealer or an authorized Clarion service center.
APX2120/APX4240/APX1300 9



English
Power and speaker connections
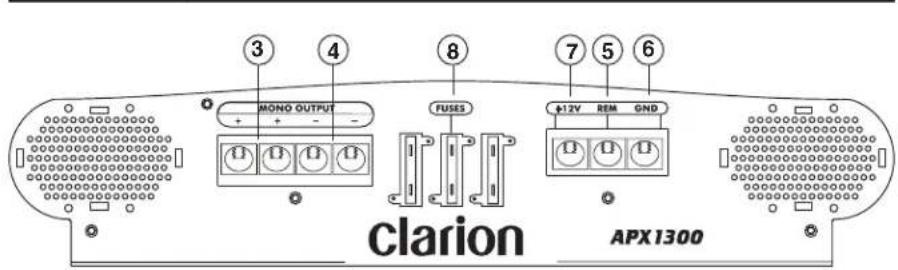
APX1300 power and speaker connections
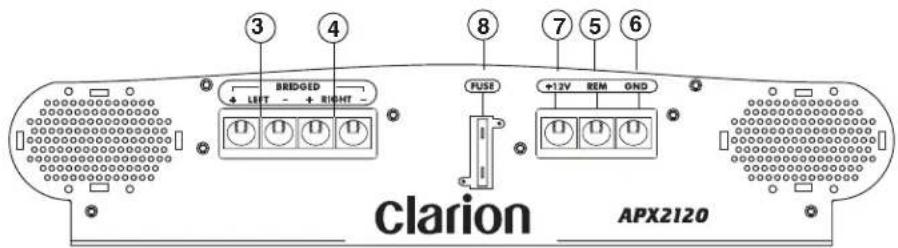
APX2120 power and speaker connections

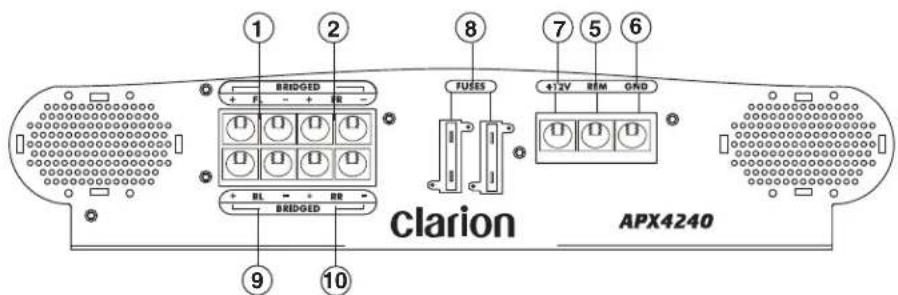
APX4240 power and speaker connections
- Left front speaker output
- Right front speaker output
- Left speaker output
- Right speaker output
-
Remote turn-on input
-
Ground input
- Battery +12V input
- Fuse
- Left rear speaker output
- Right rear speaker output
10 APX2120/APX4240/APX1300




Applications
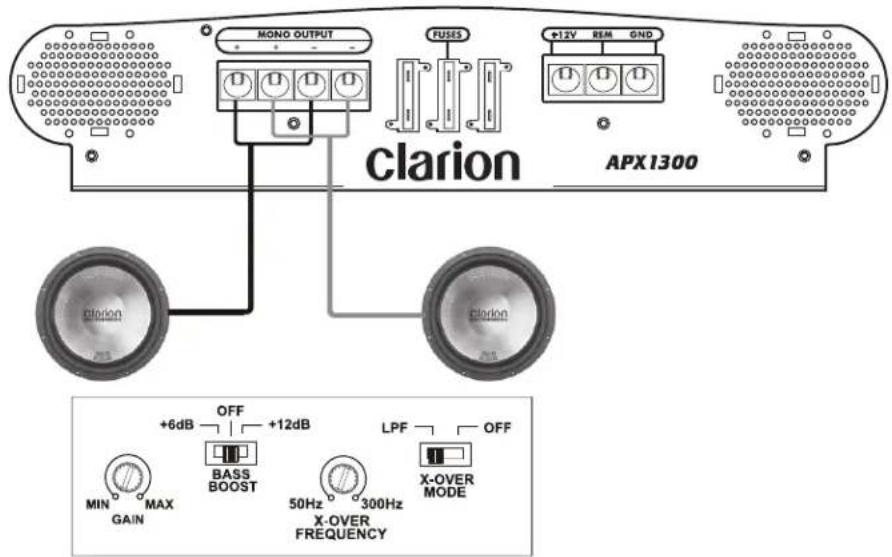
The APX1300 car audio amplifier can be used in a variety of system applications.
Mono subwoofer system
This application shows the amplifier in mono operation to drive a subwoofer.
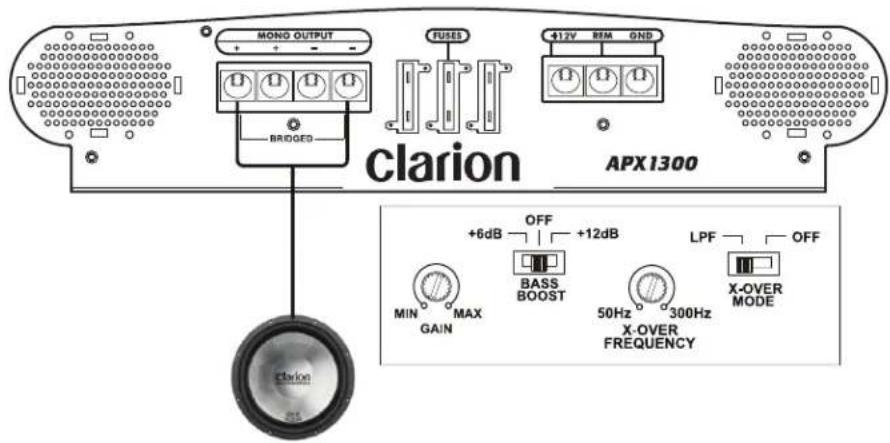

Set X-Over mode to LPF and adjust the frequency to the subwoofer specifications.

APX2120/APX4240/APX1300 11




English
Subwoofer system
In this application, the amplifier is used in a subwoofer system.


12 APX2120/APX4240/APX1300




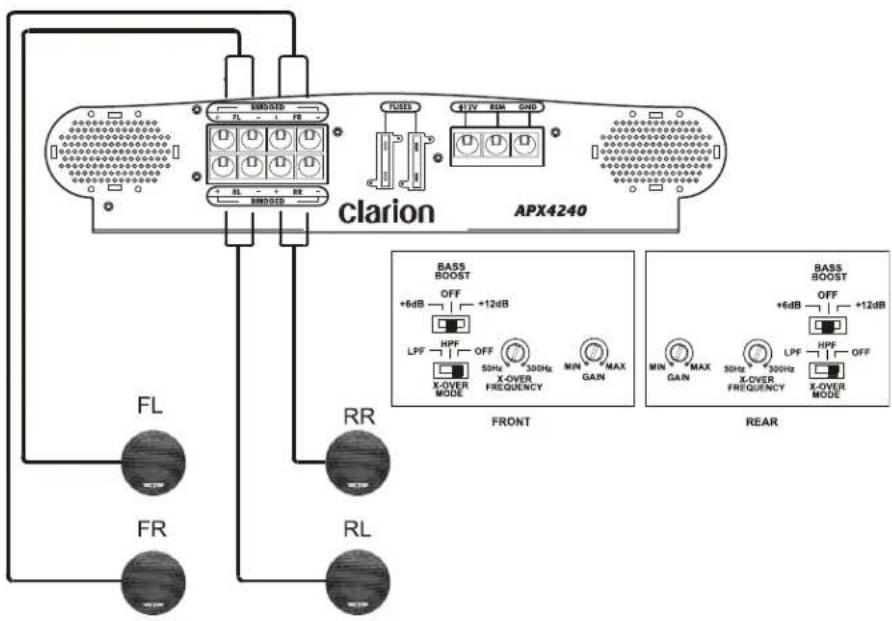
Four-channel stereo system
In this application, the APX4240 is used as a four-channel amplifier to drive four full-range speakers in stereo.
English


APX2120/APX4240/APX1300 13




English
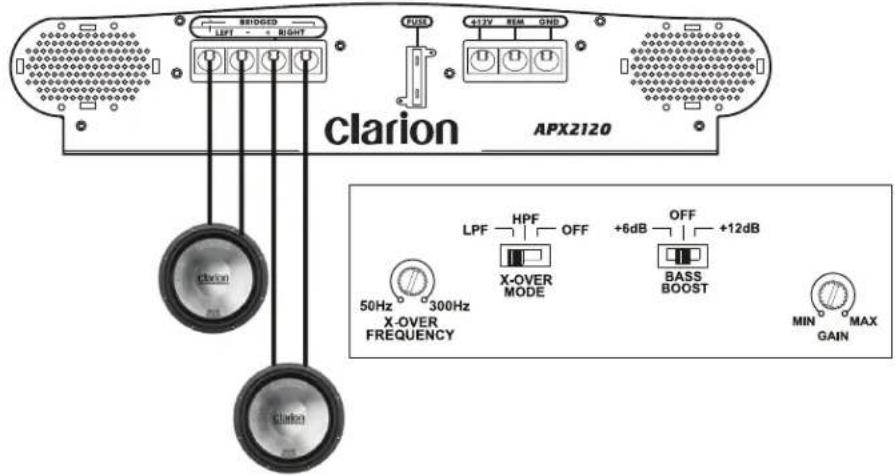
Two-channel high power system
In this application, the APX2120 is used to drive a pair of subwoofers.

Setting the gain
After completing the installation, follow these steps to set the gain control and perform the final system checks.
- Turn the gain control all the way counterclockwise.
- Turn the vehicle's ignition switch on.
- Turn the source unit on.
- Set all tone or equalization controls to flat positions and turn loudness off.
- Play a CD or tape and set the volume control to 75% of full level.
Note:
If the system uses an equalizer, set all frequency controls to the flat position.
- Slowly increase the gain control. Stop when you hear a slight audio distortion.
14 APX2120/APX4240/APX1300

Setting the crossover
Clarion amplifiers feature fully-adjustable crossovers.
- Using the X-Over mode switch, select either LP (low pass) or HP (high pass) or OFF for full range.
- Using the Freq (Hz) control, select the frequency.
Setting the bass boost
- Initially set the bass boost control to off.
- Listen to a variety of music styles (for example, rock, rap, etc.) and switch the bass boost control on until you notice an increase in low bass response.
CAUTION
If you hear a pop caused by speaker overexertion, lower the bass boost to prevent damage to the speaker.
Final system checks
- Start the engine and turn on the source unit.
- After a two-second delay, slowly increase the volume control and listen to the audio.
If you hear any noise, static, distortion or no sound at all, check the connections and refer to Troubleshooting. Depending on your system, the volume may become quite loud even at low level settings. Until you get an "audio feel" for the system's power, use care when adjusting the controls. - Turn the balance controls to their extreme positions and listen to the results. Audio output should match control settings (audio from the left speaker when balance is left).
- Increase the volume and verify that the amplifier reproduces the audio at full frequencies without distortion.
If you hear distortion check the connections and verify that the gain control is set correctly. Another cause of distortion could be underpowered or damaged speakers. Refer to Troubleshooting.
APX2120/APX4240/APX1300 15
6. Troubleshooting
No Audio
- Low or no remote turn-on voltage: check remote connections at the amplifier and source unit.
- Blown amplifier fuse: replace with a new fast-blow fuse (same rating).
- Power wires not connected: check battery and ground wiring at the amplifier and check the battery connections.
- Speaker leads shorted: check speaker continuity to ground; it should not show a common ground.
- Speakers not connected or are blown: check speaker connections at the amplifier; measure coil impedance.
Audio cycles on and off
• Thermal protection circuits are shutting the amplifier off.
- Check the location for adequate ventilation. Consult an authorized Clarion audio dealer.
Distorted audio
- Gain is not properly set or the speaker cones are damaged.
- Review the instructions for setting the gain. Inspect each speaker cone for signs of damage, such as a frozen cone, burning smell, etc.
Amplifier fuse keeps blowing
- The wiring is connected incorrectly or there is a short circuit.
- Review the installation precautions and diagram in this manual and check all wiring connections.
Whining or ticking noise when engine on
- The amplifier is picking up alternator or radiated noise.
- Turn down input gain.
- Move the audio cables away from the power wires.
- Check the power and ground connections on the amplifier and install an in-line noise filter on the source unit's power wire.
- Check the alternator and/or voltage regulator. Test for a weak battery or add water to the battery.
16 APX2120/APX4240/APX1300
7. Glossary
Crossover: A device that limits the range of frequencies sent to a speaker or amplifier.
dB: decibel, a measurement of the relative difference in power or intensity between two acoustic signals.
Equalizer: Component that boosts or cuts sound signal frequencies to improve the quality of the sound.
Gain control: gain is the amount of amplification (voltage, current or power) of an audio signal expressed in dB.
Hz: Abbreviation for Hertz, a unit of frequency equal to one cycle per second.
Octave: the musical principle of dividing sound frequencies into the eight notes of the musical scale.
Ohm: unit of electric resistance
RCA input/output: port through which sound travels in and out of the system; "RCA" refers to the type of connector, which was first manufactured by the Radio Corporation of America.
Slope: how fast the sound gets quieter rated in dBs. The higher the dB number, the faster the frequency drops off.
8. Specifications
Note:
The technical data and the design of the equipment may change without prior notice for the sake of technical improvements.
Model APX4240 APX2120 APX1300
| Maximum power output 400W 200W 400W | |||
| Continuous rated power1 | 60W x 4 60W x 2 300W x 1 | ||
| Typical power in bridged mode2 | 100W x 2 100W x 1 N/A | ||
| Typical power in 2-Ohm load3 | 90W x 4 90W x 2 400W x 1 | ||
| IM distortion | ≤ 0.1% | ≤ 0.1% | ≤ 0.1% |
| S/N (A-weighted) | ≥ 85dB | ≥ 85dB | ≥ 85dB |
| Floor noise N/A | N/A | N/A | |
| Channel separation | ≥ 60dB | ≥ 60dB | N/A |
| Frequency response | 20-30Hz full range | 20-30Hz full range | 20-30Hz full range |
| Line level input sensitivity | 200mV to 5.5 Volts | 200mV to 5.5 Volts | 200mV to 5.5 Volts |
| Speaker level input sensitivity | 2V to 9 Volts | 2V to 9 Volts | 2V to 9 Volts |
| Input impedance | 22K Ohm 22K Ohm 22K Ohm | ||
| Allowable battery voltage | 9.6 to 15.6 Volts | 9.6 to 15.6 Volts | 9.6 to 15.6 Volts |
| Size | 13"x10 7/8"x2 3/4" | 10 5/8"x10 7/8"x2 3/4" | 13"x107/8"x2 3/4" |
^1 THD ≤ 0.1%, 10Hz-20kHz, into 4-Ohms, @ 14.4V, all channels driven
^2 THD ≤ 0.1%, 10Hz-20kHz, @ 14.4V, all channels driven
APX2120/APX4240/APX1300 17
9. LIMITED WARRANTY INFORMATION
For USA and Canada only
Except as noted, Clarion products purchased from an authorized Clarion dealer are warranted against all defects in materials and workmanship for a period of one (1) year from date of original purchase.
The following Clarion products noted below ** are warranted against all defects in materials and workmanship for a two (2) year period from the date of original purchase when purchased from AND installed by an authorized Clarion dealer.
** DRZ9255 DXZ865MP DXZ765MP DXZ665MP DXZ465MP DFZ675MC DPX11500 DPX1800 DPX2250 All Clarion cables, wires and other accessories if purchased from an authorized Clarion dealer are warranted against all defects in materials and workmanship for ninety (90) days from the date of original purchase. ALL PURCHASES OF CLARION PRODUCTS FROM NON-AUTHORIZED CLARION DEALERS ARE SUBJECT TO FURTHER WARRANTY RESTRICTIONS AS DESCRIBED BELOW.
The conditions of this Limited Warranty and the extent of responsibility of Clarion Corporation of America ("Clarion") under the Limited Warranty are as follows:
-
PROOF OF DATE OF PURCHASE FROM AN AUTHORIZED CLARION DEALER WILL BE REQUIRED FOR WARRANTY SERVICE OF THIS PRODUCT. IN THE CASE OF THE TWO (2) YEAR LIMITED WARRANTY FOR THE CLARION PRODUCTS NOTED ABOVE, PROOF OF DATE OF PURCHASE AND PROOF OF INSTALLATION BY AN AUTHORIZED CLARION DEALER IS REQUIRED. INFORMATION ABOUT CLARION AUTHORIZED WARRANTY SERVICE CENTERS MAY BE OBTAINED BY CONTACTING CLARION AT THE ADDRESS LISTED BELOW.
-
This Limited Warranty will become void if service performed by anyone other than an approved Clarion Warranty Service Center results in damage to the products.
-
This Limited Warranty does not apply to any product which has been subject to misuse, neglect or accident, or which has had the serial number altered, defaced or removed, or which has been connected, installed, adjusted or repaired, other than in accordance with the instructions furnished by Clarion.
-
This Limited Warranty does not cover car static or other electrical interferences, tape head or laser pick-up cleaning or adjustments, or labor costs for the removal or reinstallation of the unit for repair.
-
The sole responsibility of Clarion under this Limited Warranty shall be limited to the repair of the product or replacement of the product, at the sole discretion of Clarion.
-
Product must be shipped in its original carton or equivalent carton, fully insured, with shipping charges prepaid. Clarion will not assume any responsibility for any loss or damage incurred in shipping.
-
CLARION PRODUCTS PURCHASED FROM A SOURCE OTHER THAN AN AUTHORIZED CLARION DEALER, INCLUDING ANY AND ALL PURCHASES VIA THE INTERNET FROM A NON INTERNET AUTHORIZED CLARION DEALER, SHALL NOT BE COVERED BY ANY CLARION LIMITED WARRANTY TO THE EXTENT ALLOWED BY APPLICABLE LAW. IN THE EVENT AND TO THE EXTENT APPLICABLE LAW PROHIBITS ELIMINATION OF WARRANTIES UNDER THESE CIRCUMSTANCES, THE APPLICABLE LIMITED WARRANTY PERIOD SHALL BE DEEMED TO BE FIFTEEN (15) DAYS FROM THE DATE OF ORIGINAL PURCHASE.
-
ALL IMPLIED WARRANTIES EXCEPT TO THE EXTENT PROHIBITED BY APPLICABLE LAW SHALL HAVE NO GREATER DURATION THAN THE WARRANTY PERIOD SET FORTH ABOVE. UNDER NO CIRCUMSTANCES SHALL CLARION BE LIABLE FOR ANY LOSS OR DAMAGE, DIRECT OR CONSEQUENTIAL, ARISING OUT OF THE USE OR INABILITY TO USE THE PRODUCT. BECAUSE SOME STATES DO NOT ALLOW LIMITATIONS ON HOW LONG AN IMPLIED WARRANTY LASTS OR EXCLUSIONS OR LIMITATIONS OF INCIDENTAL OR CONSEQUENTIAL DAMAGES, THE ABOVE LIMITATIONS OR EXCLUSIONS MAY NOT APPLY TO YOU.
-
THIS LIMITED WARRANTY GIVES YOU SPECIFIC LEGAL RIGHTS, AND YOU MAY ALSO HAVE OTHER RIGHTS WHICH VARY FROM STATE TO STATE.
-
The laws of the state of California shall govern and control this Limited Warranty, its interpretation and enforcement.
-
Should you have any difficulties with the performance of this product during the warranty period, please call Clarion or visit our web site for a listing of Authorized Warranty Service Centers in your area. You may also contact Clarion Customer Service at the address listed below for any service you may need with Clarion products.
In USA
Clarion Corporation of America
Attn: Customer Service Manager
661 W. Redondo Beach Blvd
Gardena, CA. 90247-4201
1-800-GO-CLARION (310)327-9100
www.clarion.com
In Canada
Clarion Canada, Inc.
Warranty Service Center
2239 Winston Park Drive
Oakville, Ontario L6H 5R1
(905)829-4600
www.clarioncanada.com
18 APX2120/APX4240/APX1300

natural_image
Blank white image with a color palette bar at the bottom (no text or symbols)APX2120/APX4240/APX1300 19

natural_image
Blank white image with a color palette bar at the bottom (no text or symbols)Clarion Corporation of America
All Rights Reserved. Copyright © 2006: Clarion Corp. of America
- FCC Approval
- Contents
- English
- FEATURES
- PRECAUTIONS
- WARNING
- Installation
- OPERATIONS
- Setting the operating level
- Improving bass sound
- Designing a more advanced system
- Freq (Hz) controls
- X-Over mode switches
- Connecting a source unit without RCA outputs
- Care and maintenance
- Cleaning the cabinet
- Servicing the unit
- CAUTION!
- INSTALLATION AND WIRING
- What is included in the box
- Mounting precautions
- CAUTION
- Wiring precautions
- WARNING!
- To prevent short circuits during installation, disconnect the vehicle's negative (-) battery lead before making any power connections.
- Improper connections may damage the equipment.
- Applications
- Mono subwoofer system
- Subwoofer system
- Four-channel stereo system
- Two-channel high power system
- Setting the gain
- Note:
- Setting the crossover
- Setting the bass boost
- Final system checks
- Troubleshooting
- No Audio
- Audio cycles on and off
- Distorted audio
- Amplifier fuse keeps blowing
- Whining or ticking noise when engine on
- Glossary
- Specifications
- LIMITED WARRANTY INFORMATION
- Clarion Corporation of America
Brand : CLARION
Model : APX2120
Category : Loudspeaker