KAC3 - Radio EKO - Free user manual and instructions
Find the device manual for free KAC3 EKO in PDF.


| Product Type | Clock Radio |
| Brand | EKO |
| Model | KAC3 |
| Power Supply | AC 100-240V ~ 50/60Hz |
| Power Consumption | 5W |
| Speaker Driver | 1 x 3 inches |
| USB Charging Output | 5V, 1A |
| Backup Battery | 2 x AAA (not included) |
| FM Frequency Range | 87.5 - 108 MHz |
| Preset Memory | 10 stations (P01-P10) |
| Alarm Modes | Radio, Buzzer, Off |
| Clock Setting | 12-hour format with PM indicator |
| Antenna | FM/AM wire antenna (pig-tail) |
| Display Dimming | Yes, via Snooze button in standby |
| Snooze Function | Yes |
| Safety | Double insulation, do not expose to moisture, keep ventilated |
| Cleaning | Unplug, use dry cloth only |
| Warranty | Refer to included warranty card |
Frequently Asked Questions - KAC3 EKO
User questions about KAC3 EKO
0 question about this device. Answer the ones you know or ask your own.
Ask a new question about this device
Download the instructions for your Radio in PDF format for free! Find your manual KAC3 - EKO and take your electronic device back in hand. On this page are published all the documents necessary for the use of your device. KAC3 by EKO.
USER MANUAL KAC3 EKO
Please read this manual carefully before using, and keep it for future reference.
CONTENTS
| General | Safety | |||
| Product | Overview | |||
| Basic Operation | 8 | |||
| Antenna | ||||
| Setting | the | clock | (time) | |
| Tuning | Radio | Stations | ||
| Saving | a | Preset | Station | |
| Setting | the | Alarm | ||
| Backup | Battery | |||
| Troubleshooting | 10 | |||
| Specification | 11 | |||
| Customer Support | Last Page | |||
GENERAL SAFETY
Read this manual thoroughly before you start using the radio.
Store this manual, the completed warranty card, your receipt and the product packaging. The safety precautions instructions reduce the risk of fire, electric shock and injury when correctly complied to.
Please follow all instructions and take notice of all warnings.
IMPORTANT INFORMATION
- Only using furniture that can safely support the Products.
- Ensure the Product is not overhanging the edge of the supporting furniture.
- Do not place the product on a high furniture without securing both the furniture and the product to a stable support.
- Do not place the product on cloth or other conductive materials.
- Warn children of the dangers of climbing on furniture to reach the product or its controls and to call for an adult to assist.
GENERAL SAFETY (CONT.)
IMPORTANT INFORMATION
- Do not expose this product to rain or moisture as it may result in fire.
- Do not temper or change or modify the product in any way.
- Only use Accessories outlined and recommended by the manufacturer.
- Please do not expose the product to splashing or water contact
- Please do not place any object on top of the product
This product must be positioned in a sufficiently stable location, it can be potentially hazardous due to falling when mounted and can cause injury, particularly to children if it positioned incorrectly.
- The apparatus shall not be exposed to dripping or splashing and no objects filled with liquids, such as vases, shall be placed on the product. Dry location use only.
- No naked flame source, such as candles, should be placed on the product.
- Do not cover the ventilation openings of the product with items such as newspapers, tablecloths, curtains etc or insert objects into the slots available on the products. As this could result in the product temperature rising and could cause a fire.

This symbol indicates that the appliance has double insulation between the dangerous mains voltage and the parts accessible to the user. In the event of repairs use only identical spare parts.
GENERAL SAFETY (CONT.)
- If you notice any unusual odors or smoke around the unit, immediately disconnect the unit from the outlet and contact the service center. Failure to do so may result in fire or electric shock.
- When not using the unit for long periods of time or when you are moving the unit.
- Please beware that Dust could accumulate over time on the unit and cause it to generate heat and or deteriorate insulation, which in turn may result in an electrical fire.
- The product is not intended for use by persons (including children) with reduced physical, sensory or mental capabilities, or young children of any age, They must be supervised product by a person responsible for their safety.
- Batteries from the product must be only removed by an adult, the adult must ensure to keep them out of reach of infants and children. Seek medical attention immediately if a child has swallowed a battery.
- To maintain the product do not use any chemical or cleaning agent or wet cloth, please only ensure to utilize a dry cloth to wipe it down from marks or dust and only after unplugging the product from the power socket.
- Please ensure to contact our call center for any repair or service required for the products.
Please make sure upon positioning this product, the place is:
- Not wet or damp and Well ventilated
- Away from direct sunlight or heaters.
- Away from splashes or food.
- Protected from excessive dust or grease.
- Do not place this equipment in a confined space such as a bookcase or similar unit. Allow 20cm above and 5cm spacing on both sides for proper ventilation.
- Do not place the Product near heat sources such as radiators, stoves or other audio visual equipment that produce heat.
- Do not place small metallic objects on top of the unit.
- Do not use or store flammable or combustible materials near the unit. Doing so may result in fire or explosion. Do not place any naked flame sources, such as lit candles, cigarettes or incense sticks on top of the product.
PRODUCT OVERVIEW
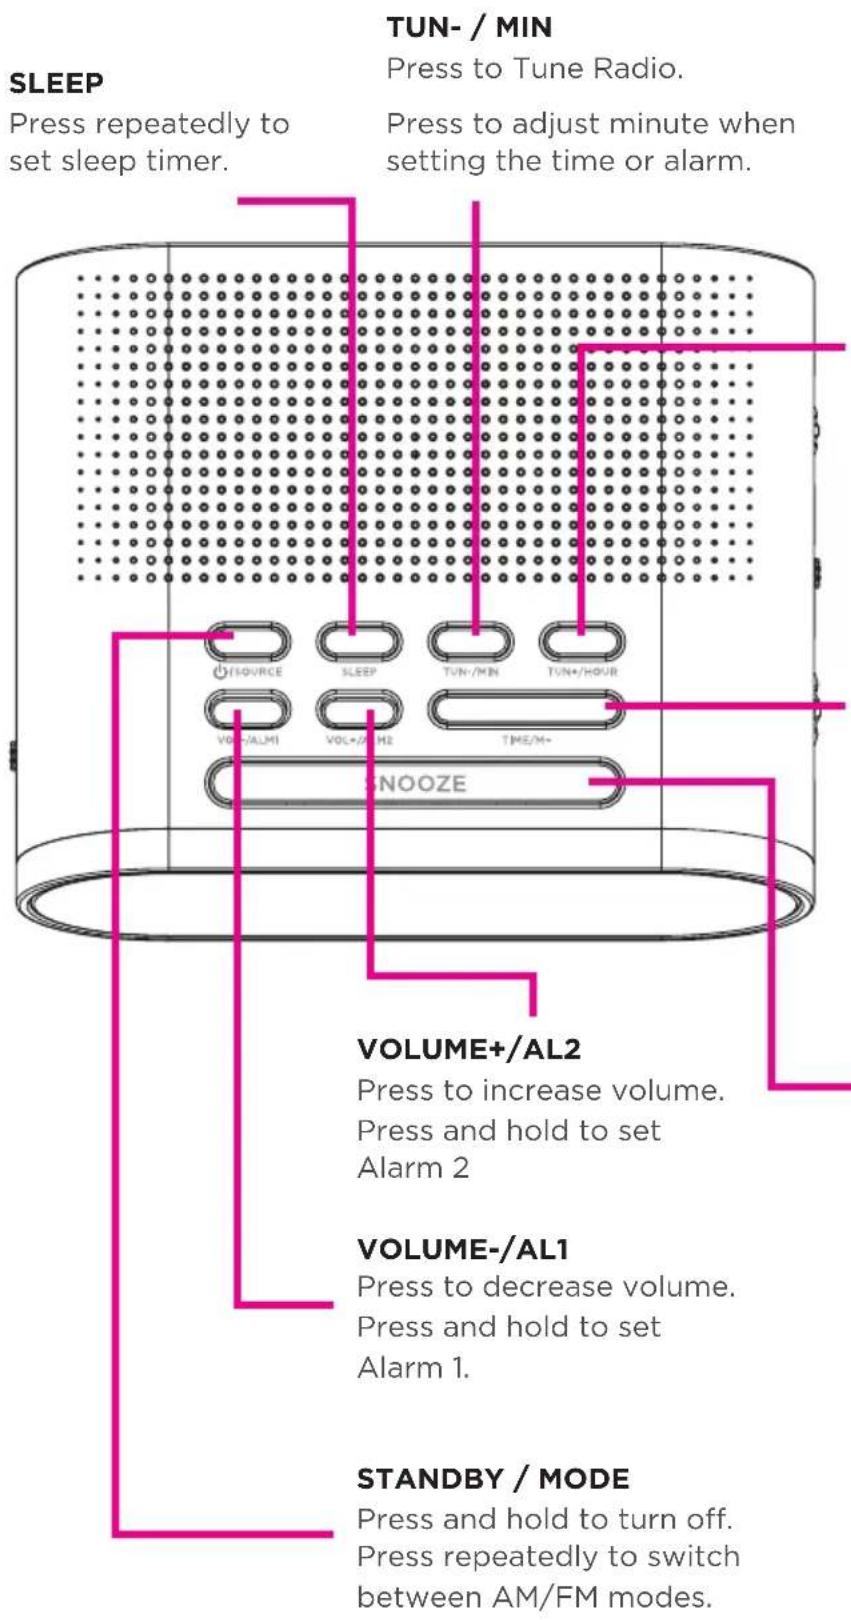
TUN+ / HOUR
Press to Tune Radio.
Press to adjust the hour when setting the time or alarm.
TIME/M+
In off Mode, Press and hold to begin setting the time.
In Radio Mode, press to cycle through preset stations.
SNOOZE
Press to Snooze the alarm after it sounds.
DIMMING
In Standby mode (No radio mode selected), Press Snooze button to adjust the brightness of the Radio Screen.
BASIC OPERATION
ANTENNA
- Unwind and extend FM/AM wire antenna to its full length for F/AMM reception and place it in the position. Which permits best reception.
- If FM/AM reception is weak, slightly rotate or re-position the unit to get the best possible reception.
SETTING THE CLOCK
1 In Radio mode, Press and hold the POWER button to turn the unit off.
2 Press and hold the TIME/MEM button until the display starts to flash.
3 Press the HOUR button to adjust the hour, the PM indicator will light when the time is set in the PM.
4 Press the MIN button to adjust the minutes.
5 Press the TIME/MEM button to finish setting the time.
TUNING RADIO STATIONS
1 Once turning on the radio, press the POWER/BAND button to switch between AM or FM.
2 Press the TUN+ or TUN- to adjust the radio to desired frequency. Press and hold to scan for next desired station.
SAVING A PRESET STATION
1 Once tuning the desired station press and hold the TIME/MEM button and press TUNE+/- Buttons to choose your desired program location (between P01 and P10).
2 Press the TIME/MEM button again to confirm store current radio station as a preset. Can save up to 10 preset stations.
1 In Standby mode, Press and hold ALM1 or ALM2.
2 Press the HOUR button to adjust the hour, the PM indicator will light when the time is set in the PM.
3 Press the MIN button to adjust the minutes. once this is done either ALM1 or ALM2 indicator light will turn on.
4 Press ALM1 or ALM2 repeatedly to select between RADIO, BUZZER or OFF.
5 If ALM1 or ALM2 is set, and you want to turn it OFF, press repeatedly until indicator light turns off.
BATTERY BACKUP
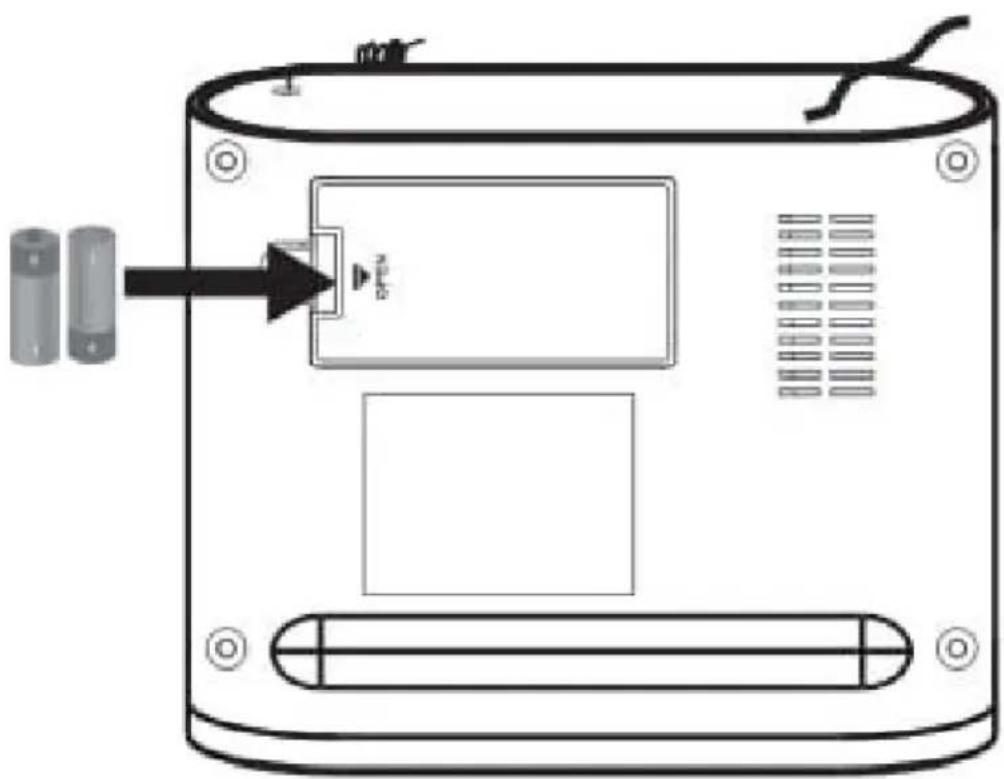
Insert 2 x AAA batteries (no included) into this battery compartment is to keep your Time and settings saved in case you want to unplug and move location of Radio. Having batteries inserted will save the settings and time.
natural_image
Diagram of a device rear panel with battery and indicator lights, showing internal components and wiring (no text or symbols)TROUBLESHOOTING
In the unlikely event of difficulties with your appliance please follow the trouble shooting guide below.
| Problem | Reason(s) | Solution(s) |
| No Power | Power cable not connected to wall socket.Power socket is not switched | Make sure the plug is connected.Make sure that there is power at the AC outlet. |
| Radio reception weak | Extend or re-position the FM pig-tail antenna.Re-position the main unit for FM reception.Keep the clock radio away from other electronic devices to avoid radio interference. | |
| No sound | Volume control set to minimum.Device volume set to minimum | Increase the volume levelAdjust volume on the Bluetooth- connected device. |
| Time reset to 12:00 | Backup batteries exhaustedClock not set | Replace the batteriesSet the clock following steps on page 10 |
| Alarm does not sound | Alarm mode not activeClock not setAlarm not set | Activate the alarm following steps on page 10Set the clock following steps on page 10 |
| Clock/alarm setting erased | Power has been interruptedPower plug has disconnected. | Make sure the plug is connected.Reset the clock/alarm |
SPECIFICATIONS
| Power Supply Input: 100-240V~50/60Hz | |
| Power Consumption 5W | |
| Speaker Driver 1 x 3” | |
| USB Charging 5V, 1A | |
| Batteries (2x AA, Not included) | |
| Frequency | |
| FM 87.5 - 108MHz | |
EKO
CUSTOMER HELPLINE:
info@ayonz.com
DISTRIBUTED BY:
Ayonz Pty Ltd
- CONTENTS
- GENERAL SAFETY
- IMPORTANT INFORMATION
- GENERAL SAFETY (CONT.)
- Please make sure upon positioning this product, the place is:
- PRODUCT OVERVIEW
- TUN+ / HOUR
- TIME/M+
- SNOOZE
- DIMMING
- BASIC OPERATION
- ANTENNA
- SETTING THE CLOCK
- TUNING RADIO STATIONS
- SAVING A PRESET STATION
- BATTERY BACKUP
- TROUBLESHOOTING
- SPECIFICATIONS
- EKO
Brand : EKO
Model : KAC3
Category : Radio