
CMXGTAM202501 - Uncategorized Craftsman - Free user manual and instructions
Find the device manual for free CMXGTAM202501 Craftsman in PDF.


| Product Type | OHV Vertical Shaft Engine for Lawn Mowers |
| Displacement | 159 cc and 196 cc models |
| Engine Configuration | Single Cylinder, OHV (Overhead Valve) |
| Starting System | Recoil (Manual) or Electric Start (optional) |
| Fuel Type | Unleaded gasoline, 87 octane minimum; up to 10% ethanol (E10) or 15% MTBE; no E15/E85 |
| Oil Capacity | 600 ml (20 oz) |
| Oil Type | SAE 10W-30 (or 5W-30 for cold weather), API service classification SJ or higher (SL, SM) |
| Spark Plug Gap | 0.030 in (0.76 mm) |
| Fuel Shut-Off Valve | Equipped on some models |
| Primer | Equipped on primer system models; press 3 times before cold start, 5 times if below 50°F |
| Choke | Manual choke on some models; automatic on Auto-Choke systems |
| Engine Switch | On/Off switch on engine (if equipped) |
| Dimensions (Approx.) | 15 x 15 x 15 in (38 x 38 x 38 cm) |
| Weight (Approx.) | 25 lb (11.3 kg) |
| Maintenance Interval – Oil Change | Every 25 hours or every season |
| Maintenance Interval – Air Filter Service | Every 25 hours (more often in dusty conditions) |
| Maintenance Interval – Spark Plug Replacement | Every 100 hours |
| Safety Features | Blade control (mower), spark arrestor option, carbon monoxide warning |
| EZ Start Promise | Guarantees engine starts on first or second pull (excluding initial start, after storage, cold starts, improper procedure) |
Frequently Asked Questions - CMXGTAM202501 Craftsman
User questions about CMXGTAM202501 Craftsman
0 question about this device. Answer the ones you know or ask your own.
Ask a new question about this device
Download the instructions for your Uncategorized in PDF format for free! Find your manual CMXGTAM202501 - Craftsman and take your electronic device back in hand. On this page are published all the documents necessary for the use of your device. CMXGTAM202501 by Craftsman.
USER MANUAL CMXGTAM202501 Craftsman
natural_image
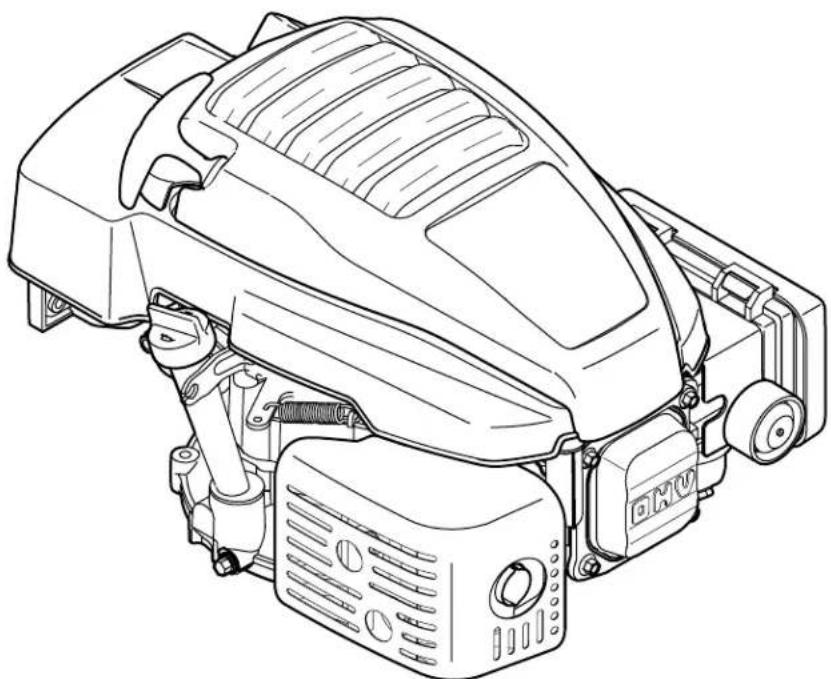
Technical line drawing of a DMV electric motor assembly (no text or symbols)159 cc & 196cc OHV Vertical Shaft Engine
WARNING
READ AND FOLLOW ALL SAFETY RULES AND INSTRUCTIONS IN THIS MANUAL BEFORE ATTEMPTING TO OPERATE THIS MACHINE. FAILURE TO COMPLY WITH THESE INSTRUCTIONS MAY RESULT IN PERSONAL INJURY.
MTD LLC, P.O. BOX 361131 CLEVELAND, OHIO 44136-0019
To The Owner
Thank You
This Operator's Manual is an important part of your new engine. It will help you prepare and maintain the engine for the best performance. Please read and understand the contents before operating the engine.
Table of Contents
Safe Operation Practices.... 3
Safety Symbols 5
Set-Up....6
Controls & Features......8
Operation....9
Engine Maintenance....11
Troubleshooting....16
Replacement Parts....17
EZ Start Promise....18
Spanish....19
Record Product Information
Before operating your new engine, please locate the model plate on the engine (shaded area in Figure below) and record the information in the provided area below. This information will be necessary, should you seek technical support via our web site or with your local dealer.
MODEL NUMBER

SERIAL NUMBER

natural_image
Row of identical empty rectangular boxes with no text or symbols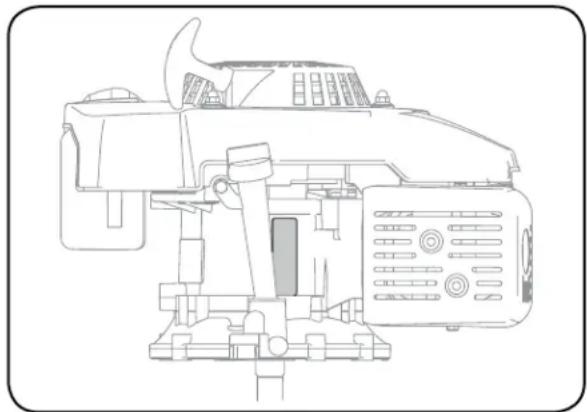
natural_image
Technical line drawing of a mechanical device with no visible text or symbolsCustomer Support
Please do NOT return the machine to the retailer or dealer without first contacting the Customer Support Department.
If you have difficulty assembling this product, have questions regarding the controls, operation, or maintenance of this machine, want to order replacement parts/attachments/accessories, or want to view an online How-To video; you can seek help from the experts. Have your full model number and serial number ready. Choose from the options below:
◇ Visit us on the web: www.mtdproducts.com
◇ Call a Customer Support Representative at: (800) 800-7310 or (330) 220-4683
Write to: MTD LLC • P.O. Box 361131 • Cleveland, OH • 44136-0019
Important Safe Operation Practices
2

WARNING! This symbol points out important safety instructions which, if not followed, could endanger the personal safety and/or property of yourself and others. Read and follow all instructions in this manual before attempting to operate the equipment. Failure to comply with these instructions may result in personal injury. When you see this symbol. HEED ITS WARNING!
CALIFORNIA PROPOSITION 65

WARNING! Engine Exhaust, some of its constituents, and certain vehicle components contain or emit chemicals known to State of California to cause cancer and birth defects or other reproductive harm.

DANGER! This engine was built to be operated according to the safe operation practices in this manual. As with any type of power equipment, carelessness or error on the part of the operator can result in serious injury. Failure to observe the following safety instructions could result in serious injury or death.
Training
- Read, understand and follow all instructions on the engine and in the manual(s) before attempting to assemble and operate. Keep this manual in a safe place for future and regular reference and for ordering replacement parts.
- Be familiar with all controls and their proper operation. Know how to stop the engine and disengage them quickly.
- Never allow children under 14 years of age to operate the engine. Children 14 and over should read and understand the instructions and safe operation practices in this manual and be trained and supervised by an adult.
- Never allow adults to operate the machine without proper instruction.
- Keep the area of operation clear of all persons, particularly small children and pets. Stop machine if anyone enters the area.
Preparation
- Wear sturdy, rough-soled work shoes and close fitting slacks and shirts. Loose fitting clothes or jewelry can be caught in the moving parts. Never operate the machine in bare feet or sandals.
- Disengage clutch levers and shift (if equipped) into neutral ("N") before starting the engine.
- Never leave the engine running while unattended.
- Never attempt to make any adjustments while the engine is running, except where specifically recommended in the operator's manual.
Safe Handling of Gasoline:
To avoid personal injury or property damage, use extreme care in handling gasoline. Gasoline is extremely flammable and the vapors are explosive. Serious personal injury can occur when gasoline is spilled on yourself and/or your clothes which can ignite. Wash your skin and change clothes immediately.
- When adding fuel, turn engine OFF and let engine cool at least 2 minutes before removing the gas cap.
- Fill fuel tank outdoors or in well ventilated area.
- Use only an approved gasoline container.
- Never fill containers inside a vehicle or on a truck or trailer bed with a plastic liner. Always place containers on the ground away from your vehicle before filling.
- If possible, remove gas-powered equipment from the truck or trailer and refuel it on the ground. If this is not possible, then refuel such equipment on a trailer with a portable container, rather than from a gasoline dispenser nozzle.
-
Keep the nozzle in contact with the rim of the fuel tank or container opening at all times until fueling is complete. Do not use a nozzle lock-open device.
-
Do not overfill fuel tank. Fill tank to full as indicated by the fuel level indicator installed inside of the fuel tank or marked on the tank. Do not over-fill to allow space for fuel expansion. On some models, a fuel level indicator may NOT be present, in this instance, fill the tank no more than 1/2 inch below the bottom of the filler neck to allow space for fuel expansion.
- Replace fuel cap and tighten until the cap ratchets.
- If gasoline is spilled, wipe it off the engine and the equipment. Move the machine to another area. Wait five minutes before starting the engine.
- To reduce fire hazards, keep the machine free of grass, leaves or other debris build up. Clean up oil or fuel spillage and remove any fuel-soaked debris.
- Keep gasoline away from sparks, open flames, pilot lights, heat, and other ignition sources.
- Never fuel equipment indoors because flammable vapors will accumulate in the area.
- Extinguish all cigarettes, cigars, pipes, and other sources of ignition.
- Check fuel line, tank, cap, and fittings frequently for cracks or leaks. Replace if necessary.
Operation
- When starting the engine, make sure spark plug, muffler, and fuel cap are in place.
- Do not crank engine with spark plug removed.
- If fuel spills, wait until it evaporates before starting engine.
- Allow muffler, engine cylinder, and fins to cool before touching.
- Keep children away from hot or running engines. They can suffer burns from a hot muffler.
- Remove accumulated combustibles from muffler and cylinder area.
- Operate equipment with all guards in place.
- Keep hands and feet away from rotating parts.
- Tie up long hair and remove jewelry.
- Do not wear loose-fitting clothing, dangling drawstrings or items that could become caught.
- When starting the engine, pull cord slowly until resistance is felt, then pull rapidly (if not electric start).
- Remove all external equipment/engine loads before starting engine.
- Direct coupled equipment components such as, but not limited to blades, impellers, pulleys, sprockets, etc., must be securely attached.
Maintenance & Storage
- Keep the engine in safe working order
- Allow the engine to cool at least five minutes before storing. Never tamper with safety devices. Check their proper operation regularly.
- Check bolts and screws for proper tightness at frequent intervals to keep the engine in safe working condition. Visually inspect the engine for any damage.
- Before cleaning, repairing or inspecting; stop the engine and make certain all moving parts have stopped. Disconnect the spark plug wire and ground it against the engine to prevent unintended starting.
- Do not change the engine governor settings or over-speed the engine. The governor controls the maximum safe operating speed of the engine.
- Maintain and replace safety and instruction labels as necessary.
- Always refer to the operator's manual for important details if the machine is to be stored for an extended period of time.
- If the fuel tank has to be drained, do this outdoors.
- Observe proper disposal laws and regulations for gas, oil, etc. to protect the environment.
Do not modify engine
To avoid serious injury or death, do not modify engine in any way. Tampering with the governor setting can lead to a runaway engine and cause it to operate at unsafe speeds. Never tamper with factory setting of engine governor.
Notice Regarding Emissions
Engines which are certified to comply with California and federal EPA emission regulations for SORE (Small Off Road Equipment) are certified to operate on regular unleaded gasoline, and may include the following emission control systems: Engine Modification (EM), Oxidizing Catalyst (OC), Secondary Air Injection (SAI) and Three Way Catalyst (TWC) if so equipped.
Spark Arrestor

WARNING! This machine is equipped with an internal combustion engine and should not be used on or near any unimproved forest-covered, brush covered or grass-covered land unless the engine's exhaust system is equipped with a spark arrestor meeting applicable local or state laws (if any).
If a spark arrestor is used, it should be maintained in effective working order by the operator. In the State of California the above is required by law (Section 4442 of the California Public Resources Code). Other states may have similar laws. Federal laws apply on federal lands.
A spark arrestor for the muffler is available through your nearest engine authorized service dealer or contact the service department, P.O. Box 361131 Cleveland, Ohio 44136-0019.
Safety Symbols
This page depicts and describes safety symbols that may appear on this product. Read, understand, and follow all instructions on the machine before attempting to assemble and operate.
| Symbol Description | |
 | READ THE OPERATOR'S MANUAL(S)Read, understand, and follow all instructions in the manual(s) before attempting to assemble and operate. |
 | WARNING—GASOLINE IS FLAMMABLEAllow the engine to cool at least two minutes before refueling. |
 | WARNING—CARBON MONOXIDENever run an engine indoors or in a poorly ventilated area. Engine exhaust contains carbon monoxide, an odorless and deadly gas. |
 | WARNING—ELECTRICAL SHOCKDo not use the engine's electric starter in the rain. |
 | WARNING—HOT SURFACEEngine parts, especially the muffler, become extremely hot during operation. Allow engine and muffler to cool before touching. |

WARNING! Your Responsibility — Restrict the use of this power machine to persons who read, understand and follow the warnings and instructions in this manual and on the machine.
SAVE THESE INSTRUCTIONS!
Set-Up
3
Gas & Oil
NOTE: The engine is shipped without gasoline or oil in the engine. Running the engine with insufficient oil can cause serious engine damage and void the engine warranty.

WARNING! Always keep hands and feet clear of equipment moving parts. Do not use a pressurized starting fluid. Vapors are flammable.
Oil Recommendations
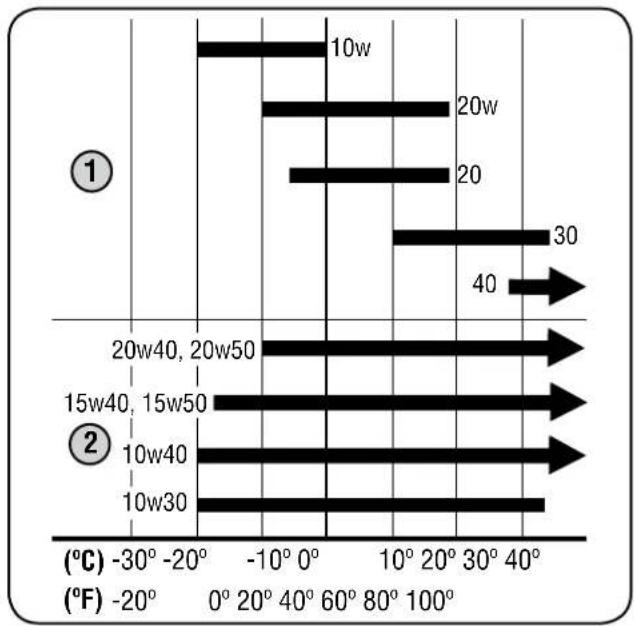
Before starting engine, fill with motor oil, capacity is 600 ml/20 oz. Refer to viscosity chart in Figure 3-1 for oil recommendations. Do not over-fill. Use a 4-stroke, or an equivalent high detergent, premium quality motor oil certified to meet or exceed U.S. automobile manufacturer's requirements for service classification of a minimum level SJ (higher letter ratings are acceptable such as SL and SM grades). Motor oil will display this designation on the container.
SAE 10W-30 is recommended for general, all temperature use. If single viscosity oil is used, select the appropriate viscosity for the average temperature in your area from the chart below.
bar
| Value | Temperature (°C) | Temperature (°F) | | :--- | :--- | :--- | | 10w | -30 | -20 | | 20w | 20 | 0 | | 20 | 20 | 0 | | 30 | 40 | 100 | | 40 | 40 | 100 |Figure 3-1
- Single Viscosity
- Multi Viscosity
CAUTION: Do not use non-detergent oil or 2-stroke engine oil. It could shorten the engine's service life.
NOTE: A 5w30 synthetic oil may be used to improve start ability for cold weather (temperatures below 40° F).
Checking Oil Level
NOTE: Be sure to check the oil while on a level surface with the engine stopped.
- Remove the oil filler cap/dipstick and wipe the dipstick clean.
- Insert the dipstick into the oil filler neck. Turn the dipstick a 1/4 turn into the locked position to fully seat.
- Remove dipstick. If the level is low, slowly add oil to the upper limit on the dipstick. See Figure 3-2 inset.
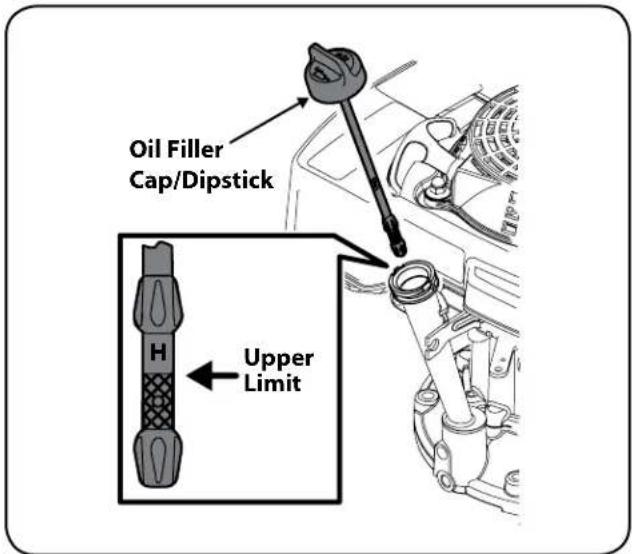
Figure 3-2
- Reinsert the dipstick into the locked position before starting the engine.
NOTE: Do not overfill. Overfilling with oil may cause smoking, hard starting, spark plug fouling, or oil saturation of air cleaner.
Fuel Requirements

CAUTION: Operating the engine with E15 or E85 fuel, an oil/gasoline mixture, dirty gasoline, or gasoline over 30 days old without fuel stabilizing additive may result in damage to your engine's carburetor. Subsequent damage would not be covered under the manufacturer's warranty.
Use automotive gasoline (unleaded or low leaded to minimize combustion chamber deposits) with a minimum of 87 octane. Gasoline with up to 10% ethanol (E10) or 15% MTBE (Methyl Tertiary Butyl Ether) can be used. Never use an oil/gasoline mixture or dirty gasoline. Avoid getting dirt, dust, or water in the fuel tank. DO NOT use E15 or E85 gasoline.

WARNING! Gasoline is extremely flammable and is explosive under certain conditions.
- Refuel in a well-ventilated area with the engine stopped. Do not smoke or allow flames or sparks in the area where the engine is refueled or where gasoline is stored.
- Do not overfill the fuel tank. After refueling, make sure the tank cap is closed properly and securely.
- Be careful not to spill fuel when refueling. Spilled fuel or fuel vapor may ignite. If any fuel is spilled, make sure the area is dry before starting the engine.
- Avoid repeated or prolonged contact with skin or breathing of vapor.
Adding Fuel

WARNING! An adult should fuel this engine. NEVER allow children to refuel the engine. Gasoline (fuel) vapors are highly flammable and can explode. Fuel vapors can spread and be ignited by a spark or flame many feet away from engine. To prevent injury or death from fuel fires, follow these instructions:
NOTE: Some engines may not have the fuel cap installed for shipping purposes. To install, remove and discard the fuel tank dust cap labeled "Discard". Remove the bubble wrap packaging from around the fuel cap and tighten securely.
• DO NOT use leaded fuel.
- Fuel must be fresh and clean. NEVER use fuel left over from last season or stored for long periods.
- NEVER mix oil with fuel.
- DO NOT use fuel containing Methanol (Wood Alcohol)
NOTE: Before refueling, allow engine to cool two minutes.
- Clean around fuel fill before removing cap to fuel.
- Fill tank until fuel reaches 12 inch below the bottom of the filler neck to allow space for fuel expansion. Be careful not to overfill.
- Replace the gasoline cap and tighten securely. Wipe up spilled fuel before starting engine. If fuel is spilled DO NOT start engine. Move machine away from area of spillage. Avoid creating any source of ignition until fuel vapors are gone.
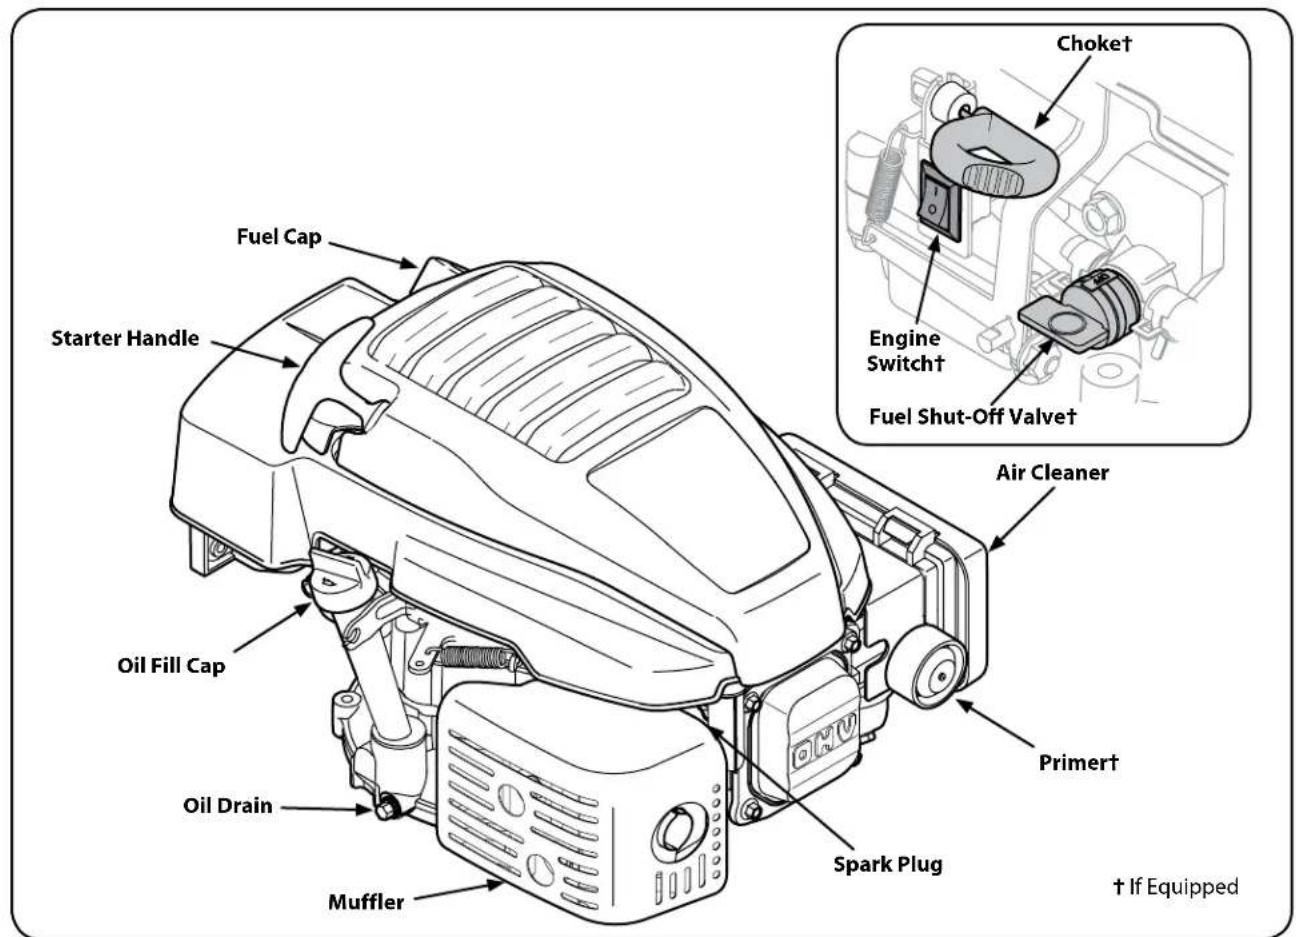
Figure 4-3
Primer (If Equipped)
The primer is located on the front of the air cleaner. Pressing the primer forces fuel directly into the engine's carburetor to aid in starting the engine.

Engine Switch (If Equipped)
The engine switch is located on the engine. Turn the switch ON when starting the engine and turn it to OFF when you want to shut it down.
Choke (If Equipped)
The choke control is located on the engine above the engine switch and when activated, closes the choke plate on the carburetor and aids in starting the engine. Pull the choke control to activate the choke on the engine. Use of the choke may not be necessary if the engine is warm or the air temperature is high.
Fuel Shut-Off Valve (If Equipped)
The fuel shut off valve is located on the engine below the choke. Be sure the valve is on before starting the engine. Turn the valve off when towing or transporting equipment.
Oil Drain
Removing the oil drain plug will drain the oil from the engine. The engine is equipped with a side drain, and on select units, you may also access a bottom drain.
Oil Fill Cap
Remove the oil fill cap to check the oil level and add oil.
Fuel Cap
Remove the fuel cap to add fuel.
Operation
5
Pre-Operation Check
The engine is shipped without gasoline or oil in the engine. Refer to page 6 in the Set-Up Section of this manual for instructions on adding oil and gasoline.
Determine The Starting System
Before starting the engine, you must determine the type of starting system that is on your engine. Your engine will have one of the following types:
• Auto-Choke System: This features an automatic choke that does not have a manual choke or primer.
- Primer System: This features a primer on the engine.
- Manual Choke System: This features a choke on the engine and no primer. Choke systems located on the engine will feature an engine switch and may also feature a fuel shut-off valve.
• Auto-Choke/Electric Start System: This features an automatic choke and an electric start switch on the handle.
To start your engine, follow the instructions for your type of starting system.
NOTE: Equipment may have remote controls. See the equipment manual for location and operation of remote controls.
Starting the Engine

WARNING: Always keep hands and feet clear of equipment moving parts. Do not use a pressurized starting fluid. Vapors are flammable.
Auto-Choke System
- Standing behind the mower, depress the blade control and hold it against the upper handle. See Figure 5-1.
- Pull the starter grip lightly until resistance is felt, then pull rapidly to overcome compression, prevent kickback and start engine. Repeat if necessary.
IMPORTANT: Do not allow the starter grip to snap back against the engine. Return it gently to prevent damage to the starter.
Primer System
- Push primer three times. Wait about two seconds between each push. See Figure 5-2. In temperature below 50^ F, prime five times. After the engine is warmed up, one prime may be needed for all temperatures.
- Standing behind the mower, squeeze and hold the blade control against upper handle.
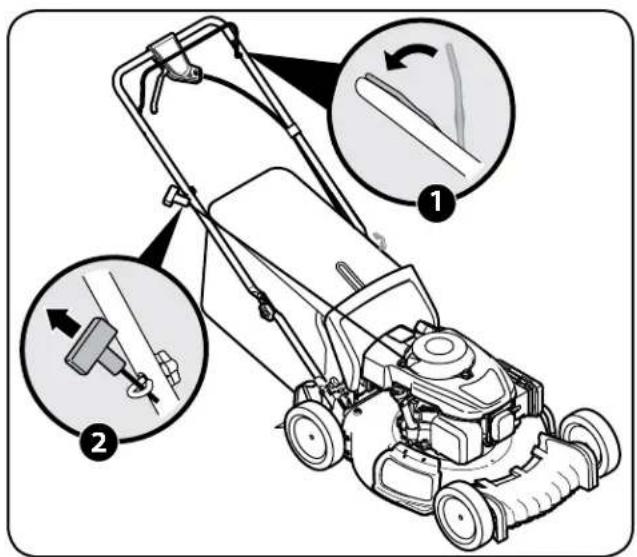
Figure 1-4
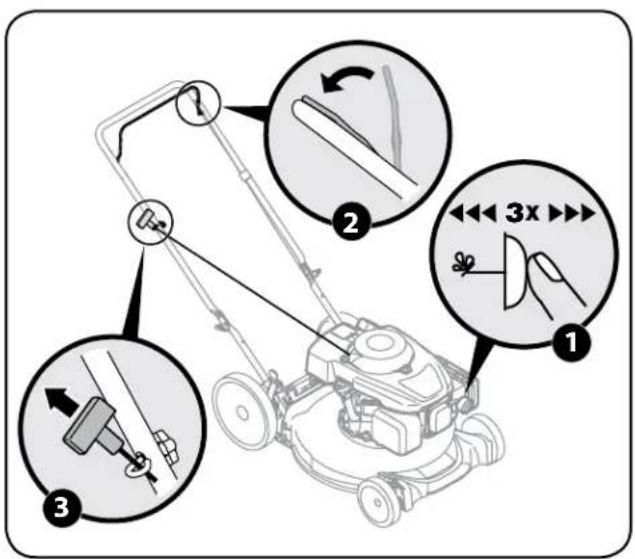
Figure 1-5
- Pull the recoil starter lightly until resistance is felt, then pull rapidly to overcome compression, prevent kickback, and start the engine. Repeat if necessary. See Figure 5-2.
IMPORTANT: Do not allow the recoil starter to snap back against the rope guide.
If engine does not start, it may be necessary to re-prime the engine.
Manual Choke System
-
If equipped, turn on fuel valve located on the engine. See Figure 5-3.
-
Pull out the choke knob located on the engine.
NOTE: Use of the choke may not be necessary if the engine is warm or the air temperature is high.
-
Press engine switch to on.
-
Pull the starter grip lightly until resistance is felt, then pull rapidly to overcome compression, prevent kickback and start engine. If engine does not start after ten seconds of repeated pulls, wait a few minutes and repeat.
IMPORTANT: Do not allow the starter grip to snap back against the rope guide. Return it gently to prevent damage to the starter.
- When engine warms up, push in the choke knob.
Auto-Choke/Electric Start System
-
Insert plastic Electric Starter Push Key into starter housing located on the right side of upper handle until it snaps in place. (Electric Start units only)
-
Standing behind the mower, pull the blade control back against the drive control. See Figure 5-4.
-
Recoil Start: While holding the blade and drive controls together firmly, pull the recoil starter lightly until resistance is felt, then pull rapidly to overcome compression, prevent kickback, and start the engine. Repeat if necessary.
IMPORTANT: Do not allow the recoil starter to snap back against the rope guide. Return it gently to prevent damage to the starter.
Electric Start (If Equipped): Push the electric starter push key to start the engine. See Figure 5-4.
NOTE: Electric starter is equipped with an internal circuit breaker. If unit fails to start when starter button is depressed, wait one minute for breaker to reset, then attempt to start again.
Stopping Engine
-
Release blade control or turn off the engine switch (if equipped).
-
Remove Electric Starter Push Key if mower is to be left unattended, stored, or serviced (Electric Start units only). To remove key, grasp the key's top push button and pull it straight up and out. Keep key in a safe place out of the reach of children.
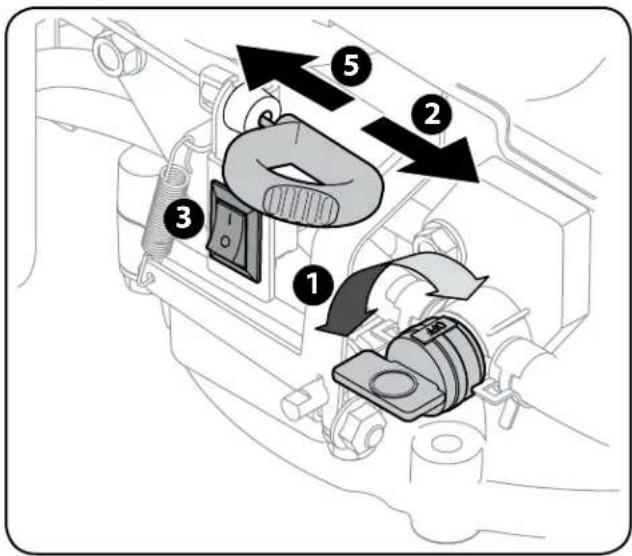
Figure 1-6
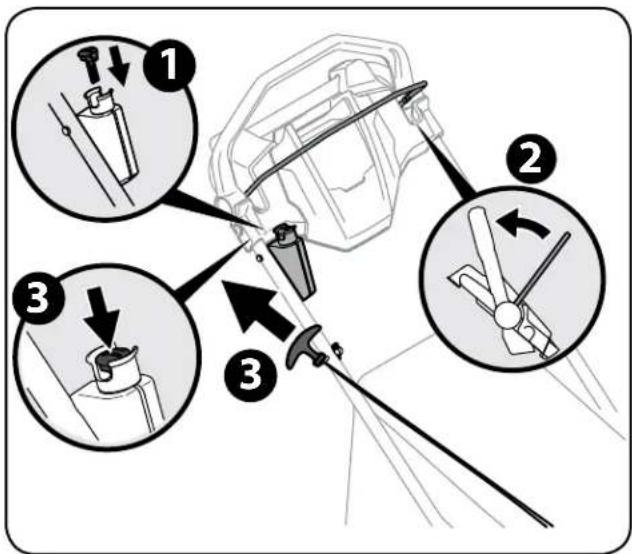
Figure 1-7
Engine Maintenance

WARNING: Shut off the engine and remove Electric Starter Push Key (if equipped) before performing any maintenance. To prevent accidental start-up, disconnect the spark plug boot.
IMPORTANT: If engine must be tipped to transport equipment or to inspect or remove grass, keep spark plug side of engine up. Transporting or tipping engine spark plug down may cause smoking, hard starting, spark plug fouling, or oil saturation of air cleaner.
Periodic inspection and adjustment of the engine is essential if high level performance is to be maintained. Regular maintenance will also ensure a long service life. The required service intervals and the kind of maintenance to be performed are described in the table below. Follow the hourly or calendar intervals, whichever occur first. More frequent service is required when operating in adverse conditions.

WARNING: If the engine has been running, the muffler will be very hot. Be careful not to touch the muffler.
Maintenance Schedule
| First 5 Hours | Each Use or Every 5 Hrs. | Every Season or 25 Hours | EverySeason or 50 Hours | Every Season or 100 Hours | Service Dates | |
| Check Engine Oil Level | √ | |||||
| Change Engine Oil †† | √ | √ | ||||
| Check Air Cleaner | √ | |||||
| Service Air Cleaner † | √ | |||||
| Service Carbon Canister Filter † | √ | |||||
| Check Spark Plug | √ | |||||
| Replace Spark Plug | √ | |||||
| Clean Engine Shroud | √ | |||||
| Clean around muffler | √ | |||||
| Replace Fuel Filter | √ |
† Service more frequently when used in dusty areas.
†† Every season or 25 hours if operating under heavy load or high ambient temperature.
Oil Service
- Check oil level regularly.
- Be sure correct oil level is maintained. Check every five hours or daily before starting engine. See oil checking procedure in the Operation section.
Oil Change
IMPORTANT: Be sure to check engine on a level surface with the engine stopped. Drain the oil while the engine is still warm to assure rapid and complete draining.
-
Remove all fuel from tank by running engine until it stops from lack of fuel.
-
Remove drain plug and allow oil to drain into a suitable container. See Figure 6-1.
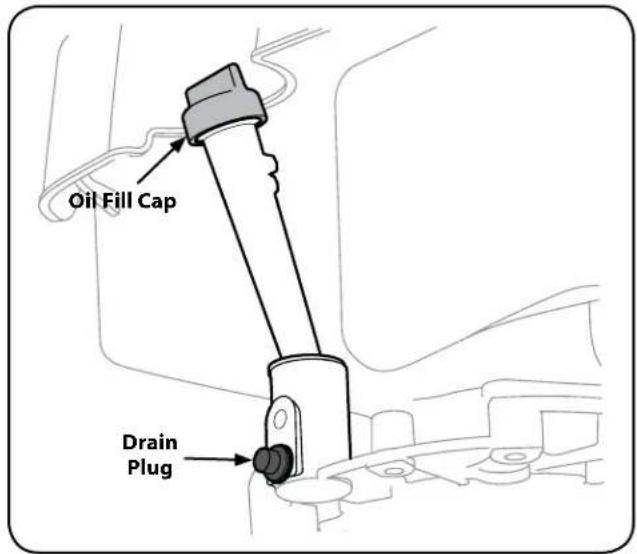
Figure 6-1

WARNING: Before tipping engine or equipment to drain oil, drain fuel from tank by running engine until fuel tank is empty.
- Reinstall the drain plug and tighten it securely.
- Refill with the recommended oil and check the oil level. Refer to page 8 in the Set-Up section.
- Reinstall the oil fill cap securely.
IMPORTANT: Used motor oil may cause skin cancer if repeatedly left in contact with the skin for prolonged periods. Although this is unlikely unless you handle used oil on a daily basis, it is still advisable to thoroughly wash your hands with soap and water as soon as possible after handling used oil.
NOTE: Please dispose of used motor oil in a manner that is compatible with the environment. We suggest you take it in a sealed container to your local service station for reclamation. Do not throw it in the trash or pour it on the ground.
Air Filter Service
Paper filters cannot be cleaned and must be replaced once a year or every 100 operating hours; more often if used in extremely dusty conditions.

WARNING: Never use gasoline or low flash point solvents for cleaning the air filter element. A fire or explosion could result.
IMPORTANT: Never run the engine without the air filter. Rapid engine wear will result.
- Press down on the tabs securing the air filter cover. Pull back and remove the cover. See Figure 6-2.
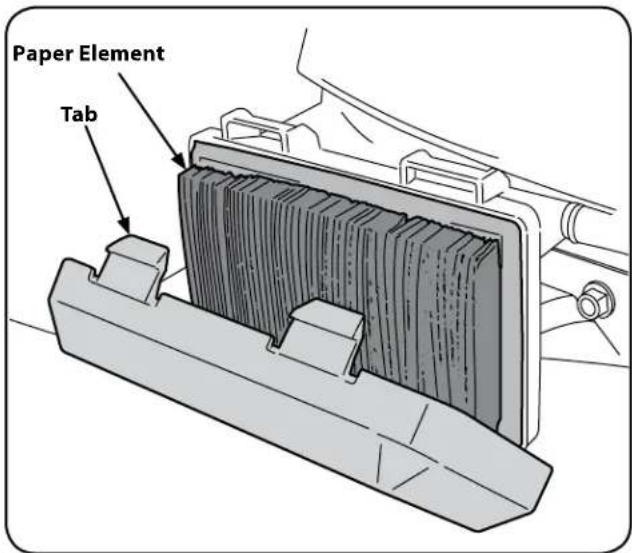
Figure 6-2
- Remove the paper element. To loosen debris, gently tap the filter on a hard surface. If the filter is excessively dirty or damaged, replace with a new filter.
- Insert the cover's bottom tabs into slots in bottom of base.
- Tilt the cover up into place and secure with tabs.
Carbon Canister Filter Service
The foam carbon canister filter must be cleaned or replaced once a year or every 100 operating hours; more often if used in extremely dusty conditions.
- Remove outer engine shroud (if equipped) and recoil starter housing as shown in Figure 6-3.
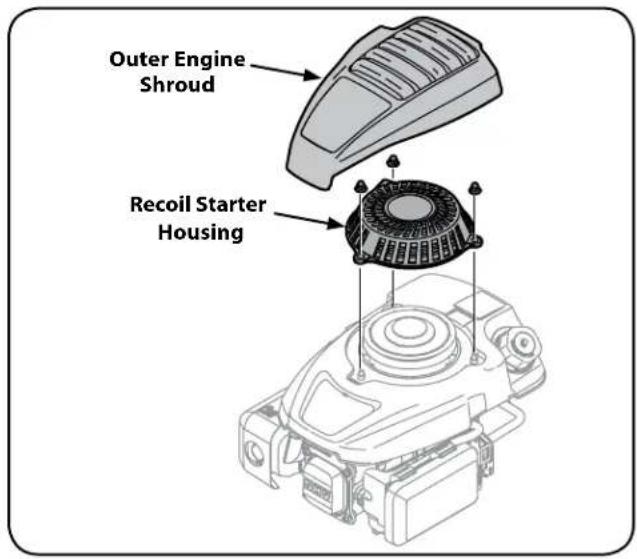
Figure 6-3
- Lift up inner engine shroud and carefully pull out carbon canister filter assembly from under shroud as shown in Figure 6-4.
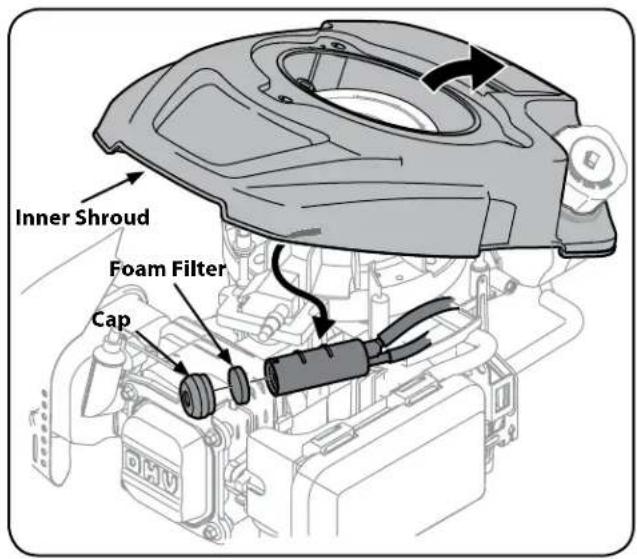
Figure 6-4
-
Remove cap from end of canister and pull out round foam filter from inside the assembly. See Figure 6-4. Clean element or replace when damaged.
-
To clean foam element, wash in mild liquid detergent and water. Squeeze or press the foam element to rinse out dirt and water. Do not twist, this could damage or tear the foam element. Allow to dry thoroughly before using. Oil the foam element with a light engine oil.
- Carefully place foam filter back into canister assembly and reattach the rubber cap removed earlier.
- Snap the carbon canister filter assembly back into place under the inner engine shroud. See Figure 6-5 inset.
IMPORTANT: Be sure the angled nipple points upwards into the shroud to avoid interference with the autochoke linkage.
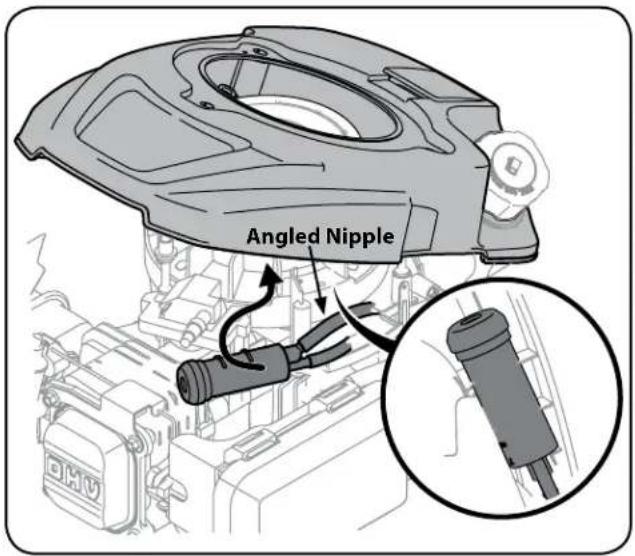
Figure 6-5
- Place the inner engine shroud back onto the engine. Fasten the recoil starter housing back down and reattach the outer engine shroud.
IMPORTANT: Be sure not to pinch/kink any of the vent lines when re-installing the engine shroud. A pinched/kinked vent line will cause the engine to stall.
Spark Plug Service

WARNING: DO NOT check for spark with spark plug removed. DO NOT crank engine with spark plug removed.
To ensure proper engine operation, the spark plug must be properly gapped and free of deposits.
- Remove the spark plug boot and use a spark plug wrench to remove the plug. See Figure 6-6.
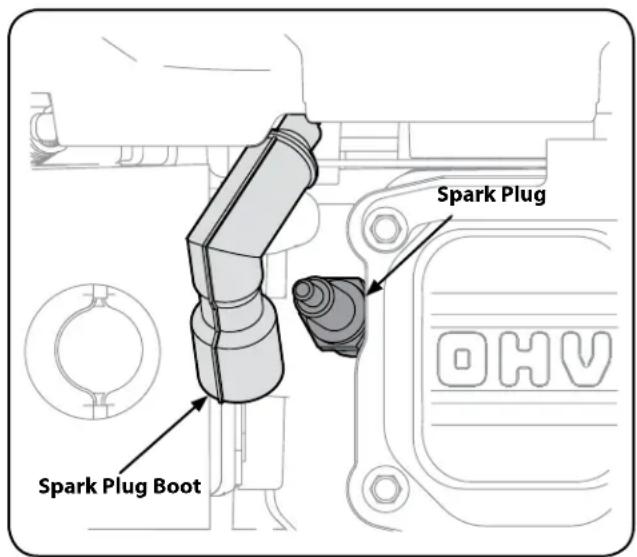
Figure 6-6

WARNING: If the engine has been running, the muffler will be very hot. Be careful not to touch the muffler.
-
Visually inspect the spark plug. Discard the spark plug if there is apparent wear, or if the insulator is cracked or chipped. Clean the spark plug with a wire brush if it is to be reused.
-
Measure the plug gap with a feeler gauge. Correct as necessary by bending side electrode. See Figure 6-7. The gap should be set to 0.030 in.
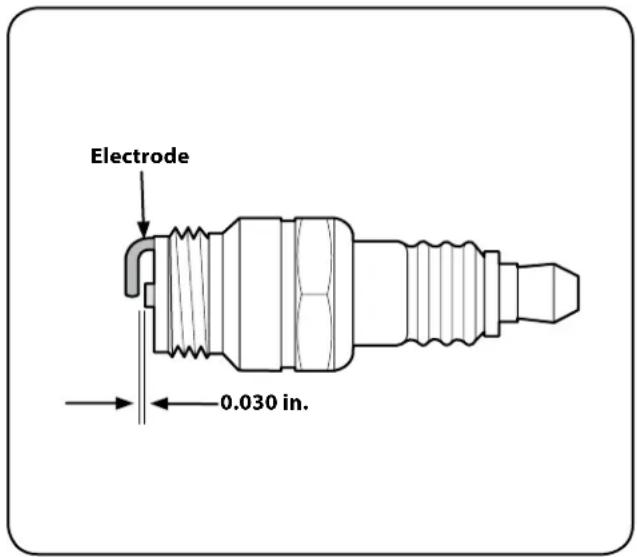
Figure 6-7
- Check that the spark plug washer is in good condition and thread the spark plug in by hand to prevent cross-threading.
- After the spark plug is seated, tighten with a spark plug wrench to compress the washer.
NOTE: When installing a new spark plug, tighten 1/2 turn after the spark plug seats to compress the washer. When reinstalling a used spark plug, tighten 1/8-1/4 turn after the spark plug seats to compress the washer.
IMPORTANT: The spark plug must be securely tightened. An improperly tightened spark plug can become very hot and may damage the engine.
Fuel Filter Service
The fuel filter cannot be cleaned and must be replaced once a year or every 100 operating hours; more often if run with old gasoline.
- Remove all fuel from tank by running engine until it stops from lack of fuel.
- Remove hose clamp from fuel line and remove fuel line from tank outlet. See Figure 6-8.
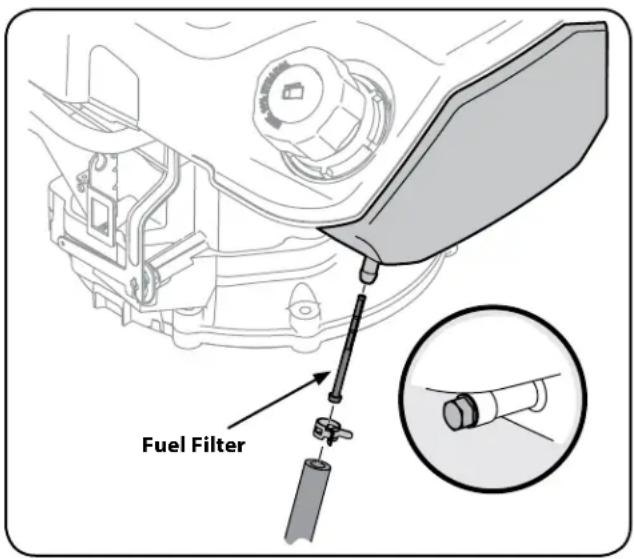
Figure 6-8
- Pull out old fuel filter from tank outlet. Replace when dirty or damaged.
- Grasp new fuel filter from shouldered end and insert it completely to the shoulder into the tank outlet. See Figure 6-8 inset.
- Replace fuel line and c-clamp.
Clean Engine
If the engine has been running, allow it to cool for at least half an hour before cleaning. Periodically remove dirt build-up from engine. Clean finger guard and around muffler. Clean with a brush or compressed air.
IMPORTANT: Do not spray engine with water to clean because water could contaminate fuel. Using a garden hose or pressure washing equipment can also force water into the air cleaner or muffler opening. Water in the air cleaner will soak the paper element, and water that passes through the element or muffler can enter the cylinder, causing damage.

WARNING: Accumulation of debris around muffler could cause a fire. Inspect and clean before every use.
Storage

CAUTION: Failure to use a fuel stabilizing additive or completely run the engine until it's out of fuel before off-season storage may result in damage to your engine's carburetor. Subsequent damage would not be covered under the manufacturer's warranty.
Gasoline that will be stored longer than 30 days needs to be pre-treated upon purchase with fuel stabilizer to prevent gum and varnish from forming in the engines fuel and intake system. Improper fuel storage can result in hard starting, no starting, stalling and poor performance. If the gasoline in your engine deteriorates during storage, you may need to have the carburetor, and other fuel system components, serviced or replaced.
- Remove all fuel from tank by running engine until it stops from lack of fuel.

WARNING: Never leave engine unattended while running.
- Change oil. See Oil Change section on page 12.
- Remove spark plug and pour about 1/2 an ounce of engine oil into cylinder. Replace spark plug and crank slowly to distribute oil.
- Clean debris from around engine, under finger guard, and under, around and behind muffler. Touch up any damaged paint, and coat other areas that may rust with a light film of oil.
- Store in a clean, dry and well ventilated area away from any appliance that operates with a flame or pilot light, such as a furnace, water heater, or clothes dryer. Also avoid any area with a spark producing electric motor, or where power tools are operated.
- If possible, also avoid storage areas with high humidity, because that promotes rust and corrosion.
- Keep the engine level in storage. Tilting can cause fuel or oil leakage.
Removing From Storage
- Check your engine as described in Pre-Operation Check on page 9 of Operation section of this manual.
- If the fuel was drained during storage preparation, fill the tank with fresh gasoline. If you keep a container of gasoline for refueling, make certain it contains only fresh fuel. Gasoline oxidizes and deteriorates over time, causing hard starting.
- If the cylinder was coated with oil during storage preparation, the engine will smoke briefly at startup. This is normal.
Troubleshooting
| Problem Cause | Remedy | |
| Engine fails to start | 1. Blade control disengaged (Lawn mower only).2. Spark plug boot disconnected.3. Fuel tank empty or stale fuel.4. Fuel shut-off valve closed (if equipped).5. Engine not primed (if equipped with primer).6. Faulty spark plug.7. Reduced fuel flow/blocked fuel filter.8. Engine flooded.9. Engine not choked (if equipped with choke). | 1. Engage blade control.2. Connect wire to spark boot.3. Fill tank with clean, fresh gasoline.4. Turn on fuel shut-off valve.5. Prime engine as instructed in the Operation section.6. Clean, adjust gap, or replace.7. Replace fuel filter as instructed in the Maintenance section.8. Wait a few minutes to restart, but do not prime.9. Choke engine. See Operation section. |
| Engine fails to start with electric starter (Electric Start Units Only) | 1. Electric starter push key not fully inserted.2. Battery not charged.3. Circuit breaker tripped. | 1. Insert electric starter push key into starter housing until it snaps into place.2. Charge battery. See Service section of equipment Operator's Manual.3. Debris may be blocking blade operation. Stop engine, remove electric starter push key, and disconnect spark plug boot. Verify grass or other debris are not obstructing the blade. Carefully clean out debris if necessary. Reattach spark plug boot and reinsert electric starter push key. Wait one minute after tripping for circuit breaker to automatically self-reset then reattempt start. |
| Engine runs erratic 1. Spark plug boot loose.2. Reduced fuel flow/blocked fuel filter.3. Vent in gas cap plugged (if equipped).4. Water or dirt in fuel system.5. Dirty air cleaner.6. Unit running with CHOKE (if equipped) applied. | 1. Connect and tighten spark plug boot.2. Replace fuel filter as instructed in the Maintenance section.3. Clear vent.4. Drain fuel tank. Refill with fresh fuel.5. Refer to Maintenance section.6. Push CHOKE knob in. | |
| Engine overheats 1. Engine oil level low.2. Air flow restricted. | 1. Fill crankcase with proper oil.2. Clean area around and on top of engine. | |
| Occasional skips (hesitates) at high speed | 1. Spark plug gap too close. 1. Adjust gap to .030" | |
| Idles poorly 1. Spark plug fouled, faulty, or gap too wide.2. Dirty air cleaner. | 1. Reset gap to .030" or replace spark plug.2. Refer to Maintenance section. | |
| Engine stalls with full tank 1. Carbon canister vent line(s) pinched/kinked (if equipped with carbon canister). | 1. Refer to Carbon Canister Filter Service section on page 13 to remove engine shroud and relieve pinched/kinked vent line(s). Re-install engine shroud making sure vent line(s) are not pinched or kinked. |
Replacement Parts
8
| Component Part Number and Description | |
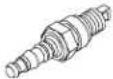 | 951-14437 Spark Plug |
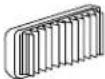 | 951-14632 Air Filter |
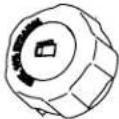 | 951-14407 Fuel Cap Assembly |
 | 951-12296 Fuel Filter |
Phone (800) 800-7310 or (330) 220-4683 to order replacement parts or a complete Parts Manual (have your full model number and serial number ready). Parts Manual downloads are also available free of charge at www.mtdproducts.com.

The EZ Start Promise Provisions of Your Limited Warranty
In addition to the other terms and conditions of the Limited Warranty applicable to your new mower, MTD LLC ("MTD") hereby warrants that your mower's engine will start on the first or second attempt by an able-bodied adult (subject to the limitations described below) for the duration of the manufacturer's limited warranty applicable to your product. If the engine on your mower fails to conform to this limited warranty, MTD will cover the cost of parts and labor associated with any adjustments and/or repairs necessary to return your engine to its warranted condition. In order to make a claim under these provisions of your warranty, you must bring the product and proof of purchase to an authorized MTD service provider. In many cases, the retailer who sold you your mower is not equipped to provide warranty service, so please locate the authorized service dealer nearest you by either calling the phone number provided in your Operators Manual or looking up an authorized service dealer on-line at www.mtdproducts.com.
Items and Conditions Not Covered
The EZ Start Promise does not cover and/or apply to the following:
- Cost of regular maintenance service or parts, such as filters, fuel, lubricants, oil changes, spark plugs, air filter, blade sharpening, worn blades, cable/linkage adjustments, or brake and clutch adjustments
- Transportation costs to and from an authorized MTD service provider
- Any engine used for commercial, rental, institutional, governmental, or non-residential applications
- Any product or part that has been altered or misused or required replacement or repair due to misuse, accidents, or lack of proper maintenance
- Repairs necessary due to improper battery care, electrical supply irregularities, or failure to properly prepare the mower prior to any period of non-use over three months
- Pickup and/or delivery charges
-
Operational misuse, neglect, accidents, unauthorized repairs or attempted repairs of the engine or its components by anyone other than an authorized MTD service provider.
-
Repairs or adjustments to correct starting difficulties due to any of the following: failure to follow proper maintenance procedures — rotary mower blade striking an object — contaminants in the fuel system — improper fuel or fuel/oil mixture (consult your Operator's Manual if in doubt) — failure to drain the fuel system prior to any period of non-use over three months.
- Any starting problem which results from the use of inappropriate fuels, lubricants, or additives.
- Special conditions or circumstances that normally require more than two pulls to start, specifically: 1) First start-up following your initial purchase, 2) first time starts after extended period(s) of non-use over one month or seasonal storage, 3) cool temperature starts such as those found in early spring and late autumn, and 4) difficult starting that results from the operator's failure to follow the proper starting procedures identified in the Operator's Manual. If you are having difficulty starting your unit, please check the Operator's Manual to ensure that you are using the correct starting procedures. This can save an unnecessary visit to a Service Dealer.
Owner Responsibilities
You must maintain your mower (including its engine) by following the maintenance procedures and starting instructions described in the Operator's Manual. Such routine maintenance, whether performed by a dealer or by you, is at your expense. In addition, please retain your proof of purchase and service receipts as these may be required to validate a claim.
General Conditions
An authorized MTD service provider using approved replacement parts must perform all repairs covered by the EZ Start Promise. Repair by an MTD authorized service dealer is your sole remedy under this warranty. MTD is not liable for indirect, incidental, or consequential damages in connection with the use of the products covered by these warranties, including any cost or expense of providing substitute equipment or service during reasonable periods of malfunction or non-use pending completion of repairs under this warranty.
Some states do not allow exclusions of incidental or consequential damages, or limitations on how long an implied warranty lasts, so certain exclusions and limitations may not apply to you.
MANUAL DEL OPERADOR
natural_image
Technical line drawing of a mechanical device with no visible text or symbolsnatural_image
A row of identical empty rectangular boxes with no text or symbols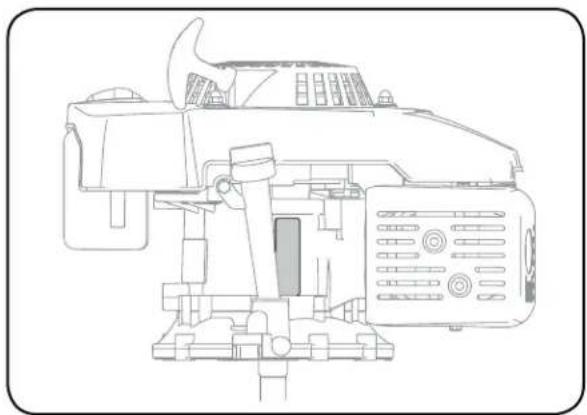
natural_image
Technical line drawing of a mechanical device with no visible text or symbolsbar
| Scenario | Temperature Range (°C) | Temperature Range (°F) | | :--- | :--- | :--- | | ① | -30°C to -20°C | -20°C to -10°C | | ① | 0°C to 40°C | 0°C to 60°C | | ① | 60°C to 80°C | 80°C to 100°C | | ① | 100°C to 20°C | 30°C to 40°C | | ① | 20°C to 30°C | 40°C to 50°C | | ② | -30°C to -20°C | -20°C to -10°C | | ② | 0°C to 40°C | 0°C to 40°C | | ② | 40°C to 60°C | 60°C to 80°C | | ② | 80°C to 100°C | 100°C to 200°C | | ② | 100°C to 200°C | 200°C to 300°C | | ② | 200°C to 300°C | 300°C to 400°C |Figura 3-13
Figura 1-16
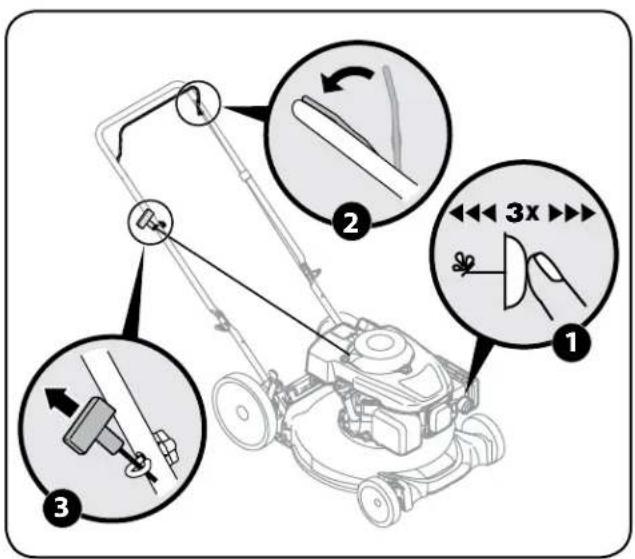
Figura 1-17
Figura 1-18
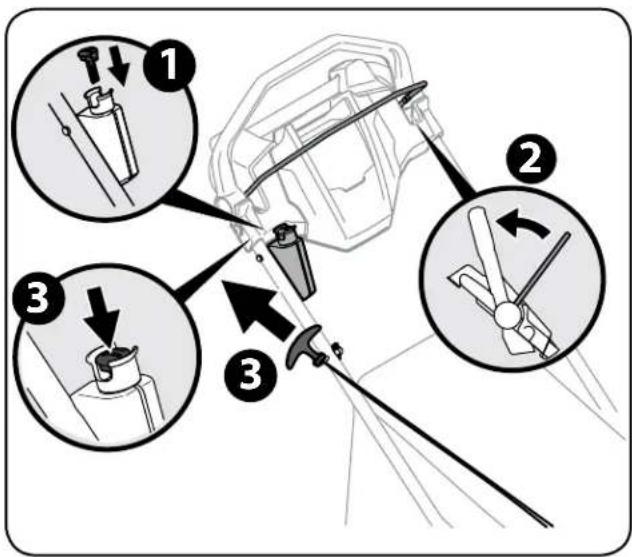
Figura 1-19
- WARNING
- To The Owner
- Thank You
- Table of Contents
- Record Product Information
- MODEL NUMBER
- SERIAL NUMBER
- Customer Support
- Important Safe Operation Practices
- 2
- CALIFORNIA PROPOSITION 65
- Training
- Preparation
- Safe Handling of Gasoline:
- Operation
- Maintenance & Storage
- Do not modify engine
- Notice Regarding Emissions
- Spark Arrestor
- Safety Symbols
- Set-Up
- 3
- Gas & Oil
- Oil Recommendations
- Checking Oil Level
- Fuel Requirements
- Adding Fuel
- Primer (If Equipped)
- Engine Switch (If Equipped)
- Choke (If Equipped)
- Fuel Shut-Off Valve (If Equipped)
- Oil Drain
- Oil Fill Cap
- Fuel Cap
- 5
- Pre-Operation Check
- Determine The Starting System
- Starting the Engine
- Auto-Choke System
- Primer System
- Manual Choke System
- Auto-Choke/Electric Start System
- Stopping Engine
- Engine Maintenance
- Oil Service
- Oil Change
- Air Filter Service
- Carbon Canister Filter Service
- Spark Plug Service
- Fuel Filter Service
- Clean Engine
- Storage
- Removing From Storage
- Troubleshooting
- Replacement Parts
- The EZ Start Promise Provisions of Your Limited Warranty
- Items and Conditions Not Covered
- Owner Responsibilities
- General Conditions
- MANUAL DEL OPERADOR
Brand : Craftsman
Model : CMXGTAM202501
Category : Uncategorized