
GFC530F - Bin GE - Free user manual and instructions
Find the device manual for free GFC530F GE in PDF.


| Product Type | Food Waste Disposer (Garbage Disposal) |
| Brand | GE |
| Model | GFC530F |
| Overall Dimensions (H x W x D) | Approx. 13.1 x 7.75 x 6.9 inches |
| Weight | Approx. 12 lbs |
| Power Supply | 110–120V, 60 Hz AC |
| Motor Type | Permanent magnet, overload protected |
| Feed Type | Continuous feed (model may vary) |
| Grind System | Anti-jam swivel impellers |
| Dishwasher Connection | Yes, with knockout plug |
| Sink Opening Required | Standard 3-1/2 inch |
| Electrical Connection | Plug-in cord (not included) or direct wire |
| Safety Features | Overload protector, manual reset button, grounded cord |
| Installation Components Included | Sink flange, rubber gasket, fiber gasket, support ring, mount ring, cushion mount, discharge elbow, gaskets |
| Splash Guard | Removable (continuous feed models only) |
| Maintenance | Self-cleaning, do not lubricate; use citrus rinds for odor |
| Warranty | 1 year full + 2 years limited (parts only) for GFC530 |
| Prohibited Items | Metal, glass, plastic, large bones, hot grease, clam/oyster shells |
| Noise Level | Typical grinding noise |
| Material | Stainless steel grind ring and turntable (estimated) |
Frequently Asked Questions - GFC530F GE
User questions about GFC530F GE
0 question about this device. Answer the ones you know or ask your own.
Ask a new question about this device
Download the instructions for your Bin in PDF format for free! Find your manual GFC530F - GE and take your electronic device back in hand. On this page are published all the documents necessary for the use of your device. GFC530F by GE.
USER MANUAL GFC530F GE
Connecting Electricity ..... 2, 3
Safety Precautions ..... 2
Installation Instructions
Attaching the
Discharge Elbow 6
Components and Installation
of Sink Flange 5
Connecting Disposer
to Sink Flange .....7
Dimensions/Typical
Installations . . . . . . . . . . . . . . . . . . . . . . . . . . . . . . . . . . . . . . . . . . . . . . . . . 8
Dishwasher Connection ..... 6
Operating Instructions
Batch Feed Models .....9
Care and Maintenance .....10
Continuous Feed Models .....9
Troubleshooting Tips
Before You Call for Service .....11
Consumer Support
Warranty 12
Owner's Manual & Installation Instructions
ModelLineSeries
GFC320
GFC520
GFC530
GFC720
GFC1020
GFB760
Write the model and serial numbers for your disposall here:
numbers for your disposal here:
Model # ____
Serial #
You can find them on a label on the bottom of the disposer.
INSTRUCTIONS PERTAINING TO A RISK OF FIRE, ELECTRIC SHOCK OR INJURY TO PERSONS
⚠ WARNING!
When using electrical appliances, basic safety precautions should be followed, including the following:
SAFETY PRECAUTIONS

Use this appliance only for its intended purpose as described in this Owner's Manual. Read all the instructions before using the appliance. To reduce the risk of injury, close supervision is required when an appliance is used near children. Do not put fingers or hands into a waste disposer. Turn the power switch (normally a wall switch) to the off position before attempting to clear a jam or remove an object from the disposer. When attempting to loosen a jam in a waste disposer, use a long wooden object such as a wooden spoon or the wooden handle of a broom or mop. When attempting to remove objects from a waste disposer, only use long-handled, non-magnetic tools or utensils, since the disposer may be actuated magnetically.
To reduce the risk of injury by materials that may be expelled by a waste disposer, do not put the following into a disposer:
a) Clam or oyster shells. b) Caustic drain cleaners or similar products. c) Glass, china or plastic. d) Large whole bones. e) Metal, such as bottle caps, tin cans, utensils or aluminum foil. f) Hot grease or other hot liquids. g) Whole corn husks.
When not operating a disposer, leave the drain stopper in place to reduce the risk of objects falling into the disposer.
For proper grounding instructions, see the ELECTRICAL CONNECTION portion of this manual.
WARNING!
HOW TO CONNECT ELECTRICITY
If you are not familiar with electrical power and procedures, call a qualified electrician.
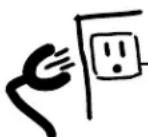
⚠️ DANGER: Improper connection of the equipment-grounding conductor can result in a risk of electric shock. Check with a qualified electrician or serviceman if you are in doubt as to whether the appliance is properly grounded. Do not modify the plug provided with the appliance if it will not fit the outlet; have a proper outlet installed by a qualified electrician.
For Models Equipped with a Grounded Cord:
GROUNDING INSTRUCTIONS: This appliance must be grounded. In the event of a malfunction or breakdown, grounding provides a path of least resistance for electric current to reduce the risk of electric shock. This appliance is equipped with a cord having an equipment-grounding conductor and a grounding plug. The plug must be plugged into an appropriate outlet that is properly installed and grounded in accordance with all local codes and ordinances. Most houses have electrical outlets under the sink that are half-hot. This means one outlet is controlled by the wall switch, while the other is always hot. The batch-feed or "TC" model connects to the hot side, while the continuous feed model connects to the switch side.
▲ WARNING!
HOW TO CONNECT ELECTRICITY (cont.)
If you are not familiar with electrical power and procedures, call a qualified electrician.
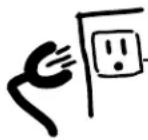
The power cord and/or connections must comply with the National Electrical Code, Section 422 and/or local codes and ordinances.
For Models Not Equipped with a Cord:
If your disposer does not come equipped with a cord, you can connect it in two ways:
- Attach a power cord, minimum 18" in length and not to exceed 36" in length. GE Kit #PM3X115 provides the parts needed to make this connection.
or
- Wire the disposer directly into the house current. GE recommends that a qualified electrician make this connection.
To Attach a Power Cord:
GROUNDING INSTRUCTIONS: This appliance must be grounded. In the event of malfunction or breakdown, grounding provides a path of least resistance for electric current to reduce the risk of electric shock. The power cord (to be installed) must have an equipment-grounding conductor and a grounding plug. The plug must be plugged into an appropriate outlet that is properly installed and grounded in accordance with all local codes and ordinances. In the absence of local codes and/or ordinances, the outlet must comply with NEC requirements.
DANGER:
Improper connection of the
equipment-grounding conductor can result in a risk of electric shock. Check with a qualified electrician or serviceman if you are in doubt as to whether the appliance is properly grounded.
NOTE: Disconnect electric power to disposer circuit before installation. Turn the circuit breaker to the OFF position or remove the fuse.
A. Connect the disposer to 110–120 Volt, 60 Hz AC current only.
B. If a plug-in cord is used, use a three-prong plug. Ground wire should be attached to the ground screw in the bottom of the disposer (end bell).
Trace lead connected to this blade and attach that lead to white wire on disposer.
Ribbed Side
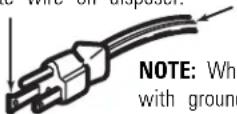
C. Use a cable clamp strain relief connector where power cord enters the disposer.
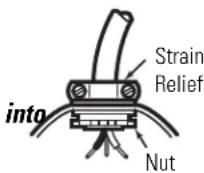
To Wire Your Disposer Directly the House Current:
GE recommends that a qualified electrician make this connection.
GROUNDING INSTRUCTIONS: This appliance must be connected to a grounded, metal, permanent wiring system; or an equipment-grounding conductor must be run with the circuit conductors and connected to the equipment-grounding terminal or lead on the appliance.
DANGER:
Improper connection of the
equipment-grounding conductor can result in a risk of electric shock. Check with a qualified electrician or serviceman if you are in doubt as to whether the appliance is properly grounded.
A. If you use BX cable:
- Install the cable connector in the hole.
- Connect white wire to white lead of disposer.
- Connect black wire.
- Connect bare ground wire.
If BX cable is not used, provide a separate ground wire to the nearest grounded connection, using the screw in the end bell for the ground wire.
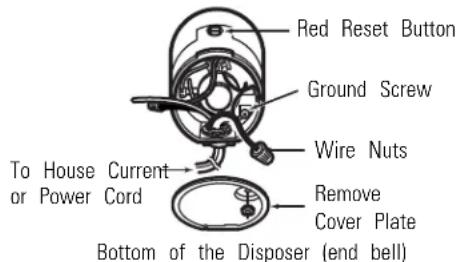
B. If your power supply does not include a ground wire, you must provide one unless metal cable is used. Attach a copper wire securely to disposer ground screw and attach other end of wire to the nearest grounded connection. Use only UL approved ground clamp. If plastic pipe is used in your home, a qualified electrician should install a proper ground. Some homes have electrical outlets under the sink that are half-hot. This means one outlet is controlled by the wall plug switch, while the other is always hot. The batch-feed blade "TC" model connects to the hot side, while the continuous feed model connects to the switch side.

READ AND FOLLOW THIS SAFETY INFORMATION CAREFULLY.
SAVE THESE INSTRUCTIONS
Installation Instructions
Disposer
If you have questions, call 800.GE.CARES (800.432.2737) or Visit our Website at: GEAppliances.com
BEFORE YOU BEGIN
Read these instructions completely and carefully.
- IMPORTANT – Save these instructions for local inspector's use.
- IMPORTANT – Observe all governing codes and ordinances.
- Note to Installer – Be sure to leave these instructions with the Consumer.
- Note to Consumer – Keep these instructions for future reference.
- Skill level – Installation of this appliance requires basic mechanical skills. •Completion time - 1 hour •Proper installation is the responsibility of the installer.
- Product failure due to improper installation is not covered under the Warranty.
PREPARATION
- Disconnect electrical power supply to disposer.
- Remove old disposer or sink flange assembly.
- Inspect drain line. If it is heavily coated with hardened grease and accumulations, rout out with a plumber's snake.
- Remove old sealing materials and gasketing from sink opening, both top and bottom.
NOTE: Top and bottom of sink surfaces must be free of any materials to prevent leaks.
WHAT YOU WILL NEED
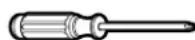
•Phillips and flat blade screwdrivers
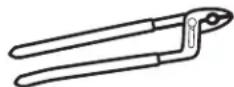
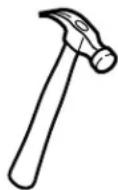
- Channel lock pliers, slip joint • Hammer
•Nut driver
ADDITIONAL MATERIALS YOU MAY NEED
• Steel punch or wooden dowel • Petroleum jelly or liquid soap • Hose clamp • Dishwasher drain connector • Adjustable pipe wrench • Plumber's putty (for cast sinks) • Stepped rubber drain adapter • Wire nuts • Cable connector • Flexible drain pipe • Power cord kit (Part Number PM3X215)
COMPONENTS AND INSTALLATION
COMPONENTS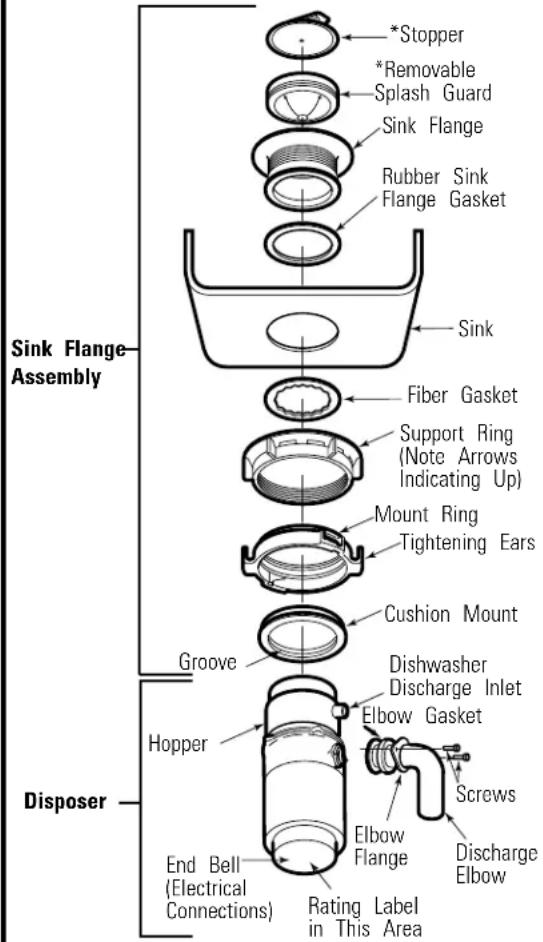
*Not used with batch feed model
NOTE: Pay close attention to the order of the sink flange parts, as they have been correctly assembled by the factory.
A. Disassemble the sink flange assembly from the disposer by turning the mount ring to the left (clockwise) and removing it. B. Raise the mount ring toward the top of the sink flange. Remove the cushion mount and the mount ring. You may want to practice installing the cushion mount at this point before you are under the sink. C. Unscrew the support ring from the sink flange and remove the fiber gasket. You are now left with the sink flange and the rubber gasket.
D. The rubber gasket is used instead of plumber's putty with stainless steel sinks.
E. If no putty is used, insert the sink flange through the rubber gasket into the sink opening. Do not turn the flange once it is seated.
F. If you use putty instead of the gasket, form a ring around the underside of the sink flange. Insert the flange into the sink opening, press down hard to squeeze out excess putty. From under the sink, trim off excess putty flush with the bottom edge of the sink opening. Use putty sparingly on cast iron sinks.
G. From underneath the sink, slip the fiber gasket onto the exposed sink flange. With arrows pointing up, screw the support ring onto the sink flange and hand tighten until the sink flange will not move. At
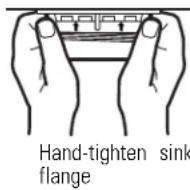
this point you may want to insert the stopper in the sink and fill with water to check the sink flange seal and ensure there are no leaks.
INSTALLATION OF SINK FLANGE (Read completely before starting.)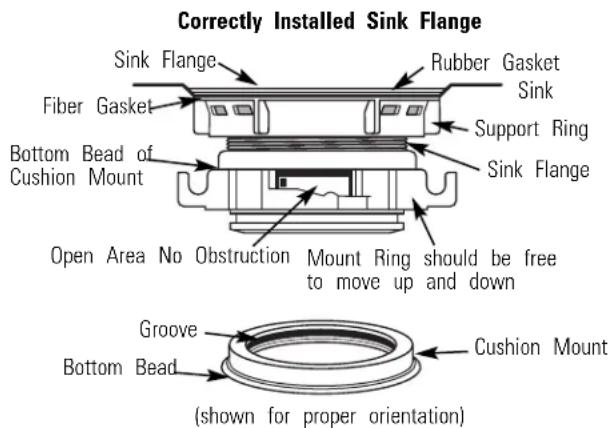
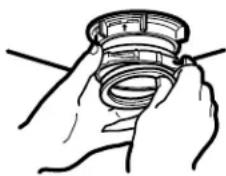
H. Place the mount ring over the sink flange and hold in place while installing the cushion mount (large side down). Make sure the groove on the inside of the cushion mount fits over the lip on the sink flange, similar to putting the lid on a plastic container.
Run your fingers around the entire cushion mount with
Cushion Mount Detail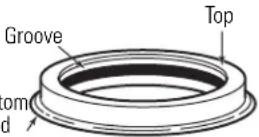
slight pressure. Do not press too hard. When the cushion mount is properly seated, the mount ring can be pulled downward over the cushion mount and will be free to turn.
2 DISHWASHER CONNECTION (IF REQUIRED)
If you are connecting to a dishwasher, complete the following step. If a dishwasher is not to be connected, go on to “Attaching the Discharge Elbow” section.
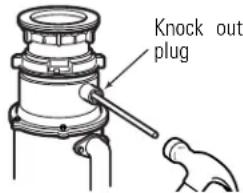
1 KNOCK OUT PLUG
Using a blunt instrument (steel punch or wooden dowel), knock out entire plug. Do not use a screwdriver or sharp instrument. When knockout plug falls into disposer, you may remove it or simply grind it up when the disposer is used. This will not damage the disposer in any way, but may take some time to grind, over the course of several uses.
2 CONNECT HOSE
Connect the dishwasher hose using a hose clamp. If the hose size is different, you will need a stepped rubber adapter.
Hose Clamp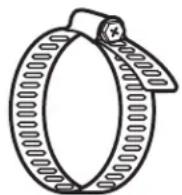
Stepped Rubber Adapter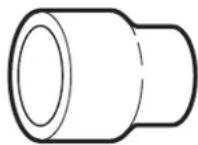
3 ATTACHING THE DISCHARGE ELBOW
CONNECT DISCHARGE ELBOW
Connect the discharge elbow to the disposer.* Make sure all plumbing connections are tight.
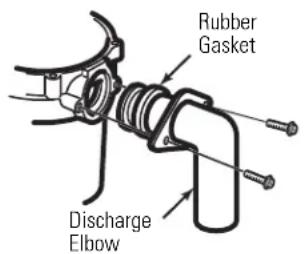
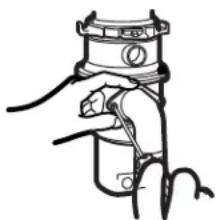
* Some installations (see page 8 for examples) may require the use of a flexible drain pipe.
4 CONNECTING DISPOSER TO SINK FLANGE
1 ATTACH TO SINK FLANGE
Line up the disposer under the sink flange. Guide the hopper projections into the mount ring slots. Turn the mount ring about 1/4" to the right so that the disposer is temporarily supported.
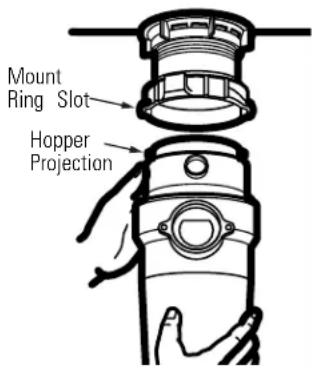
2 LINE UP WITH OUTLET PIPE
Turn the mount ring and the disposer until the disposer discharge elbow lines up with the outlet pipe (see page 8).
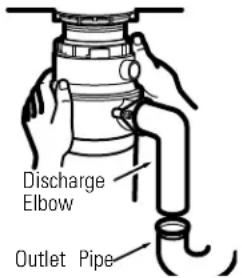
3 LOCK MOUNT RING
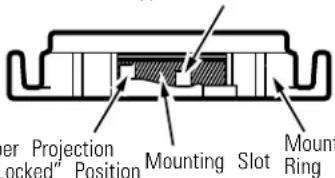
Turn the mount ring slowly to the right until it locks up tight. Hopper projections must be to the extreme left of the mounting slots. If the mount ring is hard to turn, you may add a small amount of petroleum jelly or liquid soap to the hopper projection. Run water and check for leaks.
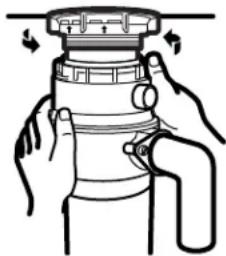
Locking Detail
Hopper Projection in "Supported" Position
4 CHECK FOR LEAKS
Check the unit for leaks 24 hours after installation and first operation.
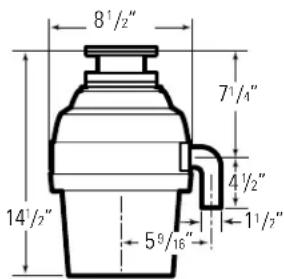
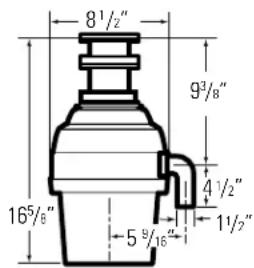
DIMENSIONS
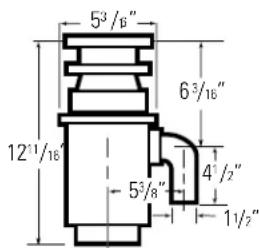
GFC320 Model Series
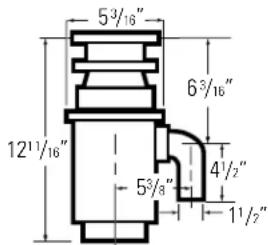
GFC520 Model Series
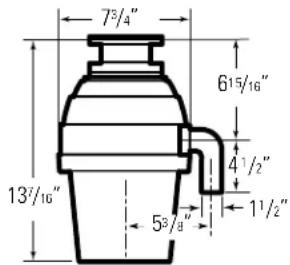
GFC530 Model Series
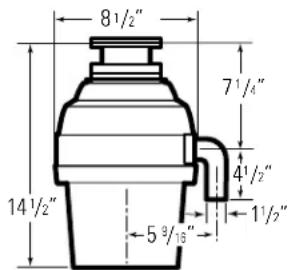
GFC720 Model Series GFC1020 Model
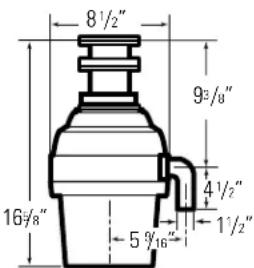
S61B760 Model Series Batch Feed Operation
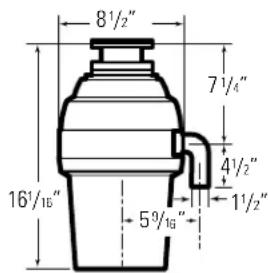
SOME TYPICAL INSTALLATIONS
Direct replacement for most makes & models.
*9" for Model Series GFC320 and GFC520 *10" for Model Series GFC530, GFC720 and GFC1020 *12" for Model Series GFB760
NOTE: It is essential for the proper operation of the disposer that this dimension be 9"-12", depending upon the models listed above, to avoid standing water in disposer motor housing.
**Flexible drain pipe may be necessary for this application.
SINGLE BOWL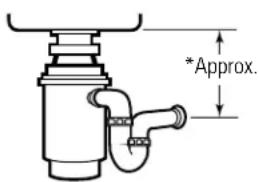
DOUBLE BOWL CENTER OUTLET**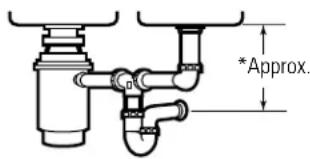
DOUBLE BOWL END OUTLET**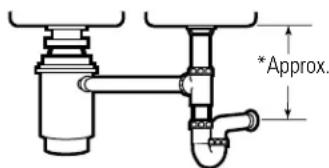
This disposer uses anti-jam swivel impellers that make a clicking sound as they swing into place. This indicates normal operation.
Continuous Feed Models
A. Remove the sink stopper and turn on a medium flow of cold water.
B. Turn the switch to ON.
C. Scrape in food waste. To speed up food waste disposal, cut or break up large bones, rinds and cobs. Large bones and fibrous husks require considerable grinding time and are more easily thrown away with other trash. Do not be alarmed that the disposer slows down while grinding. The disposer is actually increasing torque (grinding power) and is operating under normal conditions.
D. Before turning the disposer off, let the water and the disposer run for approximately 25 seconds after shredding stops. This assures that all waste is thoroughly flushed through the trap and drain.
E. Do not use hot water while running the disposer. Cold water will keep food waste and fats solid so they can be flushed down the drain.
Batch Feed Models
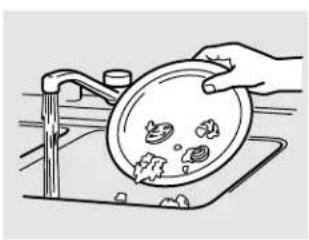
A. Remove the sink stopper and turn on a medium flow of cold water.
B. Scrape in food waste.
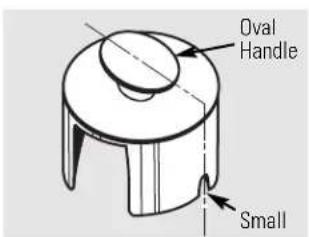
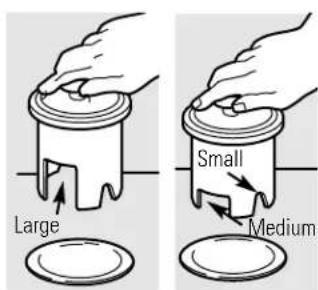
C. Insert the stopper to start the disposer. One of the two small slots in the stopper base must line up with the switch plunger inside the neck of the disposer.
NOTE: The oval shaped handle aligns with the 2 small slots in the stopper.
Push down firmly to start.
D. Run the disposer for 25 seconds after shredding stops. This assures that all waste is thoroughly flushed through the trap and drain.
Lift the stopper to shut the disposer off.
E. To fill the sink, insert the stopper so that the largest slot lines up with the switch plunger. The stopper can now be pushed down to seal the sink without starting the disposer. When the medium-sized slot in the stopper base is lined up with the switch plunger, water can drain, but tableware, etc., cannot be accidentally dropped into the disposer.
Helpful Hints
A. Be sure the disposer is empty before using the dishwasher so it can drain properly. B. You may want to leave the stopper in the drain when not in use to prevent utensils and foreign objects from falling into the disposer. C. The disposer is ruggedly built to give you years and years of trouble-free service. It will handle all normal food wastes—BUT it will not grind and dispose such items as tin cans, bottles and bottle caps, glass, china, leather, cloth, crockery, rubber, string, feathers, or clam or oyster shells. These are waste materials and belong in the trash can or trash compactor.
D. TO SPEED UP FOOD WASTE DISPOSAL...Cut or break up large bones, melon rinds, grapefruit skins and corn cobs. Items such as large bones, fibrous husks like lima bean pods and corn husks require considerable cutting time. For this reason, you may prefer to place them in the trash can or trash compactor.
Care and maintenance.
THE MOTOR IS PERMANENTLY LUBRICATED FOR LIFE. DO NOT ATTEMPT TO LUBRICATE YOUR DISPOSER. The disposer is self cleaning and scours itself with each use.
■ NEVER put lye or chemical cleaners into the disposer, as they cause serious corrosion of metal parts. Your disposer, except for the Batch Feed model, is equipped with a removable splash guard for ease of cleaning or replacement. Remove the splash guard by pulling it out from the top. To replace, insert into the sink flange and push down until it is properly seated. If an odor develops, run orange or lemon rinds through the disposer. A dozen ice cubes sprinkled with a little household scouring powder will also work.

Troubleshooting Tips
Save time and money! Review the chart on this page first and you may not need to call for service.
SAFETY NOTE: Before investigating, you must disconnect the power supply.
▲ WARNING!
Before resetting, disconnect the power supply—please see SAFETY NOTE above. The overload control prevents the motor from operating should overloading occur. This feature protects your house wiring and your disposer. When overloaded, the motor will stop automatically.
| Problem Possible Causes What To Do | ||
| Loud noises (other than those during grinding of bones and fruit pits) the | Silverware, bottle cap or other foreign object has fallen into disposer. | Remove the splash guard* and remove the object with long-handled tongs. Replace the splash guard.* |
| Disposer does not start | Reset button has been tripped.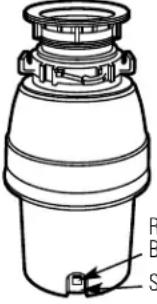 eset utton erial No. eset utton erial No. | With the splash guard* removed, check to see if the turntable will move freely using a broom handle. If the turntable moves freely, replace the splash guard* and check the reset button to see if it has been tripped. The reset button is red and located opposite the discharge elbow, near the bottom of the disposer. Push the button in until it clicks and remains depressed. If the reset button has not been tripped, check for a shorted or broken wire connecting to the disposer. Check the electrical power switch, fuse box or circuit breaker. If wiring and electrical components are intact, the unit may have internal problems that require service or replacement. |
Turntable cannot rotate.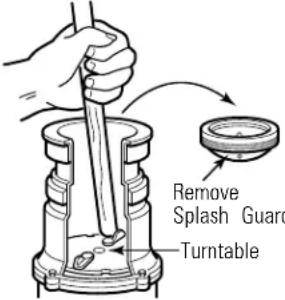 | If the turntable does not turn freely, check for an object lodged between the turntable and the grind ring. Dislodge the object by moving the turntable with a broom handle. Then remove the object.If no foreign object is present, there may be internal problems. | |
| Disposer leaks | If the leak is at the top, it may be caused by:Improper seating of sink flange(gasket choice, putty or tightening).Support ring not tightened properly.Defective cushion mount.If the leak is at the discharge elbow, leak may be caused by improper tightening of elbow flange screws. | |
*Batch Feed does not include splash guard.
All warranty service provided by our Factory Service Centers, or an authorized Customer Care technician. To schedule service on-line, visit us at GEAppliances.com, or call 800.GE.CARES (800.432.2737). Please have serial and model numbers available when calling for service.
Staple your receipt here. Proof of the original purchase date is needed to obtain service under the warranty.
| For The Period Of: GE Will Replace: | |
| One YearFrom the date of the original purchase | The entire disposer if there is a defect in materials or workmanship relating to functional parts only (appearance parts are excluded). During thisfull one-year warranty, GE will also provide,free of charge, all labor charges related to replacing the original disposeralongwith the replacement disposer within the first year. |
| Additional One YearFrom the date of the original purchase | Model Line Series GFC520: If there is a defect in materials or workmanship relating to functional parts only (appearance parts are excluded). During thisone year extended limited warrantyperiod, you will be responsible for all installation charges relating to the replacement disposer. |
| Additional Two YearsFrom the date of the original purchase | Model Line Series GFC530: If there is a defect in materials or workmanship relating to functional parts only (appearance parts are excluded). During thistwo year extended limited warrantyperiod, you will be responsible for all installation charges relating to the replacement disposer. |
| Additional Four YearsFrom the date of the original purchase | Model Line Series GFC720: If there is a defect in materials or workmanship relating to functional parts only (appearance parts are excluded). During thifour year extended limited warrantyperiod, you will be responsible for all installation charges relating to the replacement disposer. |
| Additional Six YearsFrom the date of the original purchase | Model Line Series GFC1020: If there is a defect in materials or workmanship relating to functional parts only (appearance parts are excluded). During thissix year extended limited warrantyperiod, you will be responsible for all installation charges relating to the replacement disposer. |
What GE Will Not Cover:
■ Service trips to your home to teach you how to use the product.
Improper installation, delivery or maintenance.
Failure of the product if it is abused, misused, or used for other than the intended purpose or used commercially.
■ Replacement of house fuses or resetting of circuit breakers.
■ Damage to the product caused by accident, fire, floods or acts of God. ■ Incidental or consequential damage caused by possible defects with this appliance. ■ Damage caused after delivery. ■ Product not accessible to provide required service.
EXCLUSION OF IMPLIED WARRANTIES—Your sole and exclusive remedy is product repair as provided in this Limited Warranty. Any implied warranties, including the implied warranties of merchantability or fitness for a particular purpose, are limited to one year or the shortest period allowed by law.
This warranty is extended to the original purchaser and any succeeding owner for products purchased for home use within the USA. If the product is located in an area where service by a GE Authorized Servicer is not available, you must be responsible for a trip charge or you may be required to bring the product to an Authorized GE Service Location for service. In Alaska, the warranty excludes the service calls to your home.
Some states do not allow the exclusion or limitation of incidental or consequential damages. This warranty gives you specific legal rights, and you may also have other rights which vary from state to state. To know what your legal rights are, consult your local or state consumer affairs office or your state's Attorney General.



- INSTALLATION INSTRUCTIONS
- OPERATING INSTRUCTIONS
- TROUBLESHOOTING TIPS
- CONSUMER SUPPORT
- INSTRUCTIONS PERTAINING TO A RISK OF FIRE, ELECTRIC SHOCK OR INJURY TO PERSONS
- ⚠ WARNING
- SAFETY PRECAUTIONS
- WARNING
- HOW TO CONNECT ELECTRICITY
- FOR MODELS EQUIPPED WITH A GROUNDED CORD
- ▲ WARNING
- HOW TO CONNECT ELECTRICITY (CONT.)
- FOR MODELS NOT EQUIPPED WITH A CORD
- TO ATTACH A POWER CORD
- DANGER
- DISPOSER
- BEFORE YOU BEGIN
- PREPARATION
- WHAT YOU WILL NEED
- ADDITIONAL MATERIALS YOU MAY NEED
- COMPONENTS AND INSTALLATION
- DISHWASHER CONNECTION (IF REQUIRED)
- KNOCK OUT PLUG
- CONNECT HOSE
- ATTACHING THE DISCHARGE ELBOW
- CONNECT DISCHARGE ELBOW
- CONNECTING DISPOSER TO SINK FLANGE
- ATTACH TO SINK FLANGE
- LINE UP WITH OUTLET PIPE
- LOCK MOUNT RING
- CHECK FOR LEAKS
- DIMENSIONS
- SOME TYPICAL INSTALLATIONS
- CONTINUOUS FEED MODELS
- BATCH FEED MODELS
- HELPFUL HINTS
- CARE AND MAINTENANCE
- WHAT GE WILL NOT COVER
Brand : GE
Model : GFC530F
Category : Bin