ORC98G - Range hood OMEGA - Free user manual and instructions
Find the device manual for free ORC98G OMEGA in PDF.


| Product Type | Glass Canopy Range Hood |
| Model | ORC98G |
| Brand | Omega |
| Power Supply | 220-240V ~ 50Hz |
| Total Power Consumption | 305 W |
| Motor Power | 265 W |
| Lighting Power | 2 x 20 W (Halogen capsule lamp) |
| Air Output (max) | 1000 m³/h |
| Ventilation Tube Diameter | 150 mm |
| Noise Level | Low noise (specific value not given) |
| Speed Settings | 3 speeds (Low, Mid, High) |
| Control Type | Push button with indicator lights |
| Filter Type | Reusable aluminum grease filter (easy-clean, non-stick); optional activated charcoal filter for recirculation |
| Material | Stainless steel and glass |
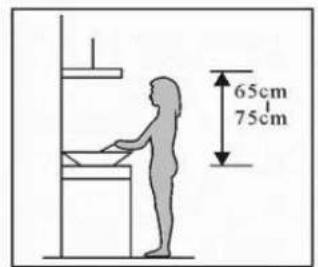
| Installation Height | 65-75 cm (26-30 inches) above cooking surface |
| Venting Type | Ducted or recirculation (with charcoal filter) |
| Special Features | Wind tunnel construction, centrifugal fan, low voltage (12V) halogen lights, safety screws included |
| Cleaning | Grease filter: dishwasher safe or hand wash; body: warm water with non-corrosive detergent |
| Warranty | Refer to warranty card (not specified) |
| Weight | Not specified (estimate approx. 15-20 kg) |
Frequently Asked Questions - ORC98G OMEGA
User questions about ORC98G OMEGA
0 question about this device. Answer the ones you know or ask your own.
Ask a new question about this device
Download the instructions for your Range hood in PDF format for free! Find your manual ORC98G - OMEGA and take your electronic device back in hand. On this page are published all the documents necessary for the use of your device. ORC98G by OMEGA.
USER MANUAL ORC98G OMEGA
Instructions for the Use and Care and Installation of
ORC97G
ORC98G
Glass Canopy Rangehoods
CONTENTS
| 1 | N o t i c e |
| 2 | Features |
| 3 | Installation |
| 4 | Notice of installation |
| 5 | Safety Warning |
| 6 | Use Instructions |
| 7 | Maintenance |
| 8 | Troubleshooting |
| 9 | Specification |
It is important that you retain these instructions, proof of purchase as well as other important documents about this product for future reference.
Due to continual product development, Omega reserves the right to alter specifications or appearances without notice.
Dispose of packaging responsibly – recycle where facilities are available.
(1) NOTICE
- Thank you for choosing our cooker hood. Please read the instruction manual carefully before use.
- The installation work must be undertaken by a qualified electrician and competent installer.
- The manufacturer disclaims all liability for any damage or injury caused as a result of not following instructions for installation contained in the following text.
The cooker hood is rated for use on 220/240V, 50Hz.
2
(2) FEATURES
- The cooker hood uses high quality materials, and is made with a streamlined design.
- Equipped with a high power electric motor and centrifugal fan, it produces strong suction with low noise, and features a non stick grease filter which is easy to clean.
- The isolated low voltage (12 volt) circuit board control, means the halogen lights are brighter and safer than incandescent alternatives.
- Due to the special wind tunnel construction and filter design, any odours and dust will be absorbed quickly.
(3) INSTALLATION
1) The cooker hood should be placed at a distance of 65-75cm (26-30inch) from the cooking surface for the best effect. See Pic 1.
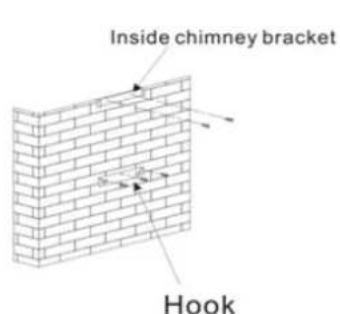
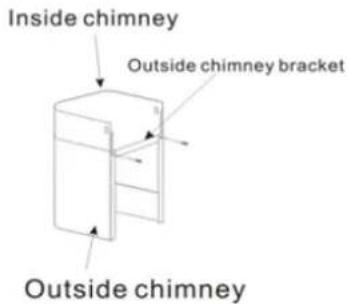
2) Install the hook on a suitable place once the installation height is fixed, and keep it in line. The fixed position of the
Pic1
inside chimney bracket is the place of chimney.
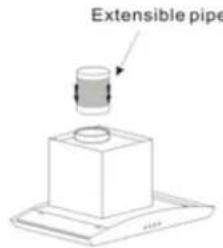
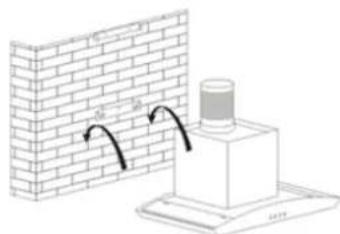
3) Fix the extensible pipe according to the lead direction and way, and then put the cooker hood on the hook. See pic 3.
4) Lead the extensible pipe outside of the room, meanwhile adjust the height of the inside chimney to the position of the inside chimney bracket and fix on it by screw, here should be sure the inside chimney can be flexed freely. See Pic 4.
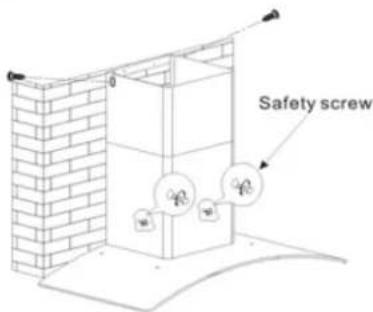
5) Put the two chimneys together onto the cooker hood body, meanwhile adjust the height of the inside chimney into the suitable height, and fix the inside chimney to the inside chimney bracket by screw. Finally, fix the body with safety screw. See Pic 5.
natural_image
Diagram showing a brick wall and a cylindrical object mounted on a base, with curved arrows indicating motion or force direction (no text or symbols)Pic 3
Pic 2
Pic 5
Pic 4
Note: Fix the Canopy with safety screws. See Pic 5. The two safety screw holes are positioned on the back casing, with diameter of 6mm.
Warning: Failure to install the screws or fixing device in accordance with these instructions may result in electrical hazards.
(4) NOTICE OF INSTALLATION
- Before installation, please ensure the area is clean, to avoid suction of the remaining bits of broken wood and dust.
- The canopy hood cannot share the same air ventilation ducting as other appliances, such as gas and electric heaters.
- The bending of the ventilation ducting should be ≥ 120^ , parallel or above the exit vent, and should be connected through the external wall.
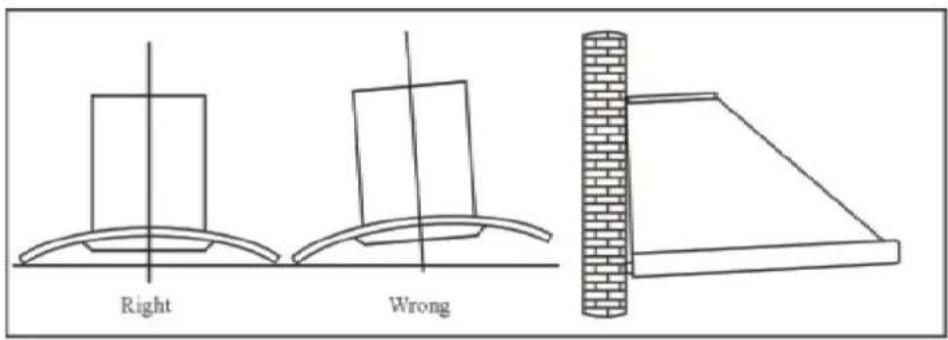
- After installation, make sure that the extractor is level to avoid grease collection at one end.
Pic5
NOTE: Remove all protective plastic coatings from the stainless steel surfaces before use.
(5) SAFETY WARNING
Young children should be supervised to ensure that they do not play with the appliance.
The appliance is not intended for use by persons (including children) with reduced physical, sensory or mental capabilities, or lack of experience and knowledge, unless they have been given supervised or instruction concerning use of the appliance by a responsible person for their safely.
Your cooker hood is for domestic use only, not suitable for barbecue, fast - food shops, and other commercial use.
✿ Any installation work must be carried out by a qualified electrician or competent person.
The cooker hood and its filter mesh should be cleaned regularly in order to keep in good working order.
Before cleaning, always ensure that you have switched your cooker hood off.
Do not flambé under the range hood.
Clean the cooker hood according to the instruction manual, and keep the cooker hood away from the danger of flames.
If there is any fault with your cooker hood, please call the customer service number in the Warranty Card.
Please keep the room adequately ventilated when your cooker hood and gas hob are working.
Do not exhaust the gas from cooker hood through the same heated flue which is for the gas from gas hob and other kitchen appliances.
Before installation and usage, read all the instructions and make sure that the voltage (V) and the frequency (Hz) indicated on your cooker hood are exactly the same as the voltage (V) and the frequency (Hz) in your home.
To ensure that you get the best Warranty experience for your cooker hood, please provide copies of the Warranty Card and purchase receipt, when booking warranty work with the Customer Service department.
(6) USE INSTRUCTIONS
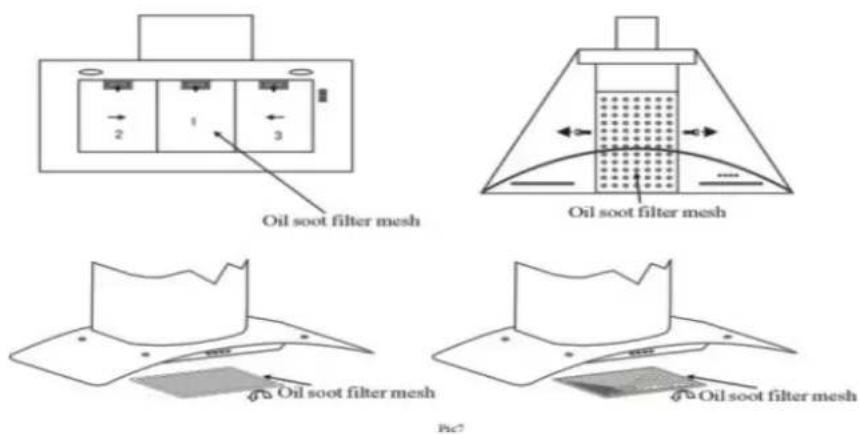
The re-usable aluminium grease filters supplied with this rangehood should be cleaned every month or so to avoid grease build-up.
To remove the grease filter, release the locking mechanism at the front of the filter, and lower the filter slightly to unhook it at the back. Whilst the filter is removed, clean off any residual grease from the housing to avoid fire risk.
When replacing the grease filters, ensure that the locking mechanism is facing down.
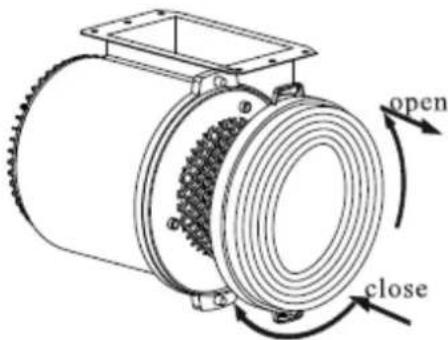
If the rangehood is used in re-circulation mode, the activated charcoal filter must be in place. These charcoal filters are designed to absorb cooking odours and are located in the canopy above the grease filters. Before fitting or replacing charcoal filters, the grease filters must first be removed.
To remove, or install, the charcoal filter - twist the charcoal filter in the direction shown below.
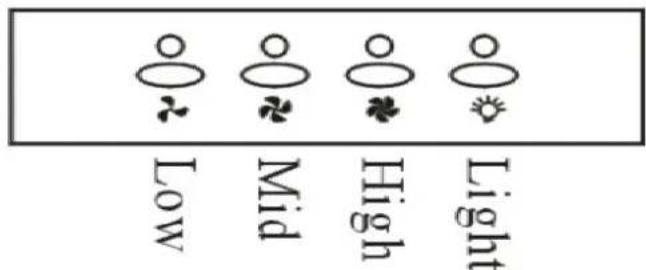
SPEED ADJUSTMENT - See pictures
-
Push the "Low" button, the indicating light 1 is on, and the motor runs at low speed. Push it again and the motor will stop.
-
Push the "Mid" button, the indicating light 2 is on, and the motor runs at mid speed. Push it again and the motor will stop.
-
Push the "High" button, the indicating light 3 on , and motor runs at high speed. Push it again and the motor will stop
-
Push the light button; the indicating light 4 on, and the two lighting lamps is on. Push it again and the lamps will be off.
Indicatorlight


Pic6A
(7) MAINTENANCE
7.1 Cleaning the grease filter mesh
The filter mesh is made of high-density stainless steel. Please do not use corrosive detergent on it. Keeping this filter clean will keep the appliance running correctly. Please strictly follow the guidelines below.
Method 1: Place the mesh in 40 - 50 DegC clean water, add in a small amount of detergent, and soak for 2 - 3 minutes. Wear gloves, and clean with a soft brush. Do not apply too much pressure, as the mesh is delicate and will damage easily.
Method 2: The grease filters can be put into a dishwasher. To do so, set the temperature at around 60 degrees.
7.2 Notice of cleaning cooker hood
A. To protect the main body from corrosion over a long period of time, the cooker hood should be cleaned with hot water plus non corrosive detergent every two months.
B. Please do not use abrasive detergent for it will damage the body.
C. Keep the motor and other spare parts free from water, as this will cause damage to the appliance.
D. Before cleaning the appliance please remember to turn off power
E. If fitted with active charcoal filters, the charcoal filter should not be exposed to heat.
F. Please do not tear open the fixed bar around the active charcoal filter.
G. If the supply cord is damaged, it must be replaced by the manufacturer or its service agent or a similarly qualified person in order to avoid a hazard.
9
(8) TROUBLESHOOTING
| Fault | Cause | Solution |
| Light on, but motor does not work | The fan is blocked Remove the source of the blockage | |
| The capacitor damaged Replace capacitor | ||
| The motor jammed and bearing damaged | Replace motor | |
| A smell coming from the motor | Replace motor | |
| Light does not work, motor does not work | Beside the above mentioned, check the following: | |
| Light damaged Replace lights | ||
| Power cord loose Take to authorised service centre. | ||
| Oil leakage | One way valve and the air ventilation entrance are not tightly sealed | Take down the one way valve and seal with silicon rubber. |
| Leakage from the connection of U-shaped section and cover | Take U-shaped section down and seal with silicon or paint | |
| Shake of the body The | The fan is damaged and causes shaking | Replace the fan |
| The motor is not tightly mounted | Lock the motor mounts tightly | |
| The body is not tightly hung on wall | Fix the body tightly | |
| Insufficient suction The | The distance between the body and the gas top too long | Readjust the distance |
| Too much ventilation or breeze from open doors or windows | Choose a better location and re-assemble the machine | |
| The machine inclines | The fixing screw not tight enough | Tighten the hanging screw and make it horizontal |
| The hanging screw not tight enough | Tighten the hanging screw and make it horizontal | |
10
(9) SPECIFICATION
| Model | ORC97G |
| Rated Input 220V-240V, | 50Hz |
| Rated Power 305W | |
| Lighting Power 20W X 2 | (halogen capsule lamp) |
| Motor Power 265W | |
| Air tube diameter 150MM | |
| Air output 1000m3/h |
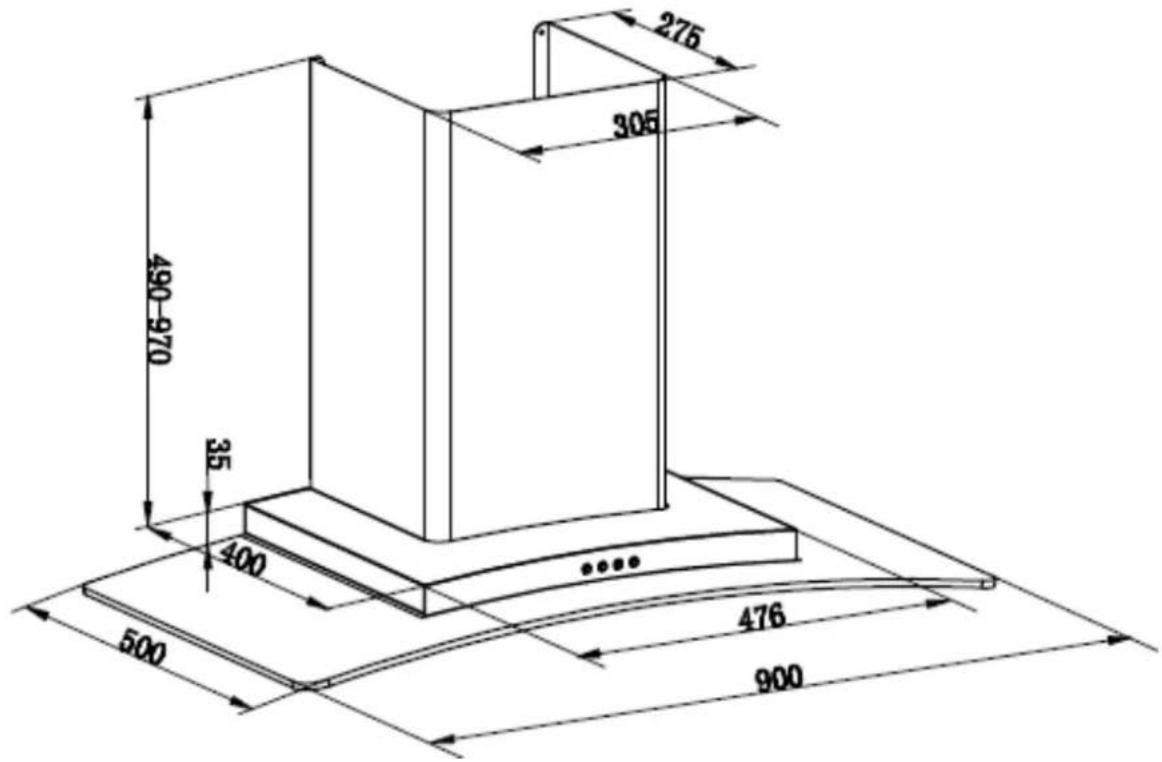
| Model | ORC98G |
| Rated Input 220V-240V, | 50Hz |
| Rated Power 305W | |
| Lighting Power 20W X 2 | (halogen capsule lamp) |
| Motor Power 265W | |
| Air tube diameter 150MM | |
| Air output 1000m3/h |


Brand : OMEGA
Model : ORC98G
Category : Range hood