
ORU70X - Range hood OMEGA - Free user manual and instructions
Find the device manual for free ORU70X OMEGA in PDF.


| Product Type | Range Hood |
| Brand | Omega |
| Model | ORU70X |
| Width | 70 cm |
| Installation Type | Built-in / Under Cabinet |
| Extraction Mode | Ducted (external) or Recirculating (with charcoal filter) |
| Maximum Airflow | Approx. 650 m³/h |
| Noise Level | Approx. 45-65 dB(A) |
| Number of Speeds | 3 speeds |
| Lighting | 2 x LED lamps (included) |
| Filter Type | Aluminum grease filter, optional charcoal filter |
| Filter Cleaning | Grease filter: dishwasher safe; charcoal filter: replace every 3-6 months |
| Control Type | Electromechanical buttons |
| Energy Class | A+ (typical) |
| Power Supply | 220-240 V, 50 Hz |
| Rated Power | Approx. 200 W |
| Weight | Approx. 12 kg |
| Dimensions (W x D x H) | 700 mm x 500 mm x 150 mm (approx.) |
| Duct Diameter | 150 mm / 6 inches |
| Safety Features | Thermal cut-off, anti-flame backflow prevention |
| Spare Parts Availability | Grease filters, charcoal filters, LED lamps available from Omega service |
| Warranty | 2 years (depending on region) |
Frequently Asked Questions - ORU70X OMEGA
User questions about ORU70X OMEGA
0 question about this device. Answer the ones you know or ask your own.
Ask a new question about this device
Download the instructions for your Range hood in PDF format for free! Find your manual ORU70X - OMEGA and take your electronic device back in hand. On this page are published all the documents necessary for the use of your device. ORU70X by OMEGA.
USER MANUAL ORU70X OMEGA
natural_image
Top-down schematic of a room layout with triangular patterned floor and two circular tops (no text or symbols)Instructions for the Use and Care and Installation of
ORU52X
ORU70X
Undermount Rangehoods
Thank you for introducing our family to yours
At Omega, we understand that cooking, cleaning and washing may not be your favourite things in the world. That's why we created a range of no-nonsense, reliable products that always get the job done for you. With the features you need and nothing you don't. What's more, they're made to fit perfectly into your home life and your wallet.
We aim to simplify any further appliance purchases. When researching our products you will find a range of icons that visually represent our products key features. Visit our website to learn more about these icons and the features and benefits of our products.
You are welcoming an Omega appliance into your place and you can be sure it'll always serve you well.
For important information about your Omega such as warranty registration, online manuals, specifications and catalogues, please visit
www.omegaappliances.com.au/customer (if you are in Australia) or
www.omegaappliances.co.nz/customer (if you are in New Zealand).
Make sure you activate your product warranty on our websites on the links above.
If you want to know more about promotions, to receive cool tips and tailor made content, like us on www.facebook.com/omegaappliances and follow us on www.instagram.com/omegaappliances_aus.
We hope you love this product as much as we do!

www.omegaappliances.com.au / www.omegaappliances.co.nz

omegaappliances

omegaappliances_aus
CONTENTS
It is important that you retain these instructions, proof of purchase as well as other important documents about this product for future reference.
Due to continual product development, Omega reserves the right to alter specifications or appearances without notice.
Dispose of packaging responsibly – recycle where facilities are available.
1. WARNING
- Young children should be supervised to ensure that they do not play with the appliance.
- The appliance is not intended for use by persons (including children) with reduced physical, sensory or mental capabilities, or lack of experience and knowledge, unless they have been given supervised or instruction concerning use of the appliance by a responsible person for their safely.
- Your cooker hood is for domestic use only, not suitable for barbecue, fast-food shops, and other commercial use.
- Any installation work must be carried out by a qualified electrician or competent person.
- The cooker hood and its filter mesh should be cleaned regularly in order to keep in good working order.
- Before cleaning, always ensure that you have switched your cooker hood off.
- Do not flambé under the range hood.
- Clean the cooker hood according to the instruction manual, and keep the cooker hood away from the danger of flames.
- If there is any fault with your cooker hood, please call the customer service number in the Warranty Card.
- Please keep the room adequately ventilated when your cooker hood and gas hob are working.
- Do not exhaust the gas from cooker hood through the same heated flue which is for the gas from gas hob and other kitchen appliances.
- Before installation and usage, read all the instructions and make sure that the voltage (V) and the frequency (Hz) indicated on your cooker hood are exactly the same as the voltage (V) and the frequency (Hz) in your home.
- To ensure that you get the best Warranty experience for your cooker hood, please provide copies of the Warranty Card and purchase receipt, when booking warranty work with the Customer Service department.
2. INSTALLATION
Please ensure that before installing the range hood, that all power is switched off.
Installation must be in accordance to the local electrical authority and codes.
This range hood must be earthed at all times for the operators' safety.
The G.P.O. for the range hood should be positioned to enable the user to turn the power off, to enable cleaning and any maintenance required.
Ensure that when installing the range hood, that it is protected from any possible damage from tools etc.
Ducting for this unit must be installed in accordance to the local authority.
Ensure that the fixings used for this range hood are suitable.
Check the area where the range hood is to be fitted, to ensure that it is structurally sound.
Before using the appliance, remove the plastic coatings protecting the stainless steel finish.
Ensure that the wall is structurally sound, and is capable of carrying the weight of the range hood.
It is recommended that the dimension be checked on the range hood before installing.
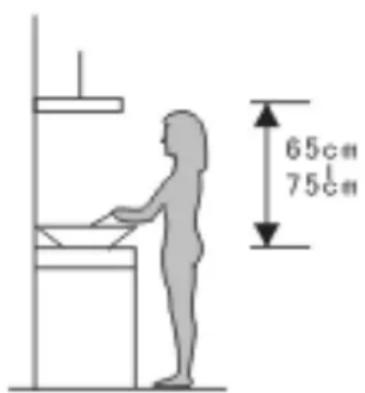
- The cooker hood should be placed at a minimum distance of 65cm from the cooking surface.
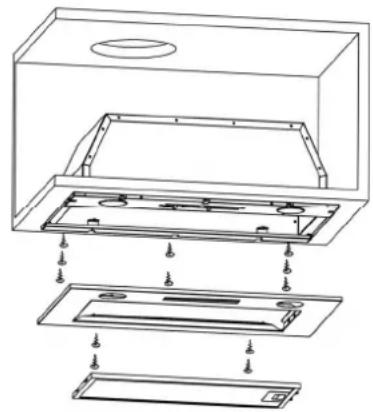
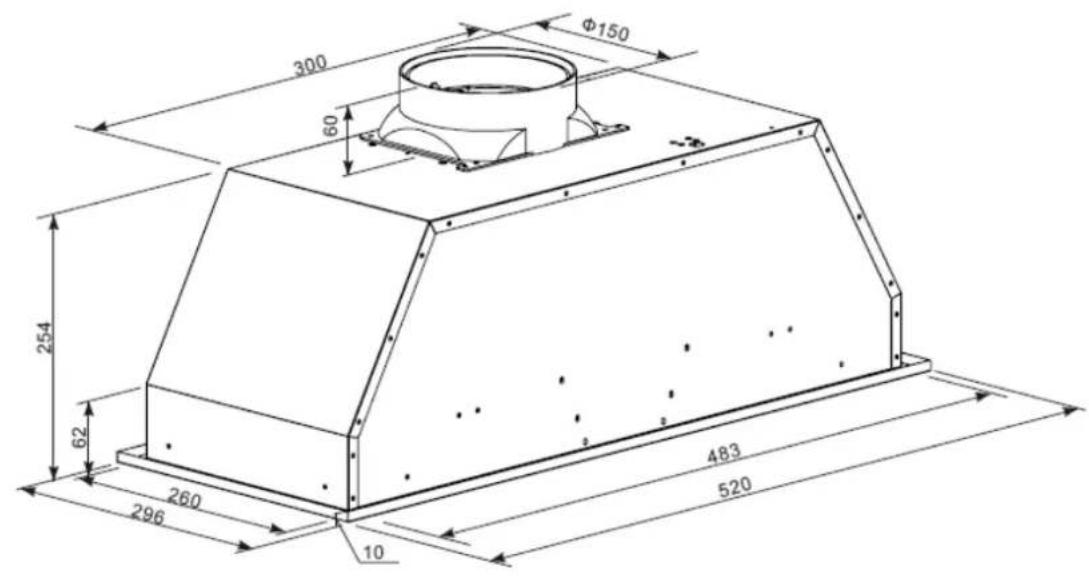
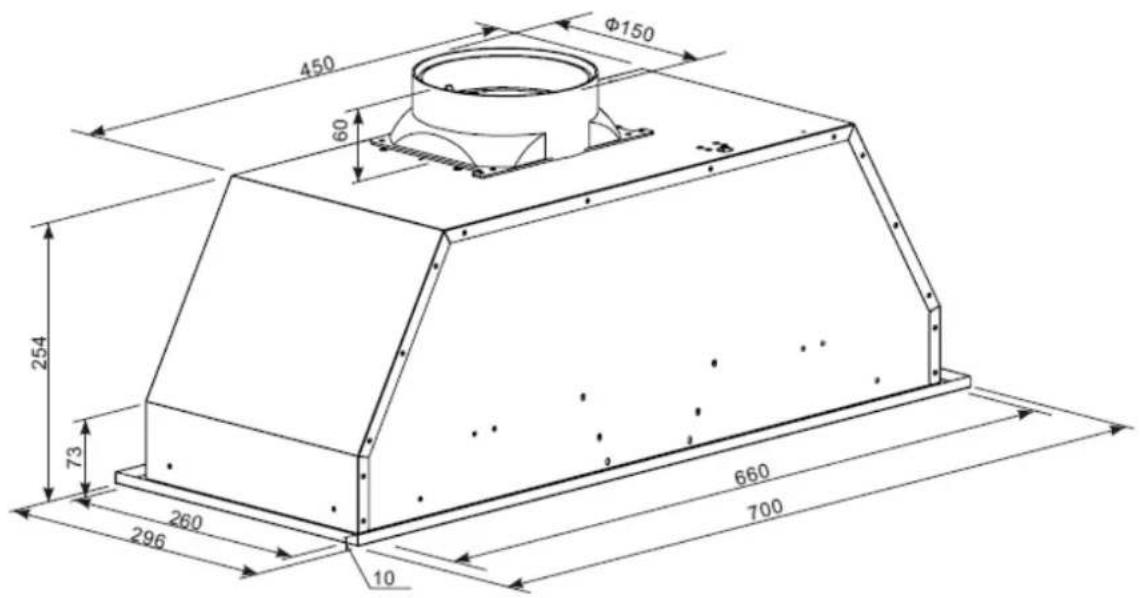
- Drill a hole in the cupboard, 490*265(mm) for model ORU52X and 665*265(mm) for model ORU70X. Make sure the distance between the edge of the hole and the edge of the cupboard edge is at least 35mm.
- Take down the filter and remove the four screws on the panel.
- Use random accessory tighten screws fix the hood into cabinet.
- Use 4 screws fix the panel into body and equip the filter.
- Install one-way valve: put the one-way valve into air outlet, Put on the one-way valve with air outlet.
natural_image
Technical line drawing of a multi-section mechanical housing with mounting holes and internal components (no text or symbols)3. OPERATION:
Note: Before the unit can be operated, it must be ducted.
- Connect the plug into the power.
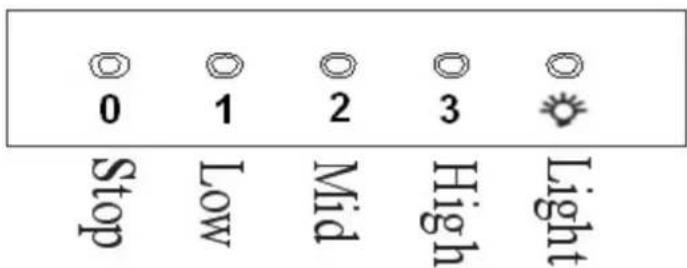
- Push 'Stop' button, the motor will stop.
- Push the 'Low' button, the motor runs at low speed.
- Push the 'Mid' button, the motor runs at mid speed.
- Push the 'High' button, the motor runs at high speed.
- Push the 'Light' button and the two lights will be on. Push it again and the light will turn off.
If your range hood does not function correctly when attempting any of the above, please ensure that your power is on and is functioning correctly. If the power seems to be functioning correctly in the house, there may be a problem with the range hood. Please call your authorized service agent in this case to organise a service call.
4. LIGHT REPLACEMENT
- Switch the unit off and disconnect from mains power first.
- Remove filter and read labels regarding maximum lamp ratings.
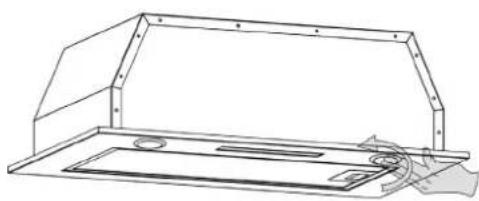
- Press the light face and remove by turning in anti-clockwise direction.
- Pull out the halogen light bulb carefully and replace by same type and same rated halogen light bulb (12V 40W MAX).
natural_image
Technical line drawing of a mechanical component with a handle and mounting holes (no text or symbols)5. CLEANING
SAFETY PRECAUTION
Before cleaning your range hood or performing any maintenance, please ensure that the range hood is turned off at the power point.
Do not use abrasive cleaners to clean the range hood. The use of warm soapy water and a cloth are recommended.
Ensure that the range hood is cleaned regularly, as a build-up of grease and fat may occur otherwise.
The filters on the range hood must be cleaned regularly to maintain efficiency, and prevent grease build up.
It is recommended that this is undertaken every 4 – 6 weeks, depending on frequency of use.
The filters can be cleaned with warm soapy water or a cloth, or they may be washed in a dishwasher. If washed in a dishwasher, discolouration may occur to the mesh and frame.
Cleaning of the range hood must be performed as described above, otherwise there is a possibility of a fire hazard due to grease and fat build up.
6
natural_image
Technical line drawing of a mechanical component with mounting holes and a base plate (no text or symbols)6. ATTENTION
·Rangehood uses 220-240V 50Hz power;
- Disconnect the power when you clean the rangehood;
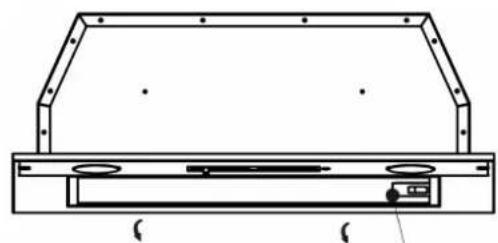
- Do not detach the filter surround
- If the power cord or plug is damaged, contact service center
7. TROUBLESHOOTING
| Fault Cause | Solution | |
| Light does not work, but motor works | The lamp may damaged Replace lamp | |
| Light panel switch is damaged Contact service | ||
| Light works, but motor does not work | ||
| Motor bearings damaged | Contact Service | |
| Motor burn out Contact Service | ||
| Light does not work, motor does not work | Plug contact outlet is damaged Contact Service | |
| Power wire cut off Contact service | ||
| Switch damaged Contact Service | ||
| Shake of the body | Fan is damaged Contact service | |
| Motor screw loose Contact service | ||
| Combination screw loose Contact service | ||
| Insufficient suction | The distance between the body and the cooktop is too high | Readjust the distance |
| Cross-ventilation too strong or too closed in the kitchen | Reduce cross-ventilation or open the window | |
| Exhaust pipe too long | Adjust the length of pipe | |
| Air outlet valve not open | Check the valve if flexible | |
| The outside wind is too strong | No the technical problem | |
For Omega service contact: 1300 739 033
8. SPECIFICATION
| Voltage 220V-240V~/50Hz | |
| Rated motor input power 265W | |
| Illumination ≤ 40W+40W(GU-10 base halogen) | |
| Rated input power 345W | |
| Airflow 783m | ^3 /hr |
| Outlet diameter 150mm |
Omega products are distributed in
Australia by Shriro Australia Pty Ltd.
Locked Bag 5002, Kingsgrove NSW 2208
Phone: 1300 795 572 Fax: (02) 9415 5525
Email: service@shriro.com.au
Web: www.omegaappliances.com.au


Brand : OMEGA
Model : ORU70X
Category : Range hood