ORF60X - Range hood OMEGA - Free user manual and instructions
Find the device manual for free ORF60X OMEGA in PDF.

User questions about ORF60X OMEGA
0 question about this device. Answer the ones you know or ask your own.
Ask a new question about this device
Download the instructions for your Range hood in PDF format for free! Find your manual ORF60X - OMEGA and take your electronic device back in hand. On this page are published all the documents necessary for the use of your device. ORF60X by OMEGA.
USER MANUAL ORF60X OMEGA
Instructions for the Use and Care and Installation of
ORF60X
ORF90X
Freestanding Rangehoods
Thank you for introducing our family to yours
At Omega, we understand that cooking, cleaning and washing may not be your favourite things in the world. That's why we created a range of no-nonsense, reliable products that always get the job done for you. With the features you need and nothing you don't. What's more, they're made to fit perfectly into your home life and your wallet.
We aim to simplify any further appliance purchases. When researching our products you will find a range of icons that visually represent our products key features. Visit our website to learn more about these icons and the features and benefits of our products.
You are welcoming an Omega appliance into your place and you can be sure it'll always serve you well.
For important information about your Omega such as warranty registration, online manuals, specifications and catalogues, please visit www.omegaappliances.com.au/customer (if you are in Australia) or www.omegaappliances.co.nz/customer (if you are in New Zealand).
Make sure you activate your product warranty on our websites on the links above.
If you want to know more about promotions, to receive cool tips and tailor made content, like us on www.facebook.com/omegaappliances and follow us on www.instagram.com/omegaappliances_aus.
We hope you love this product as much as we do!

www.omegaappliances.com.au / www.omegaappliances.co.nz

omegaappliances

omegaappliances_aus
CONTENTS
1 INSTALLATION INSTRUCTIONS
2 OPERATION
3 USE AND MAINTENANCE
4 LIGHT REPLACING
5 SPECIFICATION
It is important that you retain these instructions, proof of purchase as well as other important documents about this product for future reference.
Due to continual product development, Omega reserves the right to alter specifications or appearances without notice.
Dispose of packaging responsibly – recycle where facilities are available.
- Young children should be supervised to ensure that they do not play with the appliance.
- The appliance is not intended for use by persons (including children) with reduced physical, sensory or mental capabilities, or lack of experience and knowledge, unless they have been given supervised or instruction concerning use of the appliance by a responsible person for their safely.
- Your cooker hood is for domestic use only, not suitable for barbecue, fast-food shops, and other commercial use.
- Any installation work must be carried out by a qualified electrician or competent person.
- The cooker hood and its filter mesh should be cleaned regularly in order to keep in good working order.
- Before cleaning, always ensure that you have switched your cooker hood off.
- Do not flambé under the range hood.
- Clean the cooker hood according to the instruction manual, and keep the cooker hood away from the danger of flames.
- If there is any fault with your cooker hood, please call the customer service number in the Warranty Card.
- Please keep the room adequately ventilated when your cooker hood and gas hob are working.
- Do not exhaust the gas from cooker hood through the same heated flue which is for the gas from gas hob and other kitchen appliances.
- Before installation and usage, read all the instructions and make sure that the voltage (V) and the frequency (Hz) indicated on your cooker hood are exactly the same as the voltage (V) and the frequency (Hz) in your home.
- To ensure that you get the best Warranty experience for your cooker hood, please provide copies of the Warranty Card and purchase receipt, when booking warranty work with the Customer Service department.
- The air must not be discharged into a flue that is used for exhausting fumes from appliances burning gas or other fuels (not applicable to appliances that only discharge the air back into the room.
- Warning: Failure to install the screws or fixing device in accordance with these instructions may result in electrical hazards.
1. INSTALLATION INSTRUCTIONS
Method one:
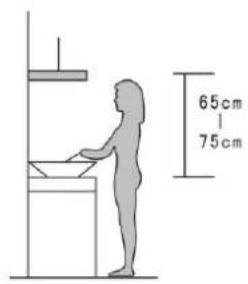
1) The cooker hoods must be placed at a distance of 65-75cm from the cooking surface for best effect.
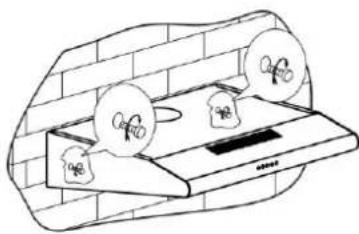
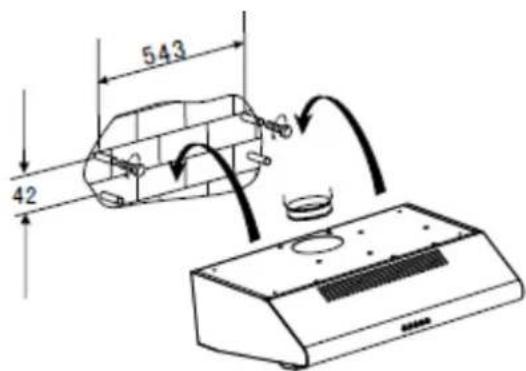
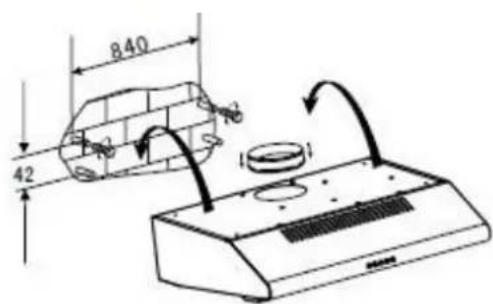
2) To install onto the wall, drill 4 holes of ∅ 8mm at a suitable place according with the centre distance of hole in the back of the cooker hood.
3) Insert the nut into the holes.
4) Insert the screws ( ST4*30 ) into the nuts and tight.
5) Put up the cooker hood onto the fixed screws.
6) Then use the attached accessories enclosed to turn the screws into the two holes of inside the hood, and then fix the screws to tighten the hood onto the wall.
7) Put the one way valve onto the cooker hood.
text_image
65cm | 75cmPIC1
natural_image
Simple line drawing of a wall-mounted device with two circular components and a base, against a brick wall background (no text or symbols)PIC2
text_image
543 42 1060CM 90CM
text_image
840 42 16 16Method two:
1) Drill 4 holes of ∅ 6mm at the bottom of the hanging cupboard.
2) Put the one way valve on the cooker hood, then install the cooker hood on the bottom of the cupboard, tighten the hood with enclosed 4 screws (M4*35 ).
3) Install the adjusted board on the bottom of the hood in order to keep out the gap between hood back and cupboard.
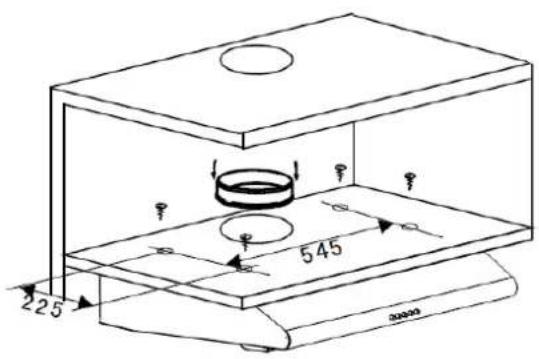
text_image
25 545 2000060CM
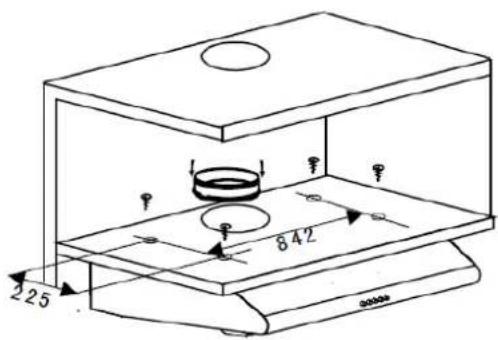
text_image
2.25 8.4290CM
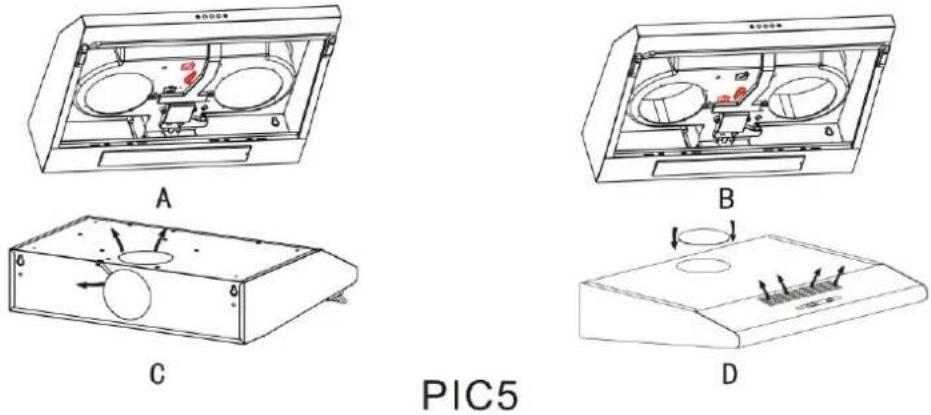
Notice:
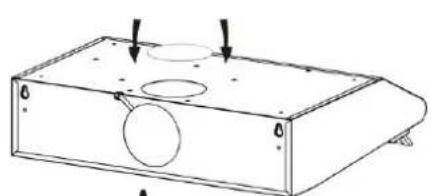
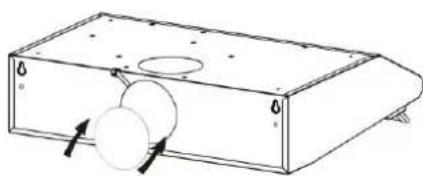
There are 2 methods for ventilation, including 'horizontal ventilation' and 'vertical ventilation'. Please pay attention to the ventilation method when installation.
Horizontal ventilation: As pic. 4A shown, please use the cover to seal the outlet on the top, then the air can be vented from back.
Vertical ventilation: As pic 4B shown, please use the cover to seal the outlet on the back, then the air can be vented from top.
natural_image
Technical line drawing of a rectangular electronic component with circular cutouts and mounting holes (no text or symbols)A
natural_image
Technical line drawing of a rectangular box with a circular hole and two circular components inserted, no text or symbols present.B
PIC4
2. OPERATION
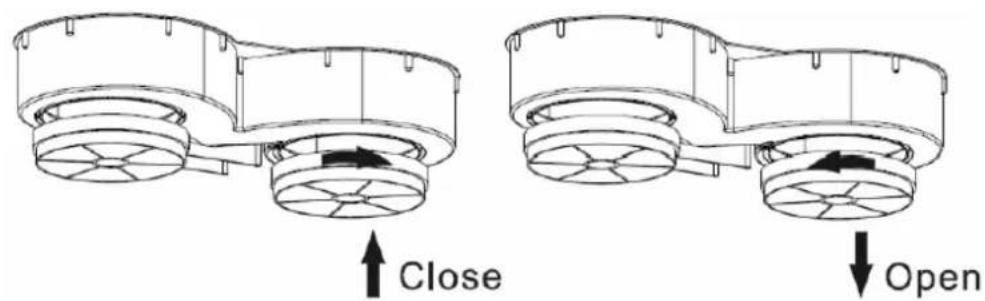
Outdoor air ventilation: Turn the adjuster to outdoor position (pic.5A), install the outlet, turn on the cooker hood, then the air will be vented from the outside outlet.
Indoor air ventilation: Turn the adjuster to indoor position (pic.5B), install the outlet cover, turn on the cooker hood, then the air can be vented from the inside outlet.
When you choose "front re-circulation mode", the charcoal filter must be installed.
SPEED ADJUSTMENT:
1) Push 'Stop' button, and the motor will stop.
2) Push the 'Low' button and the motor runs at low speed.
3) Push the 'Mid' button and the motor runs at mid speed.
4) Push the 'High' button and the motor runs at high speed.
5) Push the 'Light' button and the two lights will come on. Push it again and the light will turn off.
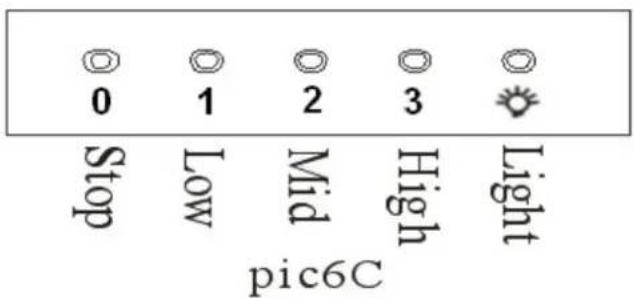
text_image
Stop Low Mid High Light pic6C3. MAINTENANCE
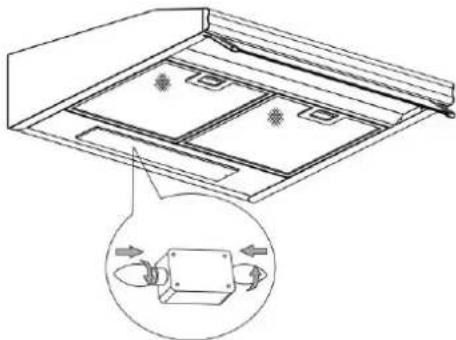
Changing and cleaning the filter as below (pic7):
-
Put the filter into the water of 40-50°C, Put some detergent in, and leave it for 2-3 minutes. Then use the soft brush to clean it with proper strength, in order not to damage the filter.
-
The filter can be cleaned by dish washer. Put the filter into the dish washer and put some detergent in, then turn the temperature to 60^ C.
All the filters are made of metal. Please do not use any corrosive detergent when
cleaning.
Notice: Please unplug before cleaning.
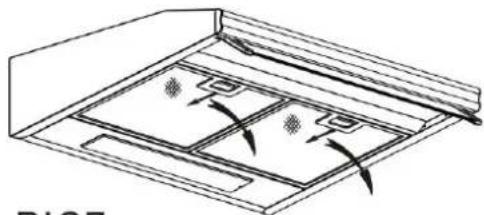
natural_image
Diagram of a device interior with two rectangular compartments and directional arrows indicating flow or movement (no text or symbols)PIC7
4. LIGHT REPLACING
1) Before changing the lights, make sure that the appliance is plugged off.
2) Open the filter, see beside picture.
3) Change the 28W E14 olive-shaped bulb.
4) Replace the filter to the original position.
natural_image
Technical line drawing of a mechanical assembly with an inset showing internal components (no text or symbols)5. SPECIFICATION
| Voltage | 220V-240V~/50Hz |
| Rotation method | Twin Motors, Twin Fans |
| Rated motor input power | 100W+100W |
| Illumination | ≤ 28W+28W |
| Rated input power | 256W |
| Airflow | 440m ^3 /hr |
| Outlet diameter | 120mm |
